DocRob
-
Posts
7,043 -
Joined
-
Last visited
Content Type
Profiles
Forums
Events
Gallery
Everything posted by DocRob
-
My kit list is very short, but that´s normal, as I spontaneously visualize a kit finishing idea and buy it then. Not much planning, but Airfix Sea King and Gannet are set, as well as a SBS 1/48 resin Caudron C.600 and - devil I did it - an already ordered Italeri (sacrilege ) kit, the 1/12 Alfa Romeo 8C 2300 Roadster, maybe with wire spoke wheels. Maybe the 1/24 resin kit of the Citroen SM made by USCP. There is also the SBS 1/48 resin Macchi M.39 on my list. and a XPlus Spinosaurus, which at least is 1/35, which opens endless dio possibilities. Cheers Rob
-
Uhh, I see lots of AM looming, maybe, she has a knack for ageing surfer dudes . Cheers Rob
-

Tamiya 1/32 P-51D Tuskegee Mustang
DocRob replied to Peterpools's topic in LSM 1/32 and Larger Aircraft Ready for Inspection
What a beauty, Peter, nice and shiny NMF, love it. Cheers Rob -
MiniArt P-47D Thunderbolt: COMPLETED 2/13/24
DocRob replied to Peterpools's topic in LSM 1/48 Work in Progress
Nice progress despite the obstacles, Peter. Good that you found the joystick, it´s terrible to loose such an important and visible part. Maybe MiniArt is listening and betters their instructions. Cheers Rob -
McLaren MP4/6 Ayrton Senna Fujimi 1/20
DocRob replied to DocRob's topic in LSM 1/35 and Larger Work In Progress
Thank you Kevin, I´m not much of a car nut myself and motorsport doesn´t interest me at all, except maybe for 80´s F1 and some classic cars, but car building and painting is entirely different than other subjects, which are mostly ´closed´, and I like variety. Cheers Rob -
McLaren MP4/6 Ayrton Senna Fujimi 1/20
DocRob replied to DocRob's topic in LSM 1/35 and Larger Work In Progress
Thank you Phil, cars are indeed a completely different breed, with a lot of emphasis on finish and replicating materials. The F1 cars are even more different, because, if you want to show engine, monocoque, drive train and other innards, you have to perform another approach, as everything needs to be build like the real one, not only cockpit, wheel wells and maybe an engine with planes. This needs careful planning of building and painting steps, but it´s a welcomed change at least to me. Cheers Rob -
McLaren MP4/6 Ayrton Senna Fujimi 1/20
DocRob replied to DocRob's topic in LSM 1/35 and Larger Work In Progress
Thank you Carl and Peter, it´s indeed a lot of work, but the casted on pattern with paint would only be sufficient for a car with a body never to be removed. Carl, I have some similar car kits in stash, for example two Tamiya AMG Mercedes GT3 with Good Smile and another similar finish and a GT3 BMW also in Good Smile livery. Cheers Rob -
McLaren MP4/6 Ayrton Senna Fujimi 1/20
DocRob replied to DocRob's topic in LSM 1/35 and Larger Work In Progress
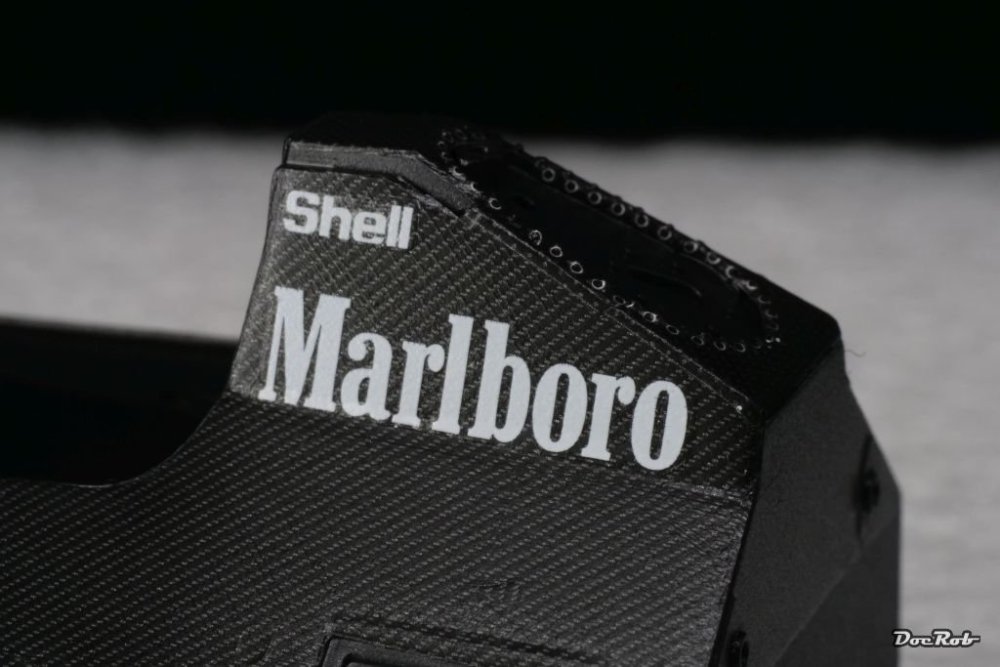
I think, I mentioned a while ago, that this build was supposed to be a fun build, but guess what, this beast keeps fighting me on all angles. After finishing the engine, I decided to give the Studio 27 carbon decals a try. There are over 80, luckily cookie cut with a very nice representation of different carbon patterns, along some rivets and fasteners. So far so good, but the decals are very thick and brittle. I broke many while applying. First things first, the preparation included removing cast textures on some of the plastic parts with files, sanding tools and chisels, then use Tamiya LP 1 gloss black as a basecoat. It´s best to develop an applying pattern for the decals, because they are slightly oversize on purpose to cover the edges as well. I started at the bottom sides and went up. It´s very time consuming as the brittle decals had to be bend around the edges with different numerous applications of strong decal softener and added heat from an hairdryer. When that is finished, you can go up further with decaling with the same exhausting procedure. I then applied a layer of AK Real clear flat for the finish and as protection. I finished further parts not shown here, but will continue with the body pan and then on to the cockpit. What you see on the pic are no decal seams, but different carbon patterns, some more glossy than others. Cheers Rob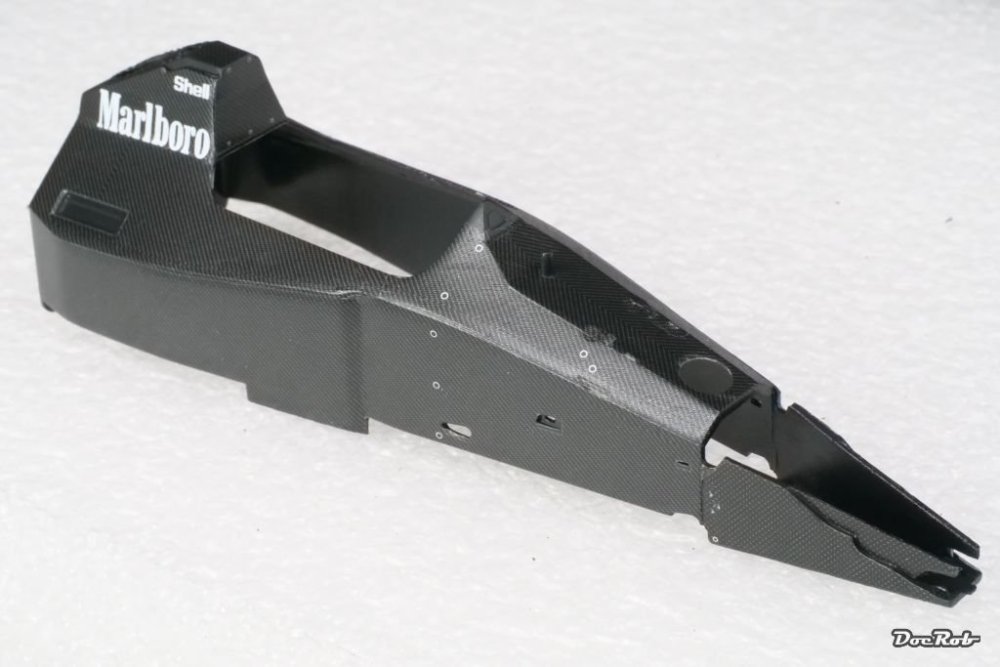
-
Just saw, there are some detail sets out there made by Magic Factory specially for the Corsair, Peter. A set of figures and a superbly 3D-printed engine. The Modelling News: Construction Review PT I : P&W R-2800 Double Wasp & Separate display version from Magic Factory in 1/48th scale The Modelling News: Construction review PT II: 1/48th scale F4U Ground service (5 figure set) from Magic Factory Cheers Rob
-
1/48 Eduard Pfalz DIIIa 1918
DocRob replied to PanzerWomble's topic in WW1 1/48 and larger Ready for Inspection
Very nice and colorful little birdie, PW. I don´t think it´s overweathered, in fact, all colors and patterns blend in nicely. I haven´t heard, that Bob no more produces buckles, but have some quantities left. In fact, they are relatively easy to reproduce, like you did. The Tatzelwurm marking makes it special. Some years ago a WNW Pfalz D.III was my first ever WW1 byplane build and I enjoyed it a lot and liked the sleek appearance. Cheers Rob -
Finally you did it, Phil. I´m sure you won´t regret it, reliable, refined tools are the way to go and the Infinity definitely is all of that. Cheers Rob
-
In short, Scott, it´s Tamiya LP1 gloss black, thinned with 2/3 of leveling thinner direct onto the plastic. There was no PE or resin involved and I therefore, skipped the primer. Tamiya LP´s are relatively durable even without priming. Then I misted on Alclad´s polished Aluminum in very thin layers, until the blackness of the base barely disappeared. This is critical, after this point, the shine reduces. After testing on some dummy´s, I chose Alclad over AK´s Extreme Metal, because of a slightly higher reflectivness of the Alclad stuff. I would have used AK´s product, if I had to mask onto the NMF, but I chose a scheme, where no further masking was needed and for which I had high quality decals. In my WIP, I described the process a bit more detailed. Cheers Rob
-
Some beautiful builds PW and Scott. I like the Gladiator picture a lot, a kit I will build as well soon, but in silver doped livery. It´s good to see, that LSM is not only LS, but open to all kinds of builds, which can be seen in the diversity of your builds. Well, for me it was a relatively quite year modeling wise. I was set to rig my Duchess of Kingston, but that again stalled and I ask myself, when I find the courage to continue. Hmmh, that´s where I am. The Gentlemen Pellew and Hornblower aren`t amazed about that and are about to let me be flogged for my failings. The 1/350 USS Arizona was a demanding project, with loads of PE involved, but I had lots of fun with the project. I finished the delicate 1/32 Arado 234 Nachtigall. This project was stalled earlier, but this year, I found the courage to pull through. My first full resin plane kit was a pleasure to build. The tiny 1/48 Caudron C561 was a plane, which I couldn´t resist to build, due to it´s avantgarde design. Another racer, but from the 80´s, the mighty 1/12 Tamiya Renault Re 20. An old kit, but still not too bad and builds into an impressive representation with some extra love. Finally something sparkling. The Tamiya 1/48 P-38 was the perfect victim for my high shine polished aluminum airbrushing ambitions. Cheers Rob
-
M29C Weasel- wow this is tiny
DocRob replied to BlrwestSiR's topic in LSM 1/35 and Larger Work In Progress
Tedious work Carl, but that´s why they made magnifiers and good background music. The running gear looks great and next are some bigger parts for a change. Cheers Rob -
Fantastic Peter, your Corsair looks sweet with your typical finish touch. What´s more to say about a kit, other than it shows the splendid signature of it´s maker. Cheers Rob
-
What is on your bench right now ? Share a picture :)
DocRob replied to Martinnfb's topic in Modelling Discussion
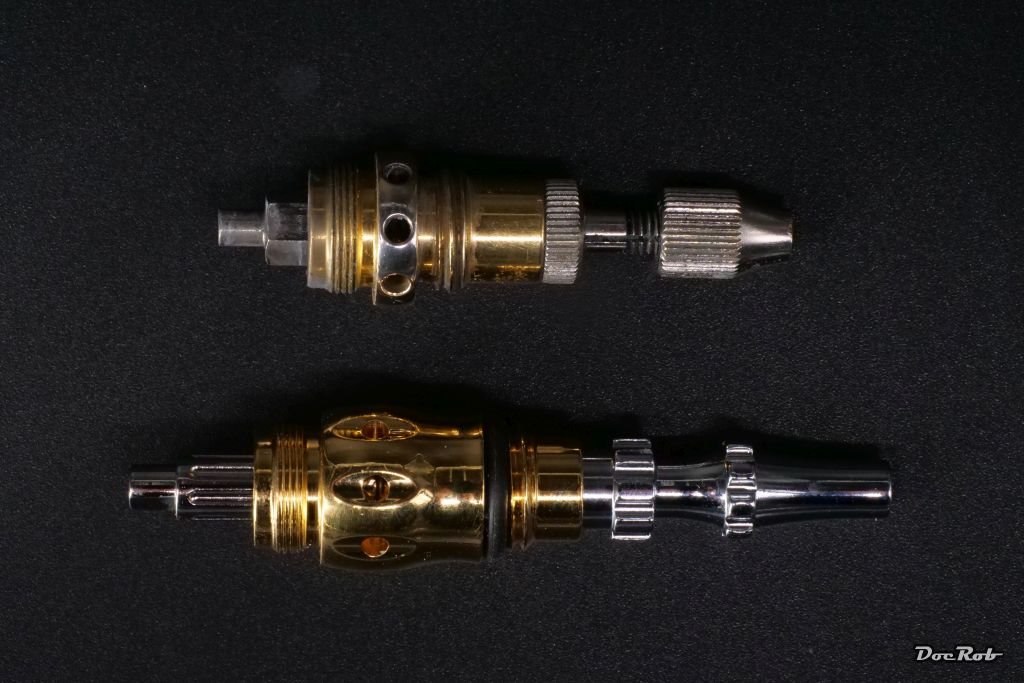
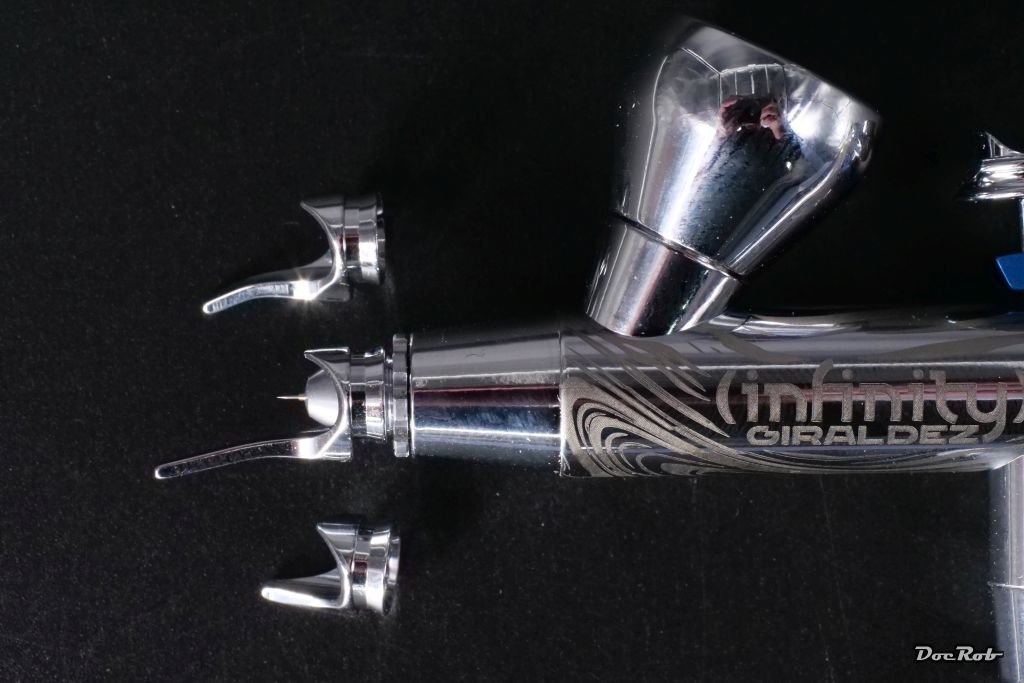
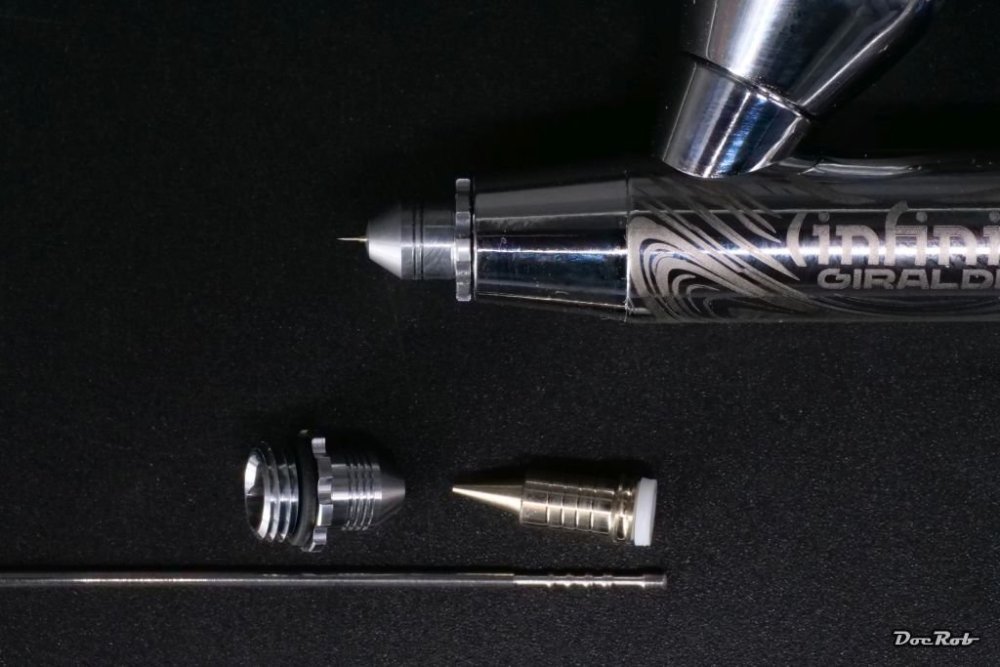
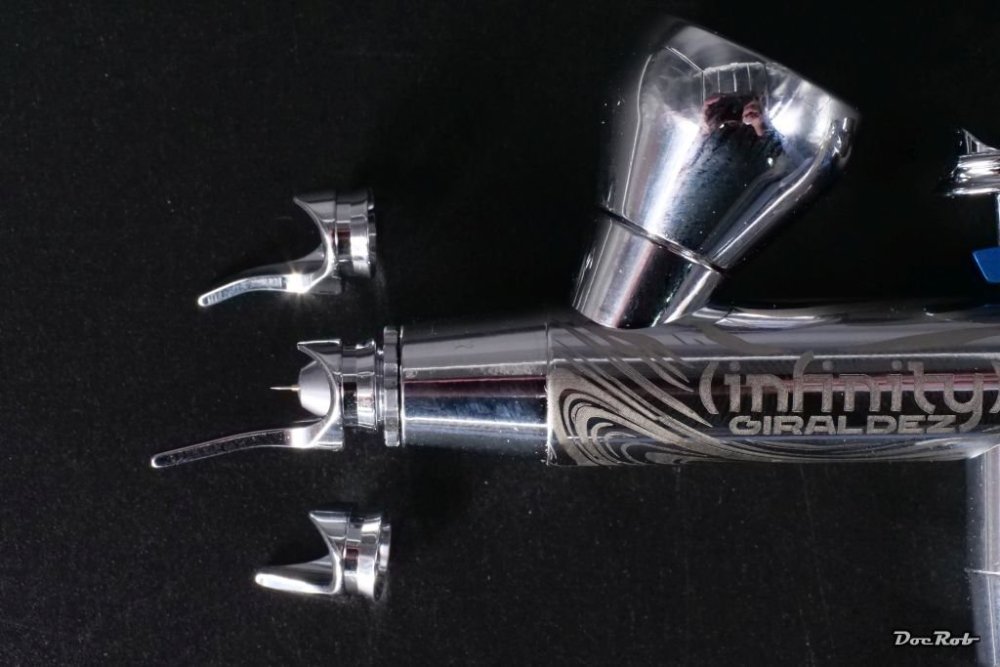
I use the H&S Infinity since years and have nothing to complain. They are great and reliable tools and I won´t lookback to cheaper models, except sometimes, I use my Rotring´s for sentimental reason. Half a year ago, I bought the Giraldez edition of the H&S Infinity, which is more than a slight upgrade. The trigger has moved forward and is much finer in movement, my only down fact with the standard infinity. The needle mount has been also reworked and you can insert the needle from the backside, without risking to bruise the tip. The quality of the needle and nozzle has also improved along with a better clarity of indication for the nozzle/needle/cap size. The design of the Giraldez´s trigger will not be to everybody´s taste, as it is better incorporated with the finger tip, than the finger print area. Here is the comparison. I will do a further test evaluation, when I find the time and have tested the new kid under all circumstances: This is the new needle/nozzle/cap marking with clearly visible engraved lines, better than the confusing markings on my standard Infinity The needle adjuster above old and the much smoother working Giraldez set below. Hard to see, but no hard edges endanger the tip of the needle, when mounted from the backside (new one right) And finally, the guiding tips of the Giraldez model, not tested yet, but should come handy with freehand camos or figure painting. Cheers Rob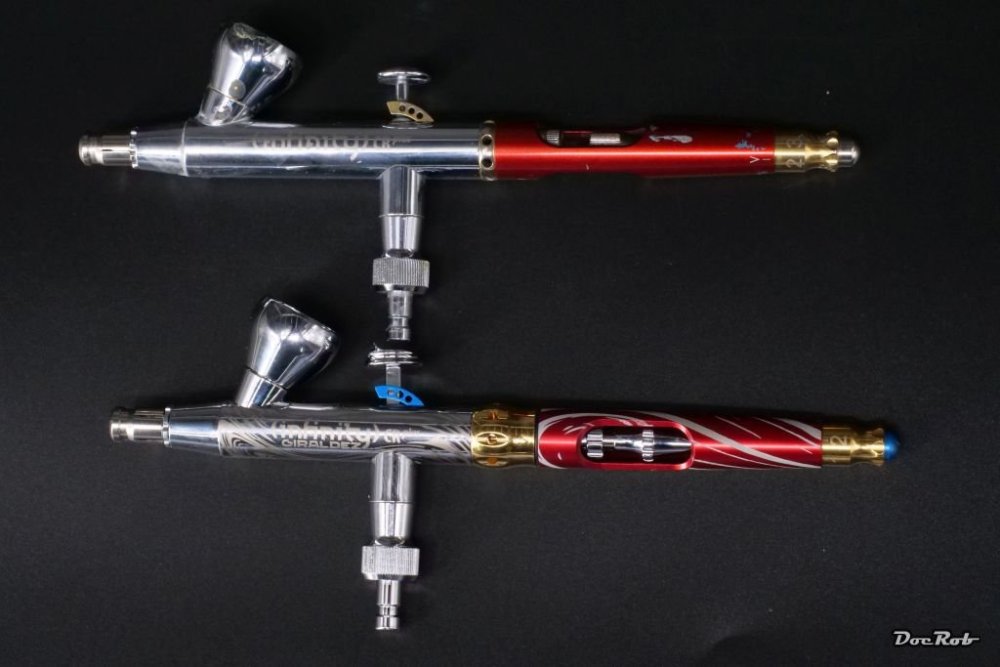


-
Very nice Jeff, the truck came out great and the extra detailing is eye candy. Cheers Rob
-
The Scharnhorst 1/200 by Trumpter-Operation Paderborn
DocRob replied to KevinM's topic in Non LSM 'WIP
Great progress with adding detail after detail, Kevin, your Scharnhorst will be epic. Watching the last pic, I may would add a tiny drop of thinned flat black color into the portholes for contrast. Cheers Rob -
At first, I thought there wer not so many for me, then I remembered some, but a lot were 2022 releases, but browsing through my stash and to buy lists unveiled some personal candidates, some mentioned before, like Airfix´s Sea King and Gannet, along the Kotare Spitfire. Further, I like to mention Copper State Models 1/32 Bristol Scout and the unbelievable detailed 3D printed British Motorcycle Triumph Model H, also by CSM. SBS released their 1/48 resin Macchi M.39 and 1/72 resin Gee Bee R6H Q.E.D. I also love my boxing of MiniArts Tempo E400 in 1/35. Vanguard´s excellent wooden ship kit of Pellews HMS Indefatigable 1794. Last but not least, another personal favorite is the Brengun 1/72 Texaco Doodlebug. Cheers Rob
-
What is on your bench right now ? Share a picture :)
DocRob replied to Martinnfb's topic in Modelling Discussion
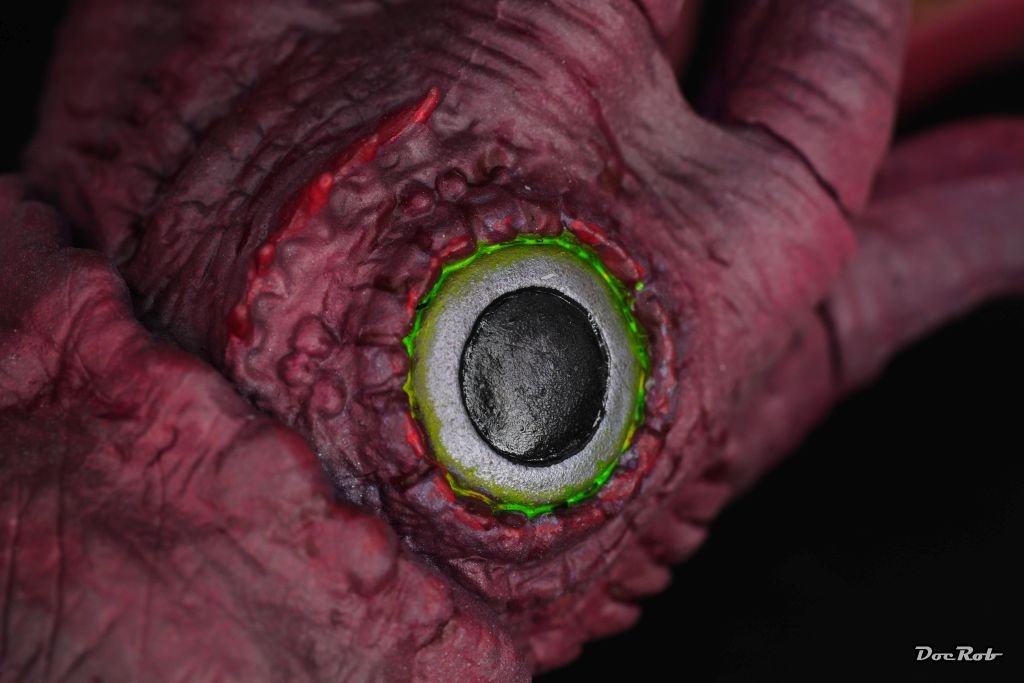
These colors are in the range from sand to earth, but I guess, with not that many living witnesses, you can go freestyle. I used some gloss black for the pupil, silver for the eyeball and a translucent green ink for the borders with my giant squid, pulling down my Nautilus submarine Cheers Rob
-
What is on your bench right now ? Share a picture :)
DocRob replied to Martinnfb's topic in Modelling Discussion
These colors are in the range from sand to earth, but I guess, with not that many living witnesses, you can go freestyle. I used some gloss black for the pupil, silver for the eyeball and a translucent green ink for the borders with my giant squid, pulling down my Nautilus submarine Cheers Rob
-
Where quality meets quantity to perfection. Your output results in a nice collection Peter, despite all the issues, you had a very productive year, congratulations, ... and a happy new year. Cheers Rob
-
There is not only Gundam out there, to leave the trotten path, Mike. You could also try Maschinen Krieger. There are tons of kits out there in different scales, but mainly in 1/20. Main producers are Hasegawa and Wave, but there are many other brands available. Most are 1/20 scale, which give a lot of freedom, when it comes to painting experiments, others are in 35 scale, which naturally allows some bashing and dio opportunities. The mainstream kits are of the same quality, Carl described. i once build a Hasegawa AmmoKnight as a stipple on brush painting experiment and loved the scale and the kit. I have some more in stash and welcome the variety. Cheers Rob
-
Only some days a bit off the forum and bang, your beautiful Corsair is nearing the finish line, Peter. Your paintwork is perfect as ever, I love your soft edge camo. I feel with you about the navy colors. I think for my Corsair and Hellcat builds, I researched and tested more colors than ever before. Recently I mainly use, what AK offers with their Real Colors, which mostly look about right. Generally, I think, plane´s colors weren´t too unique in the field, depending on the theater, the age, the maintenance and color availability. Pictures of the time are sometimes hard to read and leave a lot of room for interpretation. Lighting and refraction are also to be considered. Decaling looks spot on and I have another reason for your first misting clear over the decals. At this late stage of a build, I wouldn´t like to ruin my decals with hot color / thinner mix. A misted coat dries fast and reduces the risk of the chemicals affecting the decals. Cheers Rob