DocRob
-
Posts
7,043 -
Joined
-
Last visited
Content Type
Profiles
Forums
Events
Gallery
Everything posted by DocRob
-
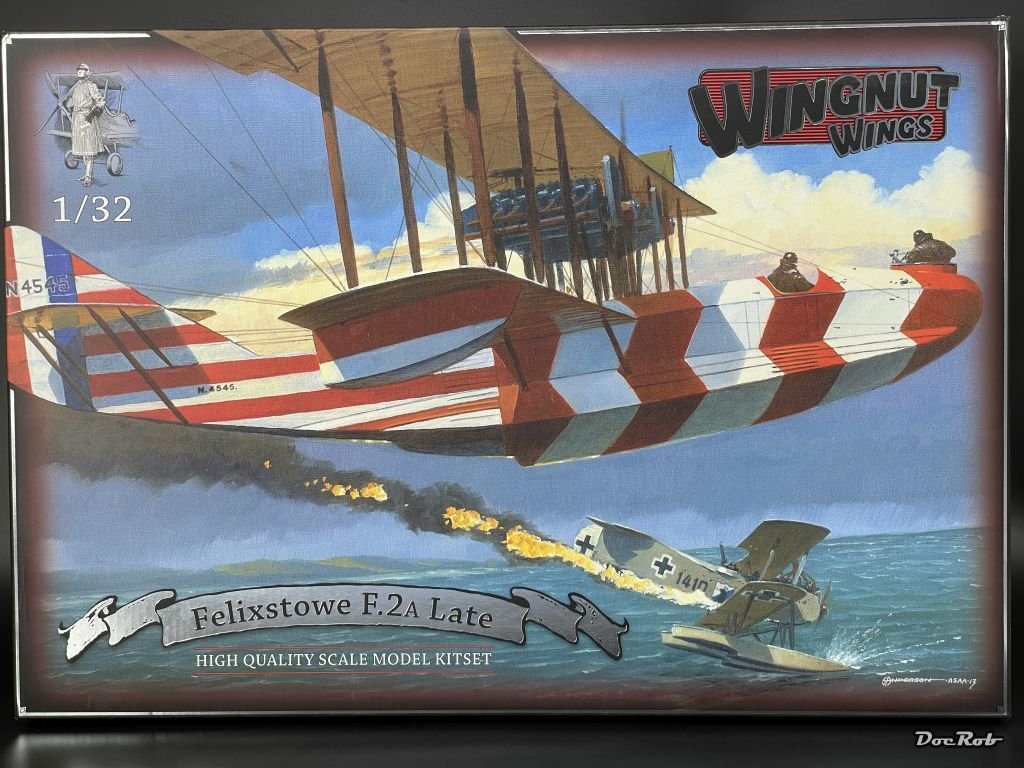
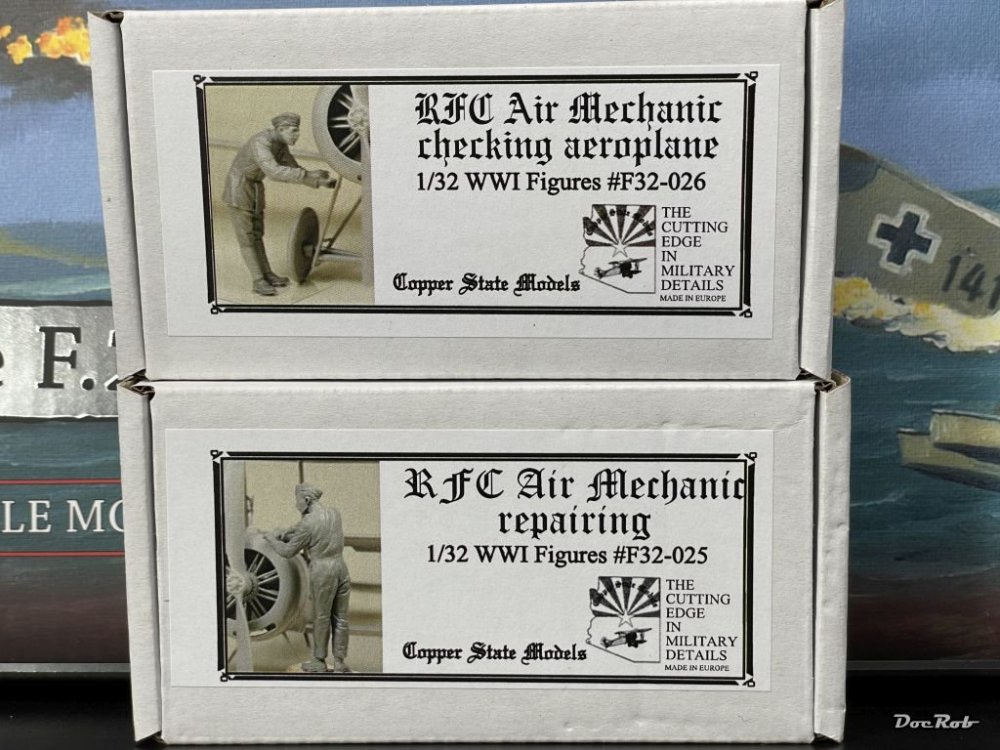
Today, my opus magnum of the Wingnut Wings kits arrived safely on my doorstep. After lots of consideration, I bought the Felixstowe finally in a summer sale new, for a price, I couldn't resist anymore. There are still some available and other WNW kits too. My hunger for the hunger for WW1 quality kits is now definitely satisfied. The plane is huge and the 92 cm wingspan hindered me, buying this fascinating plane until now. My plan is to build it without the outer wings in a maintenance scenario, maybe with removed canvas decking, to show the interior detail. I added two RFC mechanics from Copper State Models for the dio. Cheers Rob

-

Renault RE20 Turbo - Tamiya - 1/12
DocRob replied to DocRob's topic in LSM 1/35 and Larger Work In Progress
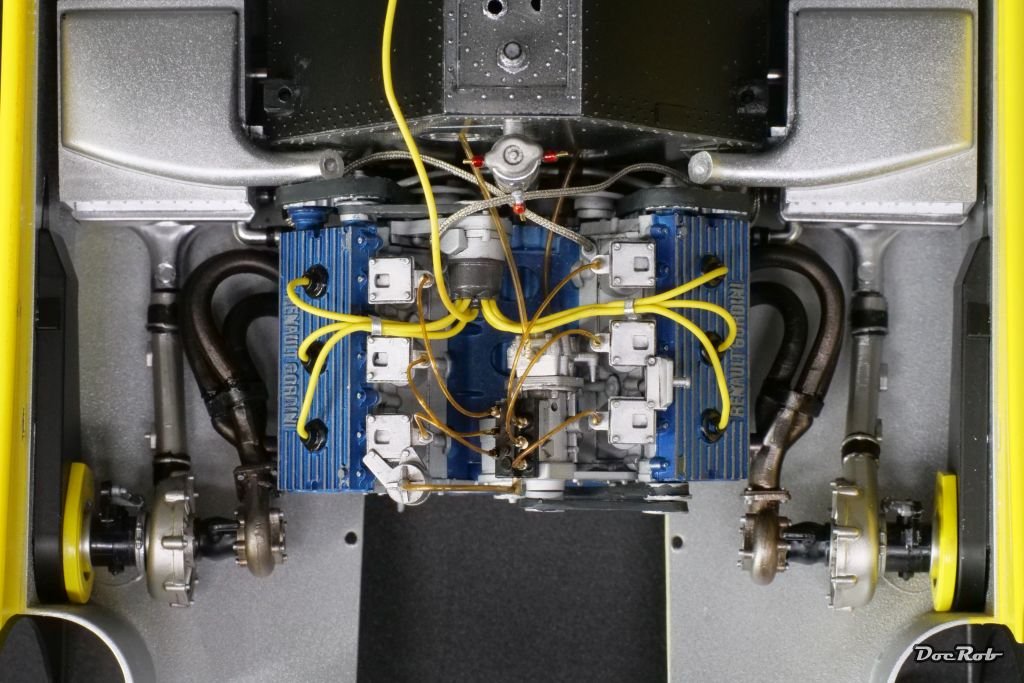
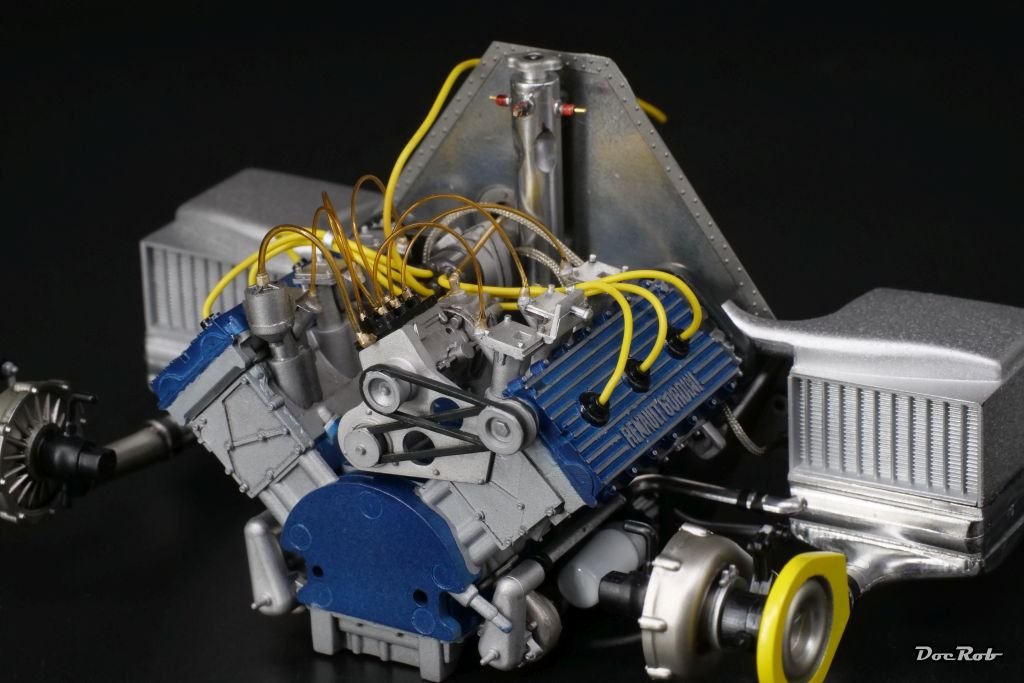
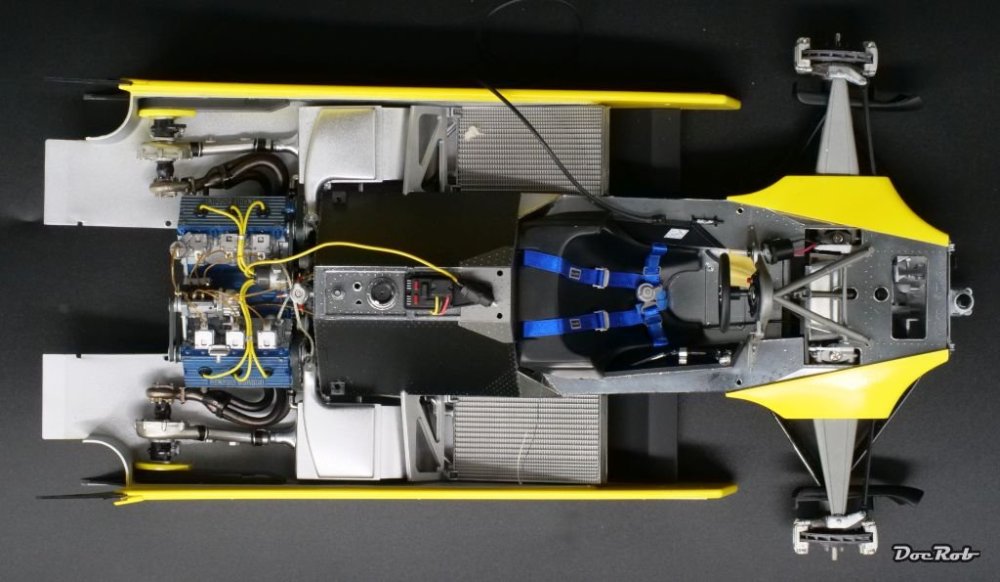
The first half of the day was very frustrating. The exhaust to turbocharger tubes were the worst fitting parts, I ever have seen on a Tamiya kit. After two hours of nerve wrecking test fitting, I decided to glue them step by step into place as best as I could, using CA for a fast bond. Some tubes, I heated a bit with a flame and altered the radii to fit better. All in all, it looks horrible, but that's the way it is. The tubes were painted matte black and then received a misted coat of Extreme Metals jet exhaust, followed by metallic blue. The better part of the day was used to marry the engine section with the firewall to the front body. Here the fit was surprisingly good, given the amount of parts, which had to fit at his step simultaneous. After dry fitting three times and looking for all the connections, I finally glued everything together with CA-glue. Afterwards, I connected some hoses and dry fitted the whole assembly into the chassis, to check if everything fits, which it luckily did after some wiggling. Cheers Rob

-
Renault RE20 Turbo - Tamiya - 1/12
DocRob replied to DocRob's topic in LSM 1/35 and Larger Work In Progress
Thank you Peter, nothing better than a well maintained airbrush. I clean mine very thoroughly all the time after use. From time to time, I do the same like you and clean all the hidden parts and check the seals. Cheers Rob -
Tamiya Mosquito FB Mk VI 60326 - 1/32
DocRob replied to Bomber_County's topic in LSM 1/35 and Larger Work In Progress
Fantastic progress Phil, so many described the Mossie build as demanding due to it's complexity. You make it look smooth and easy. The extra detail does some eye catching, superb. Cheers Rob -
Renault RE20 Turbo - Tamiya - 1/12
DocRob replied to DocRob's topic in LSM 1/35 and Larger Work In Progress
Thanks Phil, I used the new airbrush only briefly, as I prefer the bigger cup for working large scale and this does not fit too handy onto the Giraldez. I checked the function of course and it works like a charm with a much more sensible trigger, than the normal CRplus. I prepared some pics for a soon to write small comparison of the two airbrushes. Cheers Rob -
Renault RE20 Turbo - Tamiya - 1/12
DocRob replied to DocRob's topic in LSM 1/35 and Larger Work In Progress
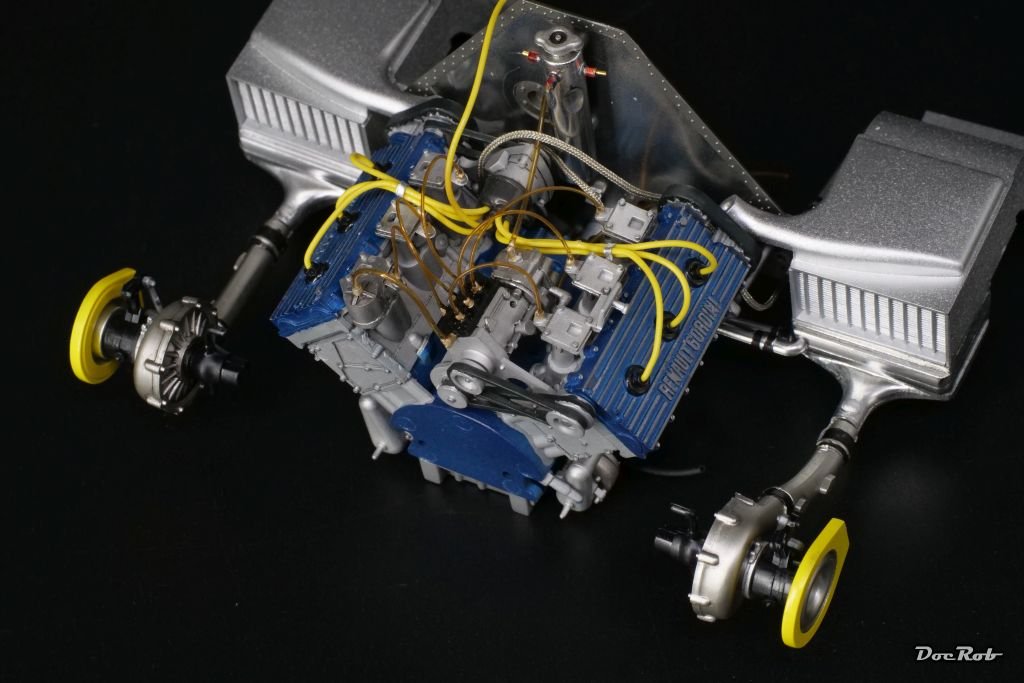
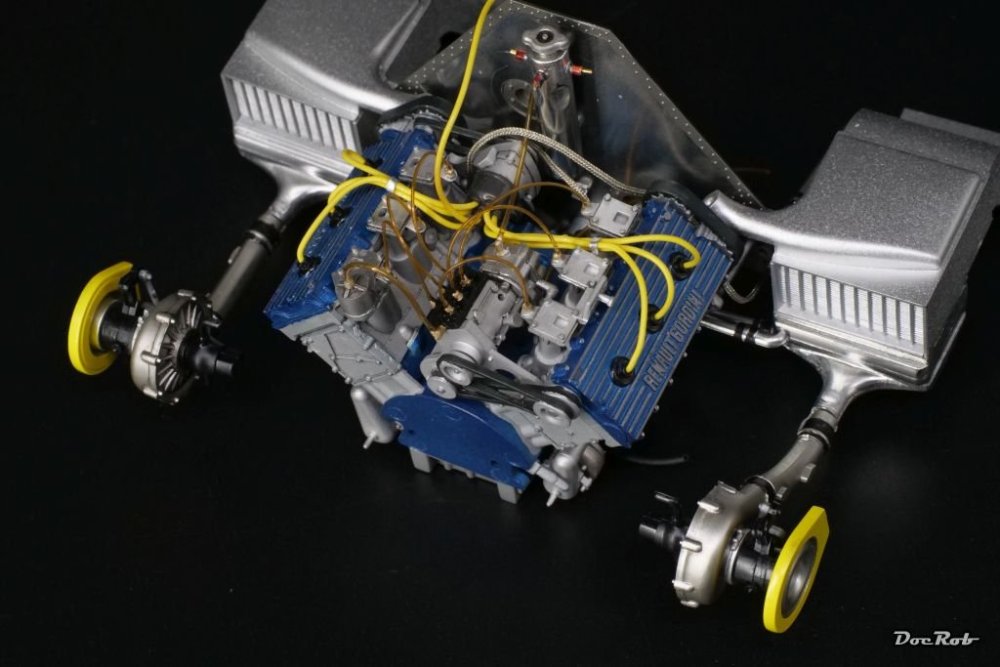
The engine is now permanently attached to the fire wall and then I started adding some silver braided lines instead of the large diameter black tubes, supplied by Tamiya, which looked downright horrible. To attach the braided lines, I inserted 0,2 mm nickel silver rod into the ends and secured these with a tiny drop of CA. Then these rods were inserted into pre drilled holes. I also started to make some order to most of the fuel lines and added the oil tank (?) to the firewall, which was before fitted with pre painted and pre drilled resin connectors, instead of the simple lug, Tamiya provided. Cheers Rob
-
Renault RE20 Turbo - Tamiya - 1/12
DocRob replied to DocRob's topic in LSM 1/35 and Larger Work In Progress
As mentioned before, it was time to get some sub assemblies off the bench and I installed the air coolers and turbo chargers. You have to have an affection for clean up, if you build such an old kit of a turbo charged car. Lots of tubes and connecting parts with ill fit and lots of flash and burr. For the air coolers, I added some resin connectors which were drilled out and inserted brass rods, but they are buried under the air ducts, out of sight. I glued the turbo charger units to the air intakes and engine and fitted everything into the chassis for a test. With a bit of tension, everything snapped into place without braking luckily. The chassis gets more and more cramped, to maintain the real car couldn't have been an easy job. Cheers Rob
-
Renault RE20 Turbo - Tamiya - 1/12
DocRob replied to DocRob's topic in LSM 1/35 and Larger Work In Progress
Thank you Peter, I like the harness too, would be interesting to see, how it compares with the Tamiya supplied one. The wiring was simple, but adds some fine detail. Adding braided hoses and resin connectors is another story, as I have to drill them out with a 0,5mm drill bit and insert brass rods. Cheers Rob -
Seems to be a good fit Carl and the surfaces look pretty good to without the typical 3D-printing traces. I have only one full printed plane kit and it has some of these superficial traces. I have to see, how it looks under primer, but your pics look pretty convincing. Cheers Rob
-
Kitty Hawk 1/35 SH-60B Seahawk
DocRob replied to Peterpools's topic in LSM 1/35 and Larger Work In Progress
A wiser fella once said, sometimes you eat the bar, and sometimes, well, the bar eats you. Peter, what can I say. Sometimes it's better to step on the brake than to go further only fighting a build with no fun at all. Your description of the building experience sums it up, there are these kits out there, which just are no fun to finish and others, far from perfect kits, which are somehow stimulating and taking all out of you, but are satisfactory. That leaves satisfaction and fun as the determining measurements for modeling, and if both lack, why not binning the kit. Do you have an exit scenario for your competition model or do you abandon the idea? Cheers Rob -
It was a kind of Honda-hype thing, I guess. The RC166 motorcycle had a 250 ccm 6 cylinder engine. Later they experimented with oval pistons like in the Honda NR motorcycle. weird engineering, but somehow it worked. Cheers Rob
-
Renault RE20 Turbo - Tamiya - 1/12
DocRob replied to DocRob's topic in LSM 1/35 and Larger Work In Progress
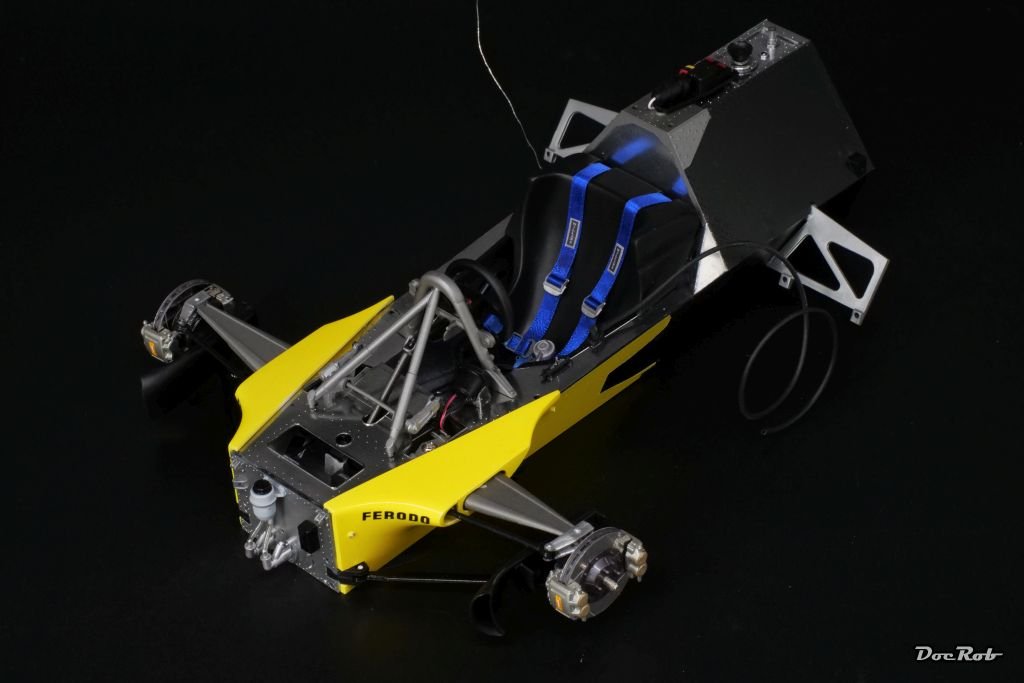
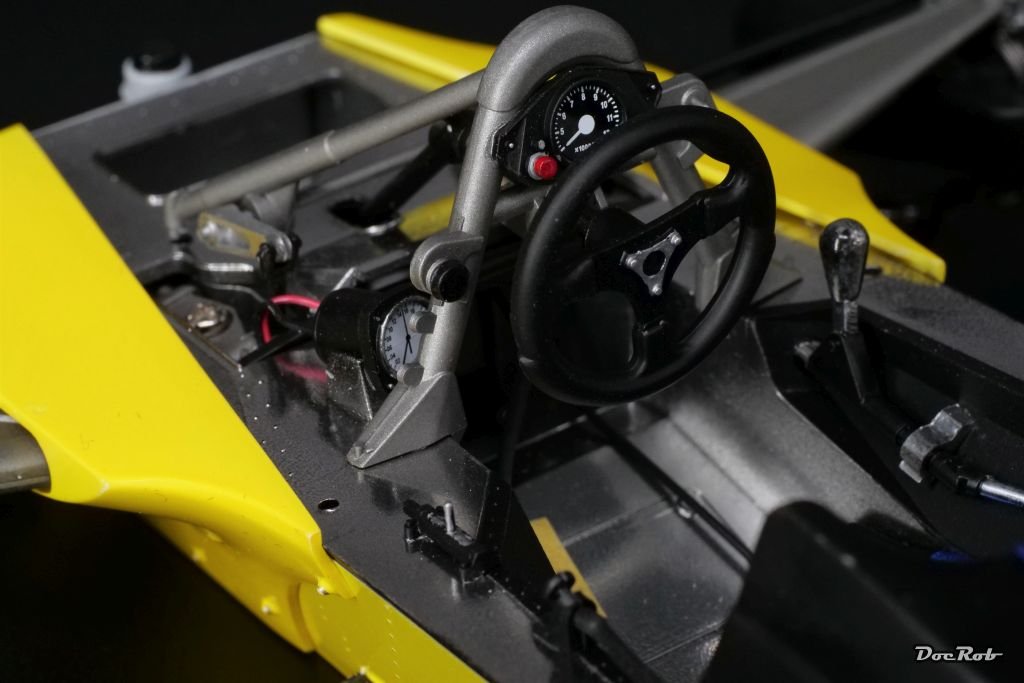
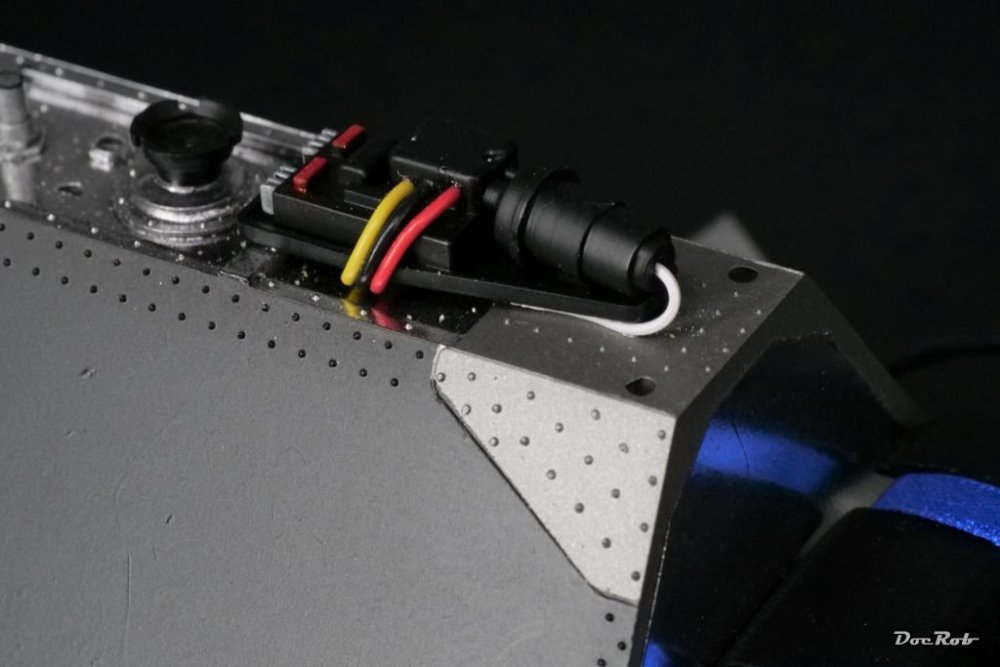
Today it's about 40° Celsius with a humidity of 10 percent, yesterday it was 22° Celsius with 95 percent humidity, what better to do than spent some time in the relatively cool cave, instead of getting a heart attack. My worktop is absolutely cramped with half build sub assemblies, pre-painted parts, so I need to get a bit of order into the mess and assemble some of these. I started with the seat belts. The kit supplied ones look good, but I had a set of Hiro belts and decided to use them. Some of the buckles are cast white metal, the rest is made from PE. Assembly is a lot easier than 1/32 seat belts from HGW, but I had difficulties to find a CA glue adhering to the ribbon. Later, I realized, that the ribbon parts should have been glued with the supplied two sided adhesive tape. Would have been great, if that would have been mentioned in the manual. The seat looks super cool now and again I have to say, I really love the semi matte black from the Tamiya LP range. Next were the front suspensions with many snap fit parts. naturally one of the arms broke, but it could be repaired easily. The steering does not work like suggested in the manual, but I think it's impossible to get it working at all. The Tamiya approach with working steering and suspension is until now the area of the build, causing the most problems. On to some detail work. I butchered an old laptop, which was waiting to get binned to get fine electric cables and added some to the instruments and racing computer. Cheers Rob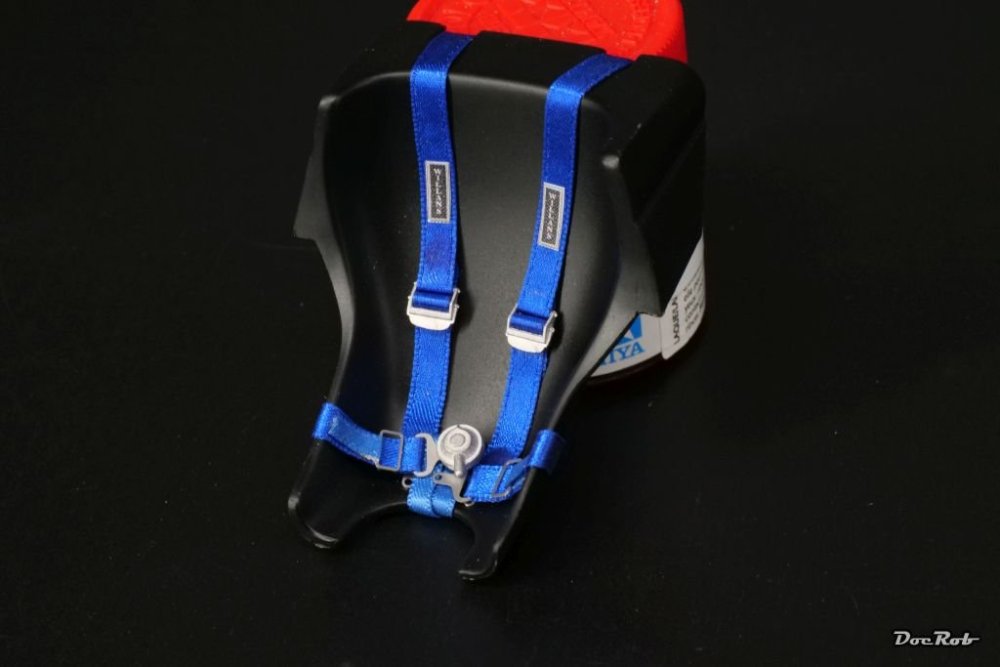


-
Hasegawa Fw-190A5 completed.
DocRob replied to GazzaS's topic in LSM 1/32 and Larger Aircraft Ready for Inspection
Wow Gary, what a nice little setting. Your Würger looks absolutely fantastic with all the different weathering techniques, blending perfectly. Cheers Rob -
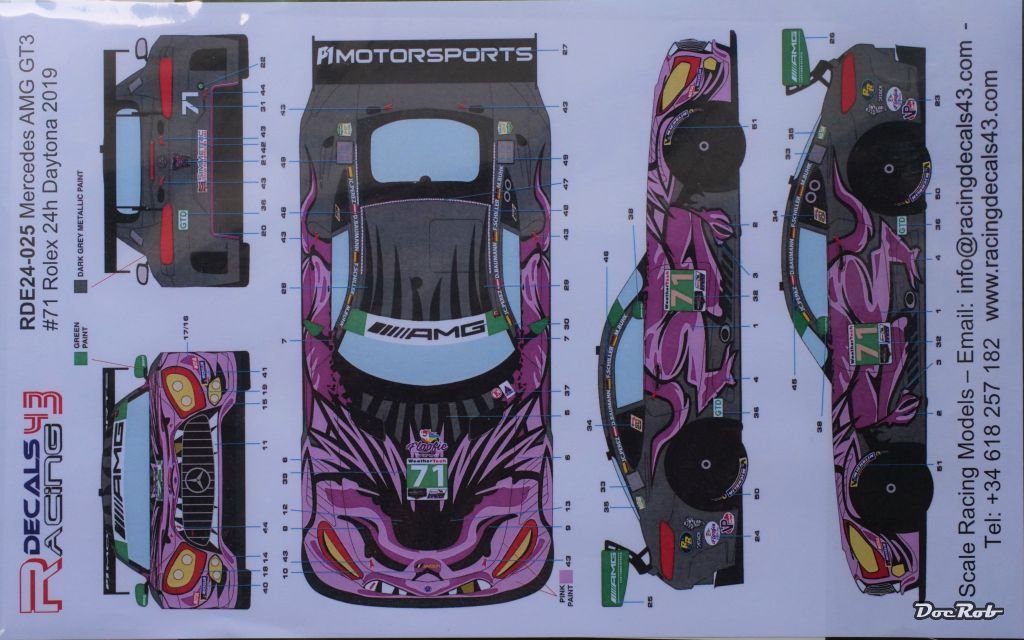
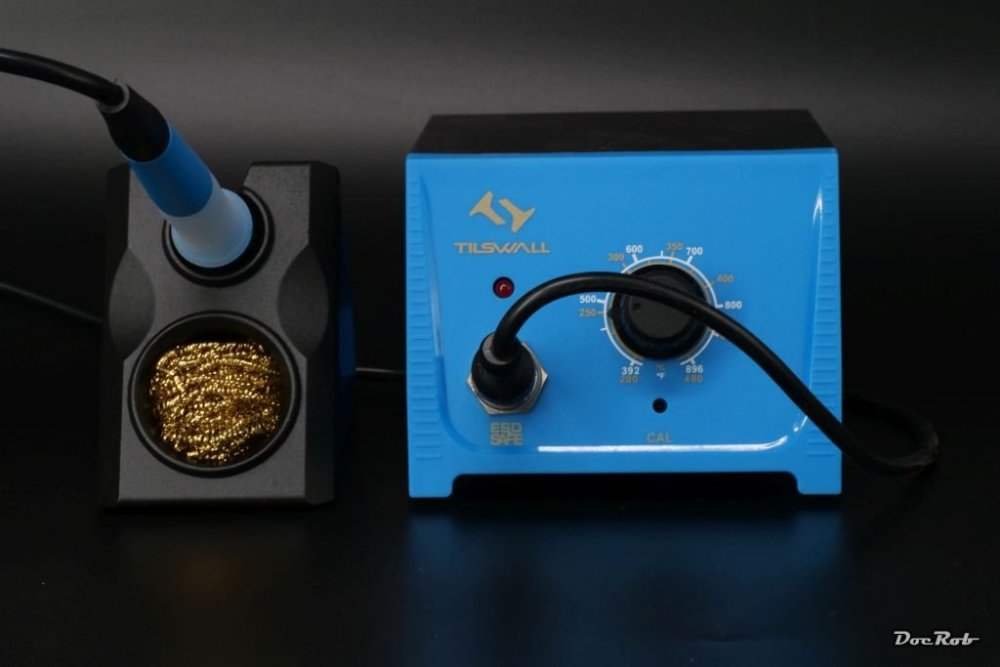
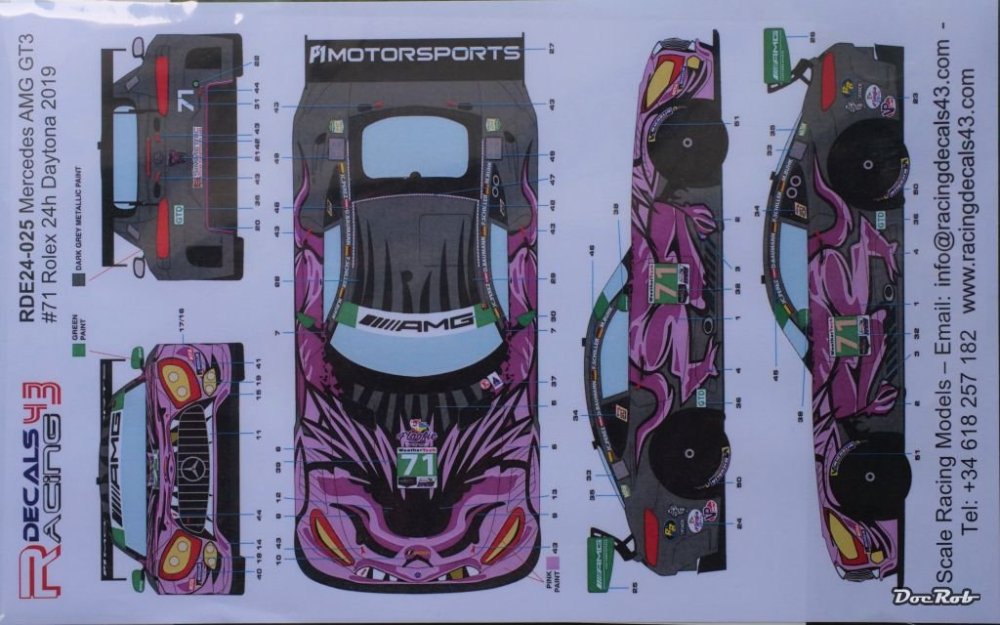
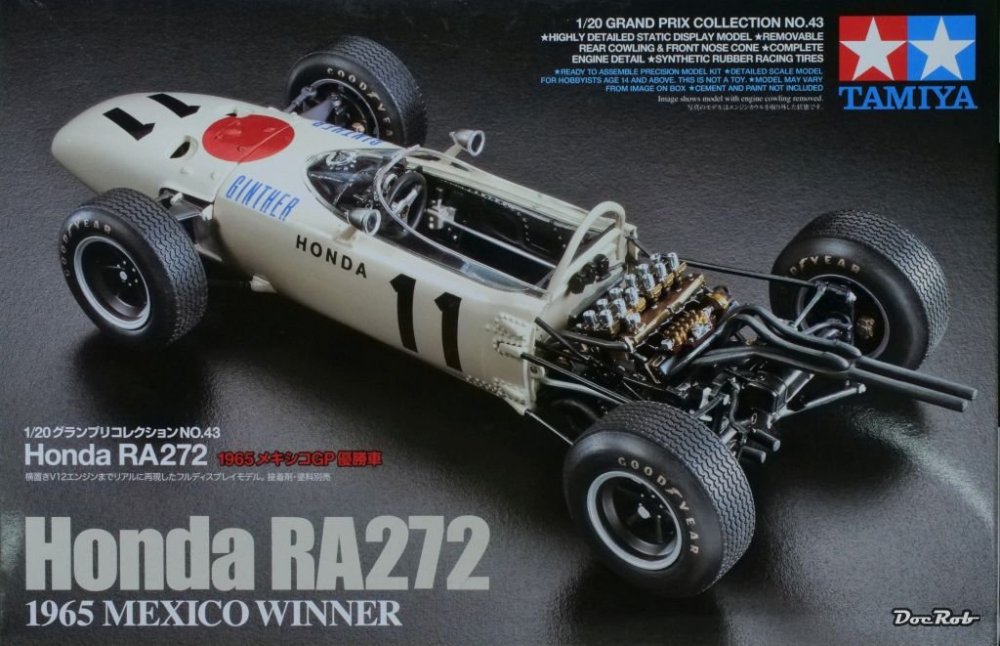
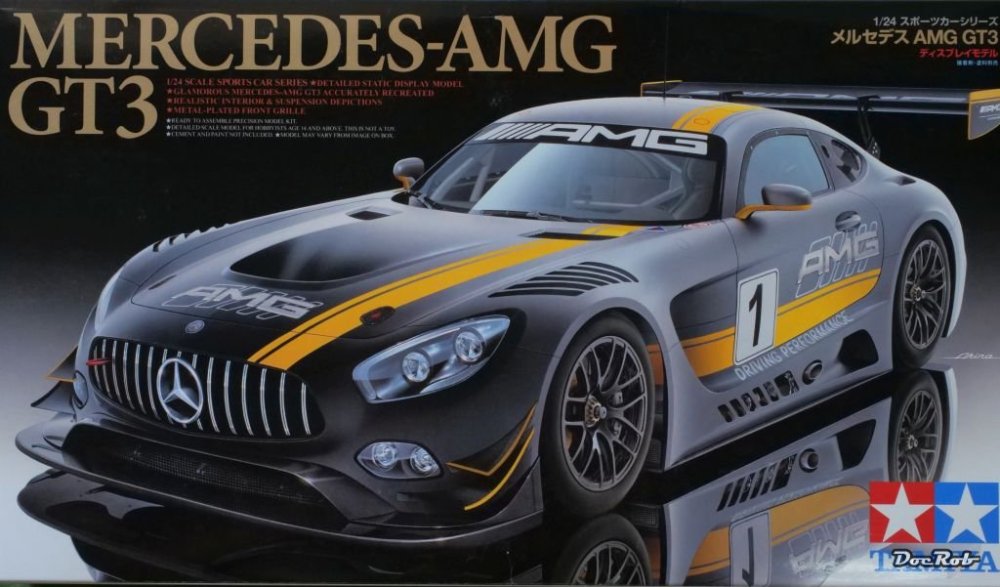
Some new kits and some tools are the catch of the day. Lately, I have developed a liking for strange looking race cars and this Tamiya Mercedes will be a first venture into this direction with the weird decal set from Racing Decals 43. Possibly this was ignited with remembering my airbrushing roots, spraying motorcycle helmets back in the late 80's with strange designs. Next is another Tamiya classic, the Honda RA 272 a simple kit, counting the parts, but a bit to simplified around some parts. Therefore, I also bought two detail sets from Falcon Models, which address the engine and rear suspension with 3D printed parts Last but not least, a hopefully decent soldering station for delicate PE jobs and electronic stuff. It comes with different tips and will replace my Weller station from the 80's Cheers Rob
-
Kitty Hawk 1/35 SH-60B Seahawk
DocRob replied to Peterpools's topic in LSM 1/35 and Larger Work In Progress
All the best to your wife, Peter. What you show here, looks nicely detailed, despite the obstacles, mainly through the bad manual and some ill fitting. I hope, putting the cabin together will not prove too difficult, or have you already tested the fit? Welcome to my world of delivery time assumptions. A month isn't so uncommon, even sometimes from the Spanish mainland. There is no place for bad planning or immediate build bursts . Cheers Rob -
Renault RE20 Turbo - Tamiya - 1/12
DocRob replied to DocRob's topic in LSM 1/35 and Larger Work In Progress
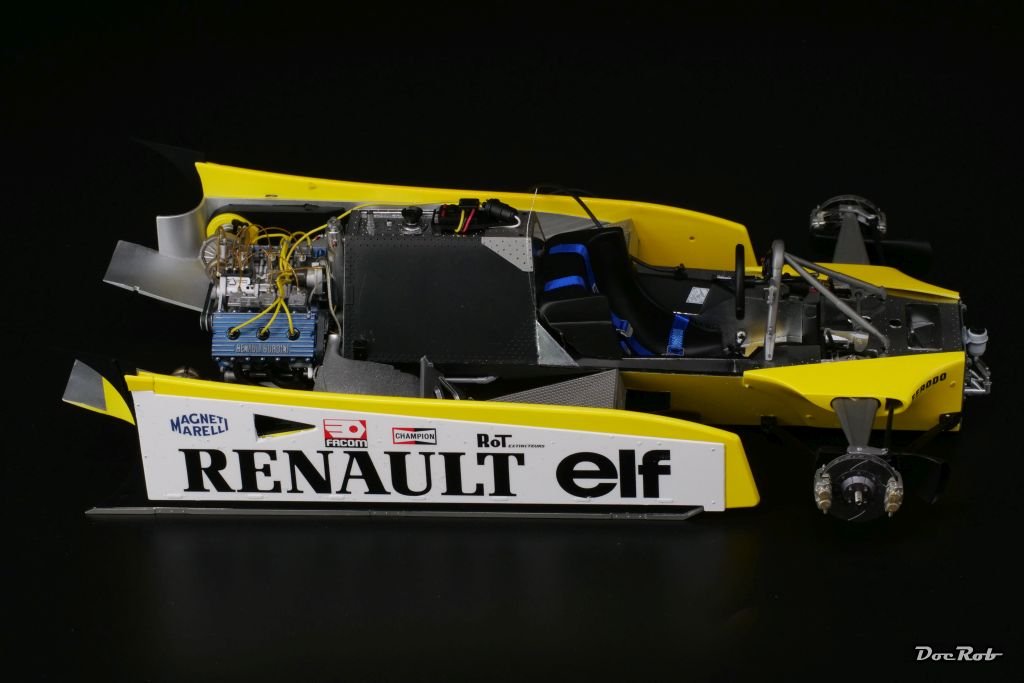
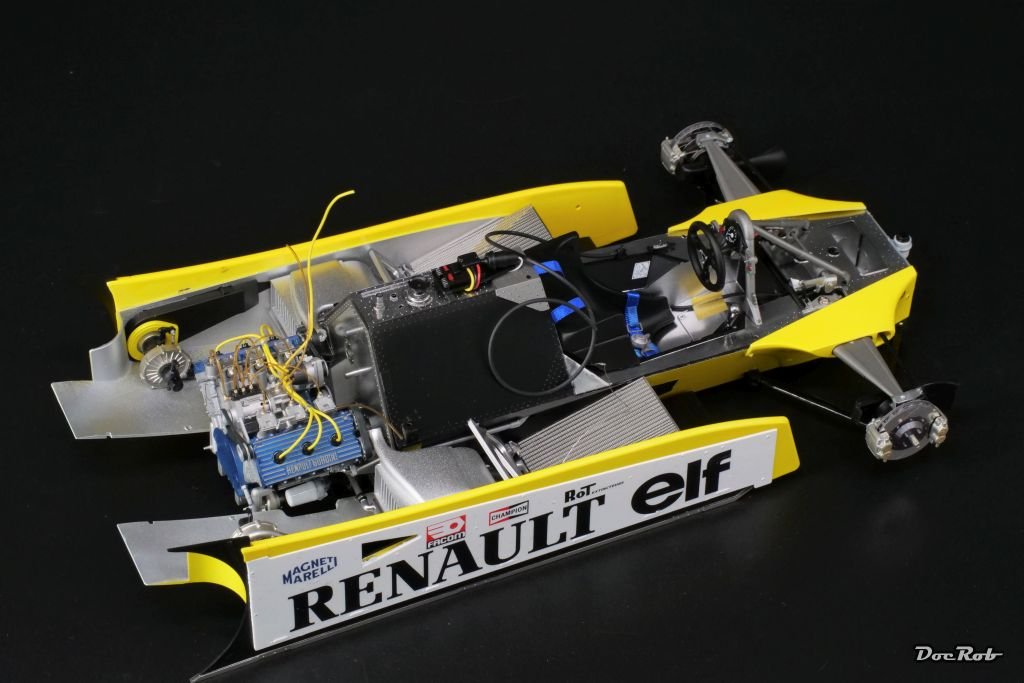
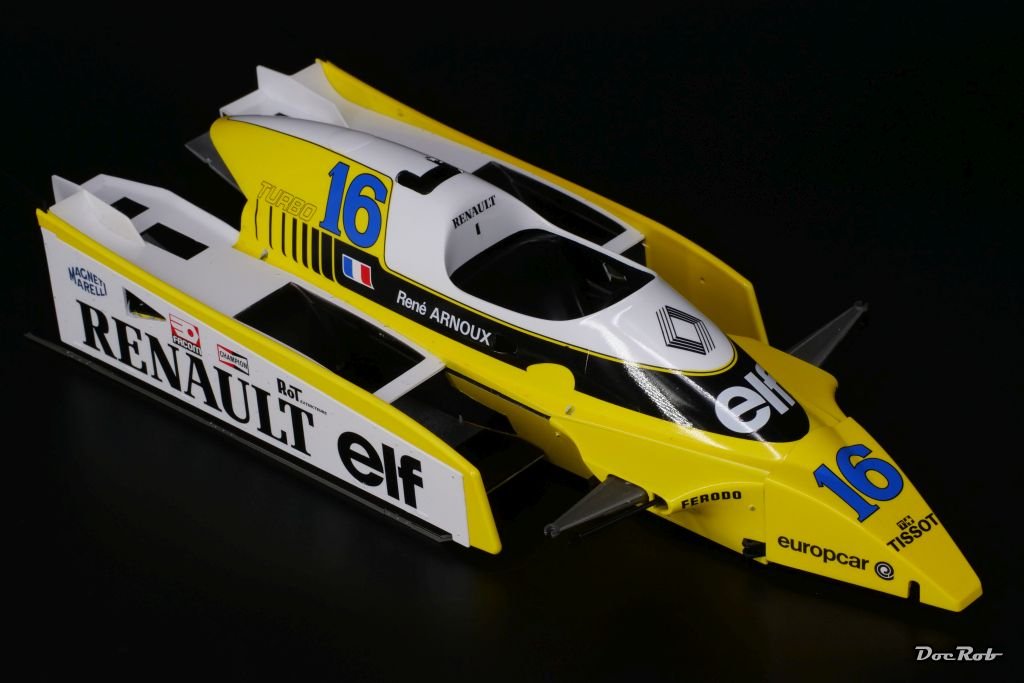
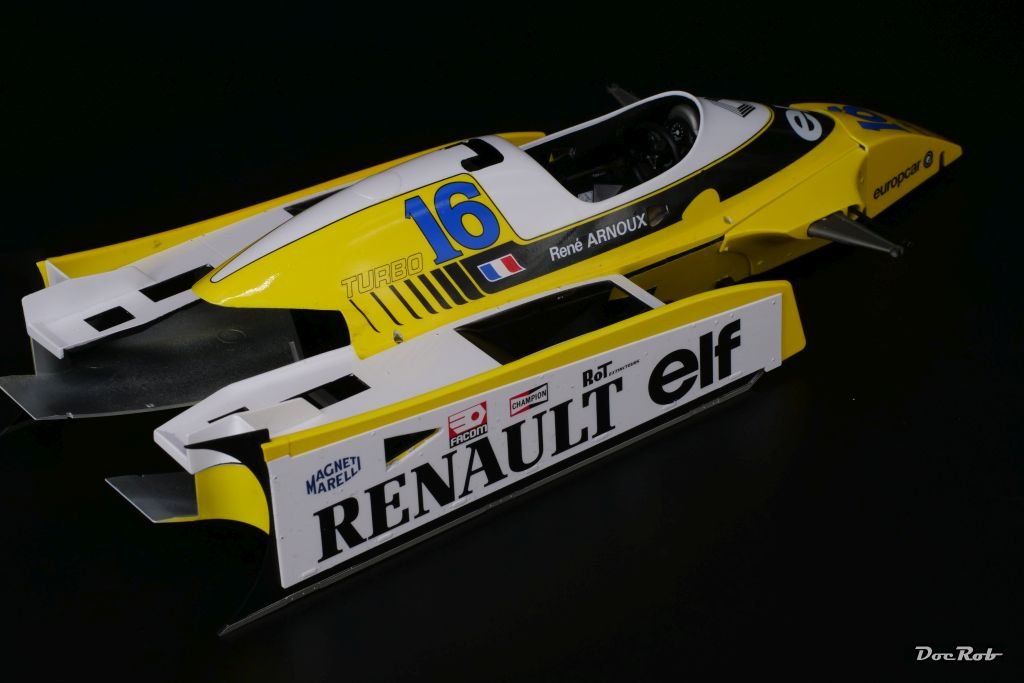
I finished the body parts, with a generous coat of clear coat. To be precise, one fast drying very thin coat, to protect the decals from the thinner and then a heavier coat of GX-100 for the deep shine. The clear coat sprayed very well and I figure, my bad results with GX-100 resulted in mixing the stuff with thinner in a plastic jar, which may got spoilt by the thinner. Reminder to myself, always use a glas jar for adding the leveling thinner. After a proper curing time, I used the three differently grained Tamiya polishing pastes and finally the Tamiya polishing wax and got a near perfect surface. Near perfect, because I had some dust issues during spraying, something I never had before, given the normally high humidity here. There is nothing, I can do about it, but I will look a bit deeper into the subject, to see, if the new compressor might be involved into the issue. There is always a hair in the soup, literally . Cheers Rob

-
Renault RE20 Turbo - Tamiya - 1/12
DocRob replied to DocRob's topic in LSM 1/35 and Larger Work In Progress
Good move Kevin, you'll like the kit besides the enormous clean up effort necessary. Generally all goes together nicely. Cheers Rob -
Renault RE20 Turbo - Tamiya - 1/12
DocRob replied to DocRob's topic in LSM 1/35 and Larger Work In Progress
These decals are great, Gary. I normally fear decaling, but here everything went right. I don't have many experiences with Cartograph, but they worked perfectly on my ZM KAI Phantom, which was literally plastered in decals. Cheers Rob -
Renault RE20 Turbo - Tamiya - 1/12
DocRob replied to DocRob's topic in LSM 1/35 and Larger Work In Progress
Thank you Gus, I have to read a little about Arnoux. I'm not so much into racing and don't know a lot about the drivers. I will fill this gap within the next days. Cheers Rob -
Renault RE20 Turbo - Tamiya - 1/12
DocRob replied to DocRob's topic in LSM 1/35 and Larger Work In Progress
Thank you Peter, my experiences with compressors are limited, as the old one survived 34 years of use. Until now, I'm satisfied with the device, noise level is acceptable and most important, it produces a regular adjustable airflow. Cheers Rob -
Good thinking and execution of the wear and tear of your 190, Gary. I liked all measures except the scuff marks. For my liking they are a bit prominent. A darker color would have suited better . The general idea of scuff marks is not so much, showing what is under the paint, then residues from boots abrasion, I guess. Cheers Rob
-
Renault RE20 Turbo - Tamiya - 1/12
DocRob replied to DocRob's topic in LSM 1/35 and Larger Work In Progress
Phew, decals are on and I, as an old decal coward have to say, these Cartograph decals are the real deal. They are very opaque and fit like a glove, if you made a precise masking job between yellow and white. Even the superfine pinstripes fittet, bordering the yellow. For the first time, I used Tamiya Decal adhesive and so far, I have no complaints. The standard one was used on flat surfaces and the additional softener type was used on contours. There is one tiny fold on the curved front black stripe, but I hope with some stronger softener this will vanish. Before decaling, I wet sanded all the body parts with 6000 and 8000 grit and the surfaces were absolutely smooth and the color borders got rid of the tiny edge from masking. The rear wing was resprayed, because I polished through the edges on a tiny spot. I painted all the rivets on the body with a precision brush for a little bit more detail. Cheers Rob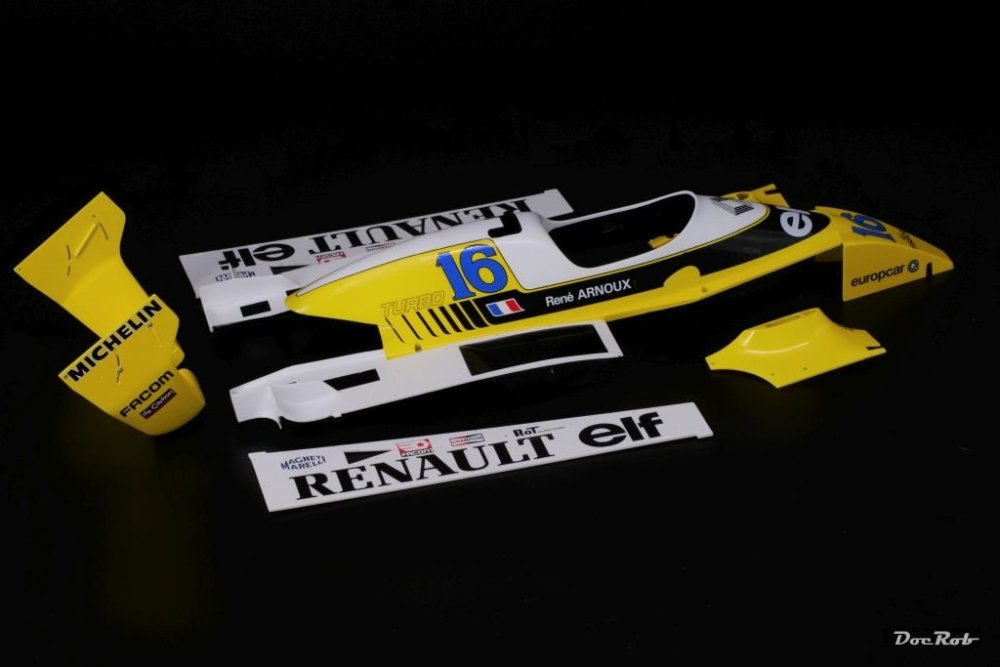
-
Eduard produced some sets for the Karas as well. One wit IP and seatbelts, the other has a lot of additional parts, which might fit into your frame as well. I have this set for my Mirage Karas. Cheers Rob
-
1:32nd scale Hansa-Brandenburg W12
DocRob replied to sandbagger's topic in LSM 1/35 and Larger Work In Progress
Wonderful as always Mike. I have a bit of a deja vu, having built one too, but on black dinged floats. Cheers Rob -
Yummy, happy birthday Carl, enjoy the cake. Cheers Rob