GazzaS
-
Posts
6,396 -
Joined
-
Last visited
Content Type
Profiles
Forums
Events
Gallery
Everything posted by GazzaS
-
Excellent!
-

Share how COVID-19 Quarantine has affected you.
GazzaS replied to 1to1scale's topic in General Discussion
Nobody wants Astra Zenica here. So that has caused some supply issues. At first, they were only offering Pfizer to people over 60. So, I wasn't gonna do it. But they dropped the age down to 50 so I eventually decided to get it done. My wife seems to think it will enable us to take a cruise from Sydney to NZ in January. But I have my doubts. P.&O. Cruise lines have stopped operations up until Dec. 17 of this year. The worst thing that can happen is getting caught in New South Wales. it's a continual Covid hot spot and Queensland, where I live, closes the border regularly. For instance, a workmate of mine went to Sydney for a wedding a few weeks ago. They closed the border and he was stuck in NSW at his expense while he self-isolated for two weeks. I just don't want that hassle/financial burden. -
Gottfreid Weiroster Bf 109G6 R6 Revell 1/32
GazzaS replied to GazzaS's topic in LSM 1/35 and Larger Work In Progress
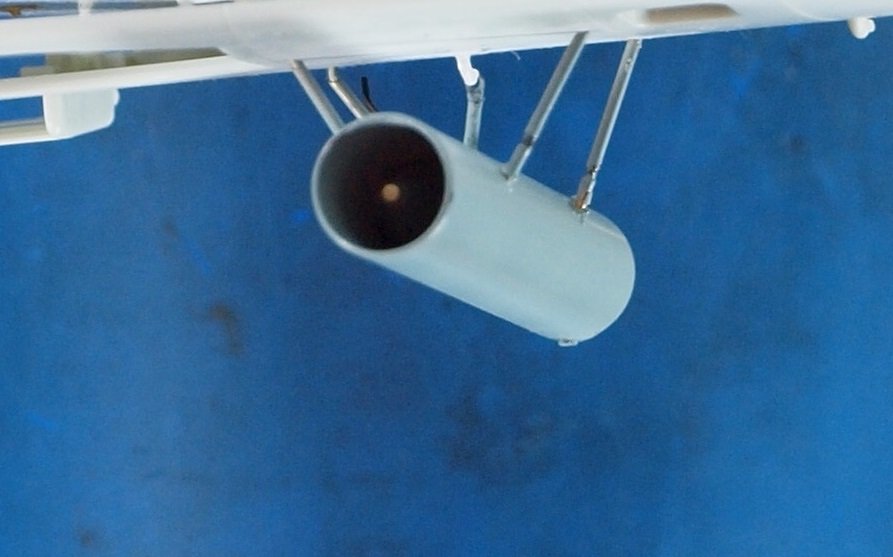
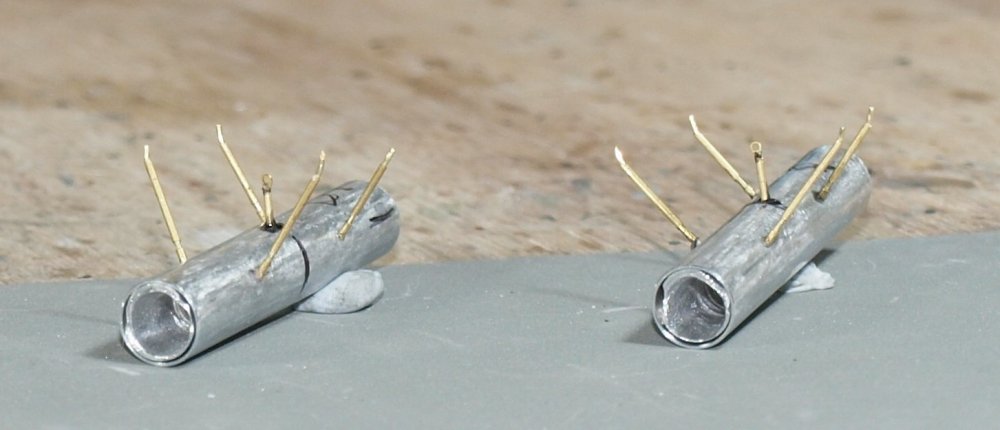
Kai, there are really only 4 attachment points. The 5th point, the hook and eyebolt joint is really only an optical illusion. The weakest part of each joint is where the rod meets the tube. The danger time will come as I work with the model near completion. Integrating it with the rest of the fuselage and weathering means that it may be subjected to movement... or even the occasional bump. Thank you, Rob. The instability of the joints can't be illustrated in photos. They only pierce the tube to a dept of less than 1mm. So there is no mechanical strength. And the CA... just does not like to stick to the Aluminum tube. I've sanded it for the CA to have something to hold... but it made no difference, really. But I need to work on something else for a while. Slap some plastic together. And paint the uniform of Herr Weiroster. -
Share how COVID-19 Quarantine has affected you.
GazzaS replied to 1to1scale's topic in General Discussion
My wife and I got our first jabs of Pfizer today. Her by design, and I lucked out due to other ppl cancelling. -
Cool! Beute Martlett!
-
Gottfreid Weiroster Bf 109G6 R6 Revell 1/32
GazzaS replied to GazzaS's topic in LSM 1/35 and Larger Work In Progress
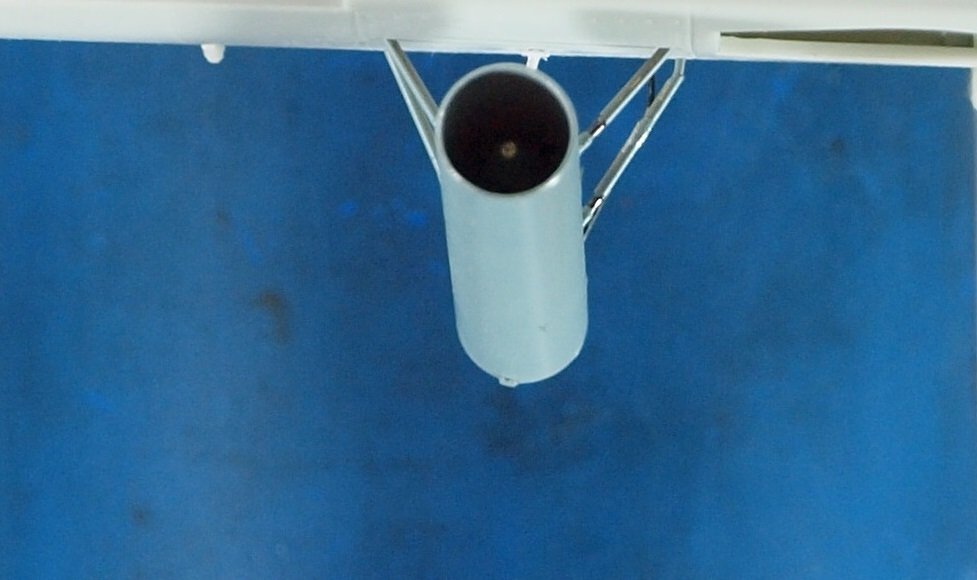
Thank you for the kind words, Fellas. I know I showed you them as they'd be on the wing. However... I just rotated the pictures. I'm very concerned about gravity. I'll tell ya... nothing shits me more than when I go to admire my display... and I see some part that has become detached. usually... it's aerials, antennae, or some part that protrudes at an angle from the model. And these rockets are relatively heavy. So... mentally I've begun to rework the project. I ordered Styrene .5mm rod and once it arrives I'll see how it goes with the .7mm tube. And.... I'll make deeper holes that penetrate into the solid-aluminum rocket projectile. Because I've already imagined them laying under the plane in the future. -
Foil it, Baby!!!
-
Gottfreid Weiroster Bf 109G6 R6 Revell 1/32
GazzaS replied to GazzaS's topic in LSM 1/35 and Larger Work In Progress
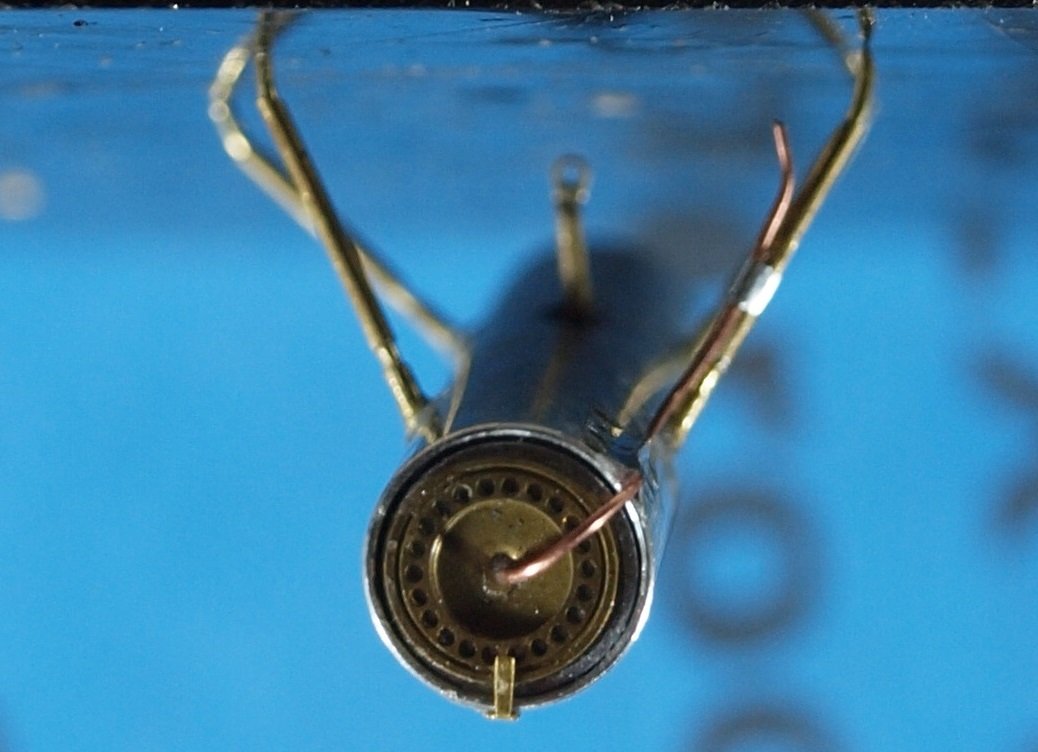
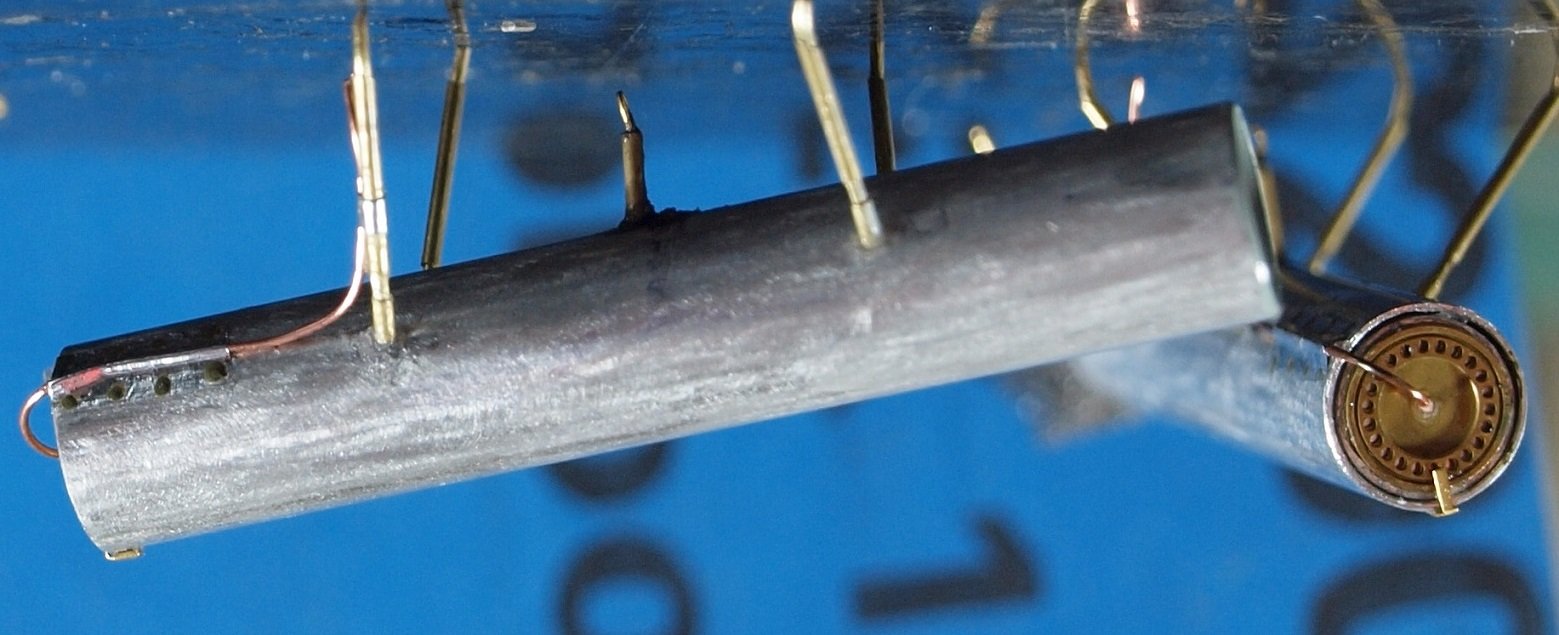
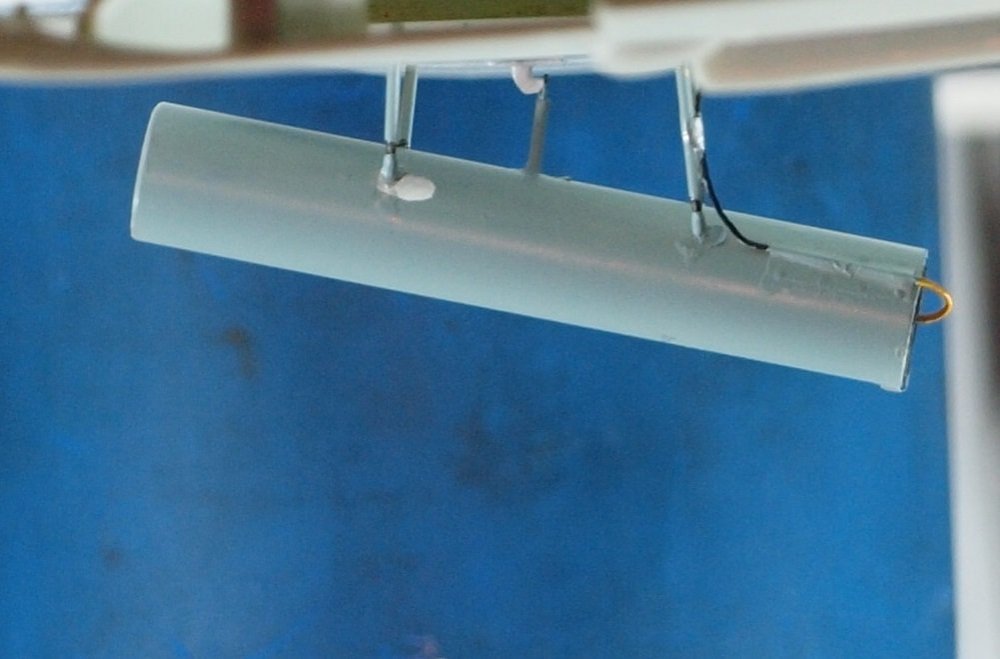
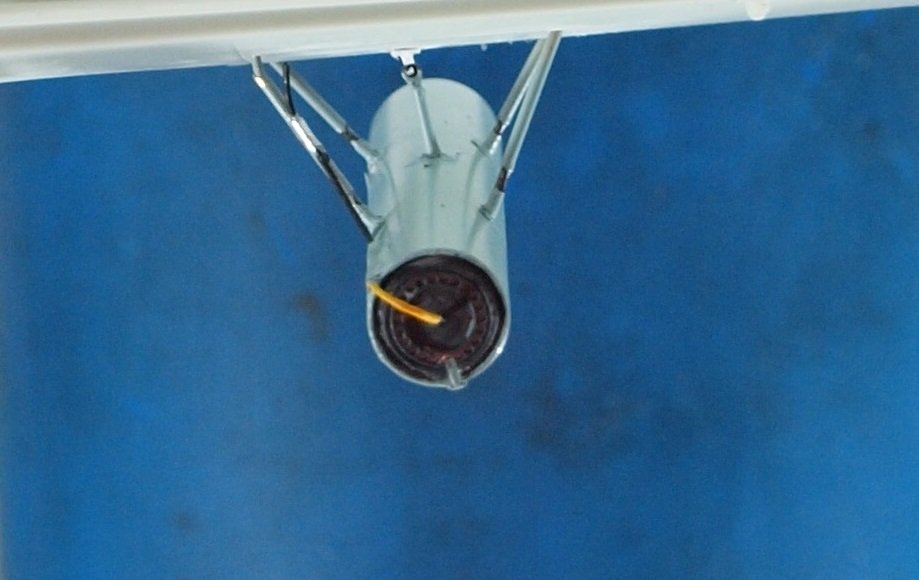
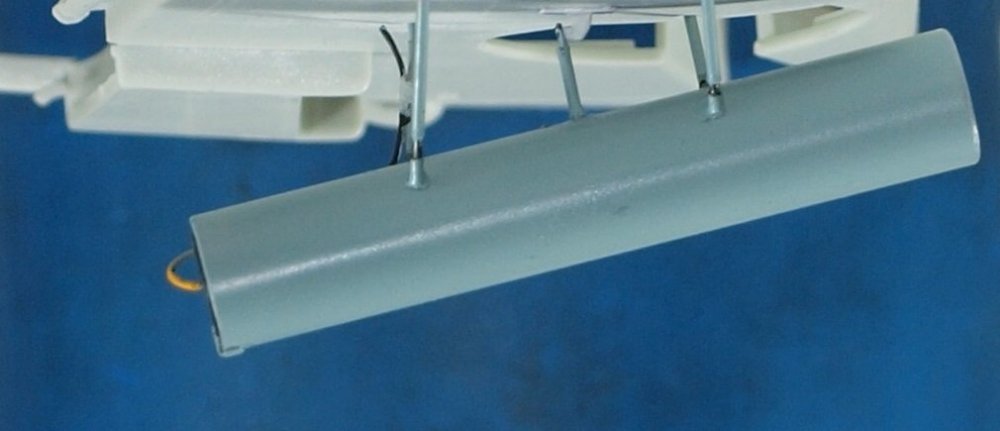
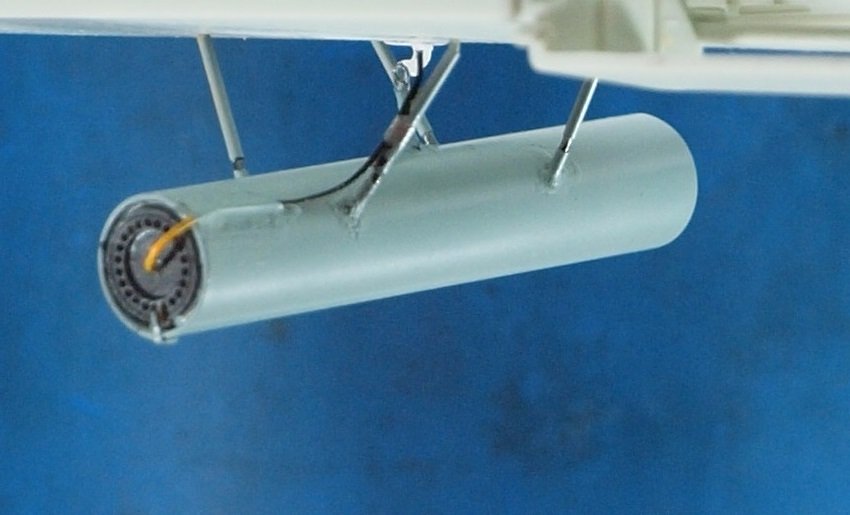
Well... Macro photos don't lie. But they might say too much. The following set of pictures depicts my WfGr. 21 in their current state. Complete. They will need some tweaking, and I might go so far as to drill into the missiles themselves and create new legs which fit deeper into the tubes/missiles. The bracket around the ignition wire is aluminum foil. The 'rivets' holding the bracket on are just little blobs of paint. The 'clamp' holding the ignition wire to the leg is also aluminum foil. Pictures show that the fuse at the tip of the rocket projectile is a lighter color... so I took the liberty of painting it a brass color. I also used the artistic license to paint the ignition wire yellow. Later, I filled the area behind the wing fillets I added with black CA. Then I sanded it down to close to level. My final useful act of the day was attaching the upper wing inner parts to the fuselage and spar. Then I set them to dry. If I did this right, there will be a nice, neat panel line where there needs to be. Thank you for looking!

-
Israeli Mirage III C with Atar9C
GazzaS replied to Kaireckstadt's topic in LSM 1/35 and Larger Work In Progress
Looking beautiful, Kai! Nice start to decalling! -
When it comes to Trumpeter.... just say "no".
-
What is on your bench right now ? Share a picture :)
GazzaS replied to Martinnfb's topic in Modelling Discussion
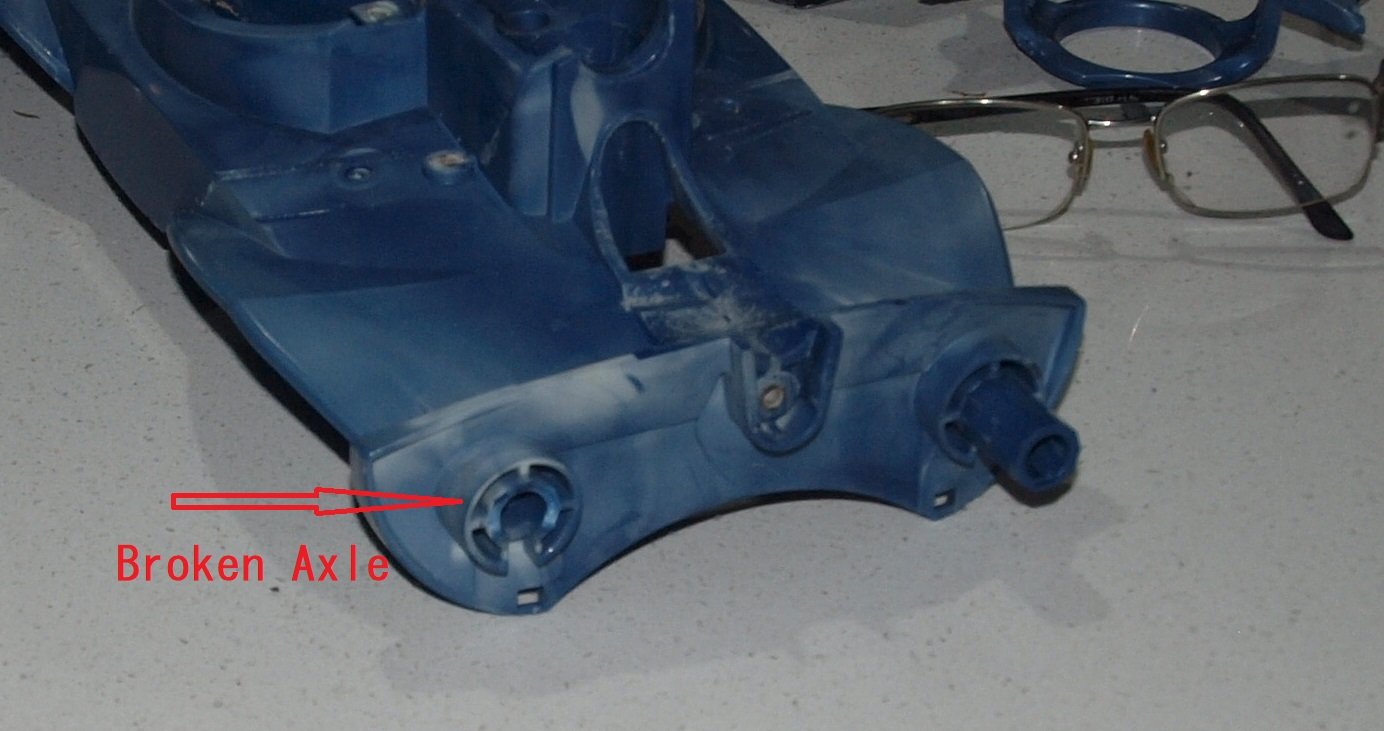
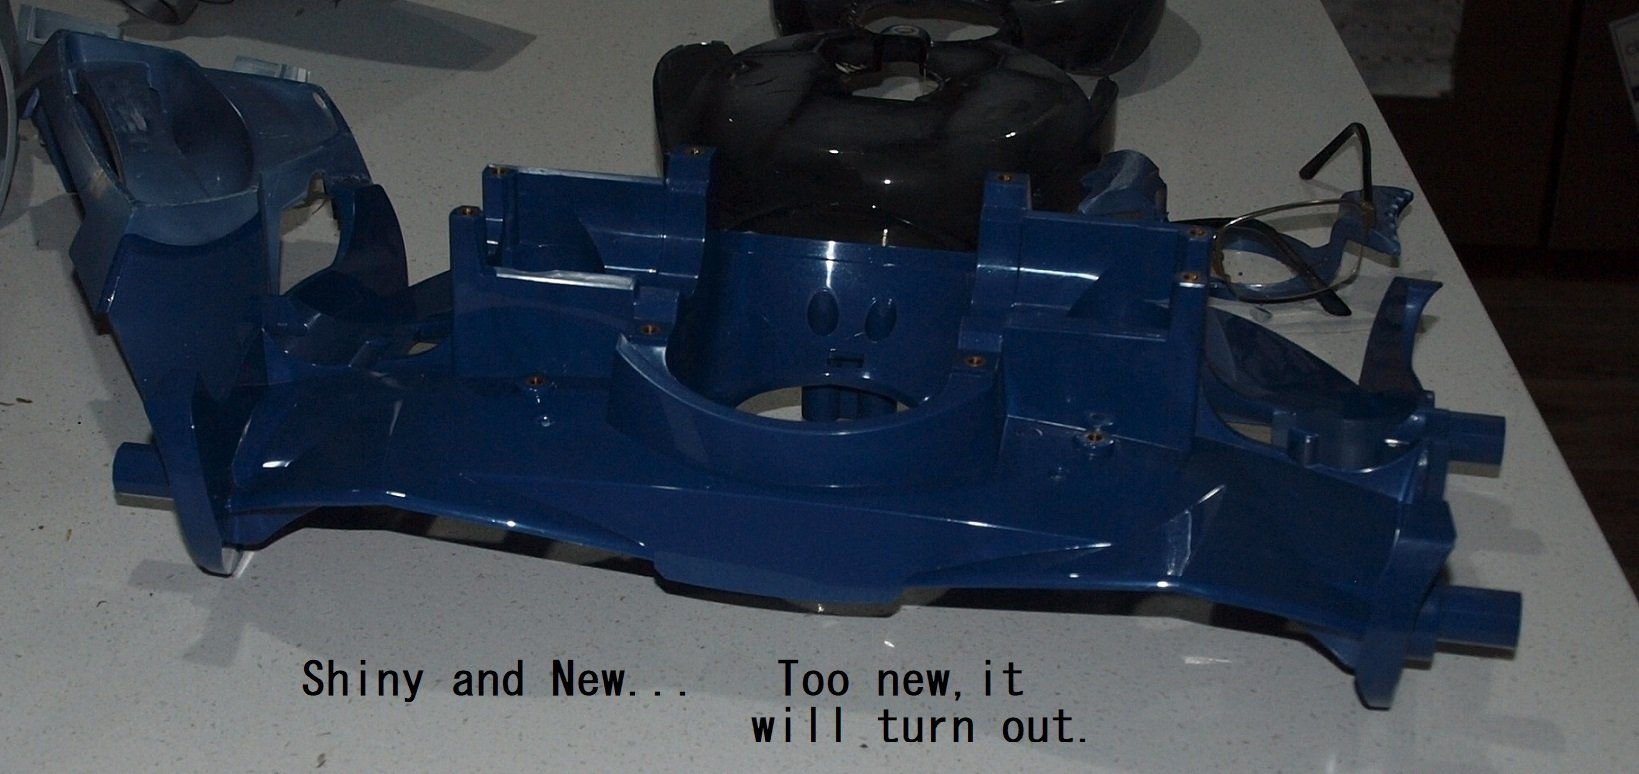
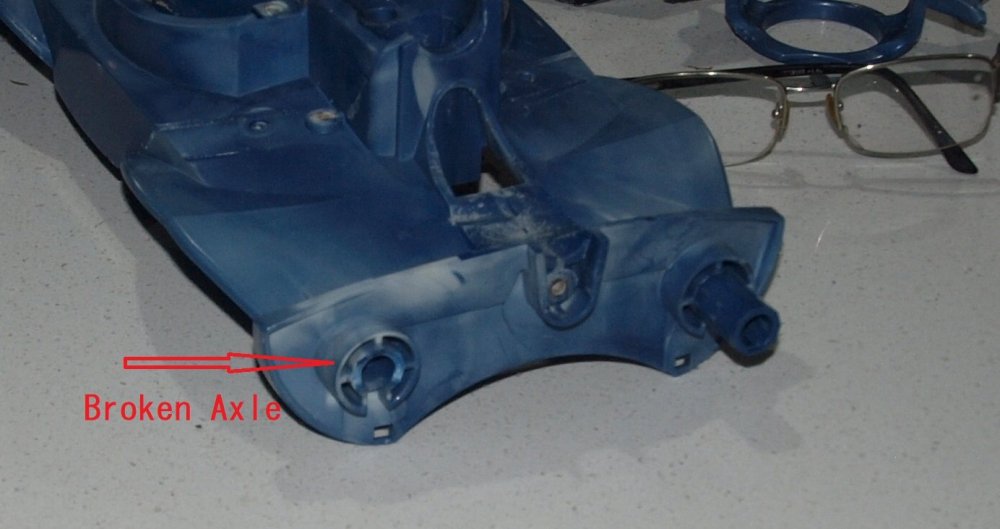
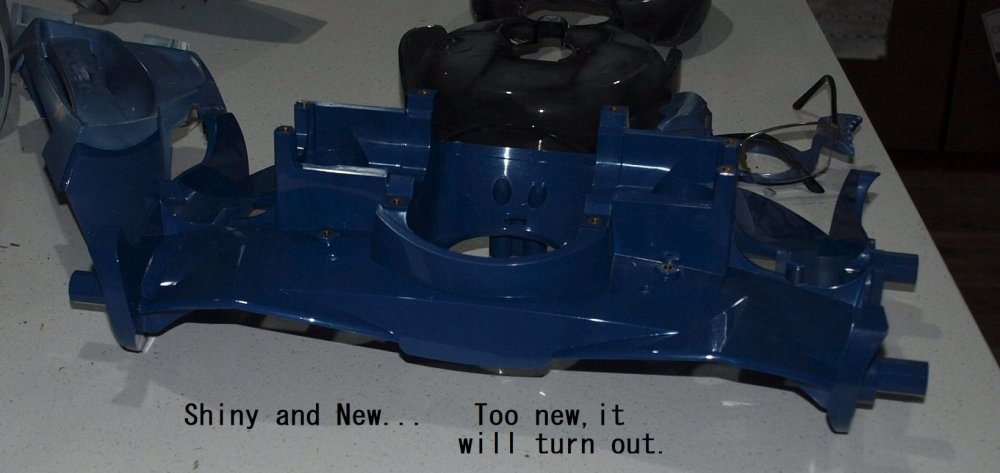
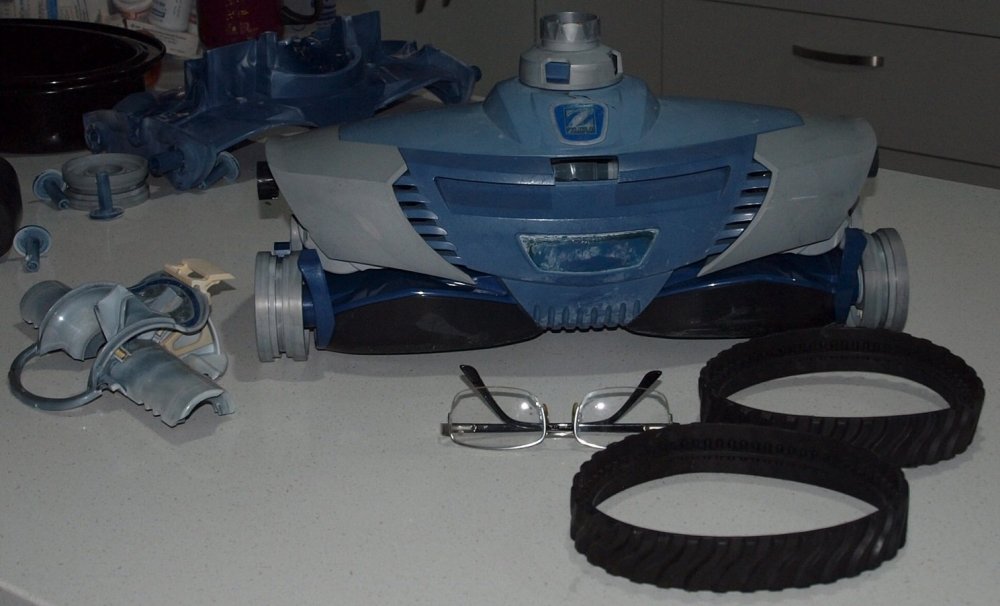
In Australian parlance, the kitchen countertops... are the kitchen "bench". A couple weeks ago, my 12 + year-old pool-sucker started spinning in circles. Closer investigation revealed that one of the four axles was broken. So I ordered a new part. For 62$ it was cheaper than buying an 800$brand new pool-sucker. So, I diligently disassemble the contraption in a linear fashion and laid it out neatly. It's constructed by a clever use of snaps and stainless steel screws. Marine quality of course. The replacement part is actually the center/frame of the machine. But since I bought my machine (years ago) some of the parts have changed. The four pins that hold the wheels in place... now have a key slot that matches a key in the axle.... And, there are four new screws in the motor housing where the outer motor bearings are housed. It was just a pressure joint before. BTW... when I say motor... it's not really a motor. The contraption is operated by the flow of water through a chamber with paddles. As the paddles cause a shaft to rotate, the rotating shaft engage the two gear boxes which make it operate in a crazy series of maunevers designed to cover your whole pool. Ir's called a Zodiac MX-8. The gear boxes and sometimes the tracks have to be replaced every year for about $100. My wife says: "That thing has saved me so much time." Because before we got it, I let her clean the pool. But because it is now a mechanical thing... it's become my responsibility. But anyway... here it is now... I have to order more parts. Please refer to the "House with pool four sale" add I posted earlier.
-
Gottfreid Weiroster Bf 109G6 R6 Revell 1/32
GazzaS replied to GazzaS's topic in LSM 1/35 and Larger Work In Progress
Thank you, John! -
Gottfreid Weiroster Bf 109G6 R6 Revell 1/32
GazzaS replied to GazzaS's topic in LSM 1/35 and Larger Work In Progress
Last time I looked, this was OOP. -
Gottfreid Weiroster Bf 109G6 R6 Revell 1/32
GazzaS replied to GazzaS's topic in LSM 1/35 and Larger Work In Progress
Thank you! -
Gottfreid Weiroster Bf 109G6 R6 Revell 1/32
GazzaS replied to GazzaS's topic in LSM 1/35 and Larger Work In Progress
But your jig needs to be more than 4 holes in a piece of wood. It needs to replicate enough of the wing to enable you to get all of the alignments right. -
Gottfreid Weiroster Bf 109G6 R6 Revell 1/32
GazzaS replied to GazzaS's topic in LSM 1/35 and Larger Work In Progress
Yes... soldering would be better. But you would want a jig made of non-melting material to hold the parts. I'd hate to see a wing that became a huge heat sink. -
Very nice, John!
-
Nice looking cockpit details, Mark!
-
Israeli Mirage III C with Atar9C
GazzaS replied to Kaireckstadt's topic in LSM 1/35 and Larger Work In Progress
What a stunning result, Kai! Absolutely perfect painting! -
Gottfreid Weiroster Bf 109G6 R6 Revell 1/32
GazzaS replied to GazzaS's topic in LSM 1/35 and Larger Work In Progress
Thank you, Peter. I can assure you... I won't be rushing to make more. -
Gottfreid Weiroster Bf 109G6 R6 Revell 1/32
GazzaS replied to GazzaS's topic in LSM 1/35 and Larger Work In Progress
Thank you, Rob. Everything is still flexible. The brass - aluminum joint isn't strong and it just seems like the glue won't make a firm joint. I think the best ting would be to use brass tube if you can find it in 8mm. I got my angles, lengths, and drilling positions from other pics supplied in this thread. -
Gottfreid Weiroster Bf 109G6 R6 Revell 1/32
GazzaS replied to GazzaS's topic in LSM 1/35 and Larger Work In Progress
Thank you, Kai. Do you guys think I didn't drill holes in the tubes? I did... other wise it would be impossible to assemble. I set my Dremel to 30K RPMs and used my Dremel drill press. I was surprised how quickly the drill bit in. I'll prime them this week, most likely. -
Gottfreid Weiroster Bf 109G6 R6 Revell 1/32
GazzaS replied to GazzaS's topic in LSM 1/35 and Larger Work In Progress
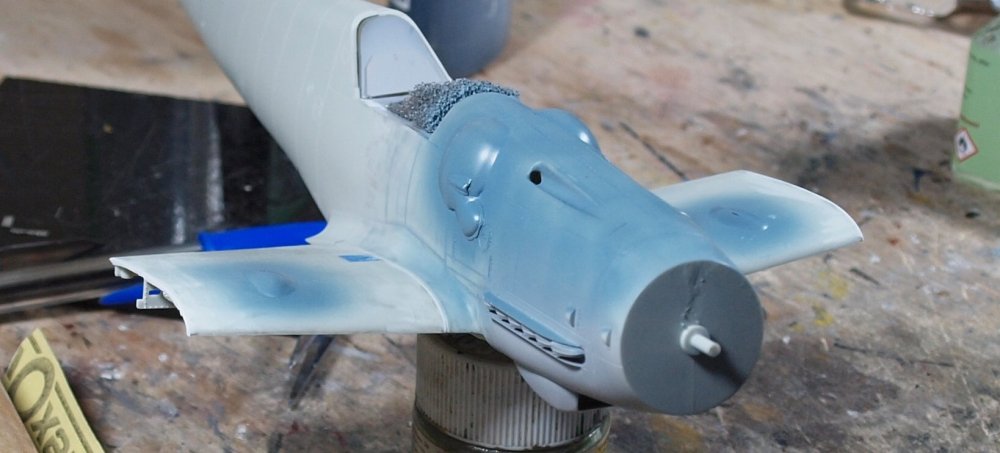
Heh... here I am again! Well... all of my modelling time this weekend was spent on two small assemblies. The angles are imperfect, but it is an area which you won;t see unless you're looking real hard. I would never take it to a show. I'm too fearful that It'll get to the venue in pieces. I still have to do the wiring and a little PE. This little bit of AM by Profimodeller is only 4 tubes, four rockets, a length of copper wire. Some of the PE you're supposed to stack to form 3d shapes. The rockets are solid aluminum making the whole thing quite heavy. I drilled out the rockets to save weight. I also modified the outside of the rockets to get past the brass rods that have pierced the tube. Nobody will see it when I put the end cap on, anyway. Main thing I have to do is paint the rocket before I is permanently fixed in the tube. There are two small hooks on the wings that most likely bore most of the weight since they are right on the spar. I made them out of card. I added arrows to make up for the crappy photos. I was gonna take another pic of everything in place. But trying to align all of the pins and get everything straight is a bit like trying to coax a preying mantis into a sandwich bag, I reckon. Happy modelling!!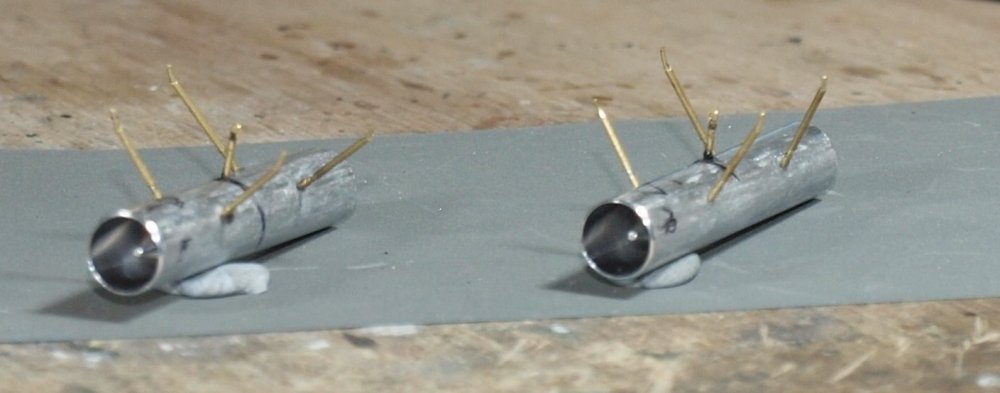

-
Israeli Mirage III C with Atar9C
GazzaS replied to Kaireckstadt's topic in LSM 1/35 and Larger Work In Progress
Nice looking airbrush work, Kai! I paint outside... so I rarely wear a mask.