
Fran
-
Posts
2,286 -
Joined
-
Last visited
Content Type
Profiles
Forums
Events
Gallery
Everything posted by Fran
-
Yes, very good news from Lukgraph!
- 161 replies
-
- 4
-

-
- greatwallhobby
- italeri
- (and 6 more)
-
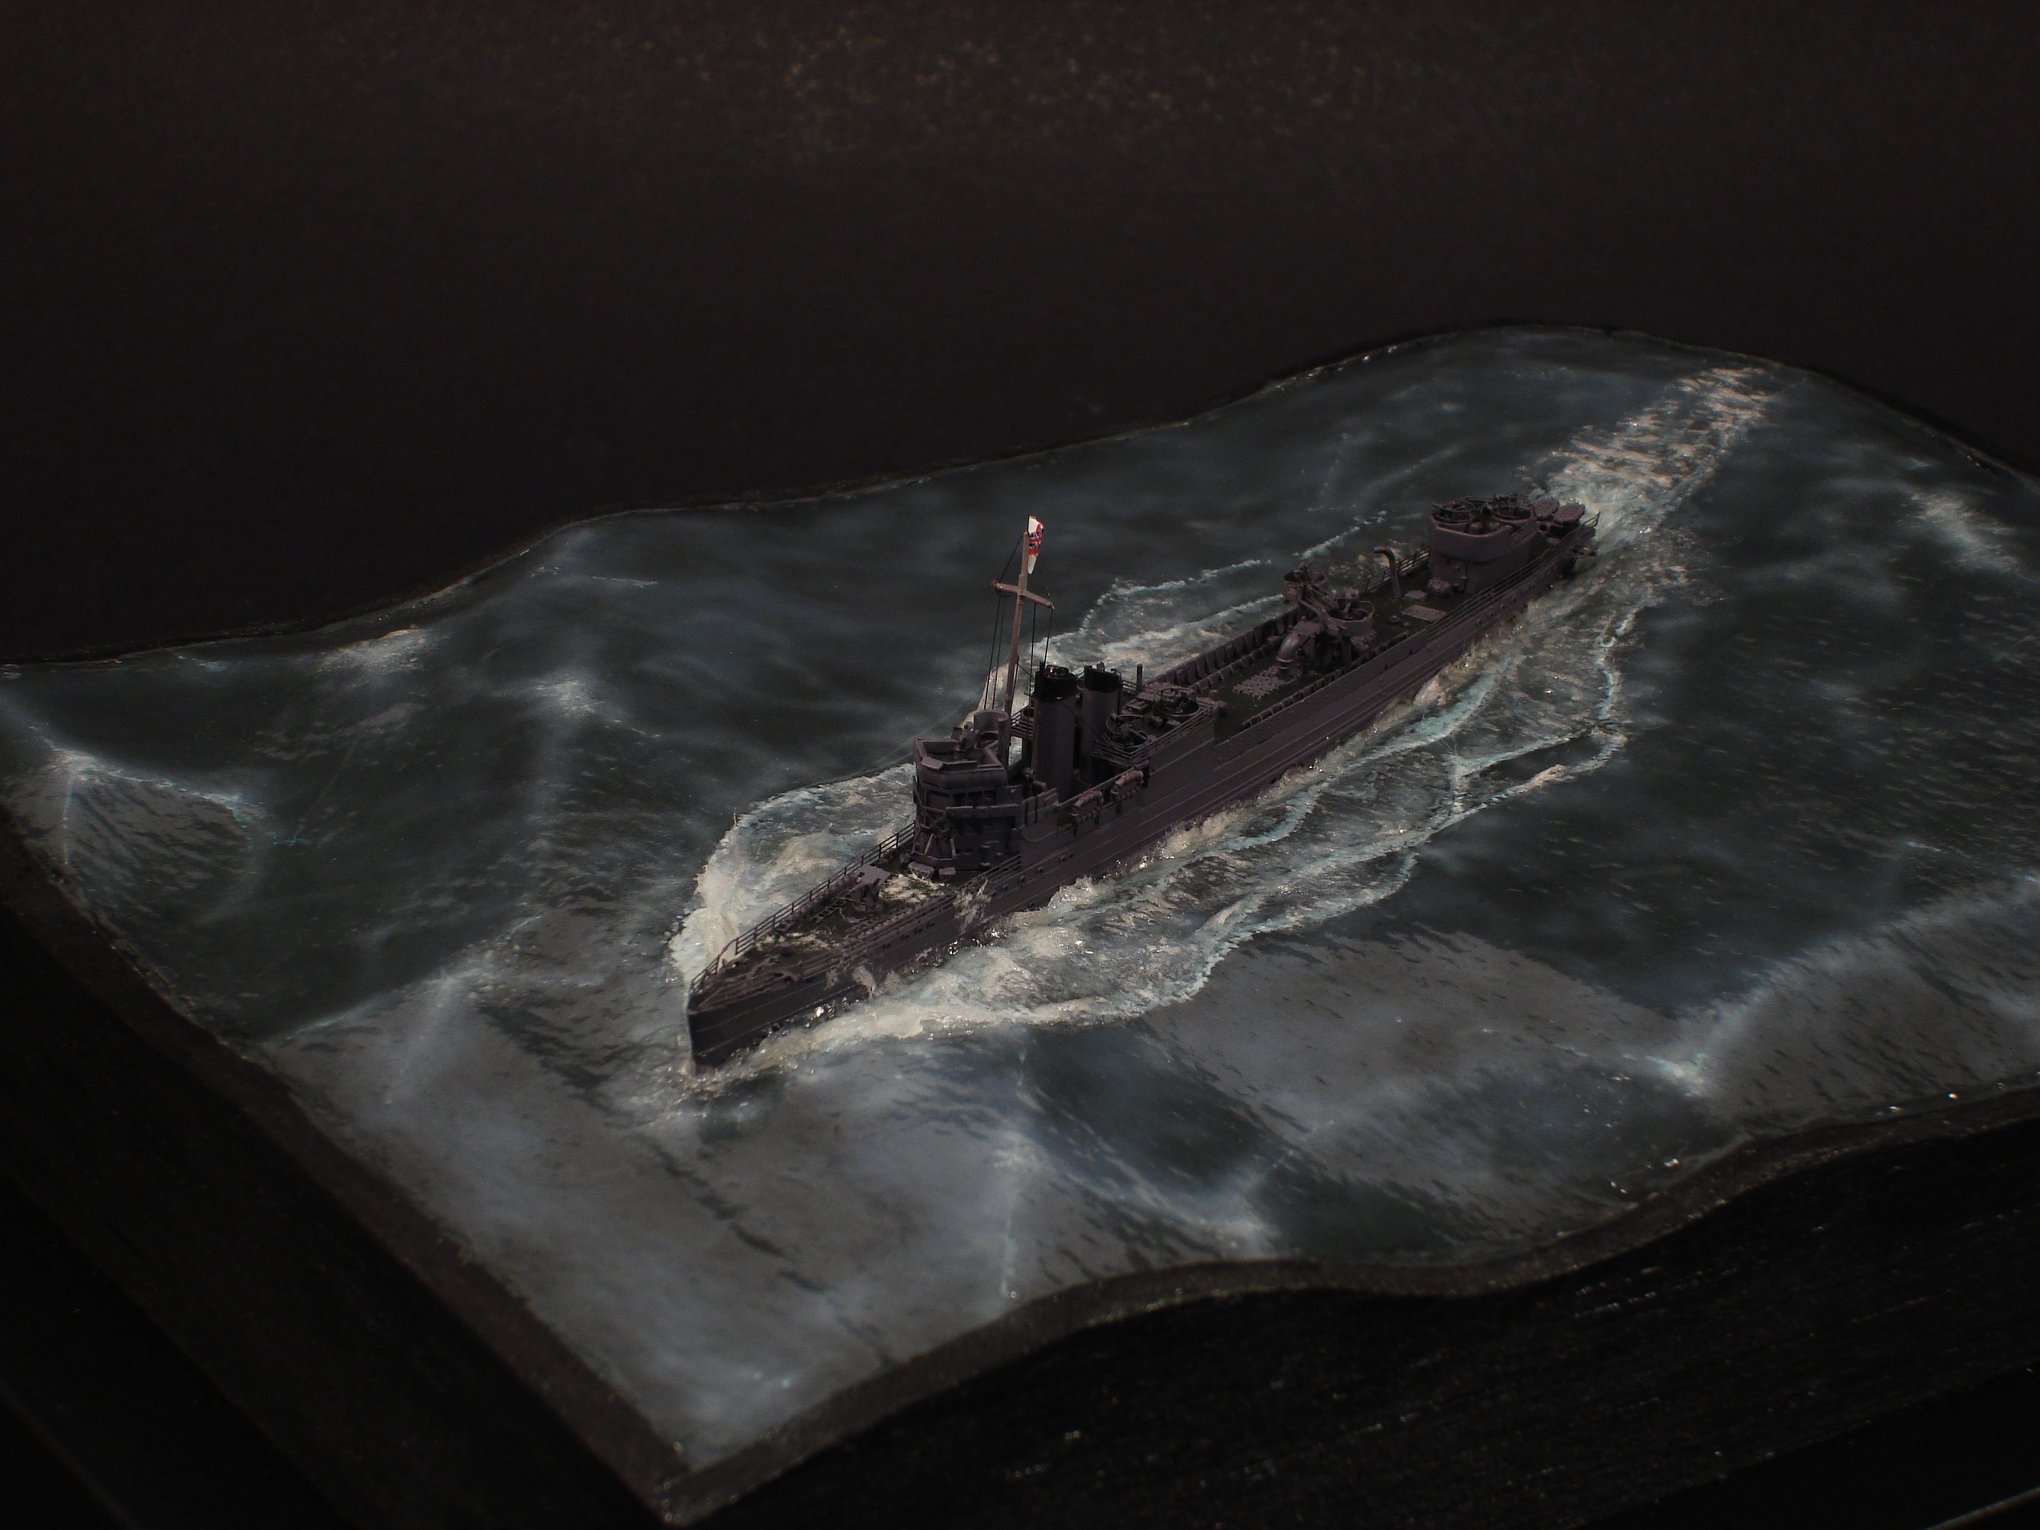
 This is mine. The water and base was made by my good friend José Brito.
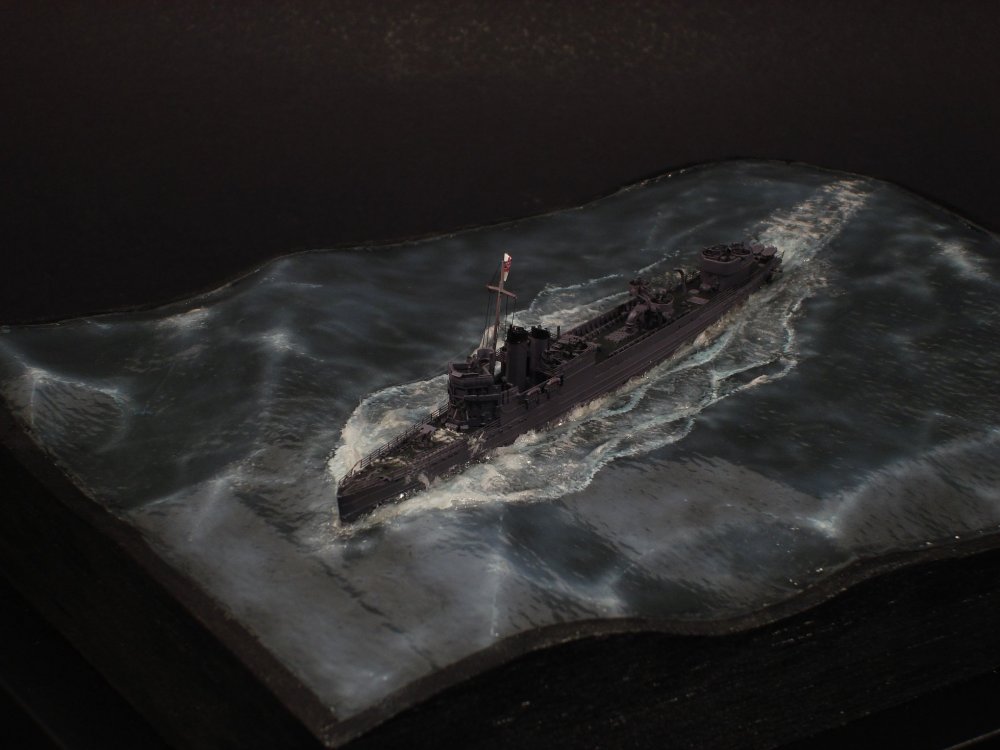

-
Total Respect!!! Great work in such a small scale.. I made the Flyhawk 1/700 Campbelttown and was quite a challenge and I have a few to make one day!
-
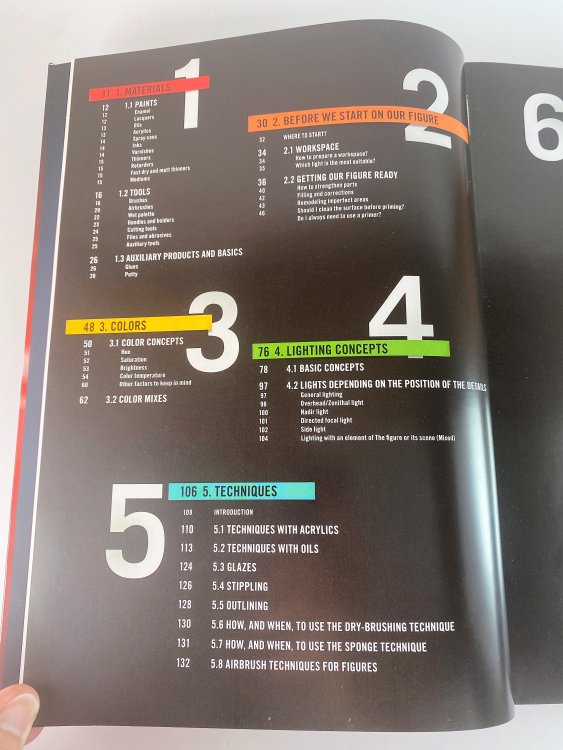
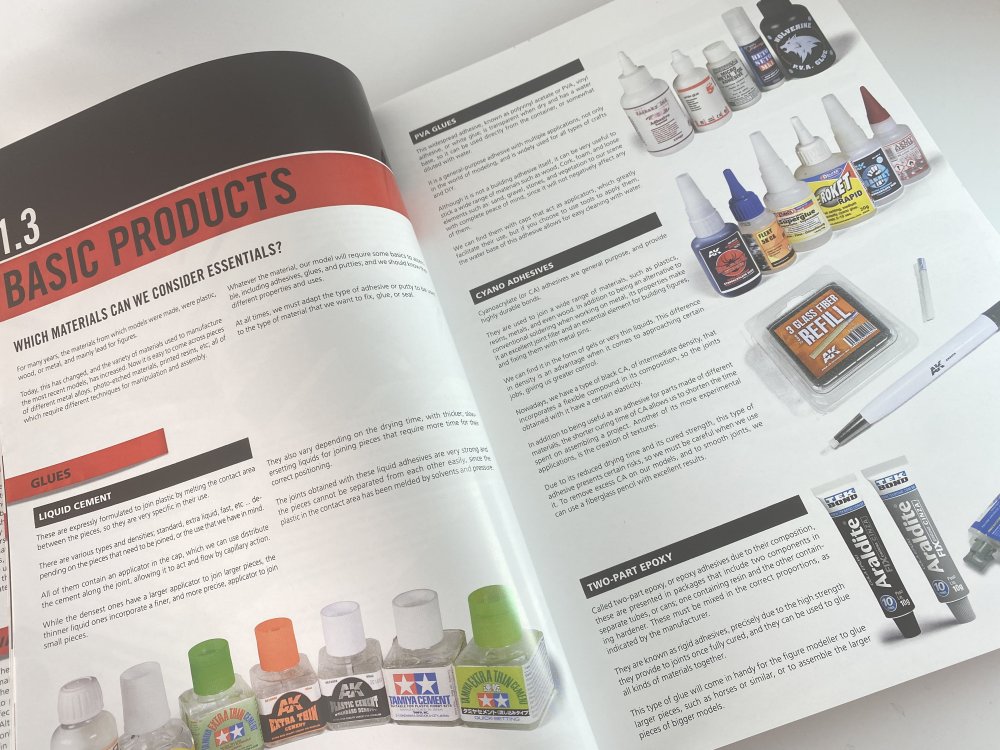
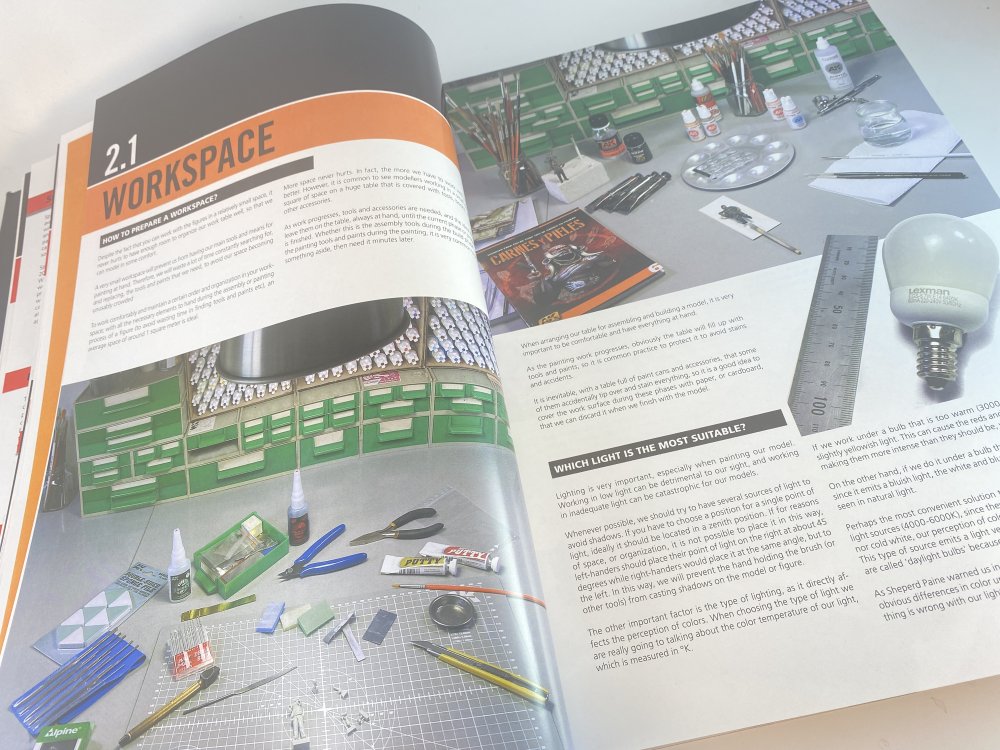
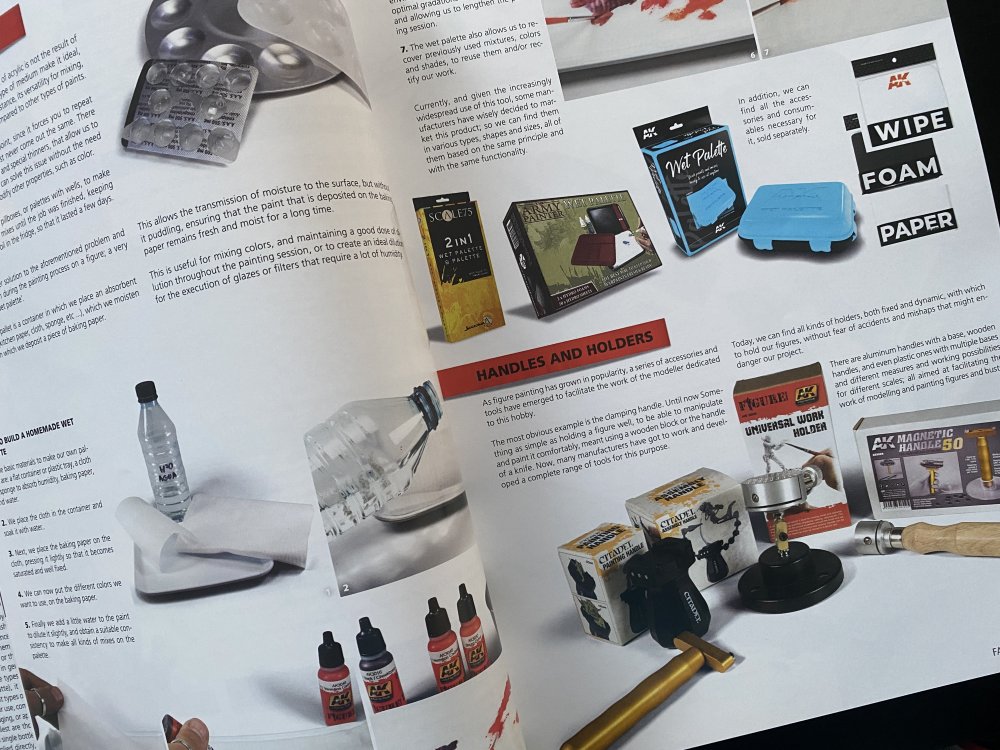
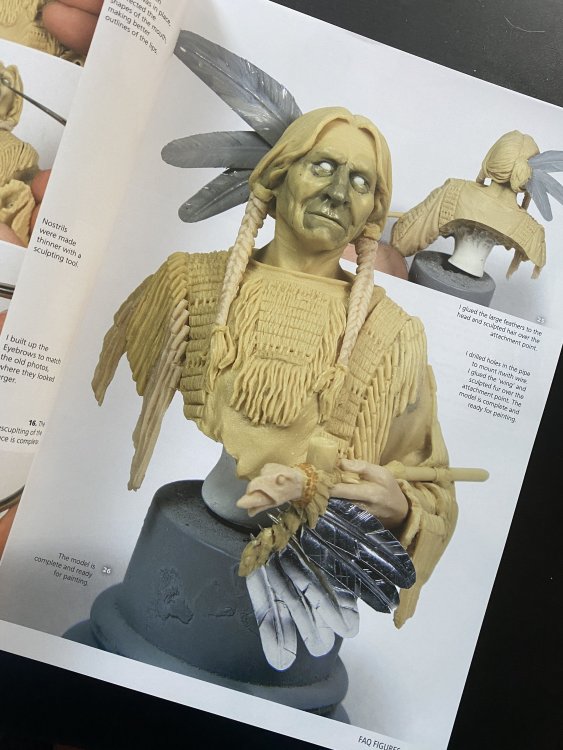
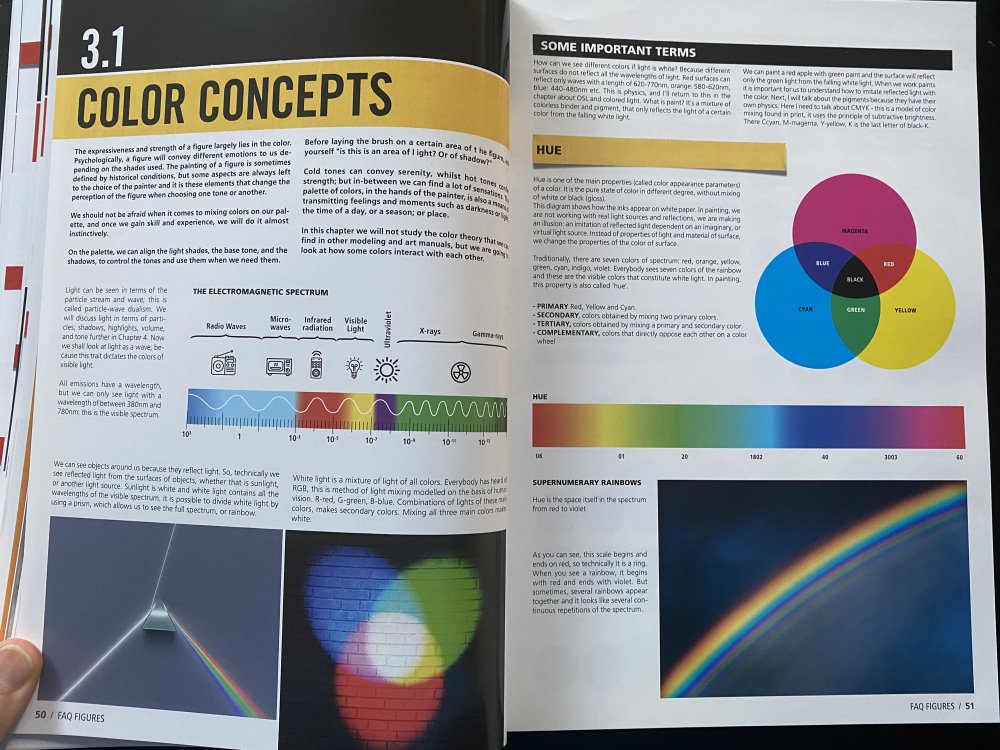
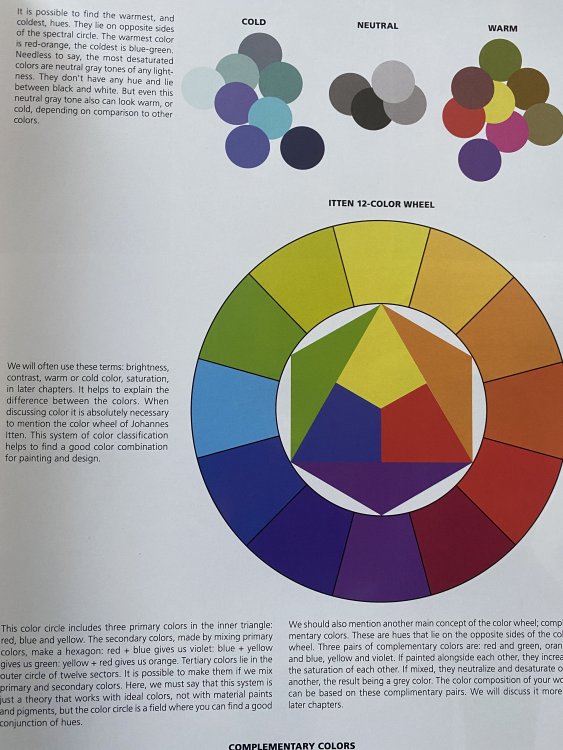
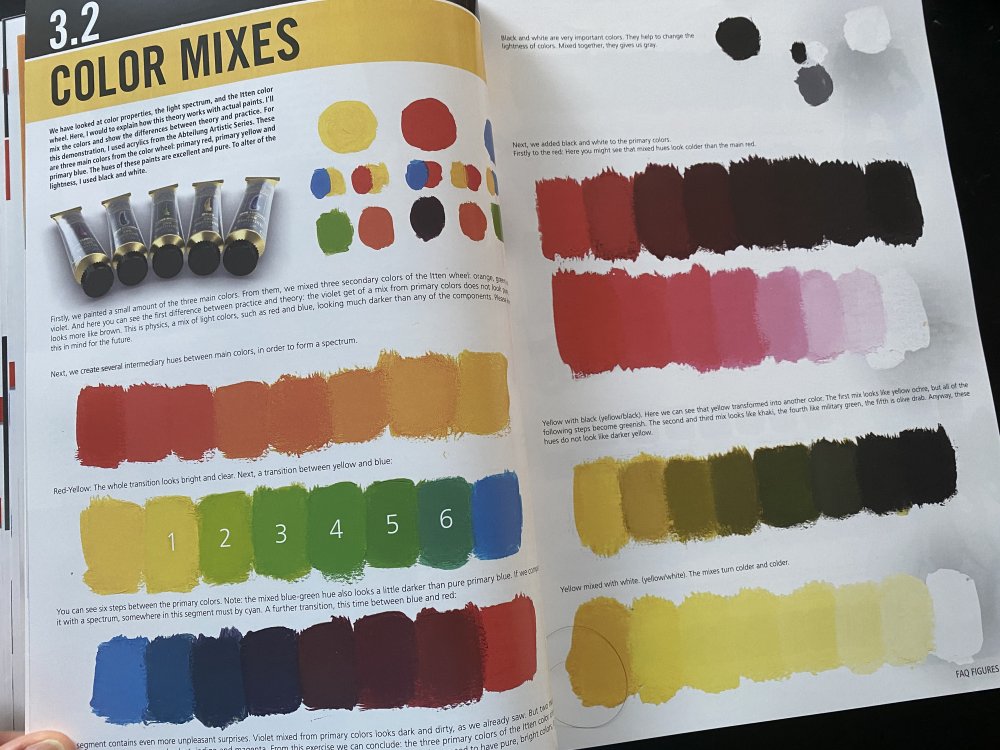
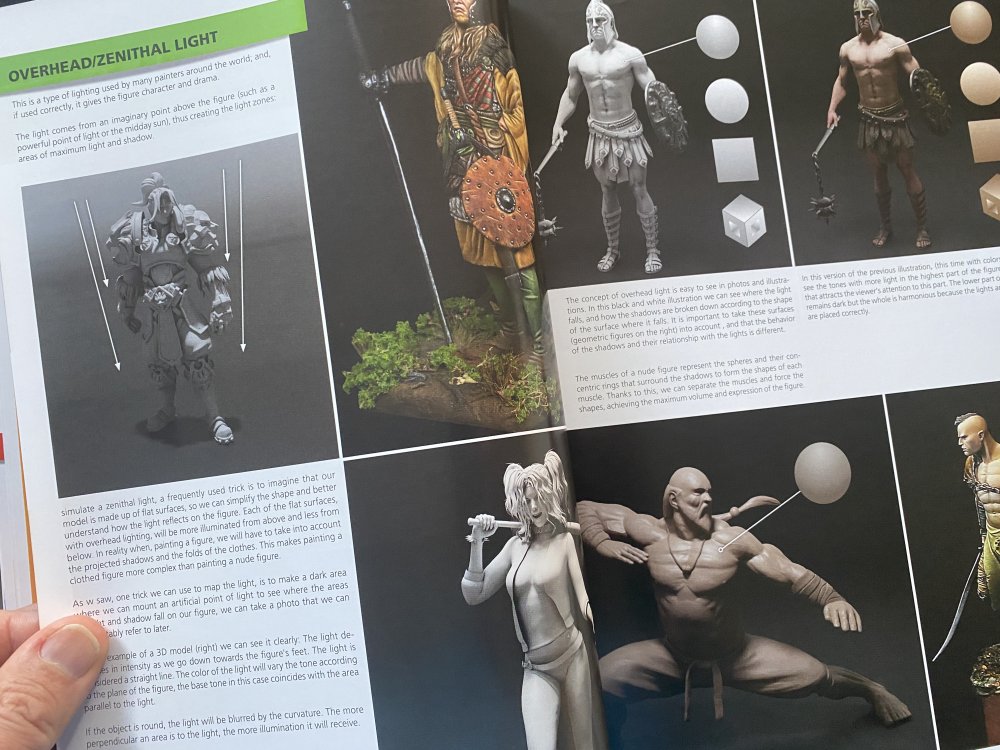
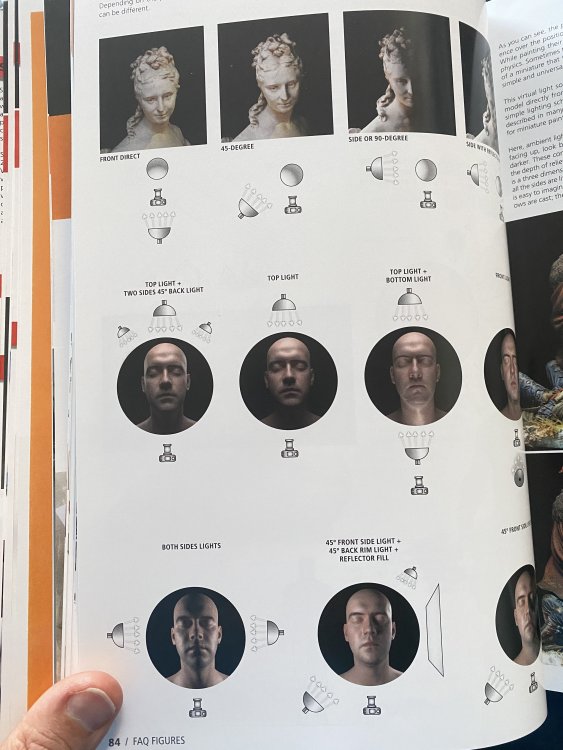
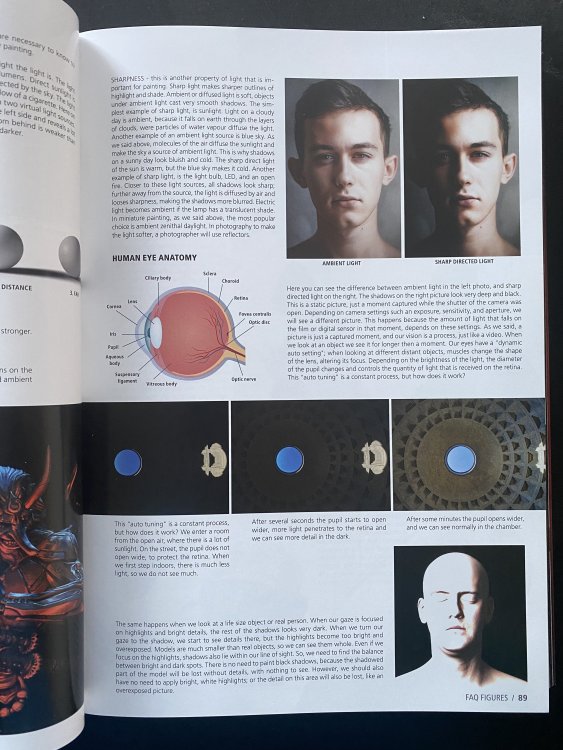
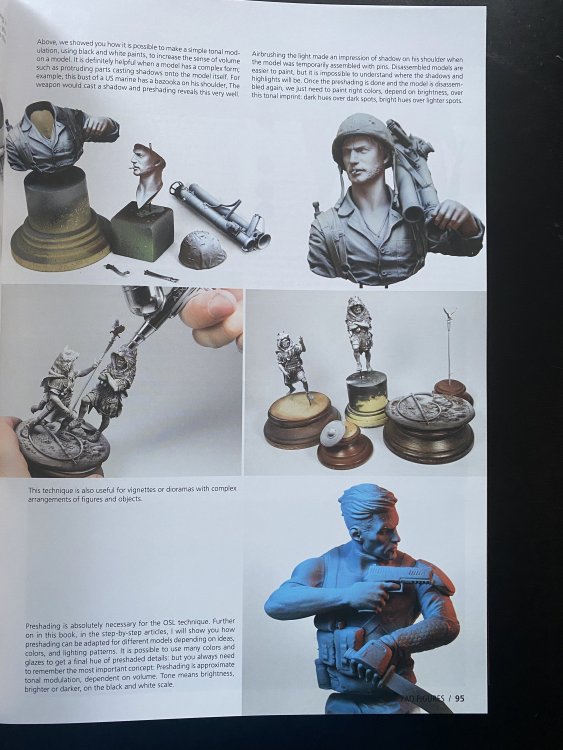
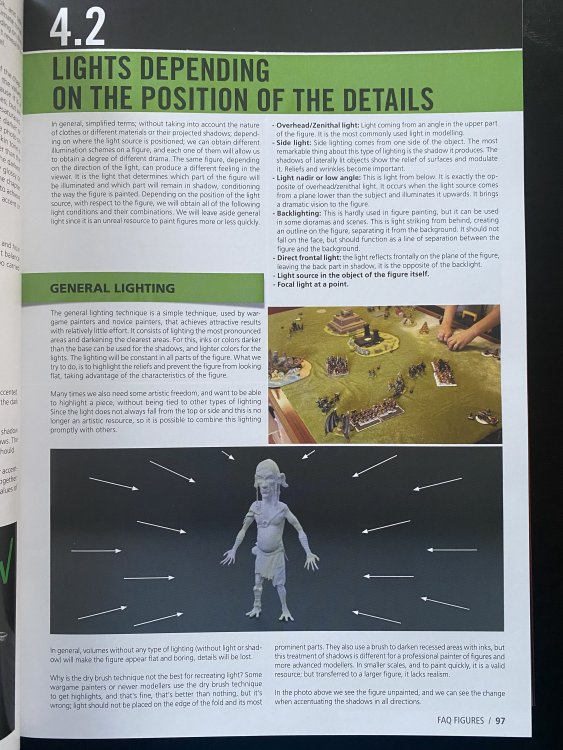
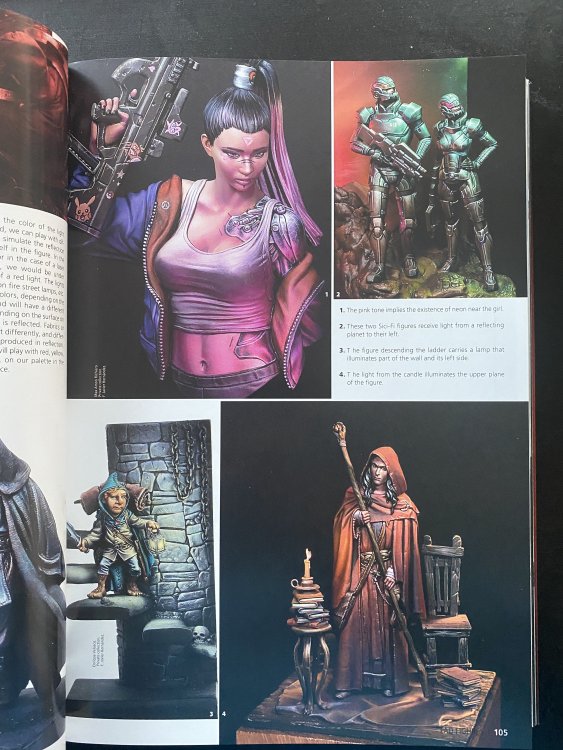
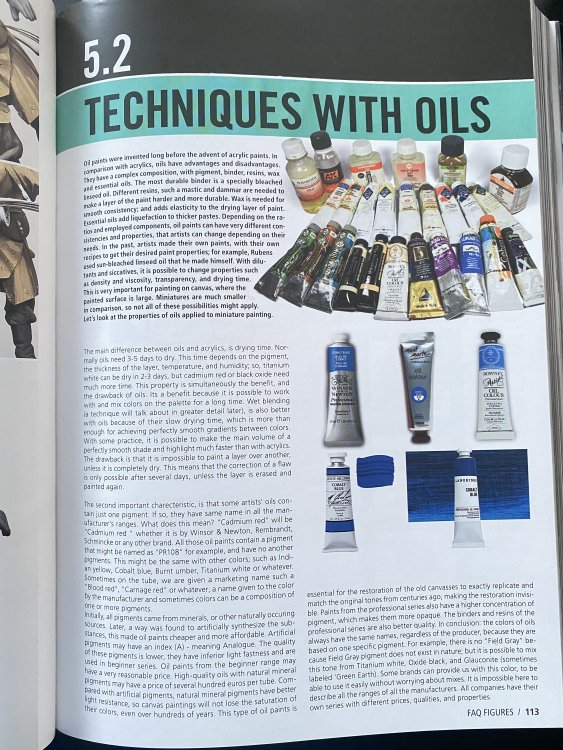
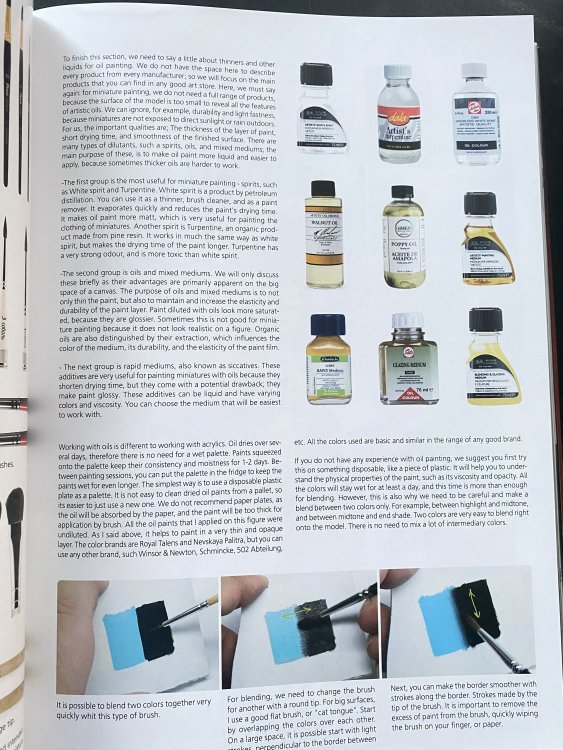
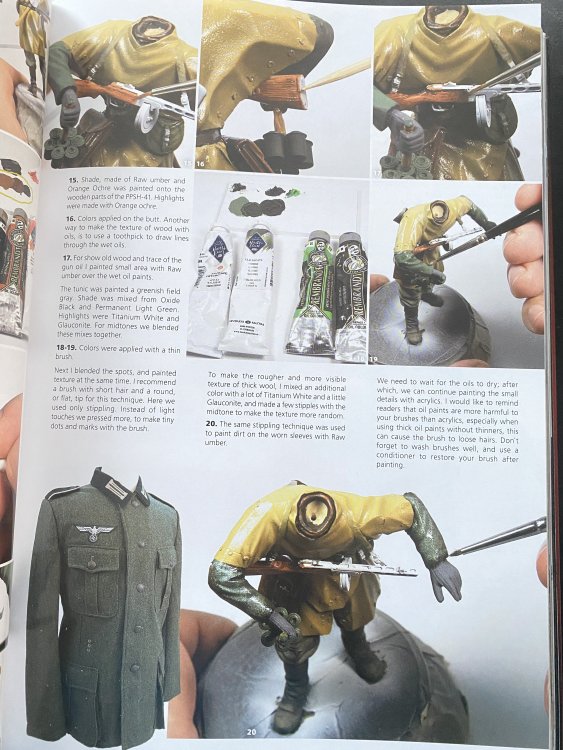
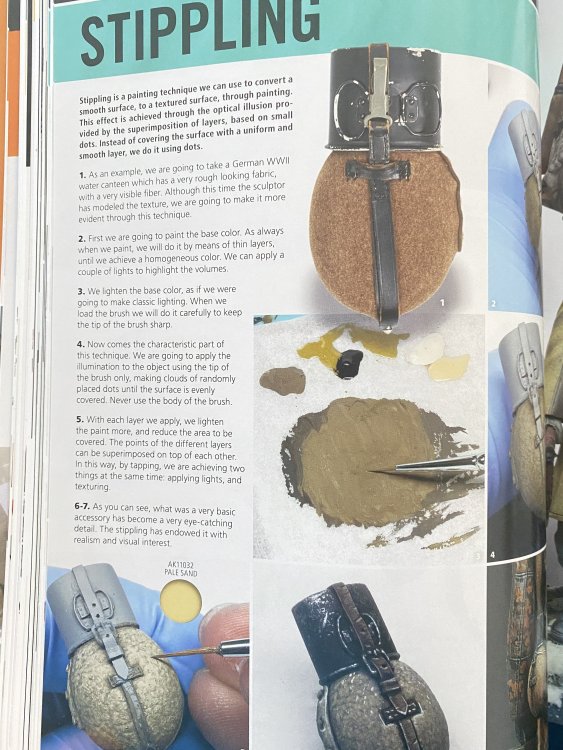
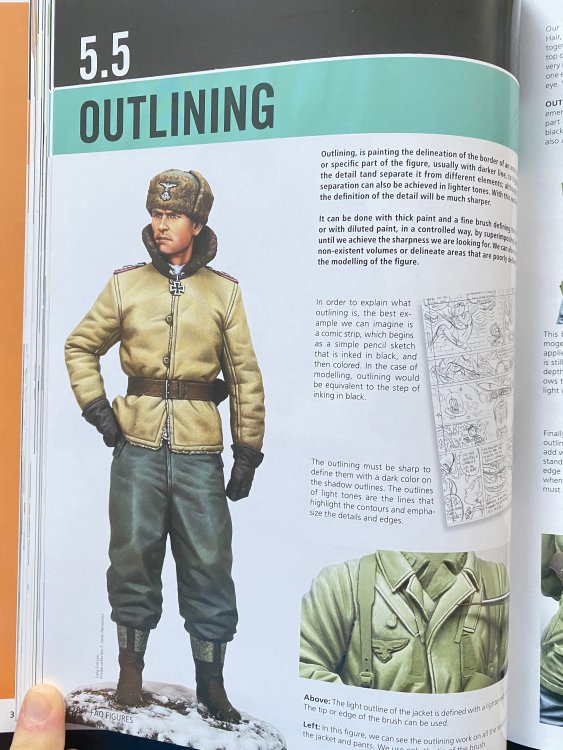
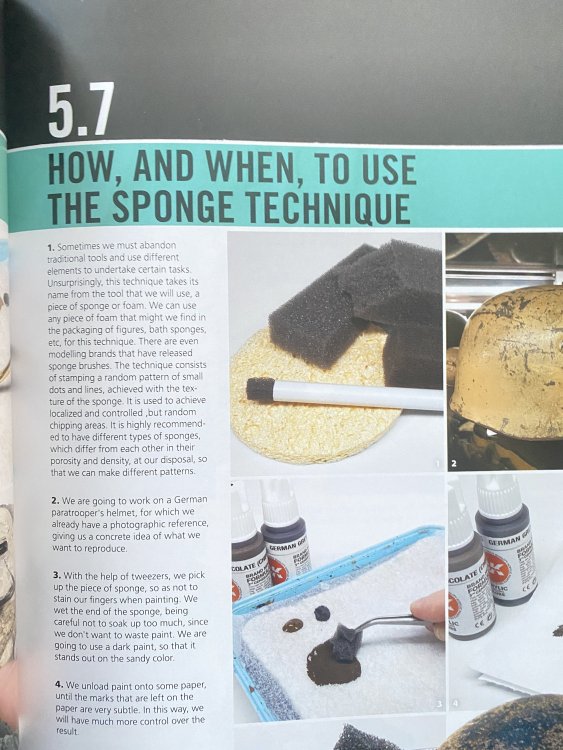
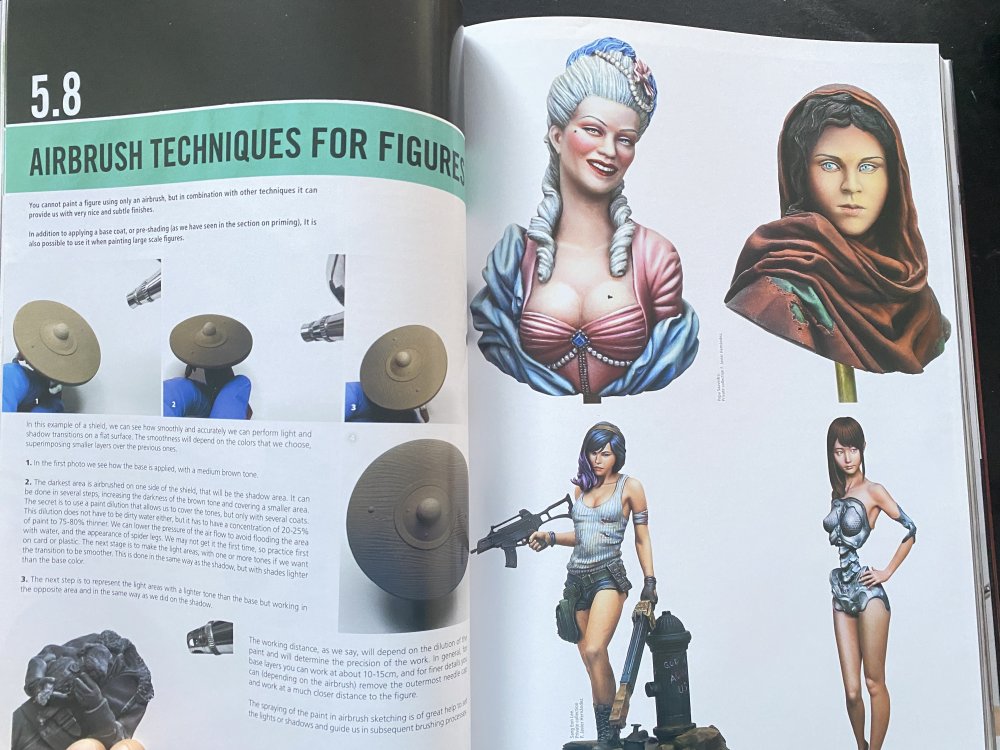
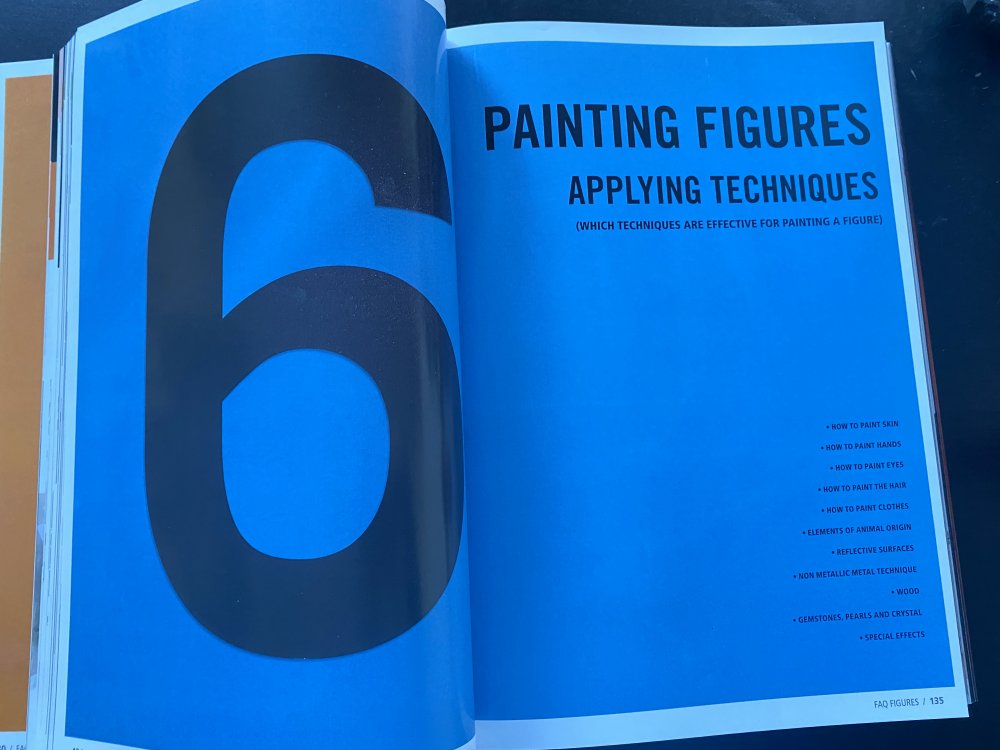
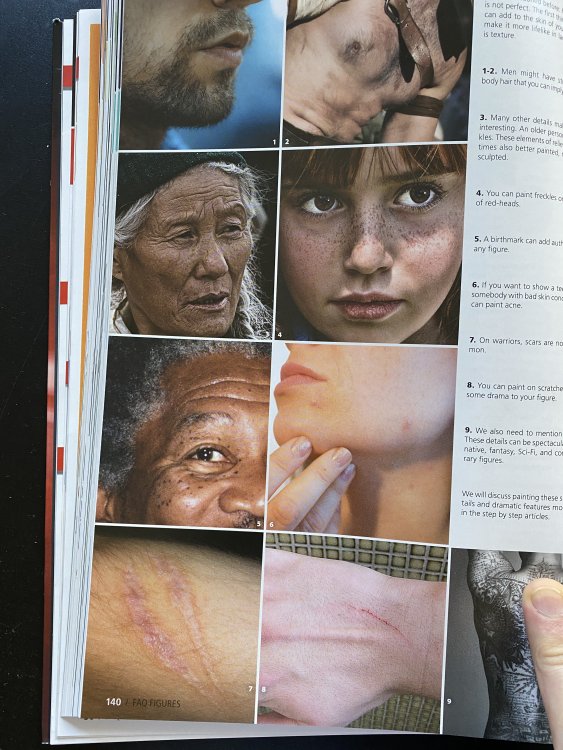
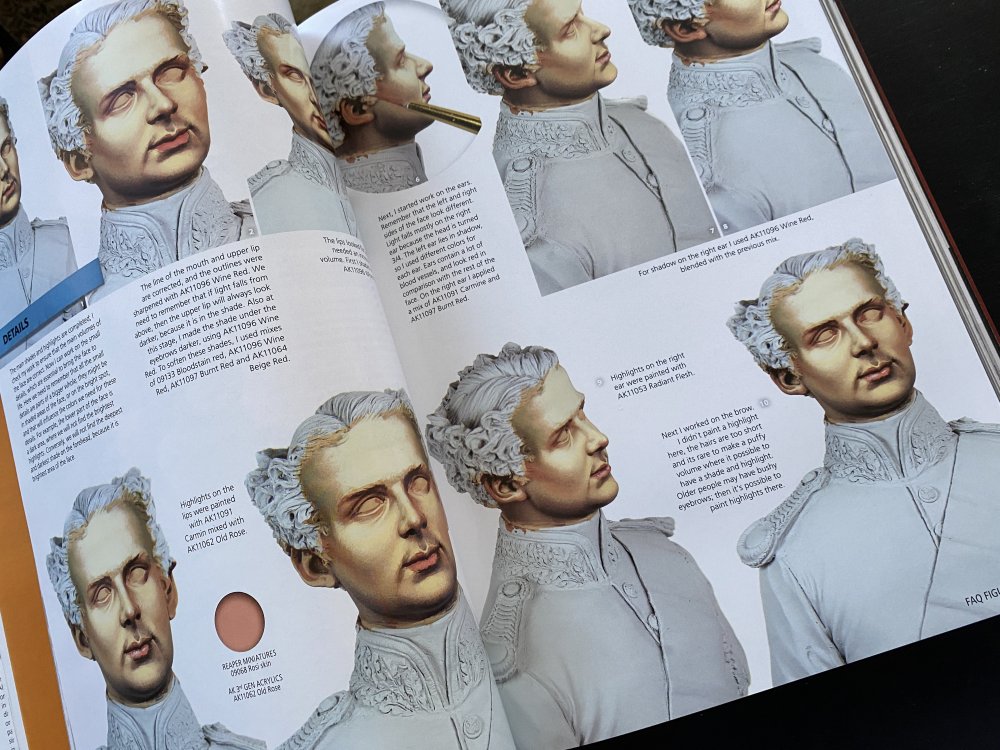
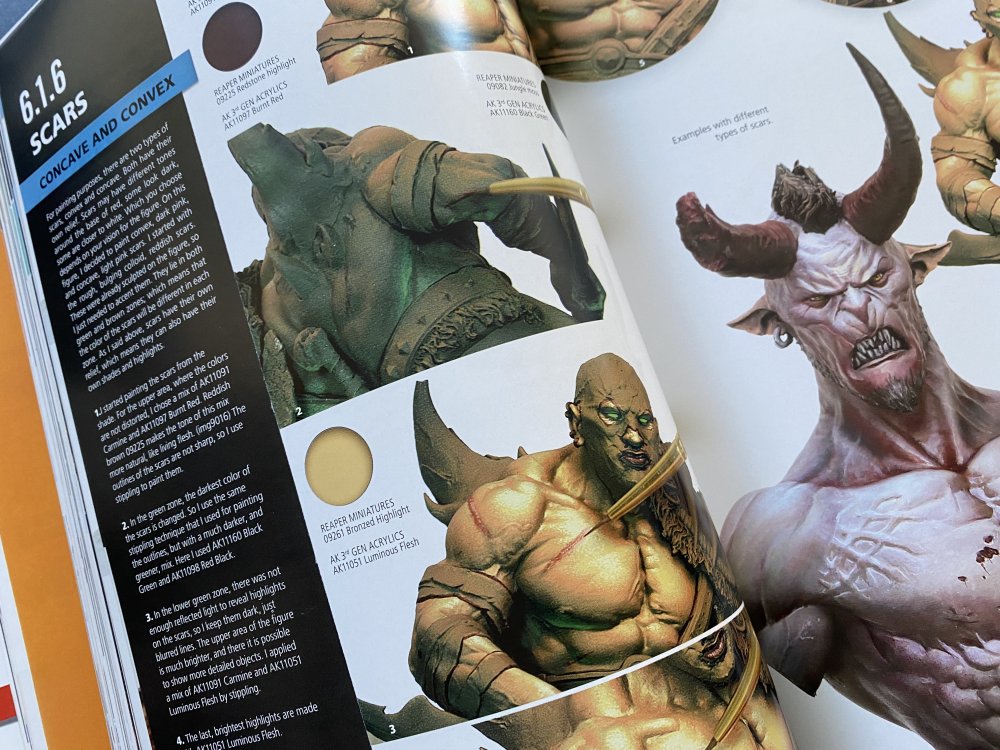
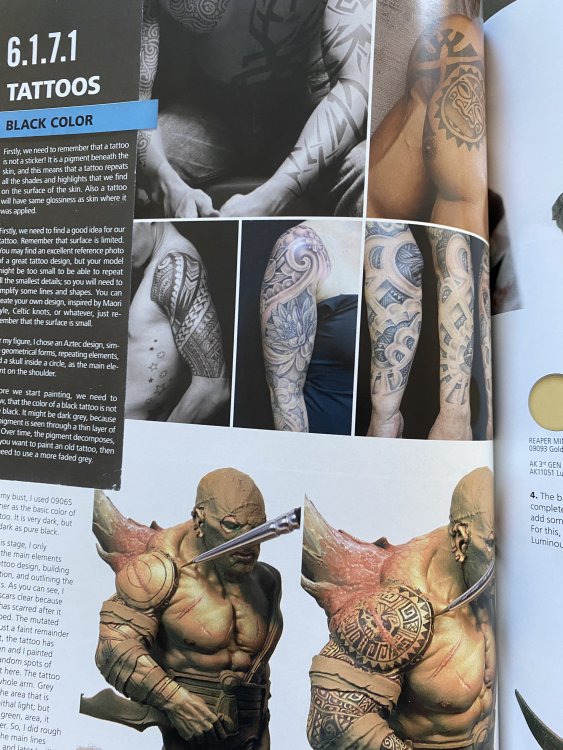
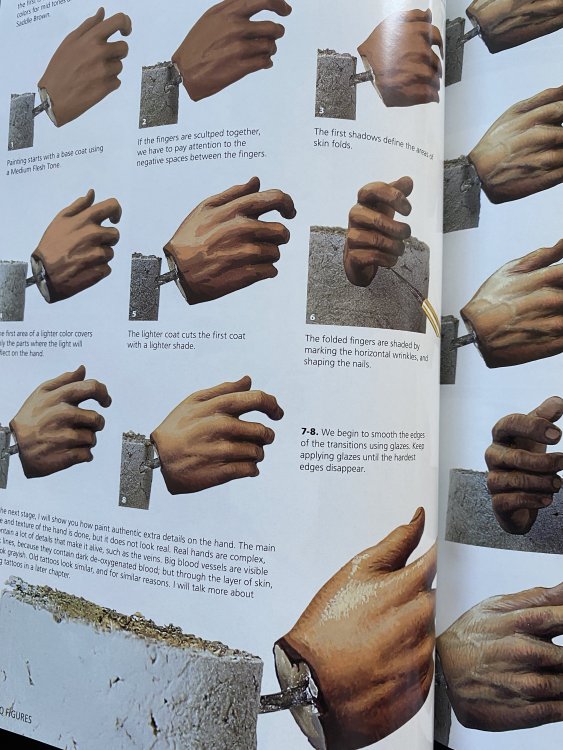
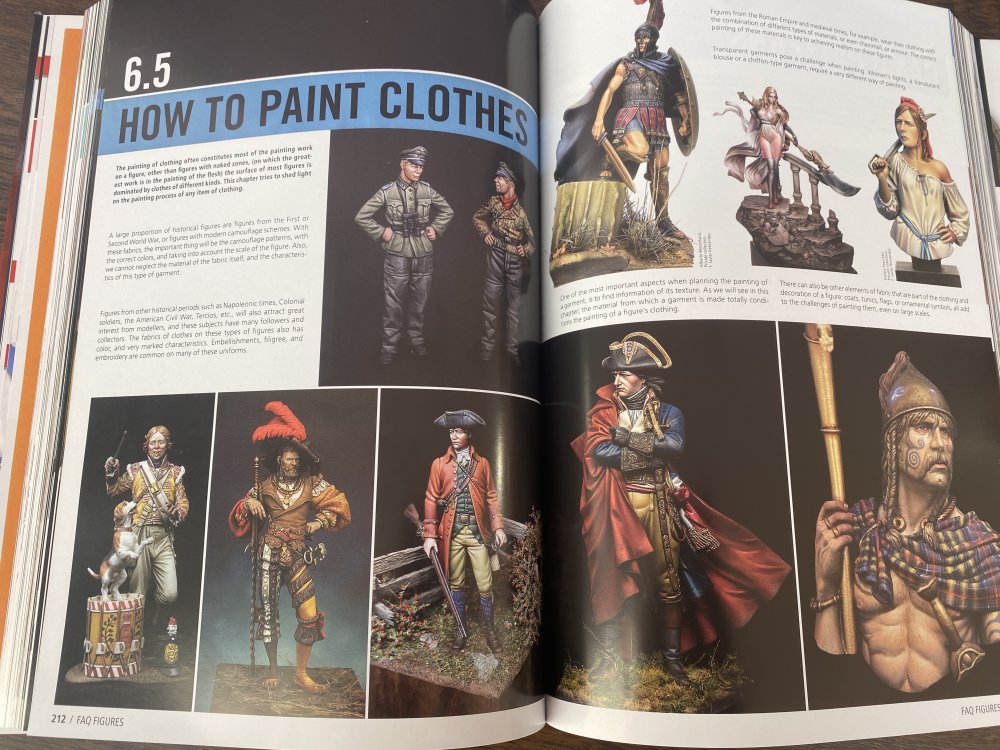
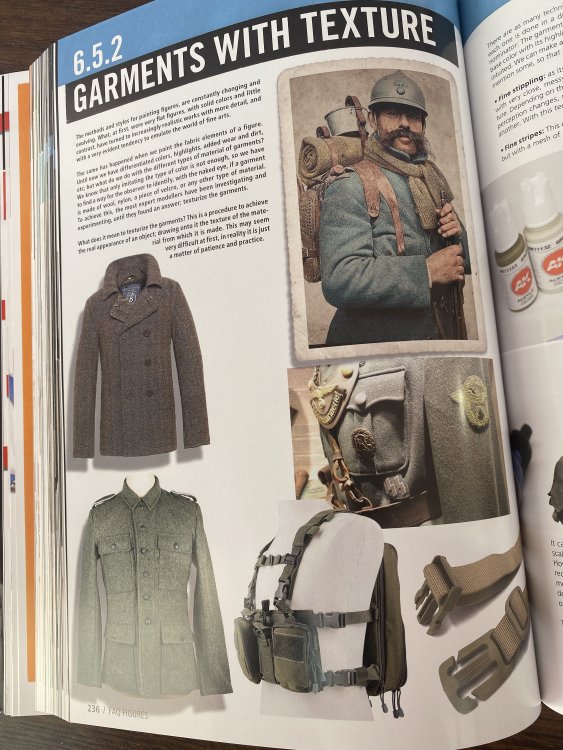
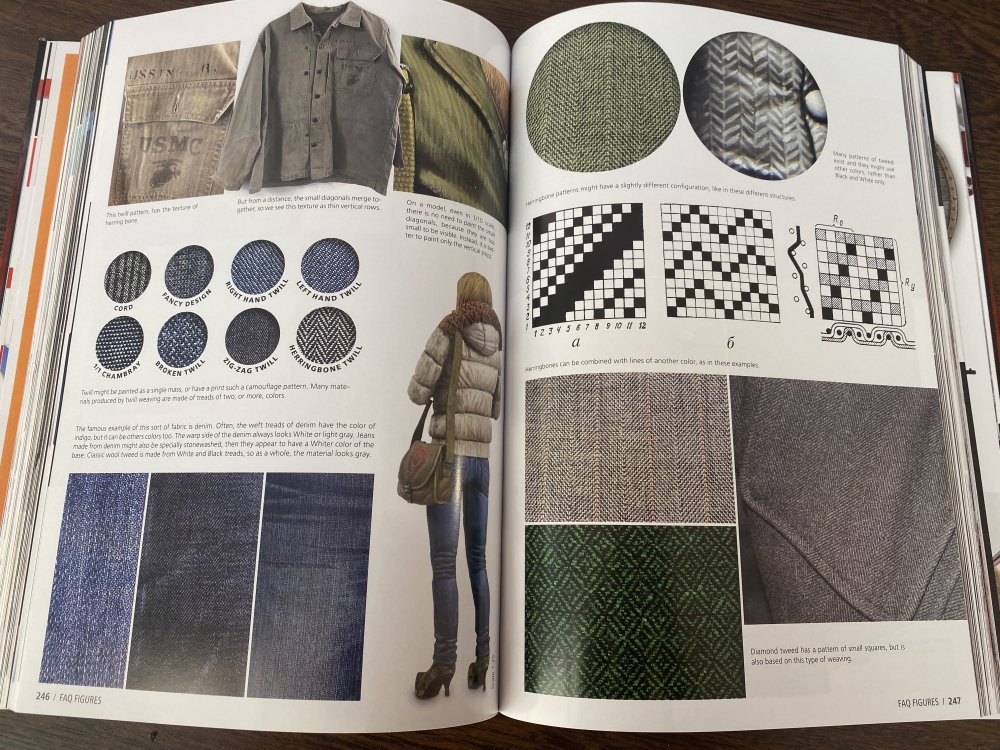
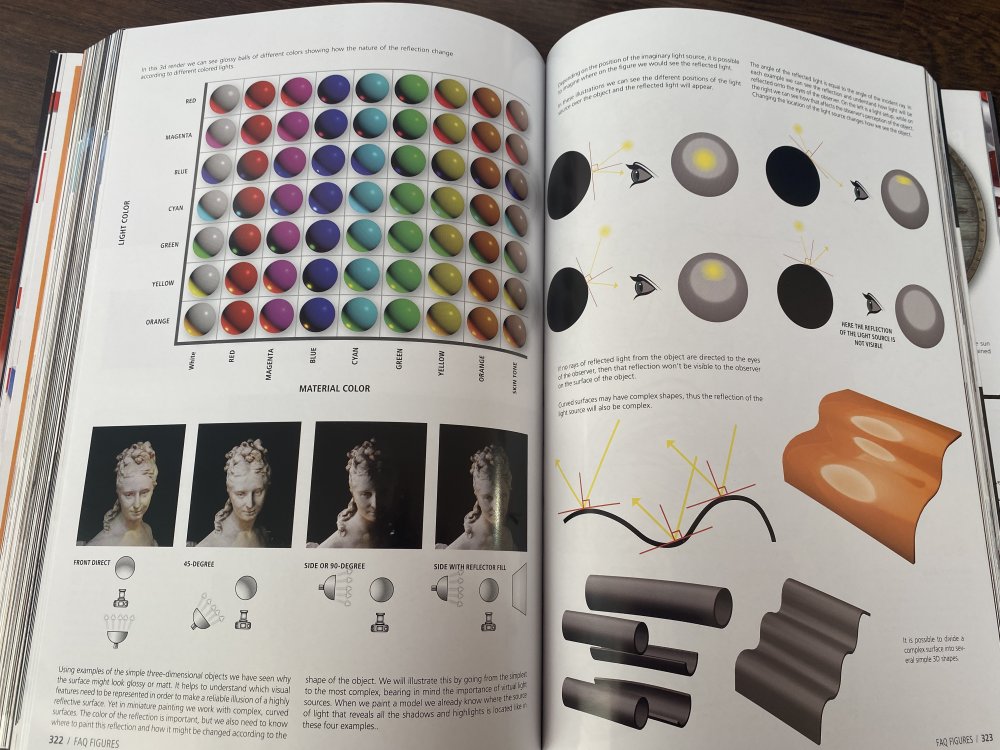
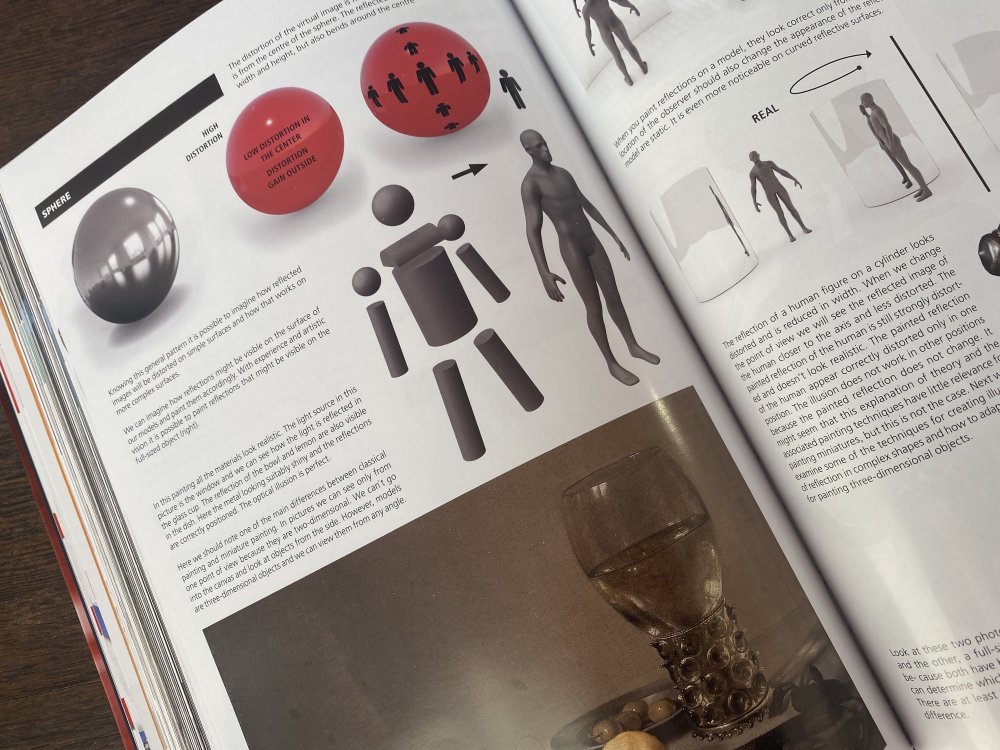
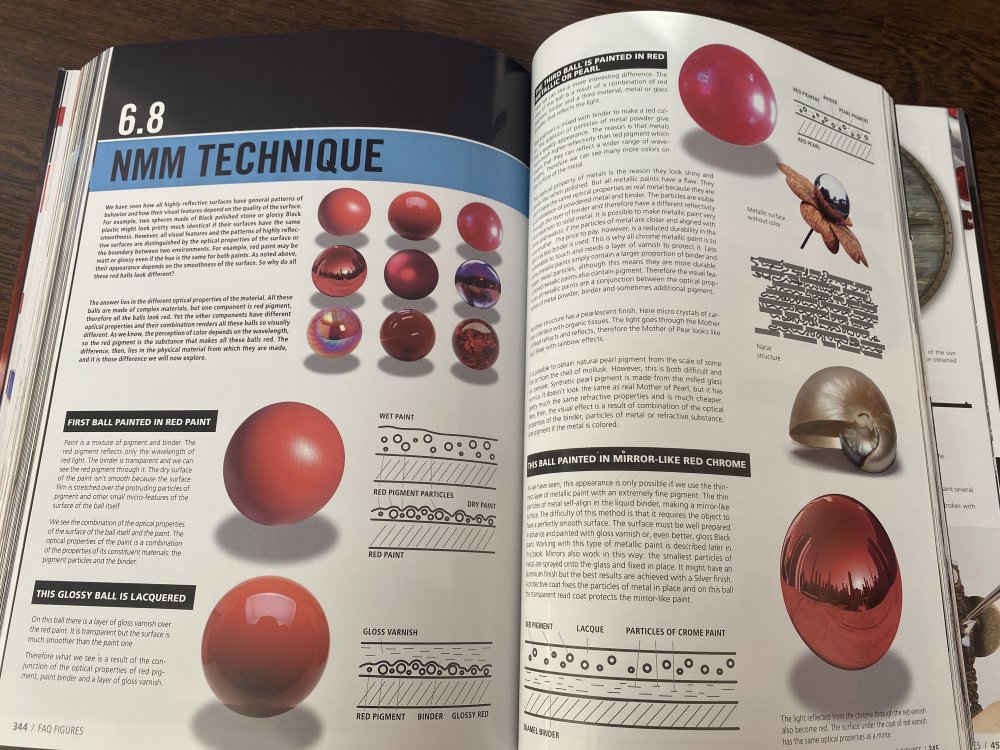
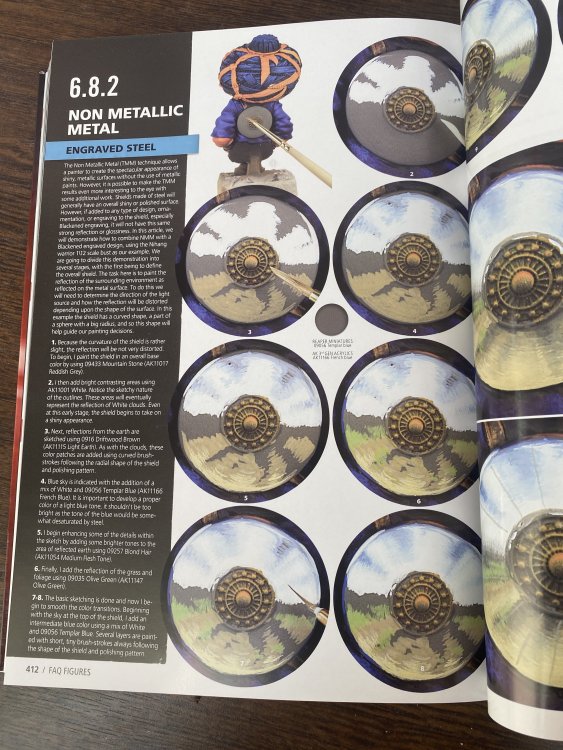
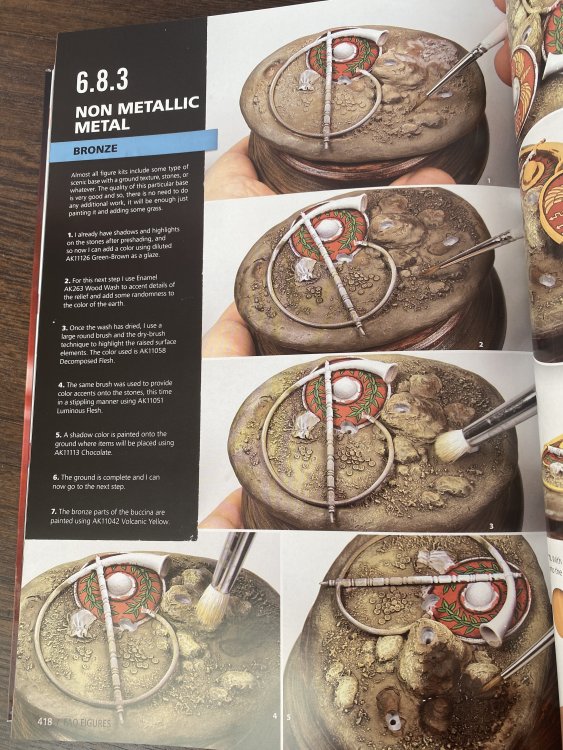
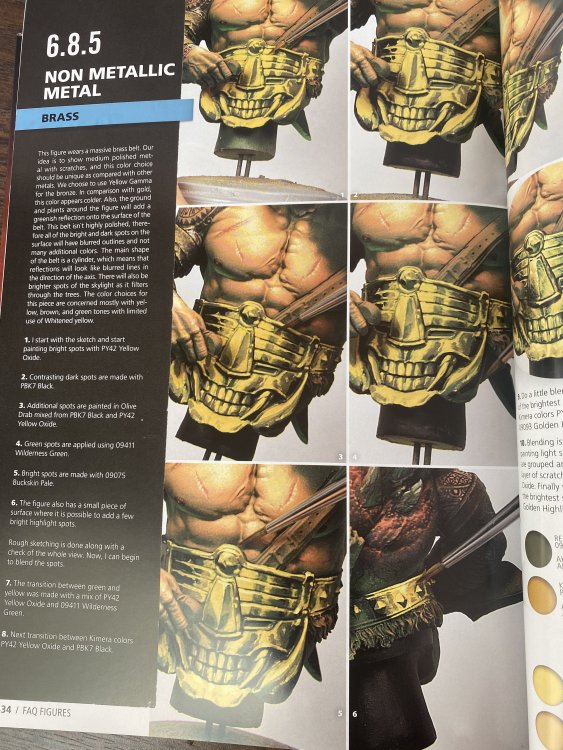
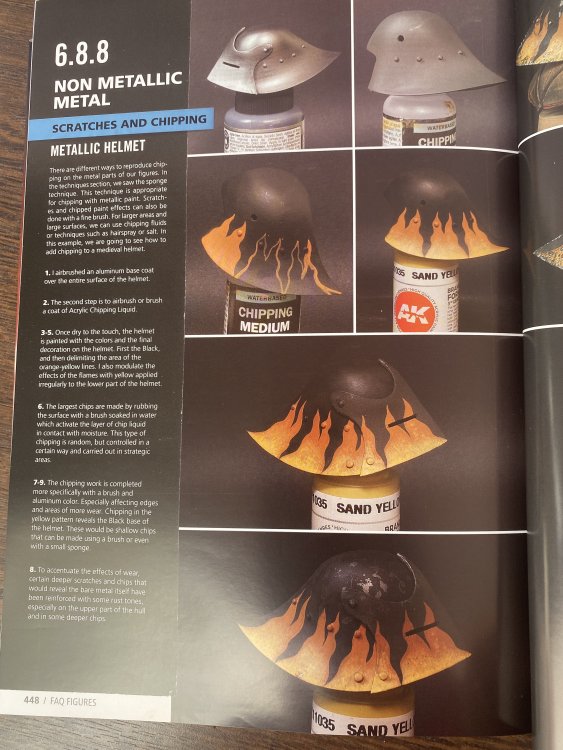
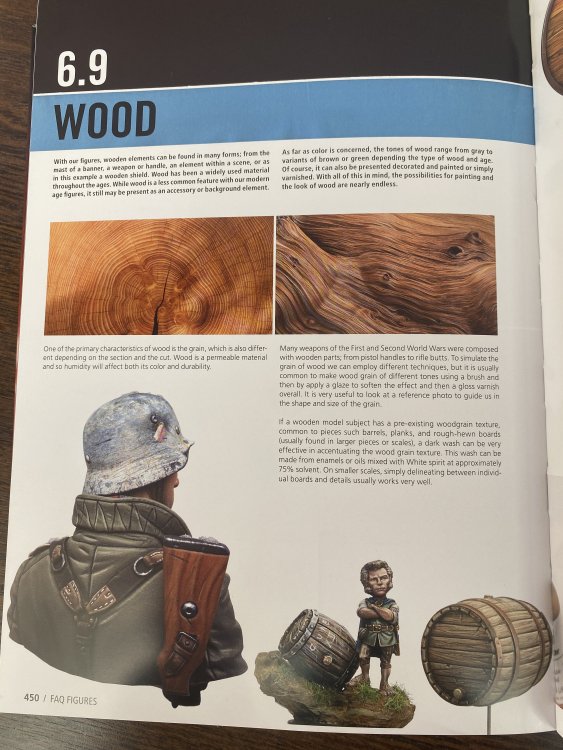
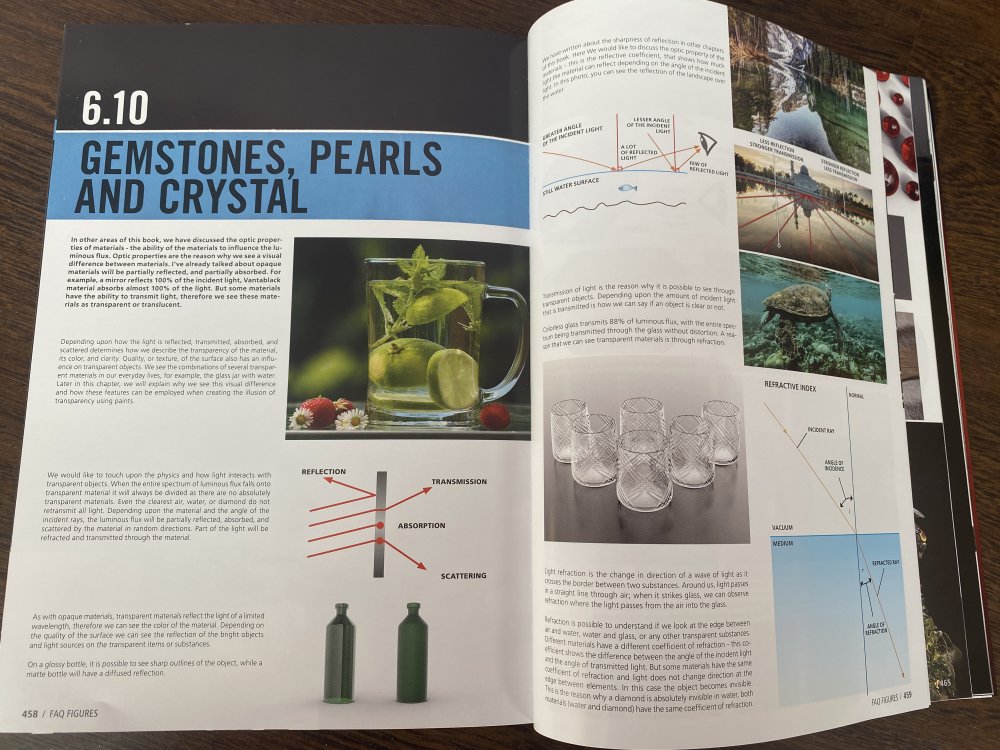
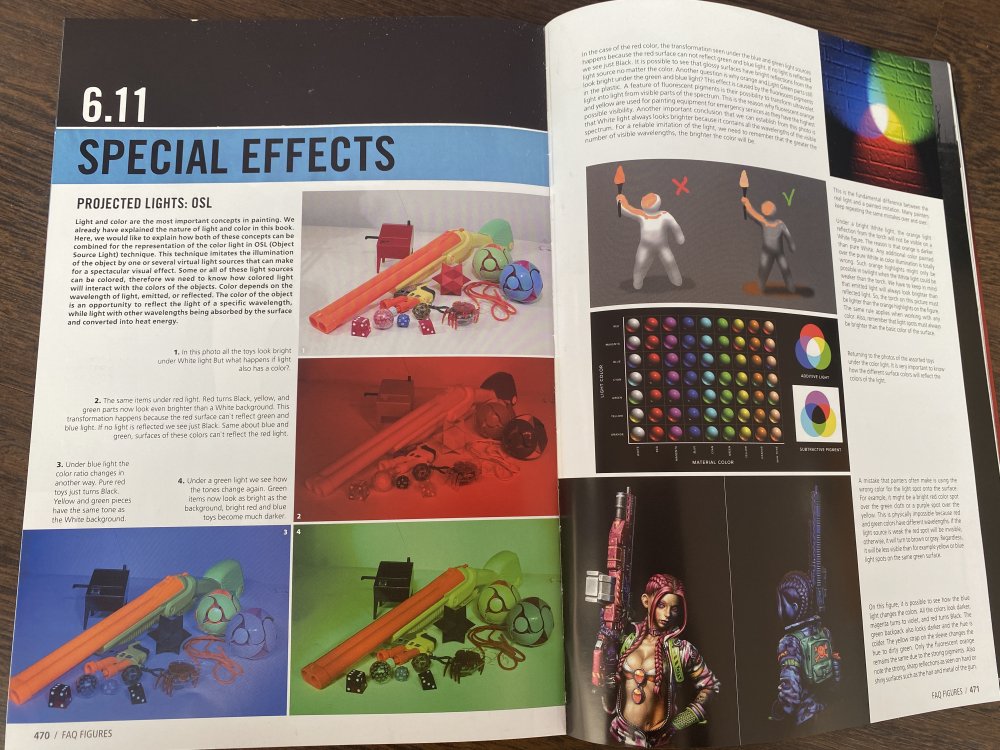
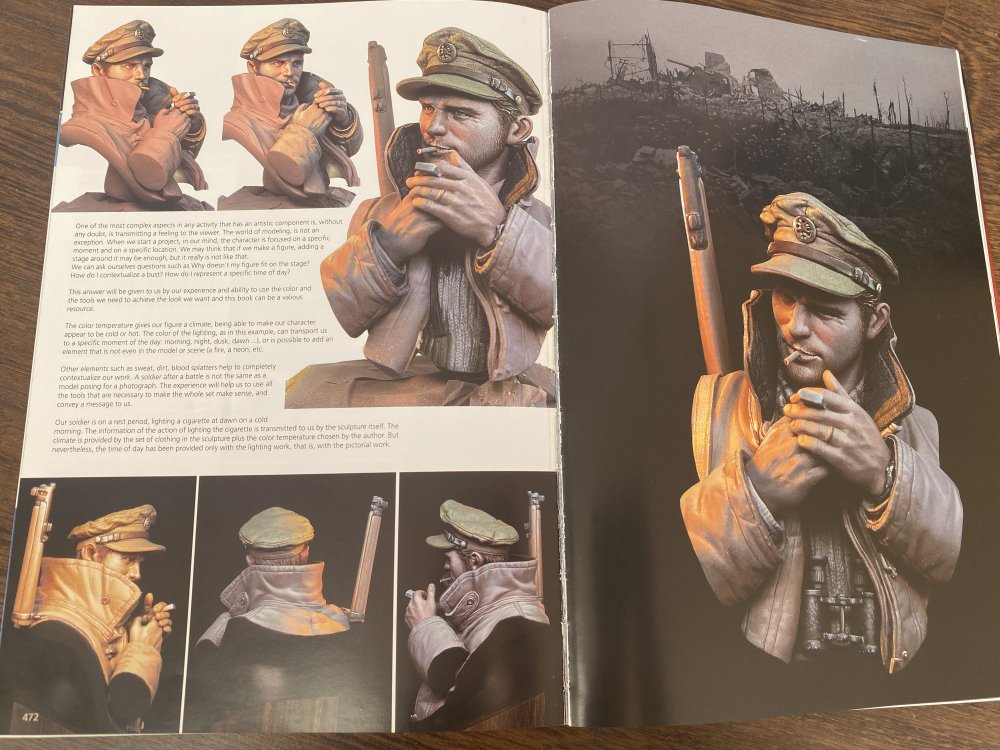
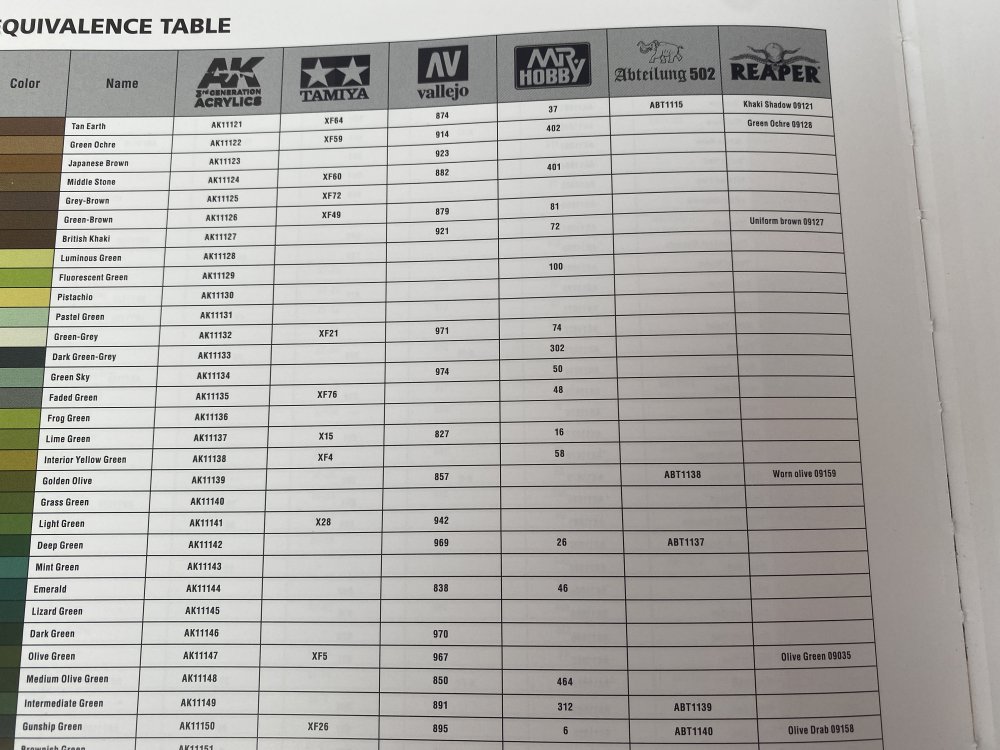
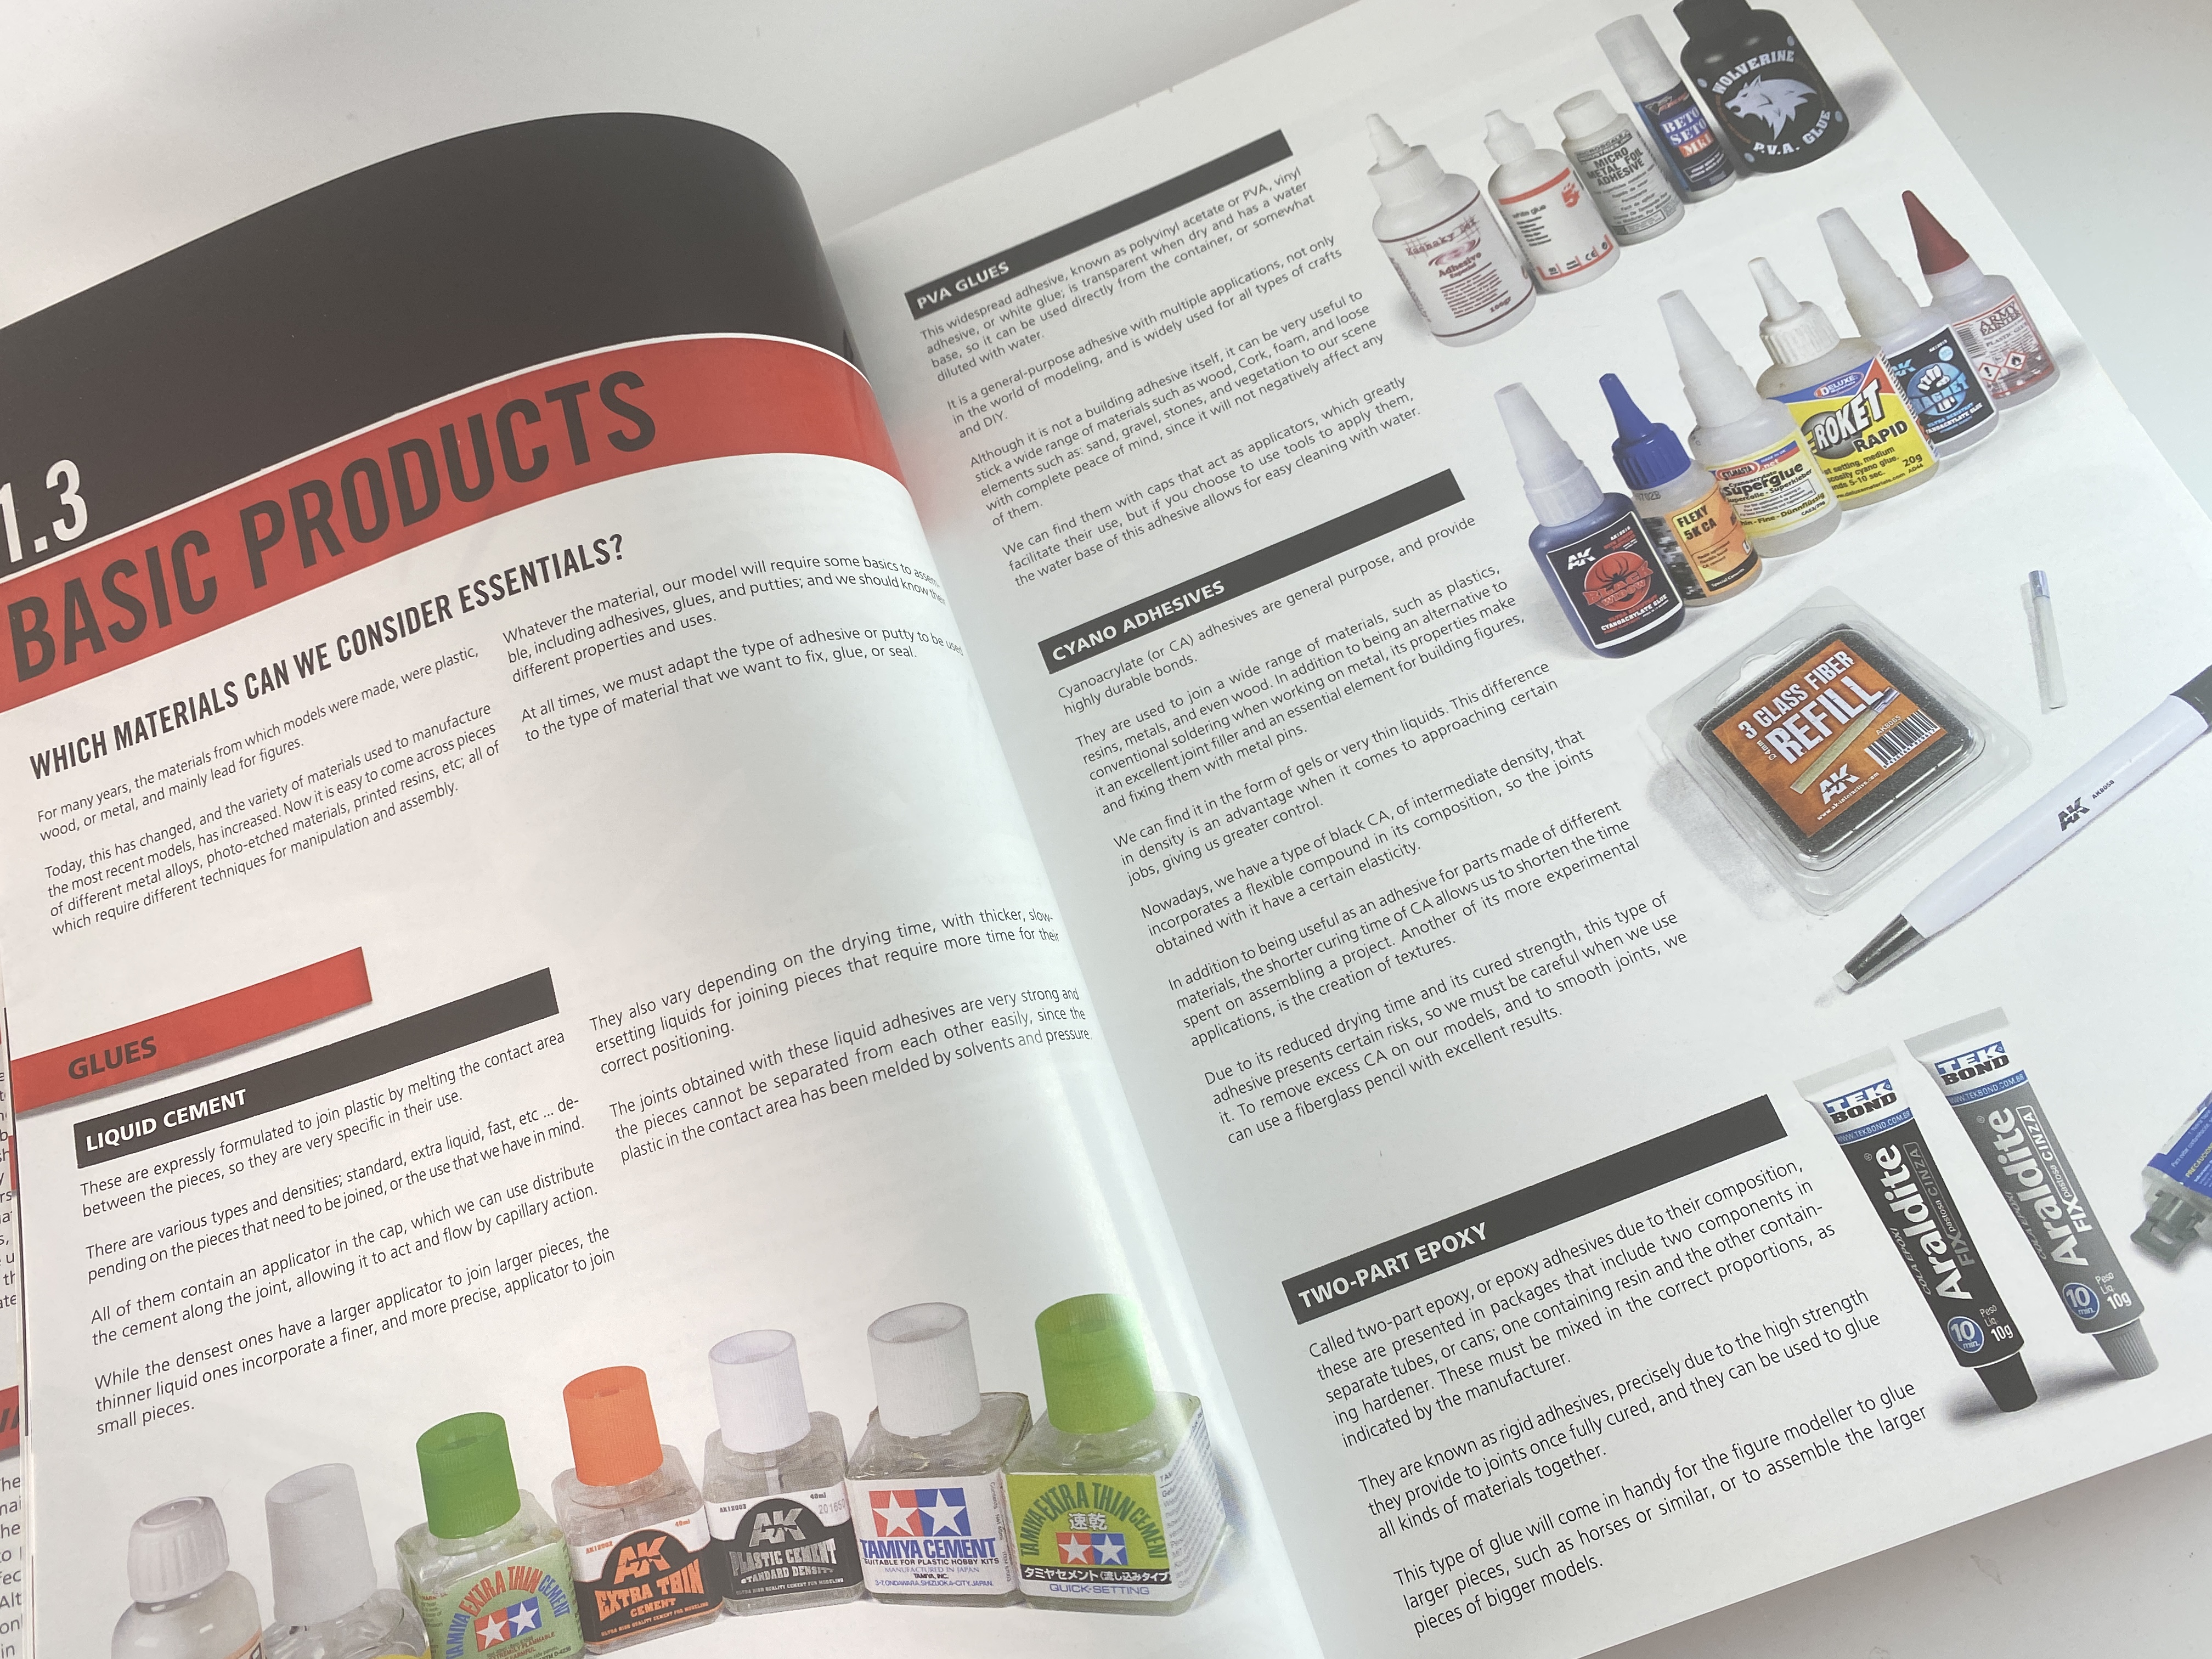
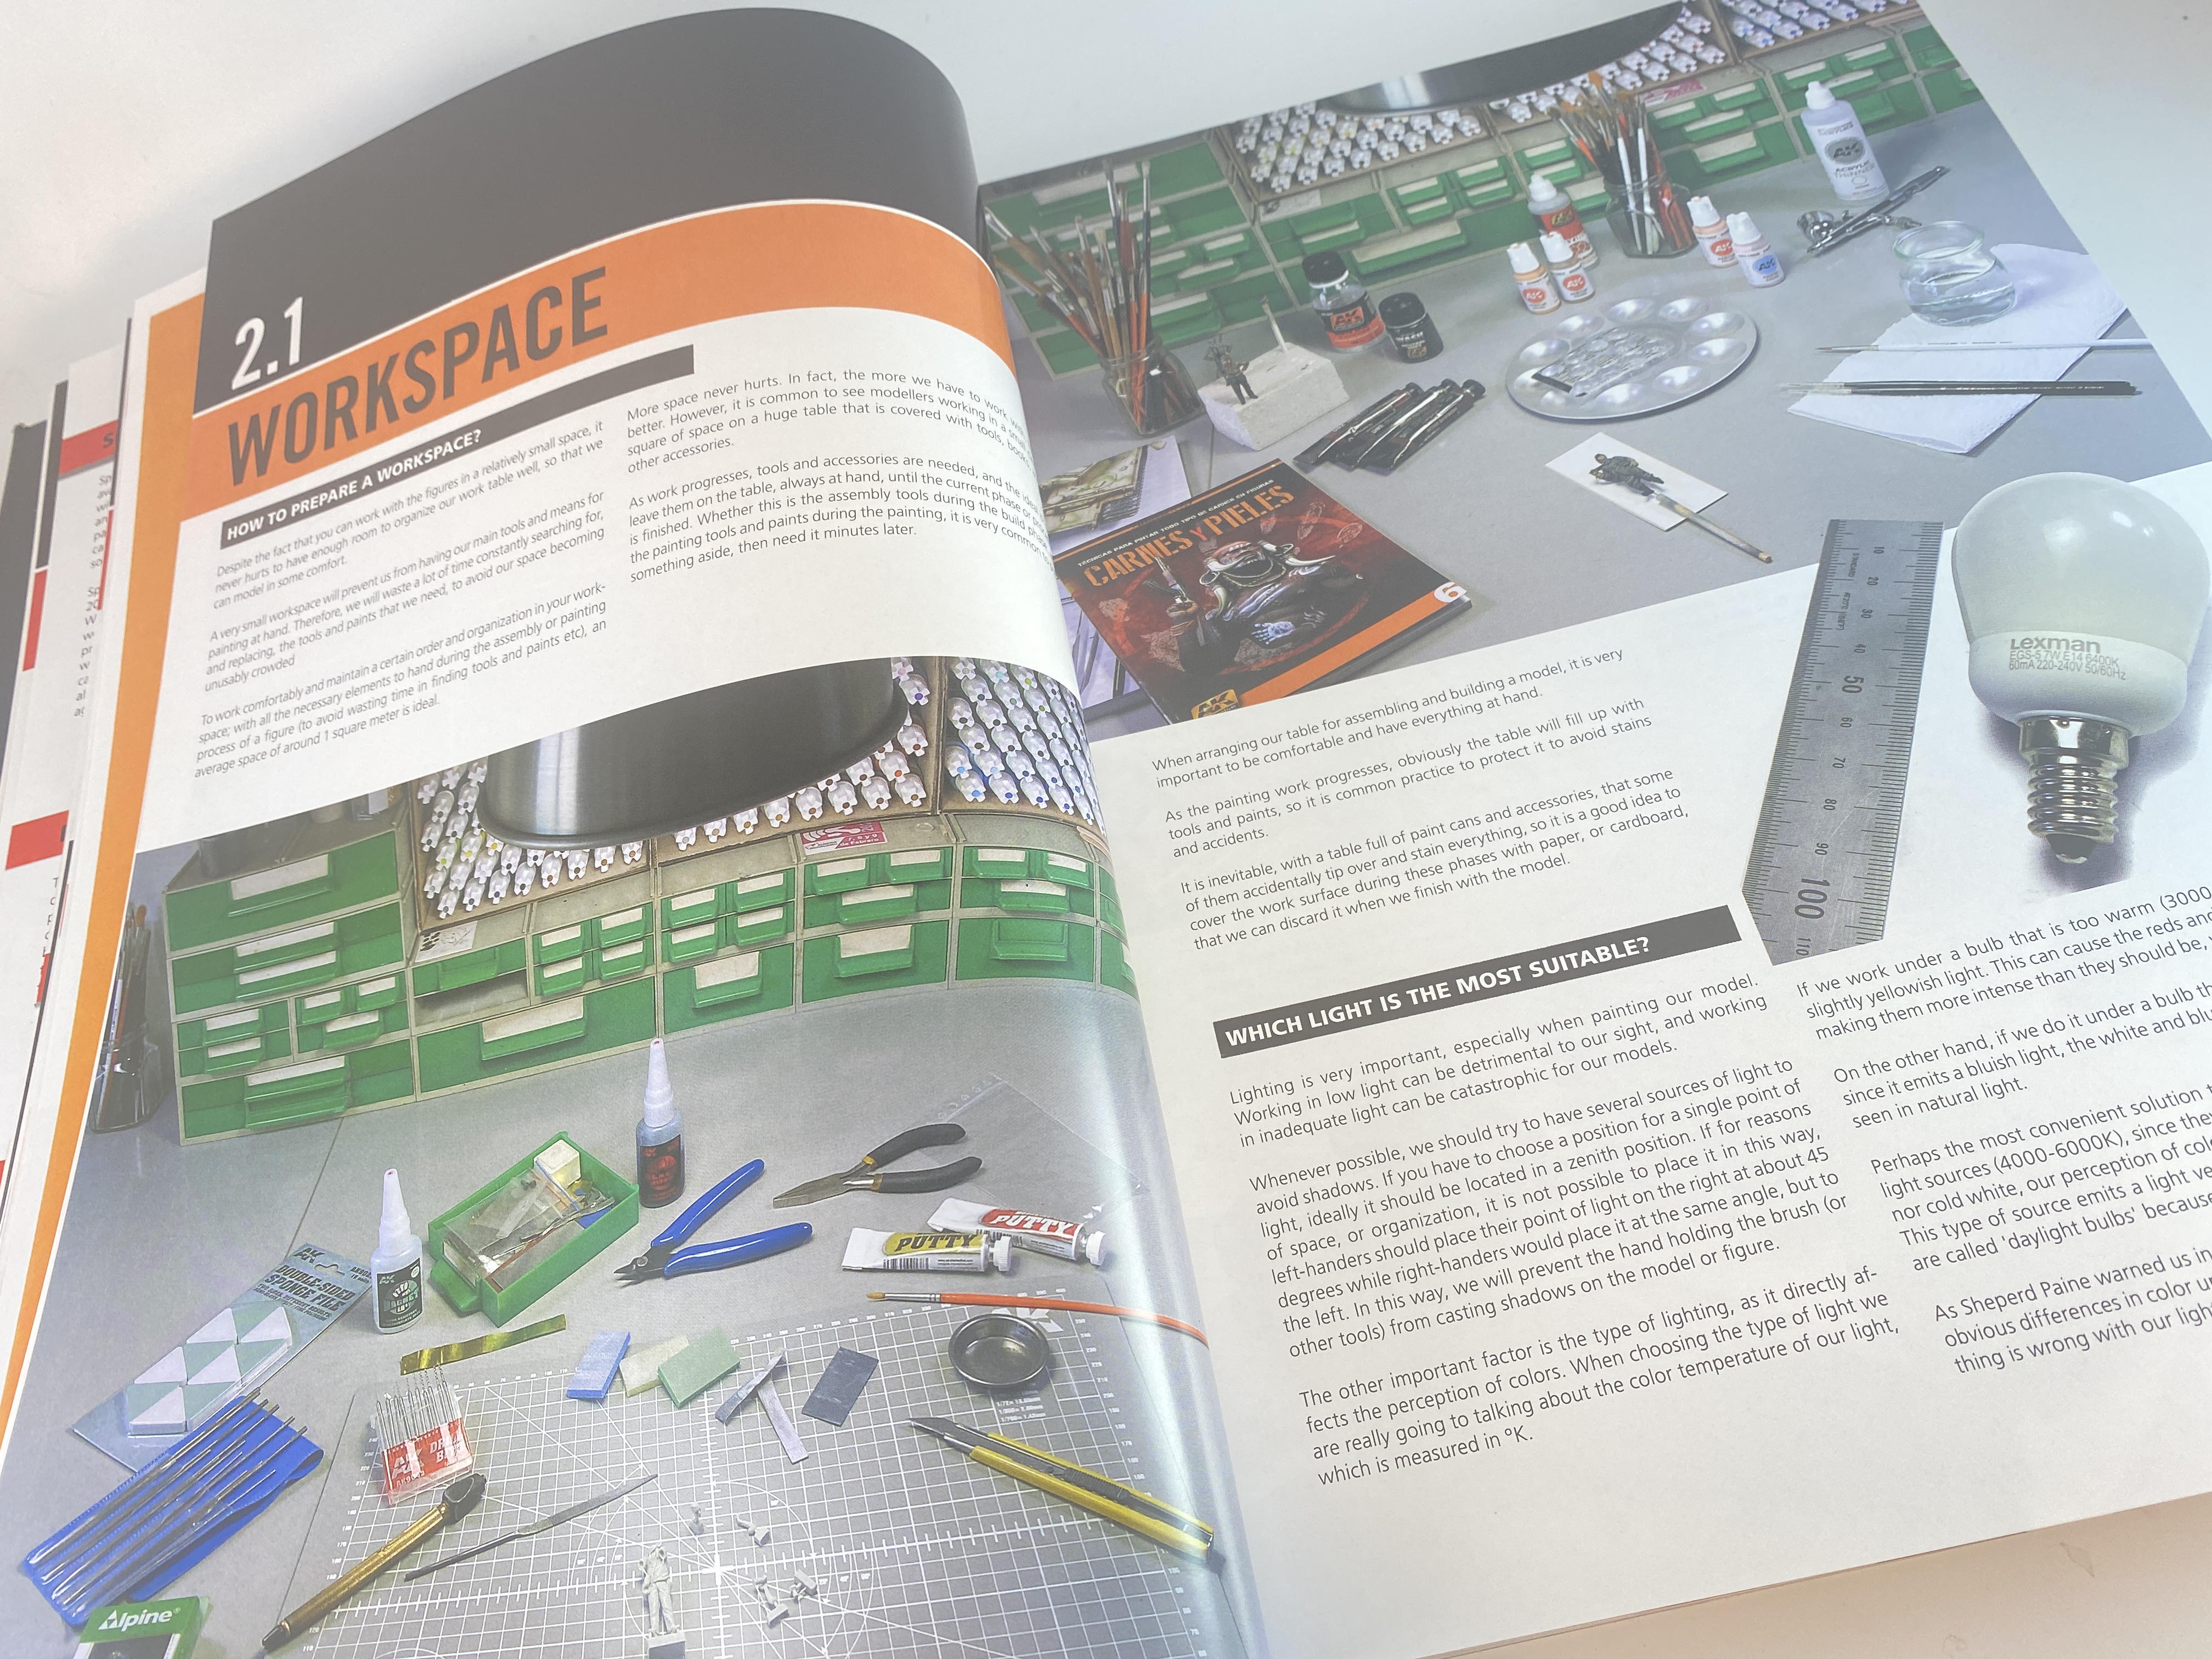
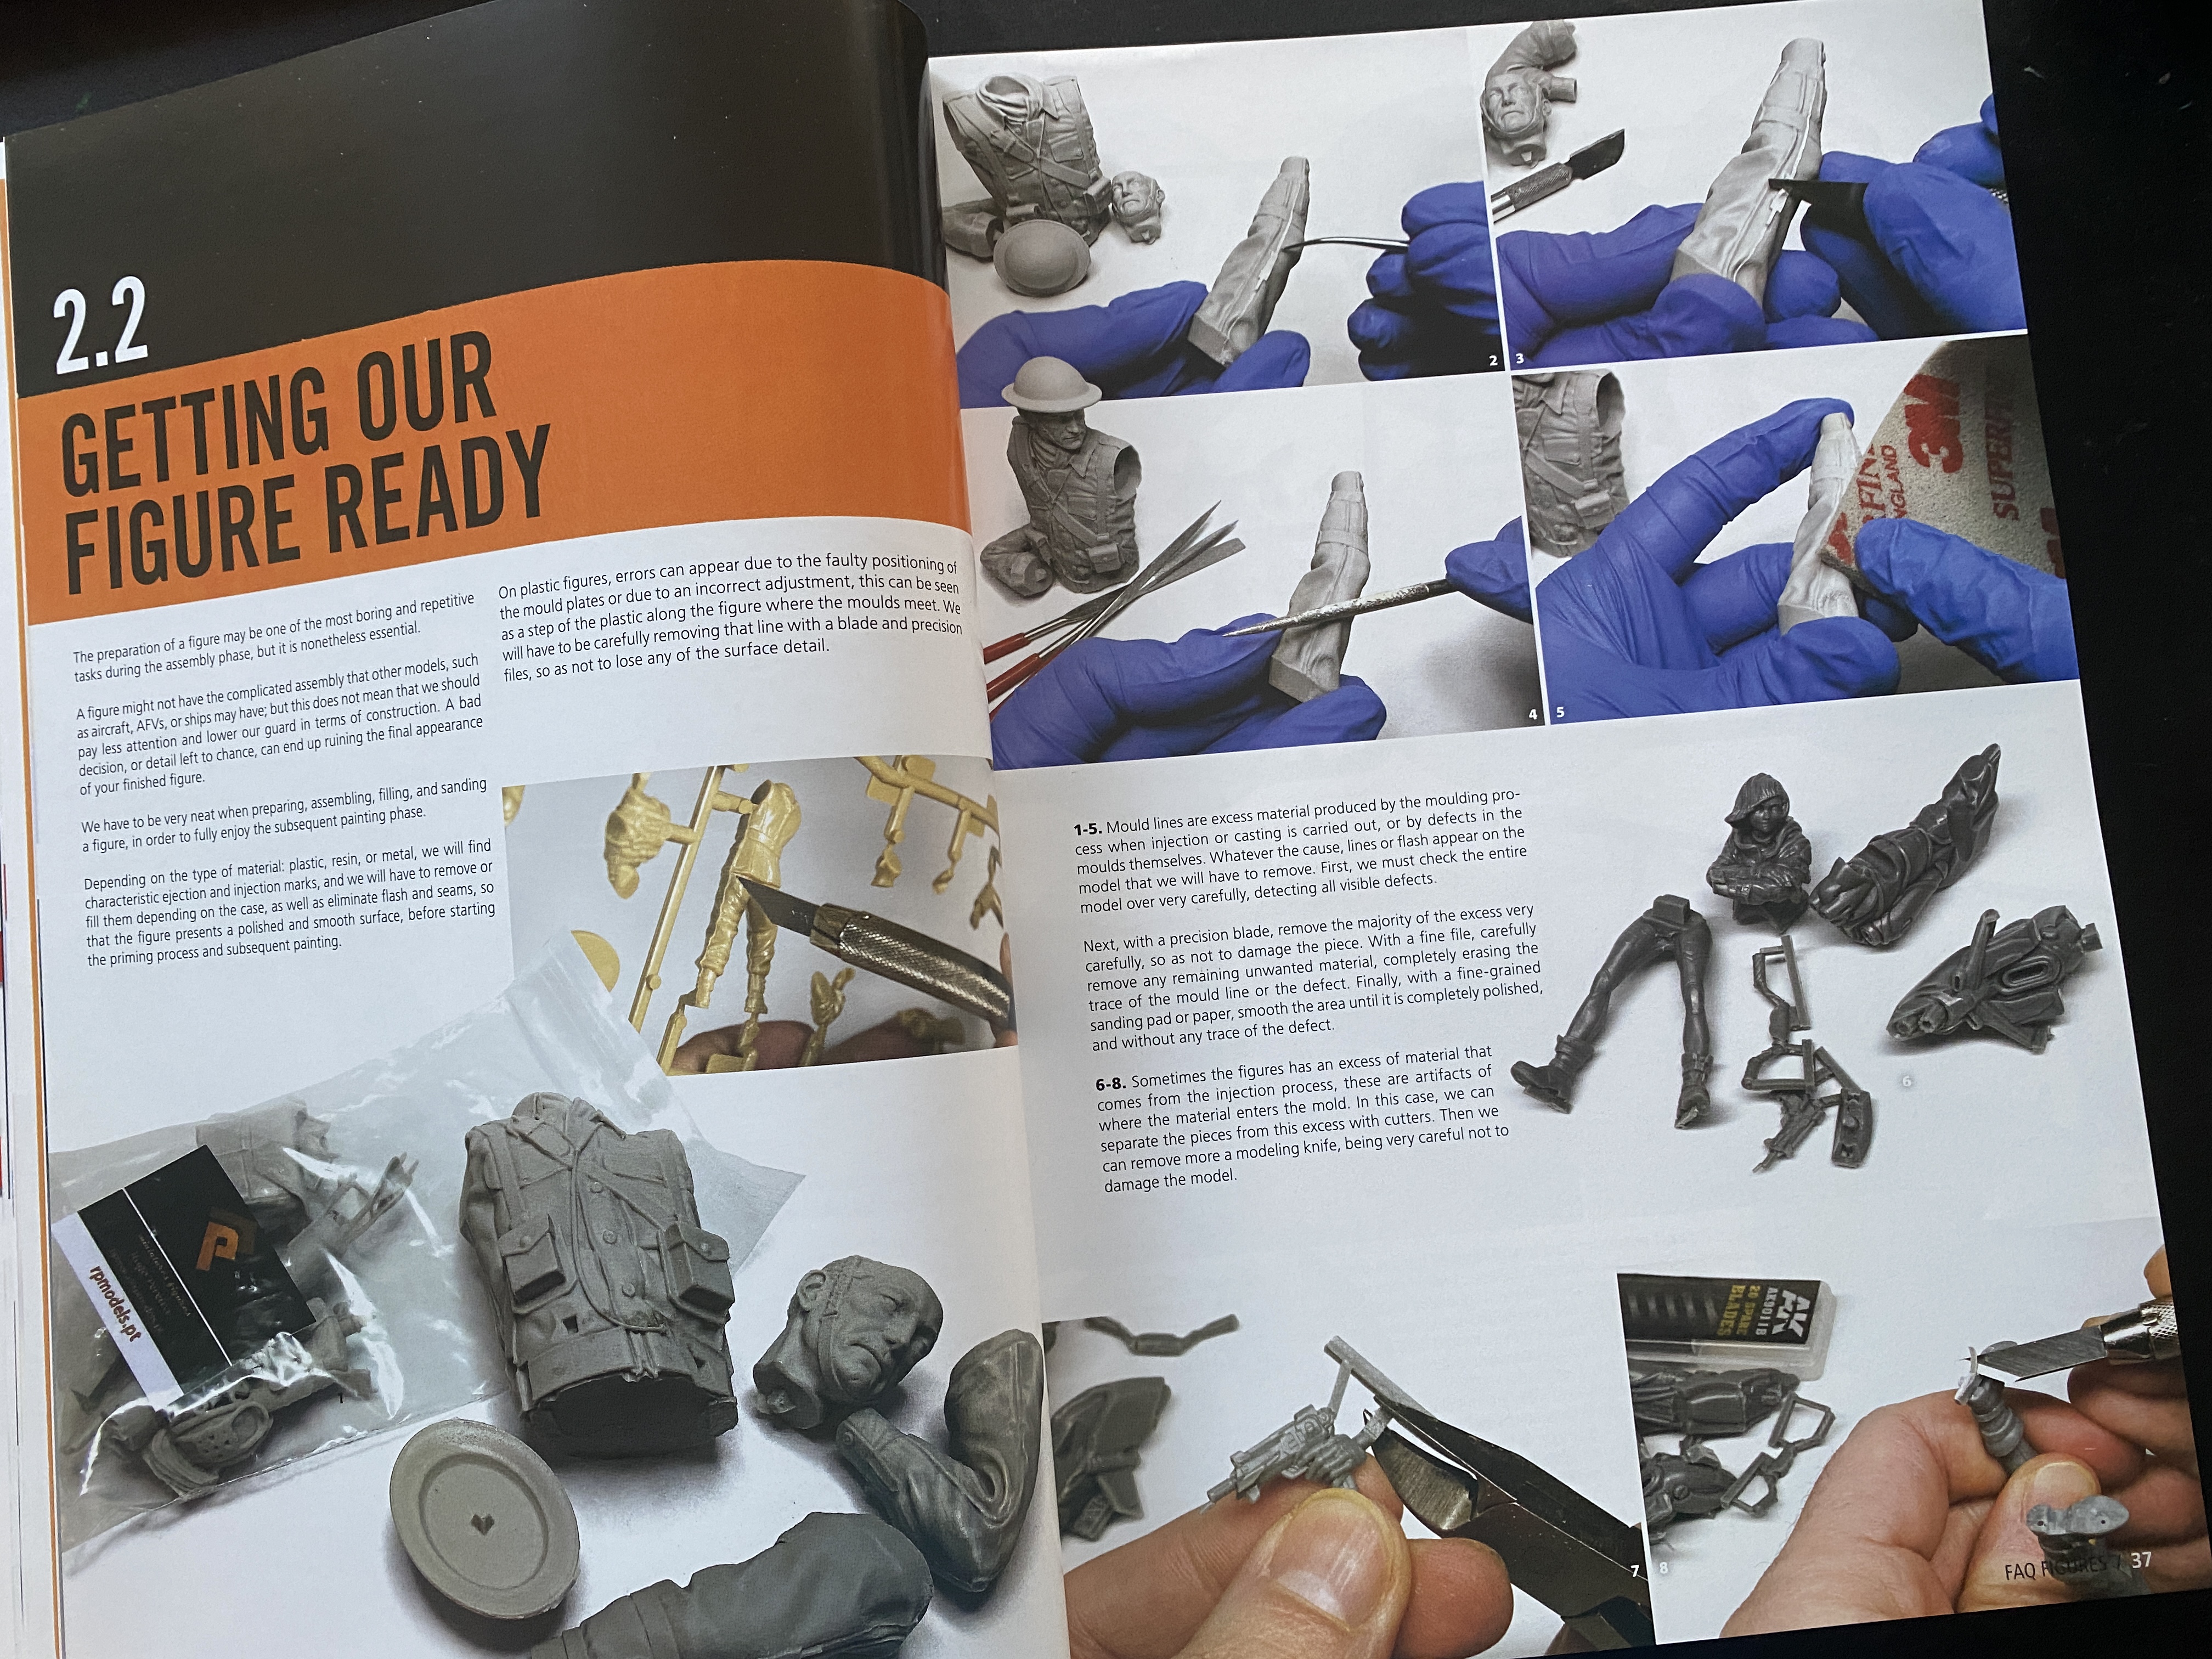
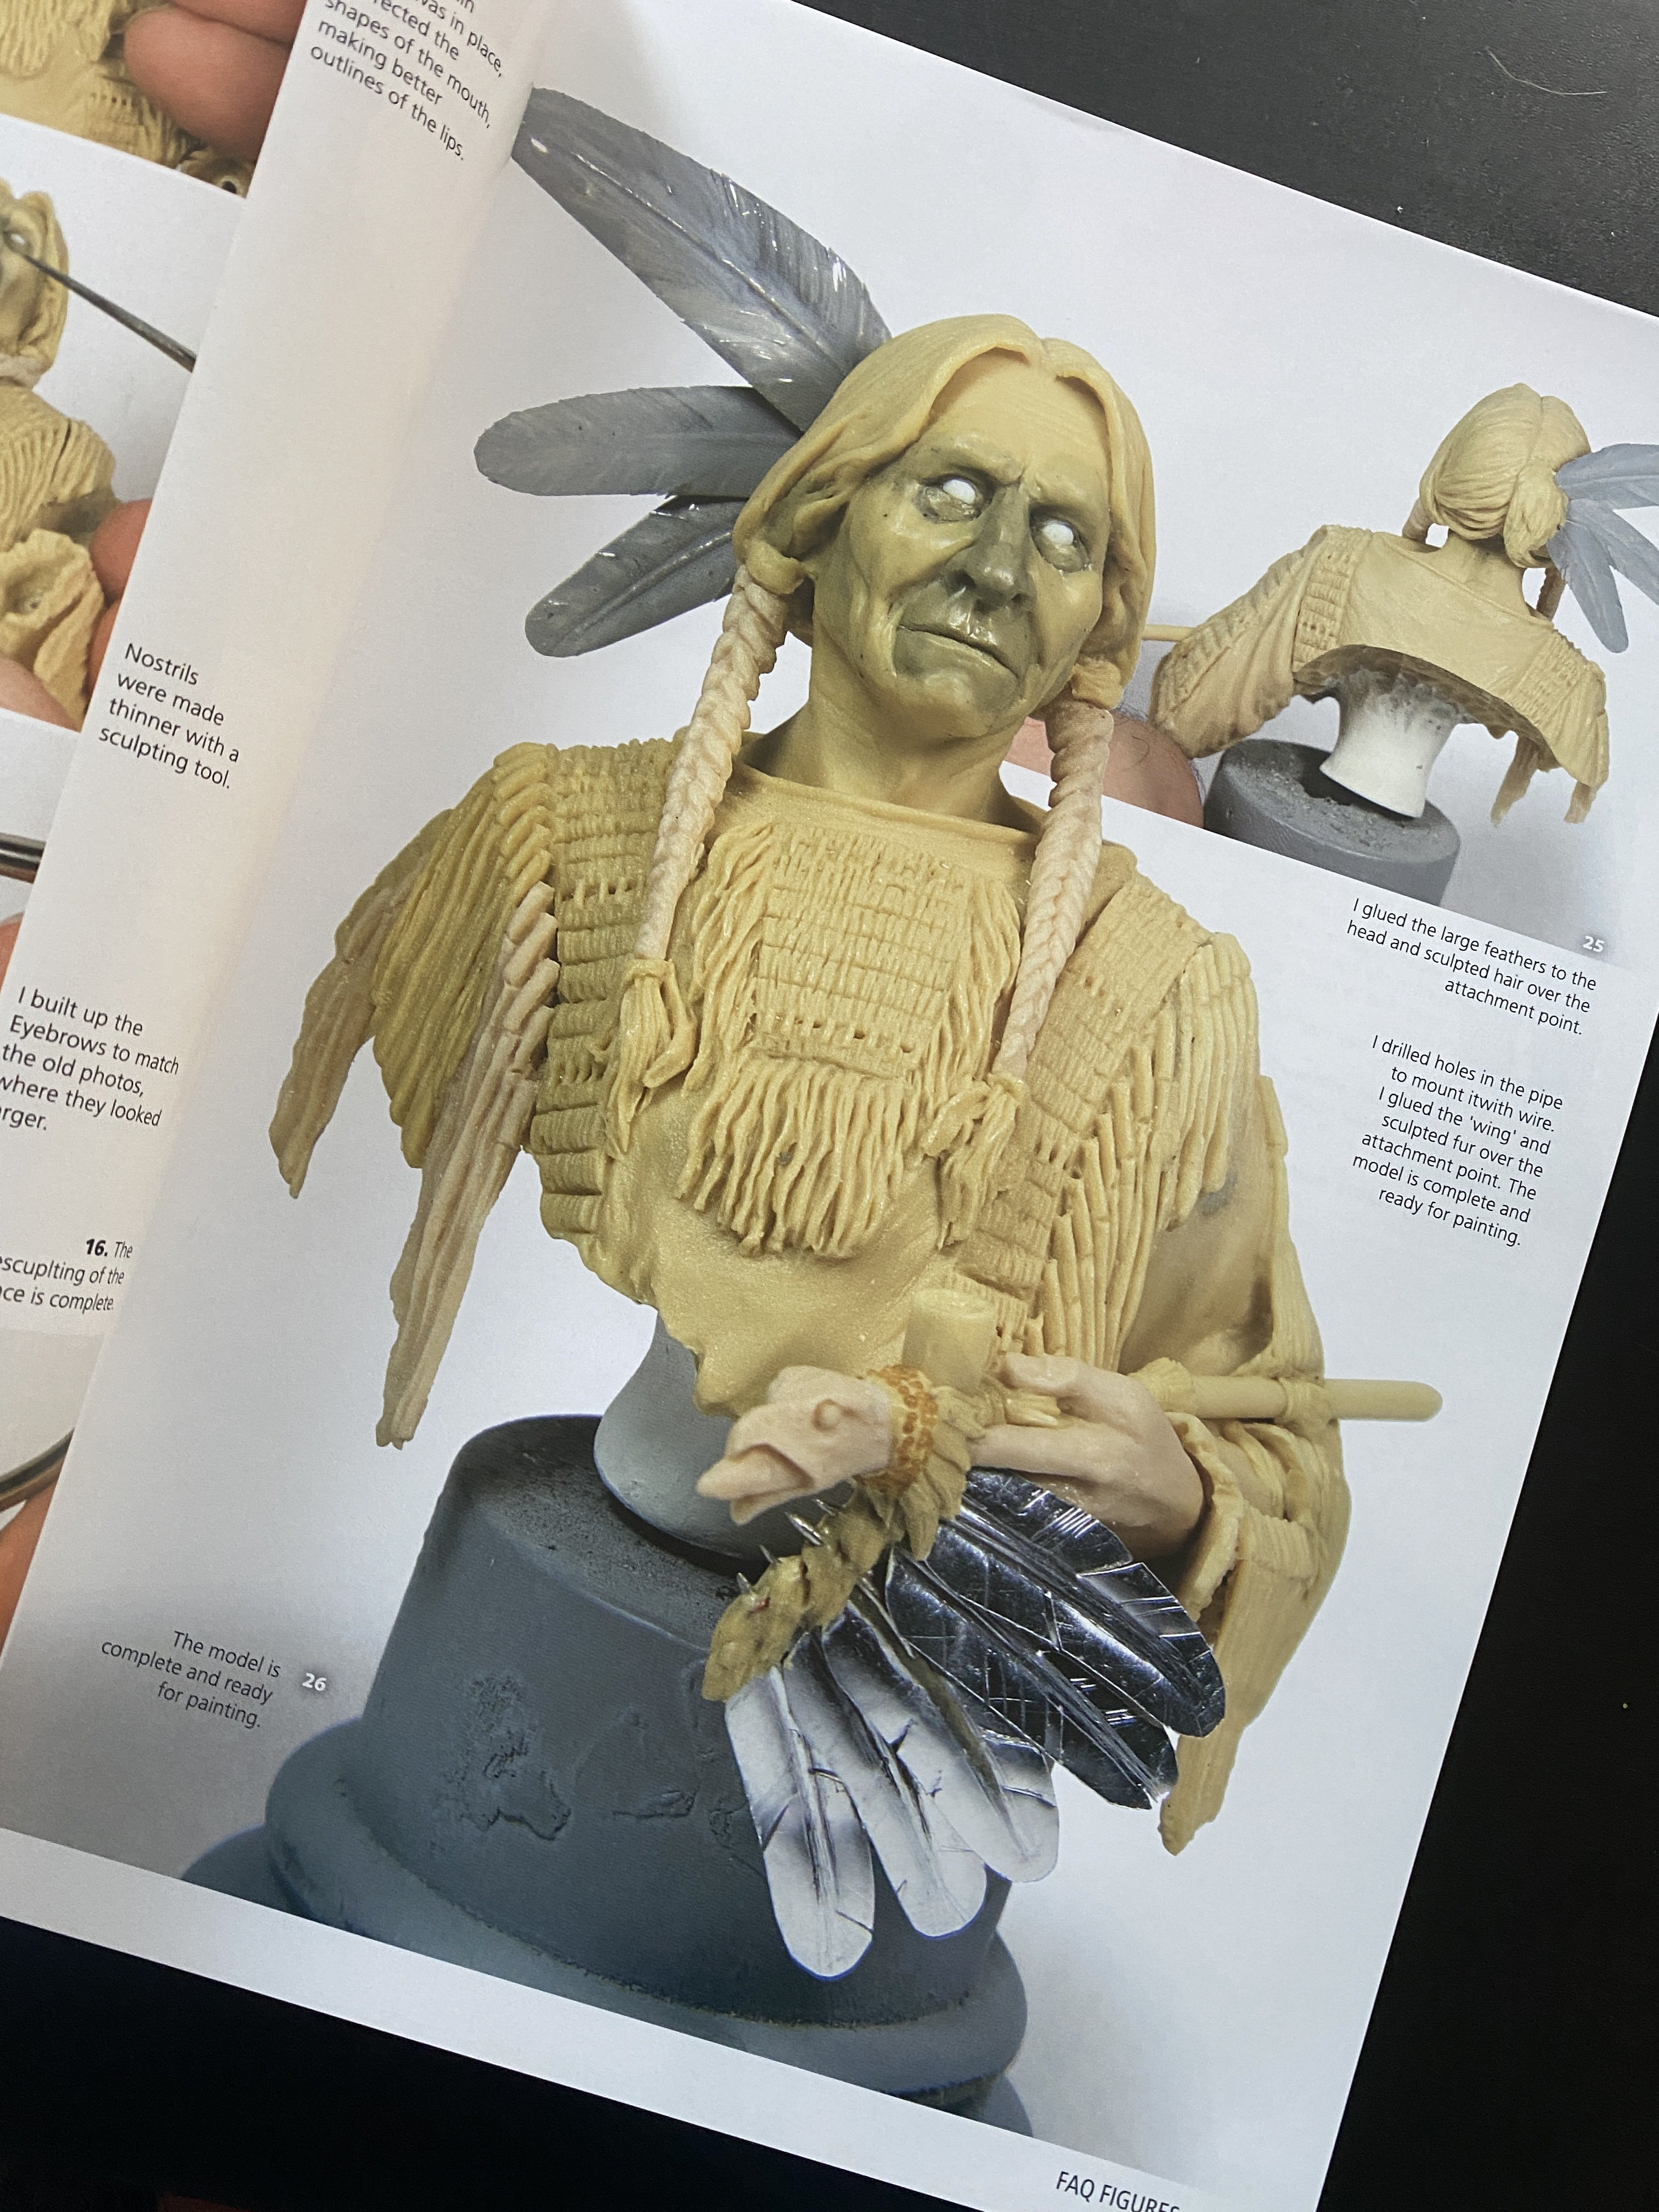
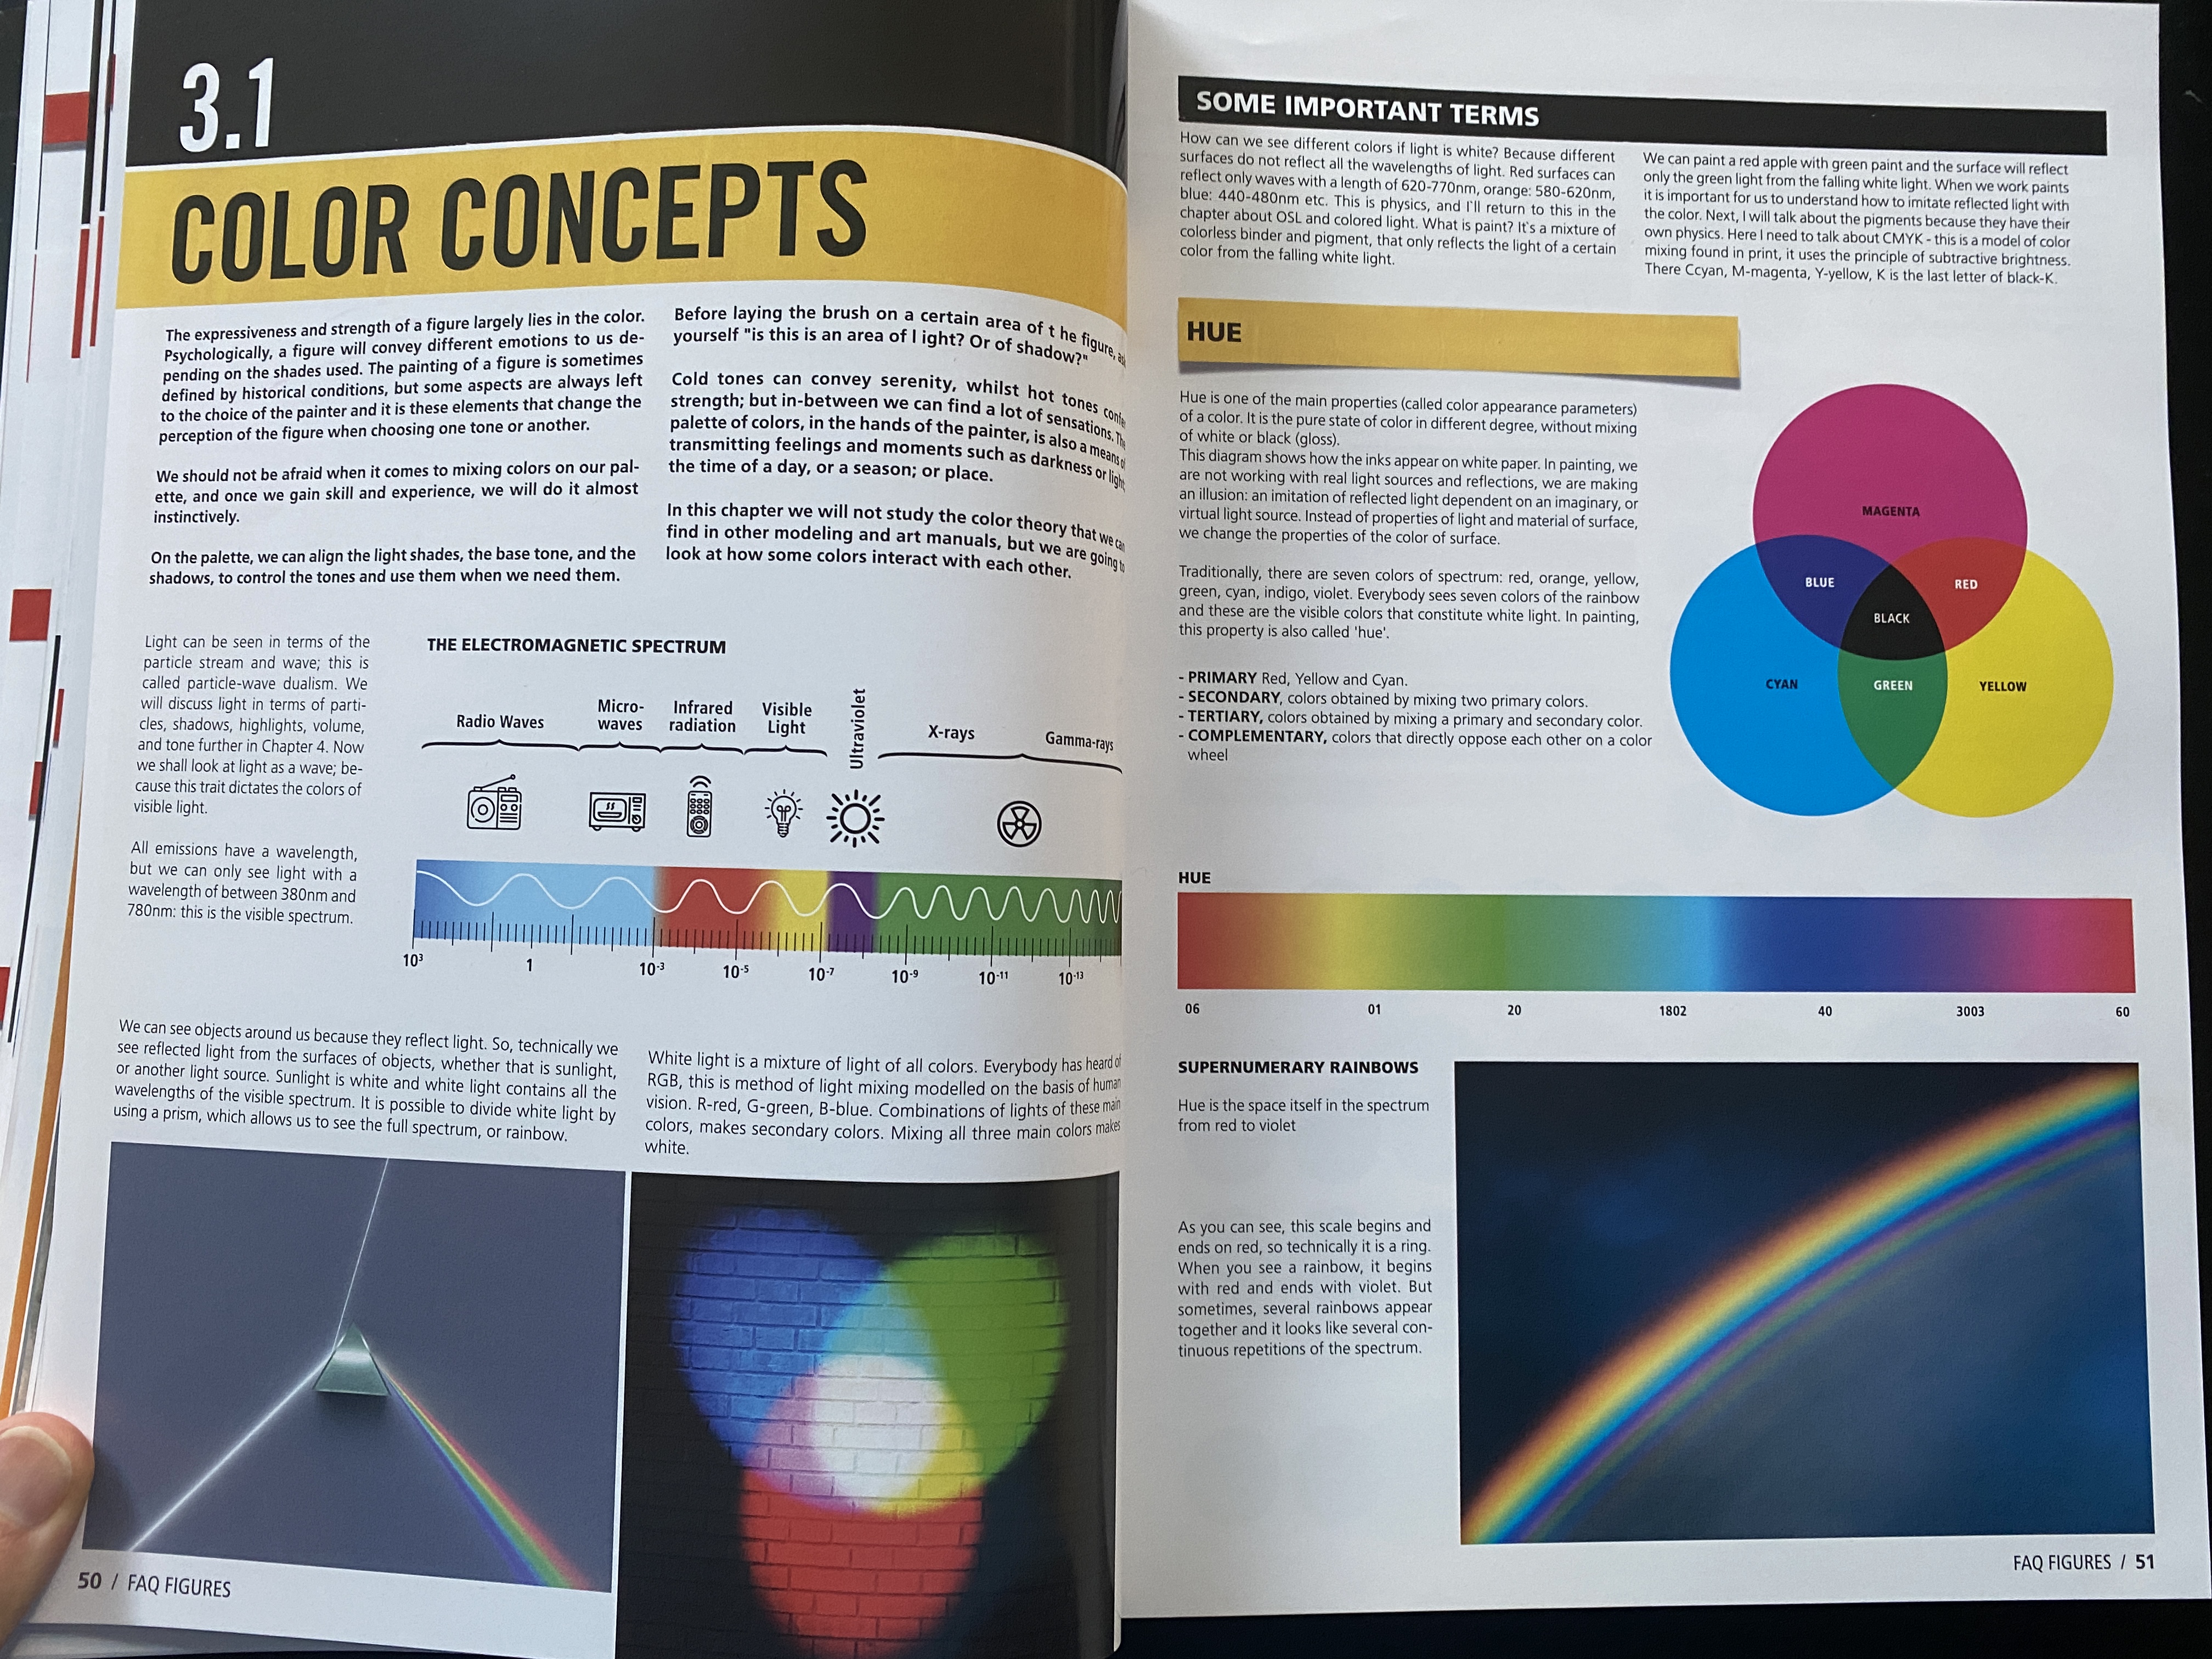
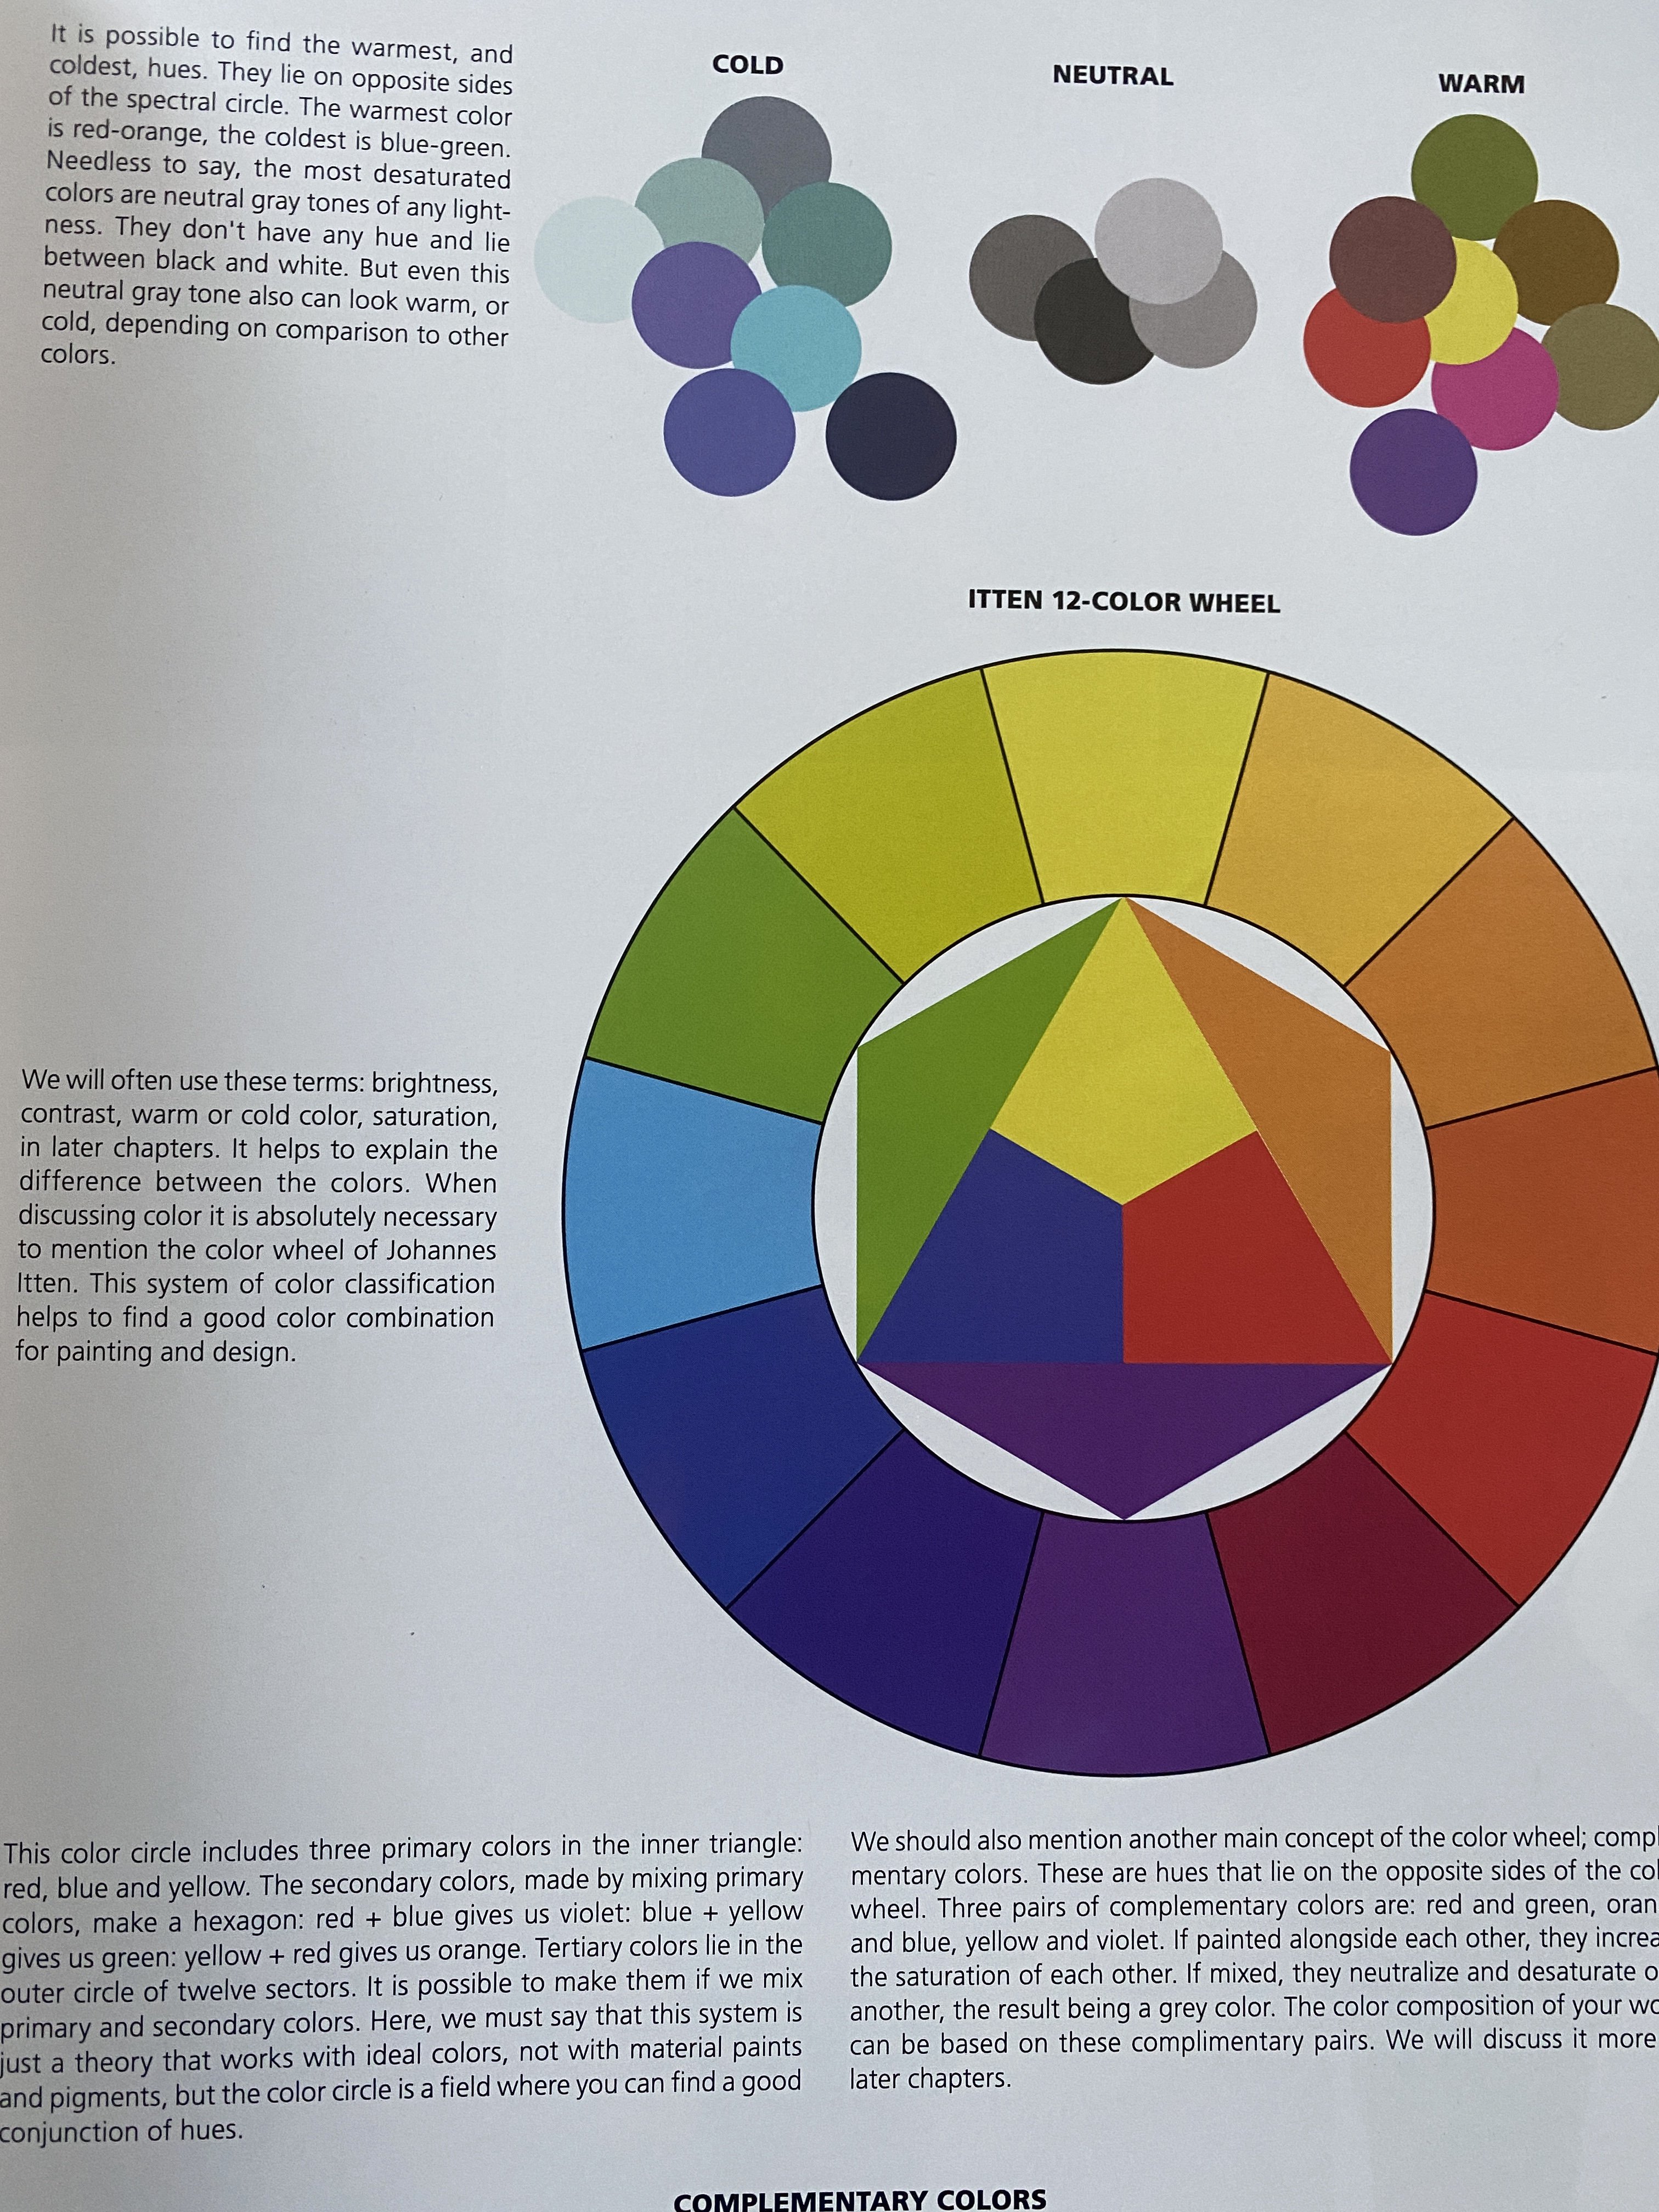
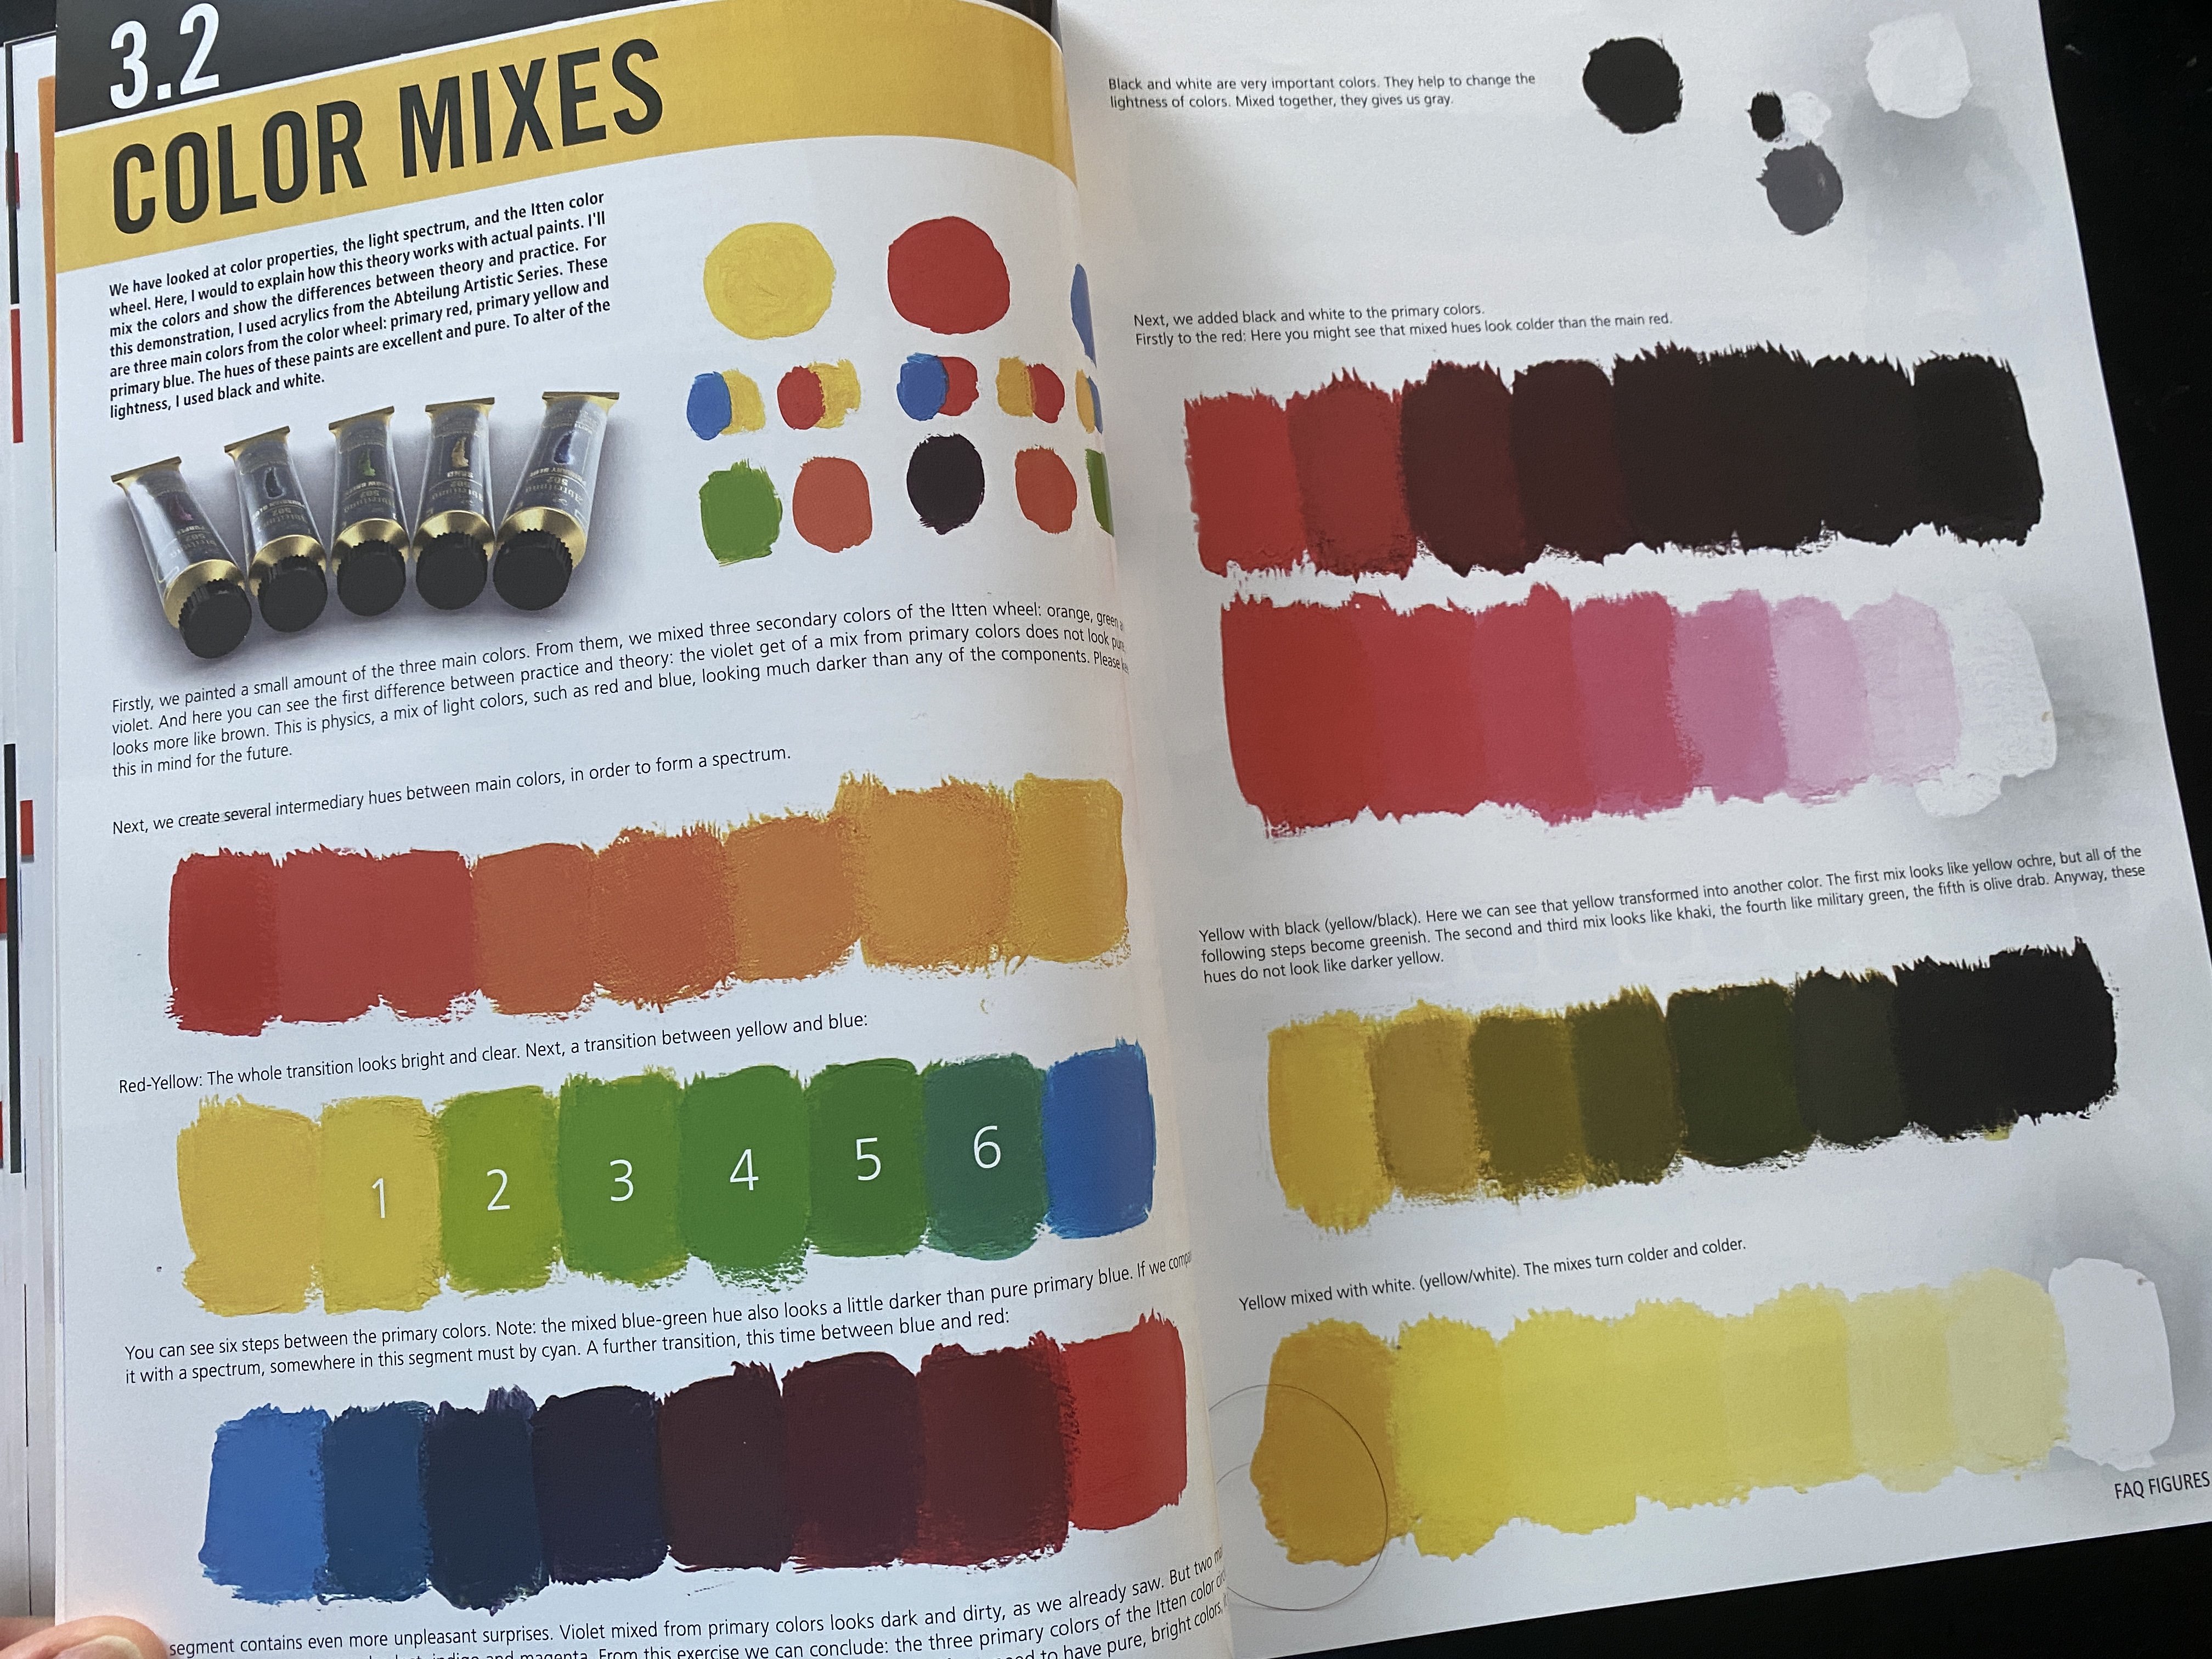
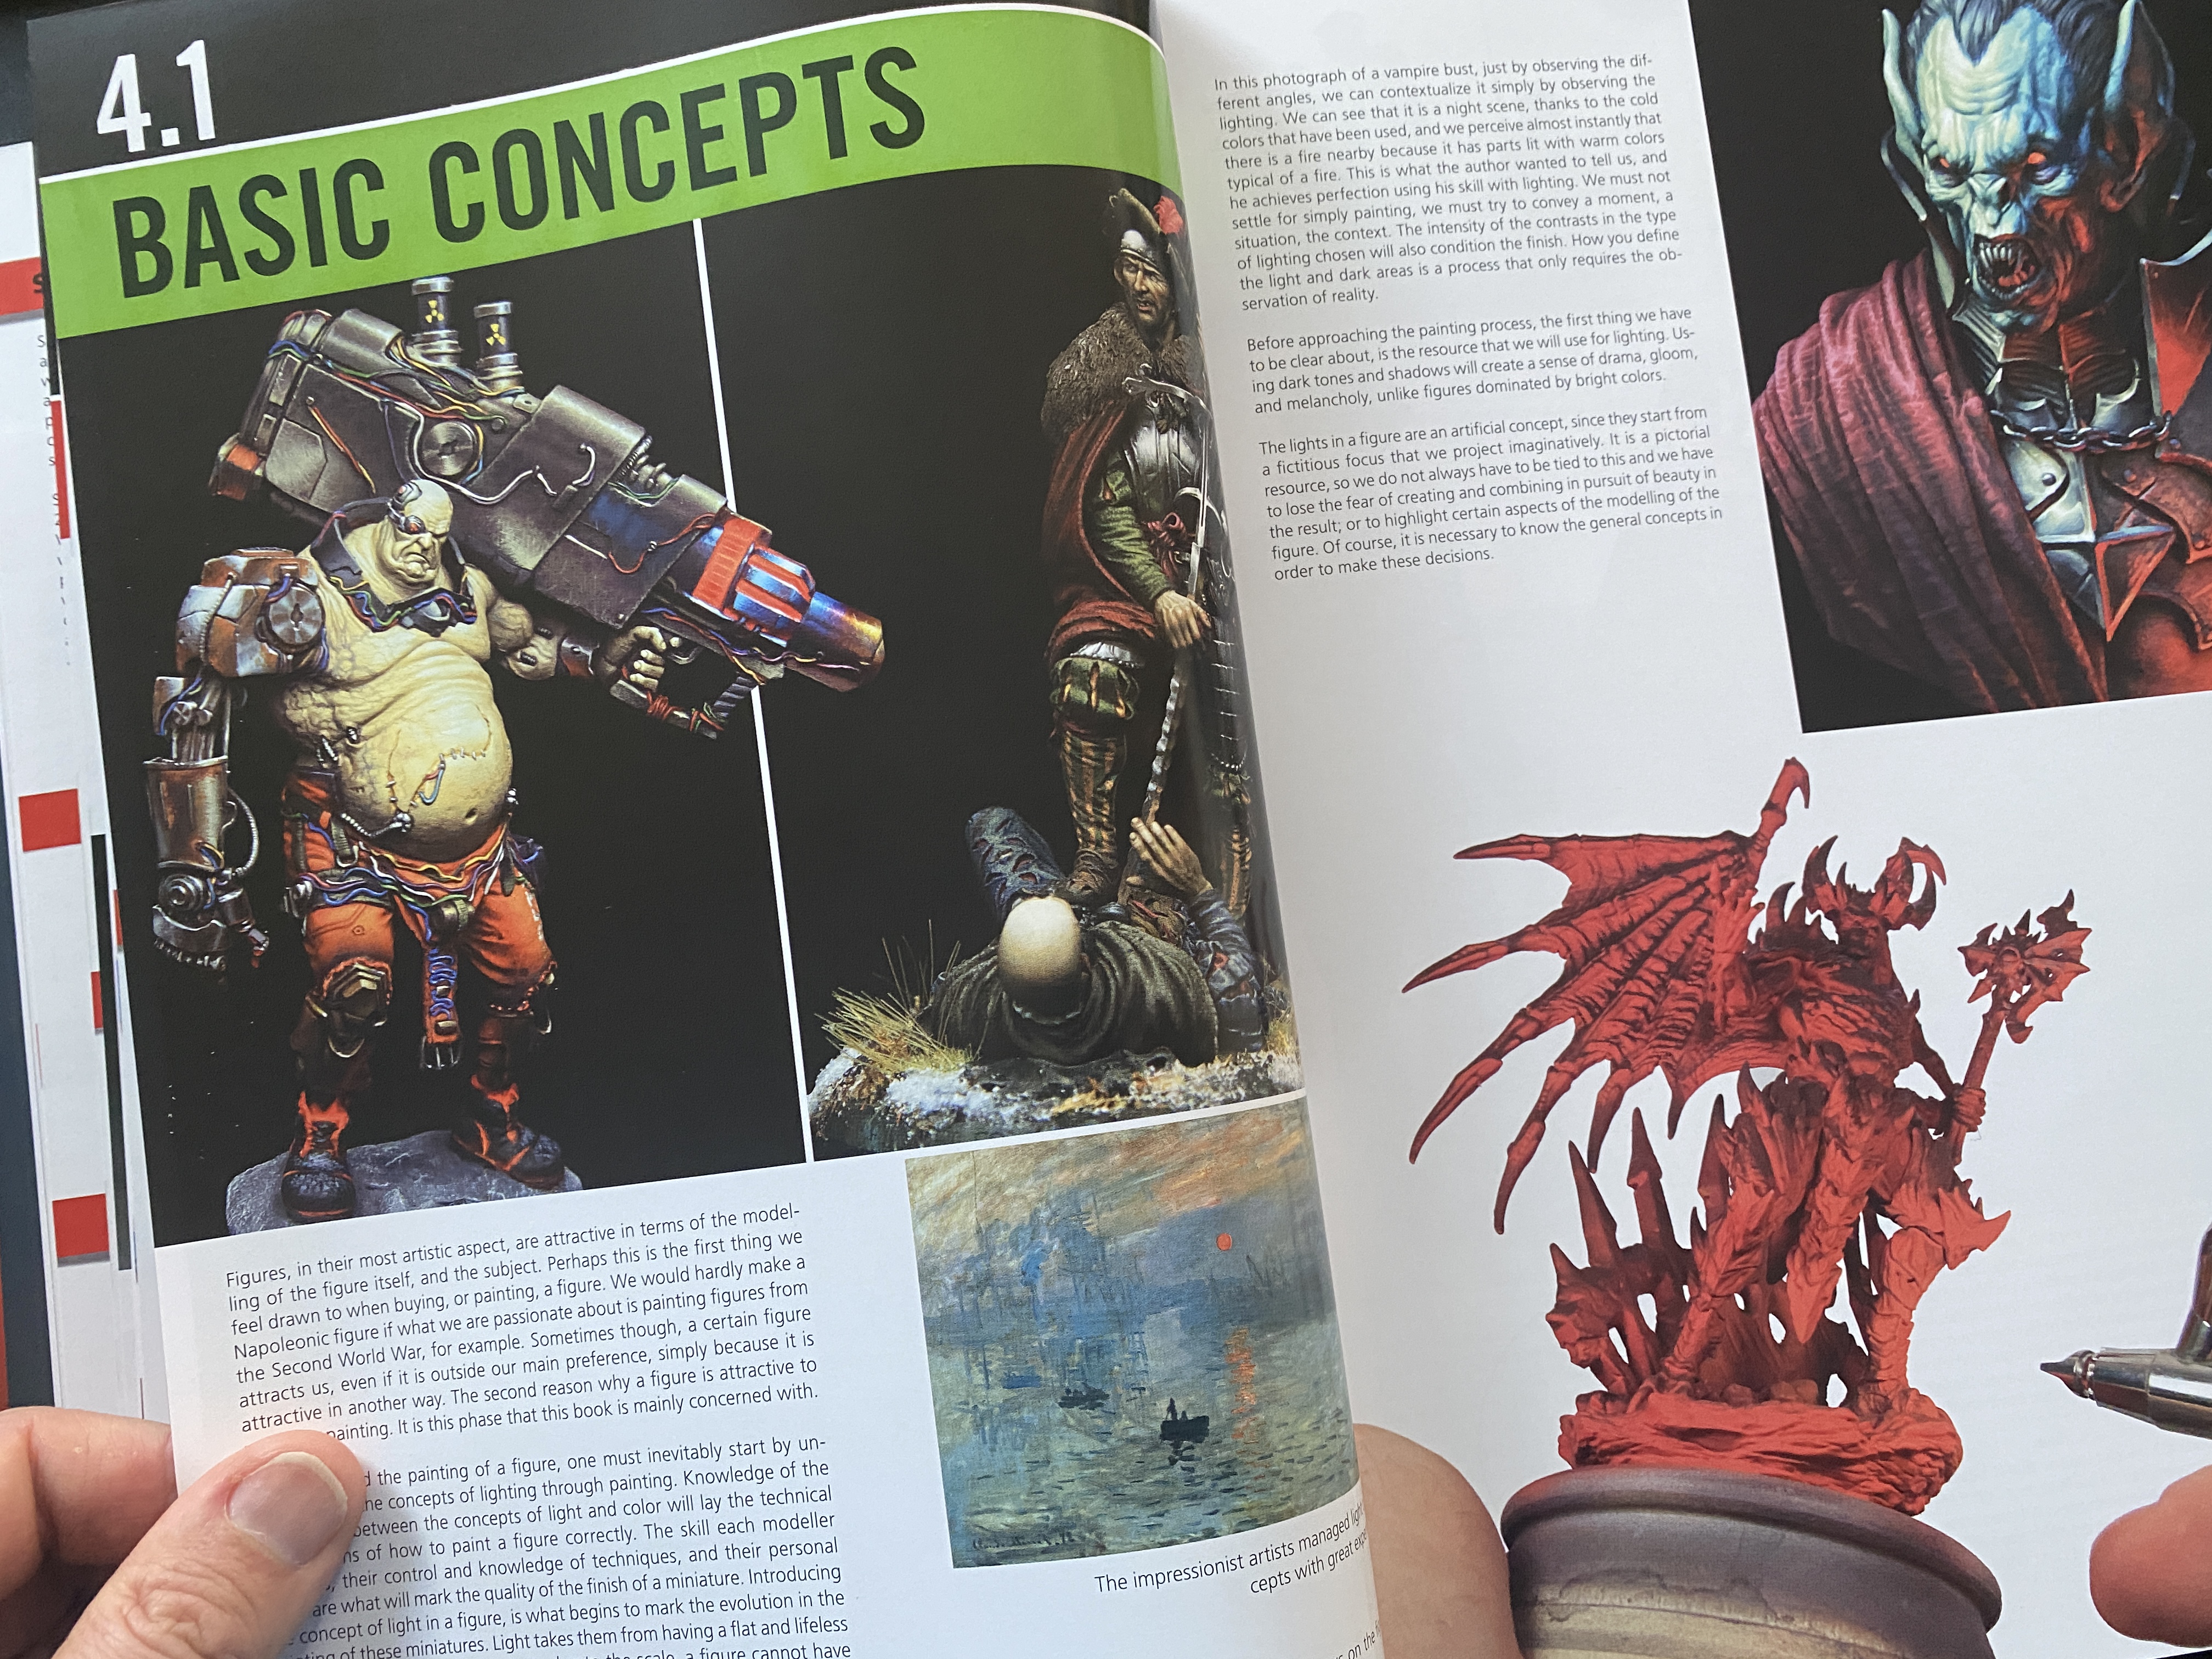
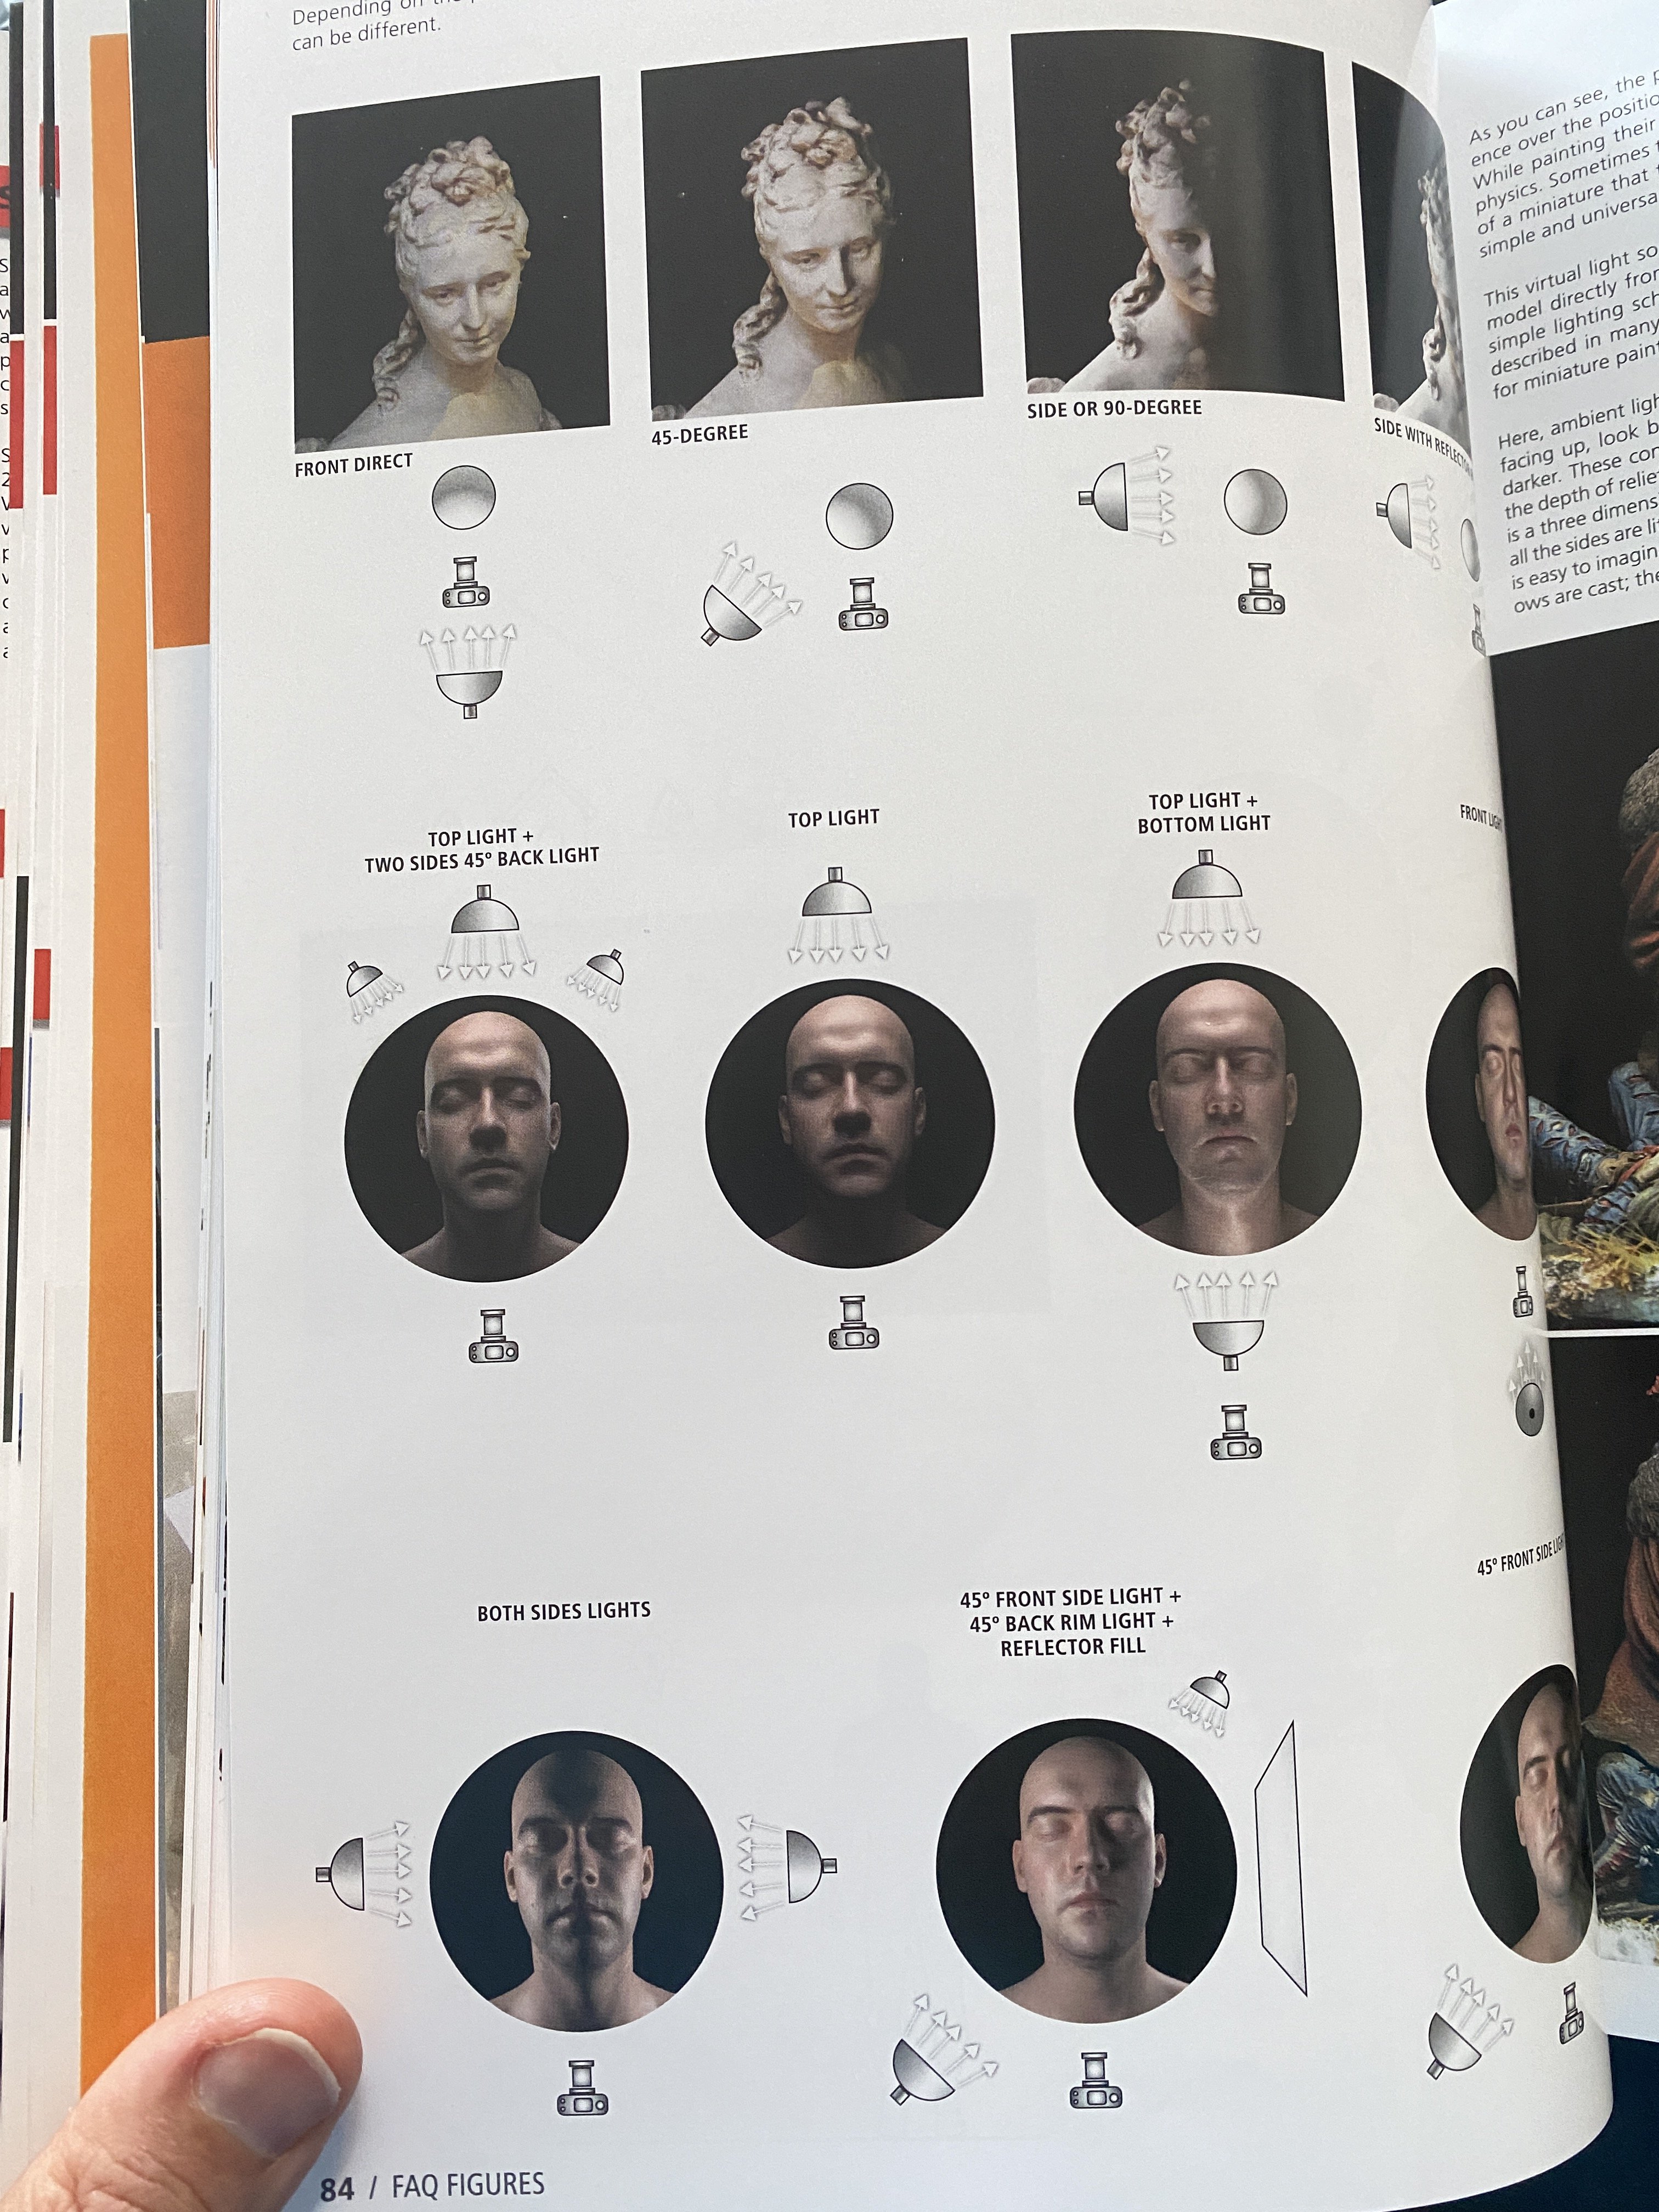
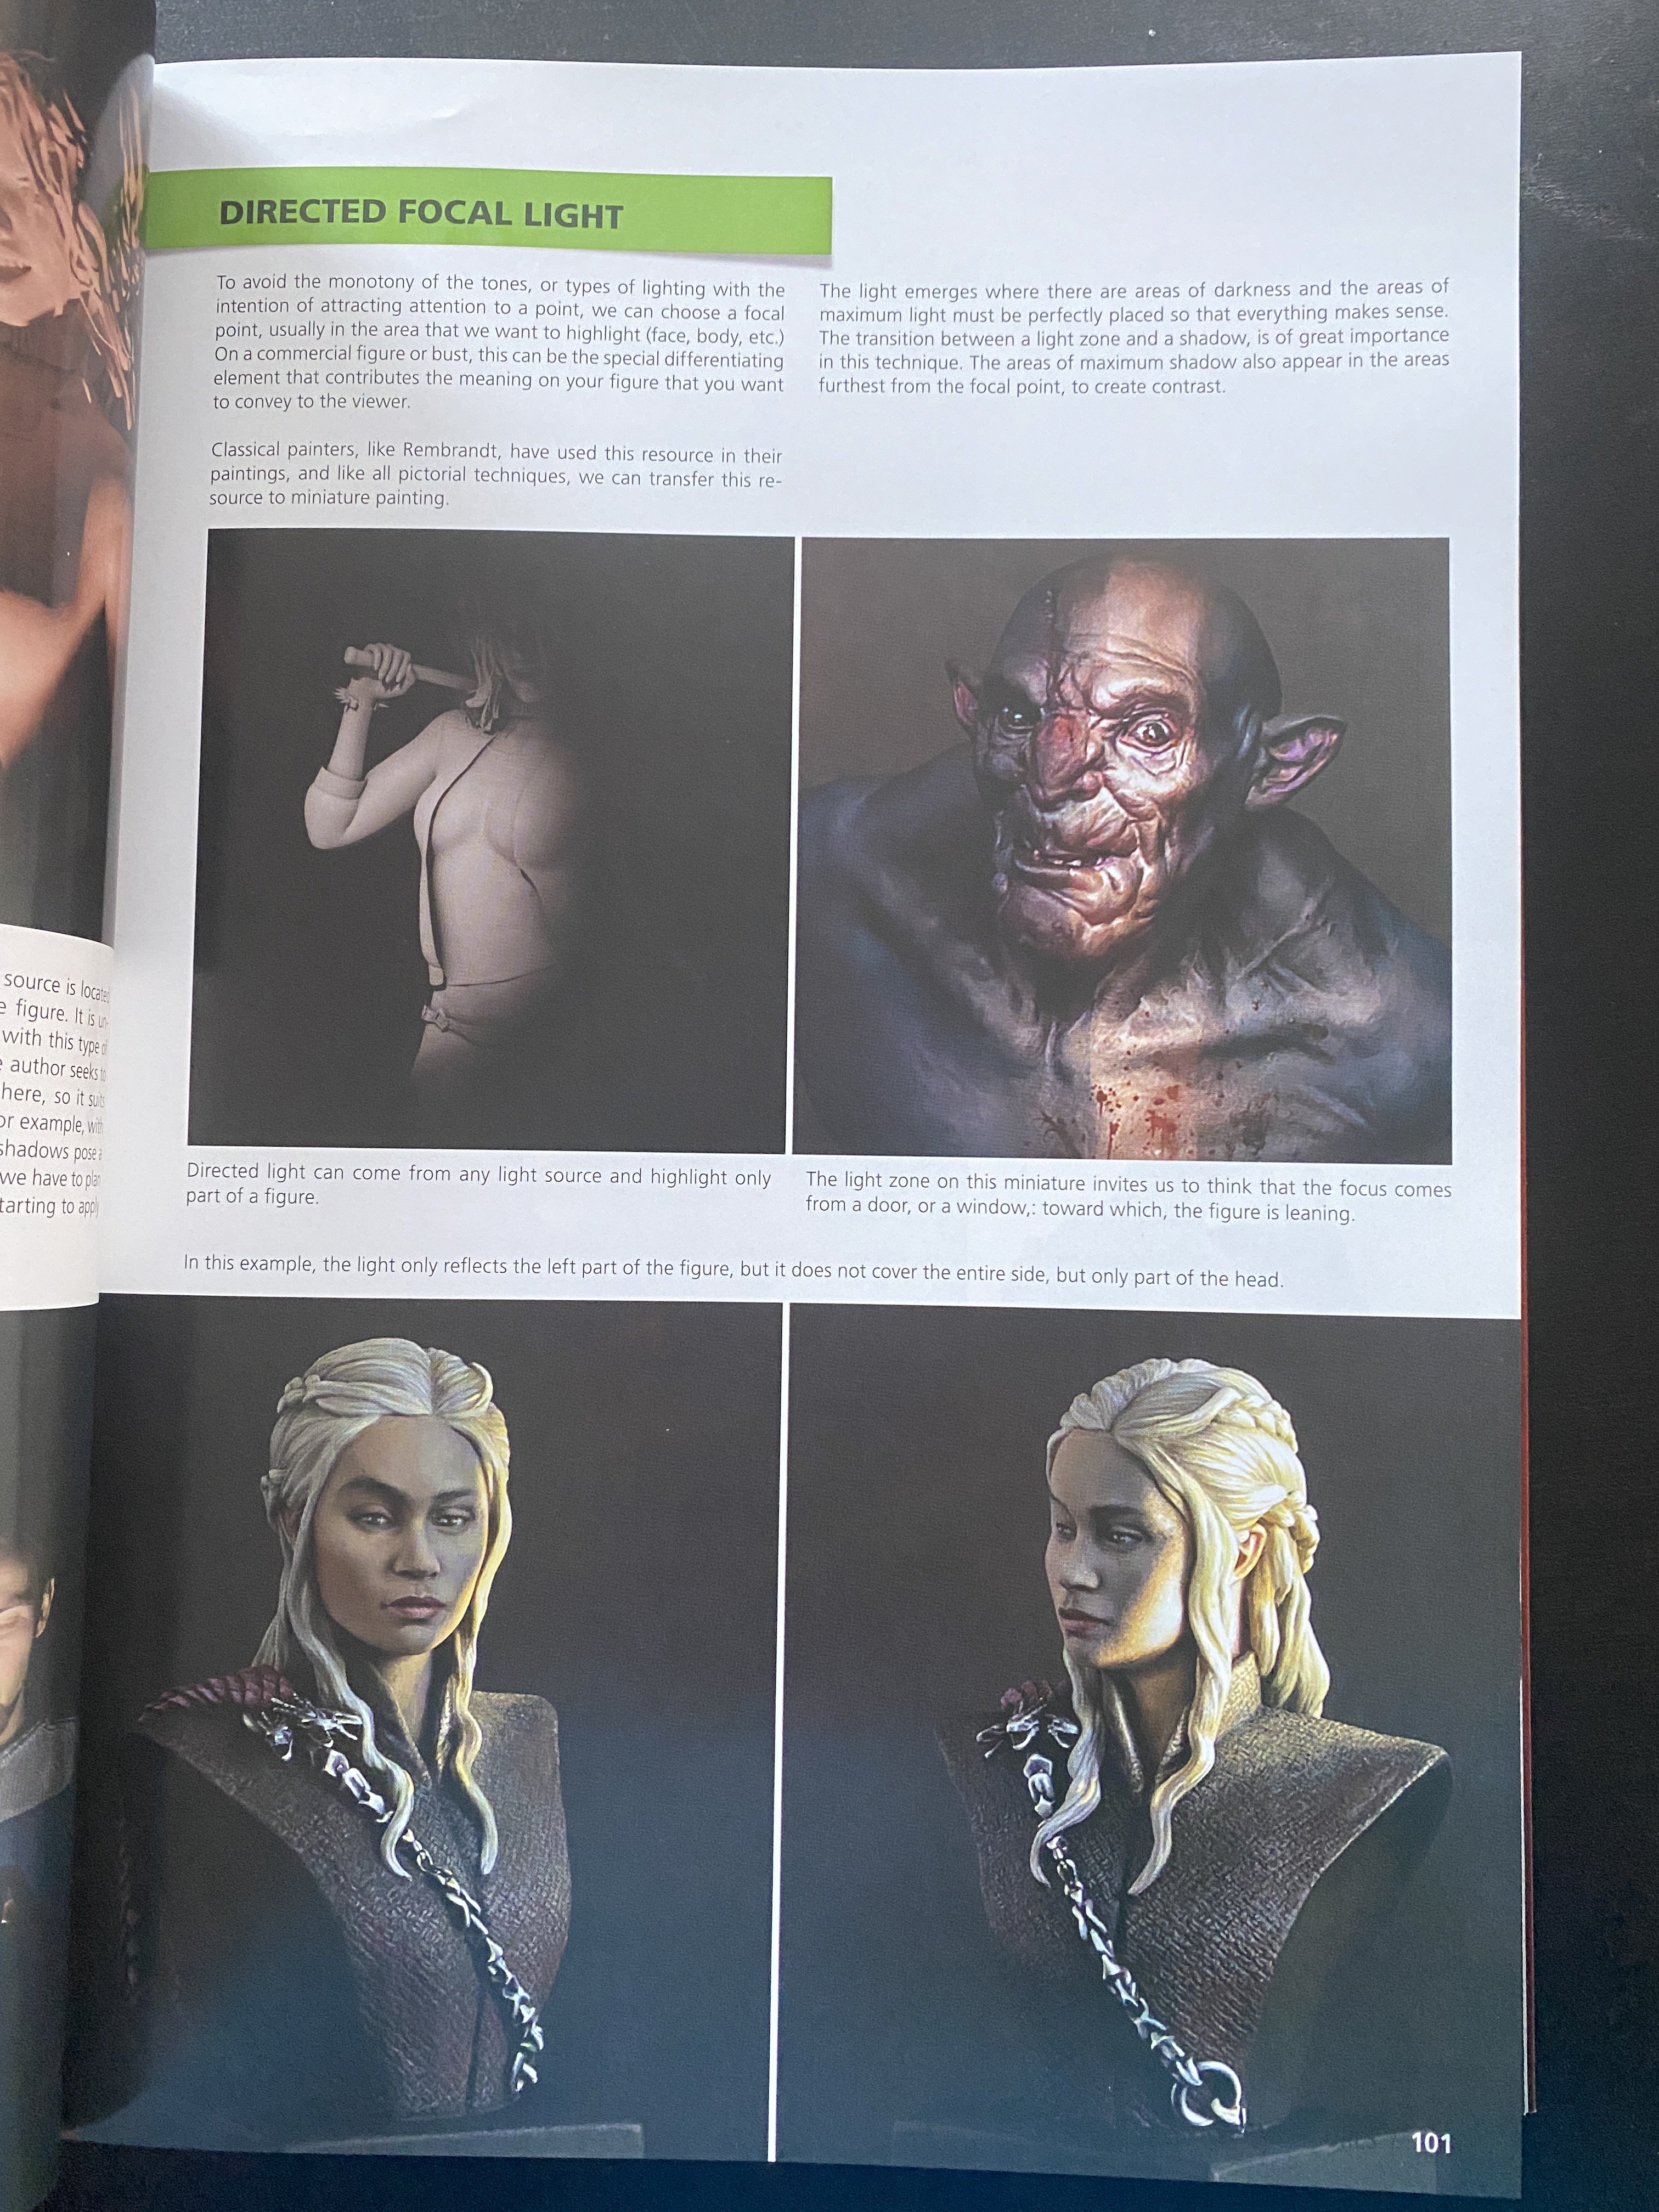
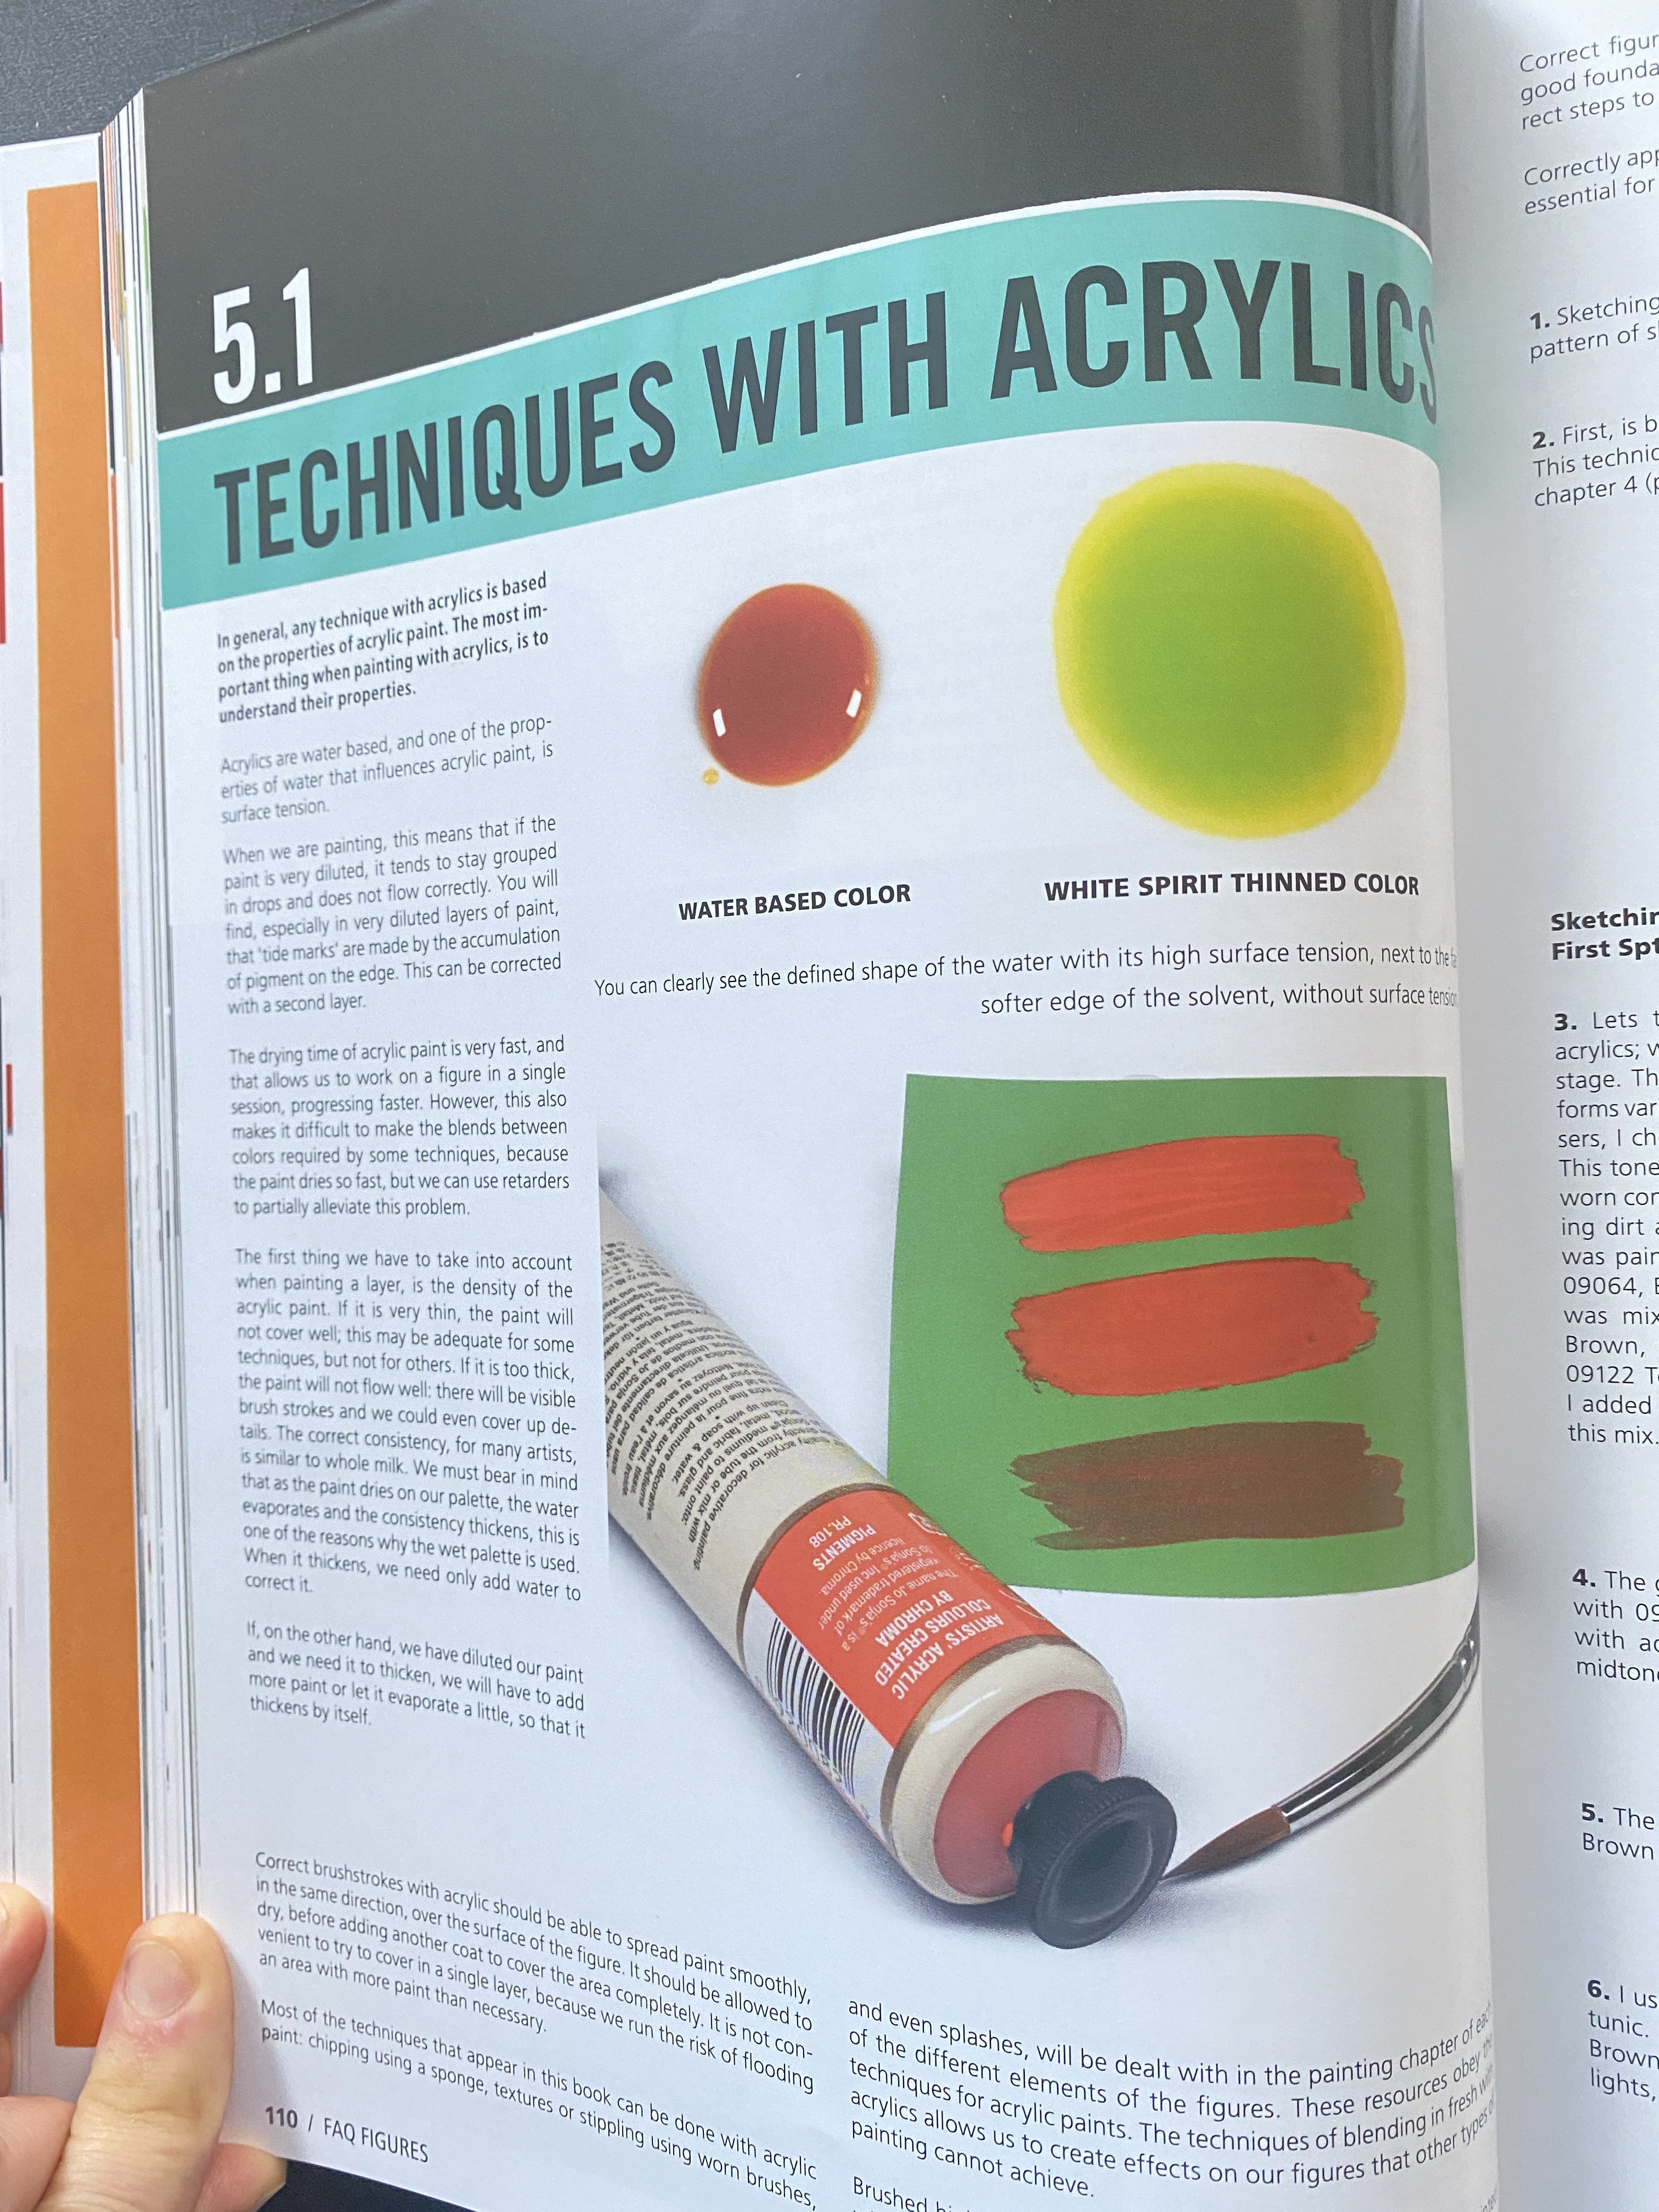
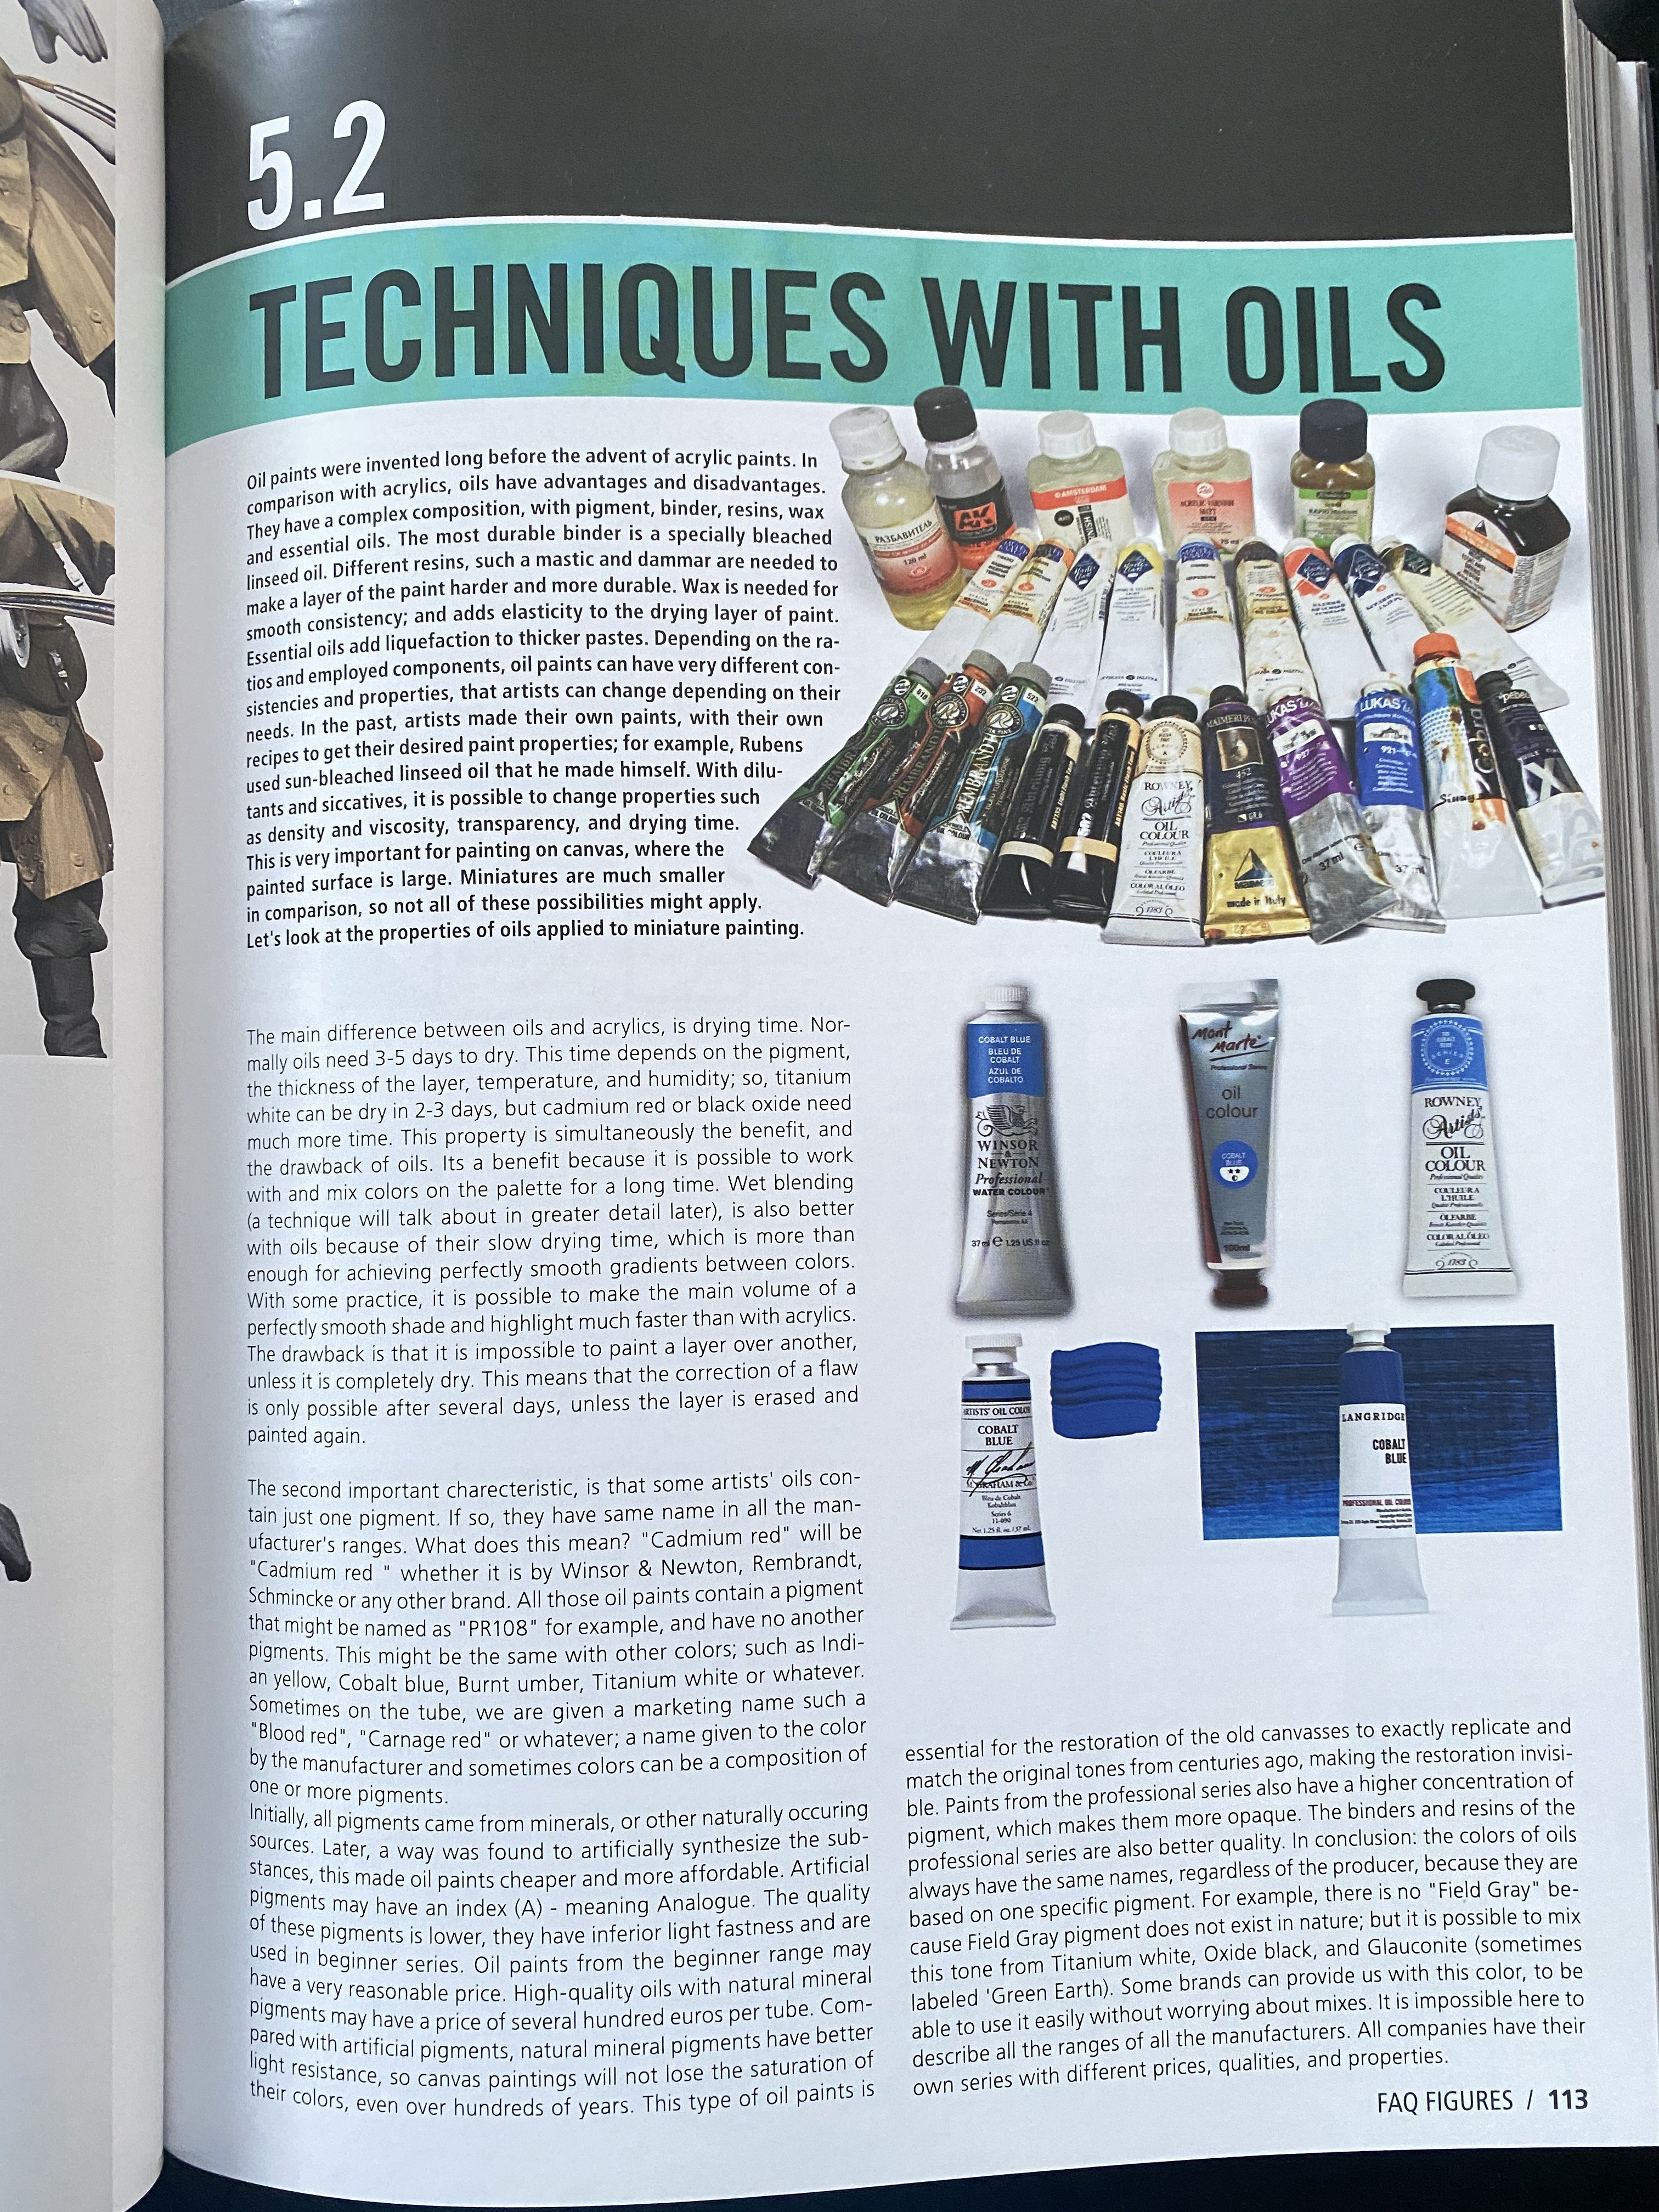
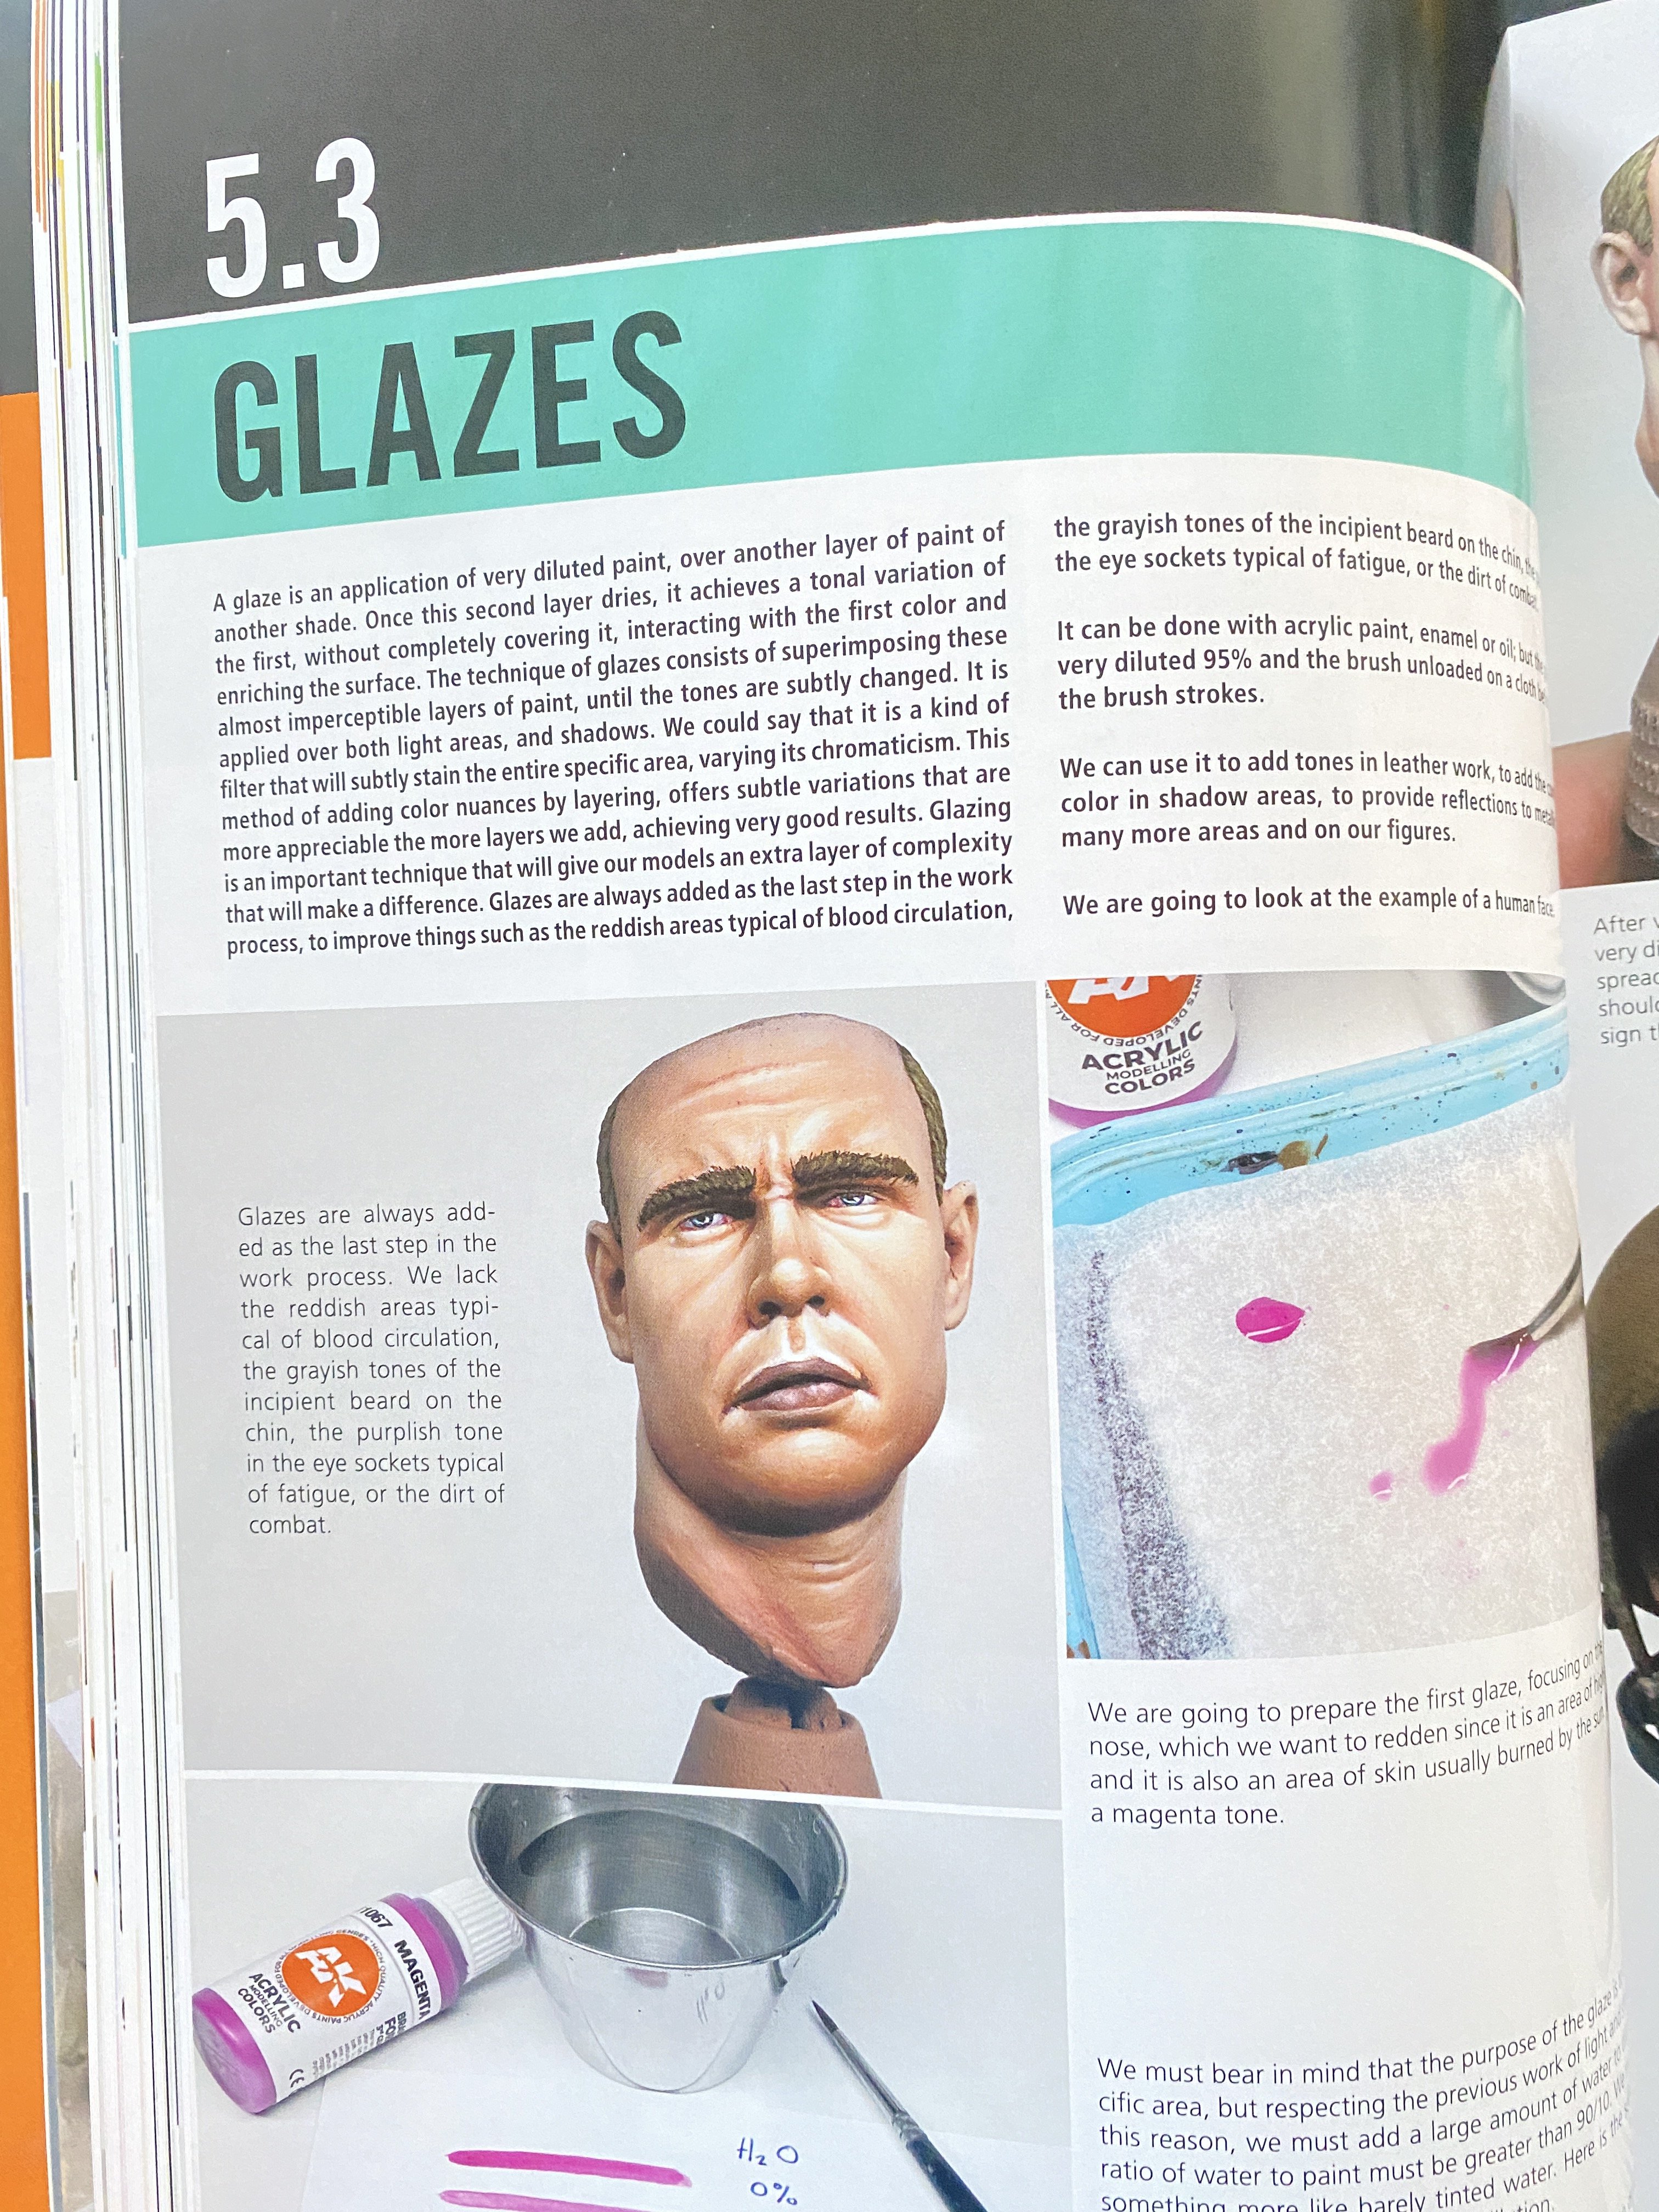
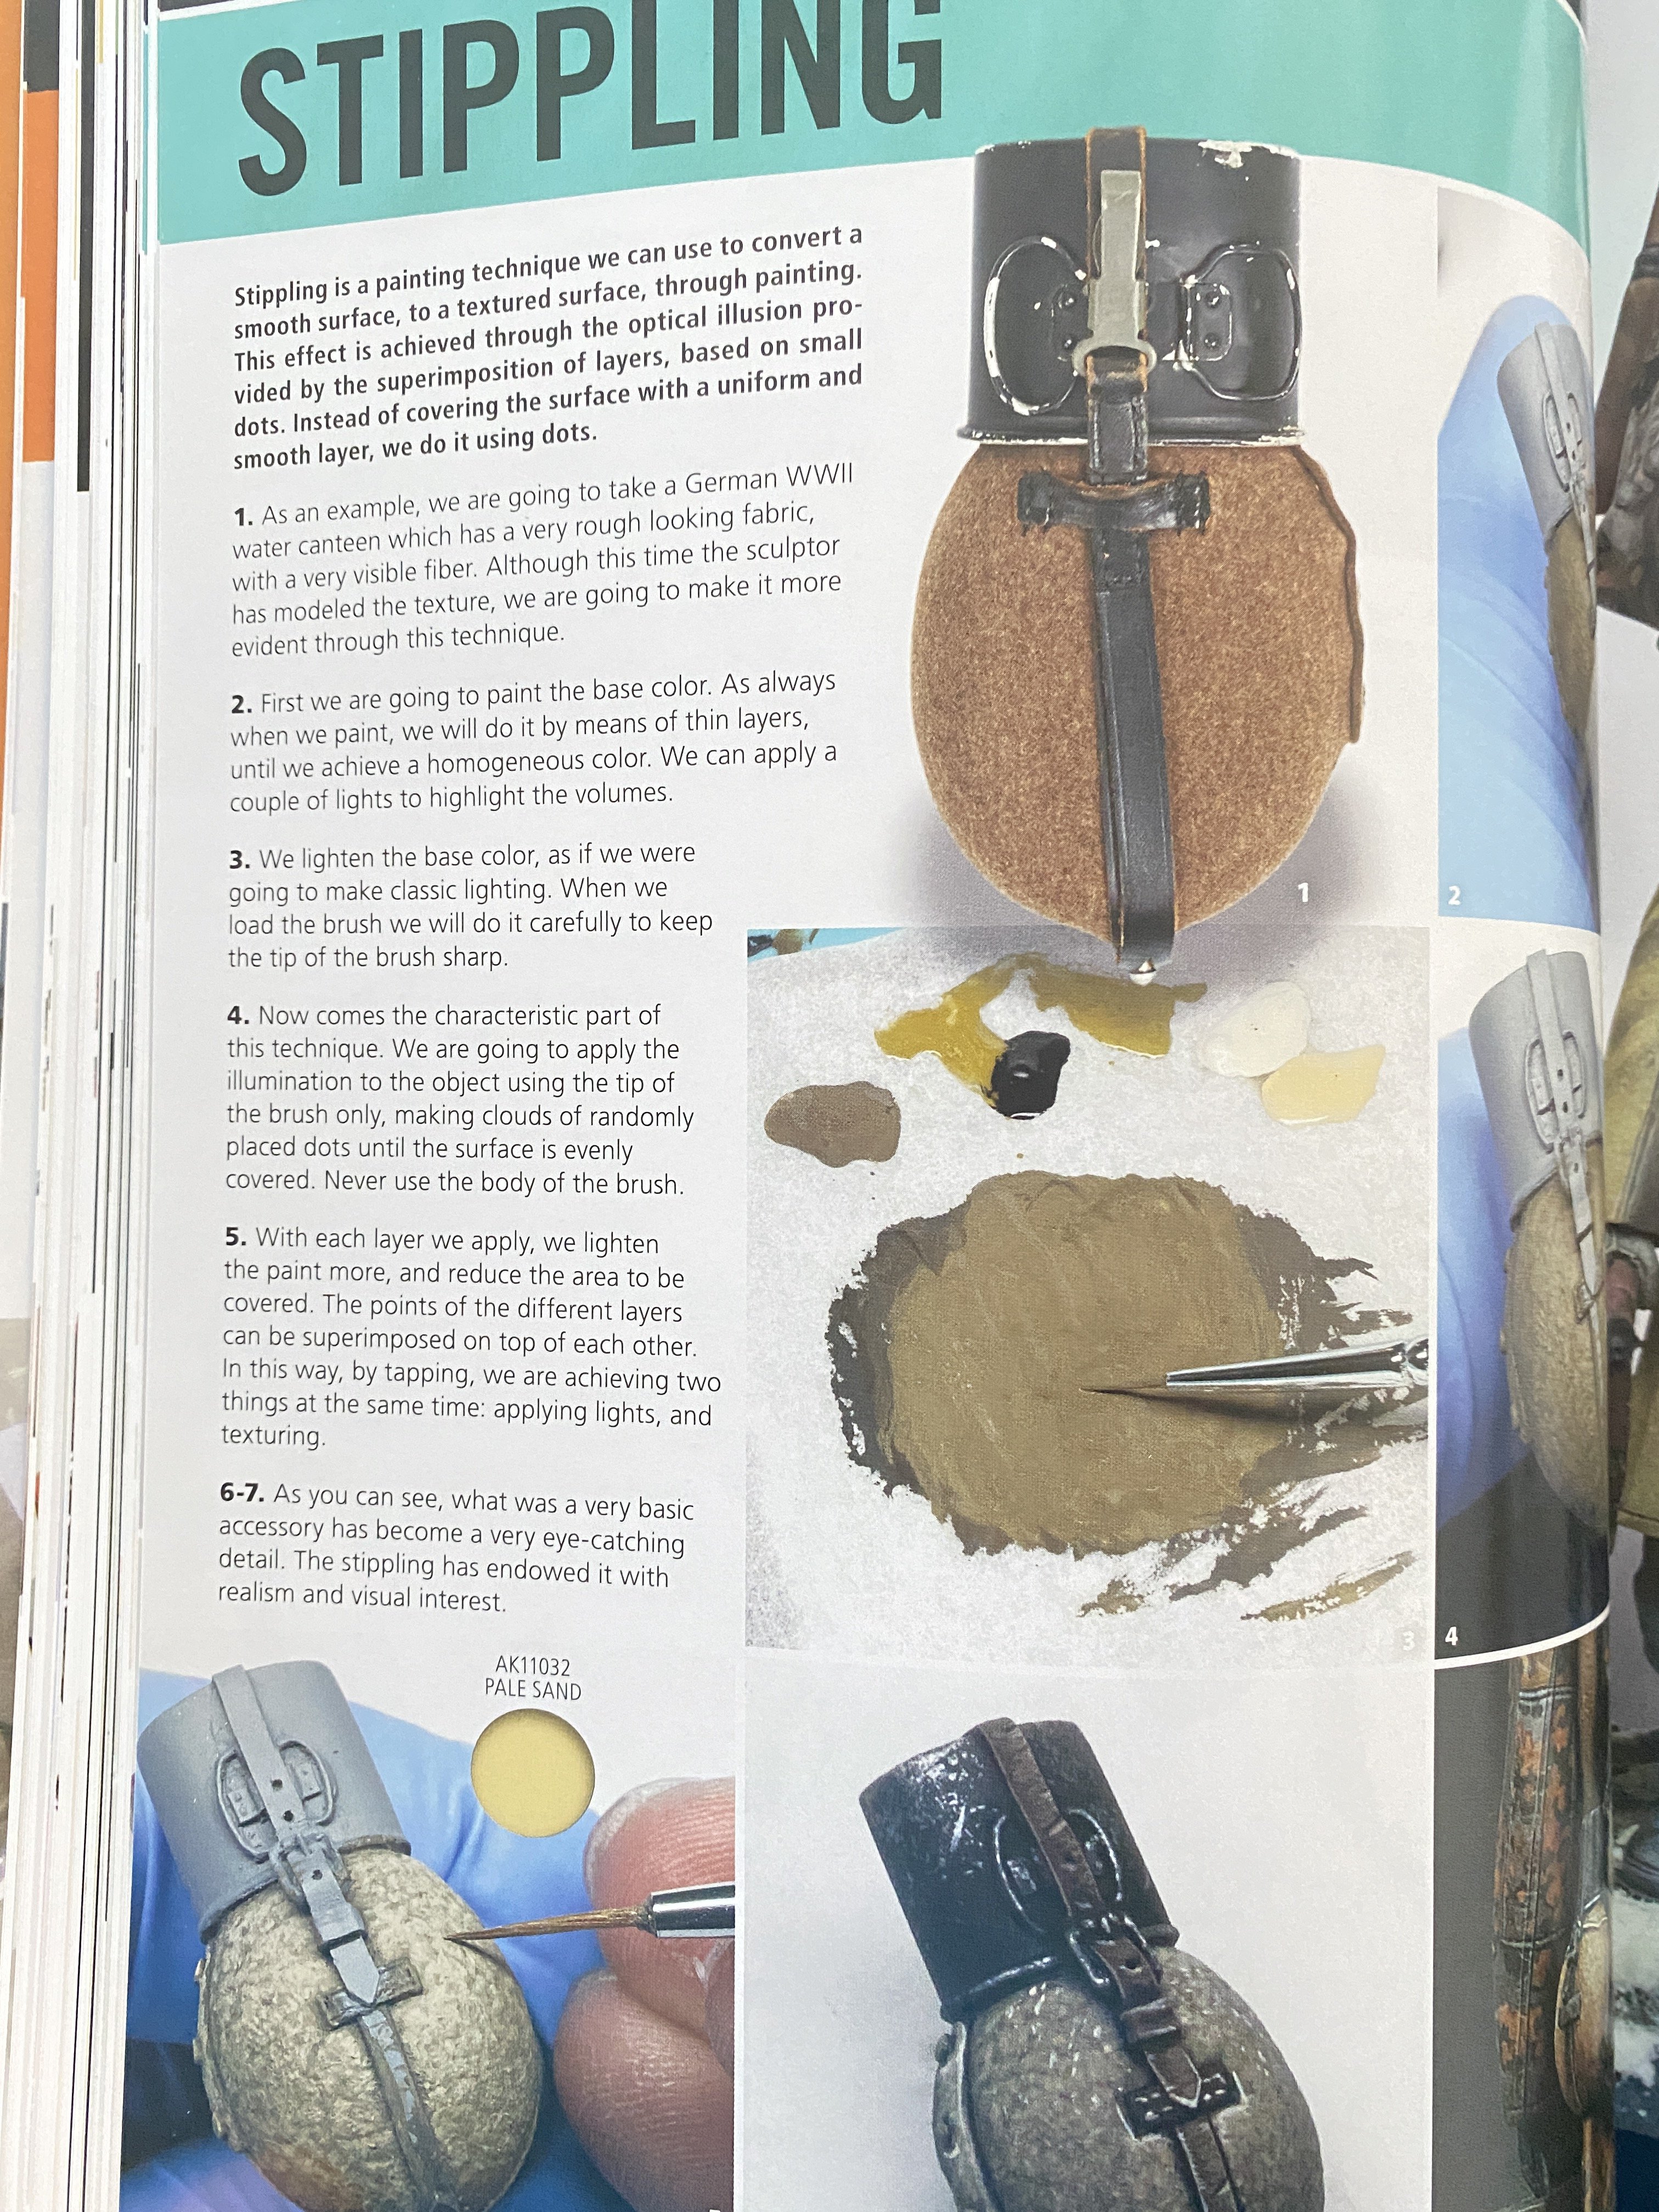
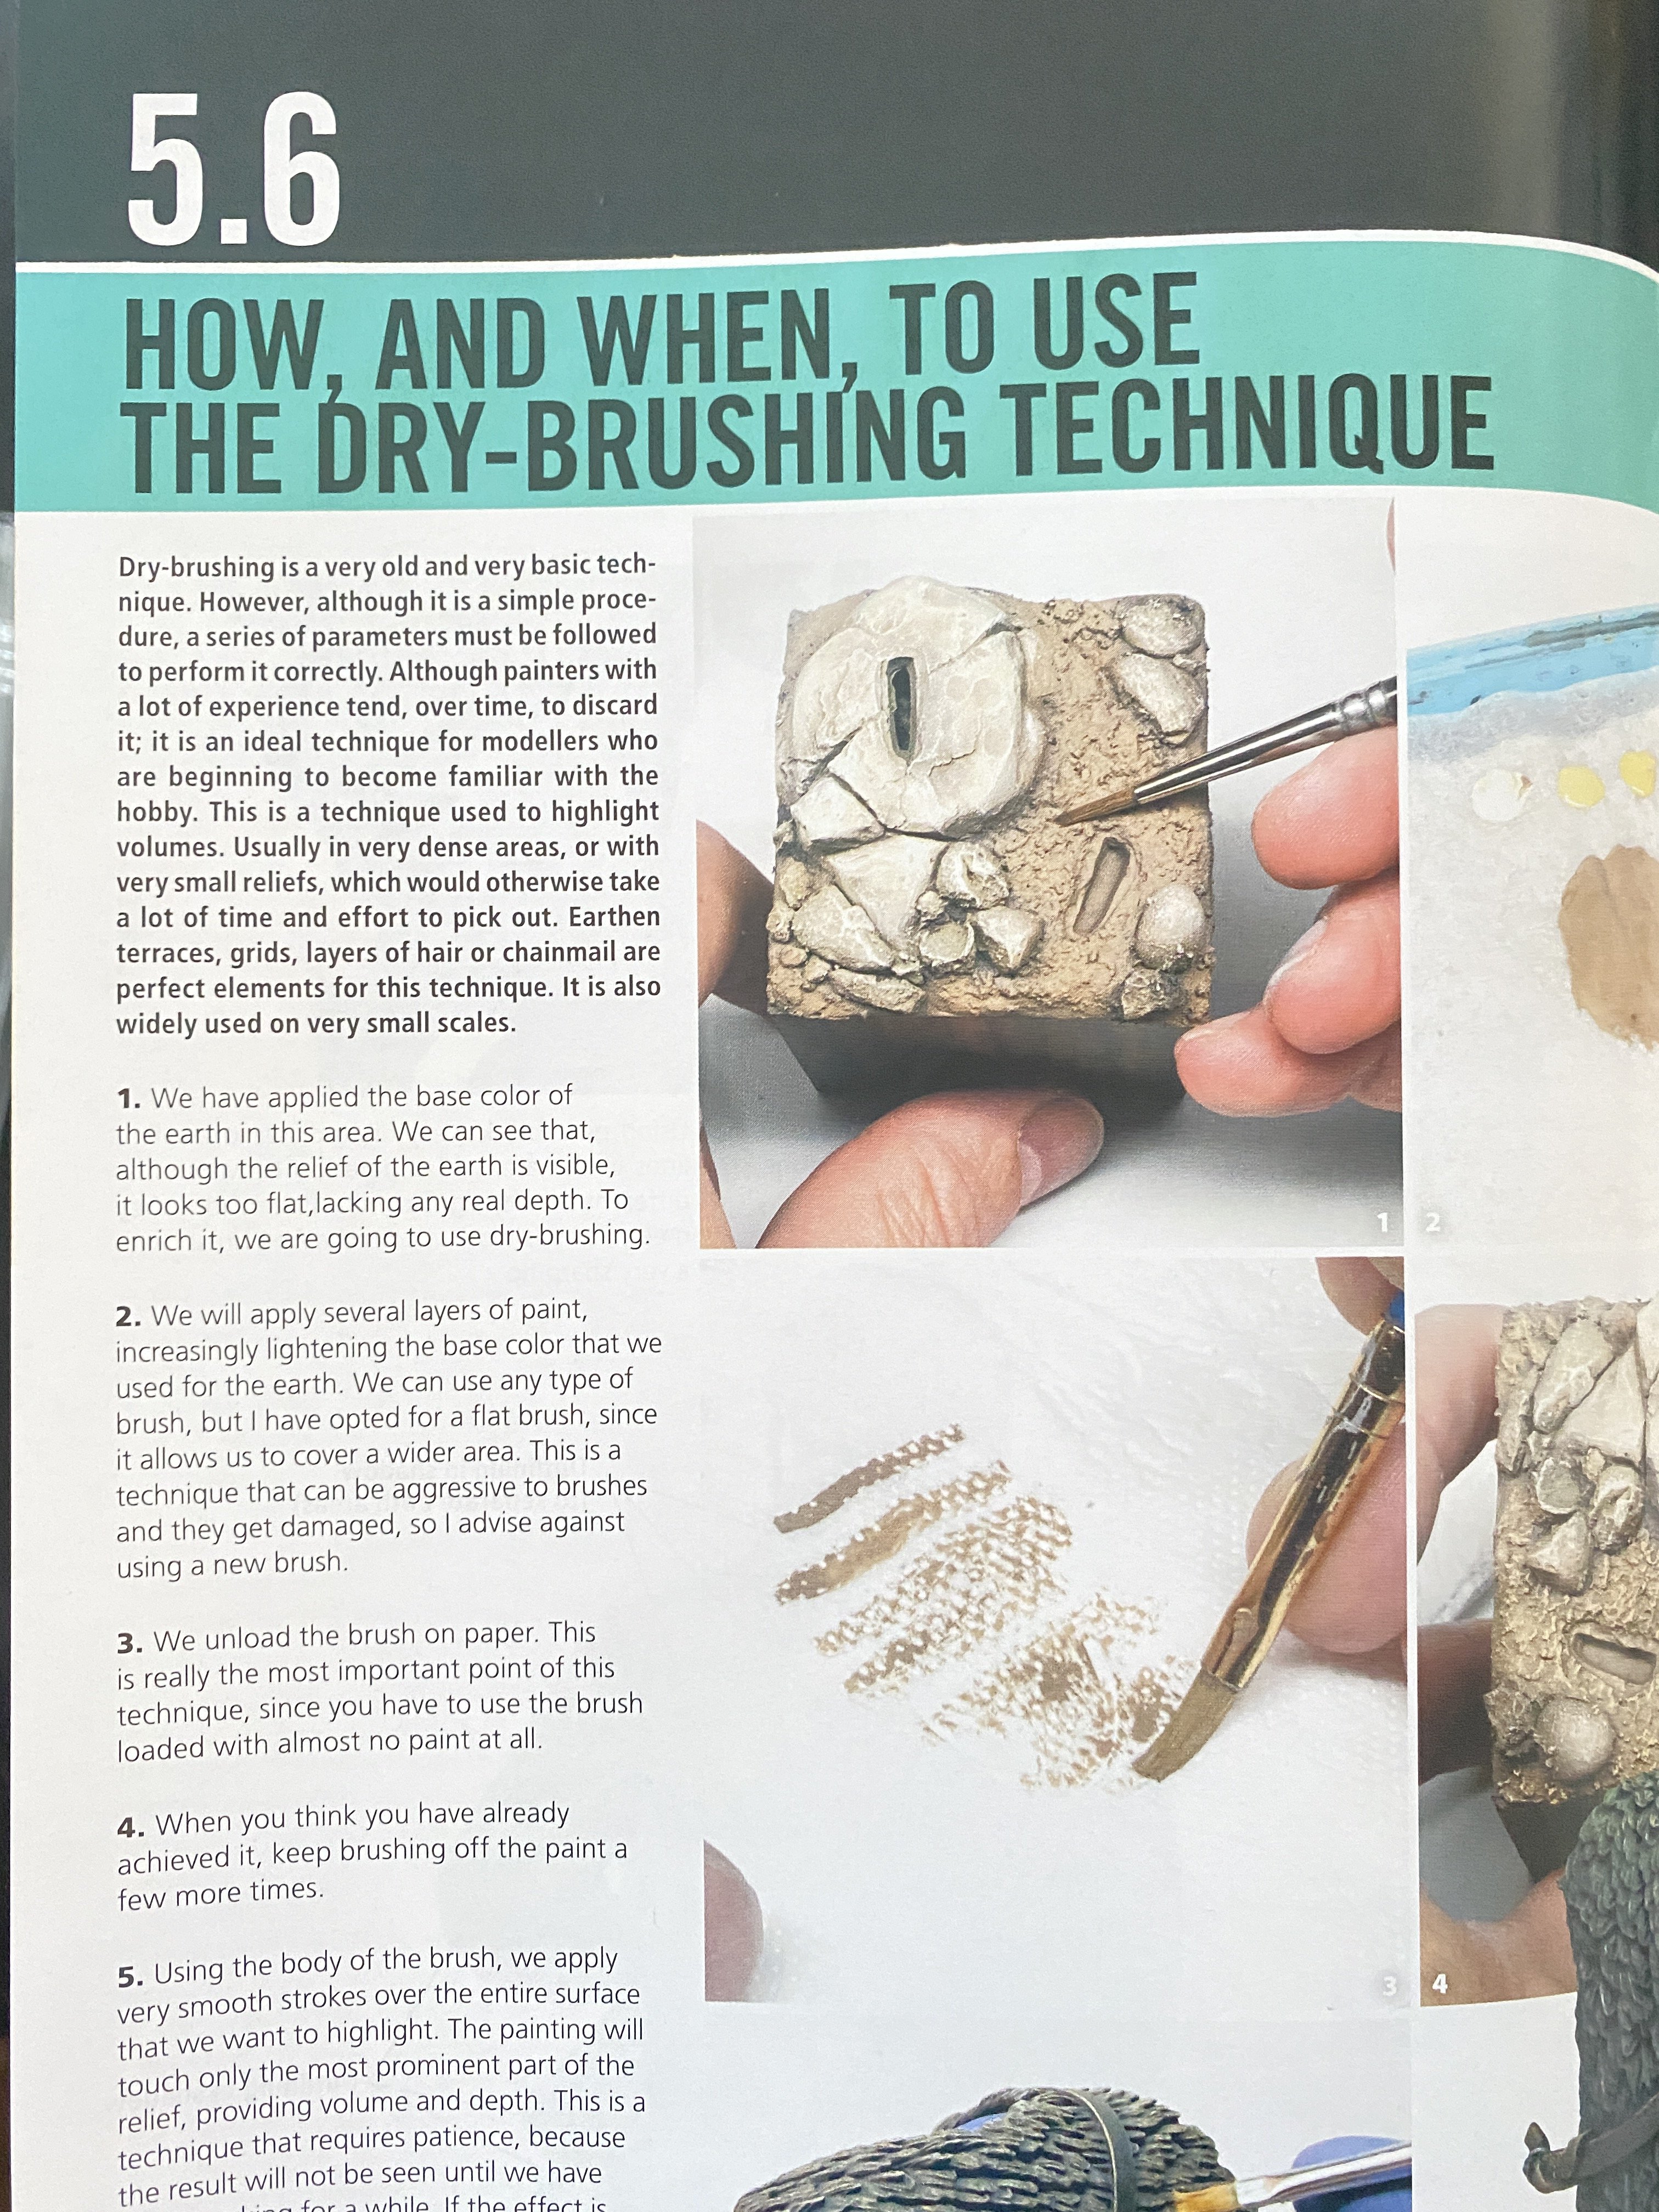
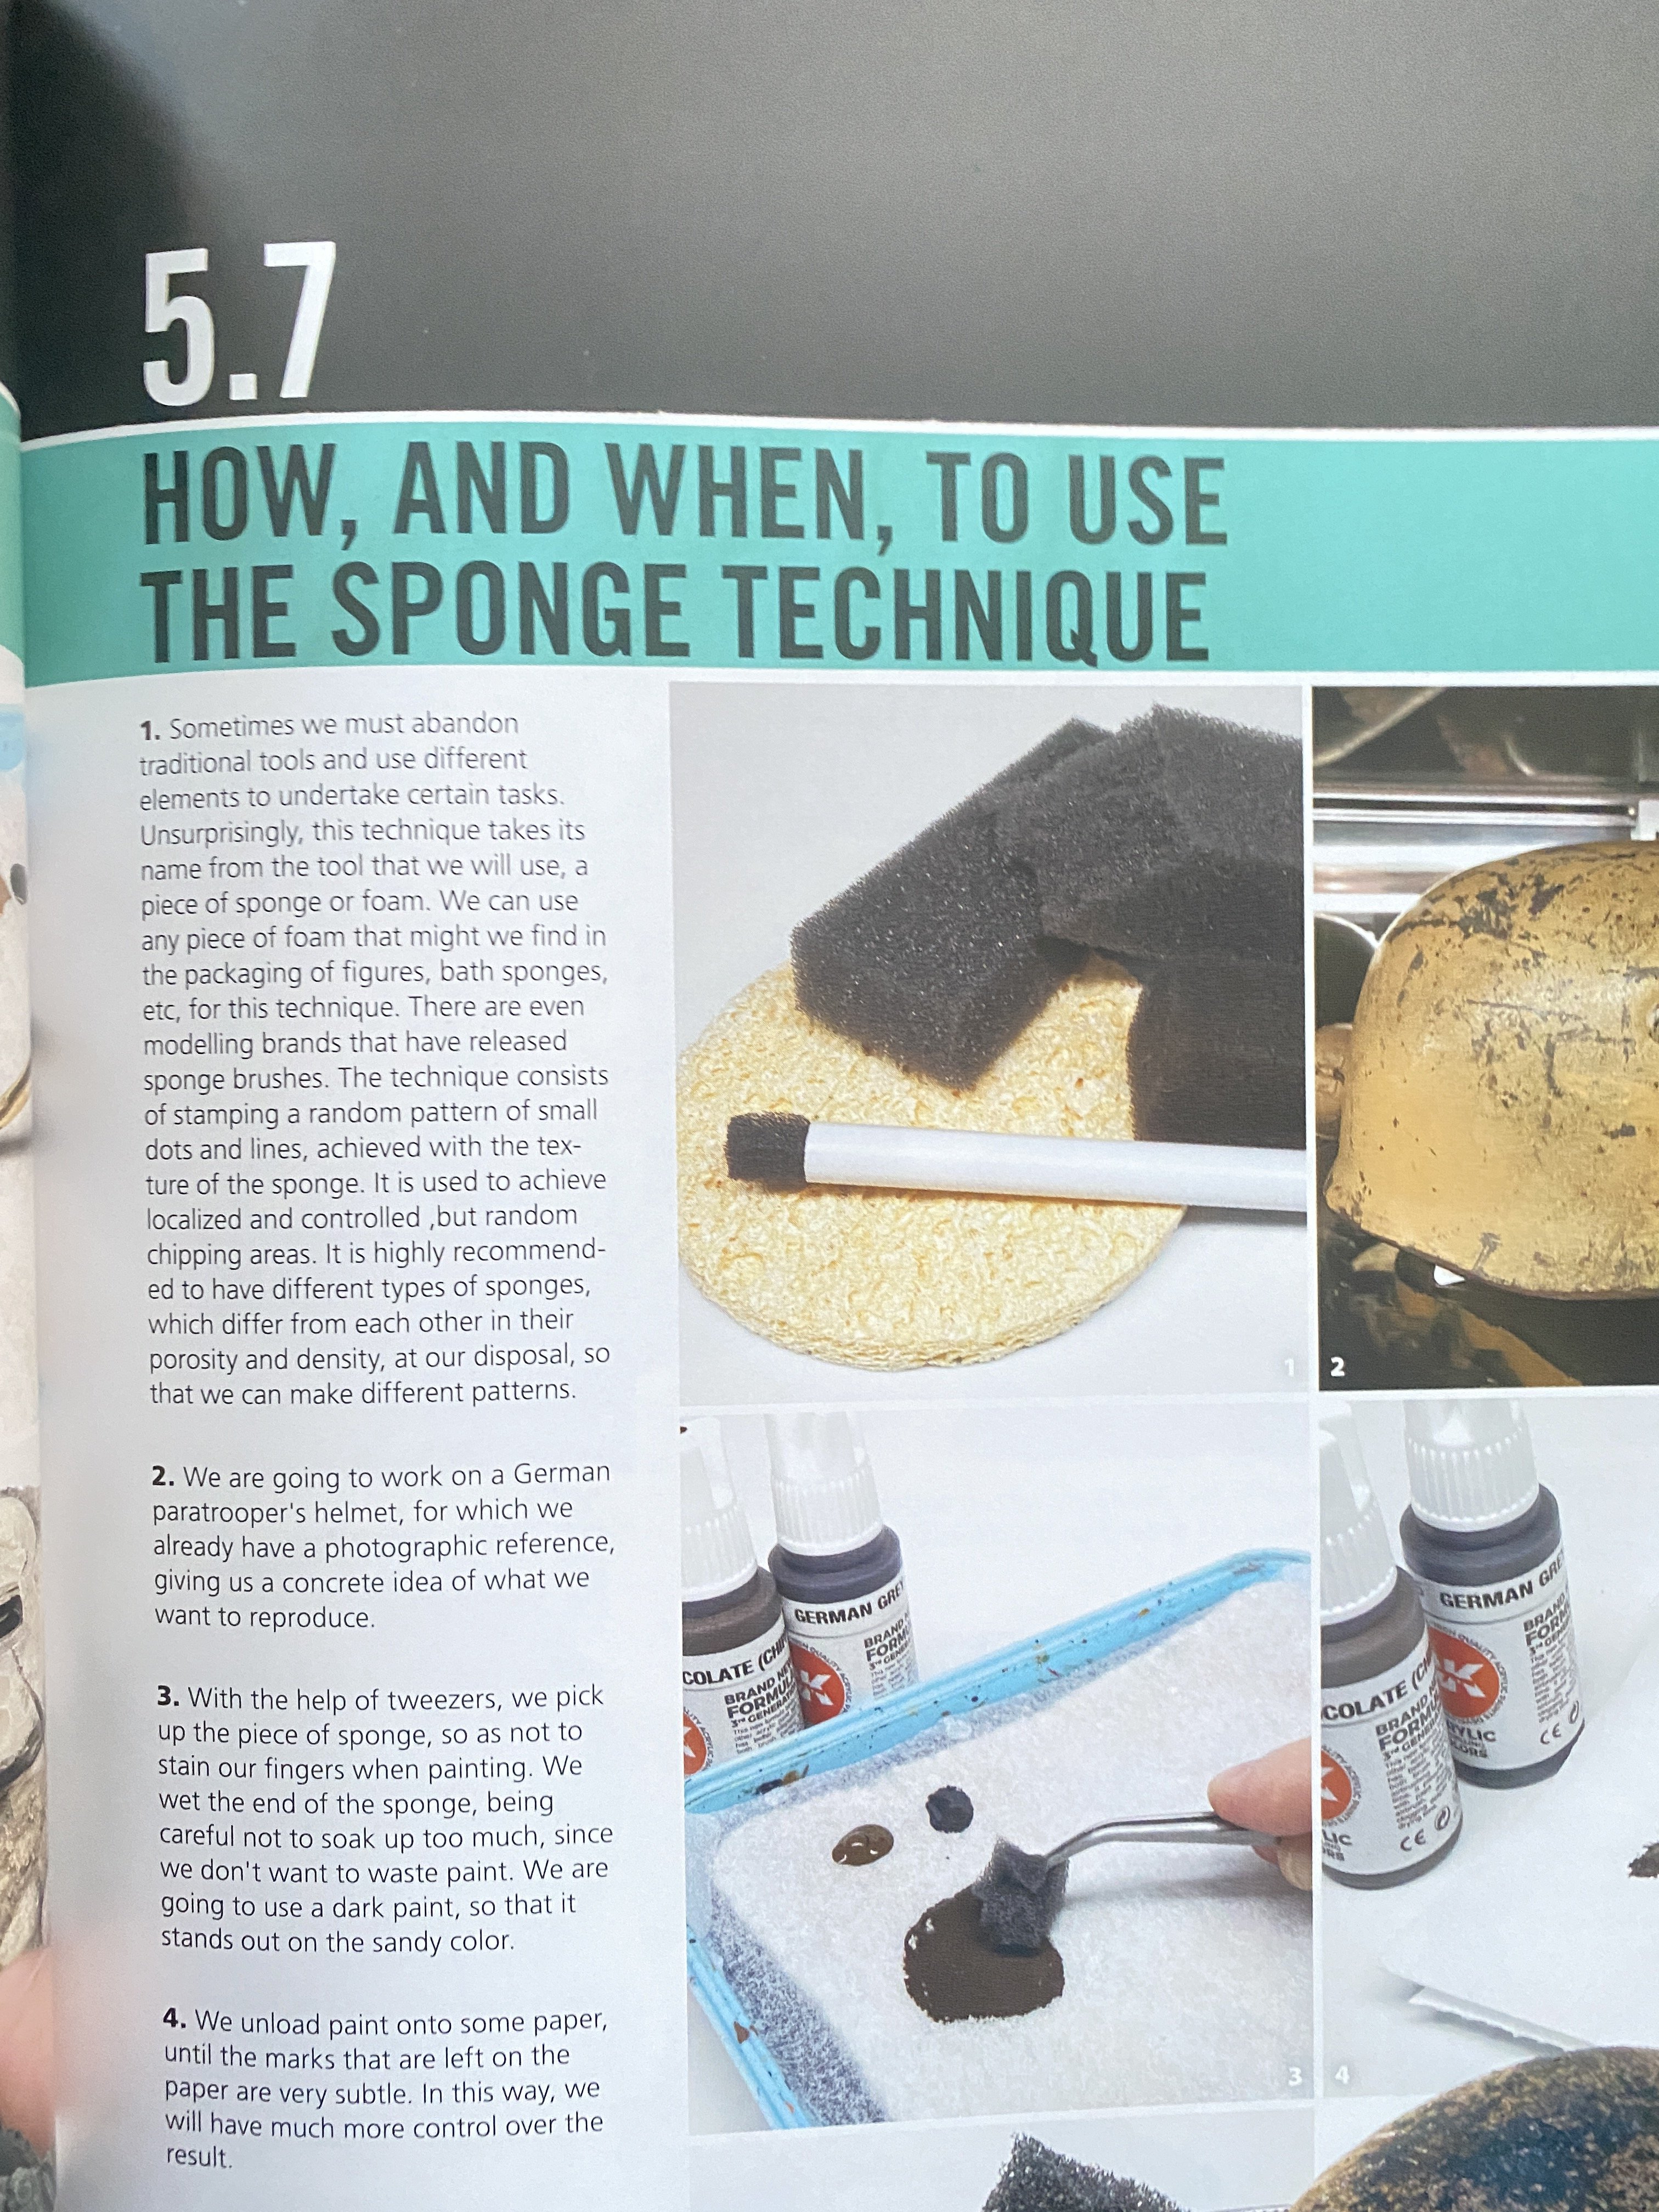
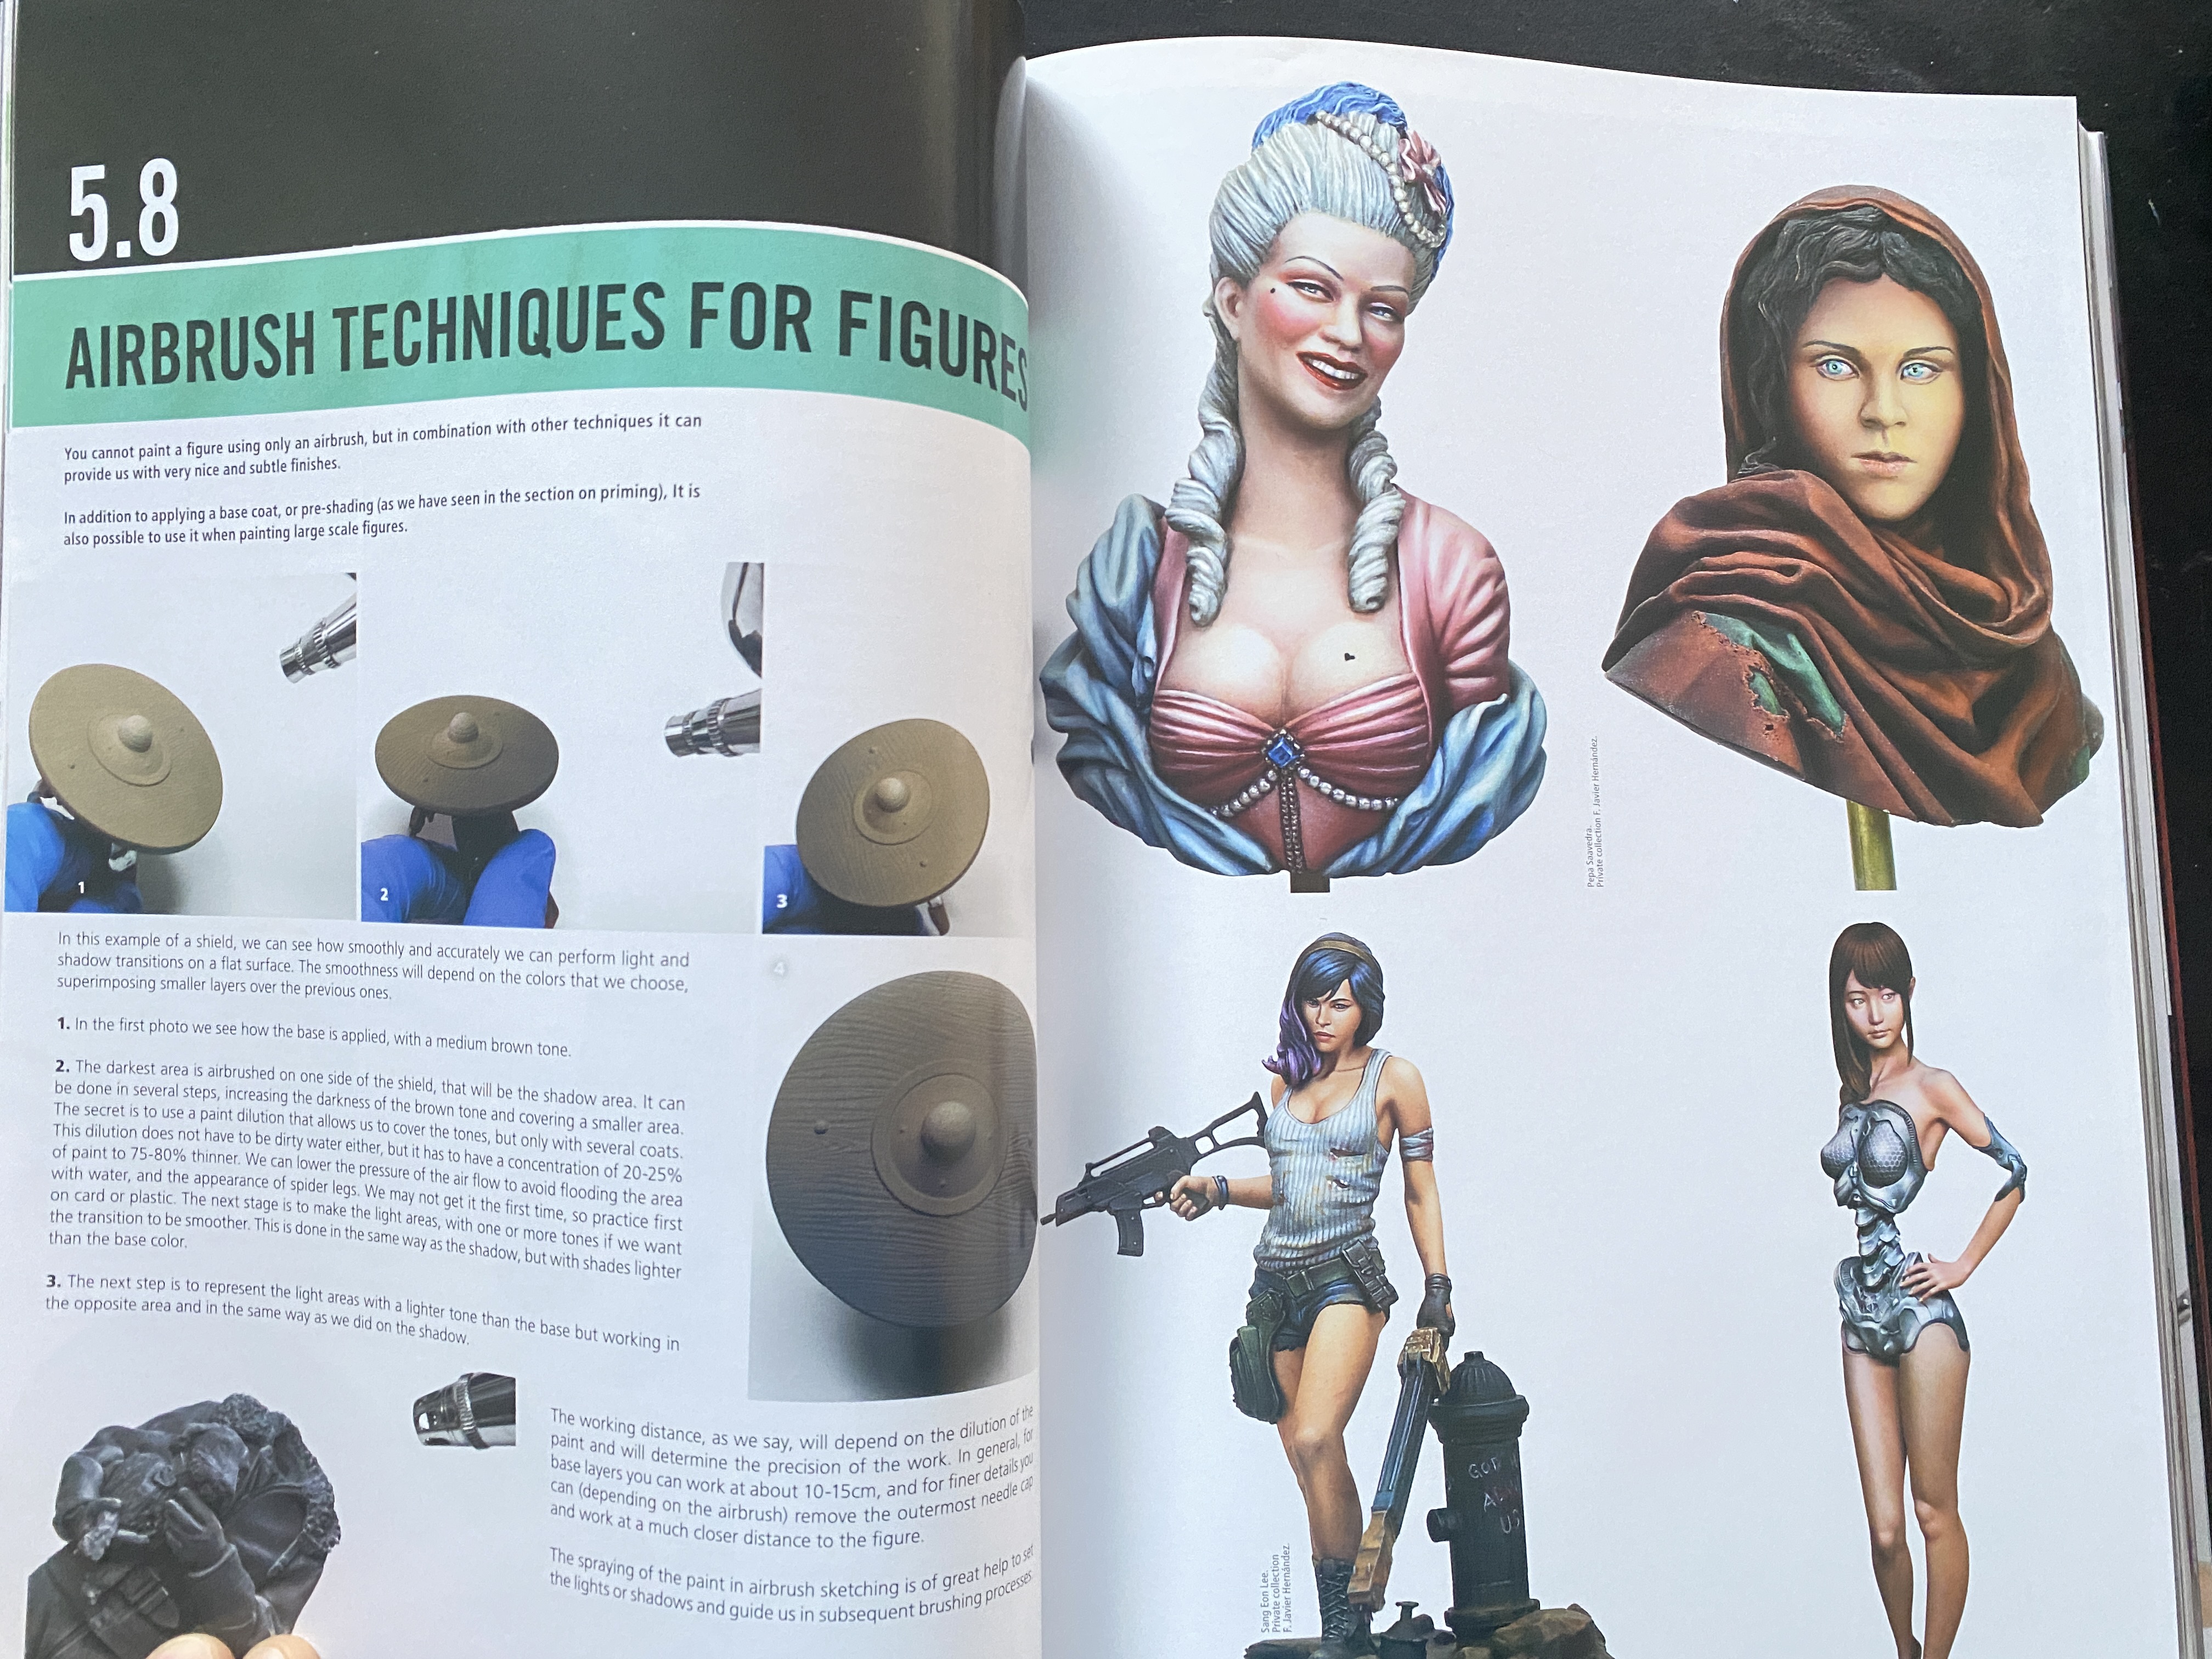
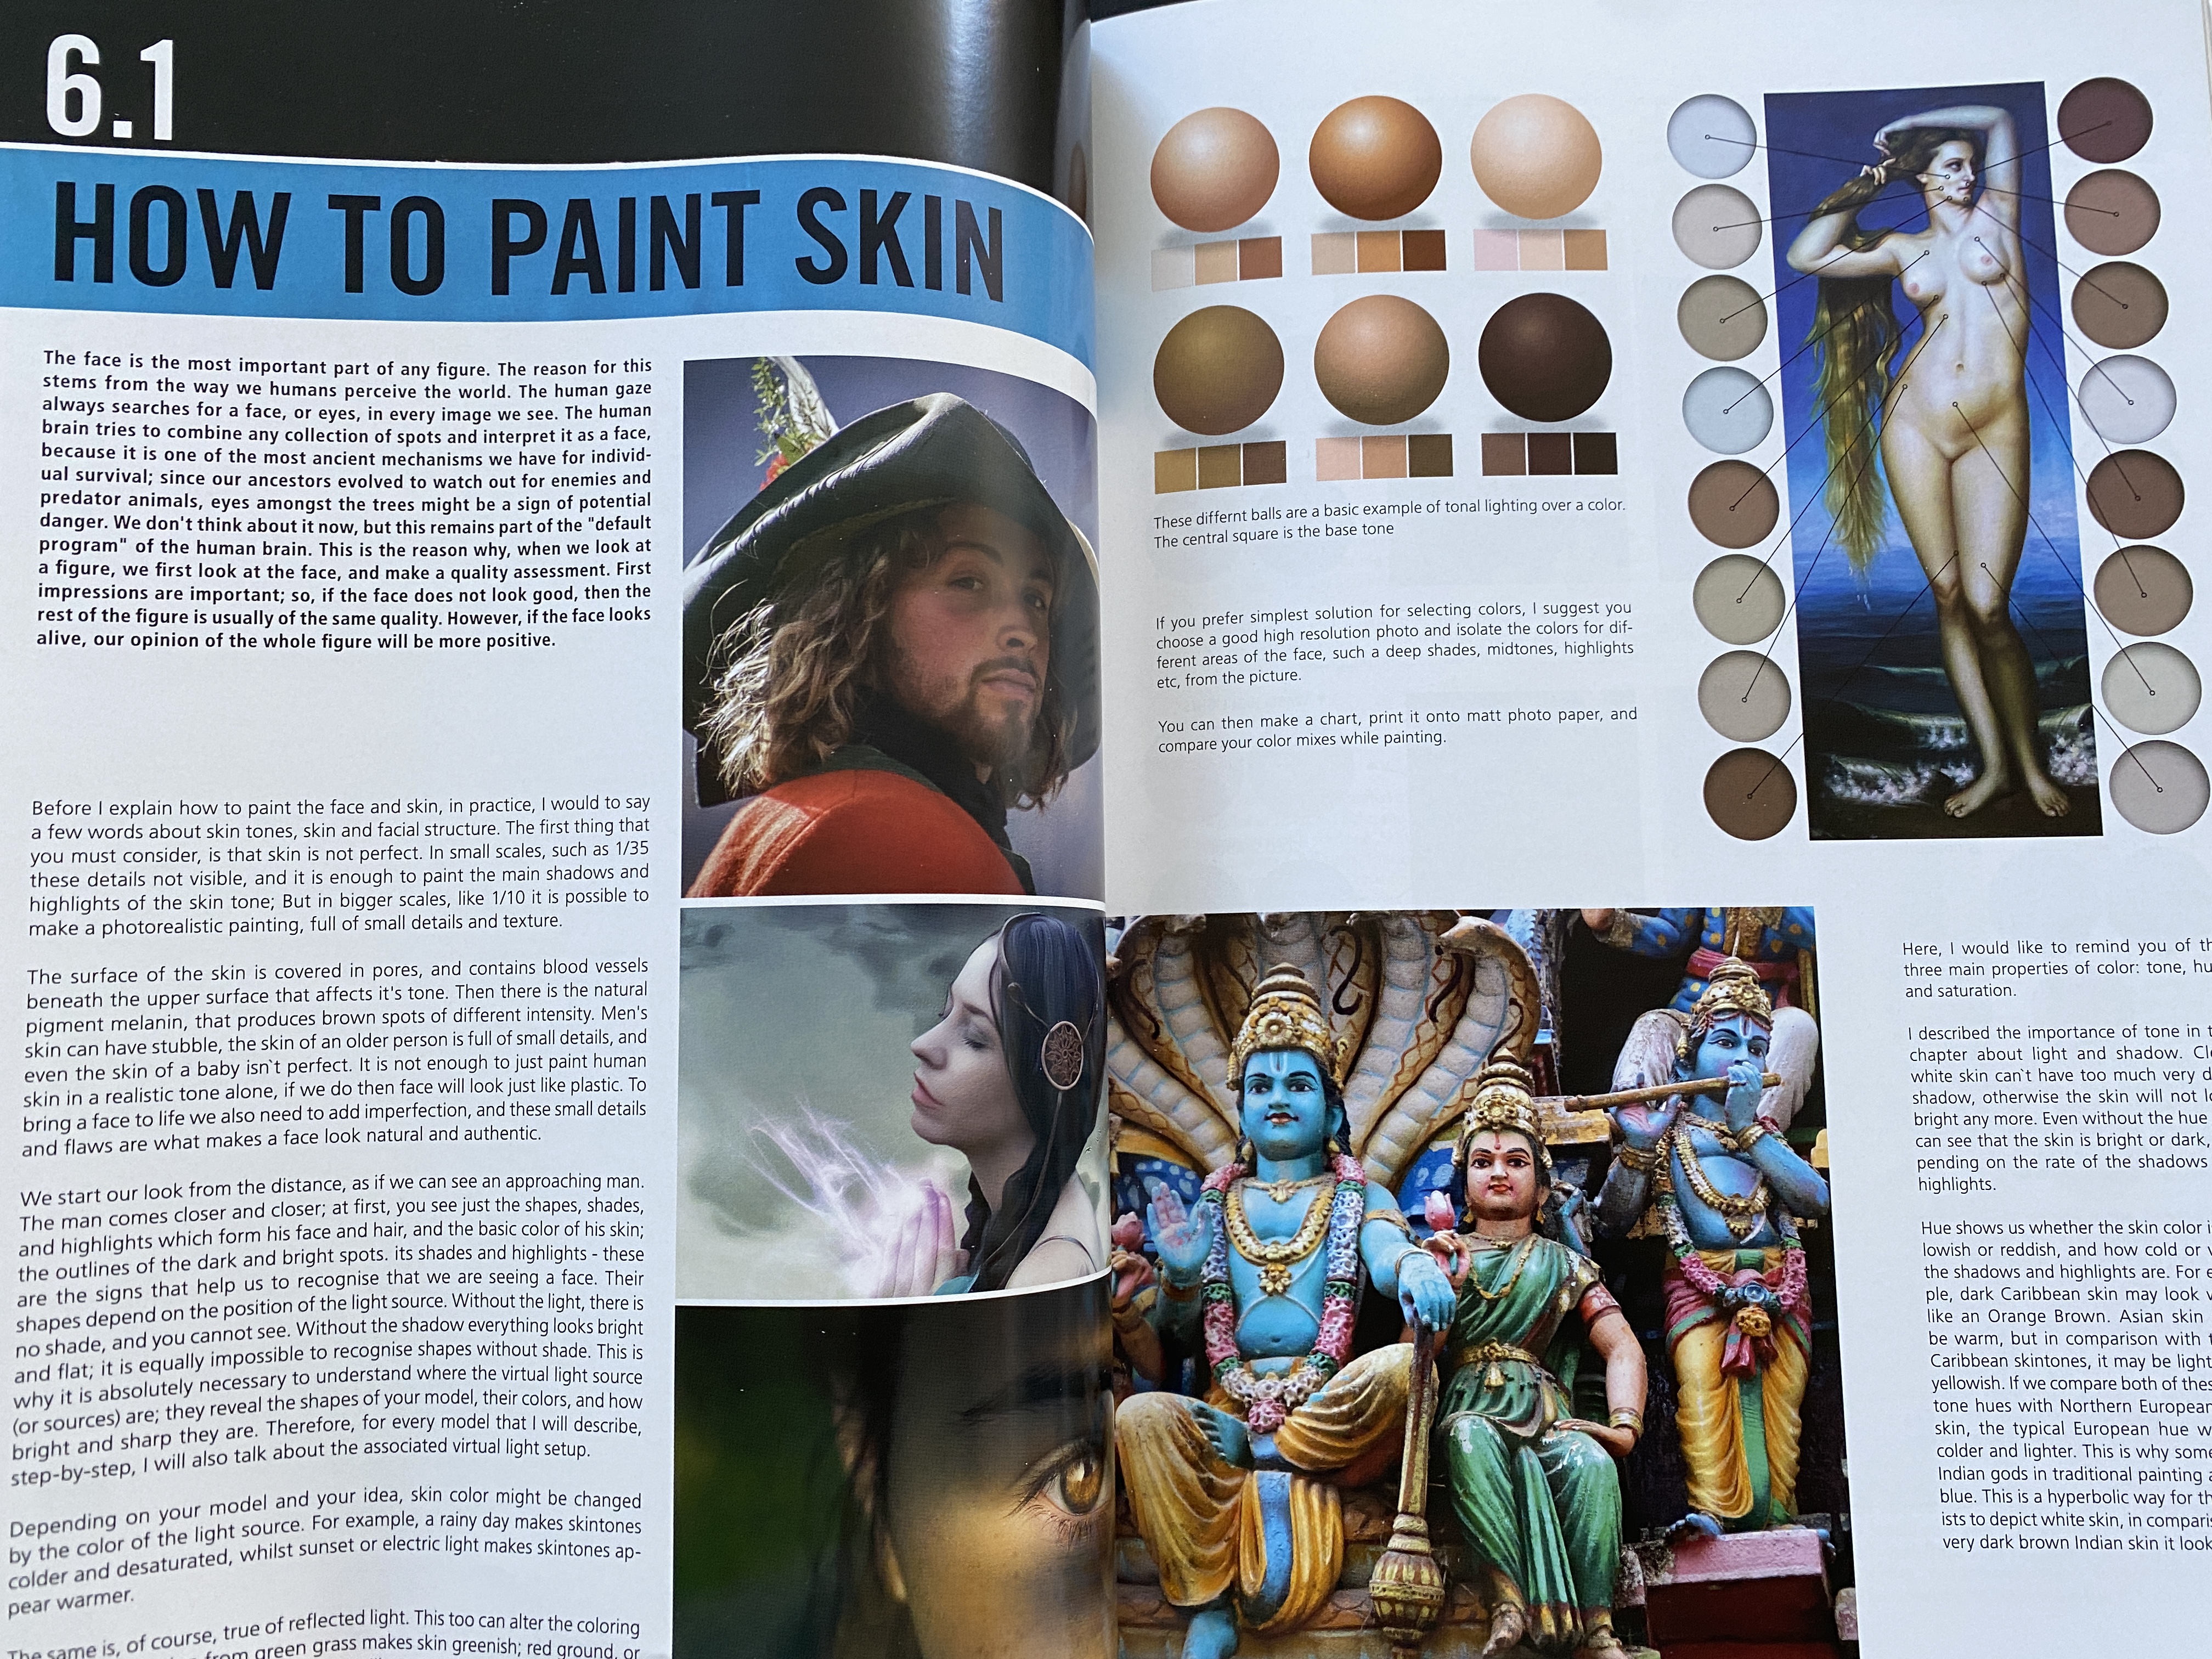
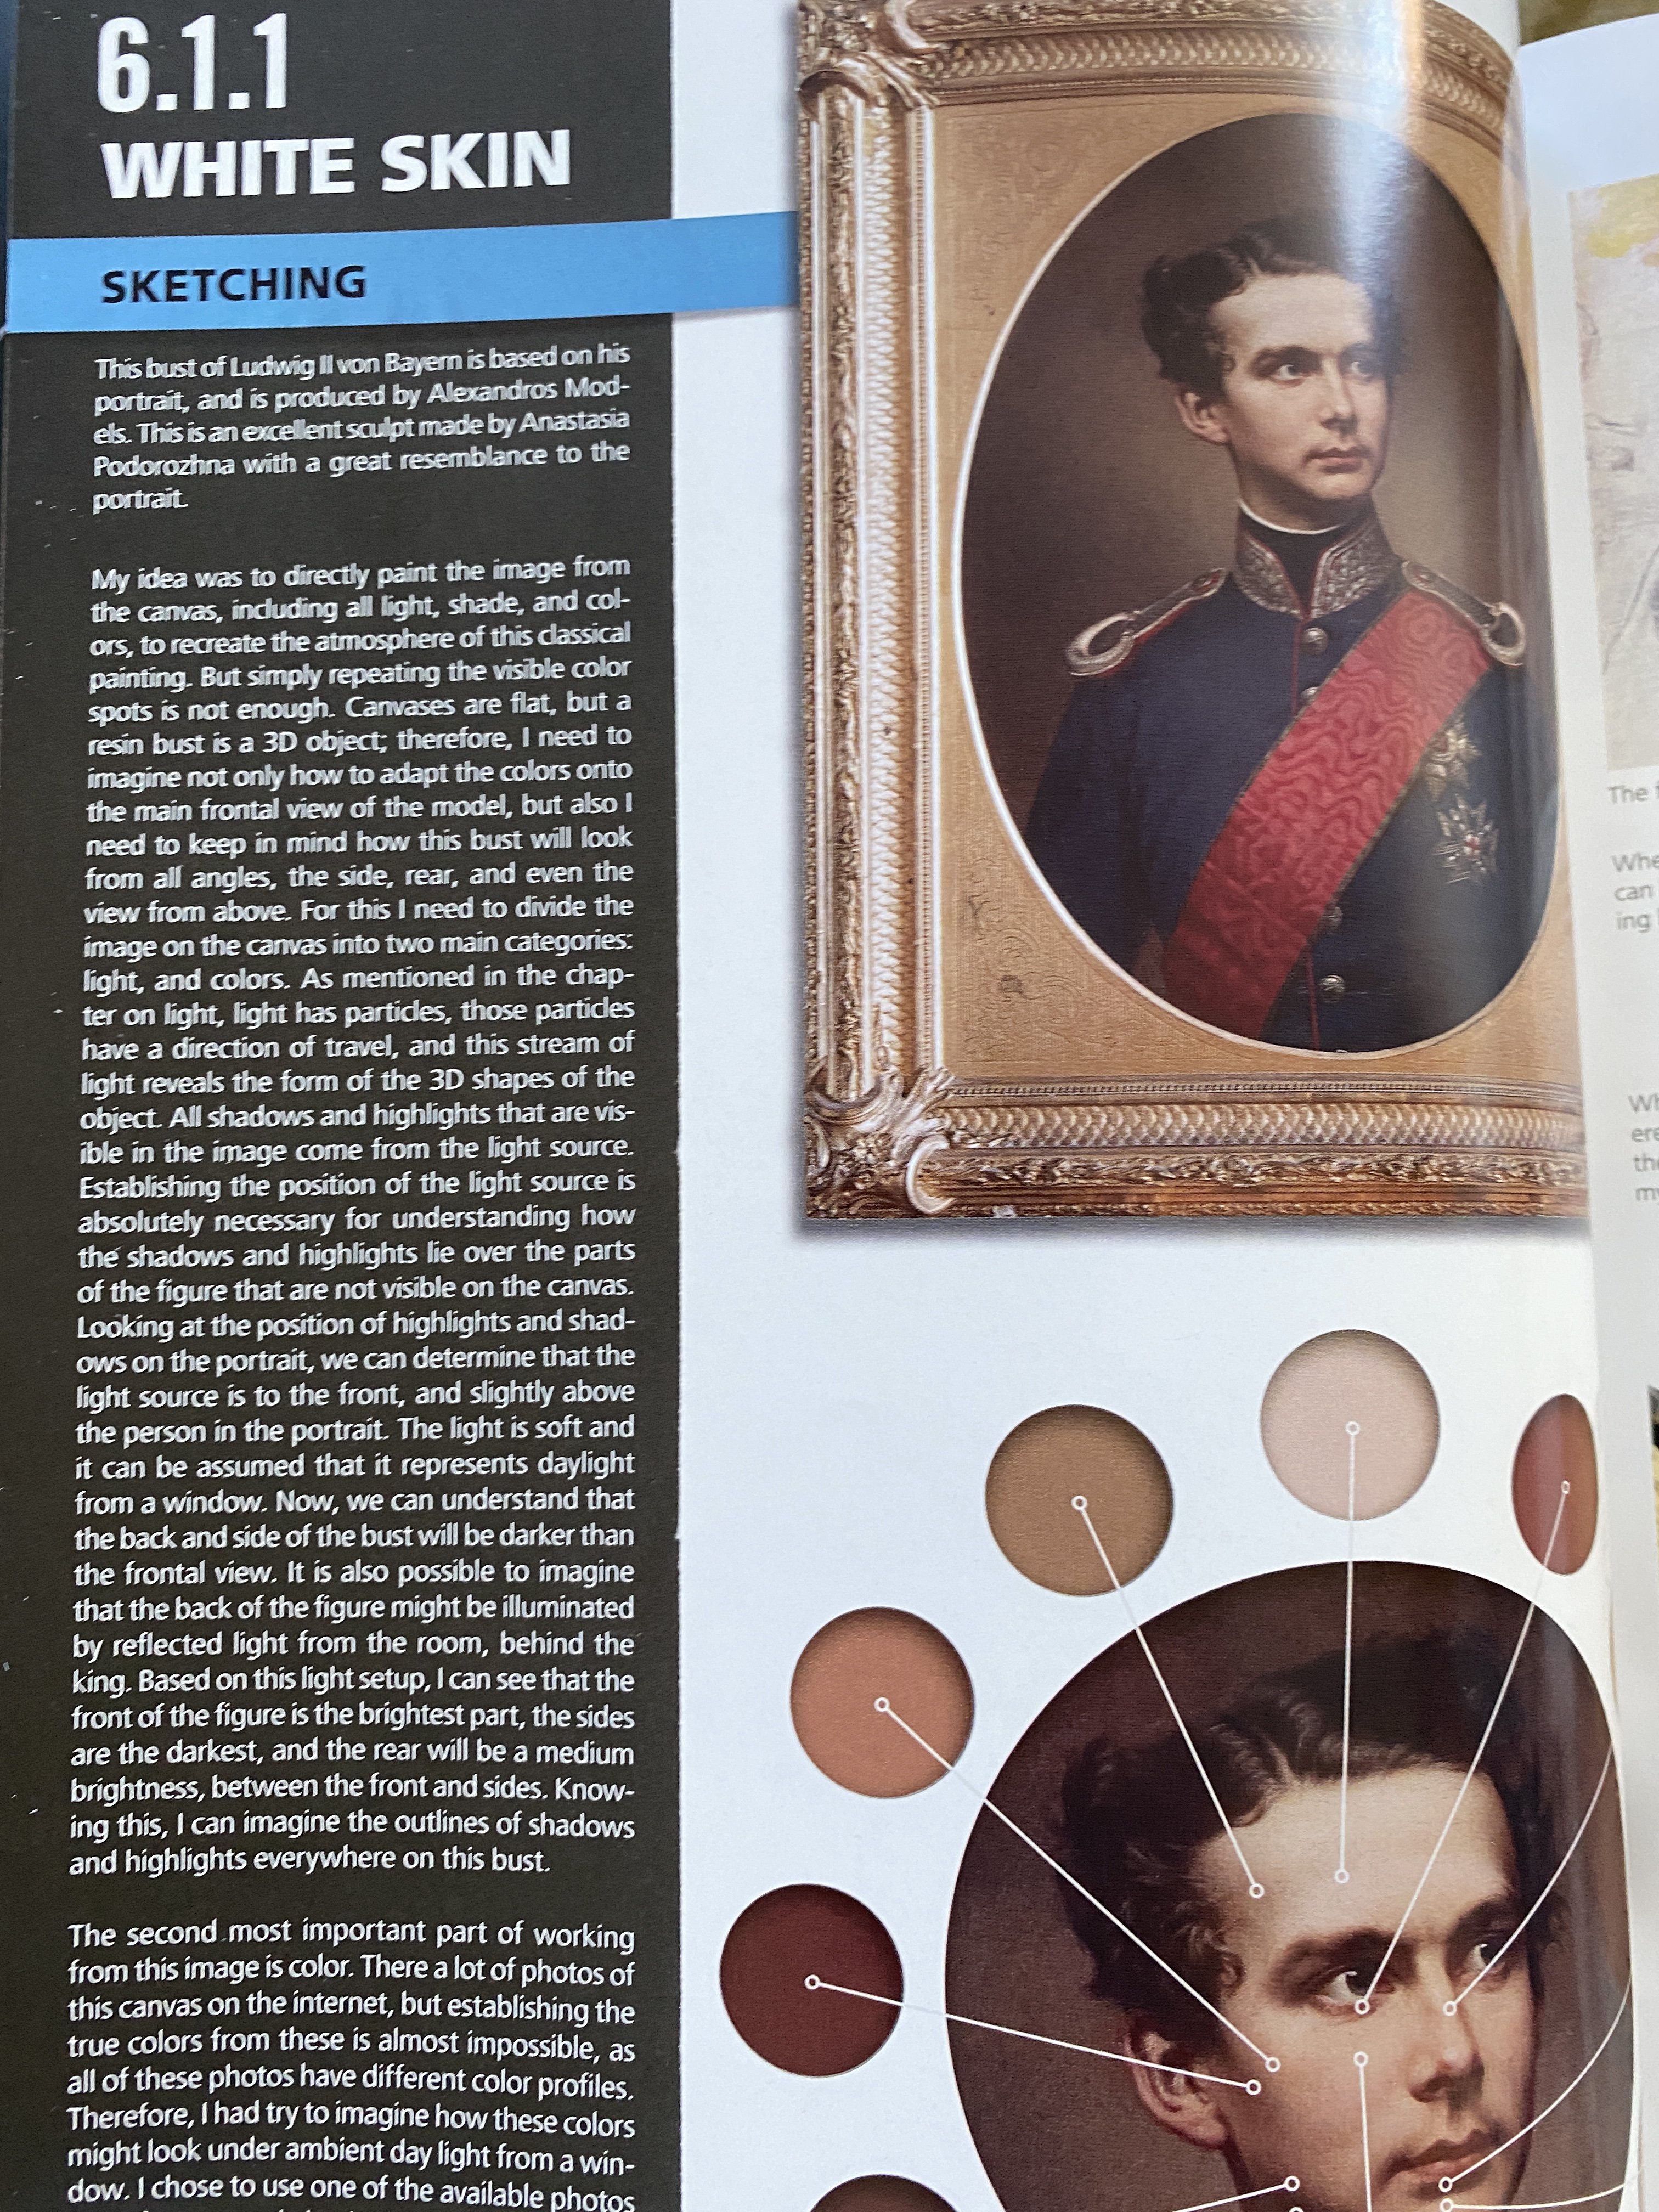
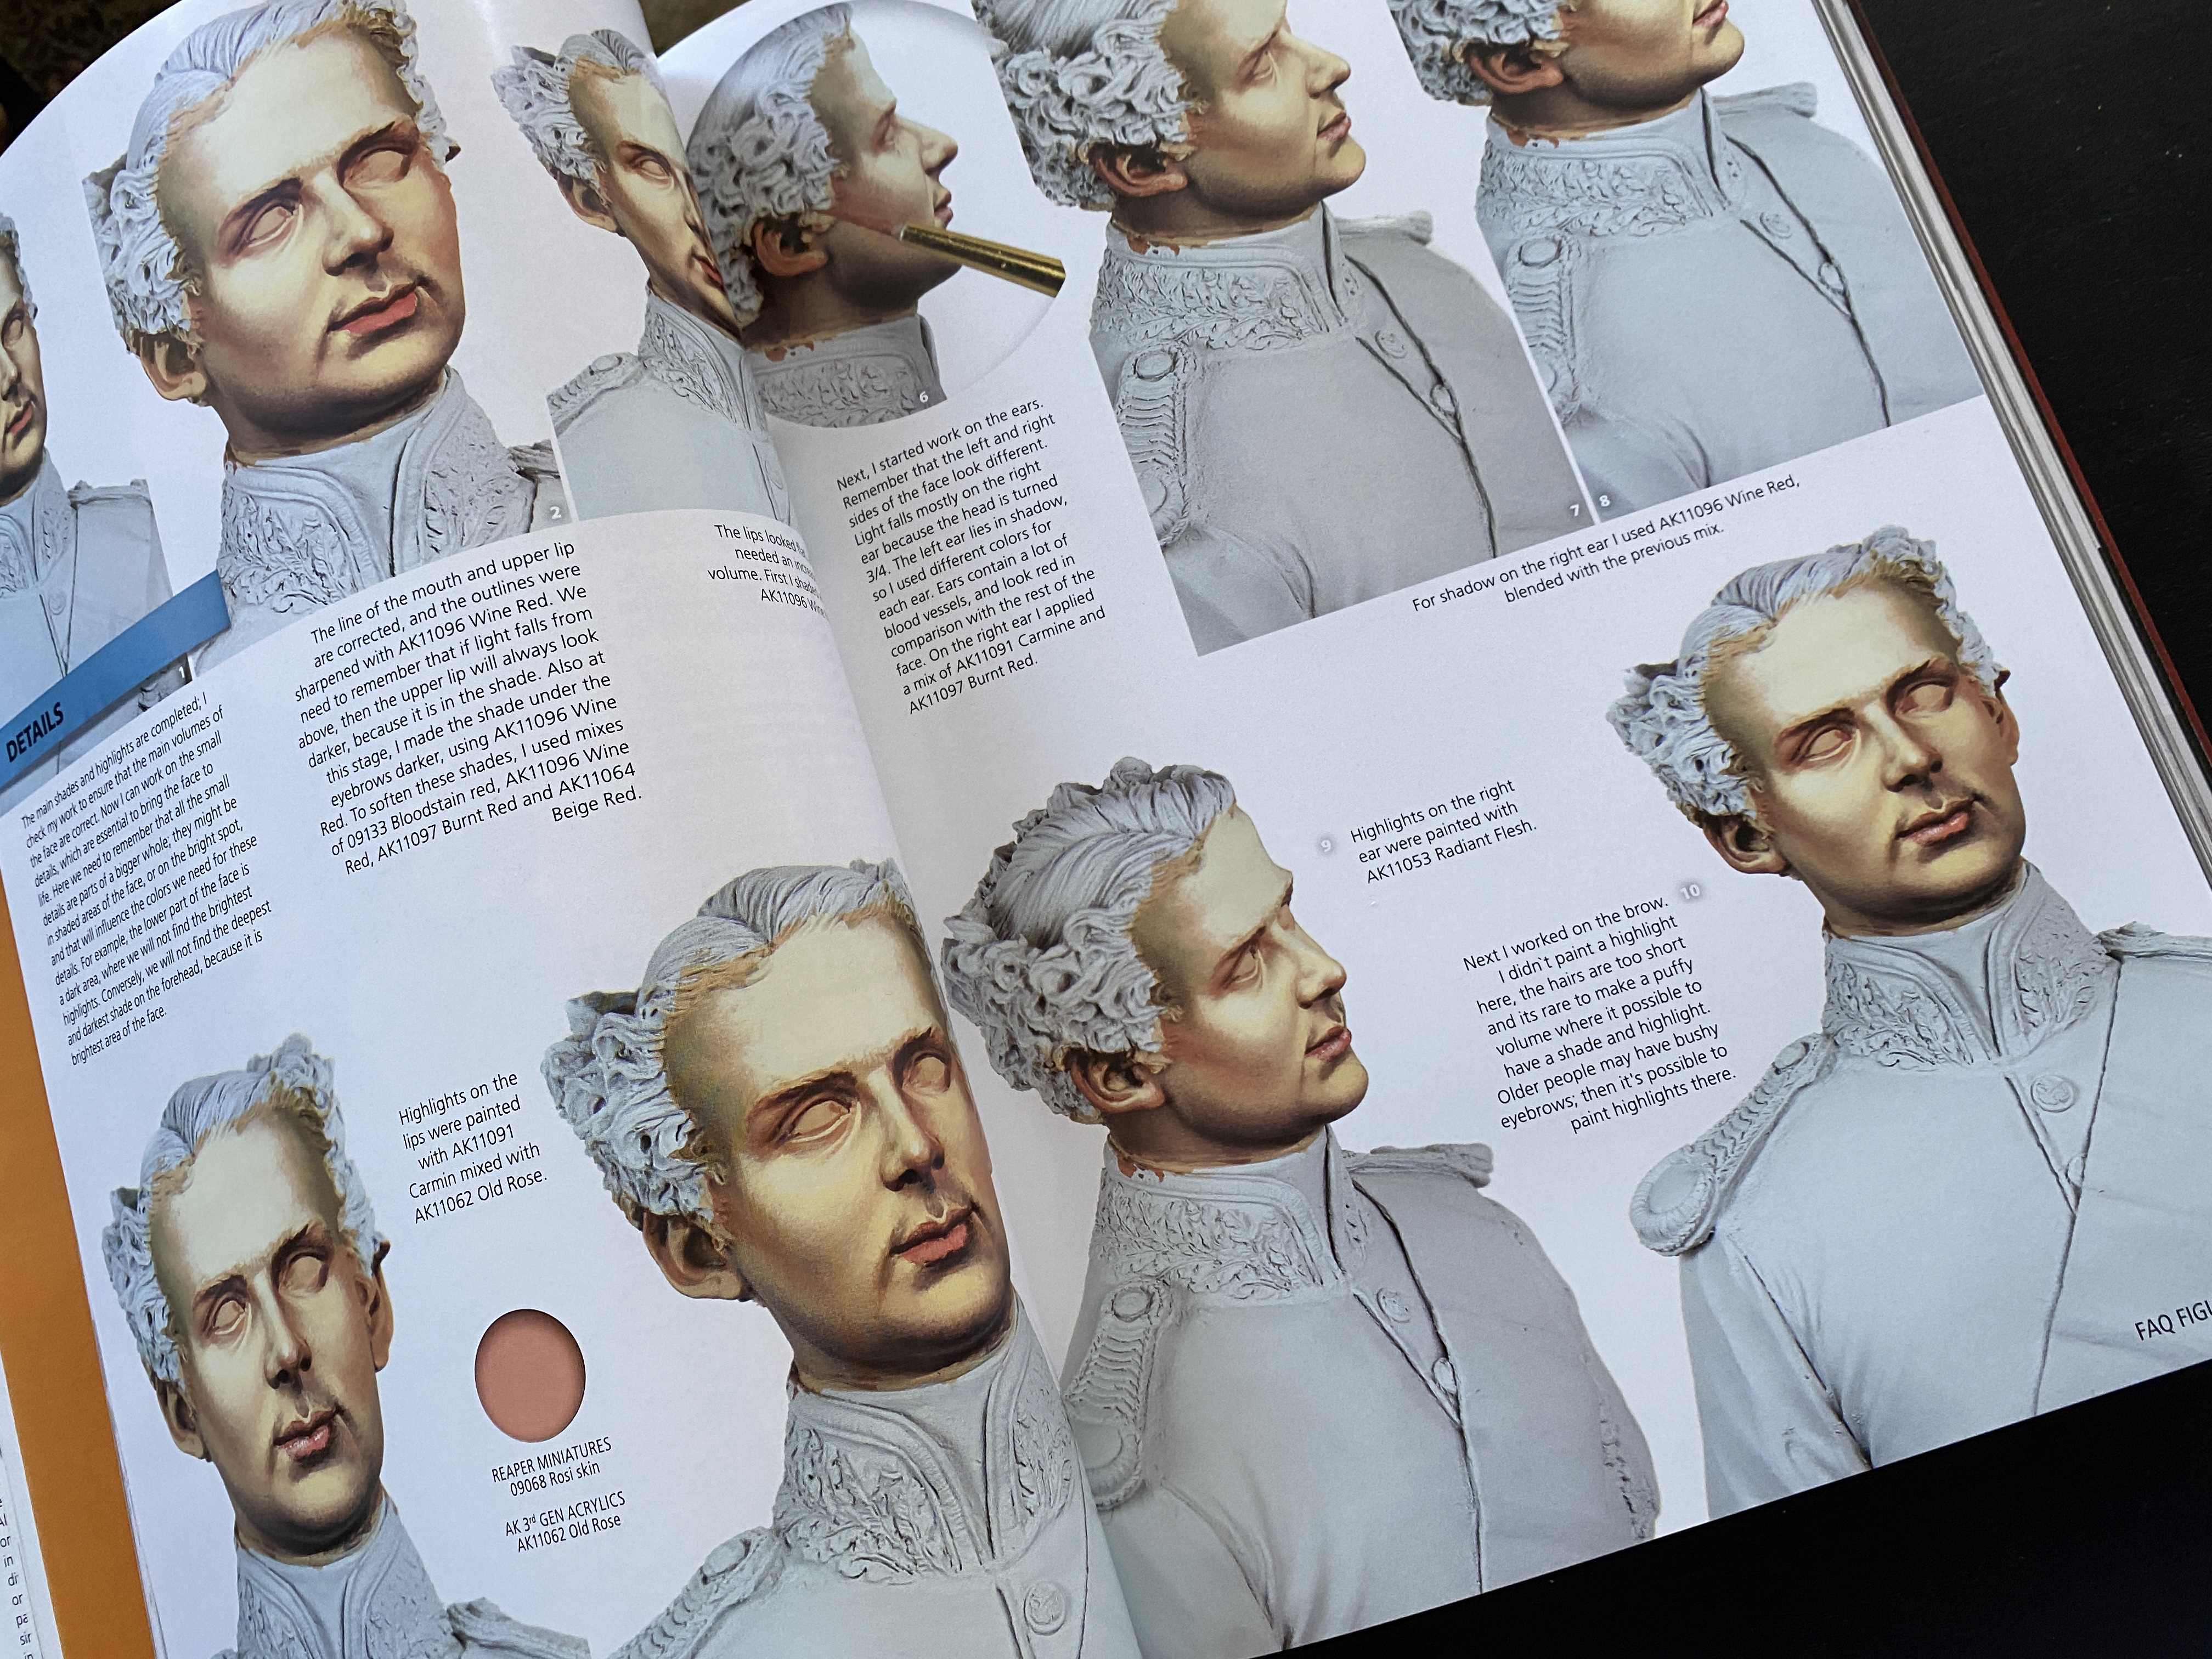
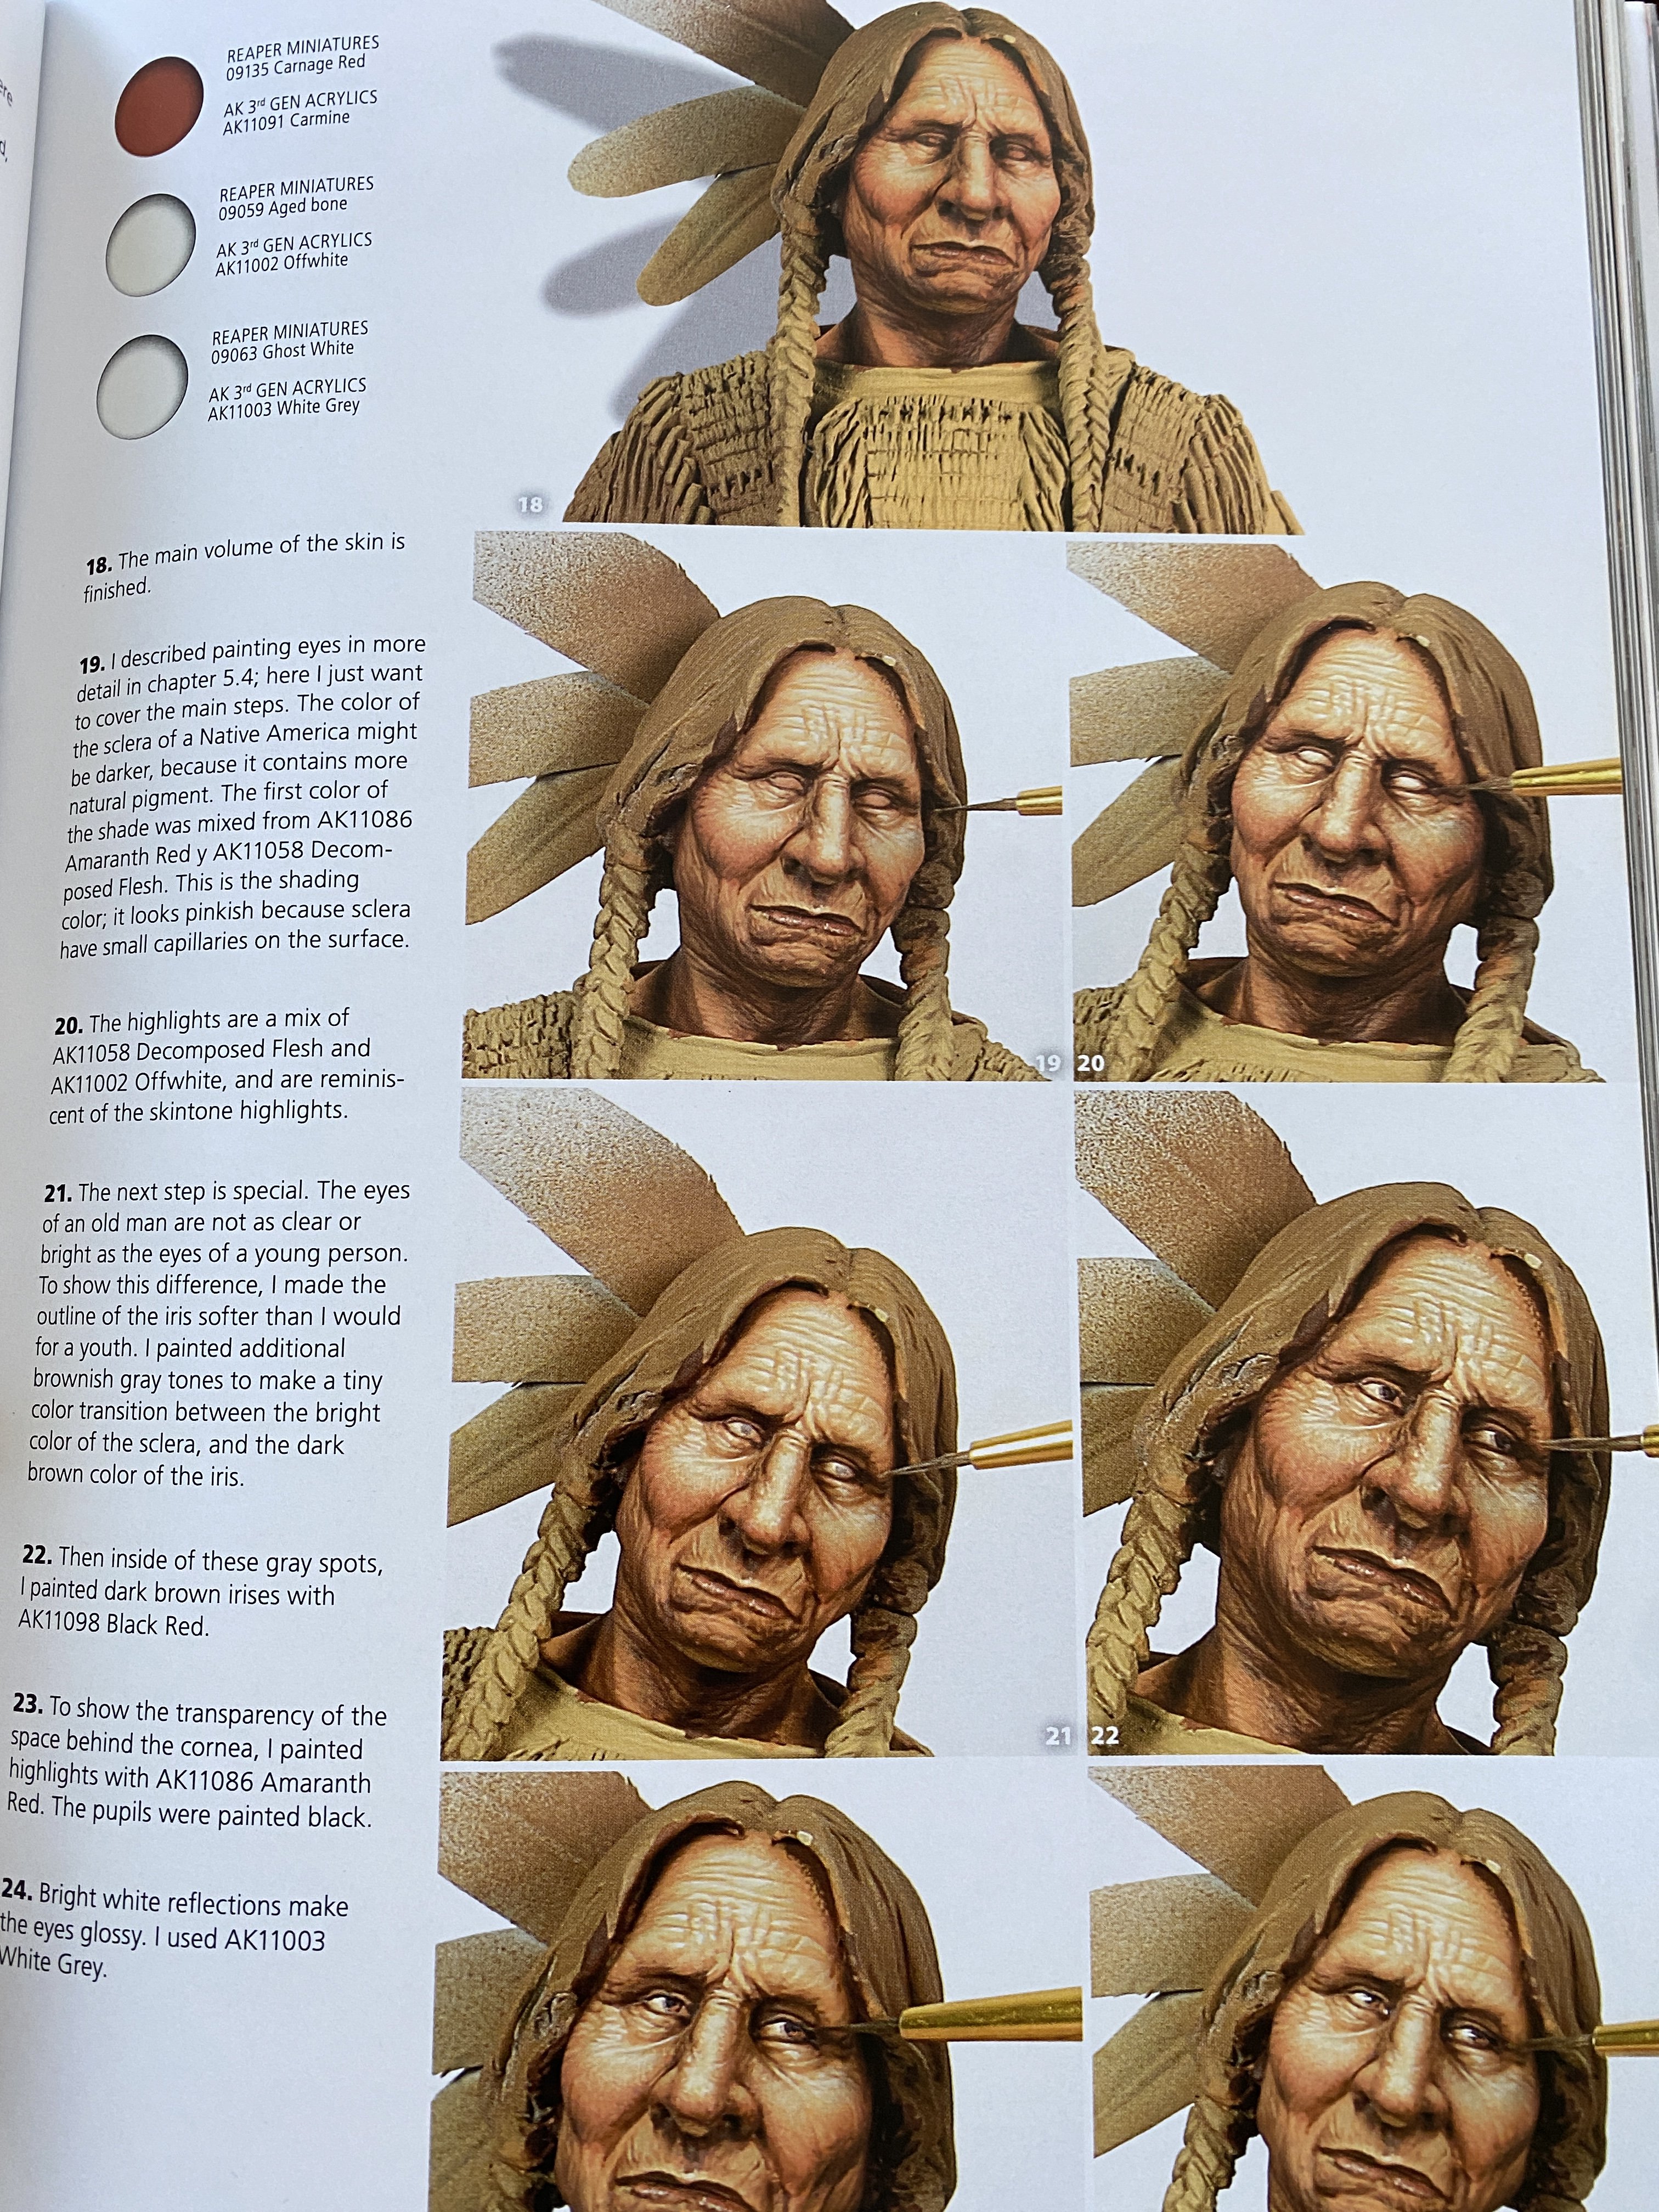
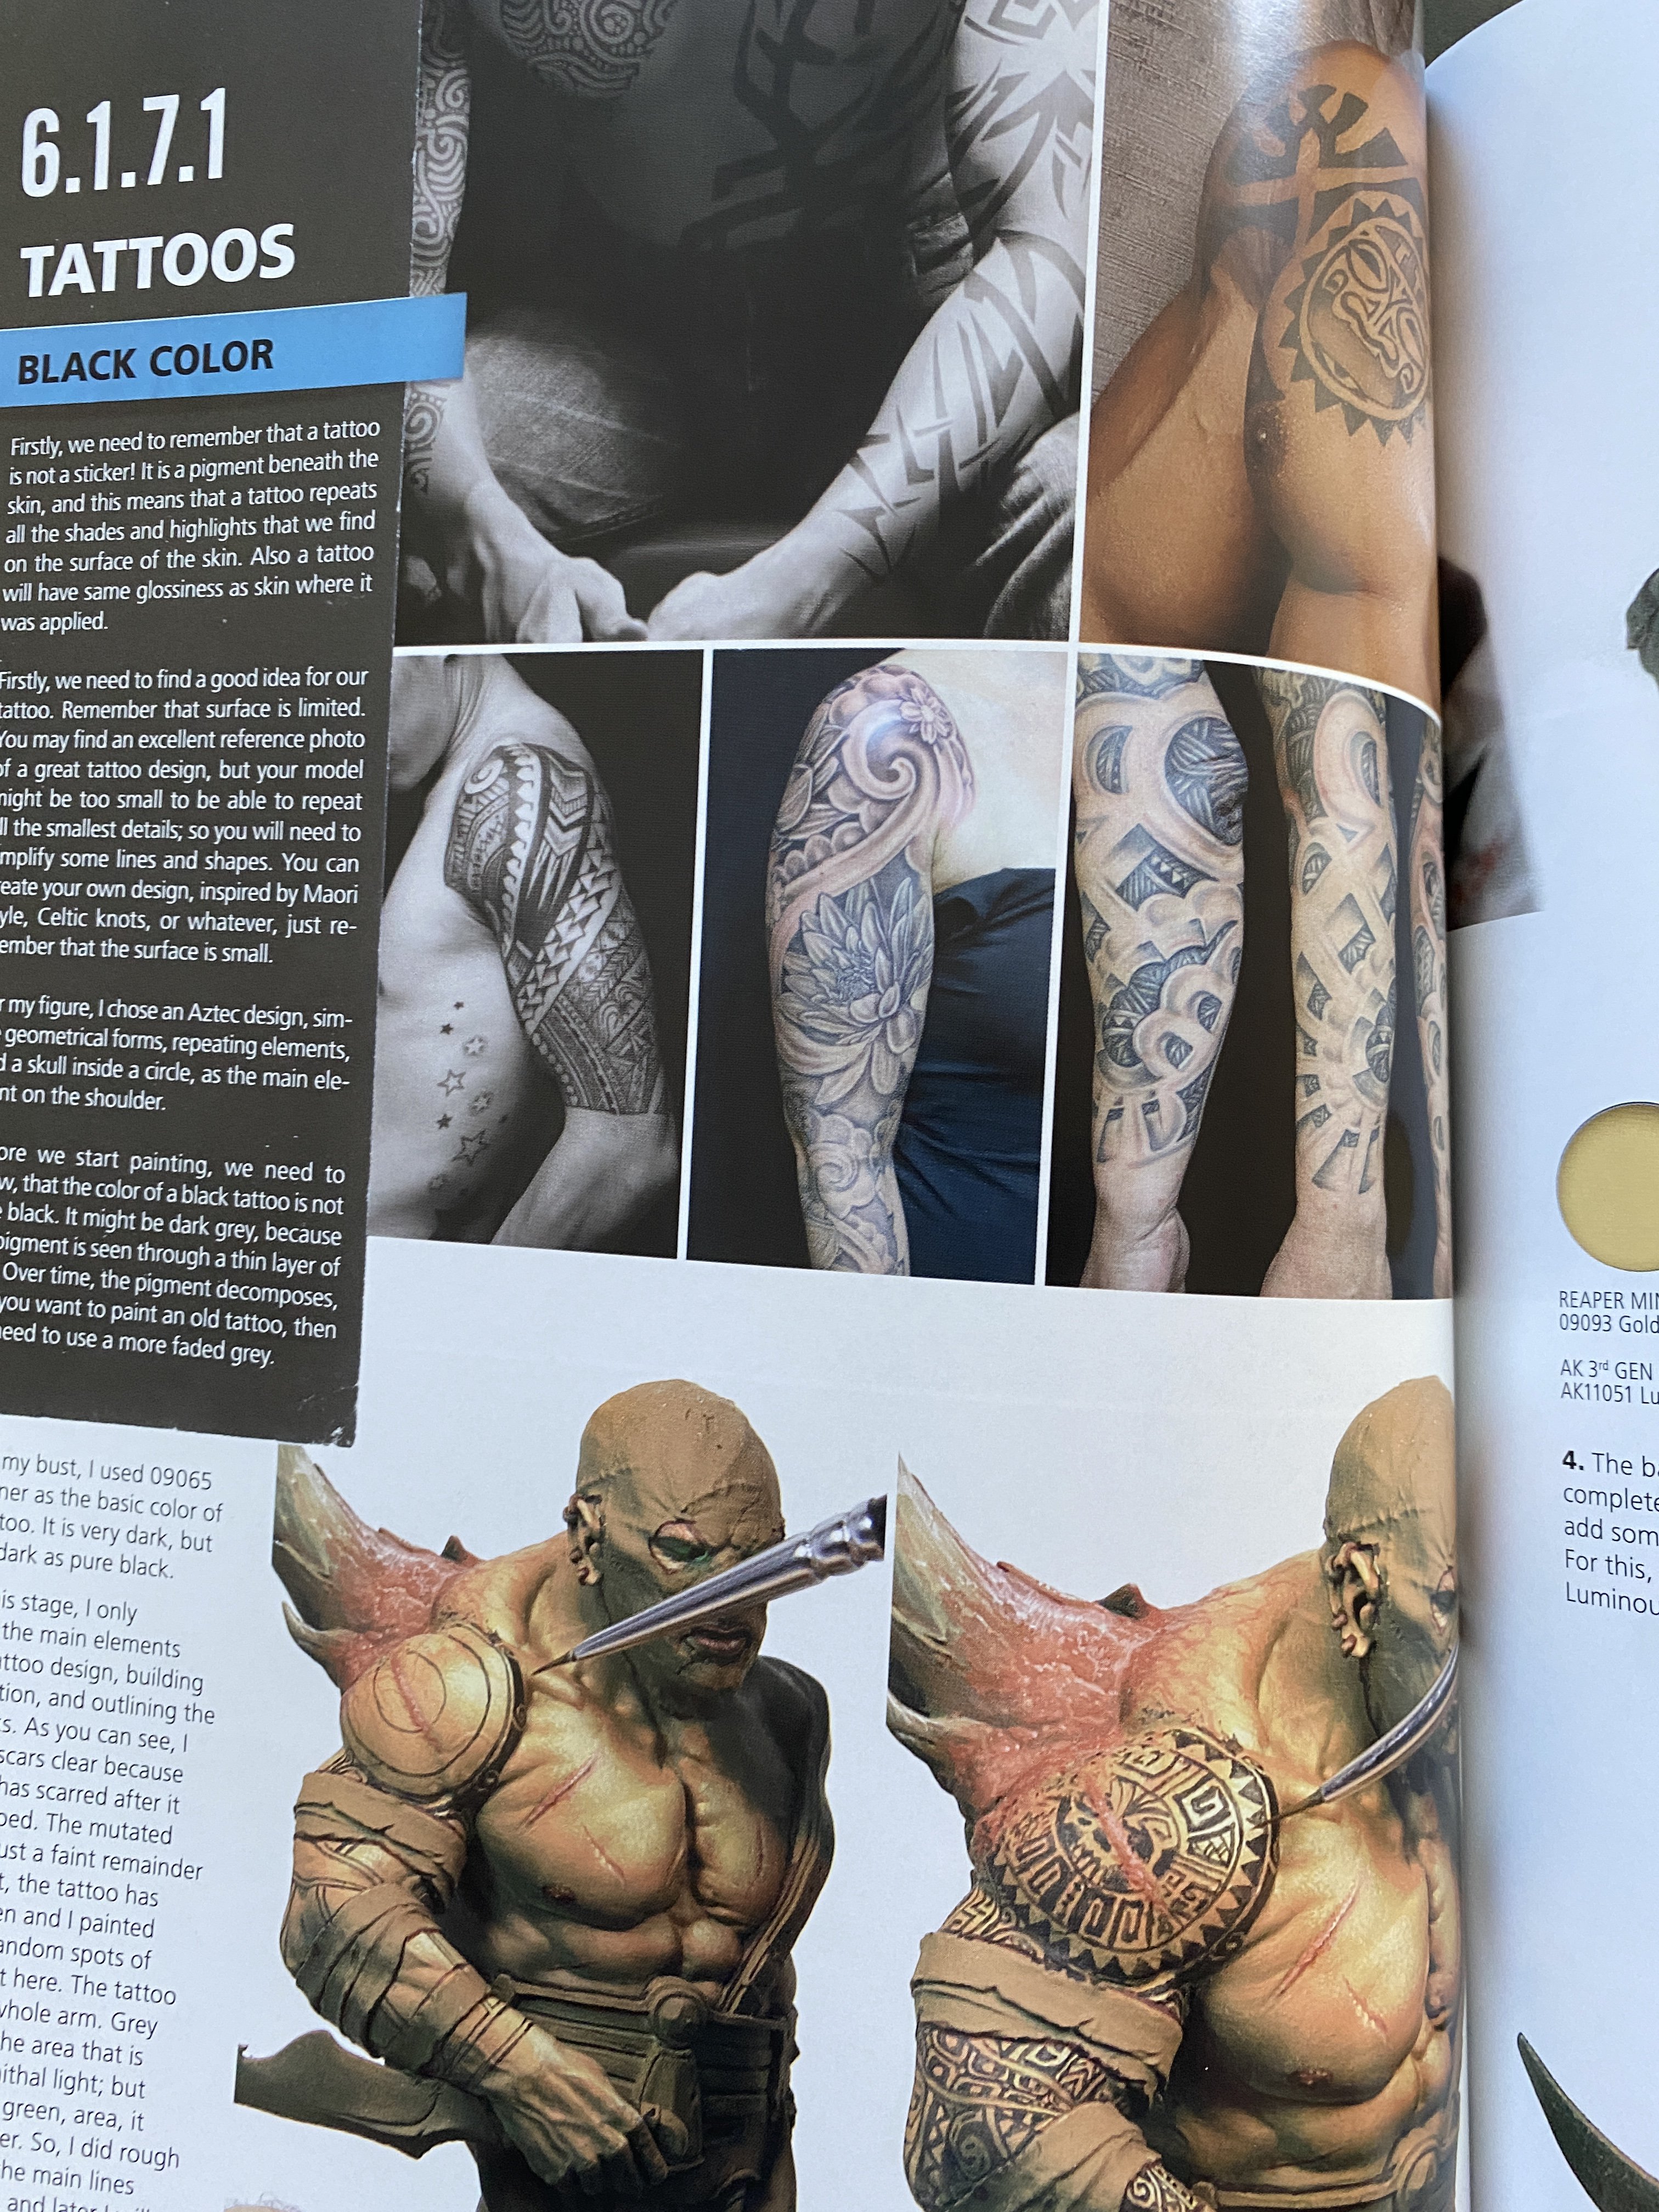
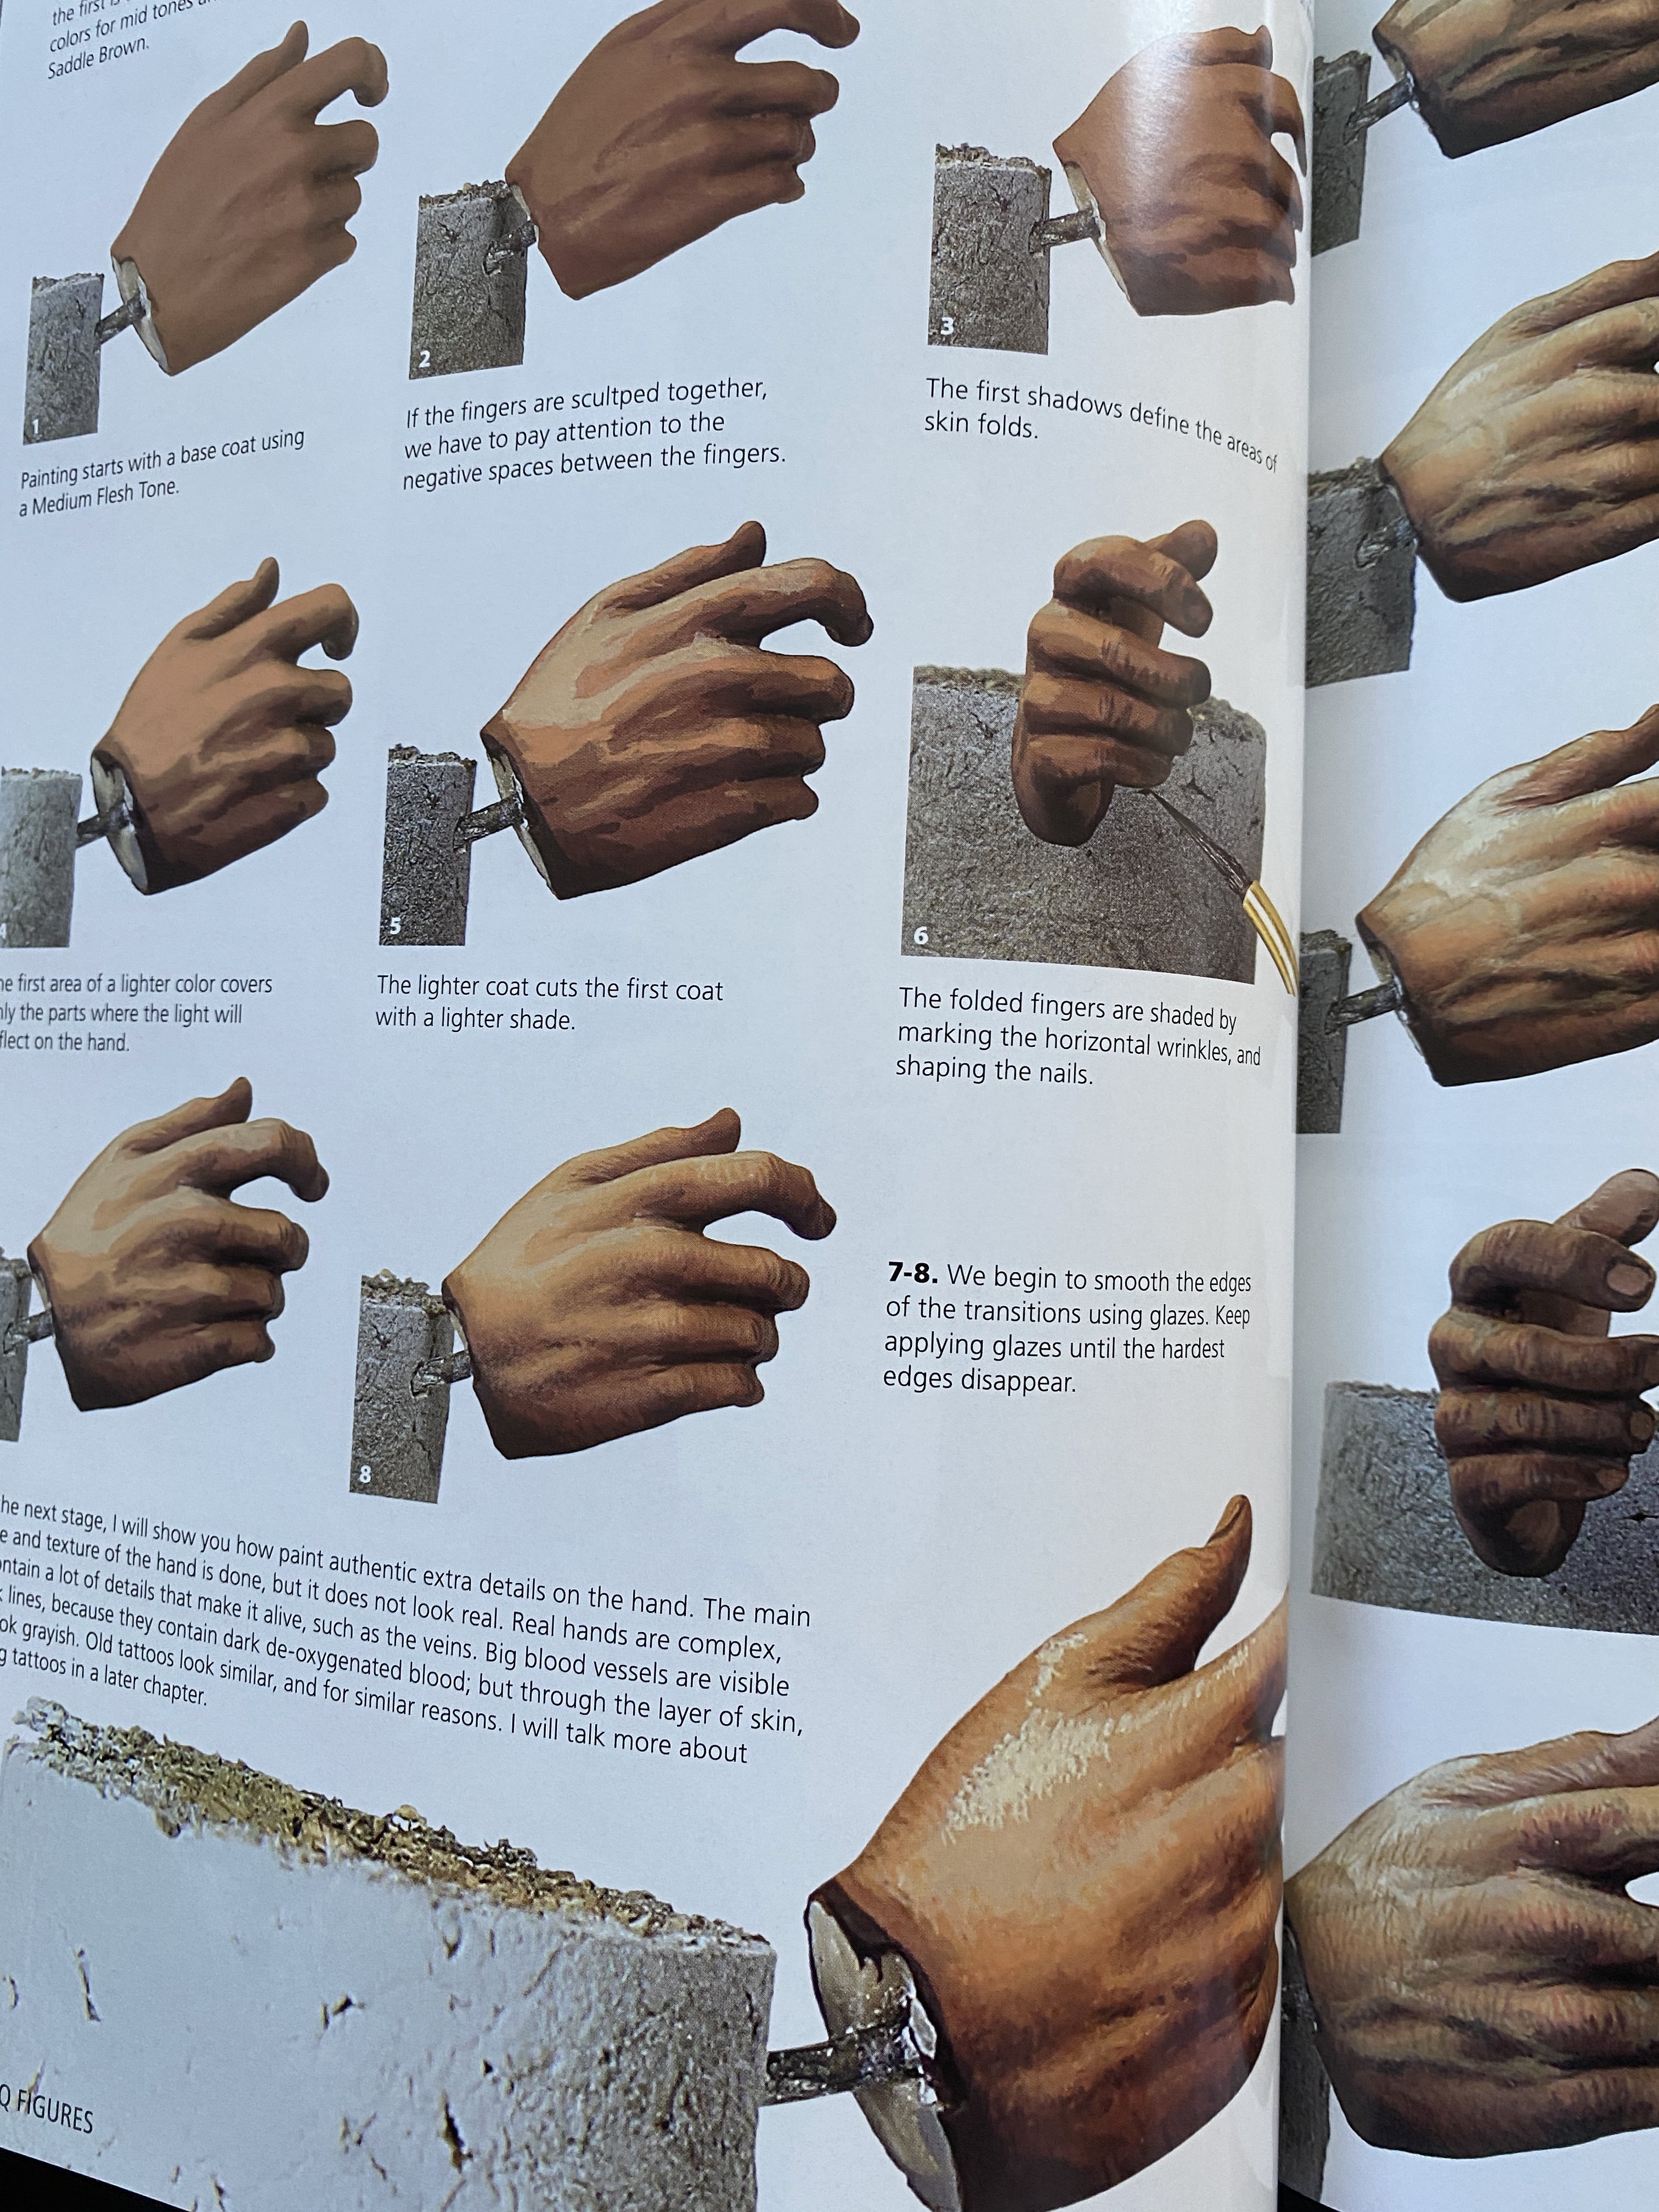
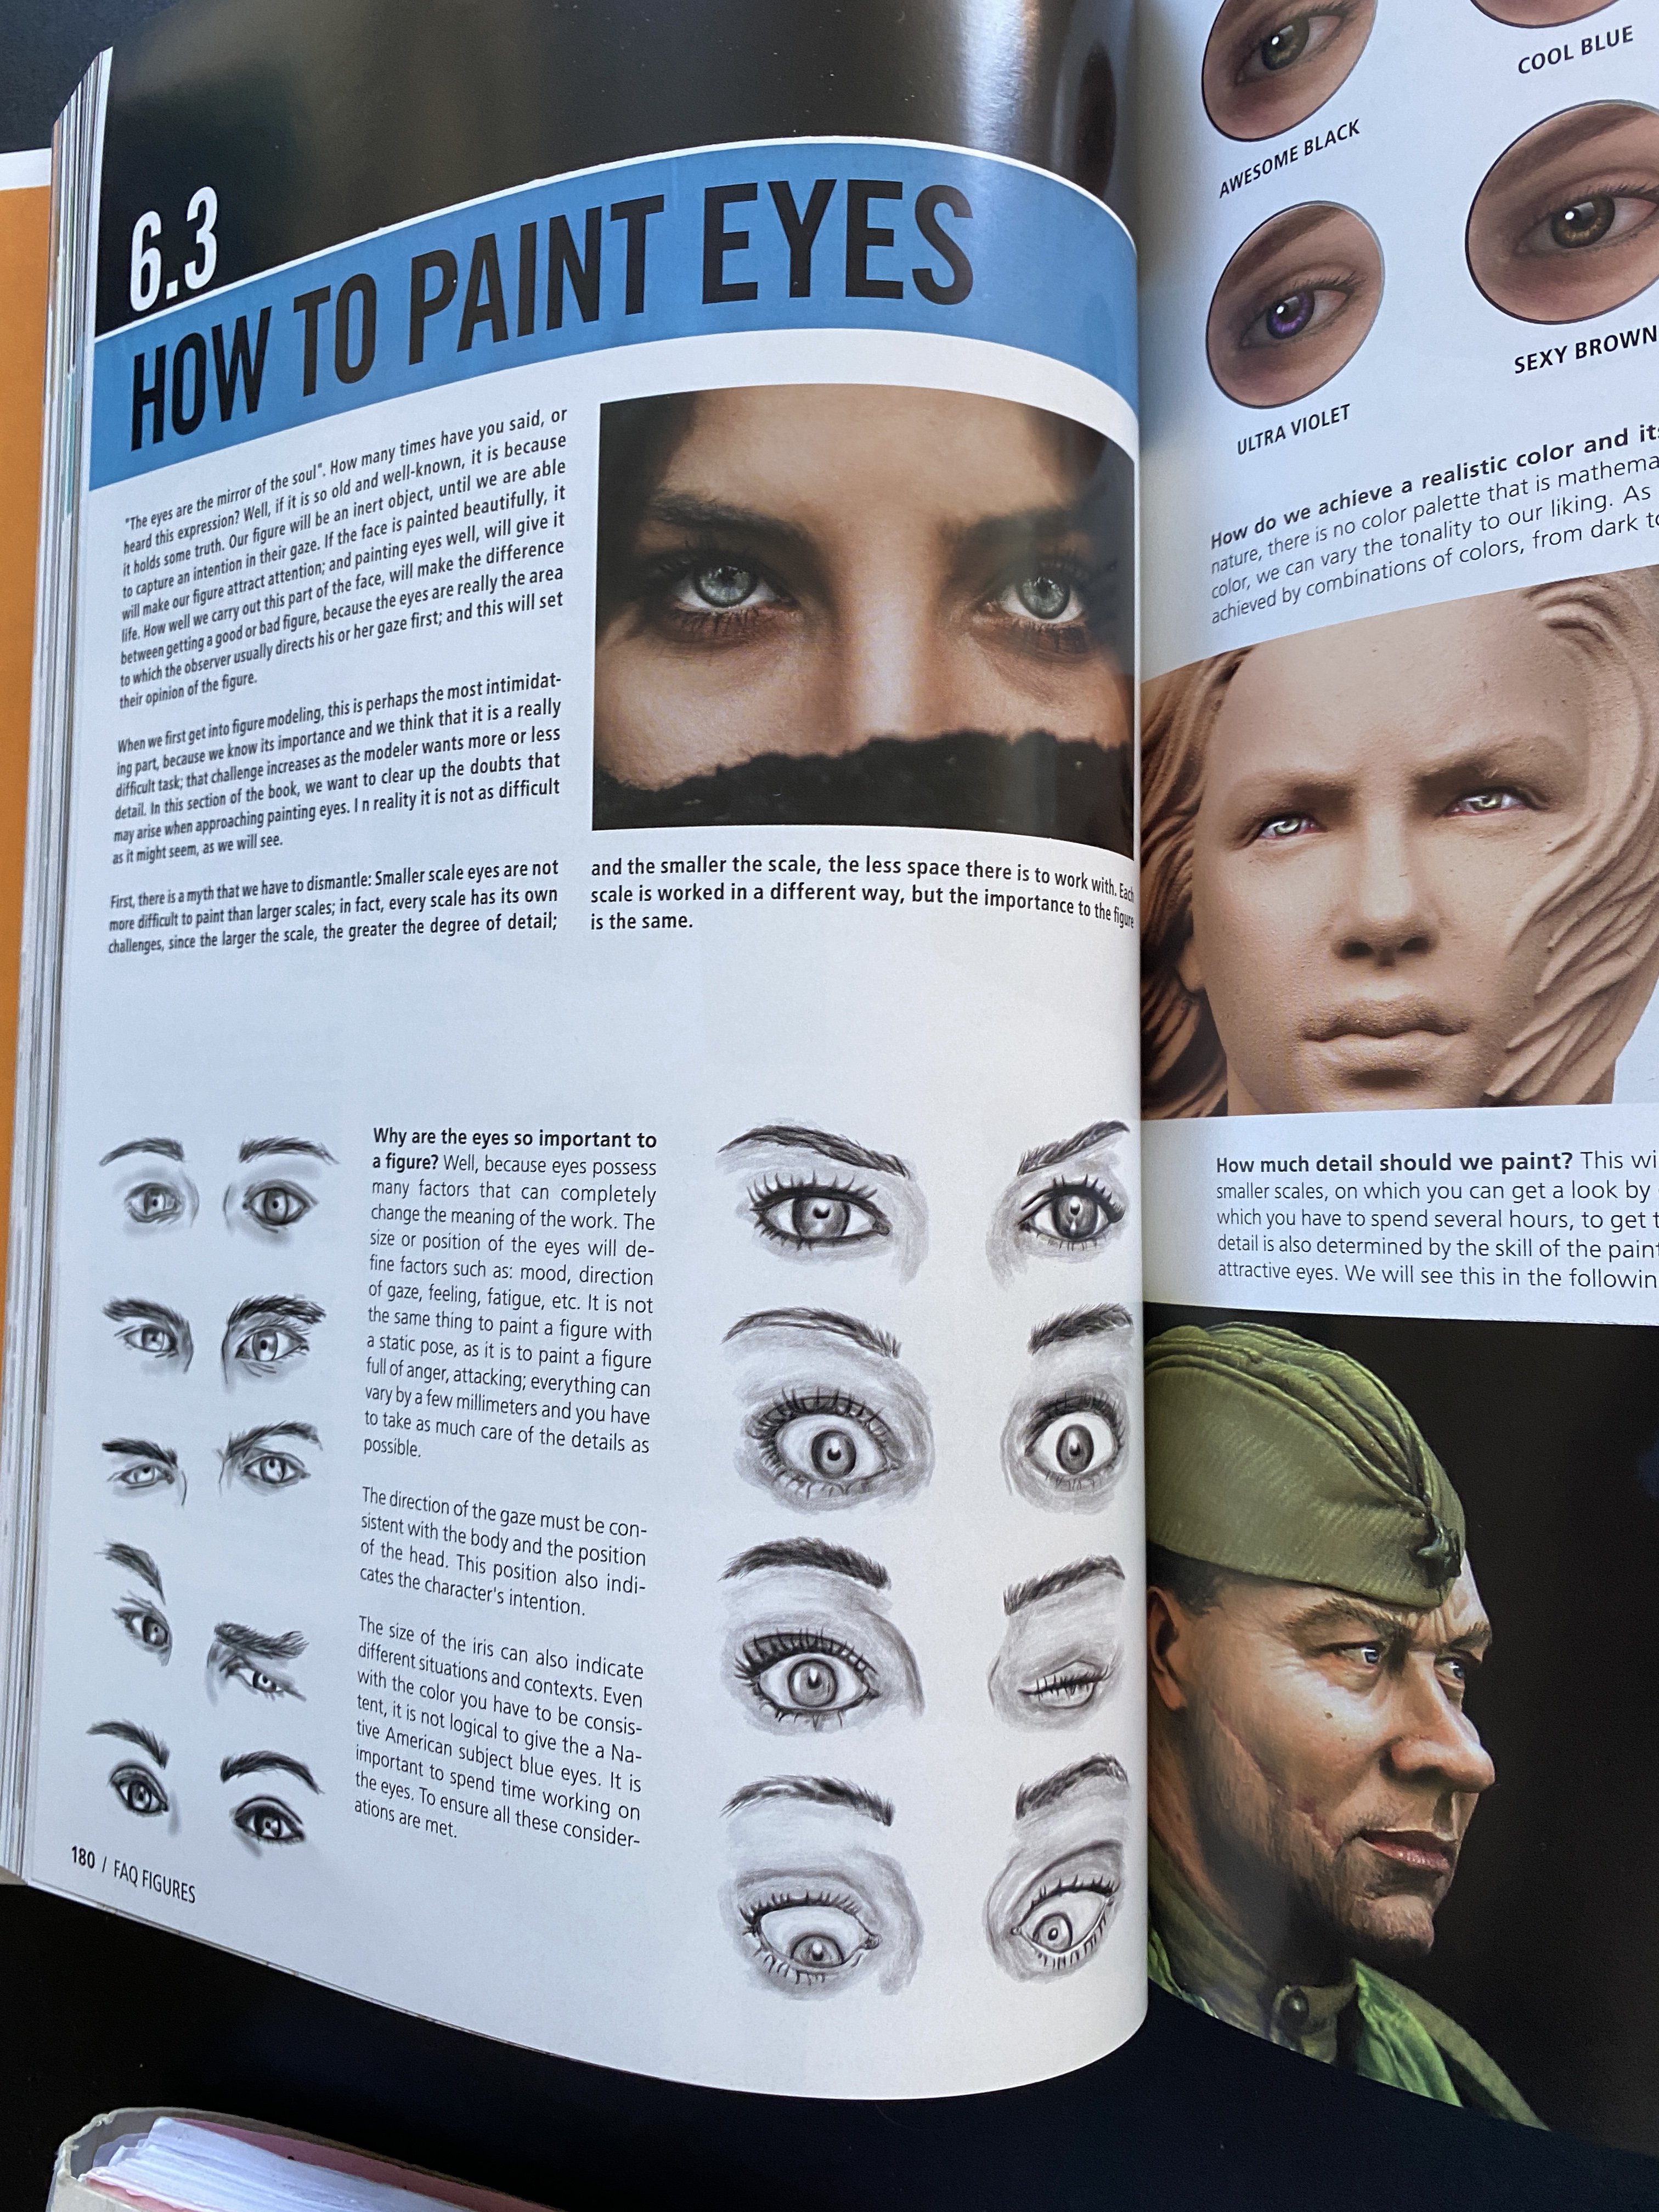
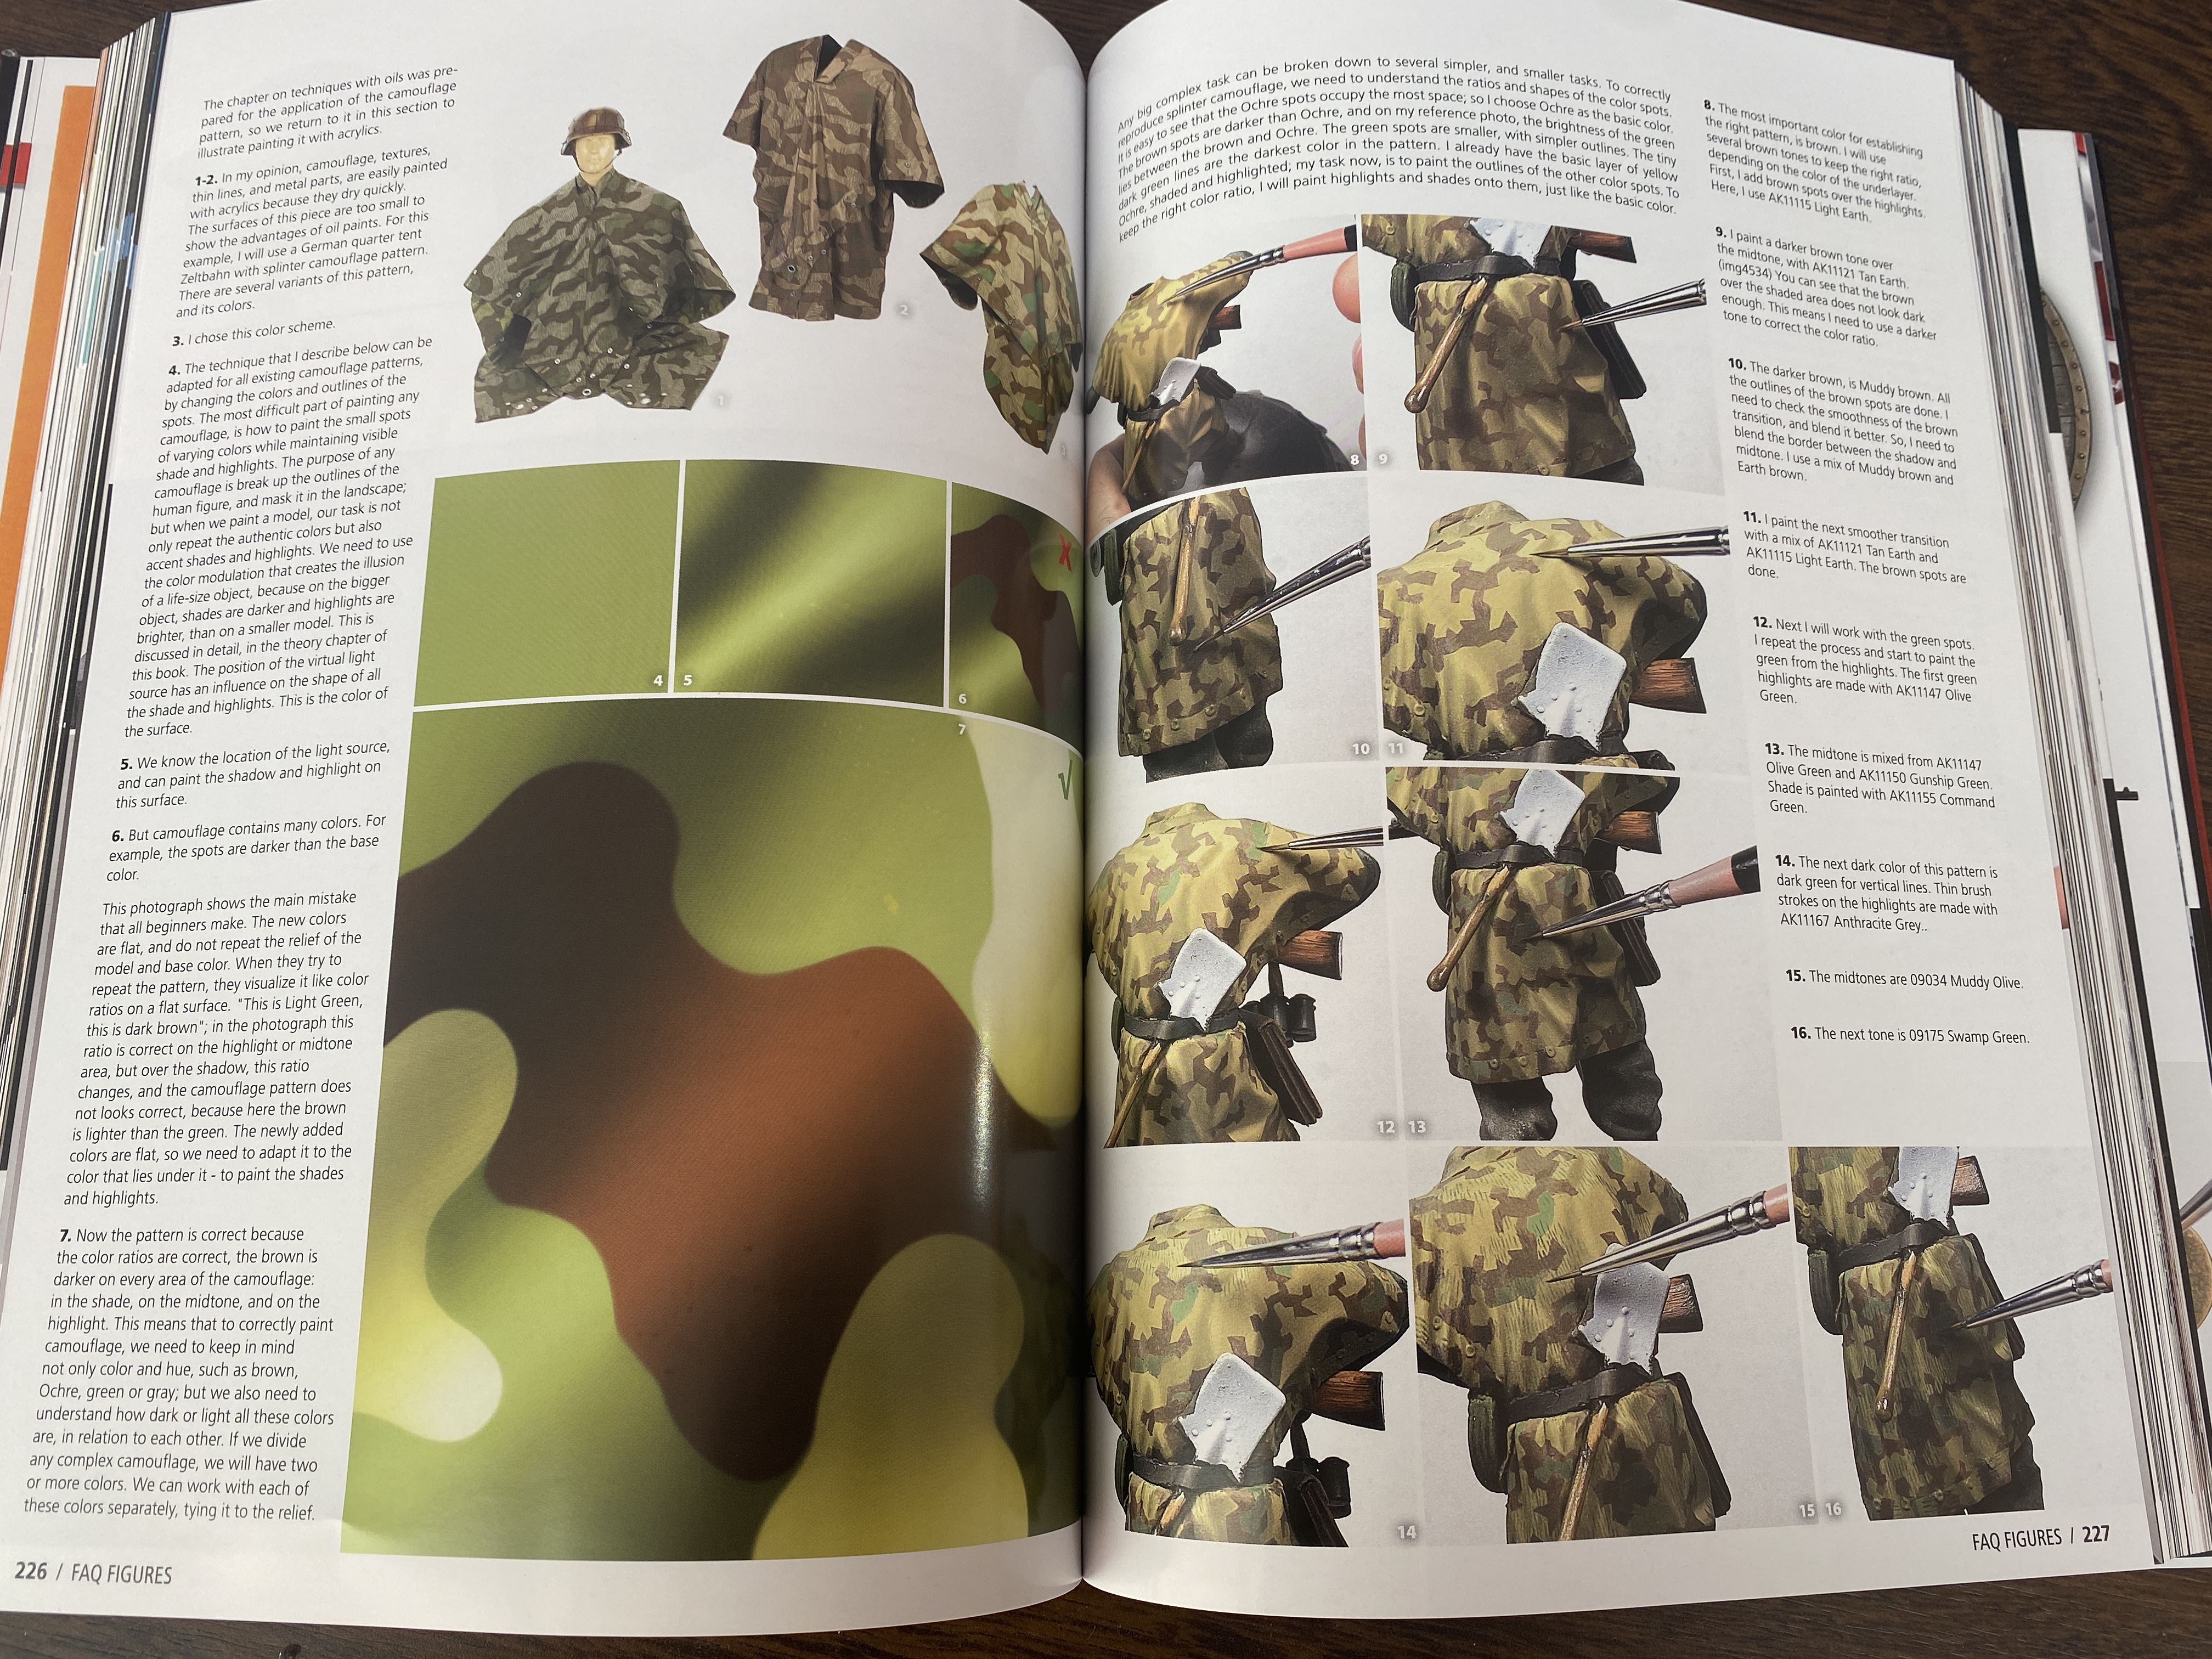
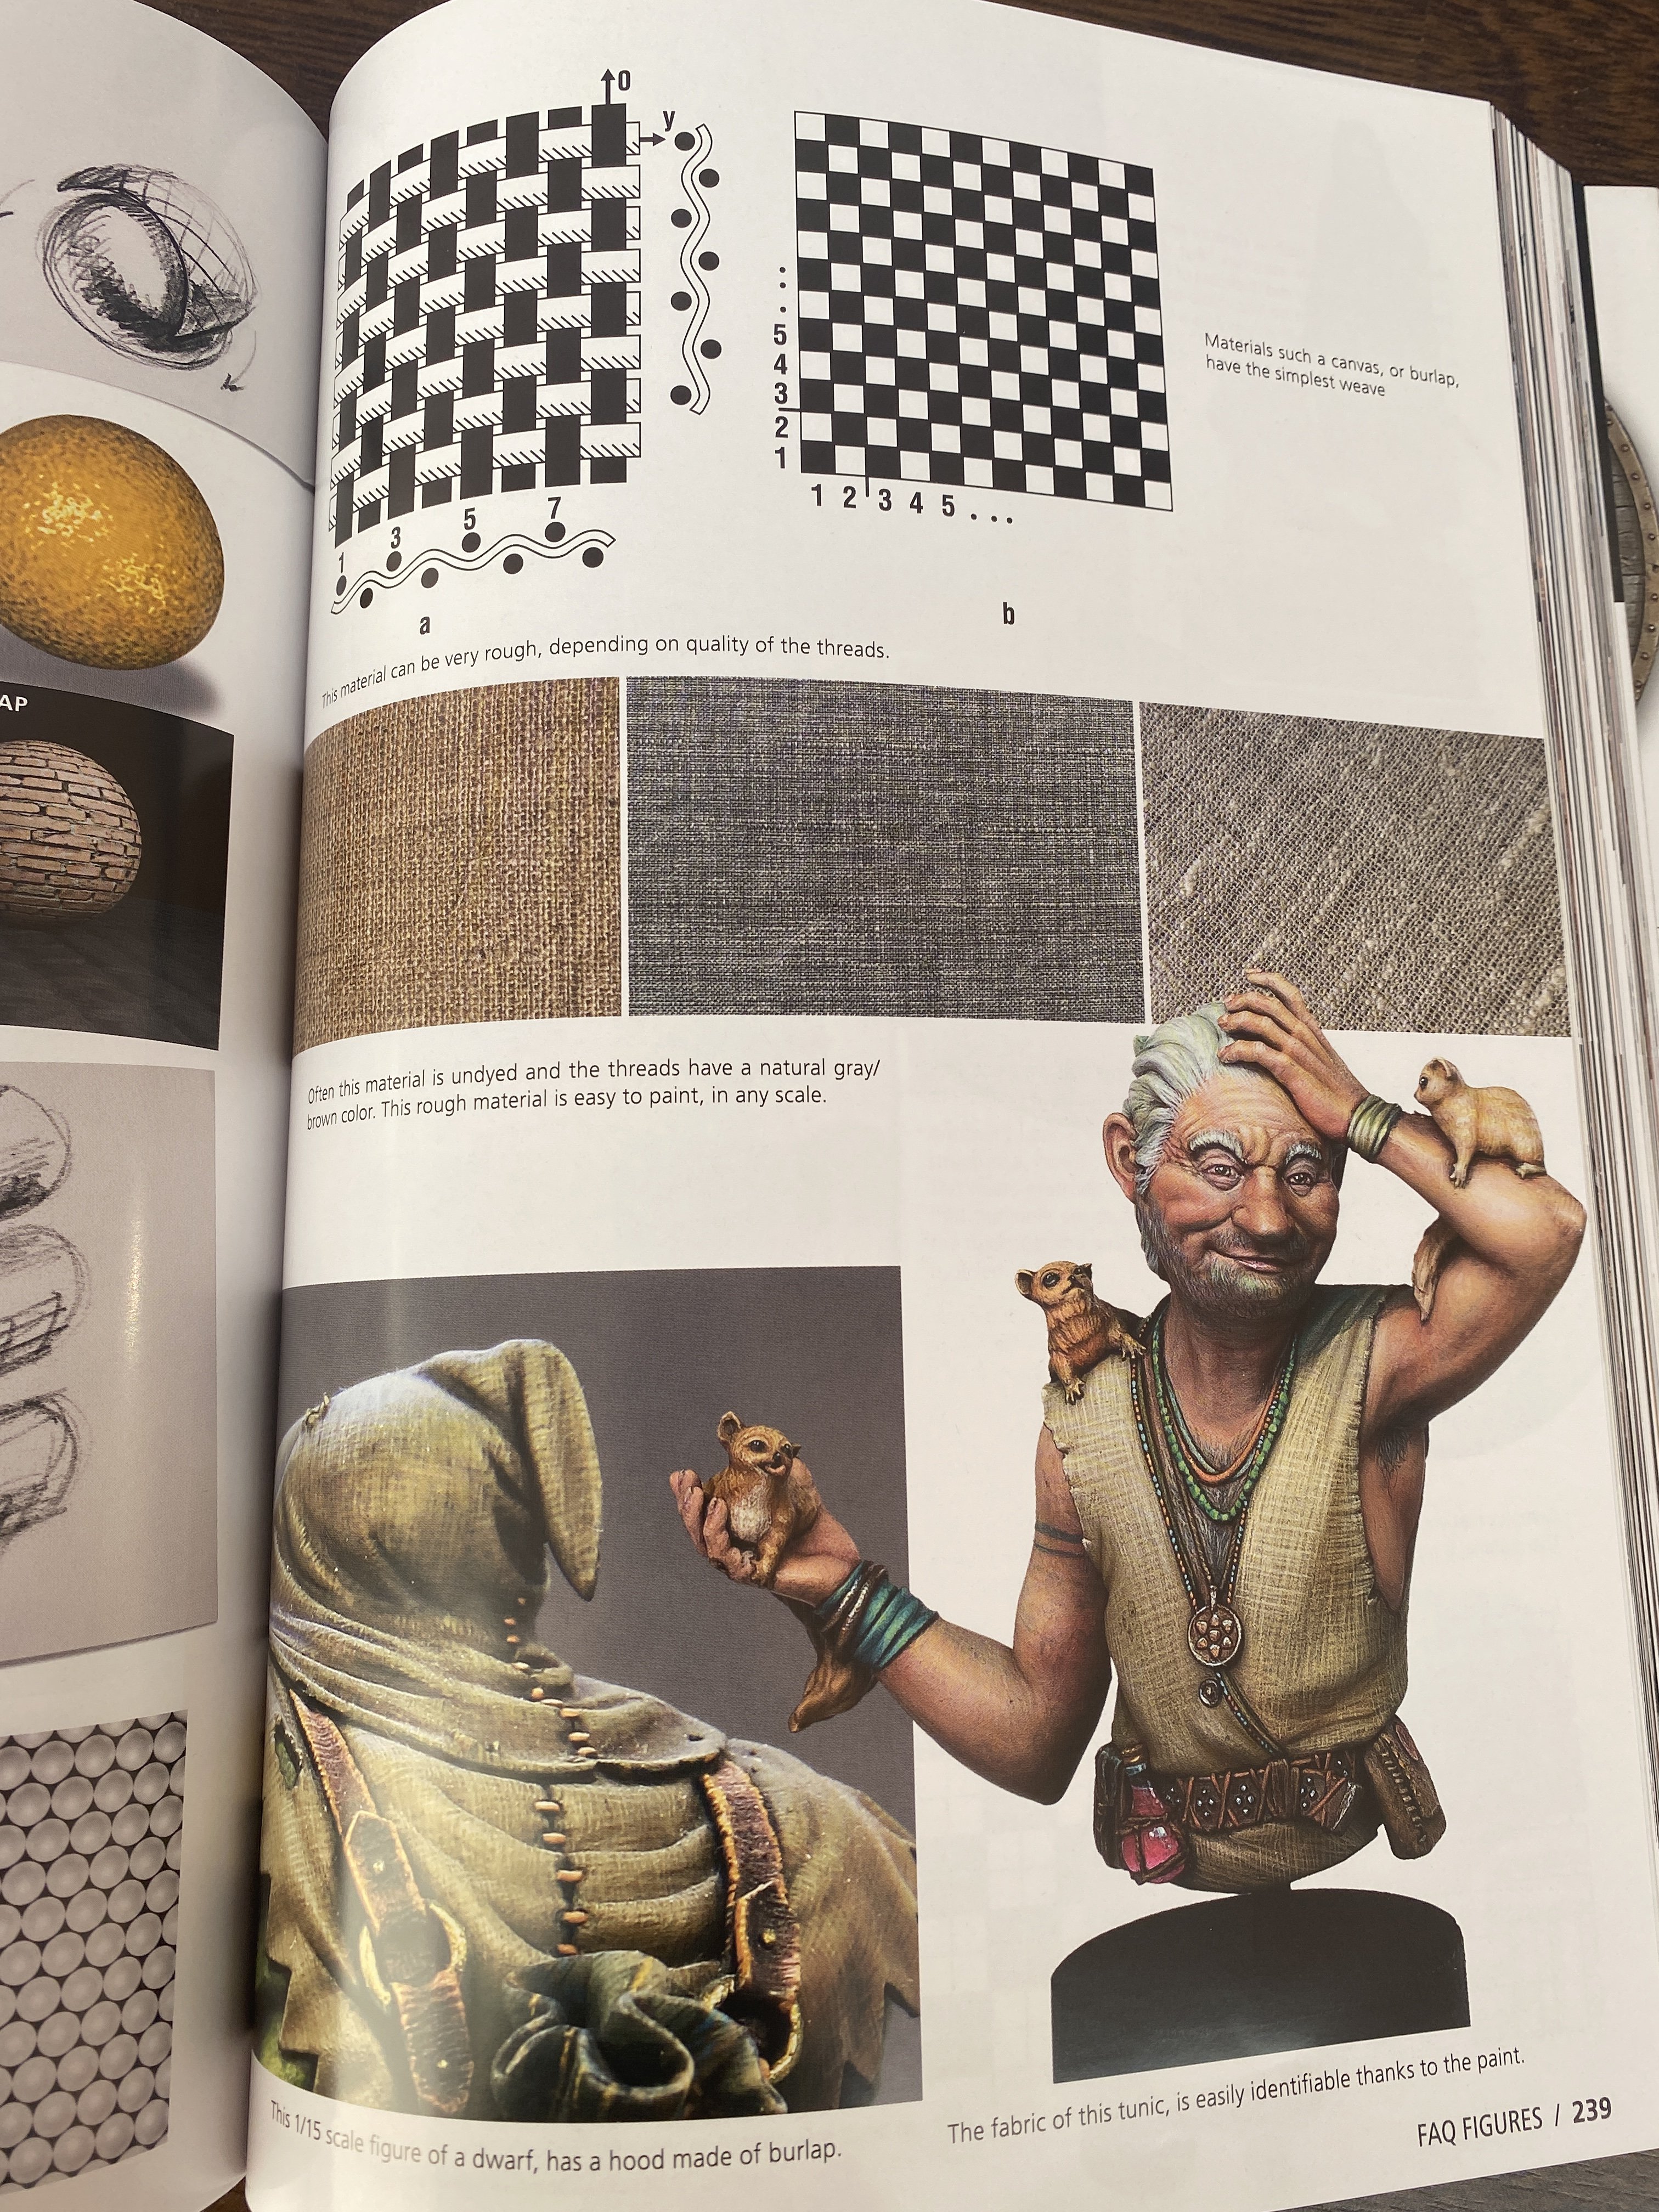
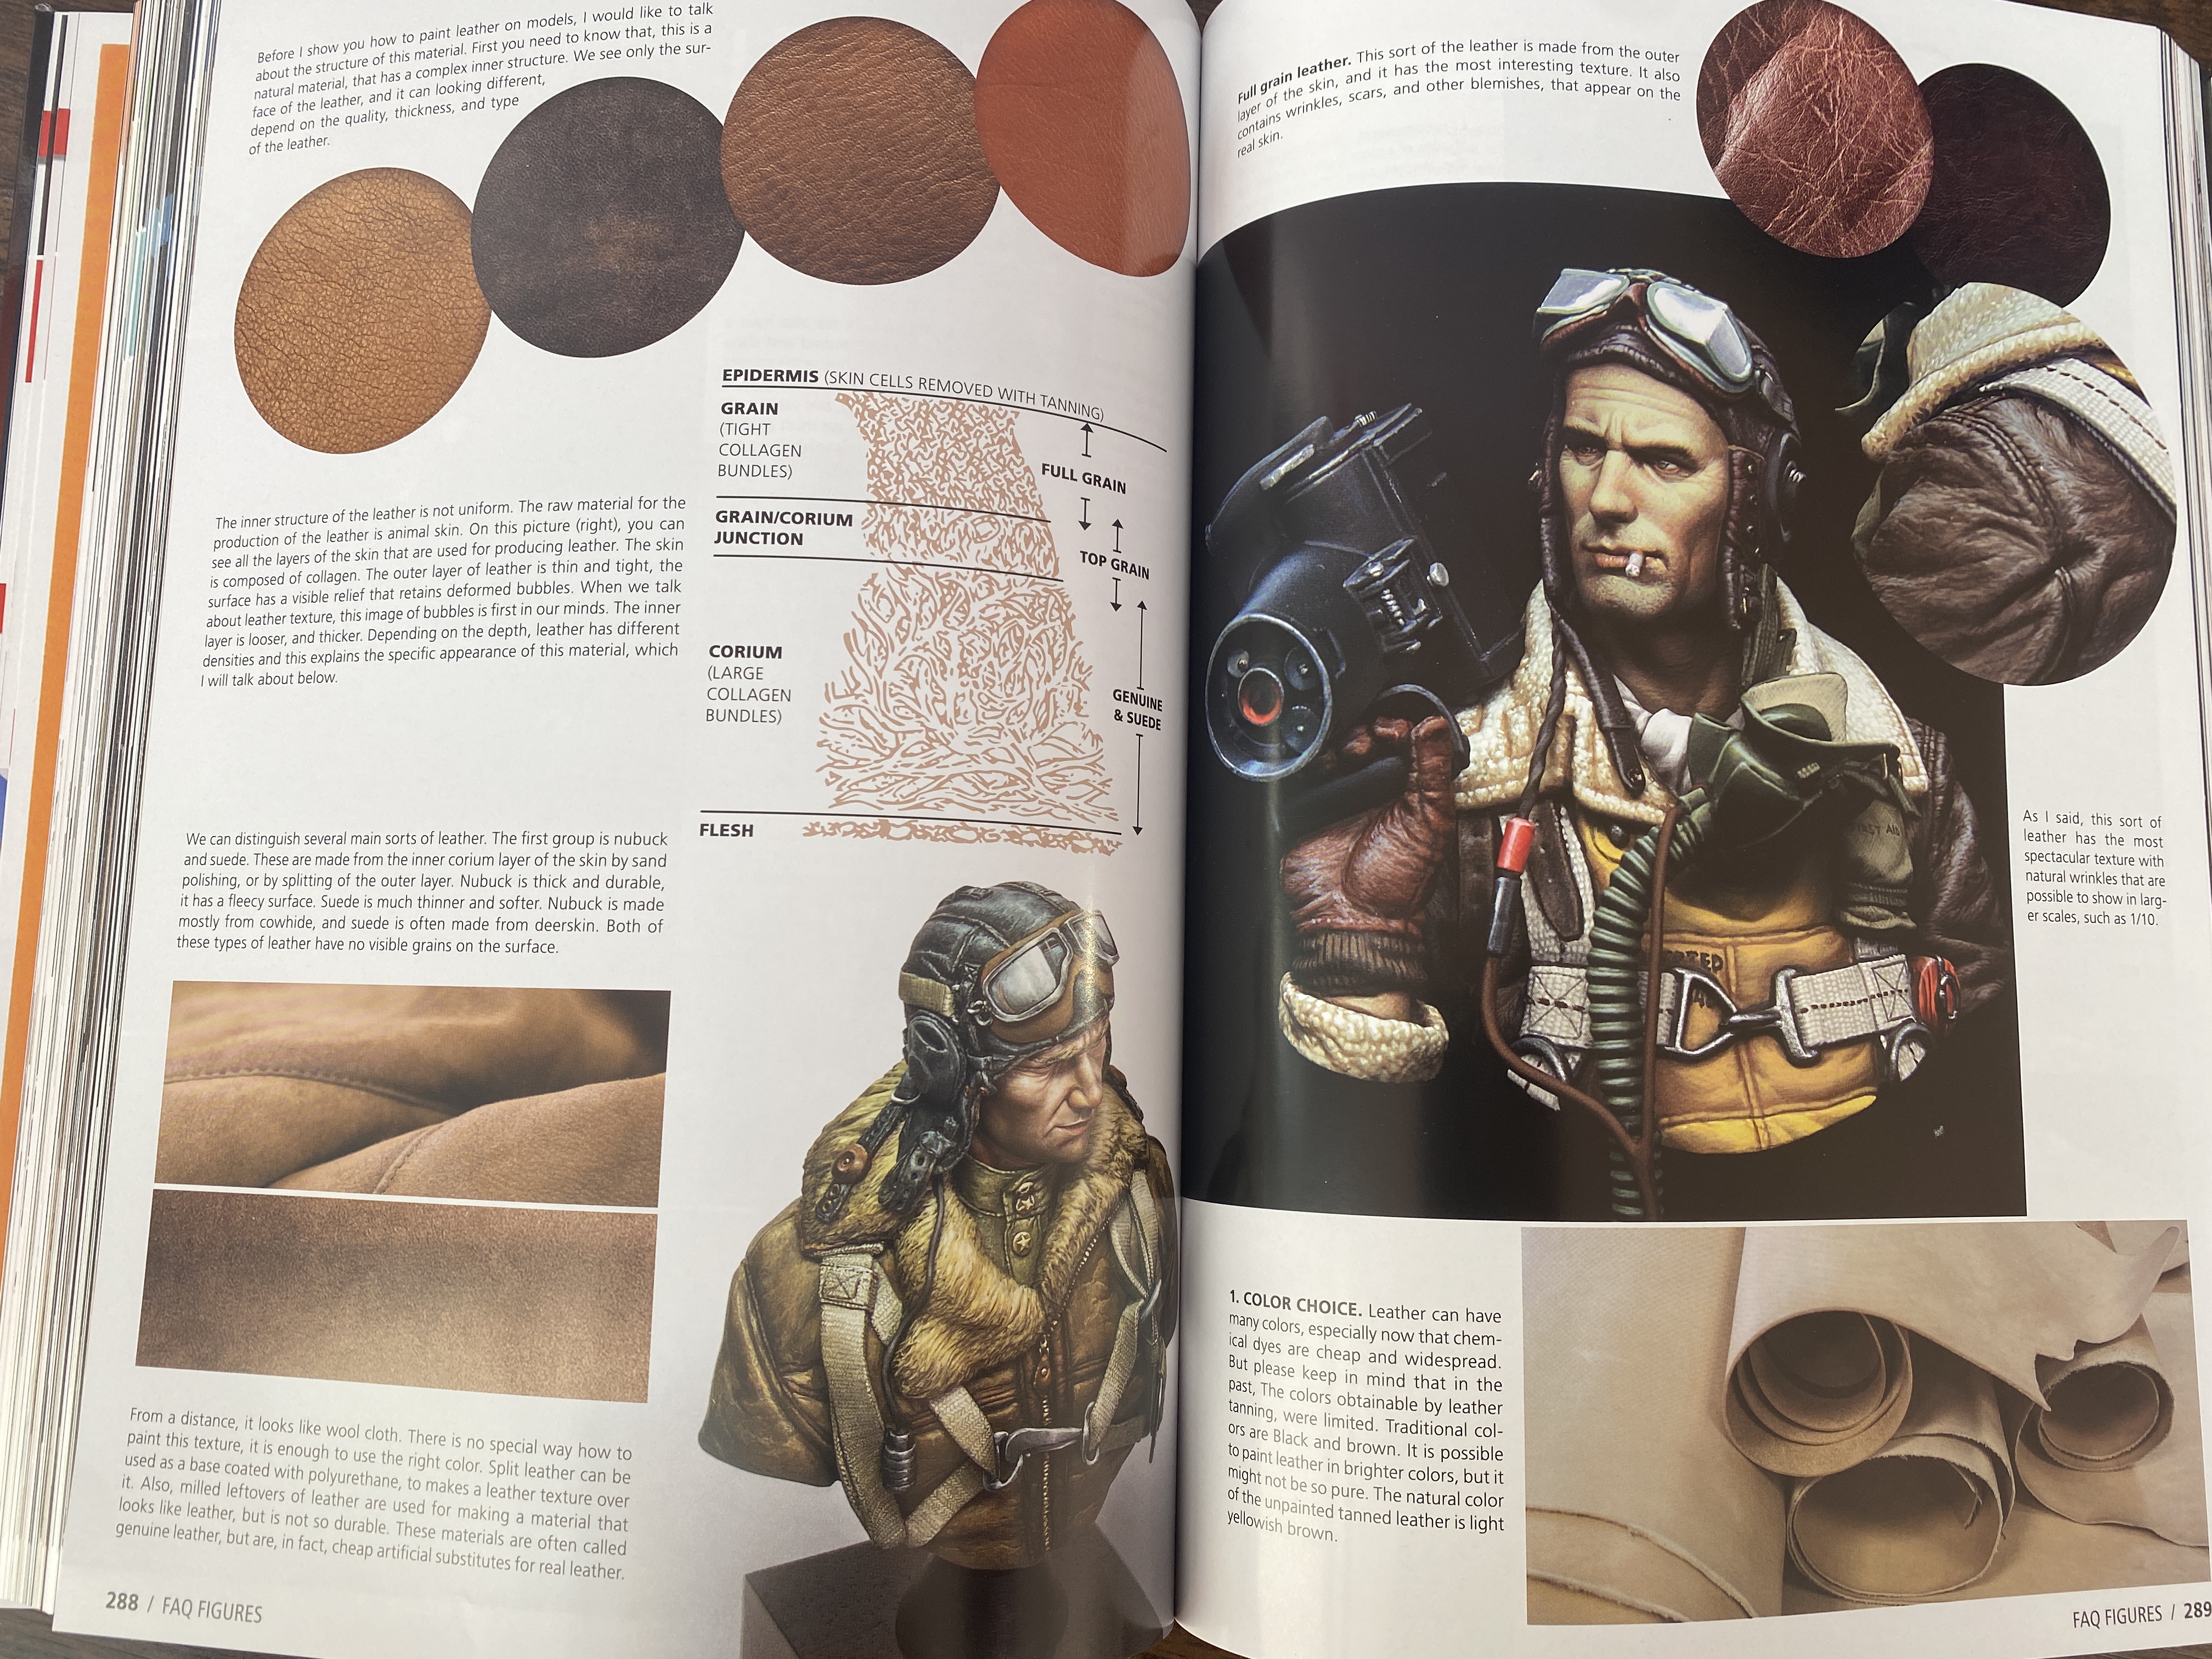
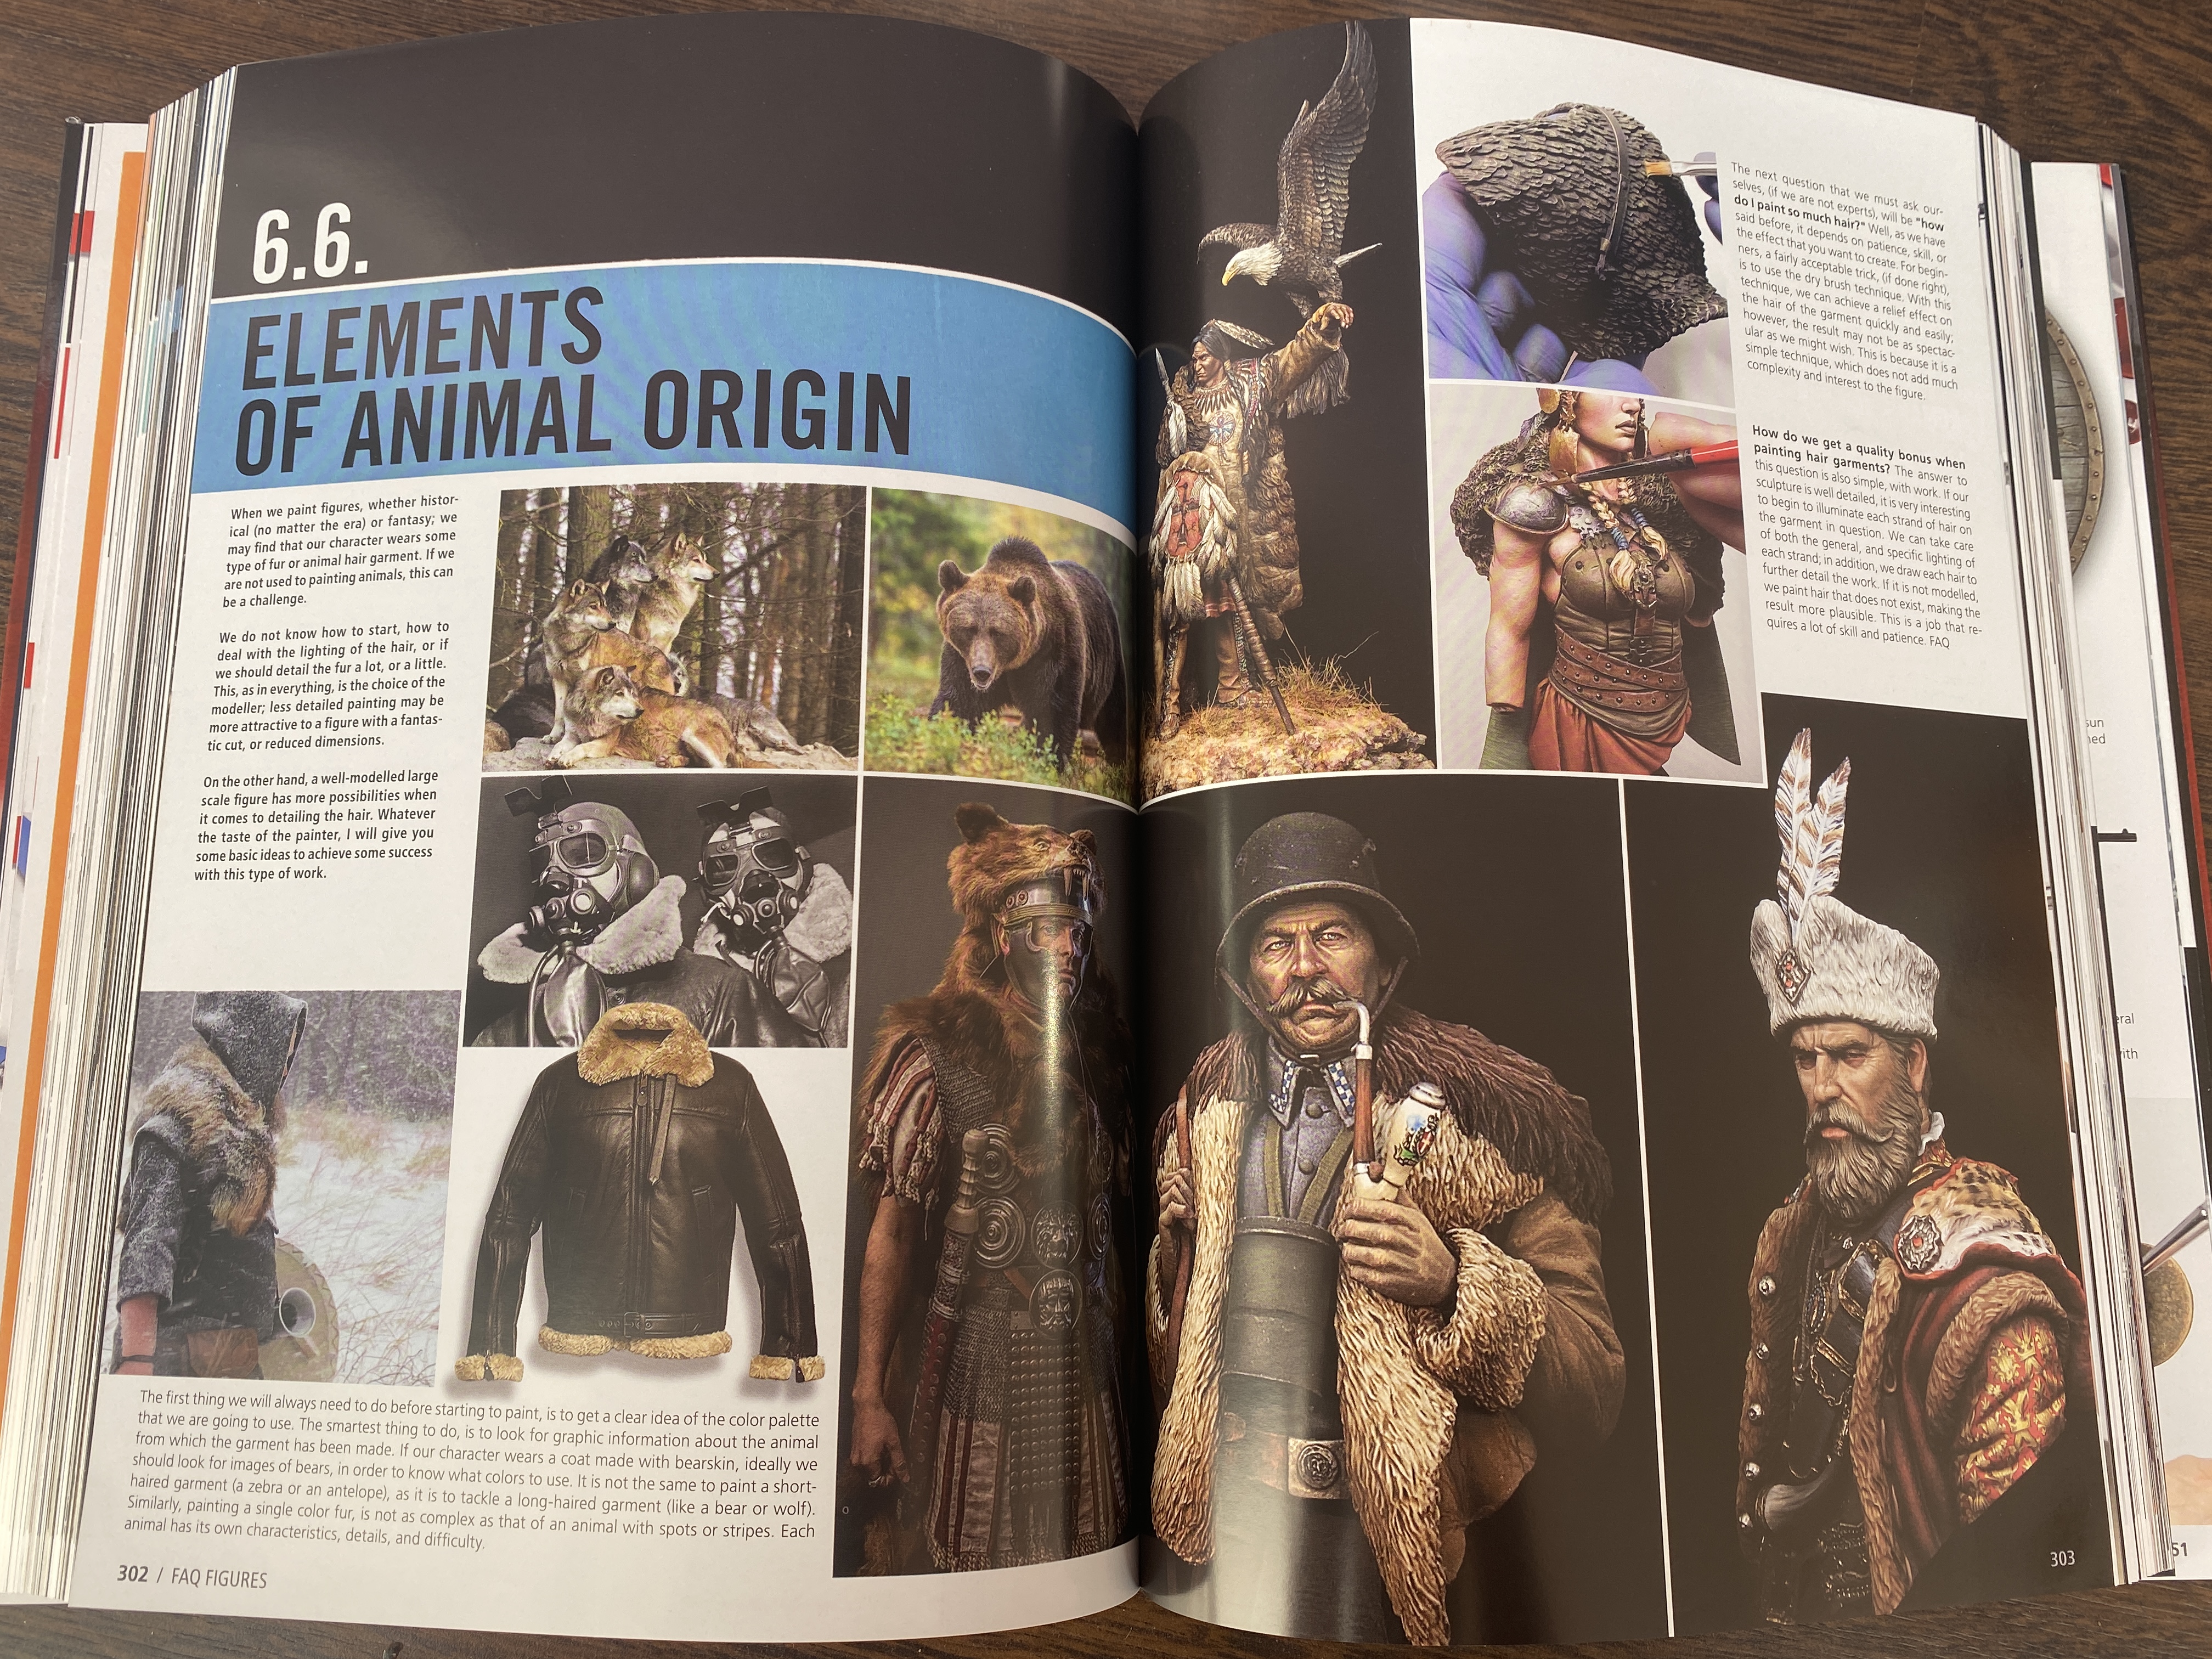
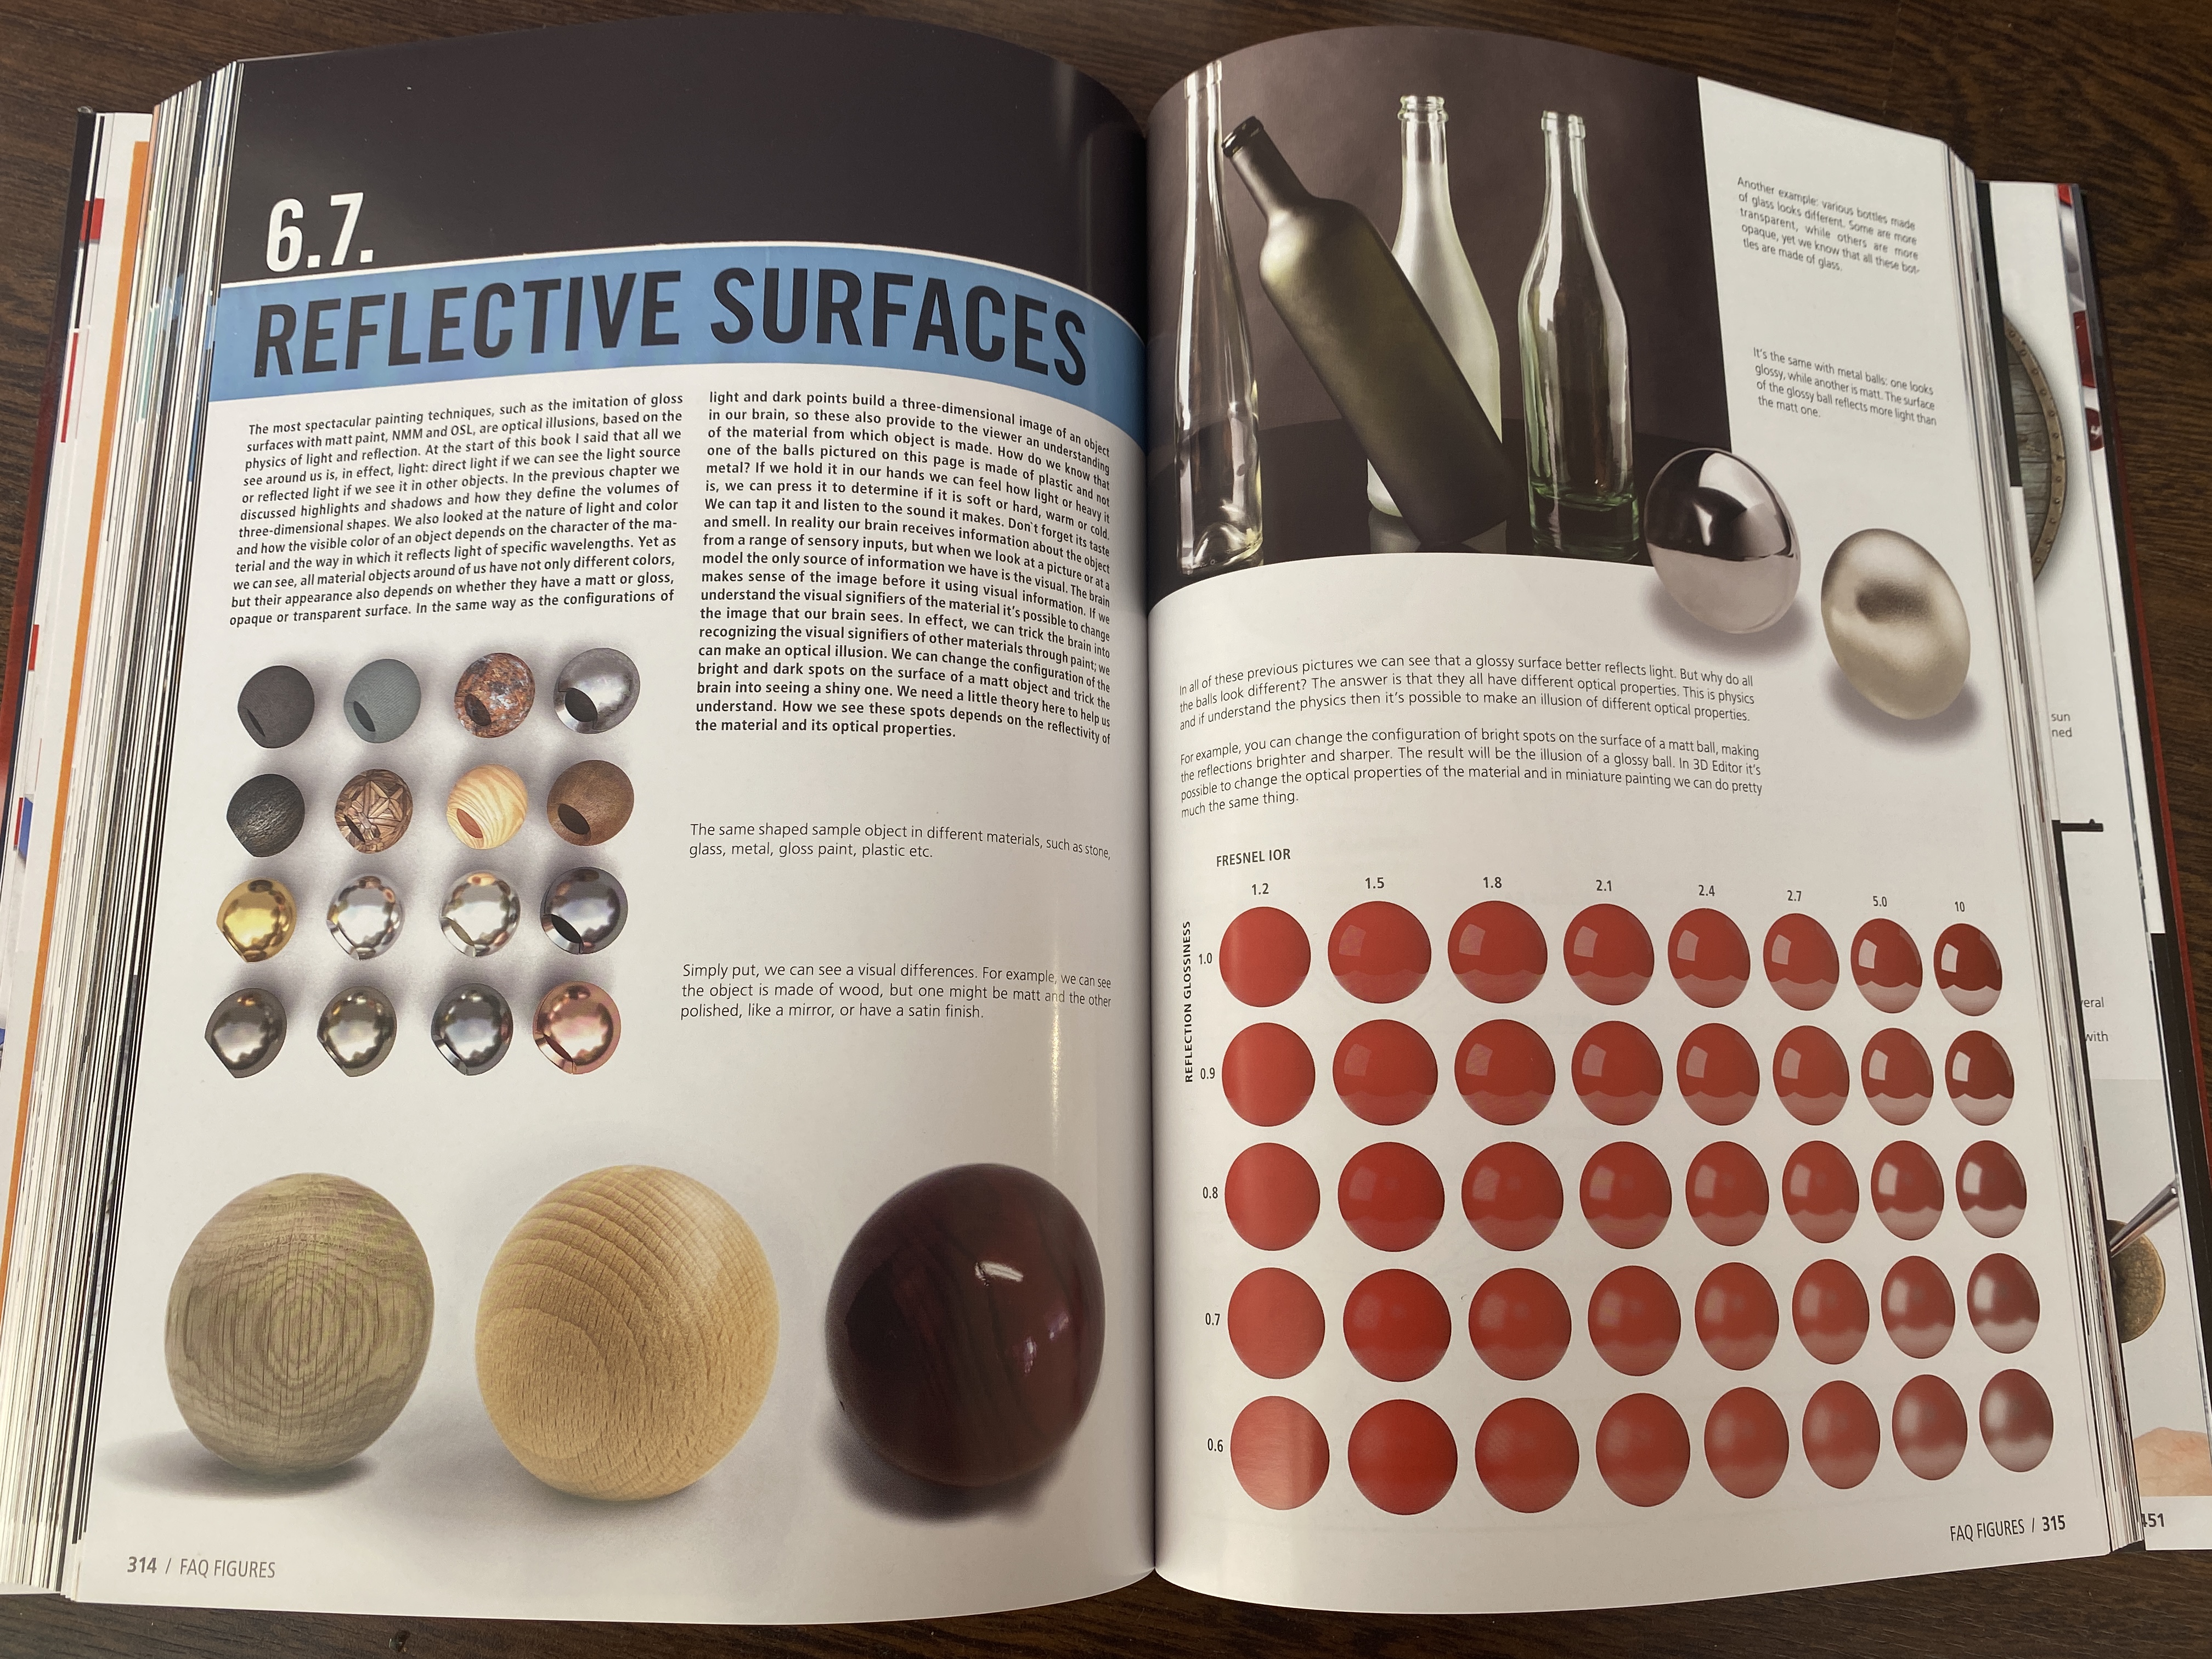
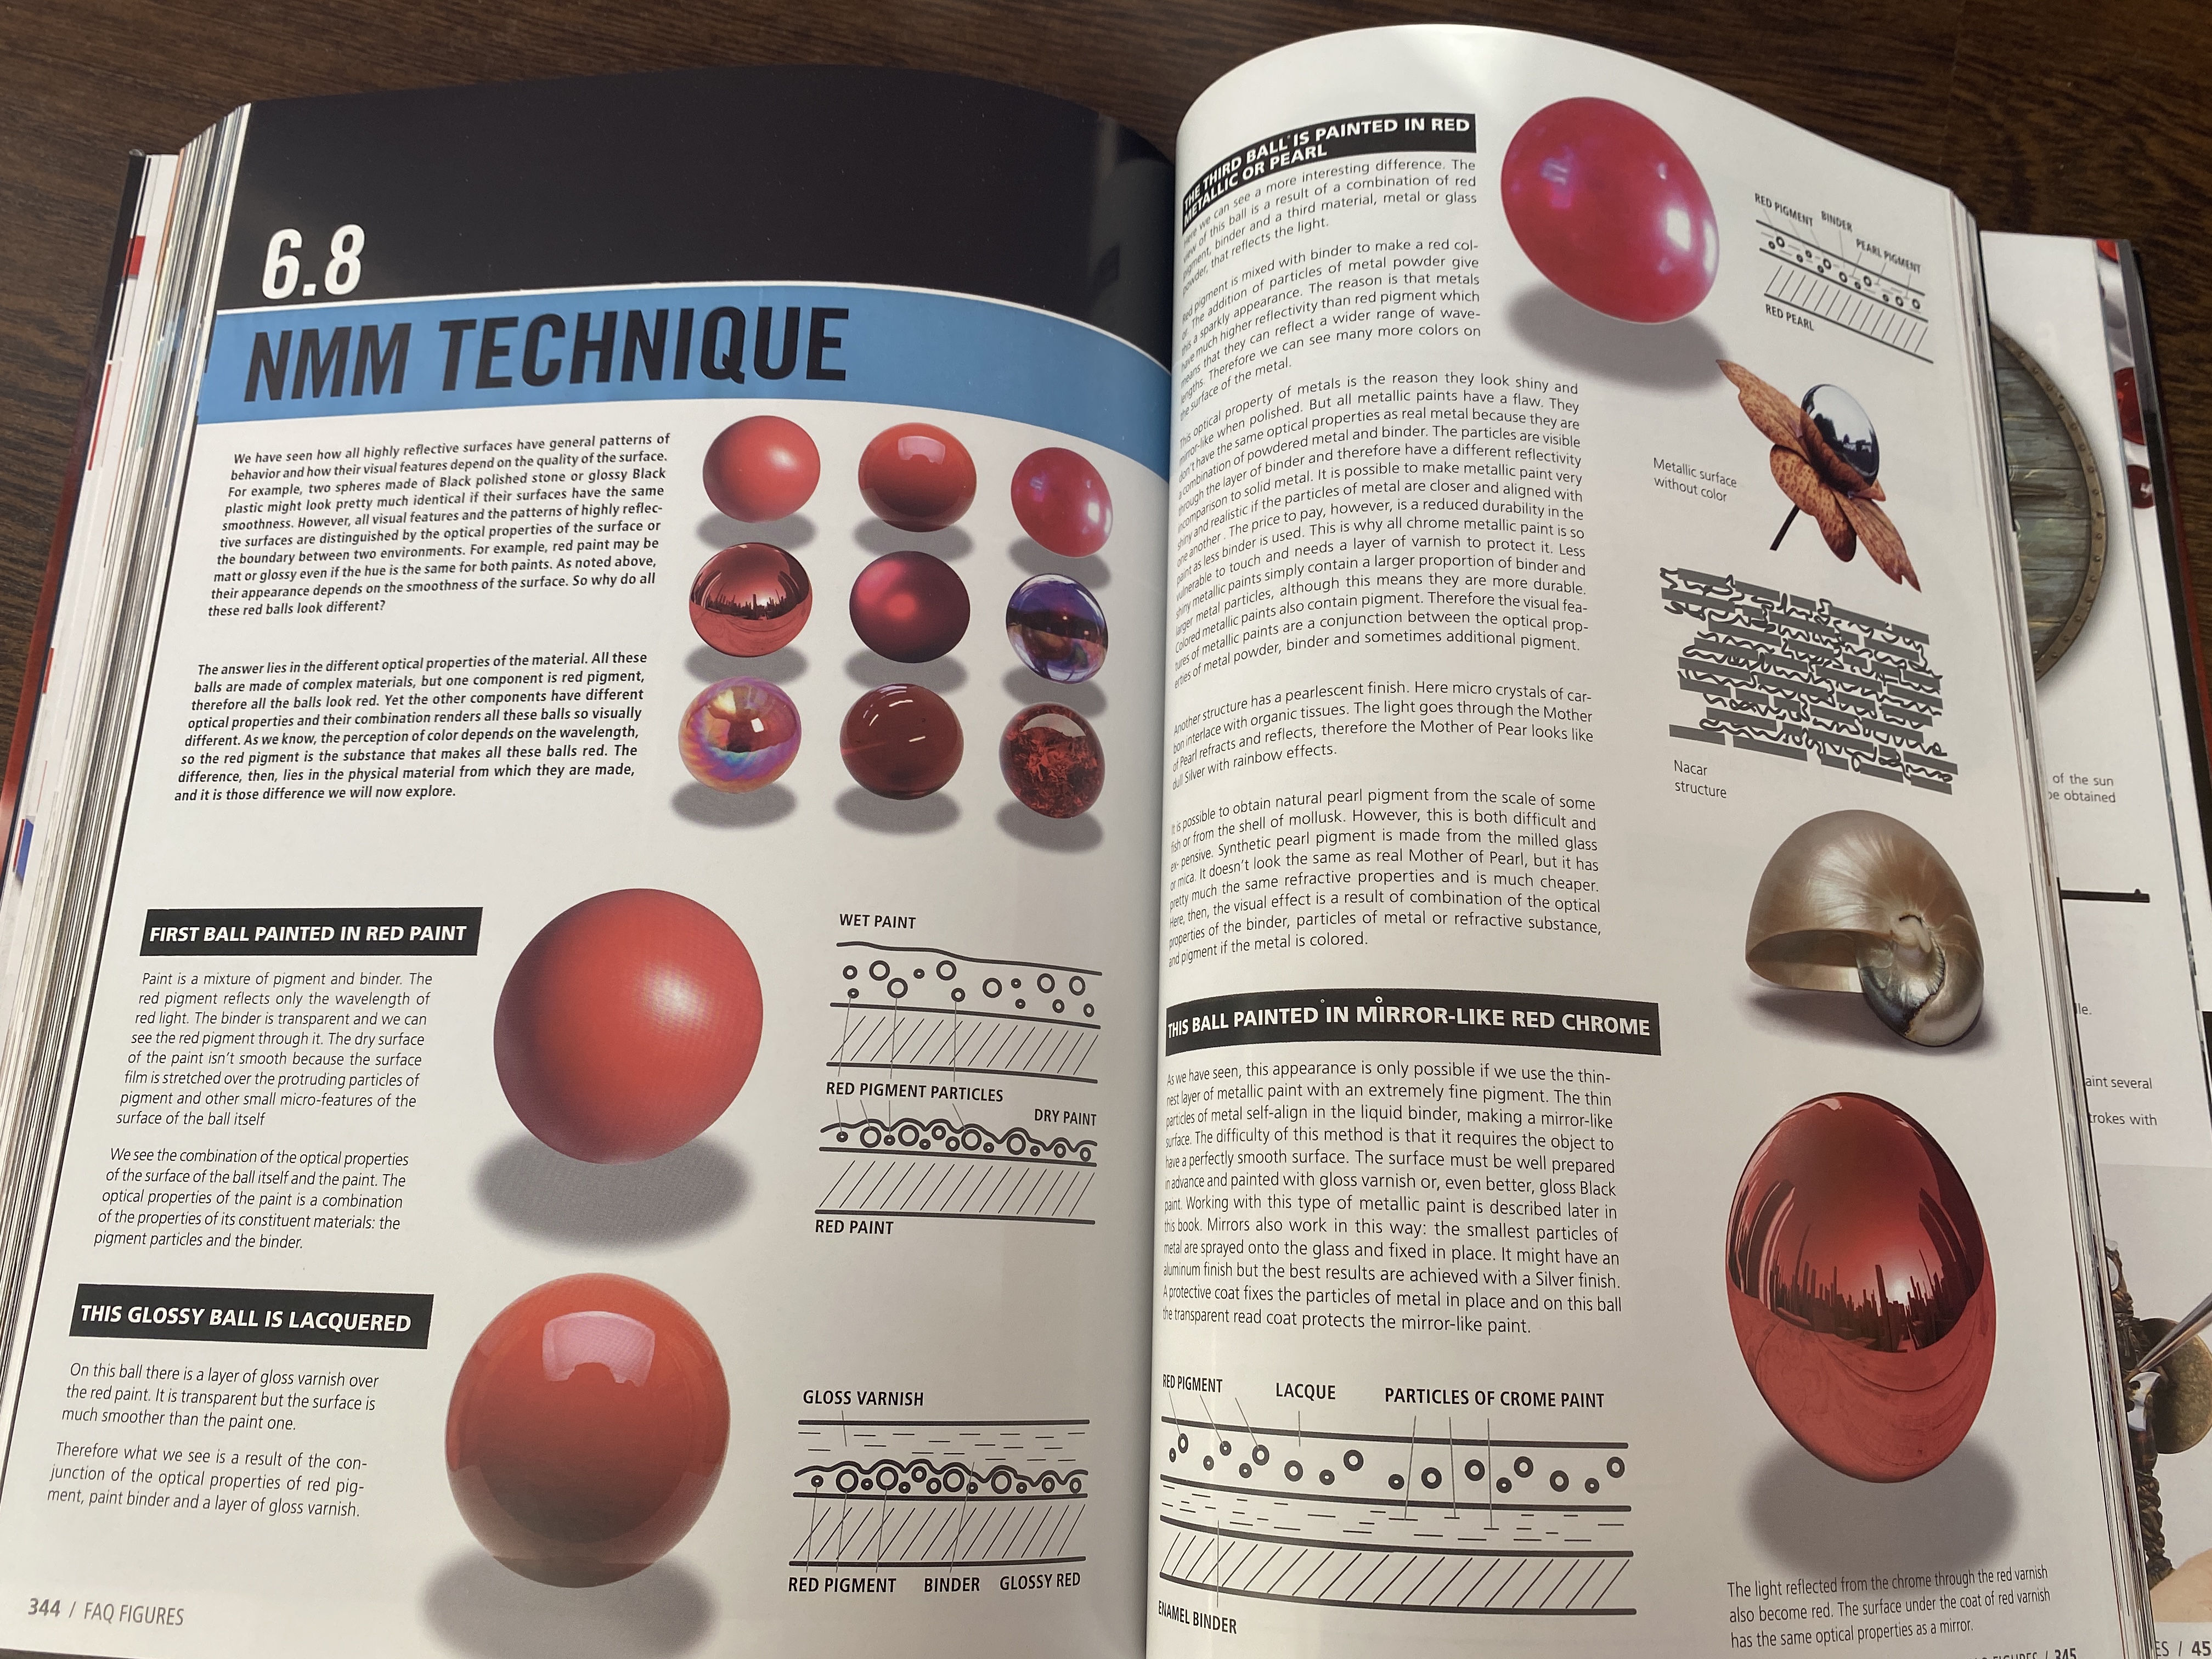
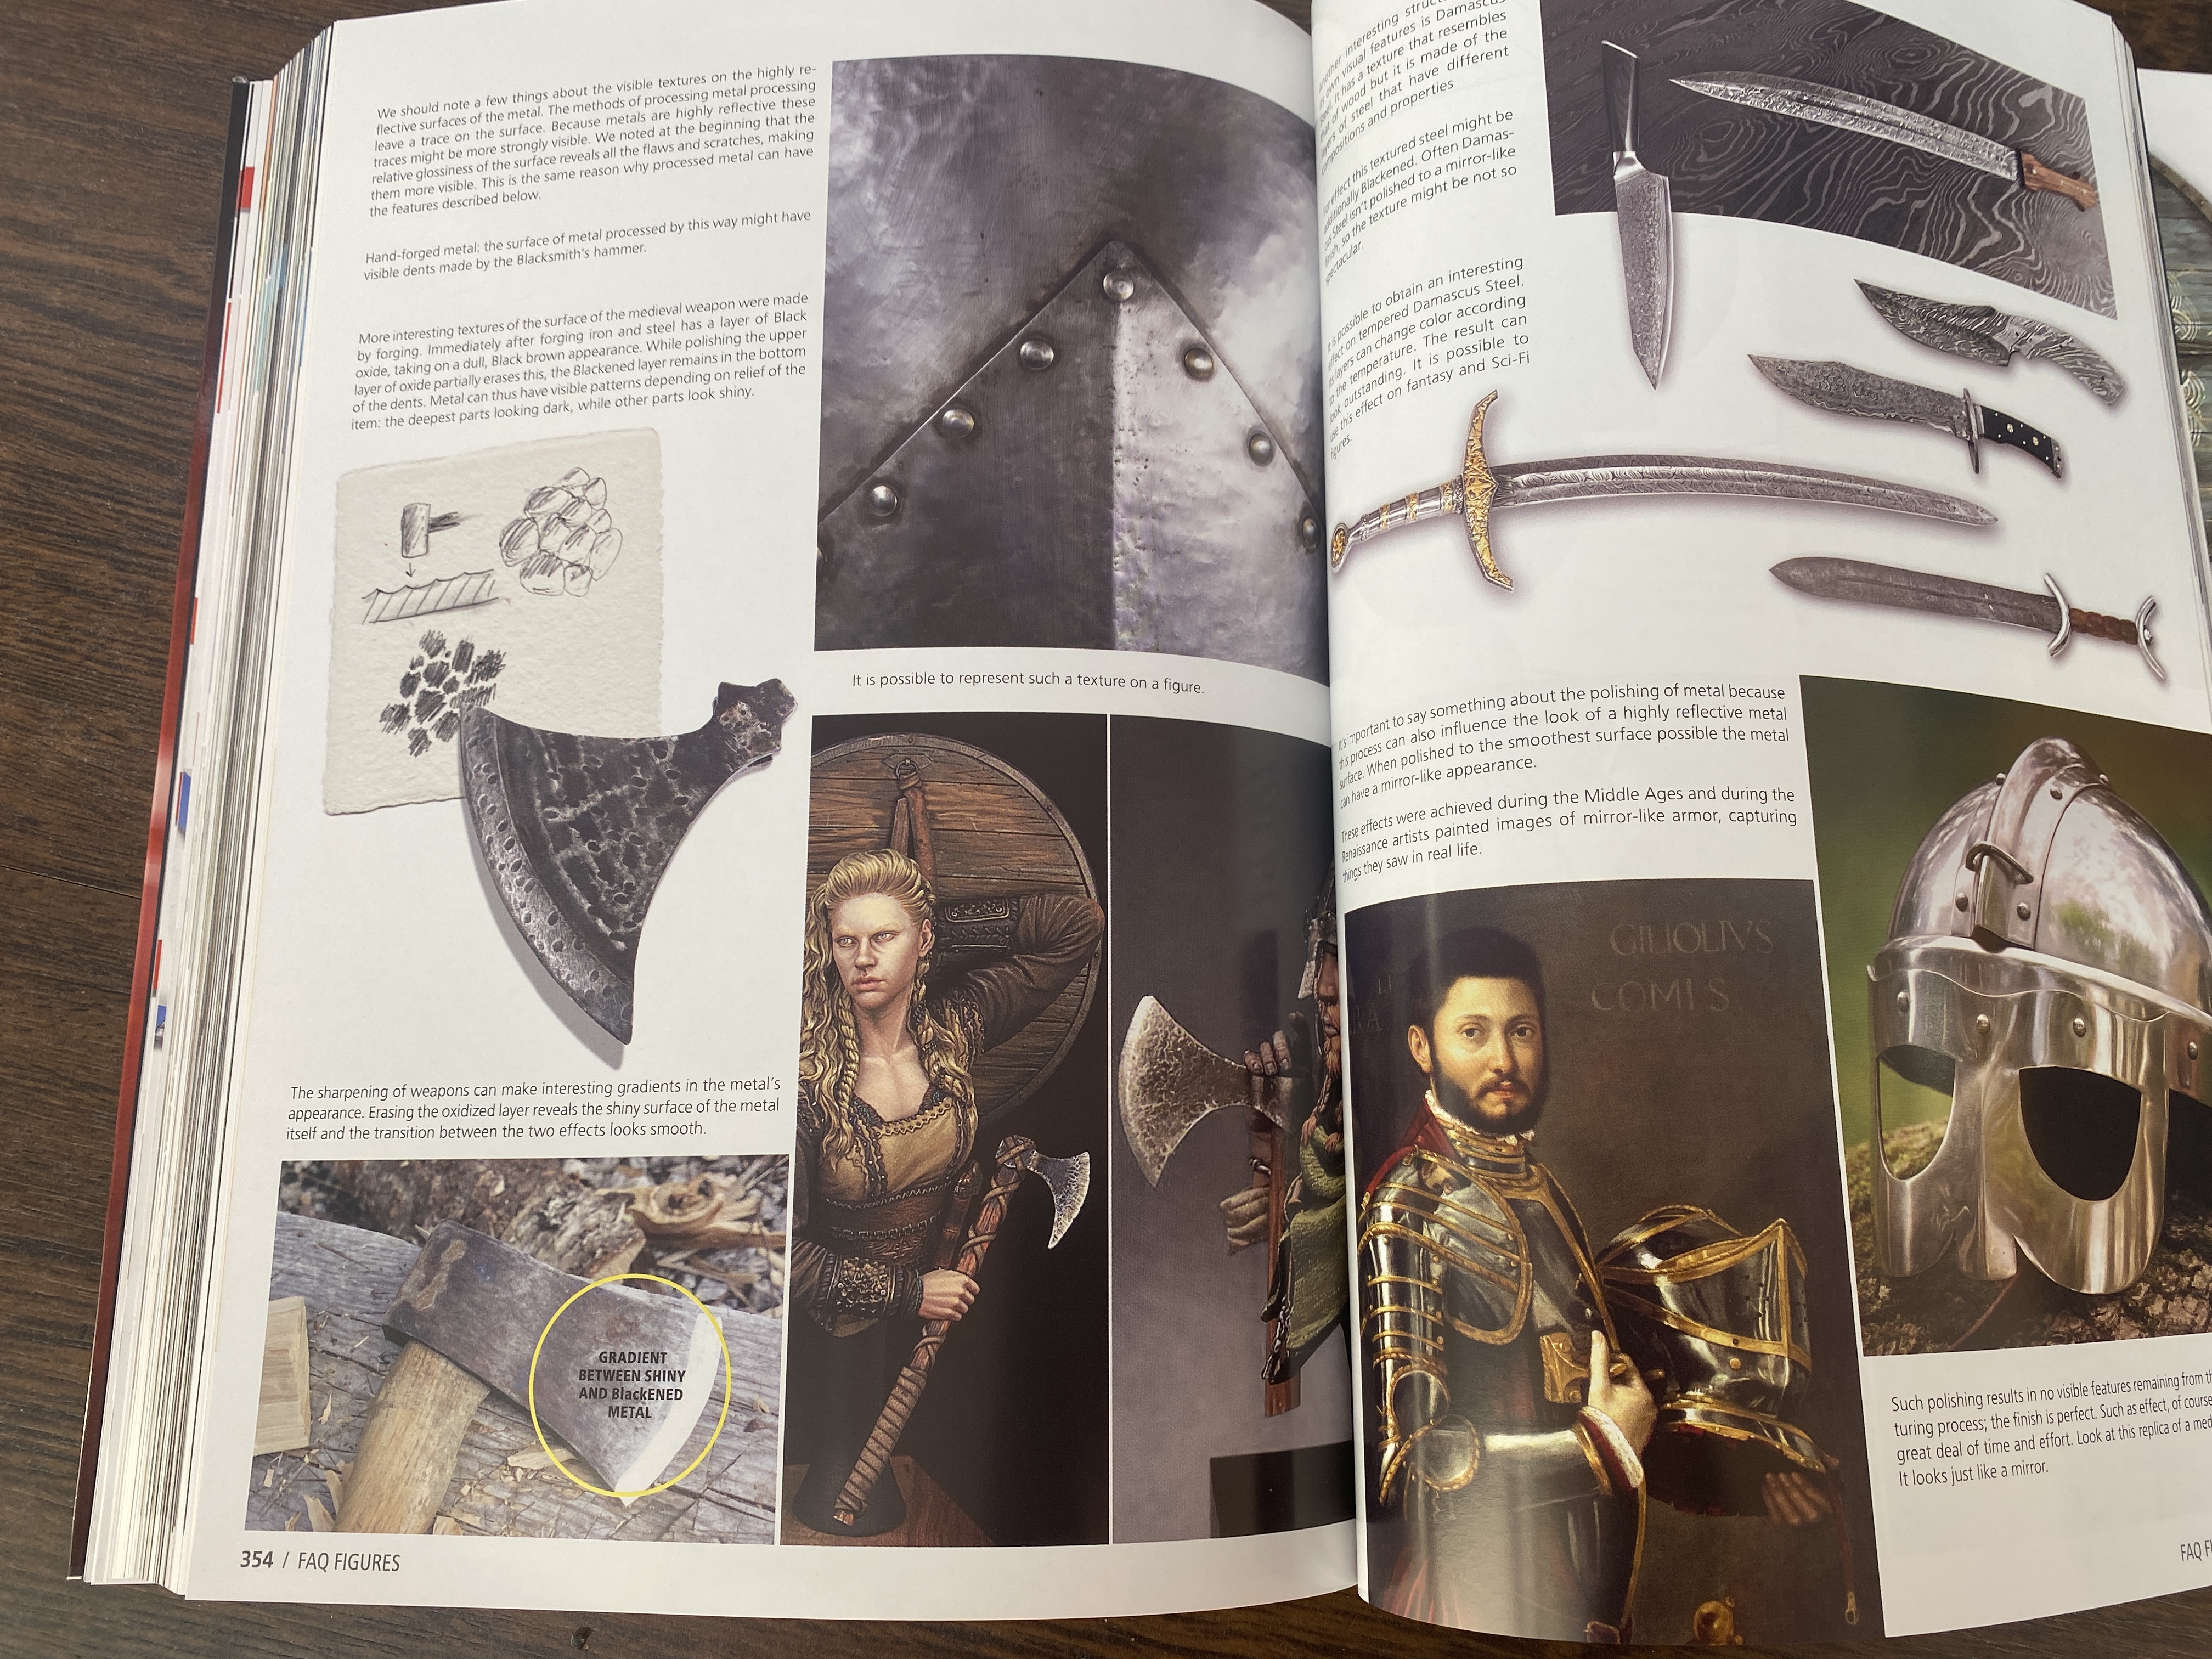
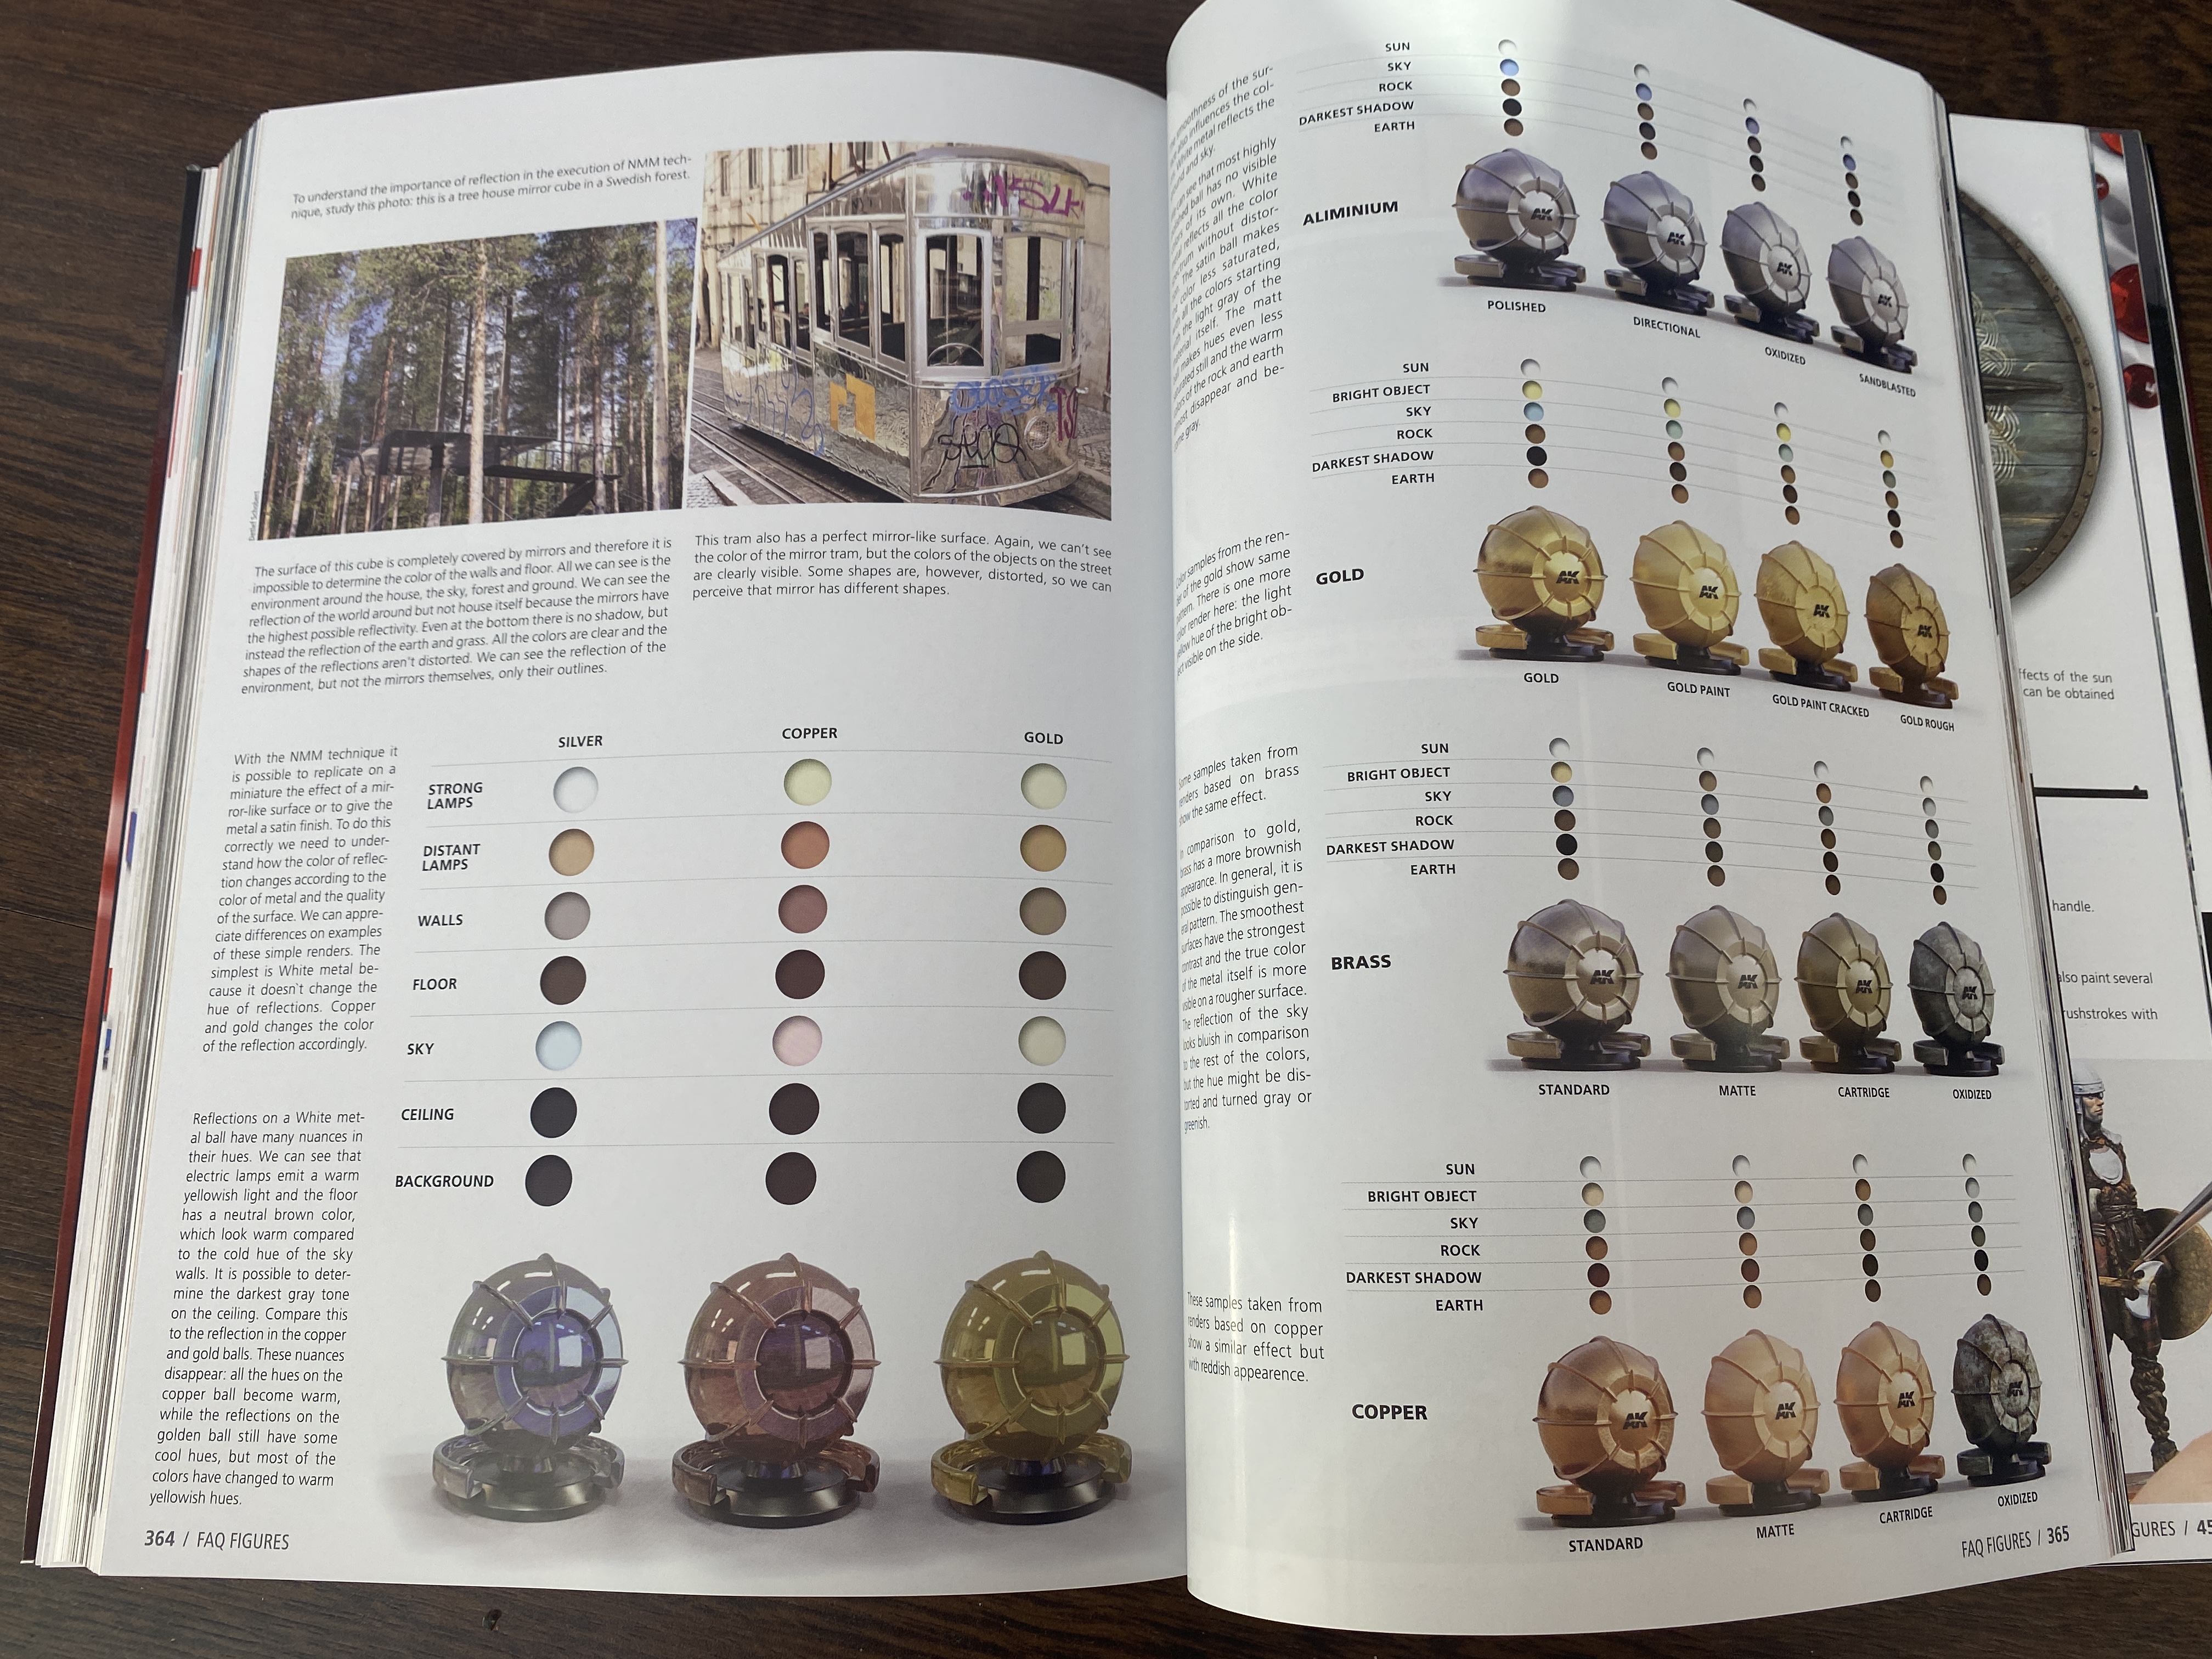
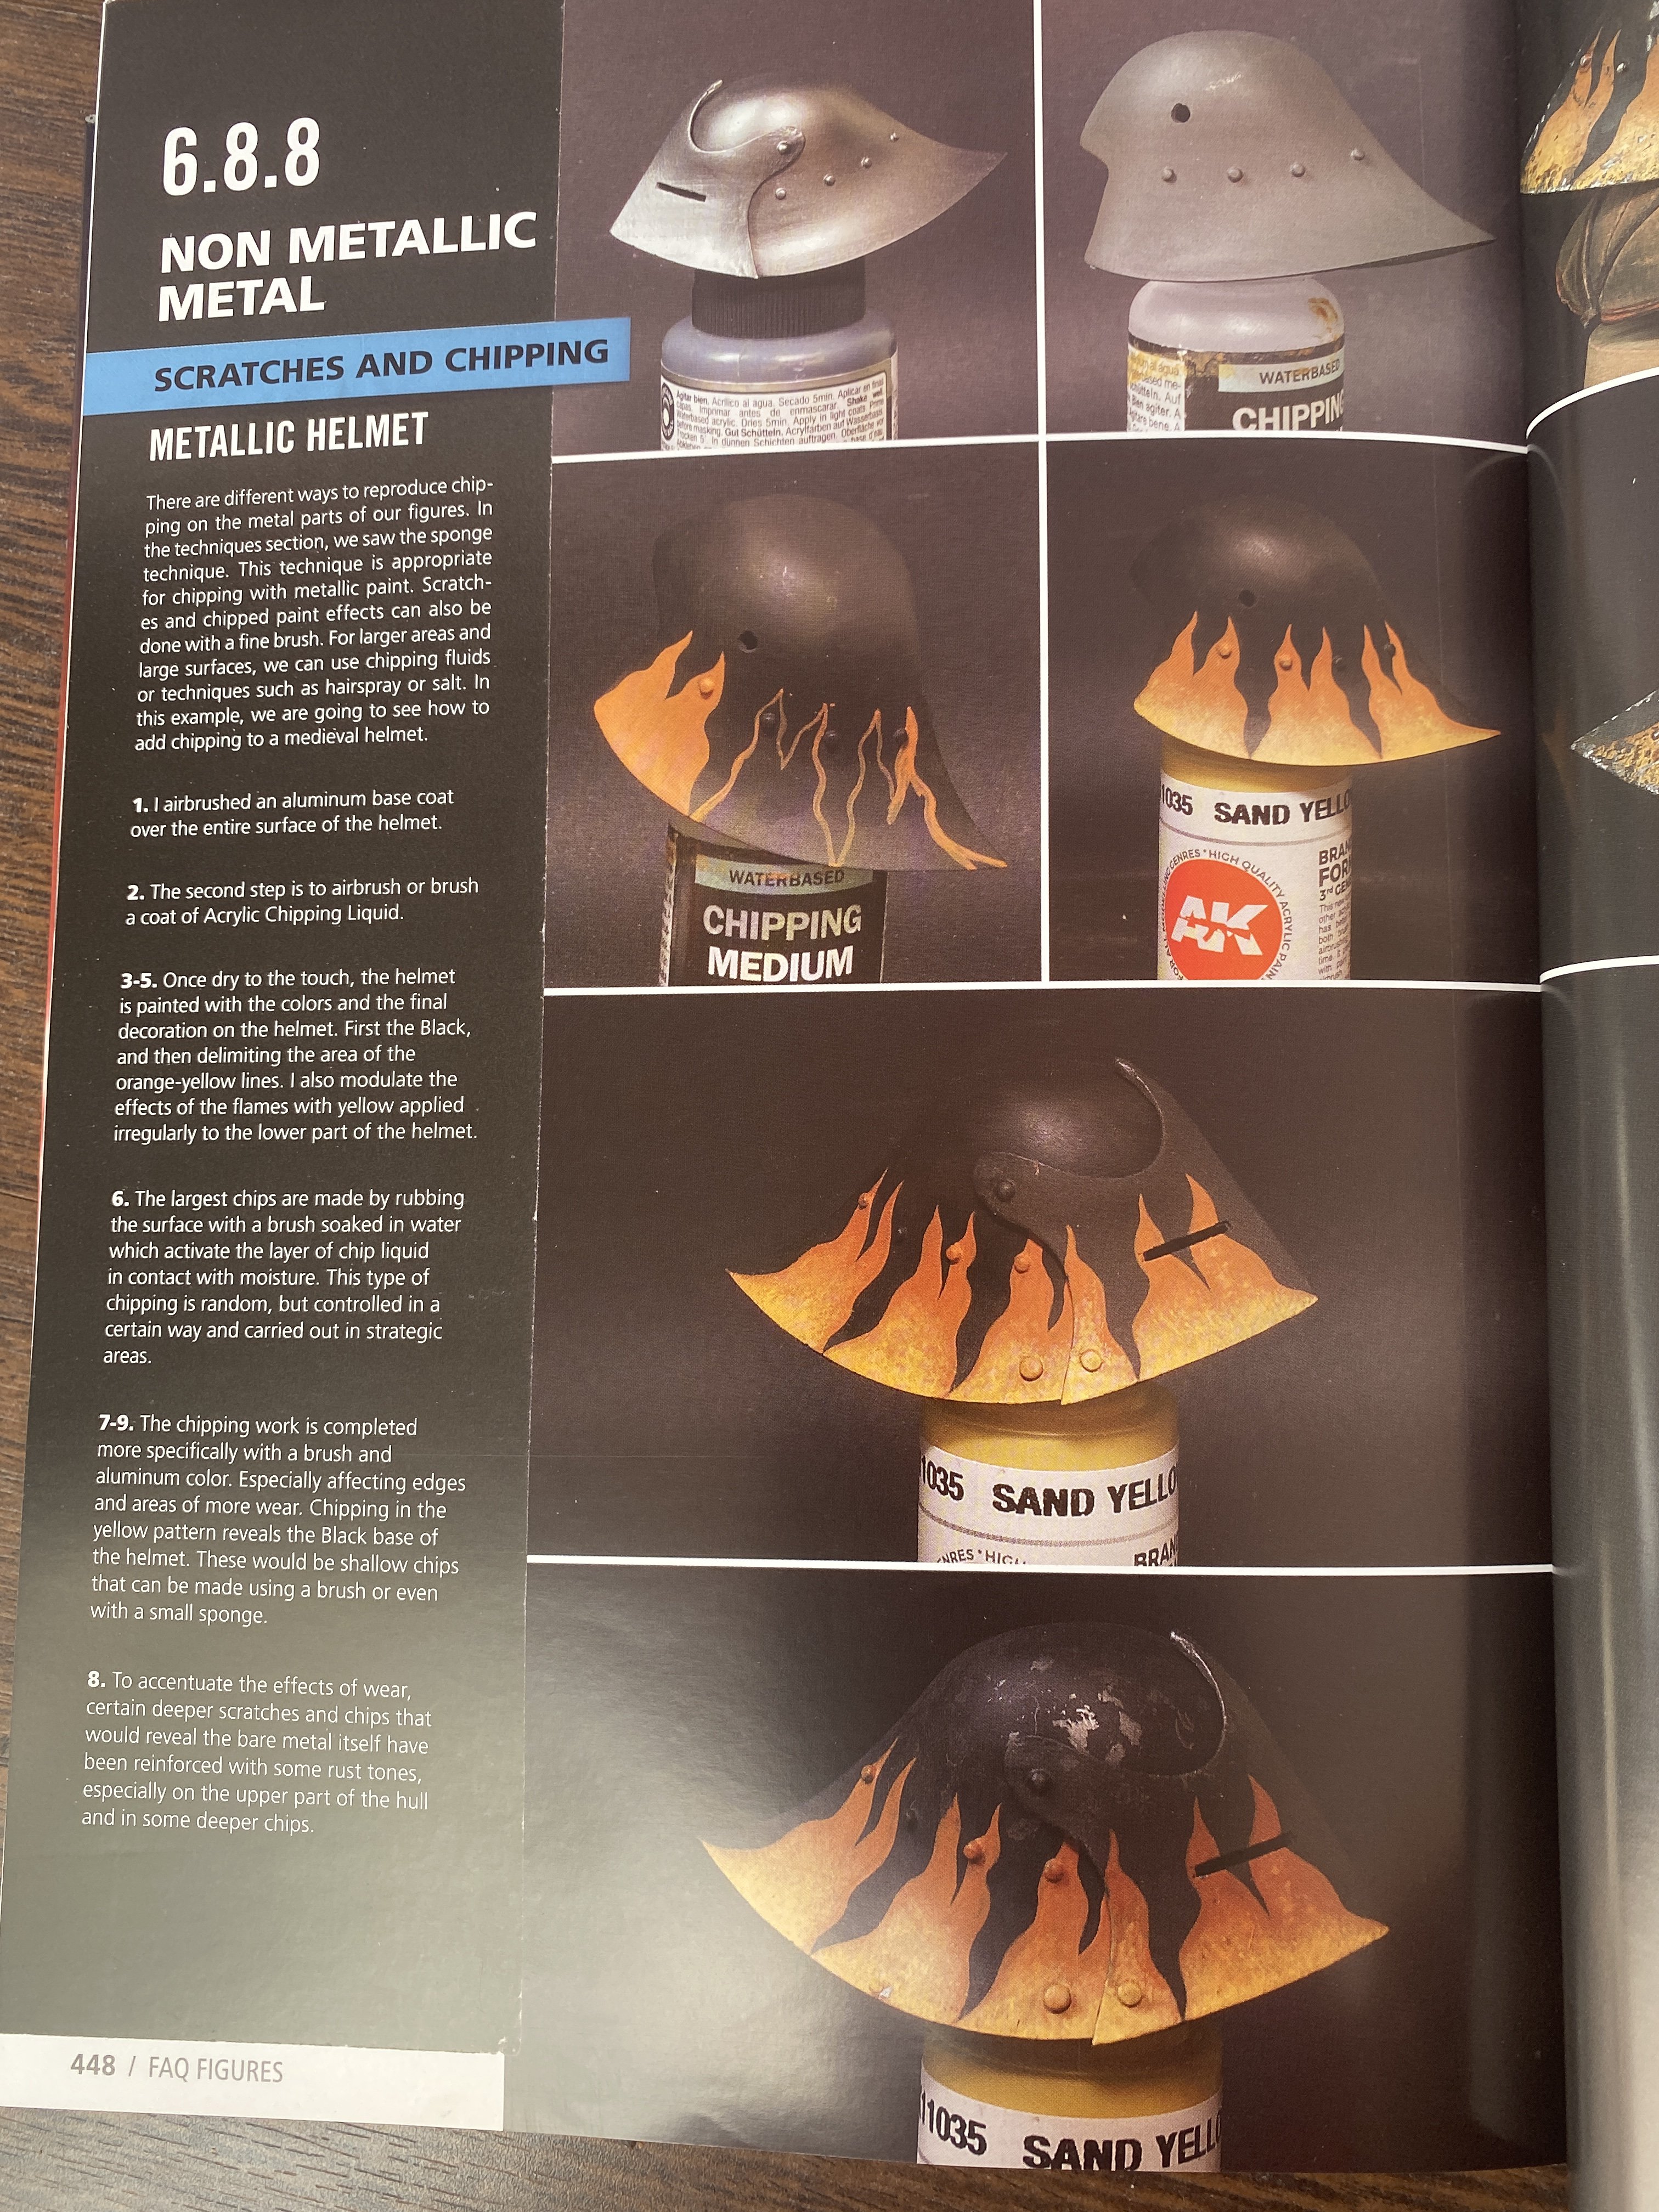
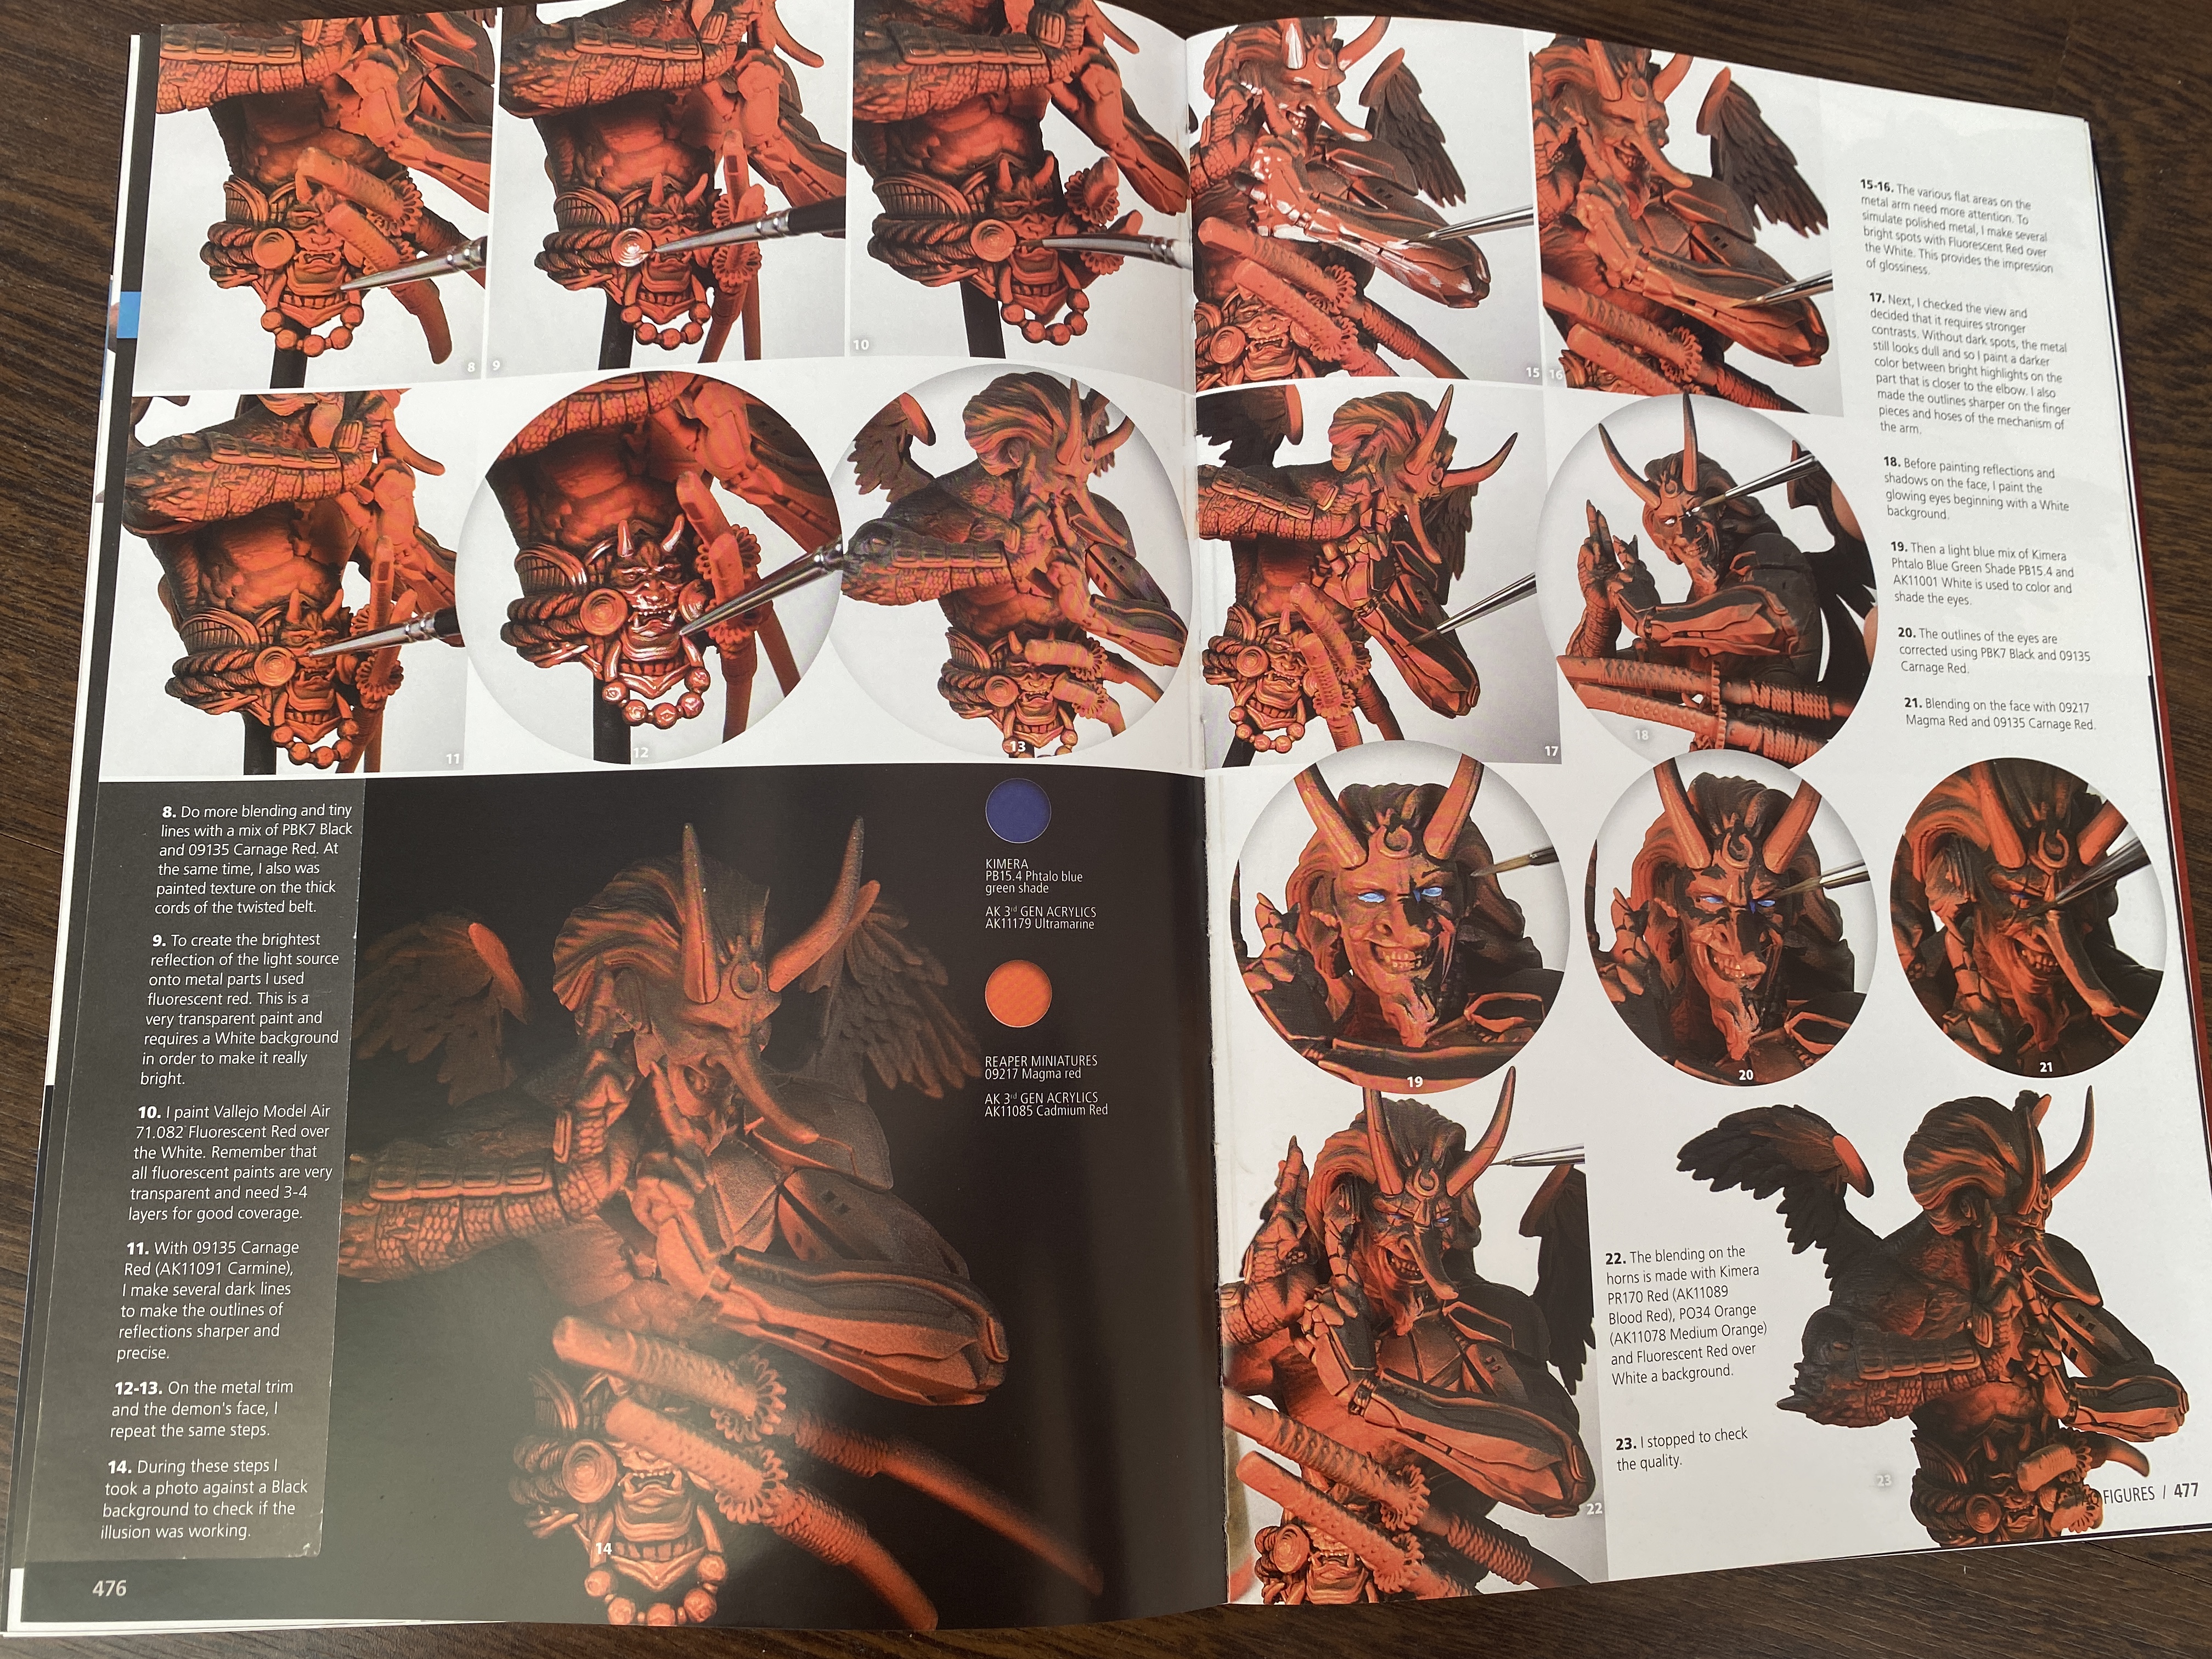
F.A.Q. Figure Painting Techniques By Kiril Kanaev (Ak-Interactive) Price: €74,90 Kiril Kanaev is a master modeler with worldwide recognition in the figure modelling and painting. I was very surprised and excited by the launch of this book, first by the author itself (one of the best figure painter in the world) and then for the type fo book: a F.A.Q. where compiled everything about painting figures. I had expectation that this book would cover the art of painting figures completely or almost entirely. We will see. The book is huge. It has 487 pages, in satin paper with excellent coloring. The English version was translate by Chris Medding, David Grummit and Rick Lawler, so we can be sure of a smooth and unblemished text. Looking at the index, we can see the why of the book being so big. 1. Materials 1.1 Paints 1.2 Tools 1.3 Auxiliary products & basics 2. Before we Start on our figure 2.1 Workspace 2.2 Getting our figure ready 3. Colors 3.1 Color concepts 3.2 Color mixes 4. Lighting concepts 4.1 Basic concepts 4.2 Lights depending on the position of the details 5. Techniques 5.1 Techniques with acrylics 5.2 Techniques with oils 5.3 Glazes 5.4 Stippling 5.5 Outlining 5.6 How, and when, to use the dry-brushing technique 5.7 How, and when, to use the sponge technique 5.8 Airbrush techniques for figures 6. Painting figures. Applying techniques 6.1 How to paint skin 6.2 How to paint hands 6.3 How to paint eyes 6.4 How to paint the hair 6.5 How to paint clothes 6.6 Elements of animal origin 6.7 Reflective surfaces 6.8 Non metallic metal technique 6.9 Wood 6.10 Gemstones, pearls and crystal 6.11 Special effects Despite being a modeler for over thirty years now, I never painted a figure, although in recent times, I has already started one but I haven't finished it yet. Thus, the materials chapter is basically aimed at beginners but each type of paint and varnish has on the part of the author a brief explanation of the paints, their use and their features. Still being a model maker with “some” experience, I found the information provided very useful. The same can be said about the use of brushes and their conservation. In this chapter the author leaves nothing behind, talking about compressors, airbrushes, wetpallet, holder and other tools Keep this record in chapter 1.3, looking at the applications and advantages of various types of glue, putty and others After going through the basic but very complete notions of the chapter, we have not yet entered the figure painting directly, but we continue with the preliminaries. The choice of the figure, moving to workspace (2.1) (what`s the best light to paint model figures) and the preparation of the figure, chapter 2.2 .. Here it is very important the steps presented in order to obtain a figure without defects and perfectly built with reinforcement of the limbs and placement on the base. The filling and putty section caught my special attention, with an excellent job of “reconstructing” the face of an “Apache” figure. It got a much more expressive face. Chapter 3.1 (color concepts) gives the notion of the study of color. I do not say elementary notions because it is more than that, at least for me, as it is very composed in the different aspects of color: HUE (pure state of the color), Brightness, Saturation, color temperature and its implications in the figures, with clear examples and graphics. It is very educational and in fact gives us notions about the behavior of color. And to complete this color theory, the author presents chapter 3.2 (color mixes) where he demonstrates in practice, the behaviors of color showing various mixes based on primary colors. After the color teachings, chapter 4.1 and 4.2 presents the basic concepts of lights and shadows and the effects of light on the figures and their dimensions. What is called “zenital light”, the lights and shadows created from a point of light, depending on their angle of incidence. This "personal definition" is highly reductive compared to the explanations and study carried out by the author Check the pics: We go into chapter 5: Techniques. I am not going to describe here what all the techniques presented consist of because it did not make sense or explain in any way what Kiril does and exemplifies in a masterful way. Its not only brush painting techniques but also with sponge and airbrush, so I leave you photographs with the different techniques that allow you to check the method of step-by-step used as well as the quality of the photos accompanied with the explanatory text. The Author could almost stop here ... but no ...In Chapter 6 and sub-chapters the author applies the techniques he explained in the previous chapter to several specific situations, taking the development of techniques even further, to the absolut perfection. Thus chapter 6 begins with skin painting giving special emphasis to the face, be it white skin, black skin, sioux skin, dark skin and even scars. The top noch: tatoos! As you can see in the photos, the presentation of the techniques is the same with a very explicit step-by-step. After going through the painting of the hands, chapter 6.3 is dedicated to one of the most complex and difficult points. At least for me: painting the eyes. Like its was not not enough to explain how to paint the eyes, we still have several types of eyes and how to paint them .. Insane !! Madly insane and wonderful ... Finish the painting of the body elements with the hair. In chapter 6.5, a new phase of painting begins: clothes. Once again, we cannot expect it to be a simple chapter. The author dedicates shows camouflaged clothing, with step-by-step techniques and used coulor. As for these clothing styles, it is an excellent source of information by it own but the nex thingwas totally unexpected for me. Paint clothes with textures?? The chapter 6.5.2. with the study of each fabric and how to achieve, through painting, the effect of the same and extends from pages 236 to 285. We drop the textures, move on to synthetic and animal skin. The attention to detail is impressive, to say the least ... I no longer have words and as such I leave you with some images. The next chapter was one of the chapters that most intrigued me: Reflectives surfaces. A long explanation is given about the reflective surfaces and their understanding of the nature and behavior of the reflective surfaces in the light. After the theoretical explanation, since simples shapes (flat, sphere) to more complex ones (full helmet), we move on to the practice and the different techniques used by the author for different finishing, always with enormous success. I think that with practical explanation and with a lot of practice we can get an acceptable result (at least, I hope so). The chapter 6.8 is also a brand new world for me… Non Metallic Metal Techinique, but makes perfect sense… reflected surface based on the different optical properties of the material. Through pages 344 to 387 the author puts down all his knowledge and experience explain all the theorist with all views and surface nature in order to get the final solution on getting the perfect tone, color and aspect that they are looking for. After the long explanation, comes the specific situations of NMM like the steel color ( 6.8.1), with a step-by-step of painting a steel armor or engraved steel (6.8.2) with a painted shield, bronze (6.8.3), cooper (6.8.4), brass (6.8.5), golden (6.8.6), chainmail (6.7.7) scratches and chipping oin mtellic helmet (6.8.8). A new chapter: wood. Right here I am a little more comfortable due to my experience with WWI airplanes and the frequent need to paint wood ... However, the technique presented and the results obtained are surprising. Totally different from the technique that I use. To experience soon!! Another chapter that was very curious was chapter 6.10 - Gemstones, pearls and crystal. Mainly how to paint glass, or rather how to simulate painted glass. Once again, the theoretical description is very important and very illuminating and in the next sub-chapter, we have the practice of how to paint a glass bottle. Or rather how to simulate the glass by painting two solid resin bottles. The final chapter: 6.11 Special Effects Here the author covers a very interesting technique: OLE (Object Source Light). In other words, that painting technique that allows the observer to erect the figure in the way that his painter intends, giving illuminated or specific light point with the smoking figure in which the light point will be a fireplace. This chapter is subdivided in two: artificial point of light (with the example of a devil) and double illumination. To finish and unlike a gallery (which, in fact, here didn't make sense with the huge amount of photos throughout the book) we have a very useful reference table. CONCLUSION Well, what a long review and I was not exhaustive ... This book has a lot of information that is impossible to summarize it in a way worthy of the book itself. it is a real must-have not only for model makers but for all model makers because there are techniques here that are universally used in all areas of model making. Its information is very well compiled and structured, allowing access to it in a very easy way, not only for reading but for the immense step-by-step that the author presents us throughout the book. So I can only say that this book is highly recommended to all modelers! My truly thanks to Fernando Vallejo and Ak-interactive for the review sample.


- 15 replies
-
- 5
-
-
- ak-interactive
- kiril kanaev
- (and 3 more)
-
Harv You're in our hearts and prays. You will get be well in no time. Fran
-
Awesome to see you back and int the way of full recovery!!
-
you`re not a kit collector but a modeller!! ... I have 250 and counting....
-
Hum... I think that Meng were tooling this for Wingnut Wings, for a never-released 1/24 scale series of WW1 aircraft... as far I know... So this could well be a former never seeing WnW model kit...
- 161 replies
-
- 7
-
-
- greatwallhobby
- italeri
- (and 6 more)
-
I have to do a master degree soon, as Im going to rescribe a 1:48 B-29. I have been using Dymo tape and some Scale Modelling Aircraft rule with some templates and a chinese (unbrand) scriber. Now, I got Hasegawa tools (several templates) and a scriber. I got them at a good price at www.sealmodel.com Fran
-
Ju-87G Tankbuster
Fran replied to Kaireckstadt's topic in LSM 1/32 and Larger Aircraft Ready for Inspection
Love it I really like the Stuka!! -
and great price also with the 10% voucher!!
-
1:32 scale Ansaldo A.1 'Balilla'
Fran replied to sandbagger's topic in LSM 1/35 and Larger Work In Progress
wow!!! What an outstanding work!!! -
Congrats!! Awesome!! So beautifull!!
-
Israeli Mirage III C with Atar9C
Fran replied to Kaireckstadt's topic in LSM 1/35 and Larger Work In Progress
eheeheh!! True!!! -
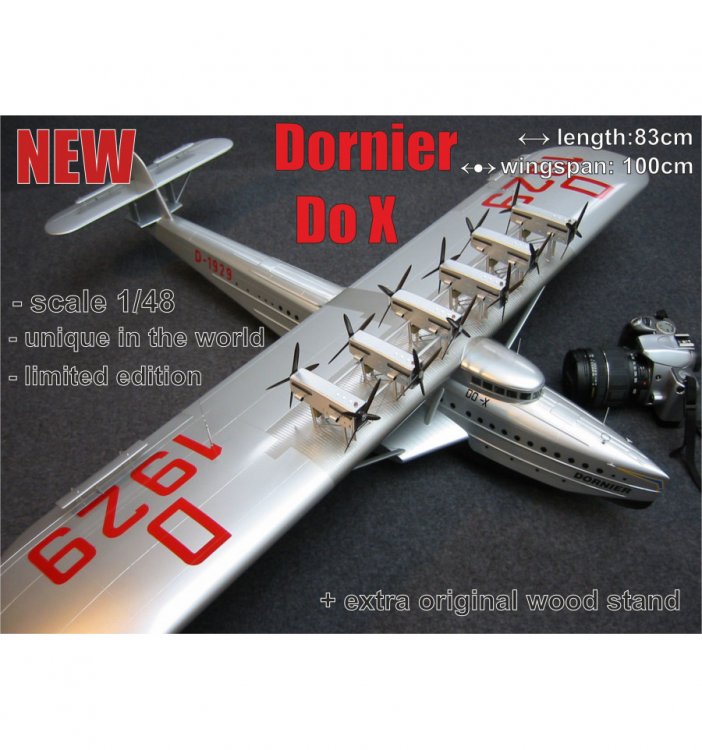
Well, I didnt see this coming... 1:48 Dornier Do X by... Hph Models!!! http://shop.hphmodels.cz/en/model-kits-in-scale-148/213-dornier-do-x.html
.thumb.jpg.1f40b61b4e953ecf63146f63b230ae10.jpg)
- 161 replies
-
- 4
-
-
- greatwallhobby
- italeri
- (and 6 more)
-
Israeli Mirage III C with Atar9C
Fran replied to Kaireckstadt's topic in LSM 1/35 and Larger Work In Progress
Now I cant wait to see this!! Tons of AM!! -
I miss this post nad share the same news on other post. Anyway, I´m not very excited with F4-b... I would prefer a... 109!?? Kidding!!! The B is already made by Academy... This Tamiya f-4 will hit 70 to 100 € price tag and probably ZM woudl have plan to launch a B soon... I would prefer to see Tamiya making their magic in other thing... for instance F-15...A-10... Fran
-
Size matters... Just for fun, what is the biggest box in your stash ?
Fran replied to HubertB's topic in General Discussion
Well, the 3 biggest boxs in my stash would be the Trumpeter 1:16 Pz IV, Felix-W-29 duellist and the biggest the Italeri 1:35 SCHNELLBOOT S-100. -
Size matters... Just for fun, what is the biggest box in your stash ?
Fran replied to HubertB's topic in General Discussion
OMG!!!! That`s BIG!! -
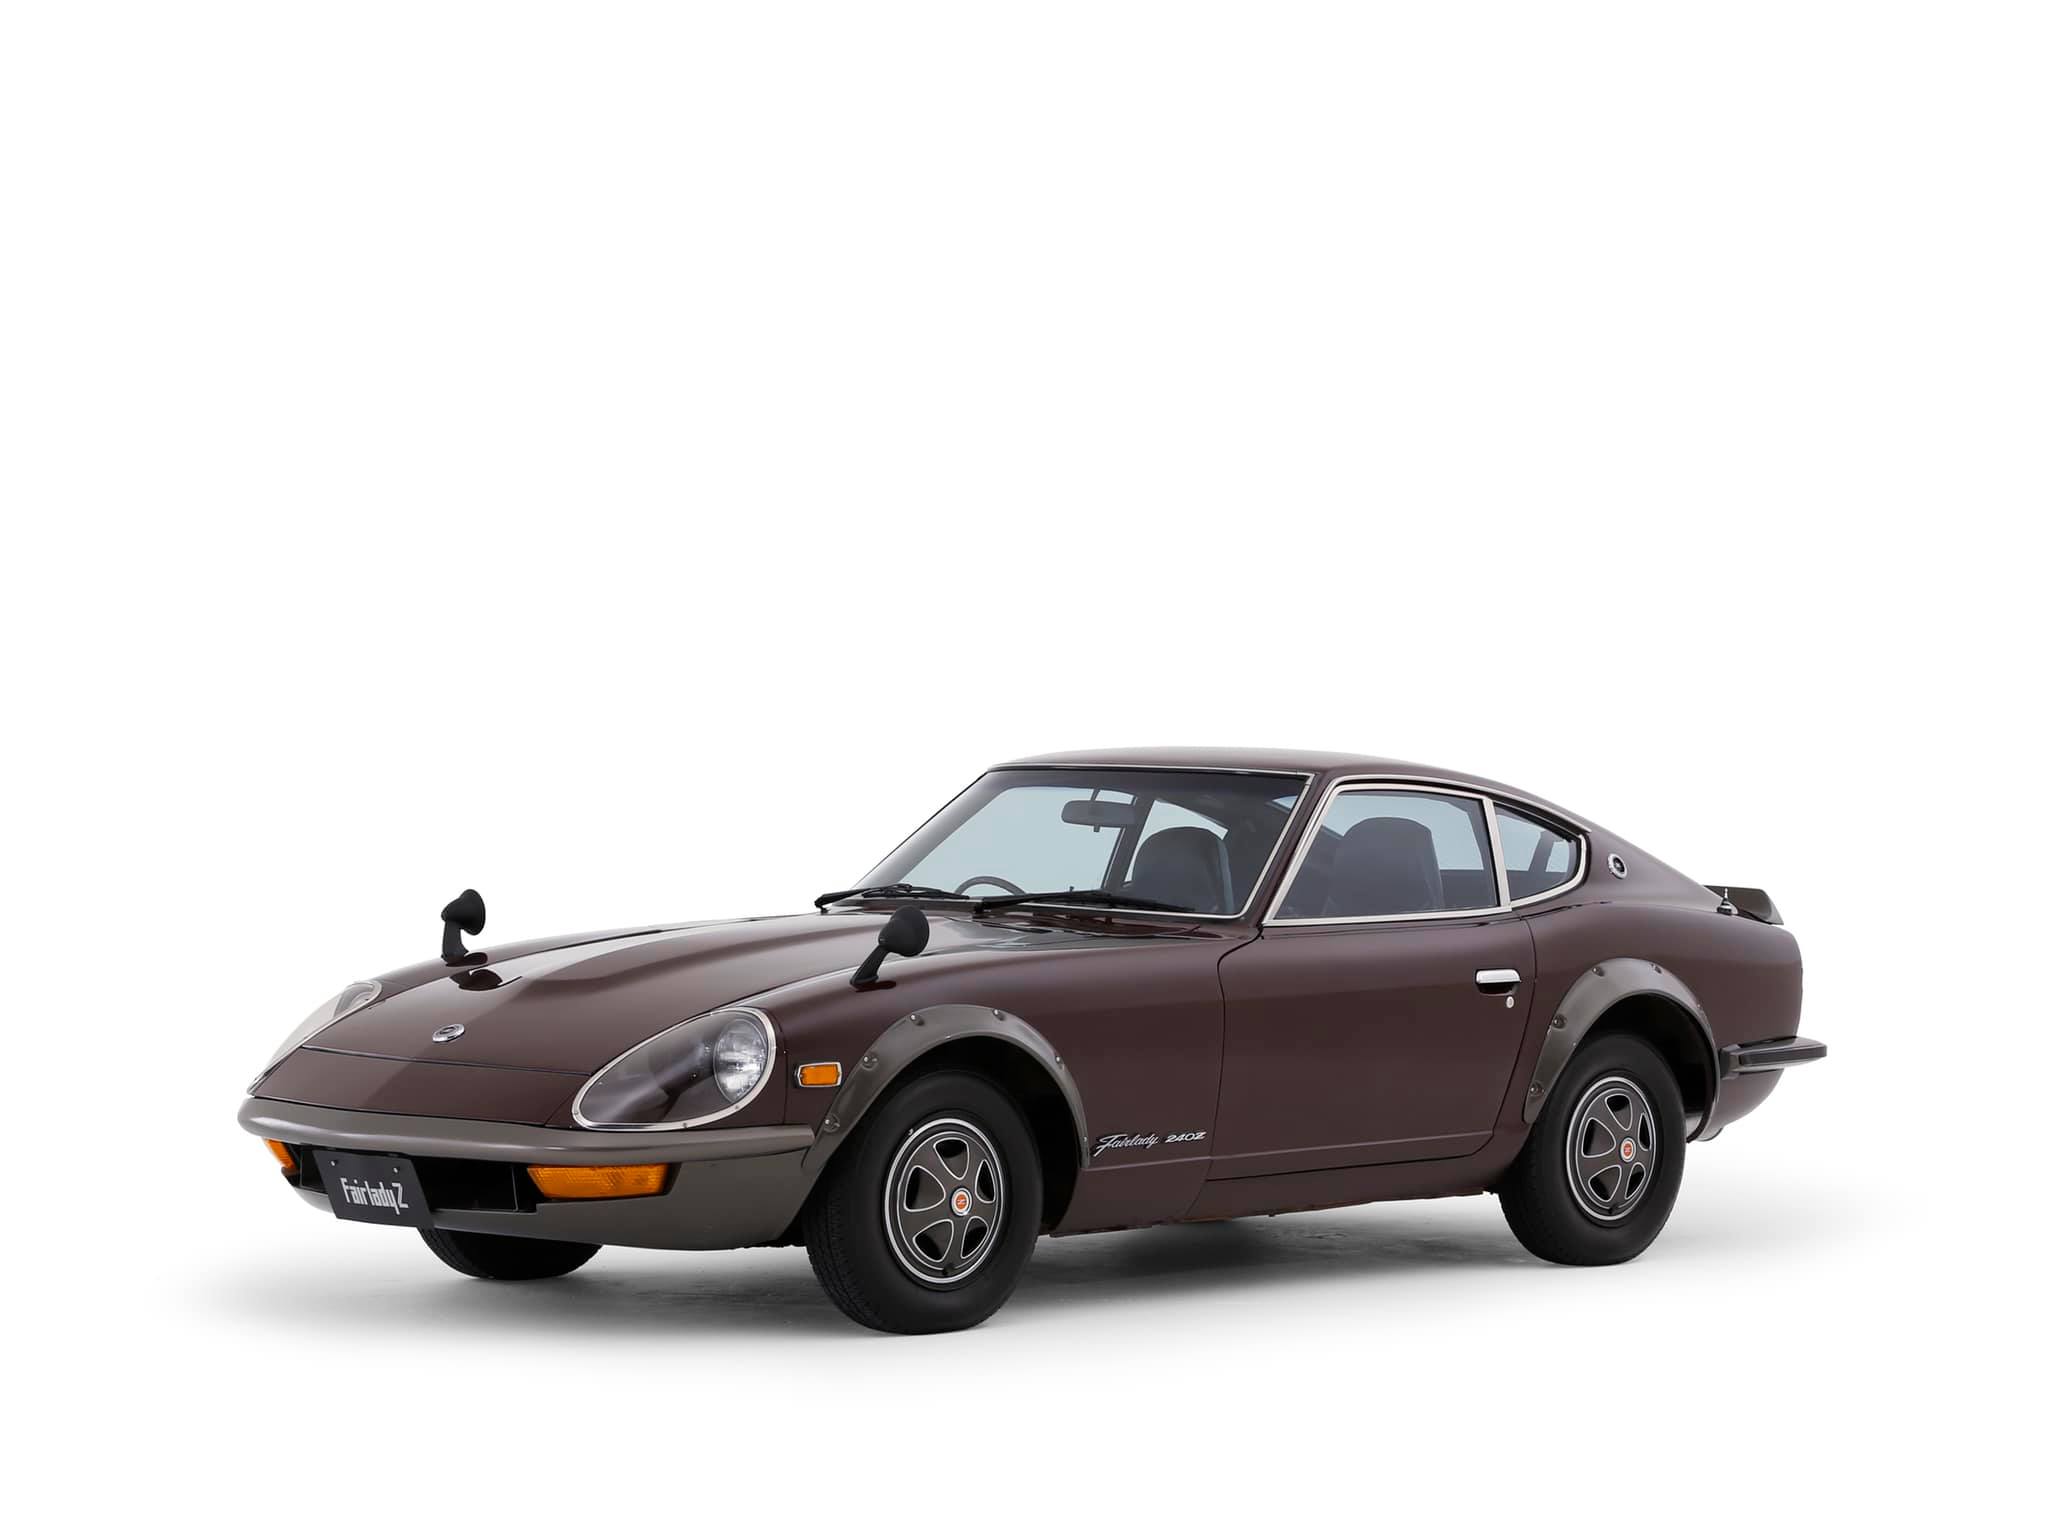
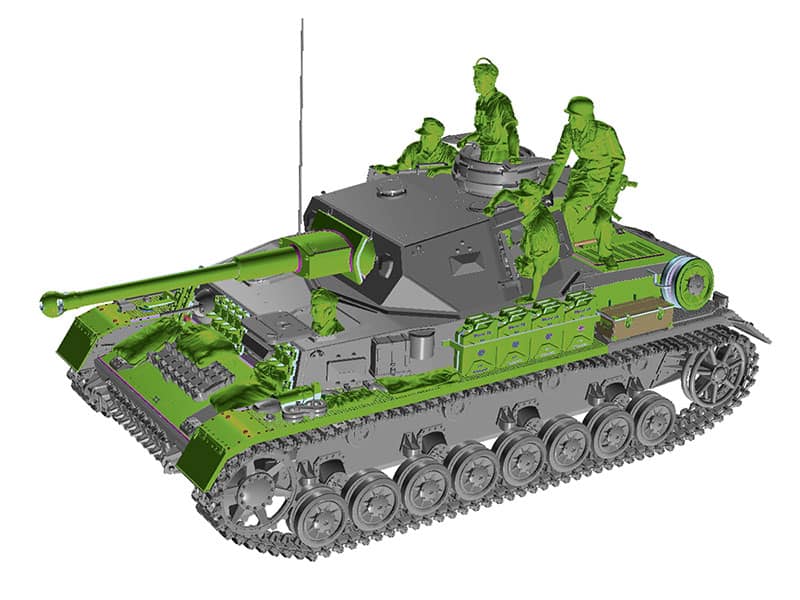
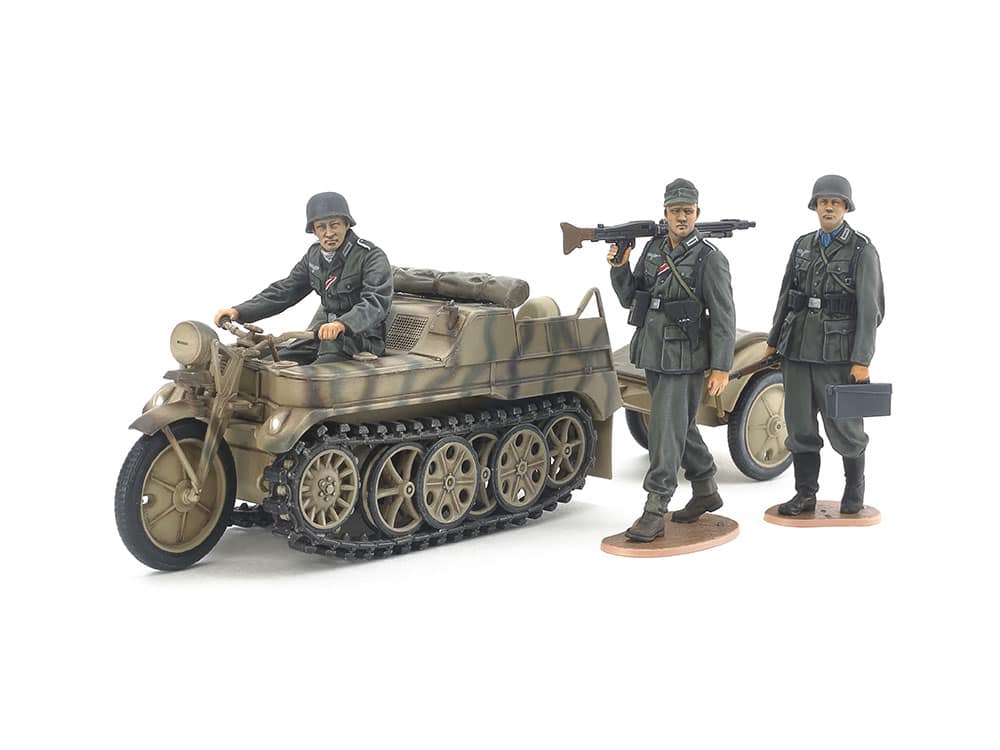
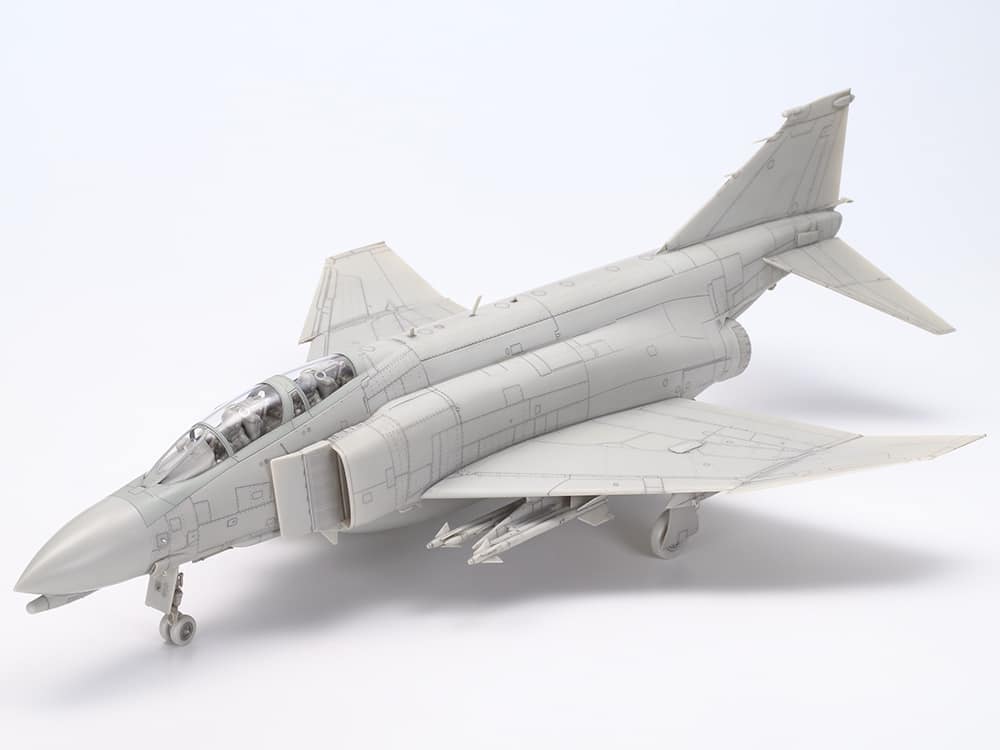
Tamiya news for 2021! 1/48 McDonnell Douglas™ F-4B Phantom II™ 1/35 German Tank Panzerkampfwagen IV Ausf.G (Early Production) 1/35 German Sd.Kfz.2 Kettenkraftrad (Mid-production) 1/24 Scale Nissan Fairlady 240ZG https://www.tamiya.com/japan/featuredreleases_early2021.html That Phantom and the new tool Pz IV Ausf. G!!!!

- 161 replies
-
- 3
-
-

-
- greatwallhobby
- italeri
- (and 6 more)
-
Yeah... looks very very good!!! Really tempted also!
- 161 replies
-
- 2
-
-
- greatwallhobby
- italeri
- (and 6 more)
-
Das Werk 1/72 S.M Unterseeboot U9
Fran replied to JeroenPeters's topic in LSM-Related Reviews (military figures etc)
great review as usual!! Its on my wishlist!!! -
wow!! This going to be EPIC!!!
-
Focke Wulf.... Triebflugel.
Fran replied to BlrwestSiR's topic in LSM 1/35 and Larger Work In Progress
I always loved the F.W. Triebflugel!! I have made in 1:72 Huma Model one but this in 1:35 is on my wihlist!


.jpg.8cff2b01f6f4b08b3c15e9c514e407f0.jpg)