

crazypoet
-
Posts
826 -
Joined
-
Last visited
Content Type
Profiles
Forums
Events
Gallery
Everything posted by crazypoet
-
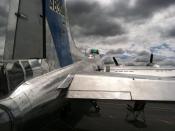
I've been hauling these pictures taken during my visit and flight on Aluminum Overcast for far too long - time to share! The EAA 2014 B-17 Tour made a stop near Atlanta, and there was zero chance that I was going to miss an opportunity to get up close and personal with the ship and her crew. Aluminum Overcast is a late-production G, serial number 44-85740, that did not see any combat time but was sold as surplus - for $750 - at the end of WWII. Details of the ship, as reported by the EAA, are located here: https://www.eaa.org/en/eaa/about-eaa/eaa-media-room/eaa-b-17-aluminum-overcast-media-room/eaa-b-17-aluminum-overcast-history I was one of the first to arrive that morning, and was booked on her first flight of the day. That meant that I got to spend a good amount of time crawling around, inside and out. I was also onboard for preflight, engine start and run-up and a lovely flight through perfect weather over the north Georgia mountains. I was sadly not as thorough as I might have been in documenting the ship and the experience - I was too busy being in awe of the ship and some living B-17 aircrew who came to visit. Regardless, here are the pictures I have from that day:
-
Every now and then things come together... Aluminum Overcast makes occasional trips down my way. In this instance I got to spend a long morning with her, and took a flight on her out over north Georgia. The pic from the radio operator's gun position was taken while we were headed out over the forests. I was able to wander all over, everywhere but inside the ball and tail turrets. It was a humbling experience. Standing and sitting in the various crew positions during the flight, navigating my way across the bomb bay catwalk, sitting up in the glazed nose... and imagining what it may have been like, back when... a hand on a gun, watching out the waist window... It's transformative, things like that
-
Nice! Who did the lighting mod? I found and ordered the ParaGrafix PE kits for the Hold, Cockpit, Gun bays and Corridor, but hadn't seen any light kits. Some of that I can do myself, but it's nice to have some help along the way. i look forward to your build - this thing has lots of room to play!
-
Love it! How many of the packs have you received?
-

Model Space Millenium Falcon - question
crazypoet replied to crazypoet's topic in Modelling Discussion
I spent a bit of time wandering around the Model Space forums. There's people doing some impressive work with this kit. I also found the SciFi equivalent of Eduard - ParaGrafix - and ordered a batch of PE enhancements for the cockpit, hold, engine and corridors. It will likely be several months months before the subscription delivers enough parts to really get going on this, which is good as it will allow me time to adjust and get things moving on other builds waiting in the queue. -
Just saw this on CNN. A Danish teenager doing research for a class project found the remnants of a German fighter, including the remains of the pilot, at his family farm in Jutland. http://www.cnn.com/2017/03/08/europe/denmark-wwii-plane-trnd/index.html Another soldier can now go home to rest
-
Thank you for putting this thread up... similar to you, I have to have something of a love-affair with my subject, or it just doesn't work. Everything I build has a story attached... somewhere, somehow These are the things that, for me, take modeling from fine craft into a close cousin of the Storyteller's narrative art.
-
Beautiful beasts, these things we love... i had had an opportunity to visit with the EAA B-17, Aluminum Overcast. Beautiful ship... herewith, some memories:
-
Model Space Millenium Falcon - question
crazypoet replied to crazypoet's topic in Modelling Discussion
True that. Does that mean it fits our "1:32 or larger" requirements? i've done some browsing of their build logs. There's an amazing amount of room for detailing and weathering of both the interior and exterior of the ship. fortunately (or not) I'm not married to making this *exactly* as it existed for the movie. This was a busy working ship between episodes, so there's scope to do a bit of "wandering" with details. I noticed that they've made the interior far too clean and tidy. I need to fix that... all those sharp and/or lumpy and/or explosive bits of kit they wore around are sure to have done at least some damage to the upholstery. And I suspect that Chewie probably shed a bit and left unclothed-large-furry-humanoid stains wherever he sat for any length of time. not to mention that never once did I see any of them wipe their feet prior to entering the ship... -
Model Space Millenium Falcon - question
crazypoet replied to crazypoet's topic in Modelling Discussion
Ah - I found the scale and it's smaller than I thought. It shows as 1:43 on the website. Seems like it should be larger. Oh, well - I'm getting it anyway. Now we need to get Eduard to work *their* magic... I can already see places where a bit of PE and resin could be quite handy. I'm gonna have to do *something* about those dead-flat instrument panels... -
This shows some of the hull detail a bit better - the somewhat-battered prow, stains and a bit of slime: and the stern, with tiller, hatches and mast socket. If I decide to move the mast, it will go on he centerline just behind the tiller. Still undecided on that...
-
The deck fittings are essentially complete, though I'm still doing a bit of fine-tuning on the masts. the front mast would of necessity been removable - it sits directly in way of the gun muzzle and would be just a bit of a mess should they forget one time to take it down! For this reason, I chose to just do the mounting socket here. For the rear, I'll mount the mast permanently, hung with an appropriate Naval Ensign. Getting the blocks and cleats the way I want them is an ongoing process at the moment, so it's not quite ready for its closeup. The mast sockets were punched from card stock, stiffened with CA and drilled through before getting a coat of graphite. I'm doing a bit of second-guessing on the location for the rear mast. It was shown offset from the centerline and ahead of the rudder post in the old drawing, but it just doesn't look quite right. I may move it before I make things permanent. If I do move it, I'll have to cover the hole i already drilled in the deck, but that is just a "design challenge"... a day in the life! i've started weathering the hull - left side in-progress just now. I've temporarily mounted the rudder/tiller and prop for reference, to help with splash patterns and the like. The weathering needs to be strong enough to be visible, but not over the top. Finding that space between just enough and too much... so herewith the progress of the moment: foredeck: hull and waterline: cockpit and stern: it doesn't show up well in these shots, but there's a layer of brown algae sludge along the waterline. That is going to be the biggest headache, I think - it's a fine line between enough and overboard. The hull has been in heavily sedimented rivers and nearshore waters for months, with groundings on sandbars and beaches along the way, but is also not yet a year old... more to come as continue along and scratch my head!
-
Model Space Millenium Falcon - question
crazypoet replied to crazypoet's topic in Modelling Discussion
Order going in today... I'm already planning enhancements, lol i read up on it a good bit yesterday, and the modular approach to construction really does lend itself well to the sorts of "improvements" we do around here. it doesn't specify anywhere in the literature (that I've yet seen at any rate) but from the raw dimensions on this beast, the scale seems to fall somewhere between 1:32 and 1:24. Lots of room to play!- 10 replies
-
- 1
-

-
- model space
- star wars
- (and 1 more)
-
Model Space Millenium Falcon - question
crazypoet replied to crazypoet's topic in Modelling Discussion
Well, bugger! i was half hoping everyone would say that it's crap, so I wouldn't have to get it... now I'm stuck! it absolutely won't be done in the same timeframe that the pieces arrive (other items in the stash are ahead in the queue). but.. Damn. It's the Millenium Freaking Falcon, in huge crawl-inside-the-thing-and-explore-it scale...! ok. Mrs Poet's eyes will roll back in her head - but she's a fan as well... I also have exactly the *perfect* spot, once it's done.- 10 replies
-
- 2
-
-
- model space
- star wars
- (and 1 more)
-
Greetings! Extraordinary inspiration here - wander around and have fun!
-
So I'm interested in this very large scale Kit of the Millenium Falcon - supposedly a 1:1 scale model of the actual prop from the Empire Strikes Back. This is not an inexpensive kit, and is sold by subscription. does anyone have any experience with this supplier and kit? http://www.model-space.com/us/build-millennium-falcon.html I like the level of detail they provide - seems a great platform for adding additional detail. I guess my concern is with the overall price vs kit quality. If I'm going to shell out the serious coin they're asking, I want a kit hat is essentially perfect in fit and finish... any thoughts?
-
STAR WARS "Millennium Falcon" - 1/72 by Revell Master Series
crazypoet replied to elmarriachi's topic in Non LSM 'WIP
I love this ship! I look forward to watching your build. This is fun! -
Every time I see an update on this it inspires me to take on bigger challenges. Beautiful work!!!
-
Scratch built B-25H nose
crazypoet replied to Padubon's topic in LSM 1/35 and Larger Work In Progress
Nicely done! It's a challenge to do a complete replacement like this is any media. Thank you for sharing the process pictures. -
Thank you! The work that I see posted here day in and day out is my inspiration. I look at the work posted by everyone in these forums and it encourages me to up my own game and take on new challenges. The deck fittings are almost done - a few more cleats and the masts are what remain in that department. I need to pay a visit to my LHS to get the right sized stock for the masts. I have 3/32" and 3/16" stock on-hand, and of *course* the masts need 1/8"... it never fails, lol. The delay will give me more time to work out exact placement and mounting options. Once the fittings are installed I'll finish weathering and stain-washing the hull and decks. After those, it's down to the home stretch - pulling together all the earlier sub-assemblines and associated plumbing. I did some test fits today, and it all sort of works. Photos to follow as I get more bits connected up. Meanwhile, I'm digging up patterns and pictures of the various tools that would have been carried aboard. Spanners, hammers, oil cans and suchlike, along with a coal shovel and the tools for loading and firing the gun. I can be working on these while I sit on conference calls at work...
-
Lamborghini Murcielago "Liberty Walk" - 1/24 by Fujimi & Eightyone81
crazypoet replied to elmarriachi's topic in Non LSM 'WIP
Put me down for matte charcoal gray -
What's the biggest part you have lost during a build
crazypoet replied to NST's topic in General Discussion
I'm tempting fate here, I know! So far, the largest piece I've lost is a bit of PE brass, for which I had to scratch-build a replacement. Everything else I've been able to find - sooner or later, usually after much cursing. now having said all that, fate will cause me to lose the entire fuselage of my next project! -
Bit of progress on the deck fittings. The forward spar hanger was a bit of a headache, fit-wise. The location makes fitting the support brace a challenge - took about 30 mins and two pairs of pliers to get all the curves and twists just right. Hmmm. Realizing that a black brace, in shadow, against a black section of hull doesn't show very well ! Foredeck almost done
-
Today's new arrival is the Signifer conversion kit which transforms their excellent Grumman Goose into the G21B seaplane flown by the Portuguese Navy This will be fun!!!!
-
Thank you for the update! I would *love* to see a Dc3/C-47 from them - it would be an amazing bit of work