

crazypoet
-
Posts
826 -
Joined
-
Last visited
Content Type
Profiles
Forums
Events
Gallery
Everything posted by crazypoet
-
I have a pair of resin kits, but neither in 1:32. 1:48 Grumman Goose and a 1:144 Confederate Ironclad (the Albemarle, to go with the Picket Boat after it's done, some year...) I'll see what else I can dig up - this would be fun!
-

does anyone know a source for 1/32 Parafrag bombs/clusters?
crazypoet replied to crazypoet's topic in Modelling Discussion
Success... sort of... There's documentation that the "honeycomb" rack for parafrag bombs used for the B-25 was adapted from a similar system first developed for the A-20. The photo I posted above of the 72 vertically suspended parafrags in a B-25 is the only photographic documentation I've found for that mounting in a B-25, but I was finally able to find at least its linear ancestor in the very excellent A-20 book by William Wolf. In the A20 mount, two separate packs of 20 were carried in a fore/aft arrangement; the B25 version was two packs of 36, loaded side by side. This is the only photo I've found so far of the actual rack used in either aircraft. I'll use this as a basis for building something for the B-25. It's at least a step in the right direction... -
Thanks, Ralph! While I'm continuing with the first layers of paint, I gave a bit of attention to the prop and shaft. The prop was cast in Britannia Metal, a soft pewter. I cleaned this up a bit last year and put a first light layer of copper electroplate on the casting. Today, I added the shaft and a scale bolt, then hit the whole assembly with a few more layers of copper to bring them together. The shaft and bolt are brass, and needed a bit of drilling and tapping to get them fit properly to the prop After snugging things up, I plated the finished assembly with two layers of copper, which gives a nice bronze finish over the brass shaft/bolt and pewter prop I'm also adding a bit of extra detail where the prop shaft passes through the hull. There's a bit more head-scratching to do here, but I started by adding sleeves for the shaft. These will both support the prop shaft and give me the foundation for adding some bearing detail after I paint the hull.
-
I love this! Making things look "right" both from a distance as well as right up-close is a gift and a talent. I can put myself into the cockpit you're building and the instuments all seem to be ready for my hands to reach out and use. Adequate. Quite adequate.
-
The first coat of heavily-thinned primer pointed out a couple small spots that need some more attention with the sanding sticks, but I'm very happy so far. A bit of touch up, light overall sanding then the second primer coat. Meanwhile, I'm calculating the waterline, as it's not specified anywhere in the docs. There won't be *much* of a difference above/below the waterline, but enough to make it obvious that it's been in the water for a while
-
Beautiful weathering!!! I learn something new every time you post, so many thanks for allowing us to watch over your shoulder
-
Welcome!!!
-
does anyone know a source for 1/32 Parafrag bombs/clusters?
crazypoet replied to crazypoet's topic in Modelling Discussion
These arrived over the weekend, and I'm delighted! I ordered six sets of two parafrag clusters, among a bunch of other goodies, from Resin2Detail The detail is superb, right down to the arming wires. There were minor casting issues on two of the twelve clusters - the central support rod did not completely fill in the molds. This is a minor issue in that I can repair the defect easily. I let the folk at Resin2Detail know about the defects and they're resolving them. They are *also* preparing to release individual parafrag bombs... I will be fist in line when these come out, as they'll help me to build exactly the bird I want. Color me happy!!! Now the next challenge - finding a photo or drawing of either the honeycomb or the squirrel cage rack that Pappy Gunn designed for these things... I've read about it in every reference I've been able to find on the B25 in the PTO, but not a single photo or drawing have I seen! It's truly frustrating... The closest I've found is a very oblique view into a loaded bomb bay, that shows 72 parafrag bombs loaded vertically. Two 3x12 "honeycomb" racks are described for that particular load-out, but nary a picture to be seen... The Squirrel Cage rack is a bit different - it held 40 parafrags stacked horizontally, 10 rows of four stacks, with each stack of four loaded nose-to-tail. I could use either of these for the bird I want - I just have to find a picture first... -
Just got this batch of goodies from Resin2Detail... For the HK B17 G, resin seats with cushions, radio set, wishbone antenna, control yokes and oxygen bottles For the HK B25 Strafer, radios, oxygen bottles and a batch of parafrag clusters (which make me *very* happy!) Plus, for future diorama use, a pair of Weaver bomb-loading carts There's a bit of cleanup to do from casting, but I am overall *delighted* both by the quality and the responsiveness of the good folk at Resin2Detail
-
Great subject and a beautiful build... I'm loving the process
-
Nicely done!!!
-
Thanks! One of these days I'd like to do this kit in civilian guise as a lake or inshore cruiser. It could be really pretty, absent the military trappings.
-
Milestone achieved - the hull is complete, ready for priming and painting... The coaming, trim, rub rails and cover boards are all complete, sanded and filled... It took a couple iterations of sand/fill/sand/inspect/groan/repeat to get things ready for the first coat of primer, but I'm happy. The paint will be black for the hull and gray for the topside. It will be a bit grungy - it had been on the water for several months by the time of the mission against the Albemarle. I'll add a touch of algae below the waterline and the usual bumps and dings that small craft tend to accumulate. In addition, smoke from the coal-fired boiler will have an impact, so on the whole this boat won't be a pristine example of the type...
-
That is beautifully done! I've been doing a ton of woodwork on the Picket Boat, and it's impossible for me to tell the difference in finish/appearance between the wood pieces I'm making and the wood finish you're applying here. It's utterly convincing. Thanks for sharing your approach and the work as it develops
-
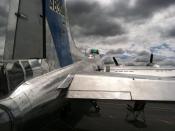
Ta-152H-0 awaiting restoration at the NASM
crazypoet replied to JeroenPeters's topic in LSM 1/35 and Larger Work In Progress
I love this approach and this topic both, and I am learning *tons* from your updates - thank you for sharing! -
The woodwork is a joy to see coming together. Any chance you could do a step-by-step photo set for one of the parts? I'd love to watch over your shoulder, if I may?
-
I look forward to any and all updates on this. I am particularly interested as I (someday!) hope to take on a similarly-scaled USS Arizona. I am learning tons through your willingness to share your own trials and tribulations... Thank you for all the in-the-trenches info about both the good and the bad of building such a huge project.
-
Here and watching! Loving every post and pic
-
does anyone know a source for 1/32 Parafrag bombs/clusters?
crazypoet replied to crazypoet's topic in Modelling Discussion
I have an update to this! The good folk at Resin2Detail have the 3-bomblet parafrag cluster in 1:32 available at their store. It comes in packs of two for $6.99 per pack. I chatted with them this morning, and they are also looking to package the individual bomblets for use in dioramas and non-cluster loadings (such as the honeycomb load I posted above). I just ordered six of the cluster packs (12 clusters total) for my HK B-25 build. I'll post a review when they arrive. These folk are amazingly responsive - I posted a question on their FB page and had a response within *minutes*. Very cool to work with. -
Good god this project is huge! I can easily see why it's taken quite some time, with breaks in-between. The additional work you've done in wood and brass to add detail and depth to the original kit work is beautifully done. Please keep posting as this develops - I very much look forward to the end result
-
I just looked at the WIP photos of this build (I should have done that first!). The barrel detail photos from your WIP show the barrel from different angles, and the difference in appearance is striking. It seems that it was indeed my own poor eyesight and the different camera angles that led to my comments yesterday. Your work is, as always, truly an inspiration
-
That is an impressive piece of ordinance, and your work on the chassis delivers a sense of the weight in all that metal. I have two comments, based entirely on my own ignorance, so by all means correct me if I am off-base. First, there's something about the barrel as a whole - it seems too light and thin-walled for the size of the projectile. This may be just the angle of the photo combined with my own ignorance. The second point is similar in that, to me, the bare-metal portion of the barrel looks more like new aluminum than used steel. I suspect that this is more a matter of lighting and focus than anything else, but it contributes to my feeling that barrel is somehow too lightweight for the shell it is intended to deliver. As always, your work is both meticulous and beautifully done - it's an interesting subject and the model is inspiring me to do some research and reading on the topic just to answer my own curiosity. Thanks for sharing all your work - you inspire me to try things I'd never have attempted otherwise
-
Beautifully done! And the Santa figure is a perfect touch of whimsy! You made me smile...
-
I've had a love affair with the Gotha since I first saw one in an old WWI flight sim. this is on my "someday" list - but only because I already have several years' worth of kits already waiting to be addressed in their turn. So instead of building my own, just now, I have the joy of following your build. I missed the early part of this build, but just spent a thoroughly enjoyable hour catching up. I love your approach - going well beyond the limits of an already-excellent kit with your own touches and add-ons. Please keep up the posts as things progress - it is a delight to be given a chance to watch over your shoulder
-
Those are some beautiful Spitfires! Without the dime for scale, I'd not have believed it