DocRob
-
Posts
7,041 -
Joined
-
Last visited
Content Type
Profiles
Forums
Events
Gallery
Everything posted by DocRob
-
Fantastic build and painting, the two tone scheme looks specially appealing. Cheers Rob
-
 Like Martin said, good to see one of the rare versions of the Corsair build. Both planes look extremely nice with lots of detail to catch the eye and the added figure is a looker. I have one question though, you nicely weathered both planes, but the wheels look absolutely clean, is that on purpose? Cheers Rob
- 8 replies
-
- 2
-

-

-
- f4u2n
- nightfighter
- (and 3 more)
-
What is on your bench right now ? Share a picture :)
DocRob replied to Martinnfb's topic in Modelling Discussion
Very nice and beautiful rendered. The wood looks the part and your work on plants and hedges is sublime. Cheers Rob -
Tamiya F-14 VF-2 Bounty Hunters
DocRob replied to Bill_S's topic in LSM 1/35 and Larger Work In Progress
The Tomcat is coming together nice and quick Bill, your solution for the pitot tube is simple and effective, love it. I have also successfully used Future on non sticking decals, but have bought a bottle of Tamiya's decal adhesive softener, which I haven't tried yet. No decals on wooden sailing boats . Cheers Rob -
A nice start with the Stuka Gary, the idea to place some figures in the pit is a good one. It looks a bit plane and there's a lot of glass above. Somehow, I like the pilots heads, I wonder how they will look under some primer. I'm still thinking about the Border Stuka in 35 scale. I've never build one and I'm astonished, how many others haven't done so. It's such a unique design and somehow iconic for the early goings in the war. Cheers Rob
-
Duchess of Kingston - Beauty of the Seas - Wooden Sailing Ship 1/64
DocRob replied to DocRob's topic in Non LSM 'WIP
Thank you Mark, have you found something interesting to build as a wooden ship? It's a great change after tons of plastic and I think, when DoK is done, I have a new hunger for some plastic kits. Cheers Rob -
Duchess of Kingston - Beauty of the Seas - Wooden Sailing Ship 1/64
DocRob replied to DocRob's topic in Non LSM 'WIP
Thank you Gary, I have to admit, I'm a bit scared of the next steps and try to find excuses not to start with the rigging. I'm accumulating information and reading logs. Quite normal for me to ponder a lot about seemingly difficult tasks, but luckily there is a breaking point normally, where all the cumulated energy has to be directed to the build again and thanks to good preparation, all is easier than thought. Cheers Rob -
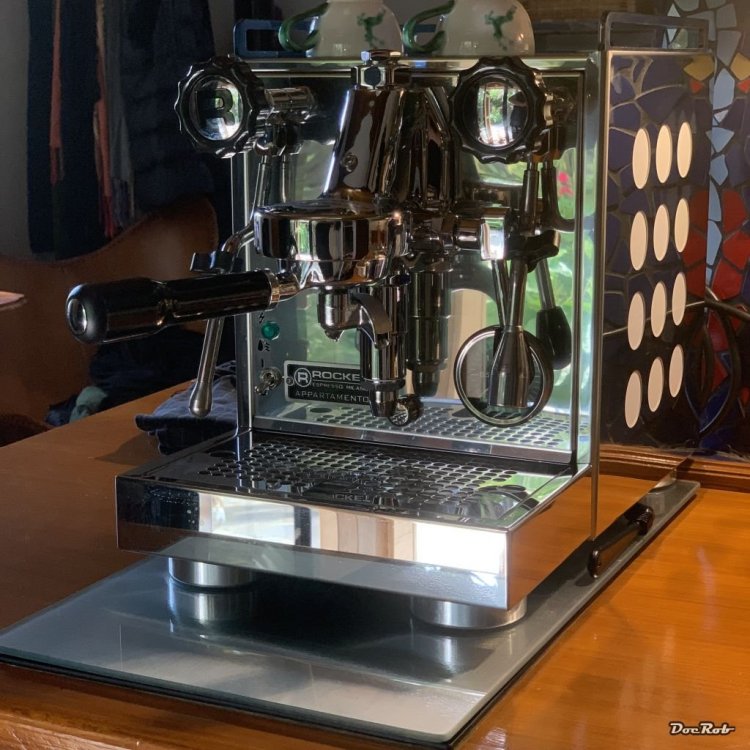
Absolutely not modeling related, but modeling affecting, this heap of mirroring metal finally showed up on my doorstep. My fingers will shiver from caffeine the next time and hinder me rigging my sailing boat . The machine has also a record in her books, as the longest enduring shipping ever to my island. Bought in February as an available product from big A, it took until yesterday to reach hear. Interestingly the machine maker company is called rocket . Cheers Rob
-
Duchess of Kingston - Beauty of the Seas - Wooden Sailing Ship 1/64
DocRob replied to DocRob's topic in Non LSM 'WIP
Thank you Martin, you seem to have an infinite access to pictures of all ages and subjects. now about the decorations of oars, often to show the nationality of the boat. In my case it's historically not so far off, because the owner of the ship, the Duchess of Kingston left England after a bigamy process and the DoK sailed under French flag, with a French captain most of the time. Cheers Rob -
Duchess of Kingston - Beauty of the Seas - Wooden Sailing Ship 1/64
DocRob replied to DocRob's topic in Non LSM 'WIP
Thank for helping me on different occasions Hubert and Peter. First for wording, it's oars not rows and second for your opinion about them. I found the blue a bit too stark and prominent on deck, but on the other hand the DoK is no ordinary plain yacht and I chose the boats colors according to DoK's livery. The other aspect was, I think I like the wooden oars a bit better, but they are a pain to refine from laser cut pear to rounded and contoured oars, a work, I hoped to spare, using the PE ones. Cheers Rob -
Ferrari 330P4 Open top 24Hrs Daytona 1967
DocRob replied to mark31's topic in LSM 1/35 and Larger Work In Progress
Your Ferrari will look epic Marc. Your paintwork is exceptional. Cheers Rob -
Duchess of Kingston - Beauty of the Seas - Wooden Sailing Ship 1/64
DocRob replied to DocRob's topic in Non LSM 'WIP
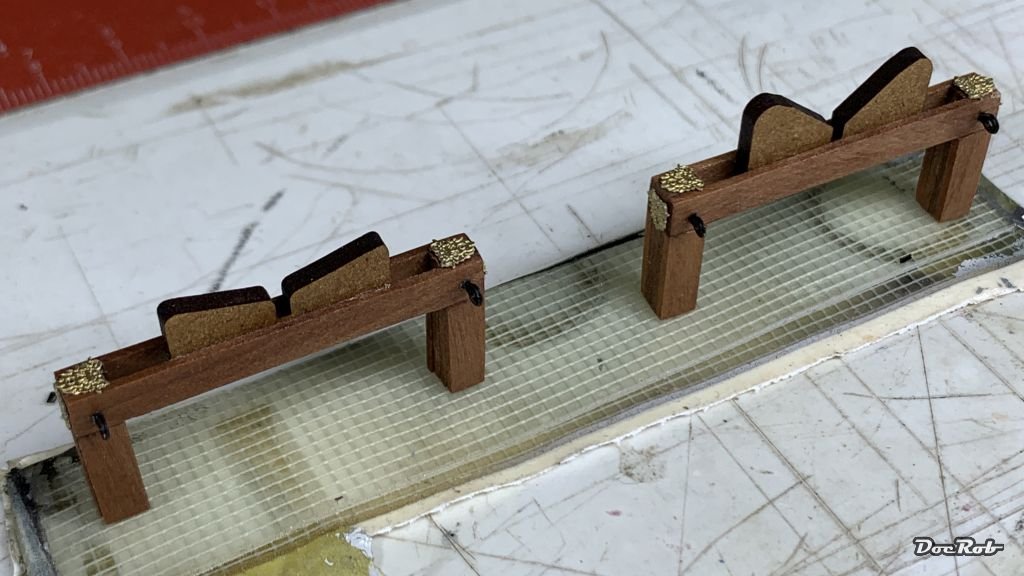
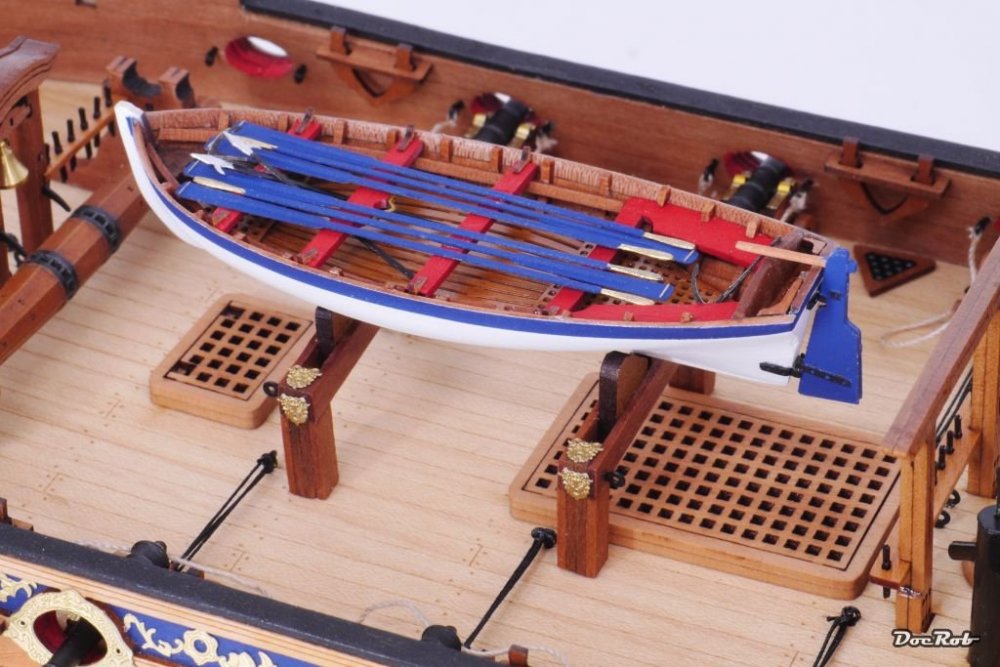
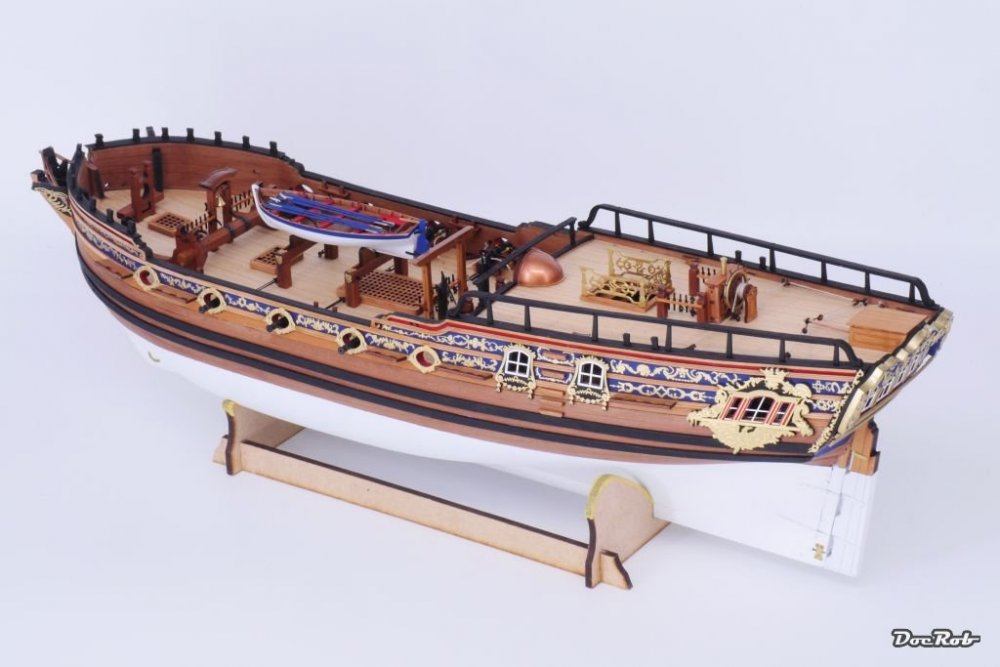
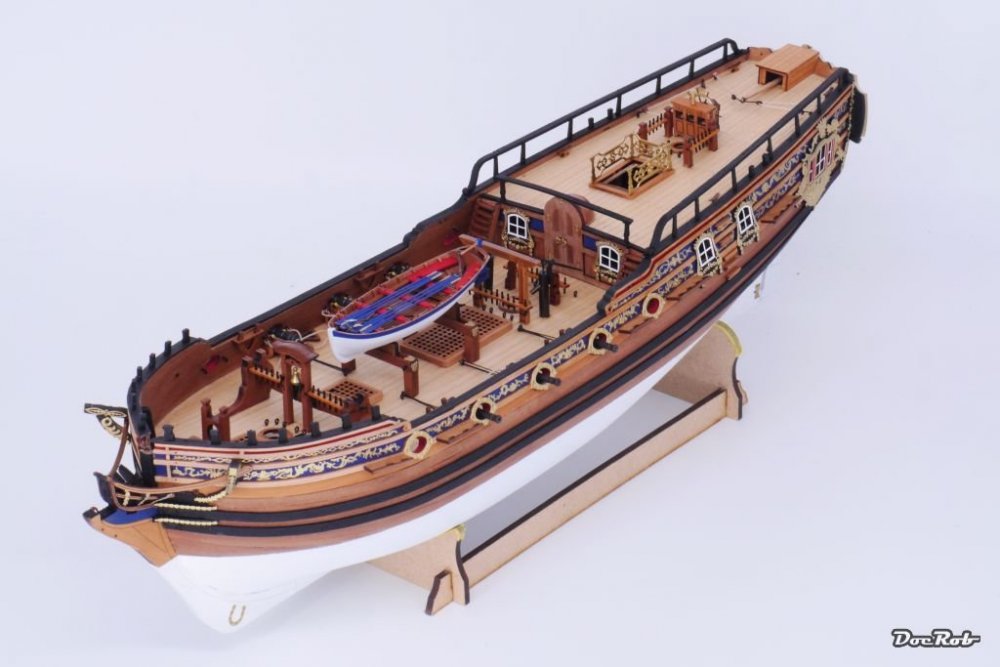
I scratch build my own supports for the boat from planking rests, cut with my trusty mitre cutter and sandwiched the MDF parts for the boats stand between them. After a coat of varnish, I added some eyebolts and decorations, which originally should be used at the hull sides, but I never liked them there. I like the look, as it fits to the other sub assemblies on deck. What I'm not sure about, is the look of the blue etched rows, which I may exchange for the also supplied wooden ones, painted differently, maybe whit and natural wood. What do you think. Cheers Rob

-
Duchess of Kingston - Beauty of the Seas - Wooden Sailing Ship 1/64
DocRob replied to DocRob's topic in Non LSM 'WIP
Muchas gracias Amigos, I don't know to much about the differences of the different boat types. I think most has to do with the size and maybe the possibility to rig and sail. I will dig a bit deeper as there are more types than mentioned as the pinnace, barge, yawl, ... Cheers Rob -
Duchess of Kingston - Beauty of the Seas - Wooden Sailing Ship 1/64
DocRob replied to DocRob's topic in Non LSM 'WIP
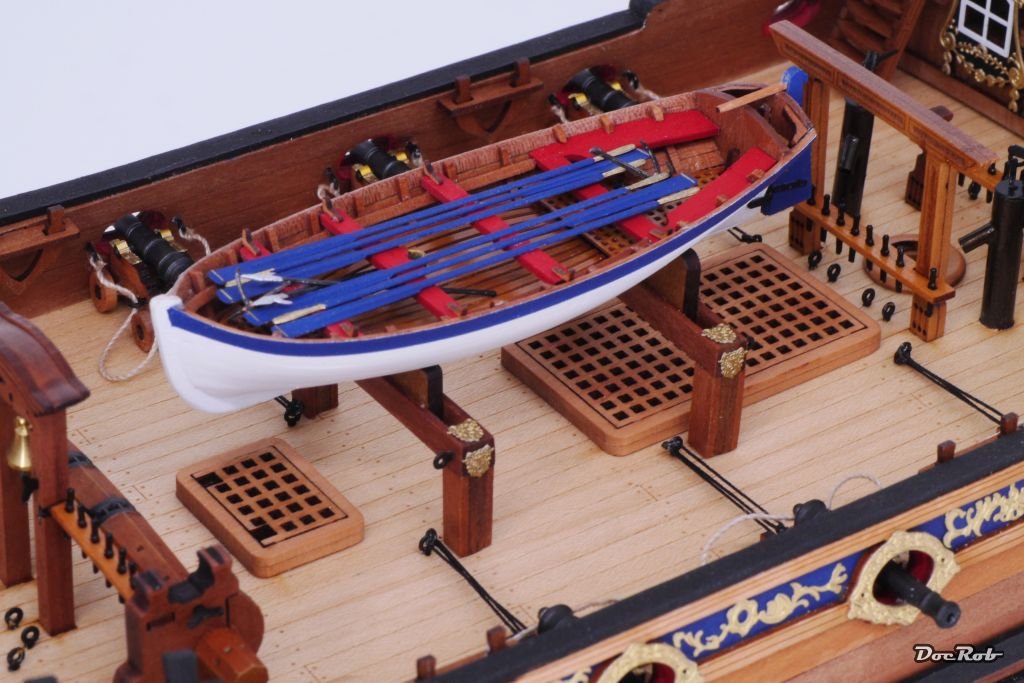
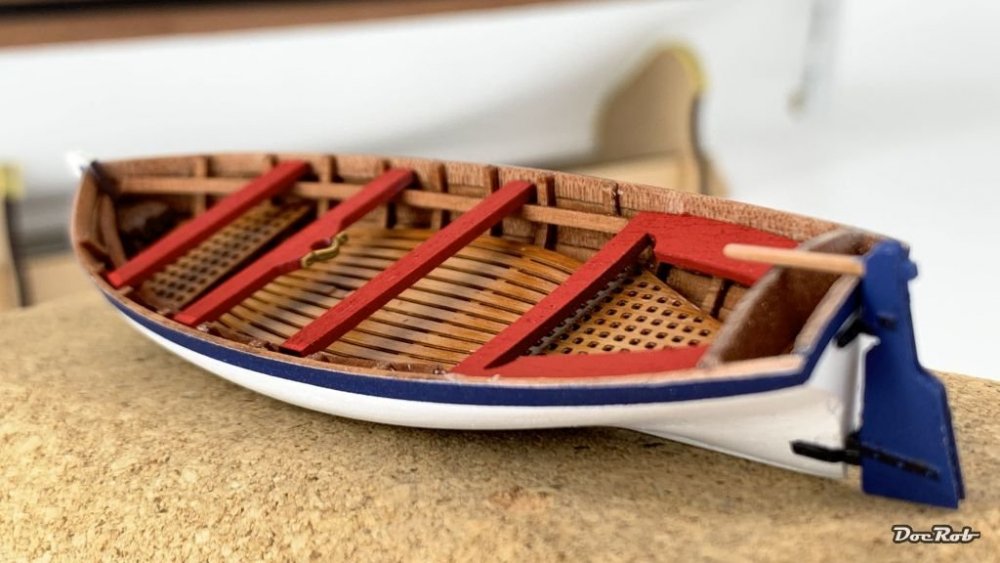
Almost there with the Cutter. I painted the hull flat white, the seats flat red and the rudder, rows and stripe flat blue, all airbrushed with Tamiya's XF colors. The gratings, which are made from PE, were primed, airbrushed with Desert yellow and then received a oil color treatment with a flat brush and whit spirit, to emulate a wood finish. Last was a coat of clear matte. The colors were chosen to match the DoK's colors. Some minor touch ups and fitting the rows, hooks and anchors and this little side project can be called done. Cheers Rob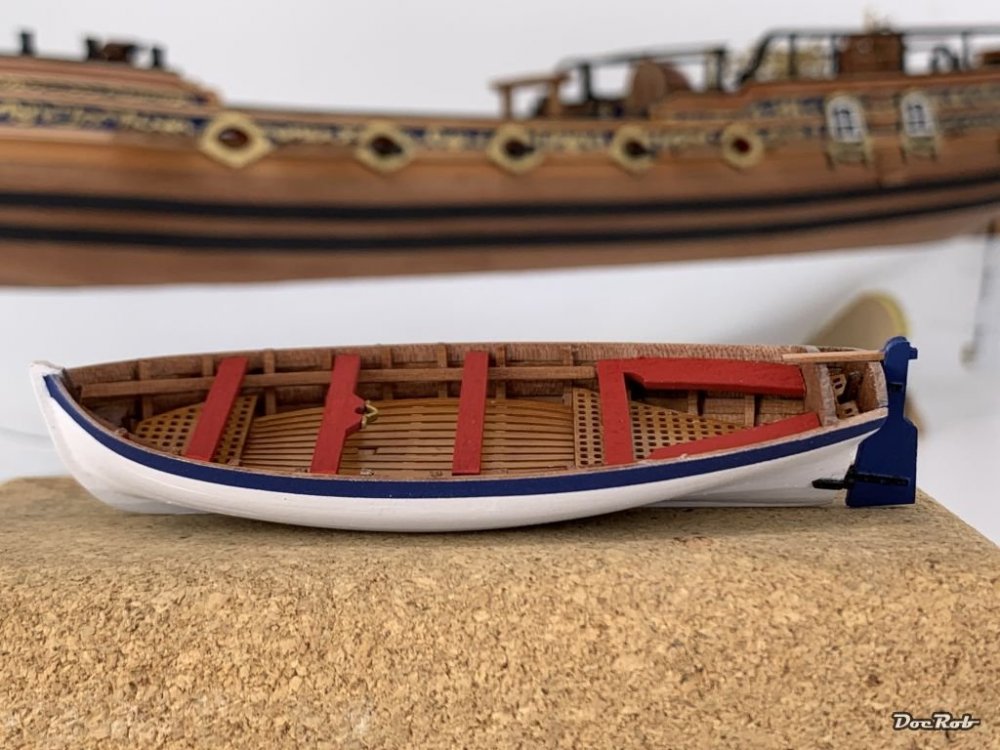


-
Duchess of Kingston - Beauty of the Seas - Wooden Sailing Ship 1/64
DocRob replied to DocRob's topic in Non LSM 'WIP
Thanks Gary, it has to, as it is very prominent on the deck of the DoK. Cheers Rob -
Duchess of Kingston - Beauty of the Seas - Wooden Sailing Ship 1/64
DocRob replied to DocRob's topic in Non LSM 'WIP
Thank you Mark, it's an absolute fun project. I try to explain thoroughly, how I build up the DoK my way and was very pleased to see, that there was a lot of help coming from experienced members, which helped a lot. Cheers Rob -
Duchess of Kingston - Beauty of the Seas - Wooden Sailing Ship 1/64
DocRob replied to DocRob's topic in Non LSM 'WIP
Thank you Peter, it's more about patience with the little boat. I have to make three for HMS Sphinx, only the thought drives me nuts. I started to see it as an own project, given the time the boat took to assemble. Cheers Rob -
Duchess of Kingston - Beauty of the Seas - Wooden Sailing Ship 1/64
DocRob replied to DocRob's topic in Non LSM 'WIP
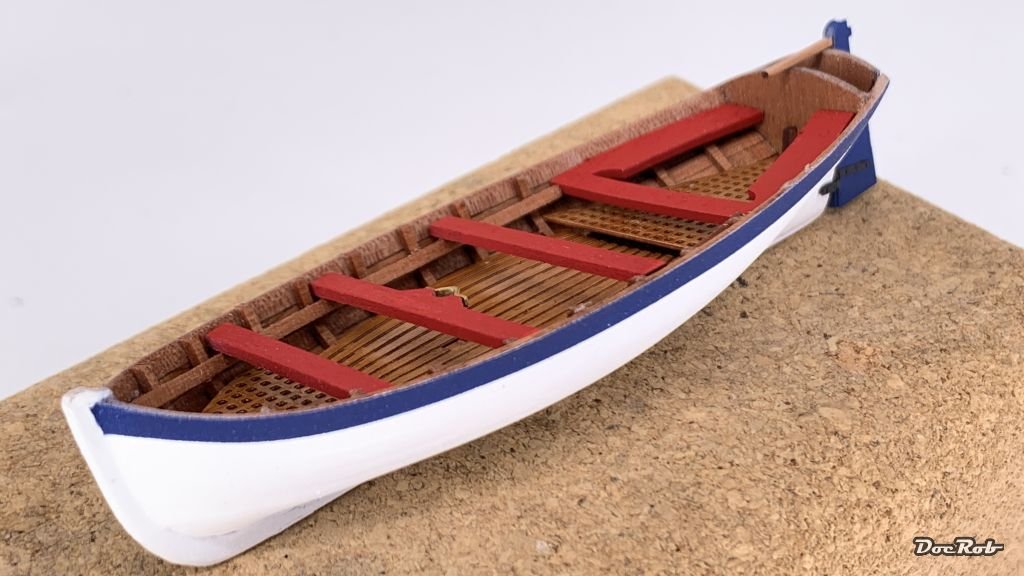
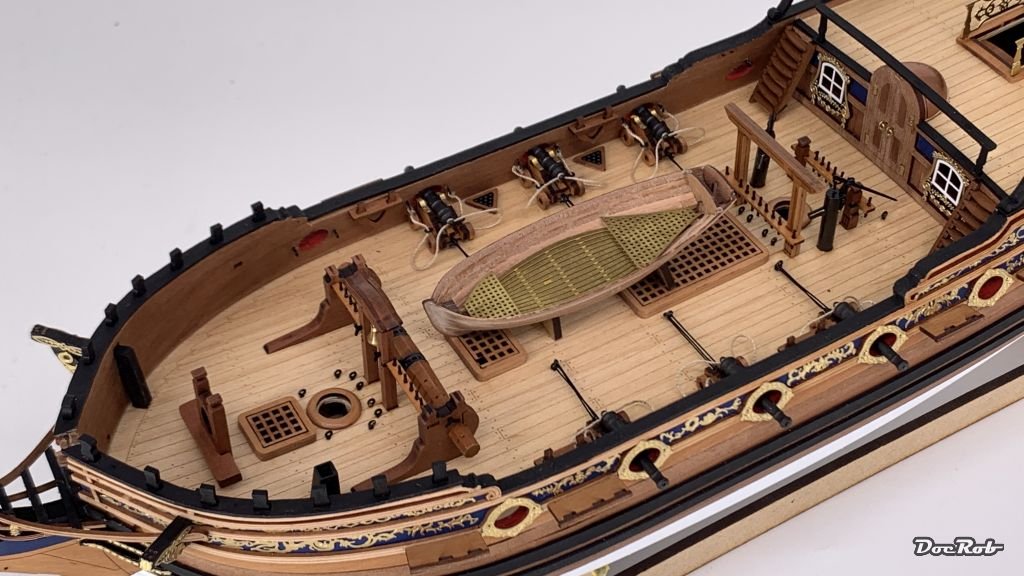
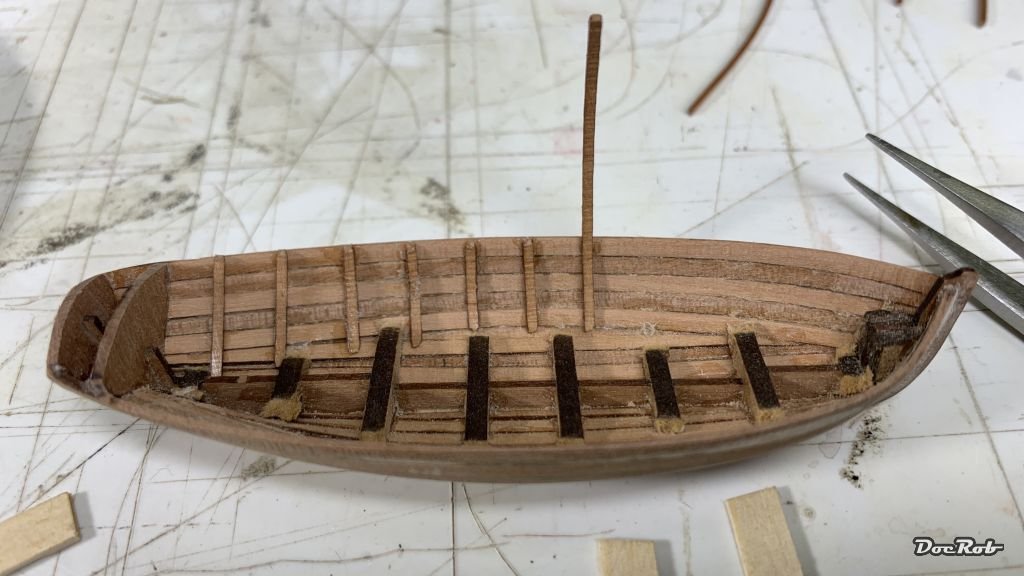
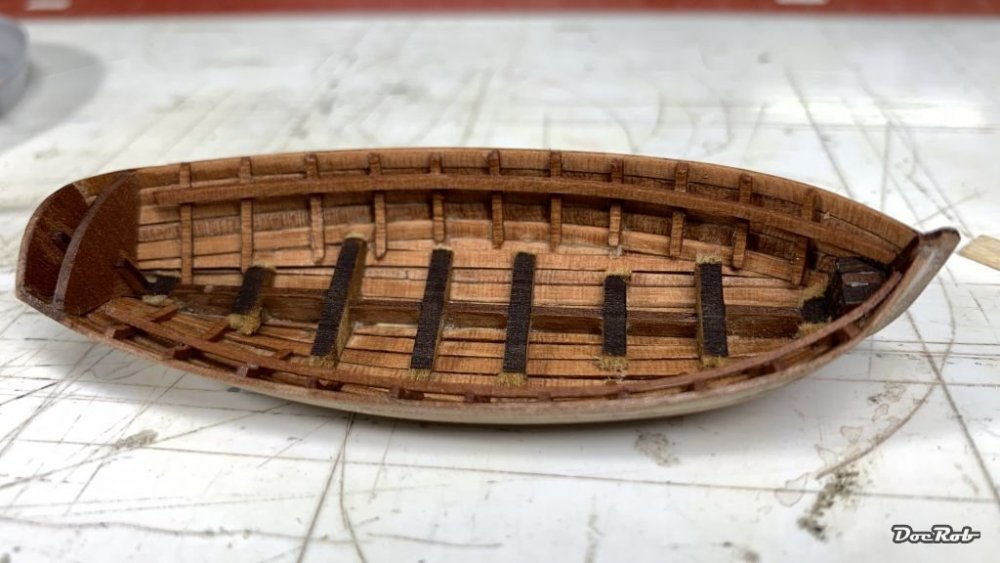
These tiny boats can truly challenge my patience. I've managed to smooth the hull due to sanding and applying filler and have torn out the MDF frames, which worked surprisingly well, given the eggshell like appearance of the cutter. It turned out to be very time consuming, to get rid off the glue residues on the inside of the boat with sanding tools, rounded scalpel blades and small chisels. After this was done, I made a small placement test on my DoK. The boat is truly a model in a model and consumes lots of time to build up. My new Sphinx kit has thee boats included, that will be a real test . I added the spars, which are made from pearwood strips, which I soaked and clamped around a tin for drying with a curved contour. These were glued in with CA and then cut. Finally after adding the supplements for the seat panels, the inside of the boat got a coat of varnish. The rest of the boat will be painted matching the scheme of the ship. Cheers Rob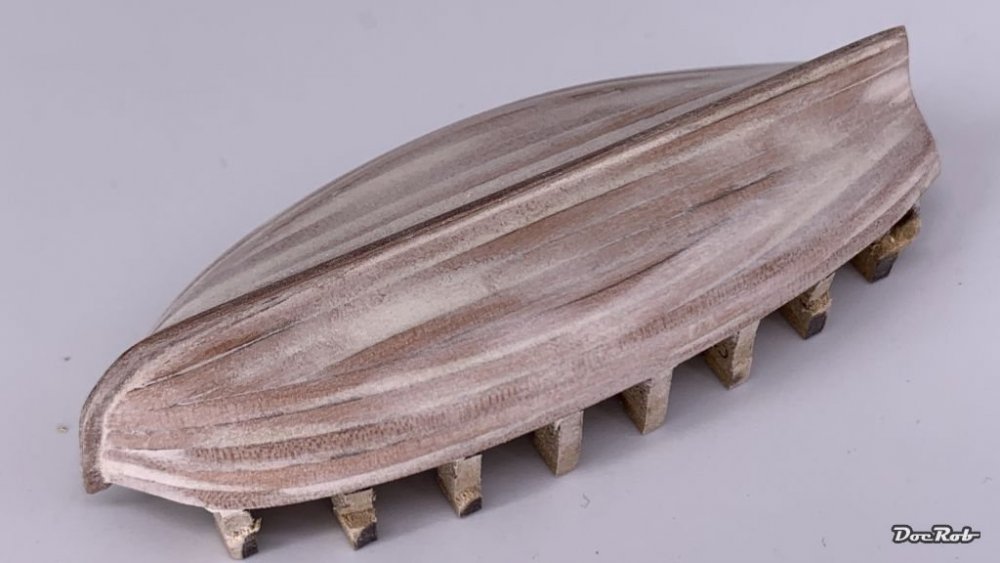


-
I'm completely opposite, If I own something, I use it, being it rare vinyls in my collection, which I unwrap and put them on my turntable and reduce their value by half, during seconds or build a rare kit. I would be very cautious while driving a genuine GT 40, but would use it. I can't understand, why people close away their valuable goods. Where is the meaning of buying goods, only to maintain them in perfect condition over time. Sure increasing value could be an argument, but to me it's a product, a thing, albeit a very special thing and things should be used as lifelike as possible. If you die tomorrow, how would you feel about not having driven your precious GT 40 only once. Cheers Rob
-
Dragon Jagdpanzer IV 70 (A) Kit 6015 COMPLETE
DocRob replied to GazzaS's topic in LSM 1/35 and Larger Work In Progress
That turned out pretty bad Gary, sorry to see that. Your not un delicate solution could maybe work, but if your mesh is made from brass, it will weaken through the soldering process. I think, I would use only CA for the Schürzen. Another option might be, to sell the 45$ kit and to buy a newer one with the Thoma Schürzen like mine, pre cut steel mesh with PE framing. I guess, that should work relatively easy, but haven't tried. If you need more info about my Thoma's let me know. Cheers Rob -
Great story Bill. I was eleven and probably ruining a glue smeared cockpit of an Airfix F-4. Cheers Rob
-
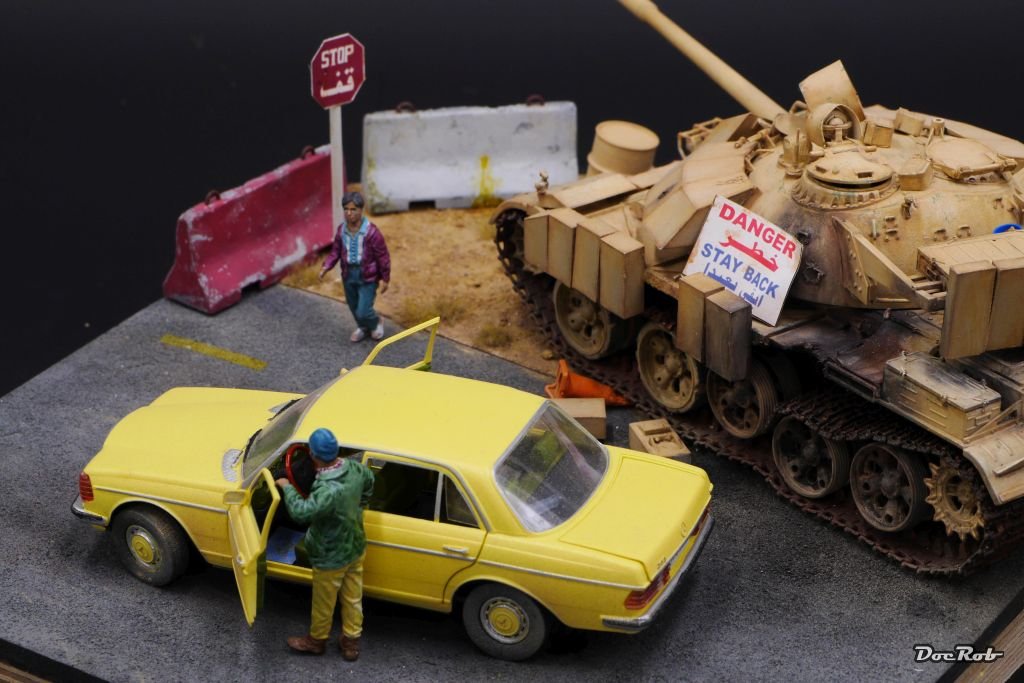
A fantastic and easy to build kit. I did one many moons ago, added resin ERA and wheels and lots of Voyager PE, along a metal barrel and Friul's, only to destroy it later, to show how simple human needs show in the grotesque scenery of war. Cheers Rob

-
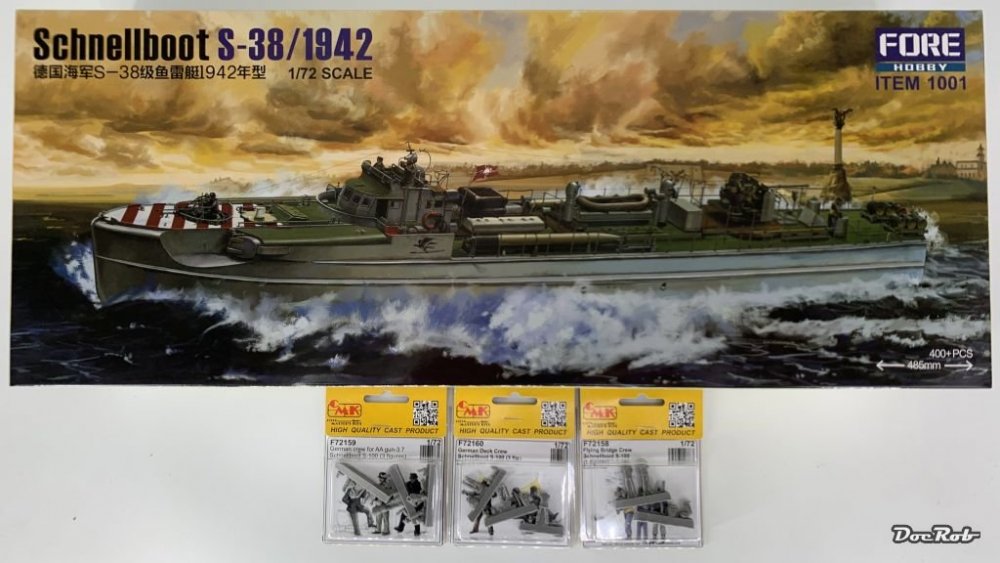
After three month of shipping, which is nobody's fault but mine, because I opted for the slowest, cheapest shipping method, this great kit arrived from Japan today. I really like the Schnellboots appearance with the old style bridge, which later was changed to the armored version. The kit has a halved hull of approximately 50 cm length, nice and crisp looking plastic parts, Some sheets of PE, metal barrels and some rope for the railings. Hasta la vista Revell and Airfix, there is a new player in the pond. The nine crew members are from three CMK sets. Cheers Rob
-
Thank you Phil and Bill, the Sphinx kit was really a great surprise to me. After having a great birthday, yesterday I savoured the contents of the well packed box. Definitely another league compared with the Duchess of Kingston and I'm lucky that I build her first. Only seeing that there are THREE wooden boats to ad gives me the shivers . Cheers Rob
-
If in doubt, I would always chose the Kabuki variant if available. I had very mixed results with different types of vinyl masks. They are not as flexible, do not adhere as well, tend to shrink more, than Kabuki. I used masks from Maketar on several builds and they were perfect. The circular masks, Carl recommended are really very helpful. Cheers Rob