DocRob
-
Posts
7,048 -
Joined
-
Last visited
Content Type
Profiles
Forums
Events
Gallery
Everything posted by DocRob
-
It's not the first time the Hiro kits got my attention. As an engineer in my former live, with interests in metals, I'm attracted and sometimes browsed through their offers, but too many different interests for me in the last time, to start with cars earnestly. But who knows, what you show here, is mouthwatering. I love the detailing of the kit, which is not possible only with plastic. Keep on your great work. Cheers Rob
- 31 replies
-
- 4
-

-

-
- model factory hiro
- mclaren
- (and 1 more)
-
Cool project, never followed a Hiro build closely, but they seem to be decent kits with great detail. Cheers Rob
- 31 replies
-
- 3
-
-
-
- model factory hiro
- mclaren
- (and 1 more)
-

Fokker E.V / D.VIII Parasol Mikro Mir 1/32
DocRob replied to DocRob's topic in LSM 1/35 and Larger Work In Progress
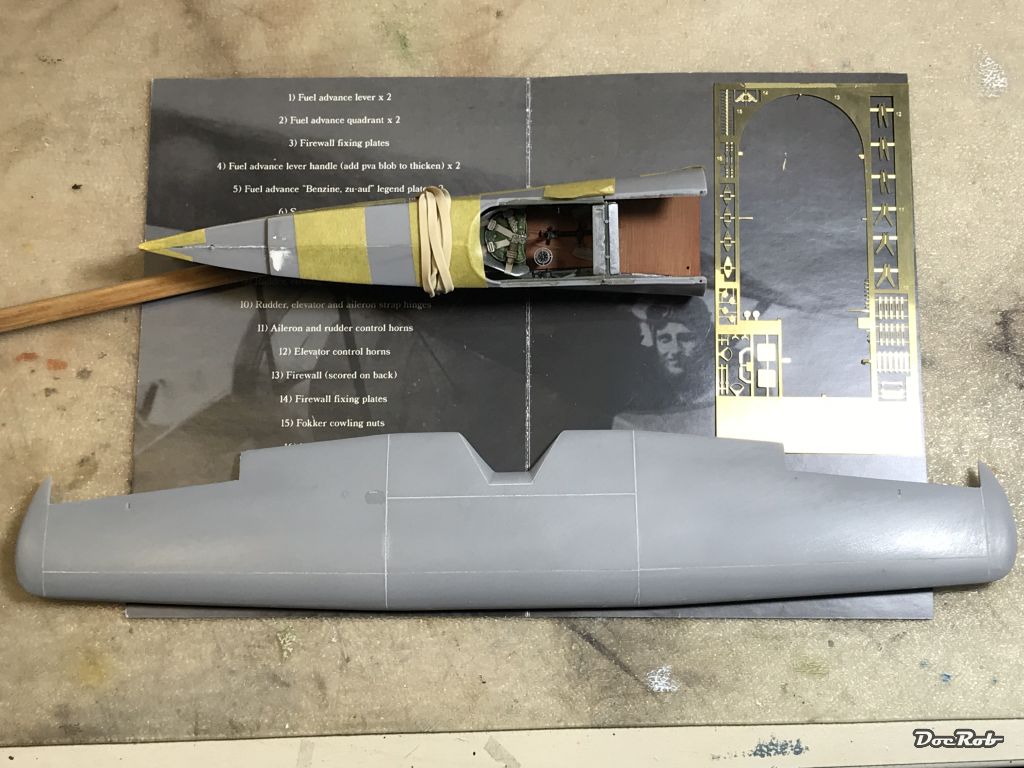
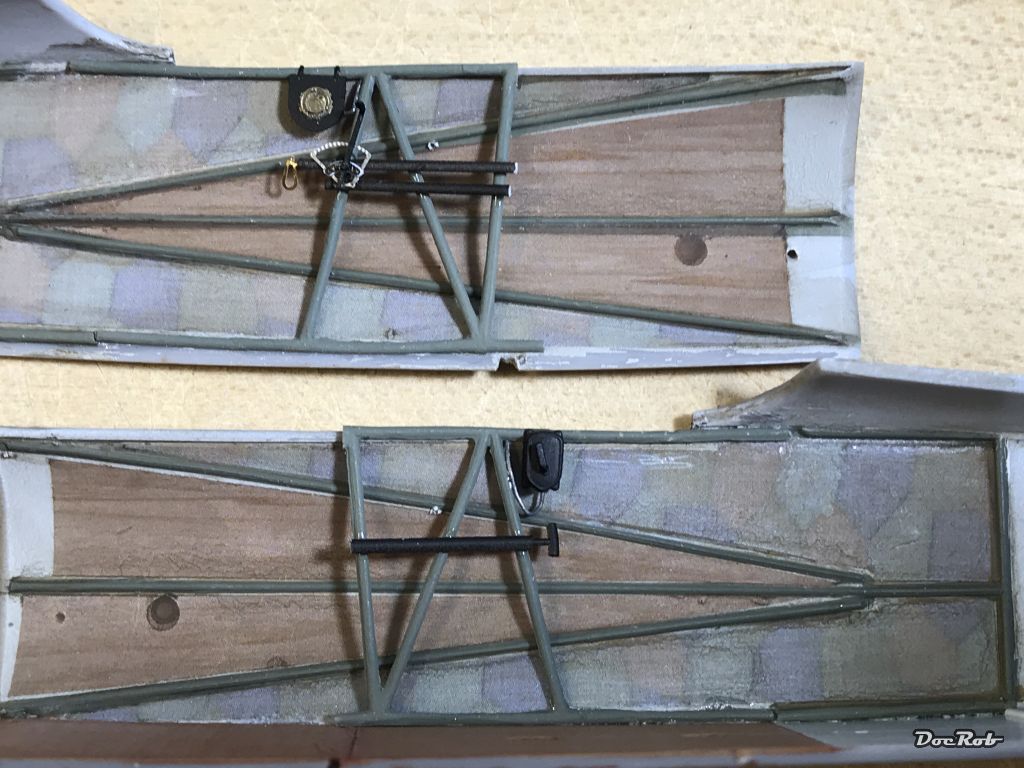
Thanks Rowdy, I like to create depth through multi layer technique, like on the seat. It's quite simple, just add up layer per layer, very thin with a bit of translucency. Meanwhile I closed the fuselage and yes, all the rubber bands, clamps and tape were necessary to get the panels aligned with the help of considerable force. The fuselage will be left for drying until tomorrow. Then I switched to the wing, were I rescribed all the panel lines, because the existing ones were inconsistent. The wing was puttied, where it had some sink marks and sanded to shape. I pre drilled the holes for the struts with a 0,5mm bit and the holes for the aileron cables 0,3mm. Now I can start thinking about the way, how to achieve the four coloured streaking on the wing. Cheers Rob
-
Fokker E.V / D.VIII Parasol Mikro Mir 1/32
DocRob replied to DocRob's topic in LSM 1/35 and Larger Work In Progress
Thank you Carl, blushing again . The partly suboptimal kit needs some solutions for it's weaker parts and as the Fokker itself is so appealing to me, it's well worth the struggle. Cheers Rob -
Fokker E.V / D.VIII Parasol Mikro Mir 1/32
DocRob replied to DocRob's topic in LSM 1/35 and Larger Work In Progress
Thanks Jeff, I'm blushing . Closing the fuselage will be a milestone for me, after that, I hope the build will be mas rapido. Cheers Rob -
Fokker E.V / D.VIII Parasol Mikro Mir 1/32
DocRob replied to DocRob's topic in LSM 1/35 and Larger Work In Progress
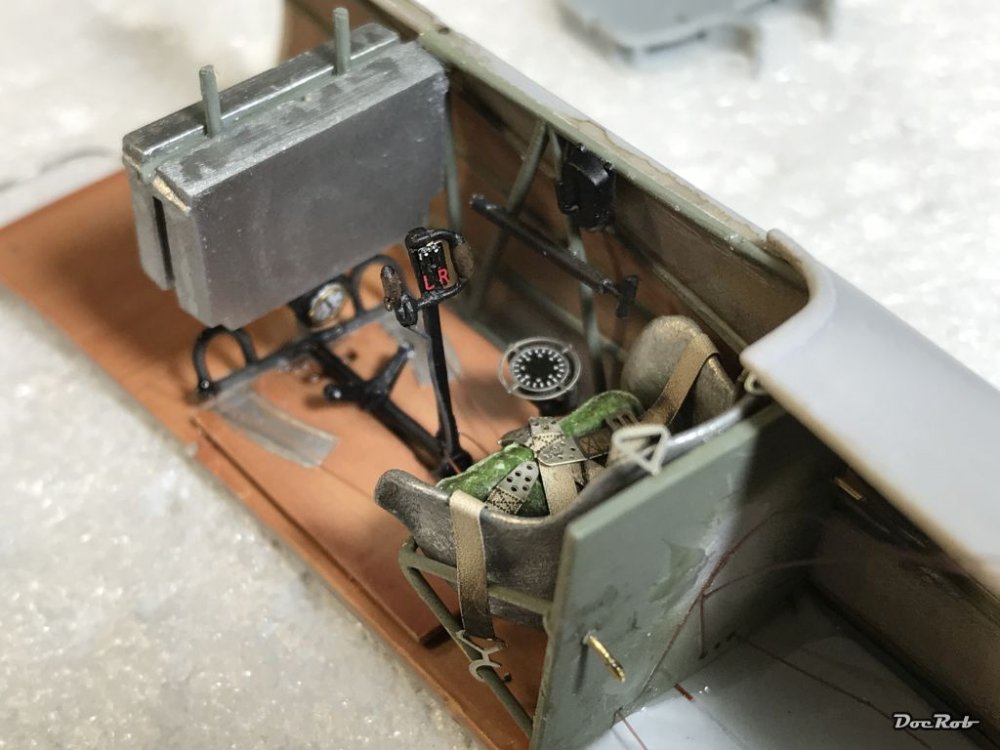
With lots of test fitting, cutting and adjusting, the fuselage halves were completed and seat and ammo boxes were added. The instrument bezels are from an Eduard set and some of the details too. The fuel pump is scratched, as well as the throttle rods. Some cables were added, made from lead wire and the steering cables were made from fishing line. The fuselage halves still fit together, after a lot of adjusting. To glue the fuselage together, will be the next task. Cheers Rob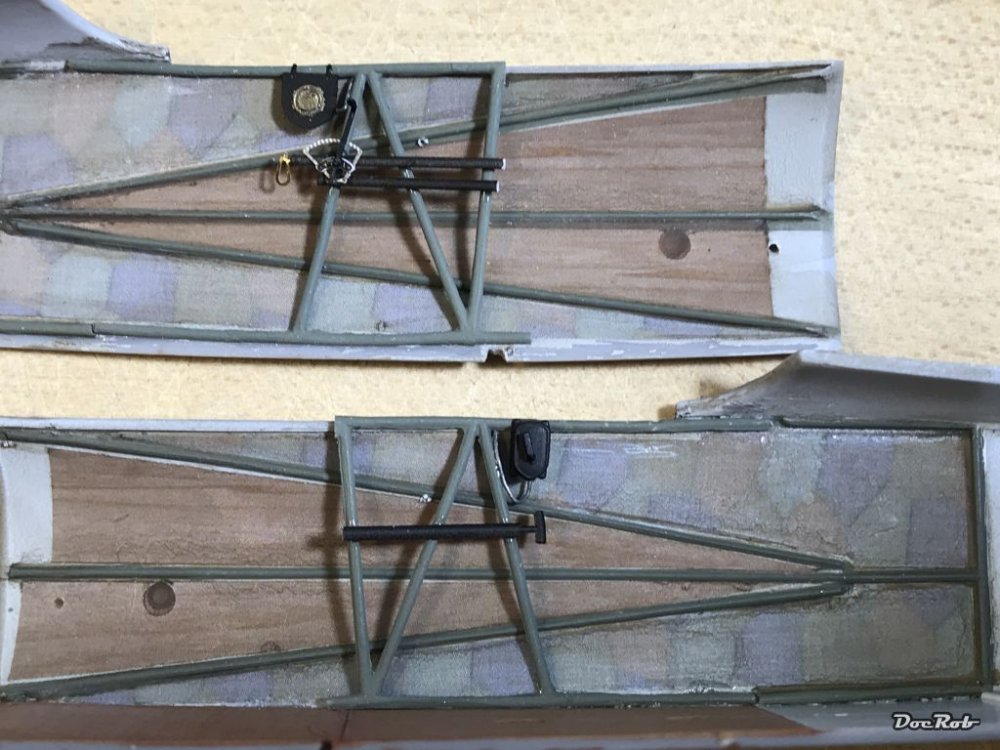
-
Fokker E.V / D.VIII Parasol Mikro Mir 1/32
DocRob replied to DocRob's topic in LSM 1/35 and Larger Work In Progress
Thanks Kai, I hope everything is still amazing, when brought together . Cheers Rob -
Nice and dirty, love it. Cheers Rob
-
1:32 scale Ansaldo A.1 'Balilla'
DocRob replied to sandbagger's topic in LSM 1/35 and Larger Work In Progress
Sorry to hear about the rigging point disaster. Do you generally anneal the PE? I only do it when there are free form bendings necessary, as with rolled parts or seat belts. I can imagine, that heat treatment weakens the parts, as it softens the material by reducing inner tension. With brass, it's easy to heat to much, as there are two phases of annealing. With 250-300 C you lose the inner tension of the material, above it goes simply soft (450-600 C). If your PE is really darkened after heating, you might have been in the second level, which means too hot. With these tiny parts, where I believe, the bending lines are even weaker, because pre etched, I can imagine, that the material becomes too soft and breaks easily. Concerning the non broken, but detached parts, aren't the holes in the middle for attaching the struts through? I imagine, this would hold the rigging points in place. I hope you will find a proper solution for this problem as late in the build. Cheers Rob -
@ Hubert, just for clarification, are you referring to AK's acrylic black primer or the dedicated Extreme Metal black base? After much praise, I tried Mr. Levelling and had the results you described, with the acrylic base and some AK acrylic colours as well as some Lifecolour's. I made my peace with the stuff, using it to thin Tamiya acrylics, where it works perfectly good. AK' Extreme Metal flat base is another breed and they recommend it as a base for their high polished shades like chrome and polished aluminum and that's where I used it without problems. Cheers Rob
-
Size matters... Just for fun, what is the biggest box in your stash ?
DocRob replied to HubertB's topic in General Discussion
Nothing too exotic in my stash size wise. The biggest boxes should be HK's Uhu and B-25 only outranked by an Italeri Vosper boat, all boxes fitted to the brim with precious AM. Cheers Rob -
I use the black base only for chrome and polished aluminum, for the other shades I use Tamiya rattle can or Mr. Hobby. Cheers Rob
-
Fokker E.V / D.VIII Parasol Mikro Mir 1/32
DocRob replied to DocRob's topic in LSM 1/35 and Larger Work In Progress
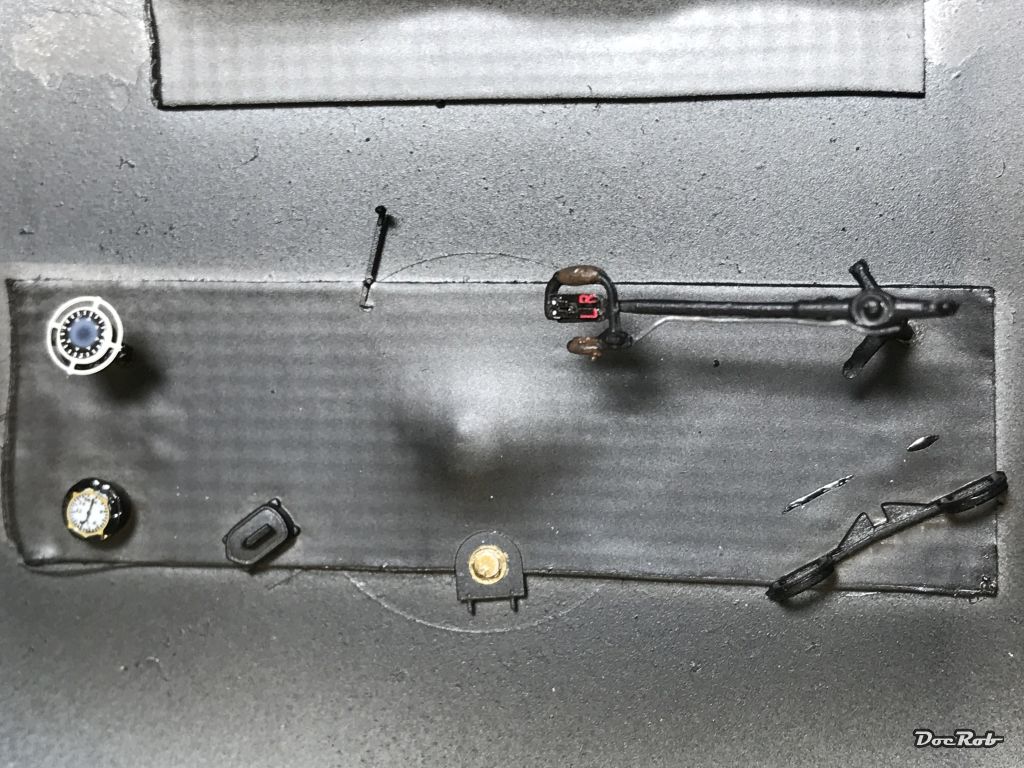
Building speed seems to come to a near halt with the preparation of all the bits and pieces which go into the fuselage. I used some PE from a Fokker DR.I set made by Eduard, which is really helpful. The steering column, one of the few better kit parts, got some etch and a lead trigger cable. Next I will add the different lines for ailerons and rudders. The holes are pre drilled with a 0,3mm bit The magneto is borrowed from a Fokker D.VII, where I have a resin substitute. I lost the lever, so I made one from flattened lead wire. Not on the picture are the scratched fuel pump and some parts for the throttle lever. The glazing on the compass looks a little blurred, but that's only, because the Pledge is not fully cured. Hopefully, I will be able to install everything and close the fuselage soon, as I really want to have that step done. Cheers Rob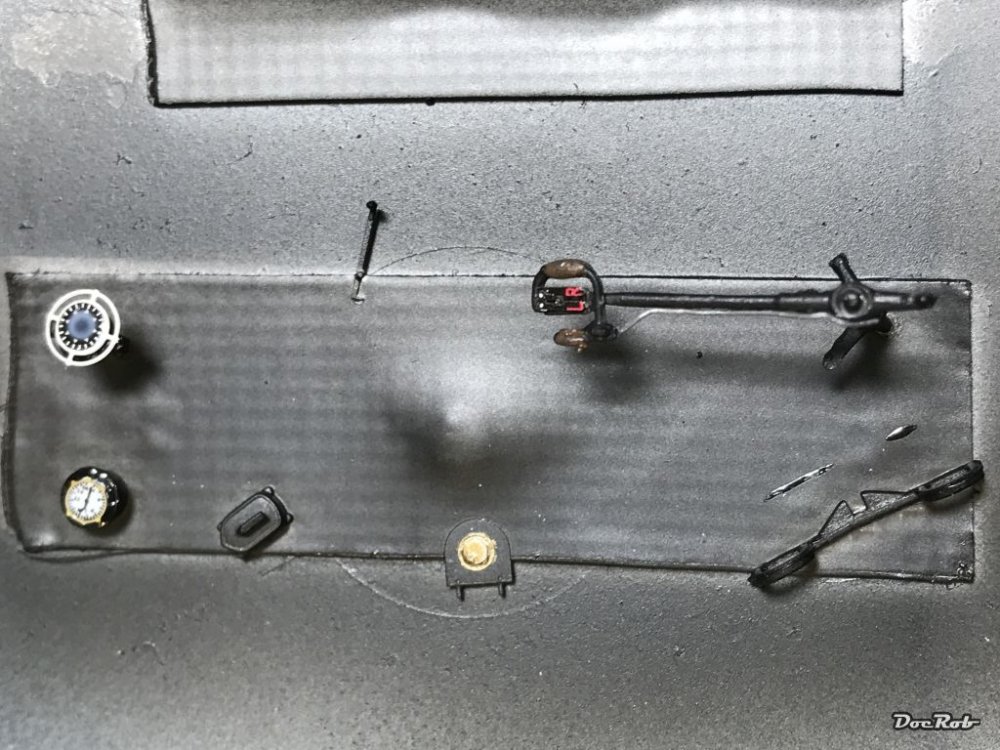
-
I've used both and I find both smell terrible. I got nice results with Alclads but it depended on the metal tones Titanium is one of the very fragile shades. Some of their products didn't cover well and were very fragile, making masking afterwards near impossible. The metal shine of the Alclads altered a lot with a varnish cover. I tried the Extreme metals on different occasions and these are now my go-to metals. They spray well, they are more durable (I never had problems with masks) and I like their shine and fine grain. I had only slight alteration when gloss- or matte coating them. They were resistant to all my used weathering products For a NMF job, with differently shaded panels, I would use Extreme Metals. On single shaded bare metal jobs, you can get away with the Alclads, which also have a great finish. One Alclad tone, I especially like is exhaust manifold, which is better than what I got from Extreme Metals. As a personal biased verdict, I prefer the Extreme Metals from AK for their general usability. Some Alclad colours give a slightly better result and some have a finer grain than the AK's and therefore a better metallic sheen. In the end, they both smell and I always use a mask when spraying and cleaning the airbrush and I wouldn't use them in the living areas of my house. BTW, I alredy finished a NMF P47-D Cheers Rob
-
I use the Meng incarnation of the cutter since a year now and yes, I like the sharpness of it's blades, but can't find mayor advantages to my Tamiya cutter. One thing, I especially don't like about the Meng is, that sometimes with fragile parts the sharp of the two blades got stuck into the plastic and there is a risk of breaking the part while removing it. Cheers Rob
-
Fokker E.V / D.VIII Parasol Mikro Mir 1/32
DocRob replied to DocRob's topic in LSM 1/35 and Larger Work In Progress
Thanks Phil, can't wait to make the next one on a Fokker D.VII, but next time with another cushion colour. After the Hansa Brandenburg, it's the second green one. Time for a maroon or dark red pillow. Like you, I absolutely love the AK metals. They spray perfect, have a fine grain and they are durable, that's the most important advantage over Alclads, where some collours were impossible to mask over. The waxes are great too, very versatile stuff. Cheers Rob -
Fokker E.V / D.VIII Parasol Mikro Mir 1/32
DocRob replied to DocRob's topic in LSM 1/35 and Larger Work In Progress
Thanks Carl, I hope, I get everything together fitting into the fuselage. I've seen different pictures of uncovered aluminum seats, not the least, the pic wich came with the Aviattic seat. How did you finish the seat of your D.VII, should be the same or very similar type of seat? Cheers Rob -
Focke Wulf.... Triebflugel.
DocRob replied to BlrwestSiR's topic in LSM 1/35 and Larger Work In Progress
Très cool Carl, what a beast. Cheers Rob -
Fokker E.V / D.VIII Parasol Mikro Mir 1/32
DocRob replied to DocRob's topic in LSM 1/35 and Larger Work In Progress
Thanks Jeff, one of the reasons of my recently arisen interest in WWI planes is the depiction of the various used materials. Wood, linen, different metals,..., it's a canvas for trying new techniques. Cheers Rob -
Fokker E.V / D.VIII Parasol Mikro Mir 1/32
DocRob replied to DocRob's topic in LSM 1/35 and Larger Work In Progress
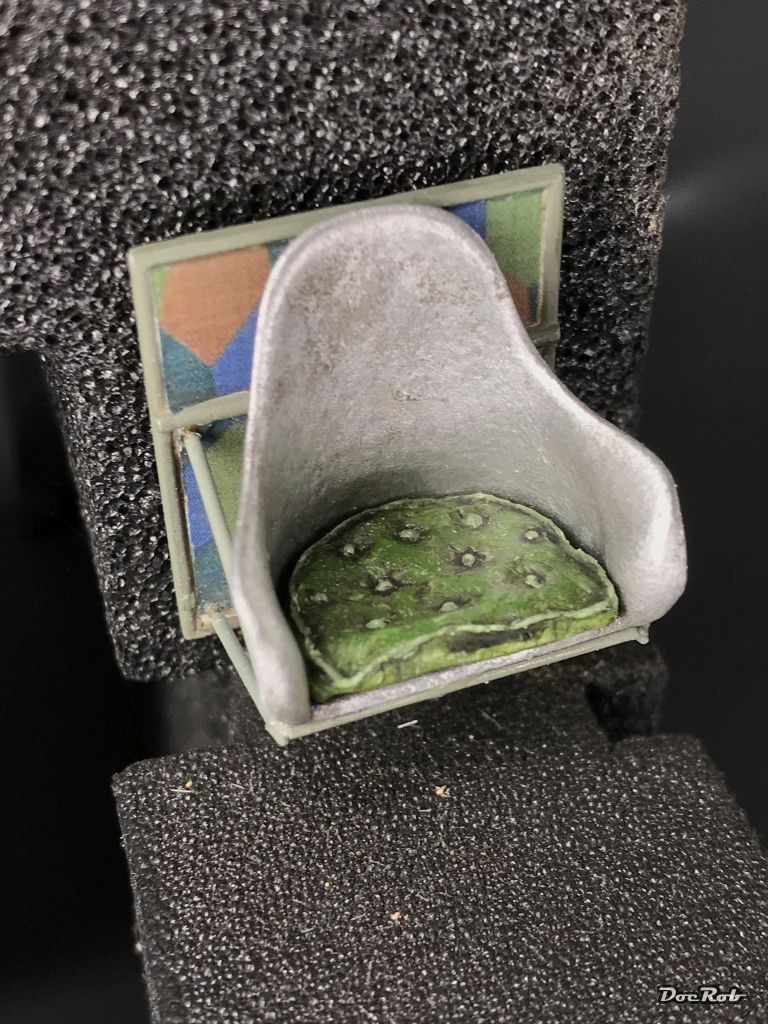
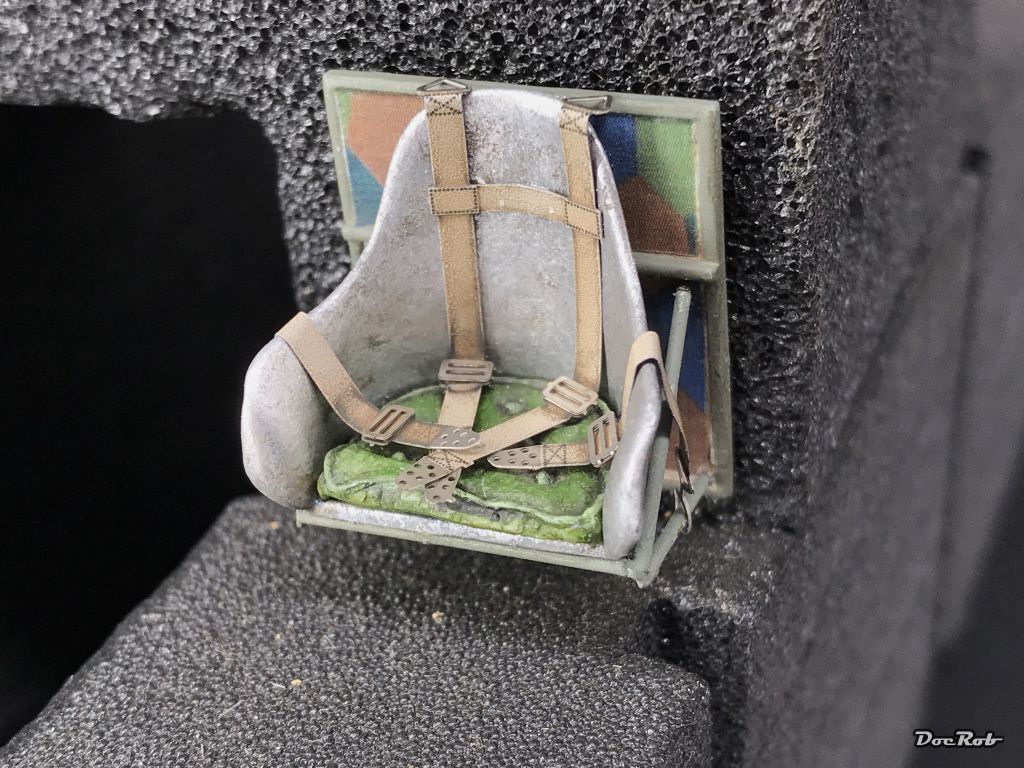
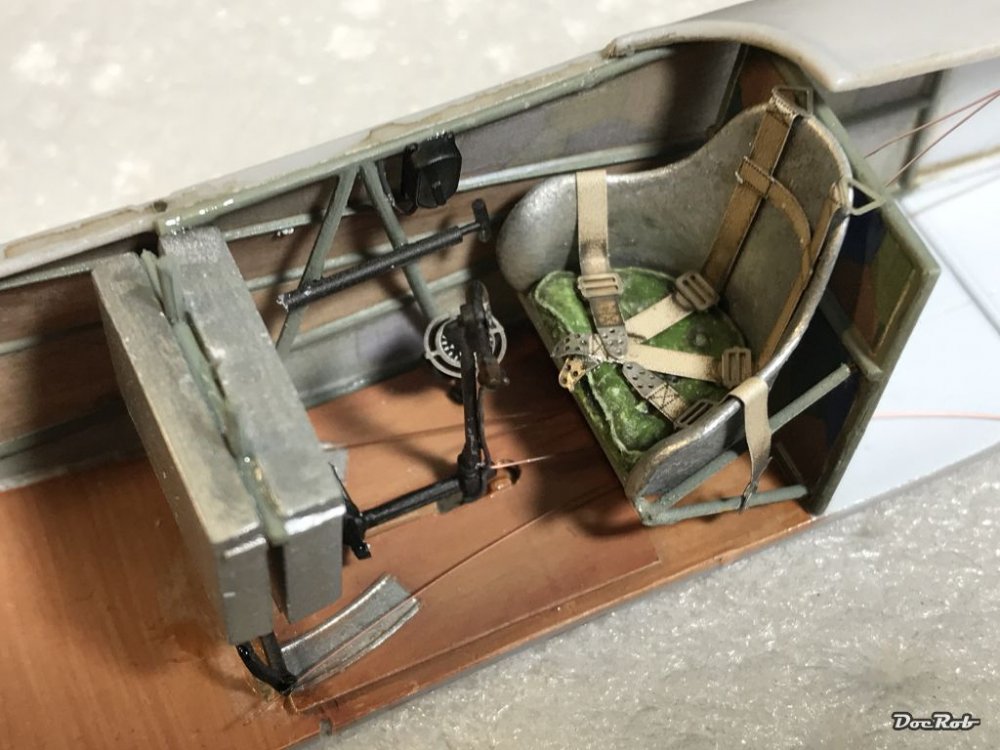
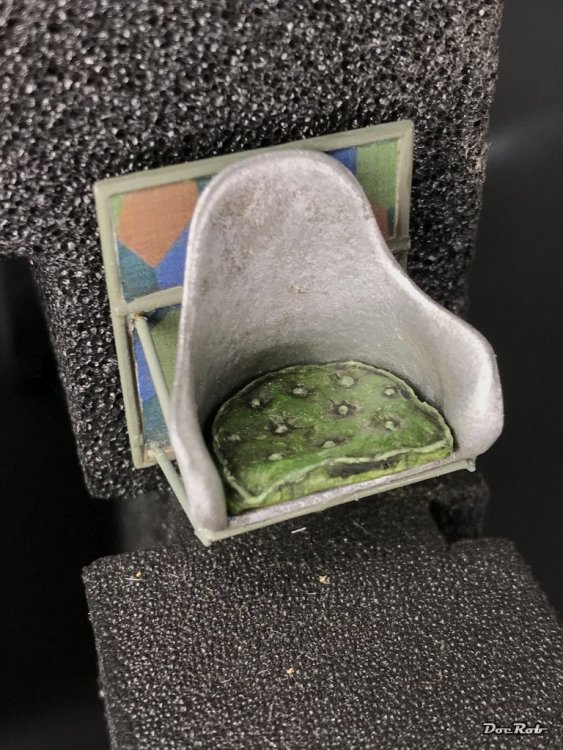
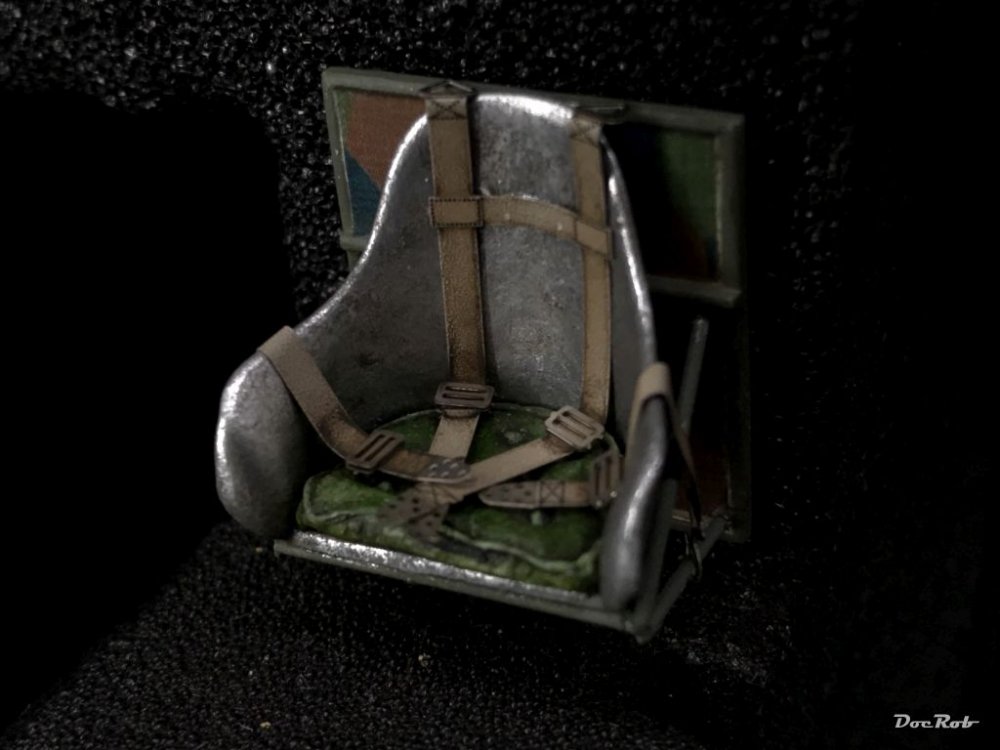
Hola Señhores, progress is very slowly with the Fokker. It's not that easy to get everything aligned into the fuselage. There are virtually no attachment points and the manual is not helpful either. A great help have been the build logs of Sandbagger Mike here and another one on the Aviattic site. All inner fuselage parts received a Flory wash of dirty grime and then I glued the shortened side frames into the fuselage parts. With some creative bending, they were aligned and left to dry. Next was the already prepared seat. I CA'd the framing to the spar and added the Aviattic seat. The cushion was painted with Abteilung oils and for the first time, I used their matte thinner, which dried, yeah matte . The seat is a tad darker and less shiny to the real eye, but my phones white balance was not to overrule far enough, even using some tricks. I attached some seatbelts from a pre printed Eduard set, which also received a treatment of Flory's grime wash. This picture is a little too dark, but gives a better idea about the aluminum look, I was after. As I said, I used my Alessi espresso maker as a guide here. Cheers Rob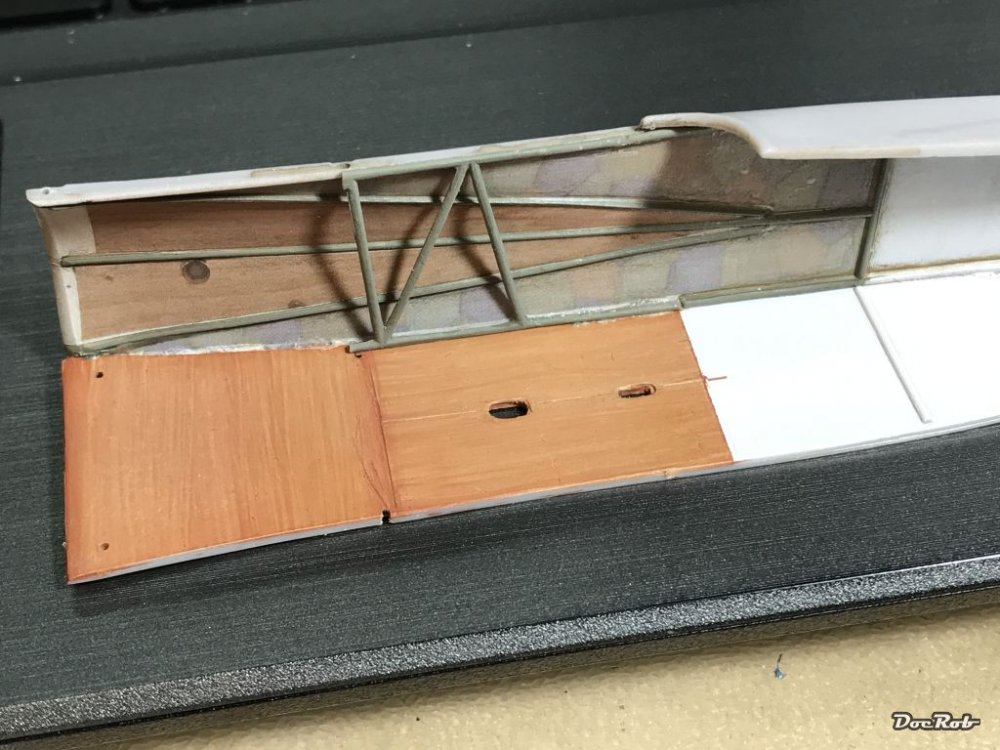

-
Gloss coat before decal matt coat after to seal it in?
DocRob replied to Pintar08's topic in Hints and Tips
Welcome to LSM Pintar and I'm sure you will be helped here because the members are resourceful and willing to share. Your basic process sounds right, paint, gloss coat, decals, solvents if necessary and then sealing with a varnish. Since I never worked with Revell colours, I can't tell you how they perform, but generally it is good thinking to develop a good working solution for the hole process for yourself with testing the stages. There are many hidden obstacles, like do the decals tend to silver, how thick are they,... Some products don't interact well, like gloss coat and decal solvents, some are too aggressive for the clear coat (I don't know about vinegar. The basic idea of an underlying gloss coat for decals is, to reduce the possibility of silvering, where the decal would not set properly to a matte surface and to enhance the adhesion for the decal. It has not to be a clear coat, if e.g. the model received a gloss colour paintjob. The final varnishing is done to blend decals and surface together, so you don't have a different shine on the decals, than the rest of the surfaces. It is also applied as a protection of all primary stages of painting and decaling for the weathering process, be it with pigments, oils, washes, panel liners, ... It depends on the type of model and personal preferences, if that varnish should be matte, semi matte or gloss. The base line remains the same, try to find a working solution for yourself through testing. It helps through your modelling career. There are too many influences, to be discussed in on thread, It starts, with the question of primer or not, types of colours, in your case enamel, laquers or acrylics and it ends with the tools, airbrush or brush. You see, there is no simple answer to your question, but developing your process is rewarding and assuring for the future. I hope, I could help a little with my vague answer. Cheers Rob -
Fokker E.V / D.VIII Parasol Mikro Mir 1/32
DocRob replied to DocRob's topic in LSM 1/35 and Larger Work In Progress
Thanks Gaz, but what black leather do you mean, it's only wood, metal and inner Lozenge yet? Cheers Rob -
Focke Wulf.... Triebflugel.
DocRob replied to BlrwestSiR's topic in LSM 1/35 and Larger Work In Progress
That weird thing looks fantastic with your paintjob, keep rolling. Cheers Rob -
Fokker E.V / D.VIII Parasol Mikro Mir 1/32
DocRob replied to DocRob's topic in LSM 1/35 and Larger Work In Progress
Thanks Jeff, still a long way to go, I have to get the look right, used, but not overused this time. Cheers Rob -
Fokker E.V / D.VIII Parasol Mikro Mir 1/32
DocRob replied to DocRob's topic in LSM 1/35 and Larger Work In Progress
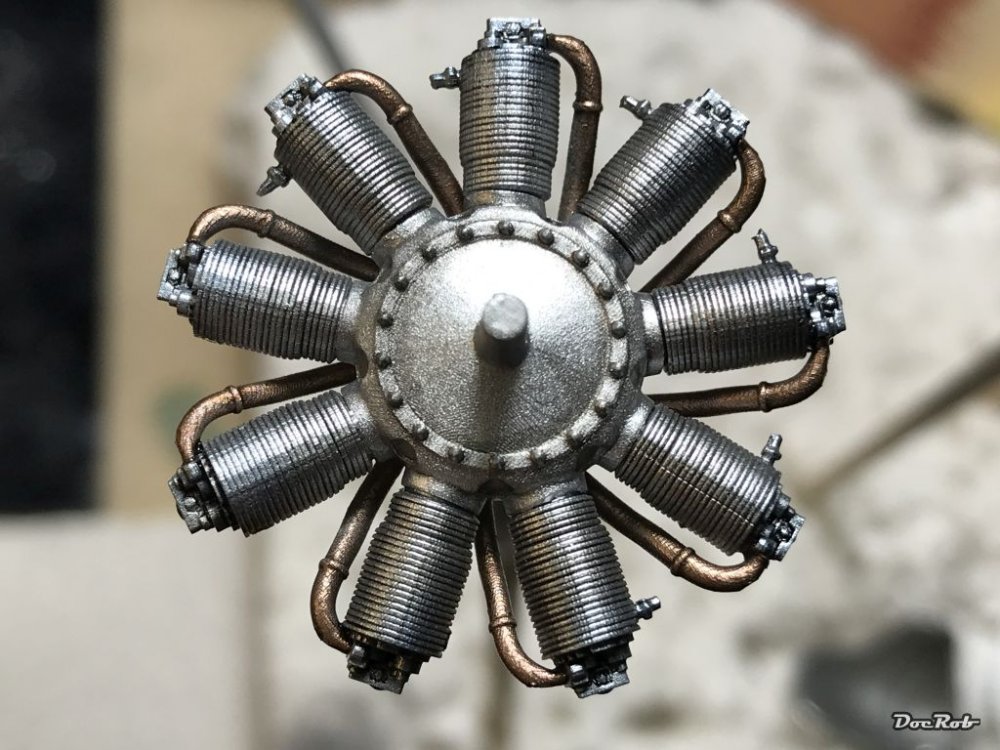
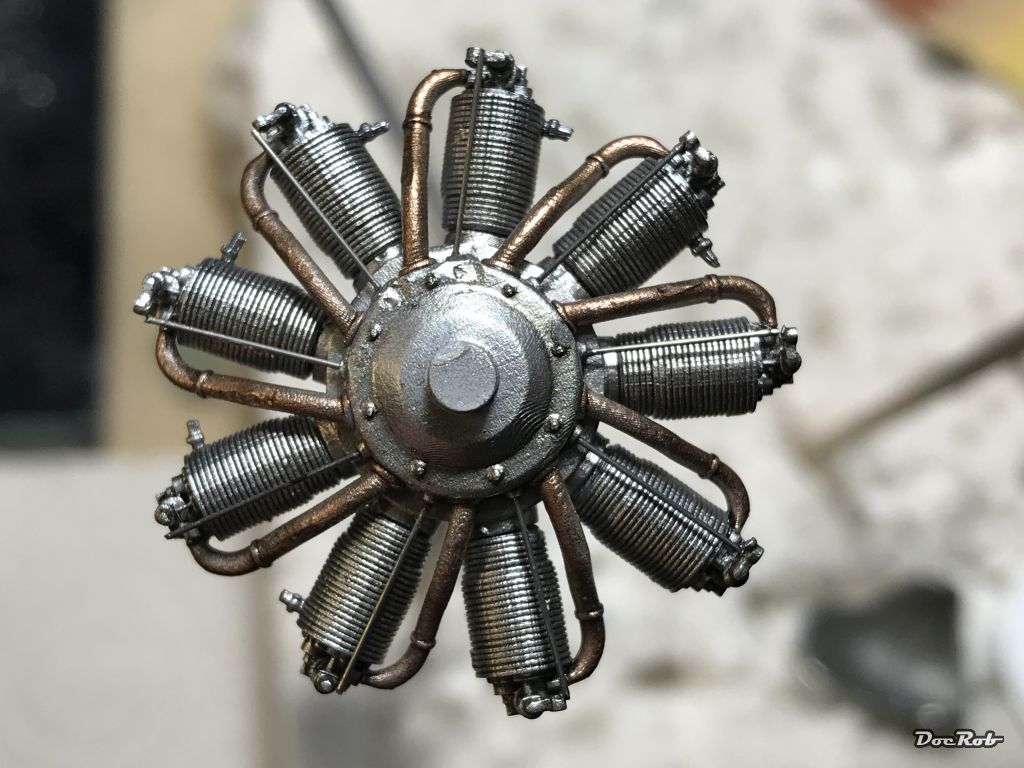
Muchas gracias Kai. Meanwhile the engine received some love, but some details still needed to be added or repaired, because I dropped the engine and broke some rockers and spark plugs. For painting, I used AK's Extreme Metals, which are great to work with. First I sprayed the complete engine in steel, then added some transparent blue (hard to see on the pics but it's there) on the heads of the cylinders for heat treatment, then used stainless steel for the rockers and finally aluminum for the casings. The exhausts were finished in copper. The whole engine got a black panel wash and then the steel pushrods were added. I will dirty the engine later with oil stains according to the general appearance of the Fokker. As a last step the ignition wires will be applied. The seat was sprayed light Aluminum and the was dabbed with AK's True metal paste in aluminum and dark aluminum, using my espresso machine as a guide for the look. The pic is bad, but gives an idea. Cheers Rob