DocRob
-
Posts
7,045 -
Joined
-
Last visited
Content Type
Profiles
Forums
Events
Gallery
Everything posted by DocRob
-
 They didn´t Paul, but to my knowledge the FT-17 tracks and the Schneider tracks are of the same type. Hobby Boss claims 64 links for their tracks, the Friul pack has 70. As I´m no expert, I can´t tell for sure for the Chamond. Cheers Rob
 -
Good to have you back here again Peter. I hope you can find a groove for you with the Spitfire build. I often feel it hard to concentrate on modelling in difficult times, but mostly relax a lot, when I force myself to the bench and do something productive. The mojo meter starts to rise again. I hope, your medical issues will be solved and you and Diane keep happy and healthy. Cheers Rob
-
I helped myself to a set of Friul´s for my Schneider tank. Less fiddly than the Hobby Boss ones. I guess, the wheelset is more or less the same. Can´t wait to see you start the Yak-9, PW Cheers Rob
-
Another one bites the dust - Maschinen Krieger Friedrich - 1/20
DocRob replied to DocRob's topic in The Sandbox Group Build.
So you are also a Kow Yokoyama design, PW, hopefully in 1/1 scale . Cheers Rob -
Another one bites the dust - Maschinen Krieger Friedrich - 1/20
DocRob replied to DocRob's topic in The Sandbox Group Build.
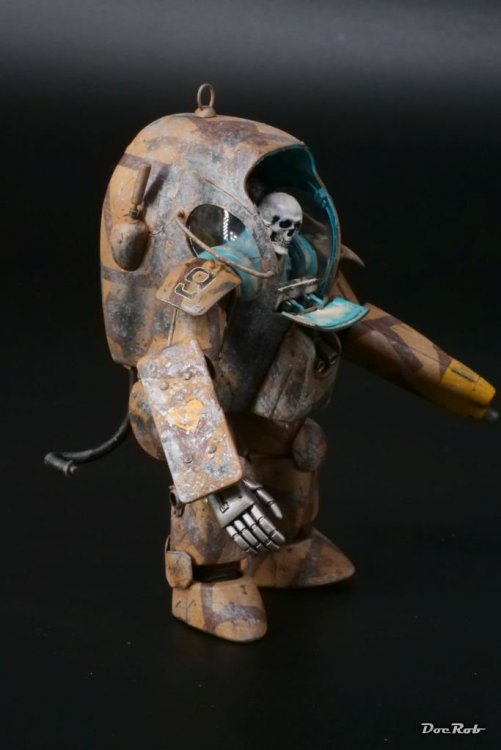
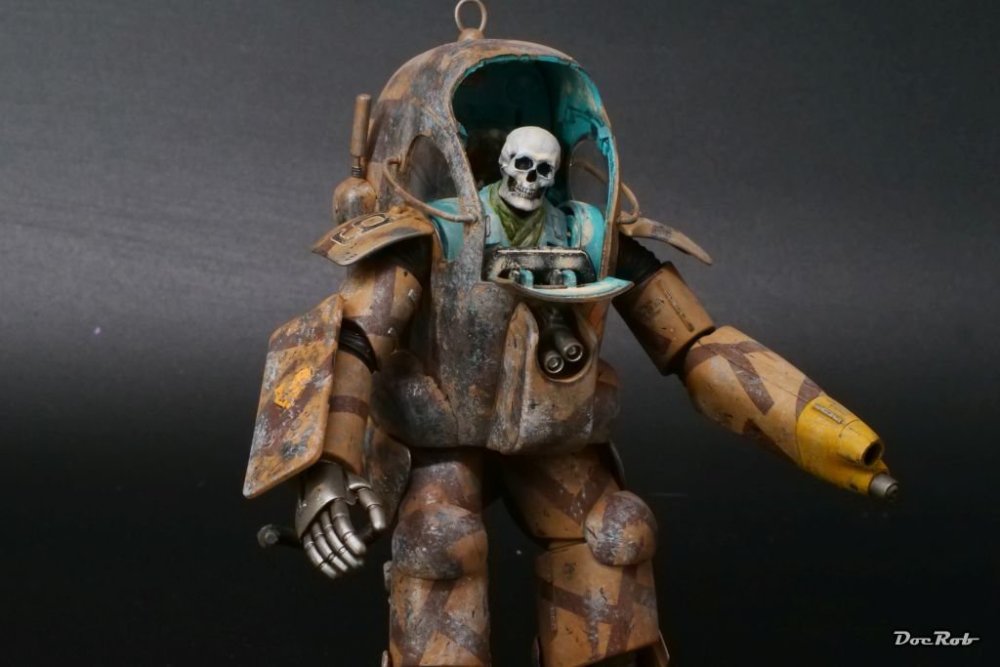
It looks somehow sinister with it´s long spindly probing arms. The plastic is a redish brown, maybe because one of the suggested paint schemes looks like red primer and when the kit hit the marked first, 40 years ago, not everybody painted the kits. The original kit had a tiny bulb included for lightening the front section, as well as the arms were mostly made from metal rods instead of plastic with mine. Hmmh, aerodynamics, so many questions. When was the front window opened and by whom? Was it the then still living pilot or the drone? Was it one storm causing the sandblast or continuous wear? Was all that happening on earth or on some deserted planet with different conditions? Let´s wait, how the story unfolds, Hubert There are really some similarities to the drones used in the Empire Strikes Back, but the Neuspotter was a bit large for being used for interrogations in tiny cells inside the death star. No Paul, there is another story behind it. The Neuspotter has no weapon systems, it would have needed a Krachenvogel for your scenario. BTW, I love the use of pseudo German names for many of the MaK subjects. These are no real words, but build from German parts of words. I always have to smile when I read them. Good find on the P.K.A., you will enjoy the build. My teenage favorite was always the Hornisse, a Kampfanzug with a hover jet attached. It was re-released by Wave some years ago and I definitely have to find one. Cheers Rob -
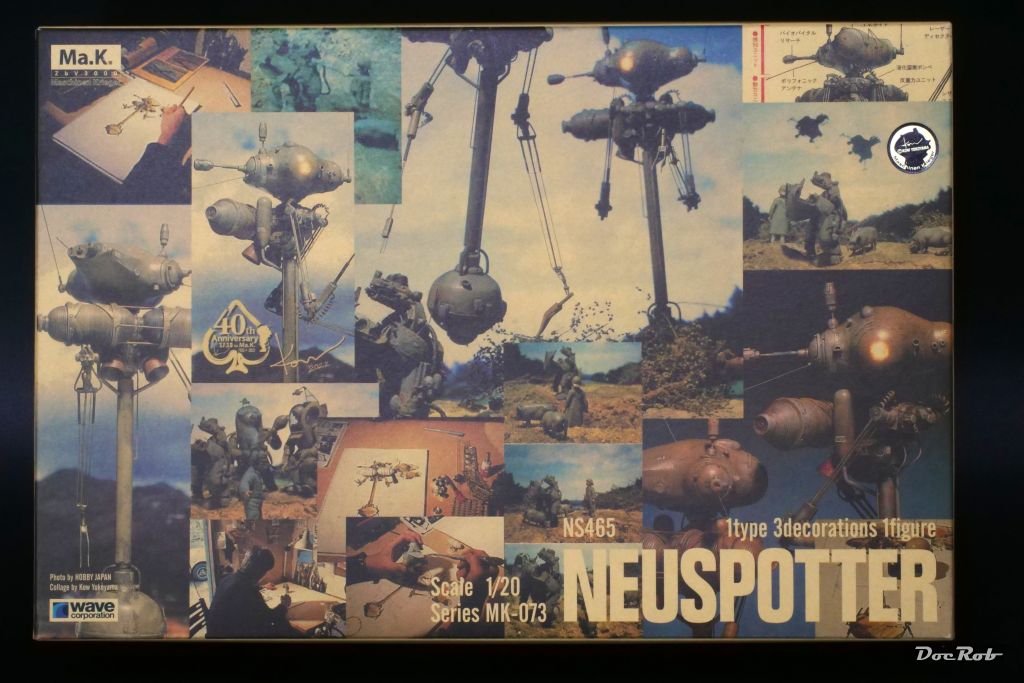
I know the feeling, Carl About forty years ago I browsed through "Werken Spielen Schenken", a hobby shop in West berlin as a teen and eying these brown Nitto boxes with photos of the build kit on top. I read, they are multi media and I had only a slight idea, what that meant. Anyway, they were quite expensive by the time and I couldn´t afford it at the time, being a teen with a lot more dubious interests. The boxes are still light brown and they still feature the carton print card of the subject. Some of the kits seem to be old molds, like the Neuspotter, others, like the Kampfanzüge (battle suits) are newer molds. Cheers Rob
-
1:32nd scale Airco De-Havilland DH.2
DocRob replied to sandbagger's topic in WNW and WW1 Ready for Inspection'
Top notch as always Mike. Your Airco scenery looks like a post colored snap shot of the real thing, with your signature finishing. Cheers Rob -
Another one bites the dust - Maschinen Krieger Friedrich - 1/20
DocRob replied to DocRob's topic in The Sandbox Group Build.
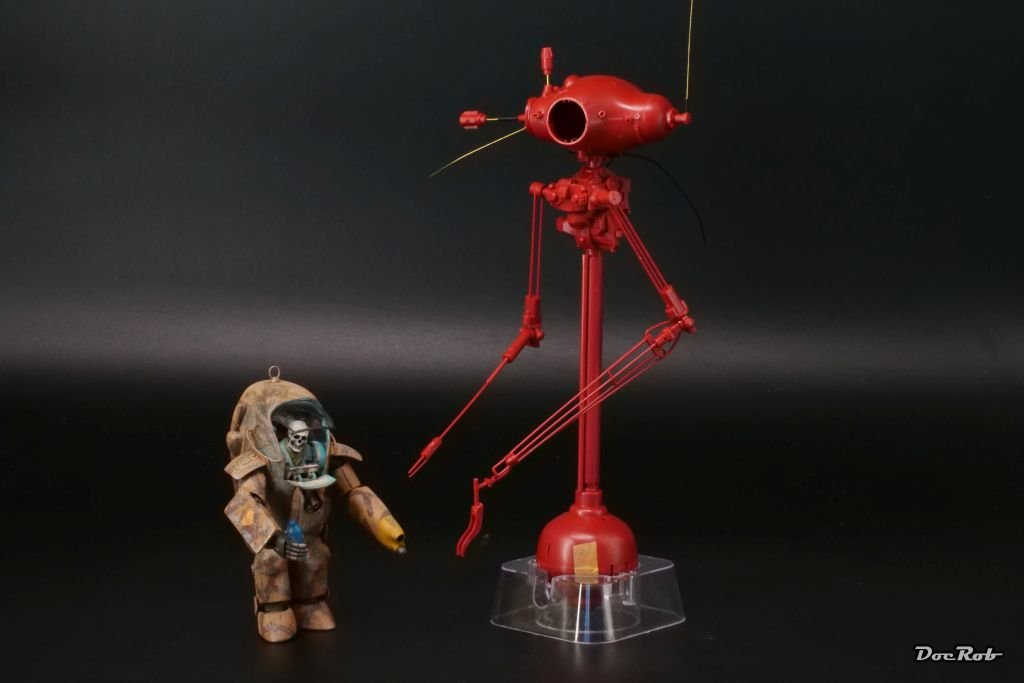
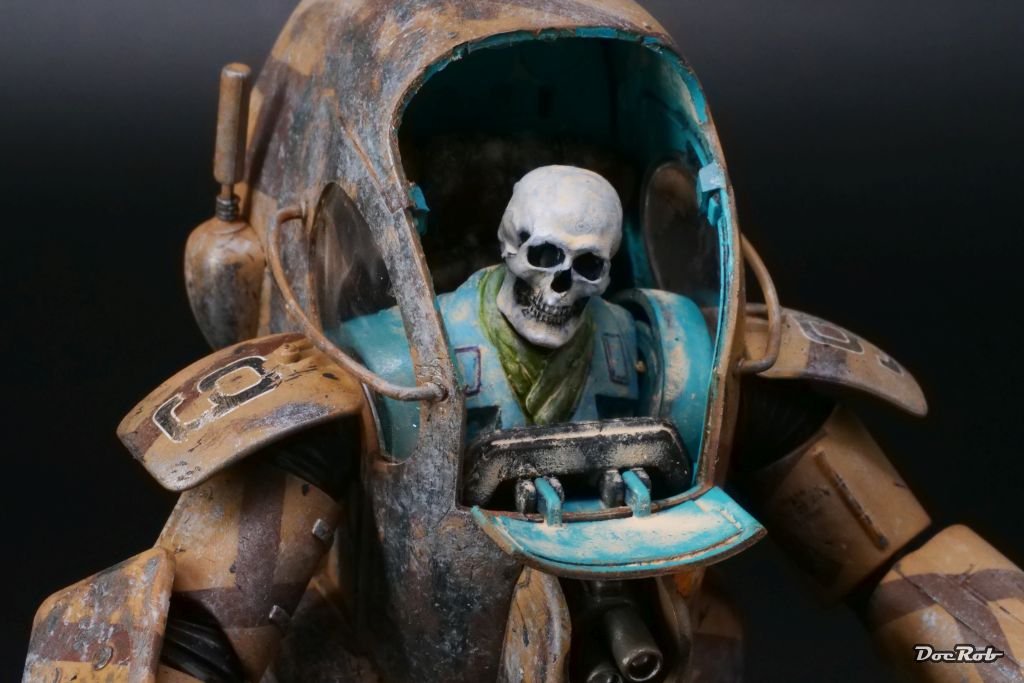
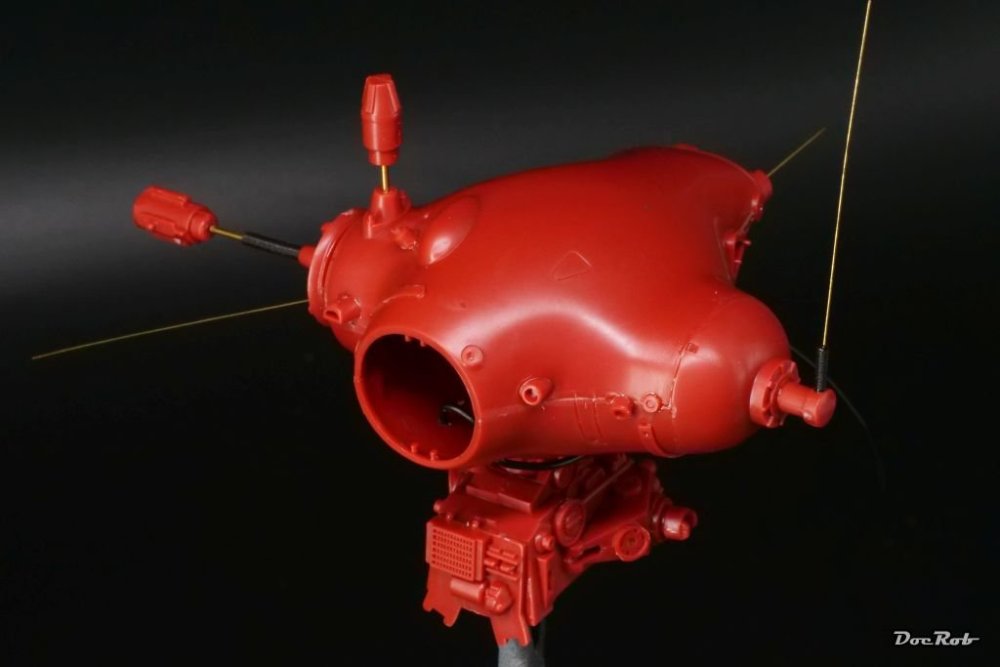
The huge Neuspotter drone is nearly finished. Not shown on the pic are the antigrav unit and the exhaust nozzles, which will be added after painting. If I use the Neuspotter in my dio, I have to find a way to let it hover. I guess, I will use slide fit brass tubes for that, epoxied to the base and the drone. Cheers Rob
-
Building WWI Aircraft Dioramas in 1:32 Scale Jeroen Veen
DocRob replied to Fran's topic in Tools, Books & Misc.
A great addition to my electronic bookshelf. I used the KLP issues about the Arado 234 and the AEG G.IV during my builds and they were very helpful. Cheers Rob- 2 replies
-
- 3
-

-
- e-book
- jeroen veen
- (and 3 more)
-
Another one bites the dust - Maschinen Krieger Friedrich - 1/20
DocRob replied to DocRob's topic in The Sandbox Group Build.
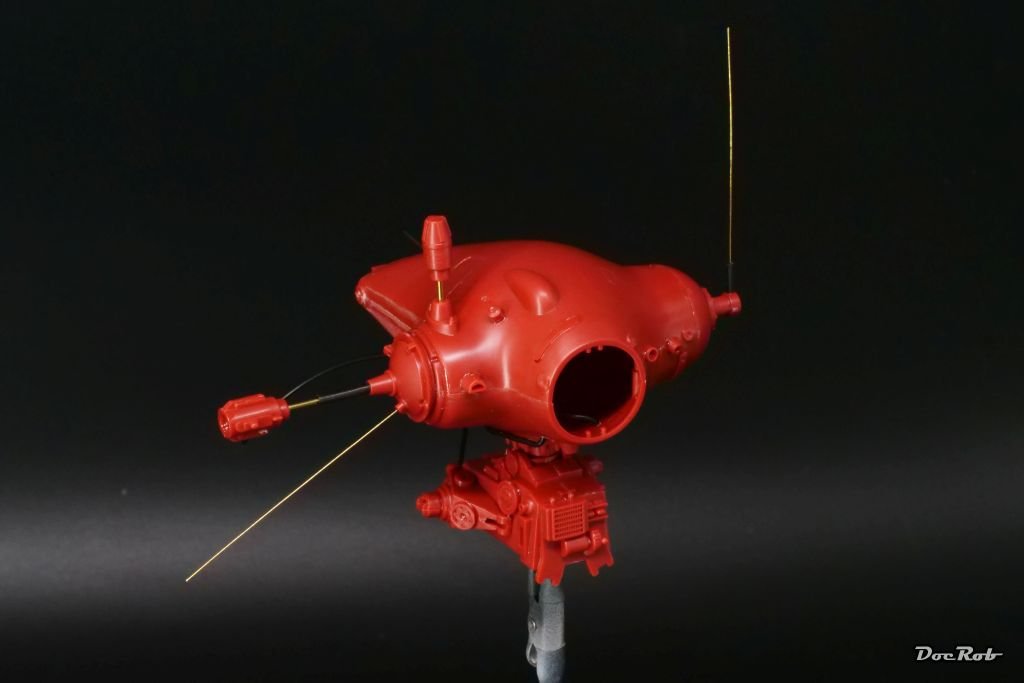
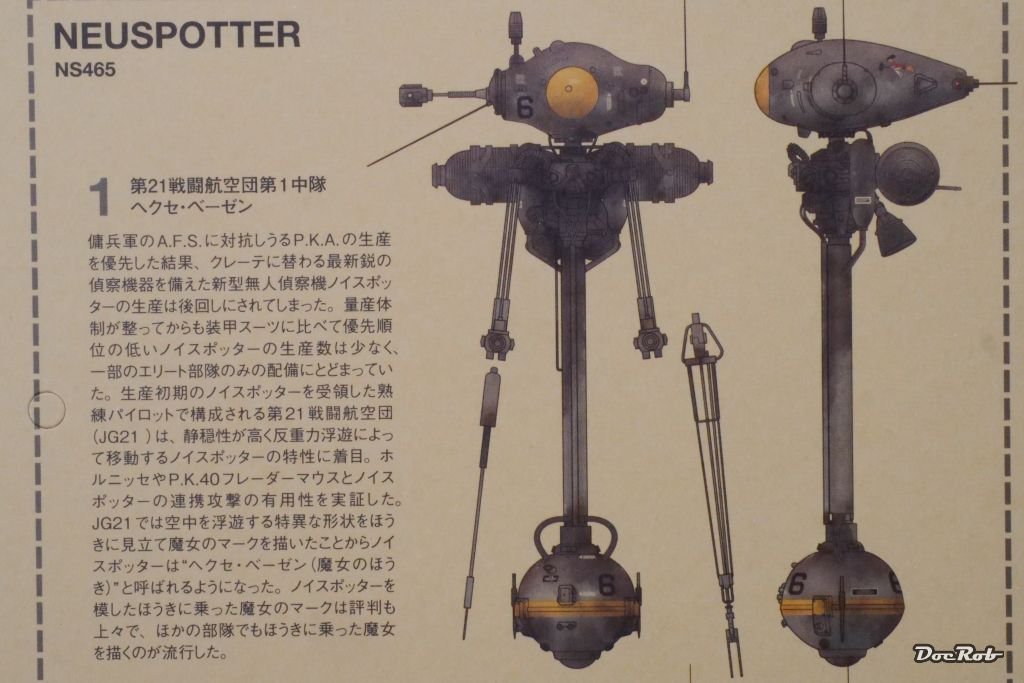
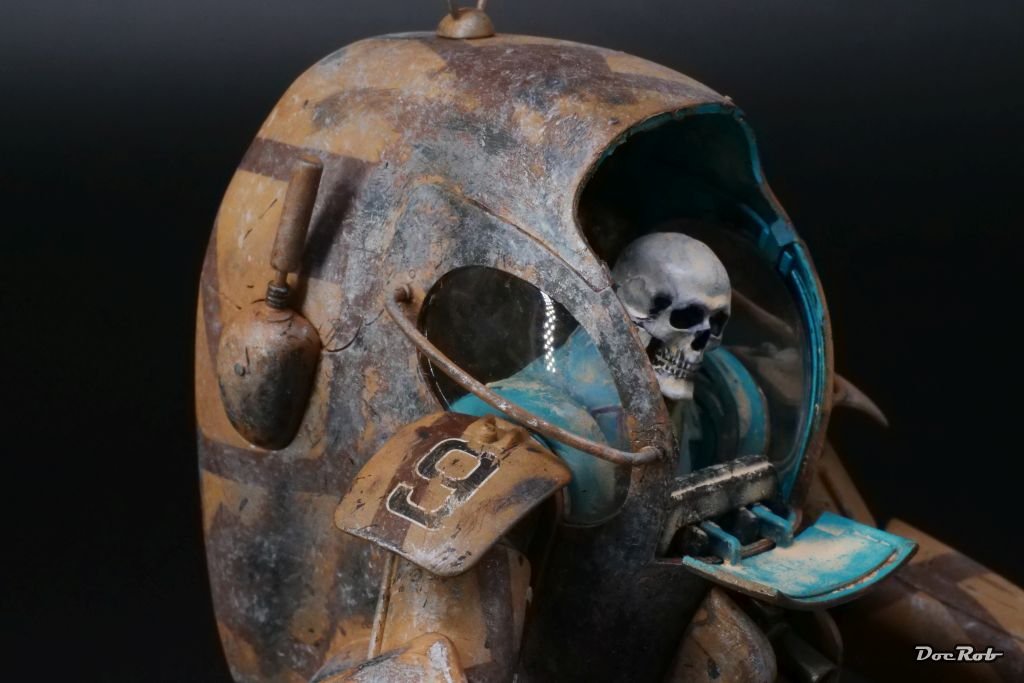
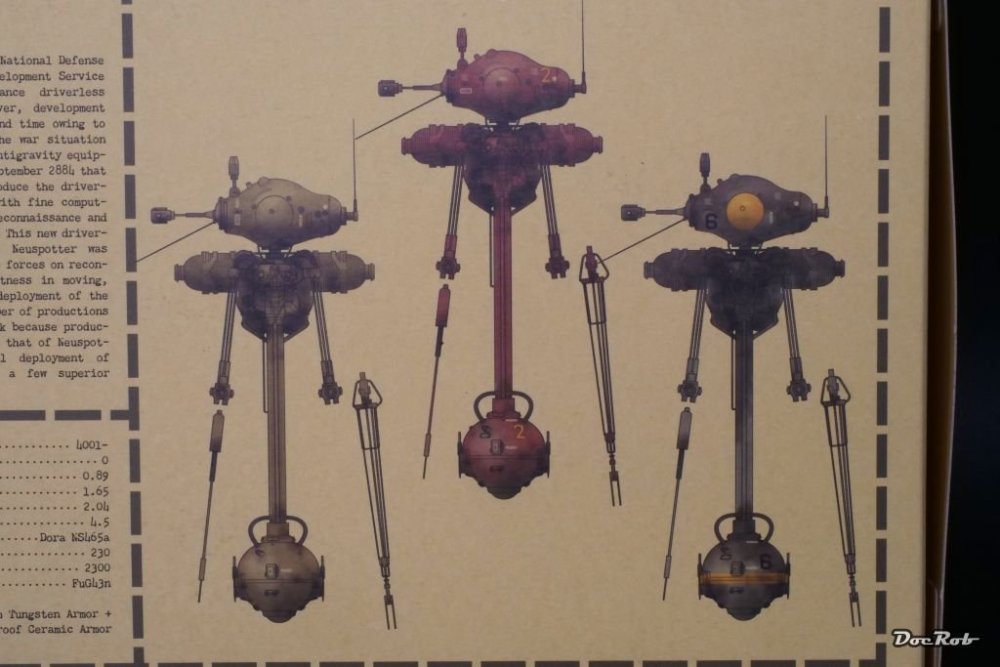
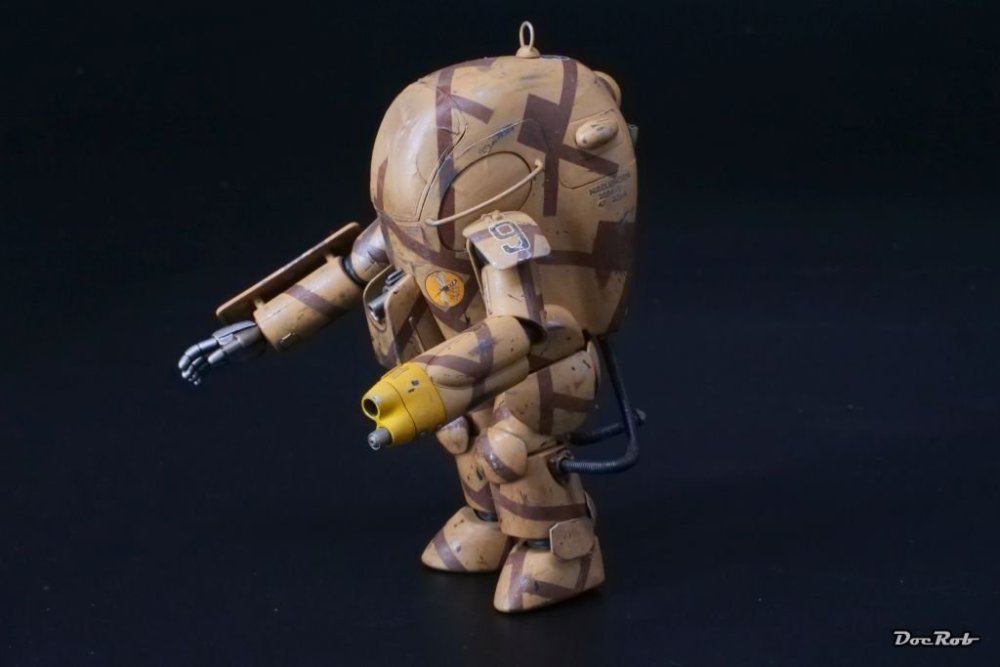
Let me introduce you to this sinister looking drone. The Neuspotter is also based on a design Kow Yokoyama for the MaschinenKrieger universe. The kit was first issued by Nitto 40 years ago and my Wave boxing marks the 40th anniversary. Still it looks cooler and somehow more frightening than modern drones. I started with the sensor unit, which besides the strange colored plastic features coil springs, vinyl tube and different wire diameters for the numerous antennas. The age of the mouldings is visible, but everything fits as it should. I will quick build the Neuspotter and then decide, if I add him in my scenery. To get a better idea about how the Neuspotter looks, I add this illustration, which comes with the kit. Cheers Rob

-
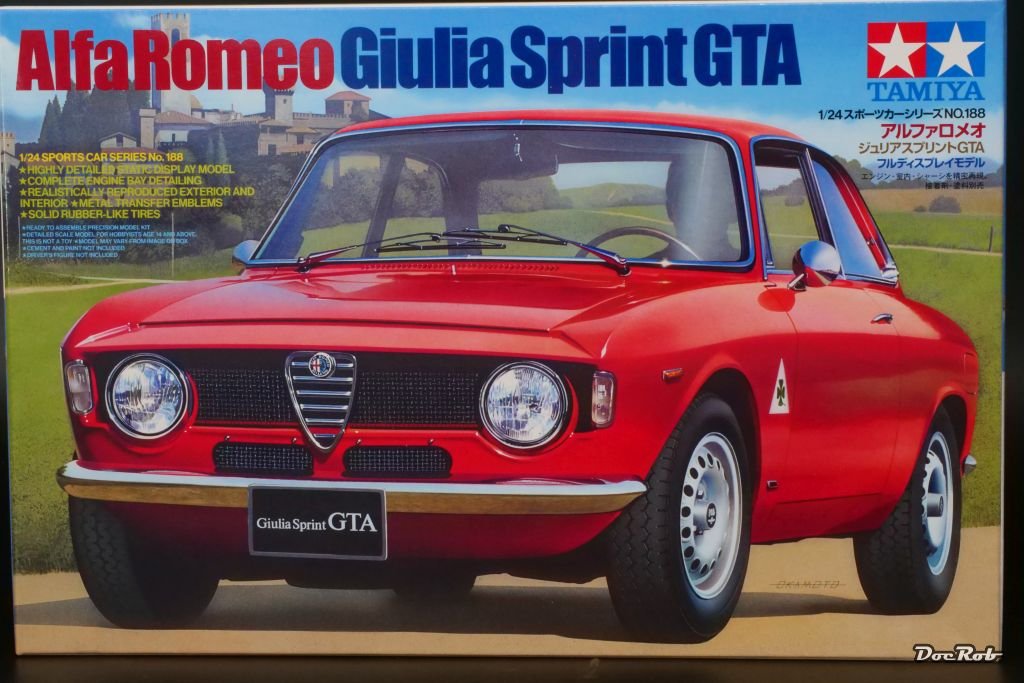
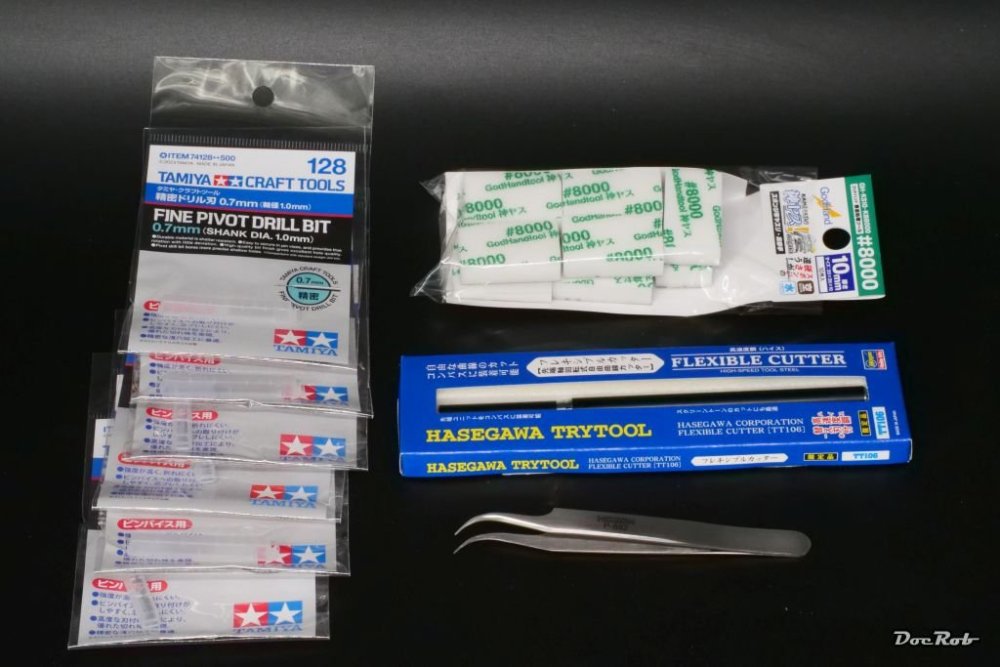
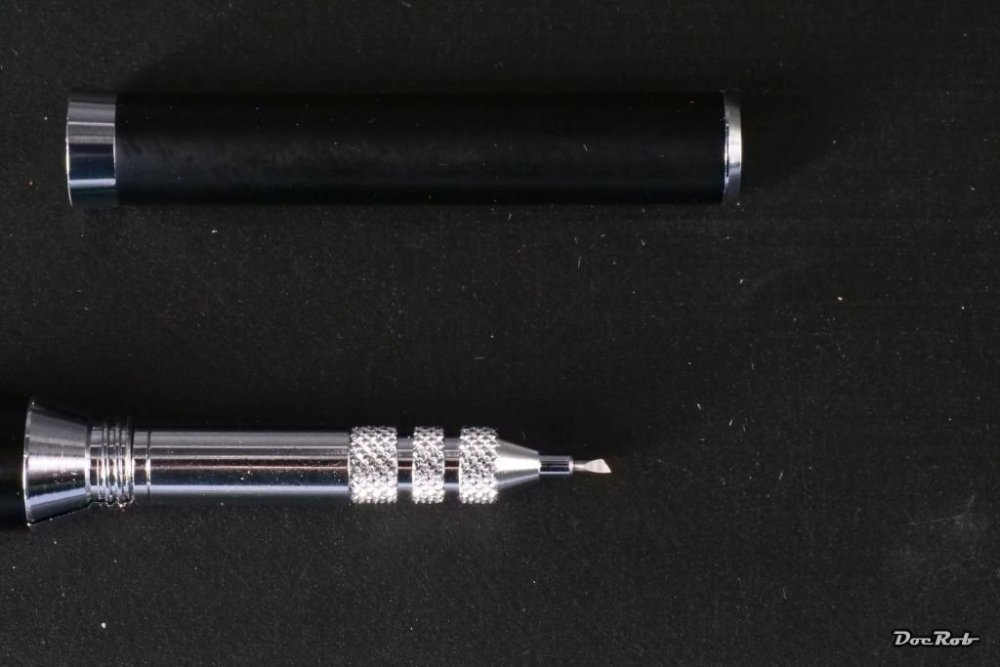
After quite a long journey some more goods from Japan arrived at my home. It seems, I have an Italian phase with car kits at the moment with the re-released Alfa Giulia, a car I always loved and nearly bought one many moons ago. The kit seems to be of decent quality, and even has an engine to show. I may add a set of PE for some further detailing. The 1/20 Neuspotter from Wave might be added to my sandbox GB entry. The version, I got is called 40th anniversary edition and since more or less as many years, I wanted to have one, among other of the veneer Nitto kits of MaK subjects. I also got a lot of drill bits for my MFH kits, a new pointed tweezer and Hasegawa Flexible Cutter. The cutter has a tiny rotating blade, which may be helpful for cutting masks for organic shaped camo patterns. Cheers Rob


-
Another one bites the dust - Maschinen Krieger Friedrich - 1/20
DocRob replied to DocRob's topic in The Sandbox Group Build.
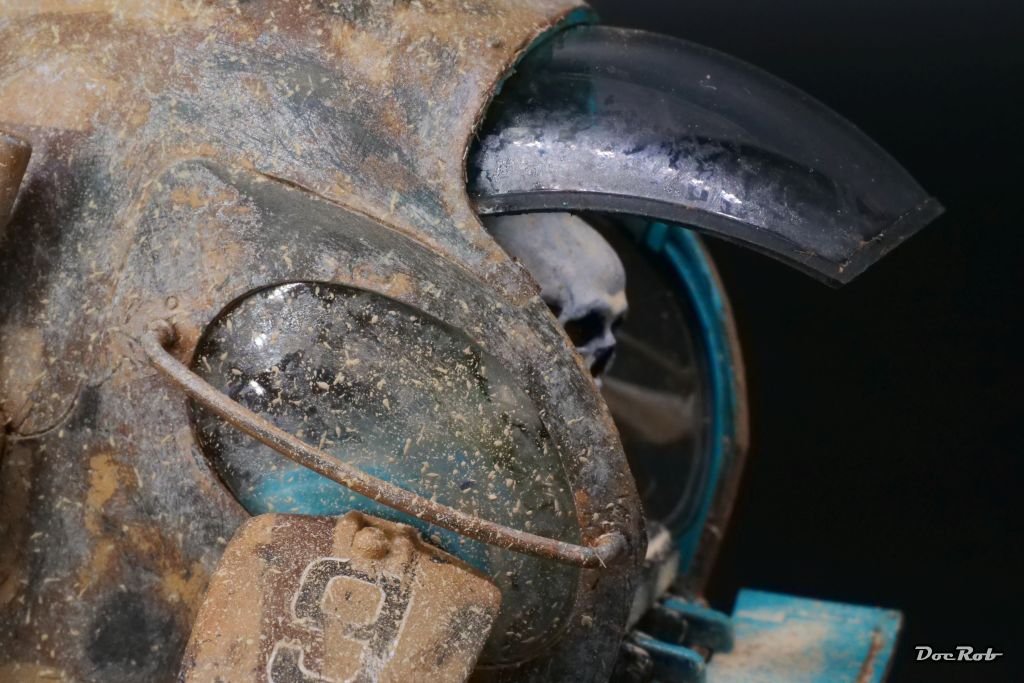
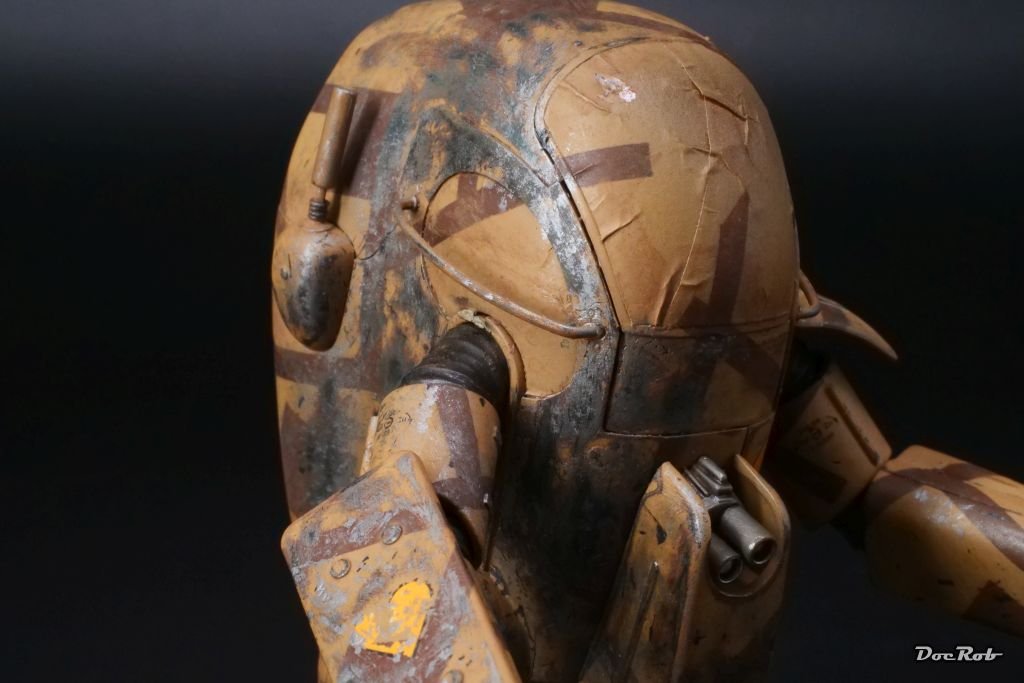
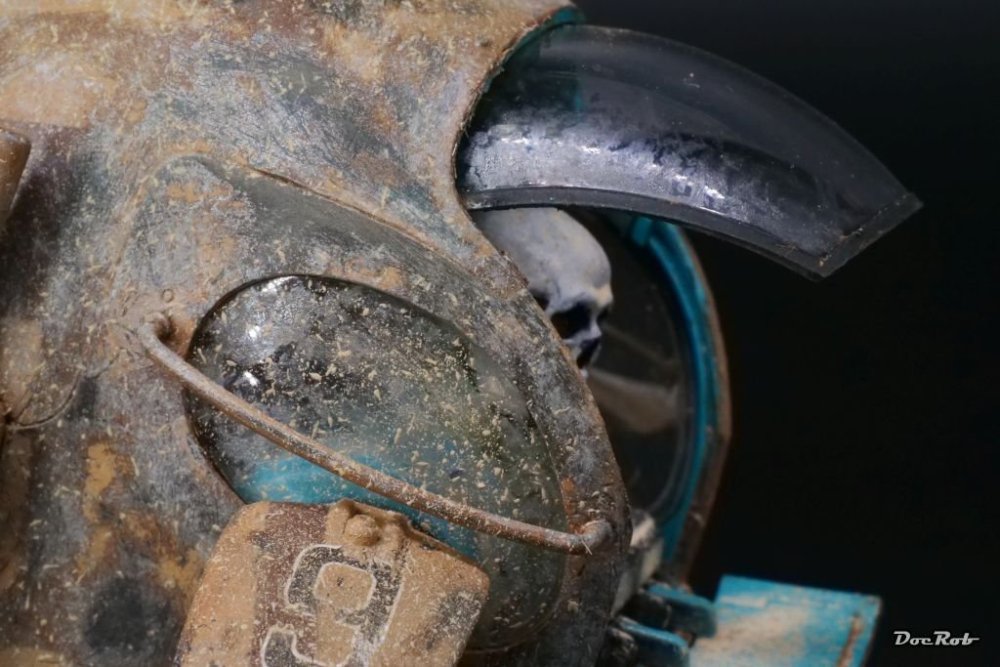
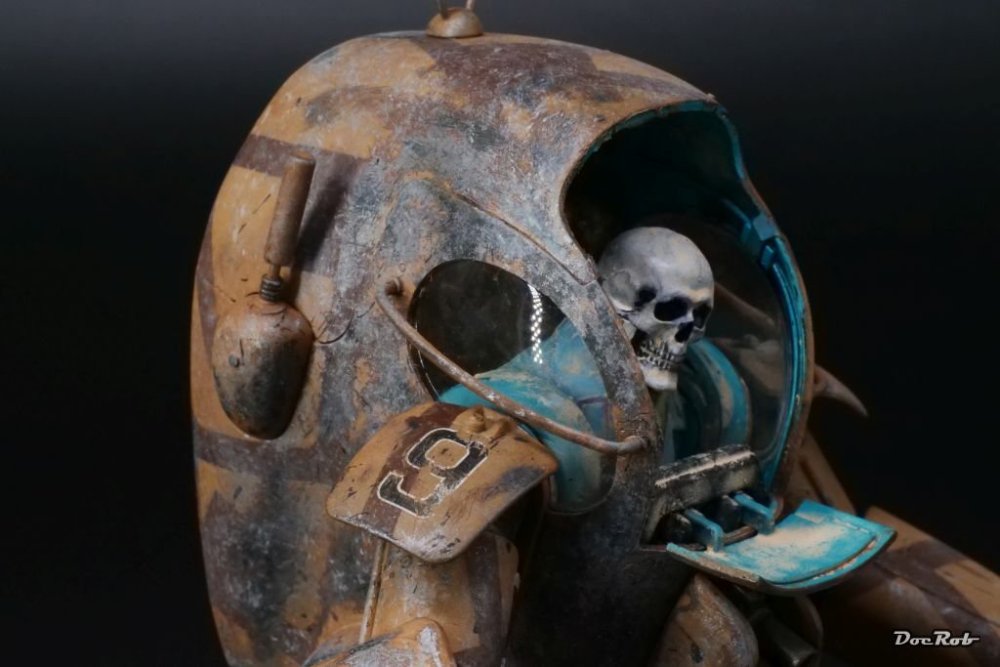
Thank you Chris, I´m blushing. I´m also lucky, that second effort worked better than the hairspray, which never failed me before. Suggestions for the window treatment came through some of our knowledgeful regulars and I tested the different methods on spare parts. The effect, I´m after is a sandblast through a storm, therefore the undoubtedly very robust windows of the Kampfanzug wouldn´t be penetrated, just blinded. Cheers Rob -
1/48 Airfix EE Lightning F3
DocRob replied to PanzerWomble's topic in LSM 1/48 Aircraft Ready for Inspection
Glad you found your mojo back with the Lightning, PW. The result is stunning, the NMF fits the brutish beauty perfect. Cheers Rob -
Thanks for showing, Kevin. this is retro cool somehow. We had a member from Belgium or Holland, who built rubber band driven planes, when I remember right. Cheers Rob
-
Can´t wait to see your approach on the Camel. It has been on my list for a while as well, but I also have the even cooler () looking Küster in my stash. And there is also an Nutcracker hover tank. Cheers Rob
-
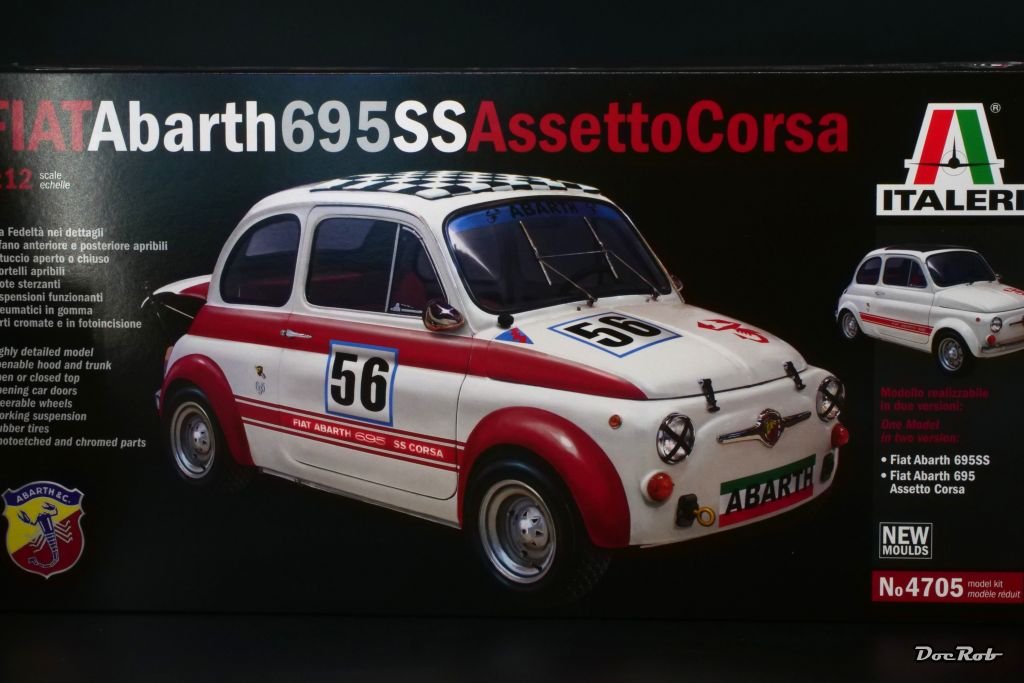
Yes it is 1/12 scale, about as long as one of the American cruisers in 1/25 . Cheers Rob
-
Another one bites the dust - Maschinen Krieger Friedrich - 1/20
DocRob replied to DocRob's topic in The Sandbox Group Build.
Thank you Paul, indeed, he hadn´t the easiest of times. Good to hear, that your Camel arrived. I ordered my Neuspotter and other items from Plaza Japan in the beginning of October and it still is a no show. Cheers Rob -
Double Ugly double build-ZM F-4G and RF-4EJ
DocRob replied to BlrwestSiR's topic in LSM 1/48 Work in Progress
One has a Pinocchio nose The fit of my ZM Kai Phantom was indeed tamiyaesque. Cheers Rob- 18 replies
-
- 5
-
-
- zoukei mura
- f-4
- (and 1 more)
-
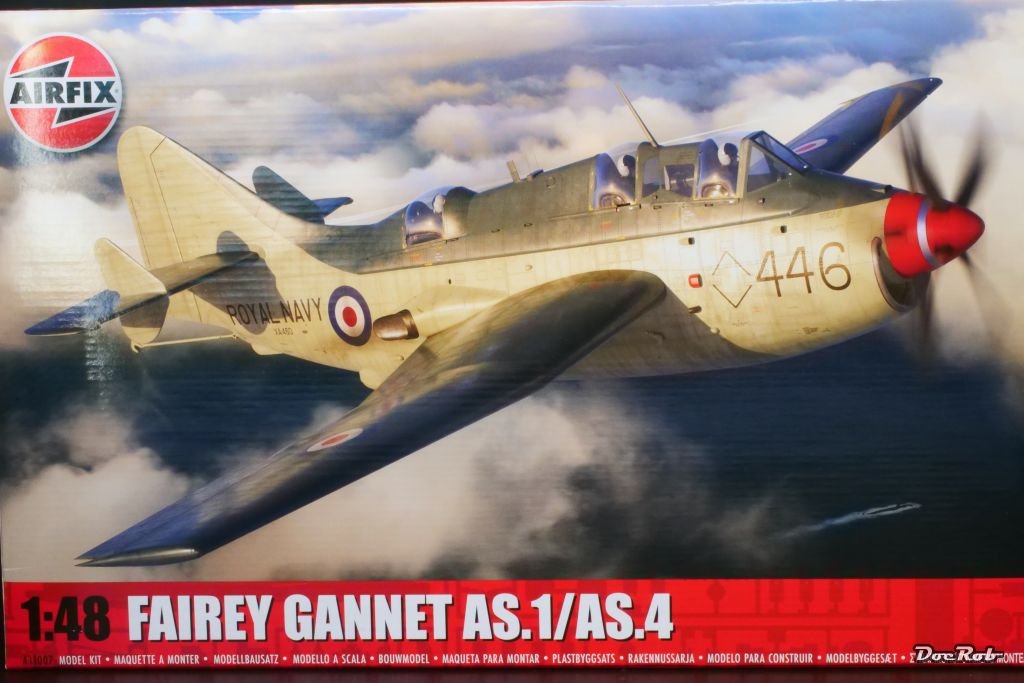
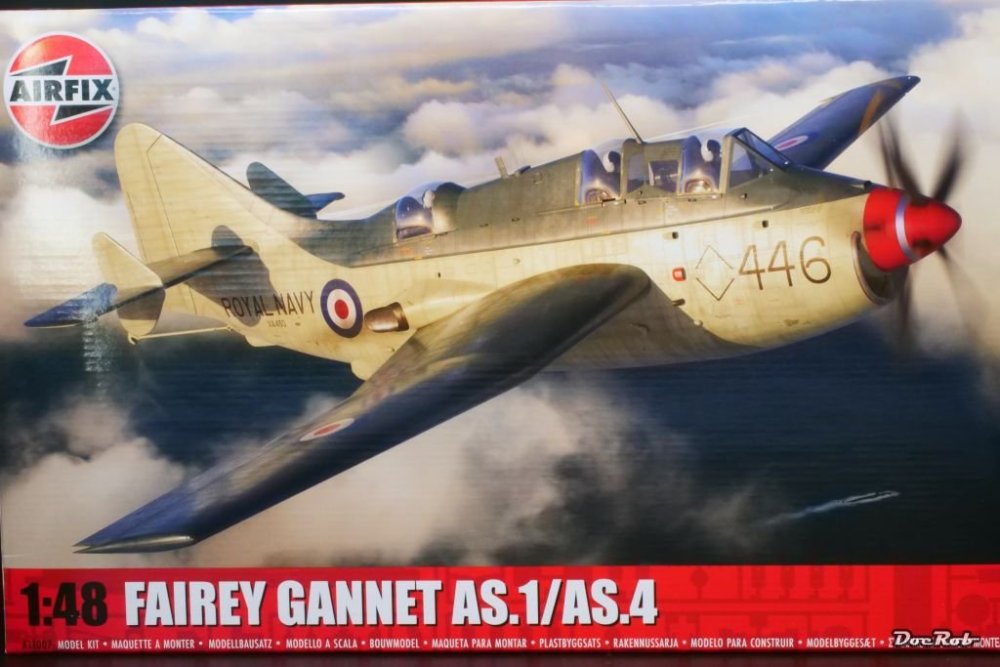
New kits in the hood. On a wombeling kick, I decided to hit the buy button on the ugly but appealing at the same time Gannet. It seems to be a nice kit and I think, I will build it in a rotten German Bundesmarine livery. For less than 60€, I couldn´t say no to this little bugger. I always loved the tiny Fiats and often drove in some, when I was young. I´m not so fond of Italeri kits, but this one seemed to be a decent one, lets see. Cheers Rob

-
Another one bites the dust - Maschinen Krieger Friedrich - 1/20
DocRob replied to DocRob's topic in The Sandbox Group Build.
After evaluating different methods on clear spare parts, I decided to use Tamiya Extra Thin for my sand blasted windows. I used the supplied brush nearly dry and applied the cement very carefully. This is only preliminary, to check the effect and more effects will be added, especially for the front window. Cheers Rob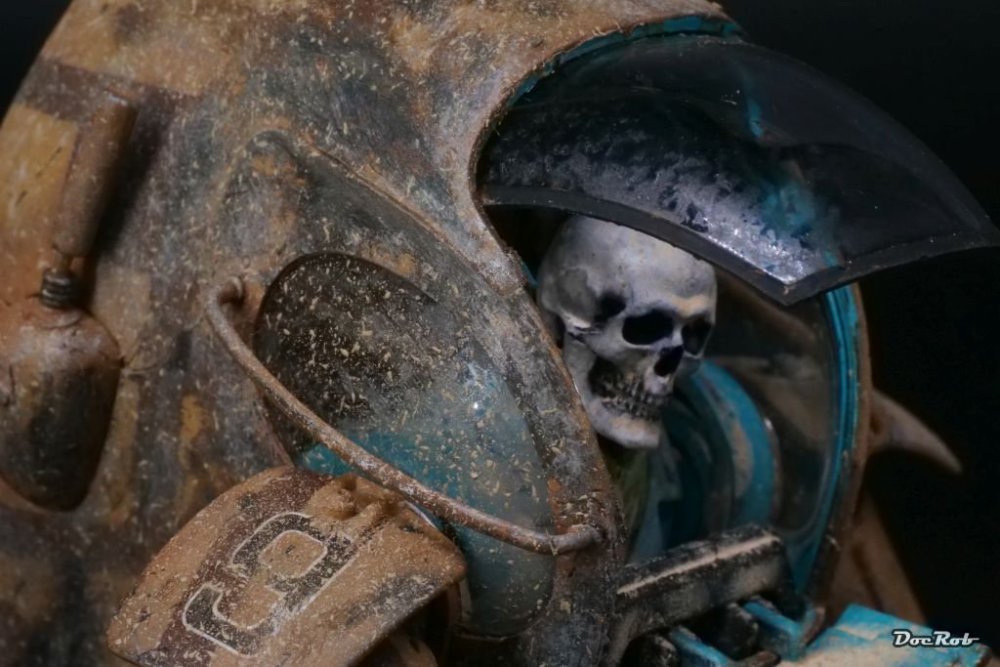
-
Another one bites the dust - Maschinen Krieger Friedrich - 1/20
DocRob replied to DocRob's topic in The Sandbox Group Build.
Muchas gracias for the suggestions, Hubert, Carl and PW. The clear parts are indeed polysyrene. I thought about using CA as well, but fear a not very controllable application. I will try thinner and matte clear on some spare parts. One side window should look blinded, the opened windshield only on the side, which calls for a faded effect. All will be followed by dust and sand deposits. Cheers Rob -
Another one bites the dust - Maschinen Krieger Friedrich - 1/20
DocRob replied to DocRob's topic in The Sandbox Group Build.
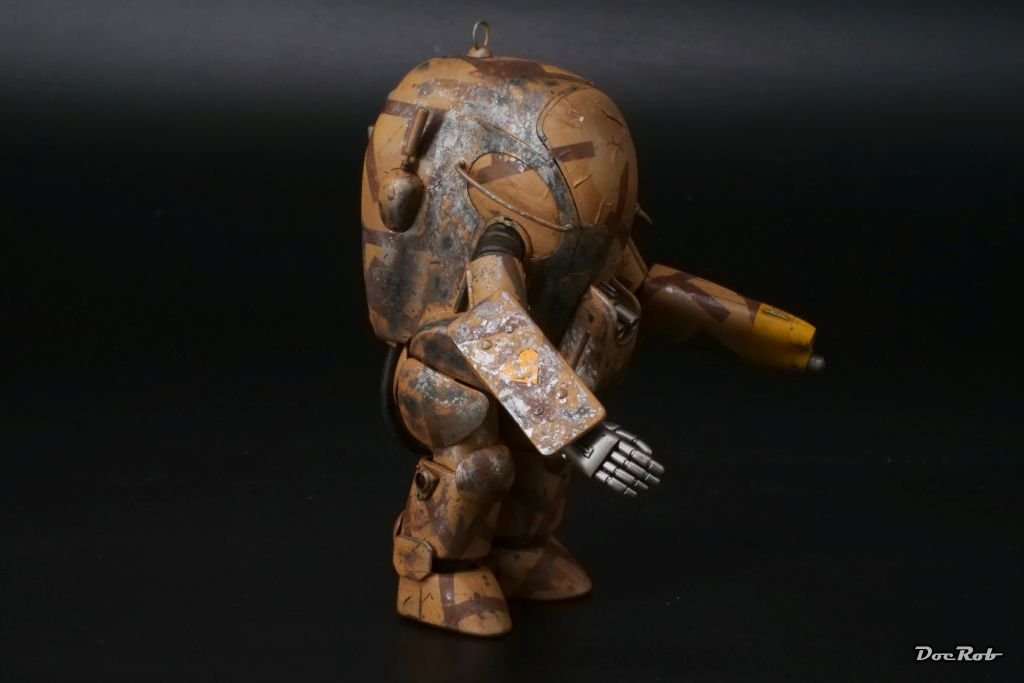
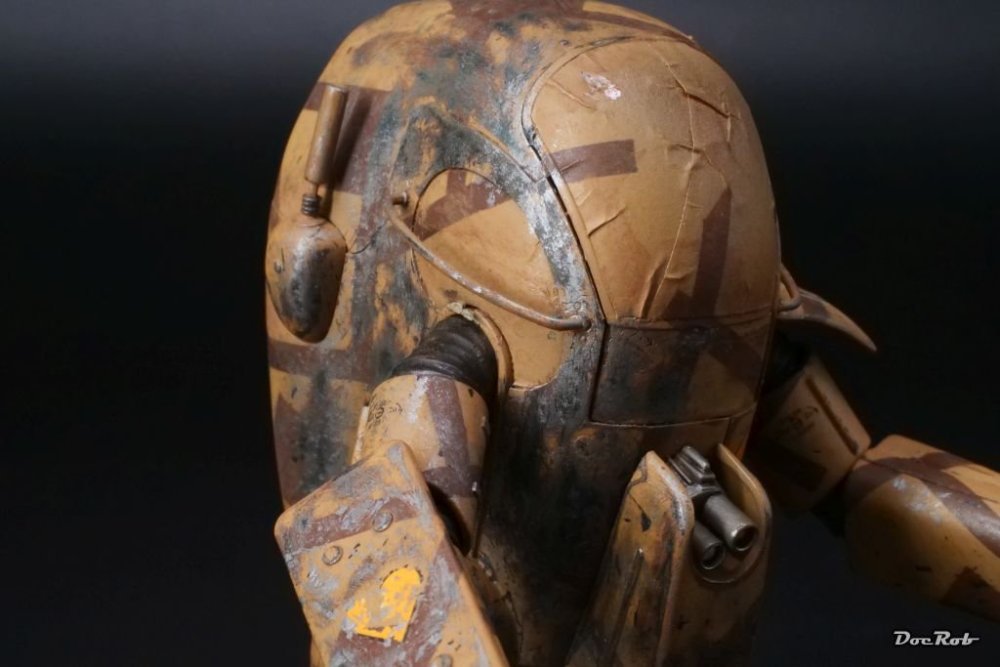
Thank you Martin and Kevin. After the hairspray thing didn´t work, it was clear, that it will be substituted by a multi layer weathering effort, starting with sanding, scratching and other sorts of mechanical abuse, followed by steel paint and then light sand paint. Later I will add more layers of sand, dust, but that will be done together with the base. Cheers Rob -
Another one bites the dust - Maschinen Krieger Friedrich - 1/20
DocRob replied to DocRob's topic in The Sandbox Group Build.
On went the second layer of dry paint dabbed on. This time it was a light bone color, called Moonray Flesh. I also applied the paint with a stiff old brush, but this time not only in the direction of the sandblast, but also a bit more from above to simulate some bleaching. This is only the basic weathering and more will be added later with sand deposits and dust everywhere. I have to decide, how to weather the clear parts. I´m open to any suggestions. The sandblast should have blinded this canopy side, but the other and front window should be relatively clear. Cheers Rob
-
Another one bites the dust - Maschinen Krieger Friedrich - 1/20
DocRob replied to DocRob's topic in The Sandbox Group Build.
Time for some pointillism. I lied a bit about the looming panic, because the hairspray didn´t work like it should. I hate to alter my original plan, but this time, I didn´t bin the project and instead worked on a plan to add the sandblast effect with different kind of paints, dabbed dryly onto the surface with an old brush. It took a while to get the Extreme Metal Steel dotted, like intended, one side blasted, the other nearly unharmed. Cheers Rob

-
Another one bites the dust - Maschinen Krieger Friedrich - 1/20
DocRob replied to DocRob's topic in The Sandbox Group Build.
So true Kevin, I usually work out my painting and weathering process in advance with the finalized picture rendered in my head and mostly stick to this plan by the numbers. Not this time. This is often a point, where I ditch a project. In this case, I decided on a different approach. Cheers Rob