DocRob
-
Posts
7,043 -
Joined
-
Last visited
Content Type
Profiles
Forums
Events
Gallery
Everything posted by DocRob
-
Wow, the cat is a stunner and a winner . The good thing on these easy going Tamiya kits, you can fully concentrate on painting and weathering and here is where your bird shines, Gus. Cheers Rob
-
Nice progress Gary, I always use a drop of something like tan in the white and maybe two drops of Nato black in the black to reduce the super harsh contrasts a bit. Works perfectly for me. Cheers Rob
-
 Thanks Ernie, I have to confess, I'm actually a bit proud to have pulled through with the build. It was not the easiest one, but motivating nonetheless. I always wanted a Nachtigall for my shelf, done now, check mark . Cheers Rob
 -
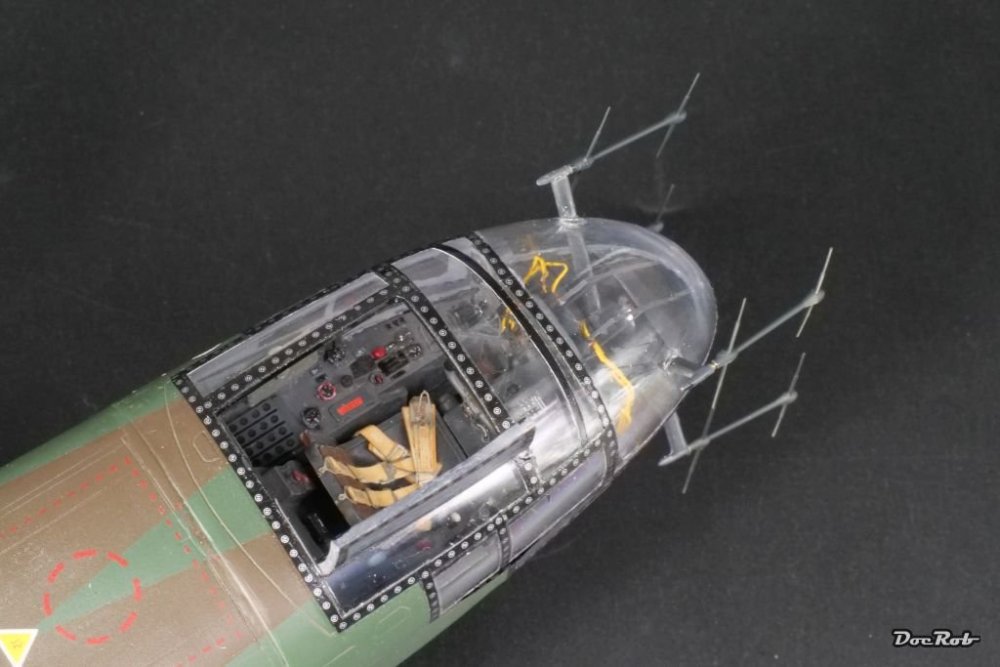
Thanks Gary, the antler antennas are from a Master set made in brass. The kit ones are not shabby, but the Master set is much finer and a bit more robust on such a prominent place. Cheers Rob
-
Congratulations guys and a big thank you to Ernie for being so generous and also managing the GB so well. Cheers Rob
-
The result looks absolutely fantastic, but your processual planning seems to be a bit on the weak side, or was that only to have an excuse to miss the deadline of the GB, Hubert? I can feel all the pain you went through and my nerves wouldn't have kept up with it, I guess. Cheers Rob
-
"Alert 1 to Eagle 1, splash the Zeros!"- Tamiya F-14
DocRob replied to BlrwestSiR's topic in Let’s Get Wet Group Build.
Looking great Carl, but will it be finished in time? Are you going 24h for the rest? Cheers Rob -
What a nice break from the usual planes Peter. I think, we need more cars and bikes here for a change. Your Thunderbird's underskirts look wonderful. BTW, I started a car kit myself yesterday. Cheers Rob
-
Thank you Carl, not sure about the next one, I was preparing the 1/72 resin kits of a Gee Bee racer and a Doodlebug fuel transporter and also a 1/12 Tamiya Renault RE-20 formula one car, lets see... Cheers Rob
-
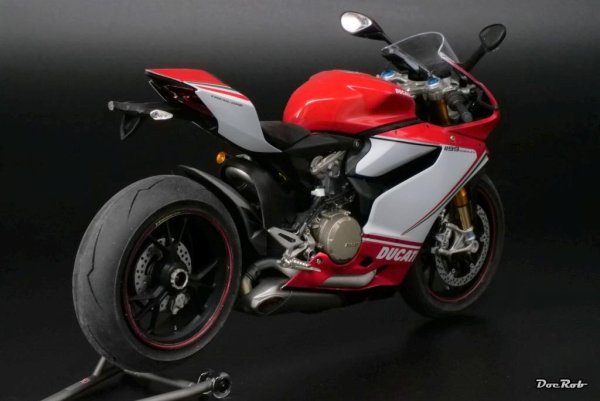
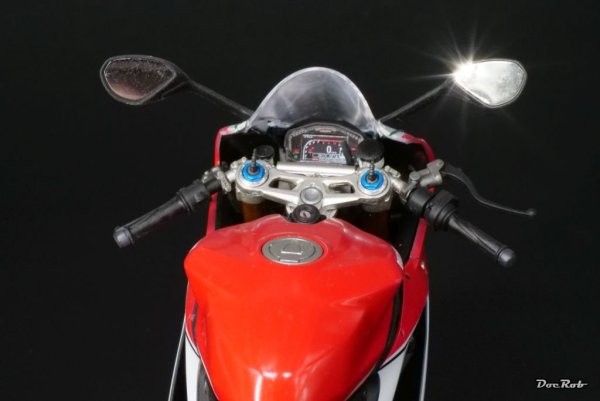
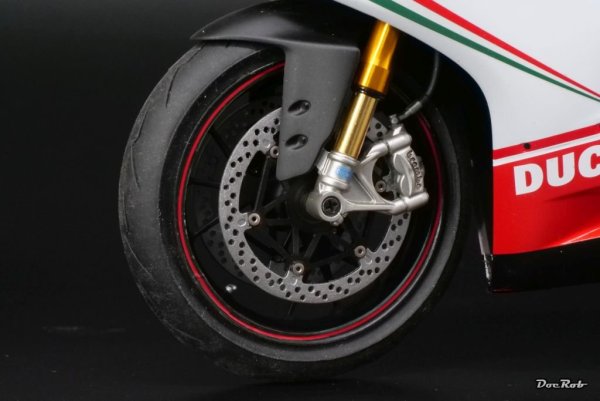
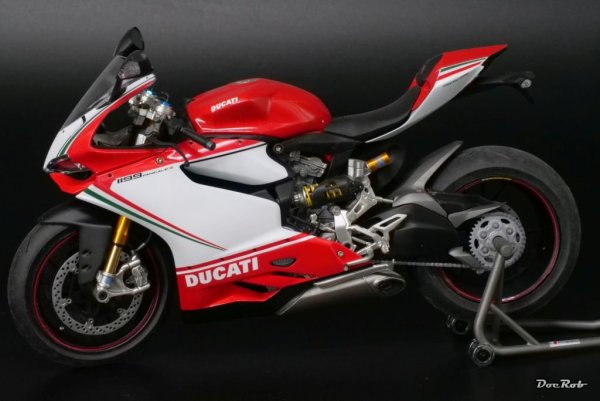
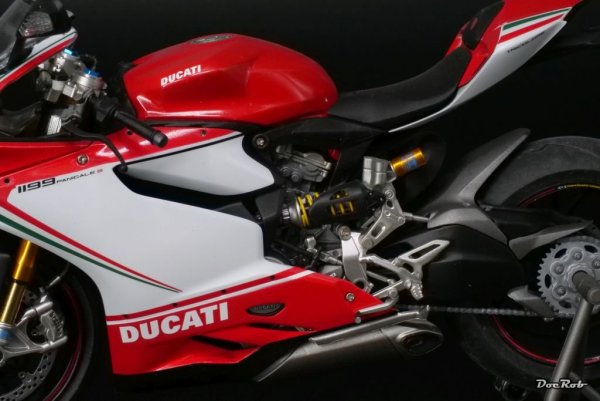
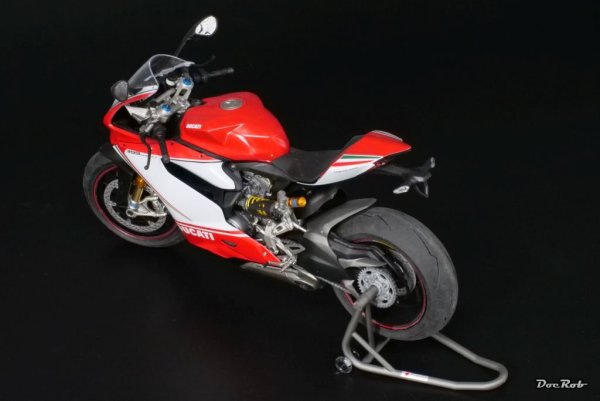
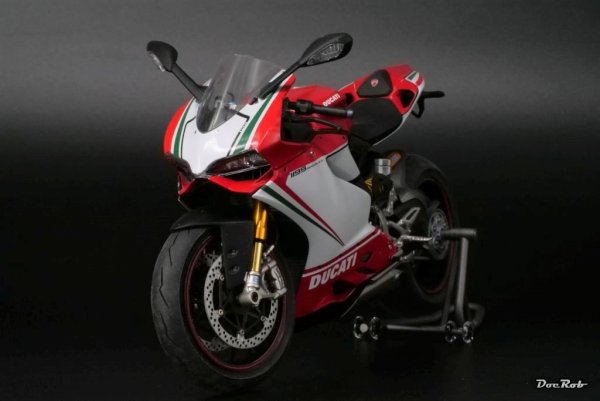
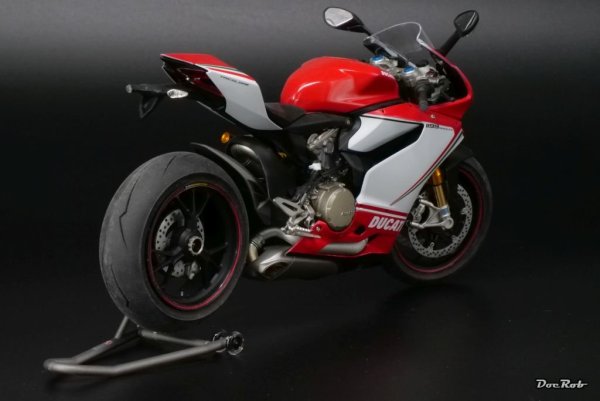
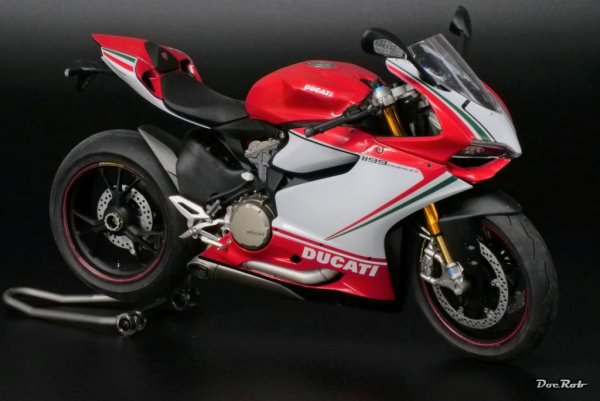
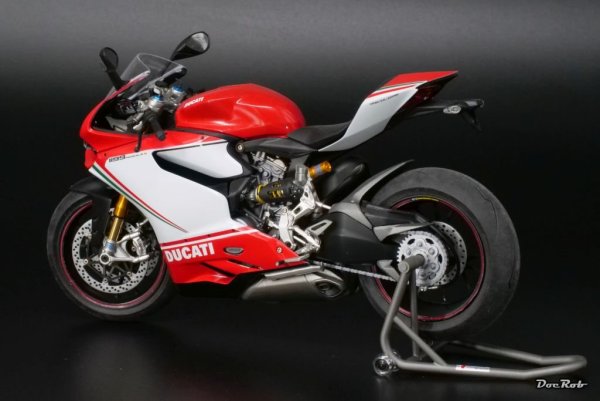
Ducati 1199 Panigale S Tricolore - Tamiya
Images added to a gallery album owned by DocRob in Non-Aircraft/Armour COMPLETED models
Relaxing build, with some modifications, like metal fork and drilled out brake disks. It was a great training canvas for replicating different metals and other materials. Cheers Rob -
-
From the album: Ducati 1199 Panigale S Tricolore - Tamiya
-
From the album: Ducati 1199 Panigale S Tricolore - Tamiya
-
From the album: Ducati 1199 Panigale S Tricolore - Tamiya
-
From the album: Ducati 1199 Panigale S Tricolore - Tamiya
-
From the album: Ducati 1199 Panigale S Tricolore - Tamiya
-
From the album: Ducati 1199 Panigale S Tricolore - Tamiya
-
From the album: Ducati 1199 Panigale S Tricolore - Tamiya
-
From the album: Ducati 1199 Panigale S Tricolore - Tamiya
-
From the album: Ducati 1199 Panigale S Tricolore - Tamiya
-
From the album: Ducati 1199 Panigale S Tricolore - Tamiya
-
Thank you Kevin and Rod, it was a long journey, but worth it. I learned a lot through this build and am not frightened enough to consider a second one sometimes. It will be a single seater than without night fighter equipment, way easier to build. Cheers Rob
-
1:32nd scale Hansa-Brandenburg W12
DocRob replied to sandbagger's topic in LSM 1/35 and Larger Work In Progress
I built this kit some years ago and I have to say, it's a true gem, Mike. You'll have fun with it. I choose a scheme from Sylt, because I have been there often. Cheers Rob -
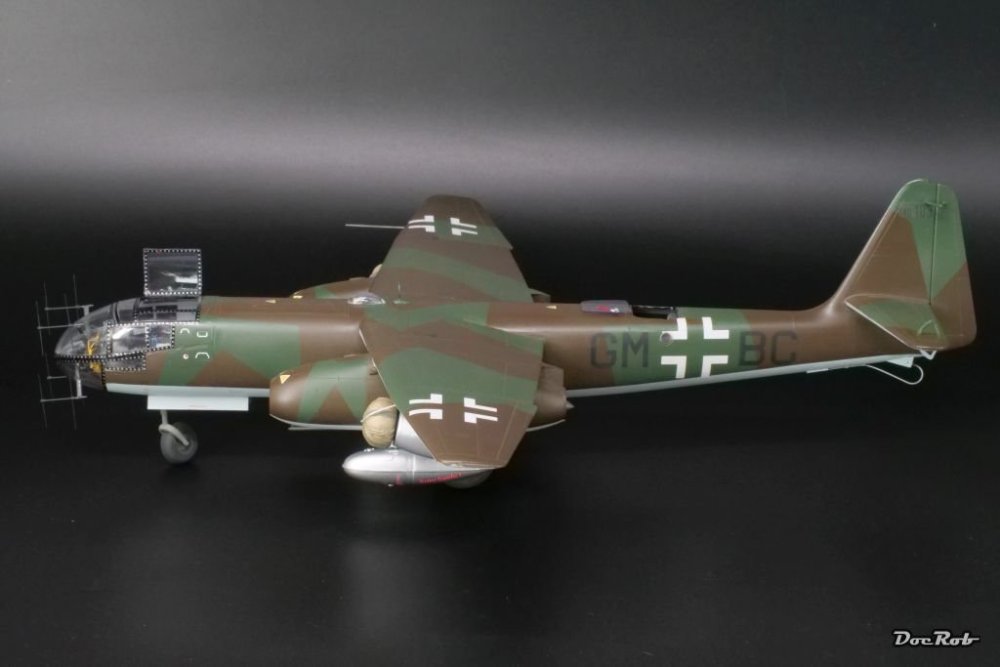
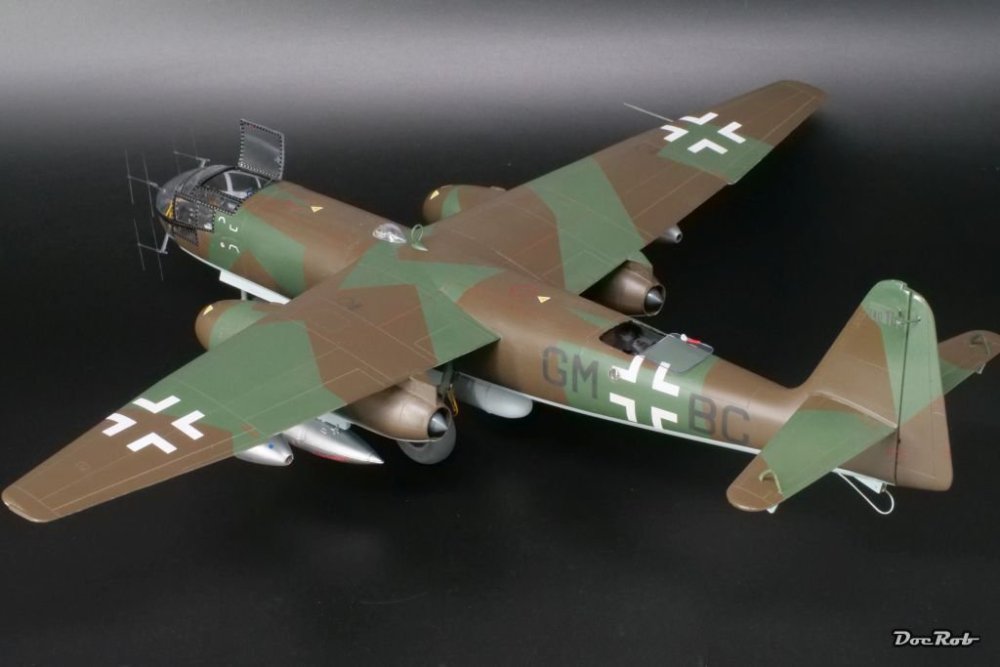
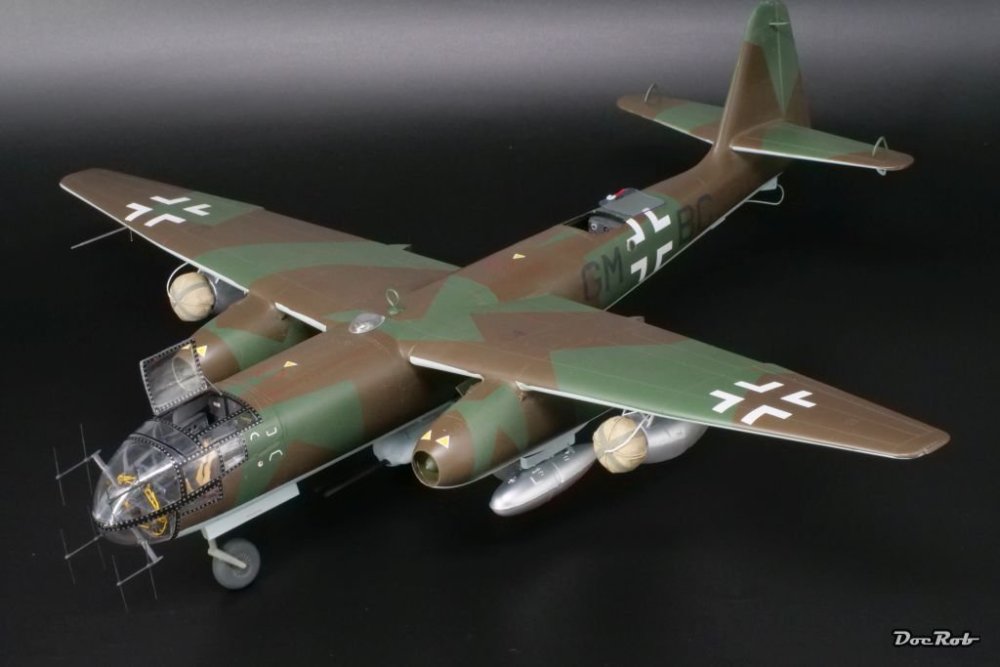
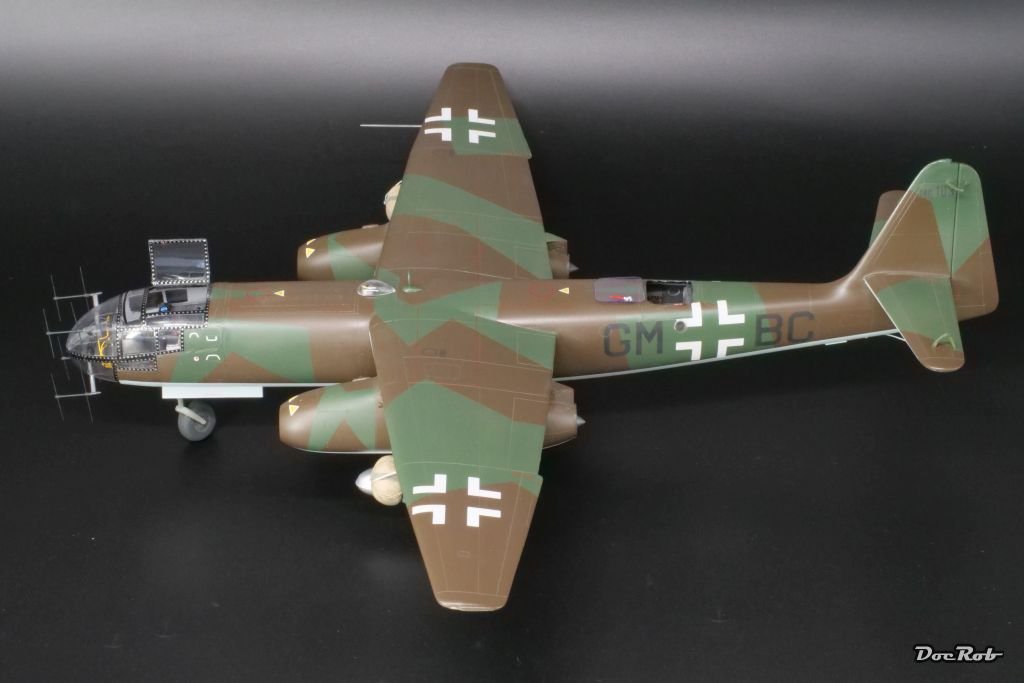
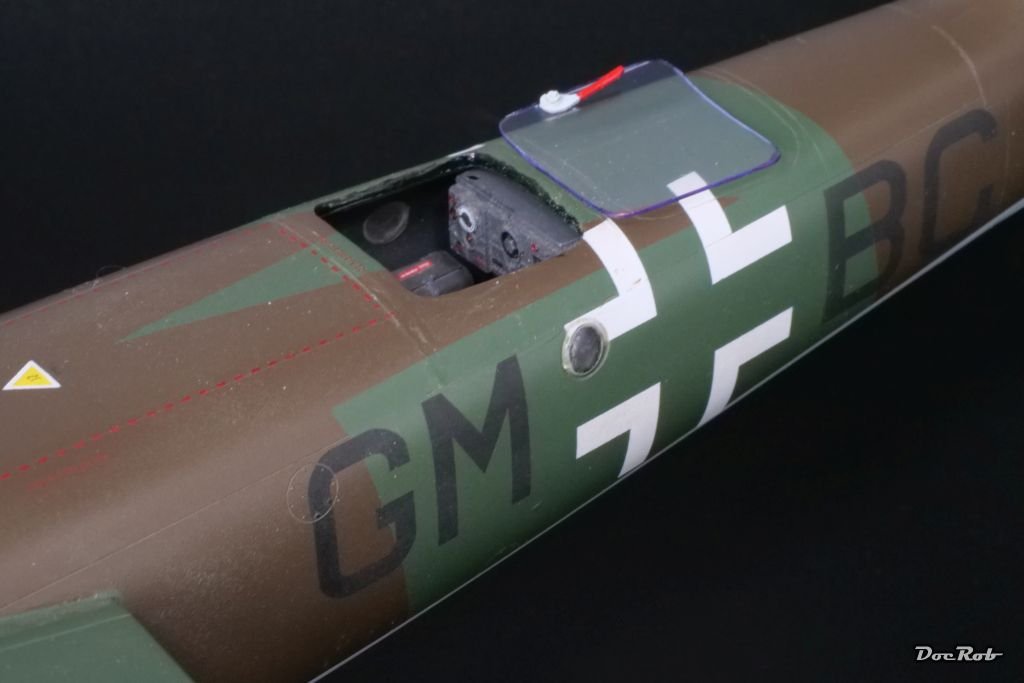
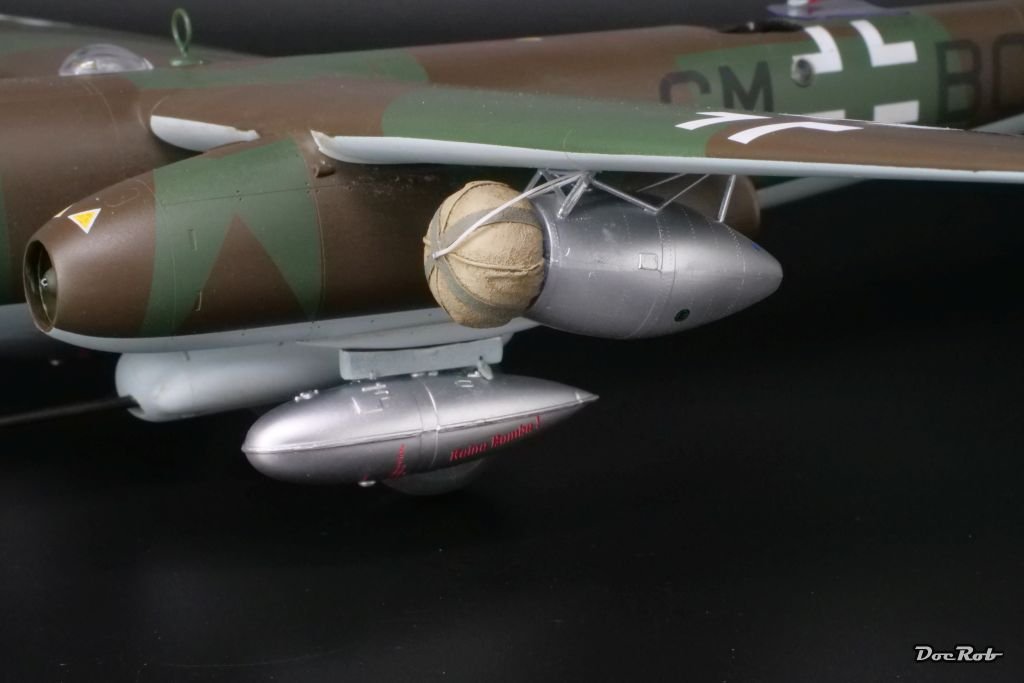
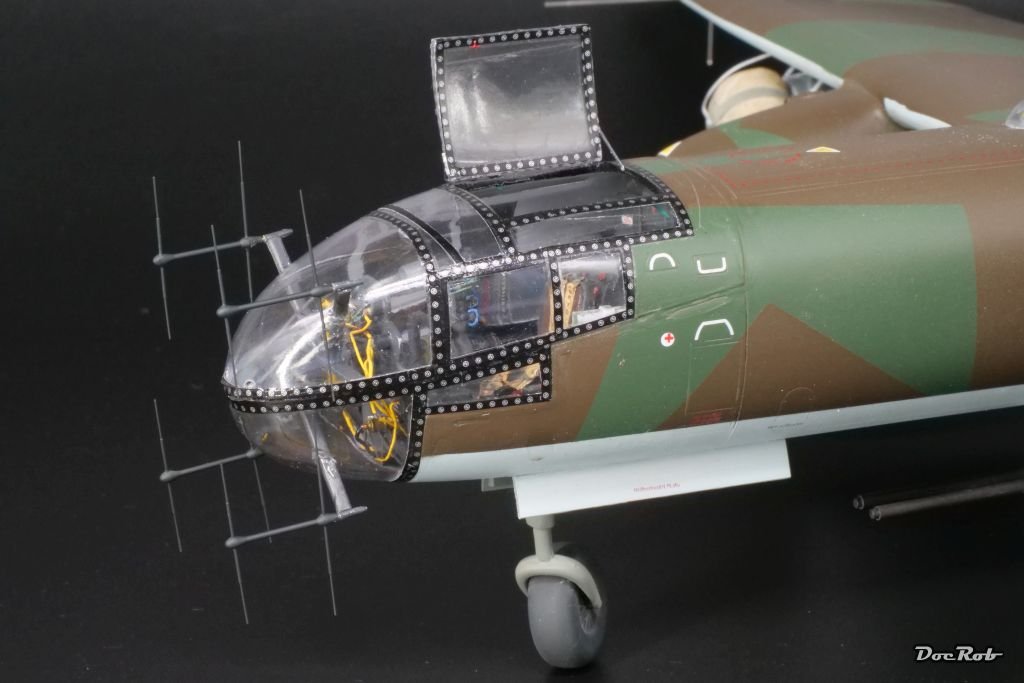
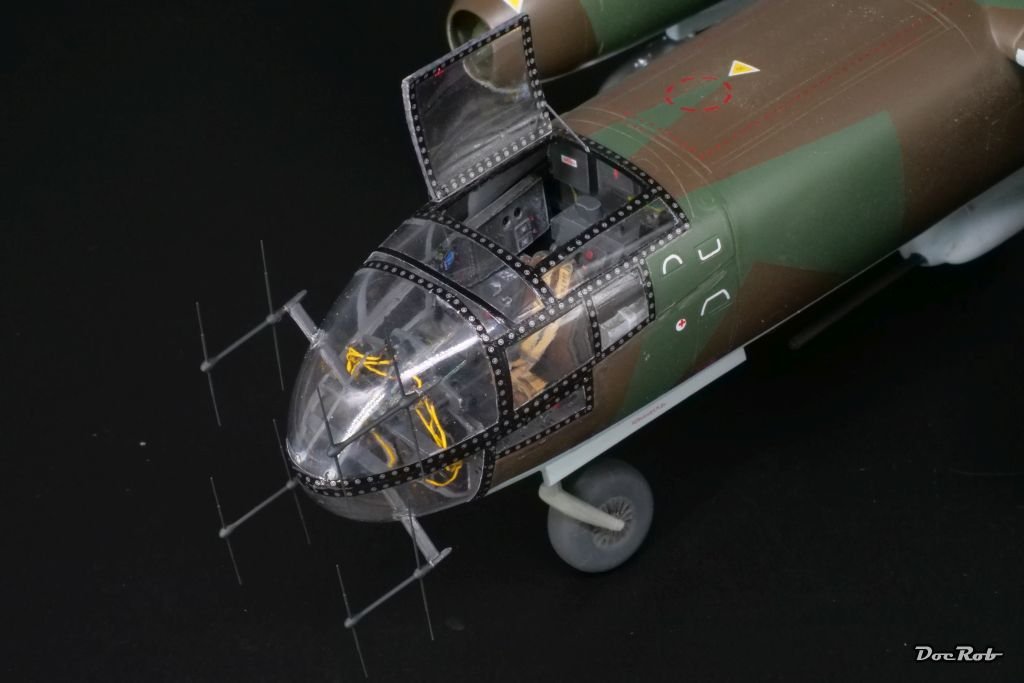
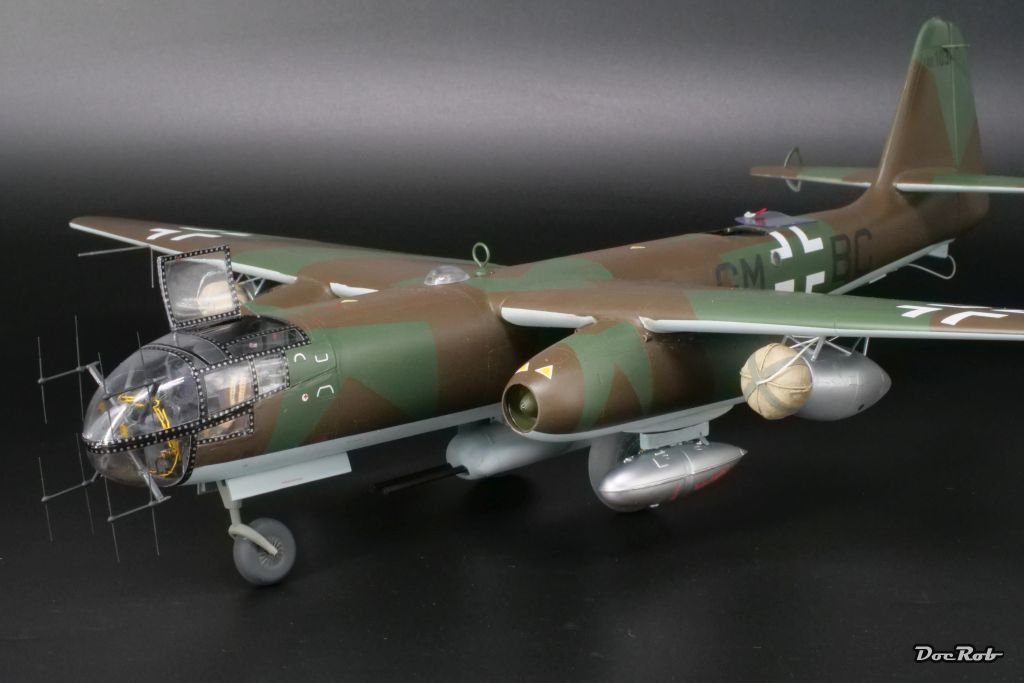
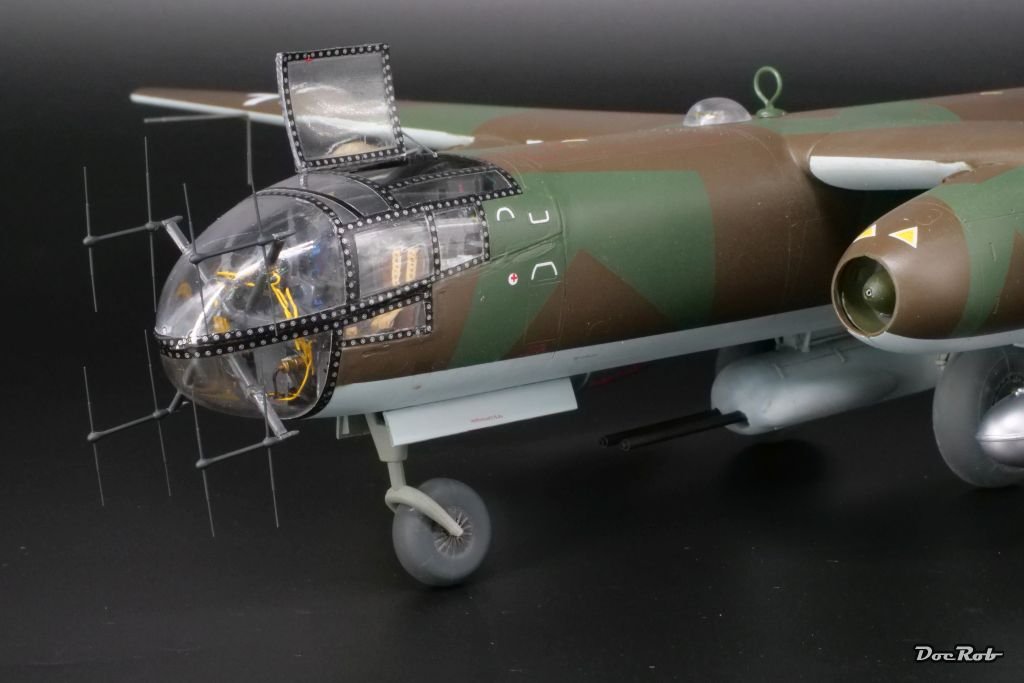
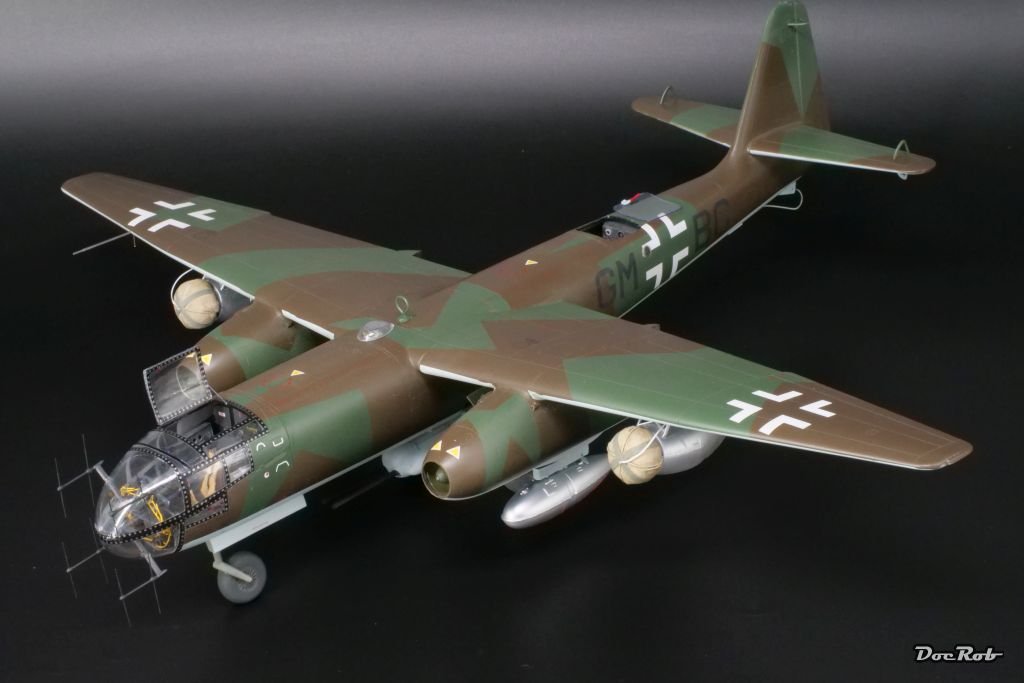
Arado 234 Nachtigall on Speed
DocRob replied to DocRob's topic in LSM 1/35 and Larger Work In Progress
Thank you Peter, it was indeed a long journey and I am relieved that the Arado is done. I started to get a bit careless with the build, a clear sign to close the book. In the end, I like most of the result and I am a bit proud to have pulled through. Cheers Rob -
Arado 234 Nachtigall on Speed
DocRob replied to DocRob's topic in LSM 1/35 and Larger Work In Progress
I call the Nachtigall done . You can find the final pictures under the link below. Cheers Rob -
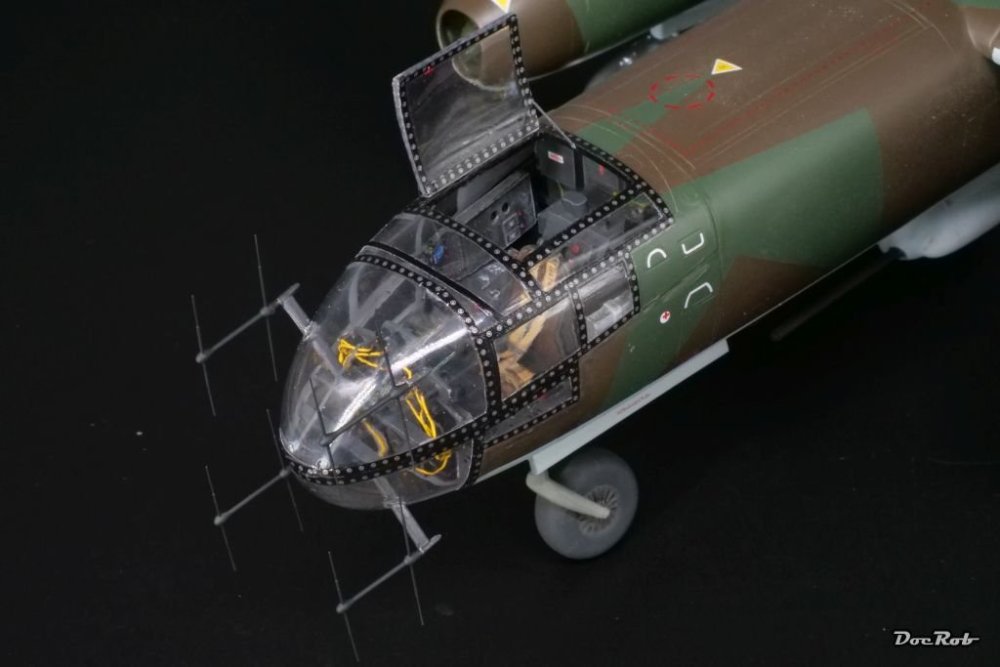
It was a long journey, which started in 2019 and led to two long pauses in the SOD. Nevertheless, I never questioned my desire to finish this demanding build, because of the fascination of the Nachtigall. It is one of those kits, you simply cannot put aside permanently. There is so much detail provided, specially with the resin parts, which are simply stunning. Aftermarket bits where used, namely HGW seatbelts, Master brass antler antennas and Yahu instruments, camo masks from LF and marking and stencil masks from 1ManArmy. You have to be a bit masochistic for this build, mainly around the canopy glazing, which cost me tons of sweat with all that sawing, sanding, drilling, gluing, painting, decaling and these vulnerable pieces are the focal point of this build and there is no margin for errors. I expanded my self torture by wanting the canopy opened, which required surgery. Speaking about errors, I made some, which I will not point out here. If you read through the build log it's there. I'm happy with the result, which of course could have been better, but somewhere you have to draw the line. The kit needed modifications in several areas, mainly to reinforce the landing gear with brass rods for a bit more stability, because the Arado has a hefty weight Cheers Rob