DocRob
-
Posts
7,043 -
Joined
-
Last visited
Content Type
Profiles
Forums
Events
Gallery
Everything posted by DocRob
-

Italeri 1/35 Elco 80' Torpedo Boat PT-596
DocRob replied to Bomber_County's topic in Let’s Get Wet Group Build.
The kit benefits a lot from your scratched details Phil. It's what brings live to a kit, specially such a large one. I have to admit, I love to work with brass, it's a metal with so many positive characteristics for modelling. Cheers Rob -
Have a nice trip into the sun, Bill. The Kingfisher looks beautiful and I don't know which livery I like better, your later one or Peter's yellow winged. It's such an appealing bird, which cries for detailing given the huge glasshouse on top, the possibility of showing the engine, ... Cheers Rob
-
Nice progress Gary, the deck starts to look busy. I like the color dots of the torpedoes, but how they were transported into the tubes, I have no idea, but carrying, I can't imagine. Sailors moving on the deck like drunk in a rough sea, carrying a ton of explosives in their midth, I can't see that. The torpedos have to be lashed somehow to the racks, you don't want to loose one or have it rolling on the deck. Cheers Rob
-
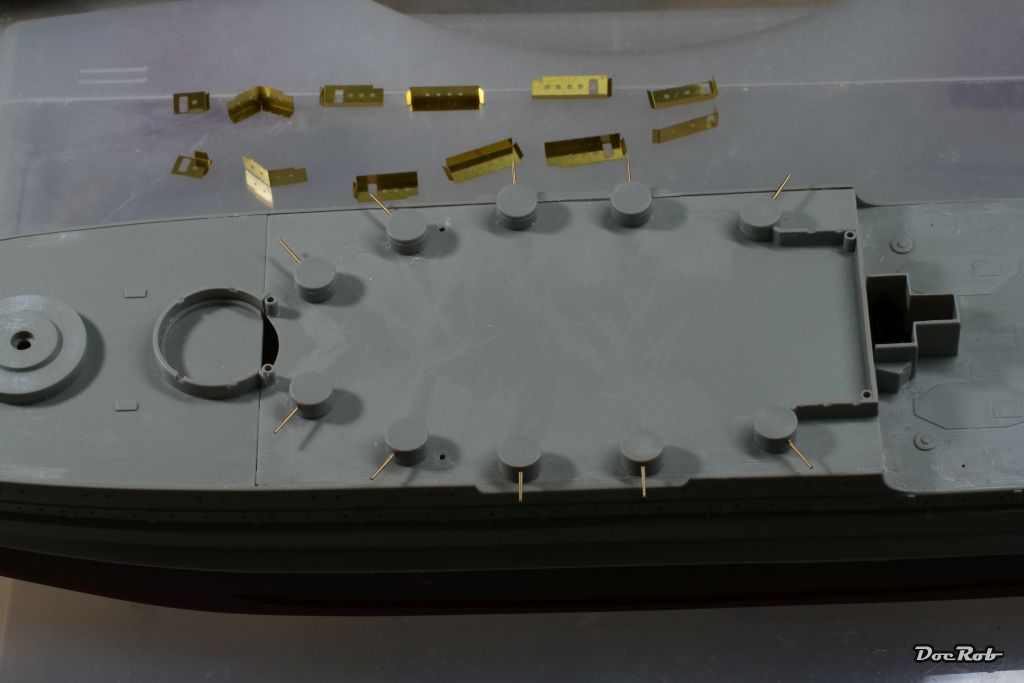
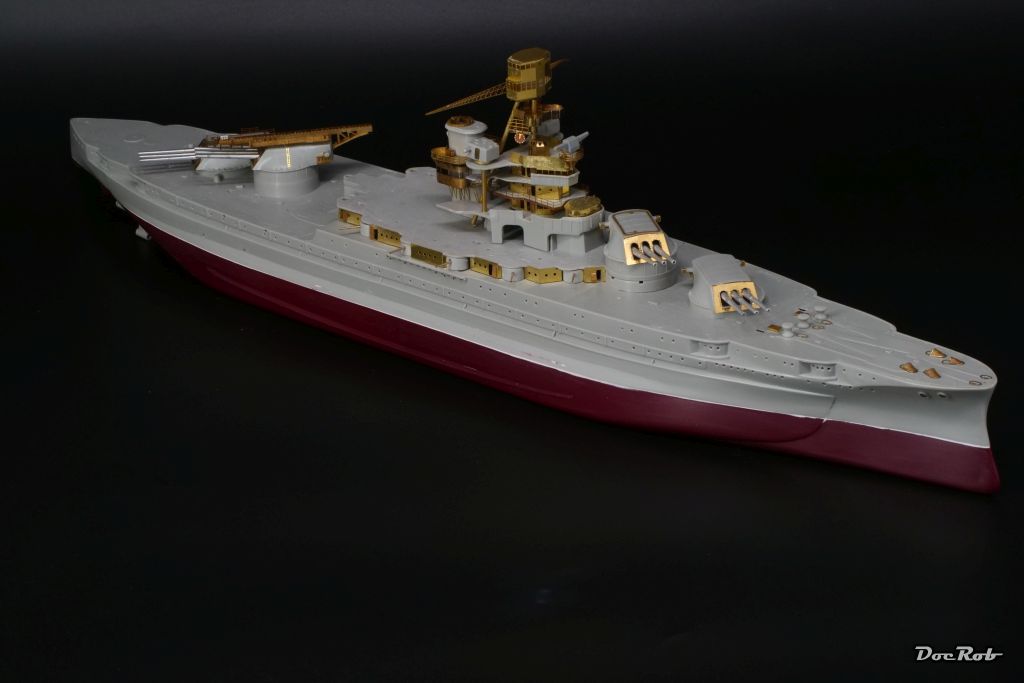
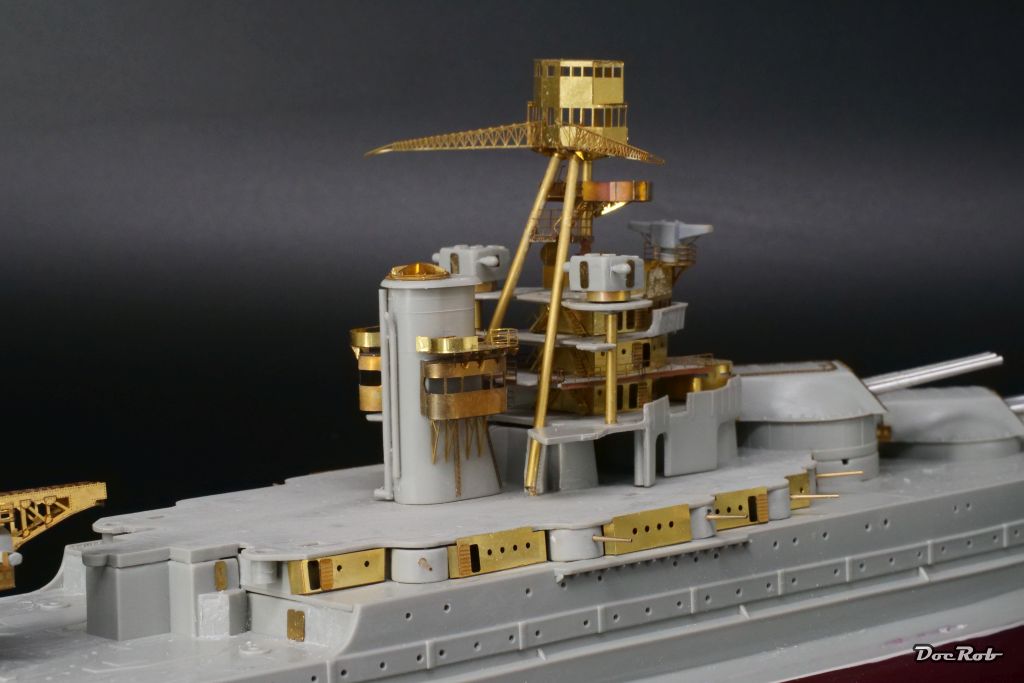
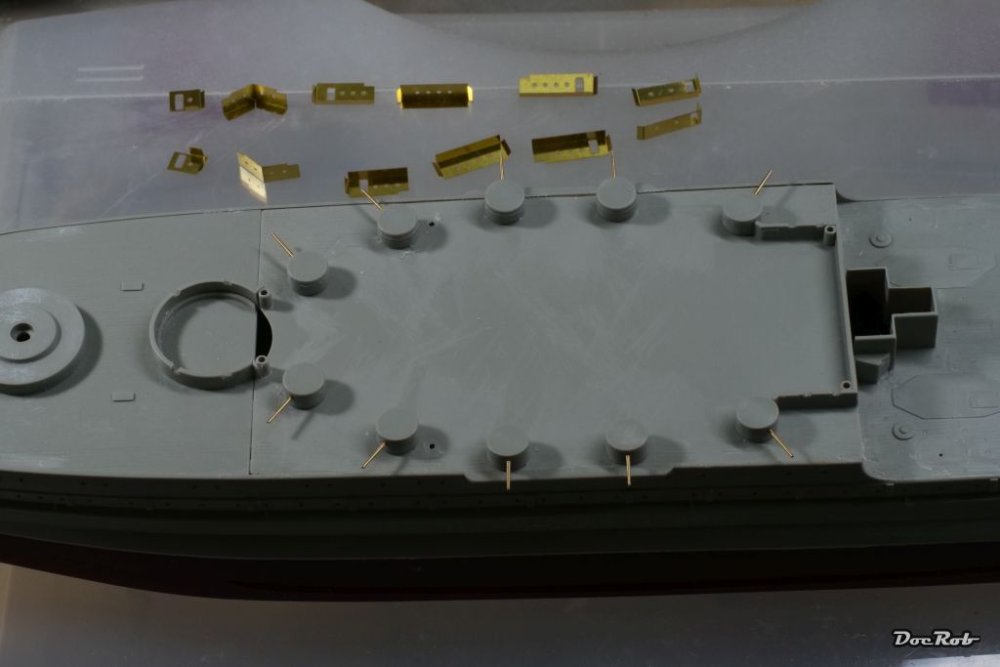
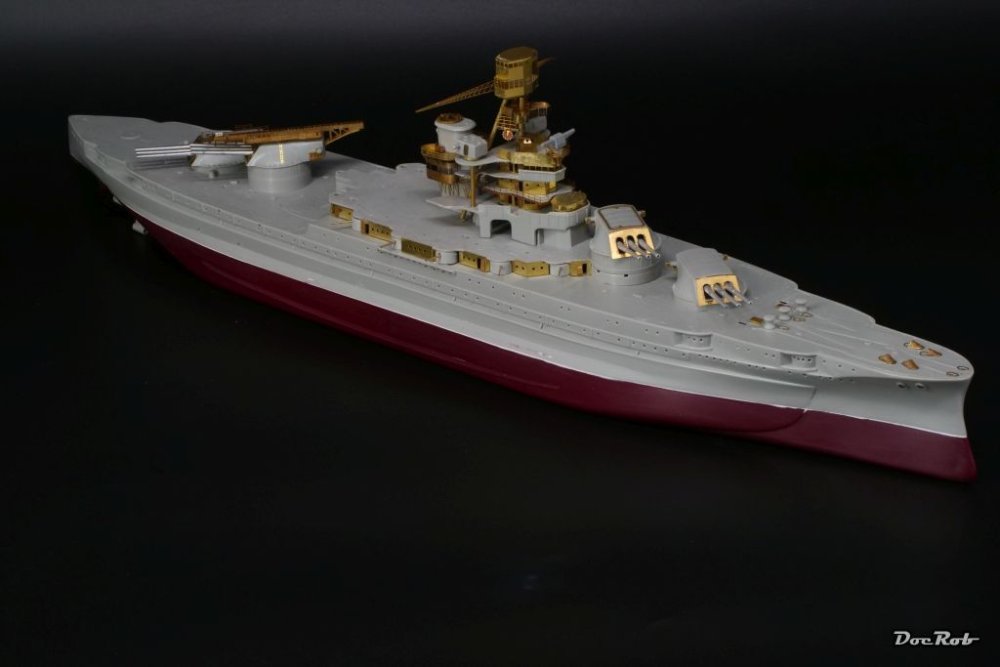
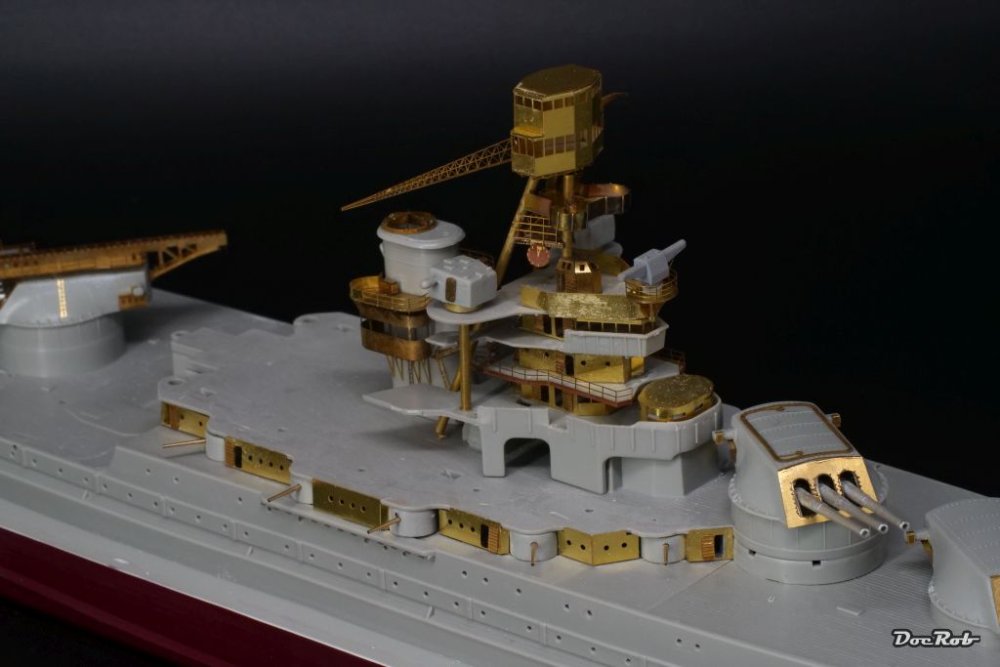
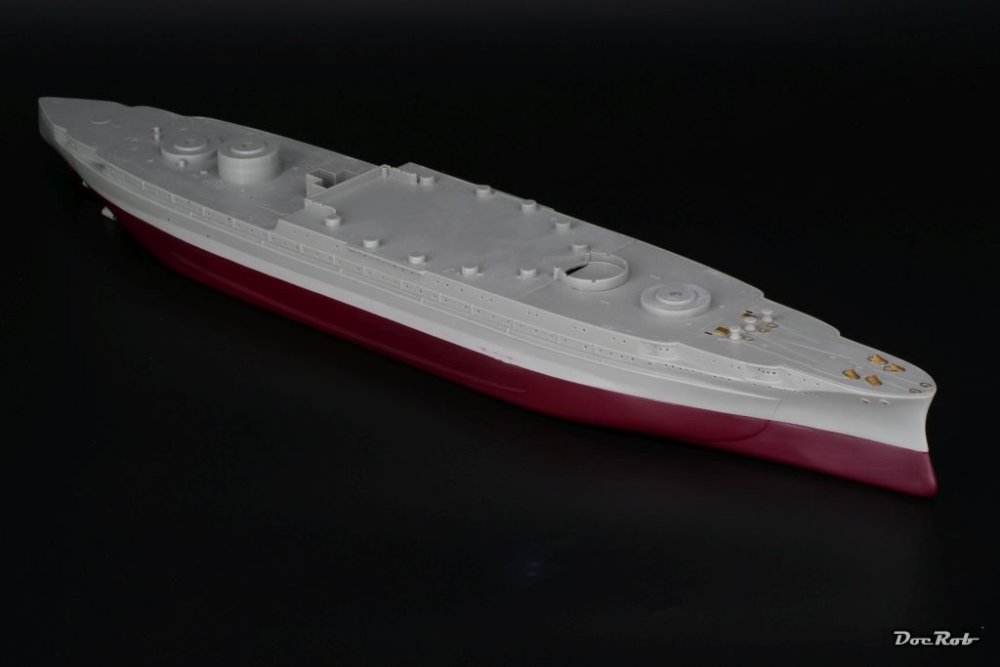
After so many distractions, back to the USS Arizona. I sanded the hull, where the seam of the meeting halves was and it does look good. I will give the final verdict on the Perfect Putty, when primed. Then it was time for the midship artillery and the casemates. I glued the provided metal barrels into 1,1 mm holes and needed to cut away some material on the stubs of the deck, which are casted there for positioning the turrets. The barrels are to long and the guns wouldn't sit flush without cutting the stubs. On reference pics, I found, the middle artillery is mainly directed to the front, which I didn't replicate, because it would have been difficult to insert the casemates PE On the picture you can also see the prepared PE casemates and the deck, where all the plastic was erased. After gluing on the upper deck, the PE-casemates where glued into place and they look so much better, than the plastic with a centerline and halved portholes. I then carefully removed the front superstructure, which stuck unwanted too the deck, due to running CA, some steps before. The wooden deck, was also glued to the plastic deck in these spots and I managed to remove the wooden deck with the help of some large sharp blades, between the decks. Now this is where I am with the Arizona and it looks, like the first priming and painting is not to far ahead. Cheers Rob

- 329 replies
-
- 14
-

-
- uss arizona
- eduard
- (and 1 more)
-
Hearing music together with a good drink or two, is a lot of fun. We sometimes have spontaneous vinyl evenings, with a special theme, like 70's live rock albums, or Jazz icons, ... Cheers Rob
- 329 replies
-
- 3
-
-
- uss arizona
- eduard
- (and 1 more)
-
That's a strange combination as well Gus. I always liked the early Judas Priest stuff, Abba, they do posees the ability to give their songs some special sparkle, other similar bands can't. I still don't like them and have no records from them. I also have some late night records, where my wife would have a very unpleasing look, if she would be with me. Rammstein though, is not one of my favorites, maybe because they sing in German . Cheers Rob
- 329 replies
-
- 3
-
-
- uss arizona
- eduard
- (and 1 more)
-
Got my long awaited Albatros B.II there, which I had backordered. I also backordered the Dolphin, but skipped it, because I have a Camel and a Snipe in stash, both more appealing and therefore more likely to be build. Some other guy got lucky with the Dolphin and I added lots of Aviattic stuff to my order instead. Cheers Rob
- 1 reply
-
- 2
-
-
Transferring mediocre Italeri plastic into something special. Great detailing work with all the PE. Cheers Rob
-
MArtin this will be epic. You did a nice job working on the soso areas of the kit. Hopefully you will soon enter fun mode with the Mossie. I have only the Tamiya one, but will follow closely. So many great pics already. Cheers Rob
-
Thank you Chris, I don't know the ratio of hit and miss with CA, but I guess, unwanted glueing are the majority . I changed to plastic work for a bit and then it will be PE again. I'm really looking forward to have this done and enter the painting stage with the USS Arizona. Don't be so sure about being happy with listening what I'm listening . Yesterday it was the White Stripes, the day before some Off Country and some German Avant-Pop from the 80's. My wife has a wide taste for music, but I can easy overstep her border of tolerance. Luckily, I can hear music as loud as I want in the nighttime, without disturbing anybody, including my wife. I always lived with music and never liked radio, or in other words unwanted information, so for me, vinyl is the way to go, along a good reproduction of the carved information. Cheers Rob
- 329 replies
-
- 4
-
-
- uss arizona
- eduard
- (and 1 more)
-
Exactly Hubert, it's the music that matters finally and mostly, there is no good or bad, except maybe 'German Schlager' or the always same looking and sounding pop bands, produced by some laboratories called labels, which luckily produce more profit, getting their output streamed, rather than cut in vinyl. I was born and risen in West Berlin, this walled bubble of capitalism, run by the French, British and Americans. It was the perfect place to grow up and develop a musical taste. In this strange city, maybe one of the strangest ever, there was everything possible, it was complete freedom, except taking a hike in the countryside. This 24 hours, everything goes, next day nuclear annihilation atmosphere attracted many creative spirits and a way of life, always close to the edge. In my late teens and early twens, the city was boiling with musical influences, through bands/musicans like Iggy Pop, David Bowie, Nick Cave, but not to forget German Bands like Einstürzend Neubauten, which created new sound and many others. My girlfriend in these times used to live in Schönebergs Goltzstraße, one of the epicenters of what was called the 'Szene' (where everything happened). All these guys and many others were not only doing concerts in the famous SO36 or Kant Kino or Quartier Latin, but hanging around in the Bars and Cafes of the area. It was a crazy time, being in the middle of the that drug fueled eye of a creative storm. I never did the drug thing, but black rings under my eyes were a signature these times. A parallel Universum of a anarchistic and hedonistic dark bohemy. There were so many strange places, concerts being played in occupied houses, by bands still to be known, The Tempodrom Circus tent in the middle of nowhere on Potsdamer Platz, a wasteland then, which is now the middle of everything in the new boring Berlin. Later old bunkers or defunct factories served as the breeding place for Techno and the Szene went psycho. I loved these times and sometimes think, I should write down some of my experiences, If I'd be better with words, as this period in the world capital of strangeness is not that well documented. Well, I got carried away a bit, but the cultural melting pot of West Berlin, were the roots of my musical taste. The first records I bought, were Donna Summers Bad Girls and AC/DC's Highway to Hell though . I still own both of them. Cheers Rob
- 329 replies
-
- 7
-
-
- uss arizona
- eduard
- (and 1 more)
-
I'm a little late, entering the party, but really like your work with the Yak. These quirky looking early jets have their charms. Besides the wash accident, everything came together very nice and I'm with Hubert. You spent too much fine work to not have a try at cleaning the mess off. Cheers Rob
-
Good to hear, that you and the Kingfisher survived surgery and all is shaping up again, Peter. Your Kingfisher looks Ab-So-Lute-Ly gorgeous. With the masks off, everything clicks and the colorful bird shines in all it's beauty. Cheers Rob
-
ProModeler 1/48 PBY-5A Catalina + Goodies, RFI
DocRob replied to CANicoll's topic in Let’s Get Wet Group Build.
I know Hubert, my suggestion was not based on the picture, I only remembered, I have this pic and it might be helpful. Cheers Rob -
ProModeler 1/48 PBY-5A Catalina + Goodies, RFI
DocRob replied to CANicoll's topic in Let’s Get Wet Group Build.
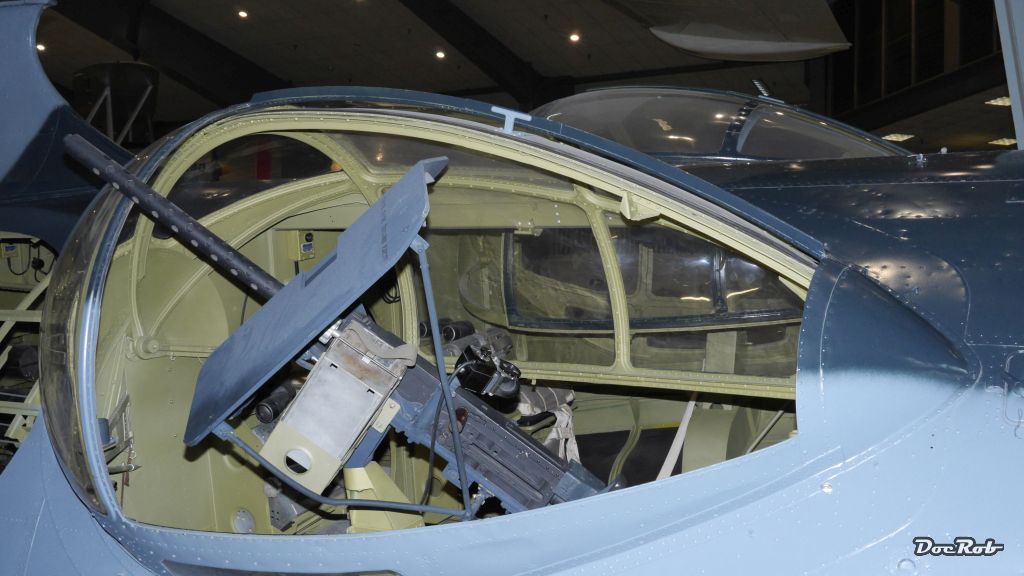
Have you considered leaving the sliding panel away, Chris. In this scale, there maybe is more to win with leaving it off, compared to potentially damage the fixed part of the blister. One of my Catalina pics from NASM Pensacola Cheers Rob
-
Somehow I knew, that there is a certain degrees of crazyness we share, Hubert . Bummer that you lost your equipment to a lost case, but I hope you are still able to enjoy good music with a decent sound. Like you have been, I'm in the better Dacia line as well and feel, that is a very good level of sound quality, you get for your money. Above it's only fractions better per K€. My set is under constant, but not rapid change, I like to stay with proven components and try to max out connections and placing. There is so much room to improve with simple steps, like setting up the loudspeakers according to the room acoustics, where possible. And for some turntables a cheap Ikea rack, made from pressed wooden debris, is the perfect fit, as it is with some of the Rega's, which play better with absorption, than on needle spikes. Of course there is no end in possibilities of spending, and I will keep my feet quite for a while, after the recent purchases, because I want to enjoy the sound without thinking about it. What is a 'retarded teenager' taste, concerning music. I'm all over the field with my tastes from punk to classic, I try to find the cherries on the cake and like in modelling am always searching for new sonic adventures. Only yesterday evening, I had a glass of wine, listening to an older 'Bohren und der Club of Gore'- album and thought, why changing anything it sounds so good right now, but deep inside, I know, the new stuff will teach me better . Thanks about the Arizona Hubert, its good to feel back on track after the delays lately. Cheers Rob
- 329 replies
-
- 4
-
-
- uss arizona
- eduard
- (and 1 more)
-
The black CA is relatively thin Carl, it's the so called 'Black Widow' CA from AK, but it takes forever to cure and doesn't make filling easy, not to note sanding, as it's harder than the surrounding plastic, even if not thoroughly hardened. I will try again with a thin CA on another occasion. The Looper does look great, I have some PE applicators and another wishbone formed one, but mostly I use toothpicks, cut to fit for different purposes. I am crazy, but not that crazy. Room acoustics can be a nightmare and are hard to optimize. I never would cover my walls with egg cartons or the very expensive hifi-equivalents. Luckily my room is sounding ok at least and I may go so far and add a rug for a bit more absorption, but not more. I try to chose my components fitting to the conditions in our living room. I have an idea, which type of turntable this was with your neighbor. You have to check the static of your house first and then your credit card . My equipment has to fit to normal living conditions, I don't want to life in a sound laboratory. On the other hand, I attended a very special Hifi session back in Berlin, where the speakers had heavy bronze tweeters which produced the sound through blue glowing ionized air, no further membrane of any kind was used. I never again had the feeling of living in Archie Shepp's Saxophone. Advanced nerdism is what I call it, but we modeler are completely free of this . Cheers Rob
- 329 replies
-
- 3
-
-
- uss arizona
- eduard
- (and 1 more)
-
Let's see tomorrow Peter, I inspected it a while ago and id did look good. The method of applying under pressure with a gloved finger seemed to have worked. Perfect Putty thins with water and I dabbed the rubber glove into it and rubbed half damp over the seamline. Cheers Rob
- 329 replies
-
- 2
-
-
- uss arizona
- eduard
- (and 1 more)
-
Thank you Mike, indeed, having a peek at the final thing due to some work on the main components, get me started again, after bending and gluing tinier and tinier parts of PE together. What astonishes me with the kit, is the bottom of the underwater ship, it's absolutely flat. I've seen drawing, which indicate this is more or less correct. Where do the builders studied their hydrodynamics other than in the Netherlands or Germanys North Sea Coast, where there is no room under the keel - err - by the way, which keel ? Cheers Rob
- 329 replies
-
- 3
-
-
- uss arizona
- eduard
- (and 1 more)
-
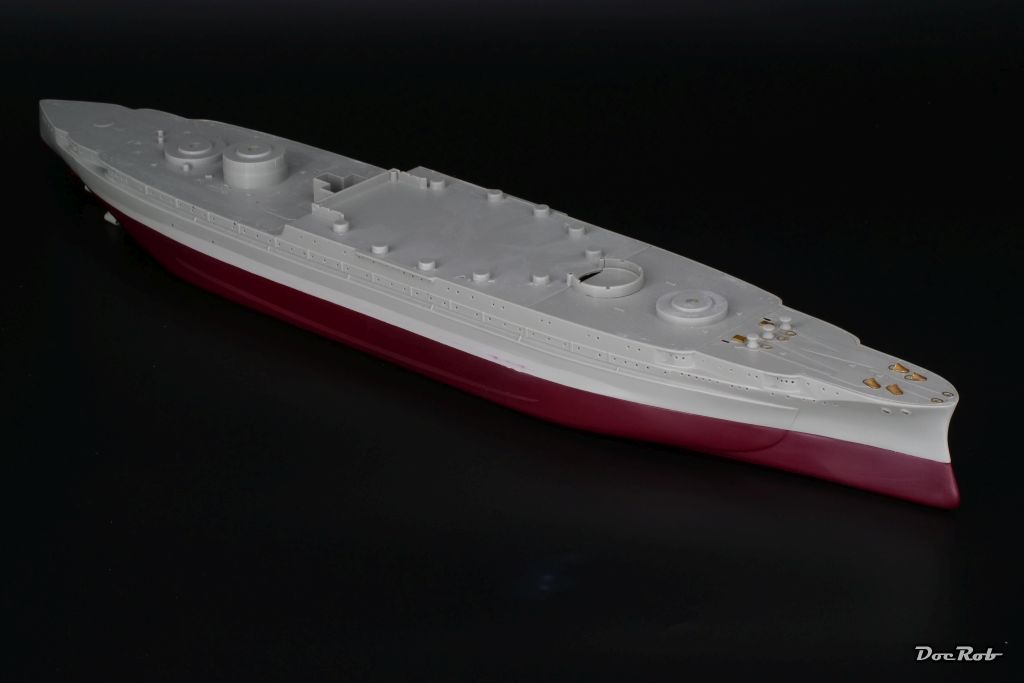
After I glued some nuts into the hull, the upper half of the hull was glued into place. To my astonishment, the fit wasn't bad at all, leaving only a tiny gap. Next, I removed a lot of later to be substituted details from the decks, like ladders, bollards, winches and lifeboat racks, again mostly using a chisel or rounded blades. The fit of the decks was ok, the minimal gaps don't need to be attended, because of the wooden deck, I apply later. I'm not very keen about filling gaps and had mediocre results at best in the past. I decided to try different materials for filling the small gap of the halved hull. Black CA doesn't work for me, as it takes forever to dry and mostly replicates the gap on a slightly risen level. With Green Putty, I was not able to spread the stuff and thrust it equally into the gap. I haven't tried thinning it and will try it another time. Finally I used Perfect Putty, a white past, of which I applied tiny amounts onto the gap and smeared it with my rubber gloved fingers into the gap. First impression was good, but let's see what tomorrow brings, after curing. Last, I build up the middle artillery by cleaning up the housings, cutting off the barrels and insert the supplied brass barrels into 1,1 mm holes, I drilled before and glued them in with CA. Cheers Rob
- 329 replies
-
- 12
-
-
- uss arizona
- eduard
- (and 1 more)
-
That was my thinking, leaving me all the options, before closing the hull. Cheers Rob
- 329 replies
-
- 3
-
-
- uss arizona
- eduard
- (and 1 more)
-
Hehe, I only need the right word to trigger you Peter . Earnestly the tonearm has a finish which strongly reminds me of the times, where camera bodies were heavy duty tools and pieces of art as well along being engineering marvels. There are some similarities between cameras and turntables, at least engineering and precision wise. It always fascinated me, that this micro groove cut in vinyl, contains all the information to replicate a complete symphonic orchestra or every other kind of music and a decent turntable can transform this into a perfect sounding output. The way from the stylus to the ear is complicated and full of obstacles though, which needed to be addressed. You can imagine, it's a madhouse for nerds like me, similar to modeling.. Most people live with digitized media (I do as well) and that's ok, they are handy and can sound absolutely perfect with the right equipment and file quality. With vinyl, there is no easy way to a very good result. You have to test a lot, discuss with people of knowledge and don't let yourself get caught by marketing phrases. I'm still blessed with good hearing abilities, but my ears are not very analytical. I can detect if something sounds right to me or not, but that proved to be enough. Analyzing analogue equipment is a passion to me, but at some point, after changing elements and testing them, it transforms into hearing fun. This is my ultimate goal, enjoying my vinyl at a very high level, without thinking about the how and why. Cheers Rob
- 329 replies
-
- 4
-
-

-
- uss arizona
- eduard
- (and 1 more)
-
Good to hear, that you still have fun with the PE . I'm a bit worn about brass tin origami at the moment, but yours look great. It looks like a compass to me, I think, there is a resin part in the SH offering for that, I have to check. Last year I bought a chisel and now can't think off, how I could have done modeling without it, it's such a versatile tool. At least half of the plastic removal with my USS Arizona build was done with it. I have only a 3 mm wide one, but will add other sizes as well. If kept sharp and pushed square, they produce nearly finished surfaces. Actually the chisel was my personal tool of the year in 2022 with some harsh competition, but won easily. Cheers Rob
-
Tamiya F4F-4 built as FM-1 Wildcat - 1/48 - FINISHED
DocRob replied to Landlubber Mike's topic in Non LSM 'WIP
Thanks for the clarification Mike, there are some interesting points in what you and Peter pointing out here. I may use a bigger needle next time and blow it free with higher pressure before starting. I always spray a drop of thinner through the AB before using the mixed color. On my gauge, the difference between spraying and non spraying is not that visible, it changes only a fraction due to the compensating air tank. Cheers Rob -
Like Gary said +1 Cheers Rob