DocRob
-
Posts
7,127 -
Joined
-
Last visited
Content Type
Profiles
Forums
Events
Gallery
Everything posted by DocRob
-
The black CA is relatively thin Carl, it's the so called 'Black Widow' CA from AK, but it takes forever to cure and doesn't make filling easy, not to note sanding, as it's harder than the surrounding plastic, even if not thoroughly hardened. I will try again with a thin CA on another occasion. The Looper does look great, I have some PE applicators and another wishbone formed one, but mostly I use toothpicks, cut to fit for different purposes. I am crazy, but not that crazy. Room acoustics can be a nightmare and are hard to optimize. I never would cover my walls with egg cartons or the very expensive hifi-equivalents. Luckily my room is sounding ok at least and I may go so far and add a rug for a bit more absorption, but not more. I try to chose my components fitting to the conditions in our living room. I have an idea, which type of turntable this was with your neighbor. You have to check the static of your house first and then your credit card . My equipment has to fit to normal living conditions, I don't want to life in a sound laboratory. On the other hand, I attended a very special Hifi session back in Berlin, where the speakers had heavy bronze tweeters which produced the sound through blue glowing ionized air, no further membrane of any kind was used. I never again had the feeling of living in Archie Shepp's Saxophone. Advanced nerdism is what I call it, but we modeler are completely free of this . Cheers Rob
- 329 replies
-
- 3
-

-
- uss arizona
- eduard
- (and 1 more)
-
Let's see tomorrow Peter, I inspected it a while ago and id did look good. The method of applying under pressure with a gloved finger seemed to have worked. Perfect Putty thins with water and I dabbed the rubber glove into it and rubbed half damp over the seamline. Cheers Rob
- 329 replies
-
- 2
-
-
- uss arizona
- eduard
- (and 1 more)
-
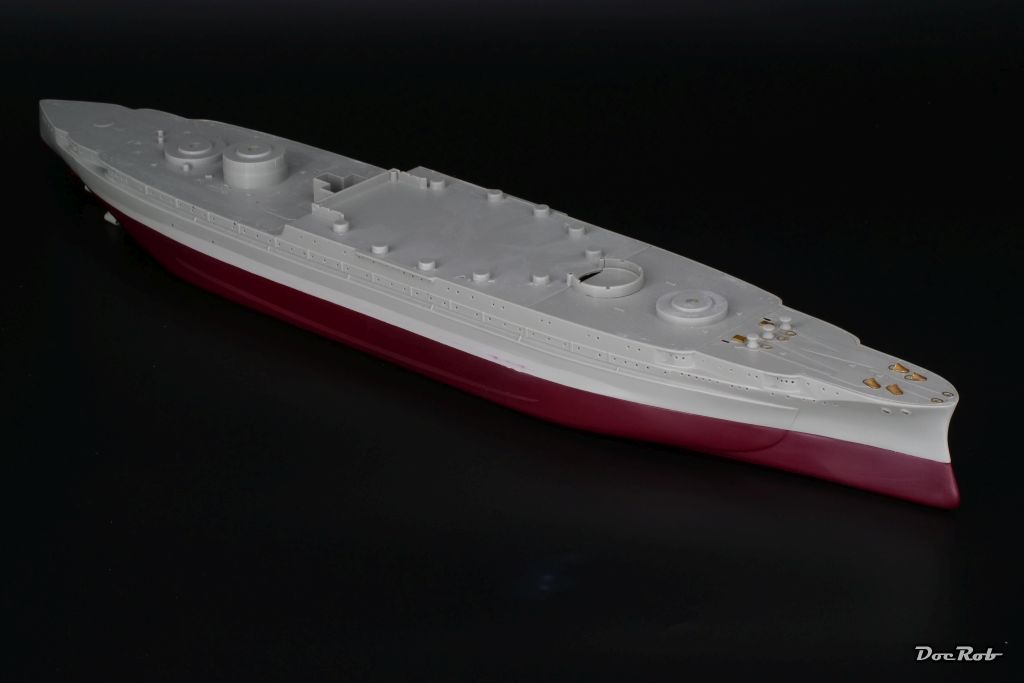
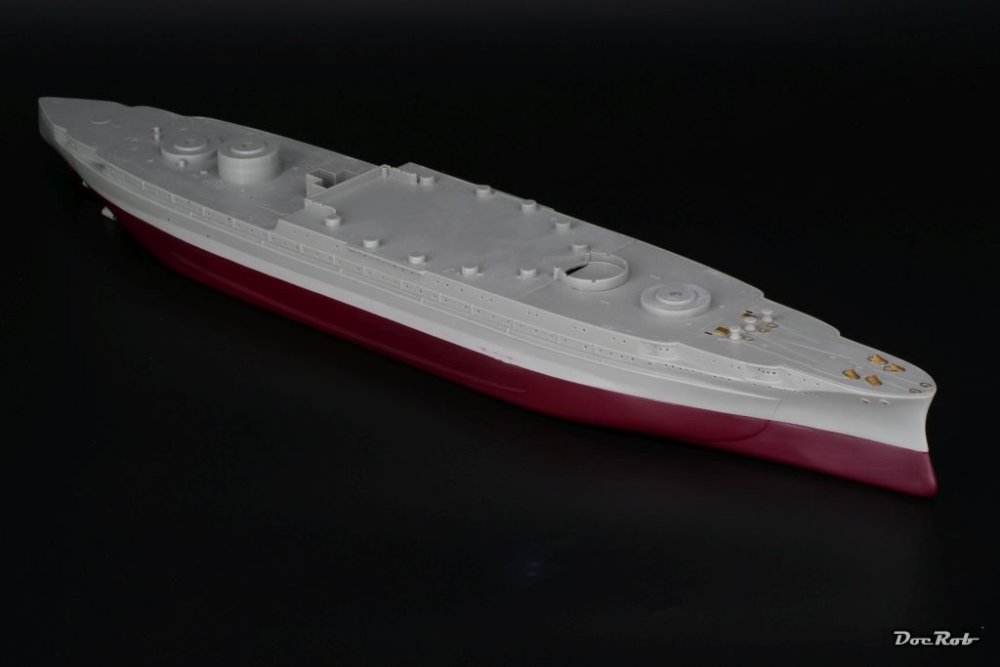
Thank you Mike, indeed, having a peek at the final thing due to some work on the main components, get me started again, after bending and gluing tinier and tinier parts of PE together. What astonishes me with the kit, is the bottom of the underwater ship, it's absolutely flat. I've seen drawing, which indicate this is more or less correct. Where do the builders studied their hydrodynamics other than in the Netherlands or Germanys North Sea Coast, where there is no room under the keel - err - by the way, which keel ? Cheers Rob
- 329 replies
-
- 3
-
-
- uss arizona
- eduard
- (and 1 more)
-
After I glued some nuts into the hull, the upper half of the hull was glued into place. To my astonishment, the fit wasn't bad at all, leaving only a tiny gap. Next, I removed a lot of later to be substituted details from the decks, like ladders, bollards, winches and lifeboat racks, again mostly using a chisel or rounded blades. The fit of the decks was ok, the minimal gaps don't need to be attended, because of the wooden deck, I apply later. I'm not very keen about filling gaps and had mediocre results at best in the past. I decided to try different materials for filling the small gap of the halved hull. Black CA doesn't work for me, as it takes forever to dry and mostly replicates the gap on a slightly risen level. With Green Putty, I was not able to spread the stuff and thrust it equally into the gap. I haven't tried thinning it and will try it another time. Finally I used Perfect Putty, a white past, of which I applied tiny amounts onto the gap and smeared it with my rubber gloved fingers into the gap. First impression was good, but let's see what tomorrow brings, after curing. Last, I build up the middle artillery by cleaning up the housings, cutting off the barrels and insert the supplied brass barrels into 1,1 mm holes, I drilled before and glued them in with CA. Cheers Rob
- 329 replies
-
- 12
-
-
- uss arizona
- eduard
- (and 1 more)
-
That was my thinking, leaving me all the options, before closing the hull. Cheers Rob
- 329 replies
-
- 3
-
-
- uss arizona
- eduard
- (and 1 more)
-
Hehe, I only need the right word to trigger you Peter . Earnestly the tonearm has a finish which strongly reminds me of the times, where camera bodies were heavy duty tools and pieces of art as well along being engineering marvels. There are some similarities between cameras and turntables, at least engineering and precision wise. It always fascinated me, that this micro groove cut in vinyl, contains all the information to replicate a complete symphonic orchestra or every other kind of music and a decent turntable can transform this into a perfect sounding output. The way from the stylus to the ear is complicated and full of obstacles though, which needed to be addressed. You can imagine, it's a madhouse for nerds like me, similar to modeling.. Most people live with digitized media (I do as well) and that's ok, they are handy and can sound absolutely perfect with the right equipment and file quality. With vinyl, there is no easy way to a very good result. You have to test a lot, discuss with people of knowledge and don't let yourself get caught by marketing phrases. I'm still blessed with good hearing abilities, but my ears are not very analytical. I can detect if something sounds right to me or not, but that proved to be enough. Analyzing analogue equipment is a passion to me, but at some point, after changing elements and testing them, it transforms into hearing fun. This is my ultimate goal, enjoying my vinyl at a very high level, without thinking about the how and why. Cheers Rob
- 329 replies
-
- 4
-
-

-
- uss arizona
- eduard
- (and 1 more)
-
 Good to hear, that you still have fun with the PE . I'm a bit worn about brass tin origami at the moment, but yours look great. It looks like a compass to me, I think, there is a resin part in the SH offering for that, I have to check. Last year I bought a chisel and now can't think off, how I could have done modeling without it, it's such a versatile tool. At least half of the plastic removal with my USS Arizona build was done with it. I have only a 3 mm wide one, but will add other sizes as well. If kept sharp and pushed square, they produce nearly finished surfaces. Actually the chisel was my personal tool of the year in 2022 with some harsh competition, but won easily. Cheers Rob
 -
Tamiya F4F-4 built as FM-1 Wildcat - 1/48 - FINISHED
DocRob replied to Landlubber Mike's topic in Non LSM 'WIP
Thanks for the clarification Mike, there are some interesting points in what you and Peter pointing out here. I may use a bigger needle next time and blow it free with higher pressure before starting. I always spray a drop of thinner through the AB before using the mixed color. On my gauge, the difference between spraying and non spraying is not that visible, it changes only a fraction due to the compensating air tank. Cheers Rob -
Like Gary said +1 Cheers Rob
-
1:32nd scale Fokker E.IV
DocRob replied to sandbagger's topic in WW1 1/48 and larger Ready for Inspection
Fantastic work Mike, as always. Cheers Rob -
1:32nd scale Halberstadt Cl.II
DocRob replied to sandbagger's topic in LSM 1/35 and Larger Work In Progress
Your lozenge decaling and cat and devil face markings look absolutely fantastic, Mike. You made me thinking, I have the same Aviattic sets for the wings like you, but always wanted the early scheme A, a Prussian bird with a yellow and blue striped fuselage. This paintjob will not be easy to achieve, as I planned to make it semi transparent, to show the underlying black and white striped livery, phew, I'm shivering, even thinking about it. This maybe is a bit to much for me and I will buy a stippled camo decal set (32208 in my case) as an option and replicate scheme E. I would have to swallow the bitter pill, this being a Bavarian plane and I'm born in Prussia, where there is some 'friction', between the two. Cheers Rob -
Do you get brass blindness like me sometimes Carl? When I work for hours on PE with the magnifier under good lighting, I got caught by the permanent glare and have difficulties to focus . Time for a beer then and some music on the turntable. Cheers Rob
-
The Mine looks great, and I understand your fear about entering the LHS . Cheers Rob
-
ProModeler 1/48 PBY-5A Catalina + Goodies, RFI
DocRob replied to CANicoll's topic in Let’s Get Wet Group Build.
I like the figures in this stage of painting. I'm always astonished, how small these 1/48 buggers are to the un-macroed eye. They will look great with their believable poses. Cheers Rob -
Thanks for the offer Mike, I can't wait to see, how you are proceeding with the interior and all the added detail like the vector engine. The 48 scale Walrus was my firs thought for the GB, as I really like the bird / fish? and I am eager to reproduce some acrylic water and bought some figures to man the Walrus and add a resin dinghy with three downed pilots in it. I haven't looked too deep into the SH box, but I guess the kit is decent, but not easy to build, but maybe easier than the HPH offering. There is a lot of resin included and I will see what fits into the Airfix's frame. Cheers Rob
-
Tamiya F4F-4 built as FM-1 Wildcat - 1/48 - FINISHED
DocRob replied to Landlubber Mike's topic in Non LSM 'WIP
Exactly Mike, that's the stuff. I use about the same mixing ratios like you, but never tried to raise the air pressure that high, because I work comfortably at about 20 PSI normally with all kinds of colors. I will give the GX100 another trying session, because when it doesn't gum up or spider webs, it looks great, better than the easier to work with Tamiya LP-clear or Future / Pledge. Cheers Rob -
Nice Paul, I love these quirky almost steam punk designs. I have a Takom MK. IV kit and helped me to an extra set of tracks, which are one piece links and click together. Takom claims, they are for MK II - MK V and Whippet and Tadpole. I've no idea, if the MK I had different tracks, but I liked to make life a bit easier on these boring redundant jobs. Cheers Rob
-
Nice start Jeroen, the engines look great. You know, there is a 1/32 Kettenkrad out there from Zoukei Mura? 1/32 Sd.Kfz.2 Kettenkrad | Products | ZOUKEI-MURA (zoukeimura.co.jp) Cheers Rob
-
Tamiya F4F-4 built as FM-1 Wildcat - 1/48 - FINISHED
DocRob replied to Landlubber Mike's topic in Non LSM 'WIP
Wow Mike, great display and skillful work to get there. I too love the Atlantic scheme a lot and yours is perfectly rendered. Your persistence with the canopy and clear coat issues payed off, I may have binned the kit. I had similar problems with Mr. Color Clear, I think it was G100 with spider webbing and turning goo in my airbrush. Strangely, it worked before. I don't know, where the problem is with this stuff, but I seem unable to achieve steady results with this stuff. Cheers Rob -
Two little Brewsters, now a Buddy Build.
DocRob replied to Clunkmeister's topic in LSM 1/35 and Larger Work In Progress
What beauty Mike, the Brewster looks absolutely gorgeous and a bit different with the unusual camo. But it's the detail work on the engine and landing gear, which pleases the eye. I always liked the stubby look of the Brewster, like a flying Robusto Cigar . Cheers Rob -
ProModeler 1/48 PBY-5A Catalina + Goodies, RFI
DocRob replied to CANicoll's topic in Let’s Get Wet Group Build.
I've seen these guys a while ago, maybe they are an option Chris. Doolittle Raid April 18, 1942 Part.A, Sabre Model 4802 (2020) (scalemates.com) Cheers Rob -
ProModeler 1/48 PBY-5A Catalina + Goodies, RFI
DocRob replied to CANicoll's topic in Let’s Get Wet Group Build.
Like Gary said, the figures add a lot with the their distinctive poses. Unfortunately the casting quality is so bad, it will be difficult to paint them up well. I guess, there are not so many options out there in 48 scale, with rolled up sleeves. Cheers Rob -
Sorry, double post. Cheers Rob
-
I do use and have used lots of power tools of all types throughout my whole life. The important thing beside the normal safety measurements is, being calm and concentrated and most important, know what you are doing, before you do it. So far, I had only minor incidents with these tools, except one, when I was 17 getting my education as a light engineer and my little finger got caught into a thread on a brass piece turning rapidly on a lathe. I ripped it out, loosing only lots of blood, but not the finger. I still have the brass piece as a reminder and bottle opener. Nice work on the sub Scott, I can feel your pain with all this filling and sanding, but the huge, albeit somehow elegant thing will benefit from the undisturbed shape, I'm sure. Cheers Rob
-
Shaping up nicely Gary. Accuracy might be an issue with the kit, but hey, it's vintage, either you accept it as it is or roll up the sleeves. I would go with option #1, I think . Cheers Rob