DocRob
-
Posts
7,127 -
Joined
-
Last visited
Content Type
Profiles
Forums
Events
Gallery
Everything posted by DocRob
-
 Lots of extra work Mike, with all these ejector pin buggers. I have the same kit in stash and was shaking my head, while examining the fuselage parts. When I build mine, I will check, what will be in sight and only correct these. I also own a Special Hobby Walrus and I think, as I only will build one, I will take some of the resin parts, specially the engine and kit bash a little. Cheers Rob
 -
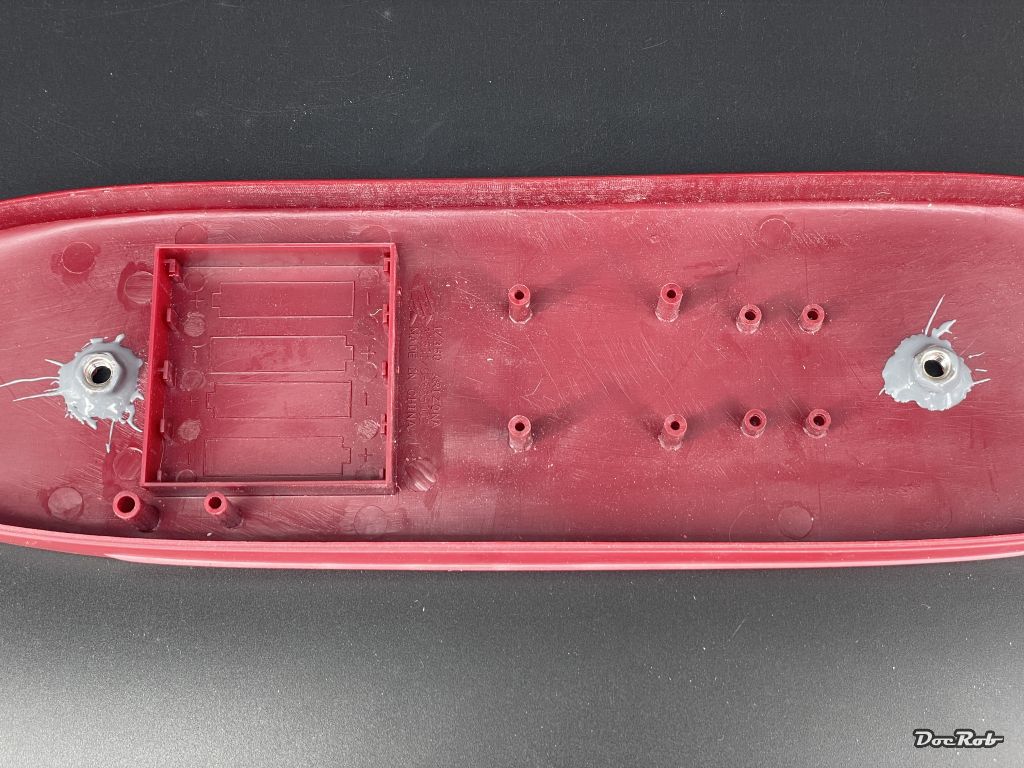
There was almost no progress, as this build is wearing me out a bit and I had my other delicate and cost intensive hobby (passion) in focus. I decided a while ago, it's about time to upgrade my Transrotor Fat Bob-S turntable a bit, a hefty piece of German precision and sheer mass in polished aluminum. The tonearm is a modified Rega one, with better cables and connectors and a more refined counterweight, but it is still a Rega, not bad, but has it's limitations. I ordered a very fine Japanese Sorane tonearm, an engineering masterpiece, looking like it was finished by the same people finishing the good old Nikon F2 cameras or maybe Leicas. My moving magnet pickup is a good one, but I wanted a better fit to the new tonearm (you wouldn't believe the physical backgrounds) and added an also Japanese Phasemation moving coil cartridge to the order. Then I thought, all these precious goodies with my old modified Lehmann phono-pre-amp, no, let's get away from the bit cheeky and unrefined Teutonic sonics and change to another Japanese jewel to amplify the weak signals of the cartridges and ordered a Aurorasound Prima Vida amp, a bit of a quirky design, but should sound exceptional. Last but not least, I had to get rid of the DC residues in my house, which are artefacts, interspersed through our relatively new photovoltaic power system. What's the benefit of a good hifi-system, when nothing good comes in, first. You can imagine, that it took the better part of my freetime the last two weeks, to read, to discuss and to brainstorm about the upgrades. In a few weeks, everything will arrive on my island and then it's testing and installing and adjusting time, which is almost as delicate as assembling the USS Phoenix's PE. Today, finally, I got something done. I drilled two 6,5 mm holes into the hull, to accept screws later, if I decide to use a stand and don't display her in acrylic water. The nuts were glued into the inside with two component epoxy and after everything cured, I glued the top half of the hull onto the lower part and rubber banded and clamped all. Cheers Rob

- 329 replies
-
- 10
-

-
- uss arizona
- eduard
- (and 1 more)
-
Italeri 1/35 Elco 80' Torpedo Boat PT-596
DocRob replied to Bomber_County's topic in Let’s Get Wet Group Build.
Love the razzle dazzle paintjob, Carl suggests. A tiny bit of headache is the price for a truly psychedelic look. Cheers Rob -
Your Kingfisher is a beauty with the decals adding even more contrast to the colorful livery. Glad that everything was good with the repair works in the end. Let's hope the same for your oral treatment, hopefully without that much drilling. All the best my friend. Cheers Rob
-
Muchas gracias hombres, thin CA can be a pain, but I like it a lot, despite it's challenges. The glue I use mainly is from Colle 21, a Spanish company and it bonds very good. The thinness helps sometimes for sealing parts through capillary action, but in the above mentioned case the same quality bit me. I never had imagined that the Ca could run that far. I use a thicker CA as well, but longer curing time makes it hard to use on the tiny bits and pieces. Sometimes I use small dots of thin to fix a part and then glue it properly with the thicker CA. I used the Colle 21 glue for second planking my wooden Duchess of Kingston kit and really liked it there. It is runny and you have to be very disciplined using it, but it bonds fast and secure, which really helped, where no nails should hold the second planking and clamping each section of every plank would have been a nightmare. Cheers rob
- 329 replies
-
- 7
-
-
- uss arizona
- eduard
- (and 1 more)
-
I'm sure you could do it Hubert and as far as there are some of the mentioned miracles available at a good price, I'm in for them . Cheers Rob
- 329 replies
-
- 3
-
-
- uss arizona
- eduard
- (and 1 more)
-
Italeri 1/35 Elco 80' Torpedo Boat PT-596
DocRob replied to Bomber_County's topic in Let’s Get Wet Group Build.
Your PT is shaping up well, Phil. The extra detailing in the bridge section looks great. Cheers Rob -
Sorry to hear, that you and your wife got the big C. Hopefully you will recover soon and without the sometimes happening C-fallout. My wife and me, we both had Corona last year, but interestingly not in the same time frame. We still lived together about normal and did not infect the other, strange. It was like a bad flu, but luckily no back effects on us. Cheers Rob
-
ProModeler 1/48 PBY-5A Catalina + Goodies, RFI
DocRob replied to CANicoll's topic in Let’s Get Wet Group Build.
Tedious job with the masking Chris, but having an Eduard set at hand helps a lot. You mentioned, that you Futurized the canopies. I had some fogging with liquid mask over Future or Pledge in my case, a while ago. The liquid mask was on for a while, but I can't remember which product it was, probably MR Masking Neo. Cheers Rob -
Wow, what a stunner. I don't know about the base kit and it's shortcomings, but yours shows nothing of it. I love these skeletal airframes of the period. The printed cowling looks great and without, it wouldn't have looked Camel enough. Cheers Rob
-
One step forward, two steps back, Peter Cheers Rob
- 329 replies
-
- 3
-
-

-
- uss arizona
- eduard
- (and 1 more)
-
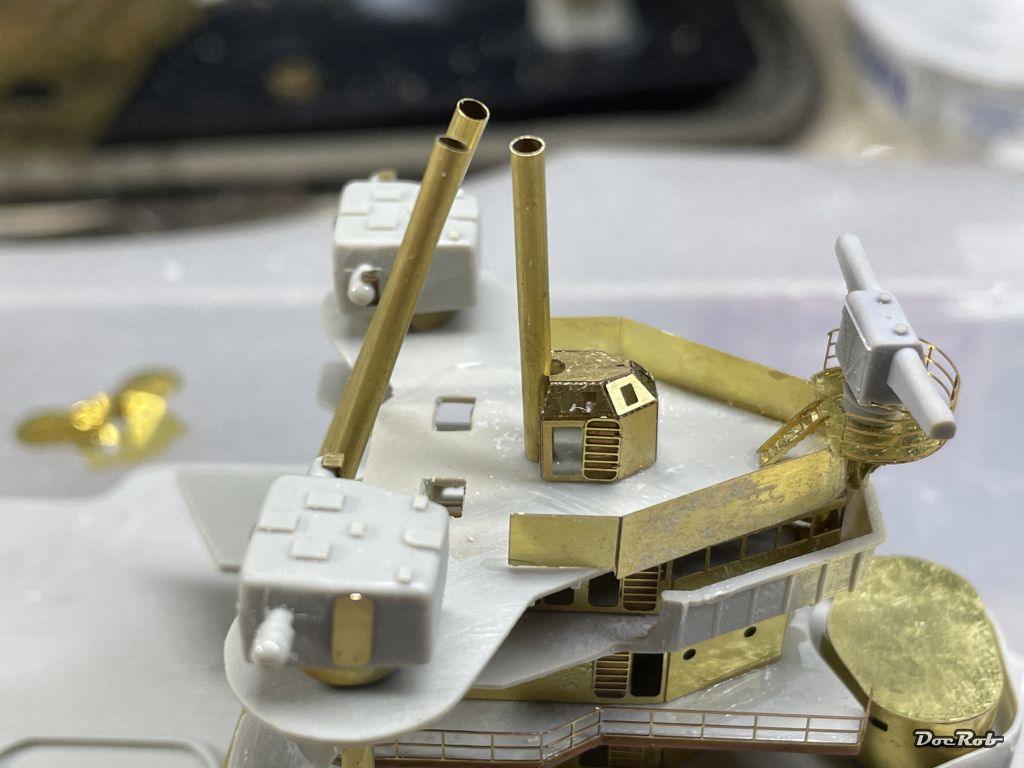
Thank you Mike, after my experiences with the Arizona, I don't think I could do something similar in 1/700. Like you said, lining up different parts is extremely difficult and has to be done numerous times for adjusting everything. For my brass tubes, I used a razor saw and a tiny mitre block with a V-shaped profile. Both are made by JLC, a Polish one man (I guess) company. For smaller diameters, like for reproducing turnbuckles from 0,5 mm brass tube, I sometimes use a scalpel blade, rolling on the tube until it cuts, It's faste, but with the larger diameters, like with USS Arizona's 2 mm, the mitre is the perfect choice. Cheers Rob
- 329 replies
-
- 8
-
-

-
- uss arizona
- eduard
- (and 1 more)
-
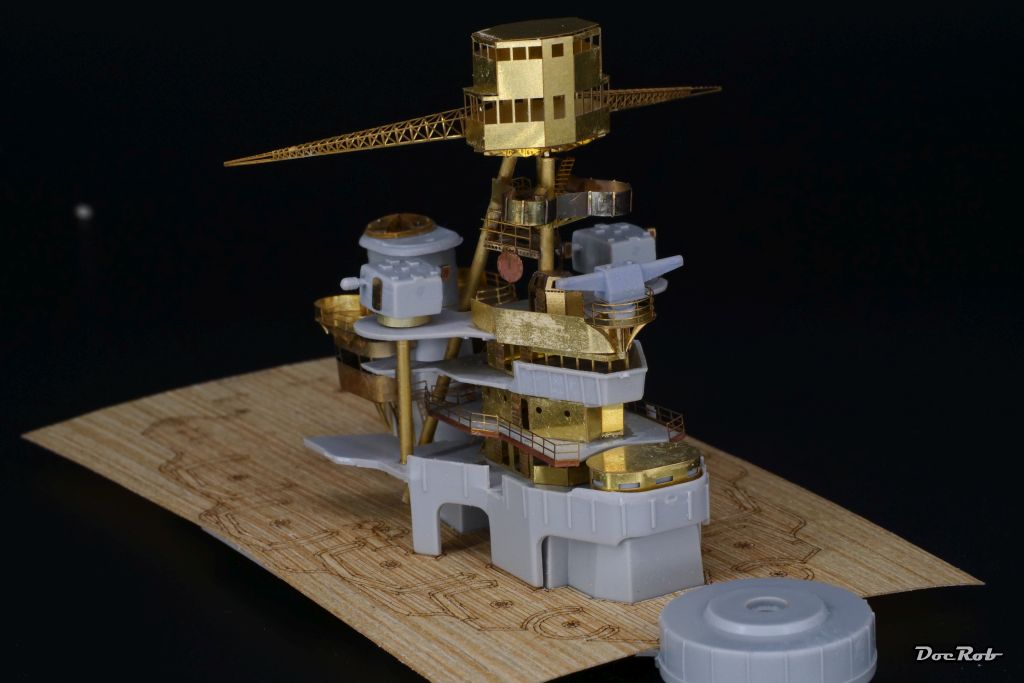
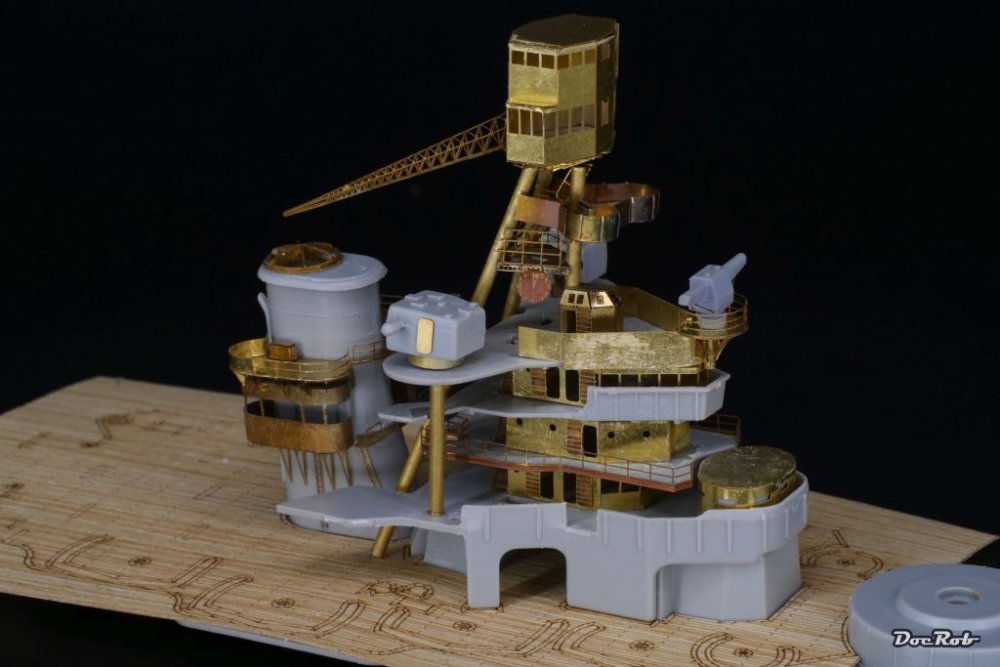
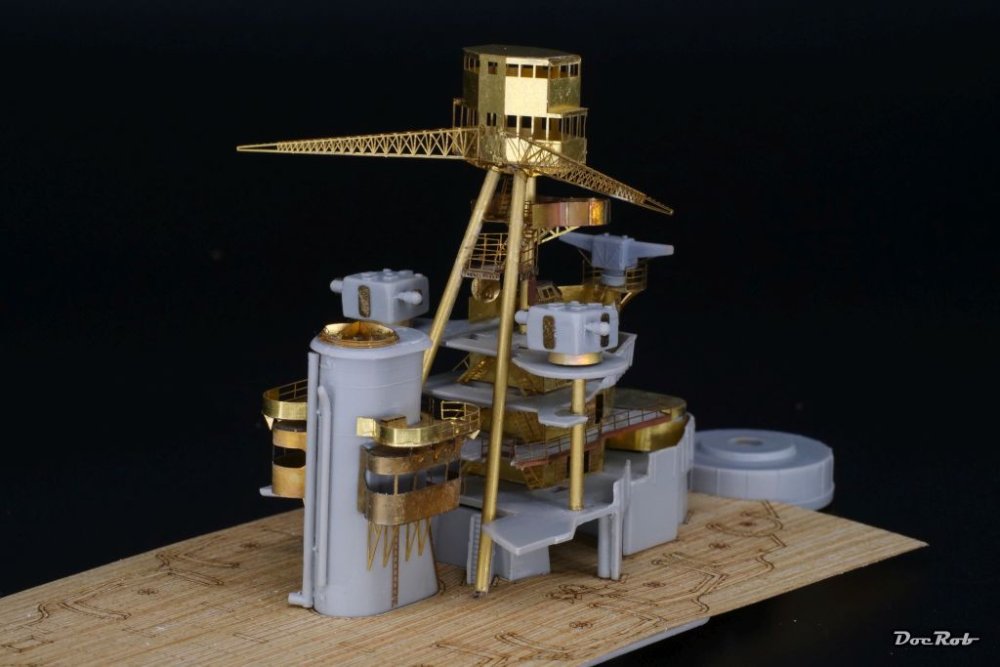
Indeed Gary, physics can be a nightmare, being it gravity with the flying bridge and now capillary with finally assembling them. I had a yeah moment, when I added the mostly finished flying bridge onto the posts, after I added railings, ships clocks and other details and two hours later, that changed into a meehh moment, when I found out, that the capilar effect of the tubes led the CA to flow to the bottom, gravity was involved too, and adhered to my brass rods on the deck. Very bad, because I need to remove the flying bridge alone or with the superstructure for painting, which is not possible anymore. I may have to cut the brass rods carefully and insert new ones . Some angles look a bit strange on the pics, but aren't in reality Cheers Rob

- 329 replies
-
- 11
-
-
- uss arizona
- eduard
- (and 1 more)
-
Nice PE work, Carl, we are sitting in the same boat, literally . Cheers Rob
-
Bummer Peter, I think as well, drilling a hole would be a good idea. I normally use my vise for drilling and drill by hand for more control, but in this case, would use a Dremel and VERY low pressure to not add stress to the brittle material. Take care, not drilling too deep and cause havoc in the interior. Cheers Rob
-
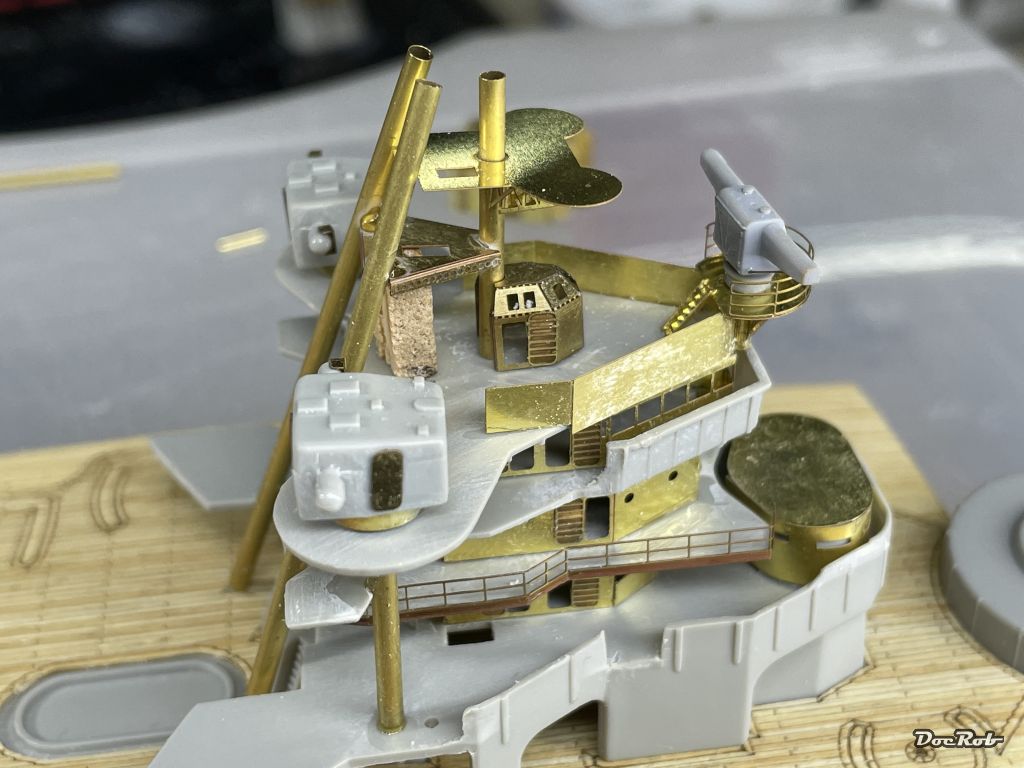
Muchas gracias hombres, building up the PE in itself is not so difficult, but making it fit to the previously cut and grinded plastic is another level of annoyance, even more with the flying bridges, where you have to produce and assemble the brass rods along, a quirky construction. The bad news, there is another craws nest, but I hope it will be a bit easier, because there are location points, where the brass tubes meet the decks. Peter, I more than once looked at my SOD and contemplated about buying a 1/200 IJN Mikasa 1902 kit with some extras. I think it's not only simpler to build, because of the scale, but many structural elements remain in plastic and you have a more solid base for PE adventures. Cheers Rob
- 329 replies
-
- 3
-
-
- uss arizona
- eduard
- (and 1 more)
-
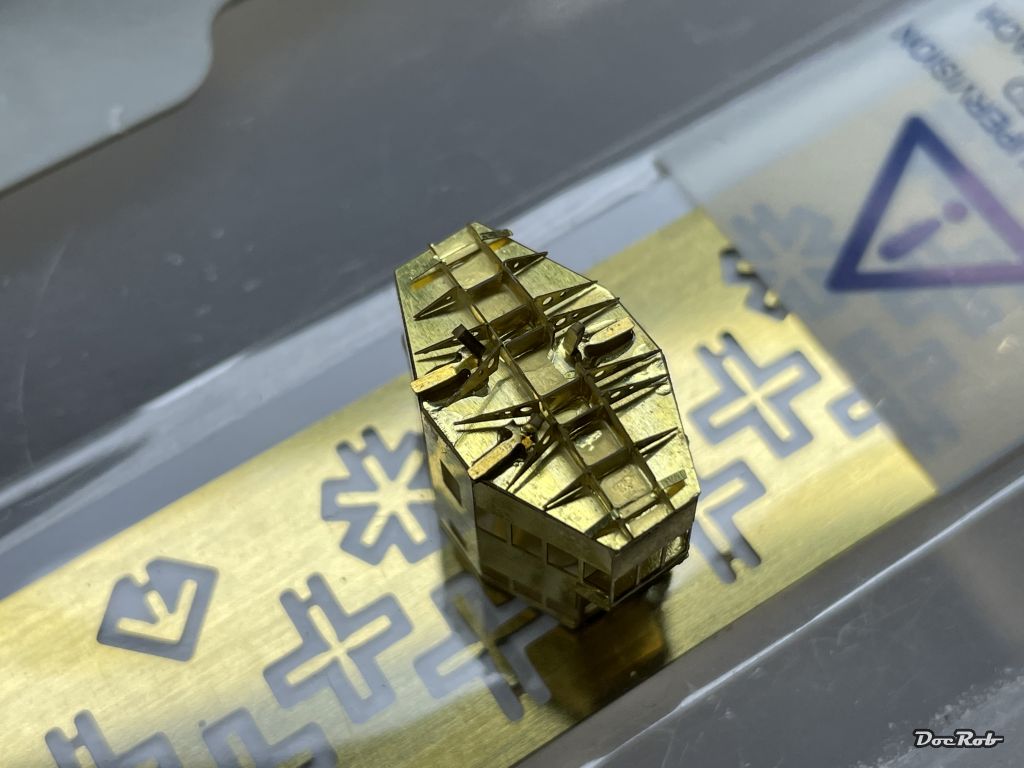
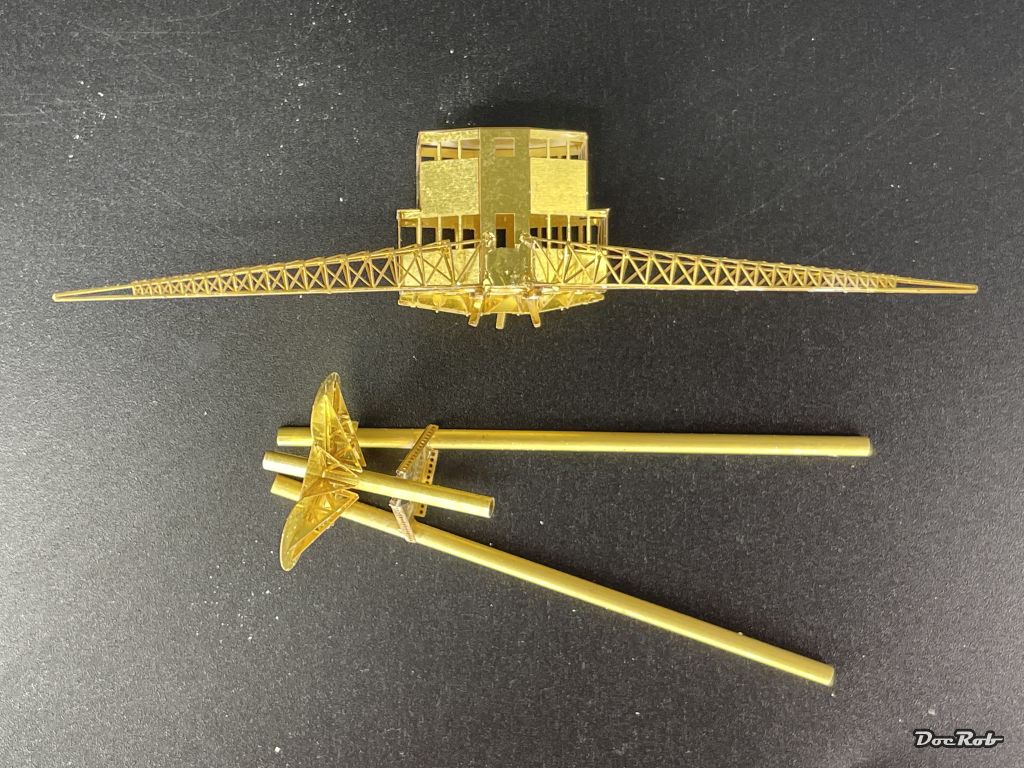
What started a bit crazy, suddenly turns into madness. The flying bridge construction causes a lot of headache, because it is built up with lots of components to align correctly, but even more because it needs to be removable for painting and applying the wooden deck. I cut the brass tubes according to the measurements in the manual, drilled holes into the plastic and wooden deck and glued in short pieces of brass rod for alignment. A third rod was glued into place on the superstructures top deck for the front post. The three tubes are not glued, I only checked, if the mating distances on top were ok, to accept the flying bridge. To enhance the rigidity and add the possibility of wiggle the flying bridge in place, I glued some bent and cut Albion Connecto brass parts into place onto the underside of the flying bridge, that will later accept the brass tubes. Than, I glued the lower brass deck to the front post, added the upper brass deck and when the CA half dried added the back posts and glued them into place. While the CA settled, I bent the whole construction into it's correct shape and after drying, added some more CA from the undersides for rigidity. Needless to say, that during preparation, the construction disintegrated a lot of times, while adjusting . Now I have to finish the flying bridge assembly and then glue it on top of the posts. Cheers Rob


- 329 replies
-
- 14
-
-
-
- uss arizona
- eduard
- (and 1 more)
-
Revell Spitfire Mk II completed
DocRob replied to JohnB's topic in LSM 1/32 and Larger Aircraft Ready for Inspection
Very nice John. Like Phil wrote in the construction log, I just missed it. You build faster, than I'm able to read . The yellow rectangle is like a magnet to the eye, somehow. Cheers Rob -
ProModeler 1/48 PBY-5A Catalina + Goodies, RFI
DocRob replied to CANicoll's topic in Let’s Get Wet Group Build.
Hehe, when it comes close, my situation betters. If the goods arrive on my island, it's a now brainer. The mail woman knows me personally and the transportista knows my name and tax number (always needed here) by heart and leaves packages, where the fire wood is stored or in the second unlocked car. Sometimes, when I'm driving around, either of them honks and I get my parcel wherever that might be. But the steps before, ... It's a good idea to go with the flow with the panel lines and use the fuselage as a template for the tail section, I think. Cheers Rob -
'Falling' together nicely, Gus . Earnestly, great work on the wheel wells and closing the fuselage is always a special moment, a moment without unpleasant surprises in this case, I think. I have a -D version in stash, but I'm not that much of a jet guy, but the Tomcat is one of my favorites, so there is a chance in a not too far future... Meanwhile, I'm following your build and can't wait for more progress. Cheers Rob
-
Thanks Peter, in the moment it's a bit slow processing, due to some delicate alignment sections. the flying bridges resting on brass tubes, which I cut roughly to size and figure, where I have to position brass rods in the decks and superstructure, to have the flying bridge removable for painting. This build is completely about the how and even more important, when. The sequence of building and painting is the determining factor. Cheers Rob
- 329 replies
-
- 3
-
-
- uss arizona
- eduard
- (and 1 more)
-
Luckily there is the hull Chris, other ways, there wouldn't be too much left of the astonishingly low plastic parts count. Above the deck line it is 1/3 plastic, 1/3 PE and 1/3 CA . I will have to restock my CA reserves after this build. I considered soldering, but decided against it, as there is always plastic near or parts which need to be CA-ed. Cheers Rob
- 329 replies
-
- 3
-
-
- uss arizona
- eduard
- (and 1 more)
-
Wow Peter, your Kingfisher reminds me a bit of our Canary birds here, where the belly is yellow instead of the wings . Your tedious masking payed off, the colorful rendition of these early navy planes is somewhat eye catching and a nice distraction from camoed subjects. With the decals on she will be splendid. Cheers Peter
-
1:32nd scale Halberstadt Cl.II
DocRob replied to sandbagger's topic in LSM 1/35 and Larger Work In Progress
Thank you Mike, for showing your great abilities with these birds. Even more so, as you proceed through your subjects, almost following, what I have in stash . Once more, I have to raise my hat for your building and documentation qualities. Cheers Rob -
An interesting plane and the kit looks decent, typical SH, but surely buildable for the more experienced builder, I guess. Thanks for the review Fran, you rolled it out in full detail. The canopy design is interesting, as it allows the instructor (sitting in the back, I presume) to escape the plane without the hassle to open a canopy, in case one of the pupil messes up. Cheers Rob