CrankyCrafstman
-
Posts
1,350 -
Joined
-
Last visited
Content Type
Profiles
Forums
Events
Gallery
Everything posted by CrankyCrafstman
-

Tamiya Mossie build resumed
CrankyCrafstman replied to JohnB's topic in LSM 1/35 and Larger Work In Progress
Hey Rob those rockets look really nice are they still available? Ron G -
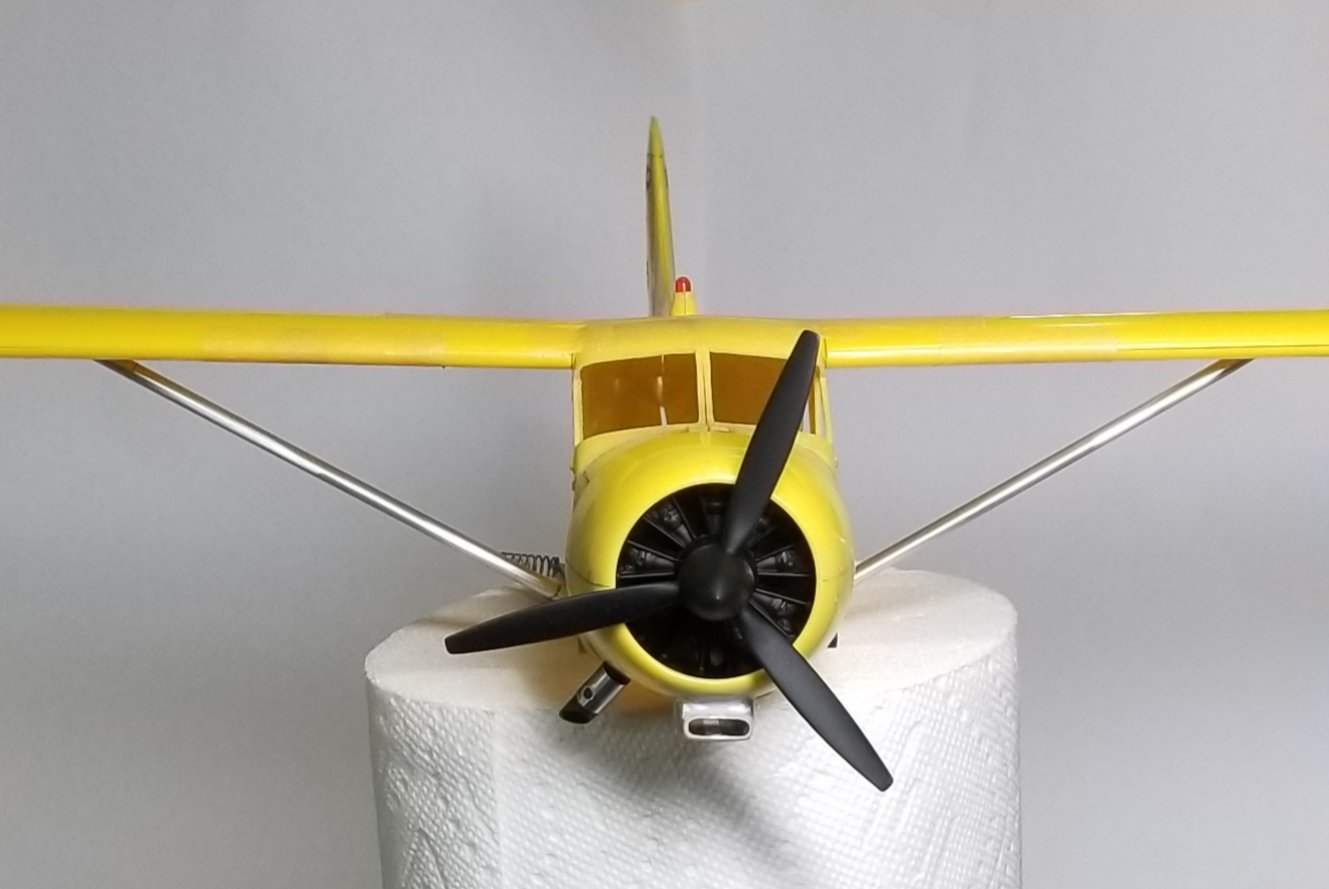
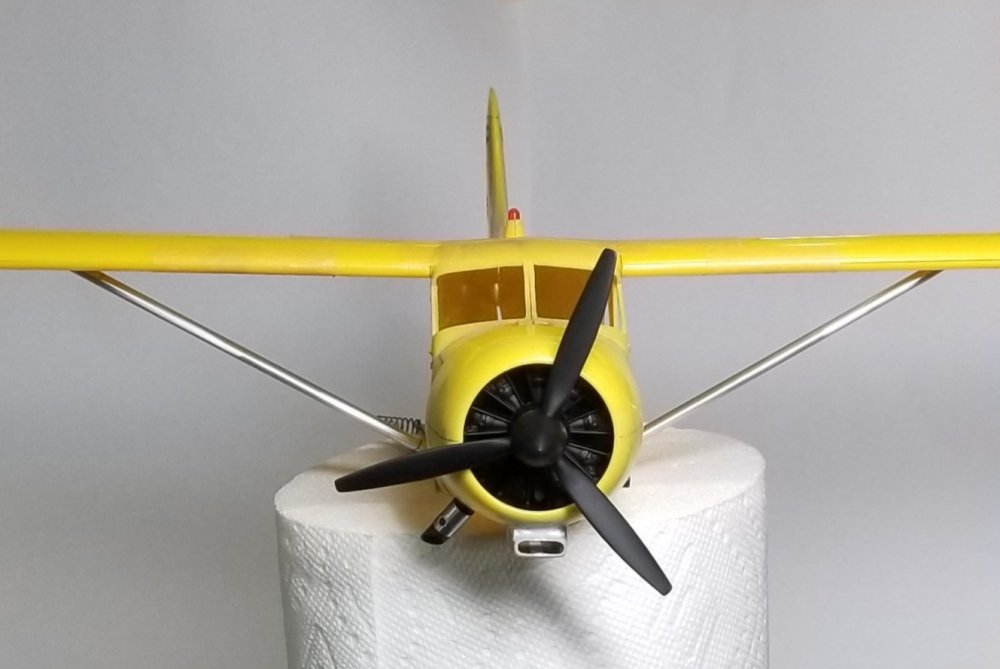
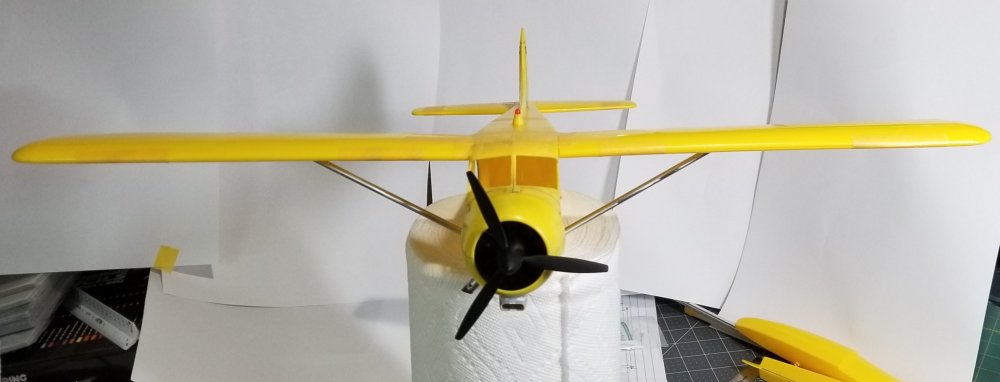
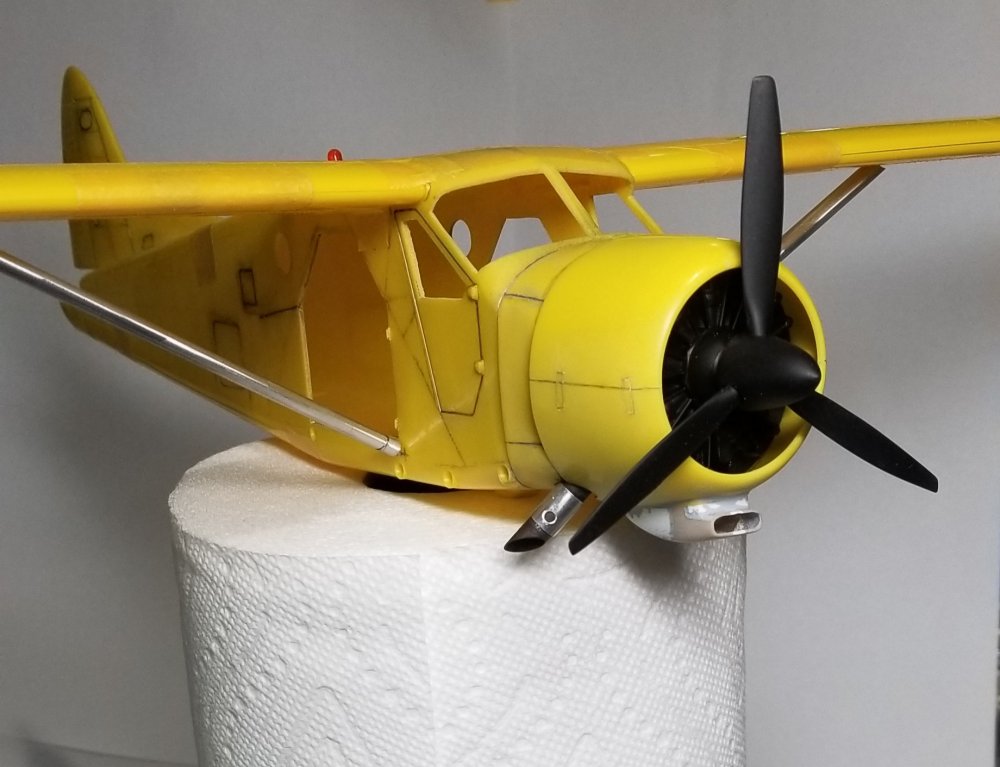
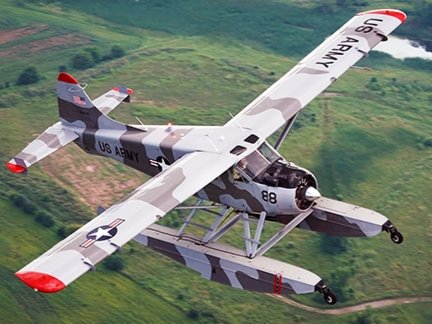
Small update I got the motor and prop primed in black. I got the wing support struts made, I did use the large airfoil the small one looked wrong compared to photos of the real plane. I temporarily assembled it to see how big it is...its BIG! And I don't even have the floats on. front view showing the wing support struts in place veiw showing the tail planes. closer view of the engine and prop I'm kind o leaning towards something like this for a paint scheme. What do you guys think? Ron G
-
Congrats Grandpa Harv
-
Hey bill don't forget to drill out the little rings at tge bottom of the main landing gear, just be careful and keep drill centered. Check out my posts on those gear to see were I had to add a reinforcement to the leg. It's in the "J" review. Ron G
-
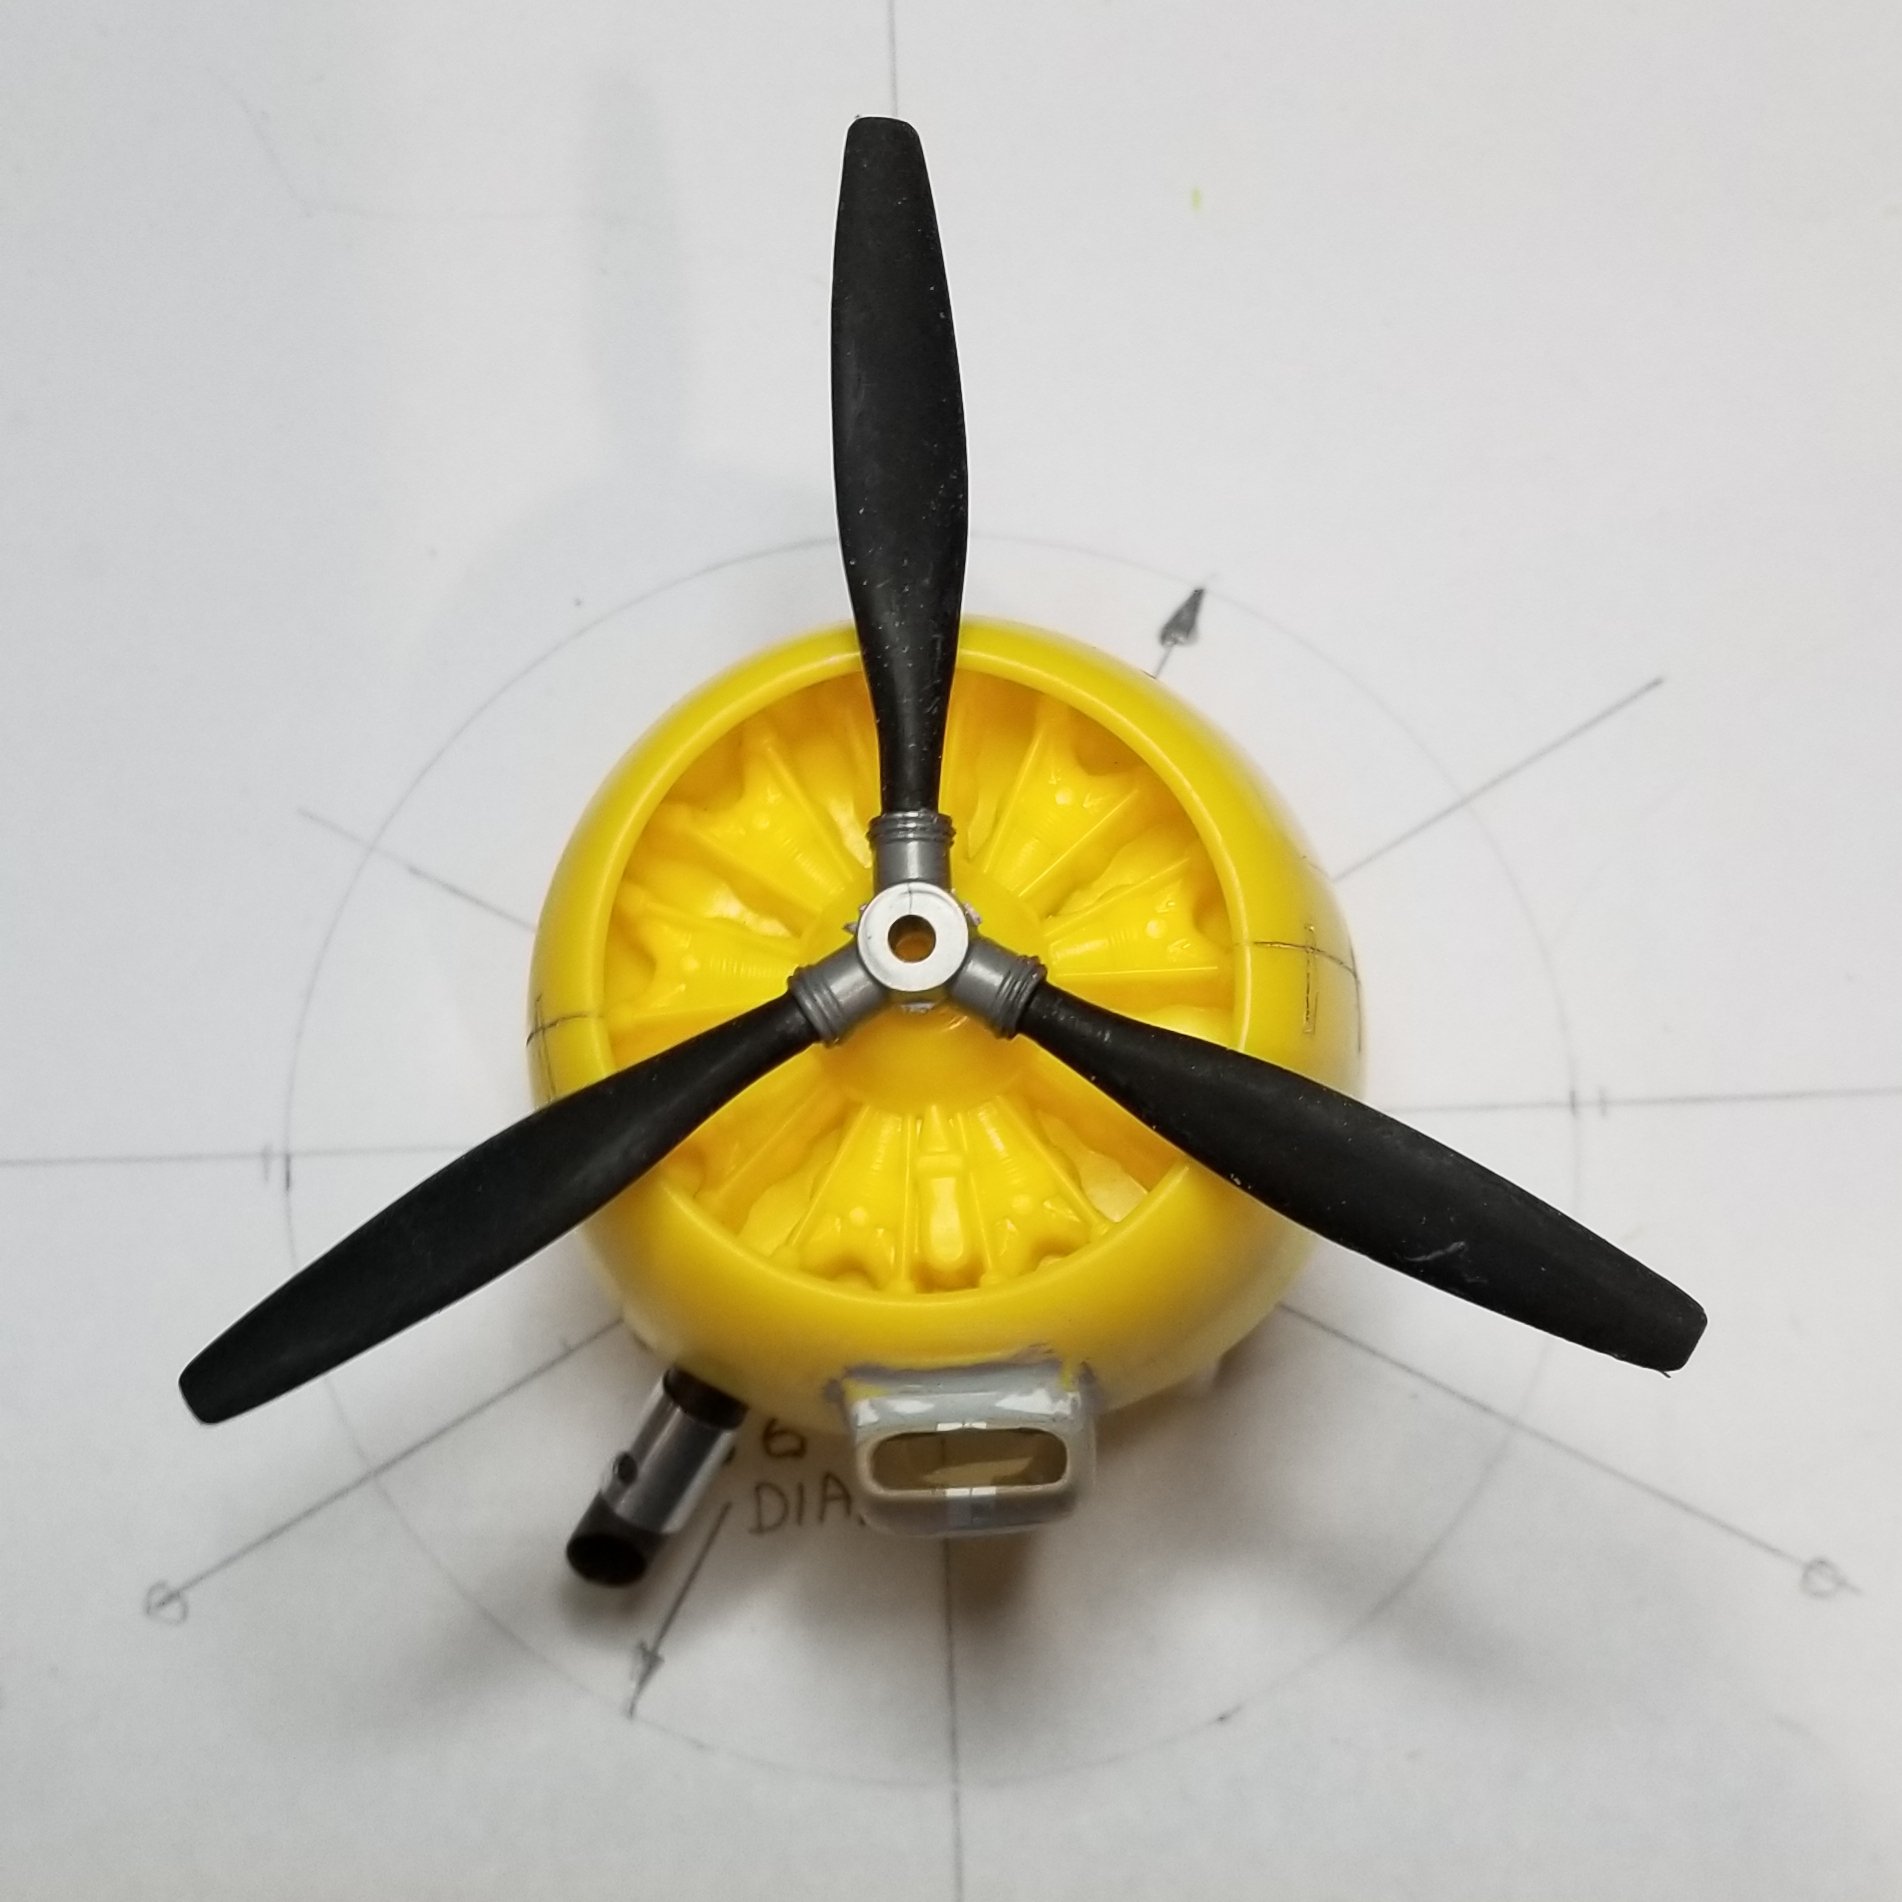
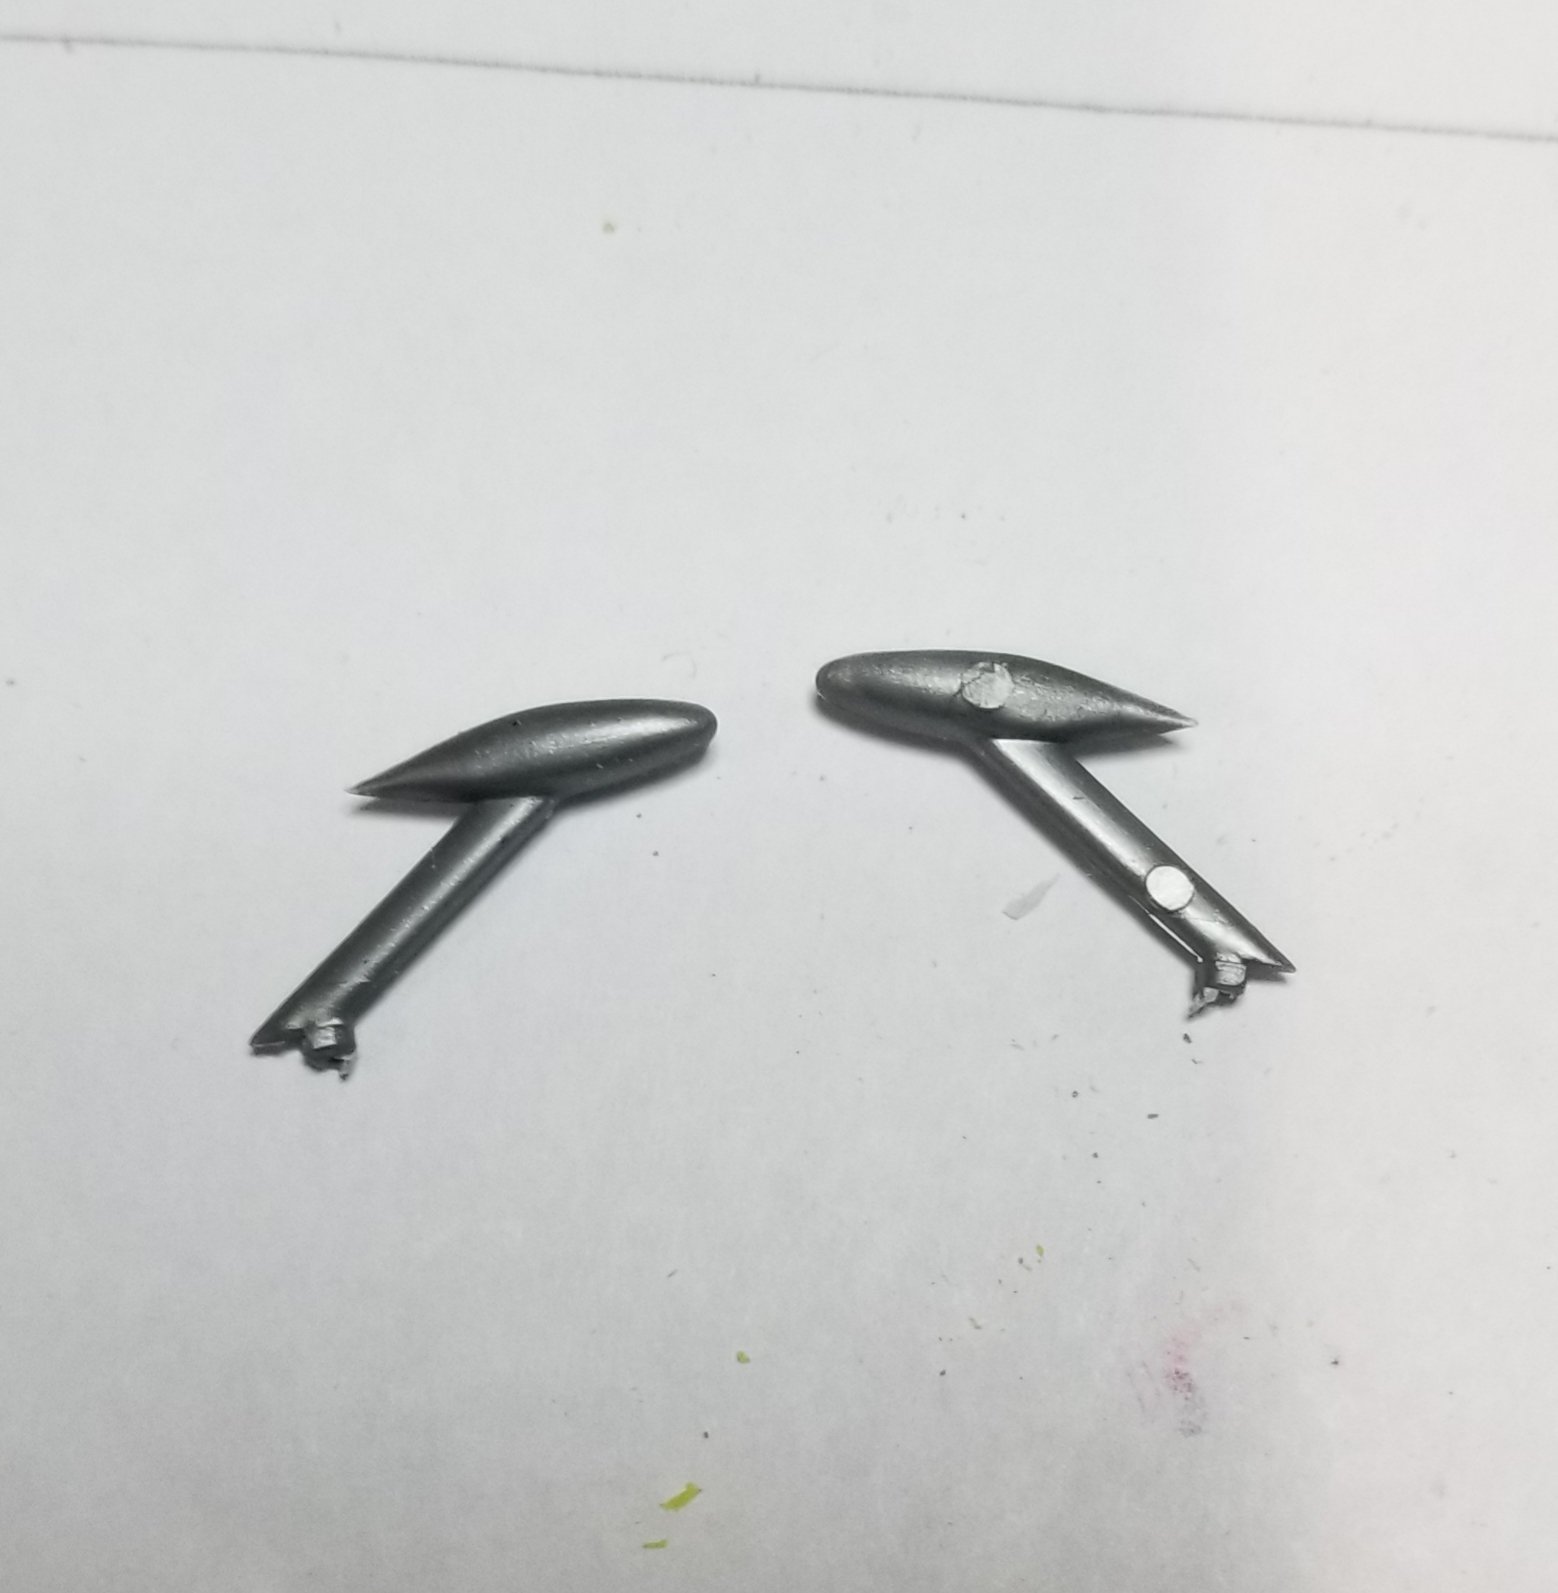
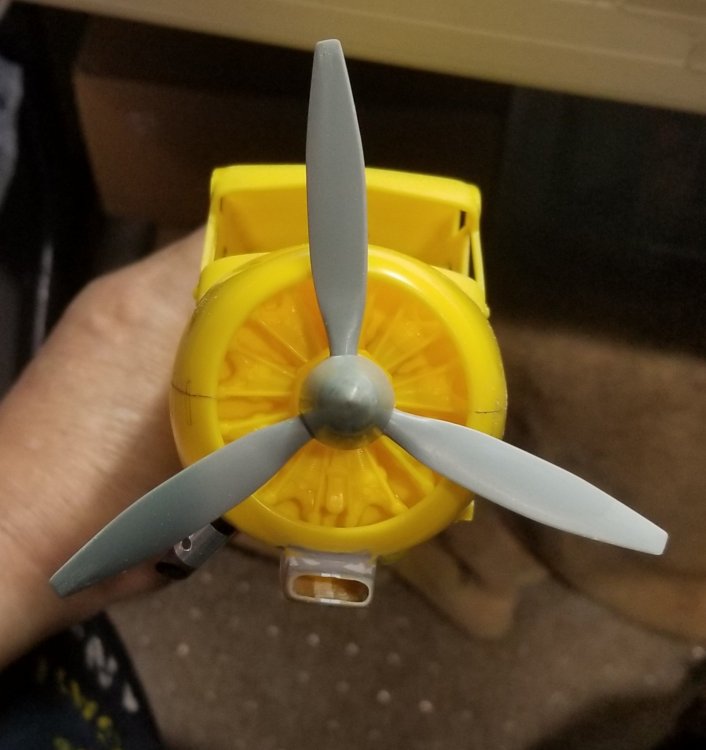
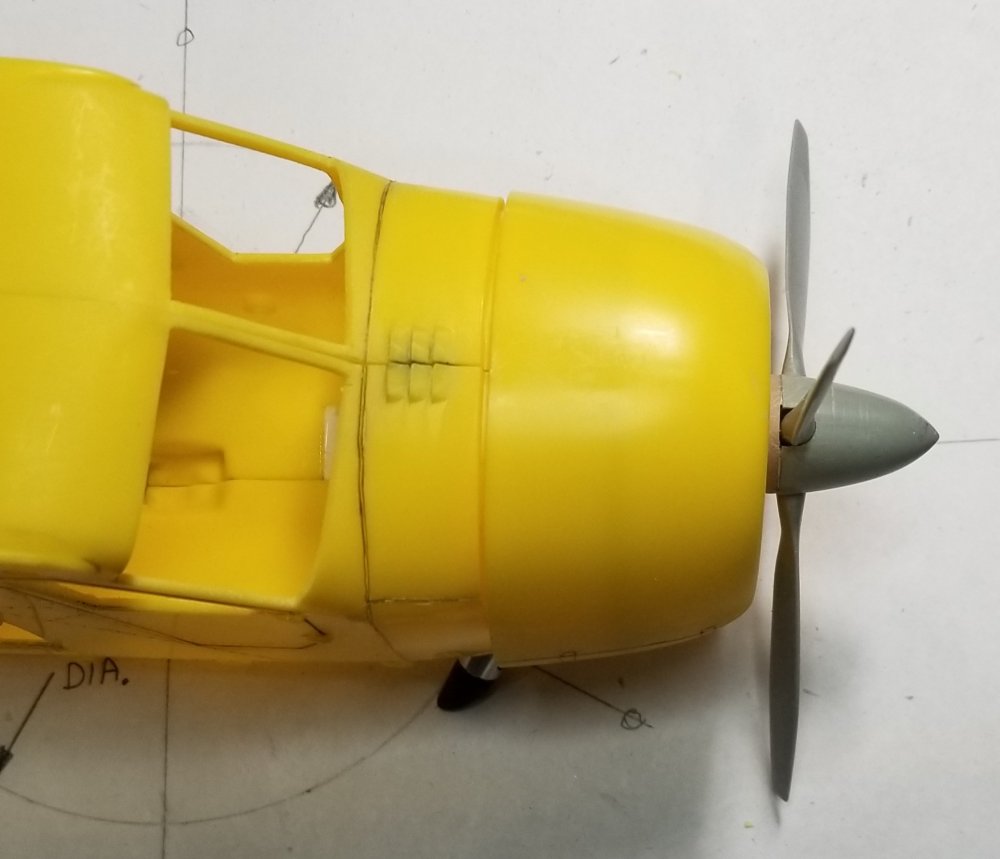
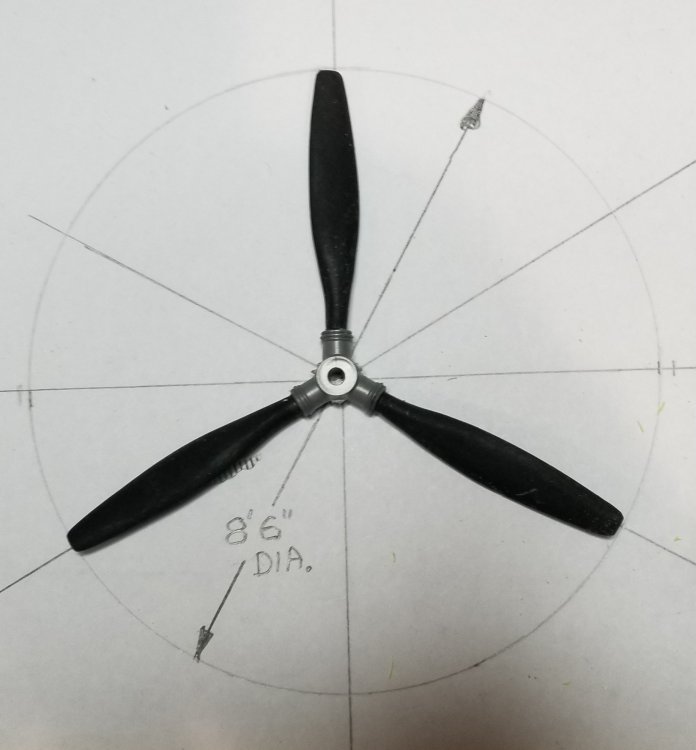
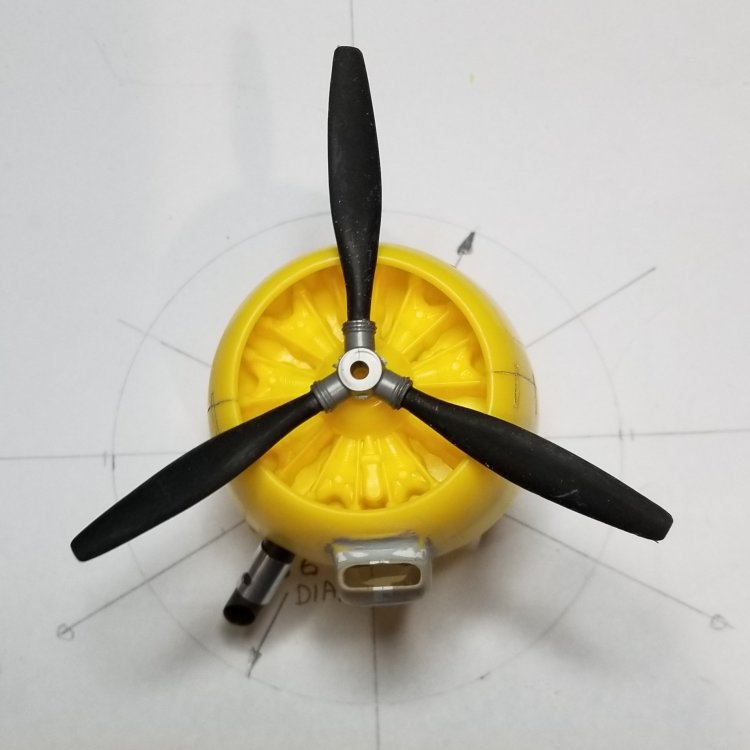
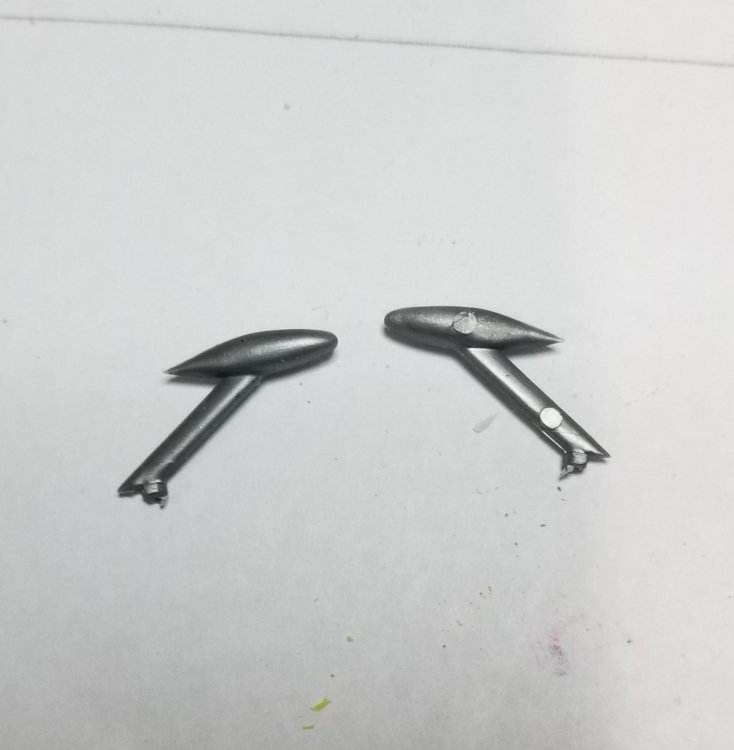
Ok I think I have figured out how the steering mechanism for the floats work, I'm not a hundred percent sure but I think I'm right. I'll try to draw a picture to let you know how I think they work. I spent the whole day trying to make a three bladed prop and spinner, only to have the whole thing backfire right at the end. So I restarted, luckily I had two p-38 props, the first one got destroyed. I took my extra p-38 prop and decided that the blades just weren't right, so what to do? I got my 1/32 Lancaster off of the shelf and took out the needle props, I'll be using the paddles on my Lanc. I cut the mounting end off right were the round shaft starts. Then I cut the props off of the p-38 hub close to the center. Then I measured the blades and cut the square end on them. I then drilled a hole in the end of the props 0.08" dia. And the same in the p-38 hub added some 0.08" plastic rod to the hub and then added the blades, but I think I have them on wrong (its know a pusher prop) I might be wrong but it looks ok so I'm going to let it go. I made the spinner from some 1/48 p-47 fuel tanks, cut, filled, smoothed and polished. Here are some pictures so let me know what you think. it looks big but it's the right diameter. here it is mounted on the motor. angled shot to see the shape of the spinner. view from the top down. Ron G


-
I have them all bookmarked, thanks
-
Hey Jeff Do you have any more pictures that show as much detail of the steering mechanism for the floats. That is the wires that run along the floats up to the rear of the fuselage to some connection to how you steer it. Not sure how this works, so any and all pictures would be great. Ron G
-
Thanks for the pics Jeff. They will come in handy on the build. Ron G
-
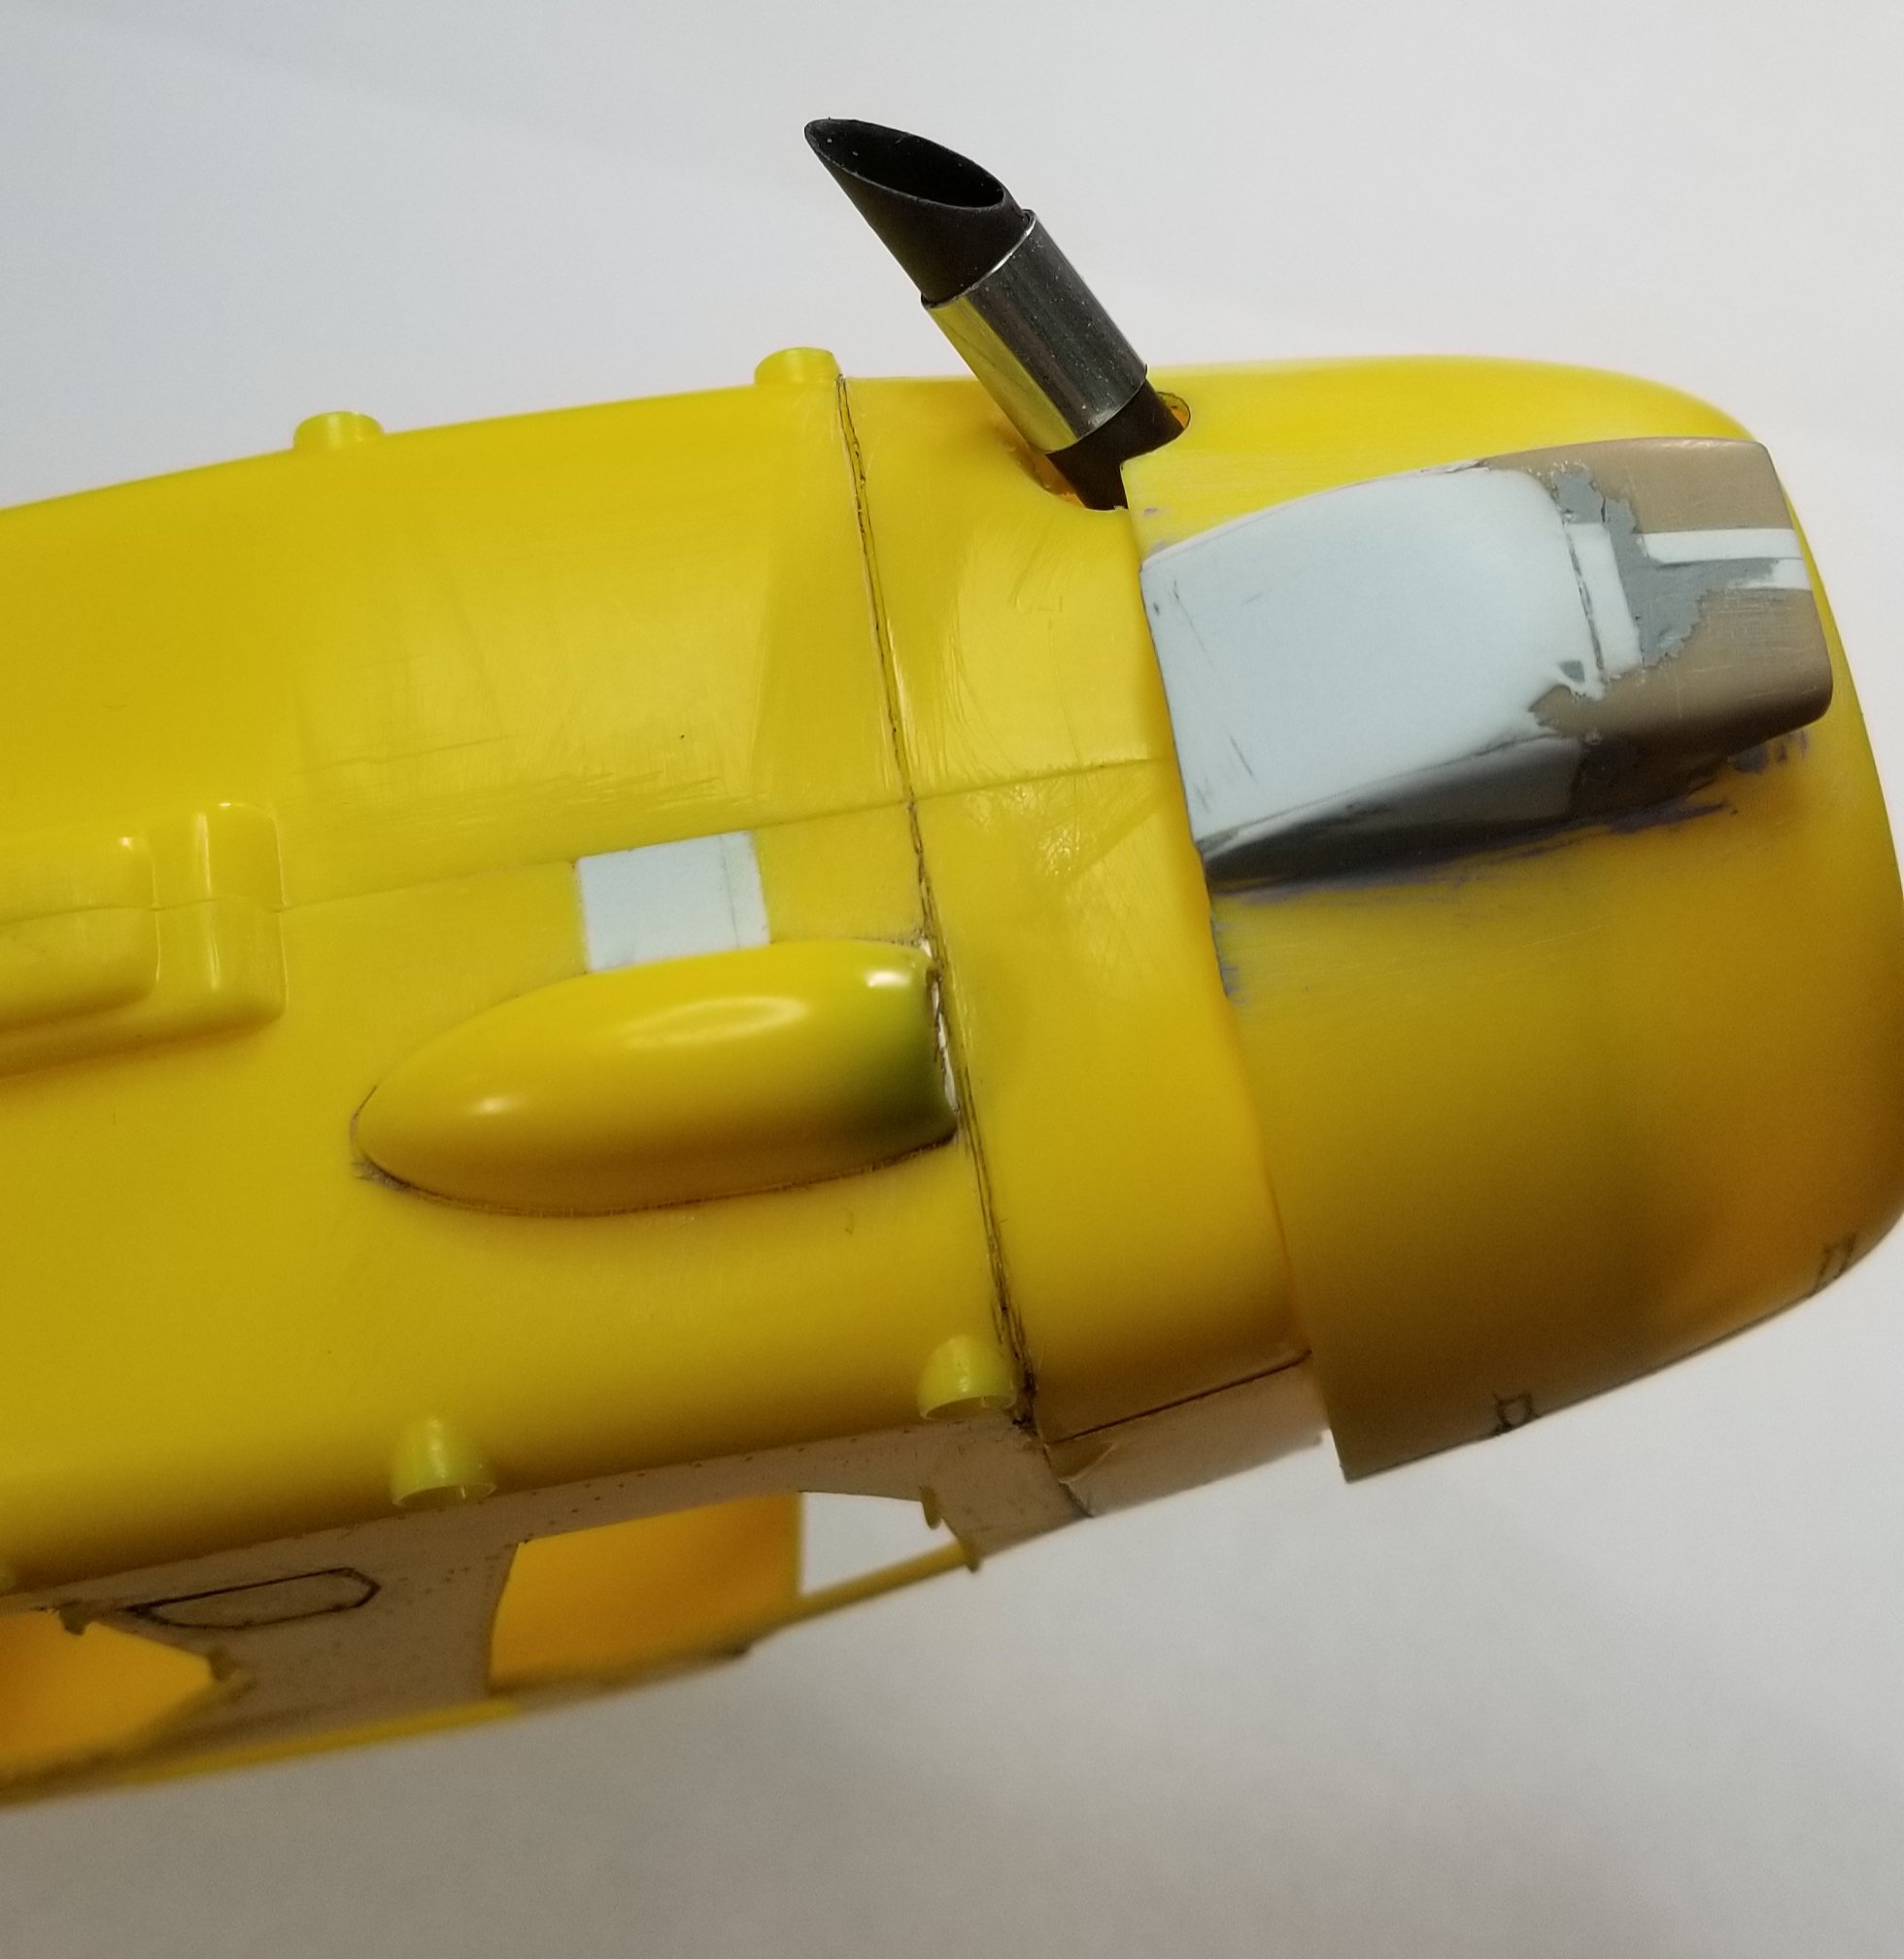
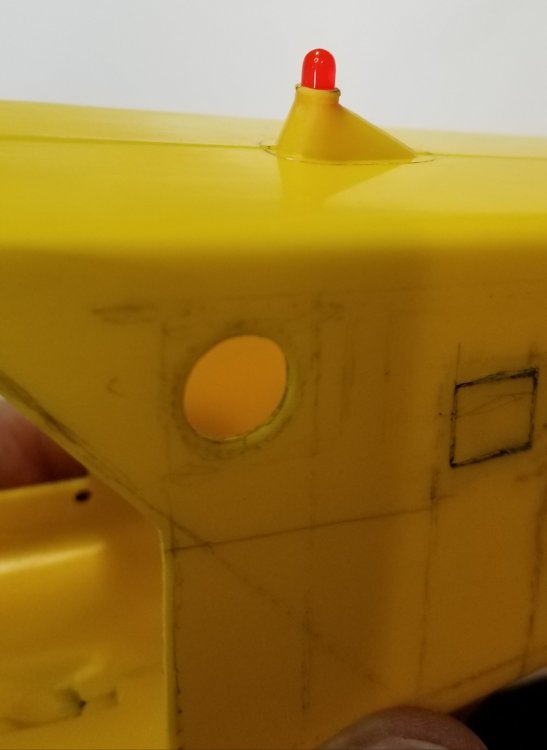
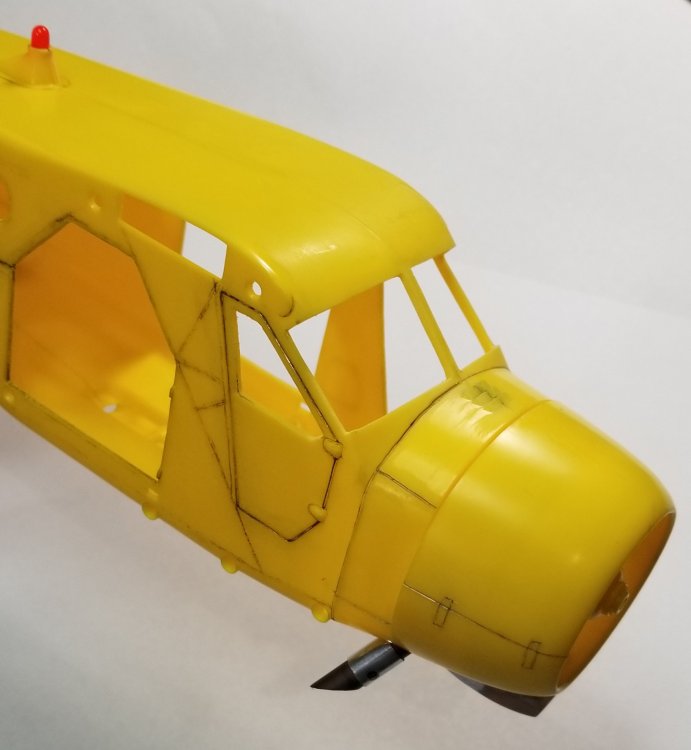
Got a little more done. I went to the LHS and picked up some things to make or replace the kit parts. Here's what I got. 2) 3/16" aluminum airfoil tubes. These will be used to make correct wing support struts and the pieces that connect the floats to the fuselage. I also got a 1/4" aluminum ai inrfoil tube that I was going to use for the wing support struts, but I think it's a little to big so I'm going to use the 3/16" ones for those. I also got some .02" x .06" and .03" x .06" plastic strip that will be used for the flap and aileron hinges. Also got a 3/16" round aluminum tube for the float to float attachment struts. Also Some 1/8" x1/8" plastic angles for the steps on the float to fuselage struts. made the red beacon on the top from some clear red acrylic rod. It's just held in with some Tamiya tape I won't install it permanently until the end. got the exhaust pipe made from some 1/4" aluminum tube and a piece of 9/32" tube for the heat exchange cover. another view of the exhaust pipe. You can see the modified lower intake scoop and the new position of the oil cooler scoop. got the other cargo door cut out. And I finished scribing allthe access hatches and covers. I still have some long lines to scribe. dug through some of my old kits looking for a three bladed prop. Tah..dah! This one is from an old Revell 1/32 p-38 kit. All I did was flaten the ends a little and it's perfect. another view showing prop on the engine, looks good to me. I have to make a spinner for it. stole these from the p-38 kit they will be used for the aileron counter weights. Well thats it for now I'll be back when I get some more done. Ron G


-
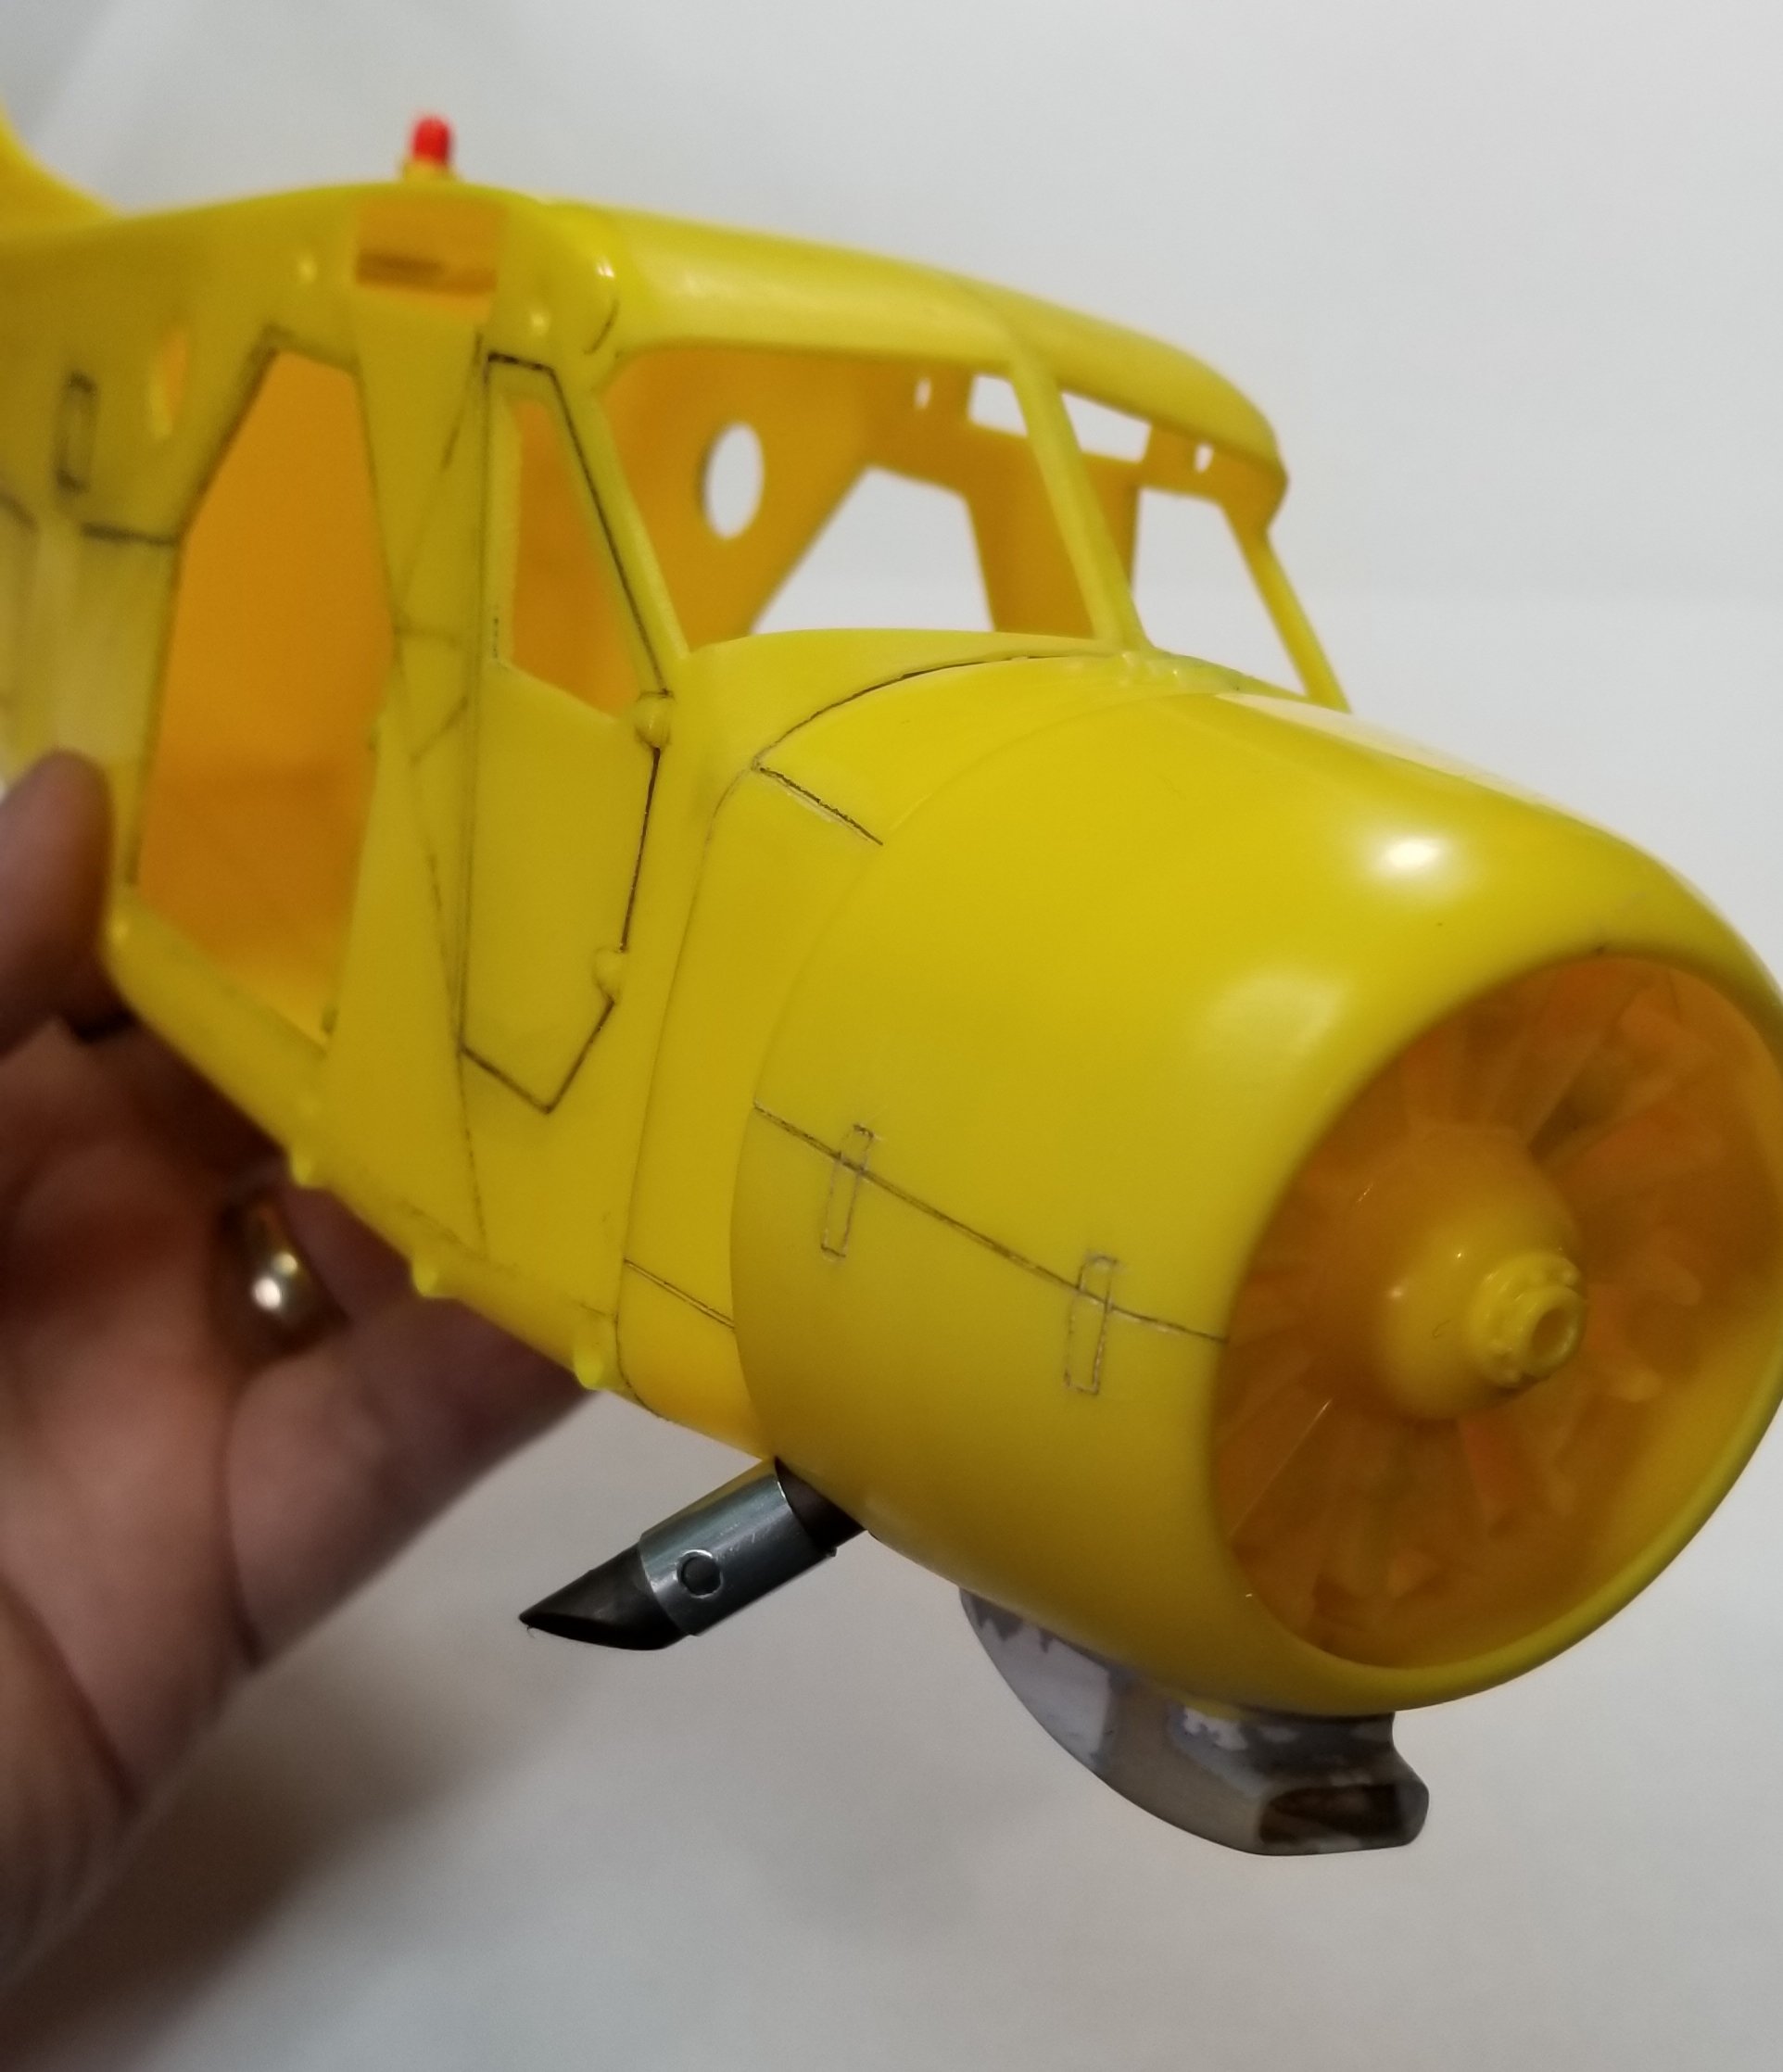
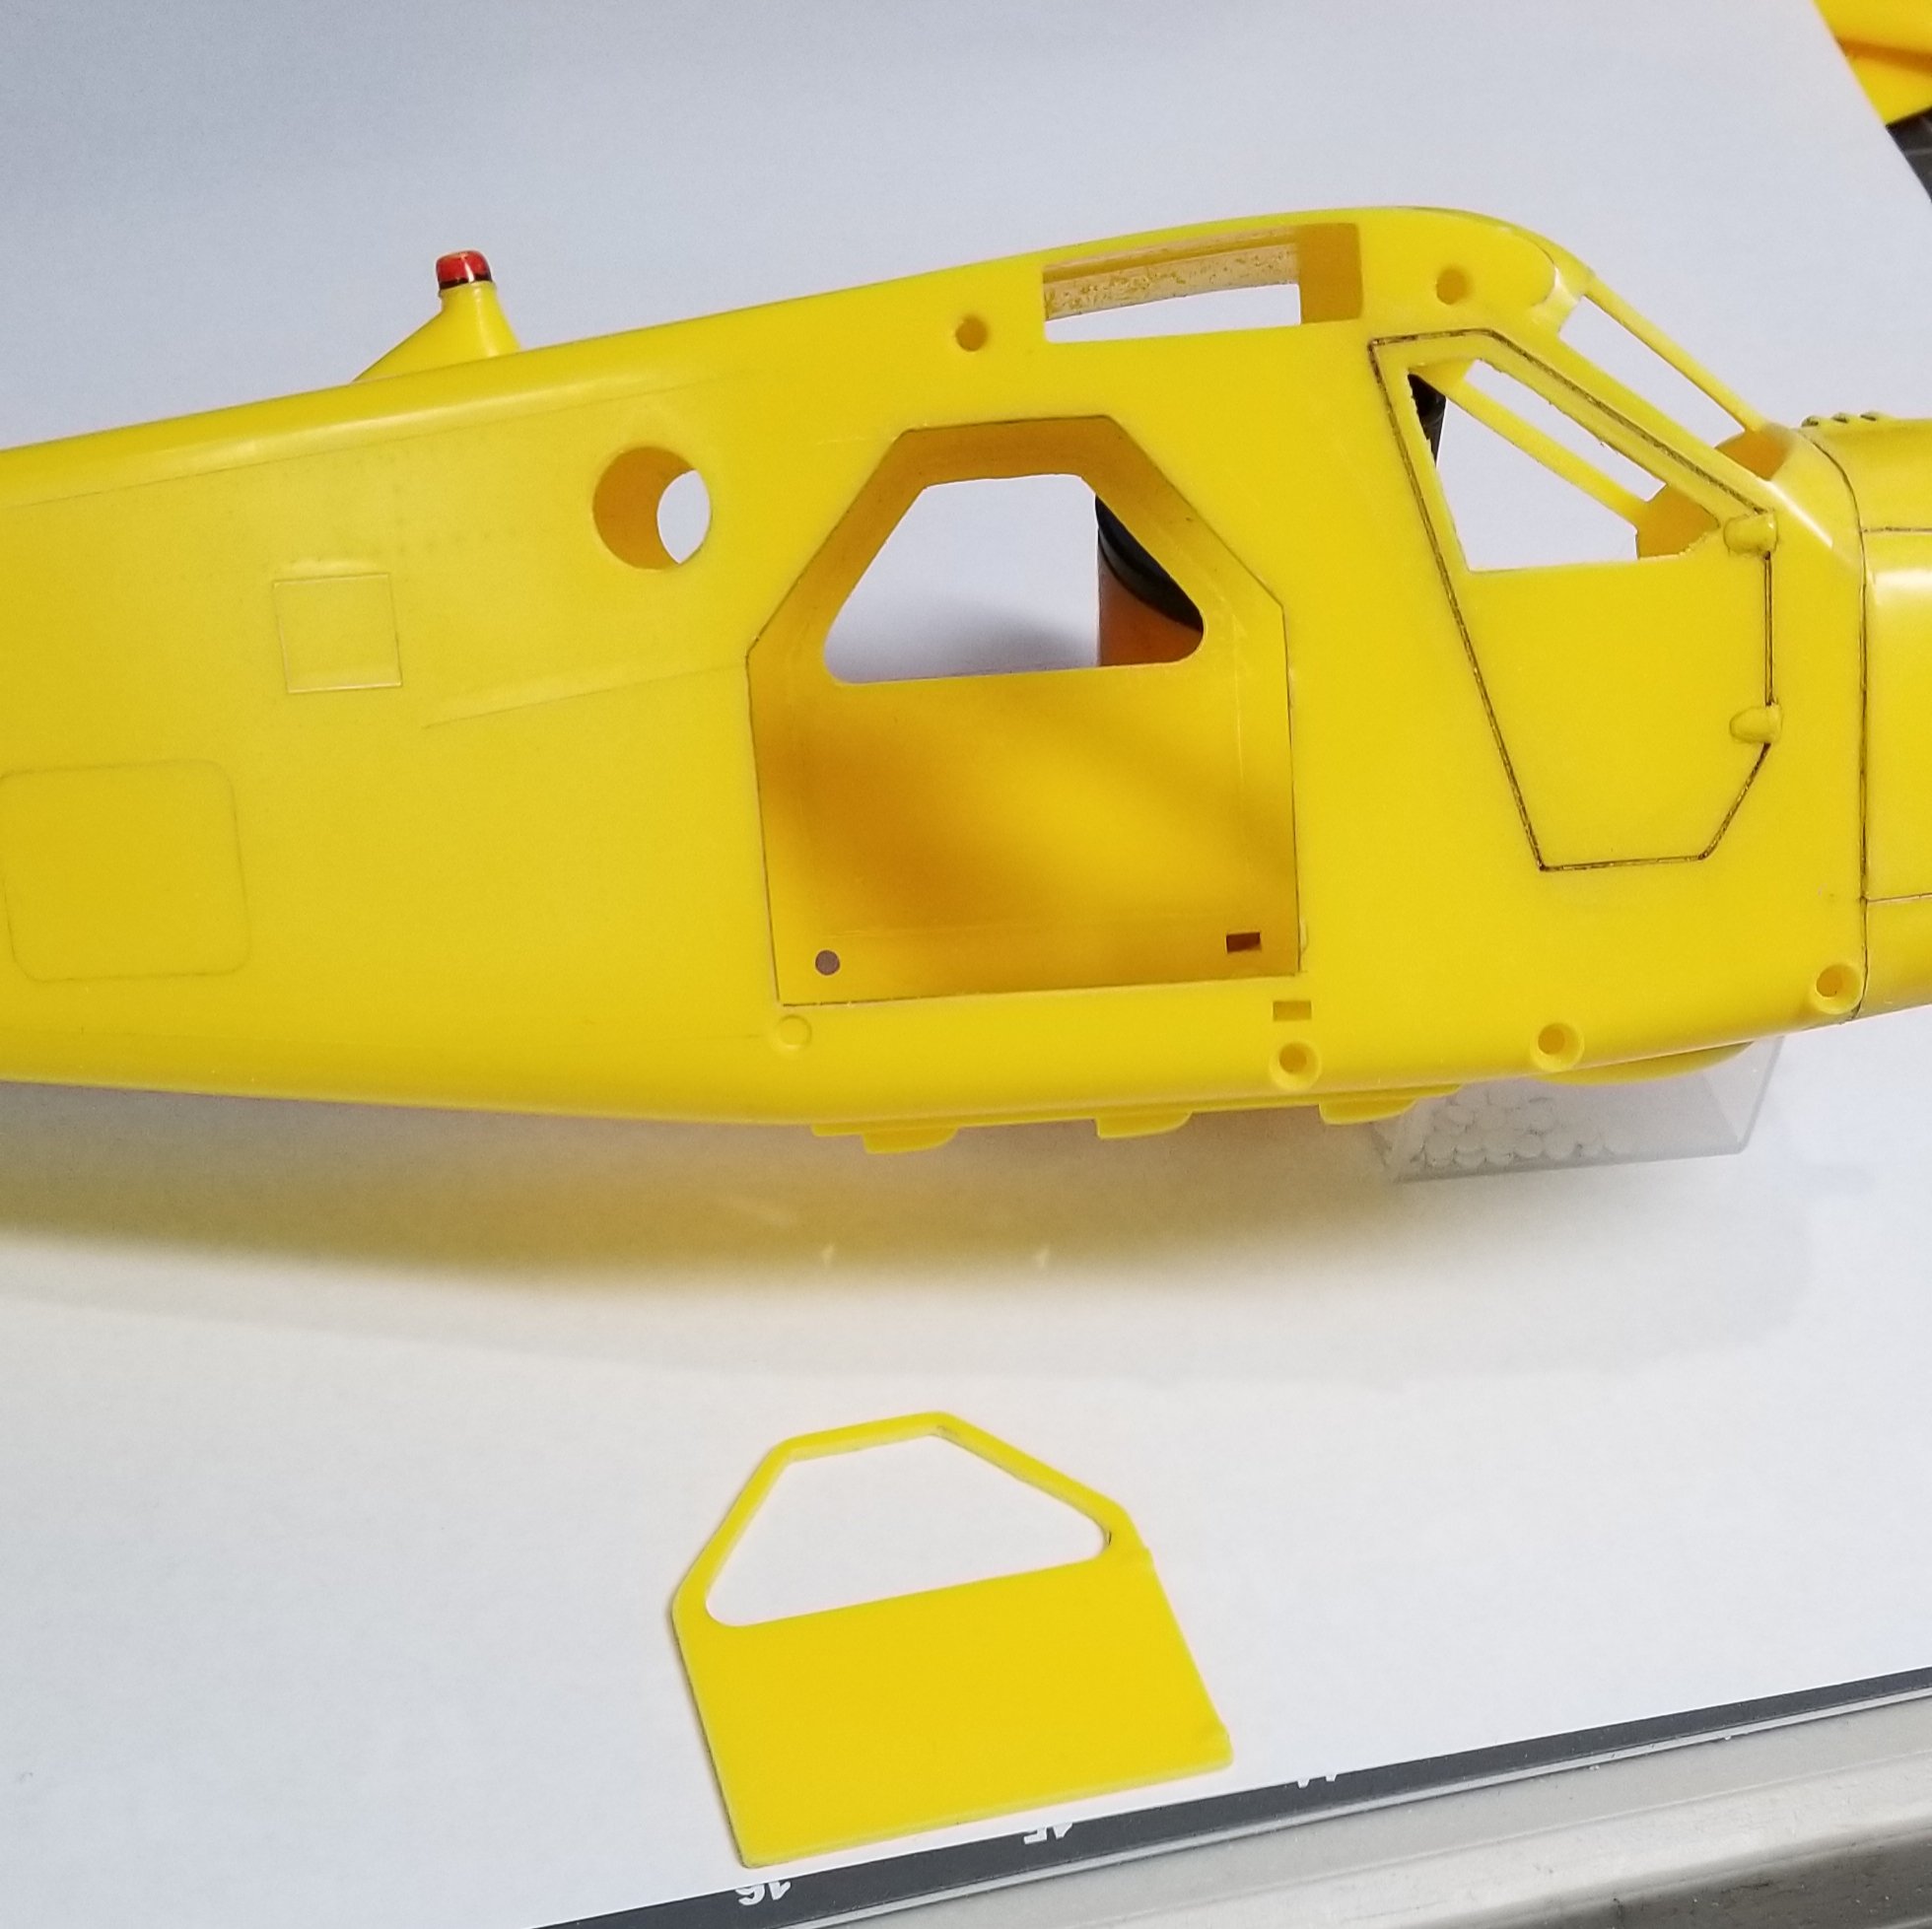
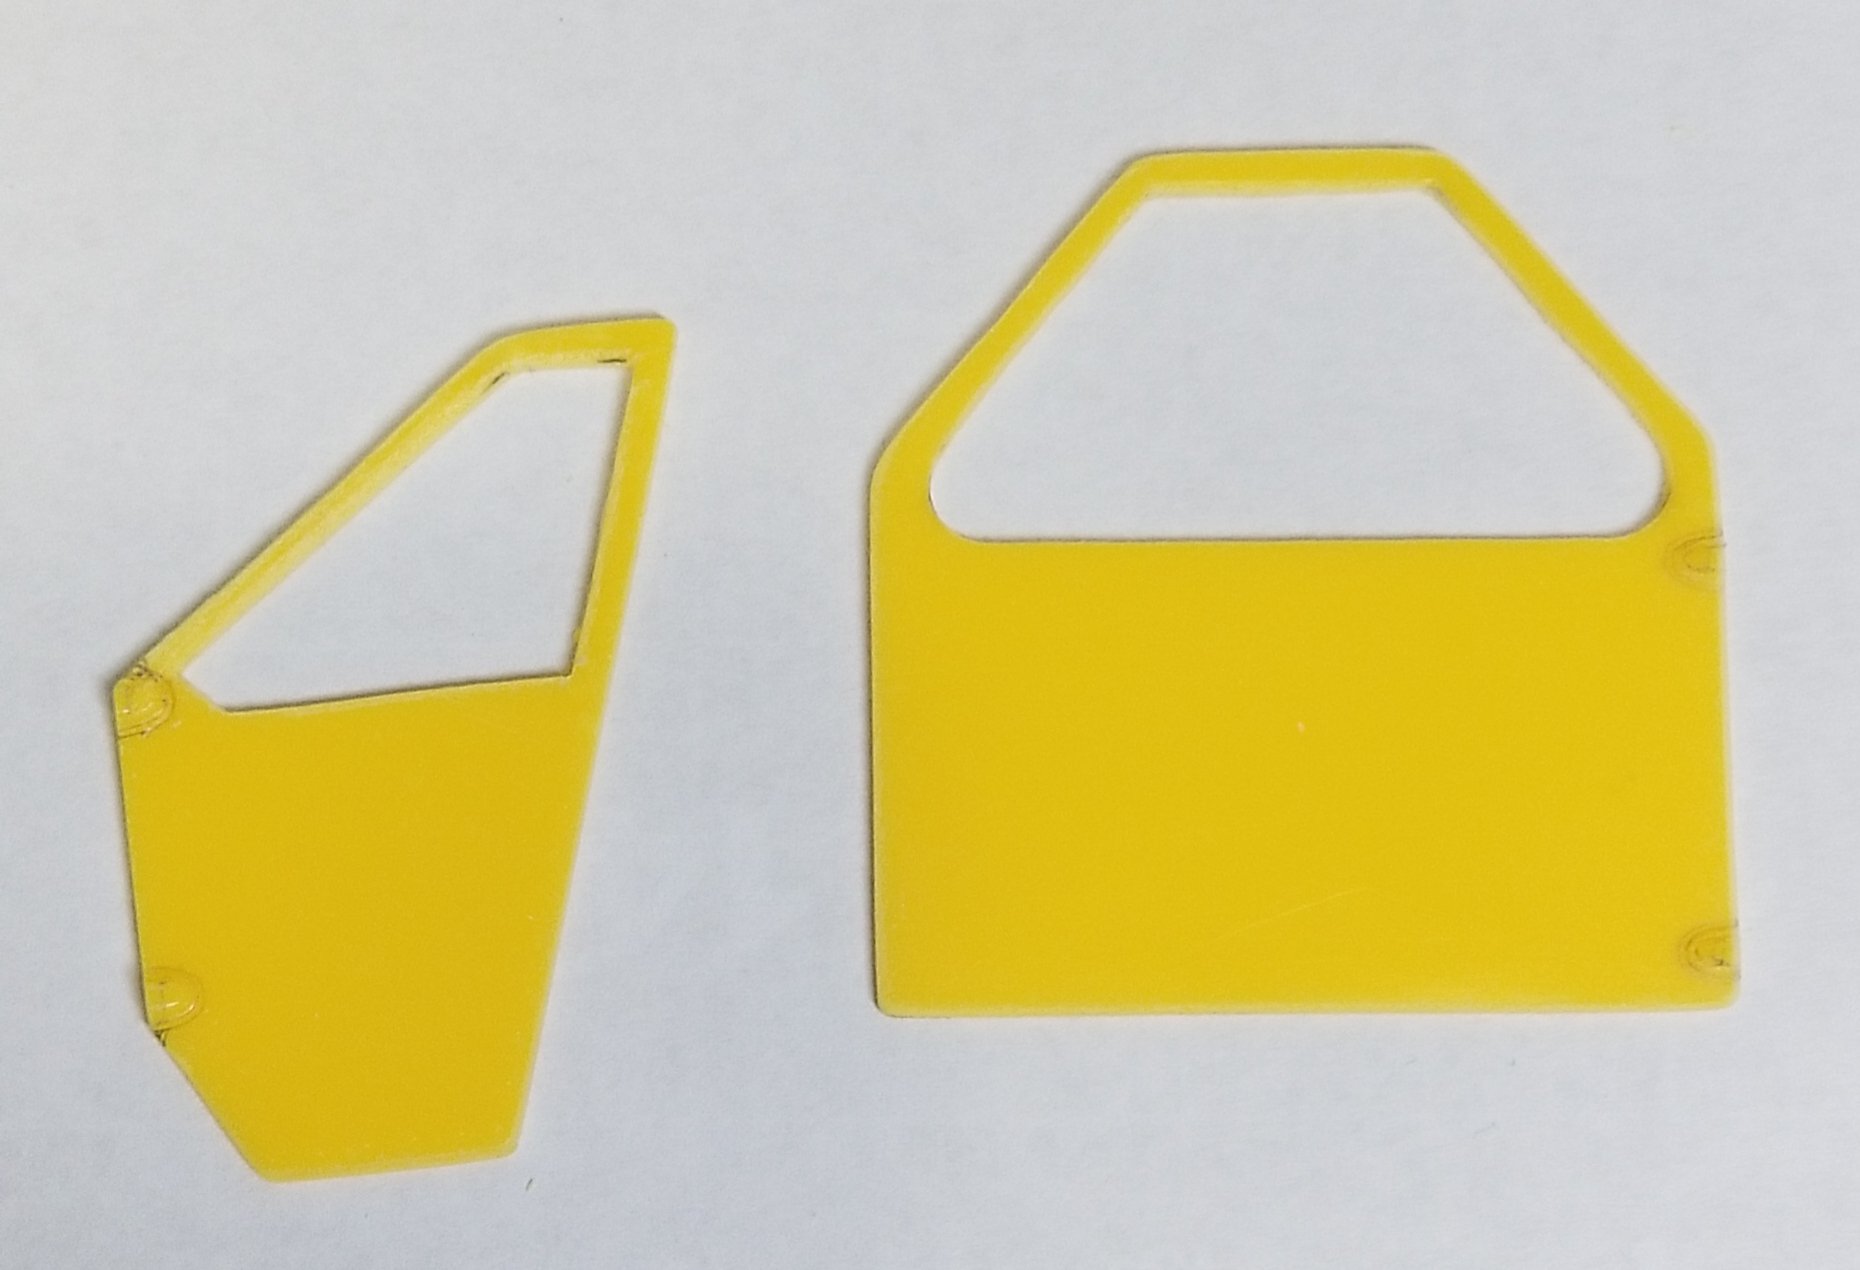
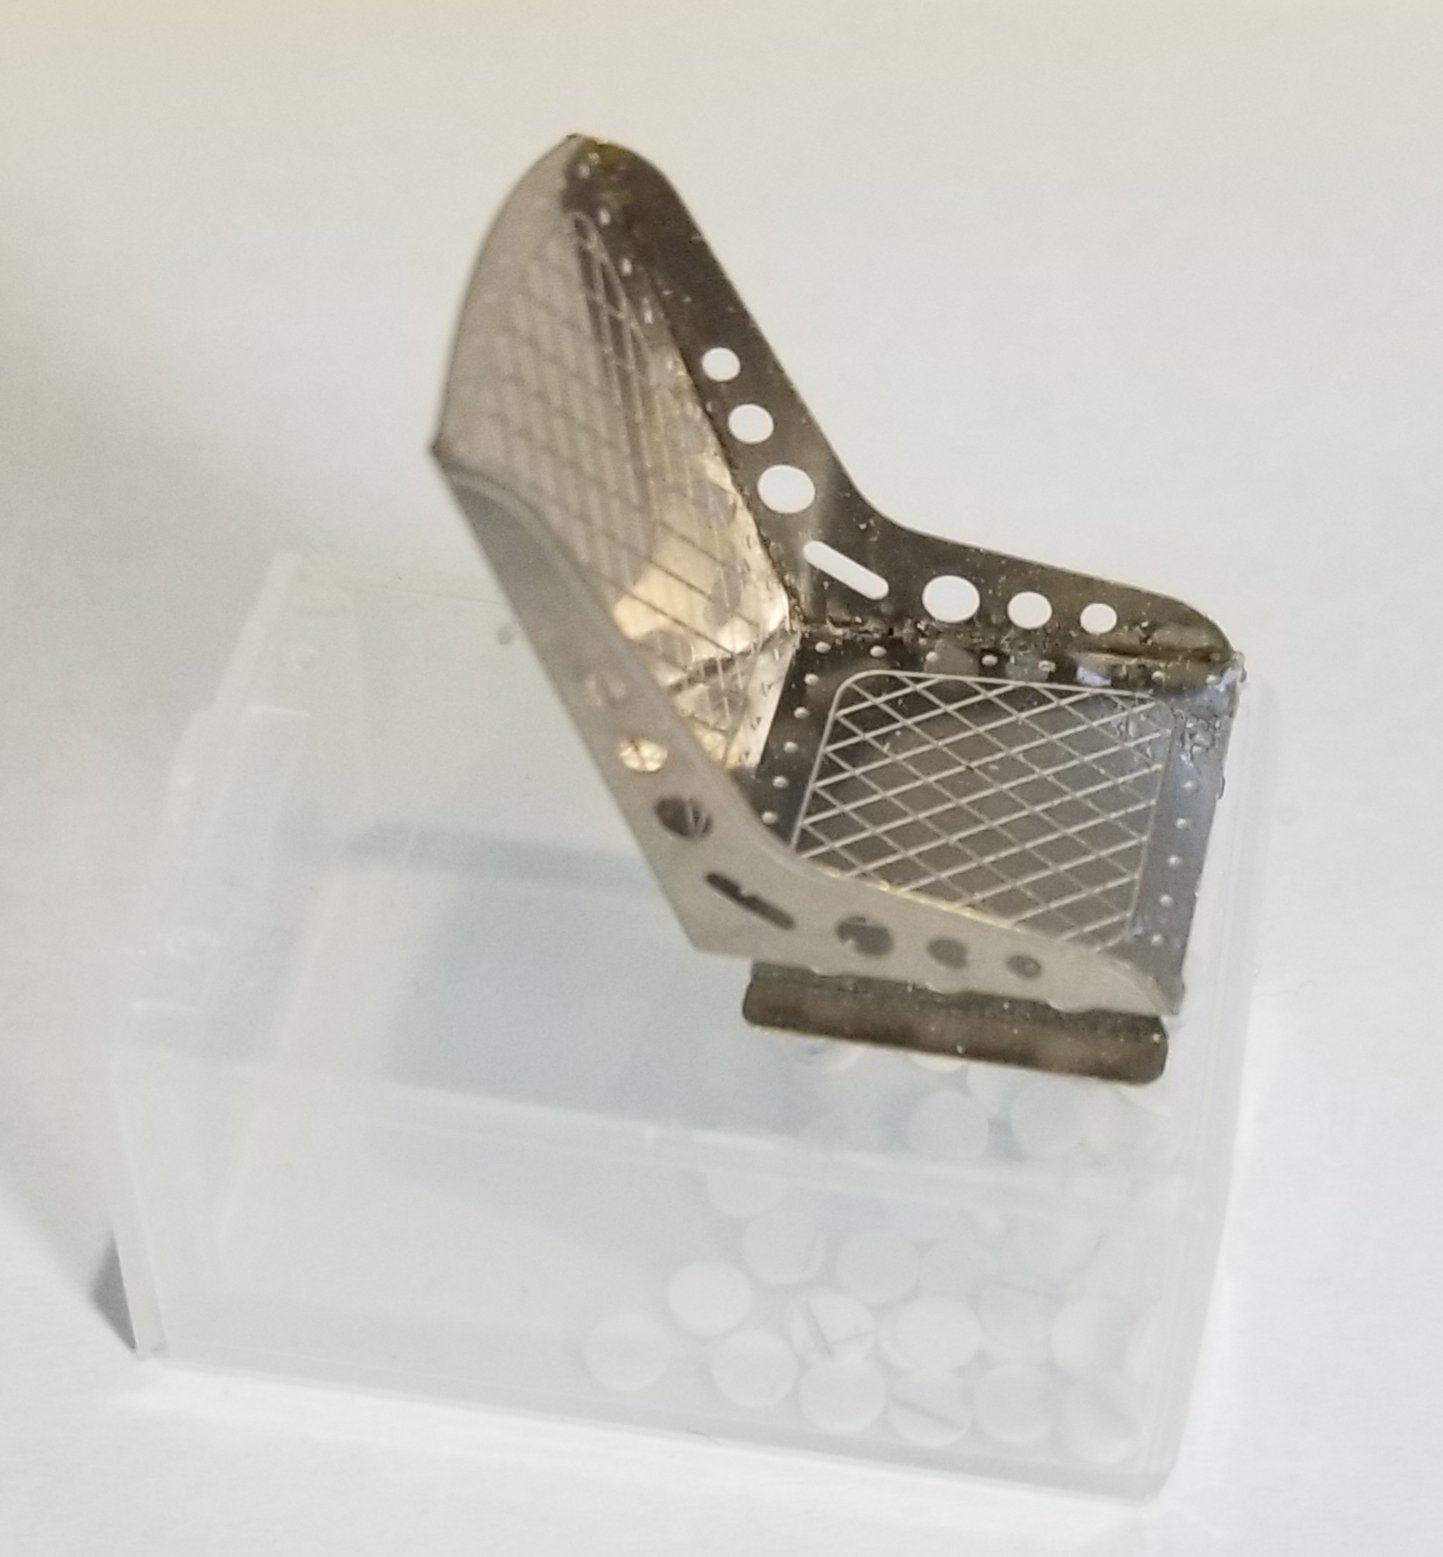
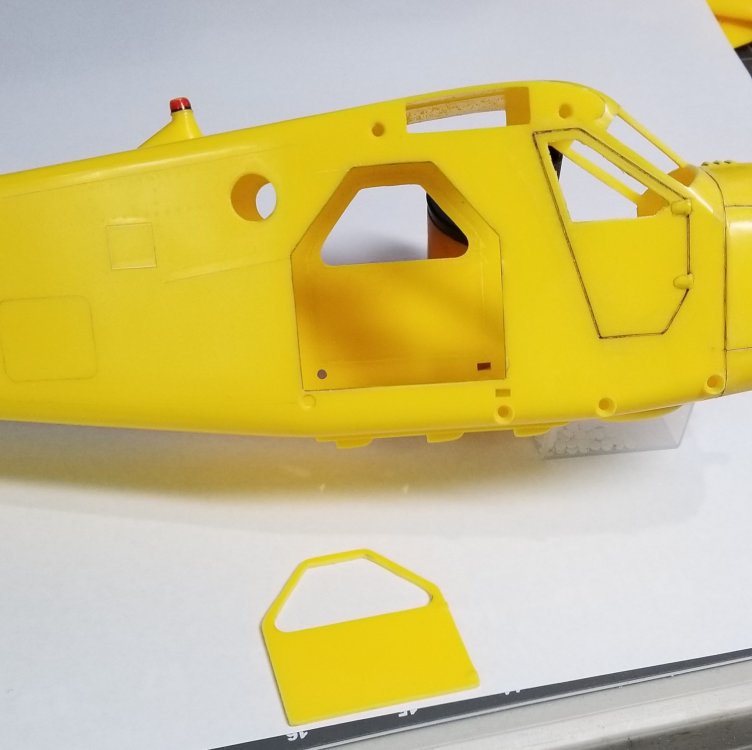
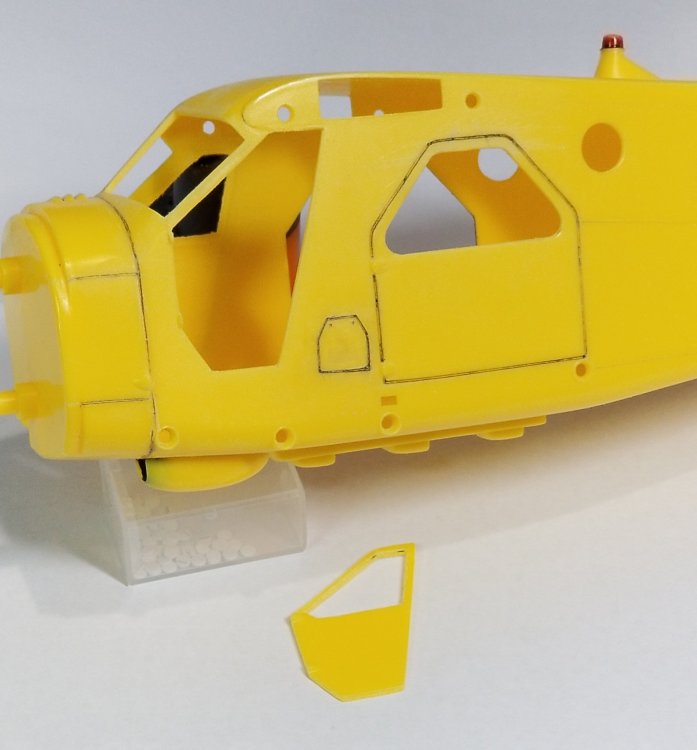
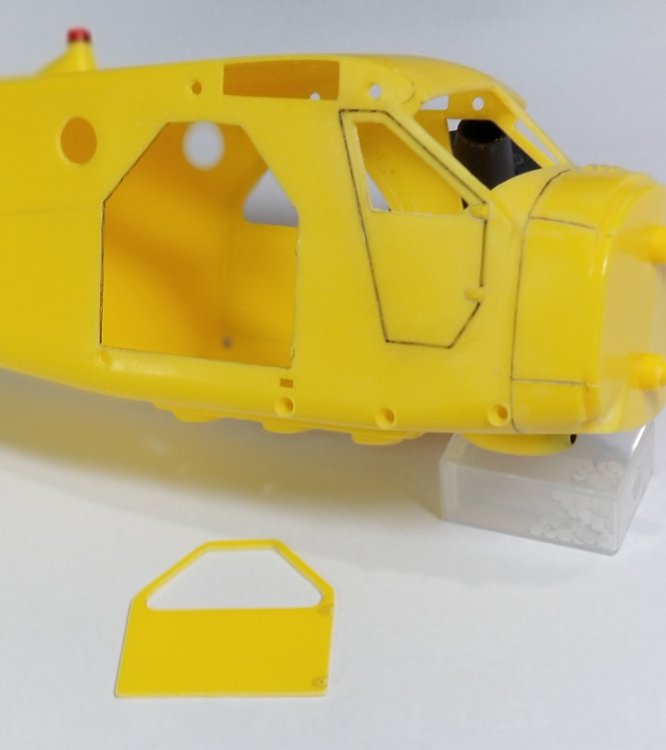
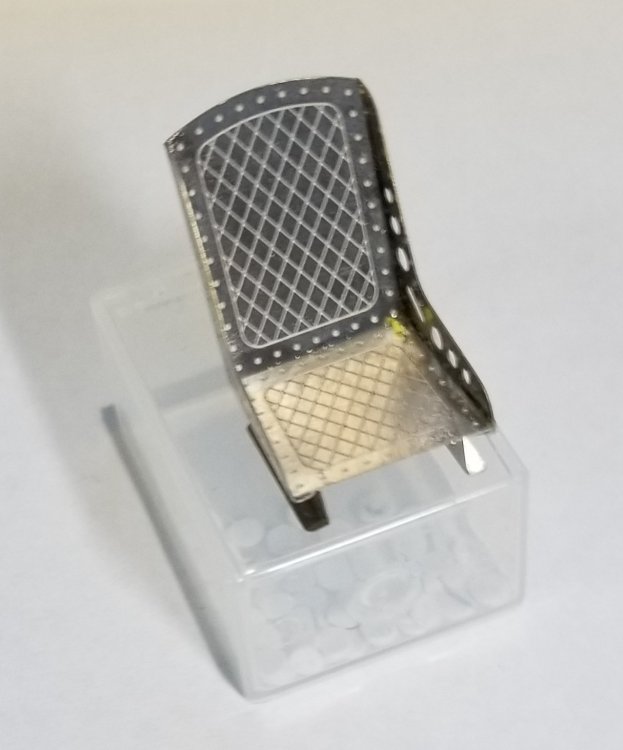
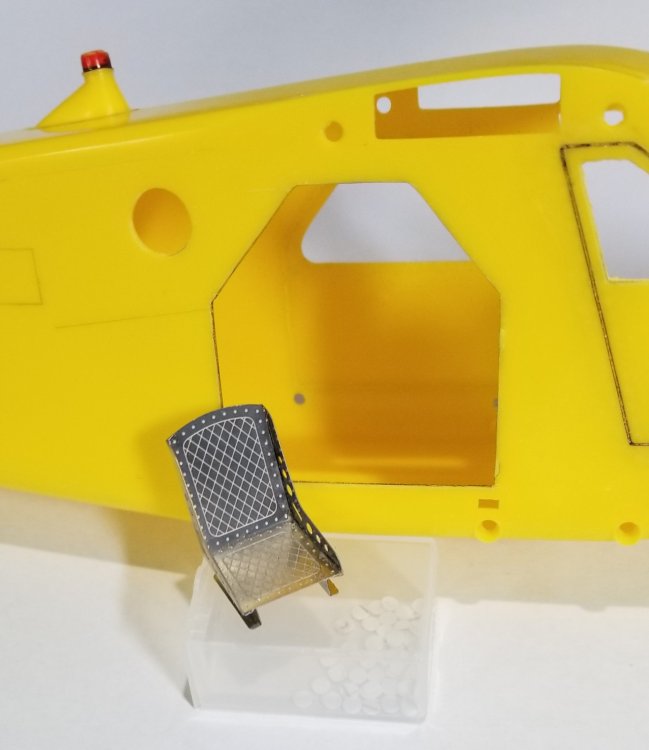
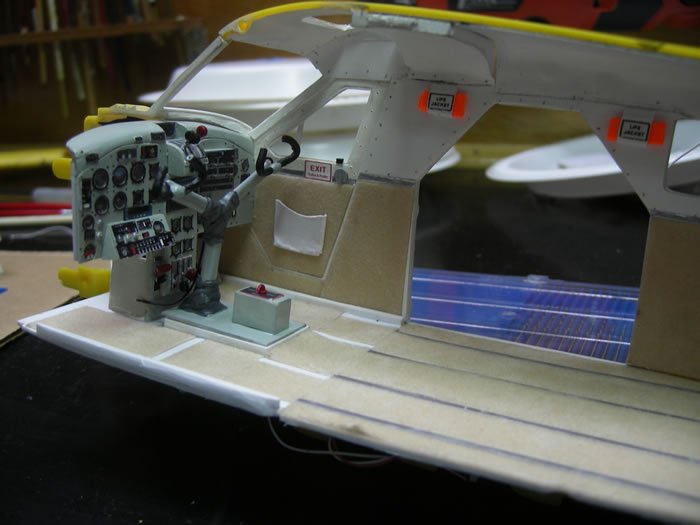
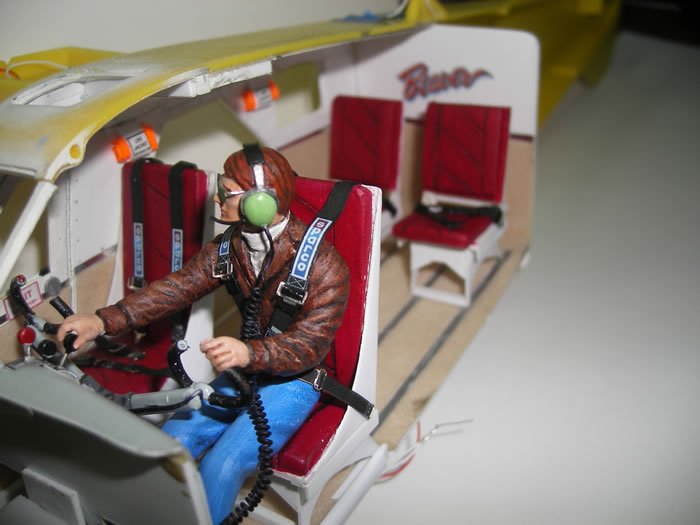
Thanks Capt. I'll check it out. A small update, but much progress. I started cutting out the windows and doors. Starboard cargo door cut out. port pilots door cut out, still have to finish cutting out the port cargo door. Added fuel tank door, scribed in. port pilots door and starboard gargo door. starboard cargo door cut out. I'm not going to cut the co-pilots door out. front windows cut out. this is one of the PE seats that will go in the aircraft. I have four of these and will be adding cushions to them and seat belts. another view of the seat. seat next to the fuselage. Well thats it for now time for dinner. Ron G


-
It's hard, but not bad easy enough to work with. The fit is pretty good, considering it's a snap together kit, it actually fits better then some of the best kits on the market from my opinion. Ron G
-
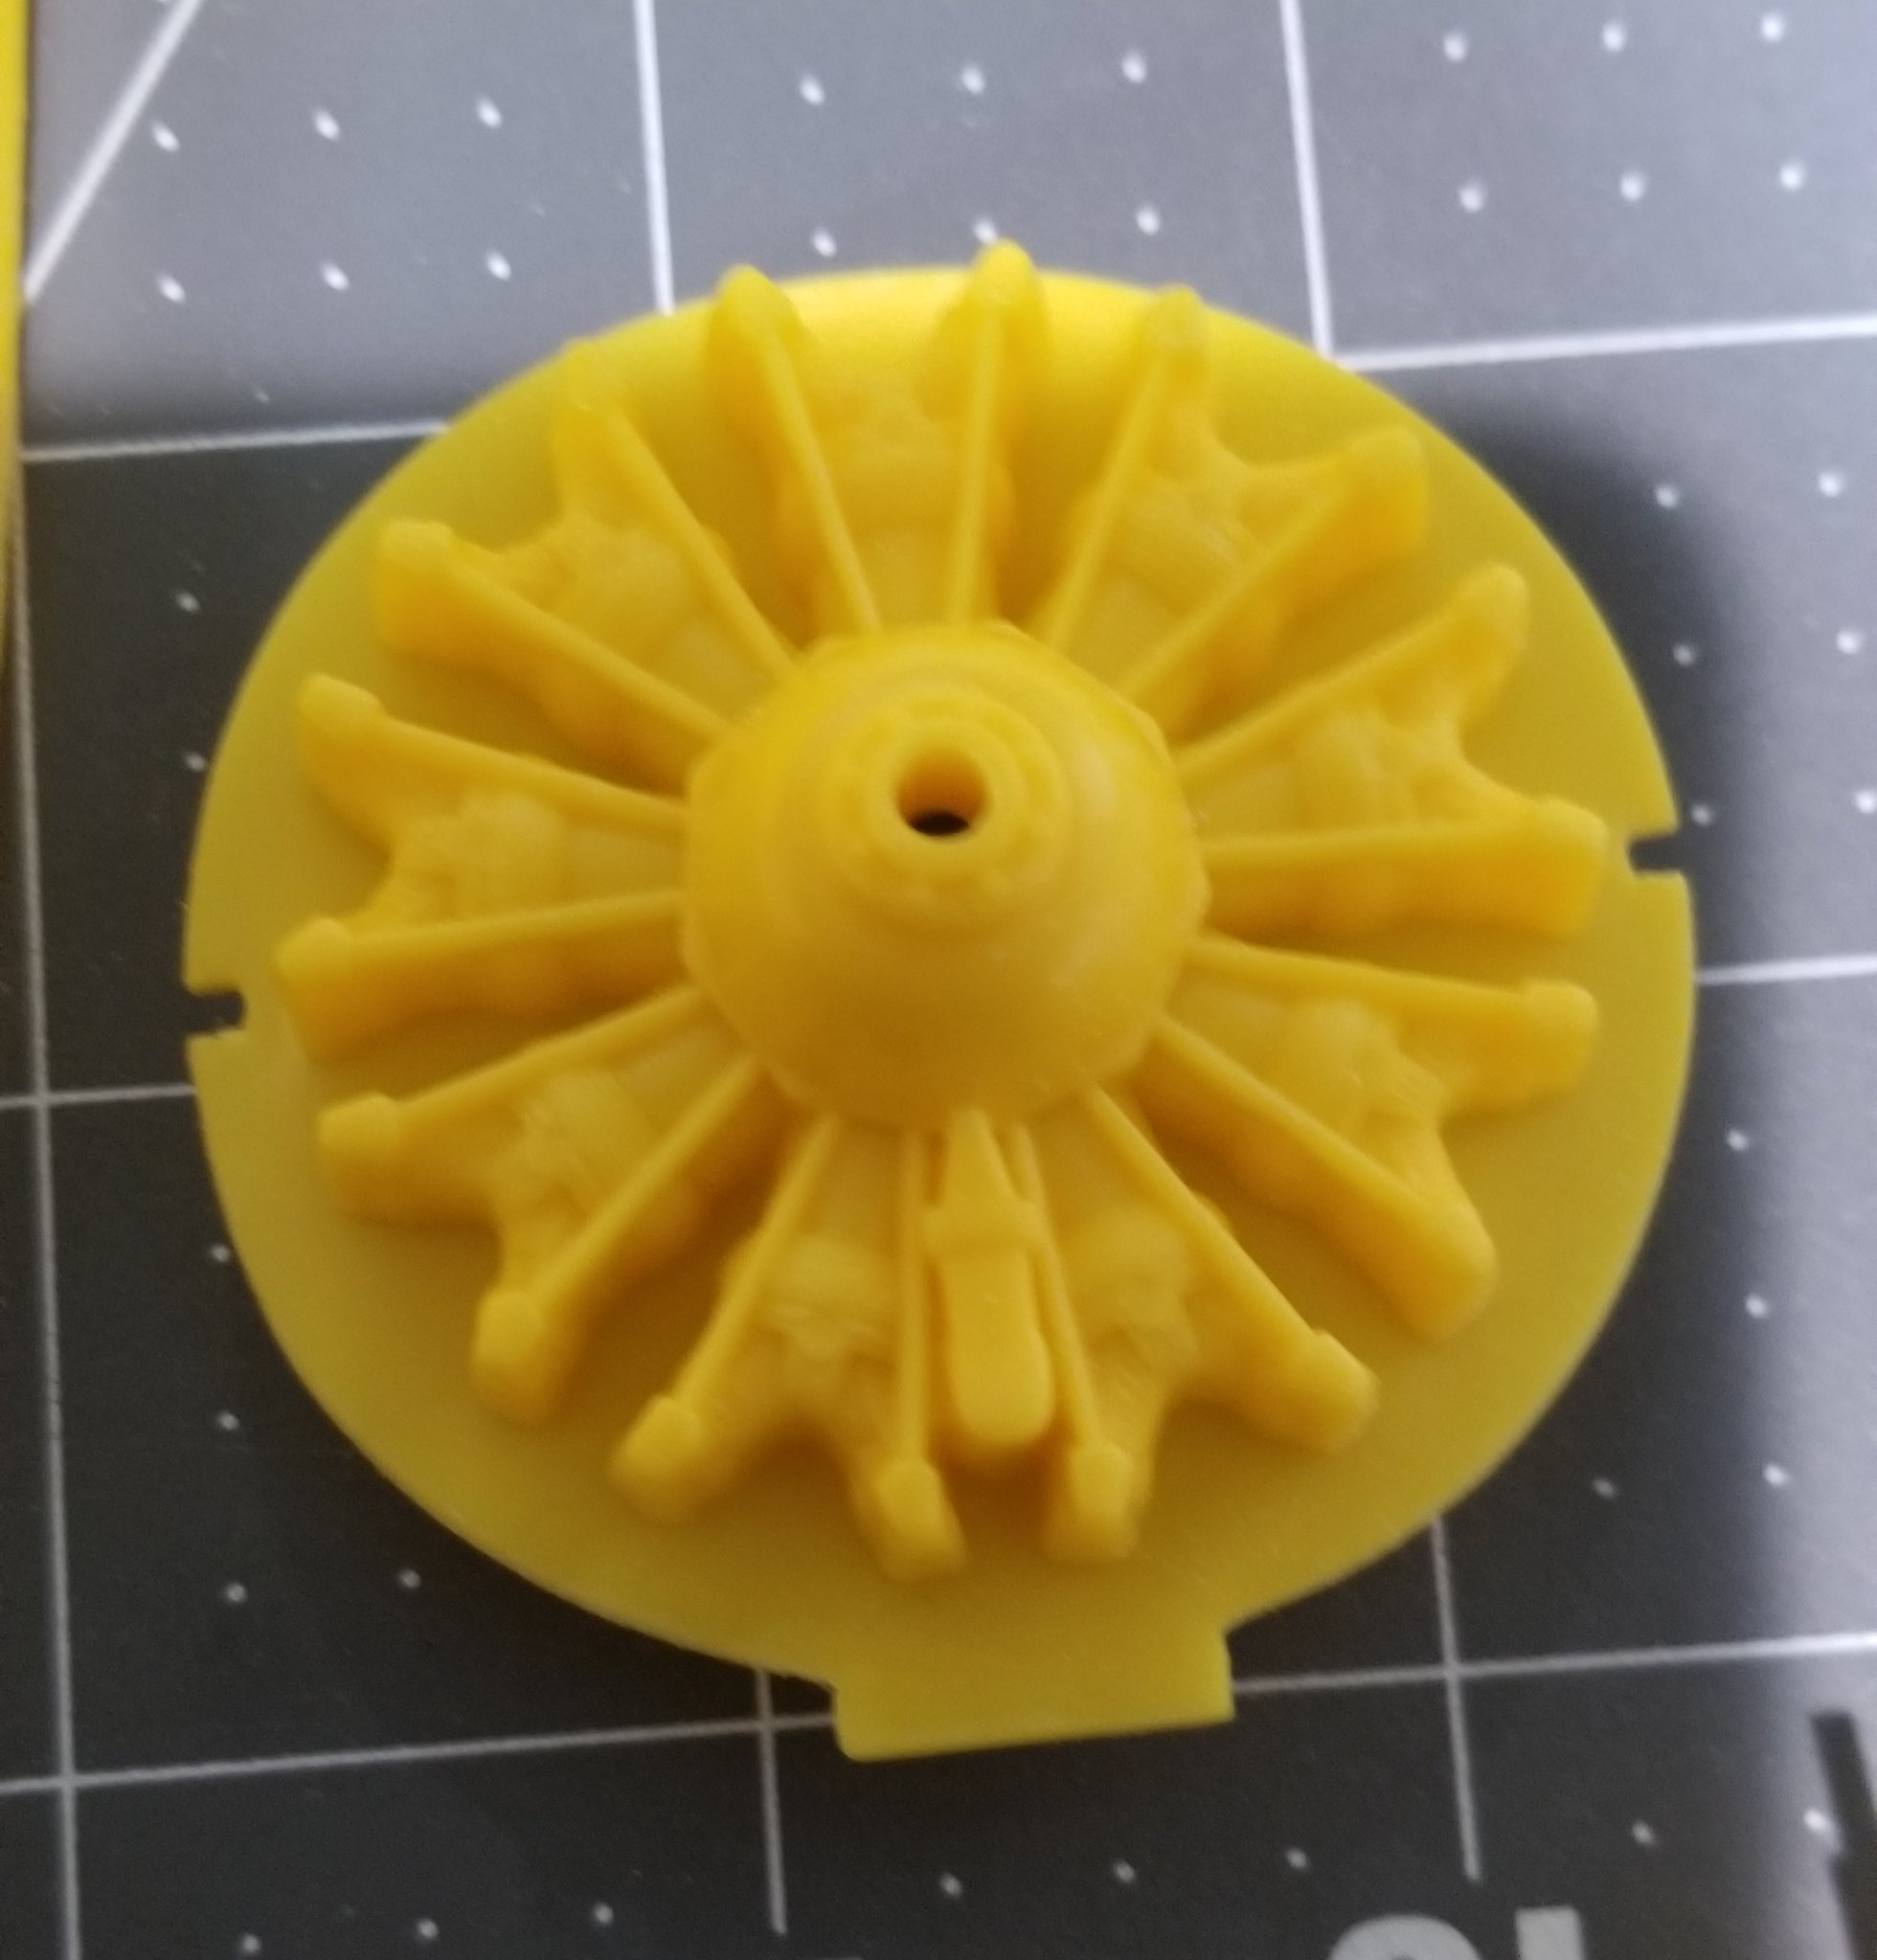
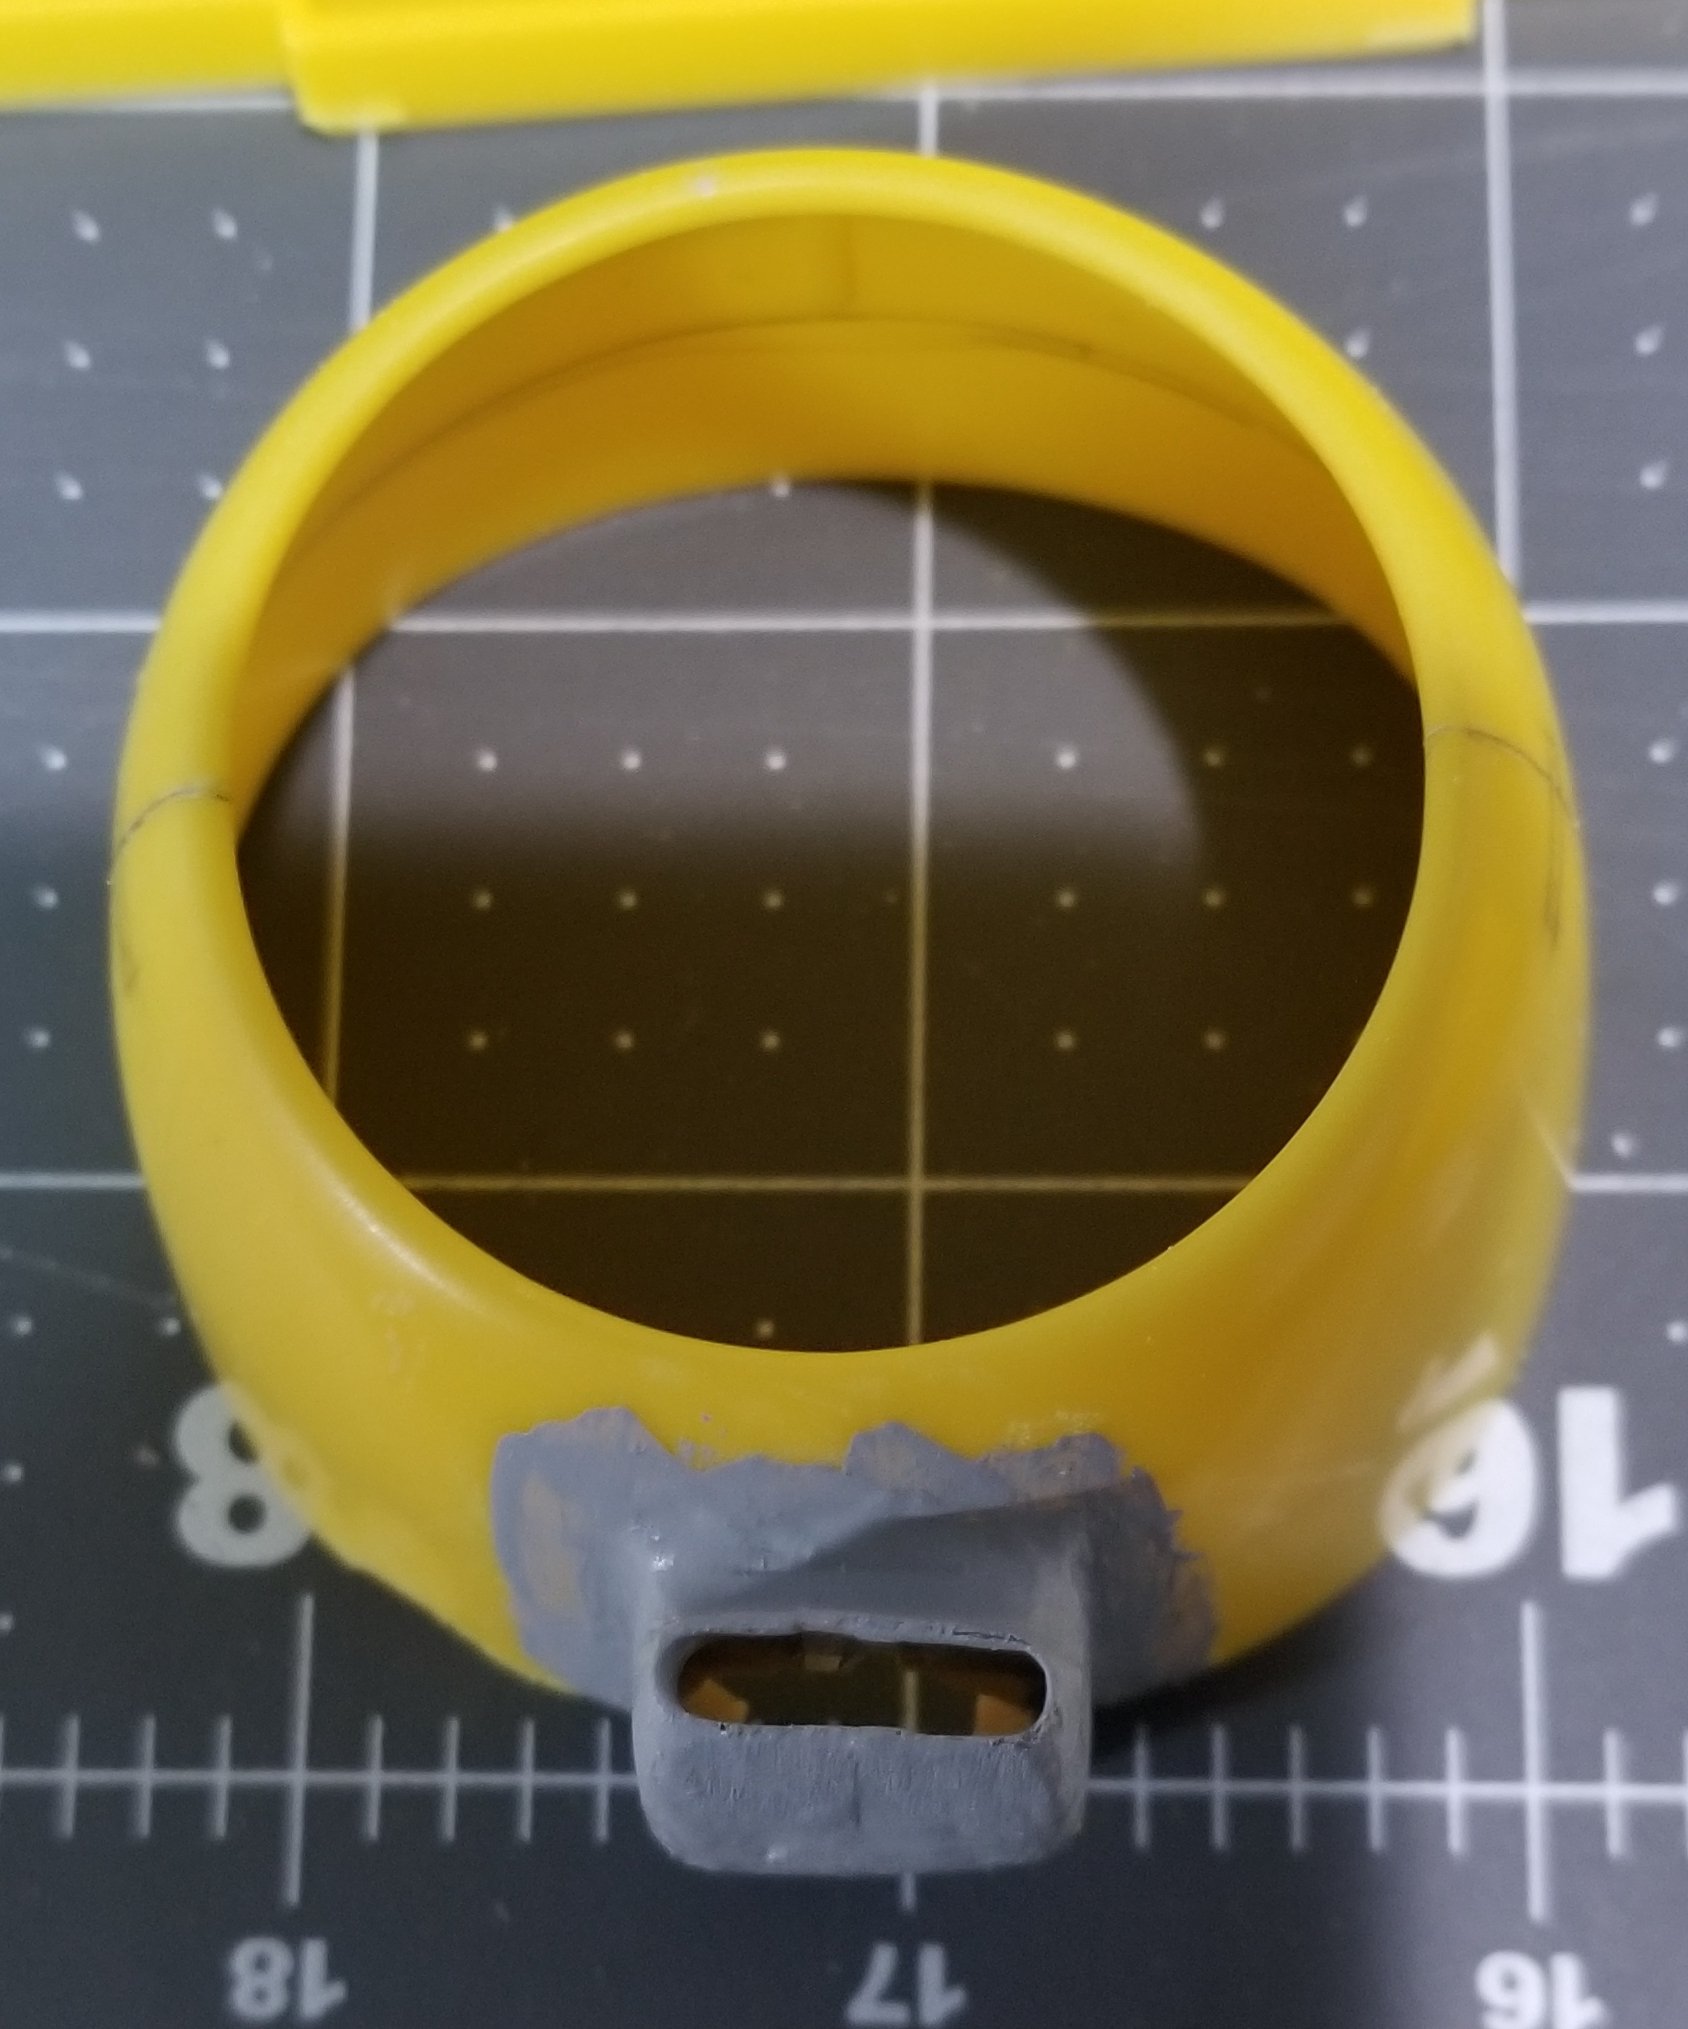
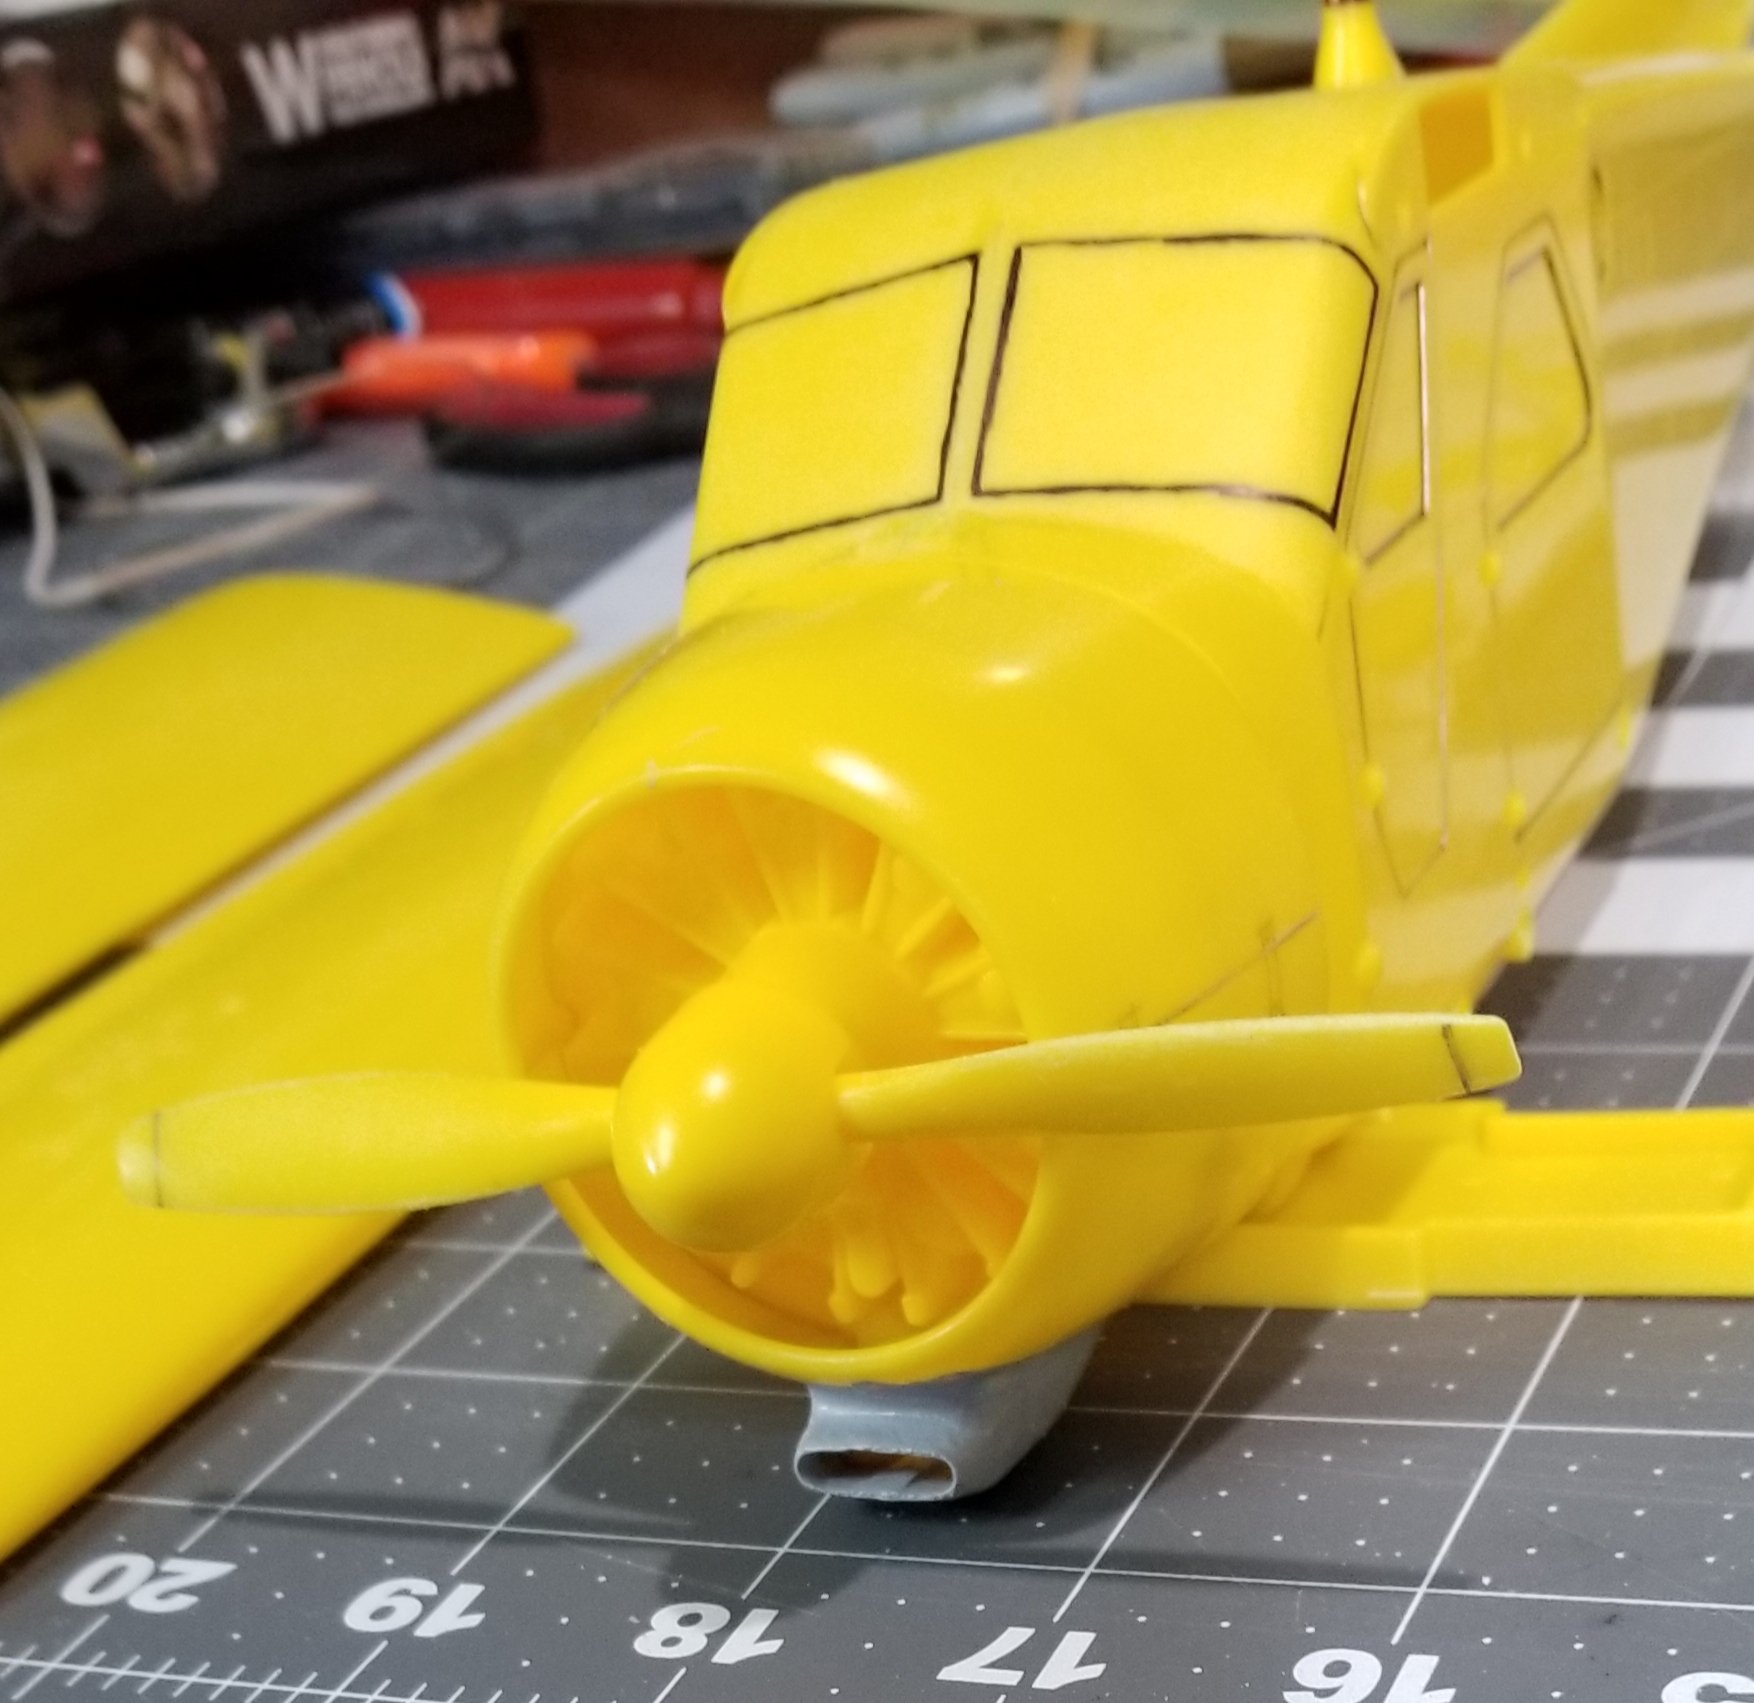
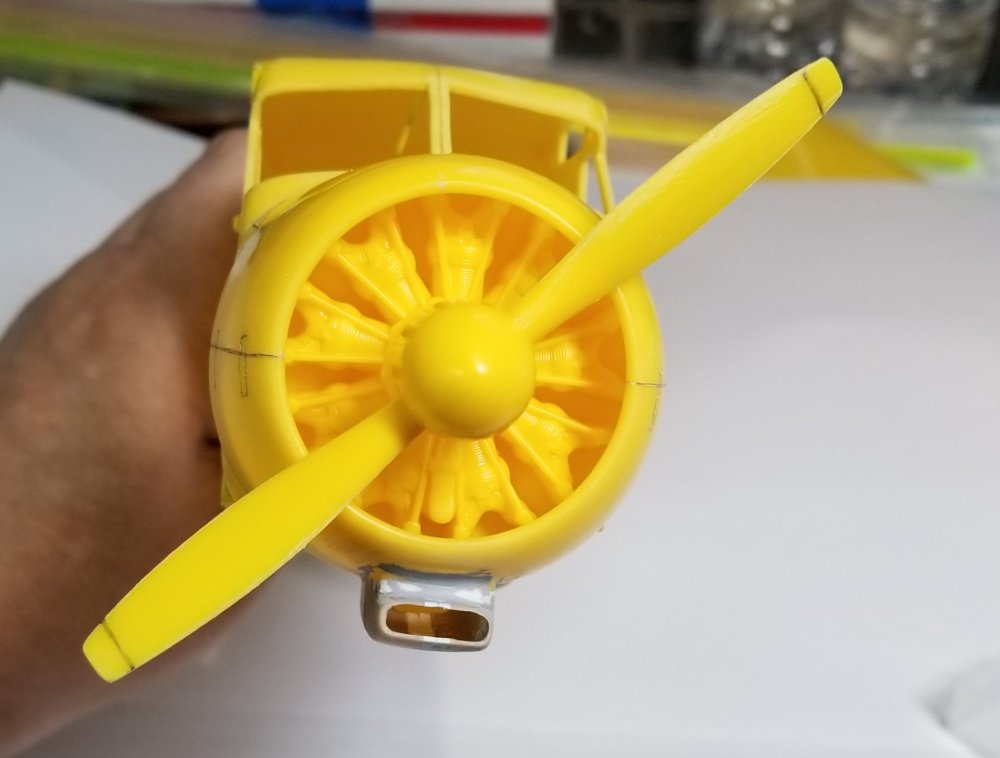
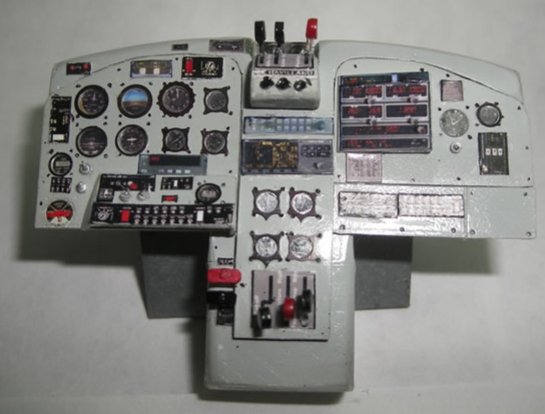
Hey all Well here we go, I'll start by posting some pictures. this is all you get. It has very fine raised rivets and lines. Not to many lines, so easy enough to rescribe. I don't think it will be that hard to cut out the windows, but it will be tricky to make the front wind screens as they cruve around a corner. I'm not sure if I'm going to make the bulged windows in the gargo doors or not. the engine isn't bad for what you get. I think I can modify it to look more correct without too much trouble. I have some 1/24 P&W emblem decals for it that will help. the prop was not the right diameter and the wrong shape, easy enough fix. It's the correct diameter now 8' 6". modified the lower cowl scope to look like the pictures I got from Jeff. I coated it with some mr. Surfacer 500 not bad I made it from an old 1/32 spitfire desert filter cut down the middle and widened about 3/32". here it is mounted on the fuselage. these are the windows and doors that I need to cut out. I'm going to be doing an interior for this. I have to make the complete dash, gauges, yoke, steering wheels, pedals and any other interior stuff, because it dont come with any interior at all. I have some 1/24 PE seats (4) on order they look just like the factor seats for the Beaver. I also have some cast metal door handles and window cranks these are for automotive models but will work fine. It's going to be detailed but not crazy detailed. I'm going to concentrate on the outside to be as accurate as I can make it with the info I have. So follow along if you want. I will be jumping between this my 1/24 Mossie and 1/24 Hellcat so wish me luck and come visit me at the looney bin...lol Ron G


-
1/24 scale DHC-2 Beaver build
CrankyCrafstman replied to CrankyCrafstman's topic in Modelling Discussion
Well guess what came in the mail today? Yep you guessed it. The 1/24 DHC-2 Beaver all the way from Fairbanks Alaska, thanks Troy. I guess I'm going to have to start a work in progress on this, as I've already started on it. So go to the work in progress area for all further info on this build thanks Ron G -
1/24 scale DHC-2 Beaver build
CrankyCrafstman replied to CrankyCrafstman's topic in Modelling Discussion
More pictures...O boy, O boy. .thanks Jeff. Ron G -
1/24 scale DHC-2 Beaver build
CrankyCrafstman replied to CrankyCrafstman's topic in Modelling Discussion
Hey Jeff Any interior or engine shots would be great. Thanks Ron G -
1/24 scale DHC-2 Beaver build
CrankyCrafstman replied to CrankyCrafstman's topic in Modelling Discussion
WUMM!...this is a family oriented forum...lol -
Tamiya Mossie build resumed
CrankyCrafstman replied to JohnB's topic in LSM 1/35 and Larger Work In Progress
See...I told you would be done before me Ron G -
1/24 scale DHC-2 Beaver build
CrankyCrafstman replied to CrankyCrafstman's topic in Modelling Discussion
WOW Jeff! Great shots of the floats, thanks greatly my friend. Ron G -
1/24 scale DHC-2 Beaver build
CrankyCrafstman replied to CrankyCrafstman's topic in Modelling Discussion
Thanks Jeff -
1/24 scale DHC-2 Beaver build
CrankyCrafstman replied to CrankyCrafstman's topic in Modelling Discussion
I think there is one left on Ebay, it's the white plastic one, it's a pacific airways one same manufacturer, but it is the same one just different color plastic. I think the bid was at $60.00 plus $19.05 shipping last I checked, but better hurry these are as scarse as hens teeth. Ron G -
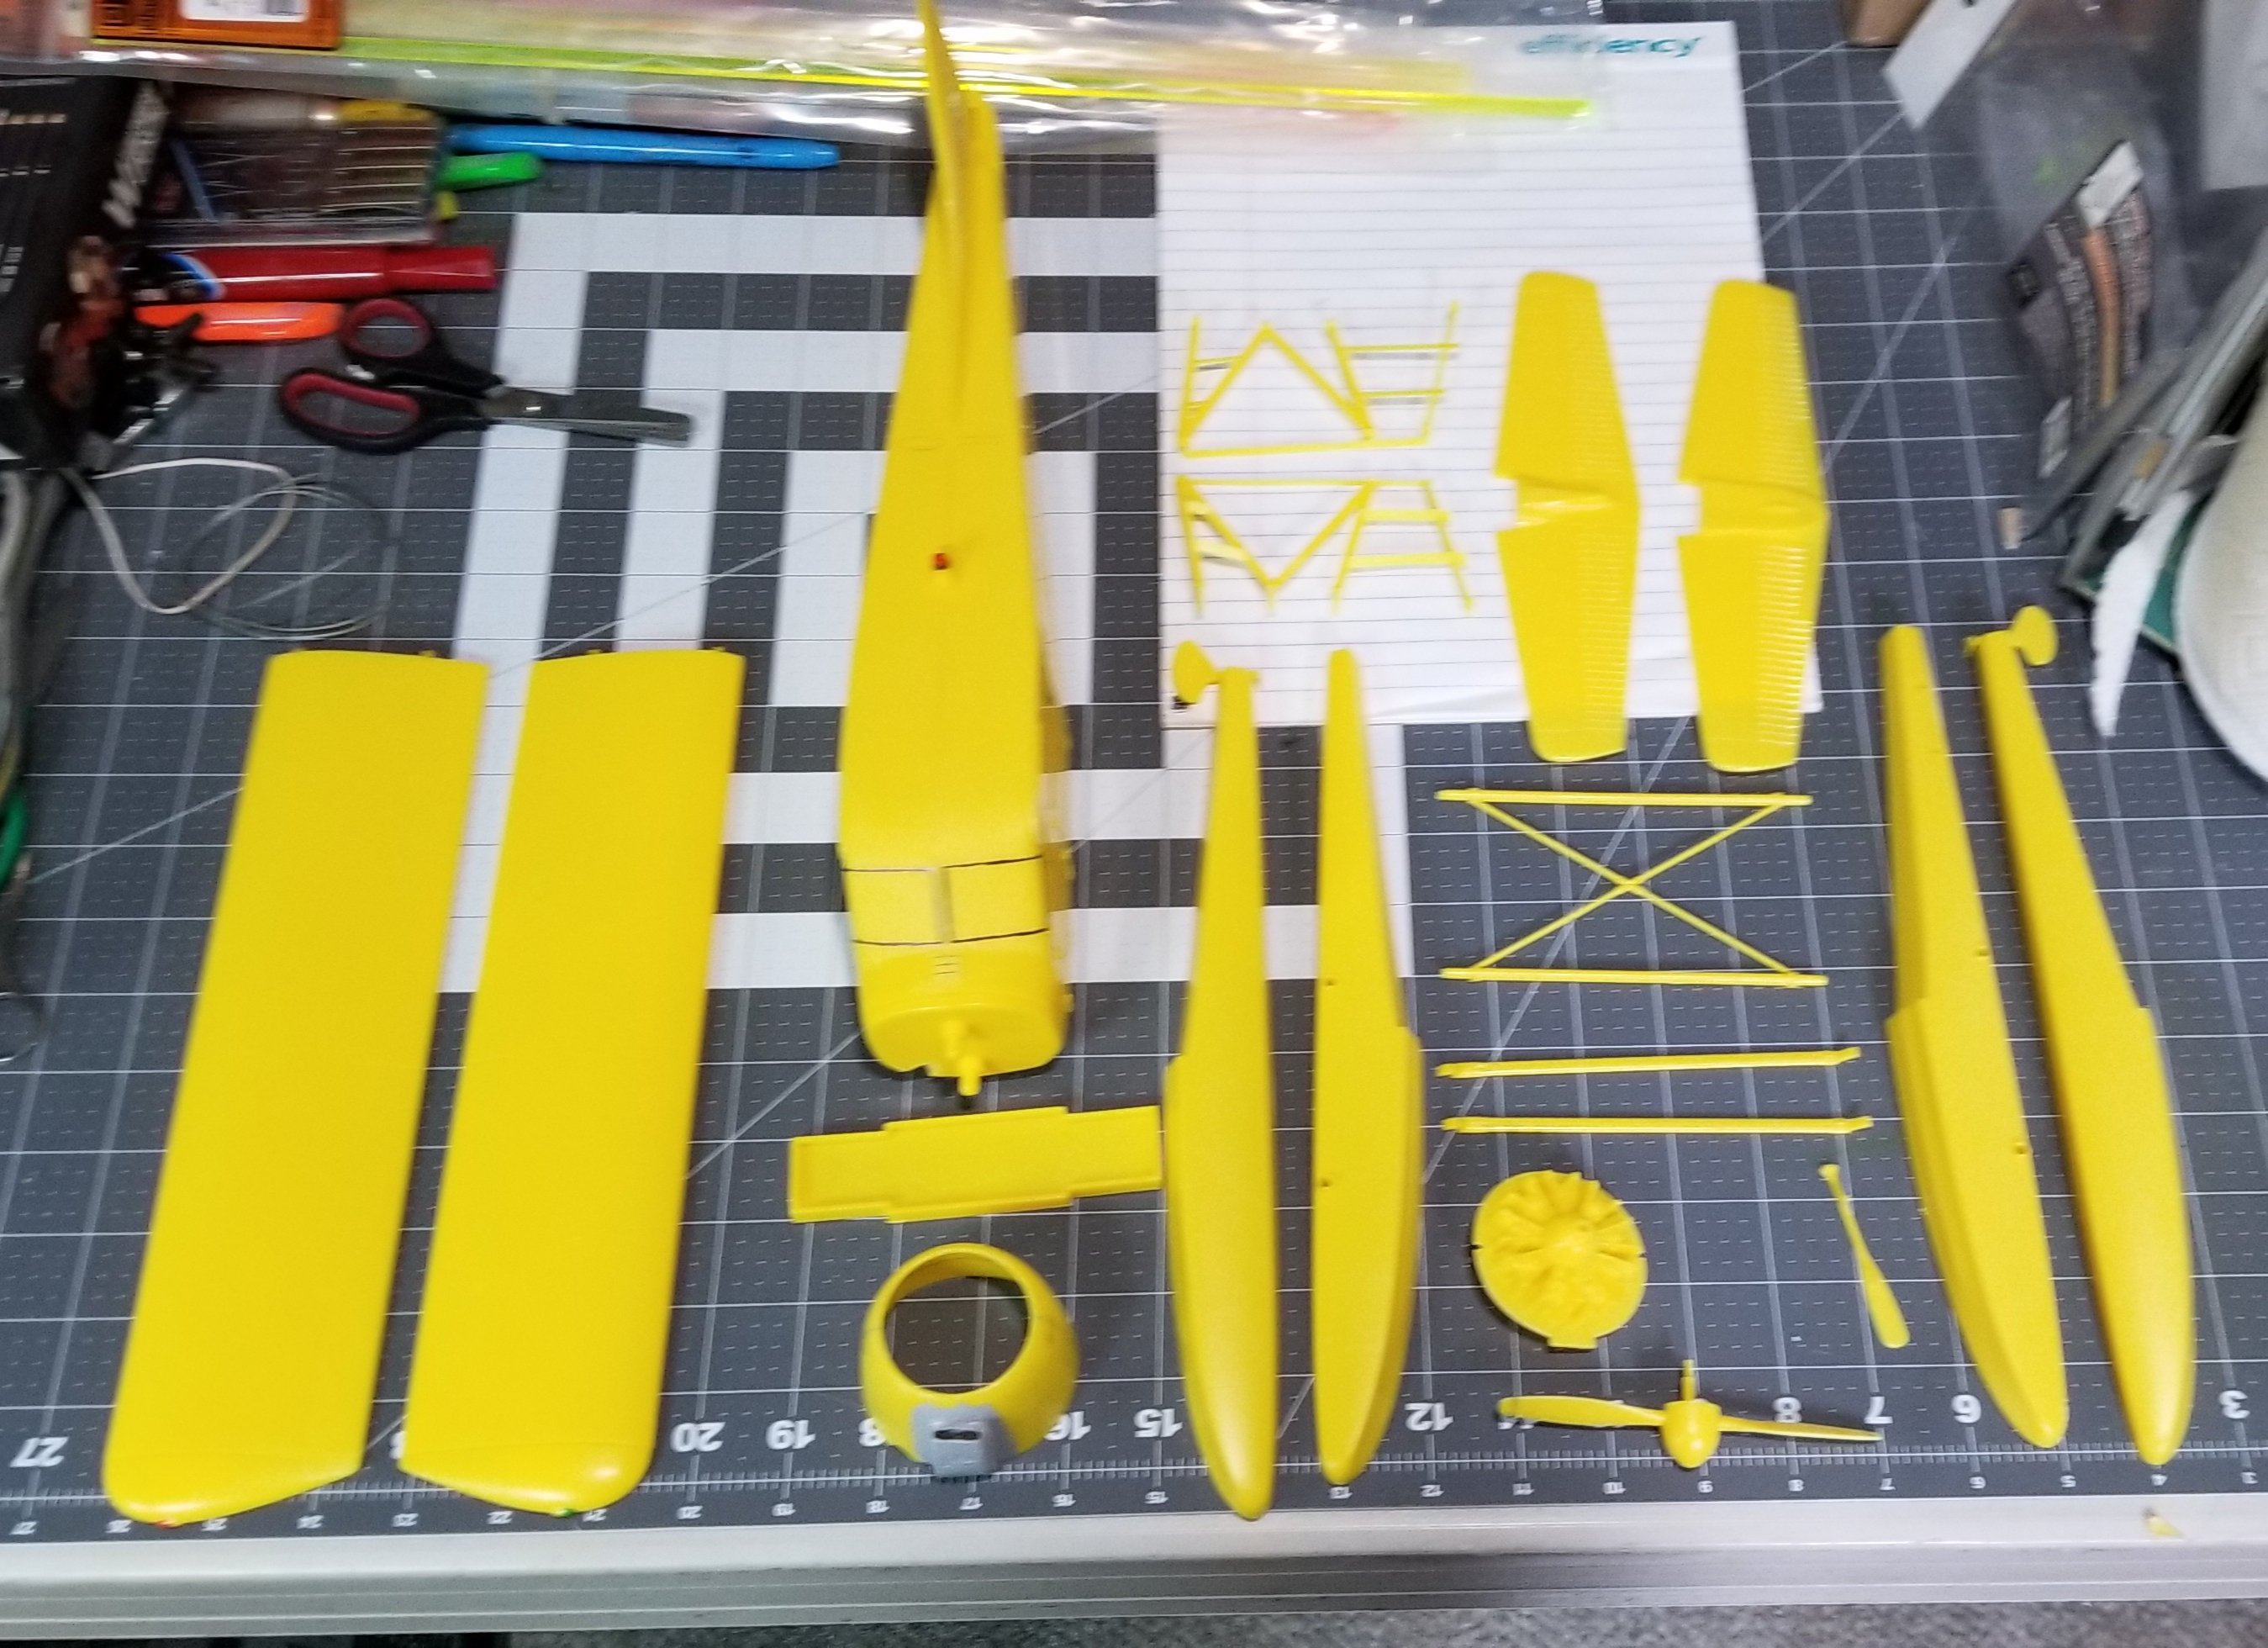
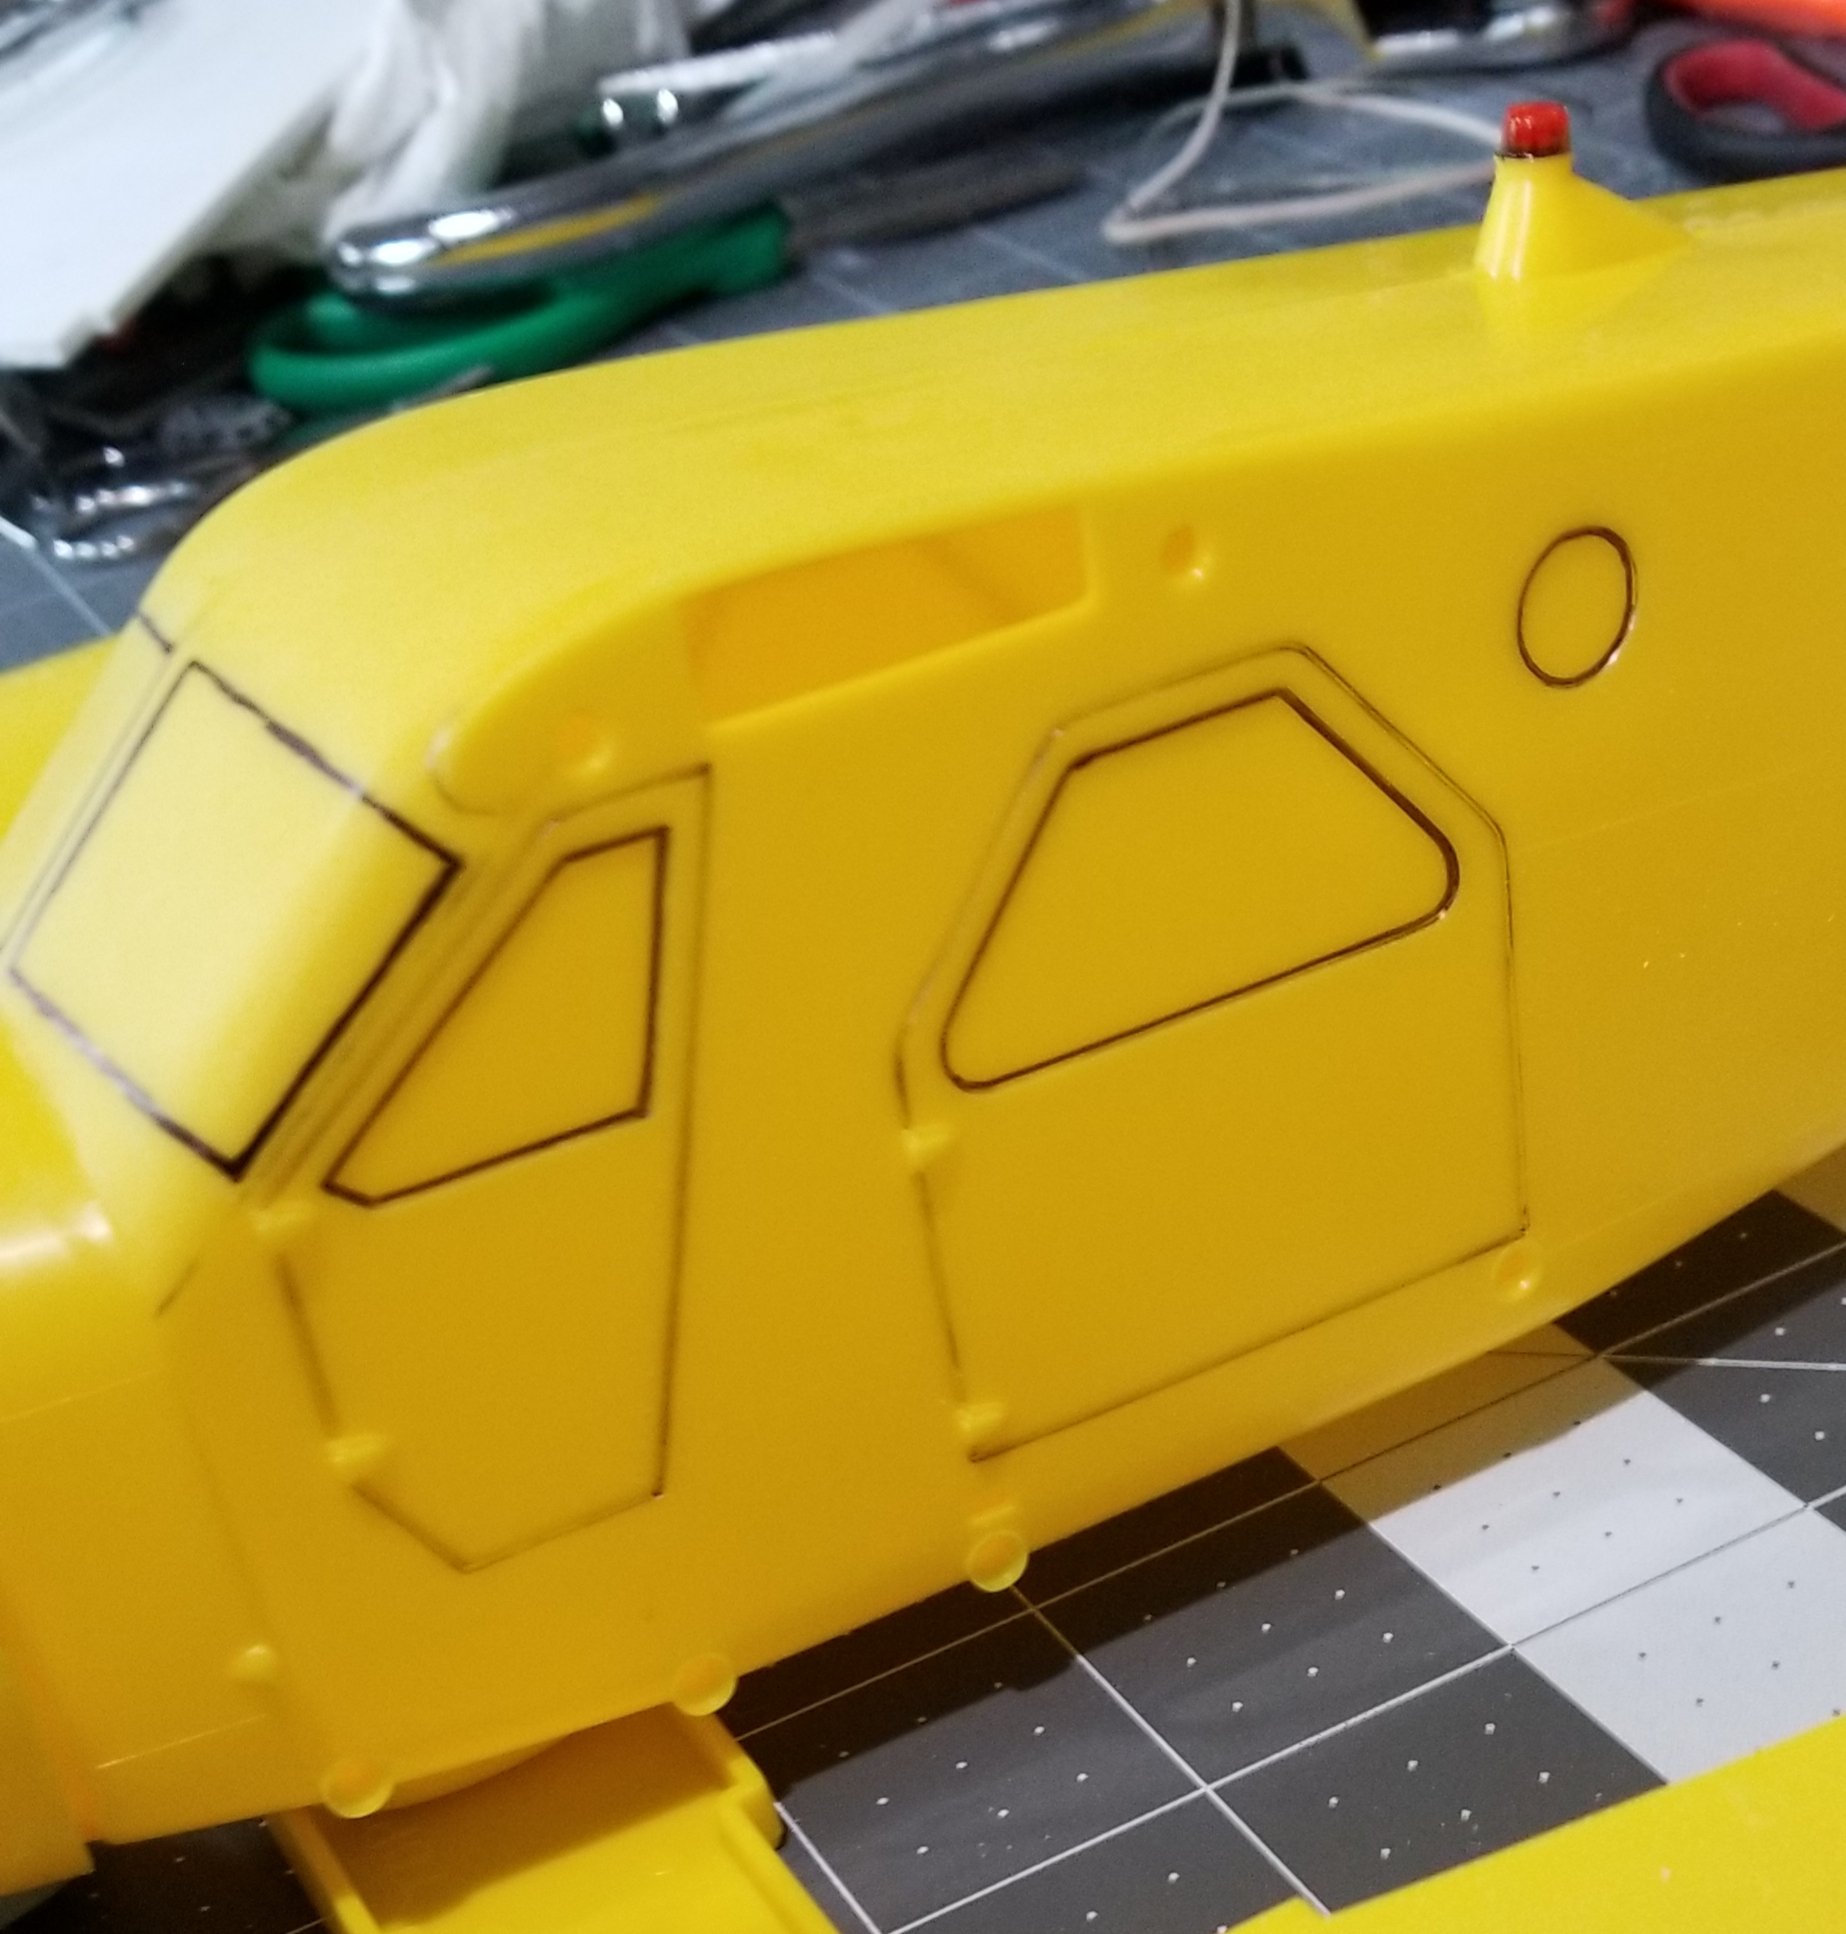
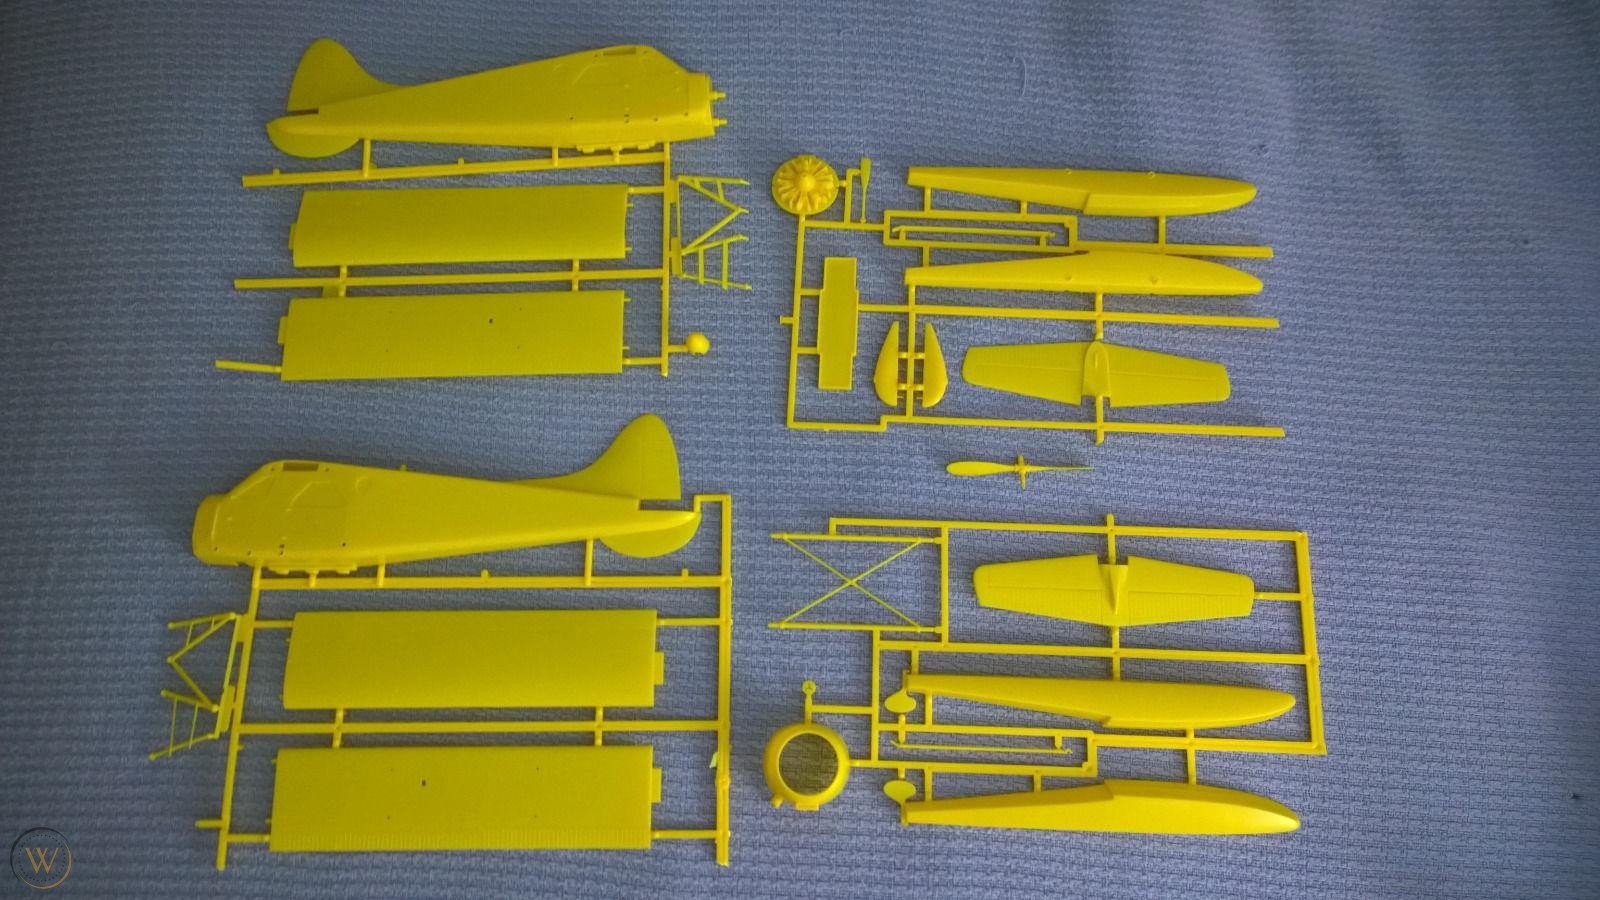
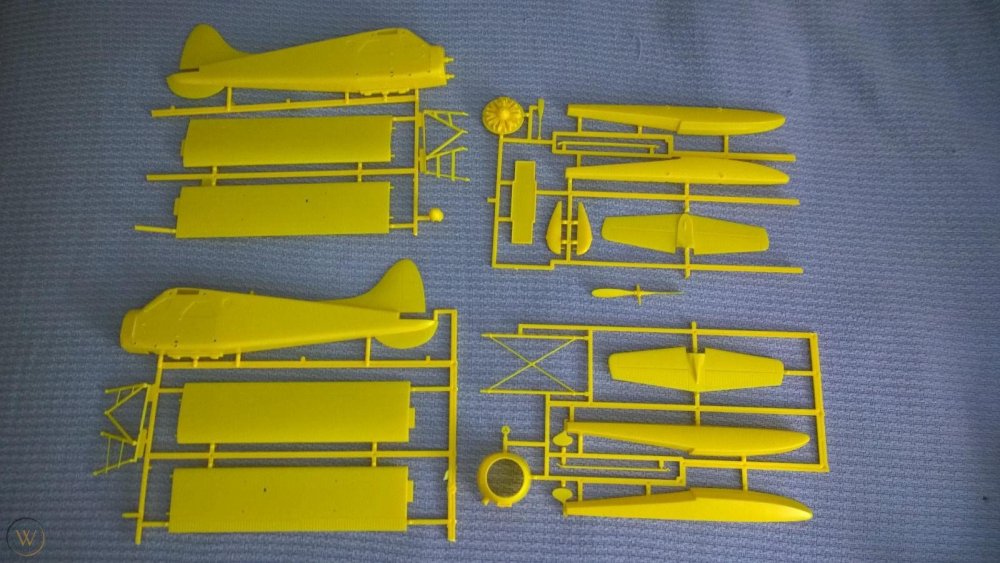
Hey all I just got this from an Ebay auction...yahoo I won. Anyway I am going to be doing a build on this. It is an old (1979ish) snap together kit from Cedar Creek. It is a very simple kit, no windows or interior. It has decals for the windows. I'll be cutting out the windows and making windows from clear plastic sheet. I'll also be doing a complete as possible interior. I'm in the process of accumulating as much info on this plane as I can. If any of you have photos, documents, etc. please share. this is what comes in the kit. Not much. this is what I plan on doing, this was a photo takin from another build. Have to cut out all the flaps, ailerons, elevators and rudder. this is a photo from another build showing what has to be scratch built for the interior. same build showing custom pilot figure and rest of interior. Alot of work! have to make this from scratch. I'm going to be using Airscales 1/24 gauage faces and instrument bezels. Ordered some balls, 1/32" dia. For control knobs also some levers, door handles and PE seats, there for automotive models, but will work fine for what I want. It's going to be a big under taking. All the rivets and line detail is raised, and will need to be sanded off and rescrbed and reriveted, thats going to be fun...lol. So wish me luck and all the help you can give. Thanks Ron G

-
Yeah that one was really cool with the working motor and sound, plus all the rest of the diorama. I'm still looking for a good paint scheme. And I need alot of info on this bird especially interior photos and dimensions. Ron G
-
Possibly my next project in 1/24 scale. it's a 1/24 de Havilland DHC-2 Beaver. Very simple snap together kit. I plan on super detailing this with complete scrach built interior. I have to cut out the window openings and add clear plastic. It's definitely going to be a lot of work. So wish me luck, I'm going to need it! Ron G

-
Thanks Ernie And it's Ron not Don
-
Hey Captain You are welcome. A word of advice the spark plugs are very tiny and intricate, even for 1/24 scale. I'm not trying to say they are bad just be very careful they are difficult to assemble and easilylost to the dreaded carpet monster. You may need extras. I bought three sets of the spark plugs, since I have two Hellcats one set for extras. The plug wires are tricky to attach to the spark plugs so be forewarned. Don't rush take your time and you will have a great kit. Have you looked into the Master Model's brass barrels for the Hellcat, also the brass undercarriage. I recommend both they will make your model better. Ron G