Wouter Posted December 3, 2015 Author Posted December 3, 2015 Picture update. Explanation given on LSP, here: http://forum.largescaleplanes.com/index.php?showtopic=53305&page=9#entry740749 Cheers, Wouter 2
Administrators JeroenPeters Posted December 6, 2015 Administrators Posted December 6, 2015 Really cool detail work! And research!
Administrators James H Posted December 6, 2015 Administrators Posted December 6, 2015 Setting the standard for future builds. A real reference point for my build
Wouter Posted December 13, 2015 Author Posted December 13, 2015 Work continued to the front of the cockpit. I had te recreate the ZFR4 telescope and build a bracket for it. I also had to create the small plexiglass bumb on top of the front canopy. You can see both parts in this photograph: I've made the small bumb form a piece of leftover clear resin casting block. I cut a small triangular piece and started sanding it in the desired shape using consecutive less coarse sanding paper. The telescope and bracket is made from a combination of materials: resin Revi unit, brass rod, styrene rod and copper wire. I think I should have made the diameter of the telescope barrel slightly bigger, but it's to late for that now. Nonetheless, the end result is convincing enough I think. Besides that I made a new rim on the inner edge with some handles which should be there. Since masking on the inside was not a option anymore I had to paint the whole unit by hand. I used a pointy brush 00 for it. The following pictures show the part about for times bigger then in real life, so in my defence the painting looks much worse then it really is . On the backside of the cockpit deck I installed the Peilgerat 6 (the rectangular brown piece). I've lost the original part, but that was to big anyway in my opinion. For substitute I used the one from a Revell Ju88. To the front I installed two more parts on the side, a compass and a red handle which opens the canopy doors. And then ofcourse some test fitting. Yeah, everything fits! The canopy does fit pretty good width wise, though I measured it several times before glueing the fuselage halves together. In the length I needed to scrape of a couple of millimeters to get it in line. This necessitated a new strip of canopy framing on the front part of the canopy. If you look closely you can see it on the picture above. The strip was made from the thinnest styrene sheet I have (don't know the thickness exactly) and punched some new rivets in it.
Wouter Posted December 13, 2015 Author Posted December 13, 2015 Work on the canopy is nearing completion. All that is left now is to add the pilots armor plate behind his head and the canopy doors. But that's something i will do after painting the model ofcourse. I also have to cleanup the glazing a little. Take not that only the inside canopy frame is properly painted, the outside will be done with the entire aircraft. I also attached the nose glazing. The lower part was painted/faired over on the B2 variant, so naturally I did this too. All glazing was held in place with small drops of CA and then the gaps where filled with Hph's epoxy. The epoxy is still drying as we speak. Cheers, Wouter 2
kahunaminor Posted December 14, 2015 Posted December 14, 2015 Bloody brilliant! Committed? You're stark raving mad....in a good kind of way!
Wouter Posted December 15, 2015 Author Posted December 15, 2015 Thanks guys and gal! I've had a lot of fun detailing the cockpit but I'm glad that's about finished. I can almost smell the painting stage now and something I'm really looking forward to do. Getting to the painting stage is where it all comes together.
Paulster Posted December 15, 2015 Posted December 15, 2015 Nice scratch skills. Looking forward to this being completed.
Administrators James H Posted December 15, 2015 Administrators Posted December 15, 2015 That superb. Really enjoyed following this one. Gonna try some Mr Paint?
Wingco57 Posted December 16, 2015 Posted December 16, 2015 I thought this kit was unbuildable? Not! Cees
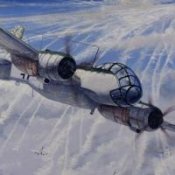
Wouter Posted December 16, 2015 Author Posted December 16, 2015 I thought this kit was unbuildable? Not! Cees Not at all, but it takes a lot of work. While it looks like it would pretty much snap together, it's quiet the opposite. I've had to adjust almost every part, especially the cockpit area. But seeing it coming together is worth it. That superb. Really enjoyed following this one. Gonna try some Mr Paint? Absolutely, here's the paint scheme I will do: I will start with a Mr. Gunze resin primer and after everything is good to go (no scratches, fingerprints, glue etc.) a coat of Mr.Gunze surfacer 1500 Black follows. I've read the some tips from Matt Doogs about this and it's something I want to try. And I really hate pre-shading. After that I will spray a variety of aluminium colors, picking out different panels using Mr.paint and Alclad2. Then I will start with the camouflage. I going to try some of Ralph Rieser's technique with stippling different hues from the same color before spraying the topcoat. Weathering should be restraint, but I'm going for enough visual interest for this rather dull camouflage pattern. The last technique i will give a go is Michael Renaldi's Oil rendering technique. I've some of his excellent 'Tankart' book series which show how to do it. I think there is a place for this on aircraft too, but it should be mire restraint. So, that's the plan anyway 4
Wouter Posted January 19, 2016 Author Posted January 19, 2016 Yeah, progress! Inching closer to the painting stage. Canopy has been masked and the model got a coat of resin primer. I'm currently in the process of detecting and repairing surface damage, rescribing lost panel lines and rivets. Sorry for the crappy pics, but I wanted to show the progress to you guys. Cheers, Wouter The radiotor flaps are a seriously pain in the ass to build. As a matter of speaking I've lost some PE parts again... grrr. 4
Administrators JeroenPeters Posted January 20, 2016 Administrators Posted January 20, 2016 First paint! Looks smooth!
Wouter Posted January 28, 2016 Author Posted January 28, 2016 Hi all, made an update on LSP. Figured I could post it here as well. 4
Administrators JeroenPeters Posted January 29, 2016 Administrators Posted January 29, 2016 Very very nice... Now the fun begins!
Wingco57 Posted January 29, 2016 Posted January 29, 2016 Fantastic rendering of the fuselage details, the radiator looks very good too. Enjoy yourself Wouter.Cees
Administrators James H Posted January 29, 2016 Administrators Posted January 29, 2016 That looks gorgeous in white primer. Construction looks excellent all round. I know this has been a trial, but you did that kit proud

Recommended Posts
Create an account or sign in to comment
You need to be a member in order to leave a comment
Create an account
Sign up for a new account in our community. It's easy!
Register a new accountSign in
Already have an account? Sign in here.
Sign In Now