MikeMaben Posted February 1, 2016 Share Posted February 1, 2016 Coming along very nicely !! Link to comment Share on other sites More sharing options...
tomv1987 Posted February 1, 2016 Share Posted February 1, 2016 Beautiful build Wouter! Stunning work so far. May I ask how you glued those parts to the clear pieces without any fogging taking place? Thanks Tom Link to comment Share on other sites More sharing options...
Wouter Posted February 2, 2016 Author Share Posted February 2, 2016 Beautiful build Wouter! Stunning work so far. May I ask how you glued those parts to the clear pieces without any fogging taking place? Thanks Tom Tom, regarding the canopy, yes I did use CA but only the smallest amount possible. Just a tiny drop of thin CA on the end of a needle or toothpick and then let it flow around the joint. With the part (say a handle) in place, I then used some epoxy on the attachment points and let that dry overnight. Thus, the CA holds the part in place, the epoxy provides the required strength. This way I didn't encounter any fogging issues. 1 Link to comment Share on other sites More sharing options...
Wouter Posted February 2, 2016 Author Share Posted February 2, 2016 Ctrl C/Ctrl V from my post on LSP. Black base with Mr Paint Fine surface primer (MRP-85). I've used a entire 60ml bottle for this model! Link to comment Share on other sites More sharing options...
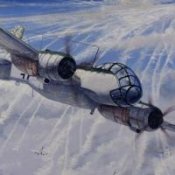
Wouter Posted February 2, 2016 Author Share Posted February 2, 2016 For the next step I was inspired by this picture: I want to use the different shades of aluminium as the real base for my camouflage. For this step I used Alclad II Duraluminium (ALC 102), Mr. paint White aluminium (MRP-9), Anodized aluminium (MRP-81) and Dark aluminium (MRP-146). The colors were sprayed on the the panels allowing the black base to shine through and thus creating a form of pre-shading. The result looks pretty harrowing, but this is just a step in the path to a vibrant, and hopefully subtle, paint job. 2 Link to comment Share on other sites More sharing options...
Administrators JeroenPeters Posted February 2, 2016 Administrators Share Posted February 2, 2016 Saweet! Link to comment Share on other sites More sharing options...
wackyracer Posted February 3, 2016 Share Posted February 3, 2016 To be honest I think it looks superb as is. Very nice build and looking forward to the next instalment! Link to comment Share on other sites More sharing options...
Members Mikester Posted February 3, 2016 Members Share Posted February 3, 2016 That really looks impressive! Link to comment Share on other sites More sharing options...
rieser Posted February 4, 2016 Share Posted February 4, 2016 Great progress! Hope the layering approach delivers the goods!! Cheers, Ralph. Link to comment Share on other sites More sharing options...
Wouter Posted February 6, 2016 Author Share Posted February 6, 2016 A few steps in the painting process. Started with RLM 76 on the underside and sides. Post shaded with RLM 65 and RAF sky (hard to see in the pictures). Next step RLM 75 on the wings, stabalizer and top fuselage. This was then masked in the appropriate scheme with RLM 74. For some variation I left the rudder aluminium as if it was hastely replaced. If have some reference from a few ME410's outfitted this way. Last but not least the yellow fuselage band was masked and painted. To be honest, I'm not really satisfied. The painting step with the aluminium shades didn't do much for the current look and was a waist of time. Besides that I'm not really happy with the colors RLM75 and 74. I think they are a pretty good match with the real thing, but it turns out pretty dark on the model. There's little contrast. I'm thinking about to possibilities: repaint or adjust with weathering. What do you guys think? I'm open for suggestions. 6 Link to comment Share on other sites More sharing options...
Administrators JeroenPeters Posted February 7, 2016 Administrators Share Posted February 7, 2016 Oh yes! Love the mottling! Link to comment Share on other sites More sharing options...
kahunaminor Posted February 7, 2016 Share Posted February 7, 2016 Wouter, I would leave the colours as they are and address your concerns with weathering, filters or another process. To me the colours/scheme look good (particularly the mottling) so I think you are on the right track. Regards, Link to comment Share on other sites More sharing options...
Wouter Posted February 8, 2016 Author Share Posted February 8, 2016 Thanks guys! In the end I redid the RLM74 several times and now I'm a happy man again. I did some research on the web on the RLM74 colour. The odd thing is, almost every colour swatch I see says it's a a grey bleu-ish tint. But almost every scale model I found on the web, in this scheme, have a more green tint... Anyway, I found the combination I was looking for. The first picture is not the best lighting but gives a nice overview of the camouflage patern. You'll probably noticed I'm a big fan of the 'Mr.Paint' paint range. This stuff sprays beautiful and you can control every layer. Even better, it dries really quick. 5 minutes after applying you can already pick up the model, though careful. 5 minutes later you can mask the paint and it won't come off afterwards! The finish depends a little on the colour, as you can see the grey has a nice satin sheen on it, the green is more glossy. Below a detail shot from the picture above. I mean, just look at that finish! Buy this stuff. And no, I don't have any stocks Hmm, two more to wet your appetite Cheers, Wouter 5 Link to comment Share on other sites More sharing options...
rkranias Posted February 9, 2016 Share Posted February 9, 2016 looks spectacular on so many levels! Link to comment Share on other sites More sharing options...
Wouter Posted February 13, 2016 Author Share Posted February 13, 2016 Thanks gents for checking in, glad you like it so far! Another update, this time it was masking time. Not my favourite part, but hey, pat of the build right. For the particular example I'm building are no decals available so I had to resort to paint masks. Though next time I'll think I will be using decals again. Maybe some wet transfer stuff from HGW. Anyway, they result is convincing enough for me. I have to do some touch up here and there. Especially the horizontal beam over the yellow band. The black part is to thin, but touching will be pretty straight forward. I'm waiting on some free line mask from Uschi for the walk/no walk lines. After those have been painted the model gets a gloss coat and regular decals for the small parts will be applied. In the mean time I will work on smaller details like the remote rearward firing guns and landing gear. I'm really enjoying this part of the build. Seeing the model come to life is very rewarding. Can't wait to remove those paint masks from the cockpit! 3 Link to comment Share on other sites More sharing options...
Administrators JeroenPeters Posted February 13, 2016 Administrators Share Posted February 13, 2016 Loving this! VERY much! Link to comment Share on other sites More sharing options...
Wingco57 Posted February 13, 2016 Share Posted February 13, 2016 Wouter, You made your own masks? Cees Link to comment Share on other sites More sharing options...
Wouter Posted March 2, 2016 Author Share Posted March 2, 2016 Wouter, You made your own masks? Cees Hi Cees, the 'M8' and the outlined black line are masks of my own making. The others are from Maketar. Anyway, we're getting there! Almost at the weathering stage. I finished the decals tonight and after that it was time to pull of the canopy masks, oh yes. I also wanted to try out something from Uschi, 'Luftwaffe dashed lines' masks. I wasn't really happy with the kits decals for the dashed lines so I thought why not try the masks. It was a bit of work to put them in place, but boy, these things deliver! Here are the masks in place. Take note that after taking this picture I masked the edges with some Tamiya tape to prevent overspray. I took a light grey instead of pure white. The results are very convincing if i might say so. This is something I'm going to use on a regular basis from now on. Next up was the wheel strut. Some wiring needs to be added and a few more bits and pieces. And the main wheels And this is where I stand now with the build. Coming along nicely Thanks for looking! Cheers, Wouter 5 Link to comment Share on other sites More sharing options...
Members Mikester Posted March 3, 2016 Members Share Posted March 3, 2016 That really looks impressive, wow! Link to comment Share on other sites More sharing options...
Administrators JeroenPeters Posted March 3, 2016 Administrators Share Posted March 3, 2016 Cant wait to see some weathering and penel lines on this. Final stretch now. Great work! Link to comment Share on other sites More sharing options...
Wingco57 Posted March 3, 2016 Share Posted March 3, 2016 Wouter, Those masks have really turned out great. They really make a difference as opposed to decals. No silvering and looking painted on (which the are). Cees Link to comment Share on other sites More sharing options...
ophthoidoug Posted March 3, 2016 Share Posted March 3, 2016 great tip for Uschi "walkway" masks - just ordered some! Link to comment Share on other sites More sharing options...
MikeMaben Posted March 6, 2016 Share Posted March 6, 2016 That's looking great Wouter !! Link to comment Share on other sites More sharing options...
Wouter Posted March 17, 2016 Author Share Posted March 17, 2016 Hi all, On Lsp someone pointed out that the wheelhubs should be gloss black and that the rudder was also fabric covered instead of aluminium. Turns out he's right so I mad those changes. The rudder was partially covered in fabric and this part is now painted in red oxide. It certainly gives you something to look at and balances nicely with all the details in the cockpit. Before that, I did several things last weeks. After finishing with the decals I sprayed a gloss coat. I let this cure for several days and then started with the pinwash. This wash was made of Vallejo paint and thinner. I used a dark grey (mixed) for the upper side and a light grey for the underside. Is also attached the formation lights at the wingtips. I really should have done this earlier because it took a lot of time to get them in shape with the wings and redo the painting there. This was followed by a flat coat (50% Mr. Hobby flat and 50% Mr. Color Leveling thinner). Thanks Jeroen for the tip, I finally have a flat coat that works. Mr. Color leveling thinner delivers. After that I sprayed the exhaust stains. This was done with heavily thinned Mr.paint eh... paint (also Mr. Color leveling thinner). I started with brown, followed by black and also a little Tamiya XF19 smoke. With all the pictures I have collected there are not many that show the exhaust stains. In the end I found a few pictures of a captured Me410 flown by the British. This showed some heavy staining on the underside. I also found anther one which showed some staining on the upperside. Take note that the staining is only visible on the right hand engine side where there is no air intake. I have tried to replicate the exhaust staining from these two pictures on the model. Furthermore I redid the spinners and propeller blades. Checking the picture of the real thing I'm trying to replicate showed that the spiral on the spinner doesn't extend over ther entire spinner but stops halfway. The part closer to the engine has the same color as the blades, RLM 70. Besides that, the paintjob on the blades got a bit damaged during the build, so I had to redo them anyway. Last but not least I redid the wheelhubs and the rudder. Now I can concentrate on adding the last bits and pieces and then this build will be finished at last! Cheers, Wouter 3 Link to comment Share on other sites More sharing options...
Administrators Fran Posted March 17, 2016 Administrators Share Posted March 17, 2016 DANG! Perfect!! Epic really! Fran Link to comment Share on other sites More sharing options...

Recommended Posts
Create an account or sign in to comment
You need to be a member in order to leave a comment
Create an account
Sign up for a new account in our community. It's easy!
Register a new accountSign in
Already have an account? Sign in here.
Sign In Now