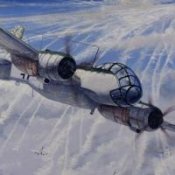
Wouter Posted October 30, 2015 Posted October 30, 2015 Hi everyone, This one will fit in just right for this group build, AIMS Ju388 L1 conversion set for the Revell Ju88. Surely I will finish my Me410 first as I've said many times before. It's just that I'm rebuilding my man-cave at the moment and can't build models in the mean time. Anyway, the finish line is in sight on that project, so I hope the be modelling again soon. I will make a post in the general forums on the new man-cave in the 'show us your workbench' sub-forum. Seeing that I still have a year from now on, I'm confident that I will be able to pull of this conversion in time for this GB. This will be the starting point . Cheers, Wouter 9
Wingco57 Posted October 30, 2015 Posted October 30, 2015 Hi Wouter, This is one project I will follow for sure. Very nice subject. Cees 3
Administrators JayDee Posted October 30, 2015 Administrators Posted October 30, 2015 Now you have my attention I'll be glad to see this built and that canopy tackled. I know there has been a little bellyaching by some about the supposed fit of it. Maybe just some logic applied.... 2
mywifehatesmodels Posted October 30, 2015 Posted October 30, 2015 Looking forward to this one, VERY MUCH! I was considering doing this for the GB, as well (but maybe with a twist ). We'll see how my build schedule works out in the coming months. I did do some preliminary fitting of the canopy/nose parts and don't believe it will be an issue, so long as one takes their time in trimming/fitting them. I'm a lot more scared about all the PE in the cockpit, truthfully. Again, I can't wait to see you work your magic on this one. John 2
Administrators JeroenPeters Posted October 30, 2015 Administrators Posted October 30, 2015 Hi Wouter, FINALLY someone is going to properly tackle this... Godspeed! 3
seiran01 Posted October 31, 2015 Posted October 31, 2015 Oh good another build! I've got mine partially built with a WIP thread over on LSP 1
Wingco57 Posted October 31, 2015 Posted October 31, 2015 You can post it here on LSM too (nudge nudge wink wink) Cees 1
Wouter Posted October 31, 2015 Author Posted October 31, 2015 Hi guys, thanks for the support. I'm aware of the canopy controversion, but the last news on that is that John from AIMS is going to provide a better version to everyone who bought the kit, so I think we will be good. Although I really liked the idea of a HPH made canopy... It's going to be a pretty big kit with a winspan of around 70 cm! I'll keep you guys updated! 1
Wouter Posted May 9, 2016 Author Posted May 9, 2016 Started preparing the conversion and some preliminary construction on this bad boy. While not as big as a B17 it still is a pretty large kit with a 70 cm (27,5 inch) wingspan. I have just enough room to handle it on my workbench. I did get the replacement canopy's from John (AIMS) and it took all four of them to get one decent fit. This has also something to do with my inexperience with vacuum formed canopy's but nonetheless it still pretty hard to get it right. My first findings are that the big parts of the conversion will go on pretty well, nothing an average modeler can't handle. The cockpit won't be so easy, there's a lot of scratchbuilding to do. This is kind of a disappointment, you pay big money for this conversion. I know it's a one man job and one has to applaud John for bringing this conversion on the market. Having done all his research I still have the feeling he could have taken it a step further. Besides that, the castings are not as sharp as I would like them to be, thus another point of major attention to get it right. This is certainly the case for the engines, which are just bad copy's in my opinion and the shape of the propeller spinners is just not right. You can say, hey, you won't see the engines anyway, but as I said, If I'm paying 200 euro I expected a little more. Nothing that can't be fixed, so we'll see how things turn out. Night all, till next time. 6
Wingco57 Posted May 10, 2016 Posted May 10, 2016 It looks menacing. And a lot of hard work by the look of it too. Cees 1
Administrators JeroenPeters Posted May 10, 2016 Administrators Posted May 10, 2016 Wow! And I can see that Jig coming in handy. Very cool. How's the canopy fit? 1
Wouter Posted May 10, 2016 Author Posted May 10, 2016 It does fit now, but still needs serious work to blend in properly. 1
Administrators Fran Posted May 10, 2016 Administrators Posted May 10, 2016 My favorite from the 88 family! I really keep my eye on this!!! Fran 1
rkranias Posted May 13, 2016 Posted May 13, 2016 Looking good. This is going to be a fun journey. Am sure you will beat the canopy issues into submission. AIMS did a great job on the castings. Agree with you on the 801 castings. When the heck is Revell going to release a 1:32 C2, G1*, 188*? They have the *801 mold. 1
Wouter Posted May 13, 2016 Author Posted May 13, 2016 I was thinking about buying two Revell Fw190 F8's, but it's not going to be worth it. You won't see much of the engines anyway, so I will work with the ones provided by AIMS. As I said, it's not a real problem, but for the price I paid for it, I expected it to be a little better here and there. 2
Administrators JeroenPeters Posted May 14, 2016 Administrators Posted May 14, 2016 I was thinking about buying two Revell Fw190 F8's, but it's not going to be worth it. You won't see much of the engines anyway, so I will work with the ones provided by AIMS. As I said, it's not a real problem, but for the price I paid for it, I expected it to be a little better here and there. I've learned not to expect too much from AIMS. Buying two 190's as donor kits will make this build epic but expensive... 1
Wouter Posted May 14, 2016 Author Posted May 14, 2016 Absolutely Jeroen, I just have to adjust my expectations on this one. Build one of the wings last night. The wingtip extension was way to fat and needed to be sanded down. The same for the aileron extension but the other way around. Not thick enough and about 1mm to wide. 1
Administrators JeroenPeters Posted May 14, 2016 Administrators Posted May 14, 2016 Absolutely Jeroen, I just have to adjust my expectations on this one. Build one of the wings last night. The wingtip extension was way to fat and needed to be sanded down. The same for the aileron extension but the other way around. Not thick enough and about 1mm to wide. At least you don't have to be afraid you're sanding delicate surface detail from the resin. Since there is hardly any! Godspeed! 1
Wouter Posted June 7, 2016 Author Posted June 7, 2016 Right, back from vacation and I have a few days left before I need to start working again. That should give me some decent time to get back up to speed with this build. Cheers! 5
Wouter Posted June 16, 2016 Author Posted June 16, 2016 So, did I make any progress? Yes I did. But I'm not sure what easier to build, a full scale resin kit or this conversion.... Anyway, on to the pictures. At first I started with a few bits and pieces for the cockpit. A lot of PE, and with some patience this is perfectly doable Then my attention went on to the engines. A bit of a warning here as I mentioned earlier, this part of the conversion is not the best in my opinion. The engine facings are really bad copy's from a Hasegawa fw190. There's almost no detail and some parts are obscured by others. The good thing is, you won't see much of it anyway. I brought them to life with a bit of painting and some copper wire. Next part is the fan in front of the engine. This is a very fidely part to build since you have to align 12 PE blades. The good thing is that the resin part has some pre drilled holes so you don't have to worry about the right distance between the blades. The bad thing is that the blades, once glued are a bit too long and the fan doesn't fit in the cowling. Careful trimming with about 0,5mm per blade will fix this. Here's the engine within the cowling and with the fan in front. As I said, you won't see much of it luckily On to the engine cover then. As you can see from behind the resin is really thick (the grey resin is cast by MDC by the way). As the engine is a little bigger on the topside the the junkers engines provided in the Revell kit you get a step of about 1 mm. Instead of applying putty and try to let it blend in i removed the excess resin from the inside of the engine cover. Here's the result and from the top and from behind and a picture from the real thing (take note that the exhaust is shaped a little different as this was an early itteration for the exhaust) 2
Wouter Posted June 16, 2016 Author Posted June 16, 2016 On to the radiator flaps on the backside. First a picture of the real thing. Look at the inwards curve (arrow) Here's the kit engine. Take note that the inward curvature is not steep enough. If you glue the radiator flaps they will lie flat on the engine (as I found out the hard way. In the end I cut the entire lower back part of the engine and did some plastic surgery . here's the result with the radiator flaps installed, much better if I may say so. Last but not least some other bits and pieces and the wingtip (to thick, needs lot's of sanding to blend in) That's it for now. On to the right wing en engine. I recon this will be a little faster now I have worked how to install and fix/adjust certain parts. Cheers 3
Wouter Posted October 2, 2016 Author Posted October 2, 2016 Evening all. With the left wing almost finished I'm now working on the right wing. Things do go a litle faster now I know what to do. I thought I give you guys a little picture update of the enhancements I made on the power egg. So here it goes: This part needs a steeper curve So let's cut the part off Then cut off another 4.5 mm from that like this Then take a coarse file and start to file in the direction of the arrows. The center part needs to be thinned with about 1 mm. And after cleaning things up you should end up with something like this and glue the altered part back on Then the top part. Again look how thick the casting is. That's no good scale wise. here I marked which part to thin this does the trick Right, class dismissed 1
Wouter Posted October 2, 2016 Author Posted October 2, 2016 Soldering on with this beast. Got the basic work on the wings completed. and the wingtips. These went on pretty straightforward. Just a bit to thick in comparison to the Revell wings. After sanding and some putty all was well. Just need to rescribe panel lines. I then started constructing the fuselage. Just build as Revell intended and cut off at the given points. Take note that the top closing panel needs some blending in around the panel lines, more then I expected. The Ju388 tailpiece is a drop in replacement. I made a little error on the fuselage cut, so I needed to revert to using a shim and some putty. Sadly the panel lines are pretty week and feature a inconsistent depth. Besides that they didn't form a continuous line with the original Revell fuselage. Fill and rescribe. Sadly the resin is a bit brittle and this makes it very hard to get an even panel line. I tried my best but as you can see in the pictures I still have some cleaning up to do. I also tacked the 'bodenwanne' in place. Again the panel lines are not very nice/straight/even depth. Besides that you have to scribe the camera panels yourself (I marked the positions). I guess Pastor did this so you can choose to build the bomber version or the recce, but since I hate scribing.... Anyway, the bodenwanne does fit pretty good if you clean up the inside as per instructions. After glueing some blending with putty will do the job. And it gives your model a hefty weight which feels rather nice holding it in your hand. Last but not least I made an early mock up with one of the propellers. Guess that will turn out OK with some more work. Sorry for the crappy pics. I just had my phone at hand. Cheers, Wouter 1

Recommended Posts
Create an account or sign in to comment
You need to be a member in order to leave a comment
Create an account
Sign up for a new account in our community. It's easy!
Register a new accountSign in
Already have an account? Sign in here.
Sign In Now