
James H
-
Posts
3,257 -
Joined
-
Last visited
Content Type
Profiles
Forums
Events
Gallery
Everything posted by James H
-
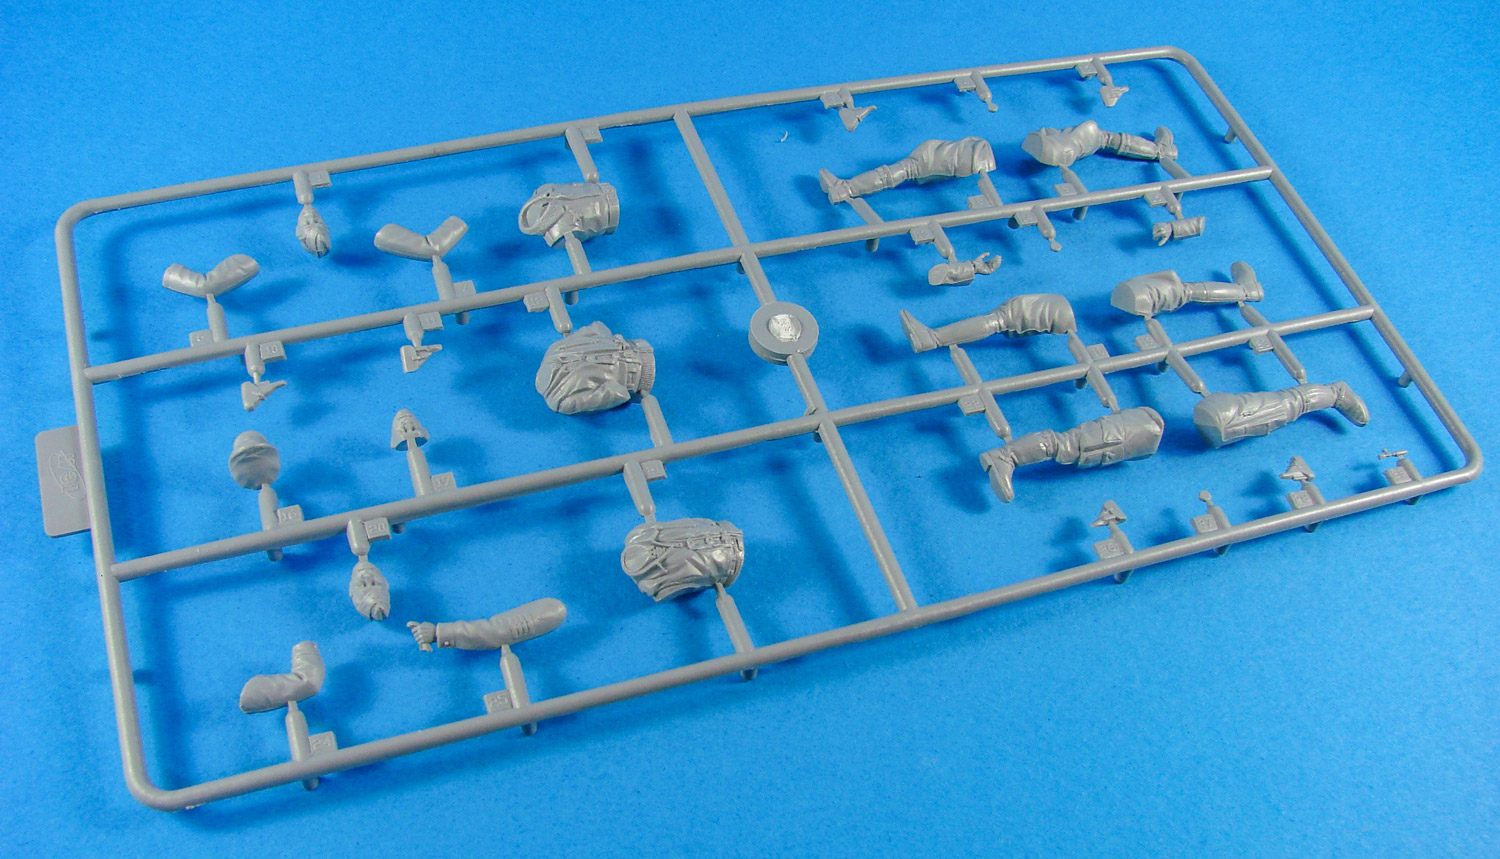
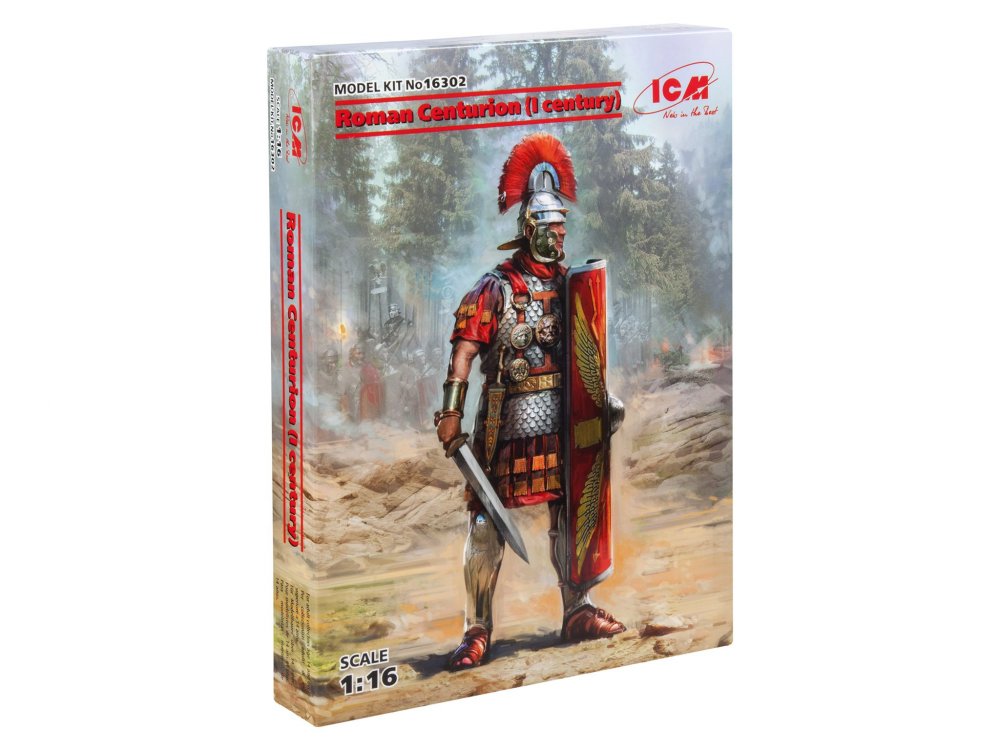
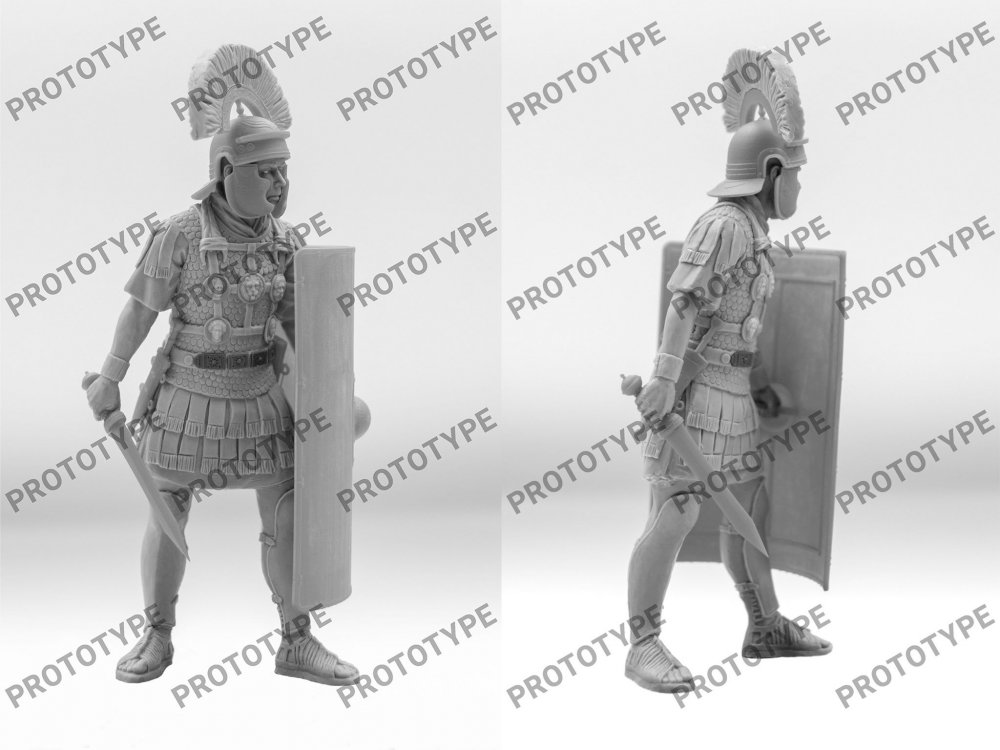
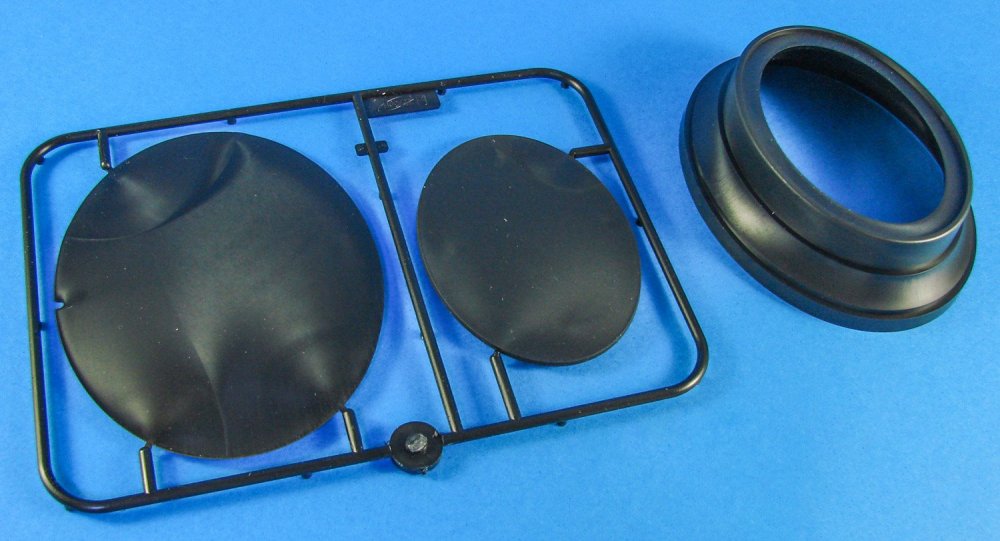
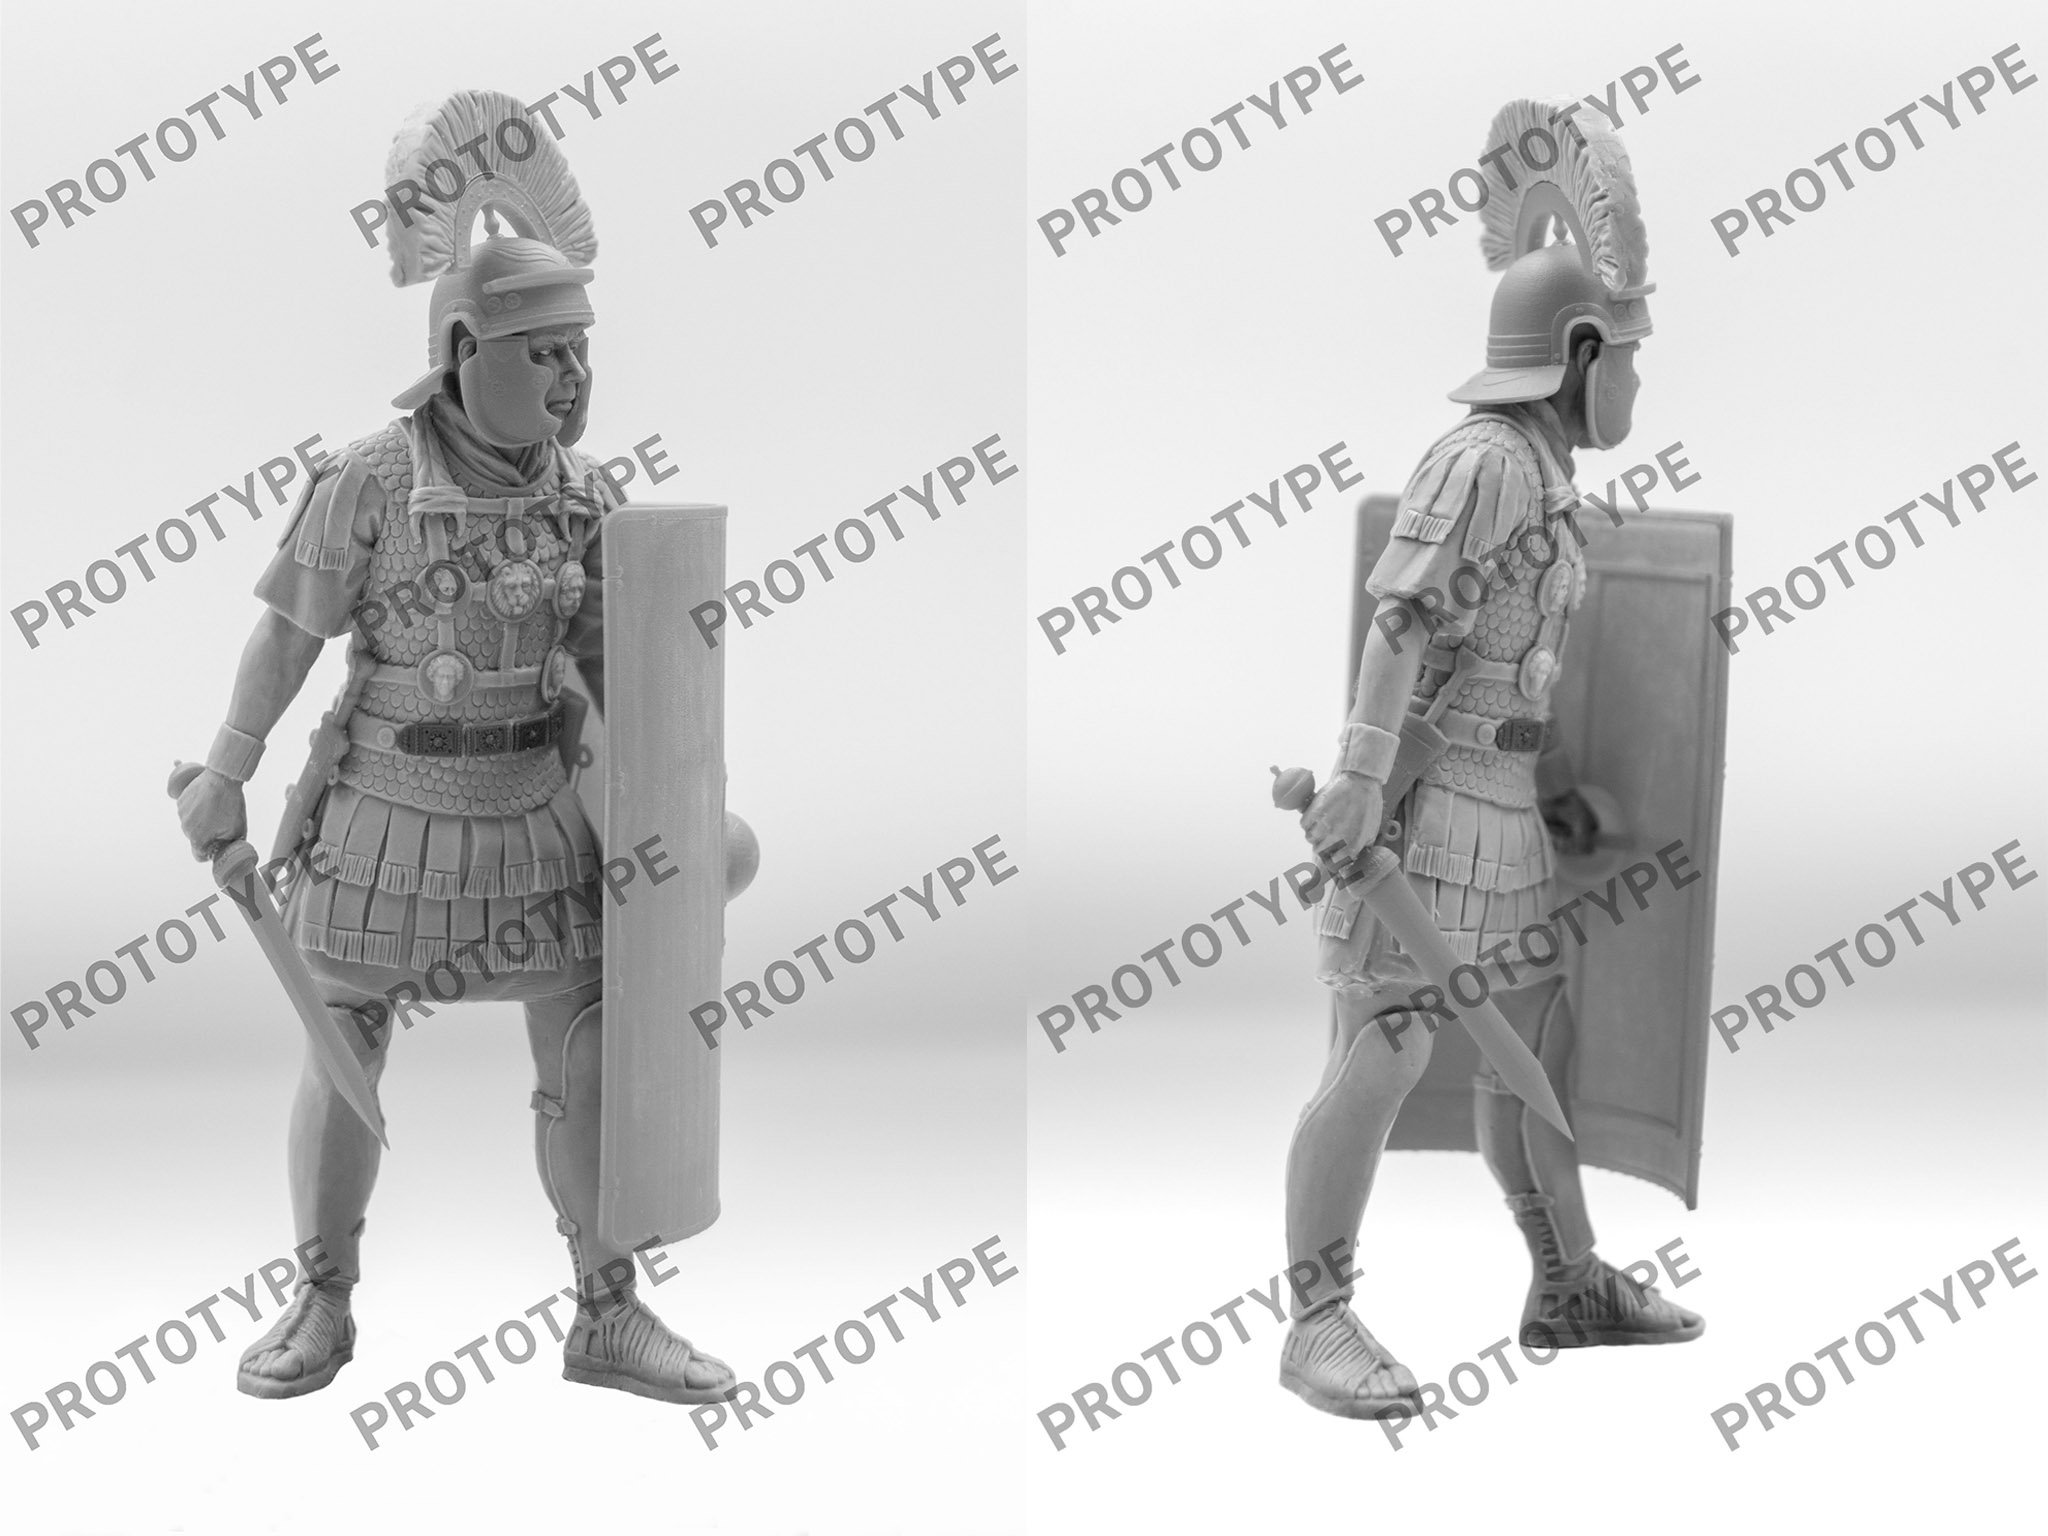
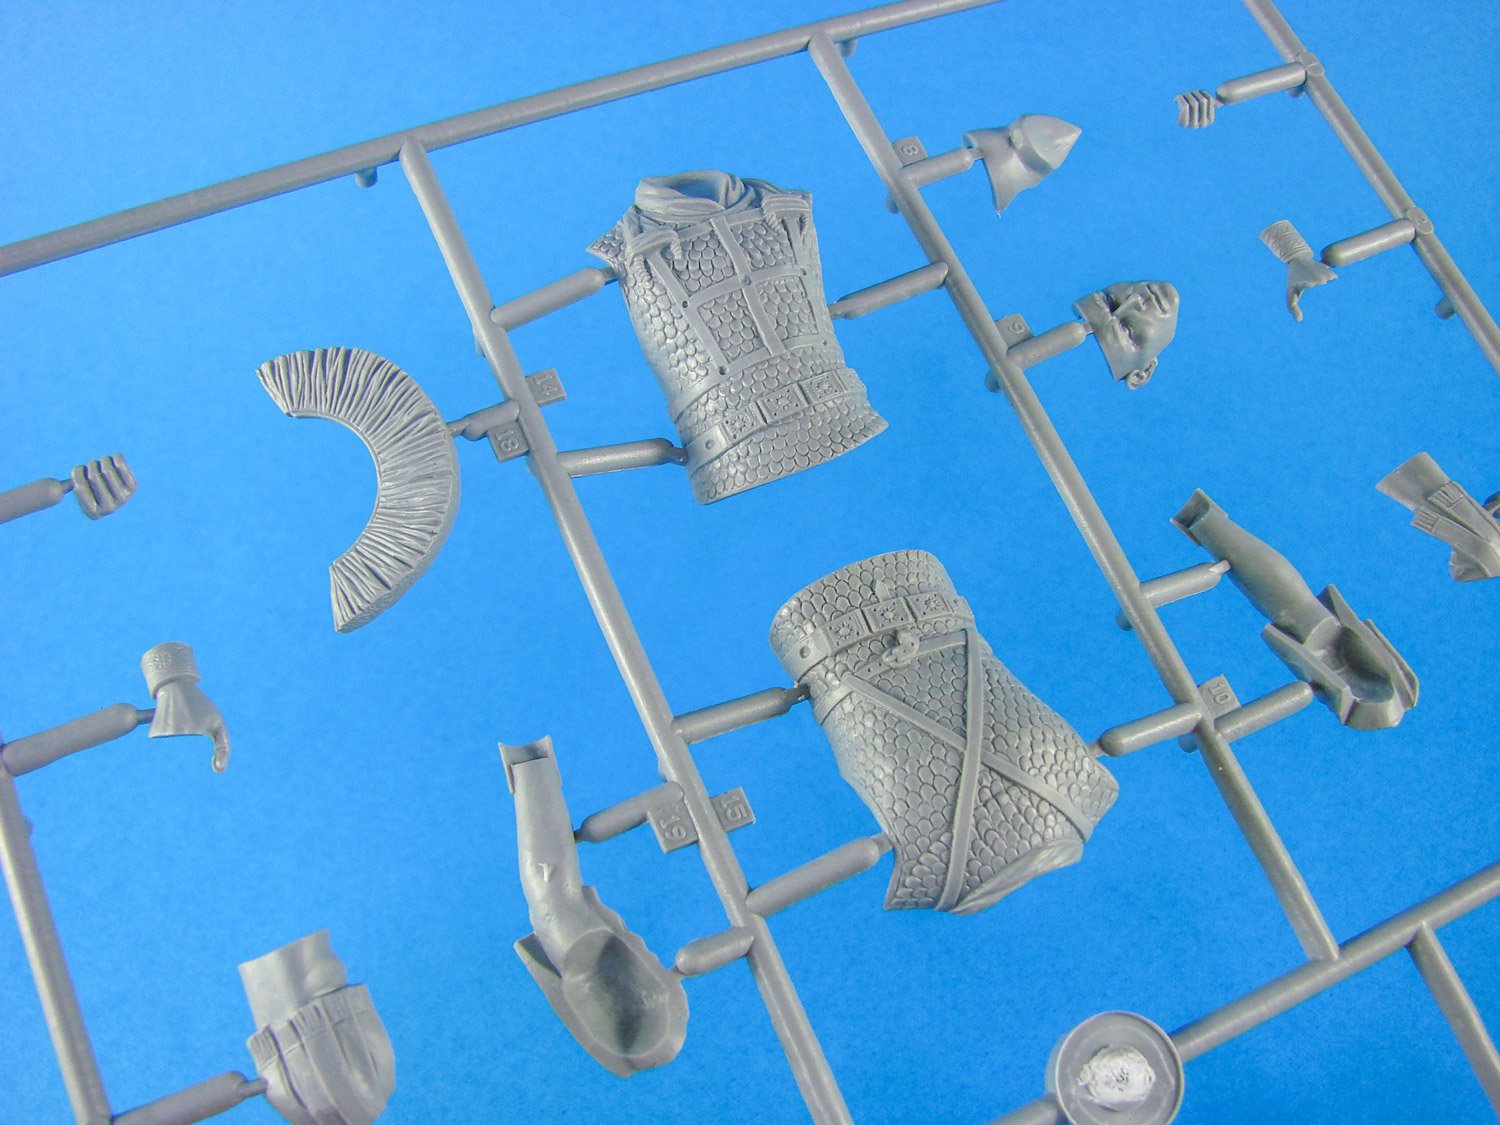
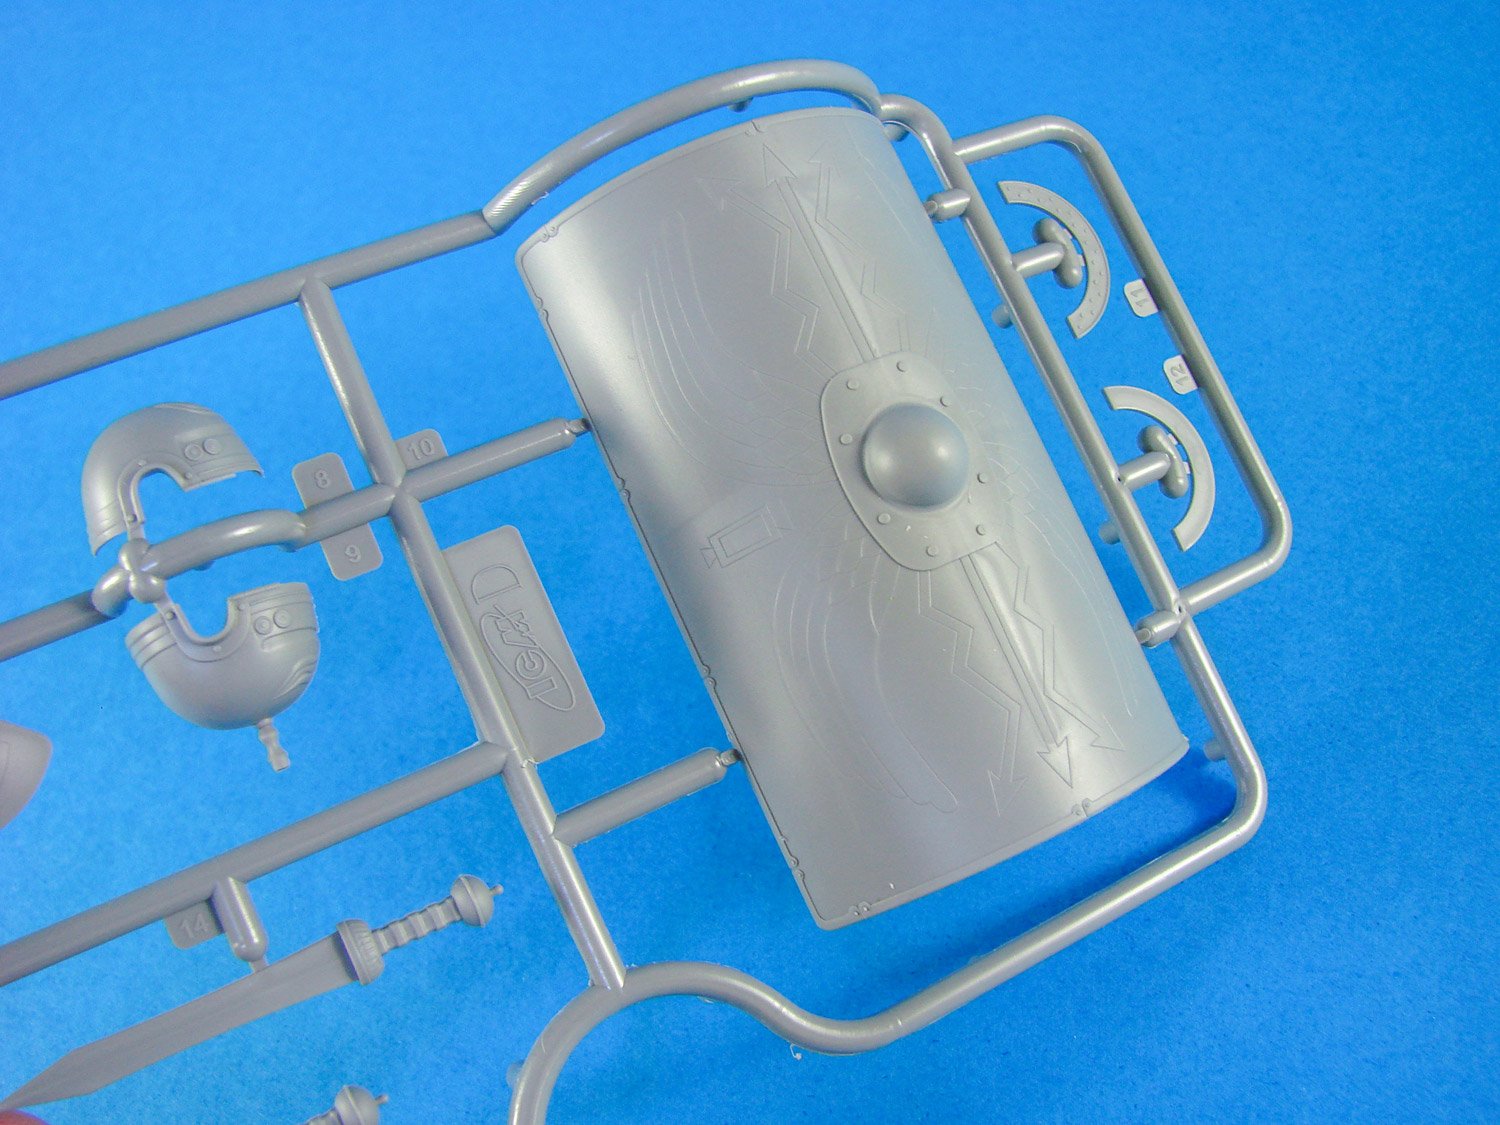
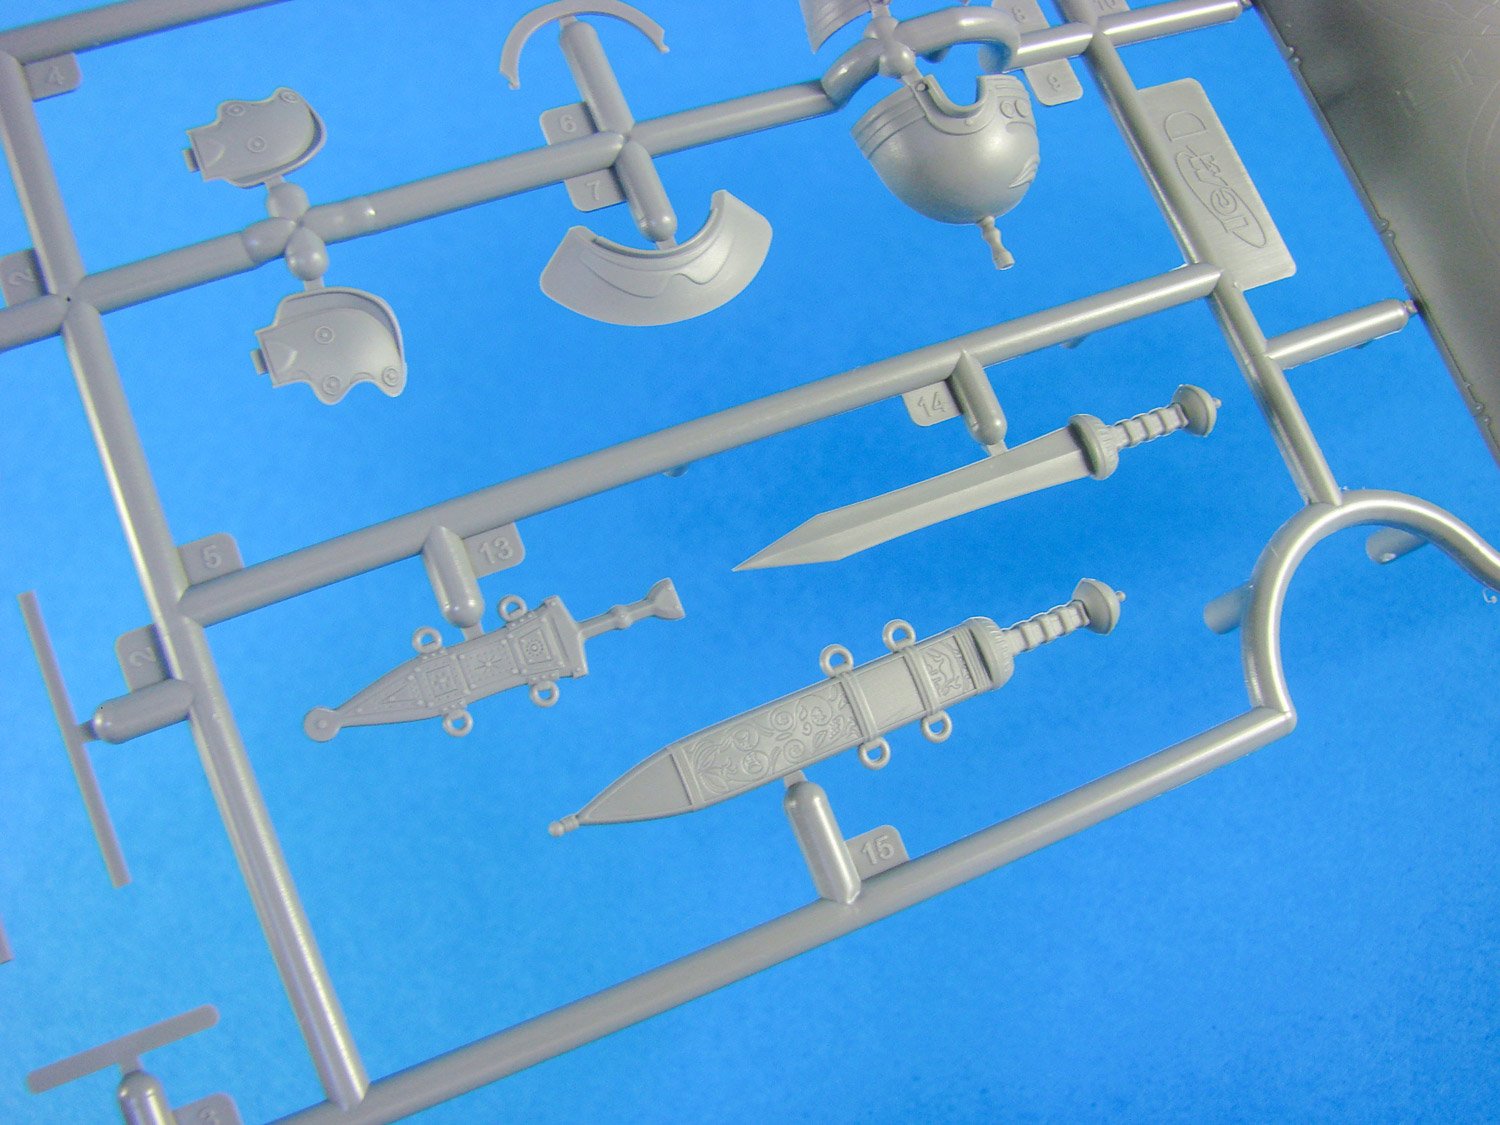
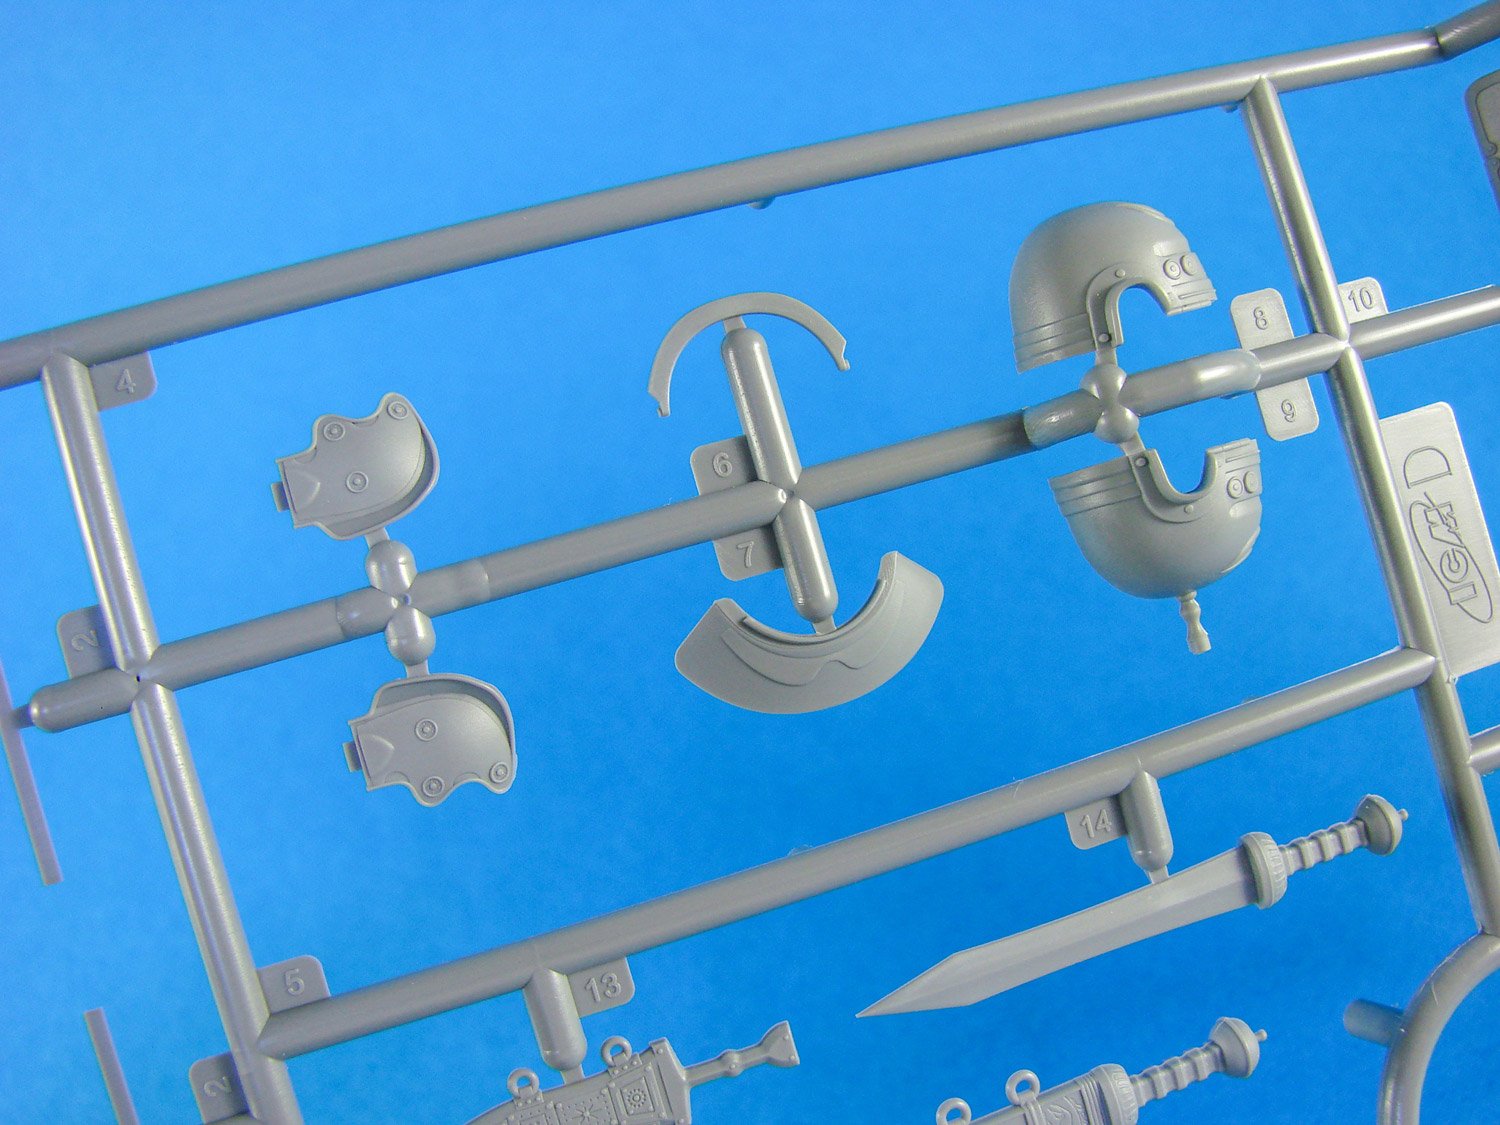
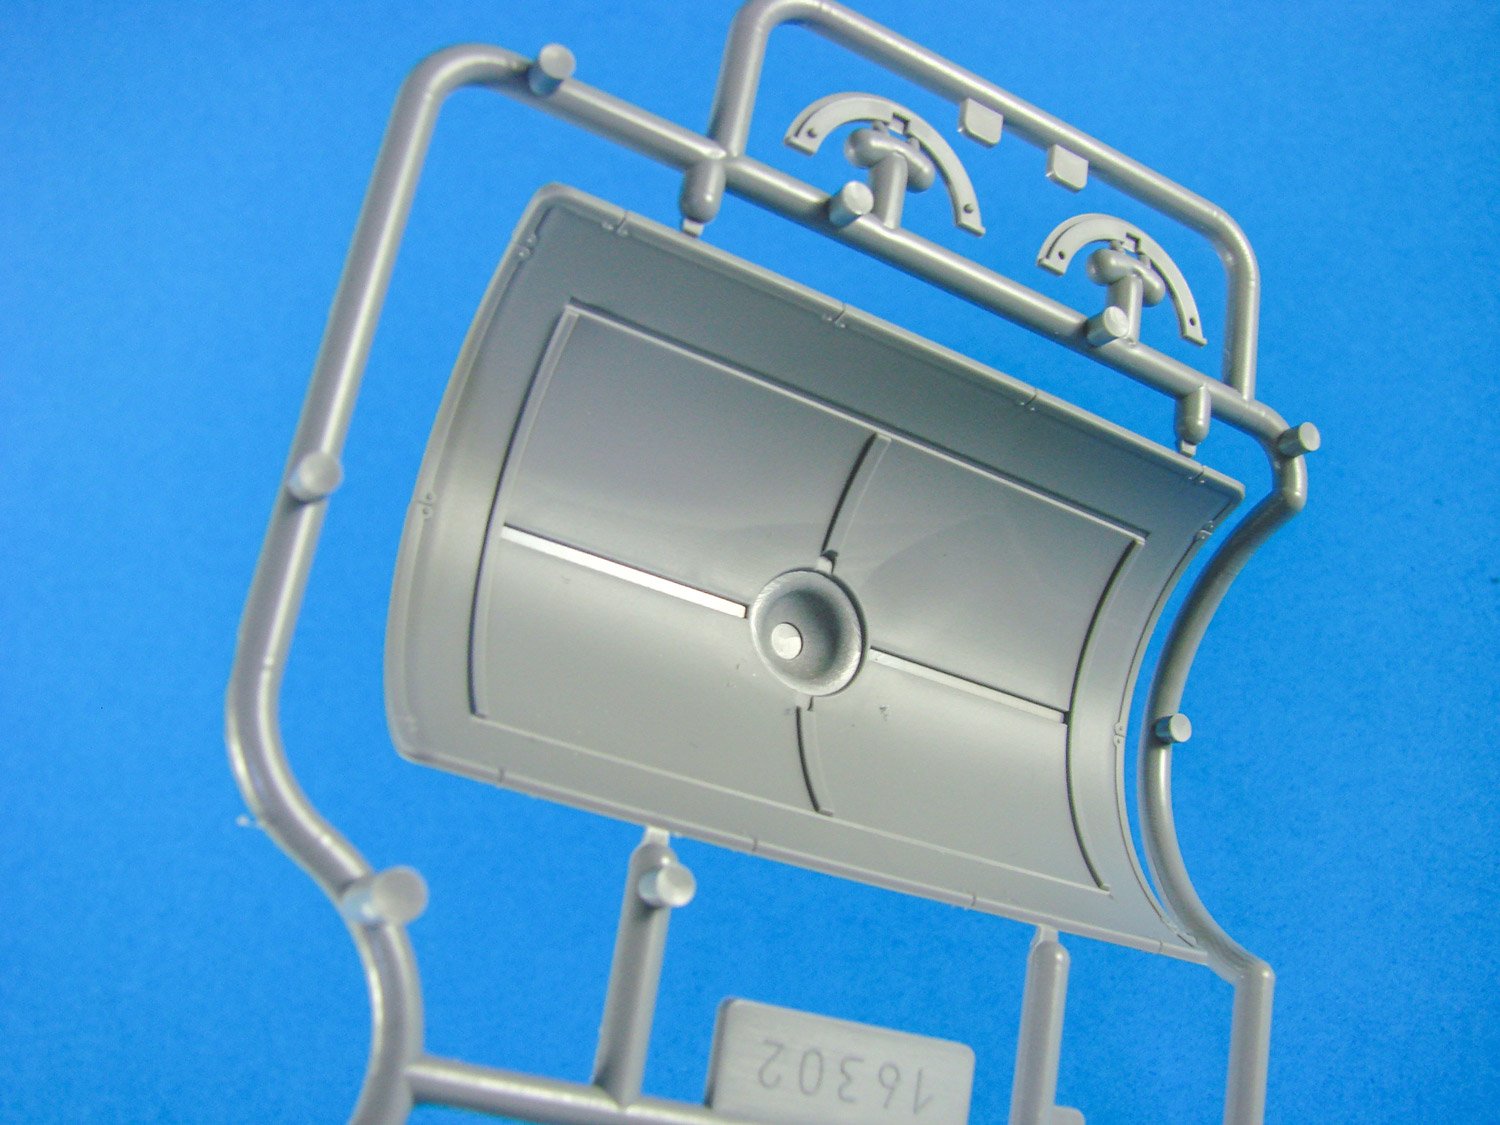
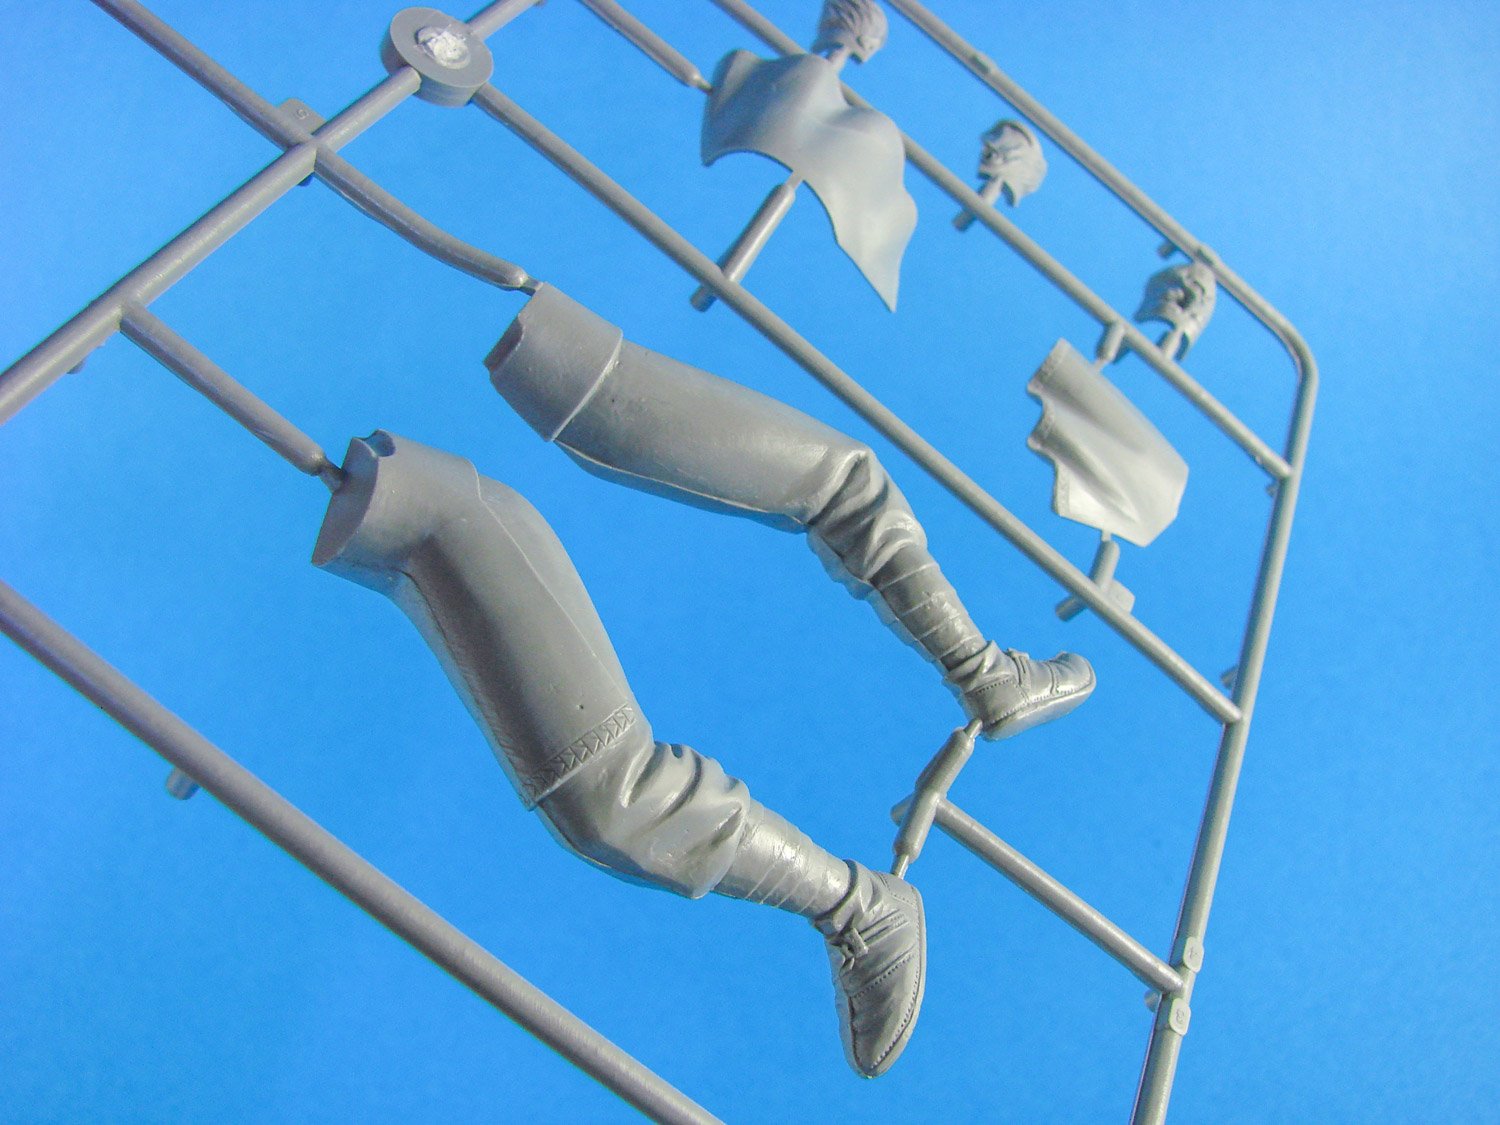
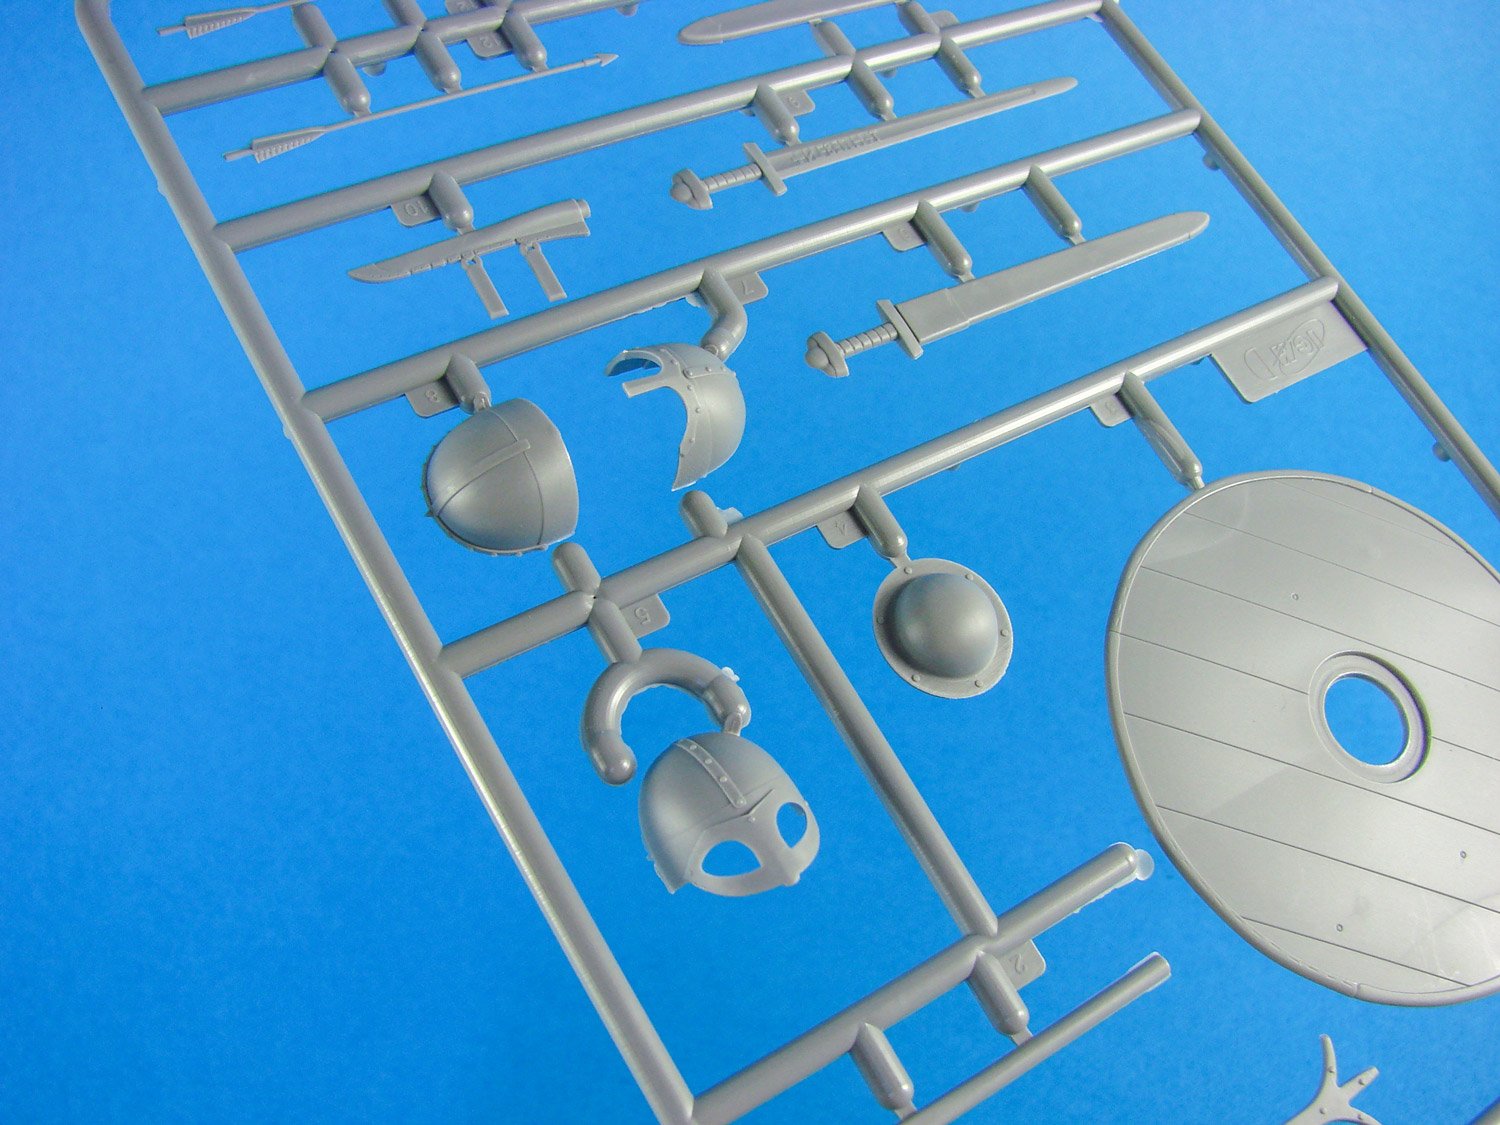
 1:16 Roman Centurion (1st Century AD) ICM Catalogue # 16302 In the Roman infantry, centurions commanded a centuria or "century". During the Mid-Republic these centuries were grouped in pairs to make up a maniple, each century consisting of 30 - 60 men. After the Marian reforms a century typically composed of around 80 men, with six such centuries forming a legionary cohort. Later, generals and emperors further manipulated these numbers with double and half-strength units. Julius Caesar, for instance, made the first cohort of five double strength centuries. Centurions also received a much higher rate of pay than the average legionary. Veteran legionaries often worked as tenants of their former centurions. The kit Something a little different for LSM in that we don’t usually look at figures, and especially 1:16. This is one of two releases from Ukrainian company, ICM, that we’ll look at over the next week. The approach for this is quite simplistic in that while it’s generally easy to gauge an armour or aircraft kit, you really need to be something of a buff on military antiquity to judge how authentic the dress of a Roman or a Viking, for instance. This review will simply look at what’s in the box and the features. We’ll have to trust ICM on how much research has gone into the various items of dress. When I was a kid, I used to build the large-scale Airfix historical figures, and I loved the artwork on these. ICM’s box illustrations are certainly next generation in terms of depiction, and the boxes are certainly sturdier with that glossy lid tightly sitting on top of a whole box with a tabbed lid. All parts to build the Roman Centurion figure itself, are provided on just two sprues of light grey styrene. Another sprue contains the upper and lower base ‘lids/caps’, and a single part is the base itself. The oval base parts are moulded in black styrene. All plastic parts are provided in the same cellophane sleeve. No PE parts are included/needed with this release, and that is very typical of ICM kits. Of note are the instructions which simply depict the competed figure from front and rear, with the part numbers pointing to specific locations, and of course, the illustrations are in colour, so they double as your painting guide. Supplementary illustrations are supplied which show details for the Gladius (sword) and the Scutum (shield) handle. You can depict the sword in its scabbard or in the soldier’s hand. To depict with the soldier holding the Gladius, you need to remove the handle from the one mounted to the belt, and then try to hollow out the scabbard a little to make it convincing. A complete Gladius part can then be used to fit into the Centurion’s hand. The figure itself is quite easy to build, comprising around 49 parts, with a completed height of about 110mm. Whilst the upper and lower torso comprise a front and rear part each, the legs and arms (with exception of shoulder area and hands) are moulded as single pieces onto which the various parts of soldierly equipment will fit. Sprue B generally concerns the limbs, torso and head of the soldier (although not exclusively so), while Sprue D is for equipment and also the multipart Galea (helmet) with its famous brush top and cheek armour. The shield is generally moulded as a large, single part, but with some frames that need fitting to the rear, as well as the handle. All moulding is superbly executed, and whilst there will still be minimal seam removal, ICM have made a very nice job of not needing to add lots of supplementary stuff, such as the old styrene belts that we saw on the Airfix kits of yore. Conclusion It’s kits like these that really make me wish I could figure paint, as well as the 1:6 Eivor figure (Assassin’s Creed) that I have. The assembly of this ICM kit is nice and easy, and I don’t doubt whatsoever that the resulting figure really will look every bit the centurion he is, and with plenty of detail to keep the modeller and viewer captivated for a good while. Moulding quality is first rate too, as is always the case (IMHO) with ICM. Definitely a kit to get if historical figures interest you at all, and one that also retails for only around £20!
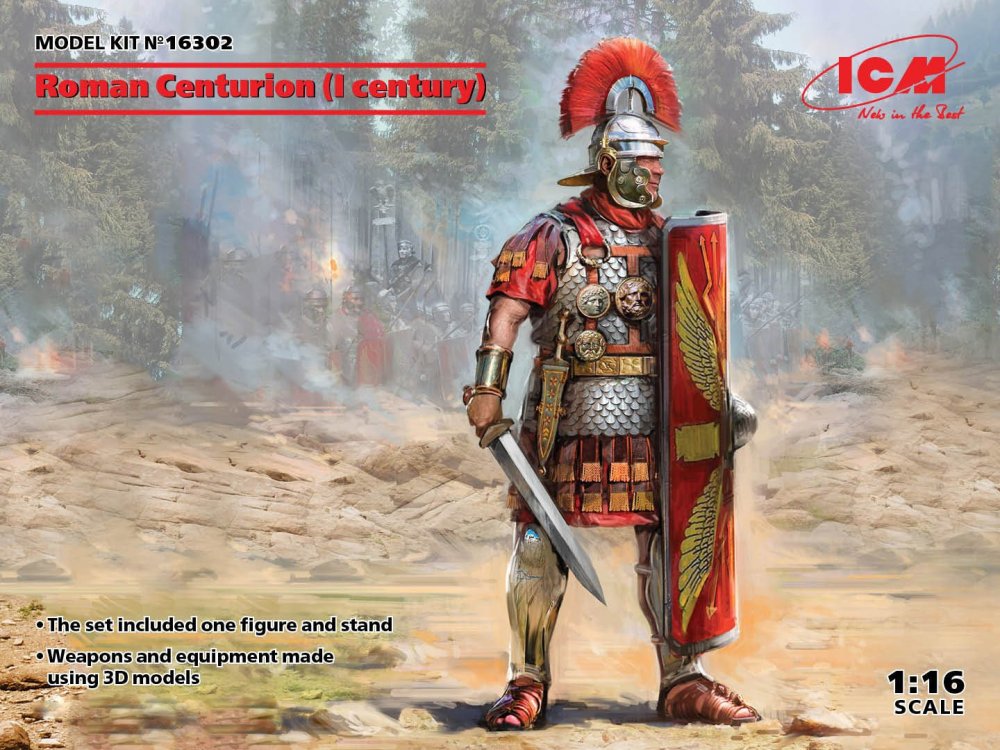


-
icm 1:16 Viking (9th Century) - ICM
James H posted a topic in LSM-Related Reviews (military figures etc)
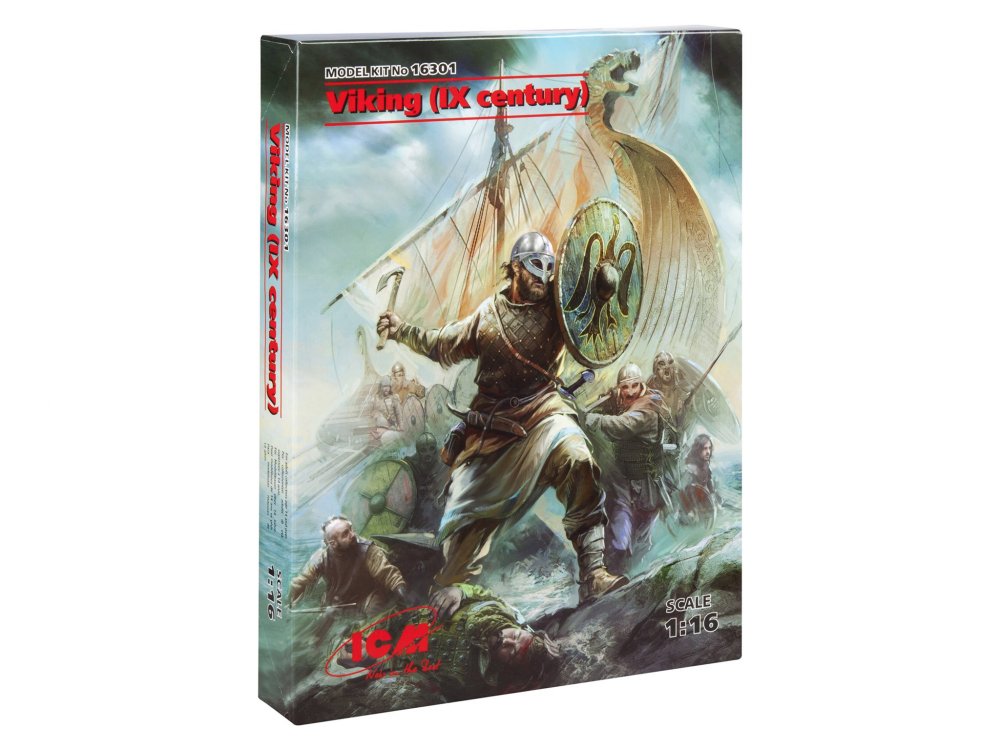
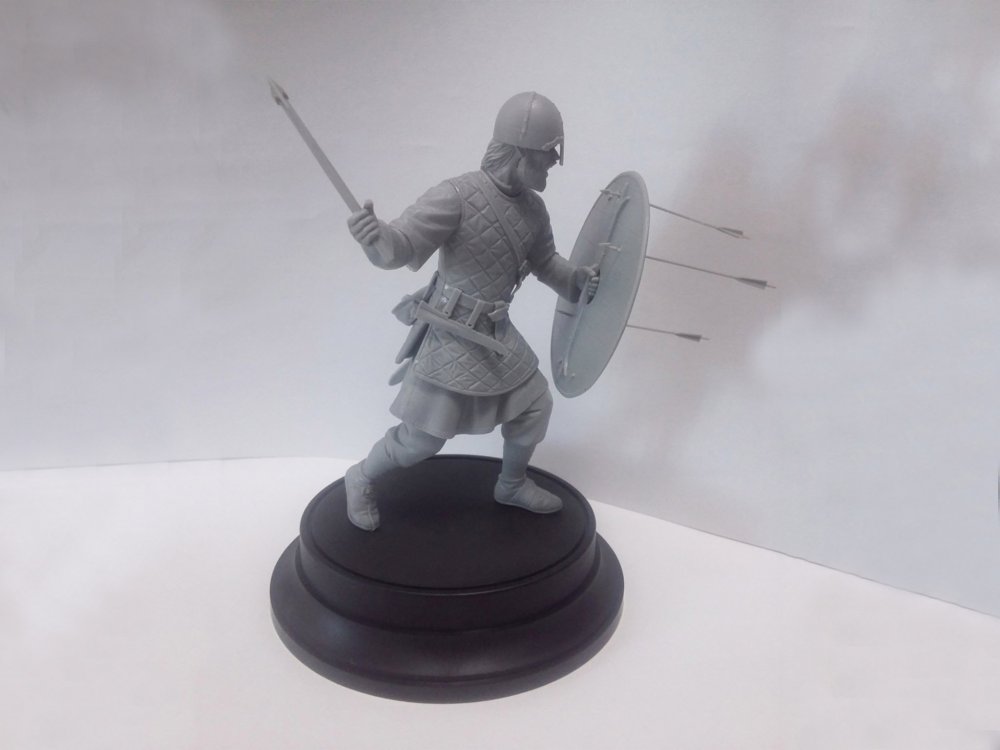
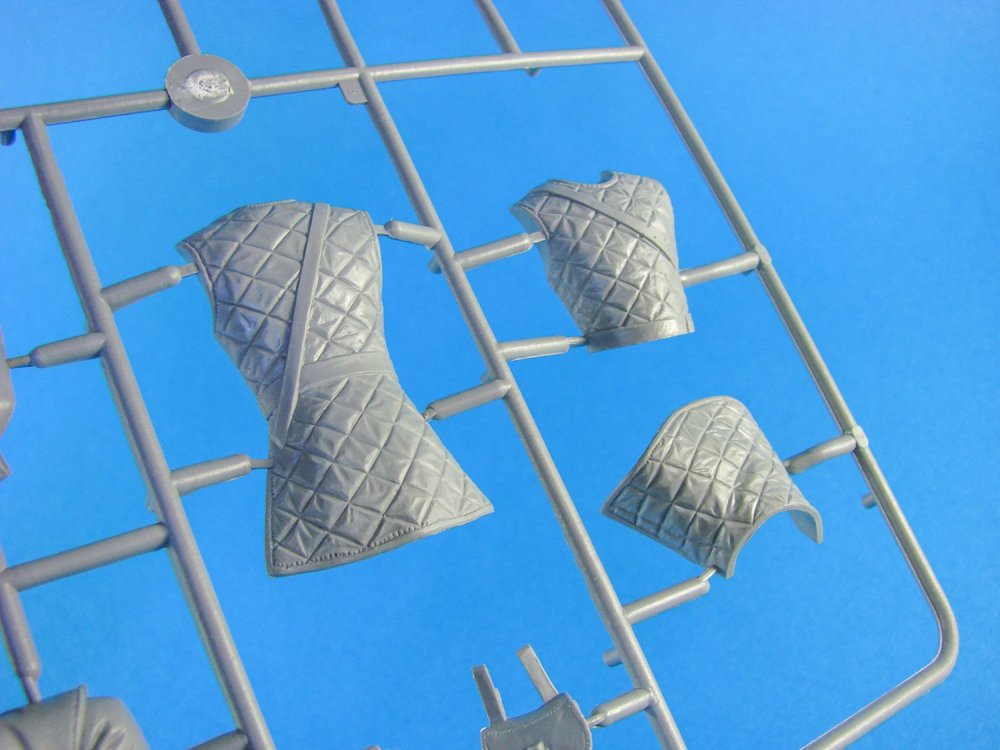
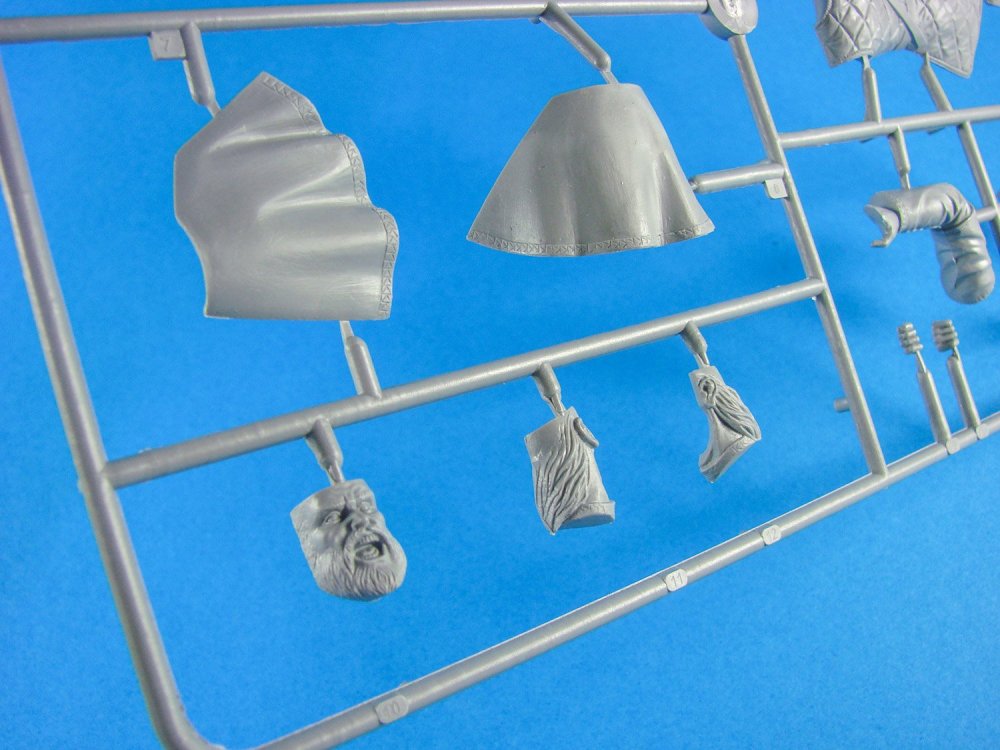
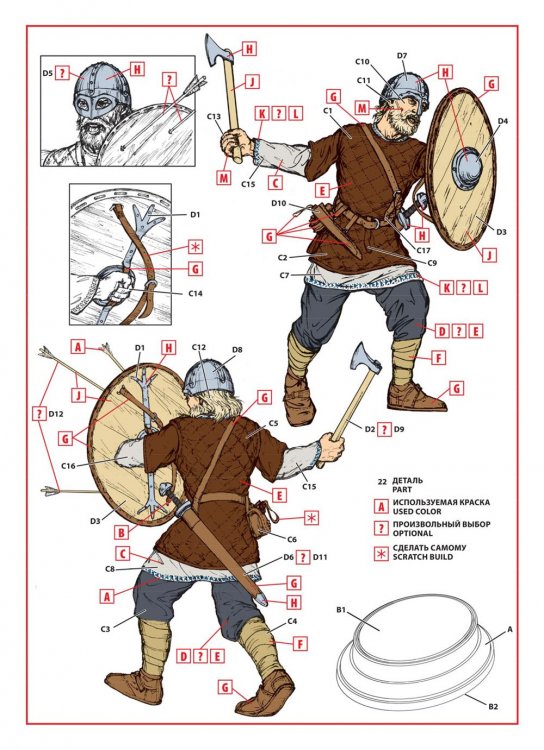
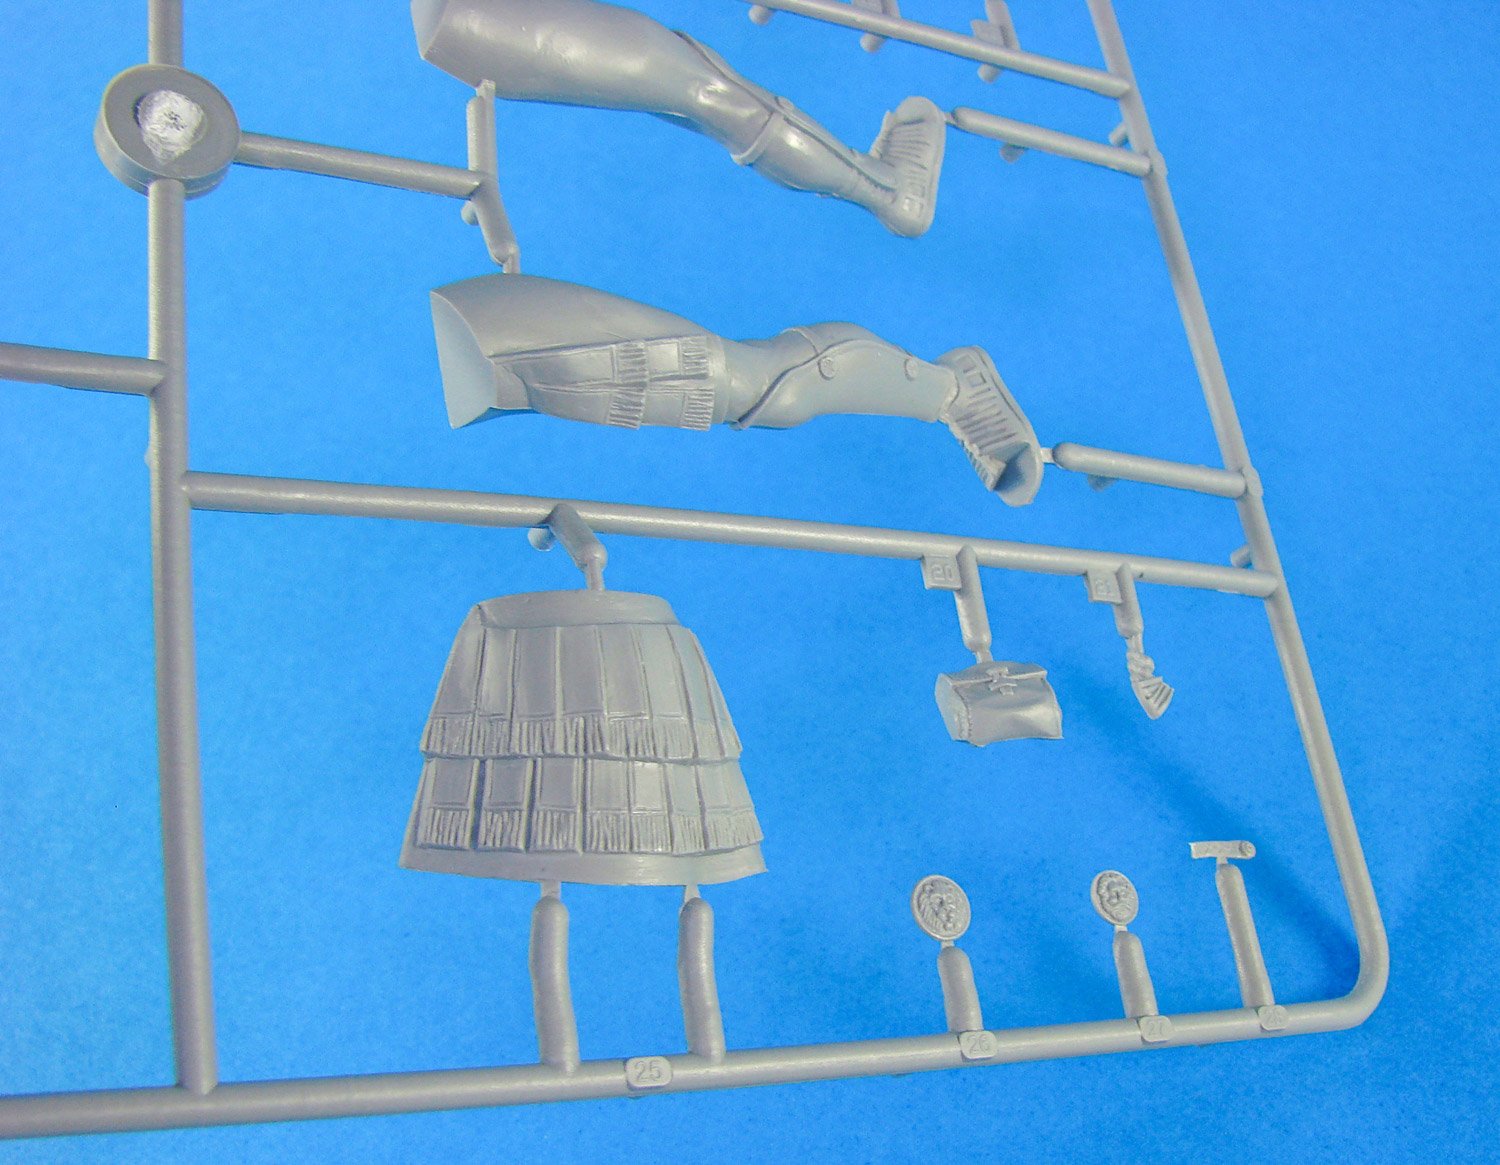
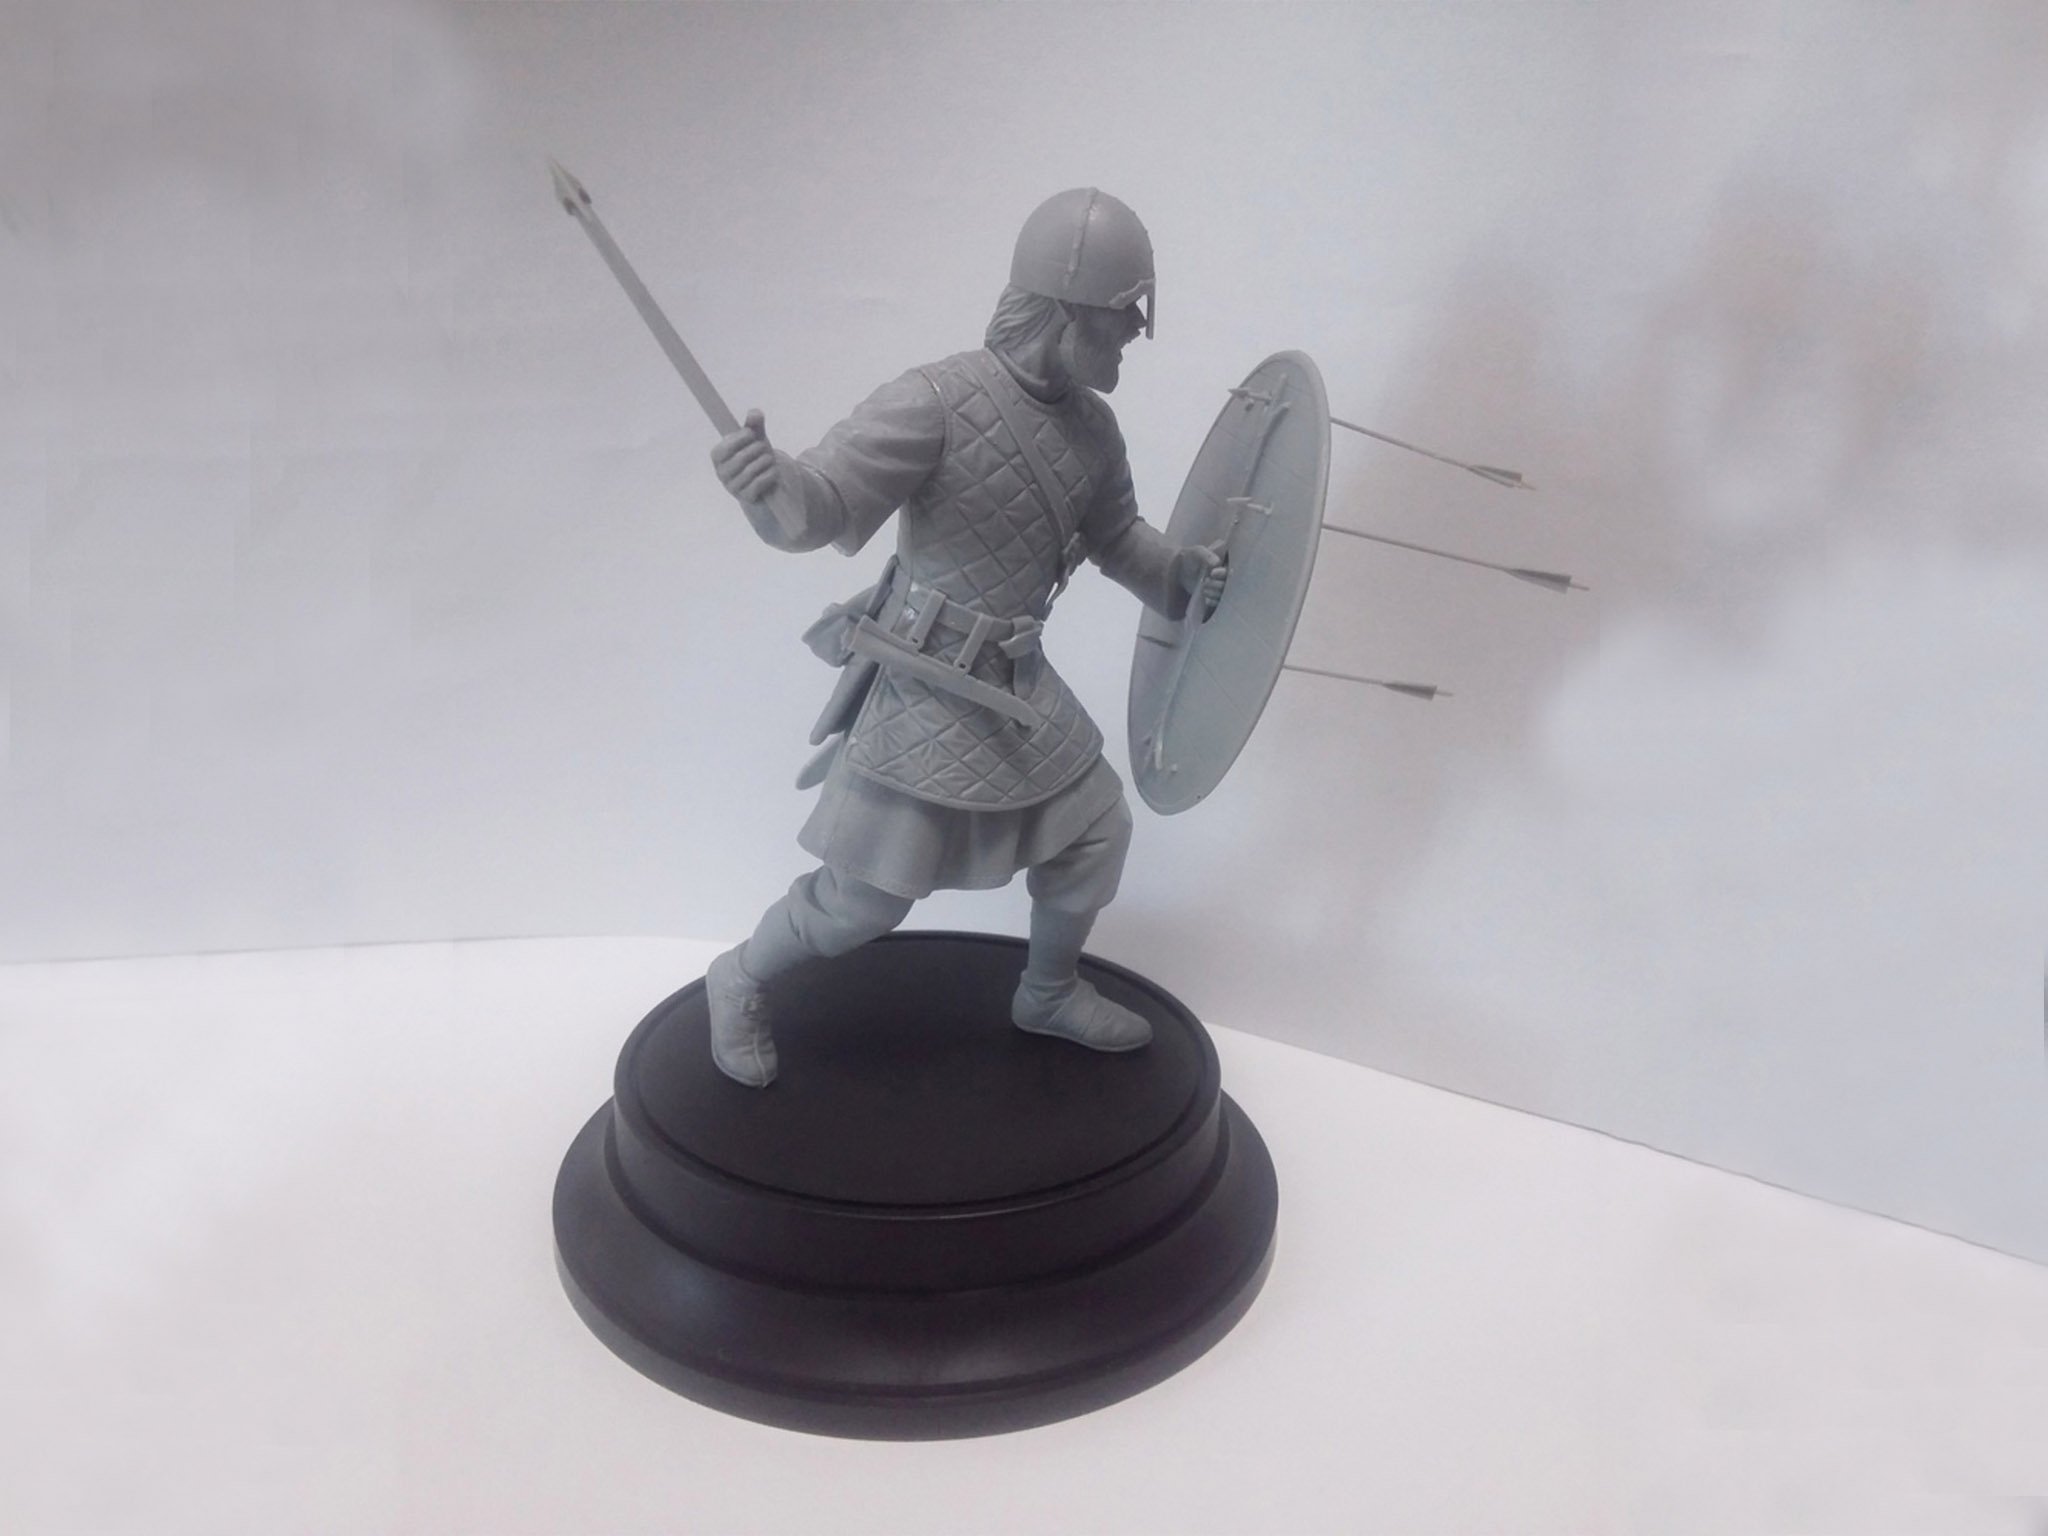
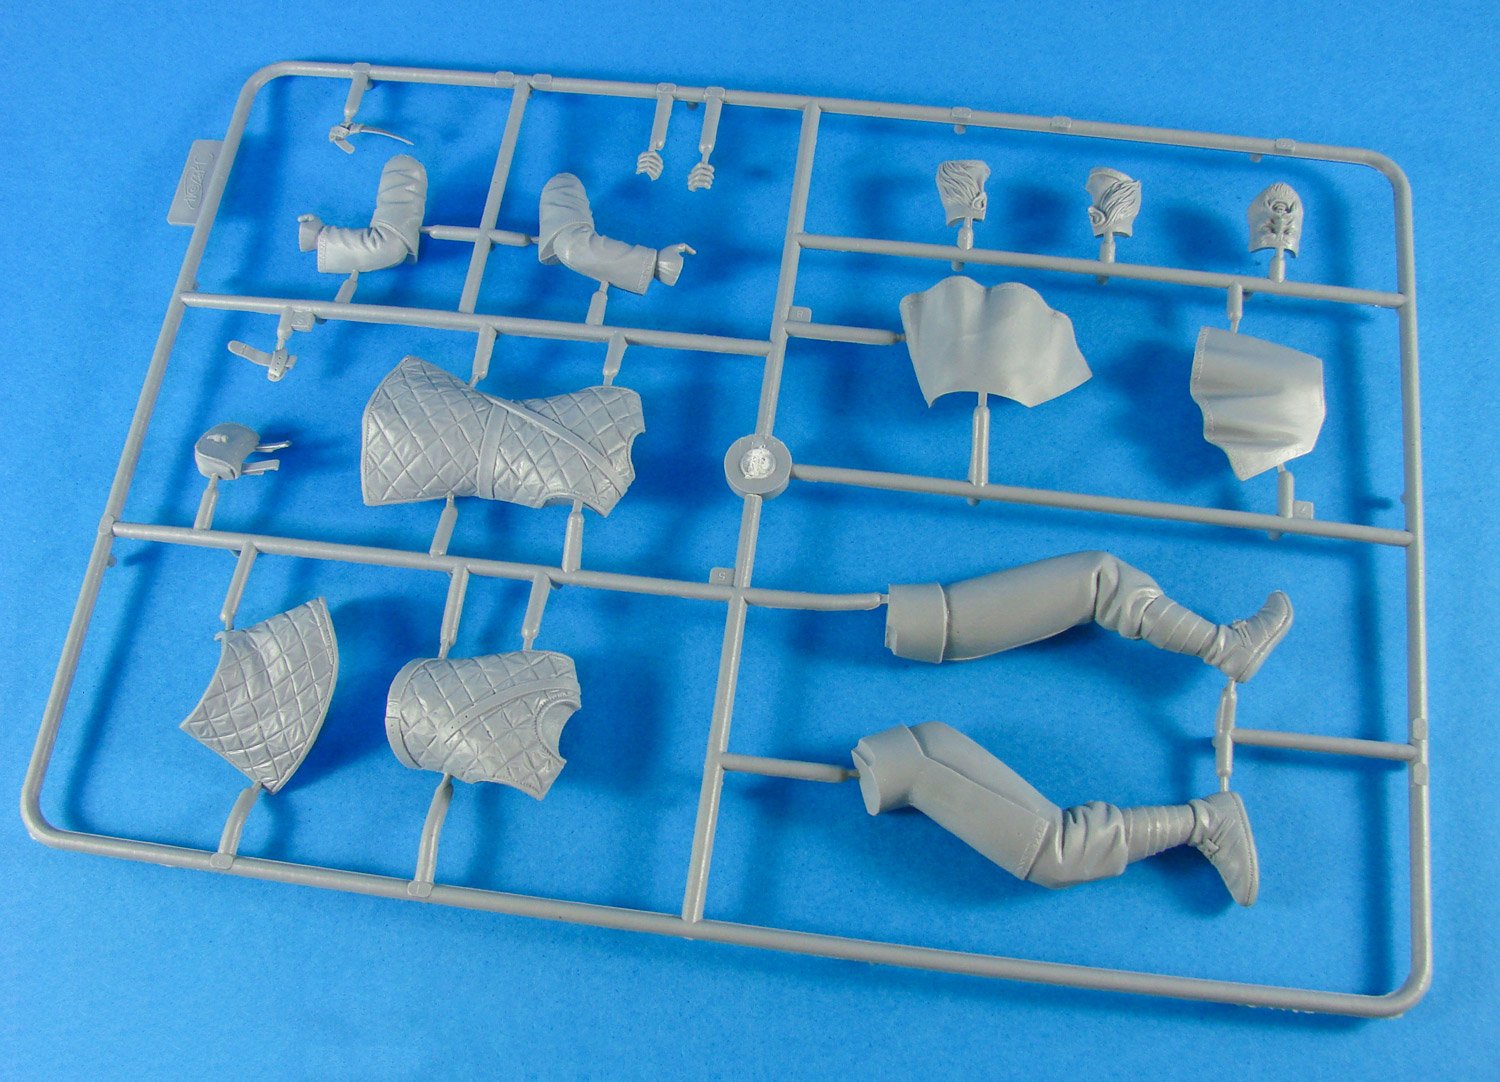
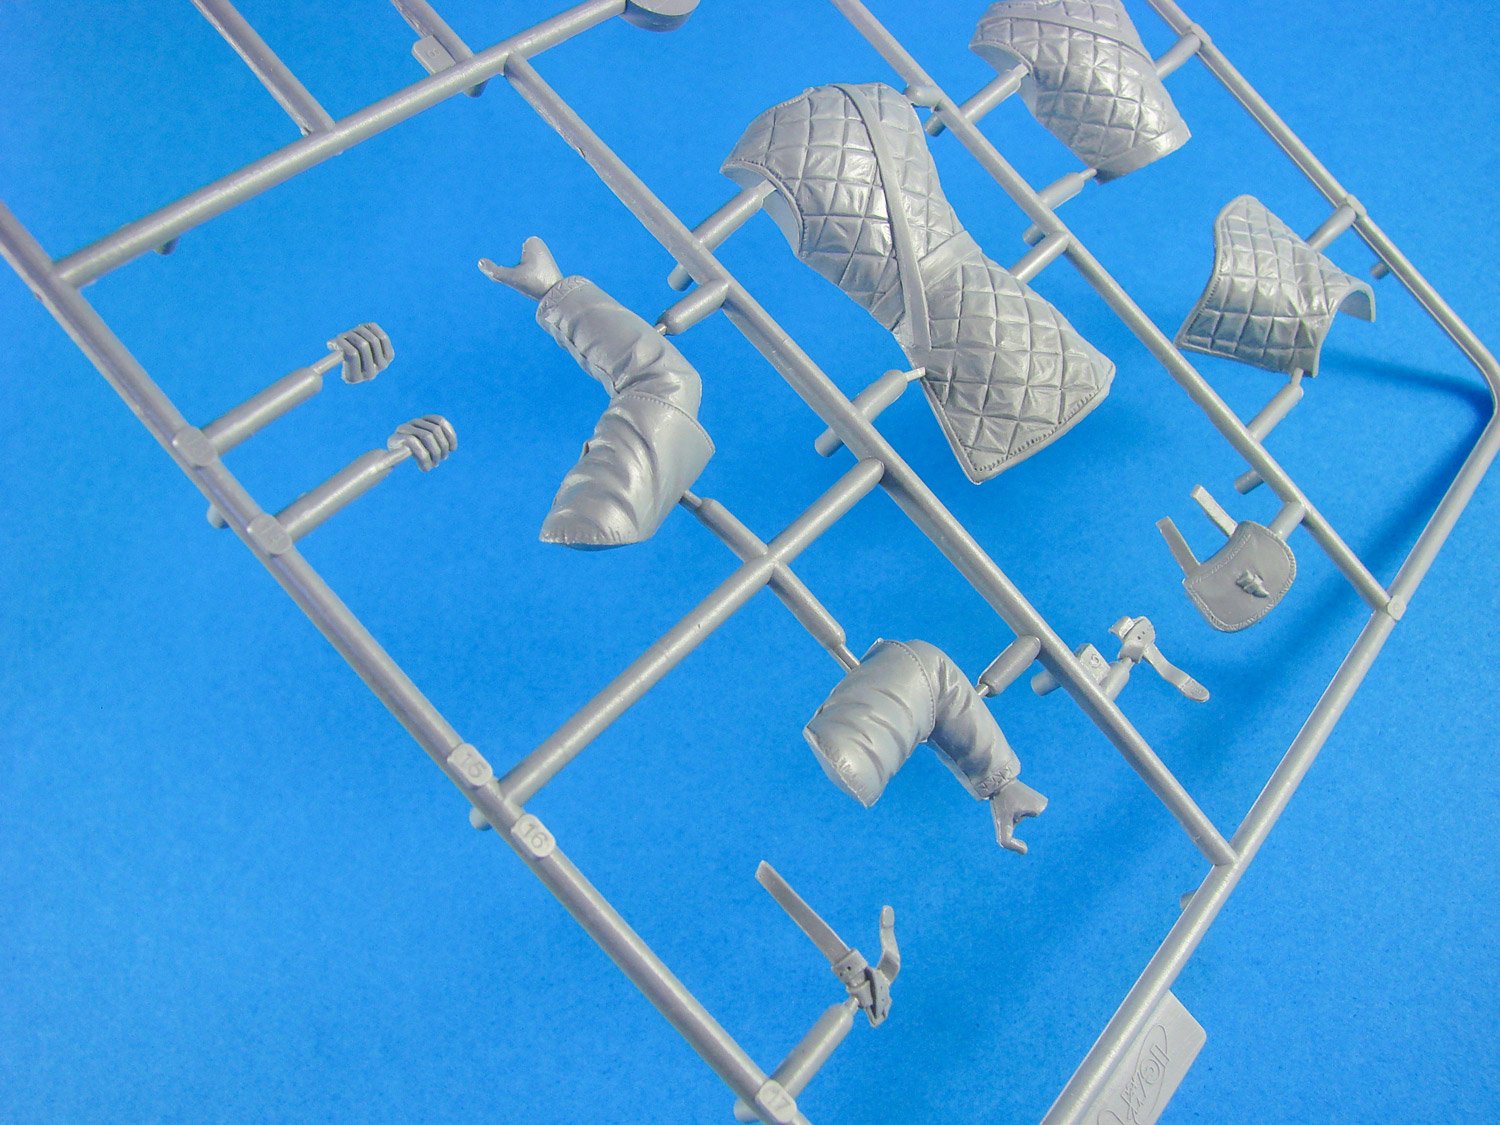
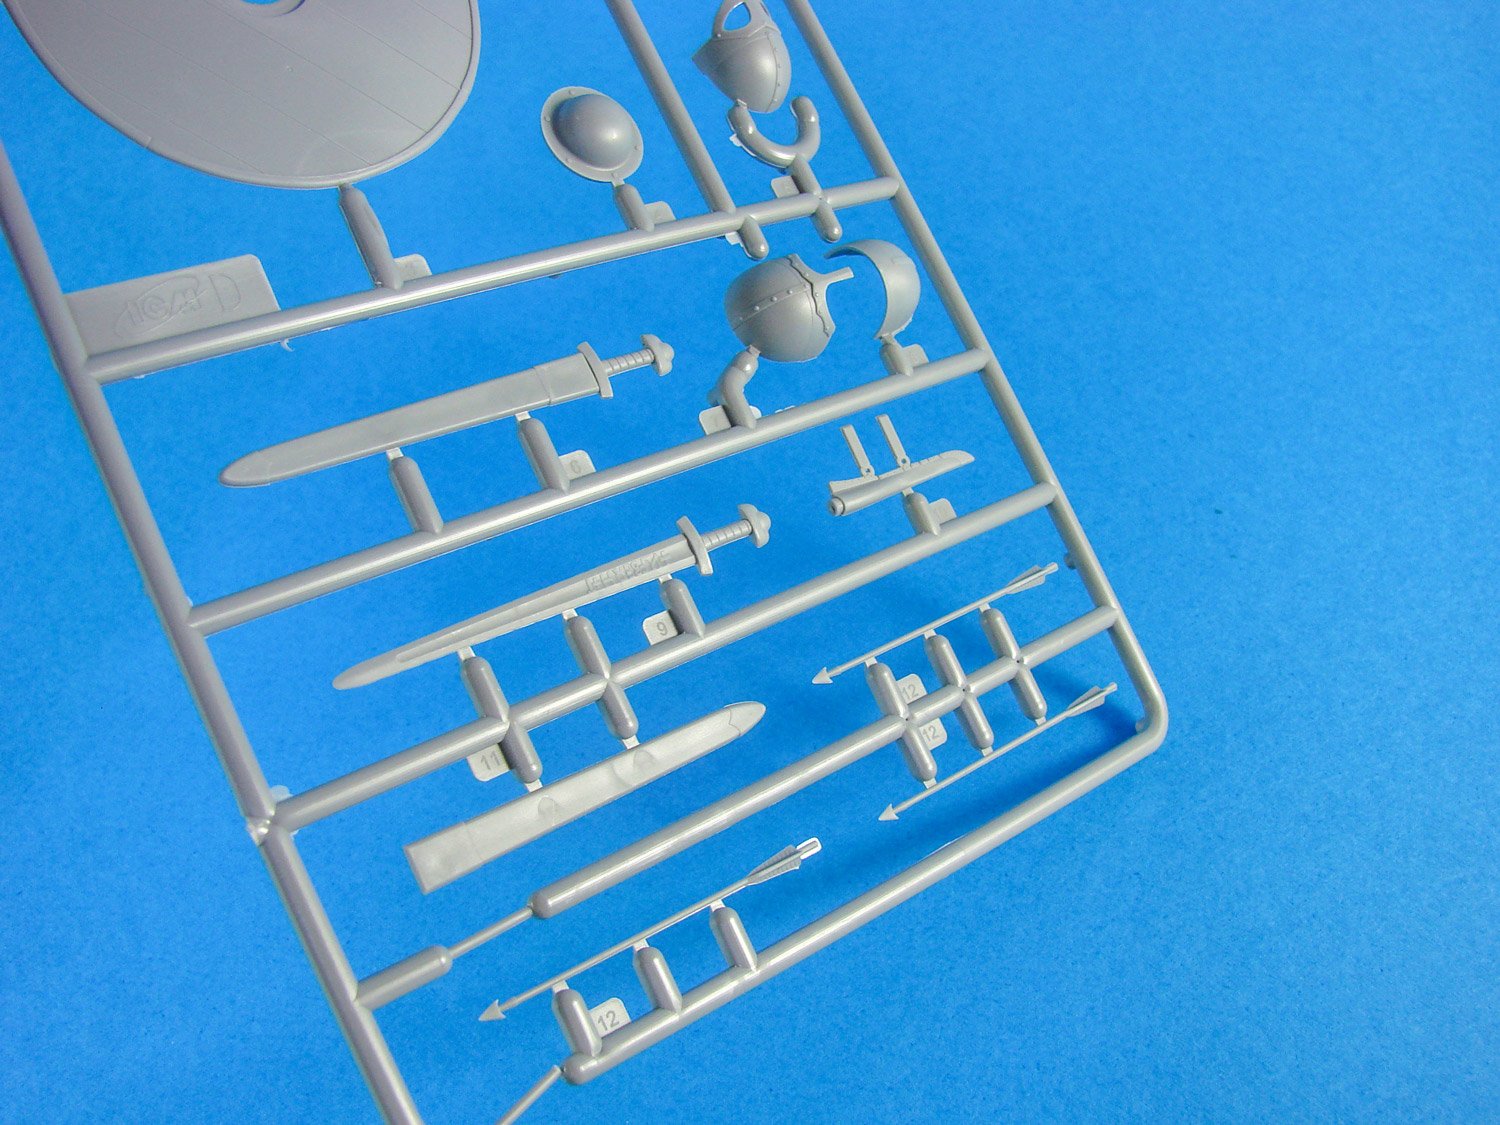
1:16 Viking (9th Century) ICM Catalogue # 16301 Vikings is the modern name given to seafaring people primarily from Scandinavia (present-day Denmark, Norway, and Sweden), who from the late 8th to the late 11th centuries raided, pirated, traded and settled throughout parts of Europe. They also voyaged as far as the Mediterranean, North Africa, the Middle East, and North America. In some of the countries they raided and settled in, this period is popularly known as the Viking Age, and the term "Viking" also commonly includes the inhabitants of the Scandinavian homelands as a collective whole. The Vikings had a profound impact on the early medieval history of Scandinavia, the British Isles, France, Estonia, etc. The Vikings spoke Old Norse and made inscriptions in runes. For most of the period they followed the Old Norse religion, but later became Christians. The Vikings had their own laws, art and architecture. Most Vikings were also farmers, fishermen, craftsmen and traders. Popular conceptions of the Vikings often strongly differ from the complex, advanced civilisation of the Norsemen that emerges from archaeology and historical sources. A romanticised picture of Vikings as noble savages began to emerge in the 18th century; this developed and became widely propagated during the 19th-century Viking revival. Perceived views of the Vikings as violent, piratical heathens or as intrepid adventurers owe much to conflicting varieties of the modern Viking myth that had taken shape by the early 20th century. Current popular representations of the Vikings are typically based on cultural clichés and stereotypes, complicating modern appreciation of the Viking legacy. The kit Something a little different for LSM in that we don’t usually look at figures, and especially 1:16. This is the second of two releases from Ukrainian company, ICM, that we’ve recently looked at. The approach for this is quite simplistic in that while it’s generally easy to gauge an armour or aircraft kit, you really need to be something of a buff on military antiquity to judge how authentic the dress of a Roman or a Viking, for instance. This review will simply look at what’s in the box and the features. We’ll have to trust ICM on how much research has gone into the various items of dress. When I was a kid, I used to build the large-scale Airfix historical figures, and I loved the artwork on these. ICM’s box illustrations are certainly next generation in terms of depiction, and the boxes are certainly sturdier with that glossy lid tightly sitting on top of a whole box with a tabbed lid. The box art on this kit shows a Viking raiding party hitting the shore. All parts to build the Viking figure itself, are provided on just two sprues of light grey styrene. Another sprue contains the upper and lower base ‘lids/caps’, and a single part is the base itself. The oval base parts are moulded in black styrene. All plastic parts are provided in the same cellophane sleeve. No PE parts are included/needed with this release, and that is very typical of ICM kits. Of note are the instructions which simply depict the competed figure from front and rear, with the part numbers pointing to specific locations, and of course, the illustrations are in colour, so they double as your painting guide. Supplementary illustrations are supplied which show details for the helmet, shield handle and also some enemy arrows that are planted in the front of the shield! The latter items are optional, but certainly would look good on a figure with a pose such as this. The figure itself is quite easy to build, comprising od only 31 parts, so almost 20 fewer than the Roman Centurion we recently looked at. Whilst the upper and lower torso comprise a front and rear part each, the legs and arms/hands (with the exception of the fingers). Sprue C generally concerns the limbs, torso and head of the soldier (although not exclusively so), while Sprue D is for equipment and also the multipart helmet. This can be depicted with an upper face shield if desired, or just with the simple nose guard that was typical of helms of this period. The shield is moulded as a large circular part, with full detail except for the boss that needs fitting to the centre, plus the handle. All moulding is superbly executed, and whilst there will still be minimal seam removal, ICM have made a very nice job of not needing to add lots of supplementary stuff, such as the old styrene belts that we saw on the Airfix kits of yore. Conclusion Another very nice figure from ICM. This one was actually released in 2018, but we thought it would be good to see another historical figure to accompany the Centurion release we showed very recently. The later Vikings down seem to be a little paired down when it came to how they dressed, compared with earlier iterations. If that is the case, ICM will have captured this character very well. Currently selling for just over £20, so go treat yourself.


-
- 1
-

-
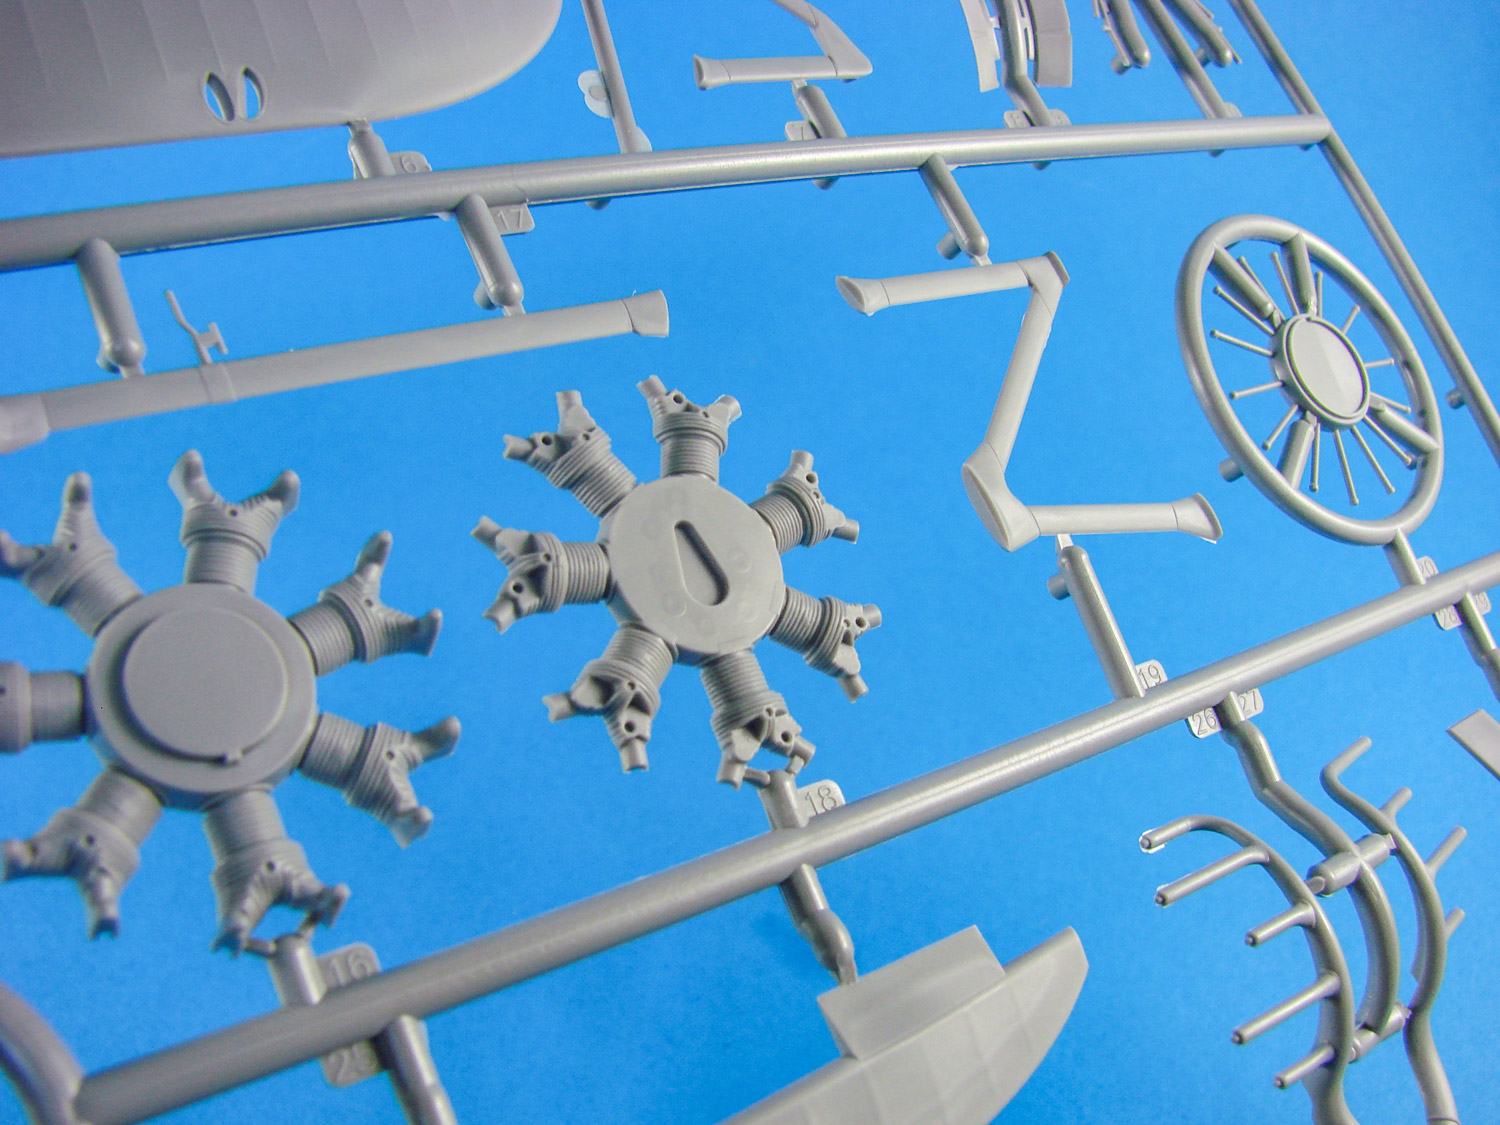
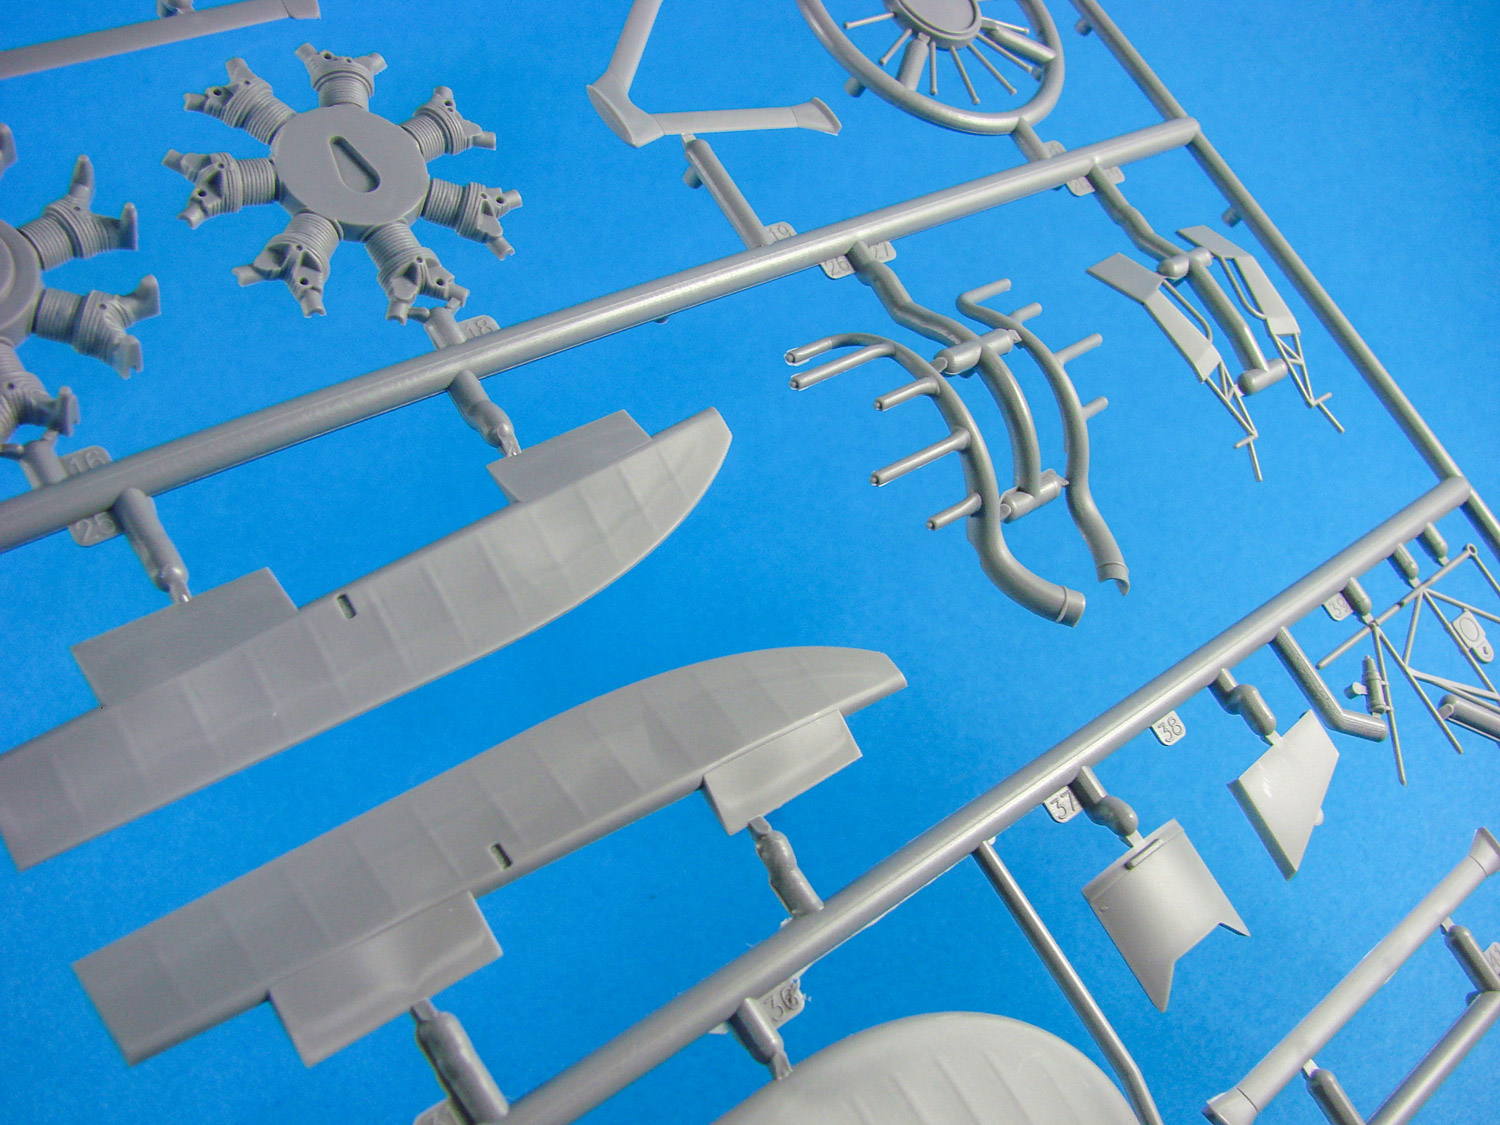
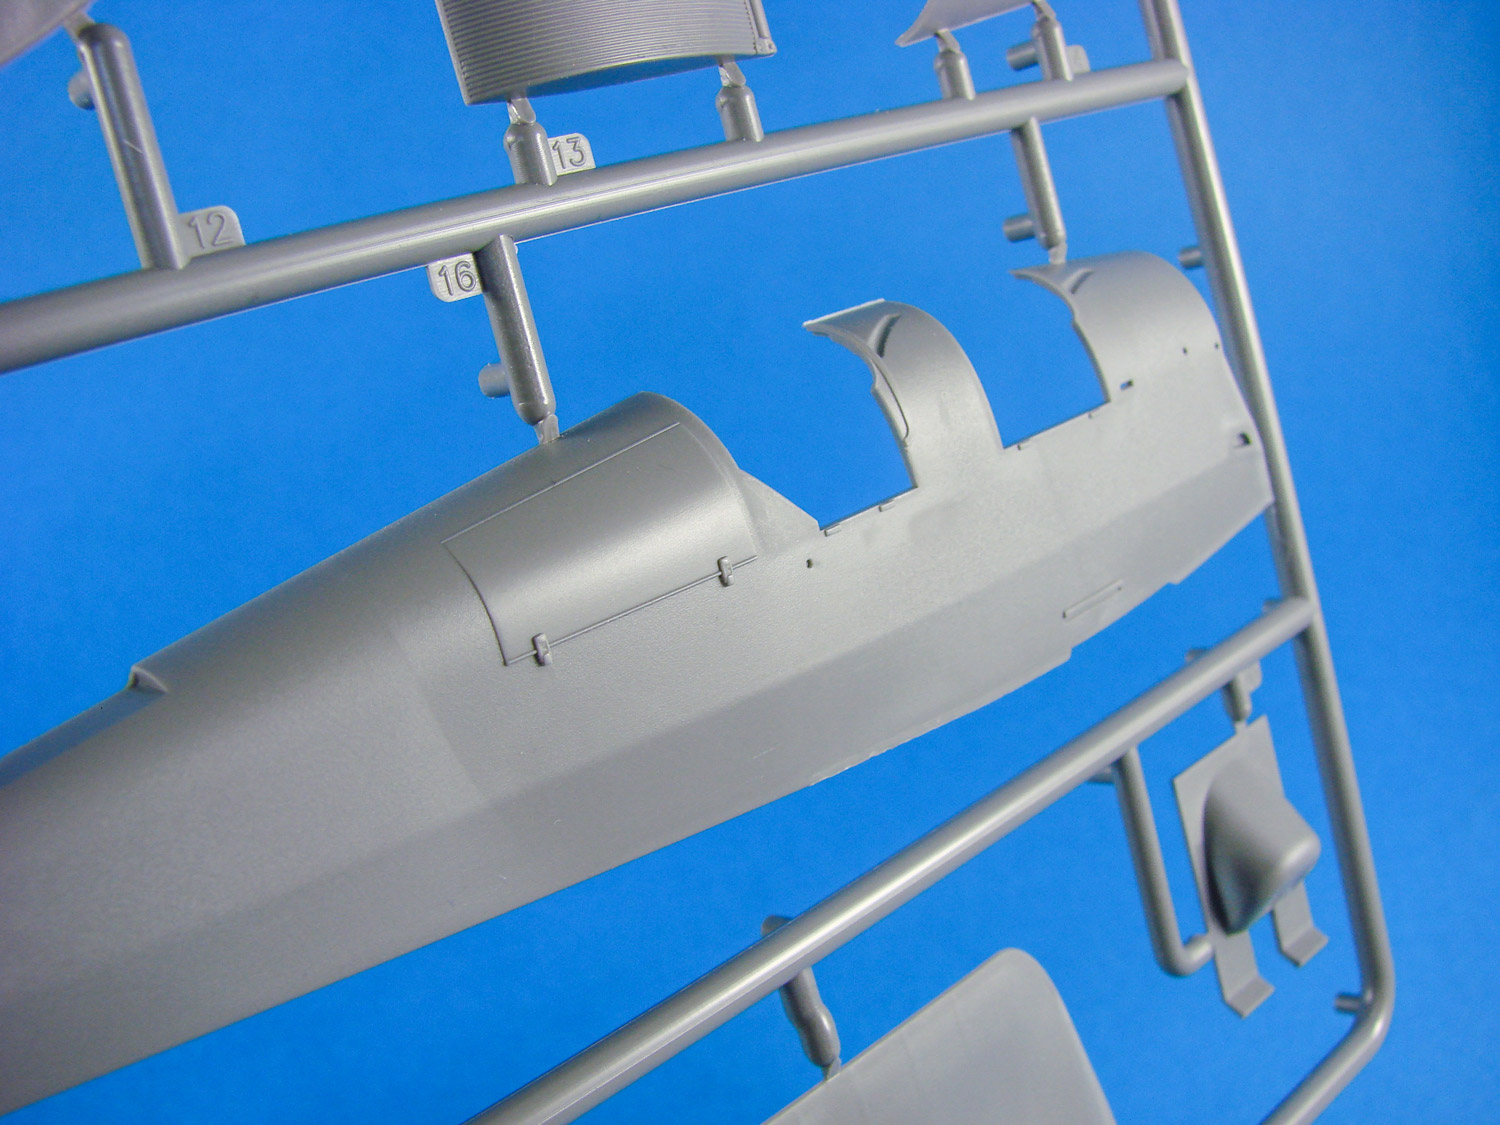
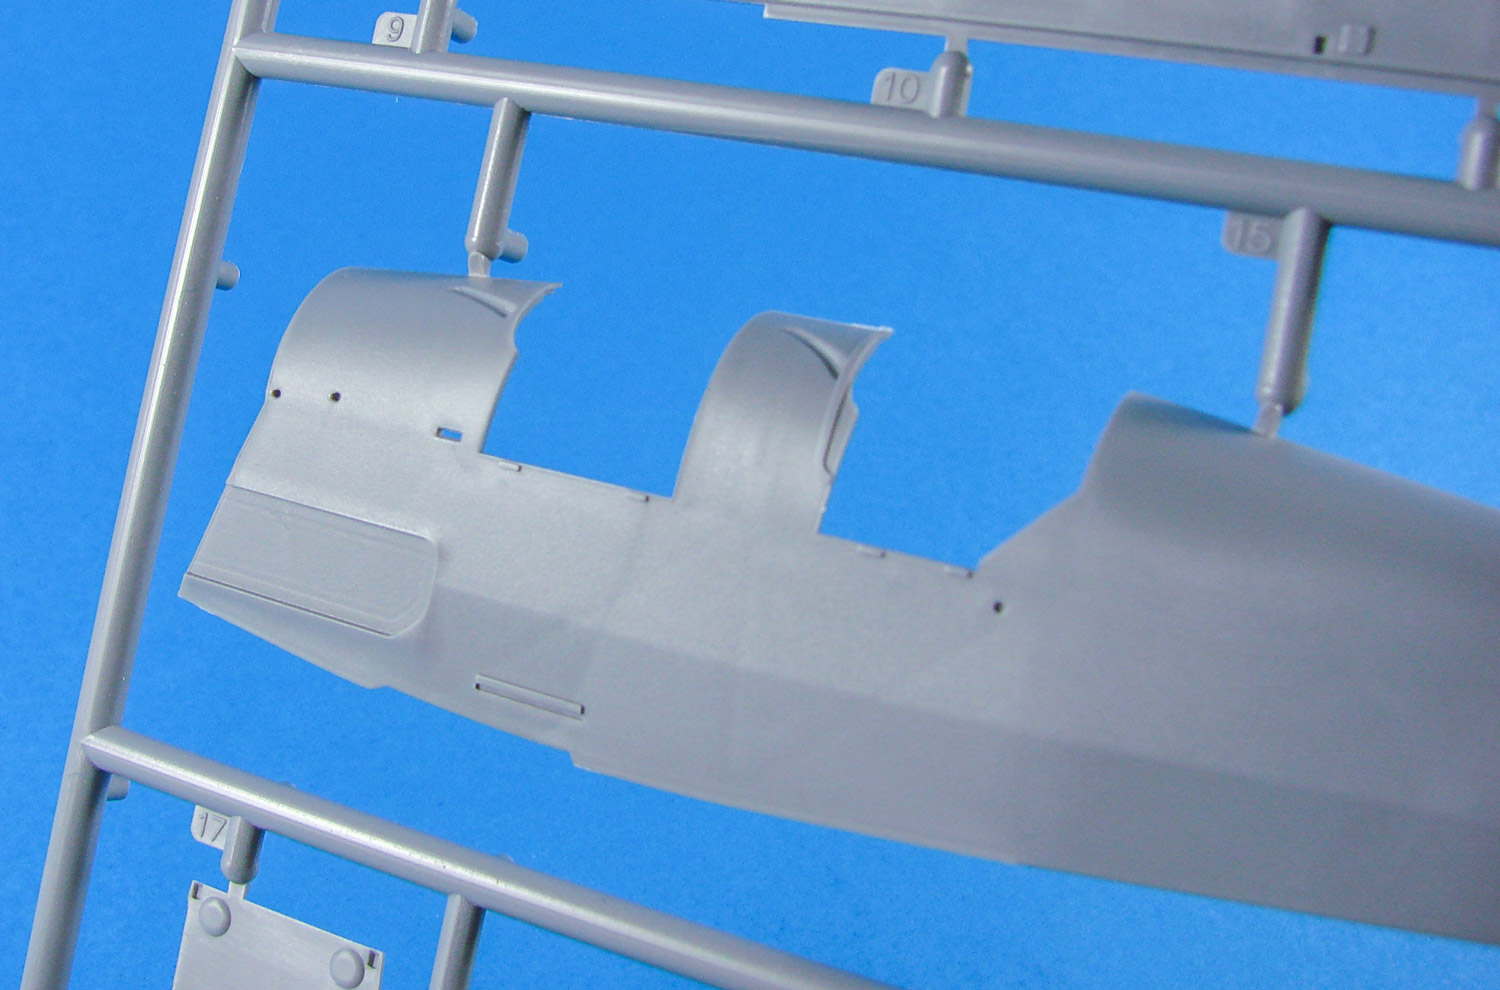
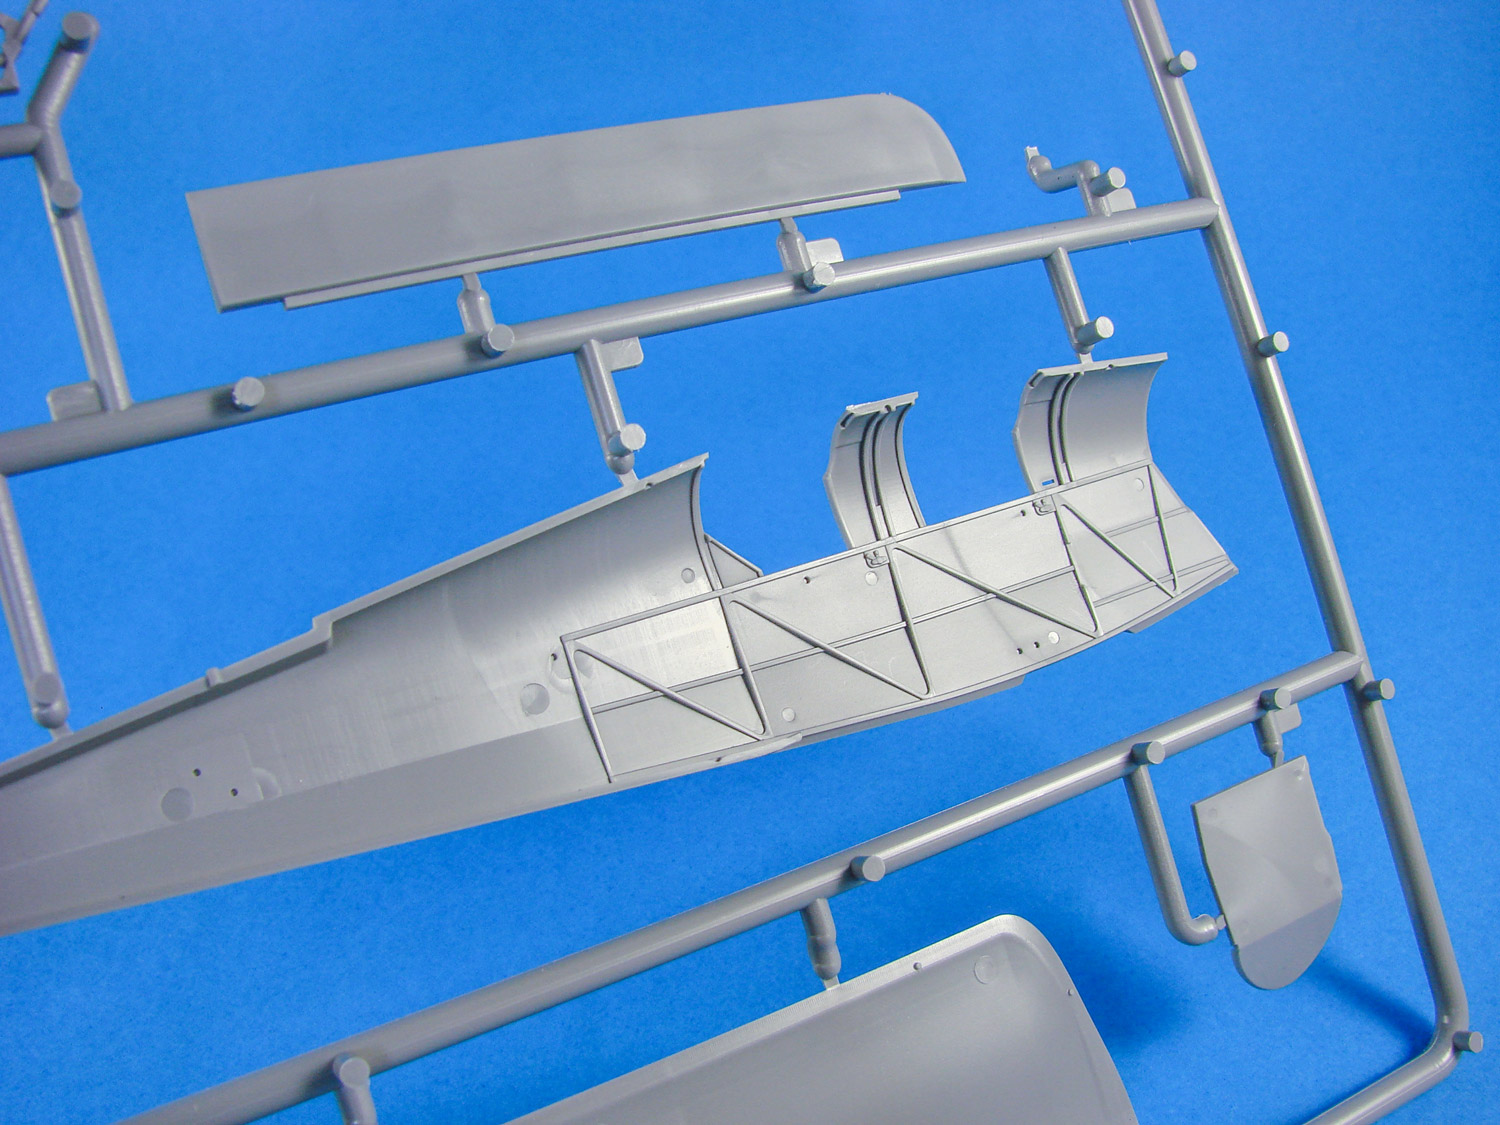
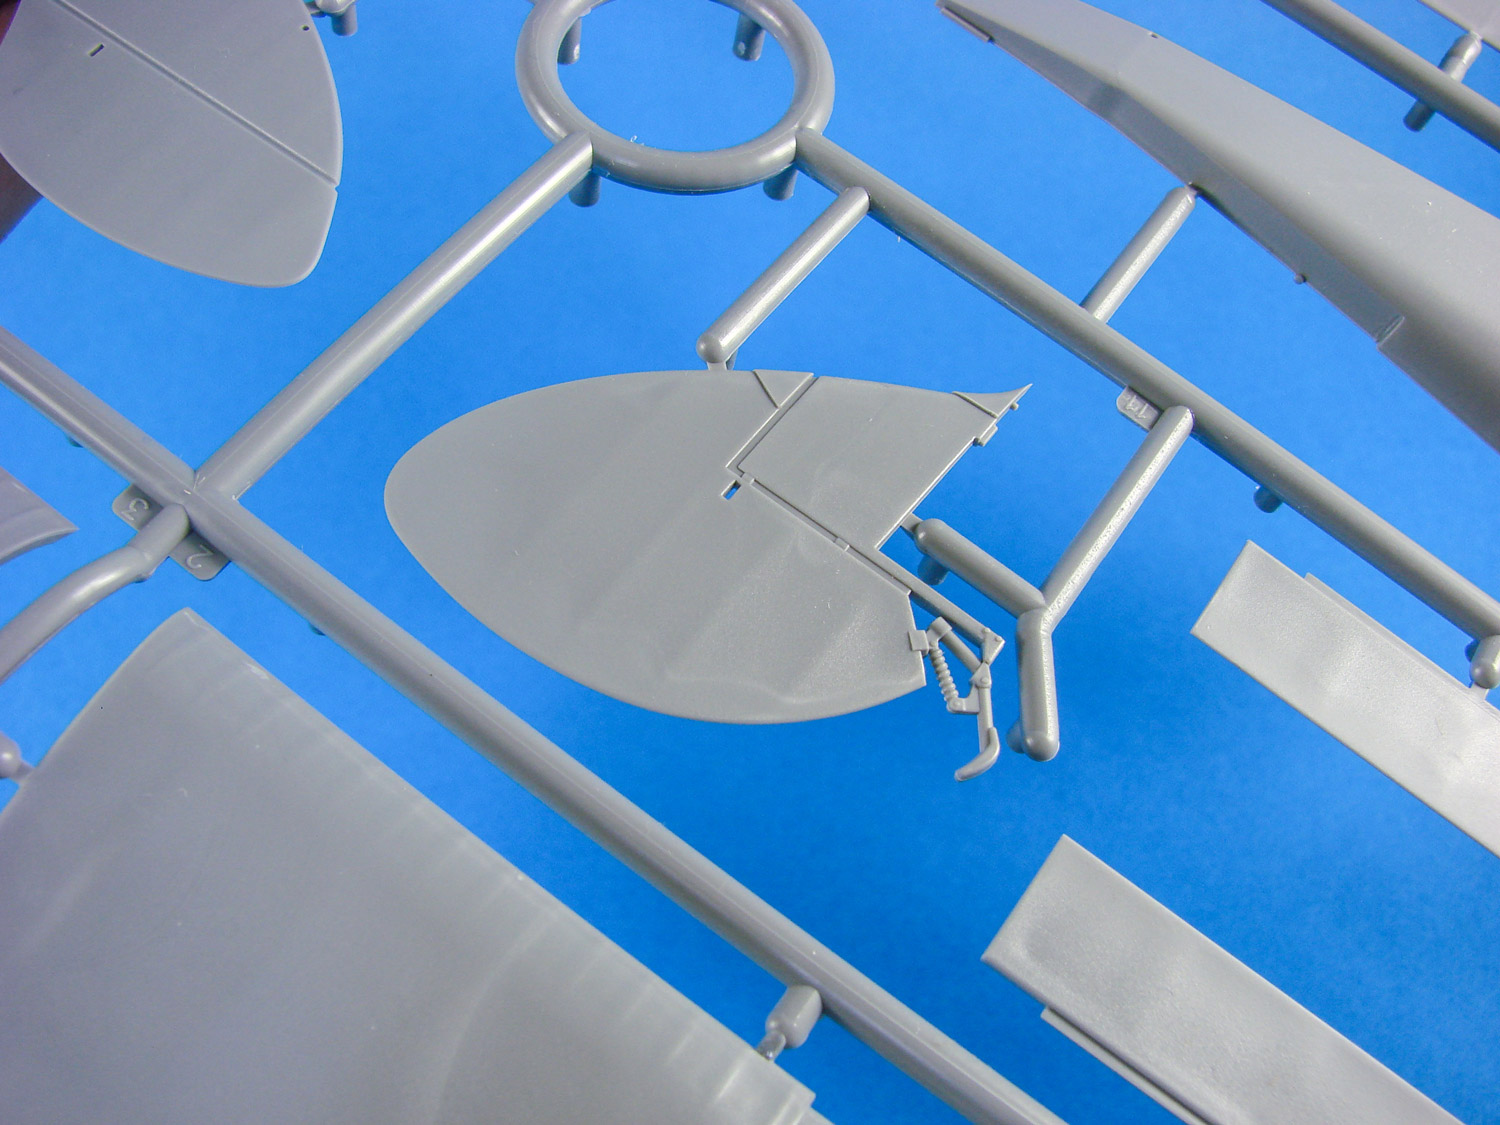
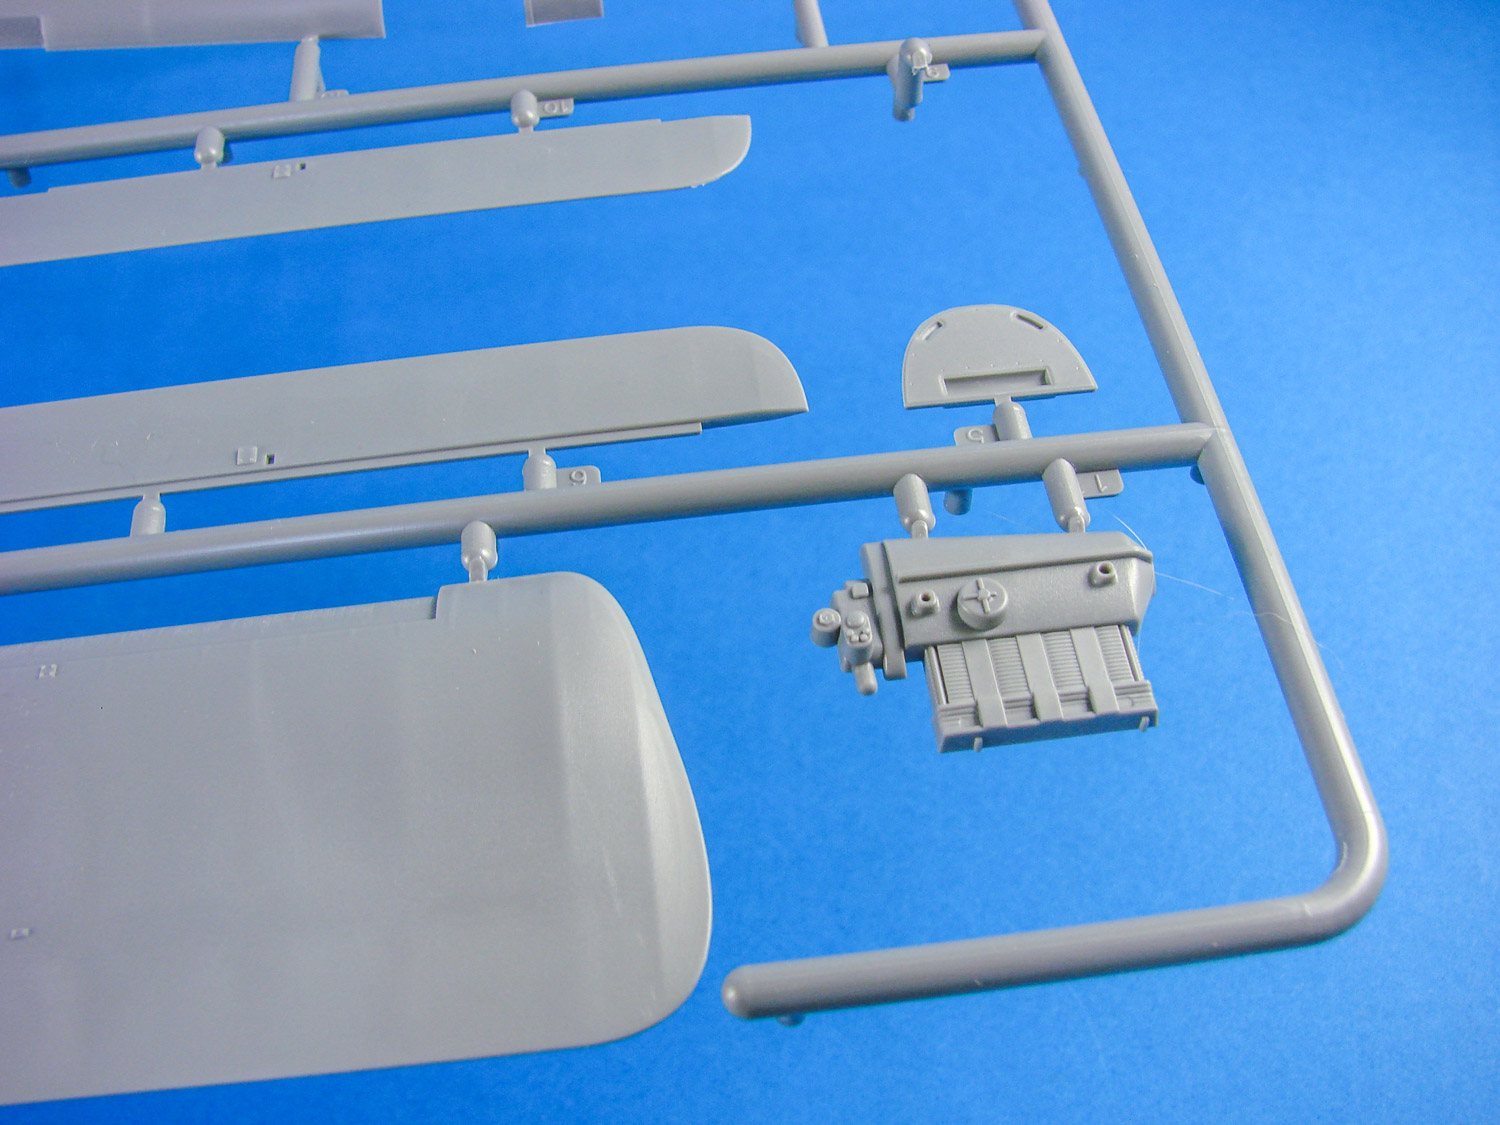
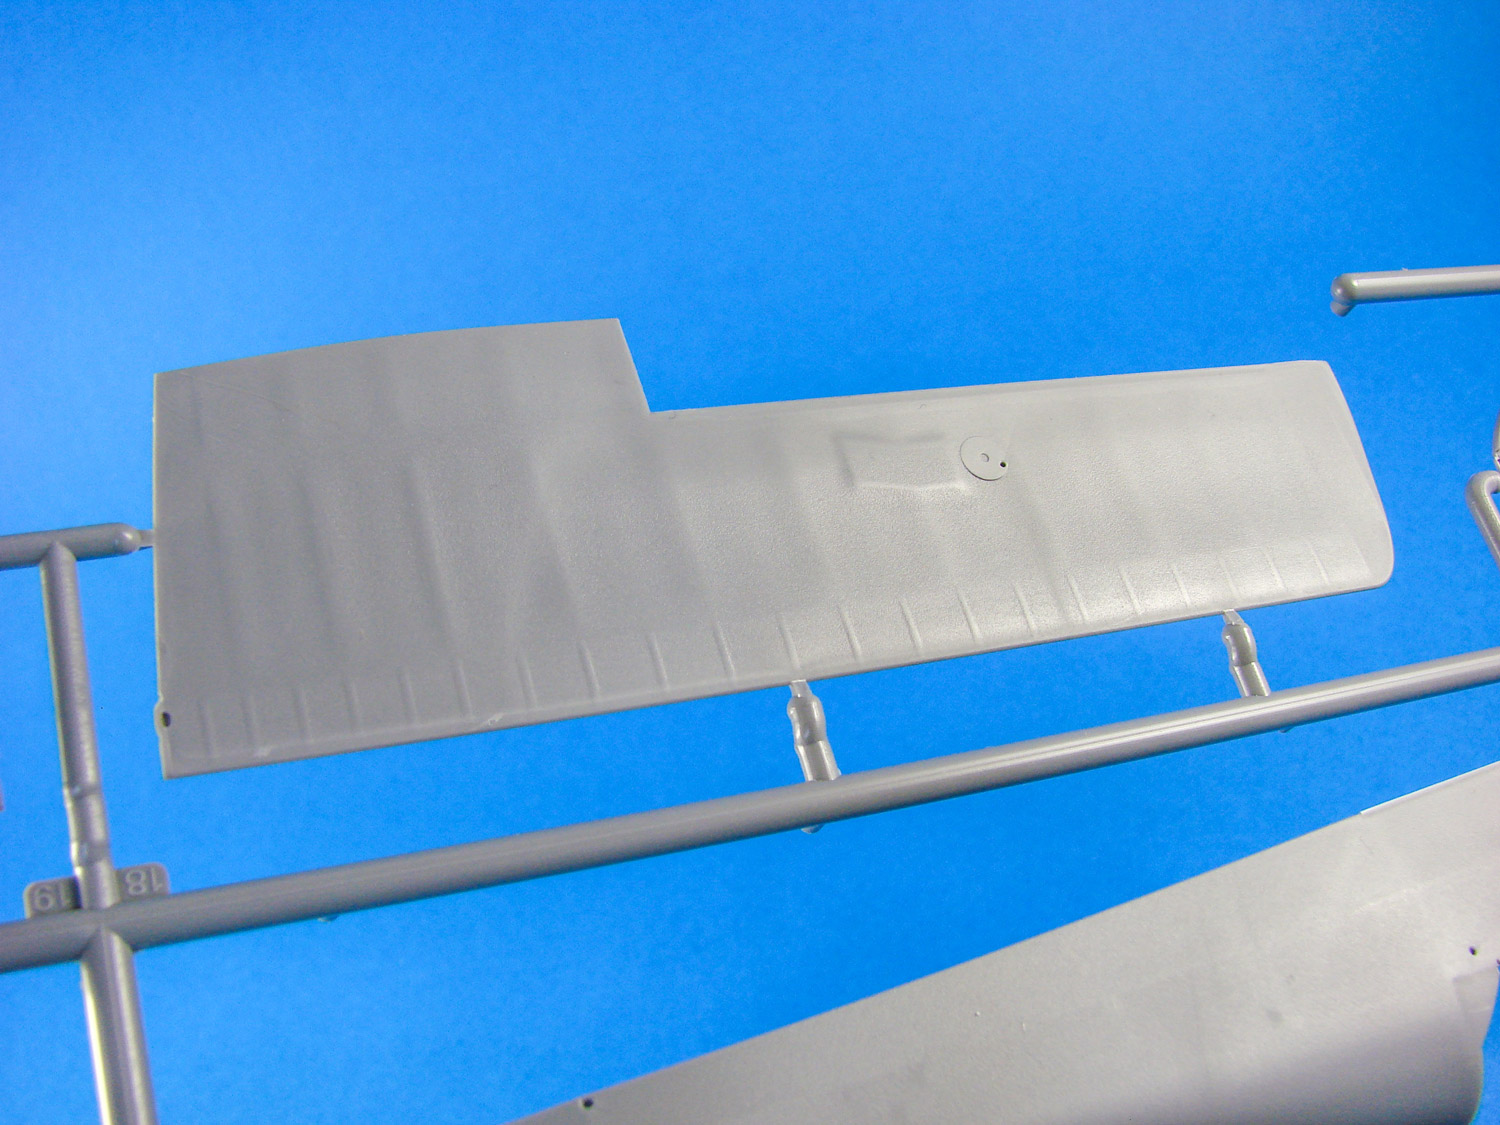
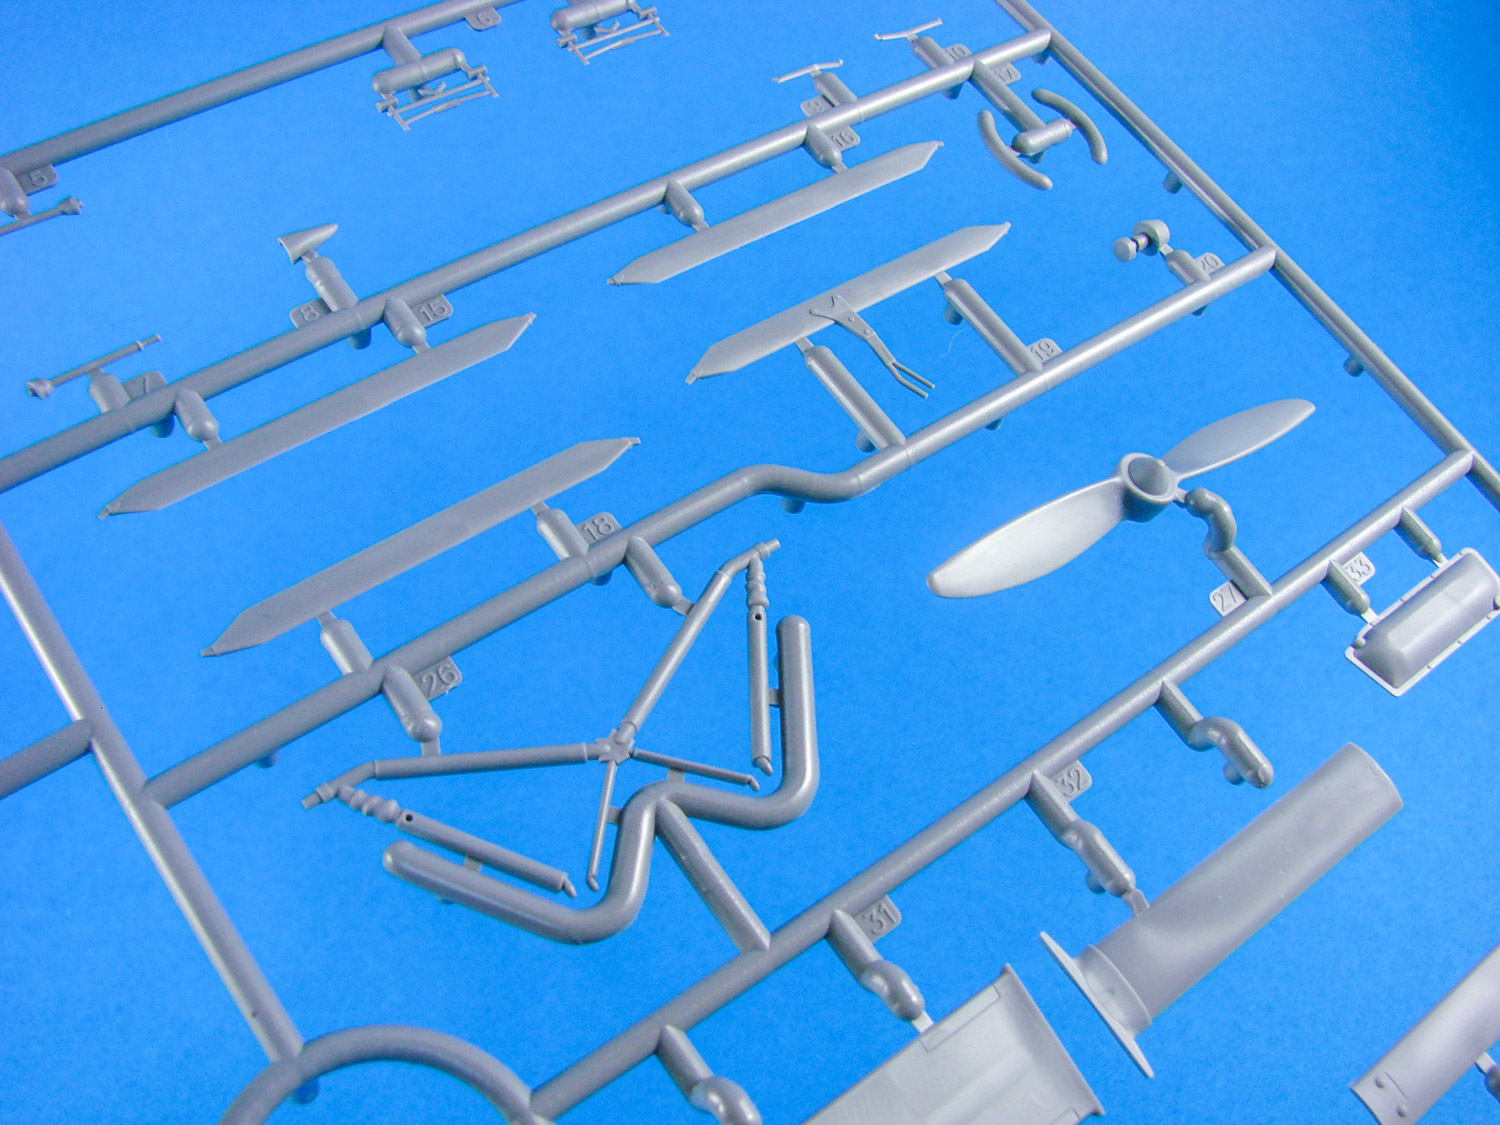
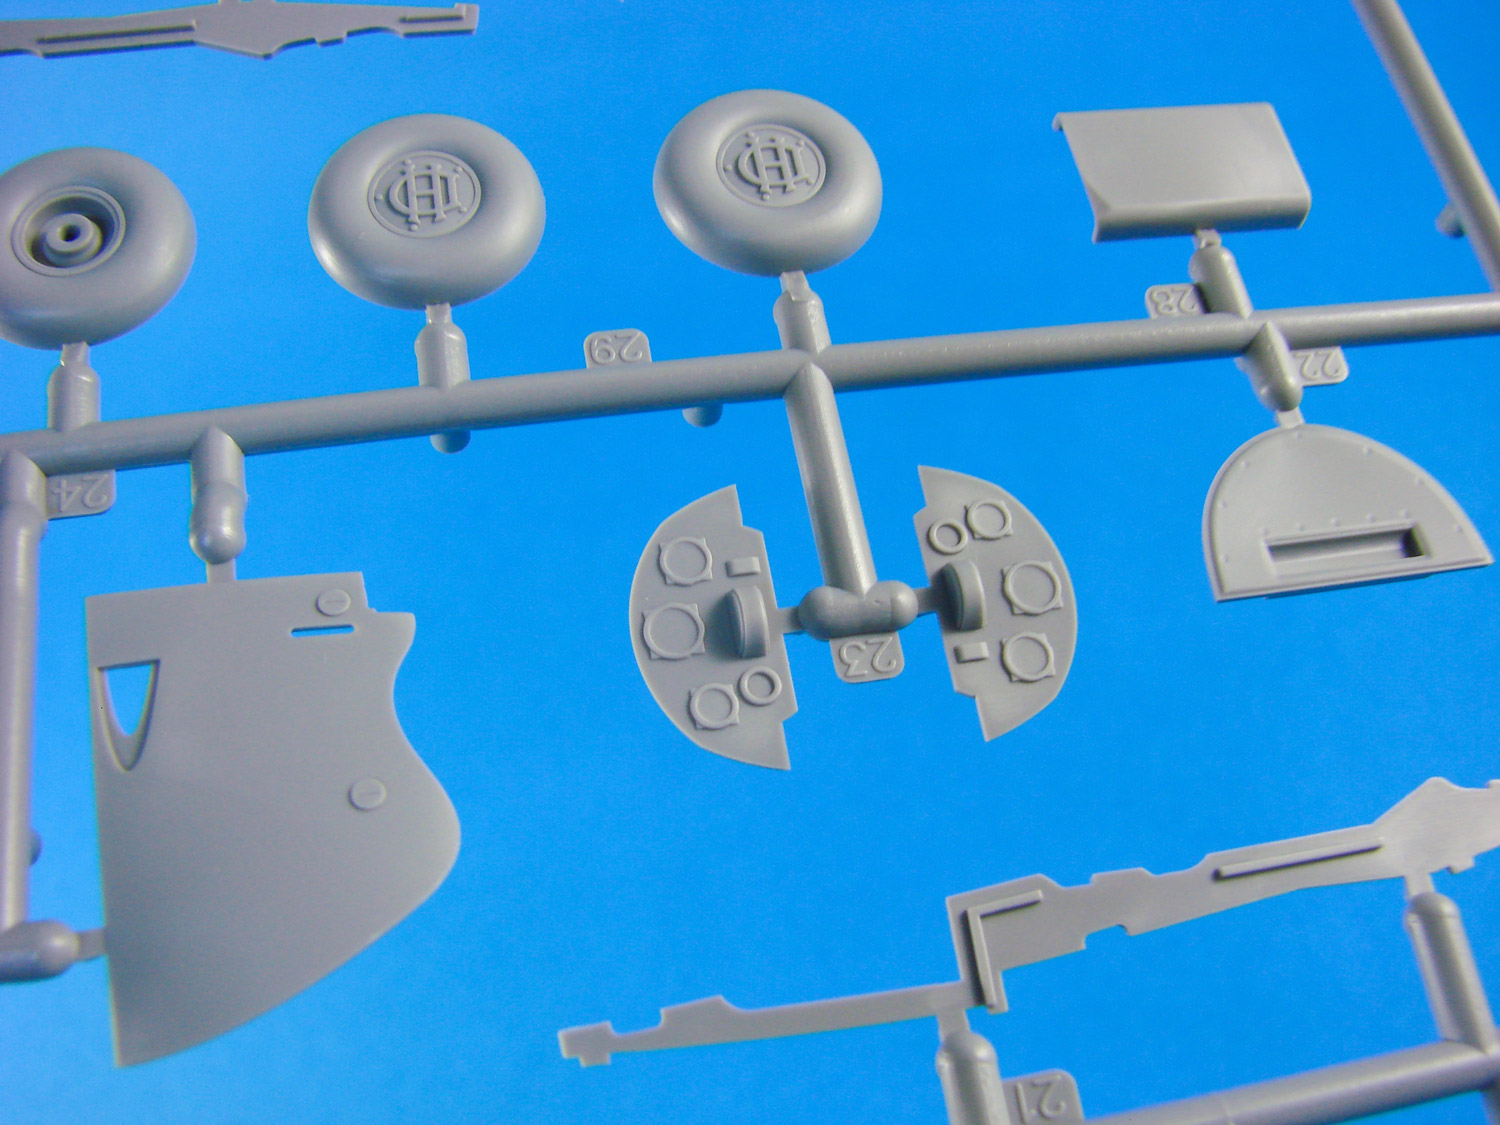
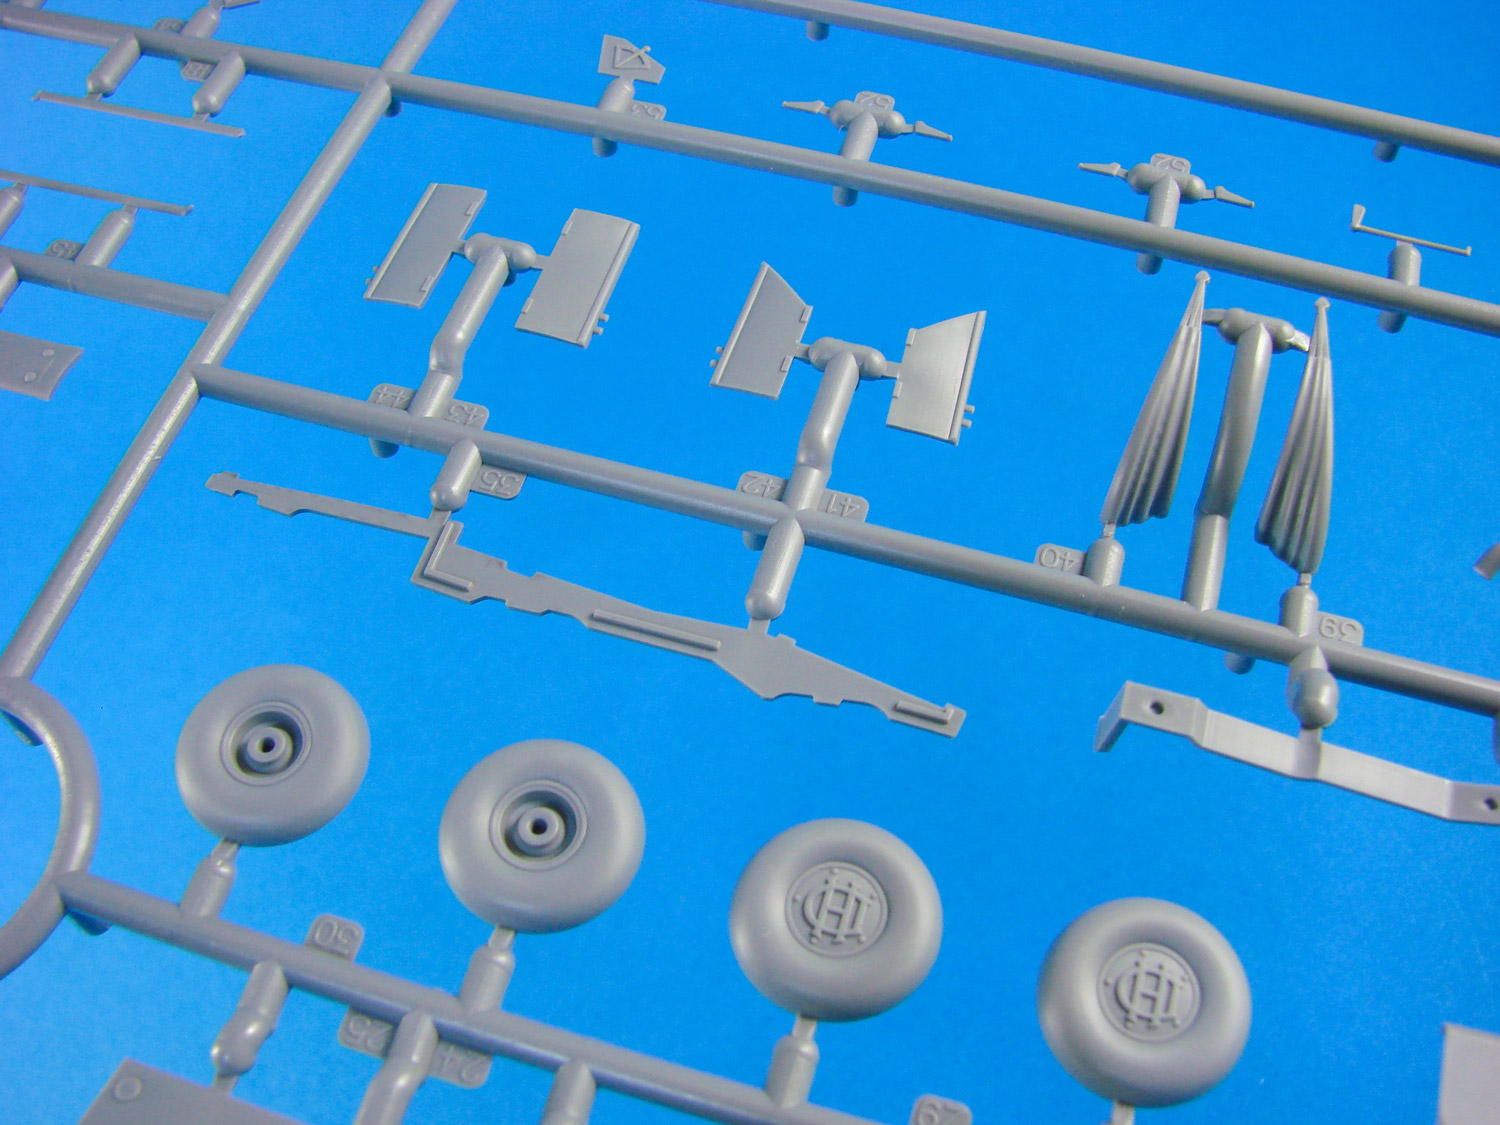
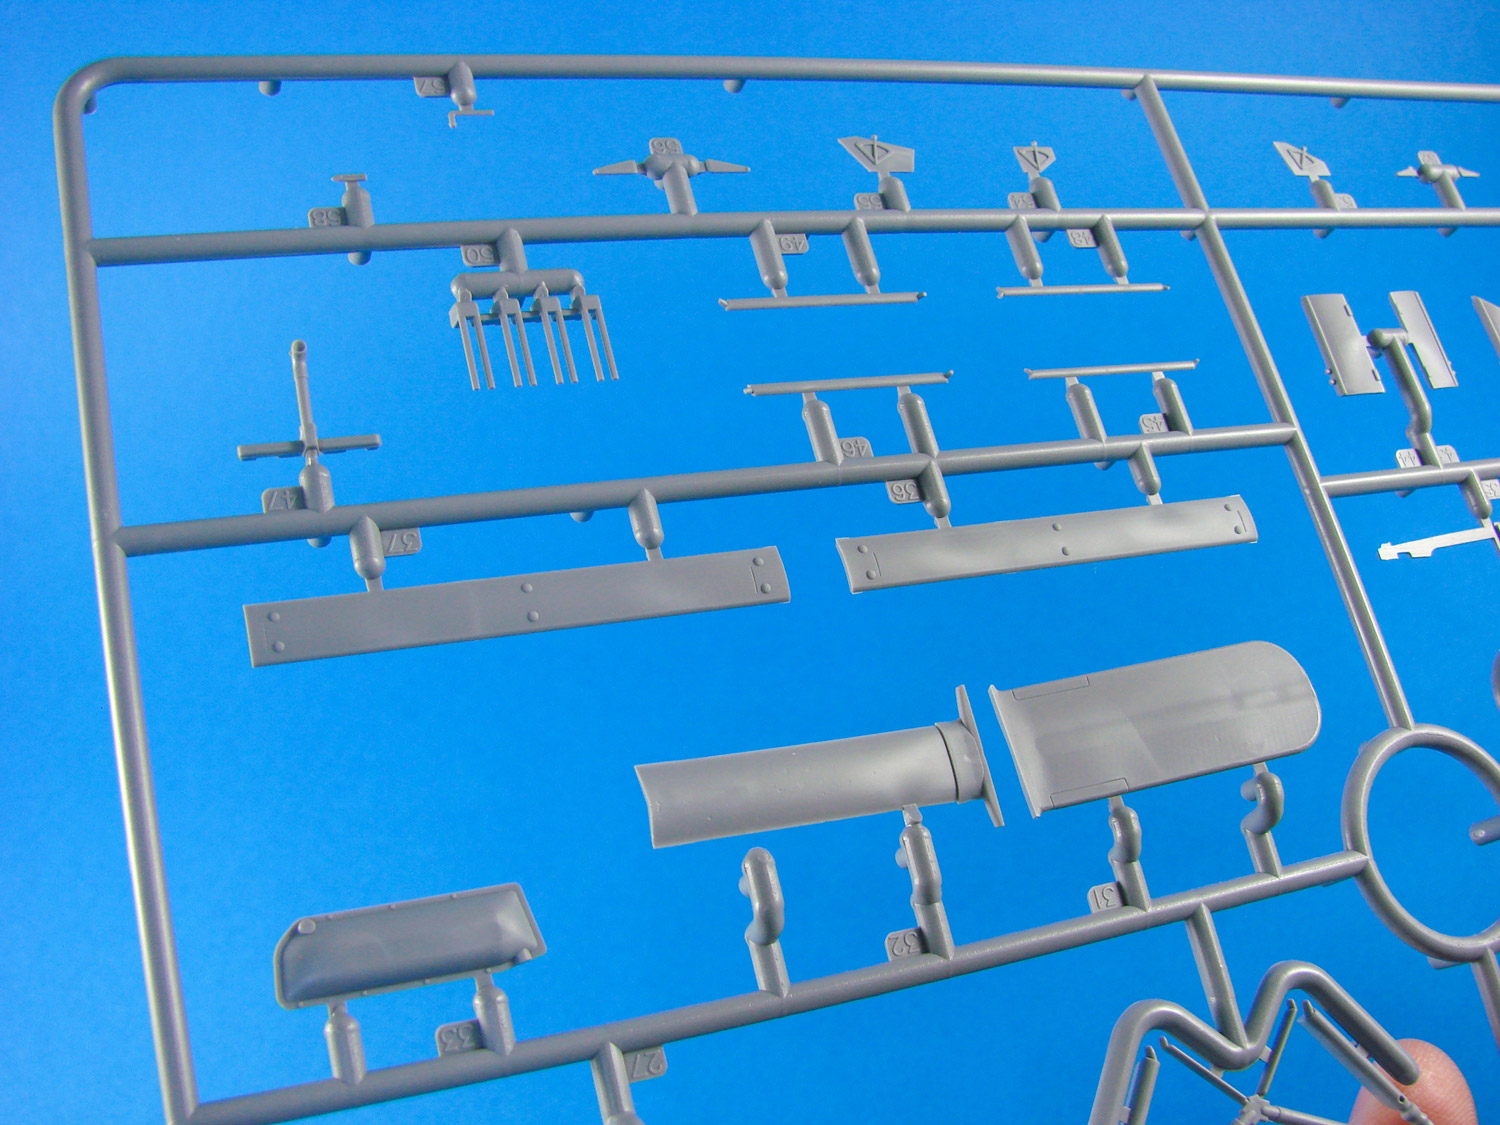
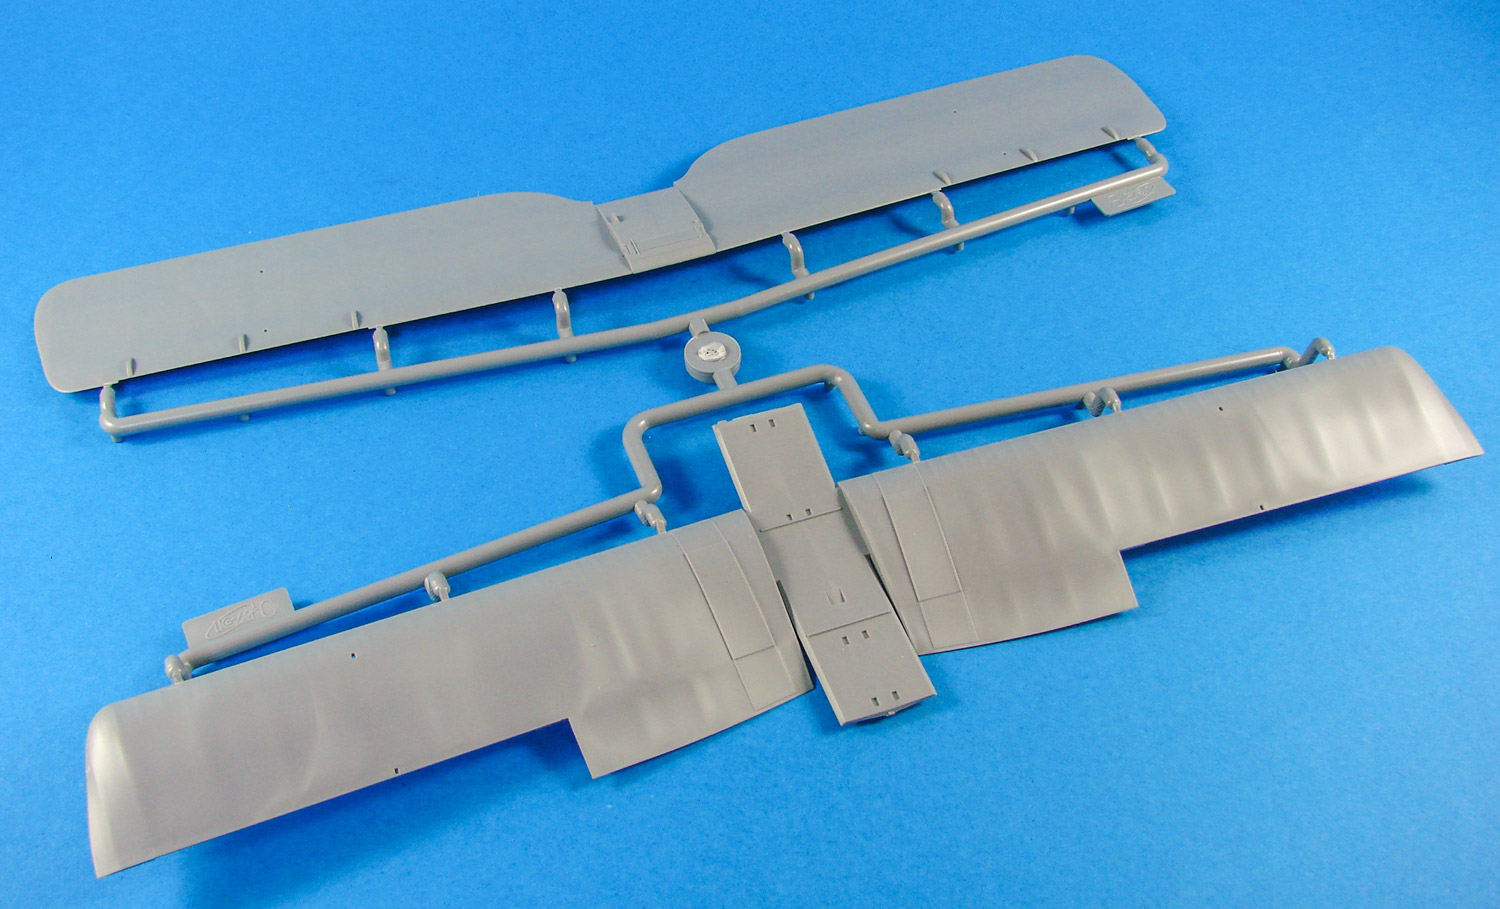
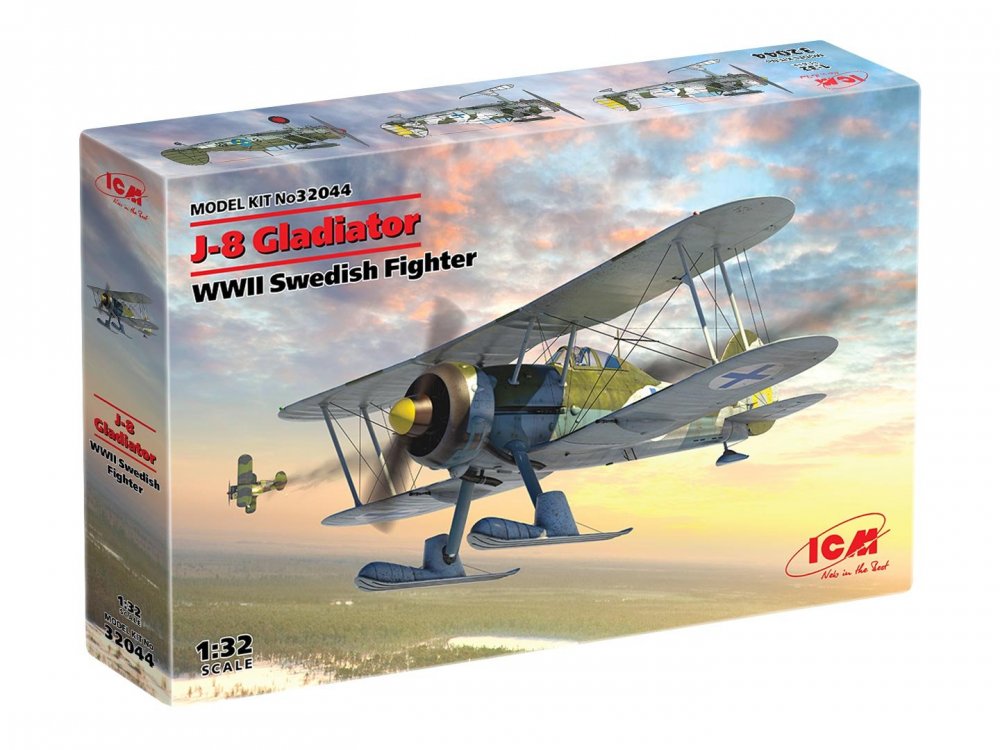
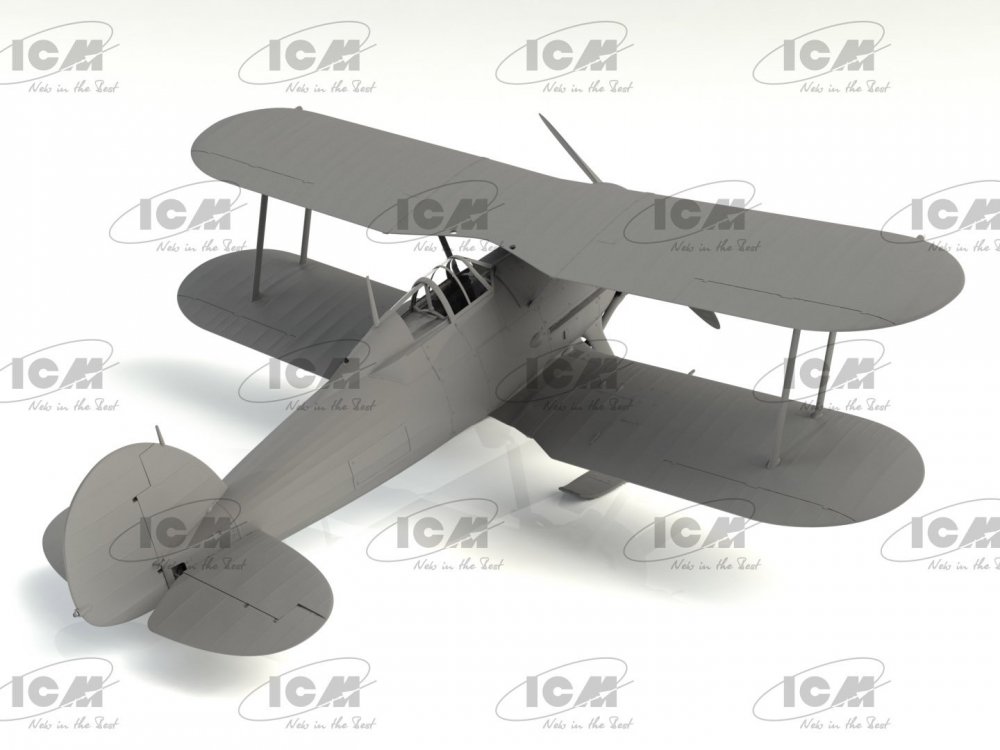
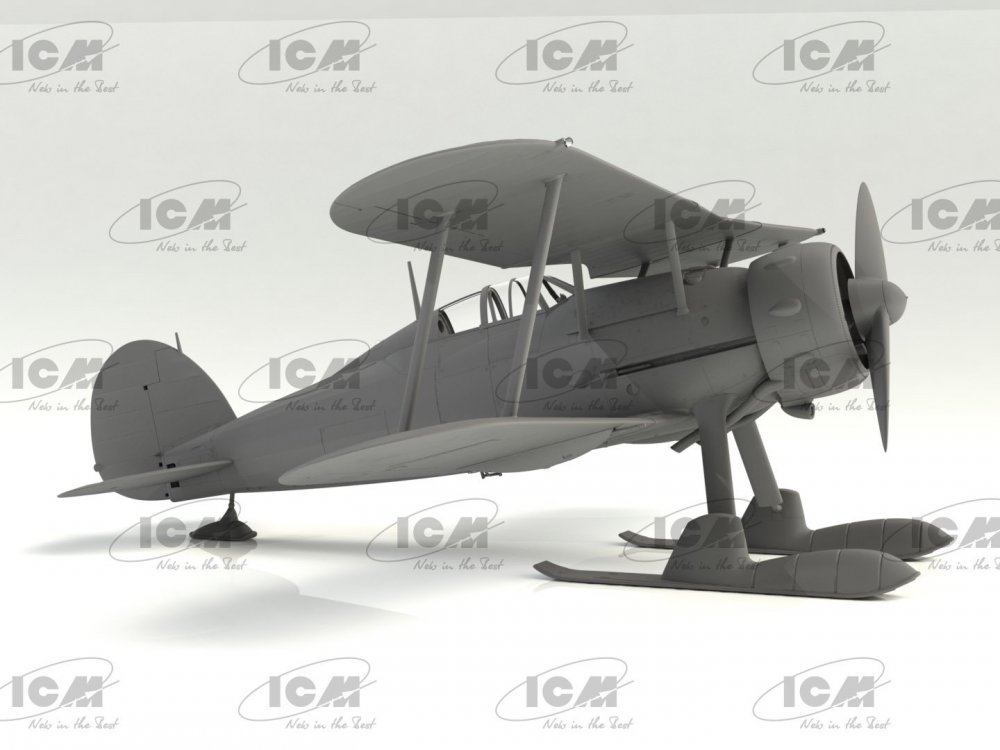
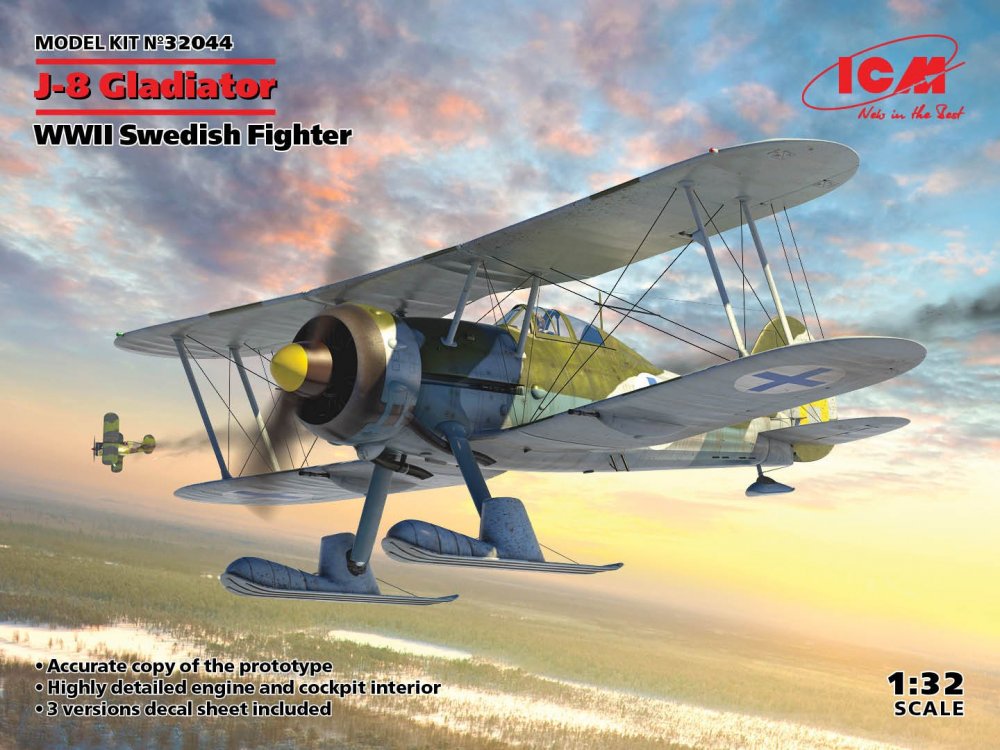
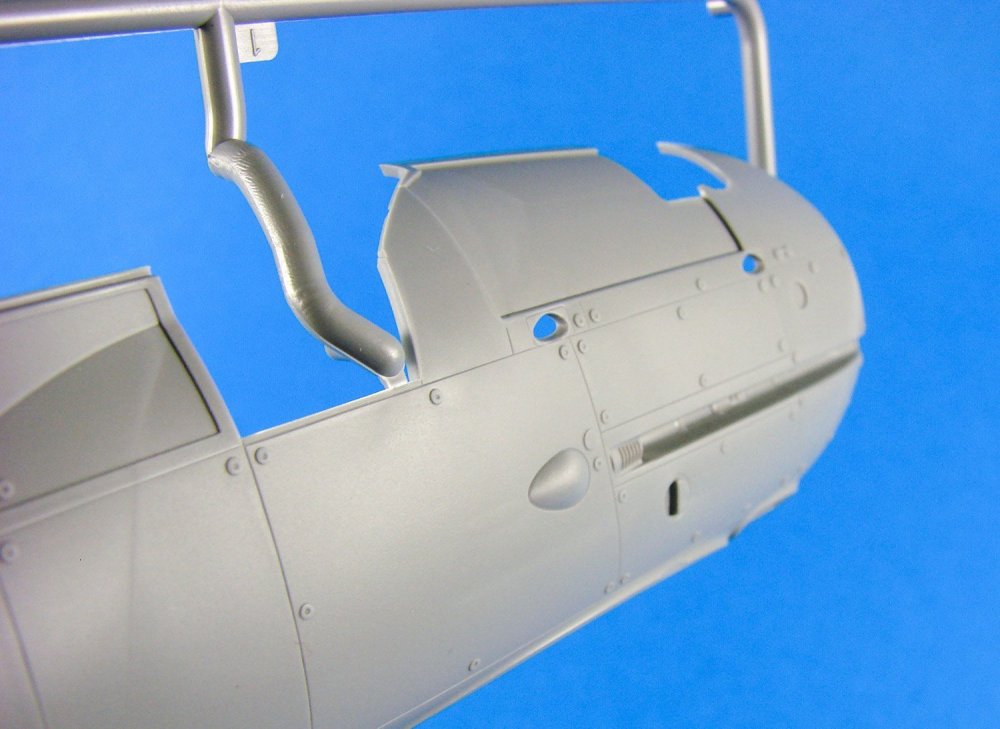
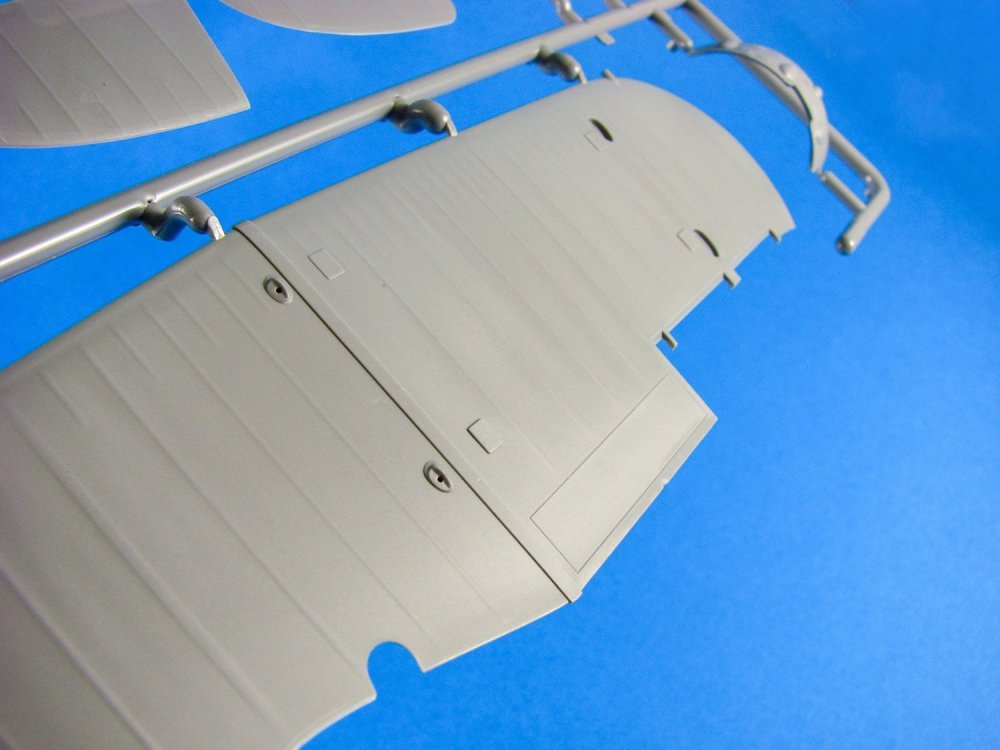
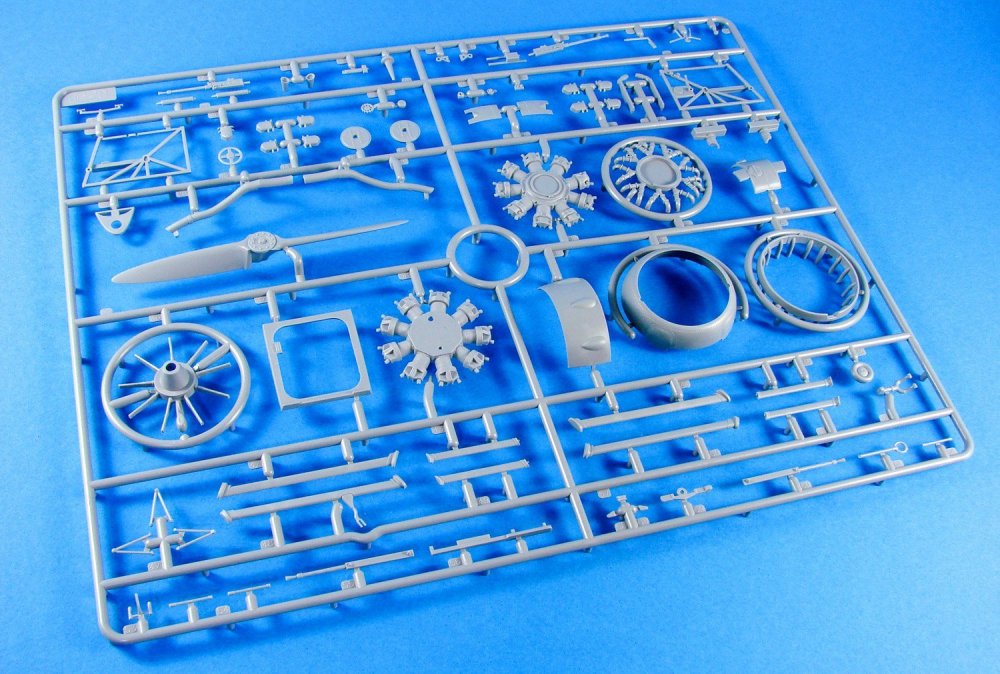
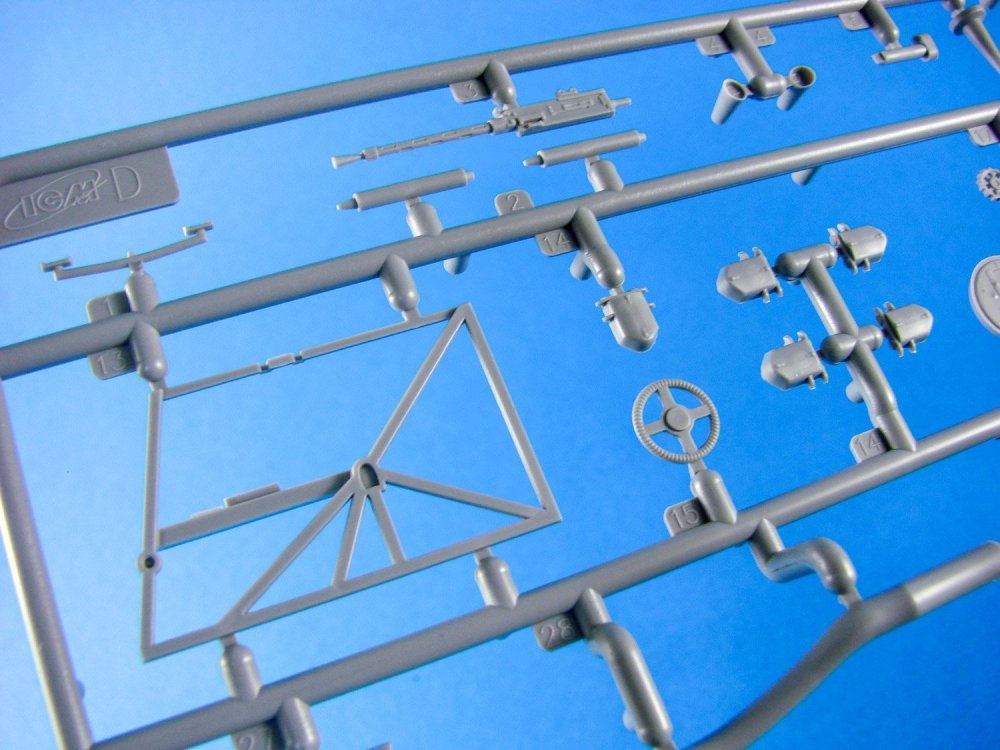
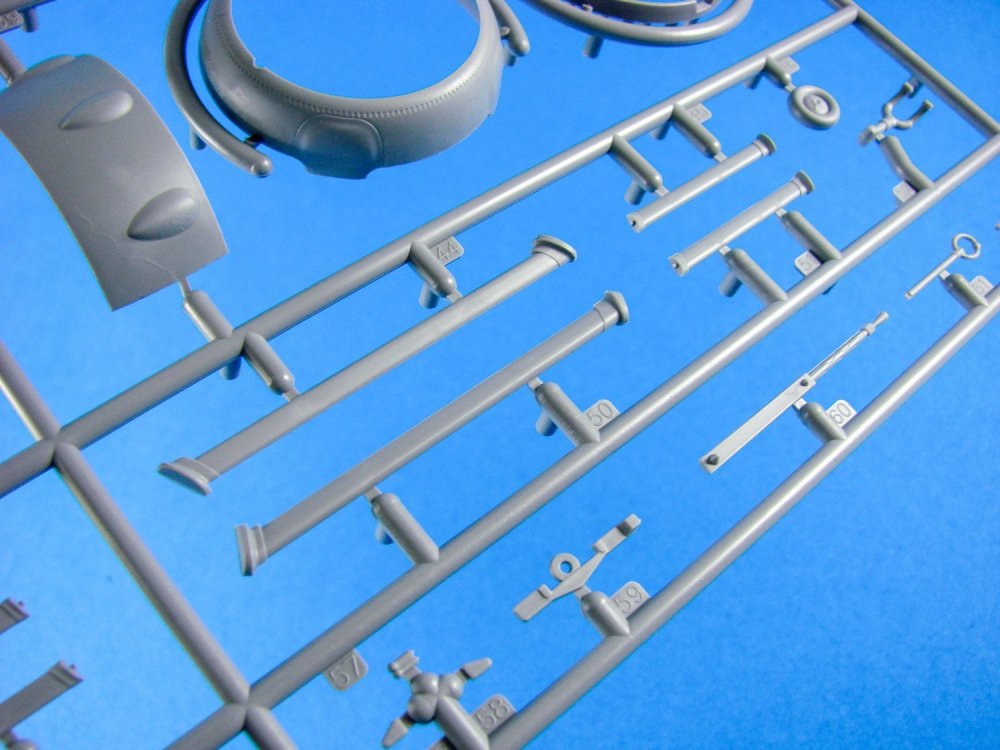
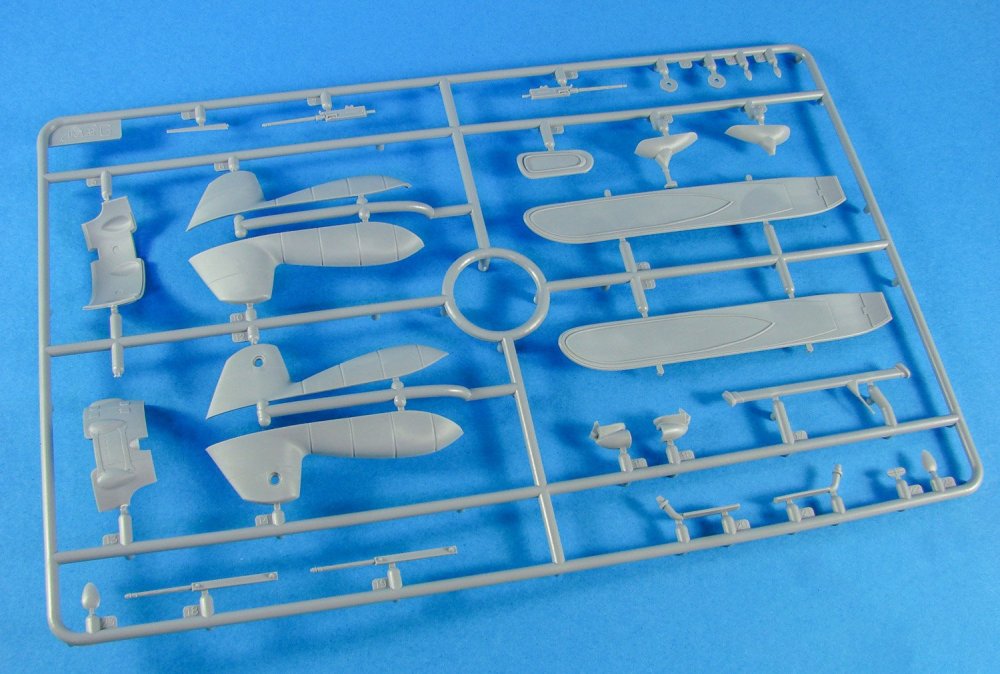
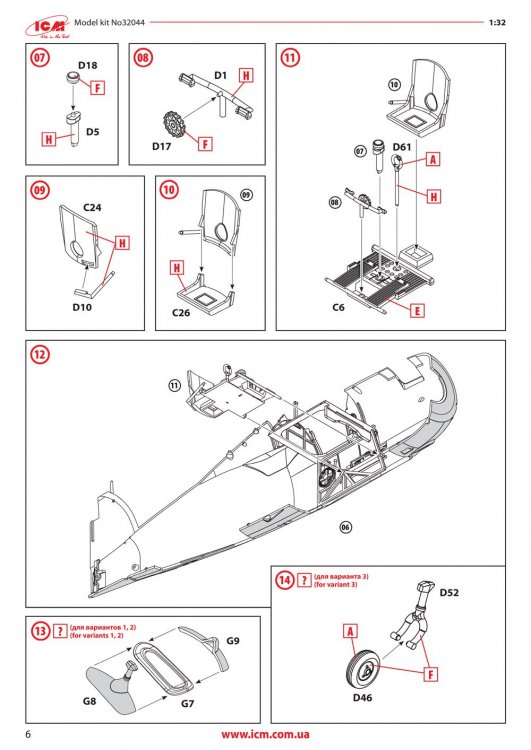
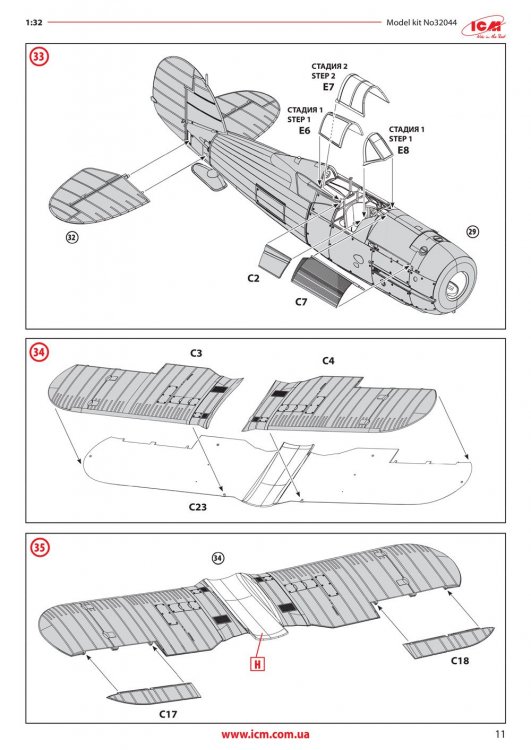
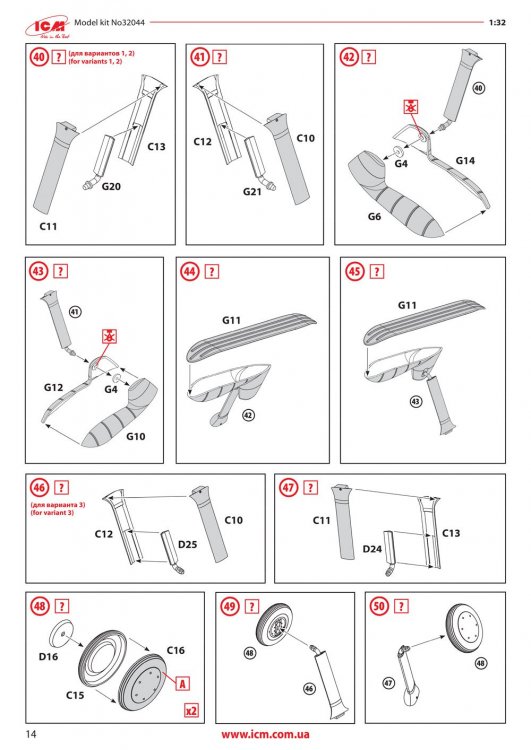
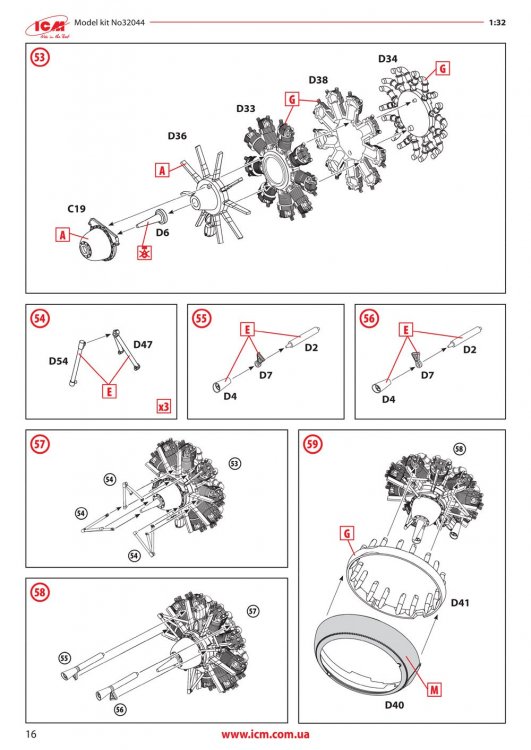
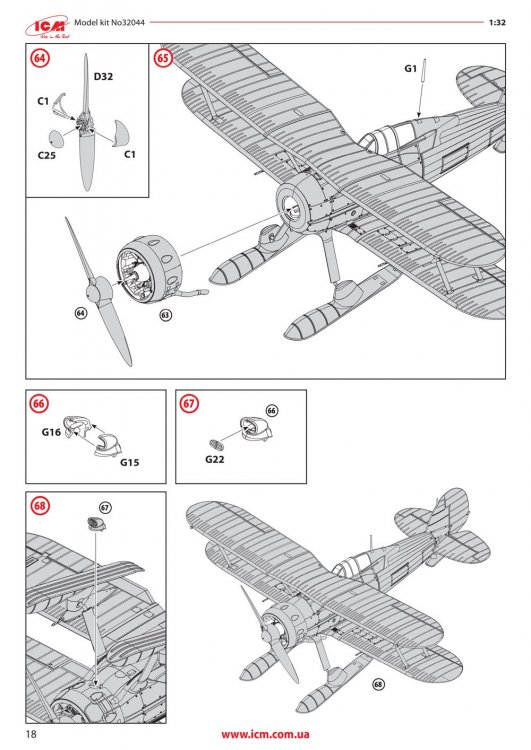
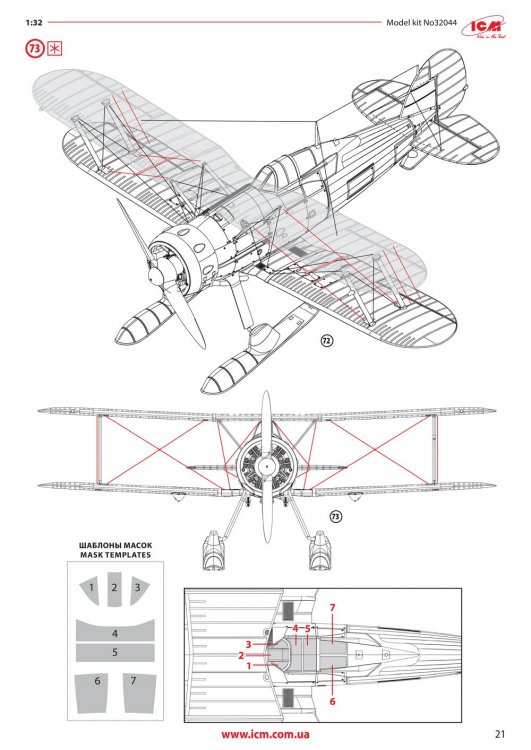
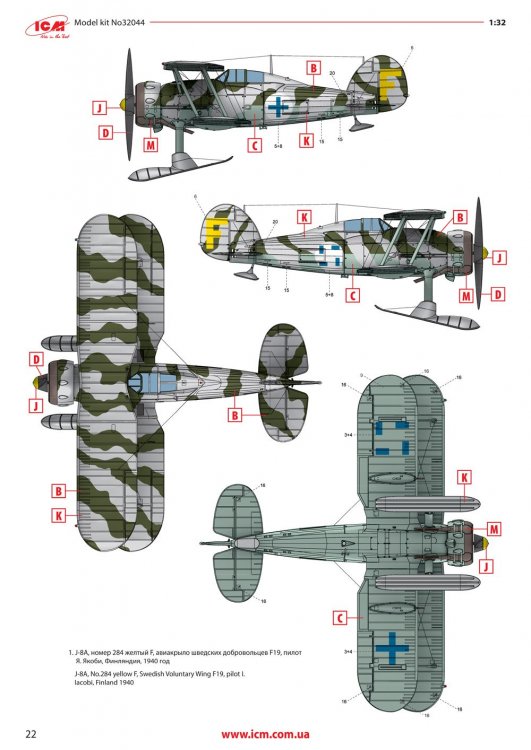
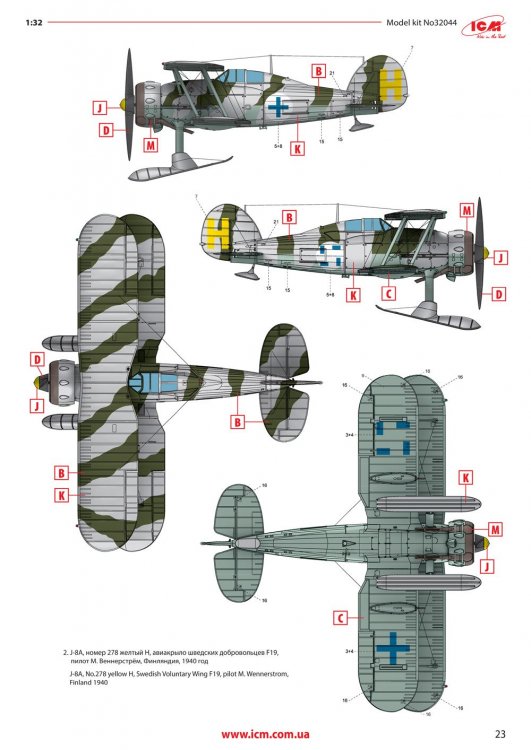
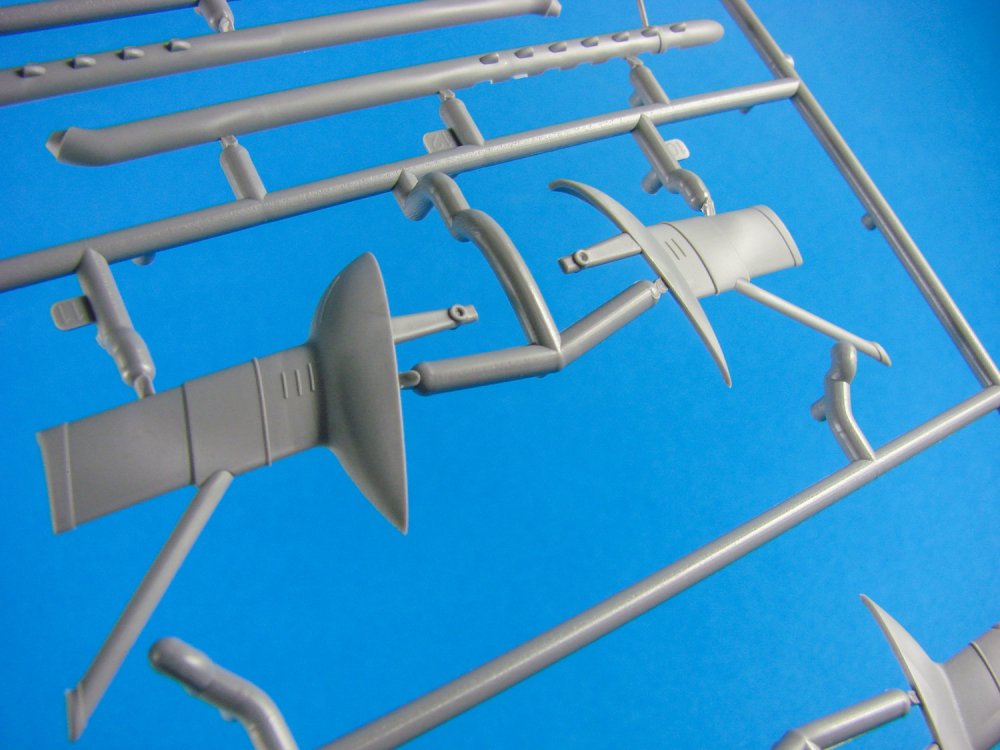
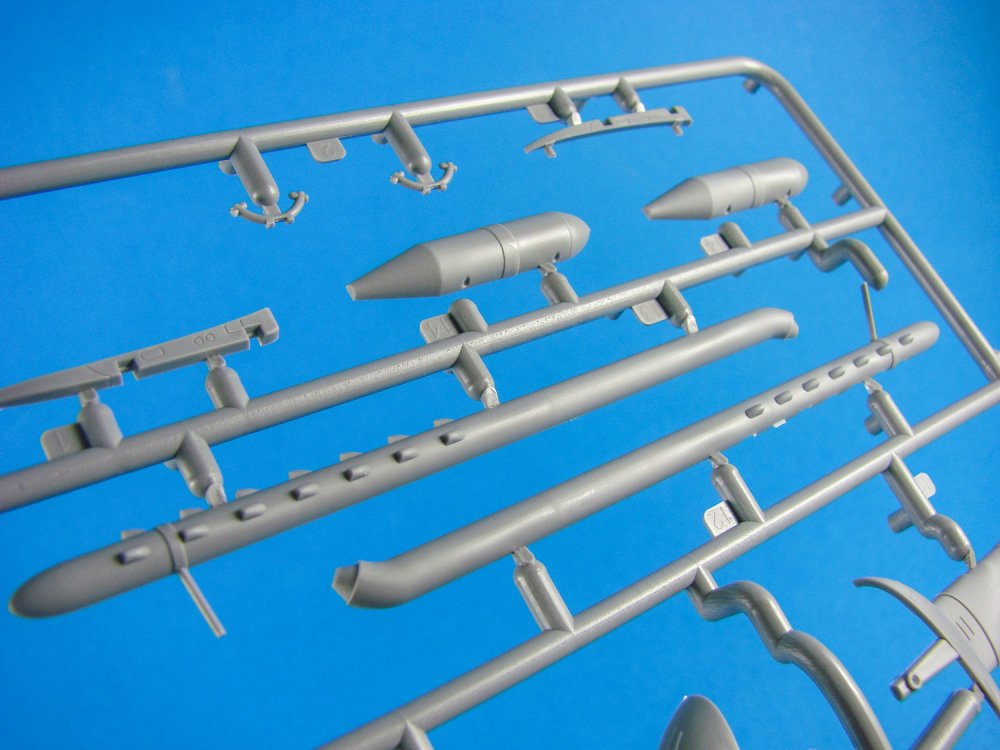
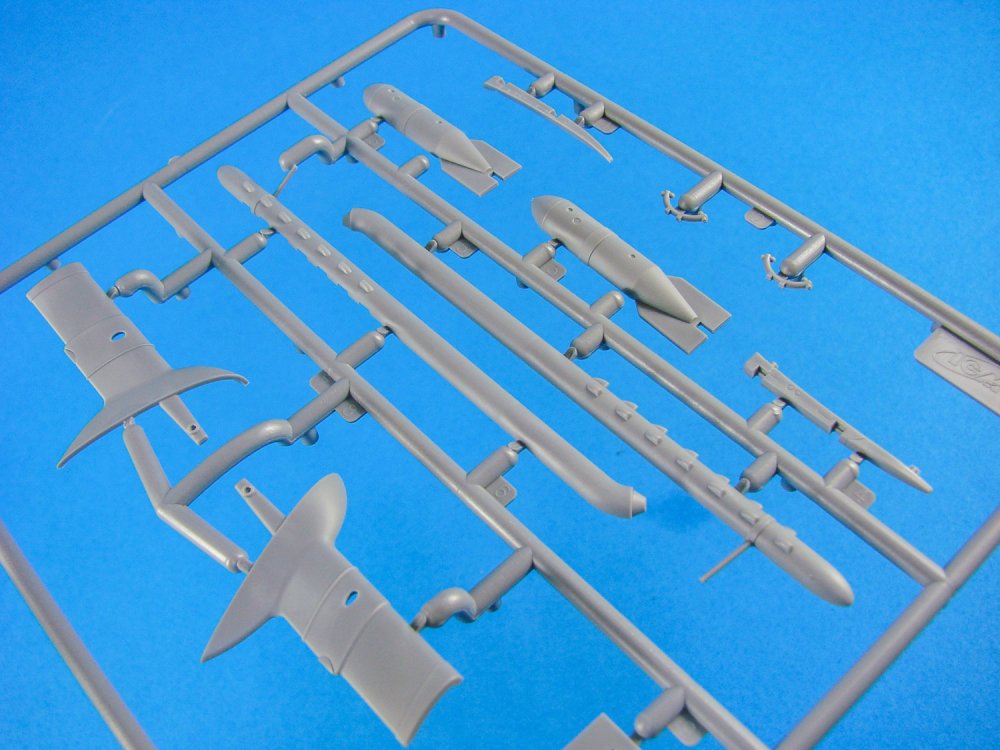
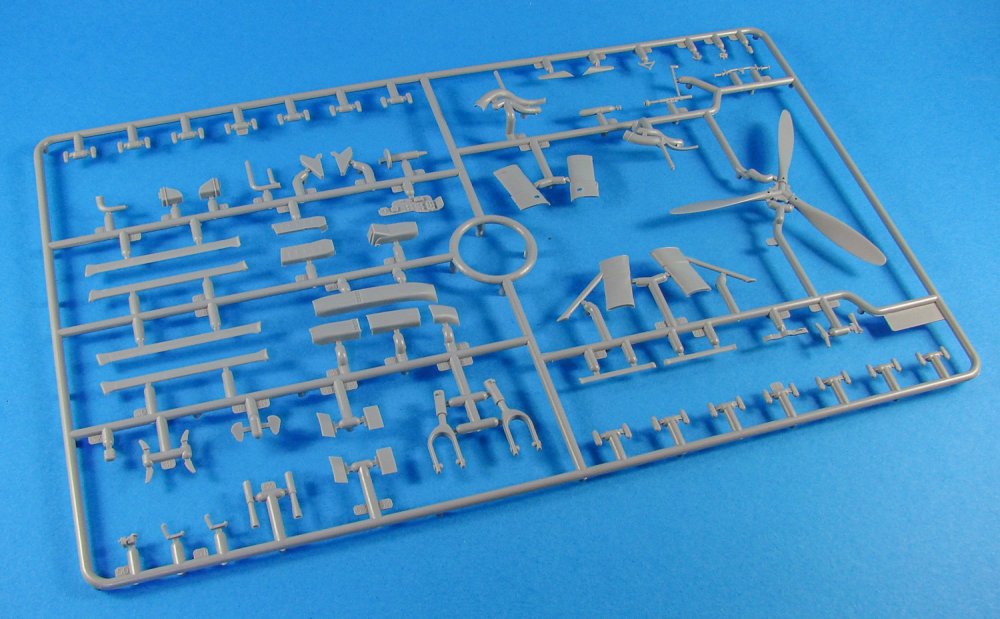
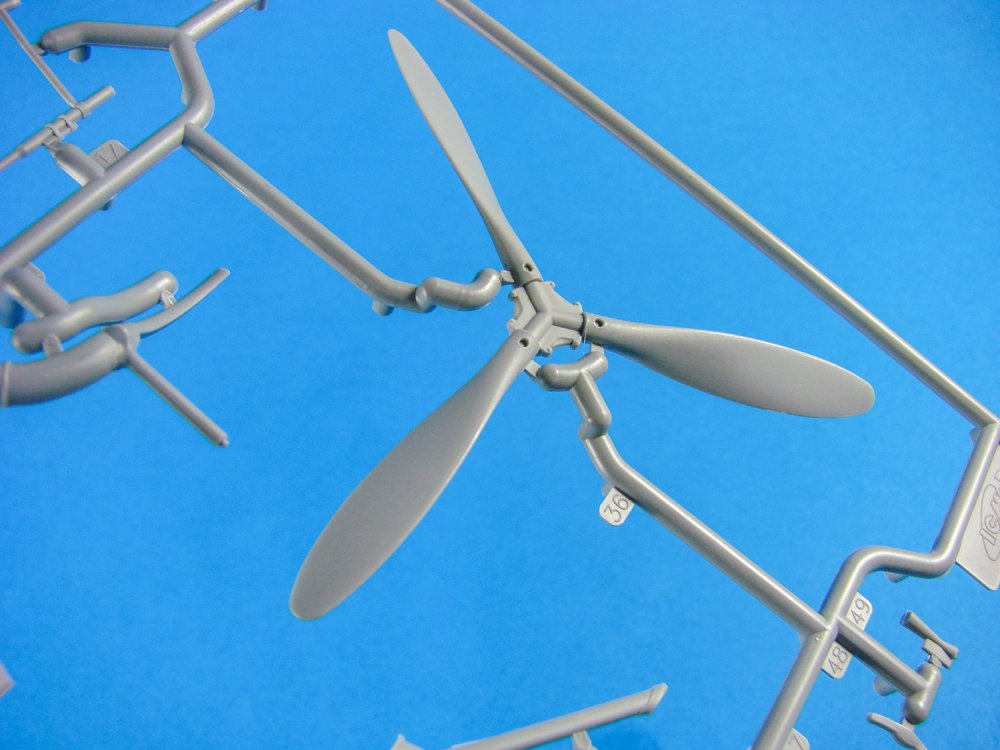
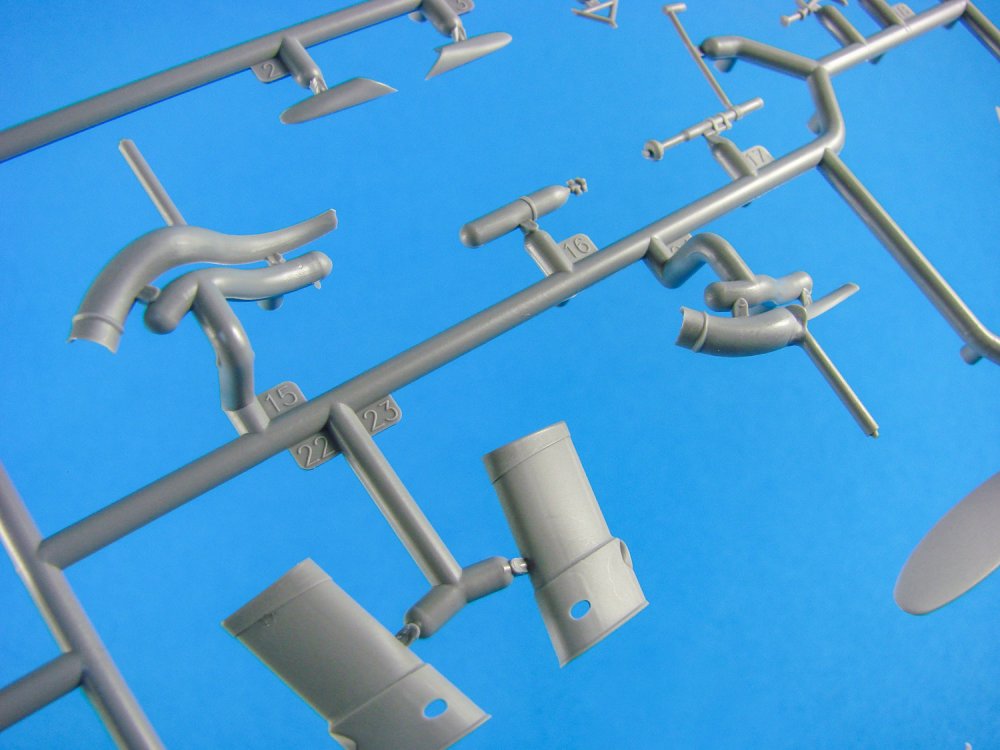
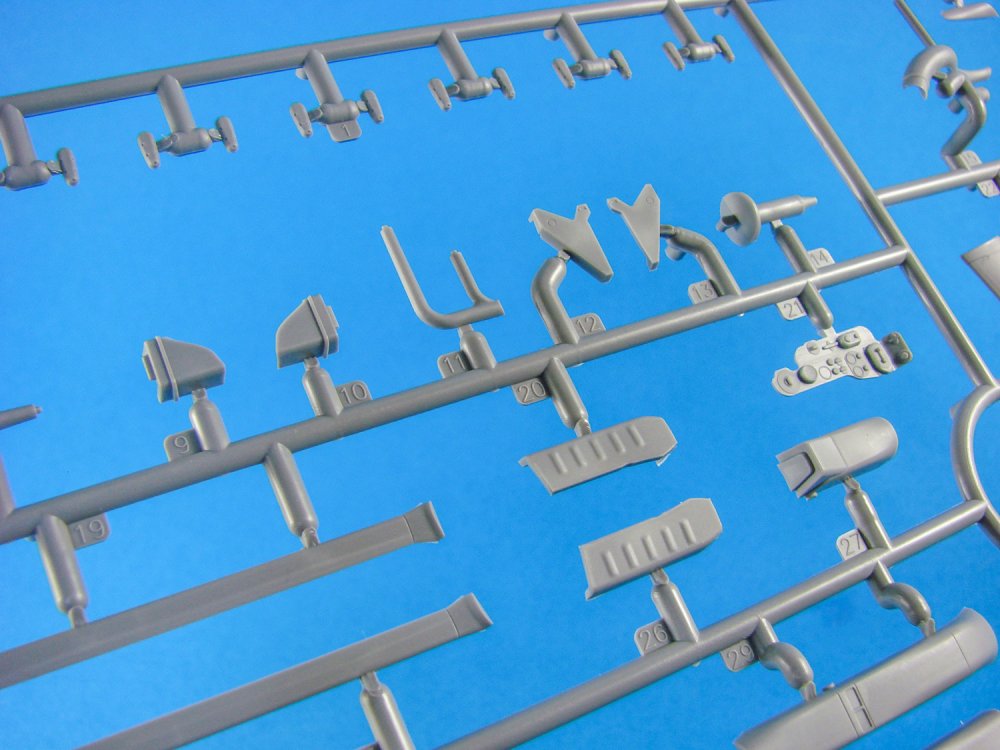
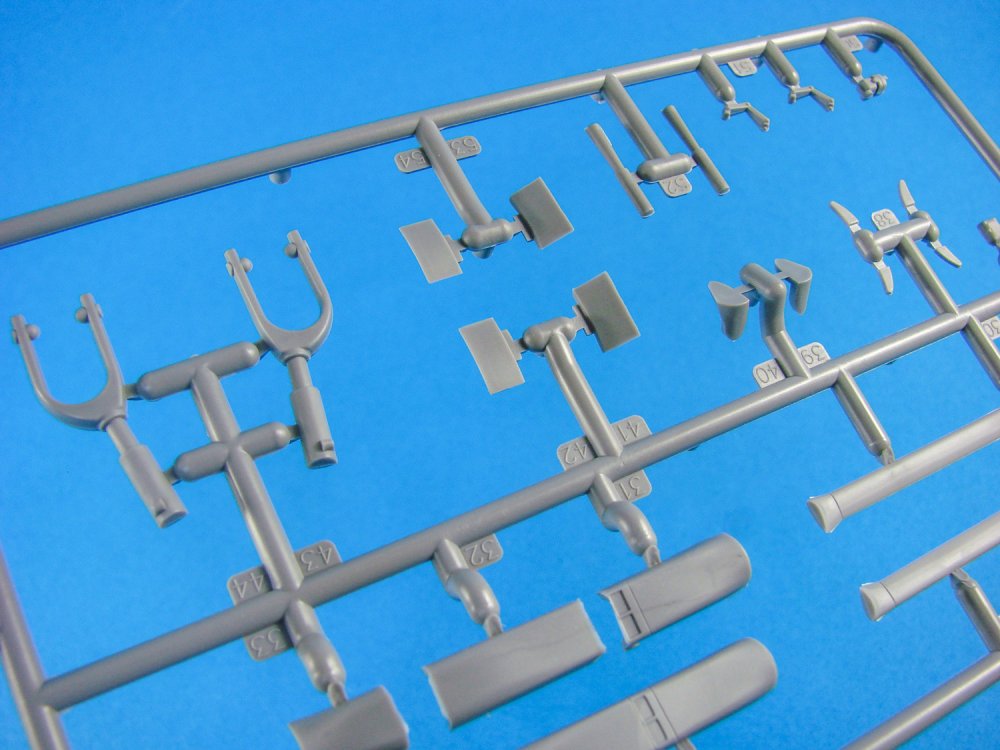
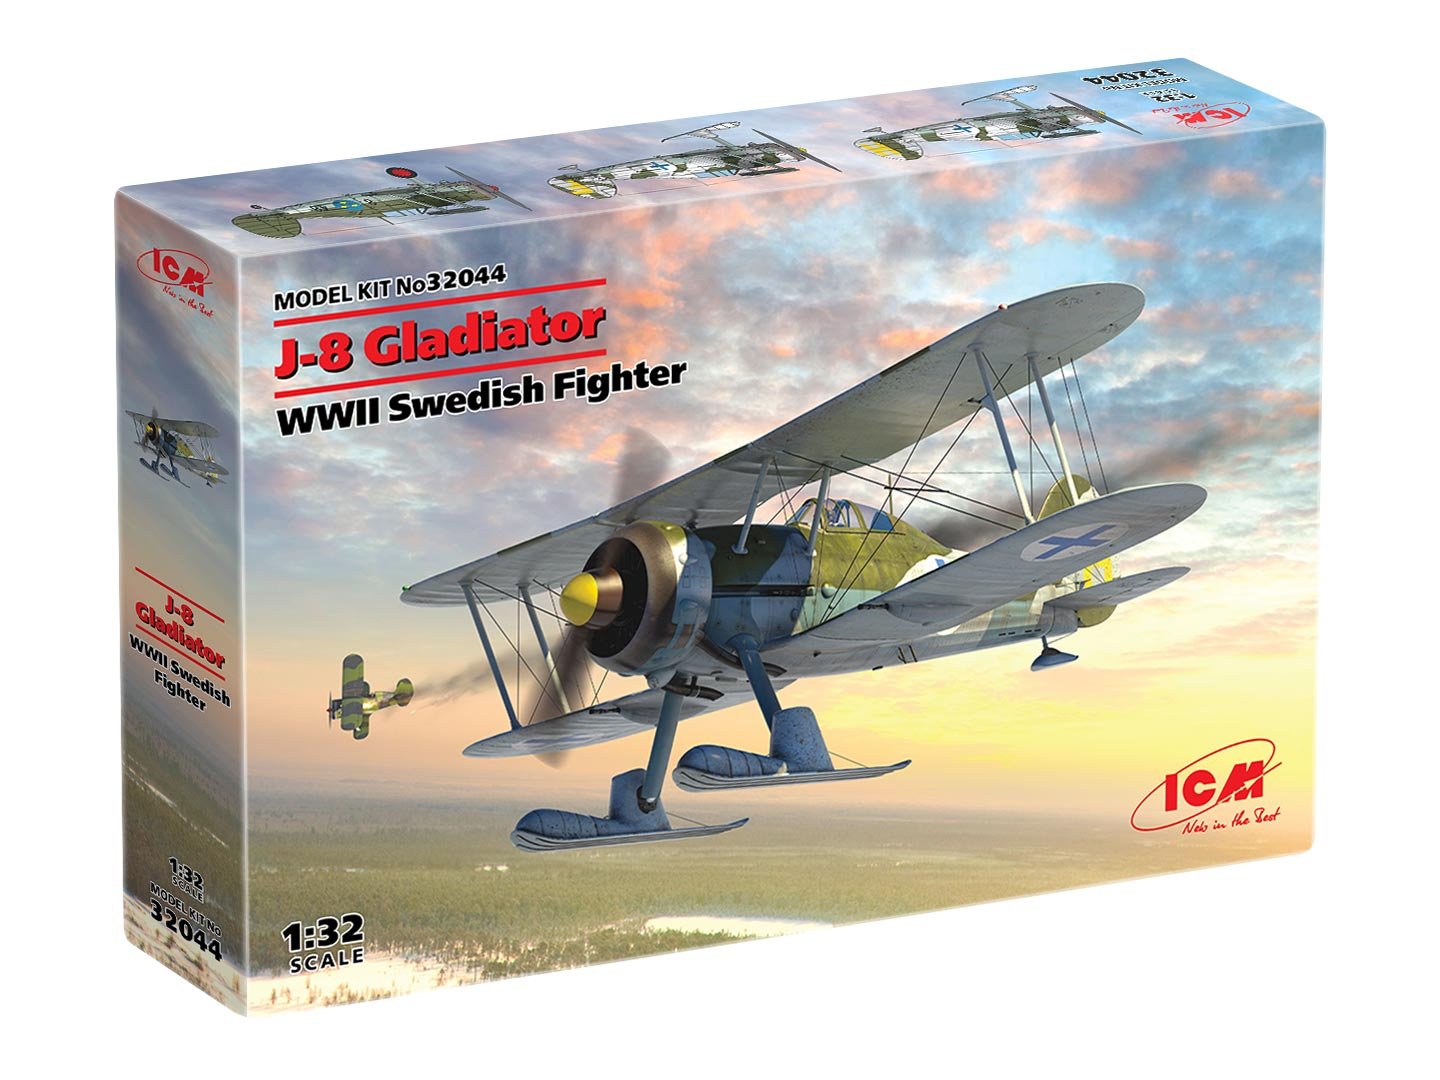
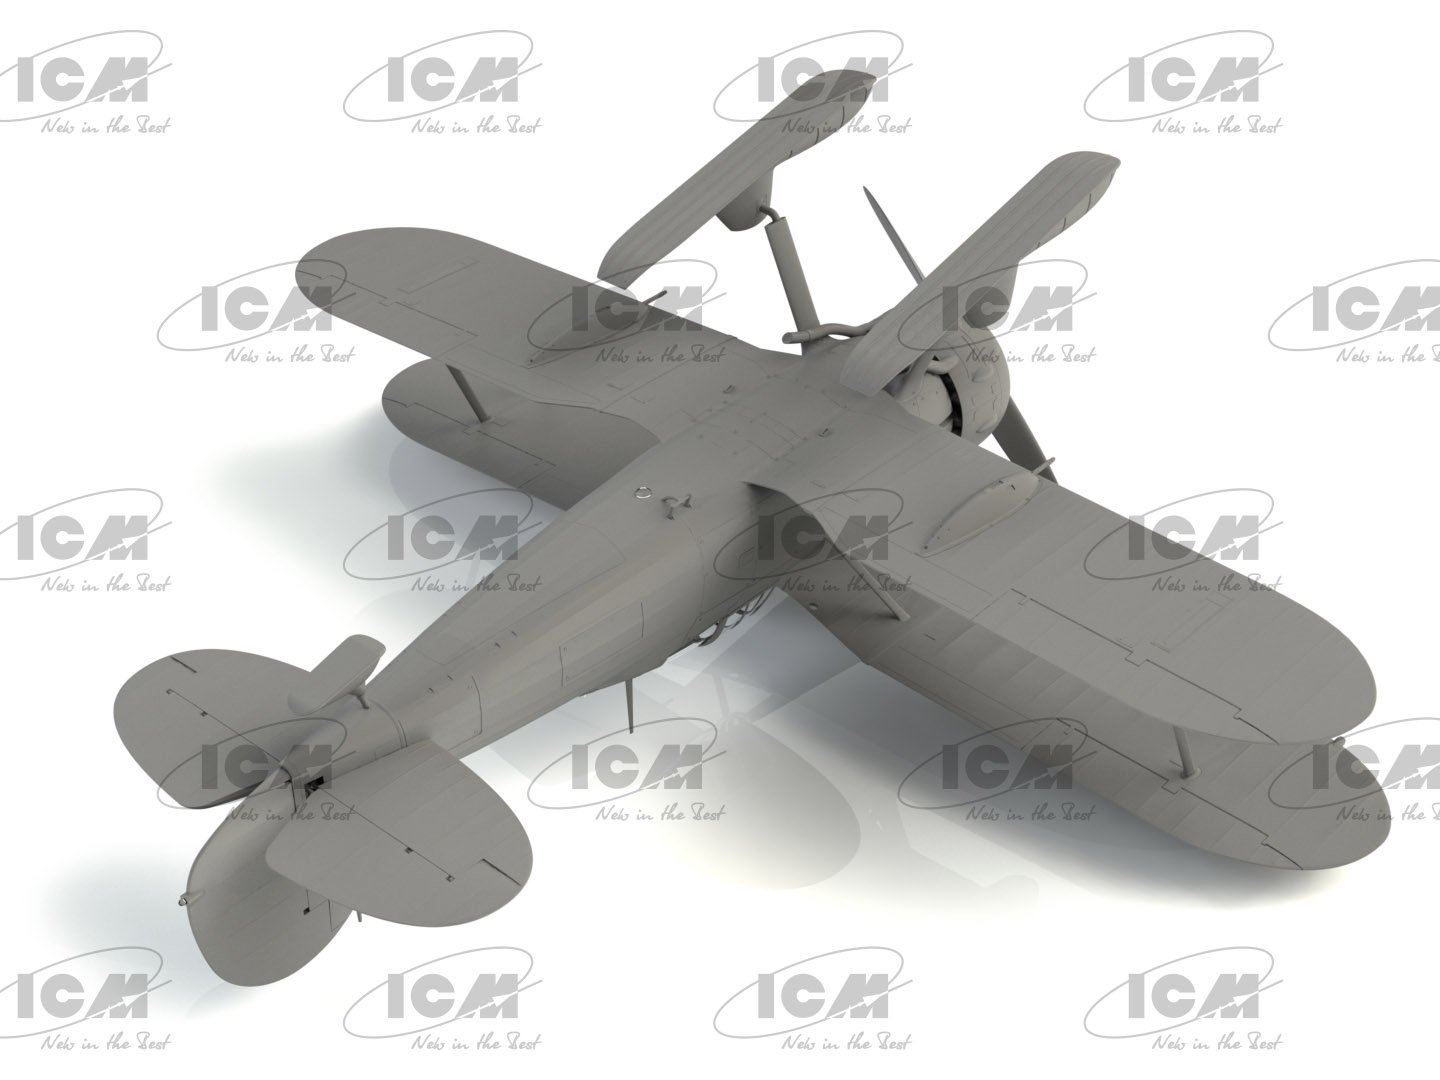
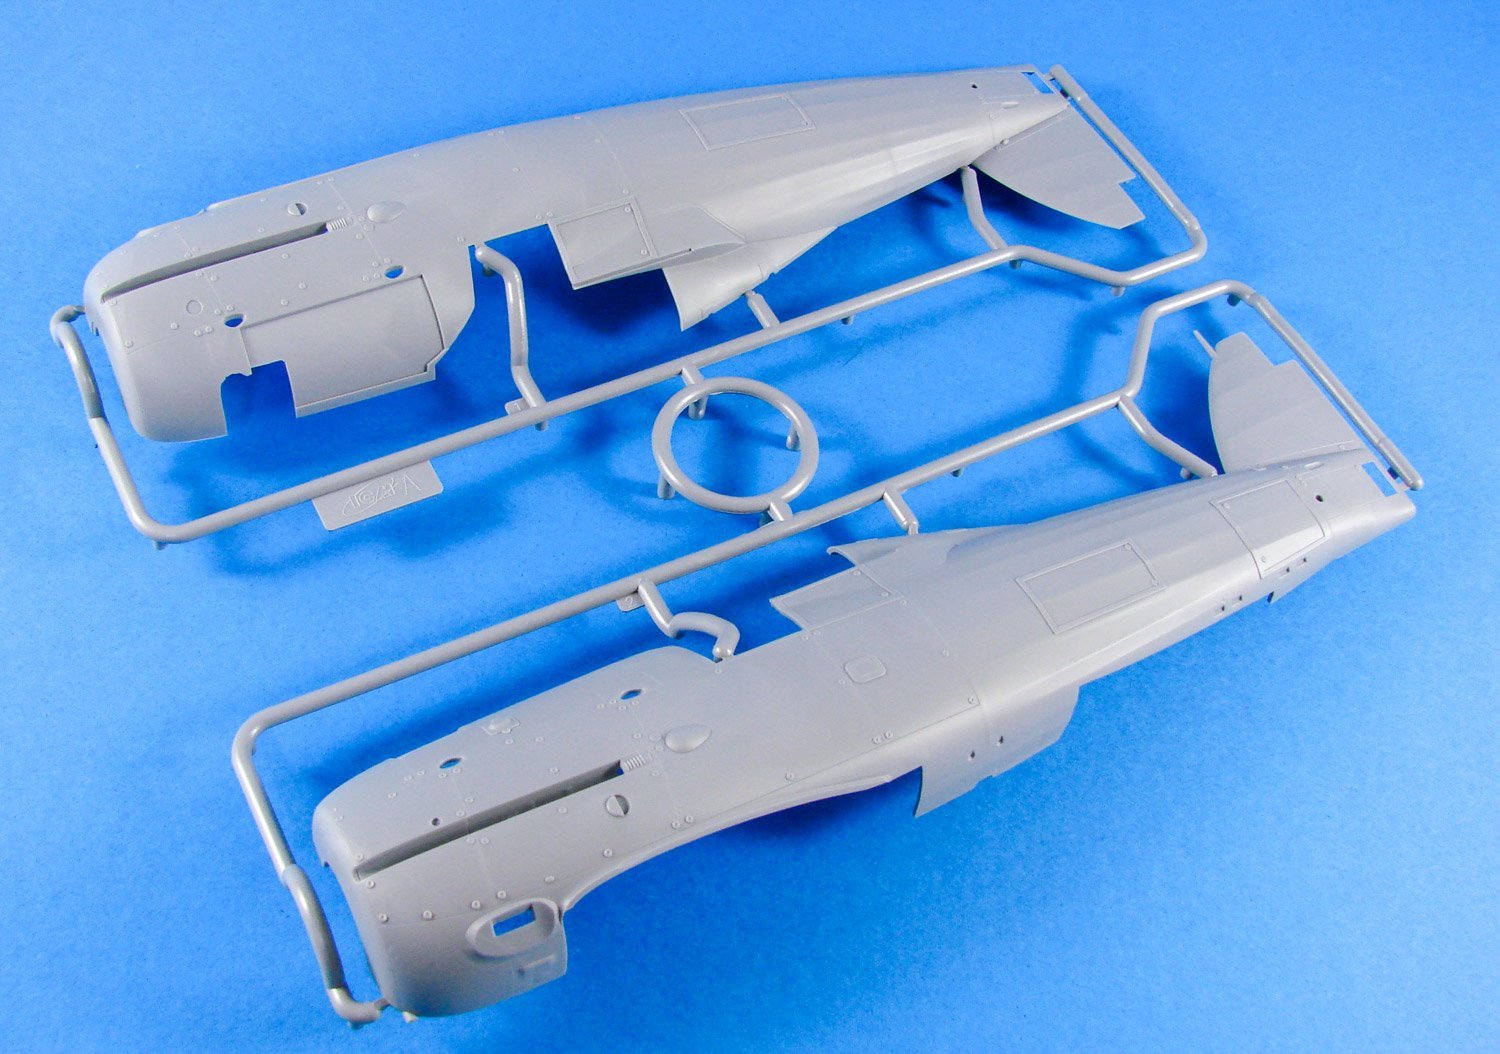
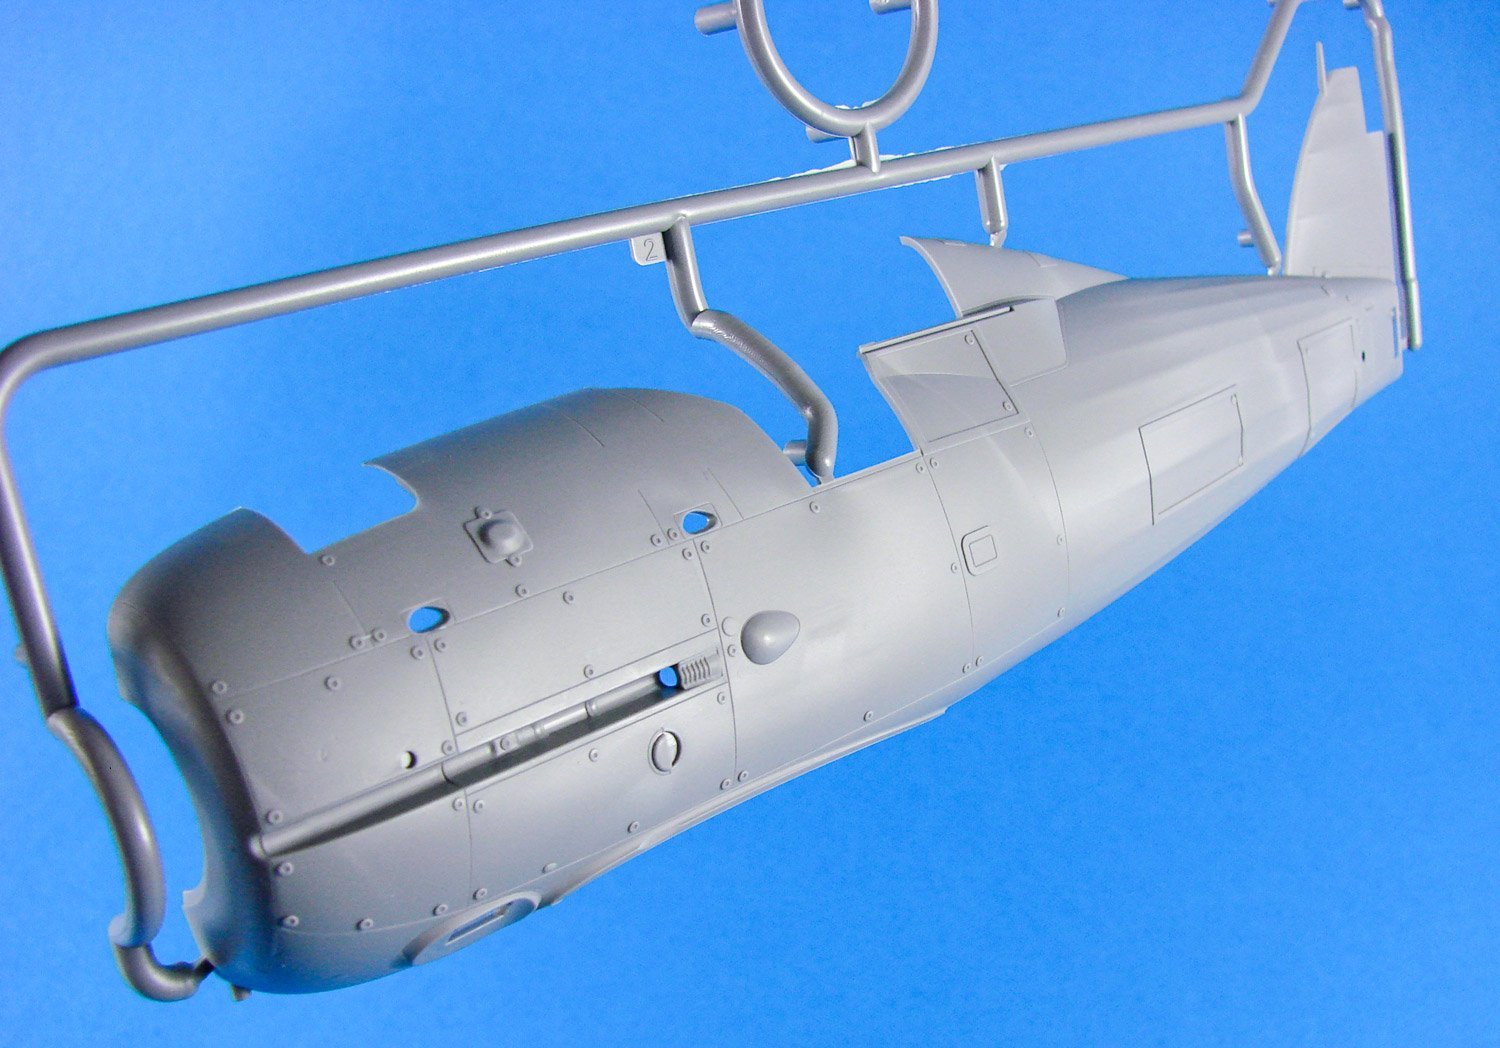
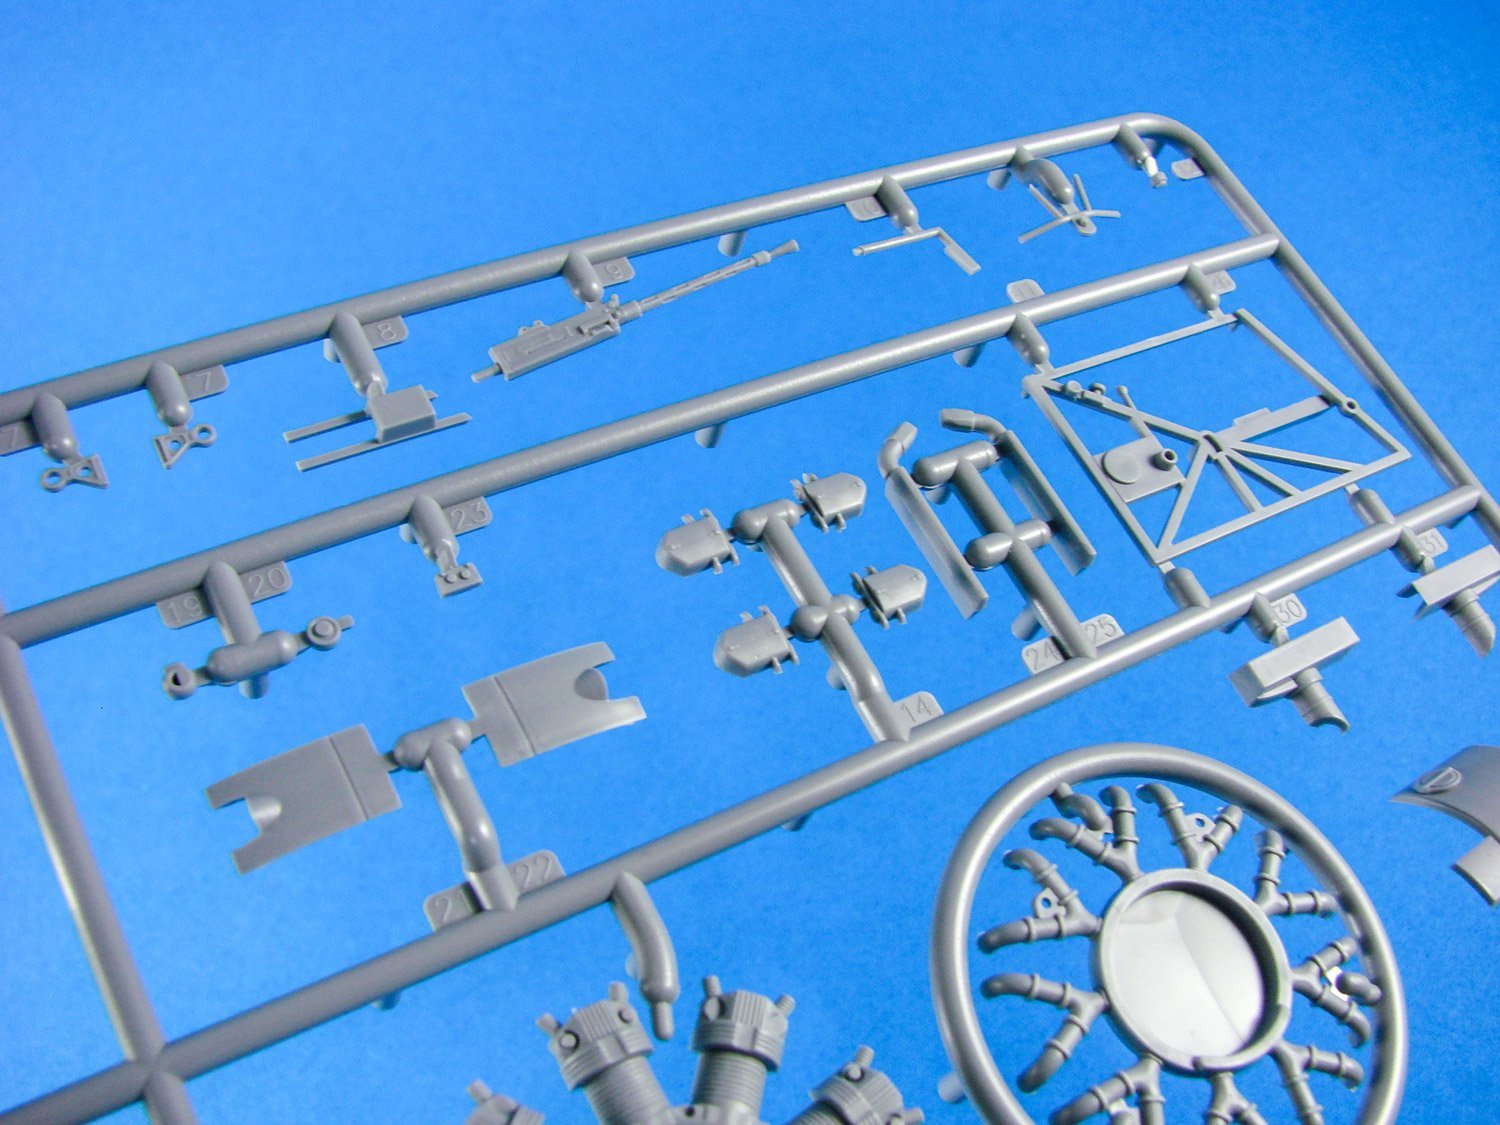
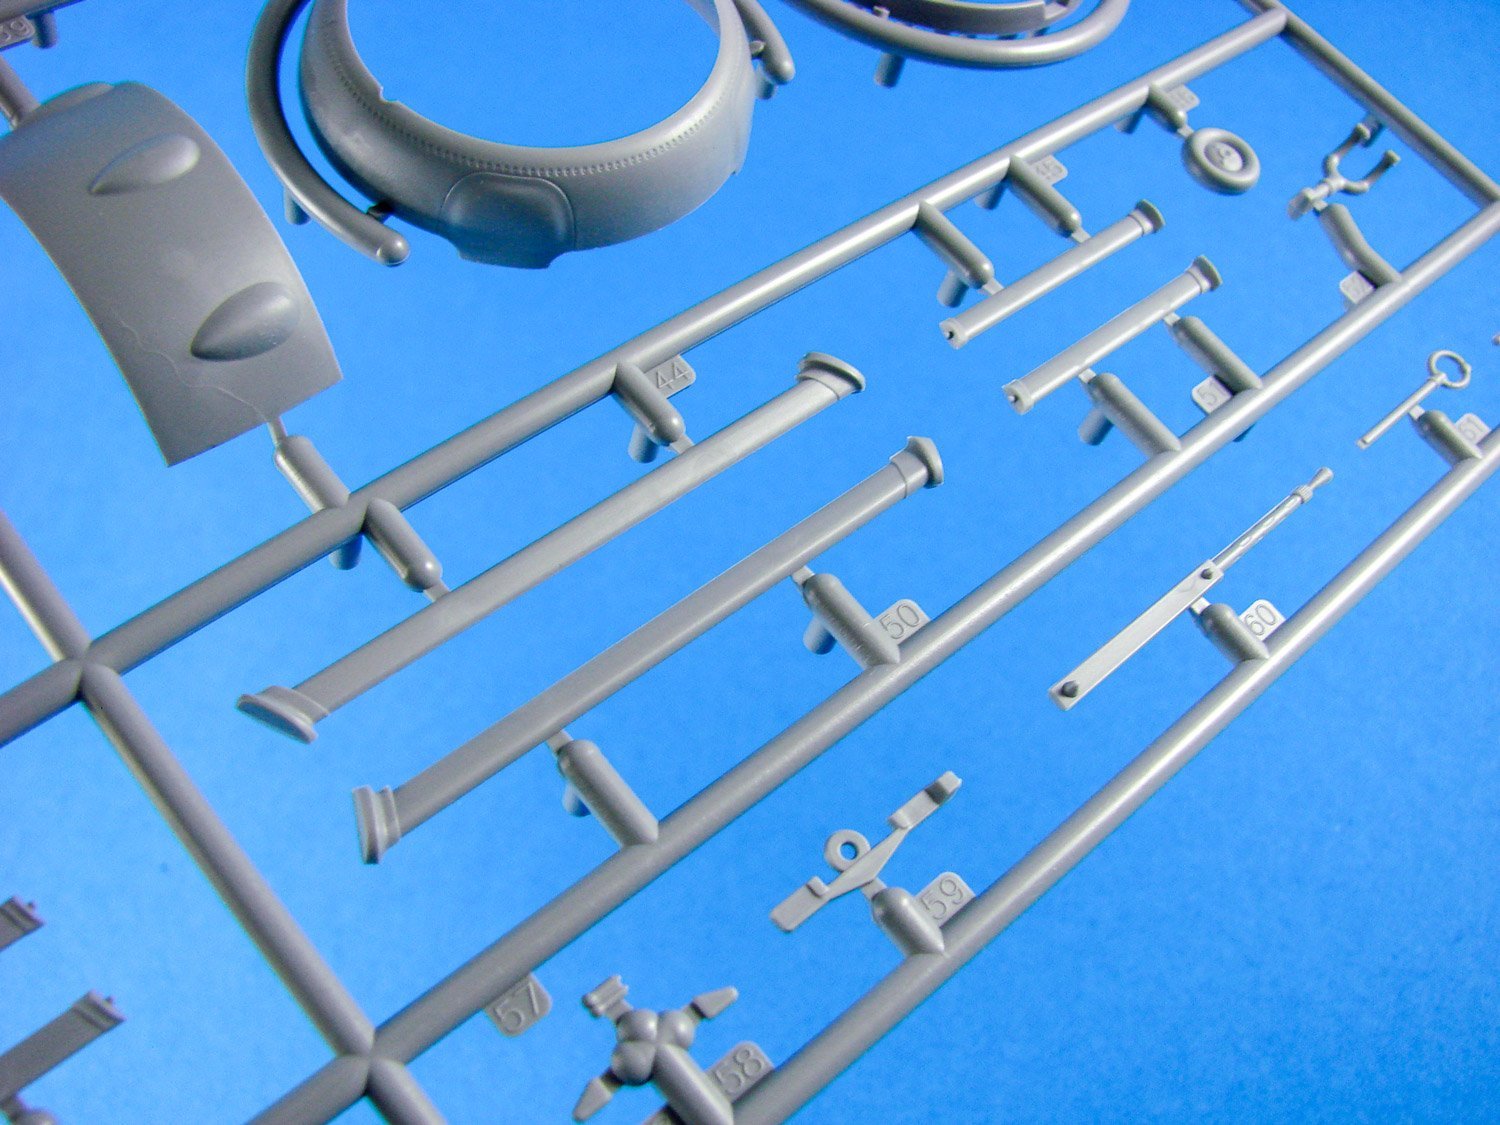
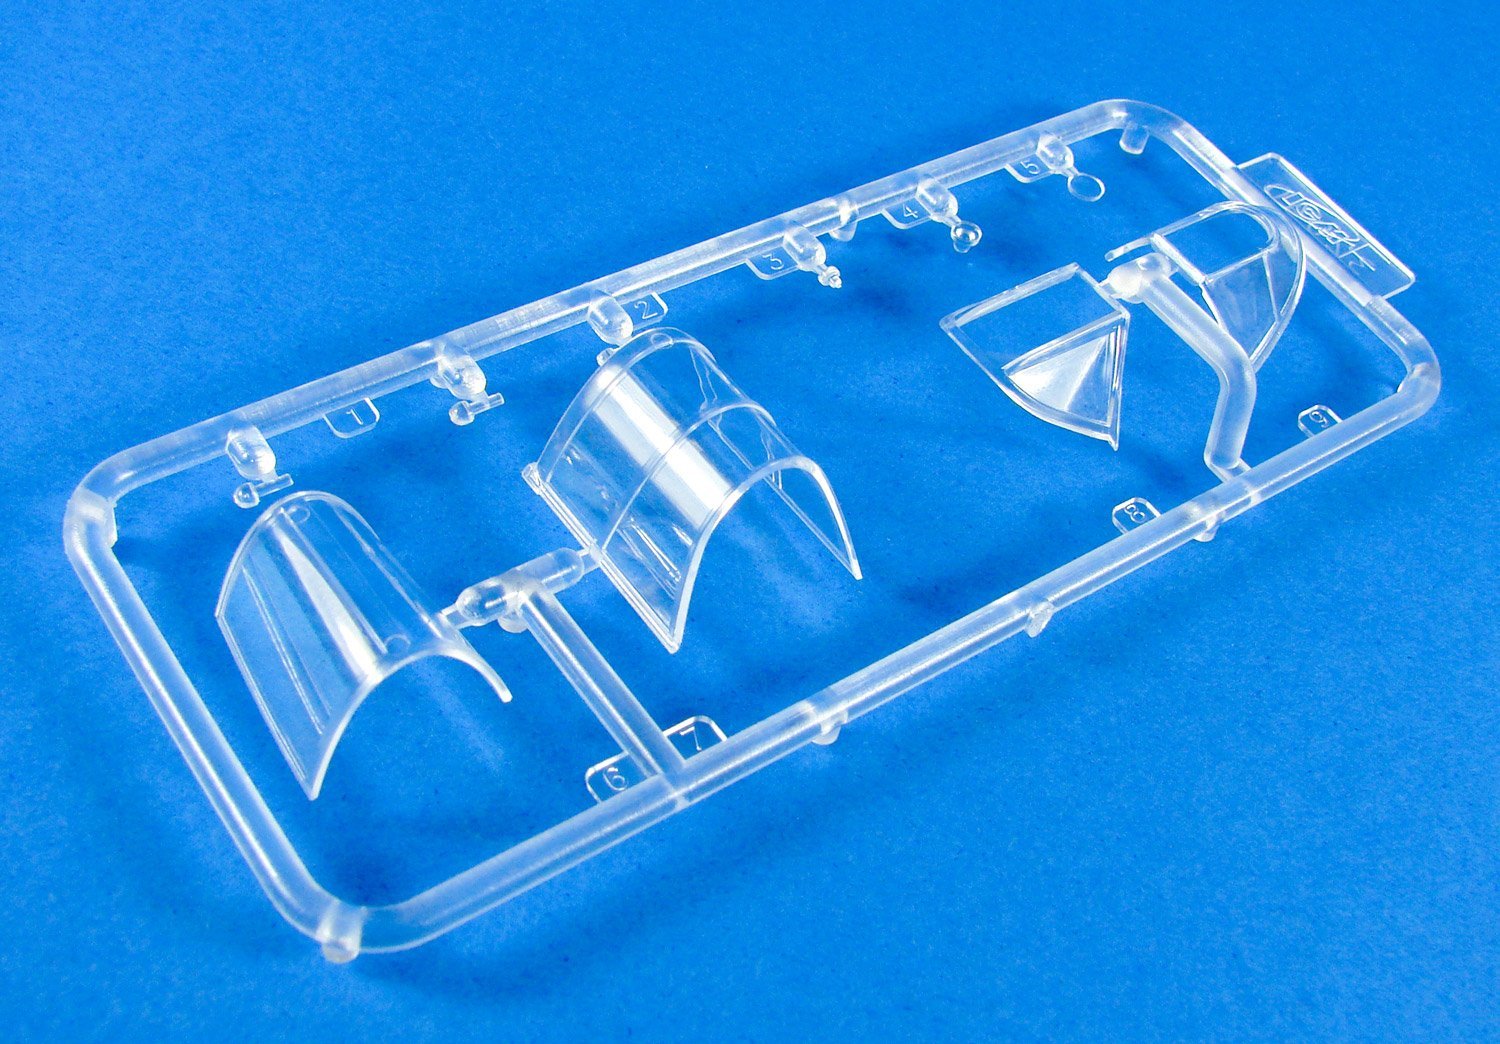
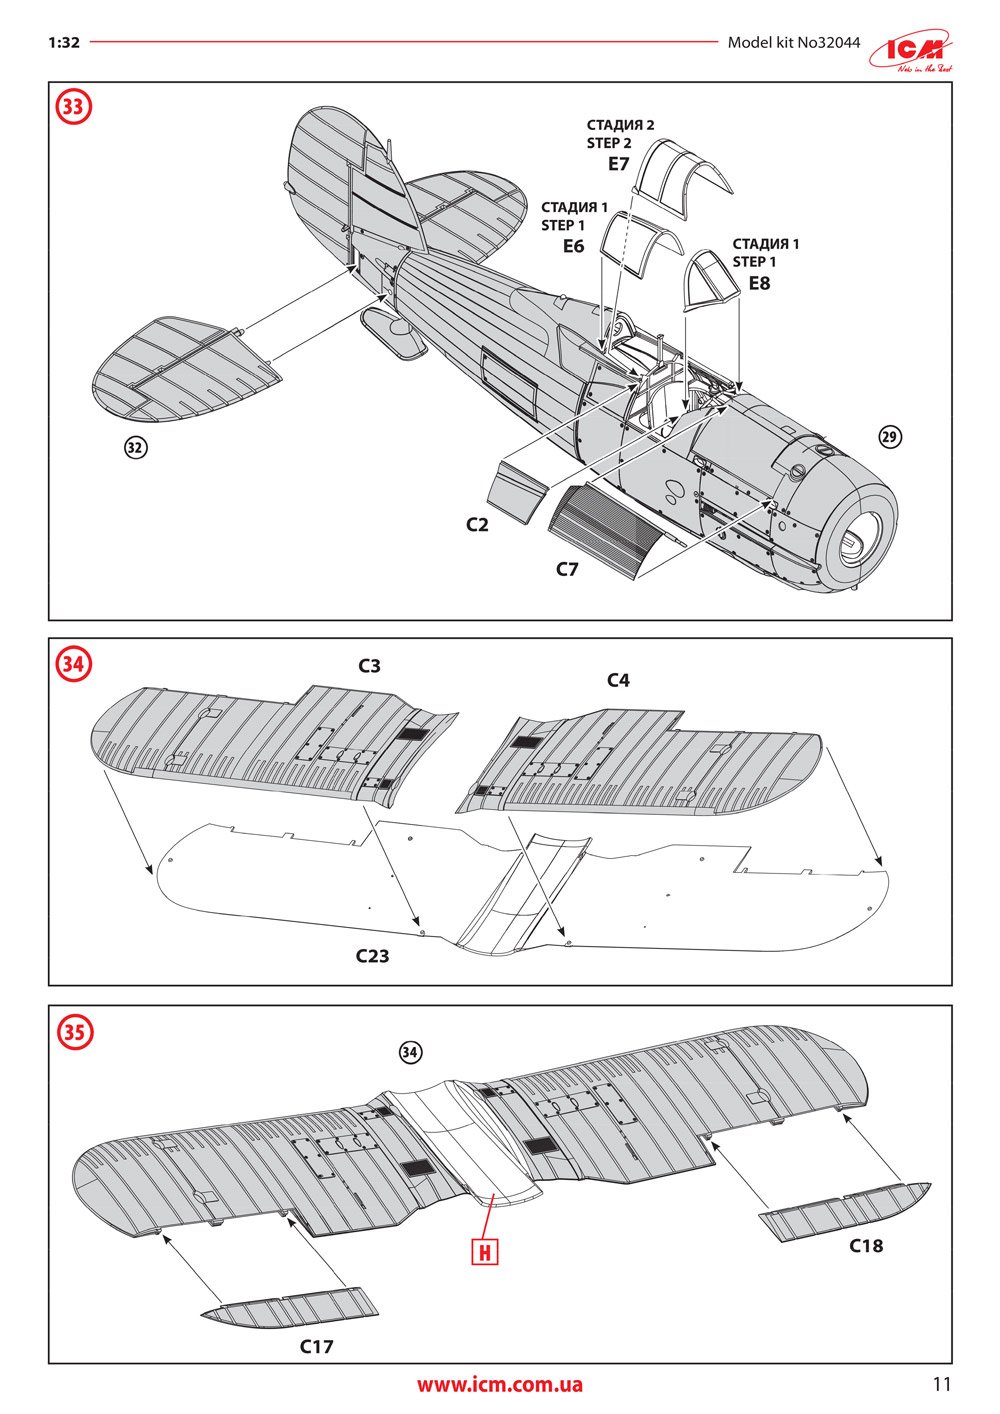
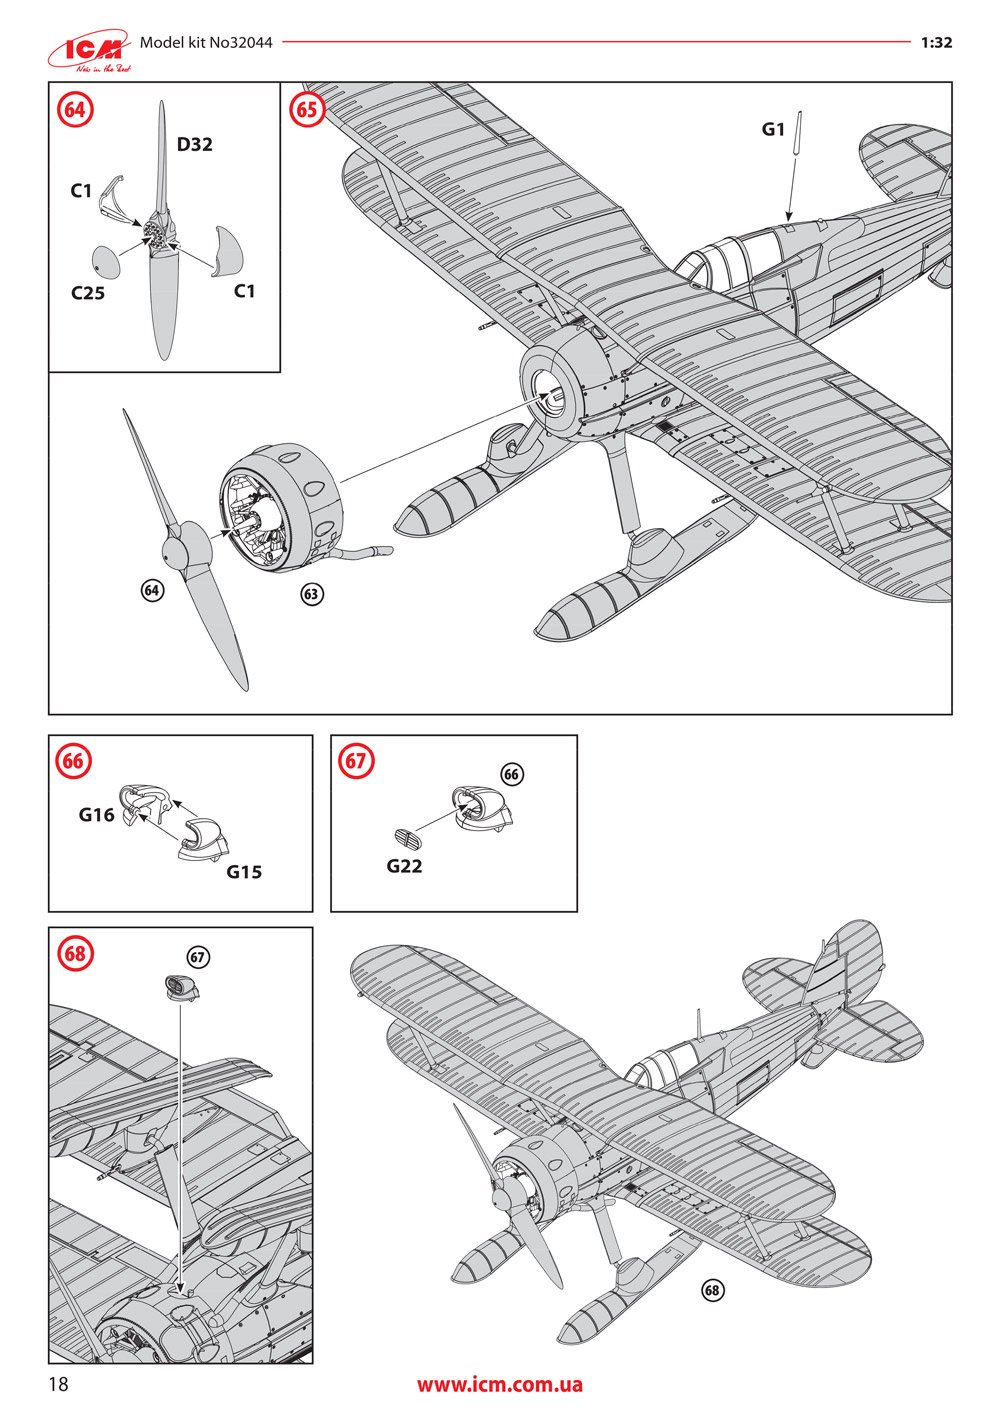
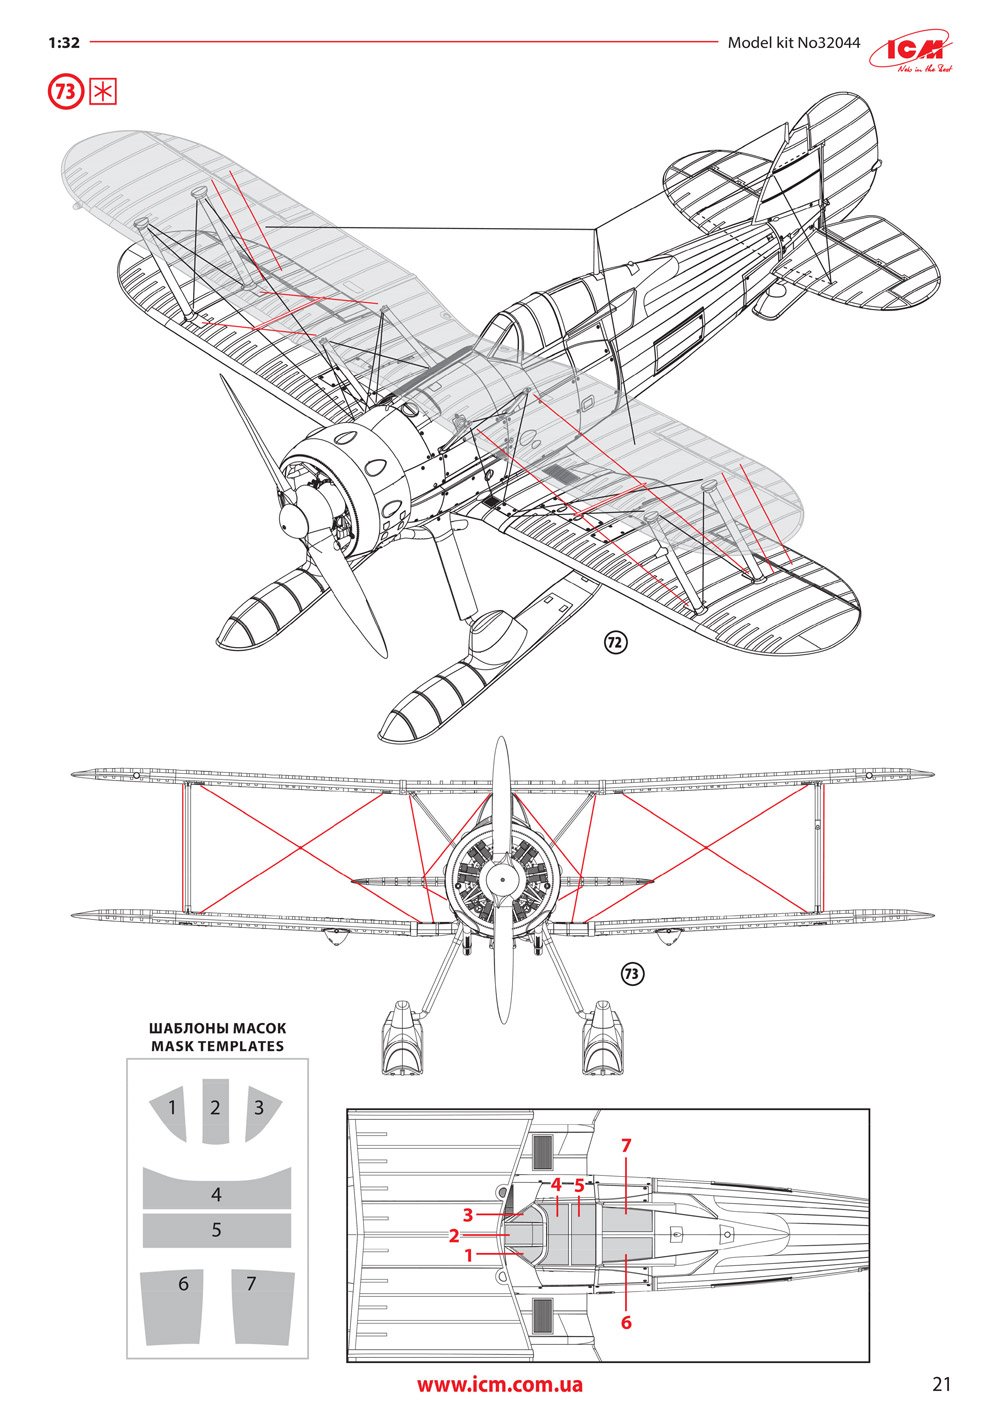
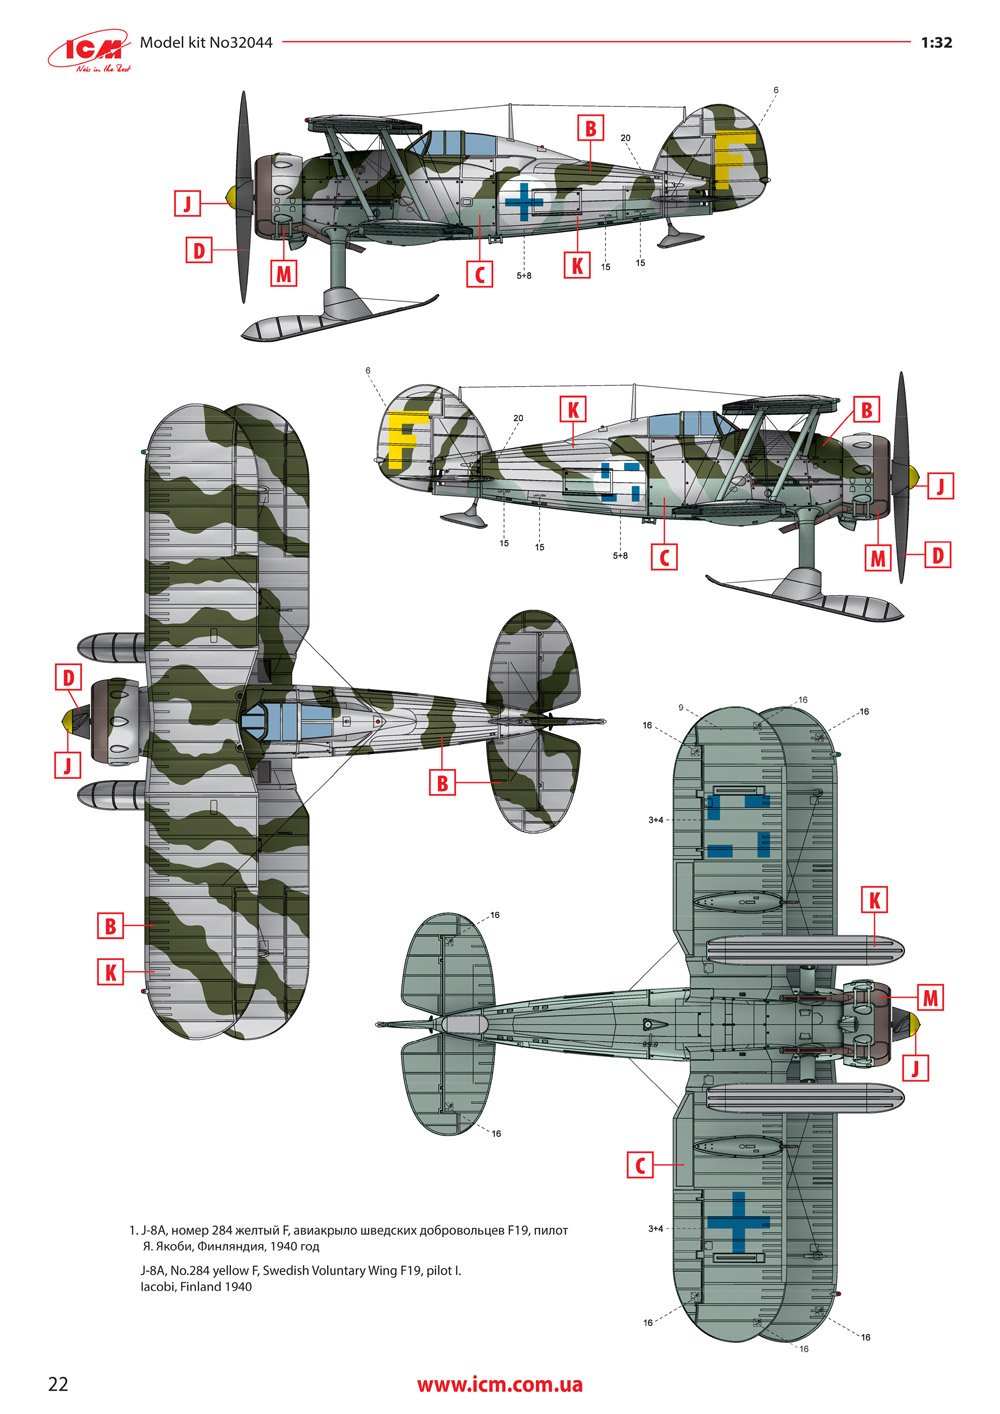
1:32 J-8 Gladiator ICM Catalogue # 32044 The Gloster Gladiator was a British-built biplane fighter. It was used by the Royal Air Force (RAF) and the Fleet Air Arm (FAA) (as the Sea Gladiator variant) and was exported to several other air forces during the late 1930s. Developed privately as the Gloster SS.37, it was the RAF's last biplane fighter aircraft and was rendered obsolete by newer monoplane designs even as it was being introduced. Though often pitted against more formidable foes during the early days of the Second World War, it acquitted itself reasonably well in combat. The Gladiator saw action in almost all theatres during the Second World War, with many air forces, some of them on the Axis side. The RAF used it in France, Norway, Greece, the defence of Malta, the Middle East, and the brief Anglo-Iraqi War (during which the Royal Iraqi Air Force was similarly equipped). Other countries deploying the Gladiator included China against Japan, beginning in 1938; Finland (along with Swedish volunteers) against the Soviet Union in the Winter War and the Continuation War; Sweden as a neutral non-combatant (although Swedish volunteers fought for Finland against USSR as stated above); and Norway, Belgium, and Greece resisting Axis invasion of their respective lands. The Gladiator II, the type depicted in this kit, was the version that was powered by a single Bristol Mercury VIIIA air-cooled radial piston engine. In the Swedish air force, the Gladiator was given the designation, J-8, which is the subject of this kit. The kit ICM’s original Gladiator was the first injection moulded kit of its type in 1:32, giving those who don’t fancy a vac or resin kit, a real chance to create this iconic bird in their favoured large scale. This kit depicts the Swedish J-8 machine, offering the builder the chance of building this beautiful bird on skis as well as the regular wheels. ICM’s Gladiator is packed into a typical and reasonably large box with a folding lid, then covered with the glossy box artwork lid. I quite like this approach as the package is far sturdier and more protective than usual kit boxes from other manufacturers. All sprues inside are bagged into a single sleeve, except for the clear parts that are further bagged to prevent any scuffing etc. There are a total of FIVE light grey sprues, and ONE clear set of parts. A single decal sheet contains the markings for THREE subjects (2 Finnish and 1 Swedish). Sprue A Just the two fuselage halves on this sprue. These are moulded with separate engine cowls (obviously) and a separate rudder. Surface detail is very good with some subtle fabric/structure rendering, and the heavy metal panel fasteners. Side cockpit doors are also separate parts, allowing the modeller to pose these in the open position. There isn’t any riveting on any of the panels, but there wouldn’t have been too much anyway, and you could also get Rosie out if you wanted to fix that. Internally, detailing is very minimal, with most of that coming from the cockpit tub and other associated parts. ICM supply some paper templates for this J-8 version. These need to be laid on specific fuselage areas and points drilled to incorporate some external details from Sprue B The upper wing is provided here in full-span upper and lower panels. The ailerons are also separate parts, so you can pose those too. Rib and fabric detail really is beautifully represented, as are the various stiffening strips, strut locations for the cabane, and control cable access panels. With similar external details are also found the rudder, stabiliser, and separate elevator parts, moulded as traditional halves. Other parts seen here are the blistered engine cowl sections and lower wing gun pod fairings. With the J-8, however, neither of the sets of blister cowl sections are to be used. As the fuselage of this kit is common to all the current Gladiator variants, a panel is included for the lower, rear fuselage. The Sea Gladiator variant will have the arrestor hook in this position, but we blank that off, of course. Sprue C As with the upper wing, the lower wing is also full span for the lower panel, with the port and starboard upper panels being separate, and with separate ailerons also. Those ailerons are provided as whole units, thus maintaining their fine trailing edge. The wings are also moulded with the recesses to mount the gun pods. Also on this sprue are the main gear struts and wheels, as well as the engine hub, various key cockpit elements (floor, bulkheads), etc. Note two instrument panel sections. Unlike with the Mk.II kit we reviewed, these parts will be used for the J-8. Sprue D This is our main details sprue, containing all of the parts for the Bristol Mercury engine, cowl parts and main cowl ring, struts, main wheel mounting lugs, cockpit parts, guns, and the optional (and much nicer) two-blade propeller option. A small number of parts on this sprue aren’t to be used on the J-8, such as some strut and gun options. Sprue E All parts are to be used here except for one windscreen option. The canopy can of course be posed in an open position. Clarity is excellent and the framing is very well defined, so it should be very easy to mask these parts for painting. Sprue G There is no Sprue F in this kit, with that being relevant to non-J-8 versions. Sprue G though contains the real differences you will see for the J-8. Here you find the blister cowls pertaining to all three supplied schemes, plus the parts to make the gear struts and skis for the two Finnish machines. Also here are the J-8 gun options and some fuselage external details that attach to the holes you drill via the paper template. Decals A single decal sheet contains the markings for all three schemes. I don’t know who prints these, but the printing is superbly thin, with minimal carrier film, good colour density and excellent register. Decals are supplied for the instrument dials, but I would suggest punching these from the sheet for a perfect fit the various cockpit gauges. The Finnish swastikas are supplied as sections so they don’t fall foul of certain countries draconian laws on such things. Instructions A 24-page A4 manual is included which starts with a very brief history of the type, along with paint codes for both Revell and Tamiya paints. After two pages which offer a parts map, the construction of the Gladiator is then broken down into 73 stages, including the latter rigging stages. All illustration is in line drawing format which is clear and easy to follow, with very good annotation for paint, parts options and decals (where applicable). Also included is a cut-out mask template for the canopy masks, but to be fair, you’re better off doing this yourself or availing yourself of the Eduard masking set. The last pages of the manual are taken over with colour profiles of the THREE schemes provided. All are very similar in paint application, with the decals presenting the variation. The three schemes are: J-8A, No.284 Yellow ‘F’, Swedish Voluntary Wing F19, pilot I. Iacobi, Finland 1940 J-8A, No.278 Yellow ‘H’, Swedish Voluntary Wing F19, pilot M. Wennerstrom, Finland 1940 J-8A, No.278/48, Fighter Wing F8, Barkarby 1939 Conclusion ICM have been releasing numerous versions of the Gladiator, and they really are excellent kits, bursting with detail, and it’s also nice to be able to model these without resorting to expensive and tricky resin kits. Very pleased to see the winter skis version at last. Alongside the Sea Gladiator and a Mk.I, these are definitely the holy trinity of this type. Not too expensive either at around £45, at time of writing. My sincere thanks to ICM for the review sample seen in this review.


-
Idea... missing the large scale ships here. ...
James H replied to elmarriachi's topic in Problems? Suggestions? Tell us!
I'm currently building a 1:64 HMS Sphinx. Big enough?
-
any probs with spam, report to either me, @JeroenPeters , @Clunkmeister or @Fran
-
Yup, forum update with some new stuff. Prob needs tweaking over the months, so if stuff baffles you, then it probably does with me too.
-
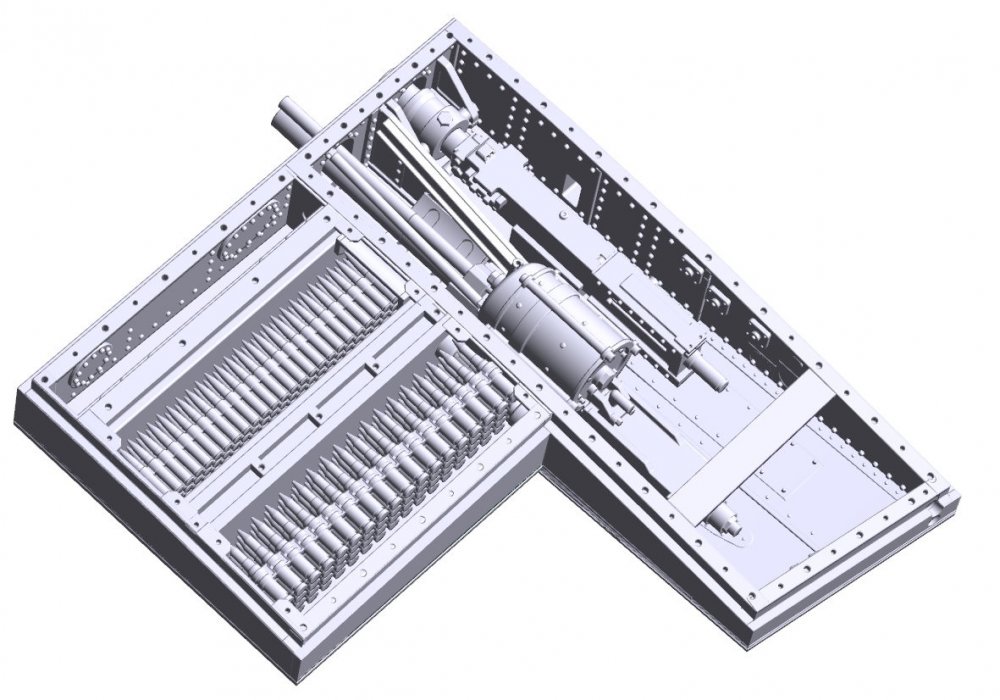
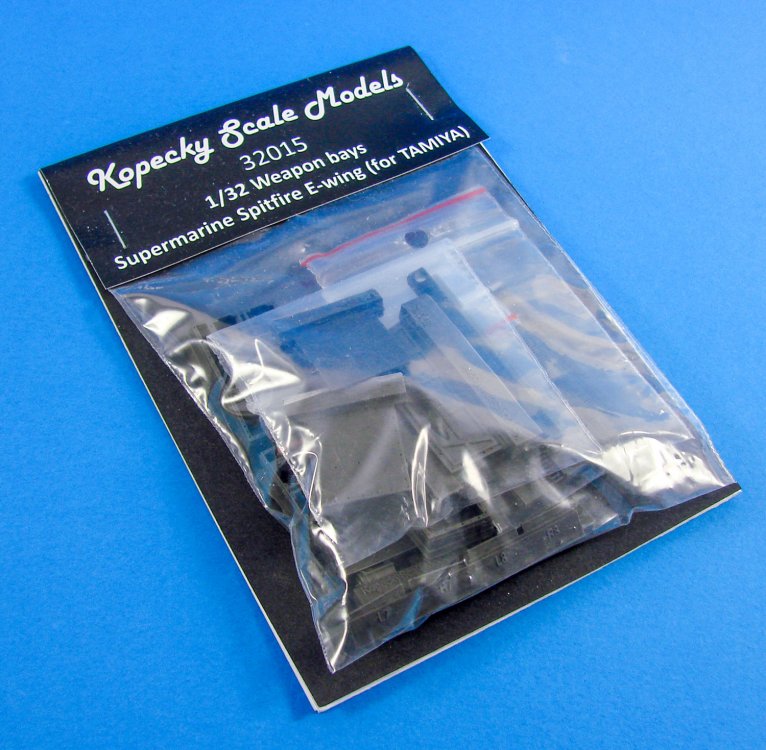
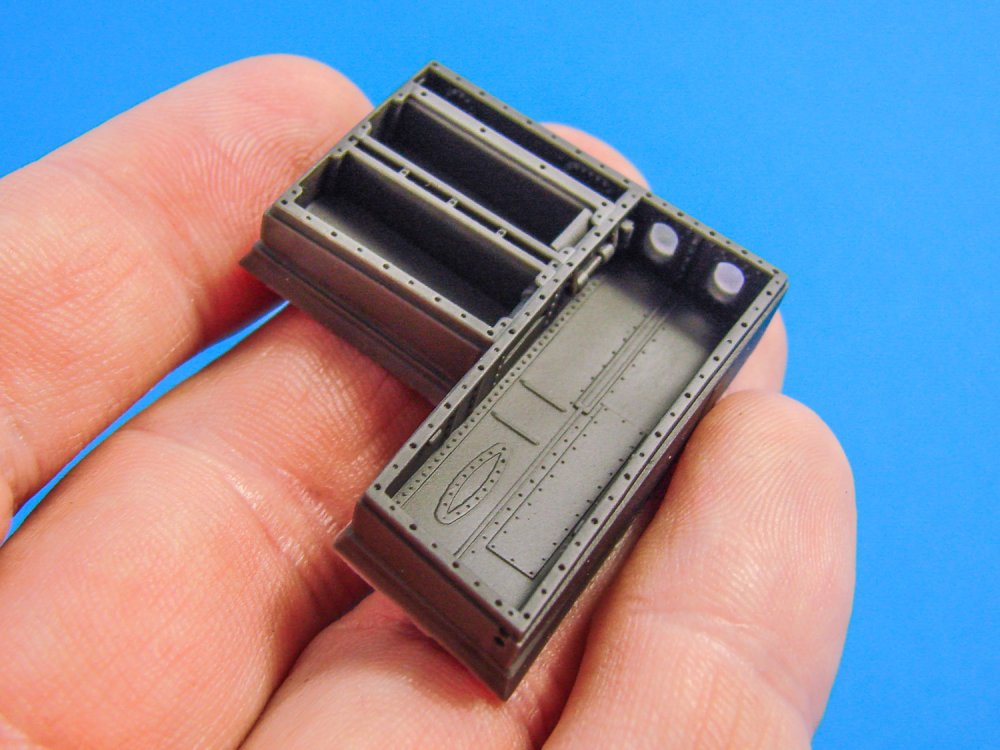
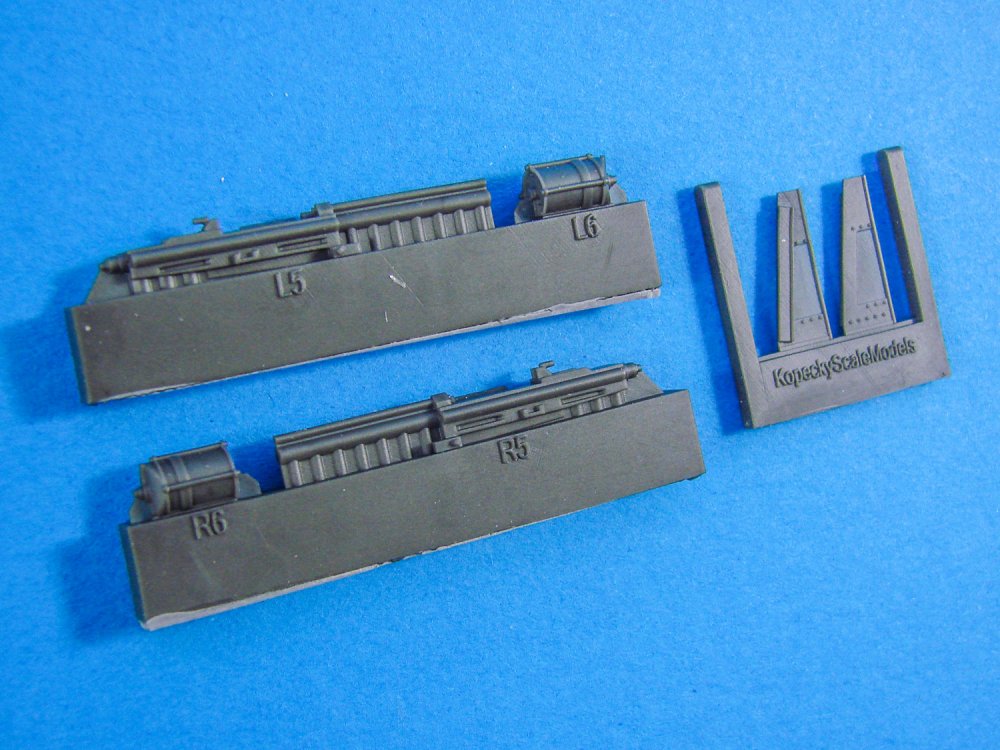
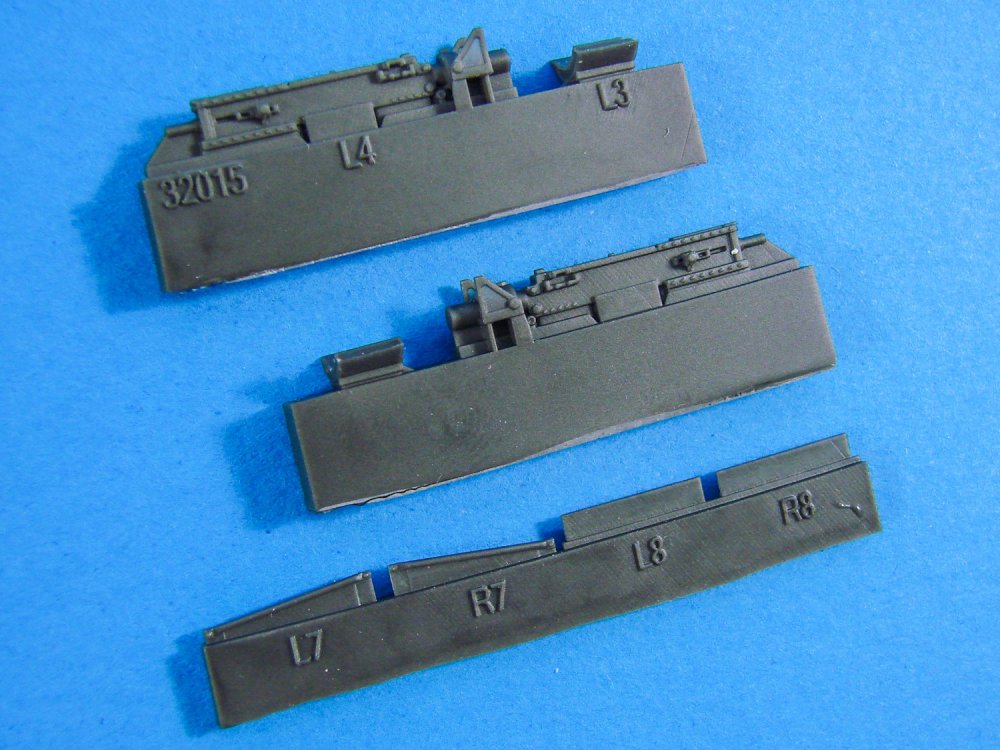
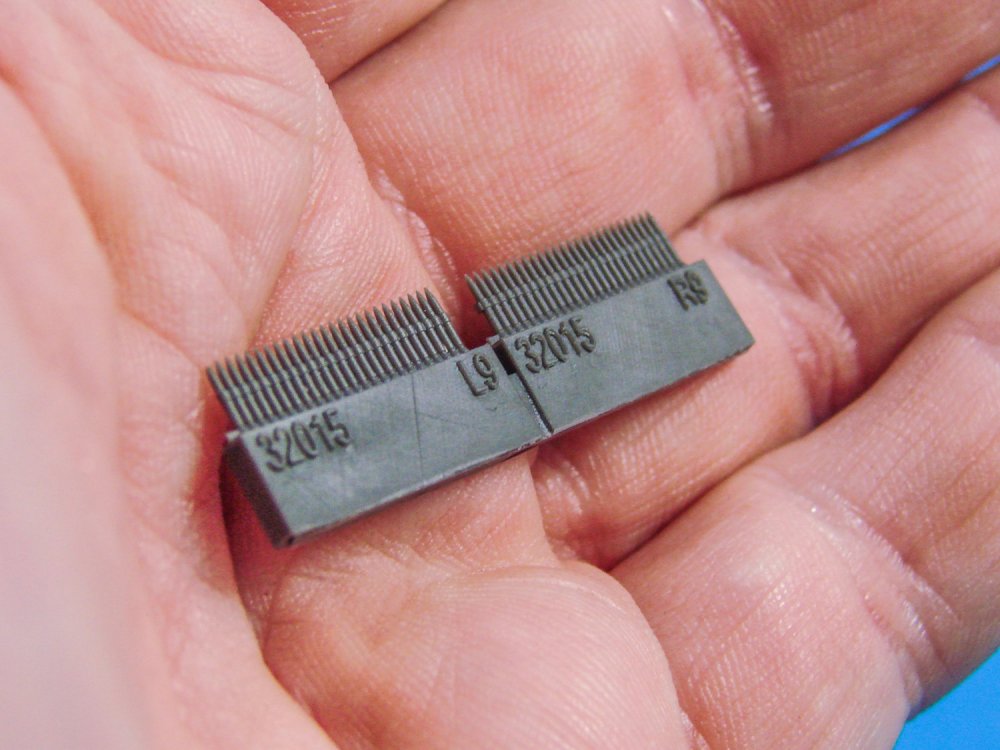
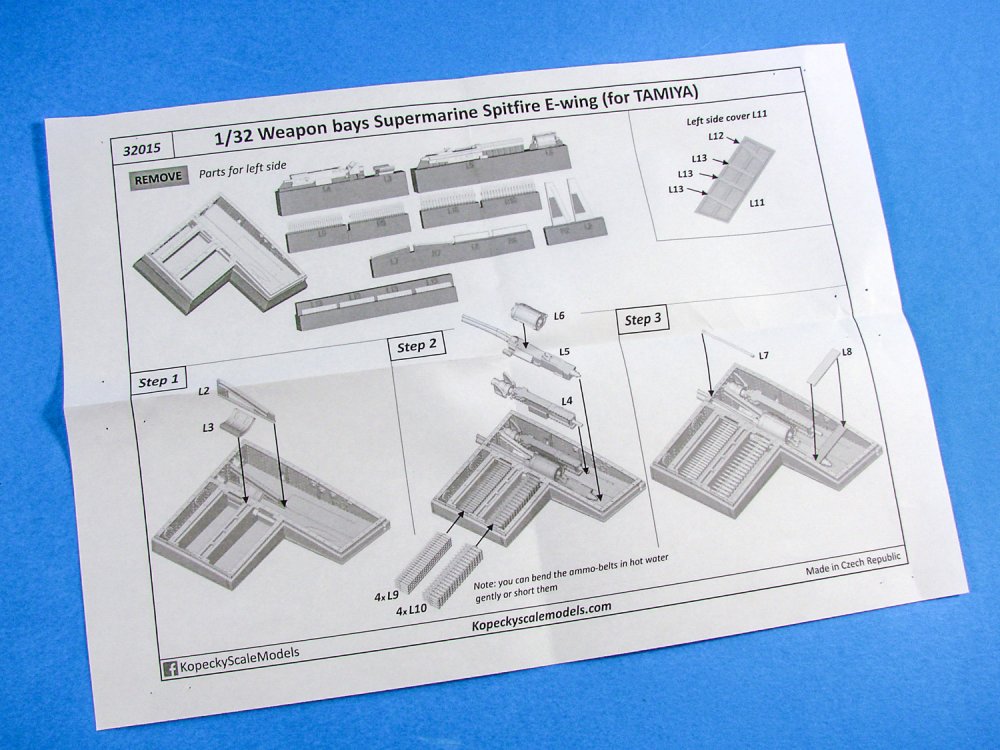
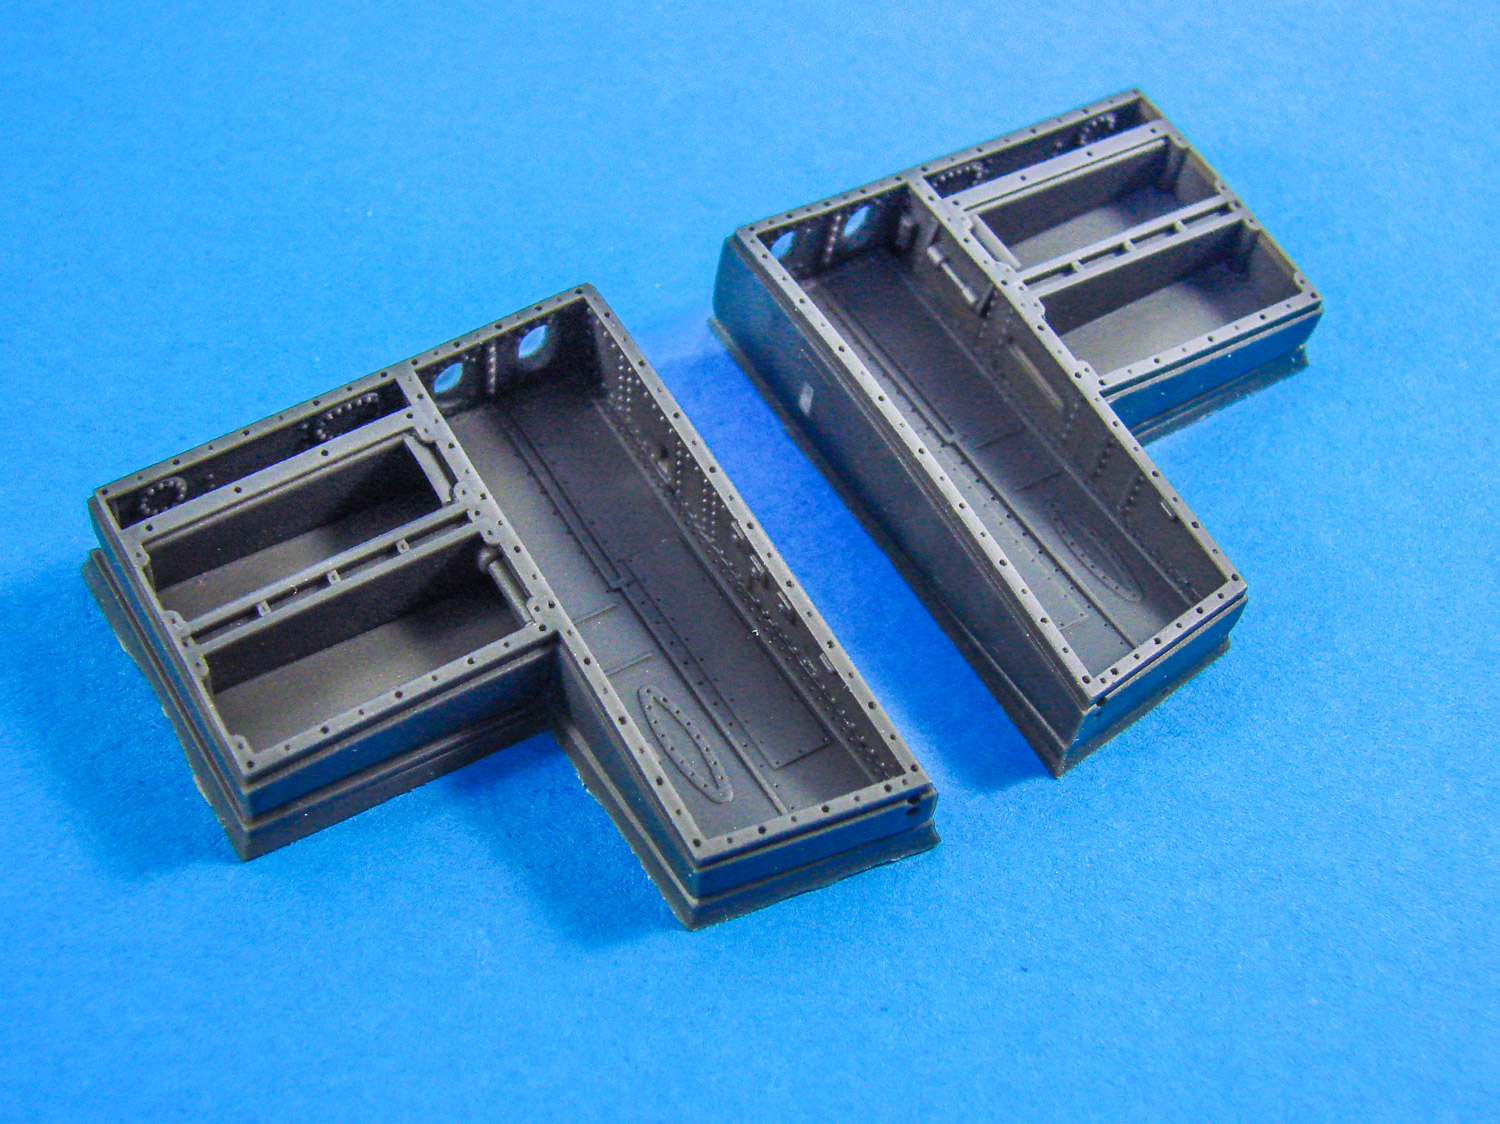
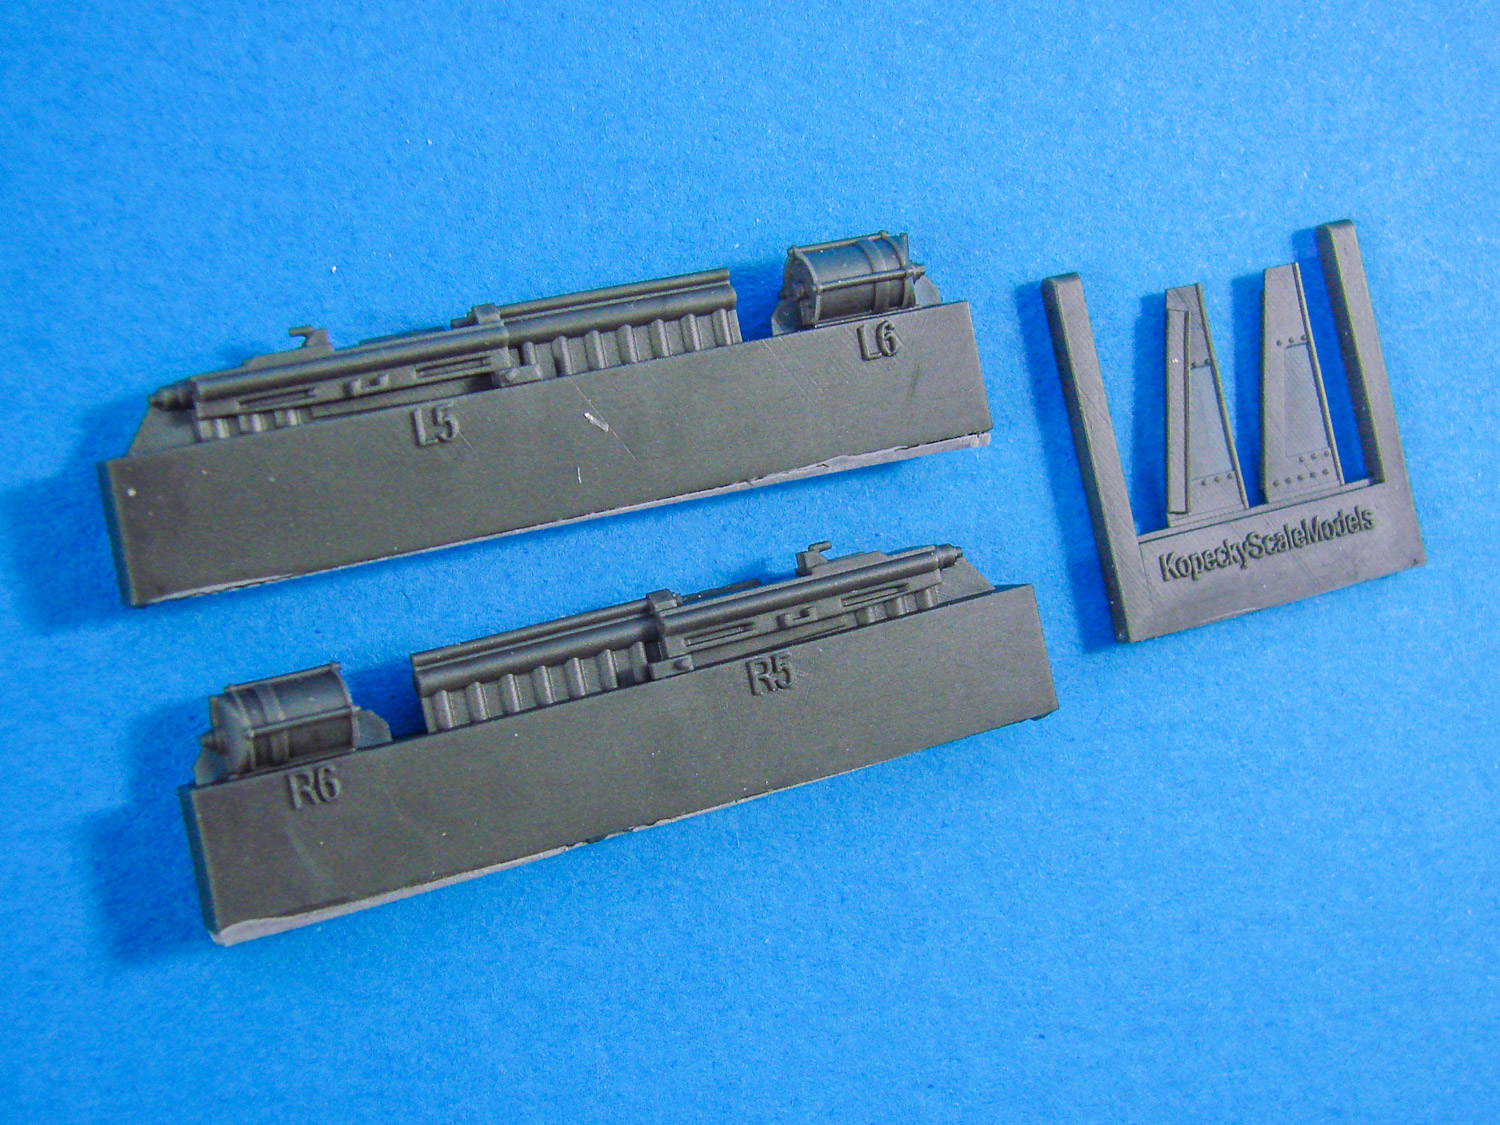
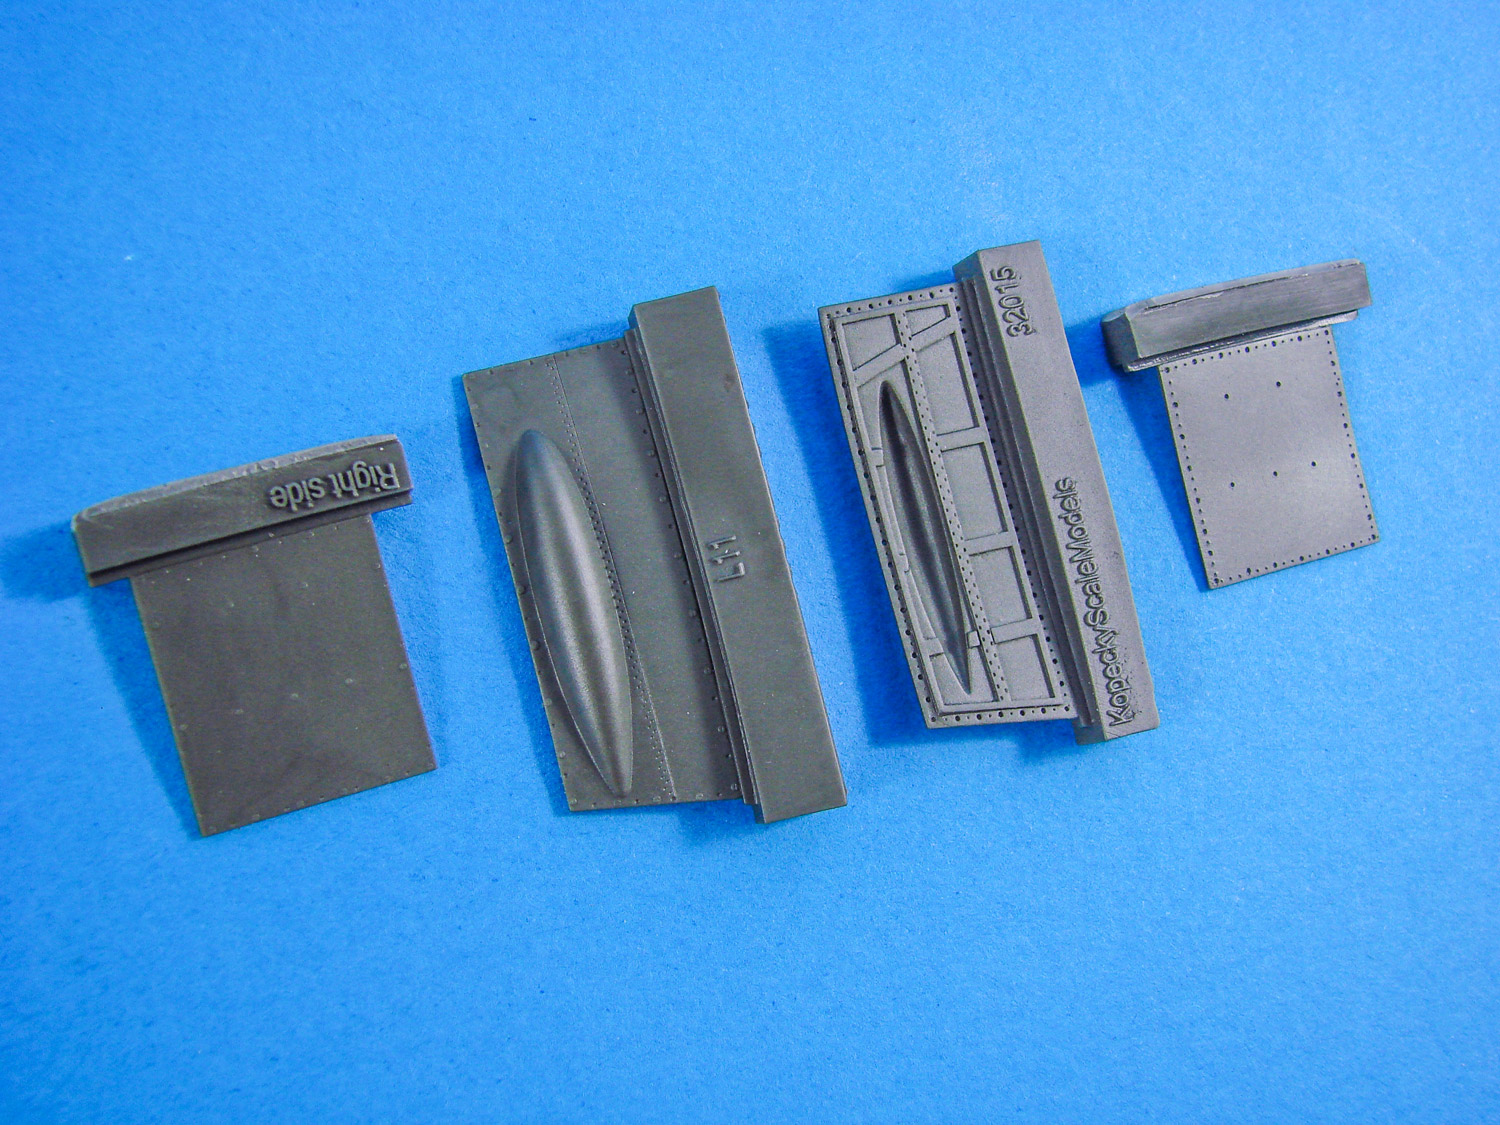
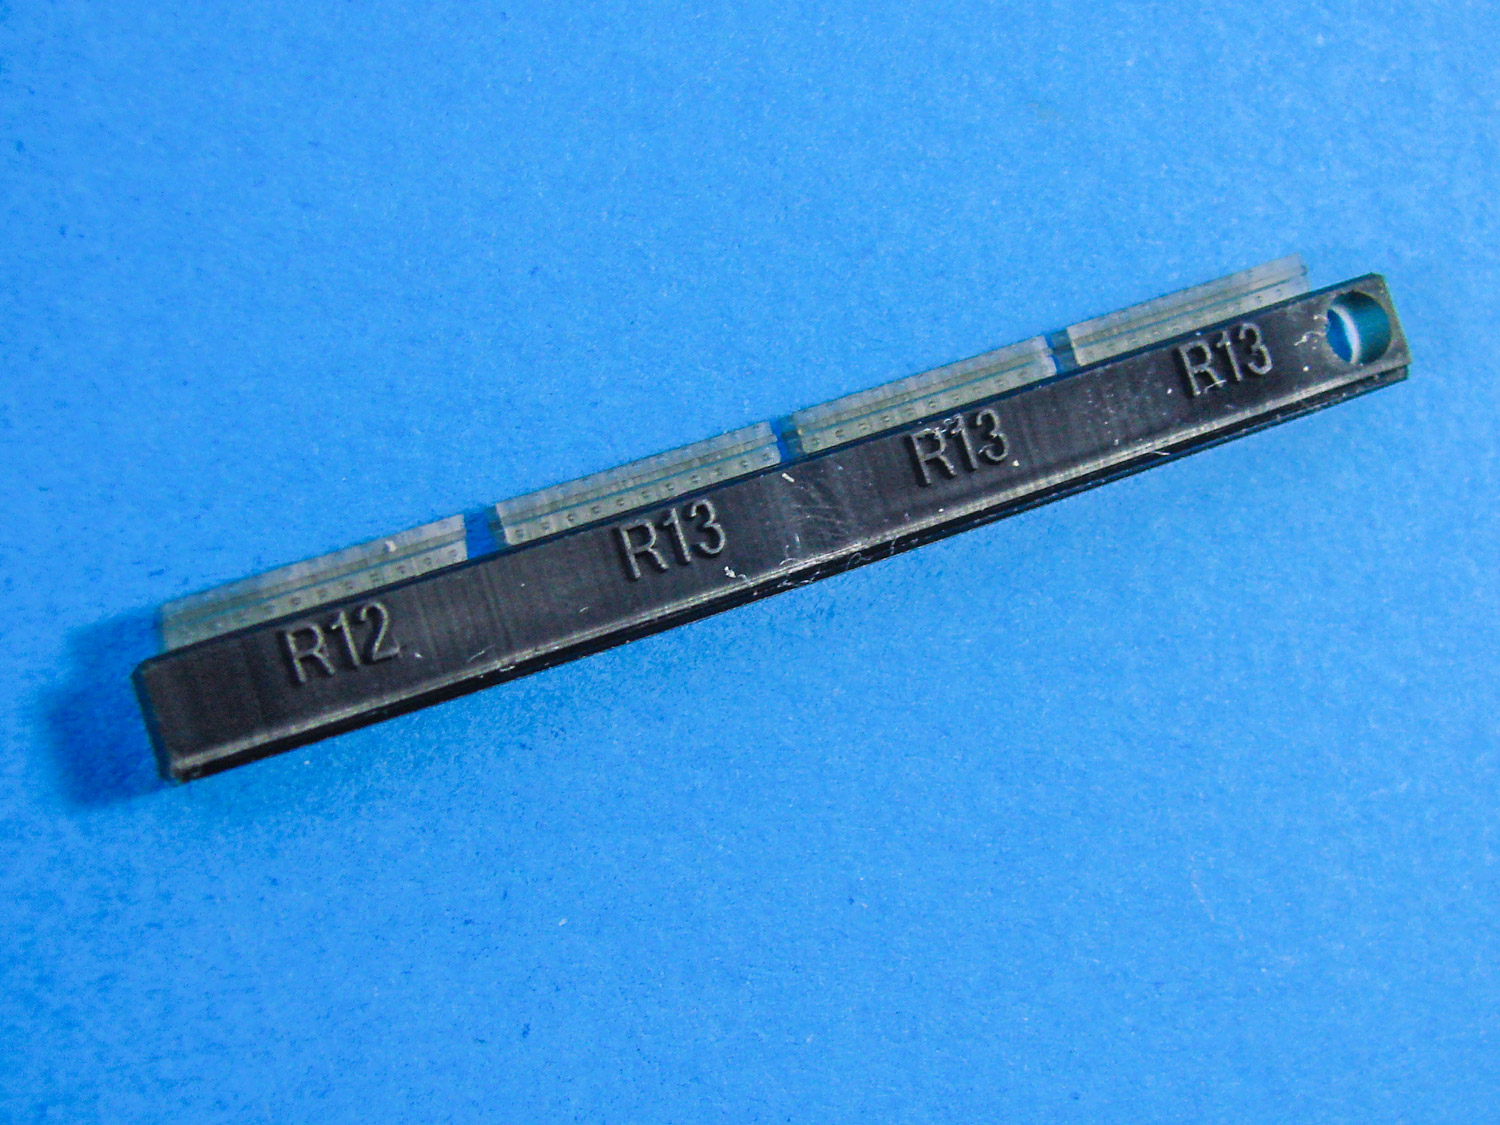
1:32 Supermarine Spitfire Mk.XVIe (E-wing) Weapon bays (TAMIYA) Kopecky Scale Models Catalogue # 32015 Available from Kopecky Scale Models for $28.00 Kopecky Scale Models are a very new name to our hobby, and from the Czech Republic, and you may not even have heard of them unless you frequent Facebook etc. Jan Kopecky is the very genial guy who runs this new enterprise, and his work so far has been nothing short of superb. KSM caught my eye a few months ago when they were offering a gun bay set for Tamiya's Spitfire Mk.IXc with the 'C-Wing'. As I was planning to crack open my Mk.XVI with an 'E-Wing', I contacted Jan and asked if this was in his plans. Luckily for all us late Spit fans, he planned to release it within months. First of all, here's a couple of extra promo photos from KSM. Last week, the latest fruits of his labours dropped through my letterbox, and here it is! For me, the Tamiya XVIe has always been in need of this addition to perk it up a little, and I don't think anyone will be disappointed by what is supplied here. Kopecky's new Spitfire Mk.XVIe gun bay set is packaged into a series of ziplock wallets, and then stapled as shown. Inside the packaging is a folded A4 sheet of instructions. There will be some very minor modification to the host kit, and certainly nothing that a total beginner to aftermarket, couldn't handle very easily. That will include cutting away the outboard panel of the main gun bay. Of course, this set does supply two new panels for each side, with detail both inside and out. The bare gun bays themselves are cast in single pieces with a beautiful level of detail inside. Here you can see the inboard wing rib and the river detail, plus ribbing and plating on the floor under where the guns will sit. In the narrow forward area, more plate and rivet detail. The casting blocks on these are quite minimal, but you will need to carefully grind these away from the main part to avoid any damage. Here you see then guns themselves and the level of detail this set provides. These are cast in the same dark grey resin, on traditional casting blocks with parts numbers in place. Here you also see the feed chutes, Hispano gun feed belt units, and the fillet that sits between the guns at the front of the bay. Casting blocks will be very easy to remove here as the connecting webs are reasonably thin. Two different type of gun requires two different ammunition belts, and here they are. The larger rounds are the 20mm Hispano cannon ones, and the smaller are the 0.50' Browning (1.27cm). All are cast in stackable rows, complete with their clips. Here you see the gun bay doors with the blister shapes which look correct, and also internal detail, fasteners etc. Kopecky have even included the hinges as separate parts, and these are cast in a different resin, presumably with more strength to prevent any accidental breakage. The hinge detail is clearly seen in the above photo. Instructions are simple yet clear, with all parts easily identified. There is no mention of the kit modification needed, but for this, it's very easy to see what's needed to fit this detail set. Conclusion I have to say I'm massively impressed with this set and also with Kopecky Scale Models themselves. The detail in this set really does mirror the guys who've been doing this for years, including the quality of the castings. A very easy set to fit that will massively enhance one of Tamiya's finest 1:32 kits. There's everything to like about this set, and the price is very reasonable too. My sincere thanks to Kopecky Scale Models for the set you see reviewed here. To purchase directly, click the link at the top of the article.


-
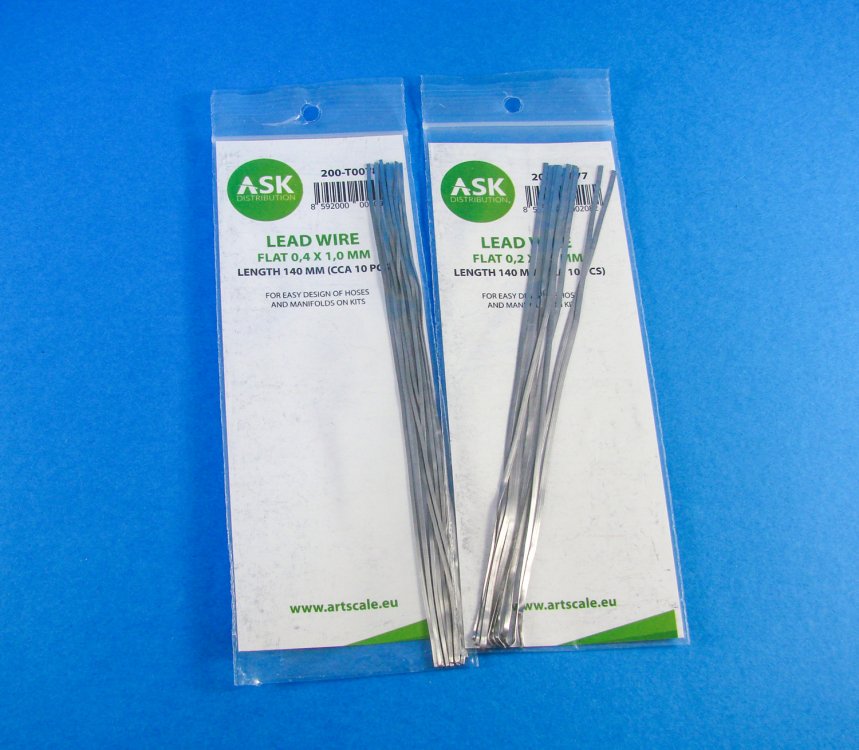
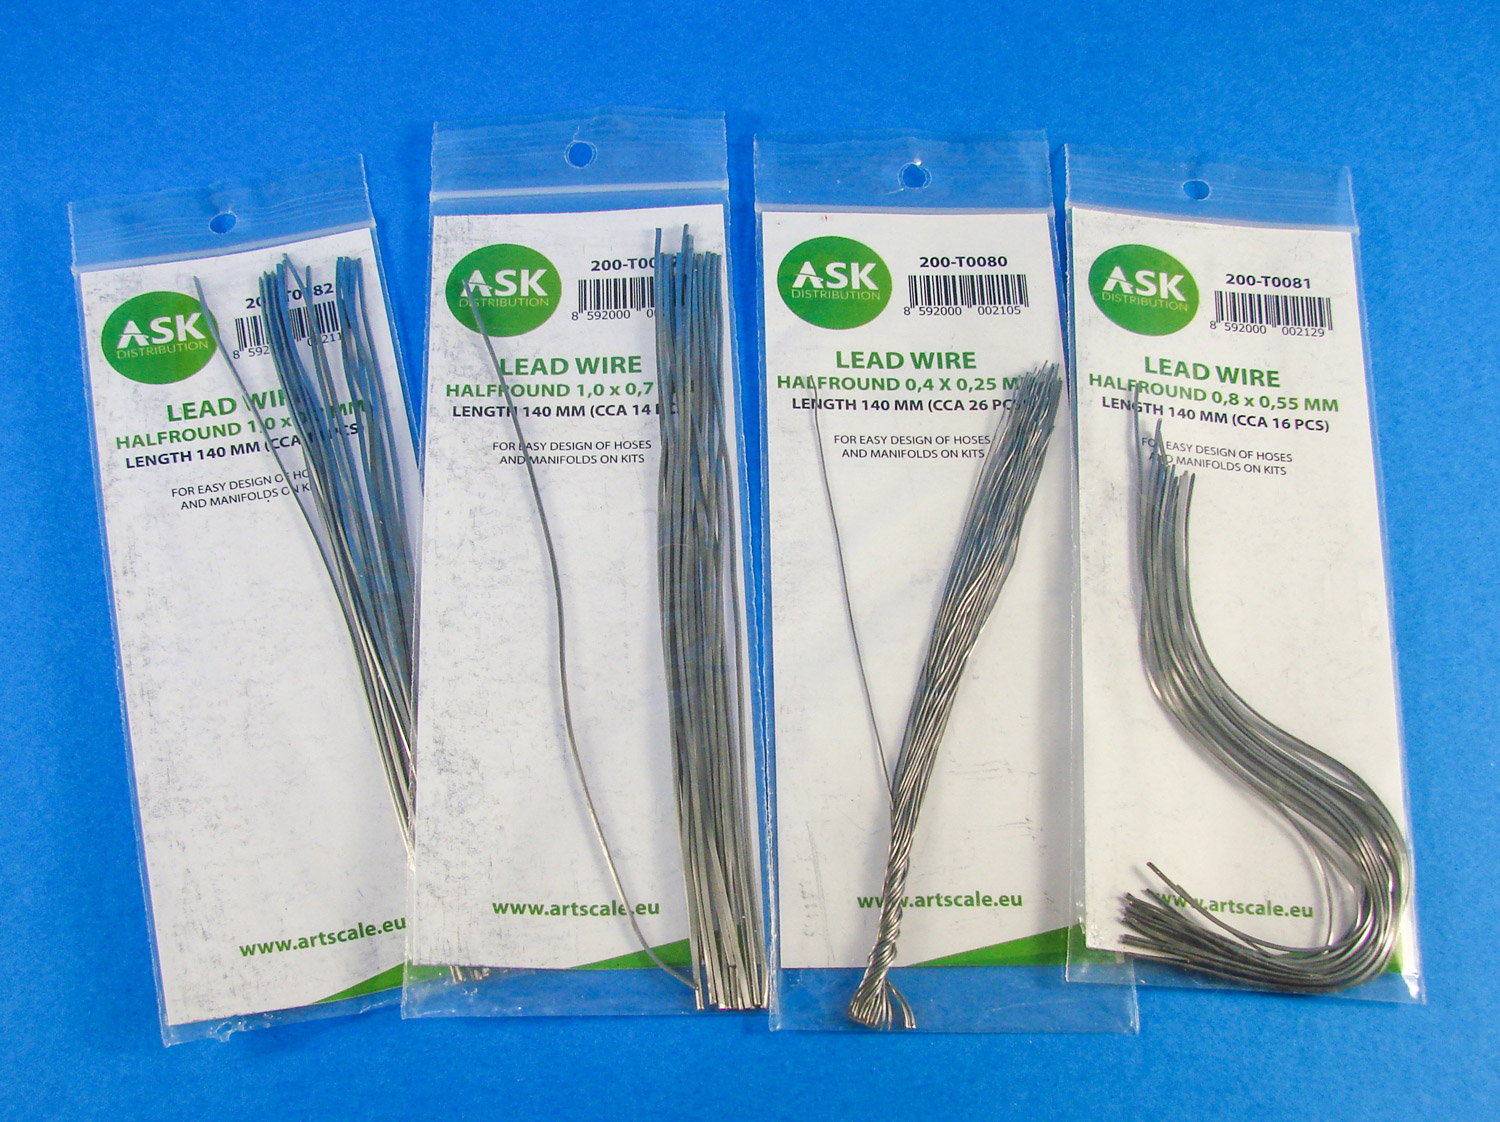
Lead Wire Artscale Various packs, all €2,70 each I've bought various packs and spools of lead wire over the years. Much of it has been pretty poor quality being inconsistent in diameter or already oxidised upon receipt. One of those is a very well known make for modellers too. One thing it all had in common was that it was just basic wire, i.e. round in section. Artscale have released SIX new packs of beautifully bright lead wire, and none of this lot is round. FOUR of these packets are half round, which I will find great for forming multiple cable runs in wheel bays etc. and the other TWO are flat! Why flat? Why not! There have been times I've wanted to run thin, flat conduits in detail areas, and this stuff would have been just perfect for that. Also great for diorama details like lightning conductor straps etc. There's not a lot more I can write about lead wire, so please check out the products on the Artscale website. There you will find specifics on the sizes of wire in each pack My sincere thanks to Artscale for the packs seen here. Head over now and treat yourself so some lead wire that actually looks very useable!


-
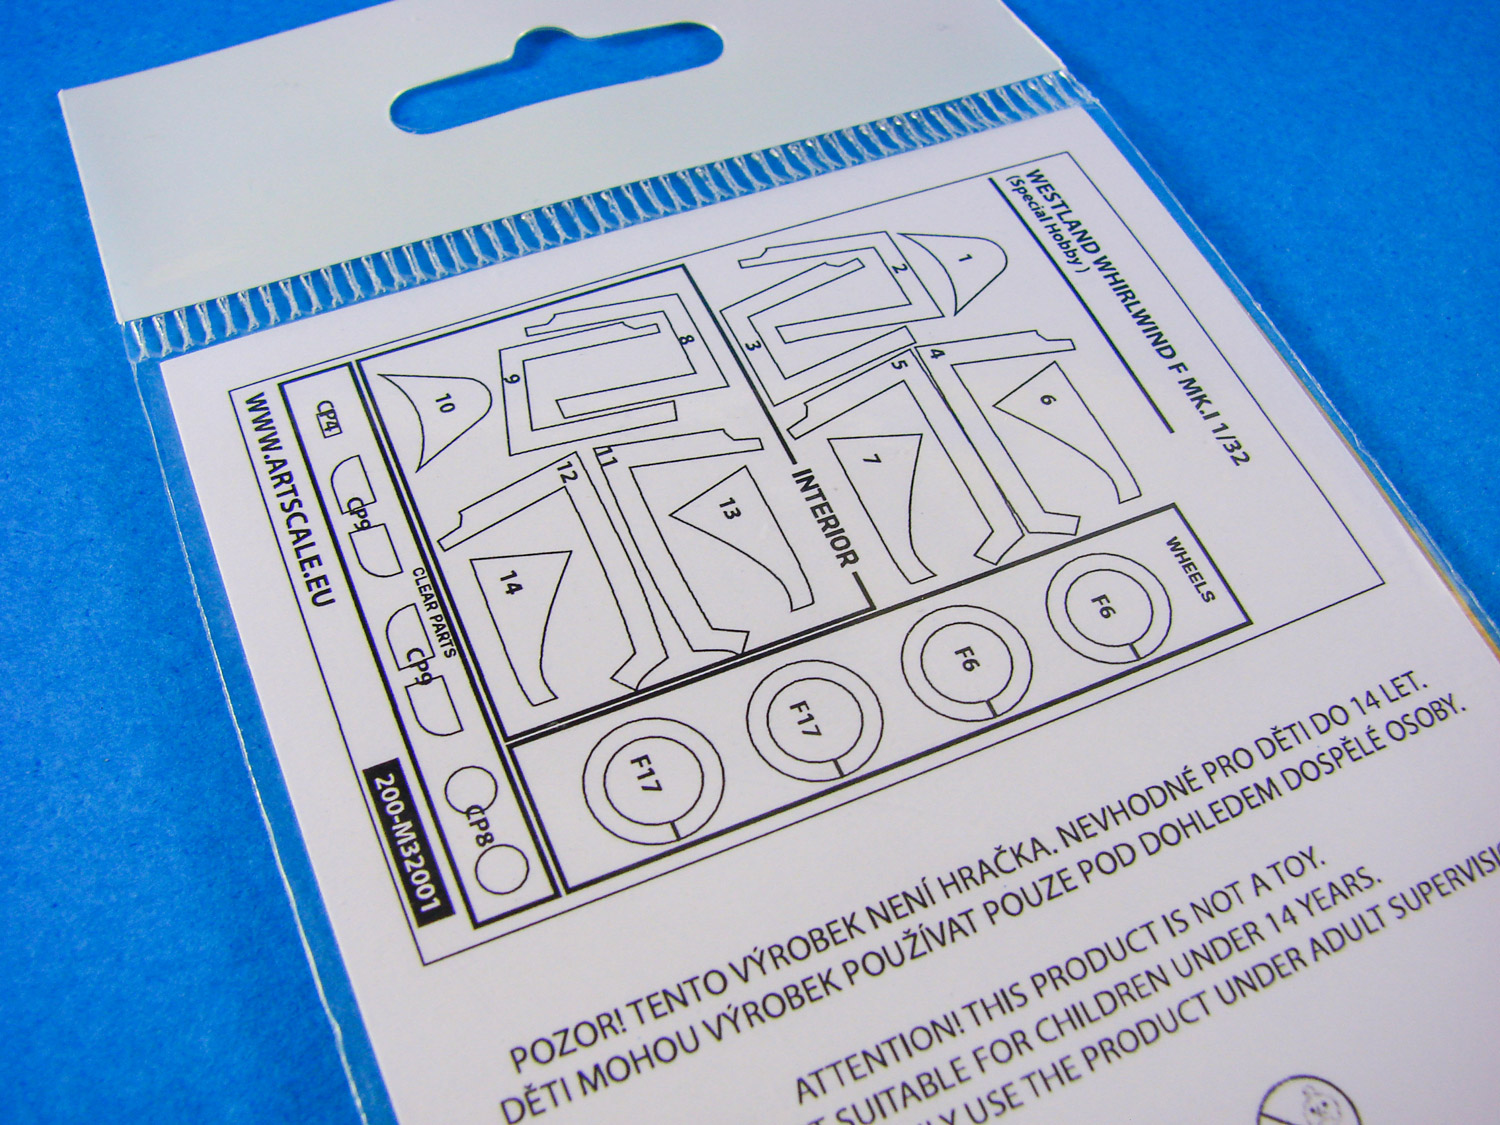
1:48 Lancaster (HKM) and 1:32 Westland Whirlwind (Special Hobby) mask sets Artscale Available from Artscale (see article for codes, prices, links) There's another player in town when it comes to mask choices. Like Eduard, ArtScale (also Czech-based), are using Kabuki paper for their new range, but from the outset, you can see there's a difference here. As well as producing beautifully cut masks, the sheets are also printed to help locate the individual parts. That printing also extends to grouping the parts too for extra clarity, as well as some occasional text thrown into the mix. There is also of course a parts map supplied with helps you locate the mask parts within each group. For the Lanc, two sets are available. These are single-sided and double-sided. 1:48 Avro Lancaster B. Mk.I (single sided) (€12,90) Single-sided means that the masks contain parts for only the canopy/turret exteriors. Even with that, there are a lot of parts to stick onto your model. 1:48 Avro Lancaster B. Mk.I (double-sided) (€17,20) 1:32 Westland Whirlwind F Mk.I (€7,80) These are actually double-sided (although it doesn't state), including masks for both the interior and exterior of the canopy. Conclusion In all, these are great sets, and not too expensive either. I know if you have the Lanc, you will definitely want to use a set, and I really do recommend the one from ArtScale. Quality is everything we expect these days with crisp, sharp cutting, and I have to say I really like the extra printing on the sheets. My sincere thanks to ArtScale for the samples you see reviewed here. To purchase direct, click the links in the article.

-
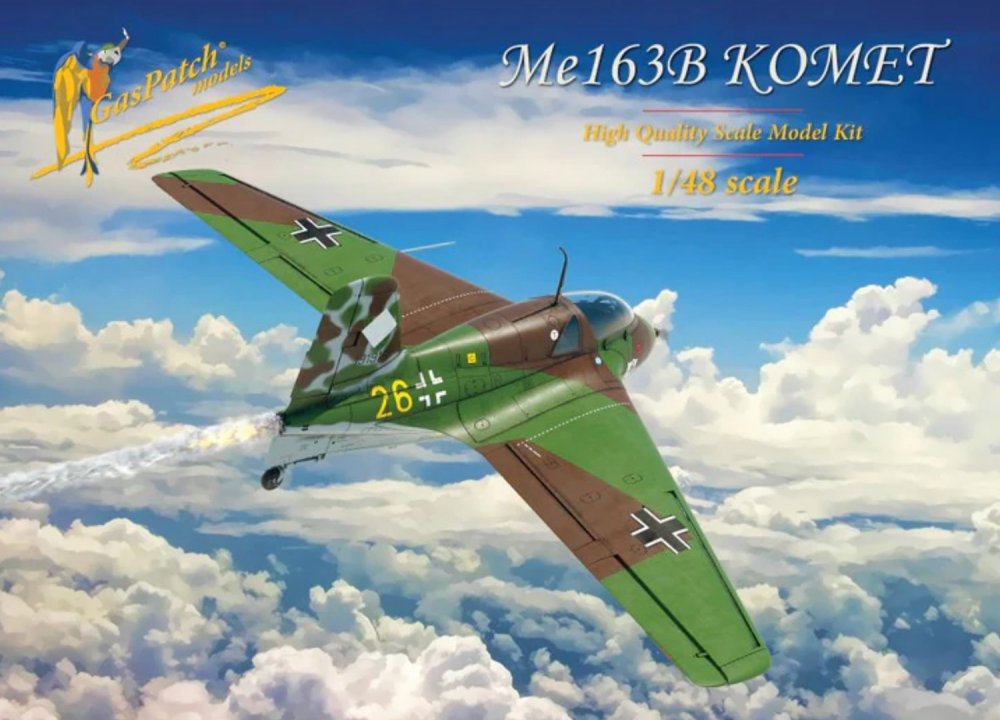
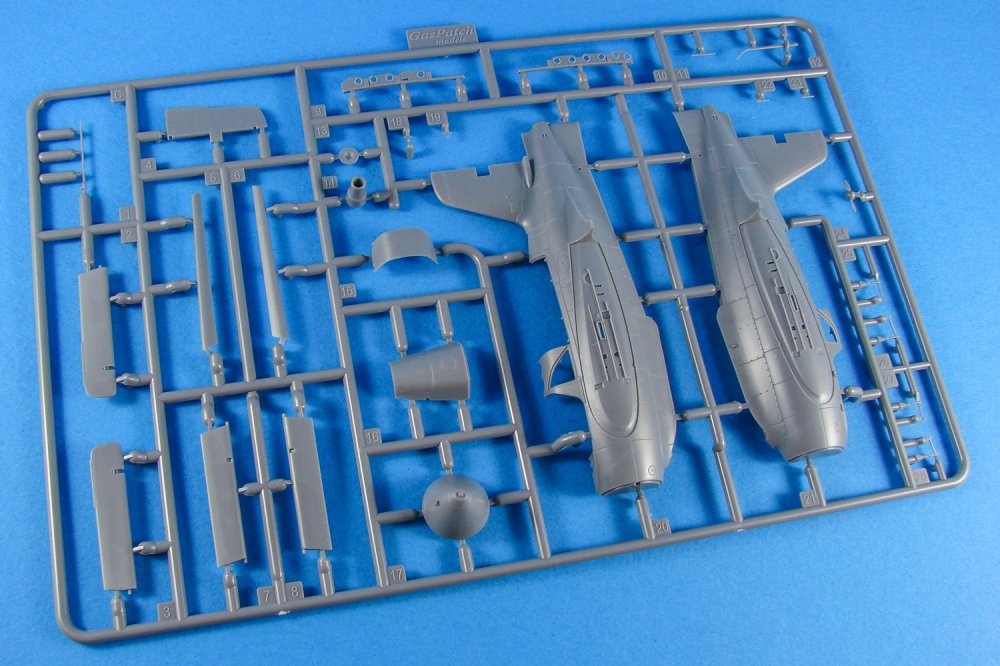
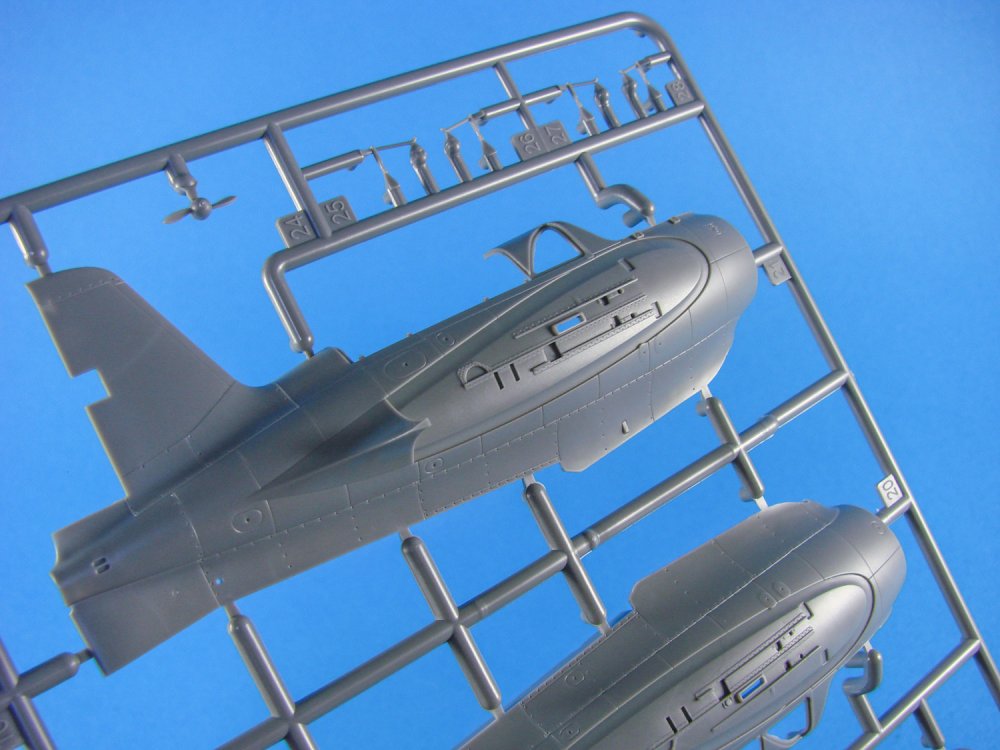
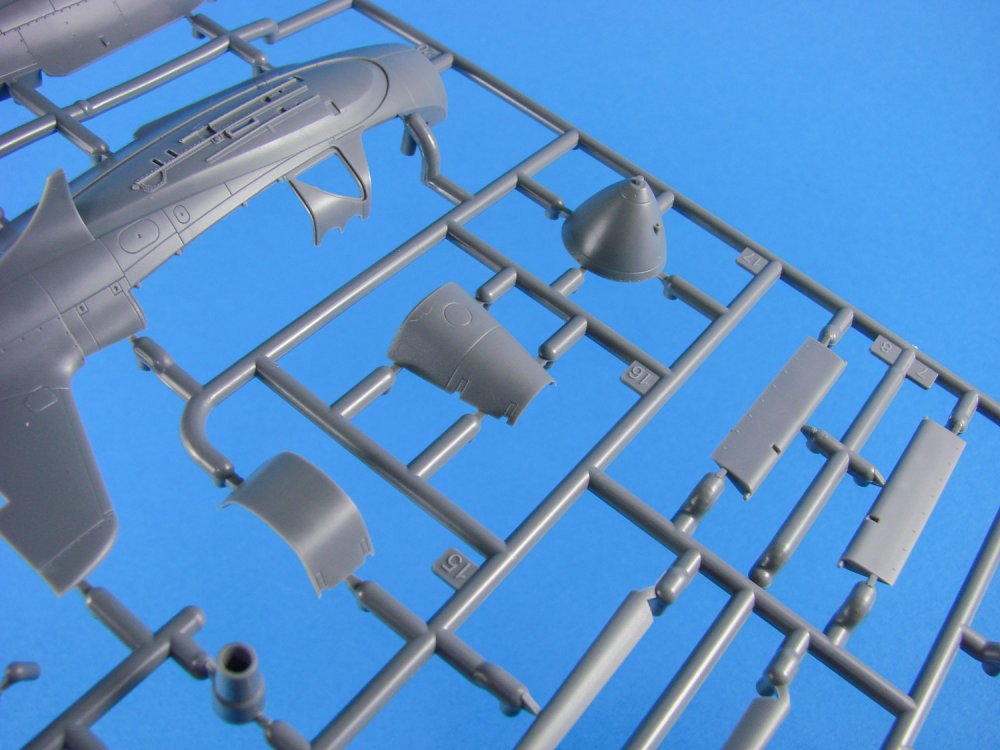
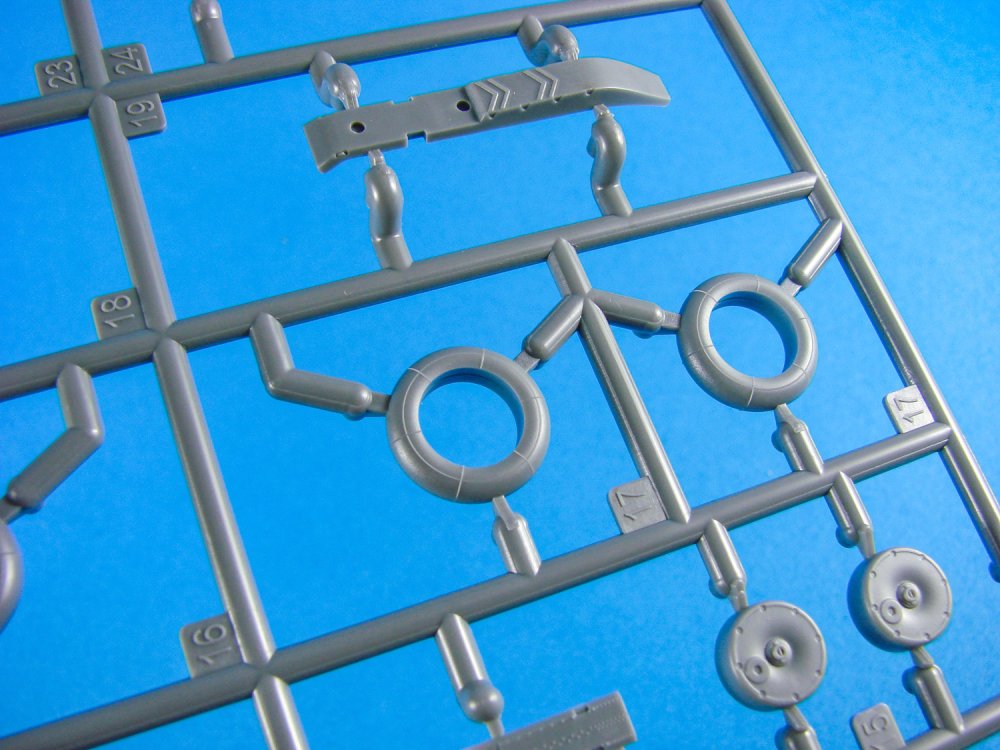
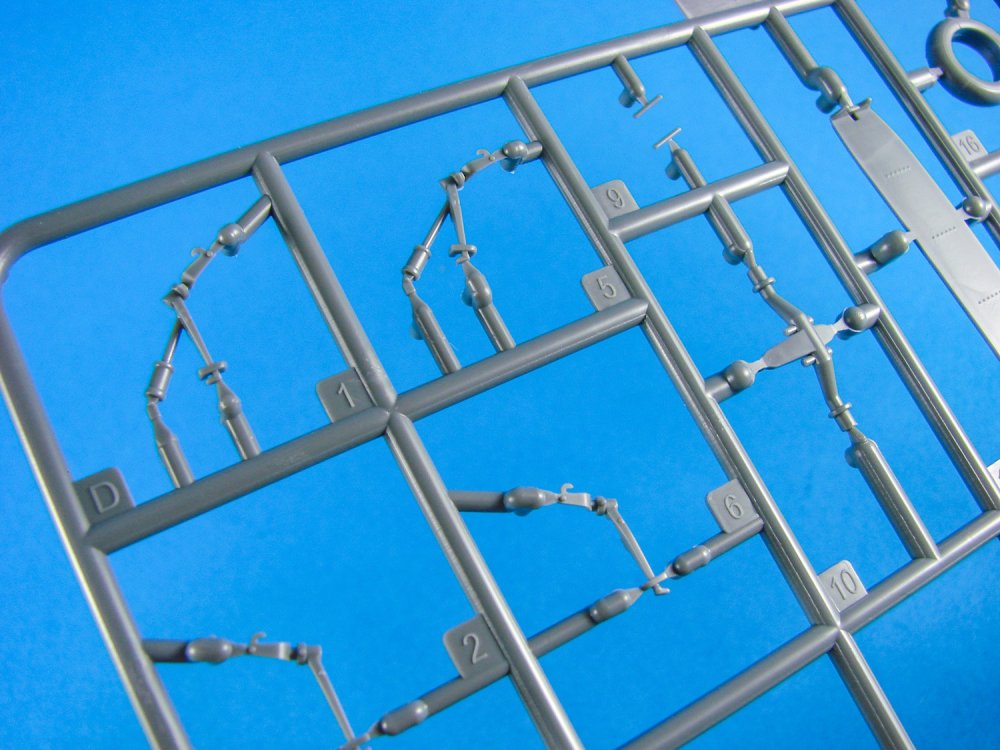
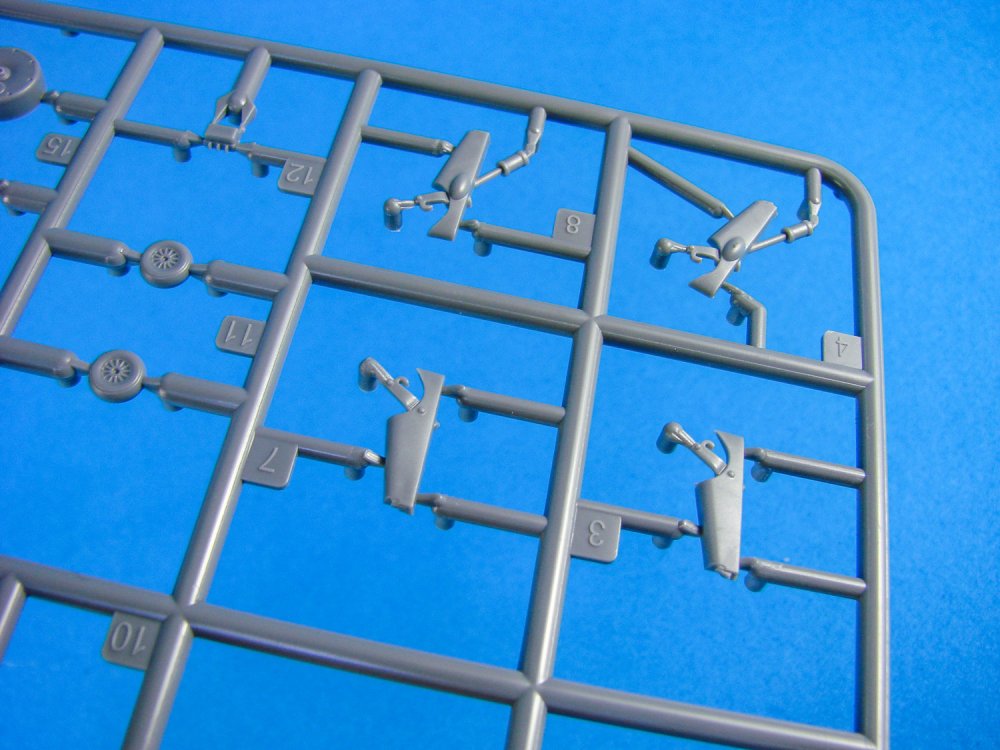
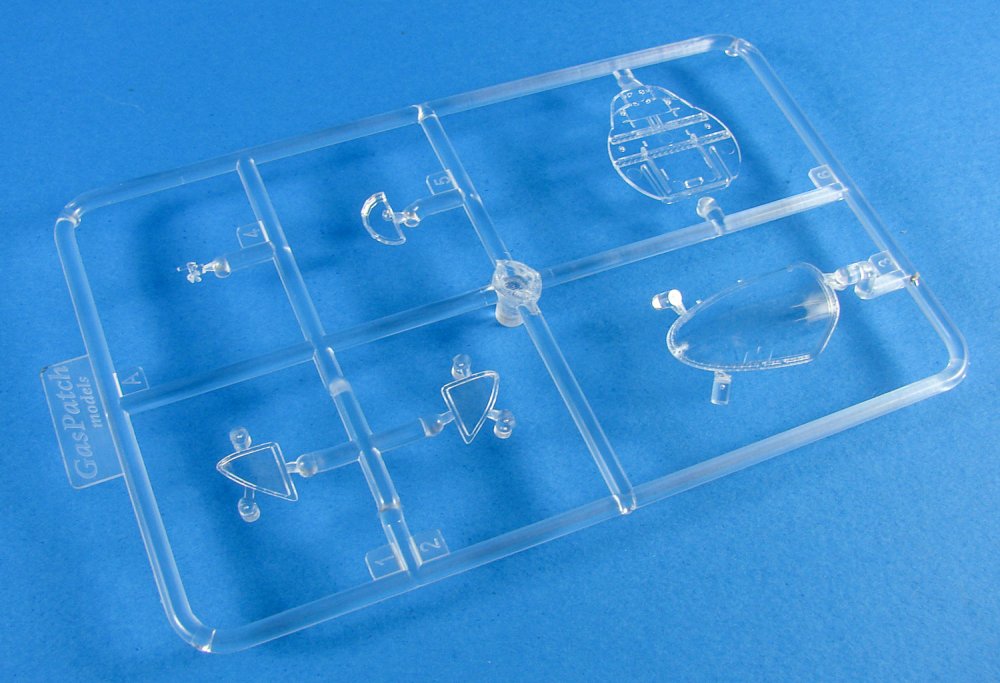
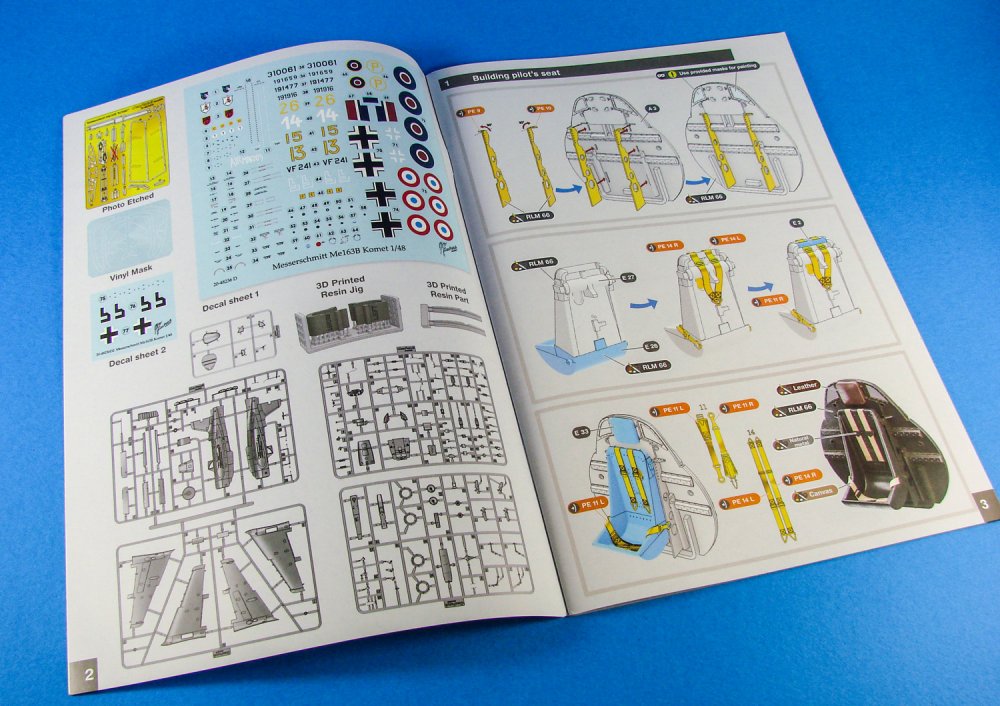
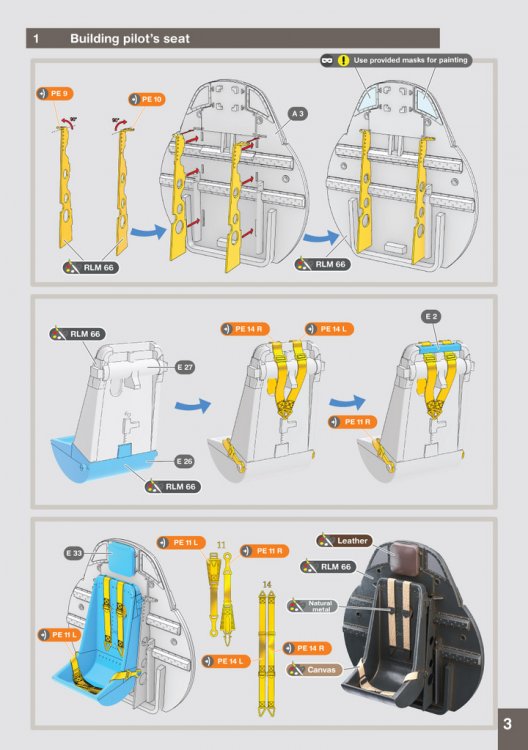
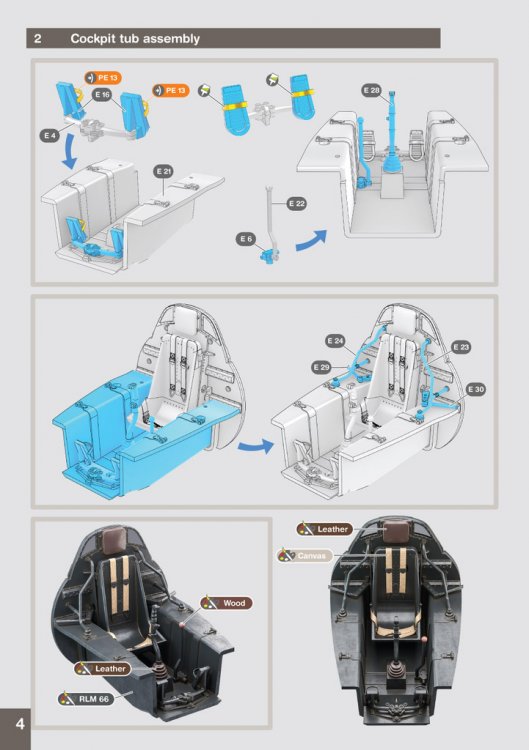
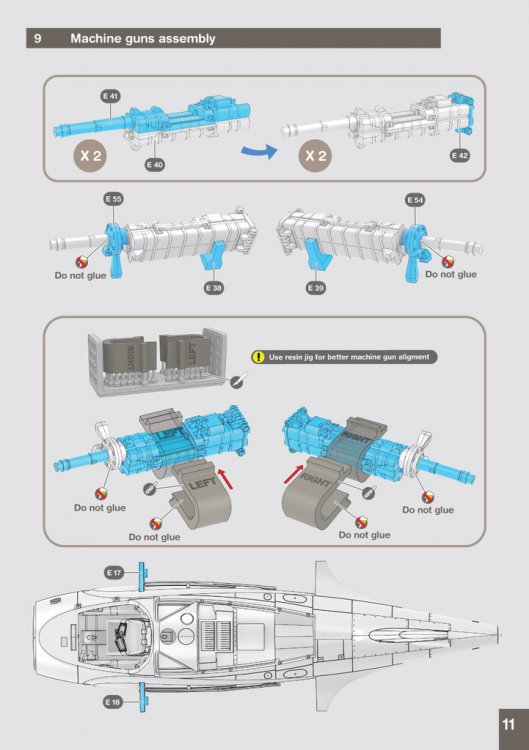
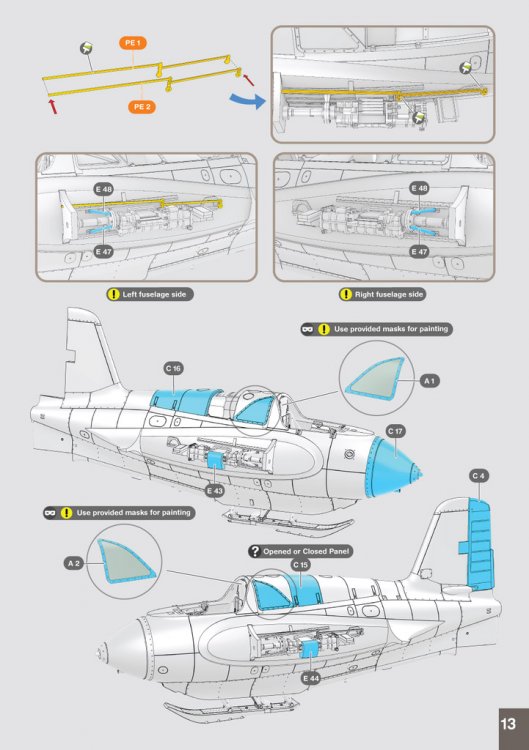
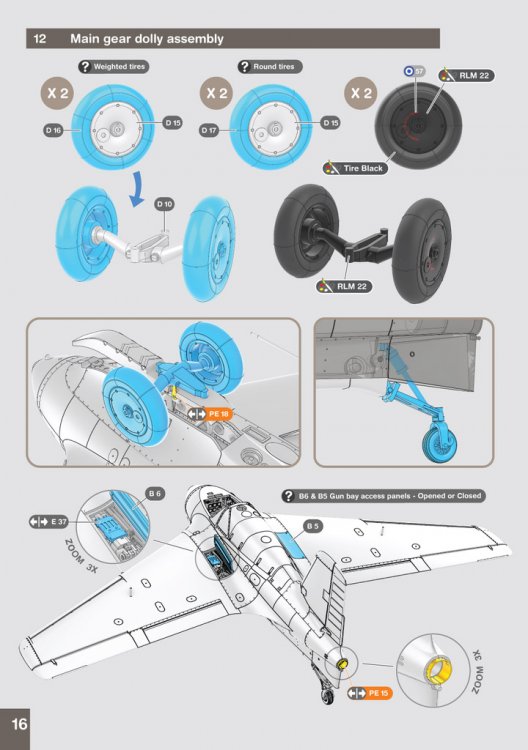
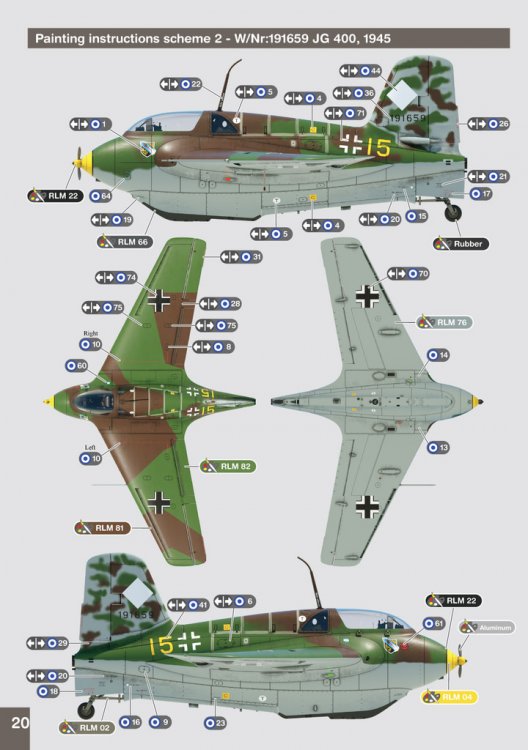
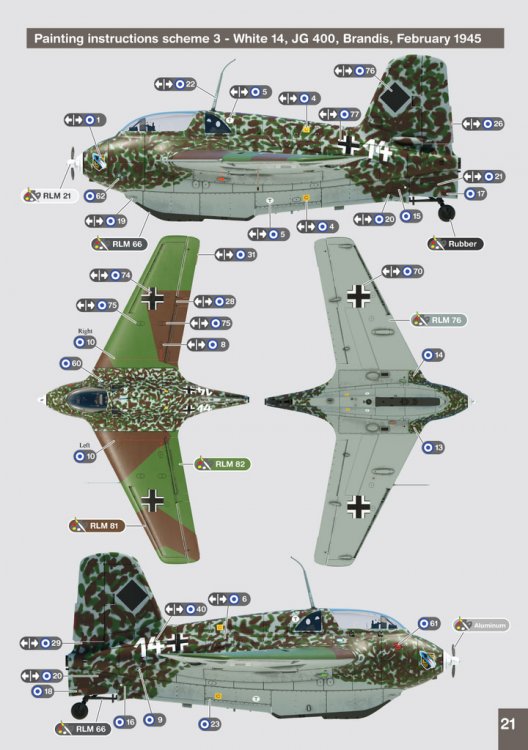
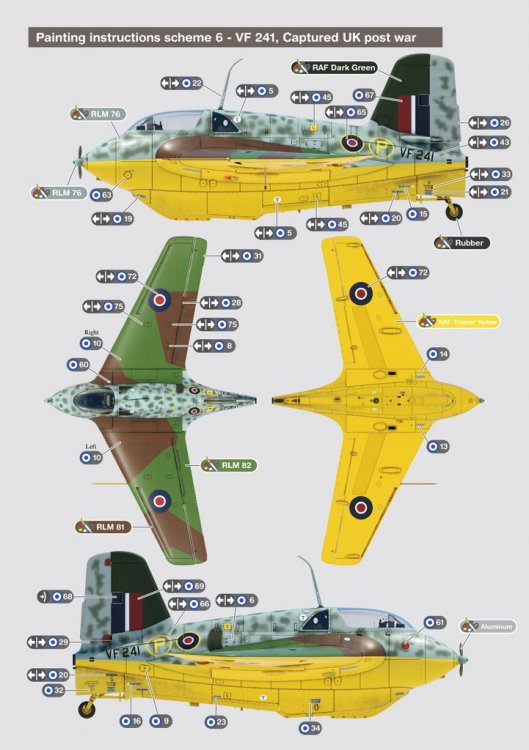
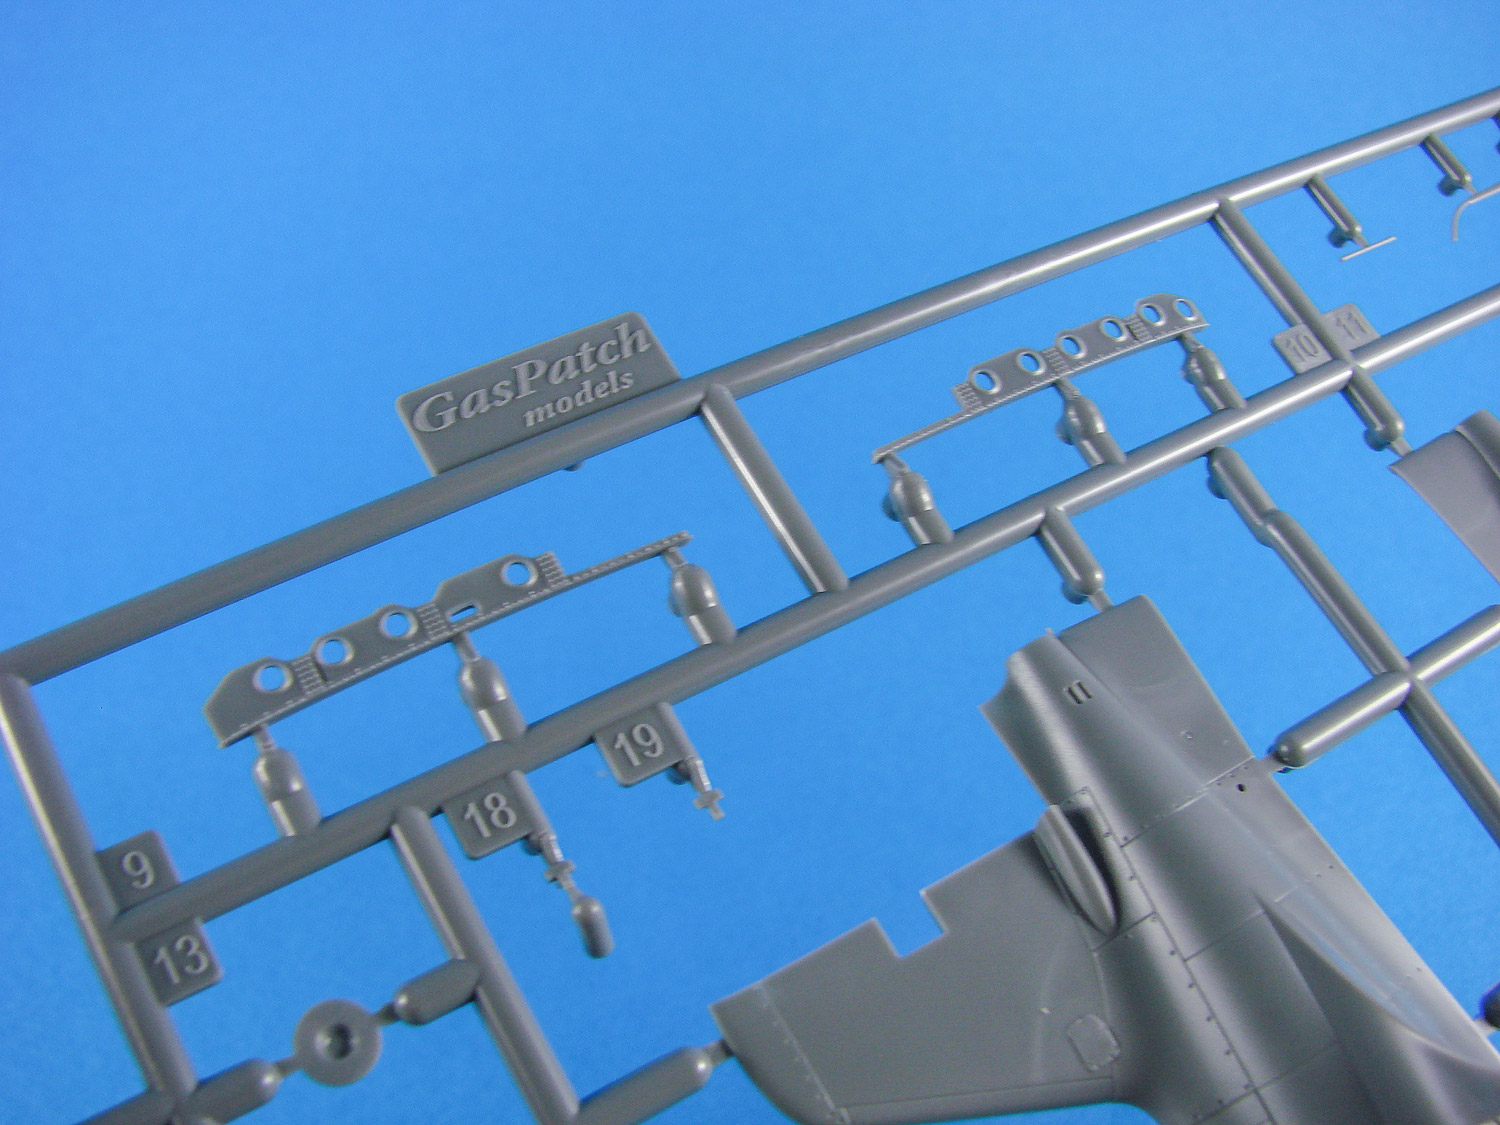
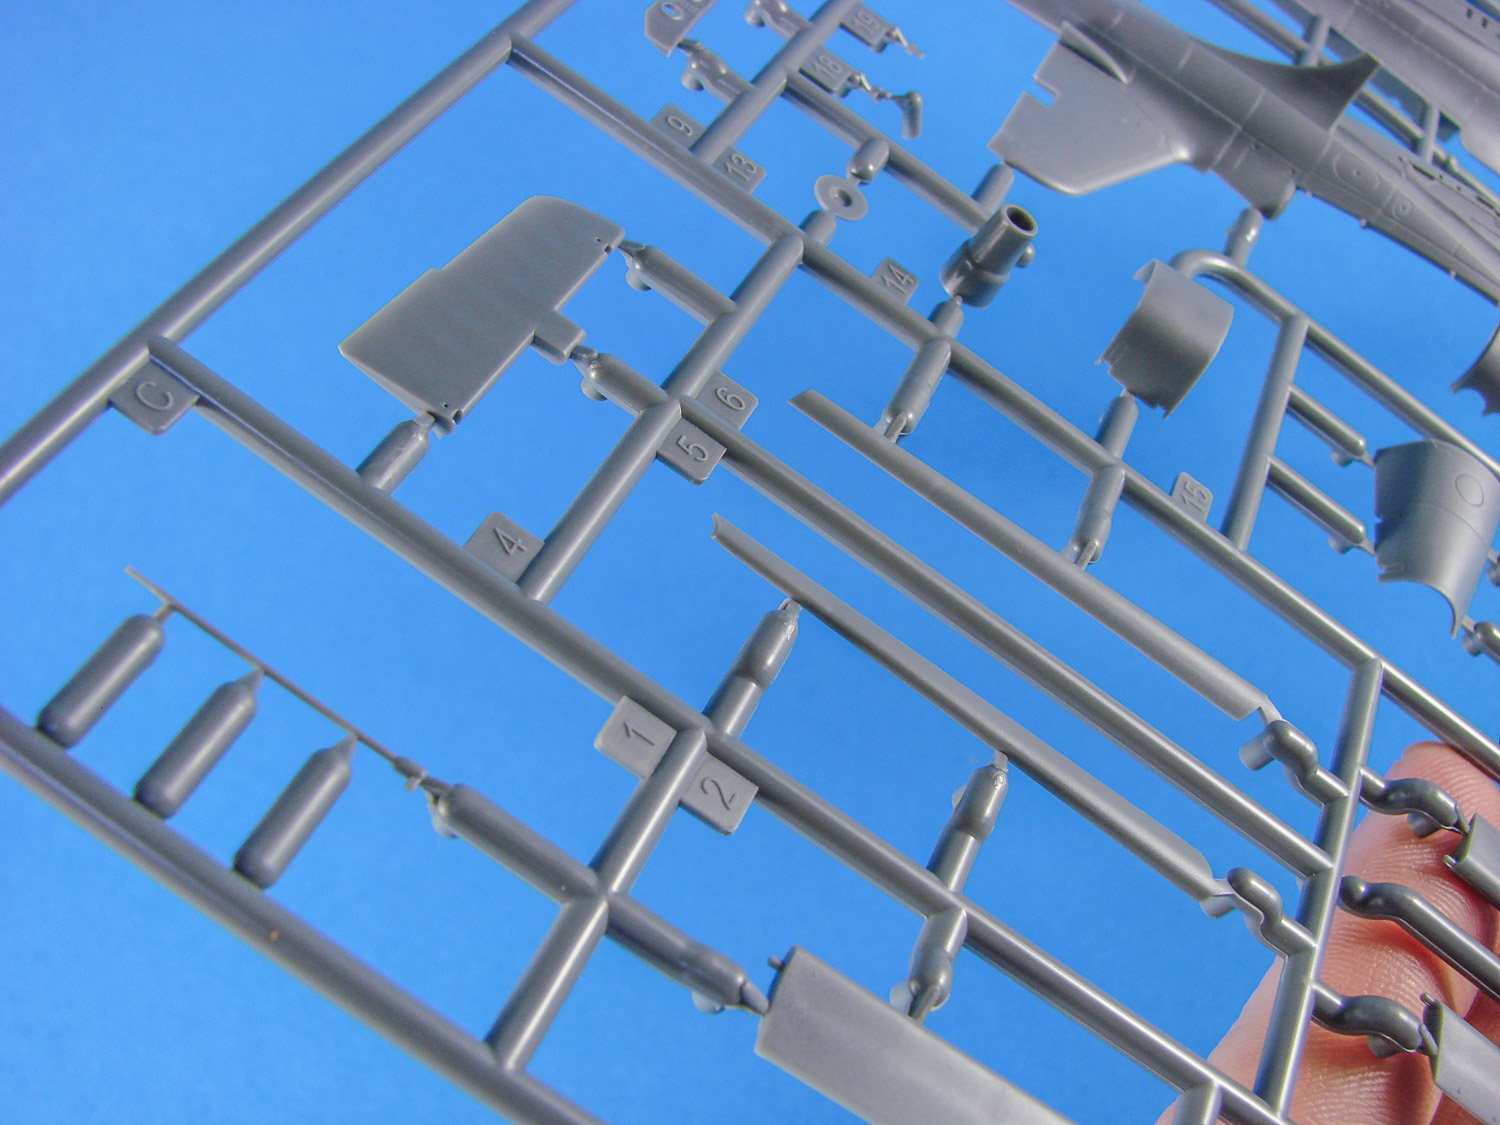
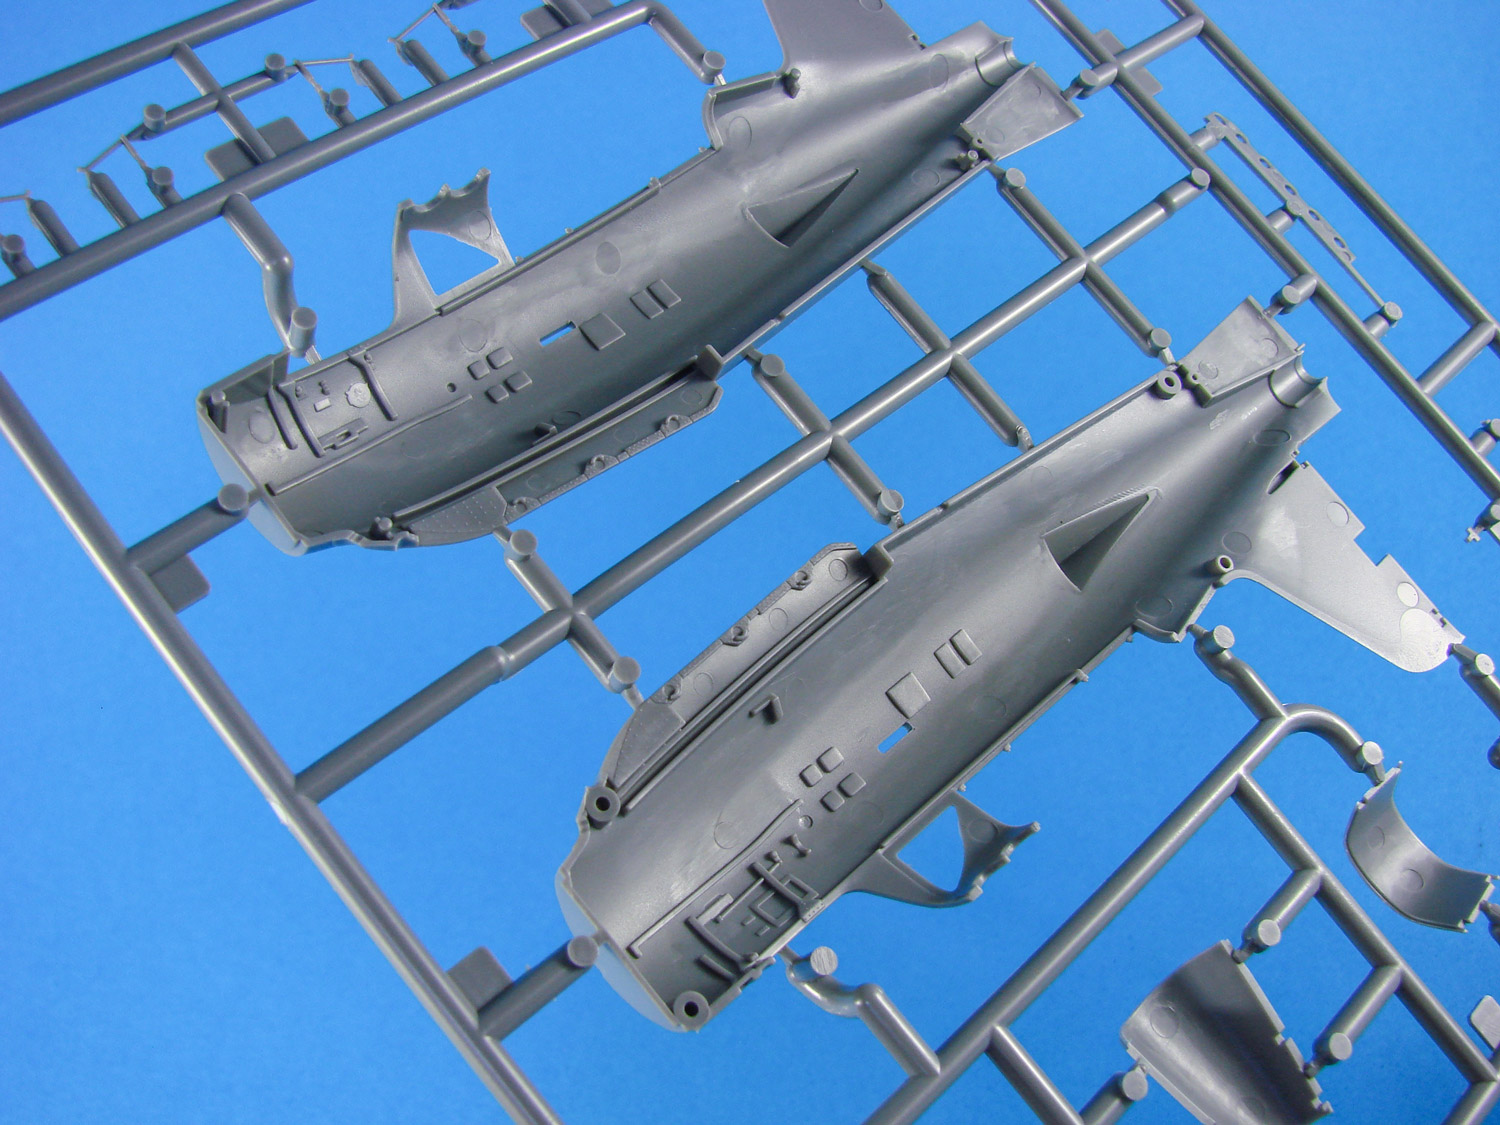
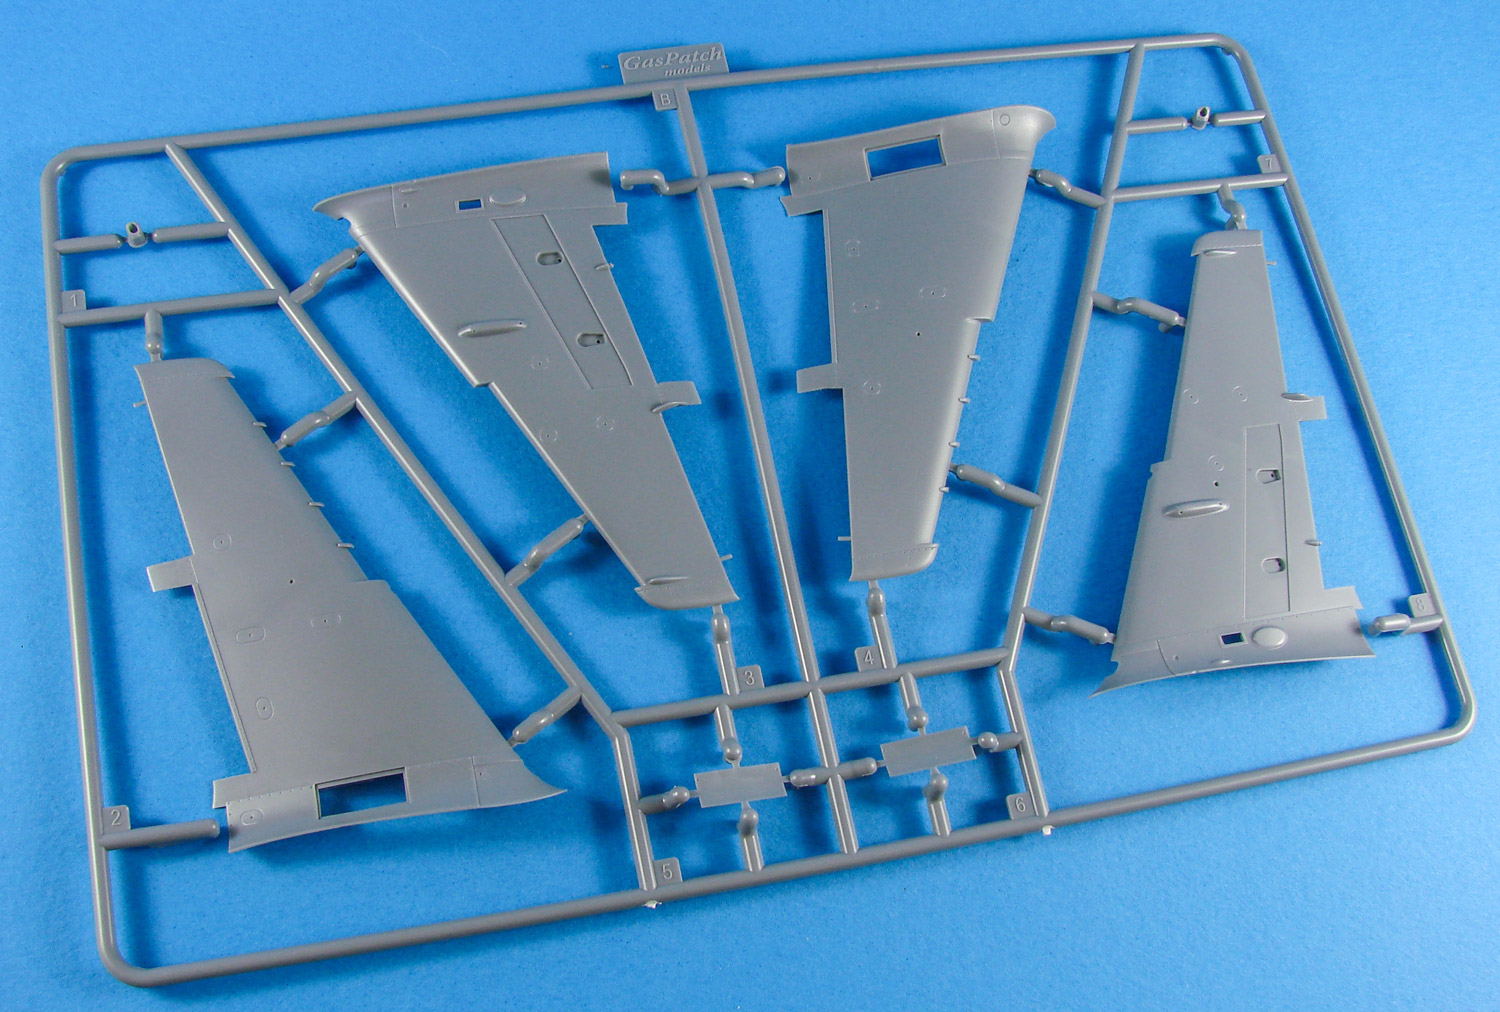
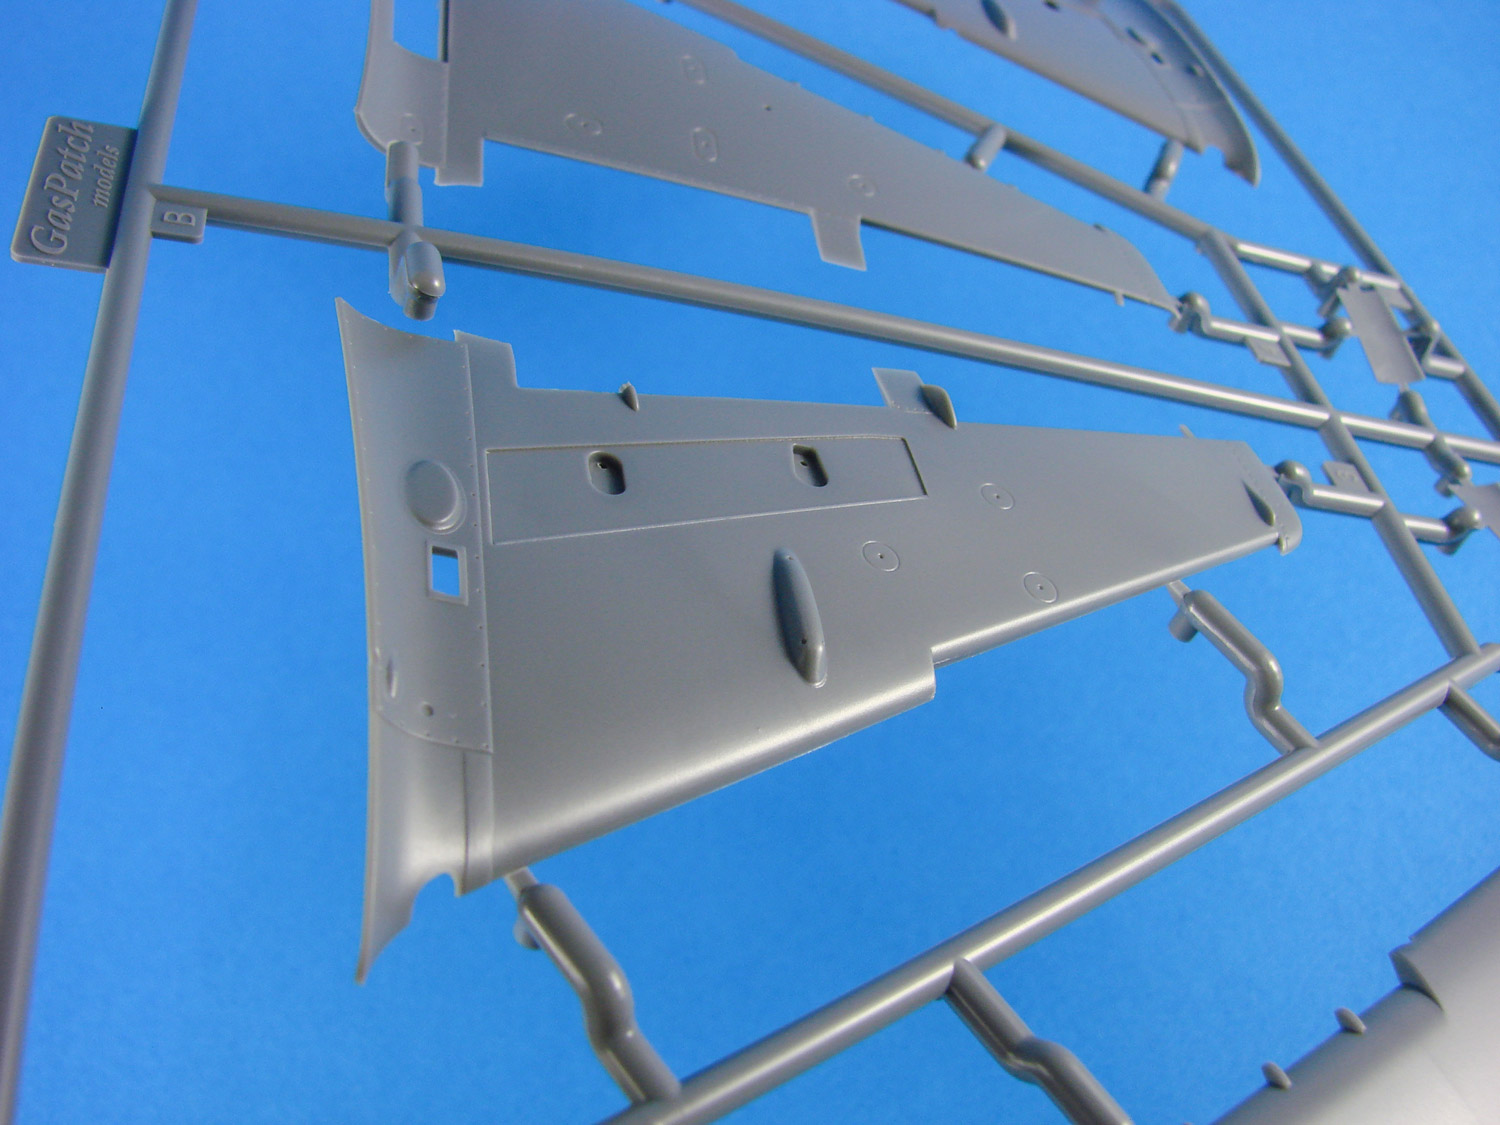
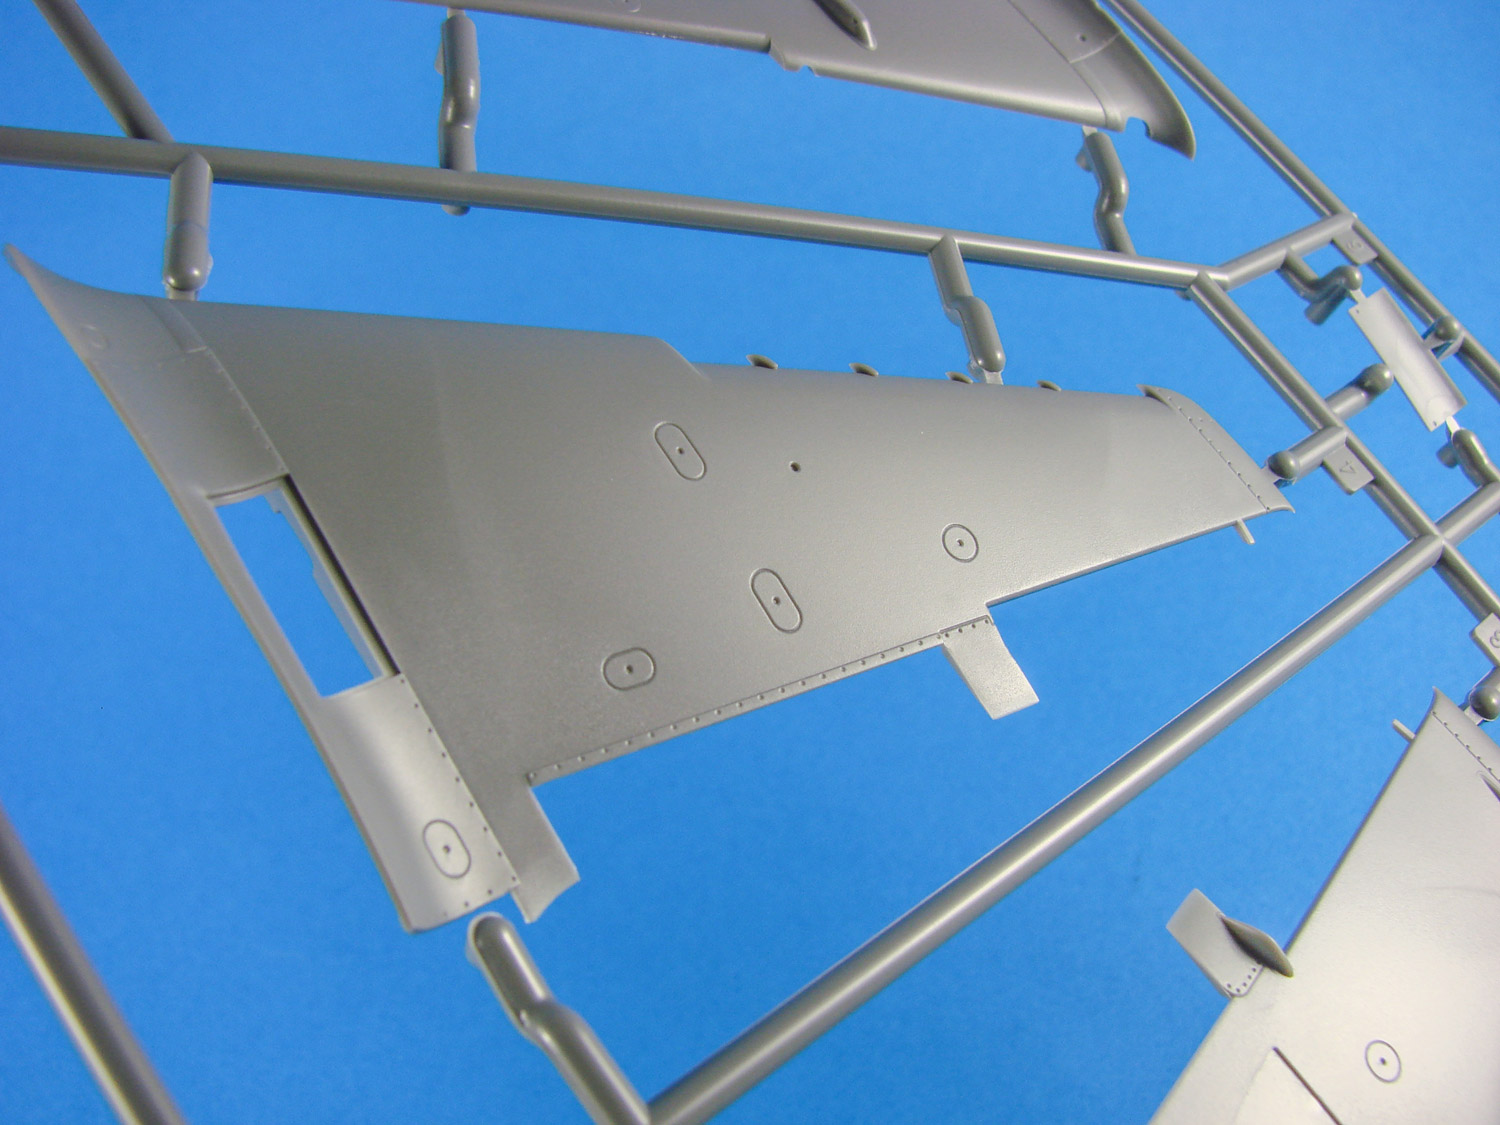
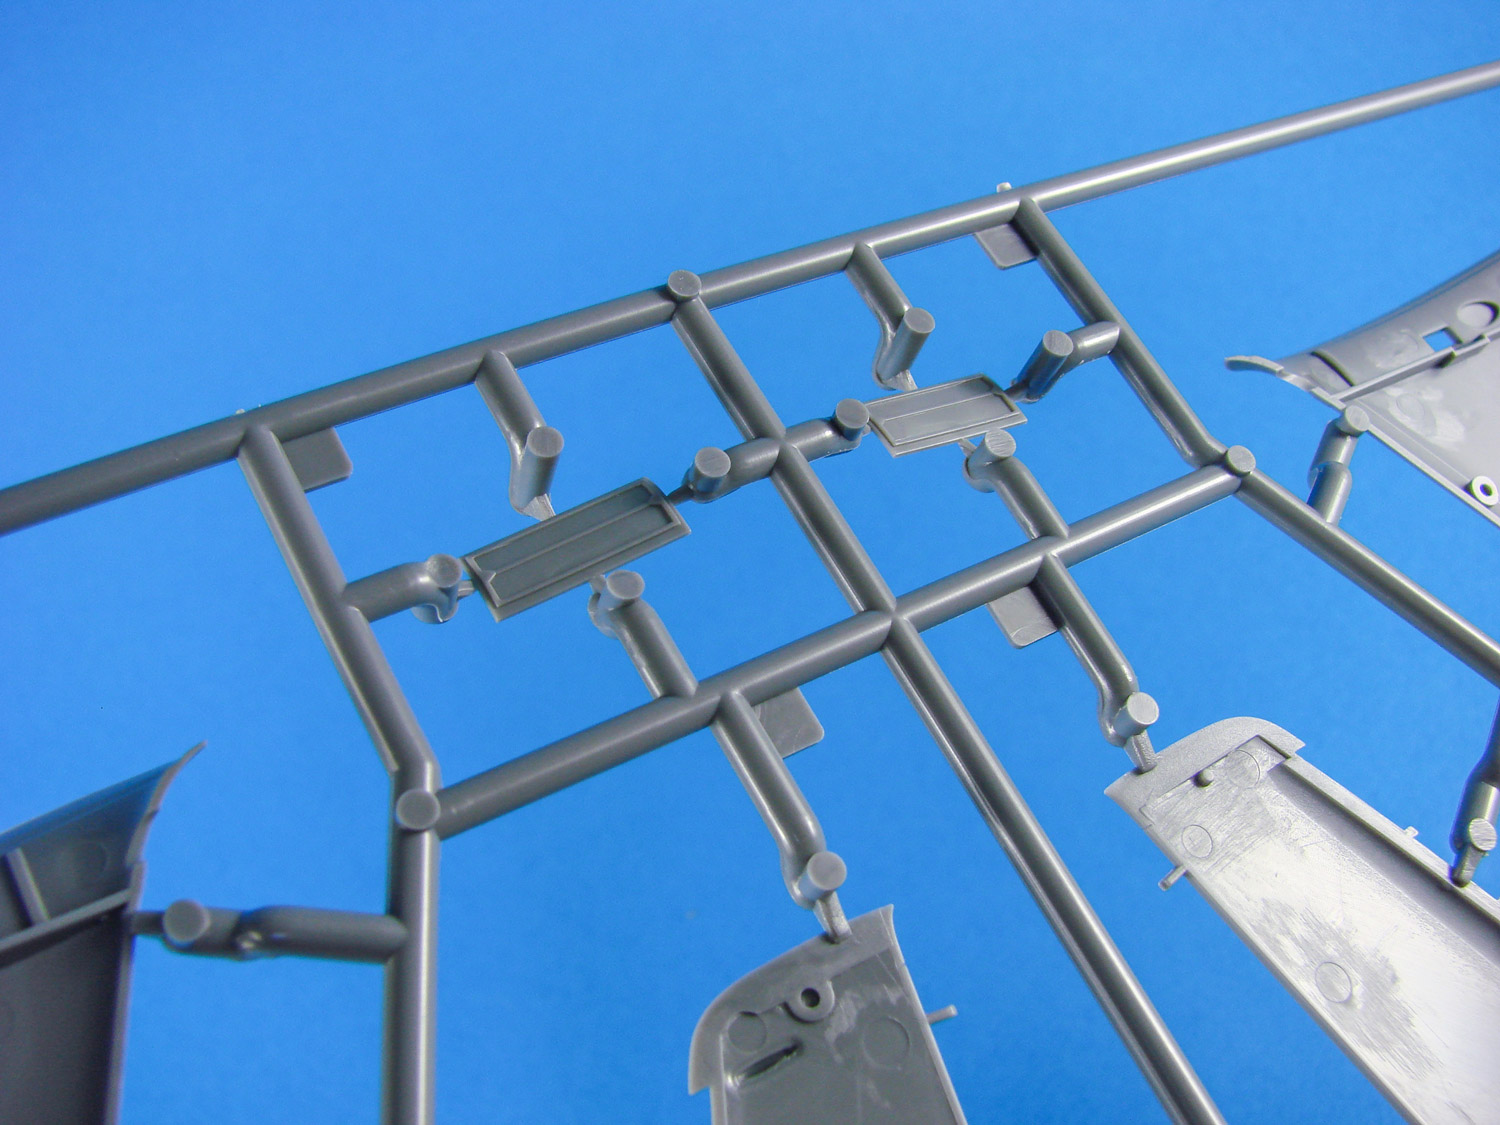
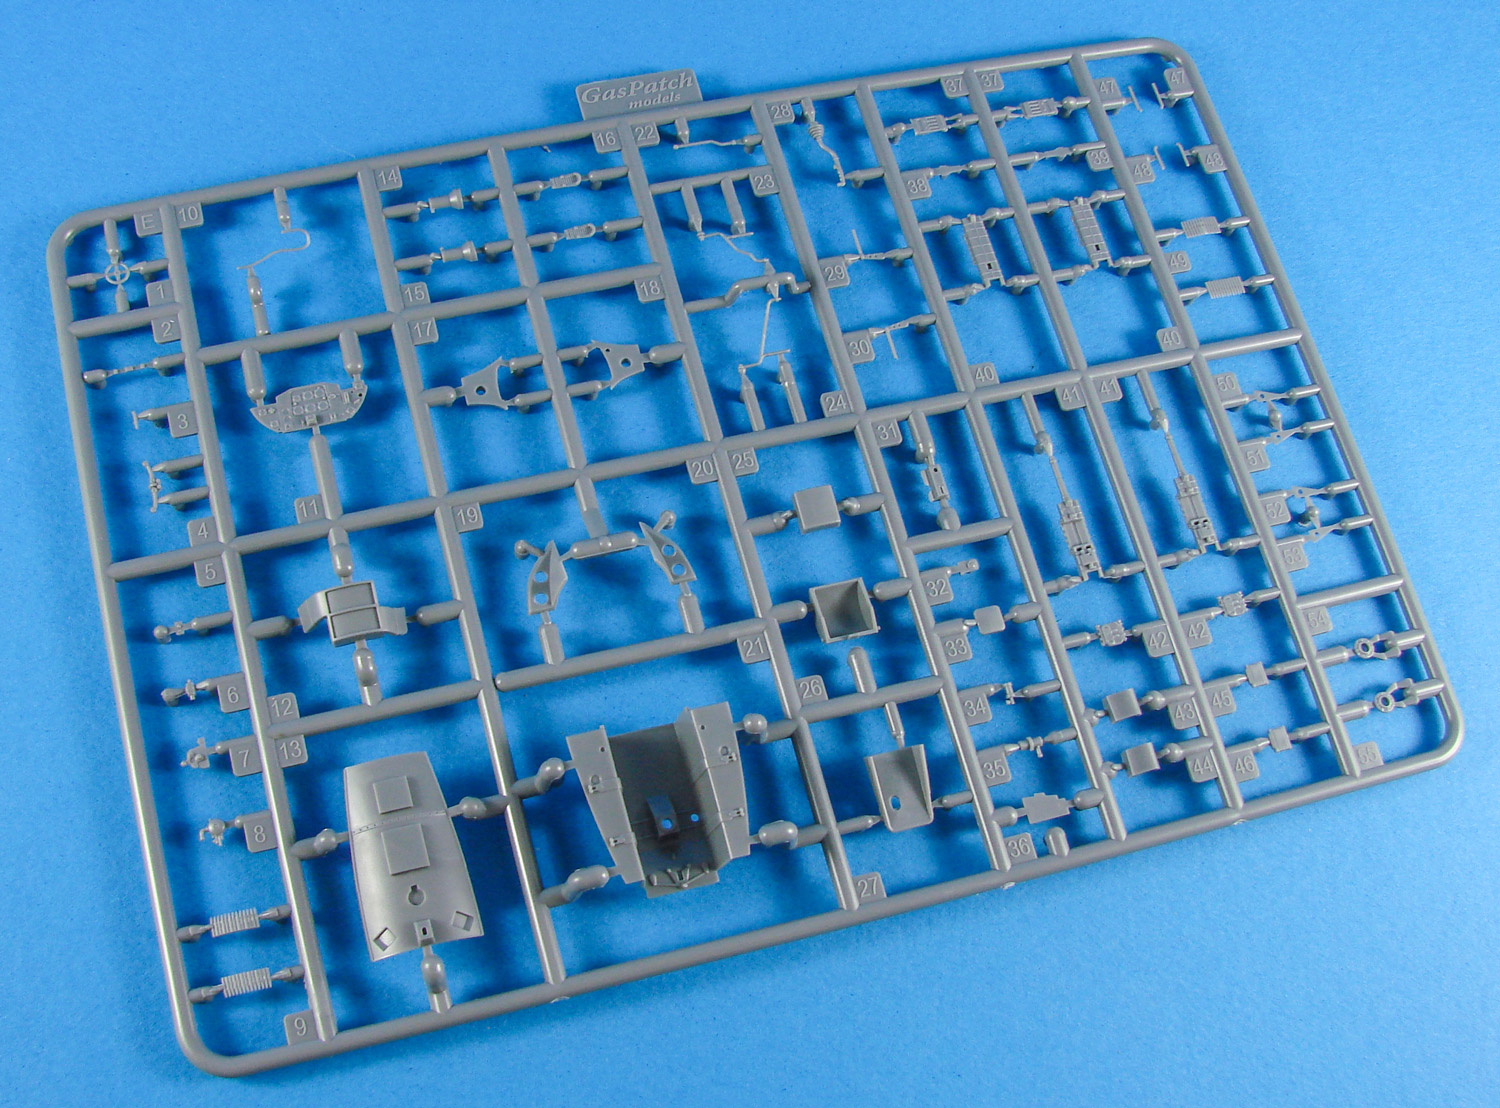
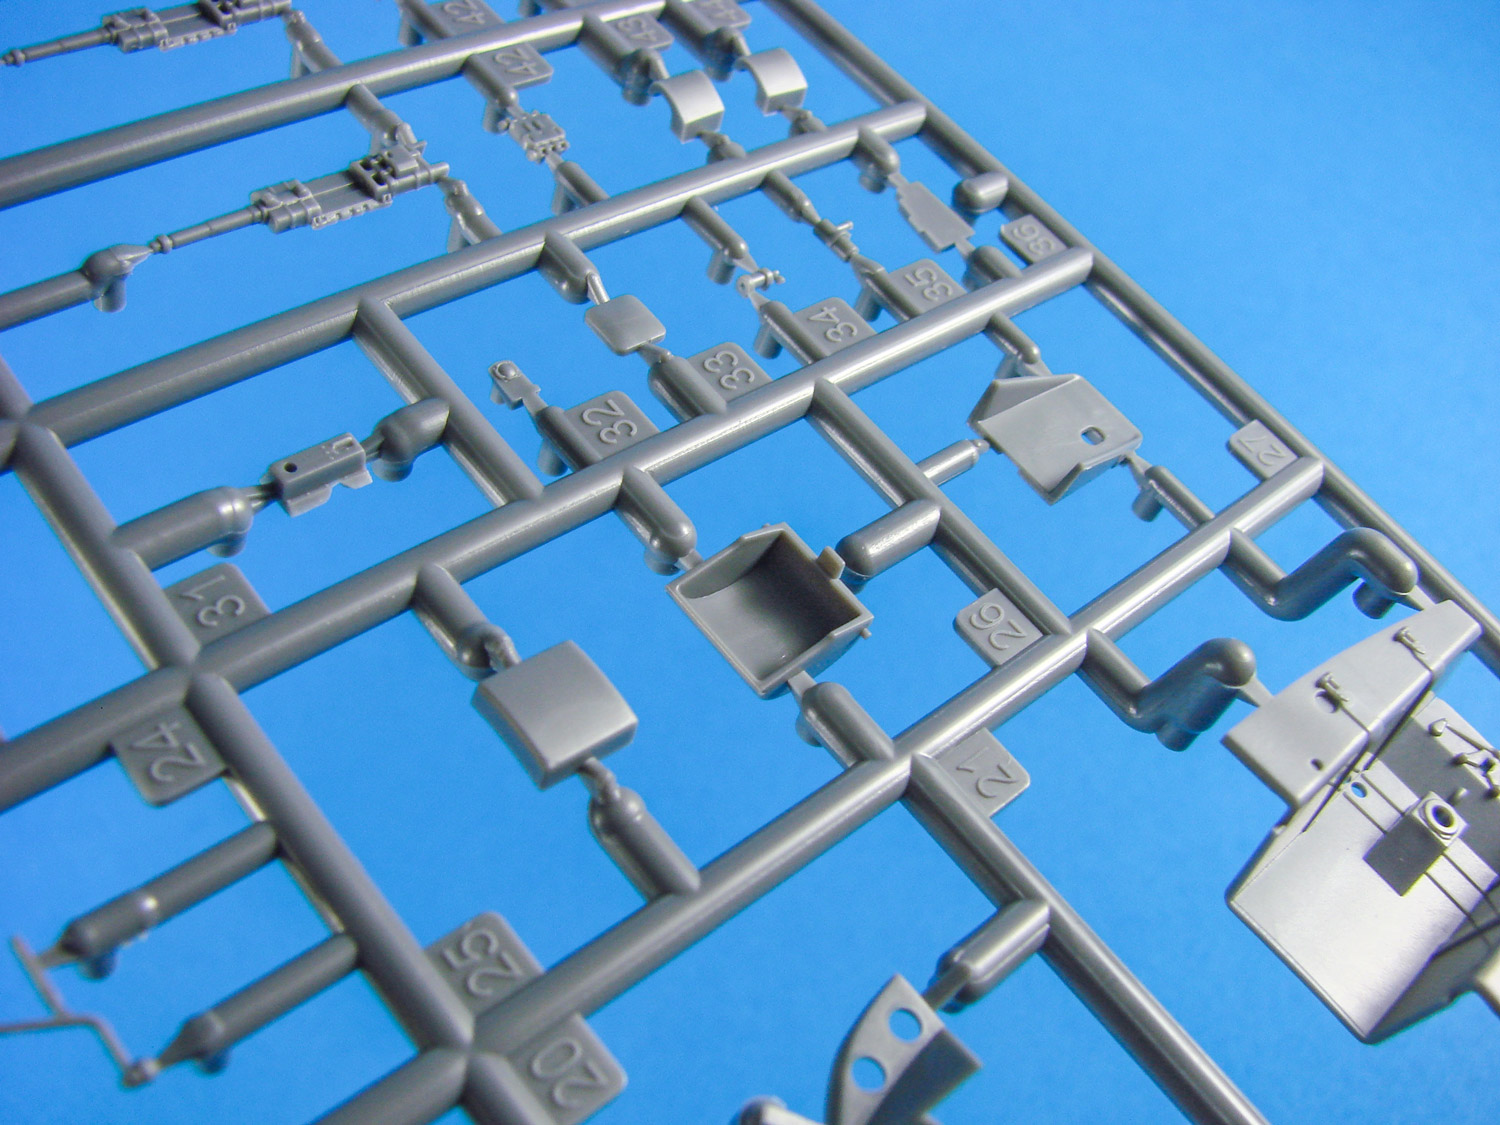
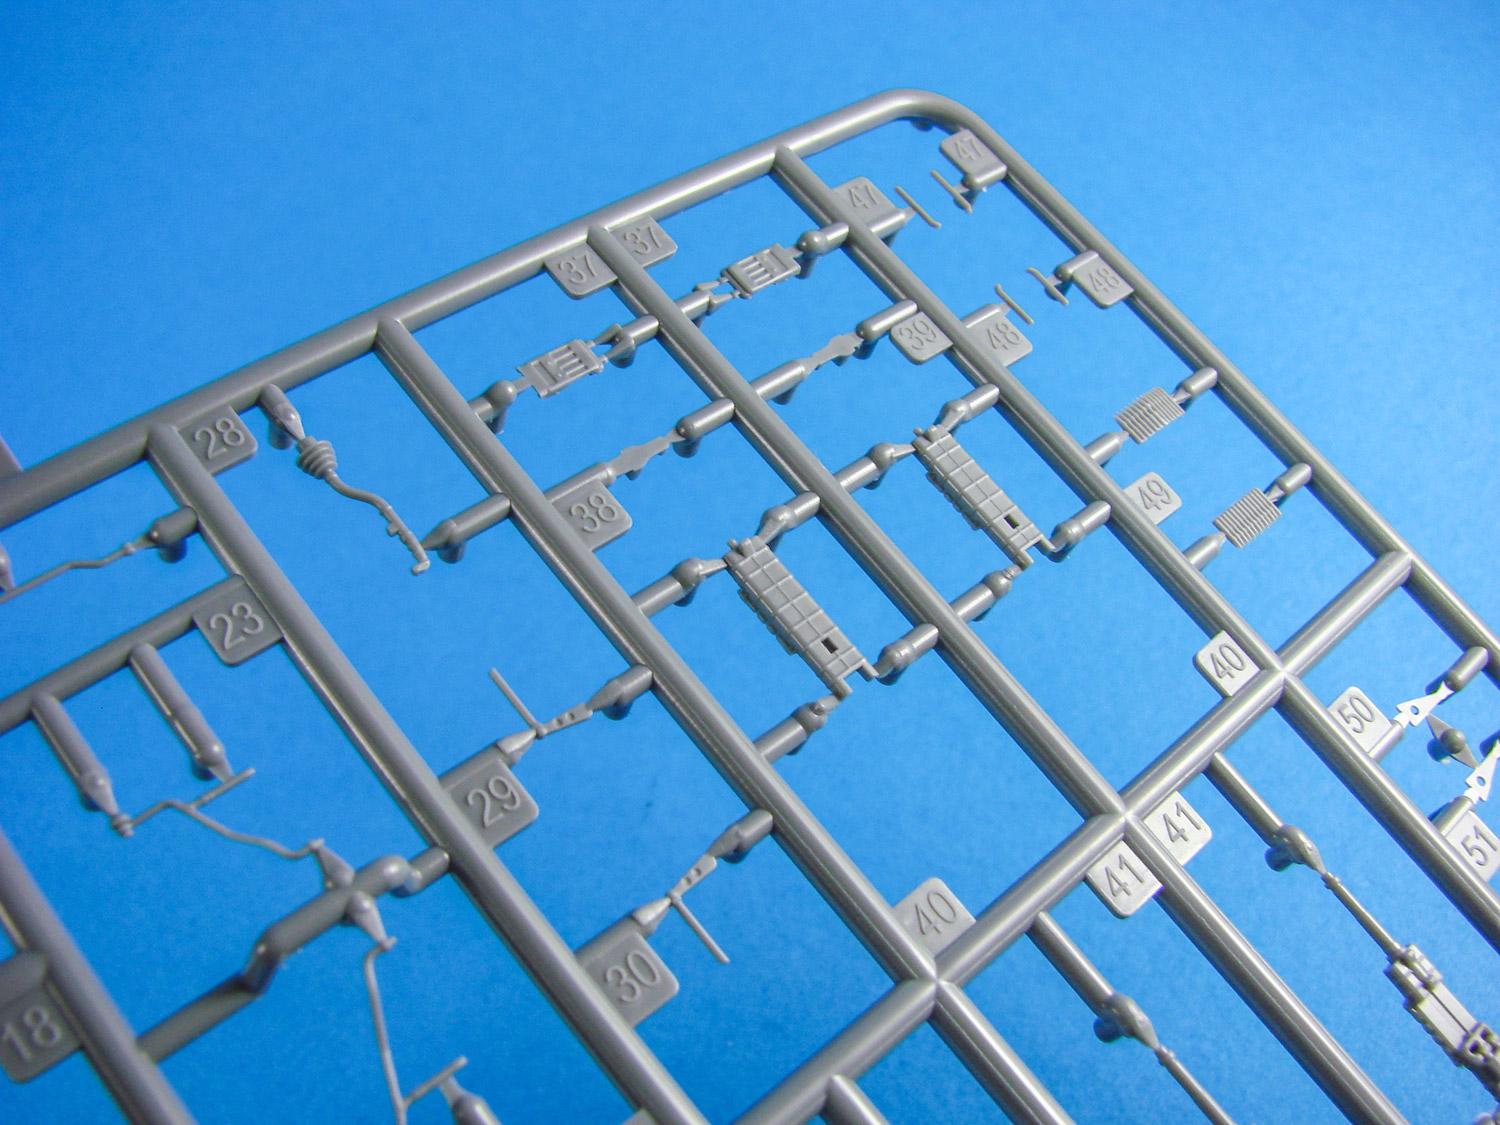
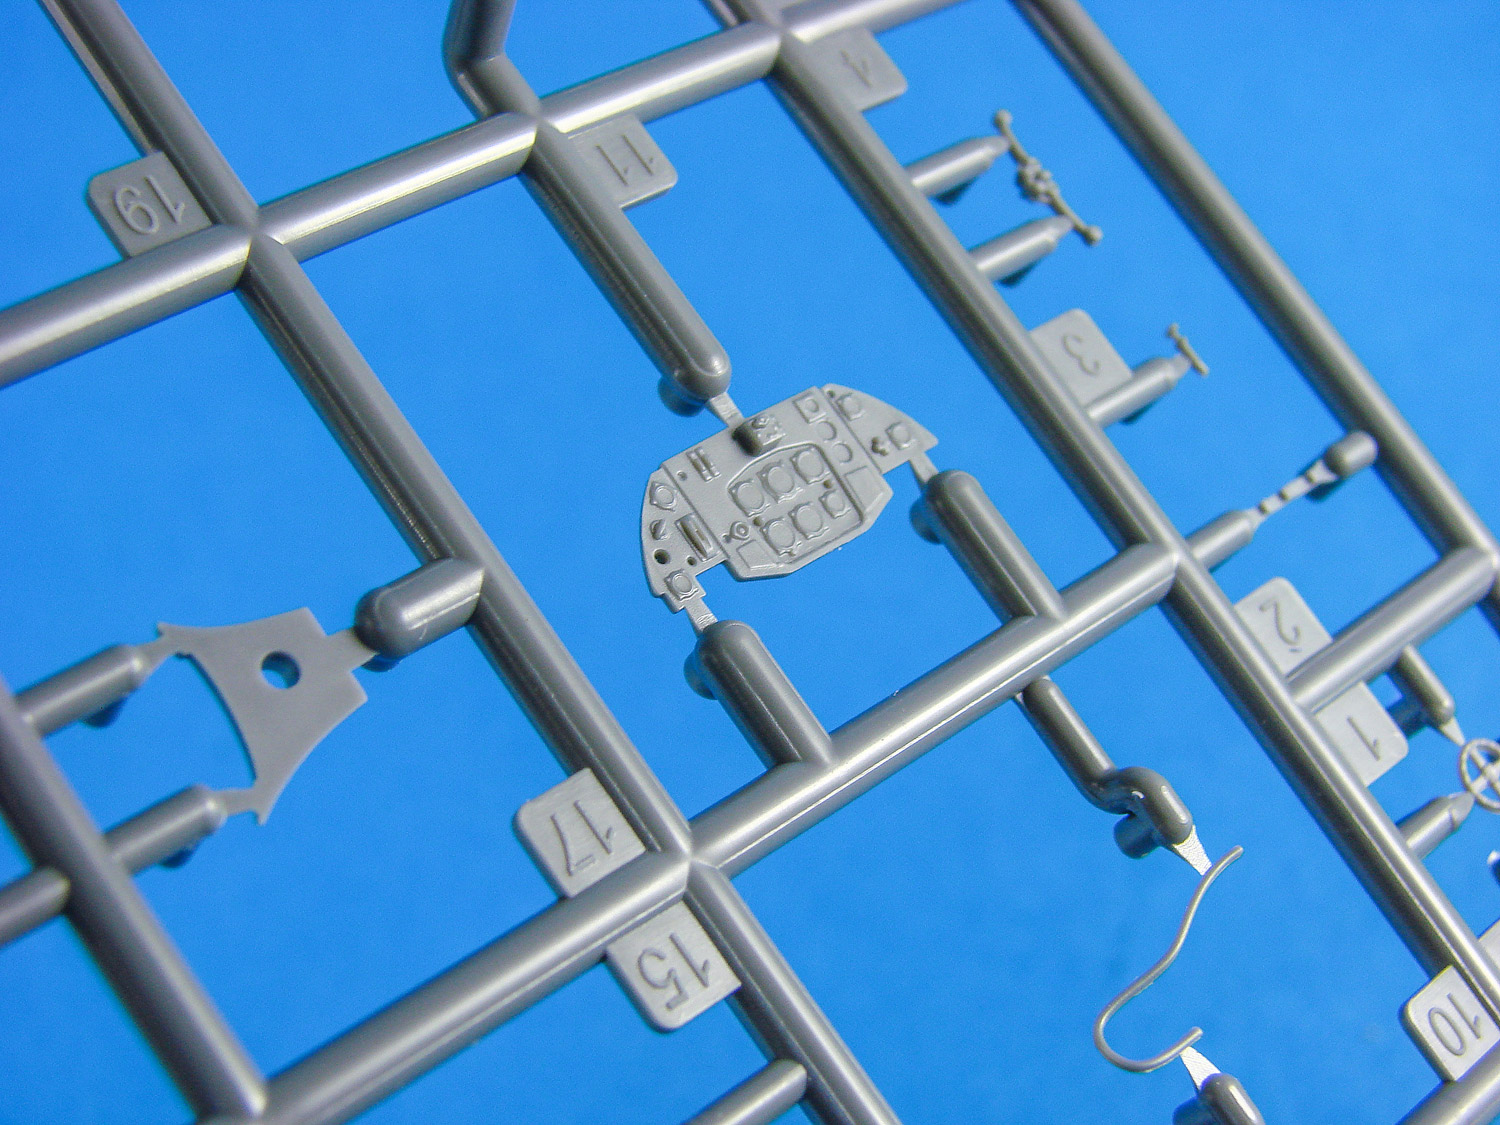
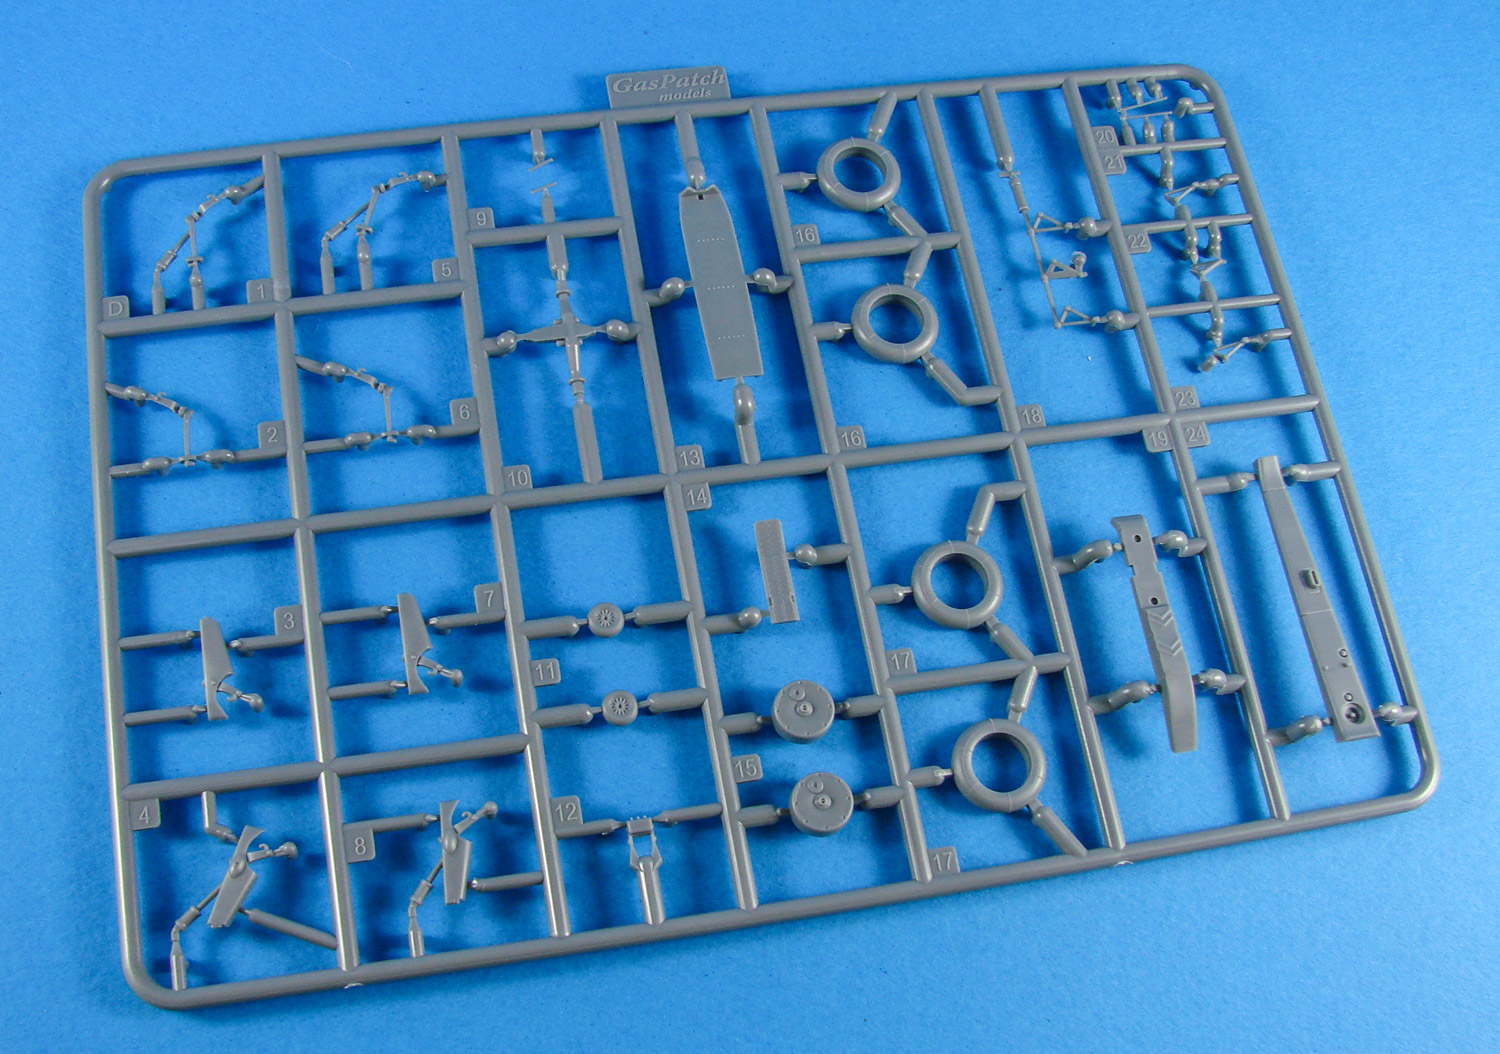
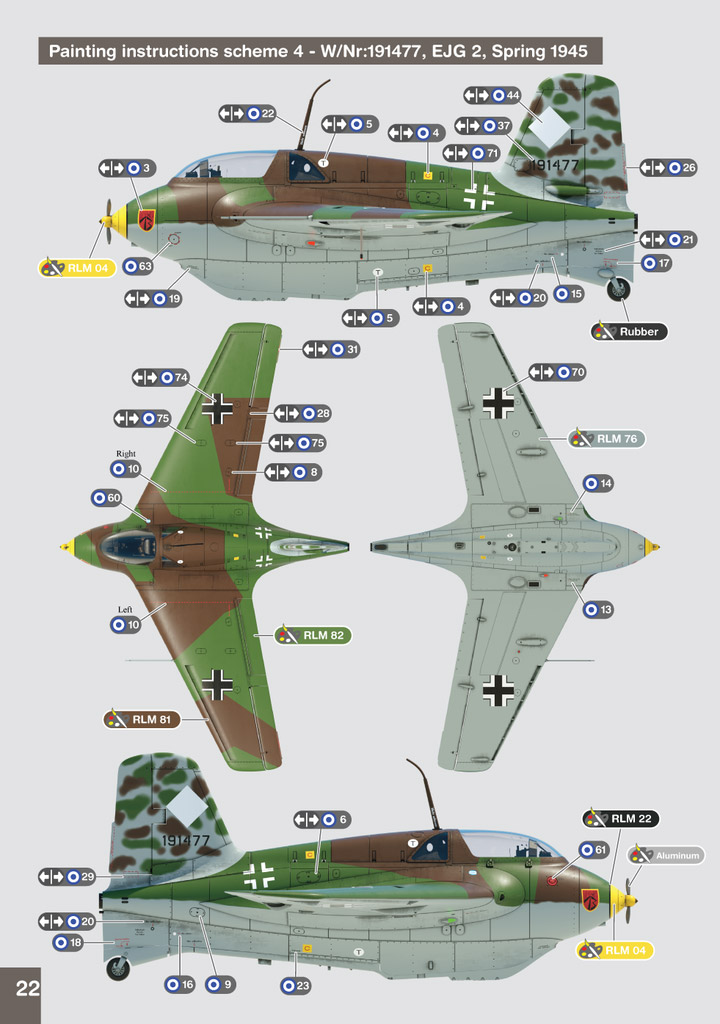
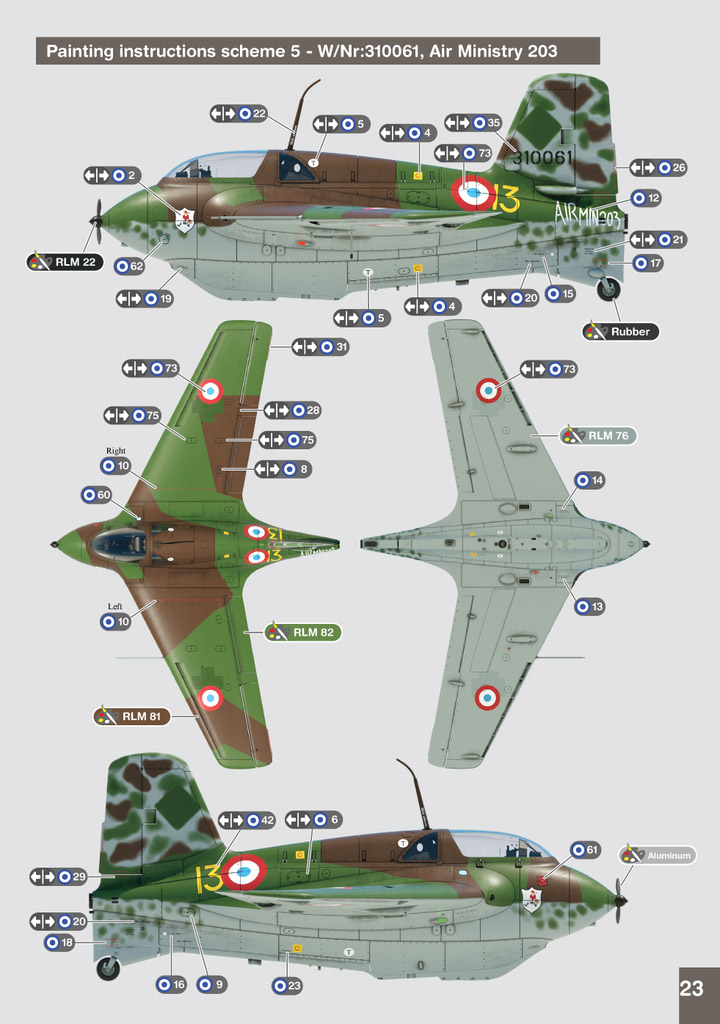
1:48 Me 163B Komet Gaspatch Models Catalogue # 20-48236 Available from Gaspatch Models for €36,00 The Messerschmitt Me 163 Komet was a German interceptor aircraft designed for point-defence that is the only rocket-powered fighter aircraft ever to have been operational and the first piloted aircraft of any type to exceed 621 mph in level flight. Designed by Alexander Lippisch, its performance and aspects of its design were unprecedented. German test pilot Heini Dittmar in early July 1944 reached 700 mph, an unofficial flight airspeed record that was unmatched by turbojet-powered aircraft for almost a decade. Over 300 Komets were built, but the aircraft proved lacklustre in its dedicated role as an interceptor and destroyed between 9 and 18 Allied aircraft against 10 losses. Aside from combat losses, many pilots were killed during testing and training, at least in part due to the highly volatile and corrosive nature of the rocket propellant used in later models of the aircraft. This includes one pilot by the name of Oberleutnant Josef Pohs, who was dissolved by the rocket fuel following an incident that resulted in a ruptured fuel line. It has been claimed that at least 29 Komets were shipped out of Germany after the war and that of those at least 10 have been known to survive the war to be put on display in museums around the world. Most of the 10 surviving Me 163s were part of JG 400, and were captured by the British at Husum, the squadron's base at the time of Germany's surrender in 1945. According to the RAF museum, 48 aircraft were captured intact and 24 were shipped to the United Kingdom for evaluation, although only one, VF241, was test flown (unpowered). Adapted from Wikipedia The kit Well, I certainly wasn’t expecting a rocket-powered interceptor to be on Gaspatch’s release schedule but seeing as it’s been over 30yrs since the last 1:48 Komet graced shop shelves with the Dragon/Trimaster (and oft-released by other companies since), I certainly won’t complain. A few years ago, I built the 1:32 Meng kit and found it fiddly, ill-fitting and not a wonderful experience to build. Gaspatch already have a reputation for wonderfully designed kits, so a Komet was an exciting prospect. The kit itself comes in a box which I would say was perhaps a little too big for such a diminutive aircraft, but one which suited their previous kit releases. A nice, simple Komet artwork adorns the box lid, with the SIX schemes available shown along the box edges. With the tabbed lid opened up, the kit’s FOUR grey styrene sprues and ONE clear sprue are seen, packaged into a single, re-sealable sleeve (with the clear sprue in another smaller sleeve to protect it). Gaspatch are known for their 3D-printed guns, so they’ve used their technology to create some 3D-prrinted resin parts for this release too, namely a couple of assembly jigs and a bracket (plus spare) that sits in front of the armoured inner windscreen. Masks are also supplied, as well as two decal sheets, a PE fret, and a colour-printed, 24-page instruction manual. Work begins in the cockpit, and it’s clear from the outset that Gaspatch have seen how fiddly the Meng kit was and decided to better it. The rear cockpit bulkhead is moulded in clear plastic. This is so you can use the supplied masks on the quarterlight windows and then simply paint the rest in RLM66…no glue anywhere near those small window areas! The cockpit itself is a multimedia affair of both styrene and PE. PE is used for the pilot seat rails which must first fit to the clear bulkhead, and with the two-part seat installed, PE seatbelts are then added. With the main tub connected to the bulkhead, the two pipes from the console fuel tanks can be installed. Between the tub and bulkhead. These were omitted from the Meng kit. The console looks perfect too, and the securing straps are also nicely represented. Rudder pedals are separate to the bar, and straps are supplied in PE. Cockpit sidewall detail really is exquisite, with a combination of plastic and PE parts, moulded with details that wouldn’t look amiss on a larger scale kit. The kit doesn’t come with a Walther rocket engine, but the spine of the model is represented by detail below those panels, including the ammunition saddle and feed, and filler cap. The quarterlight window ledges are also fitted to the interior spine unit which can be painted first before fitting the fuselage. The spine panels can be positioned either opened or closed. I admit I also prefer how Gaspatch has approached the landing skid assembly on this model. The details look far more refined than the larger Meng kit, with an option to pose the skid in both extended or retracted position. Parts detail really is excellent throughout, including the actuating mechanism. With the fuselage closed up, the Komet’s MK108 cannon can be fitted. Here’s where the 3D printed jigs are used. These are sat around each gun, holding it in the correct position on the exposed wing root, until the glue is set. Electrical firing boxes and ammunition belts then connect up to the cannon on what is already a beautifully detailed internal wing root area. Lots of lessons seemingly learned from the fussiness of the recent, larger scale kit of this aircraft. PE control surface linkages are also included, which are of course seen when the gun bay panels are open. The fuselage is moulded with separate nose cone and rudder, and the rudder has a very subtle fabric finish. Amazing that an aircraft like this even used fabric to cover control surfaces! Wing construction is quite traditional with both being separate and consisting of upper and lower panels. These trap the control surfaces in place when glued together. On the underside, the air brake panels are supplied as PE parts. For the undercarriage, a choice of faired and un-faired tail wheel is supplied, and of course, the main gear dolly is present. Both weighted and unweighted tyres are supplied, with separate hubs. The clear sprue is quite small but the canopy is nicely thin and everything has excellent clarity, including that armoured windscreen. Overall, the finish of the parts is of the highest quality, with nice surface textures where appropriate, including ports, panel lines etc. PE is also extremely high quality with good detail and narrow connection gates. Decals One main sheet of decals is included, and a smaller one which just contains the swastikas as halves. All decals are printed by Cartograf, and are nice and thin, with good, solid colour and minimal carrier film. Everything is in perfect register too. Instrument and stencil decals are also included. The SIX schemes are: Me 163B, W/Nr:191916, JG400, Brandis, April 1945 Me 163B, W/Nr:191659, JG400, 1945 Me 163B, White 14, JG400, Brandis, February 1945 Me 163B, W/Nr:191477, EJG2, Spring 1945 Me 163B, W/Nr:130061, Air Ministry 203 Me 163B, VF241, captured UK, post-war Instructions These are provided as a 24-page colour affair, with the first pages having a parts map and a colour guide. That guide is referenced throughout the build, so you’ll always have the part colour info at hand. Colour photos and illustrations also depict painting. The Komet itself is split over 14 constructional sequences in CAD/shaded style images, with PE etc. being easy to denote. The last pages show each scheme in full colour. Conclusion Simply a great little kit of a gorgeous little and ballsy combat aircraft. Quite small in 1:48, but with no less detail in than something you’d expect from a larger scale kit. The addition of the jigs for mounting the guns is a great idea, and the inclusion of masks for both the interior and exterior of the canopy is something I wish we’d see more of as standard. Now, I do know what Gaspatch are doing next, and it will be amazing, and this little model has really set the bar to a new level. Just a great kit! My sincere thanks to Gaspatch Models for the kit reviewed here. To buy directly, click the link at the top of this article.


-
- 3
-
-
- komet
- messerschmitt
- (and 1 more)
-
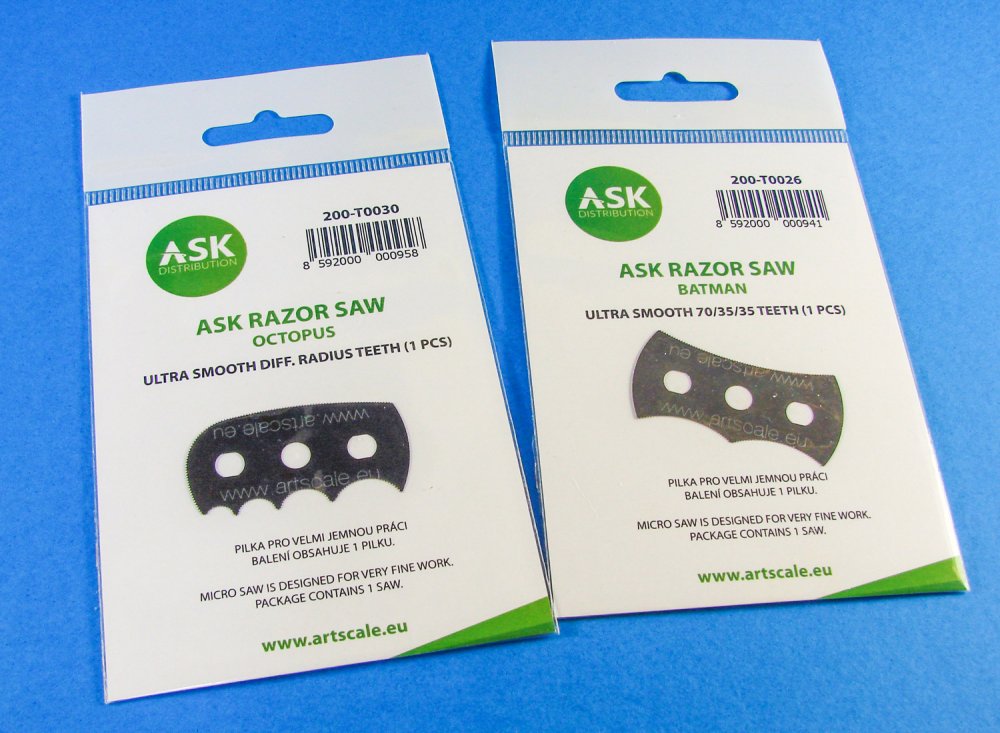
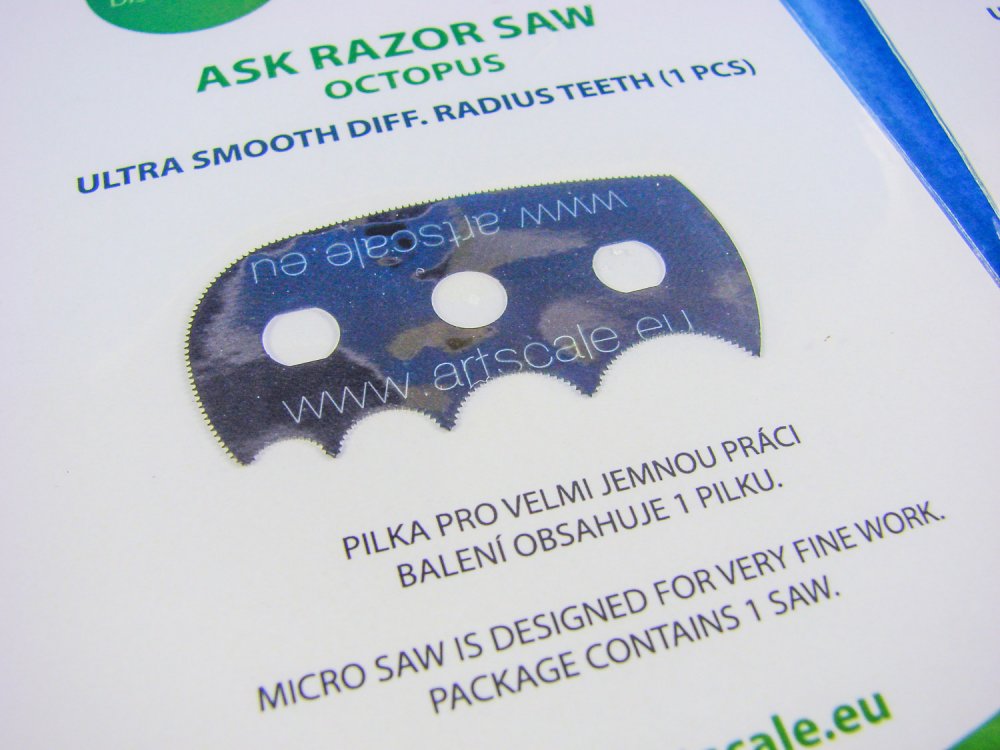
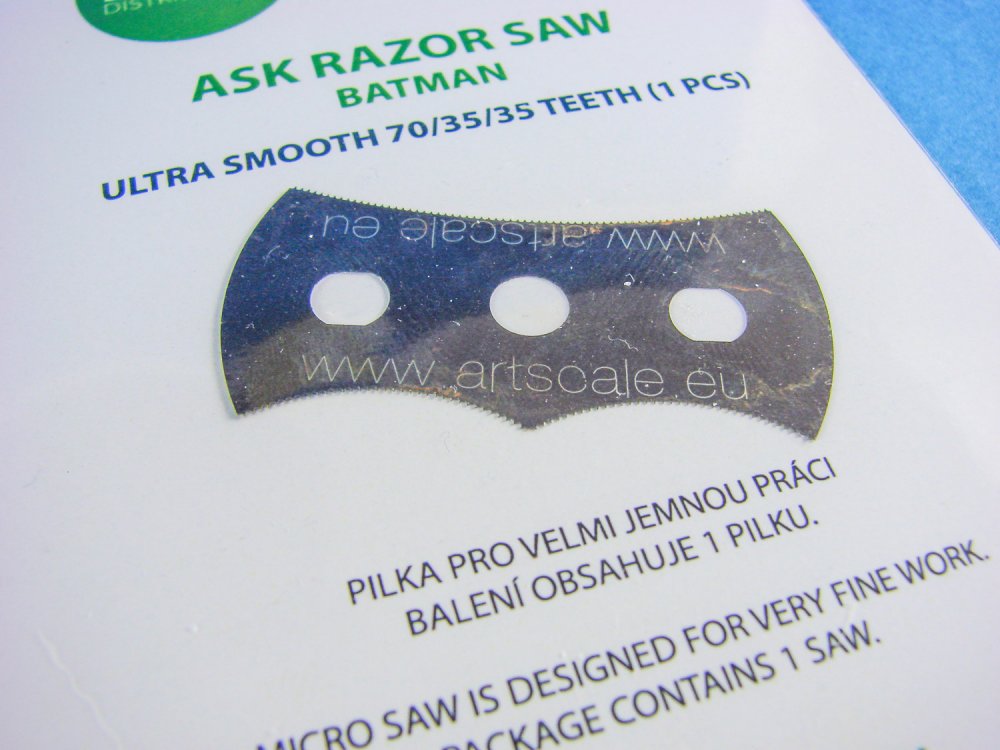
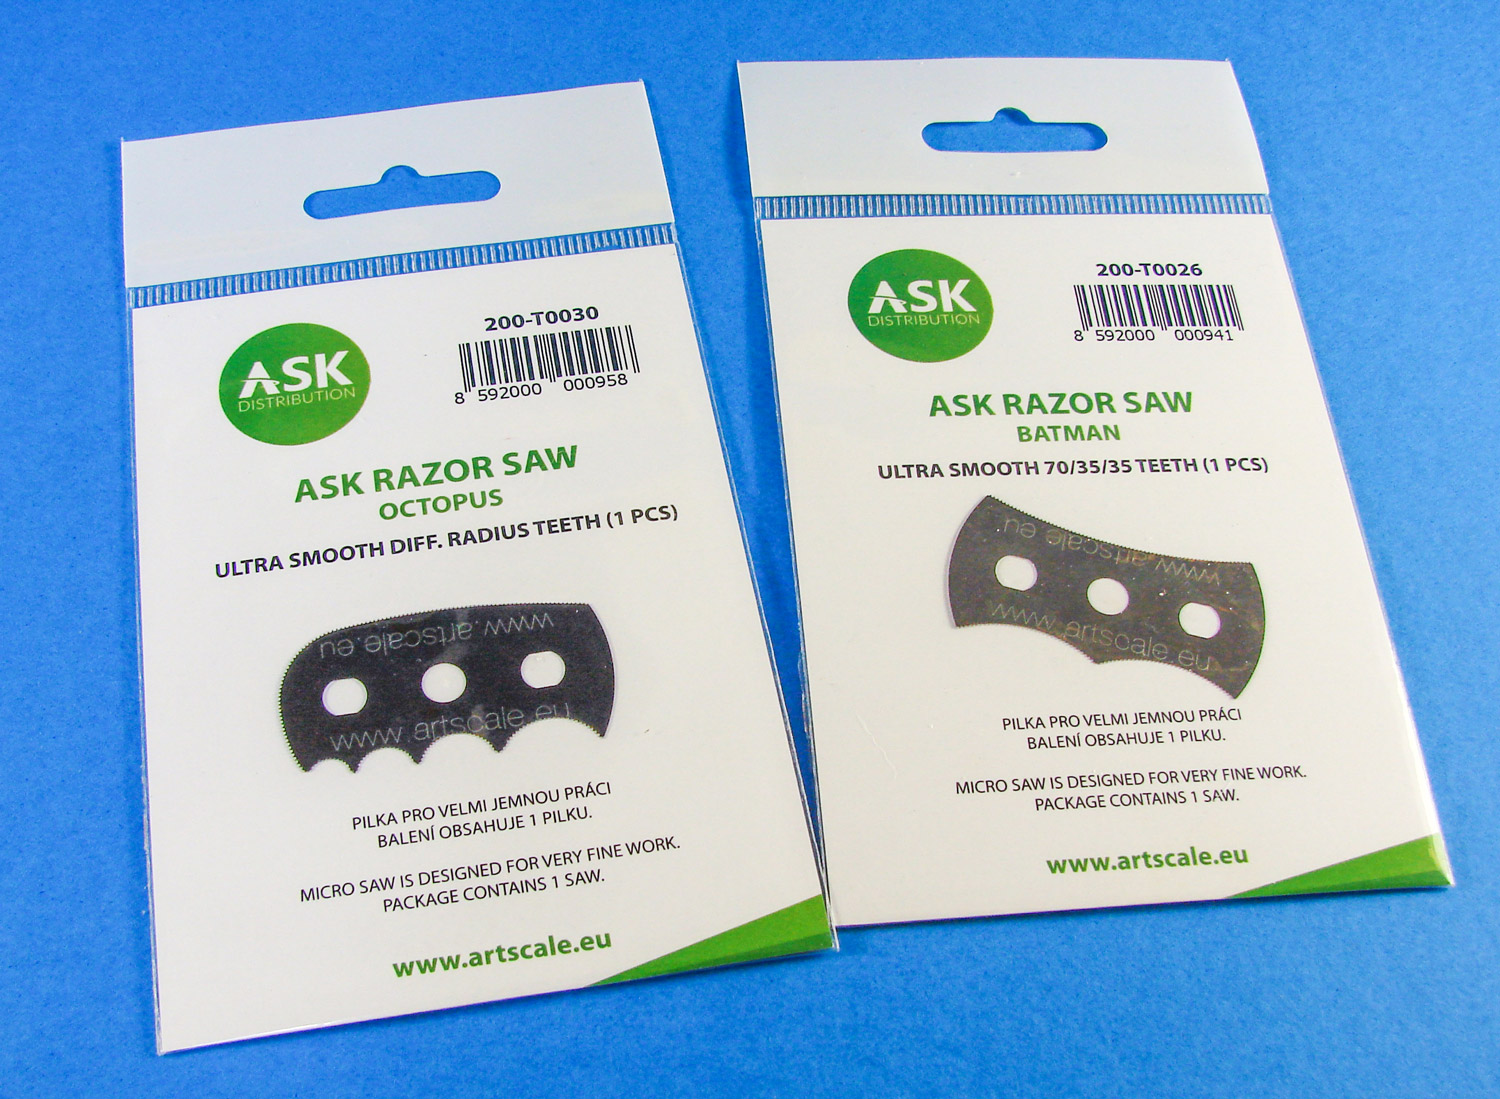
Artscale have now released some new blades for their razor saw, and these should prove very useful. Got to love the one called 'BATMAN'! These will be perfect for cutting around circular materials, or even adding panel lines too. The 'OCTOPUS' is perfect for swiping cuts with the shape of the longer edge, whilst the underside presents all sorts of possibilities. If you have the saw, then these are worth getting, and if you don't these are a perfect excuse to go shop one.
-
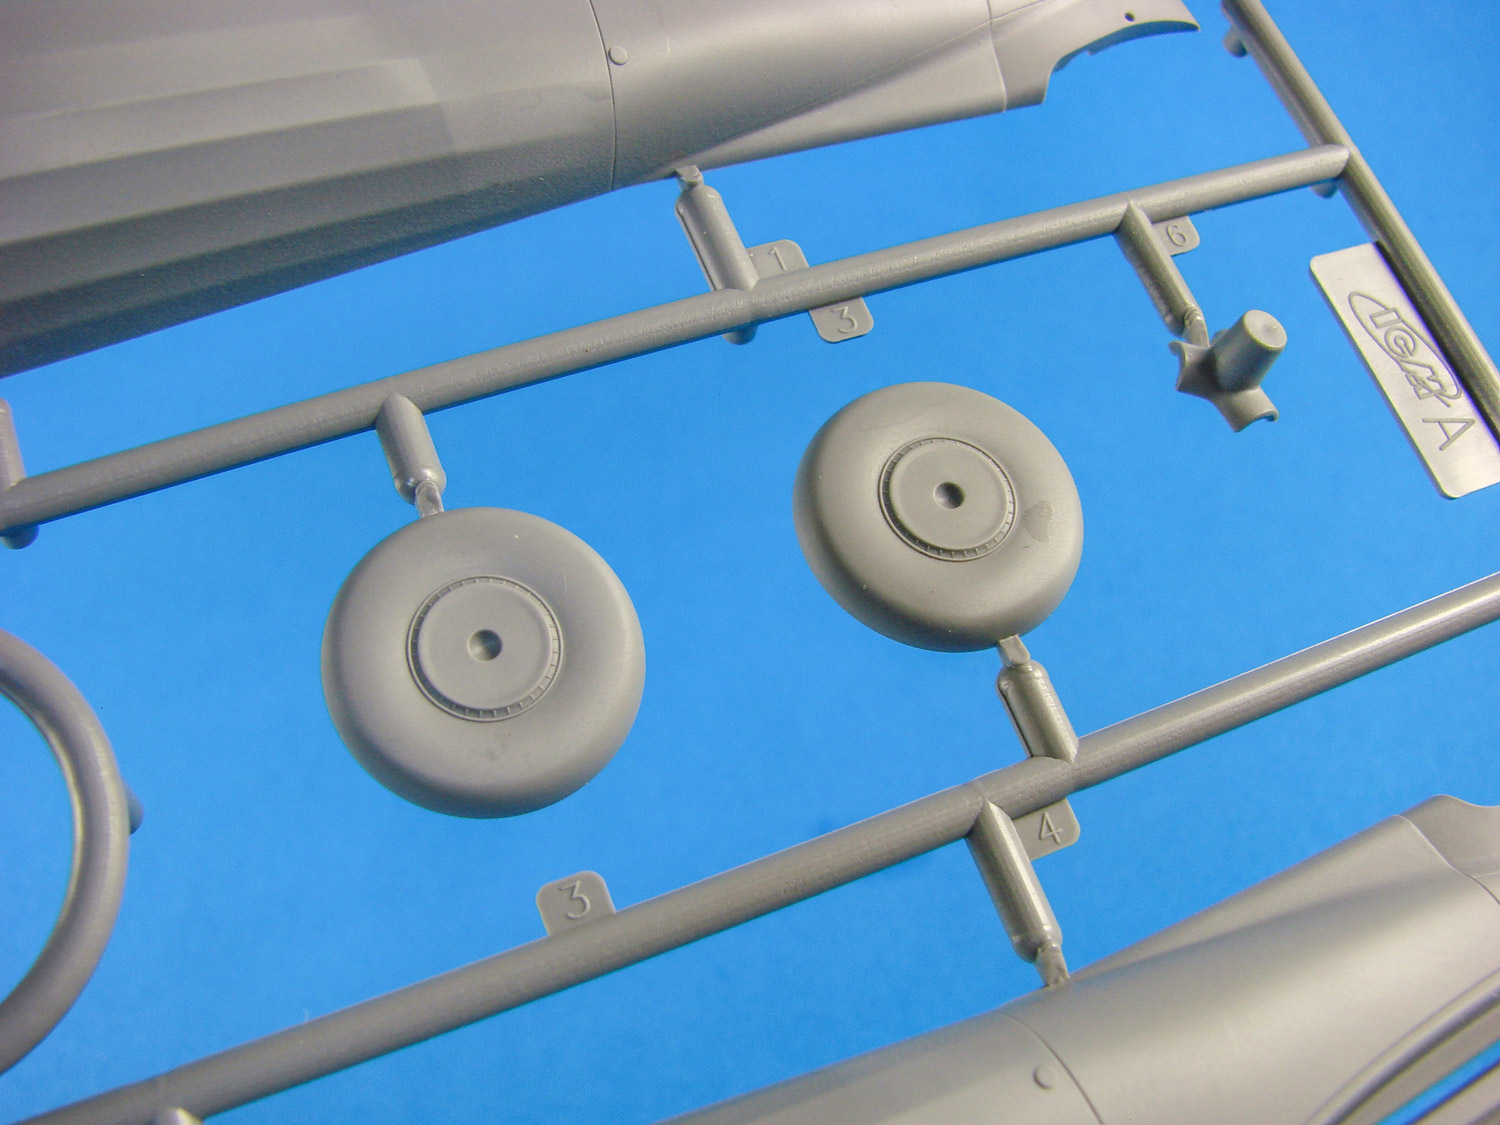
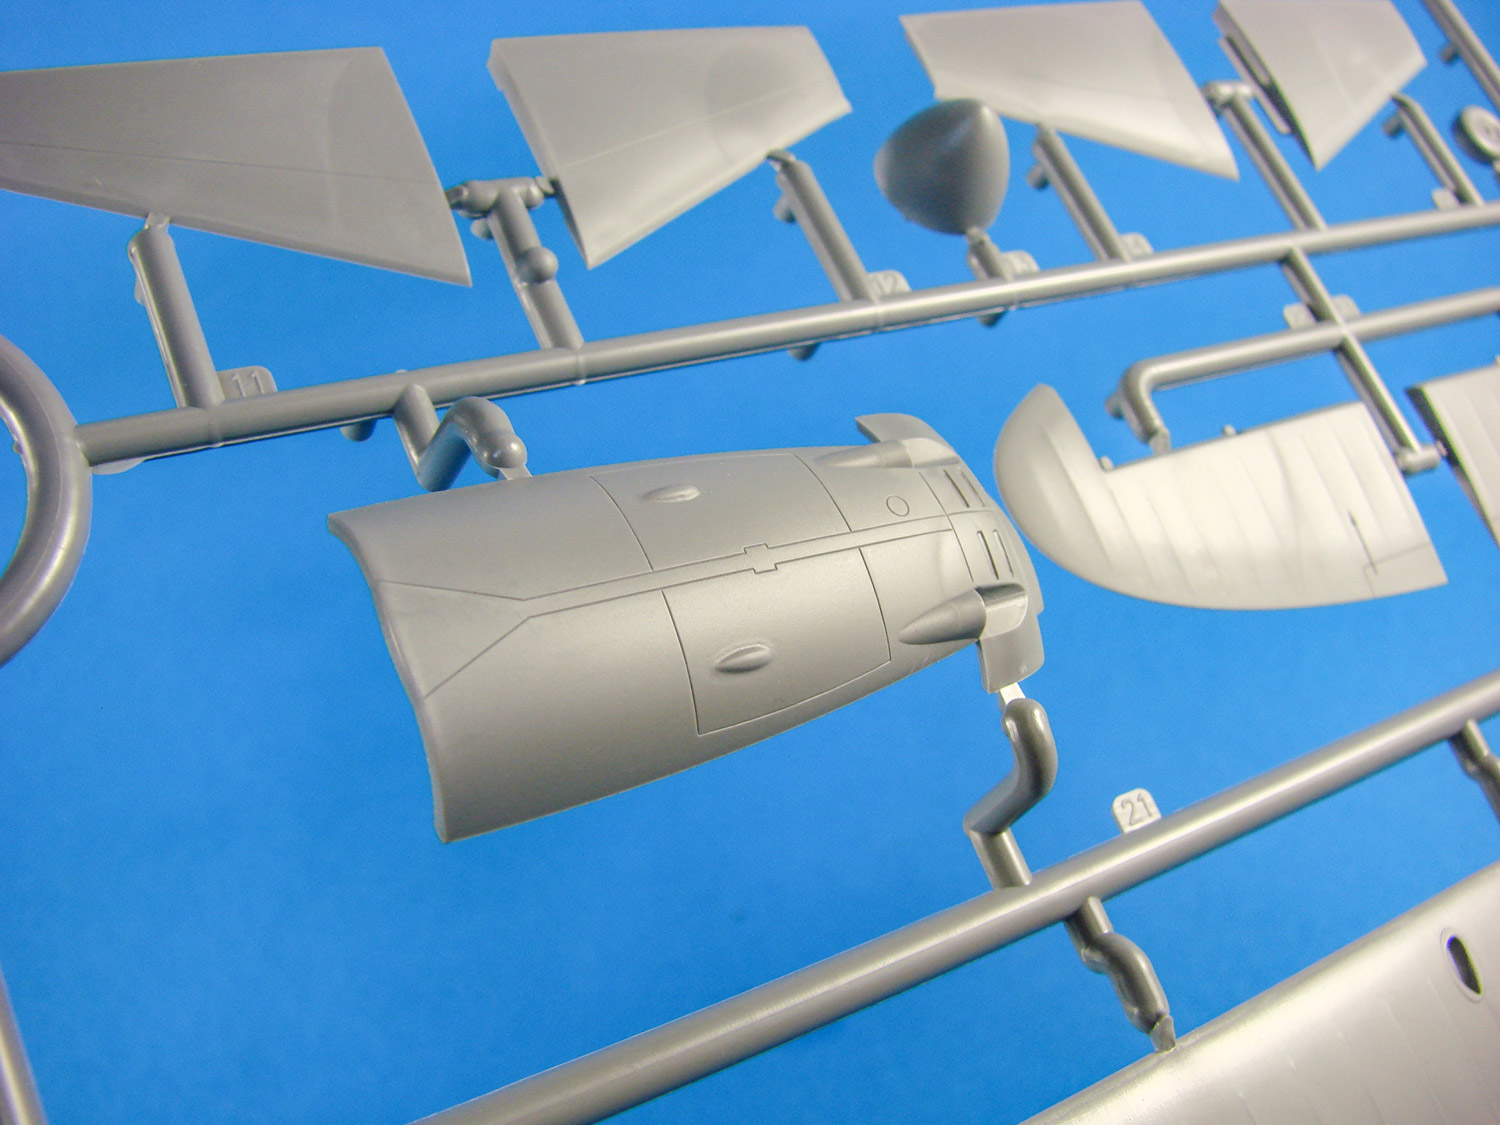
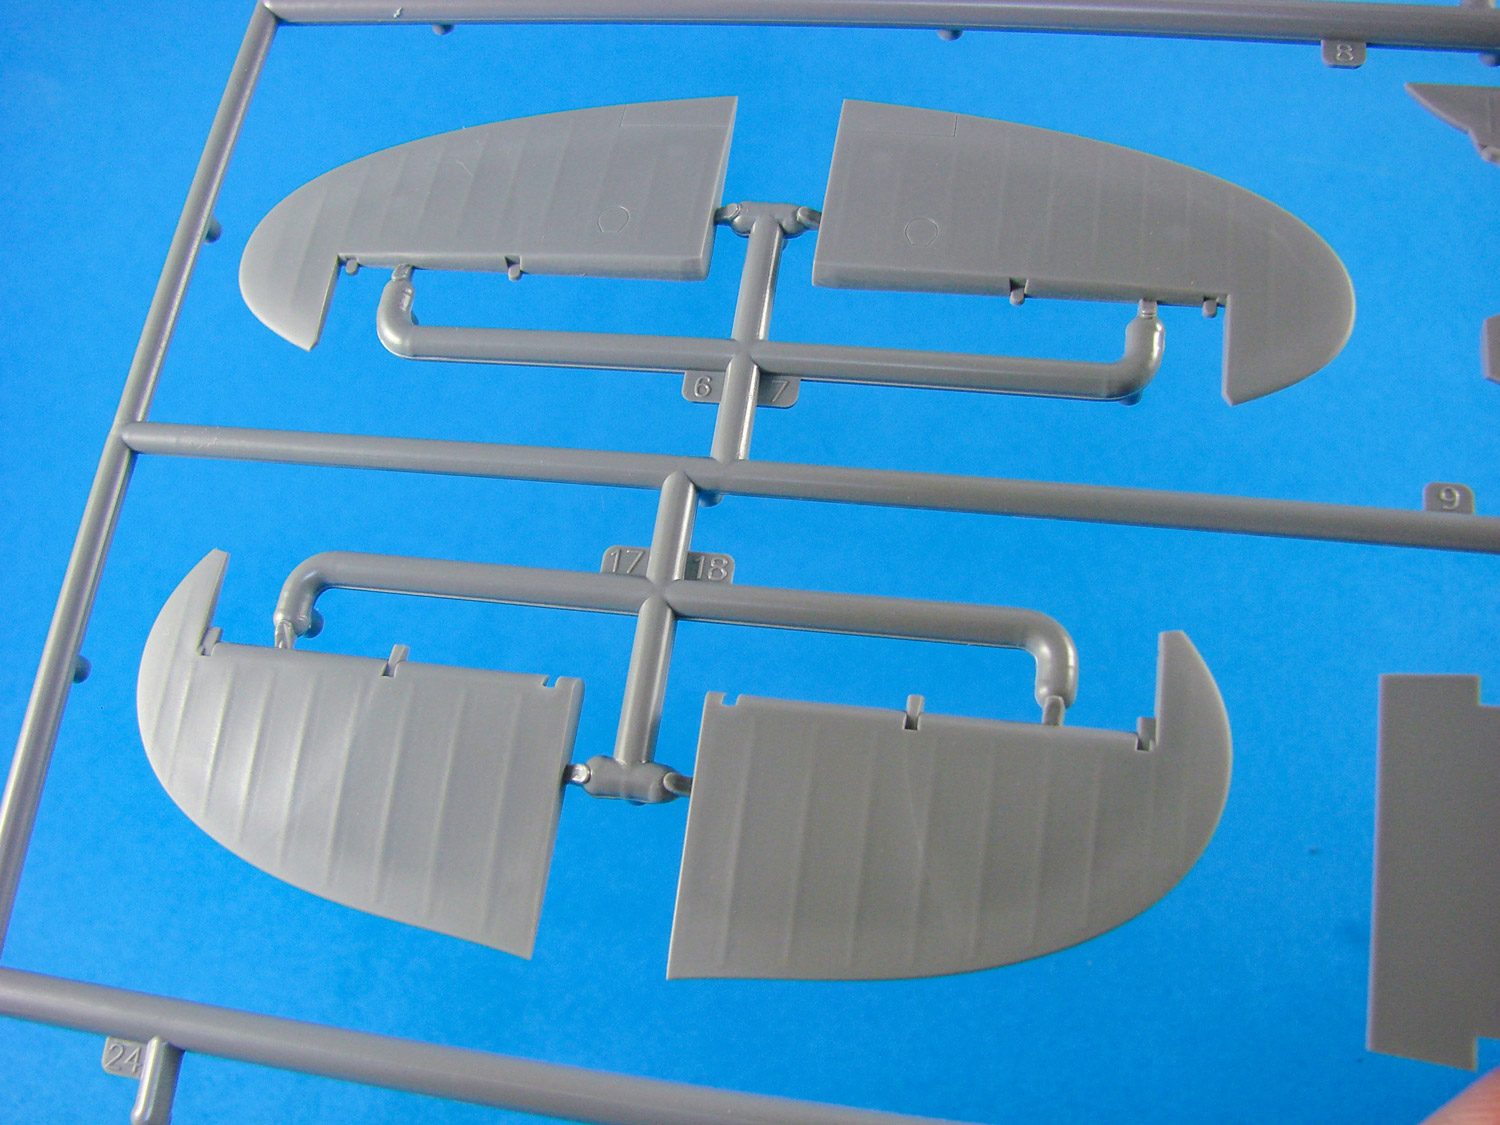
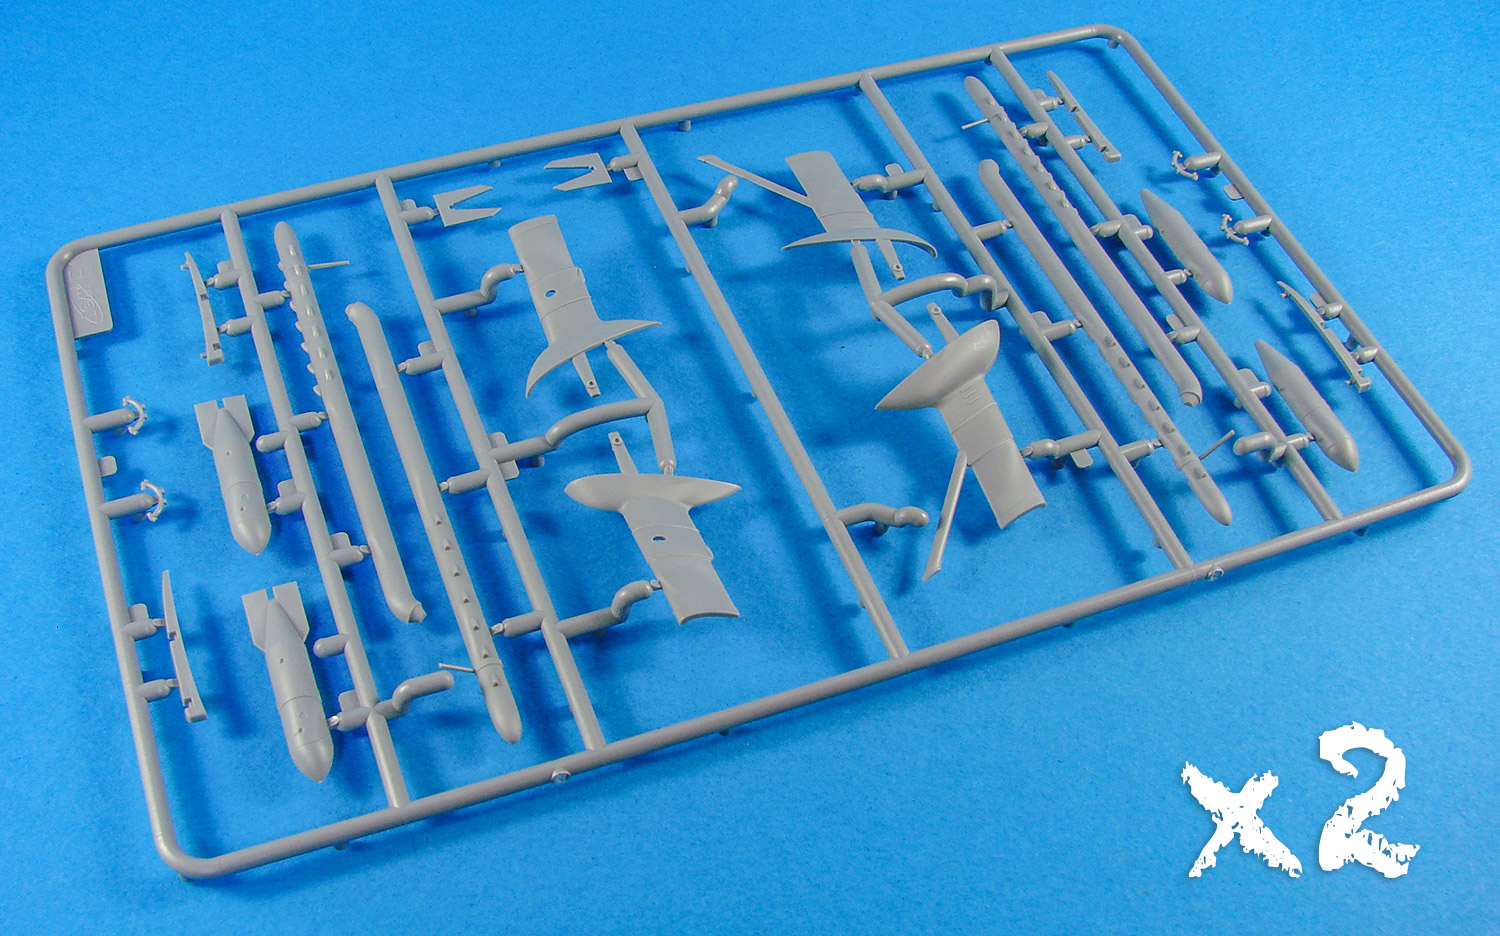
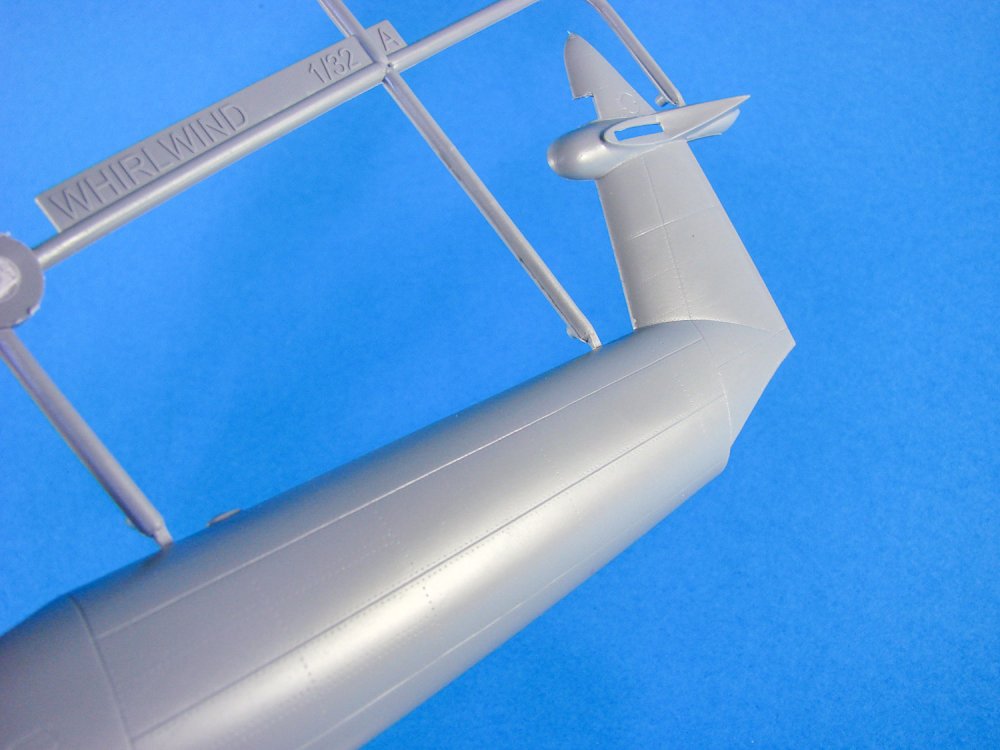
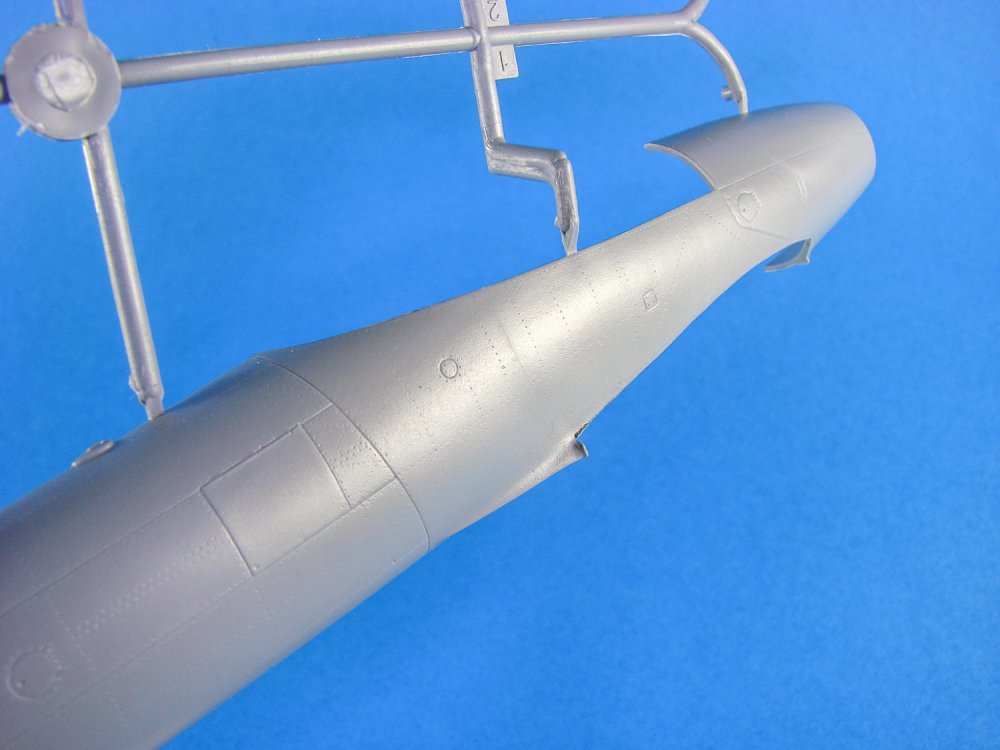
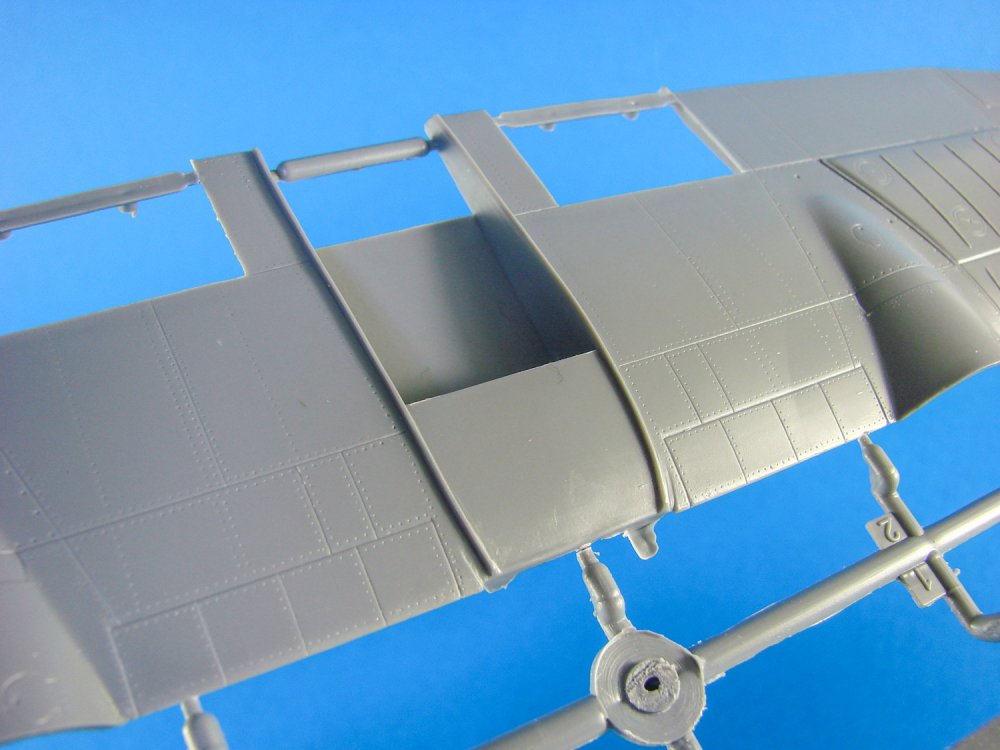
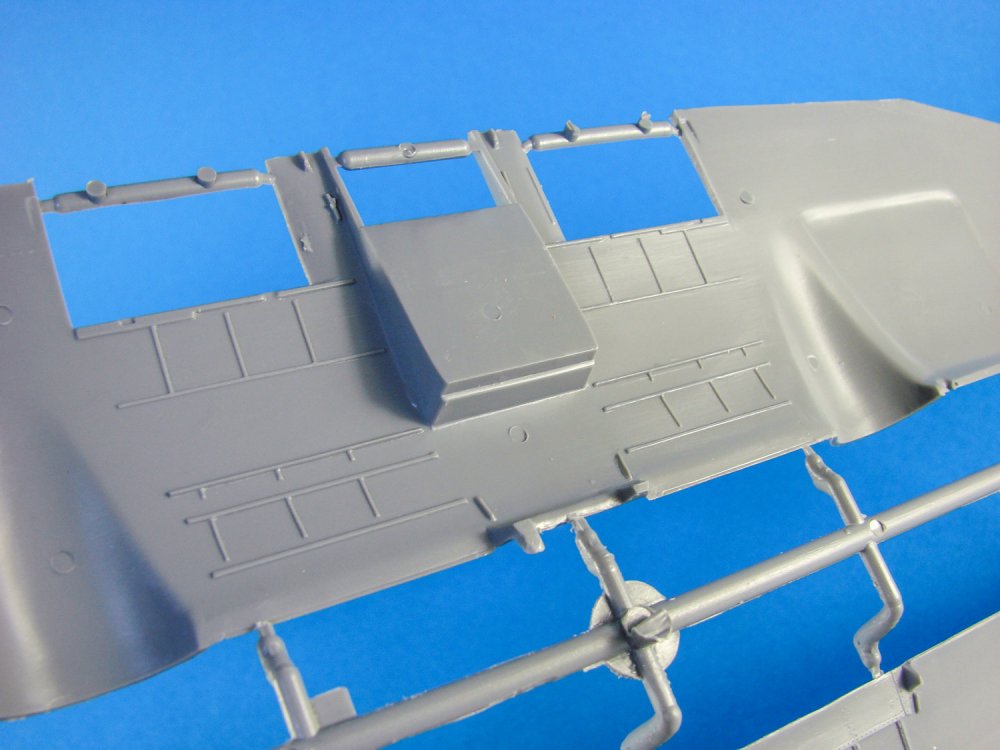
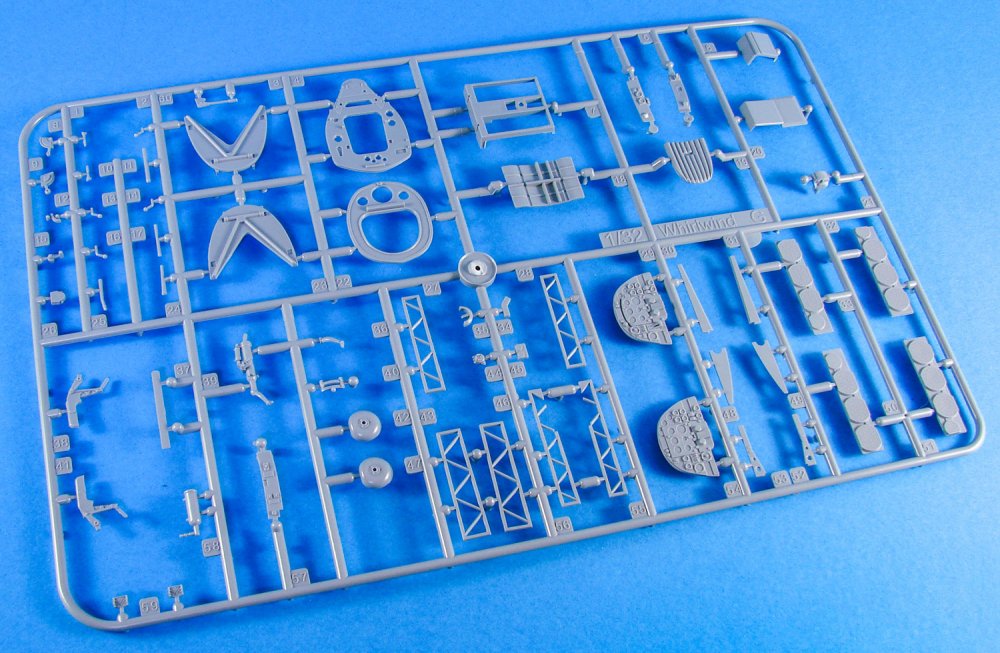
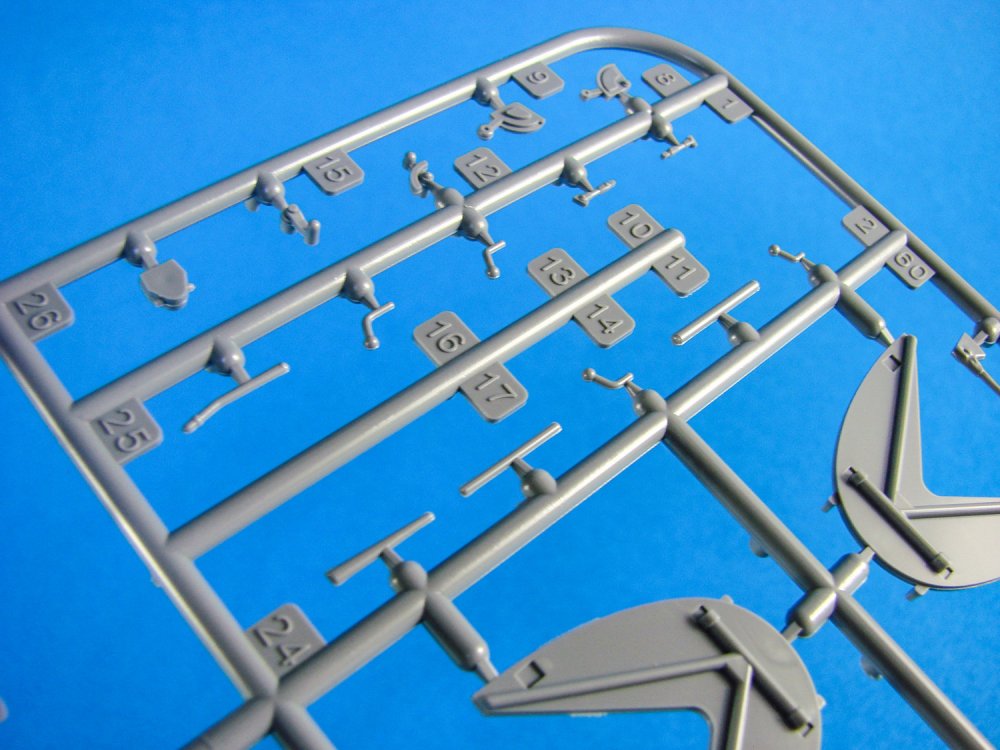
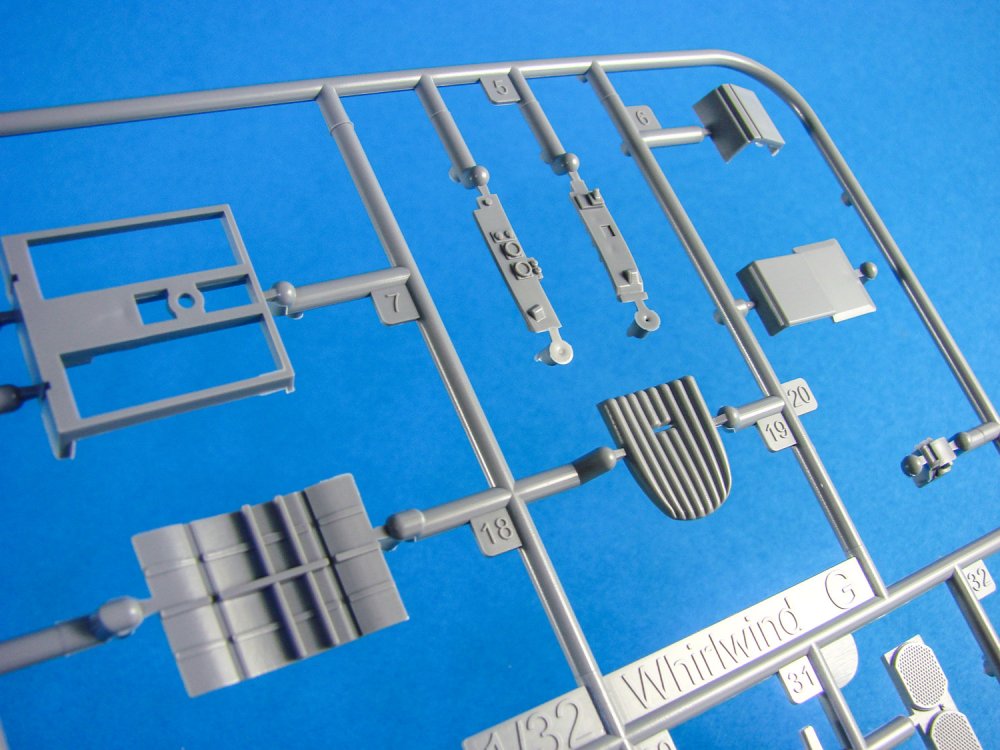
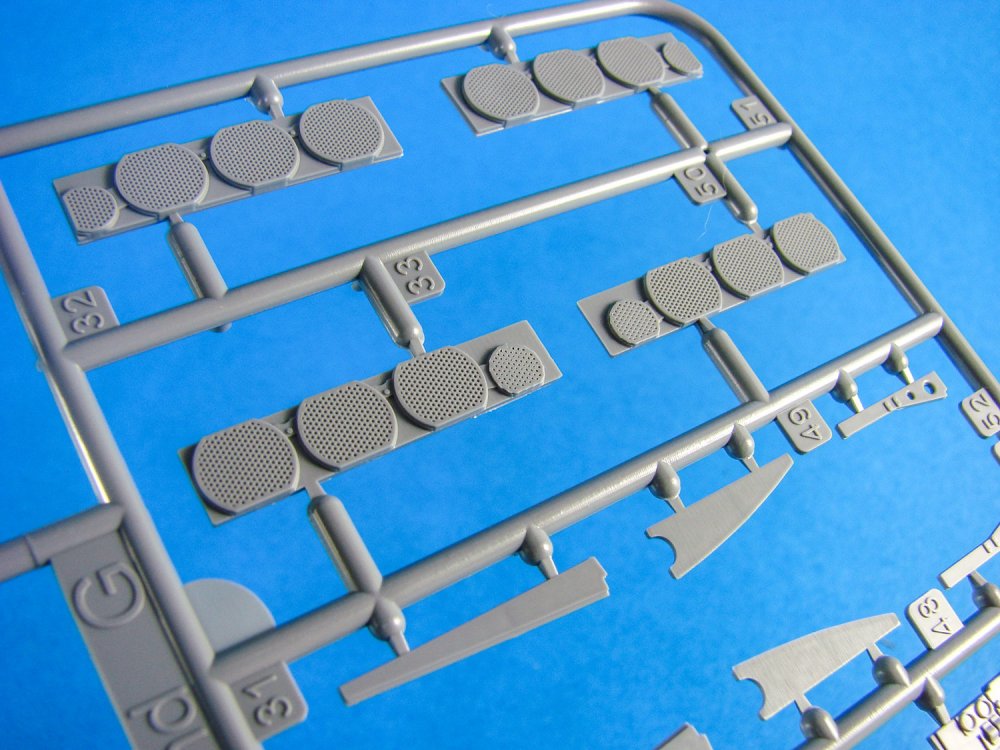
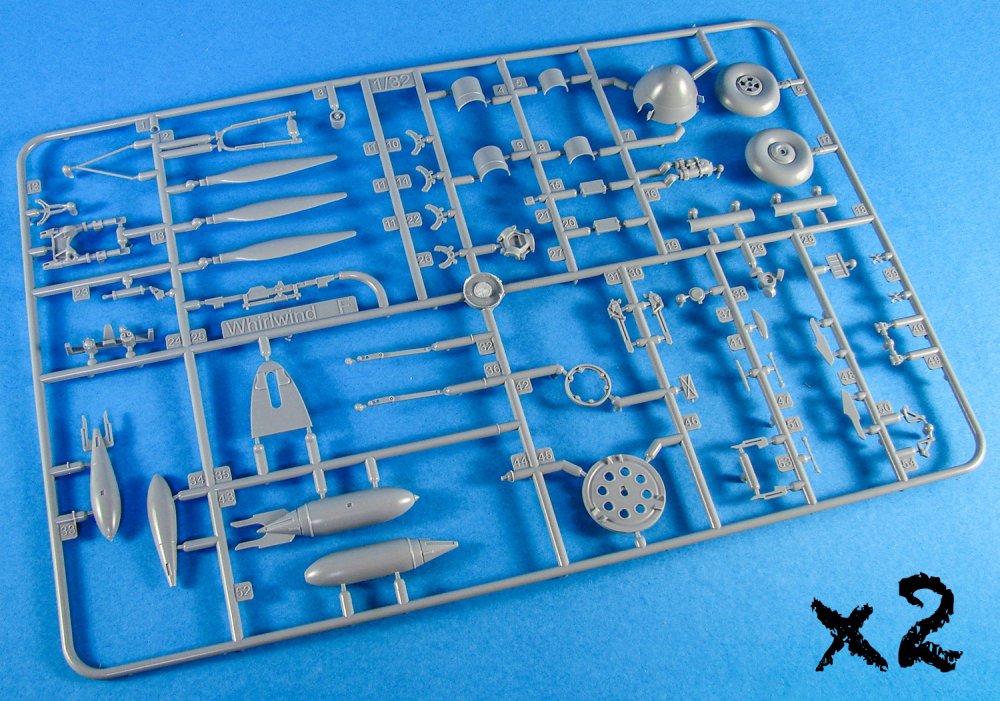
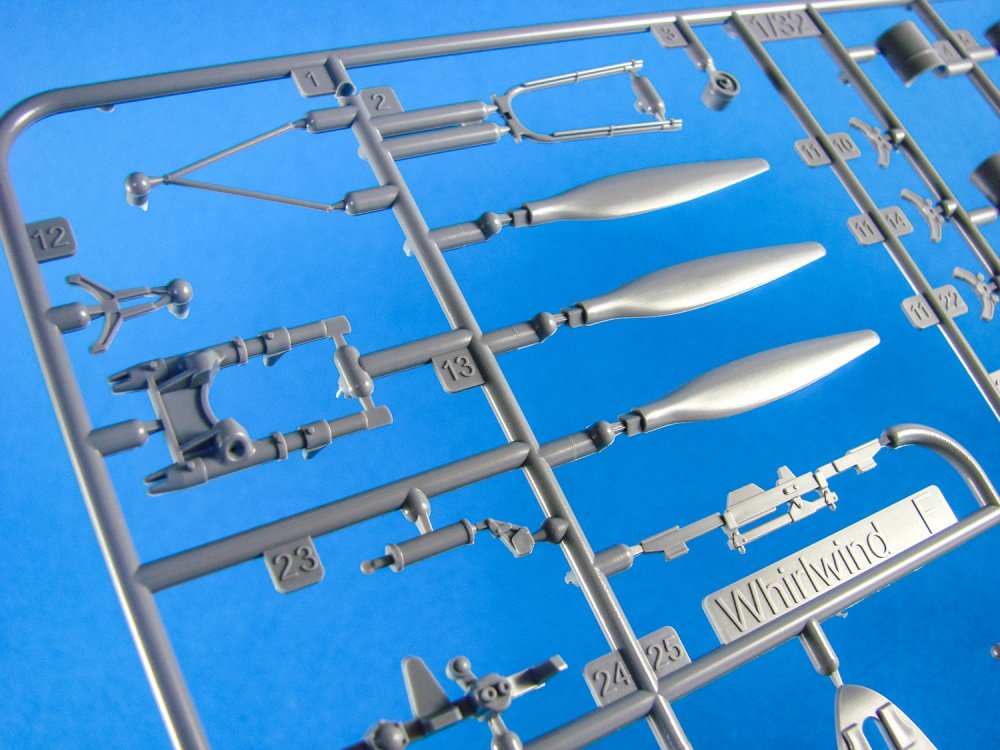
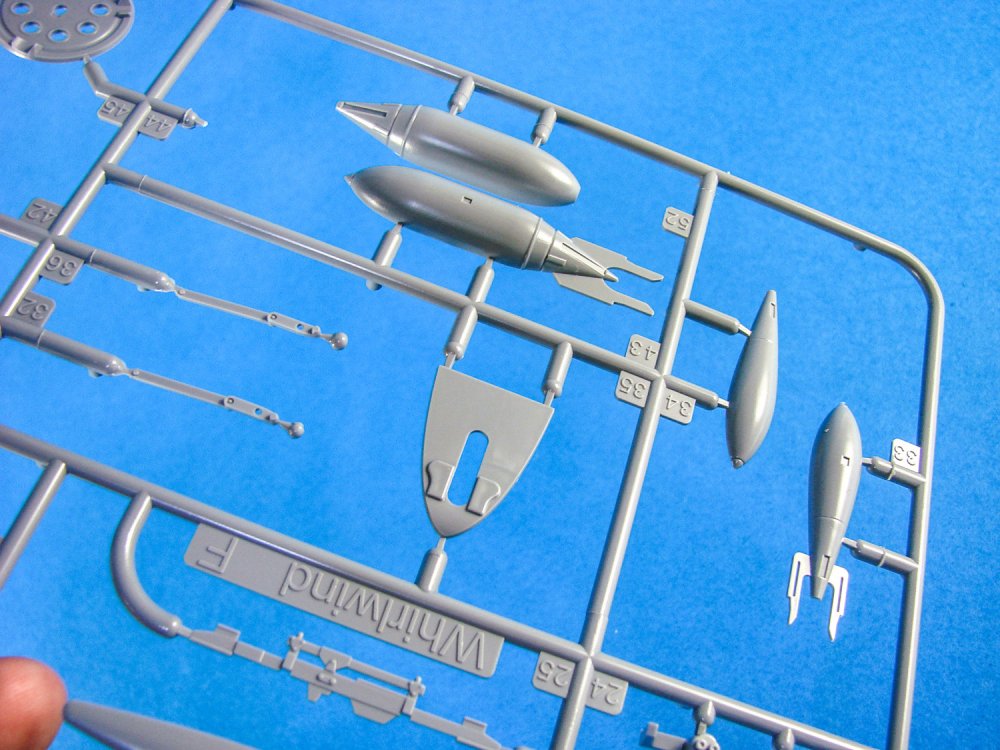
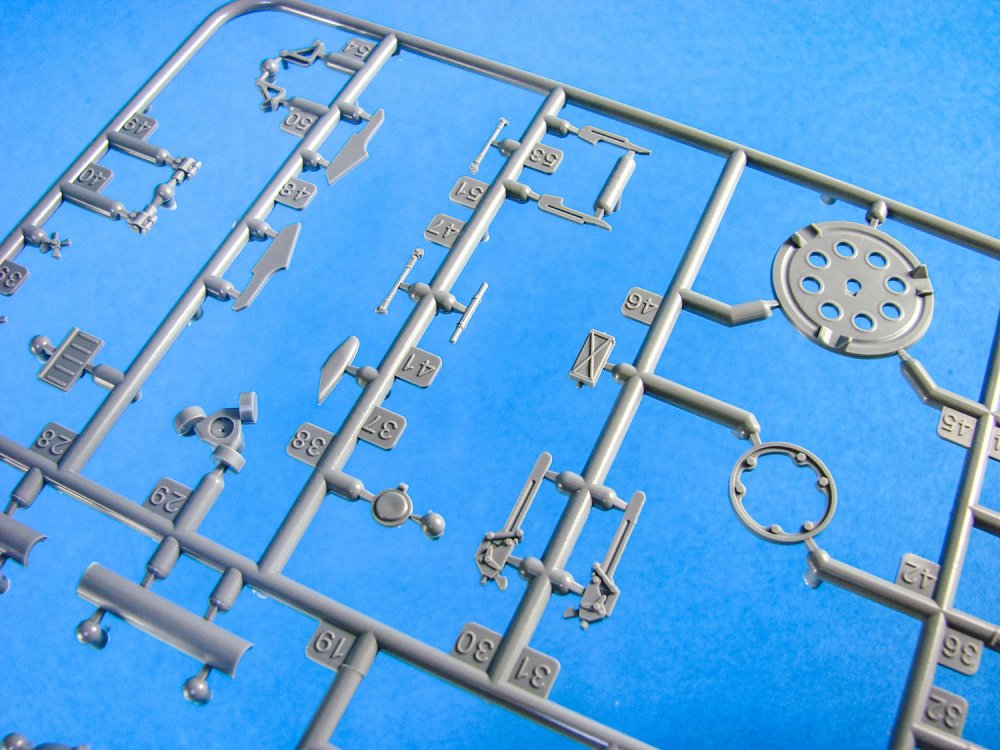
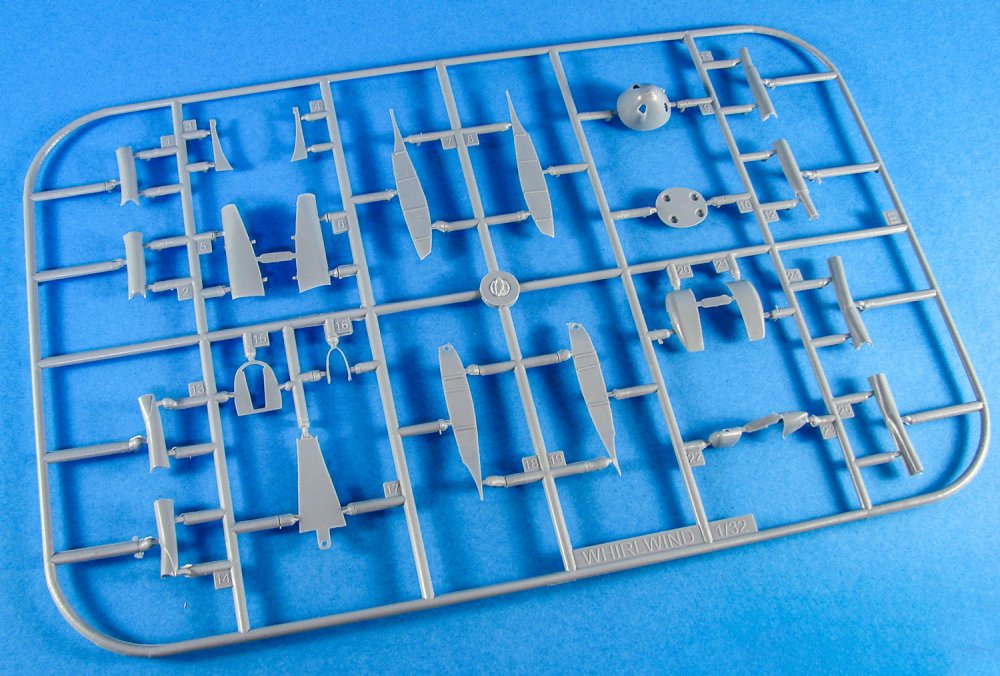
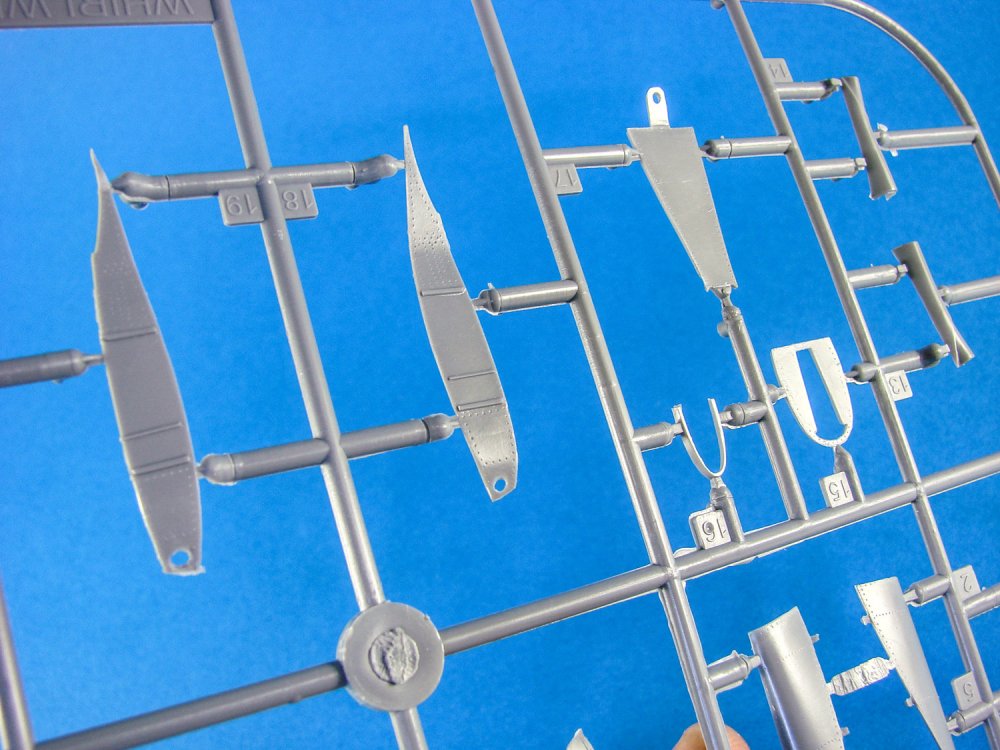
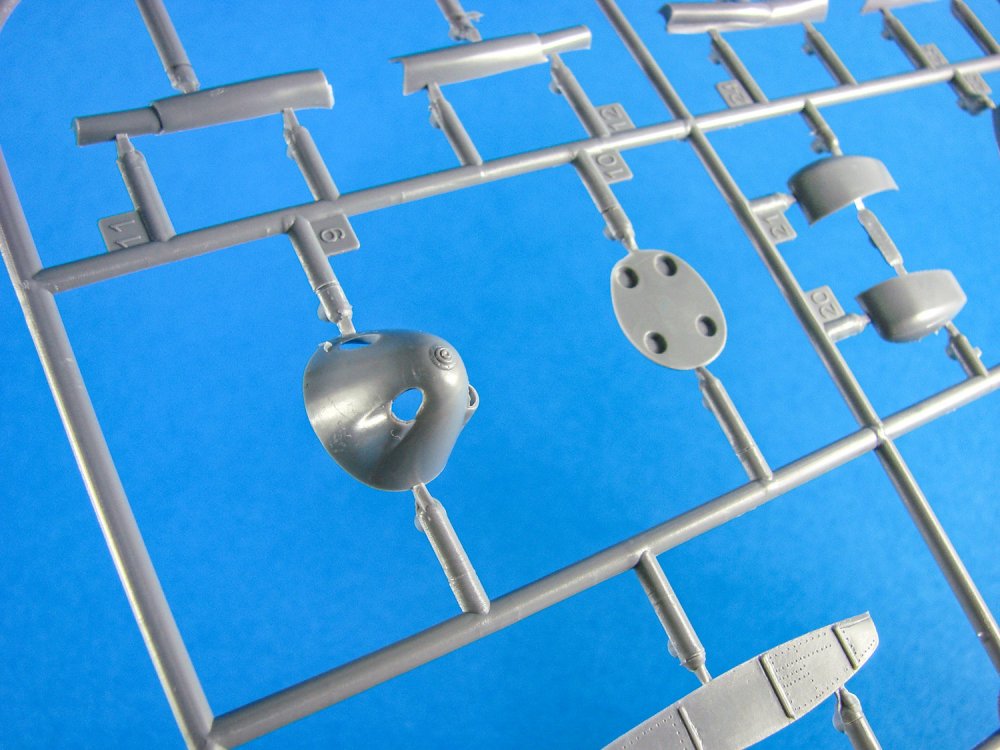
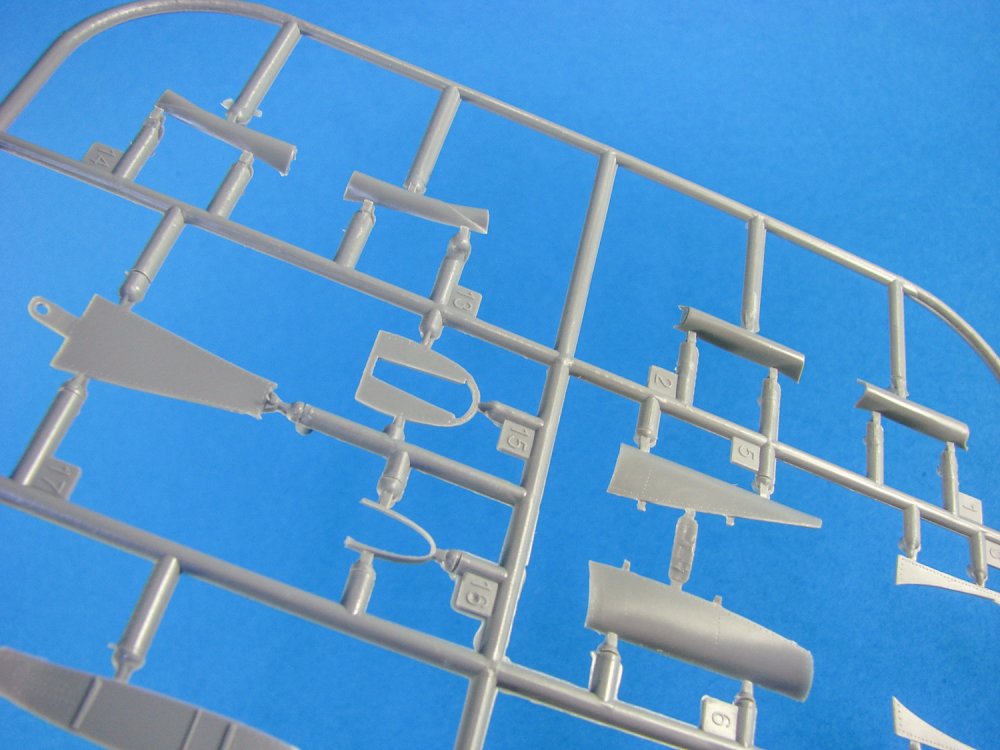
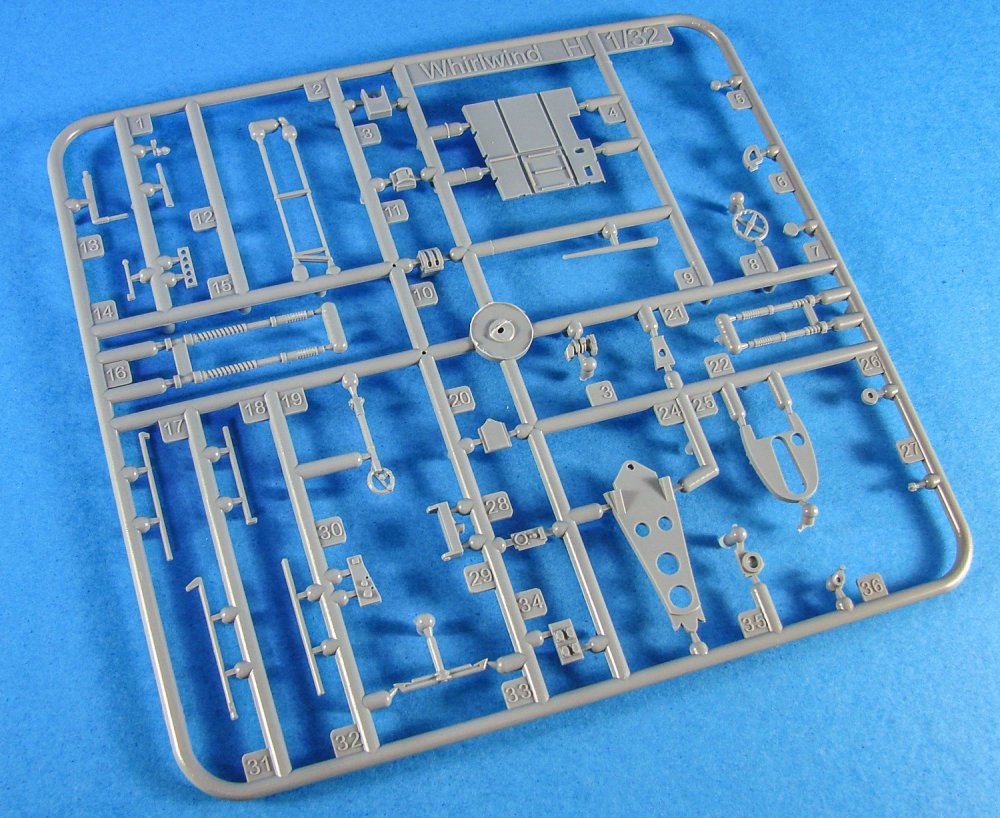
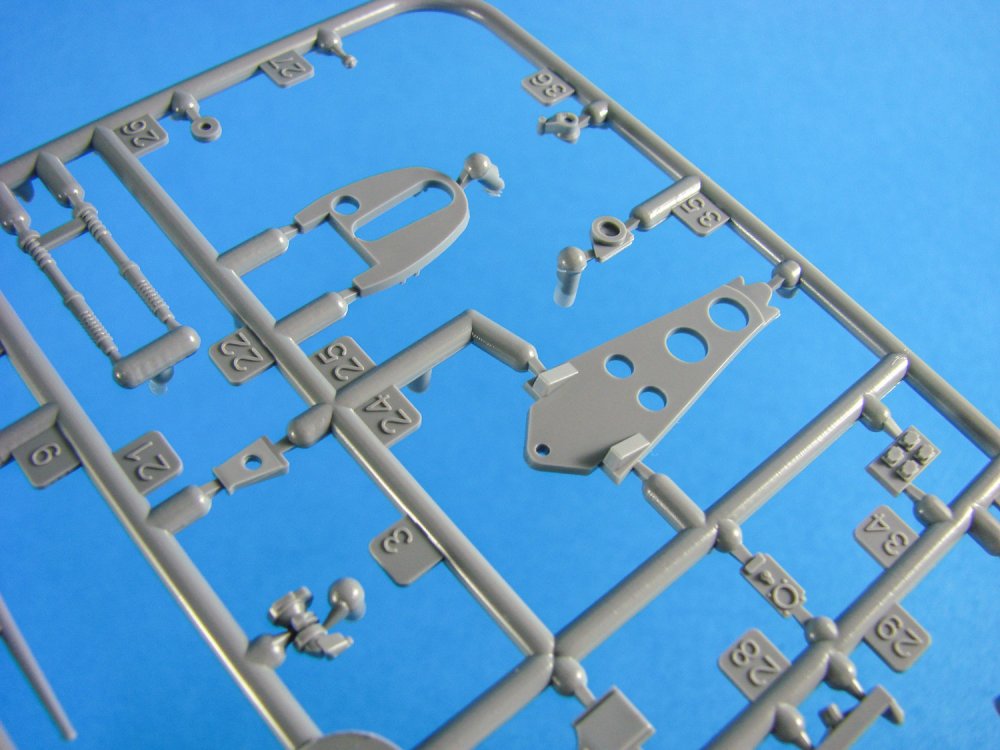
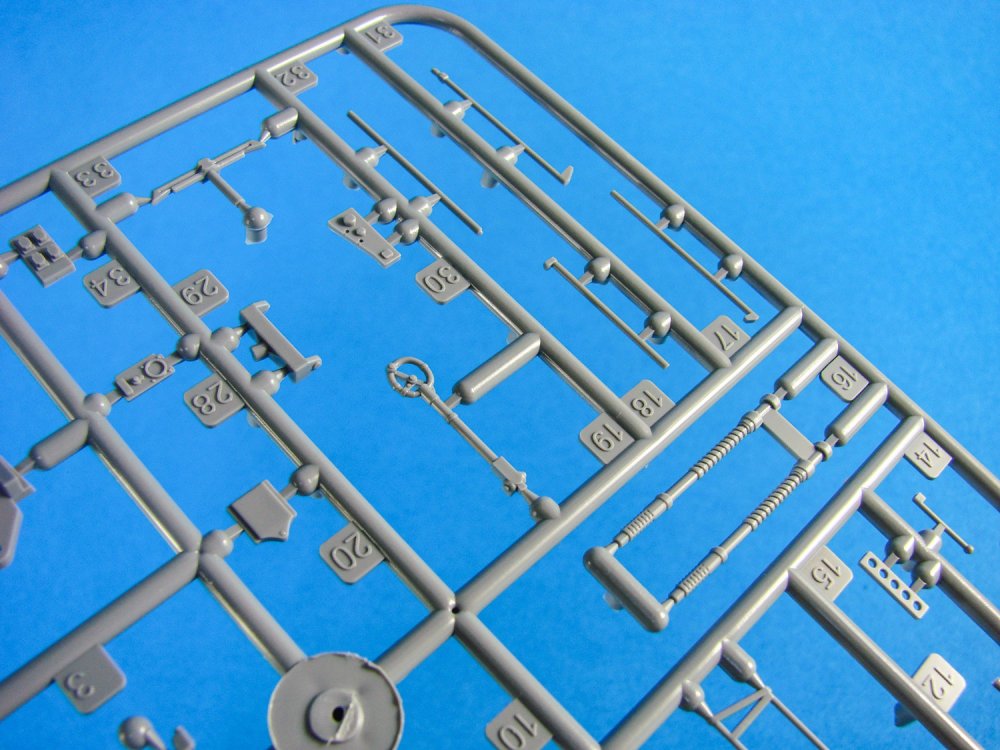
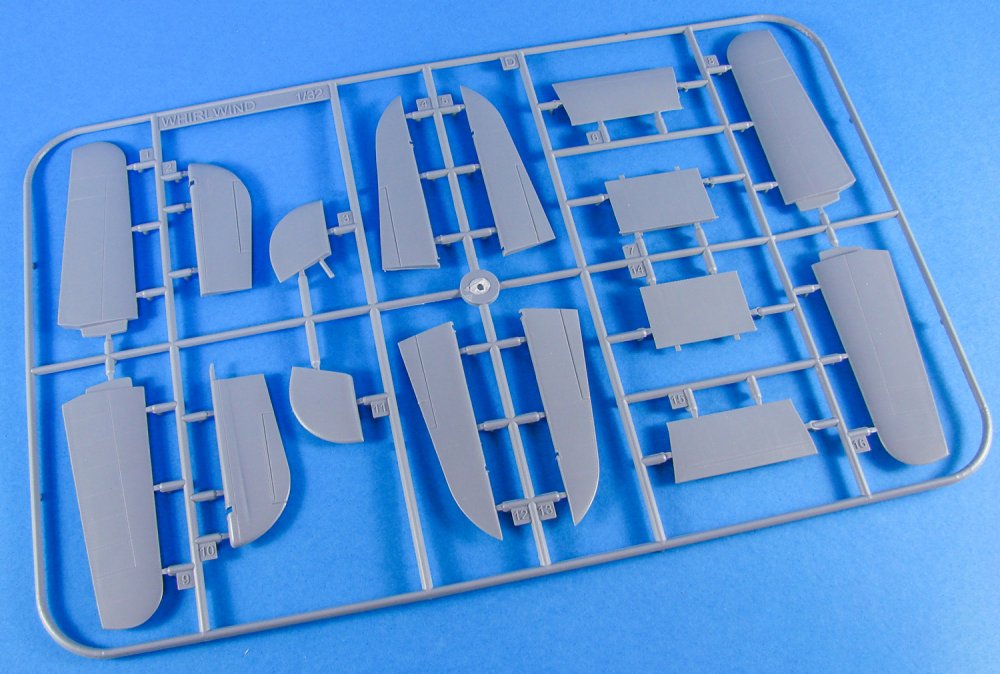
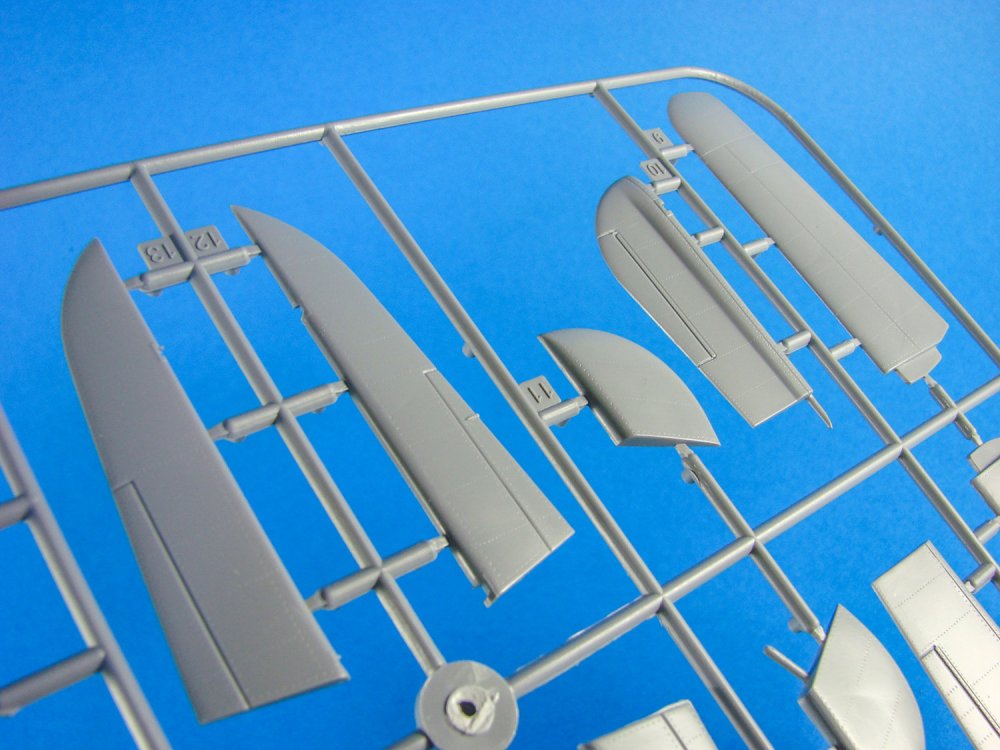
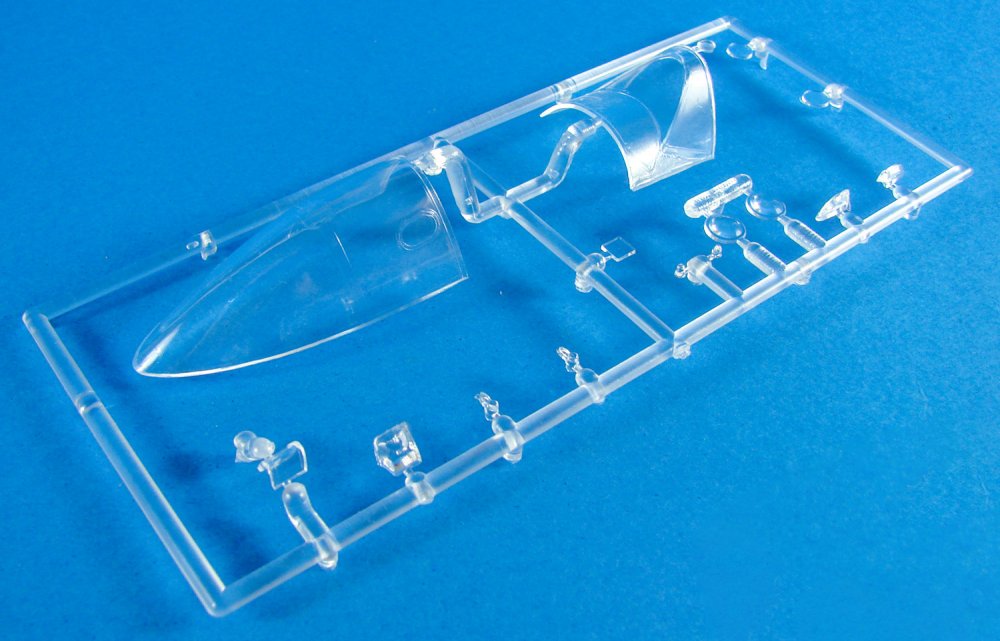
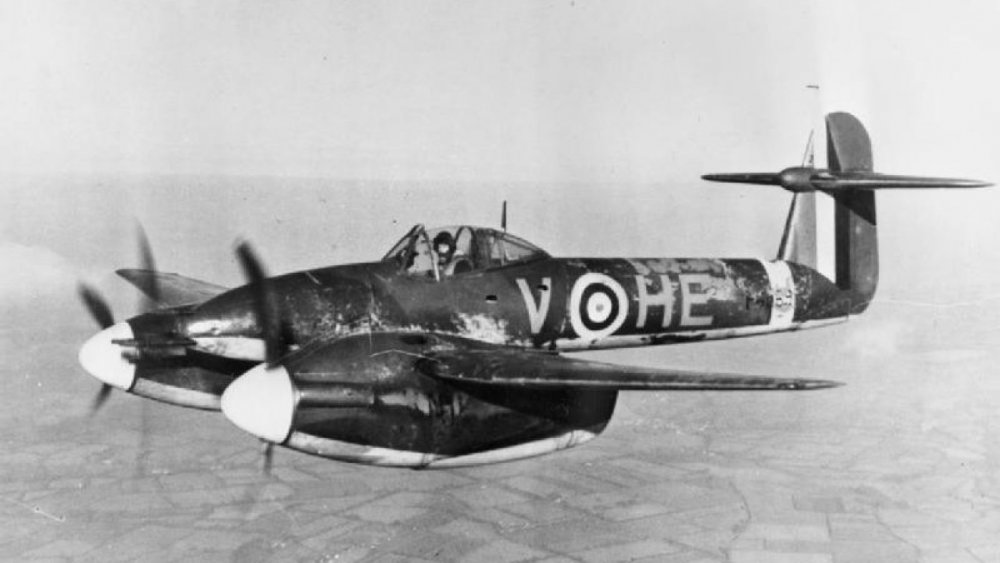
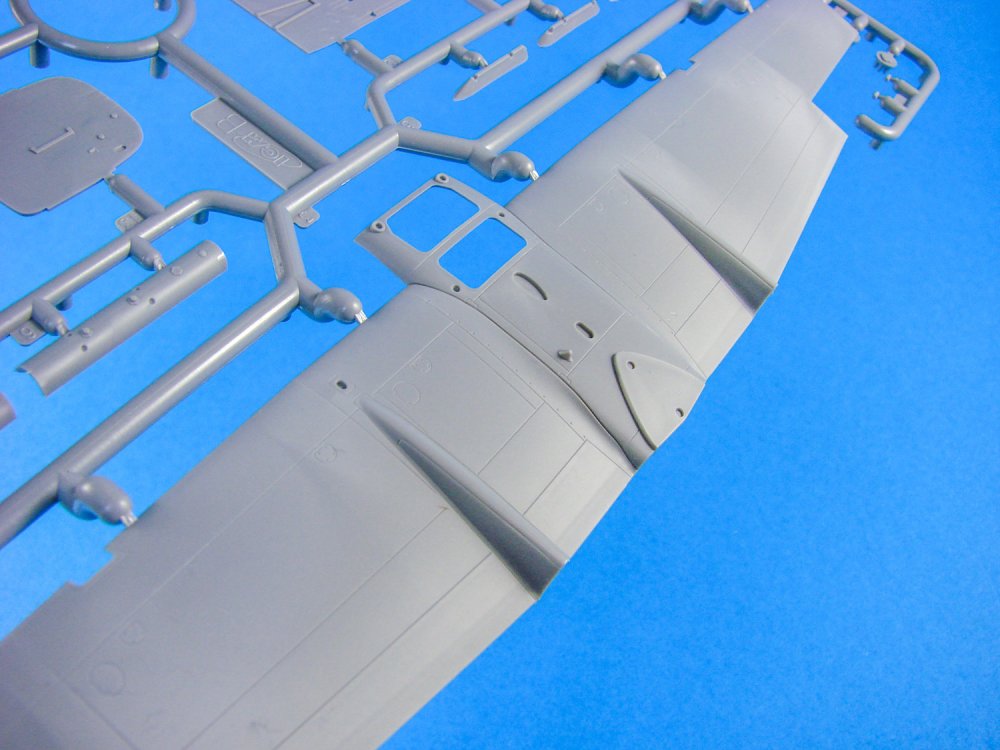
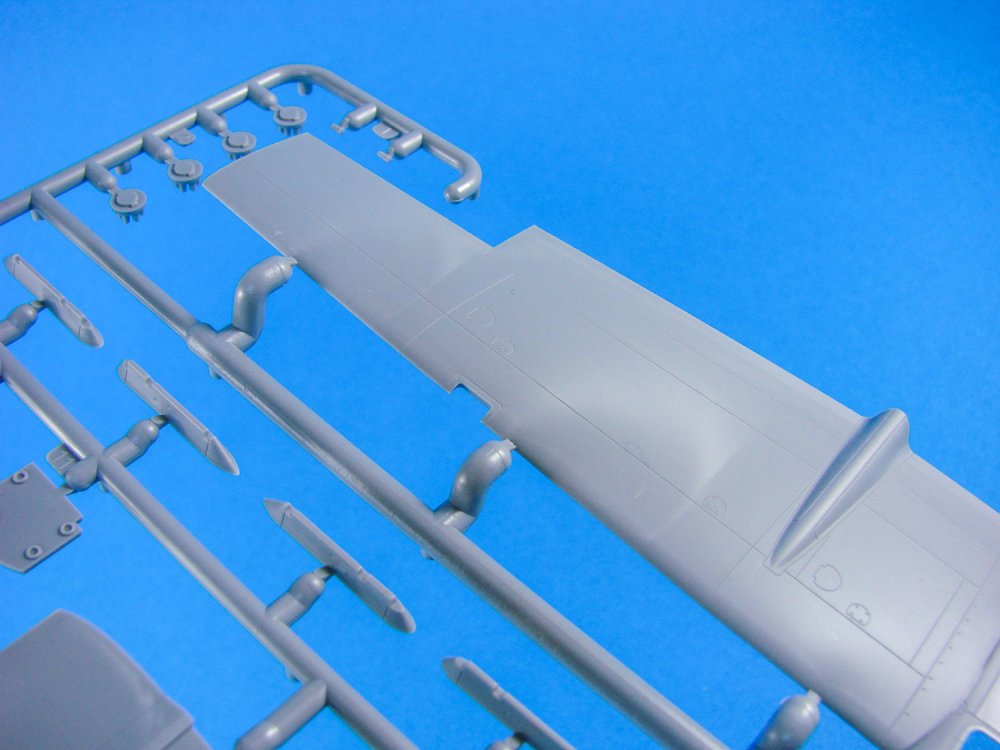
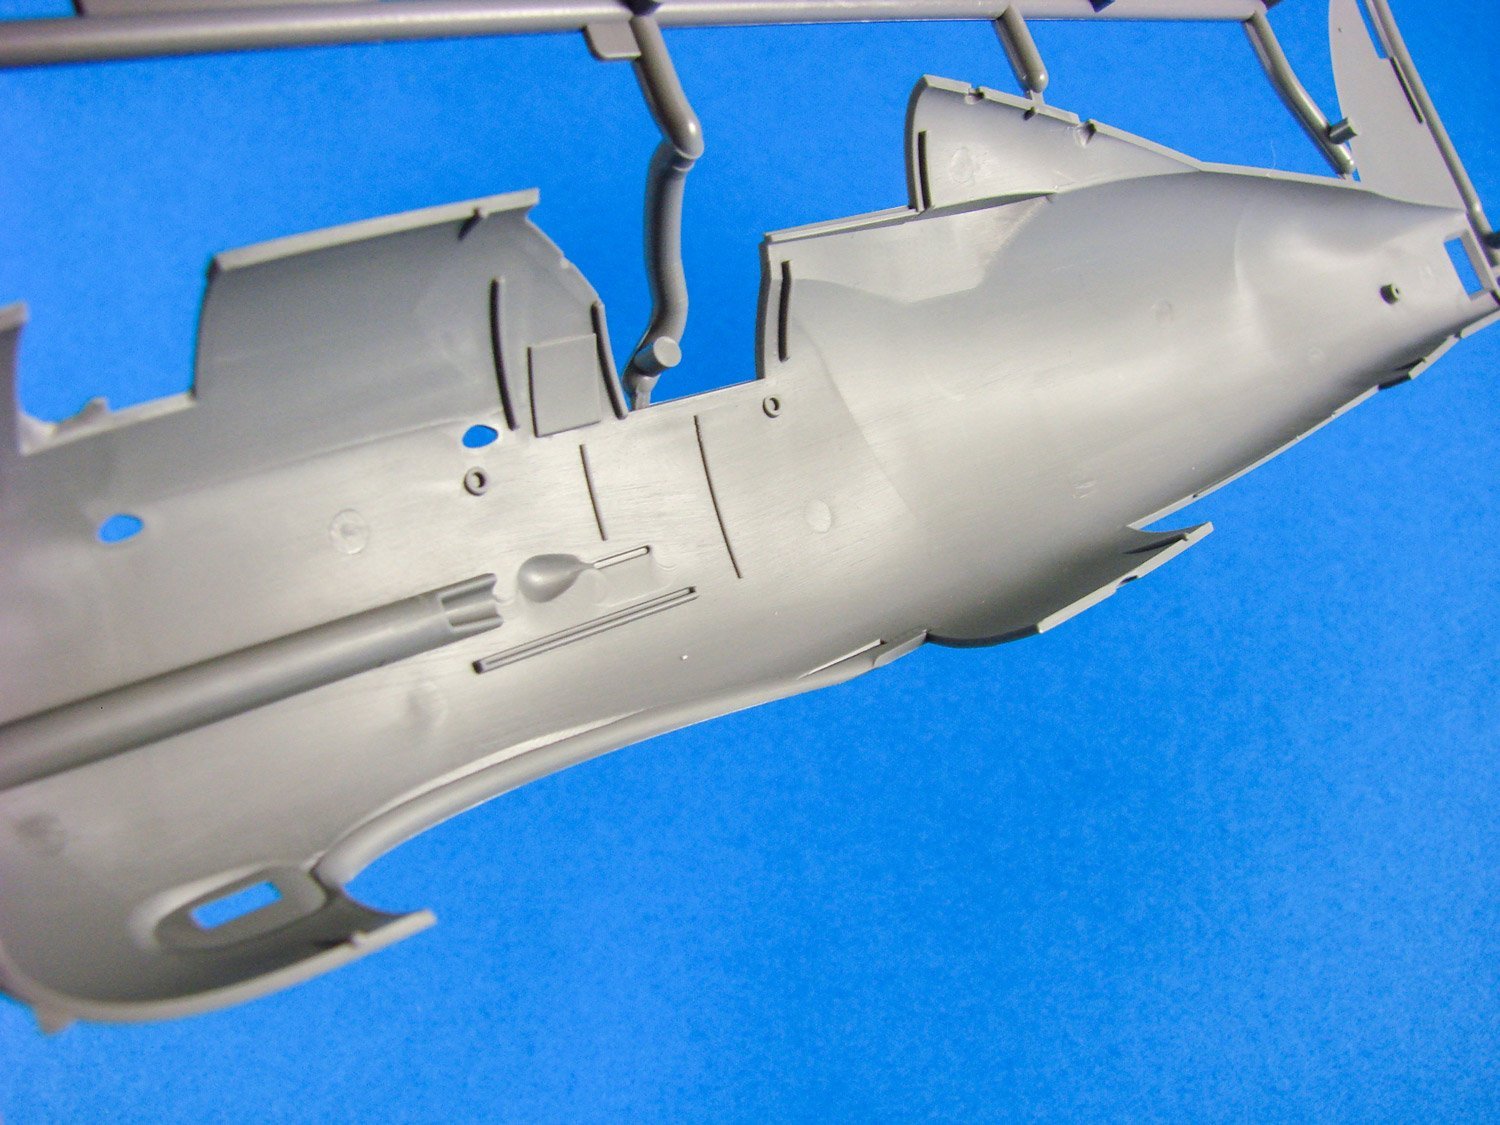
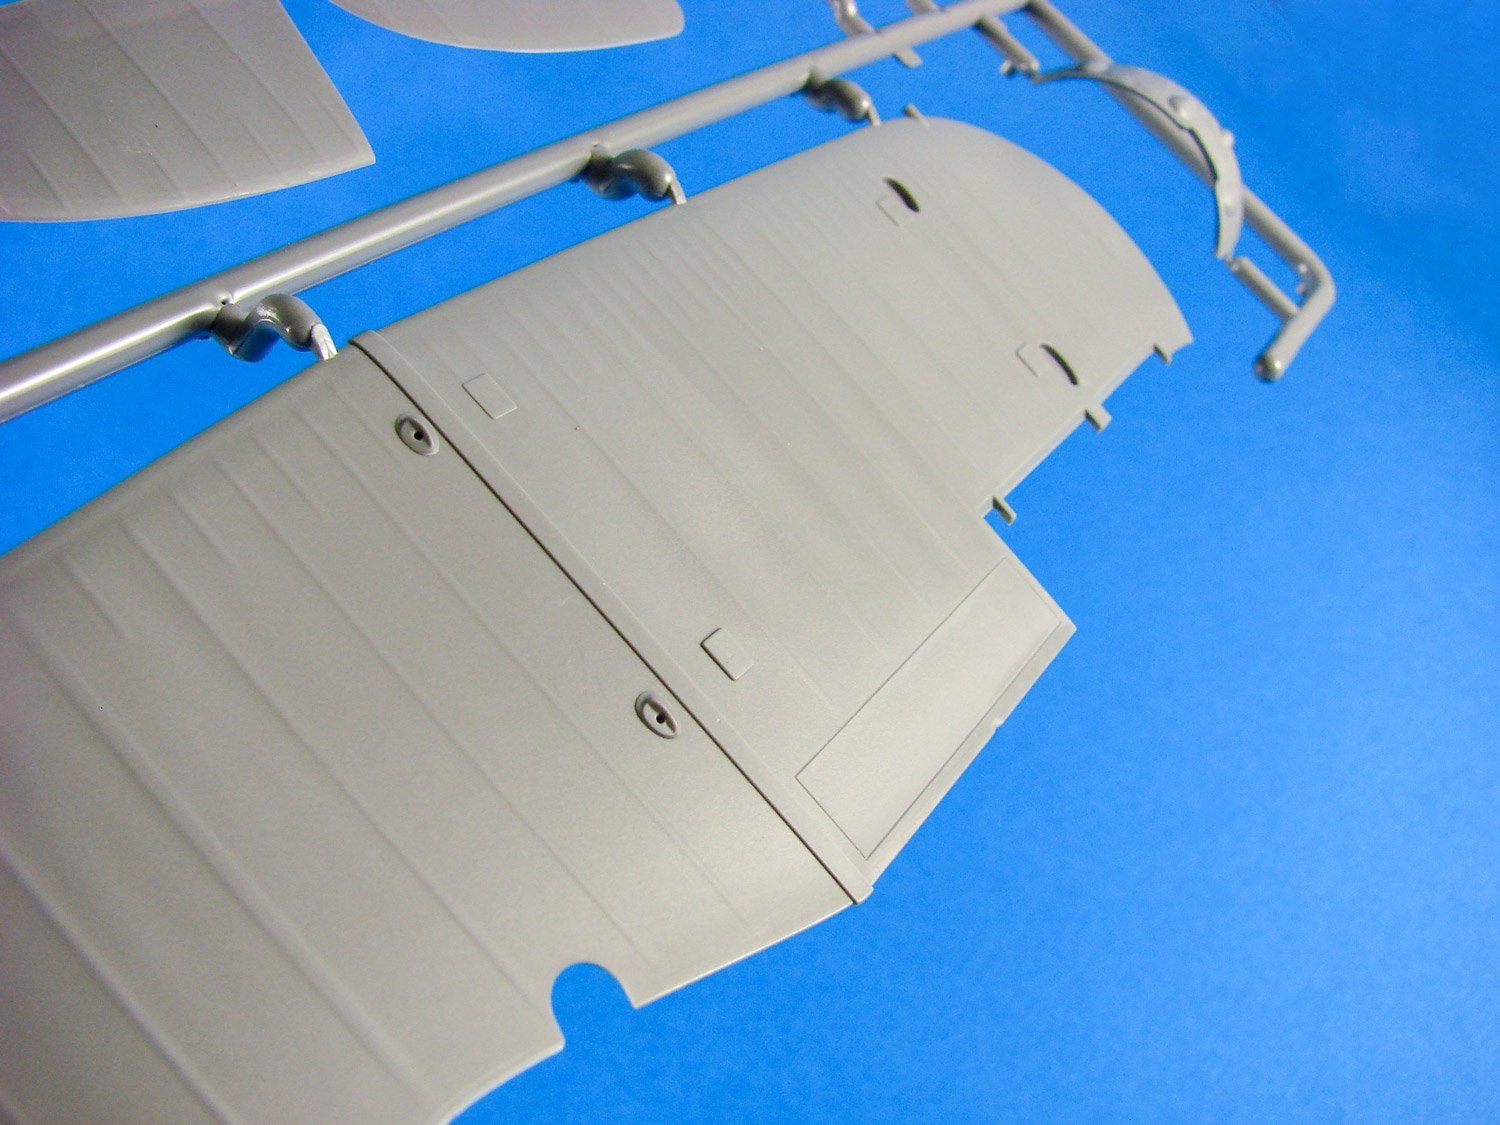
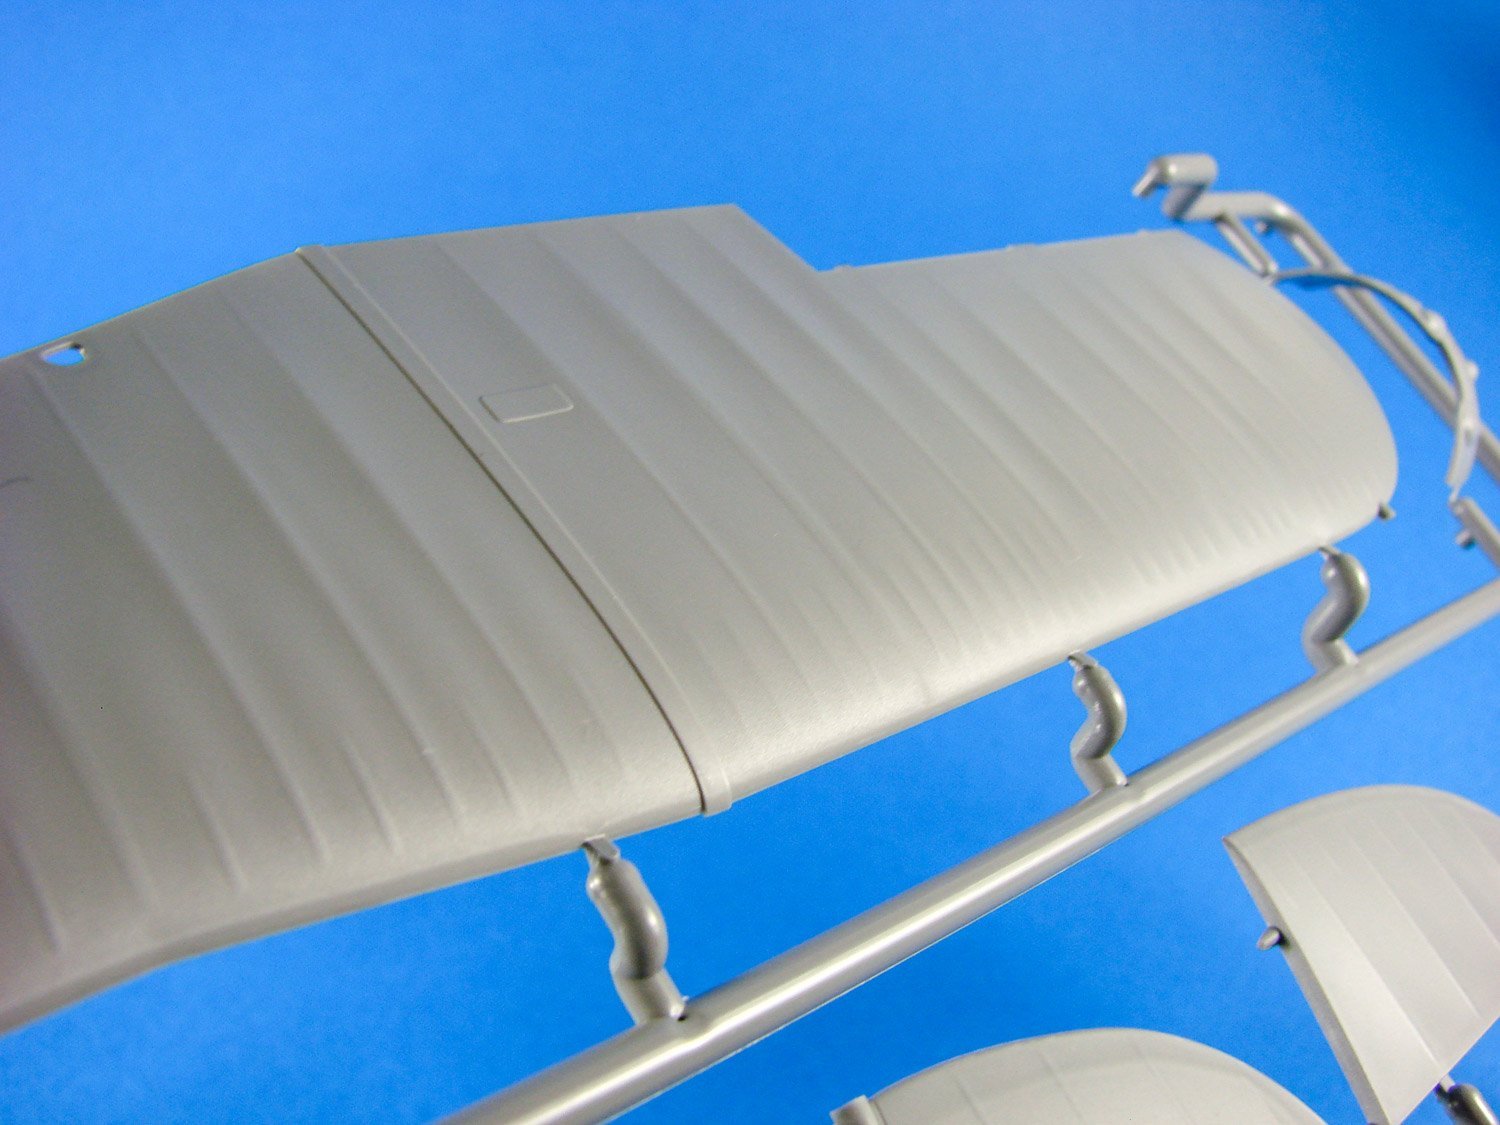
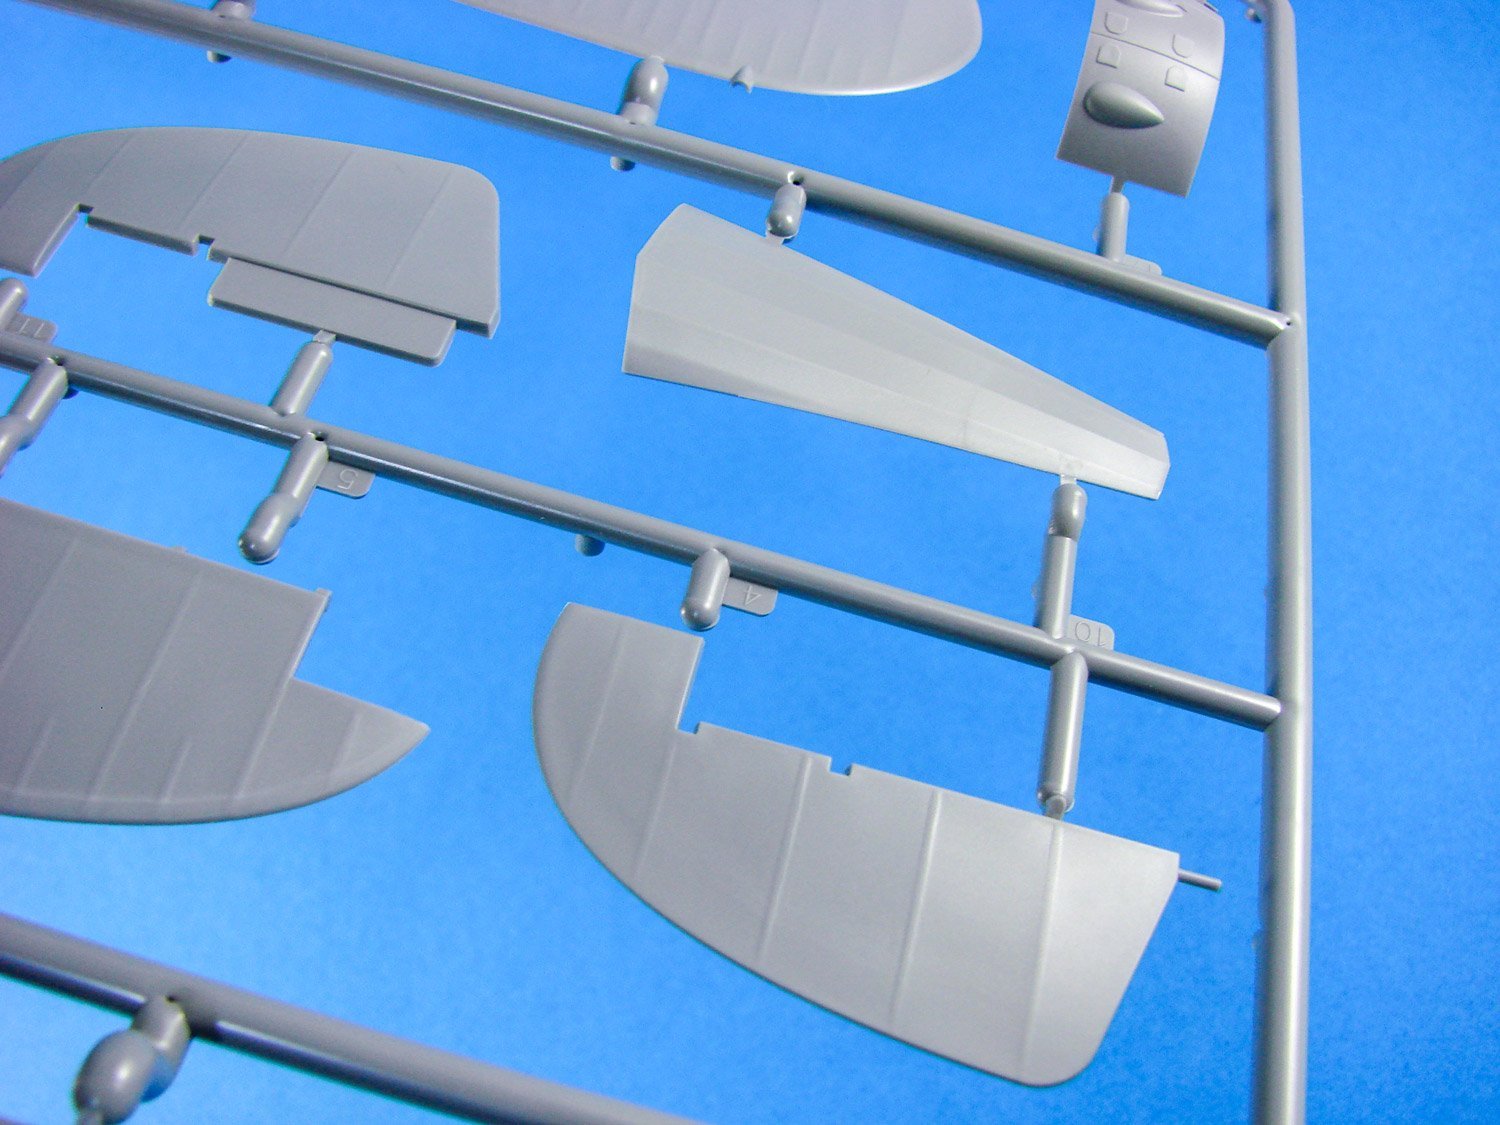
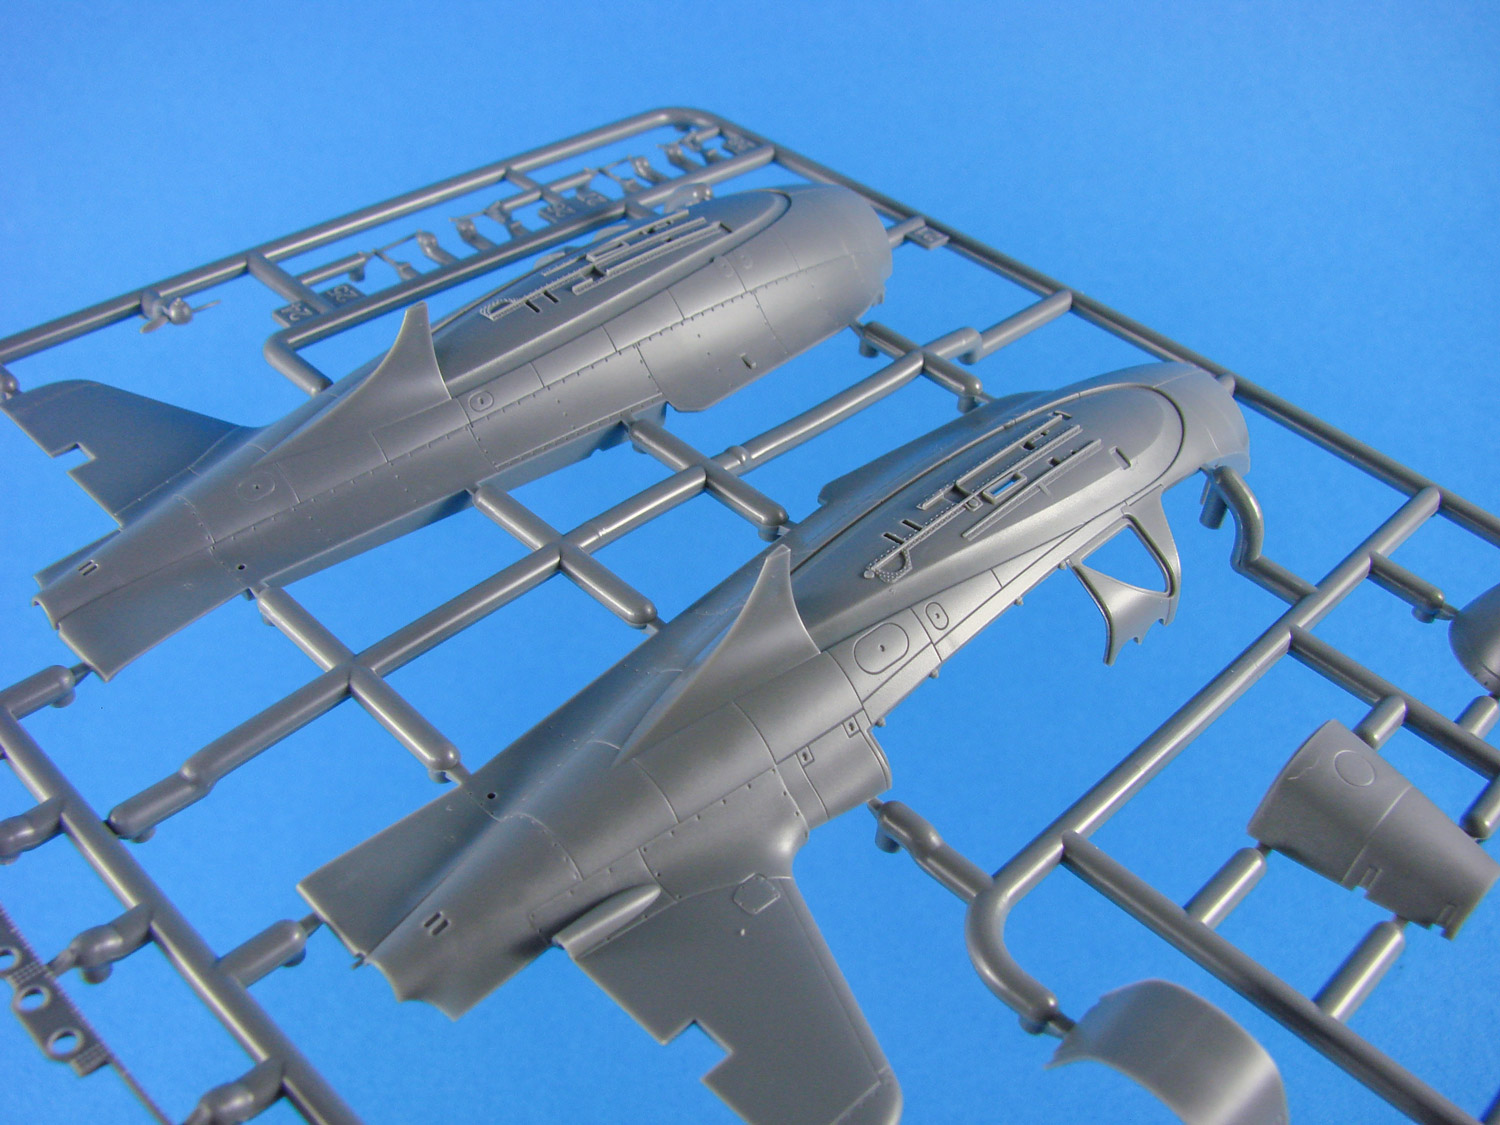
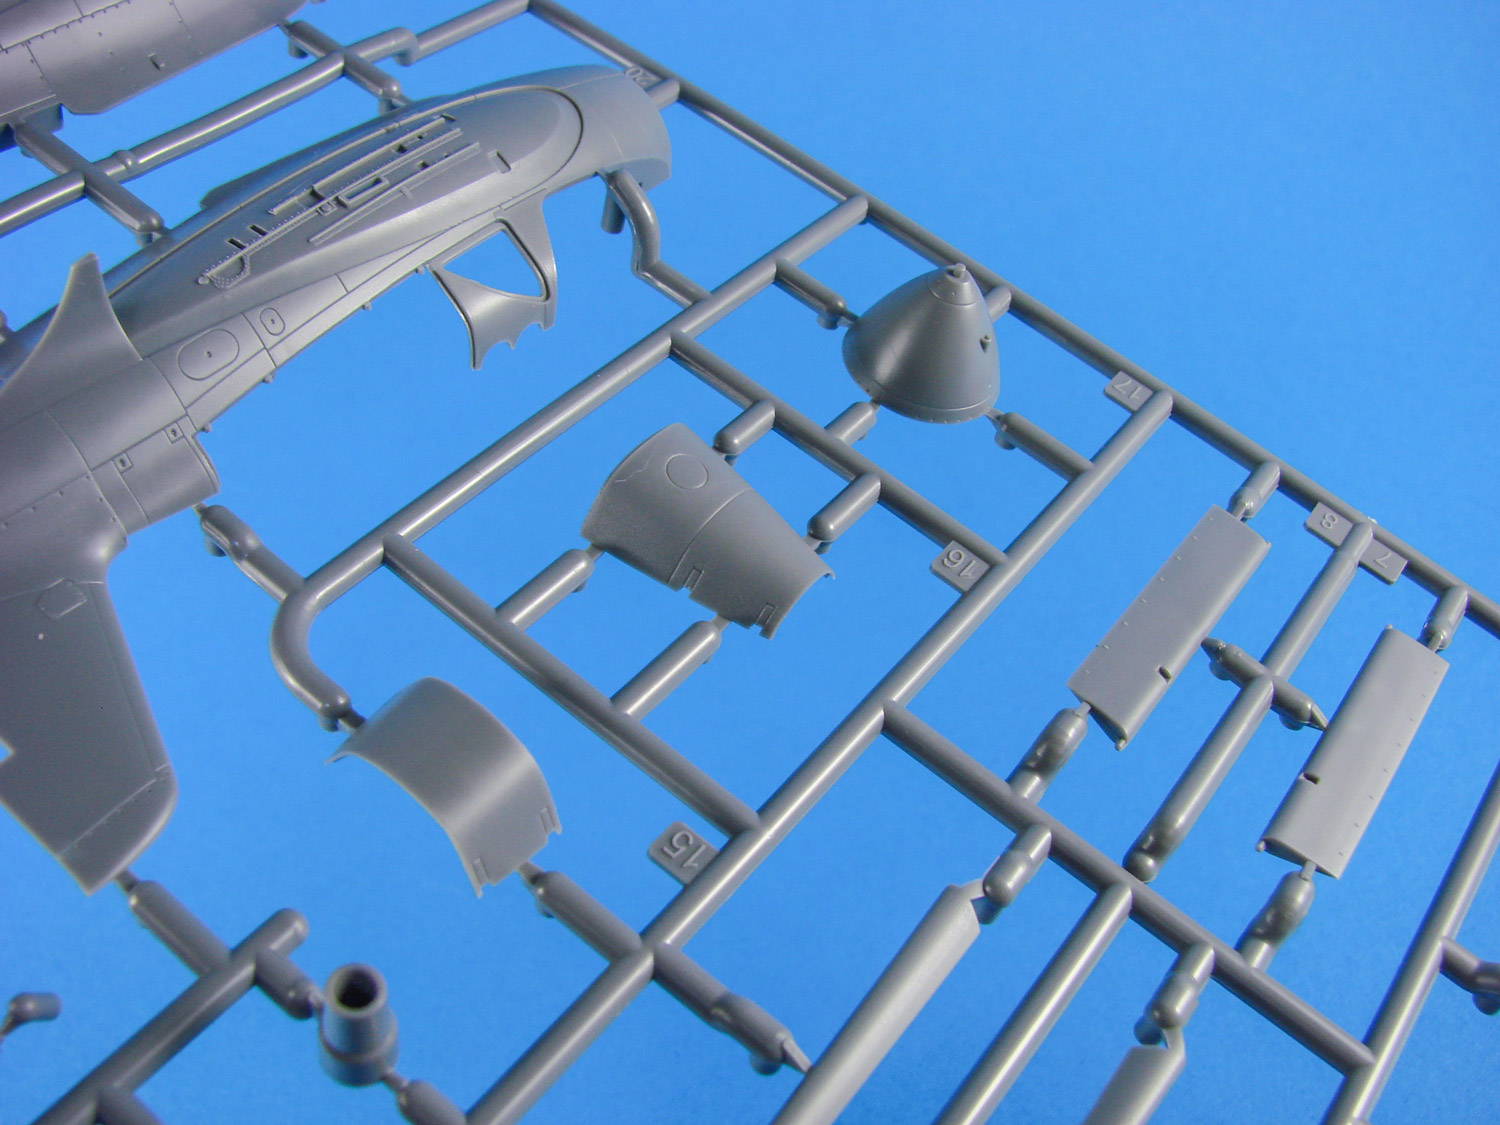
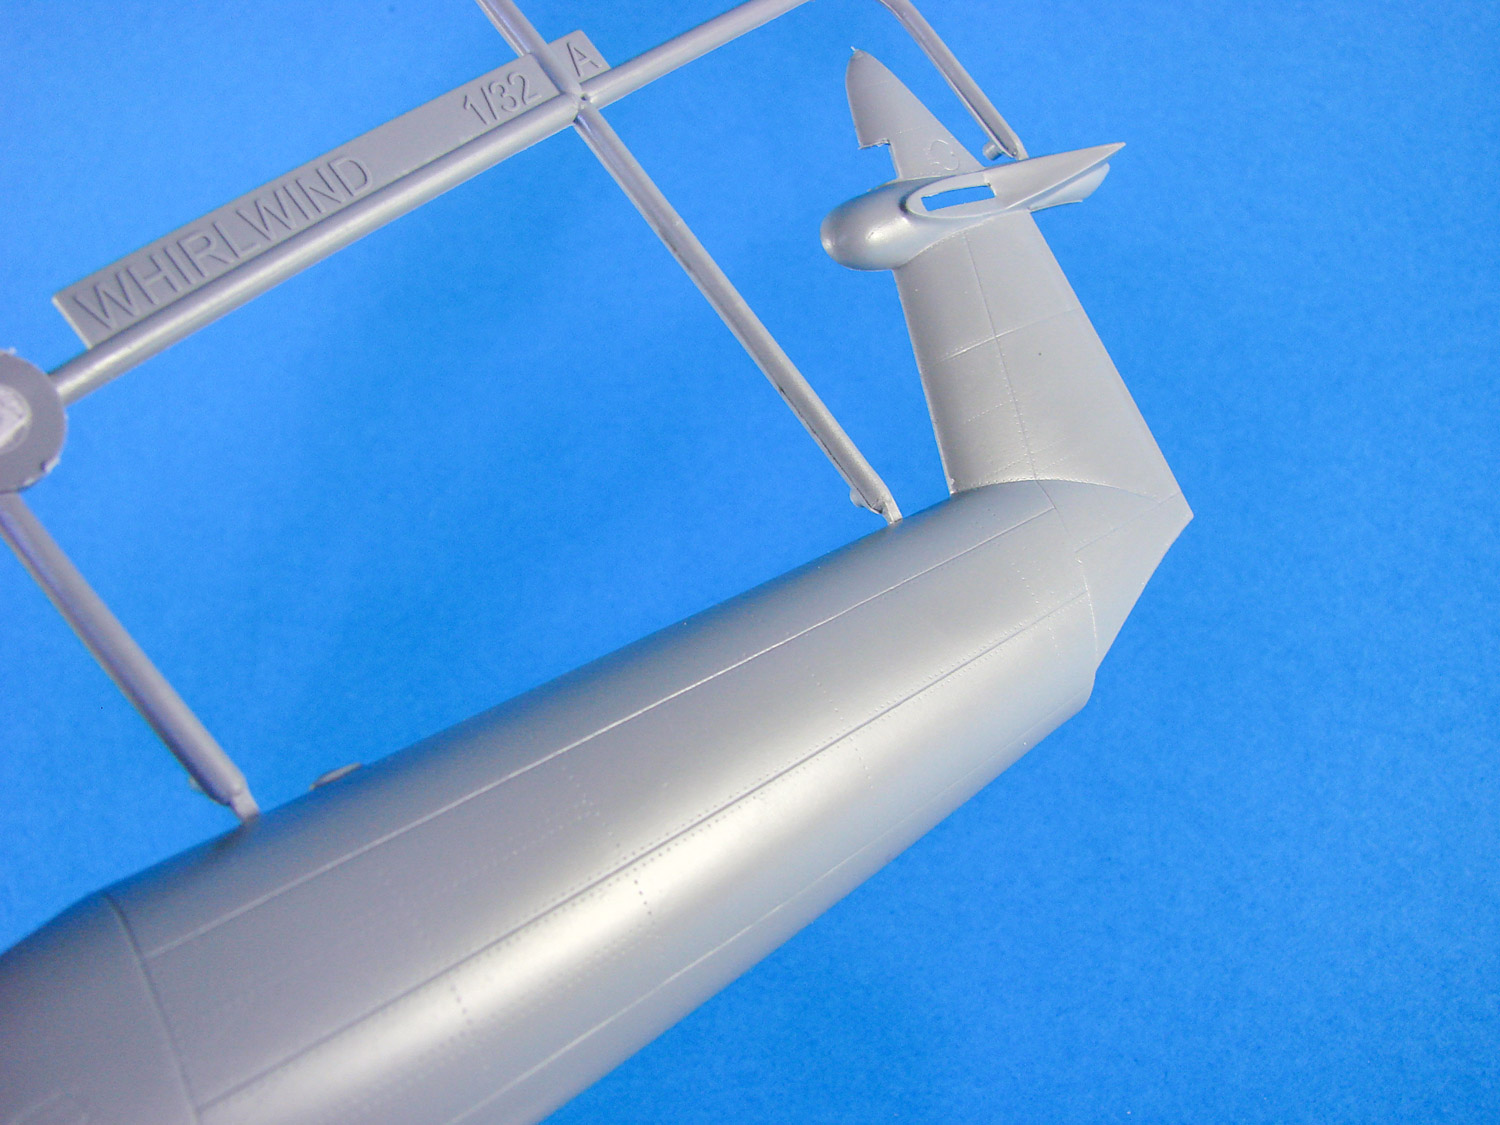
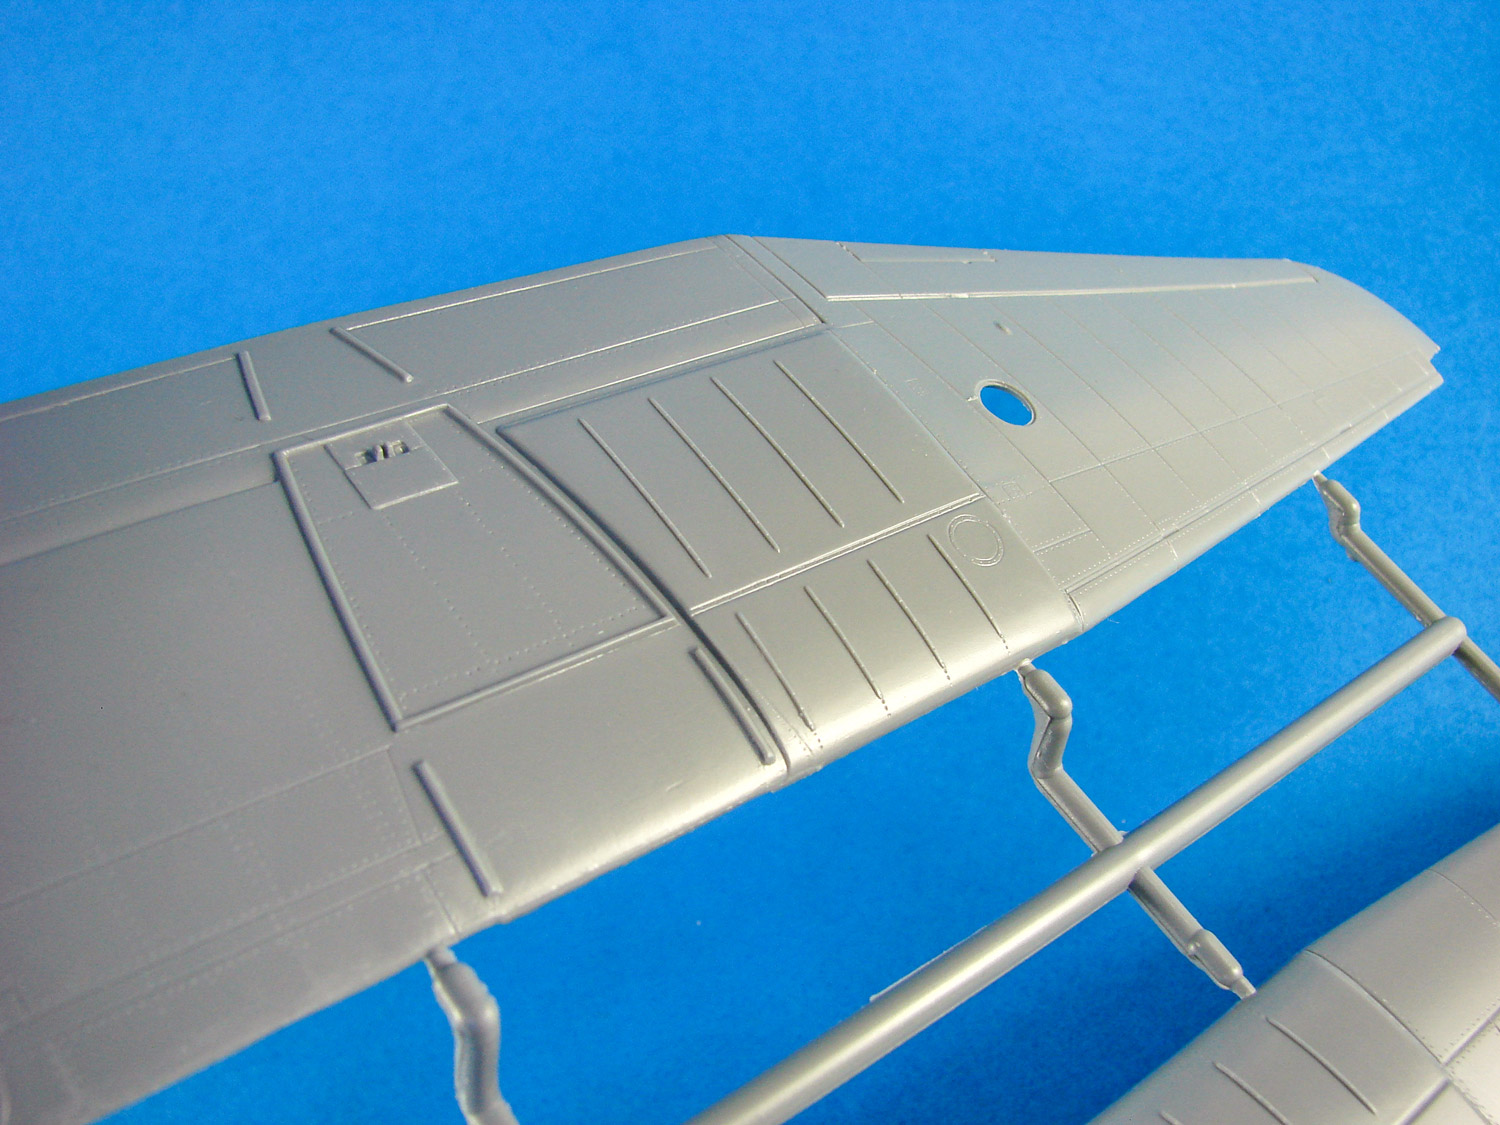
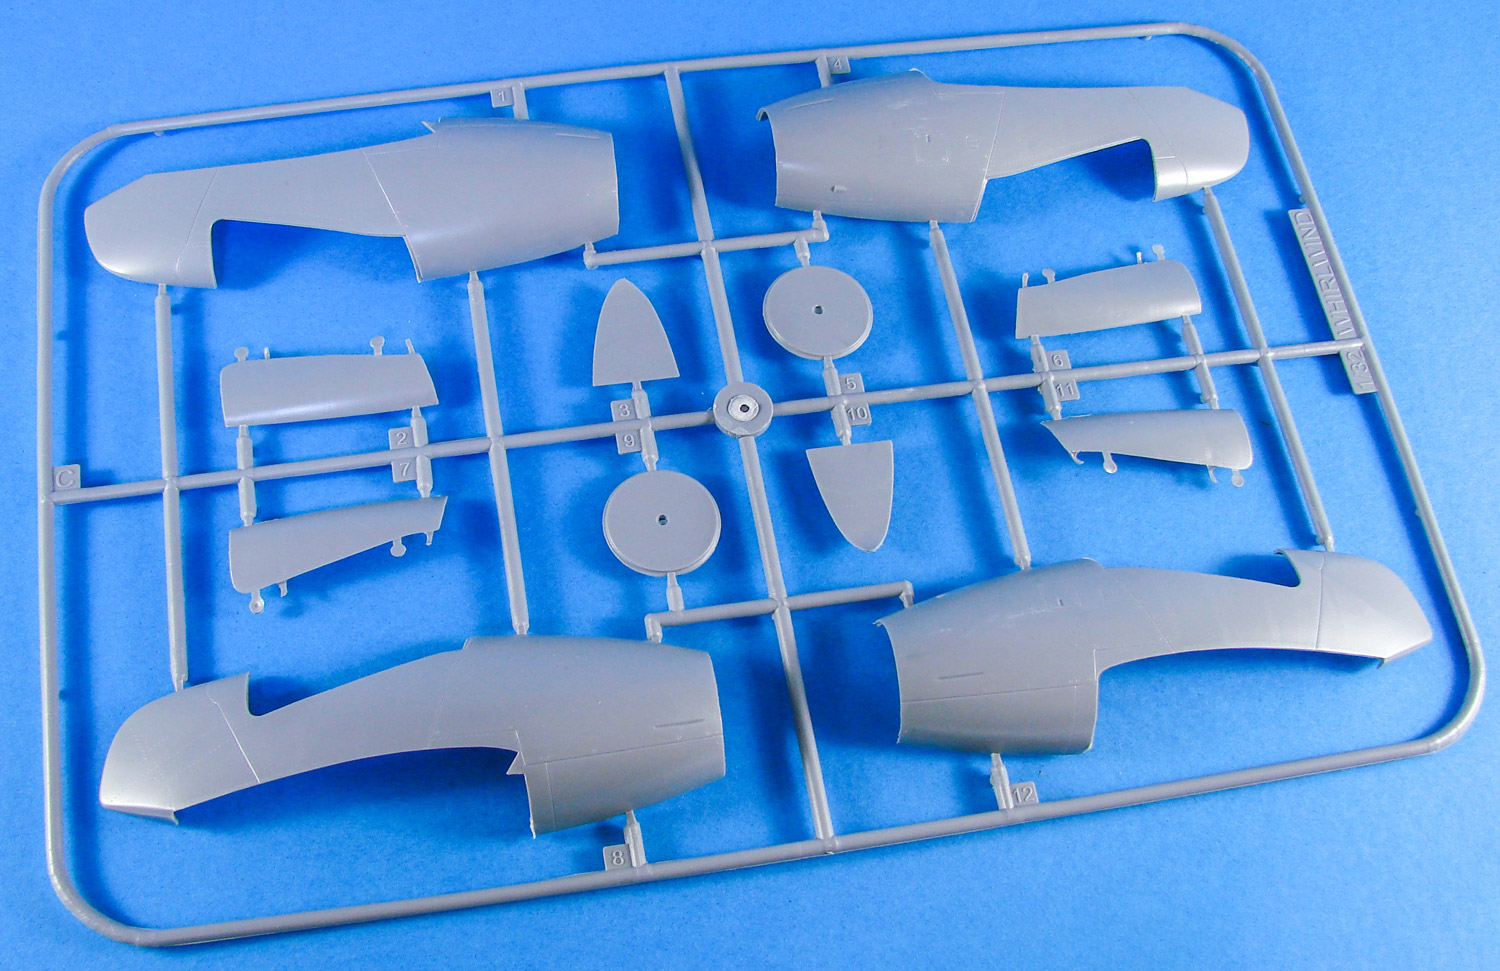
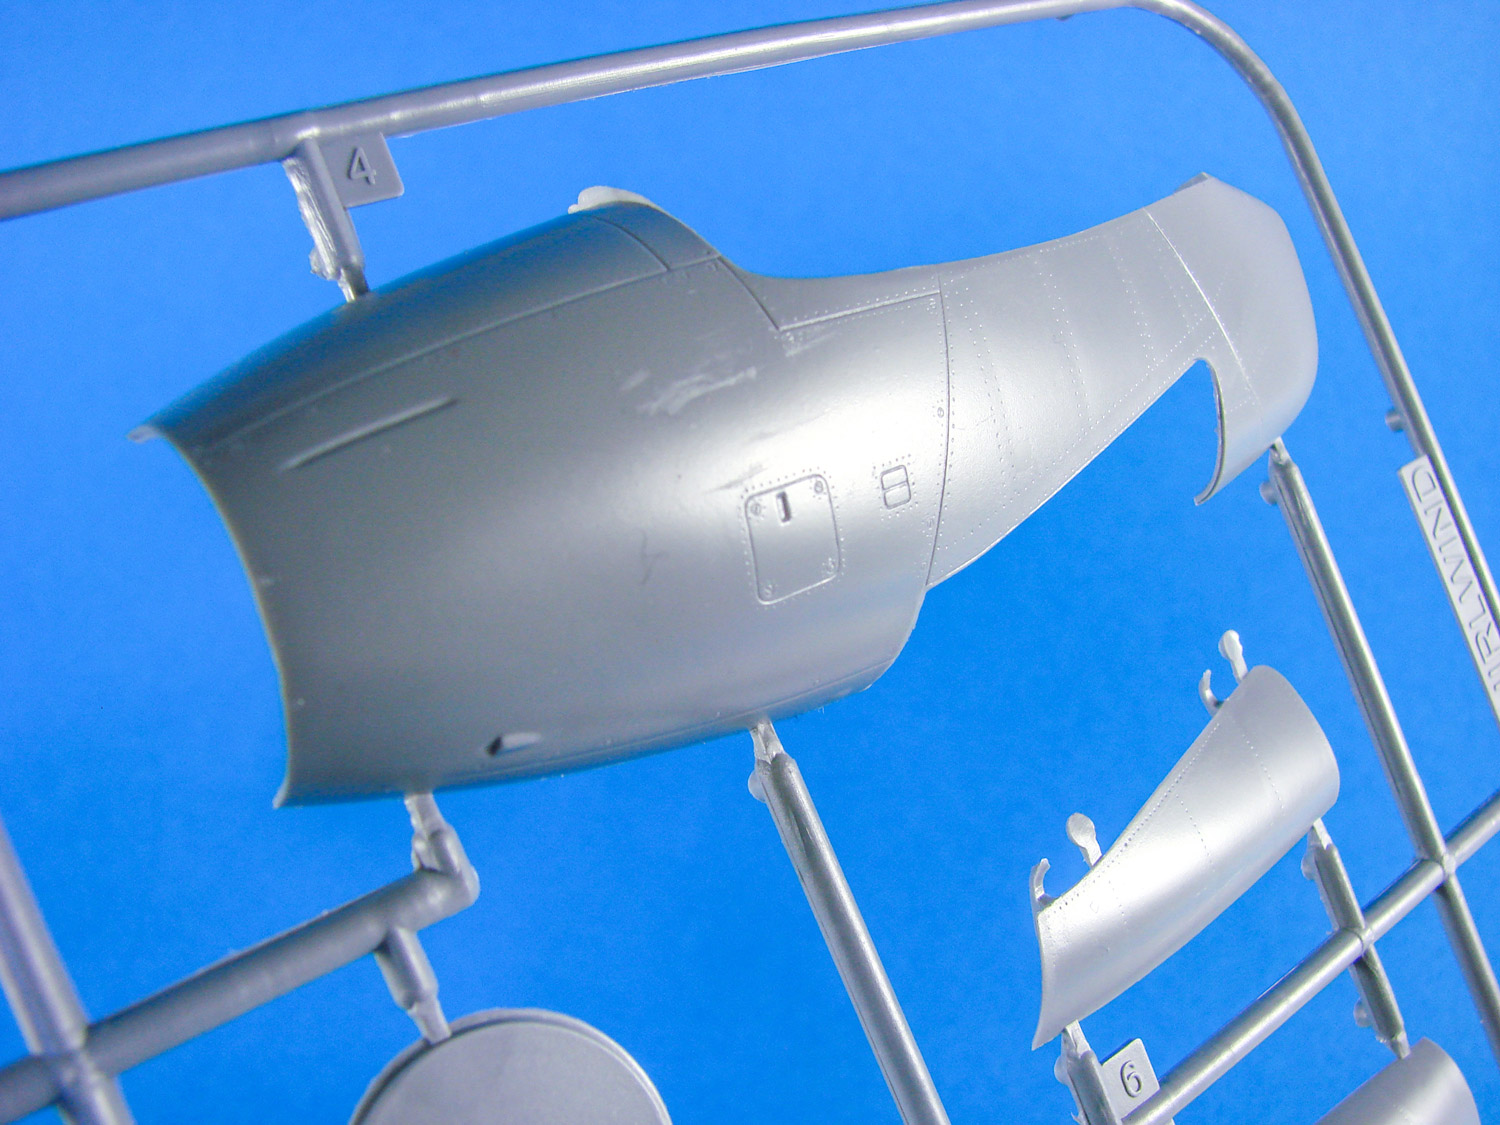
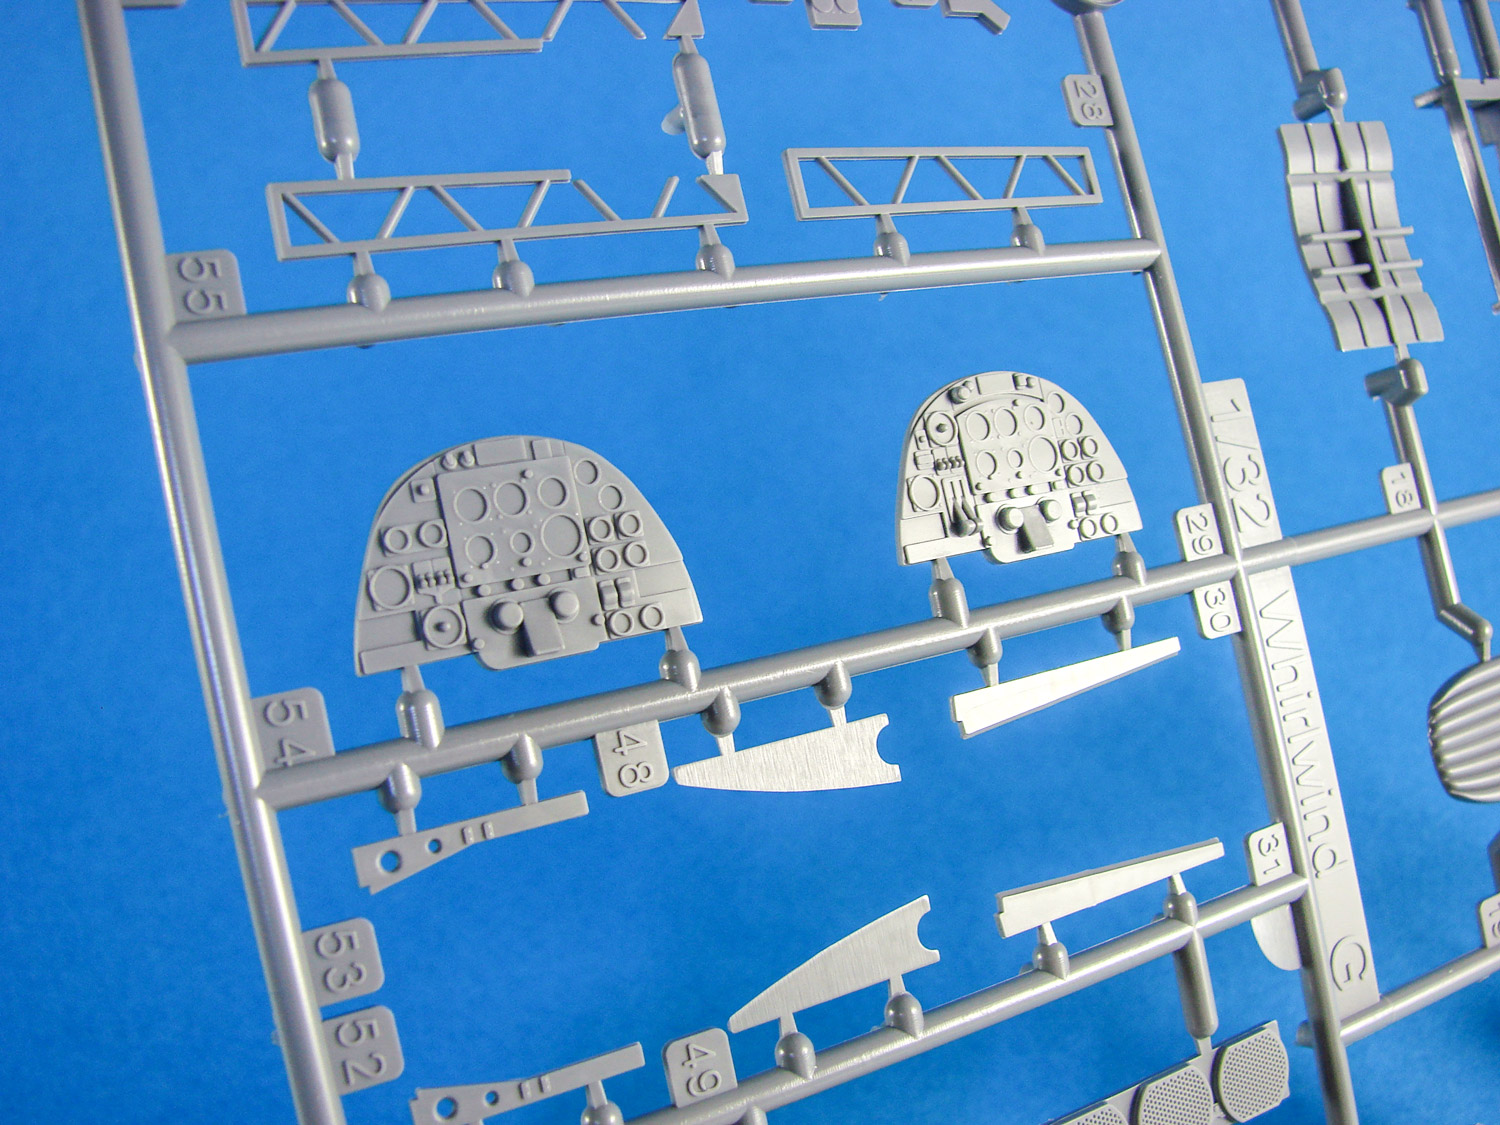
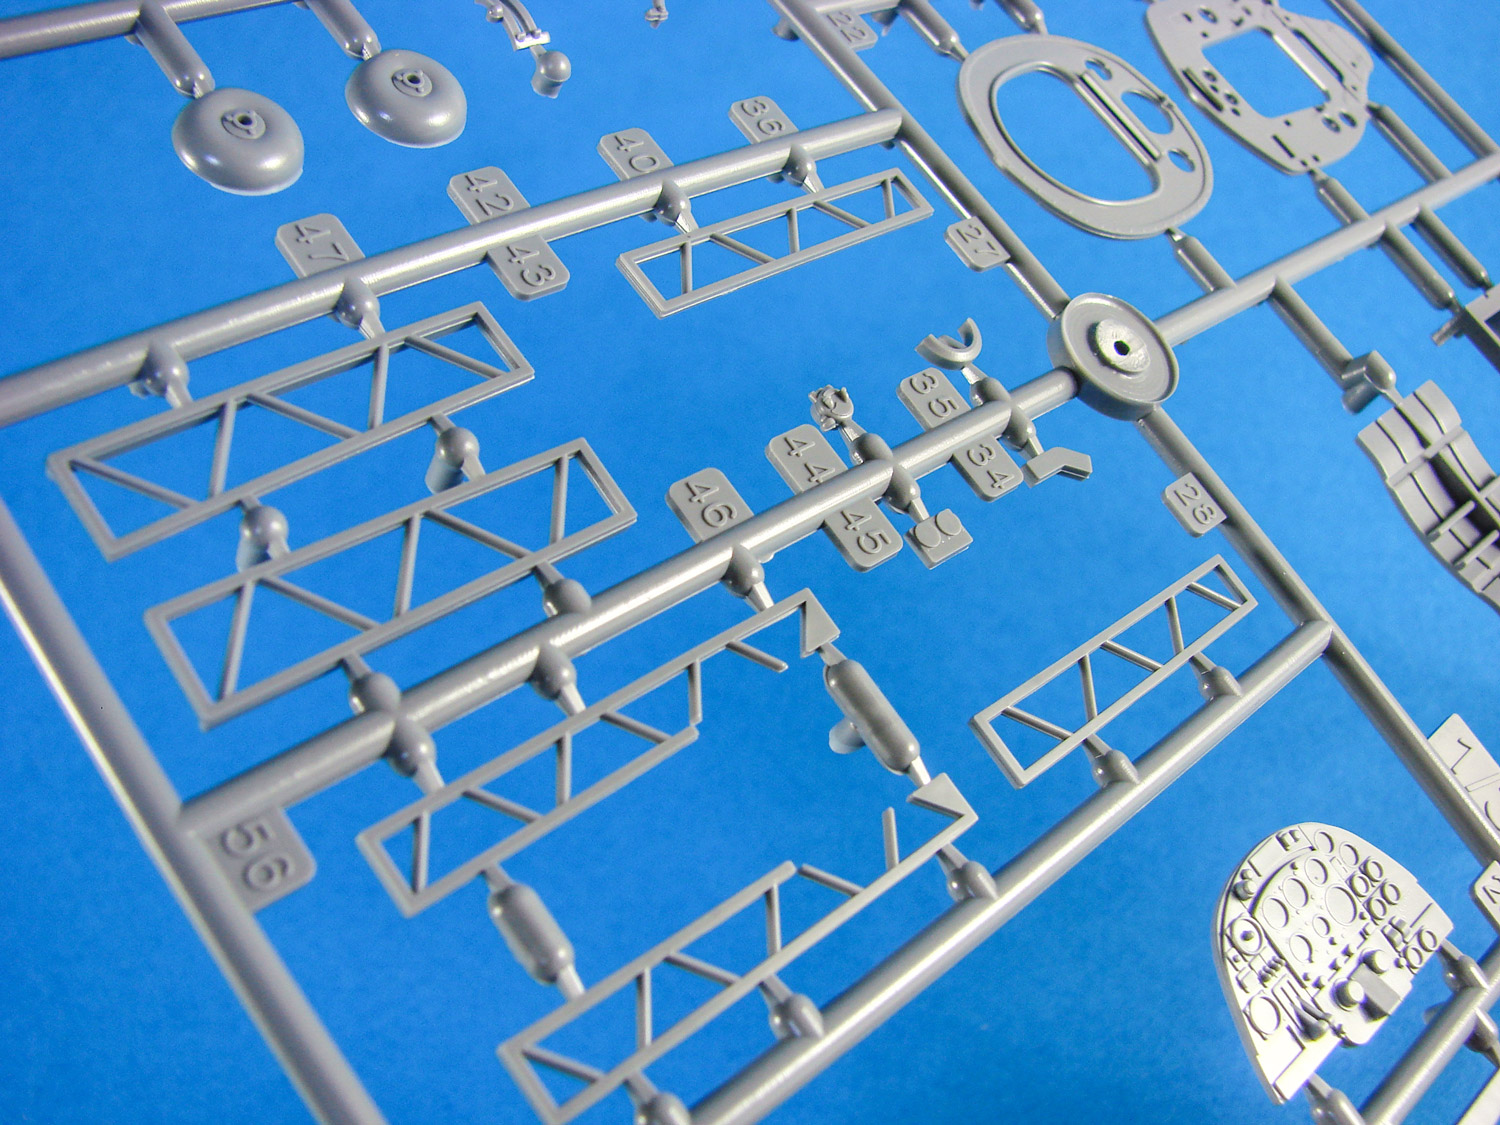
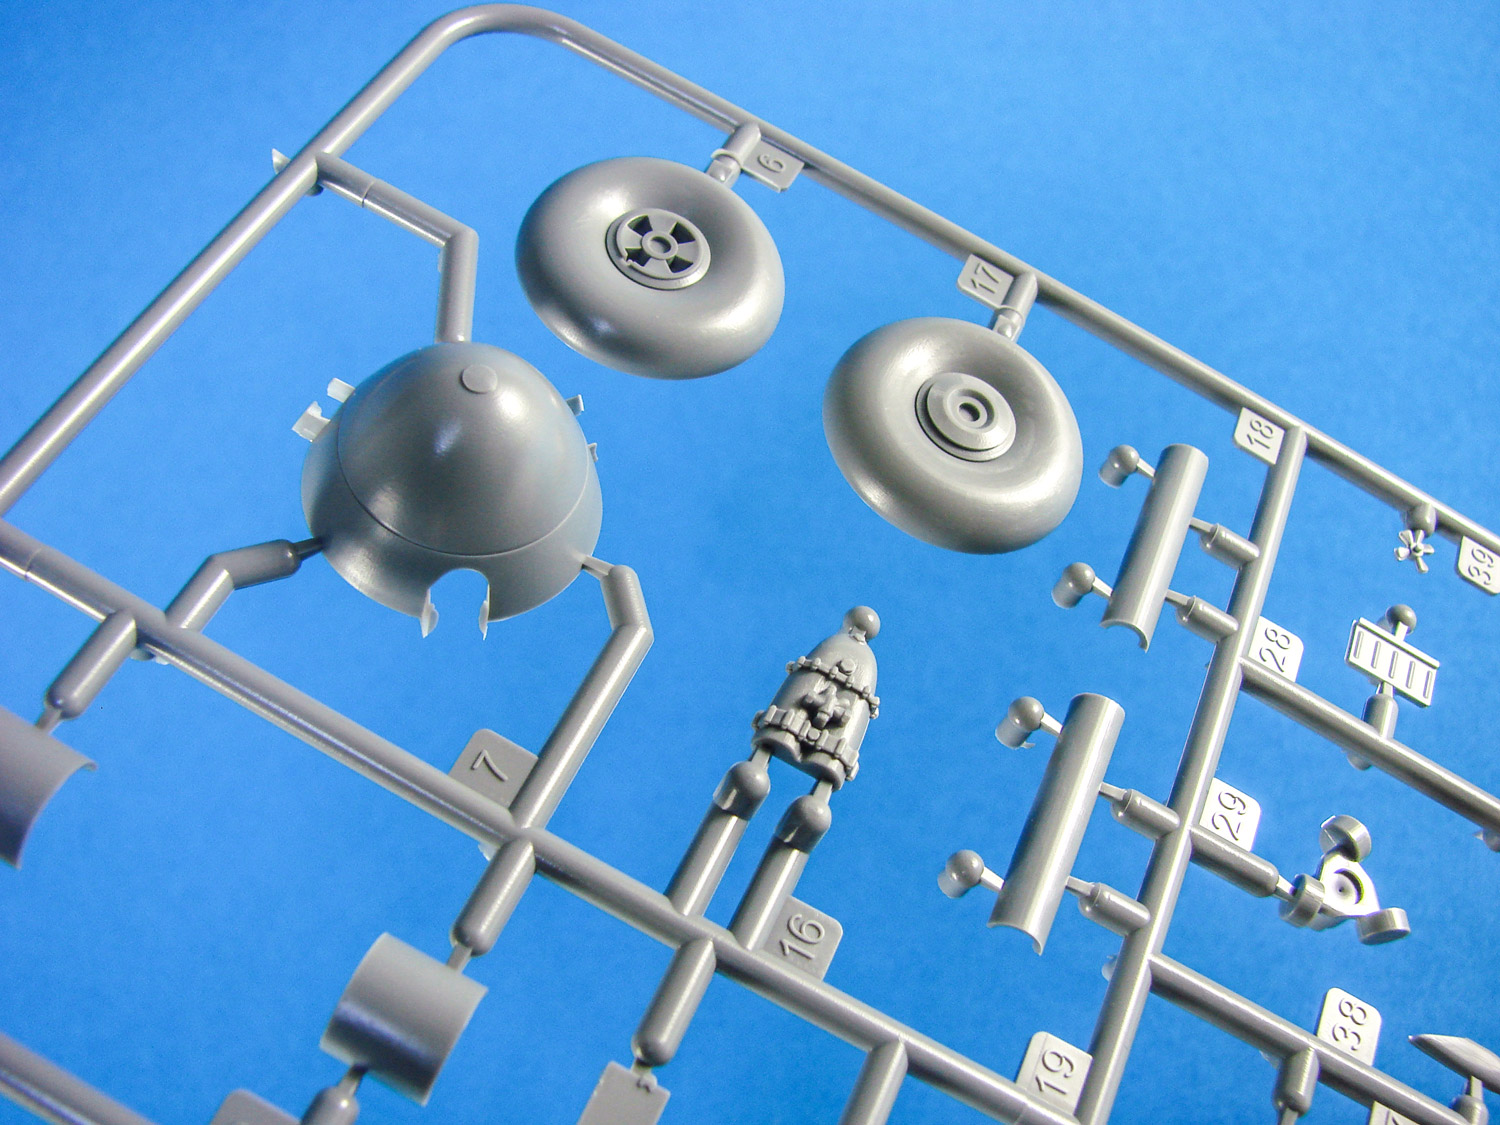
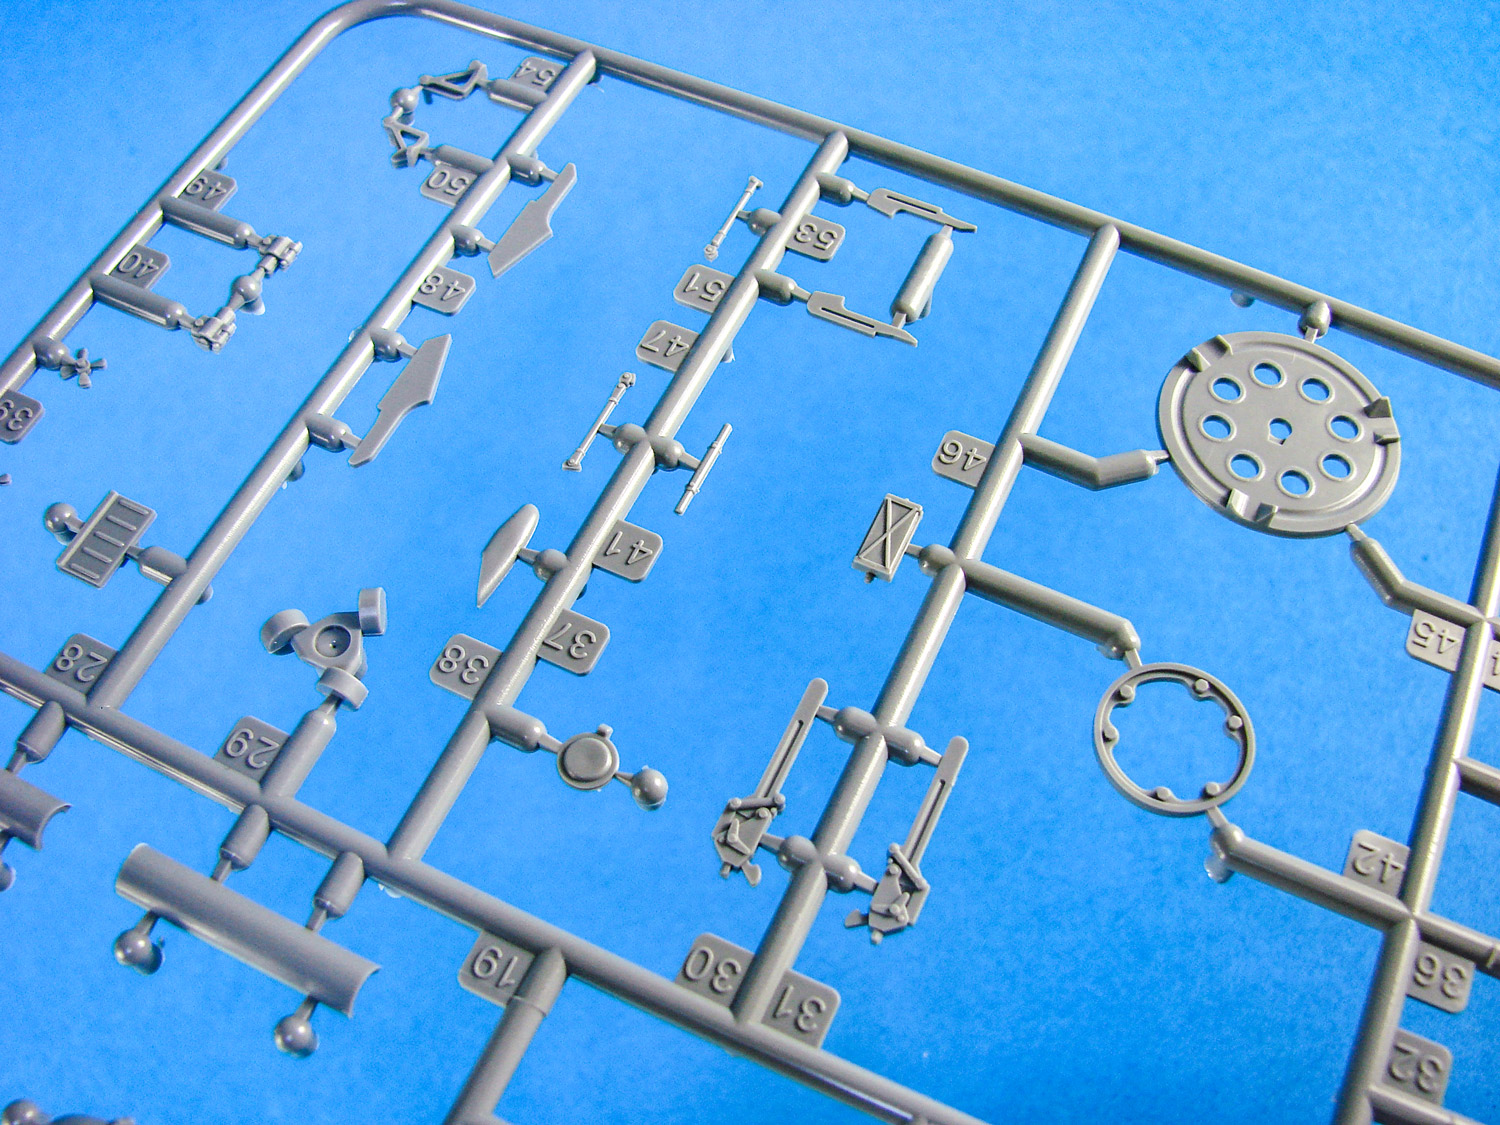
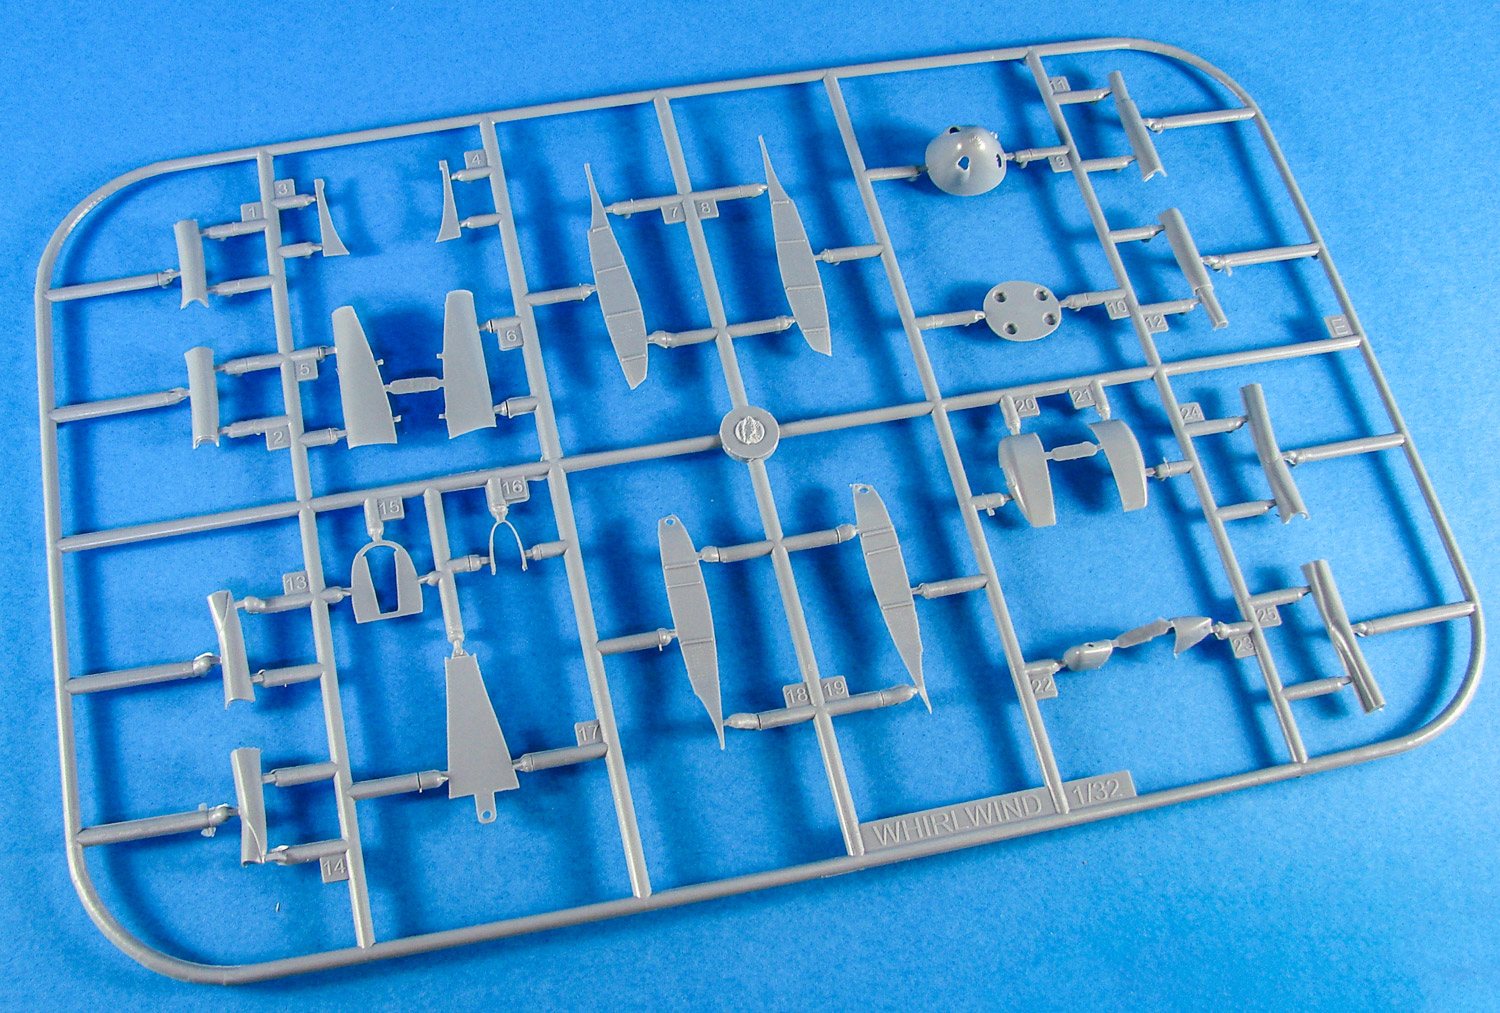
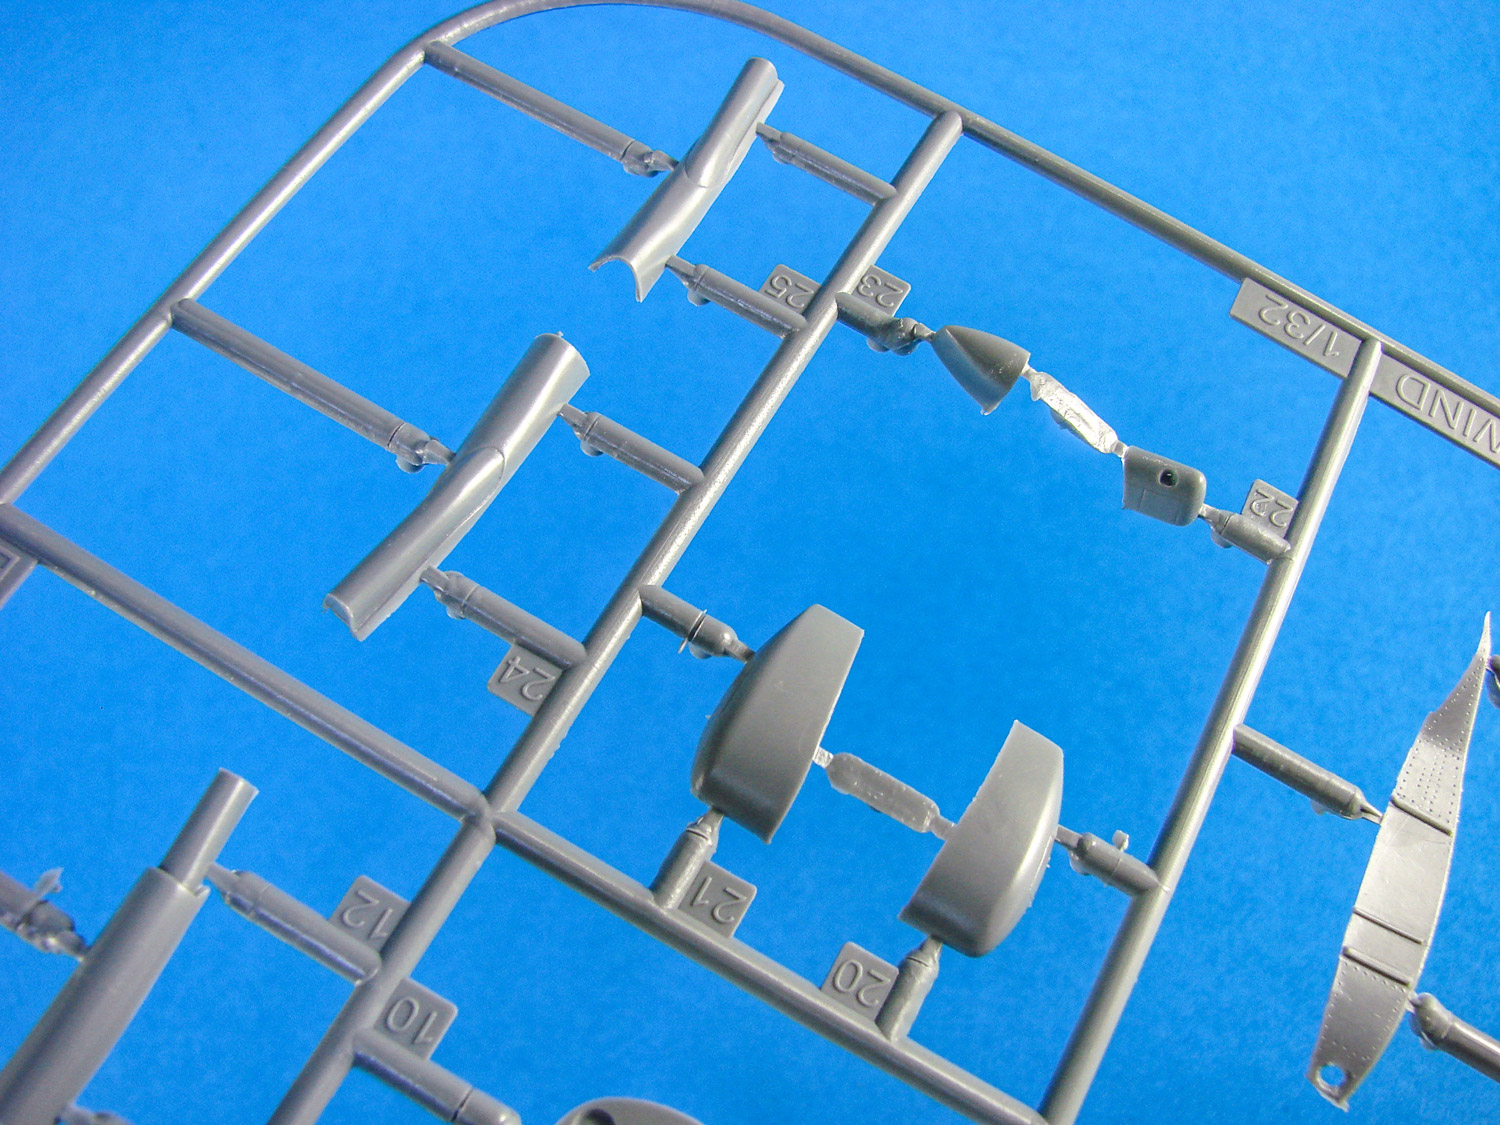
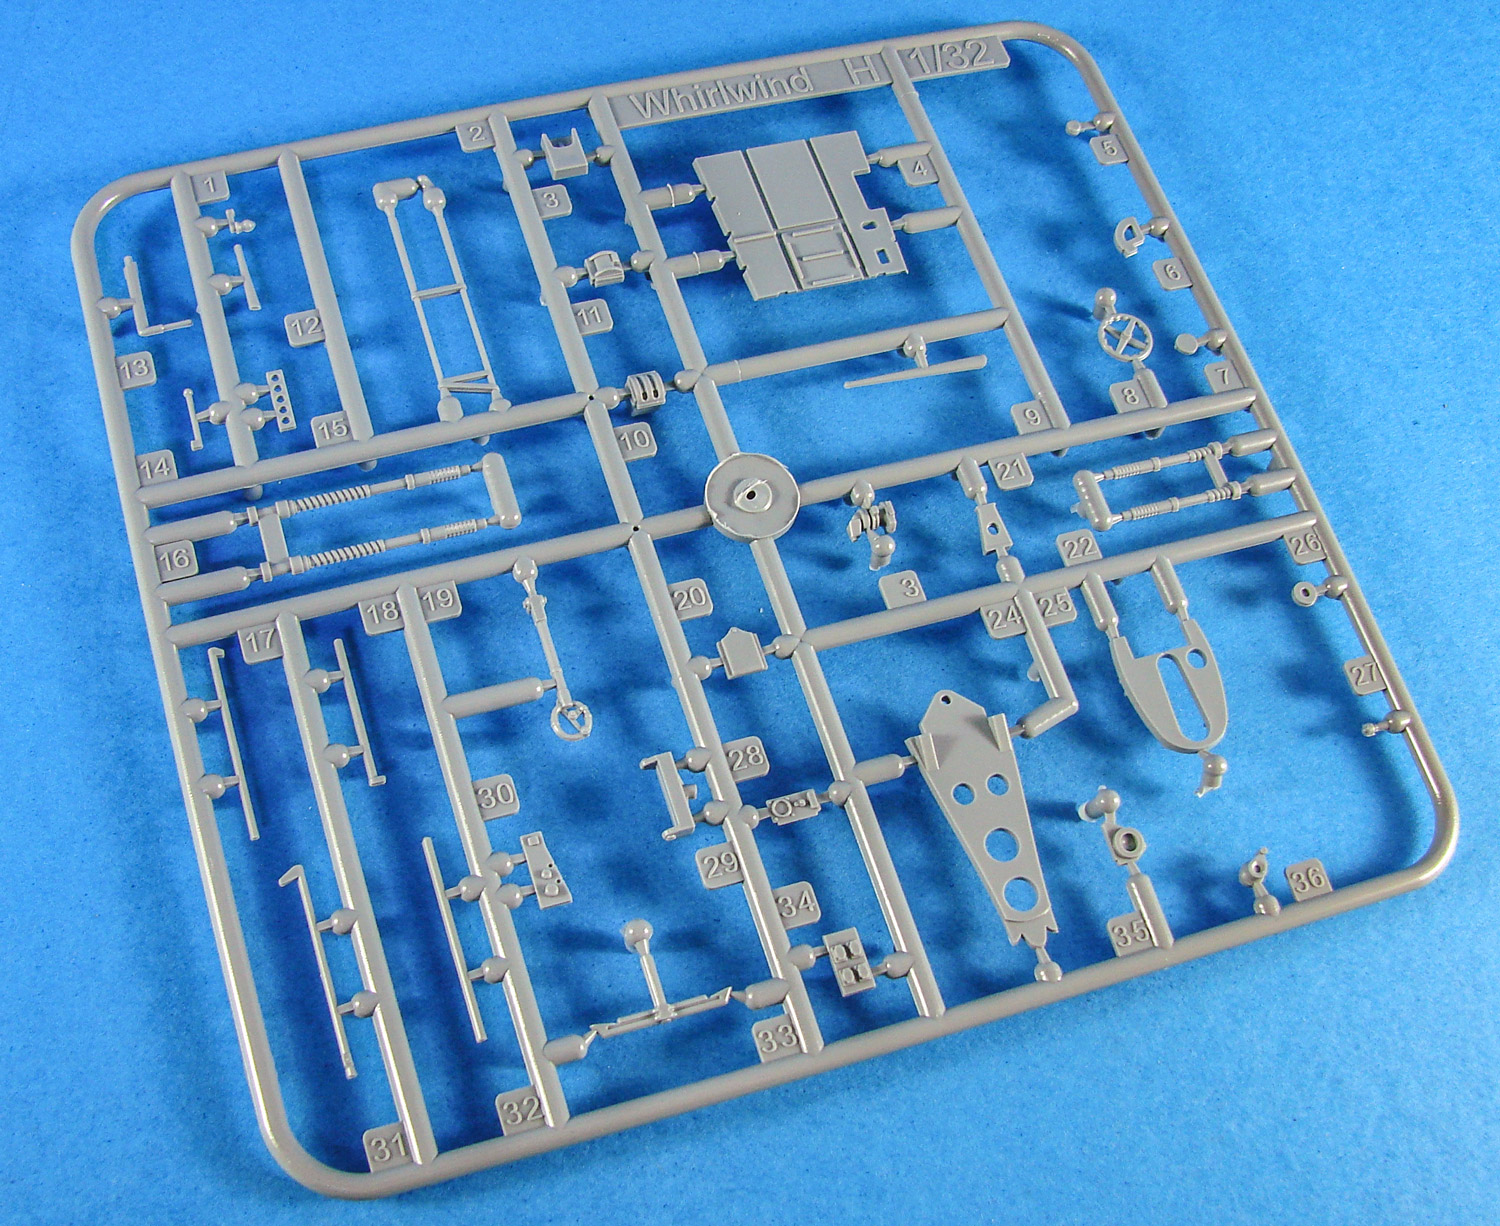
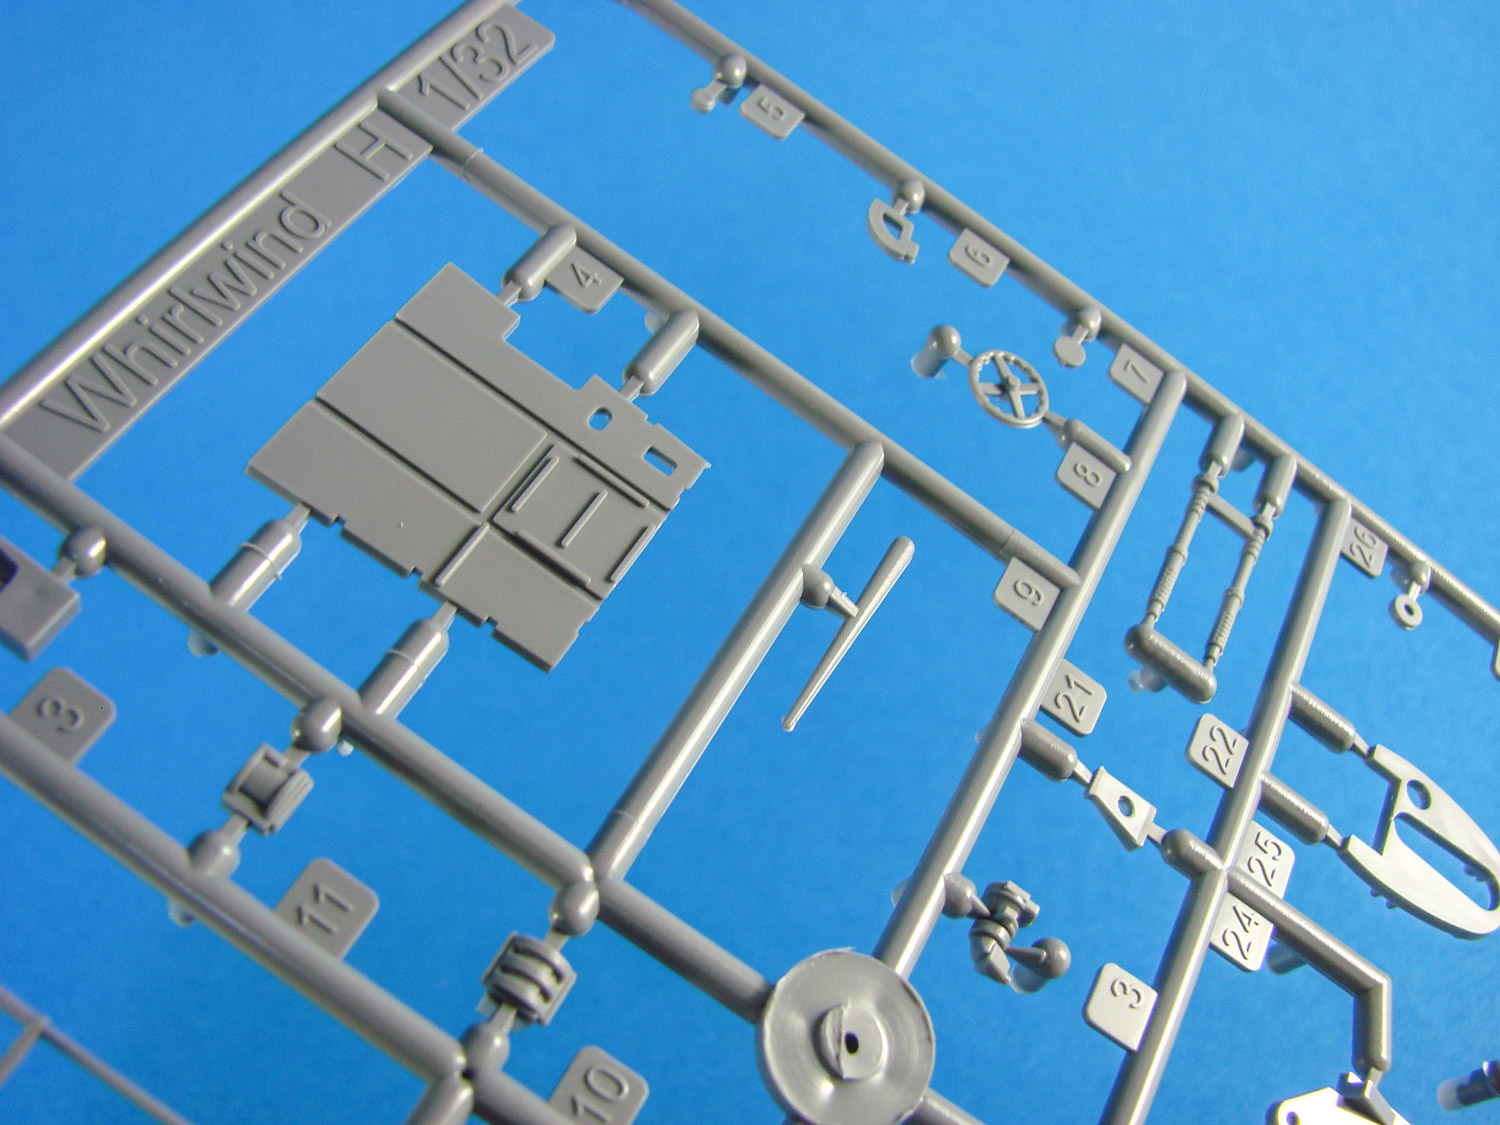
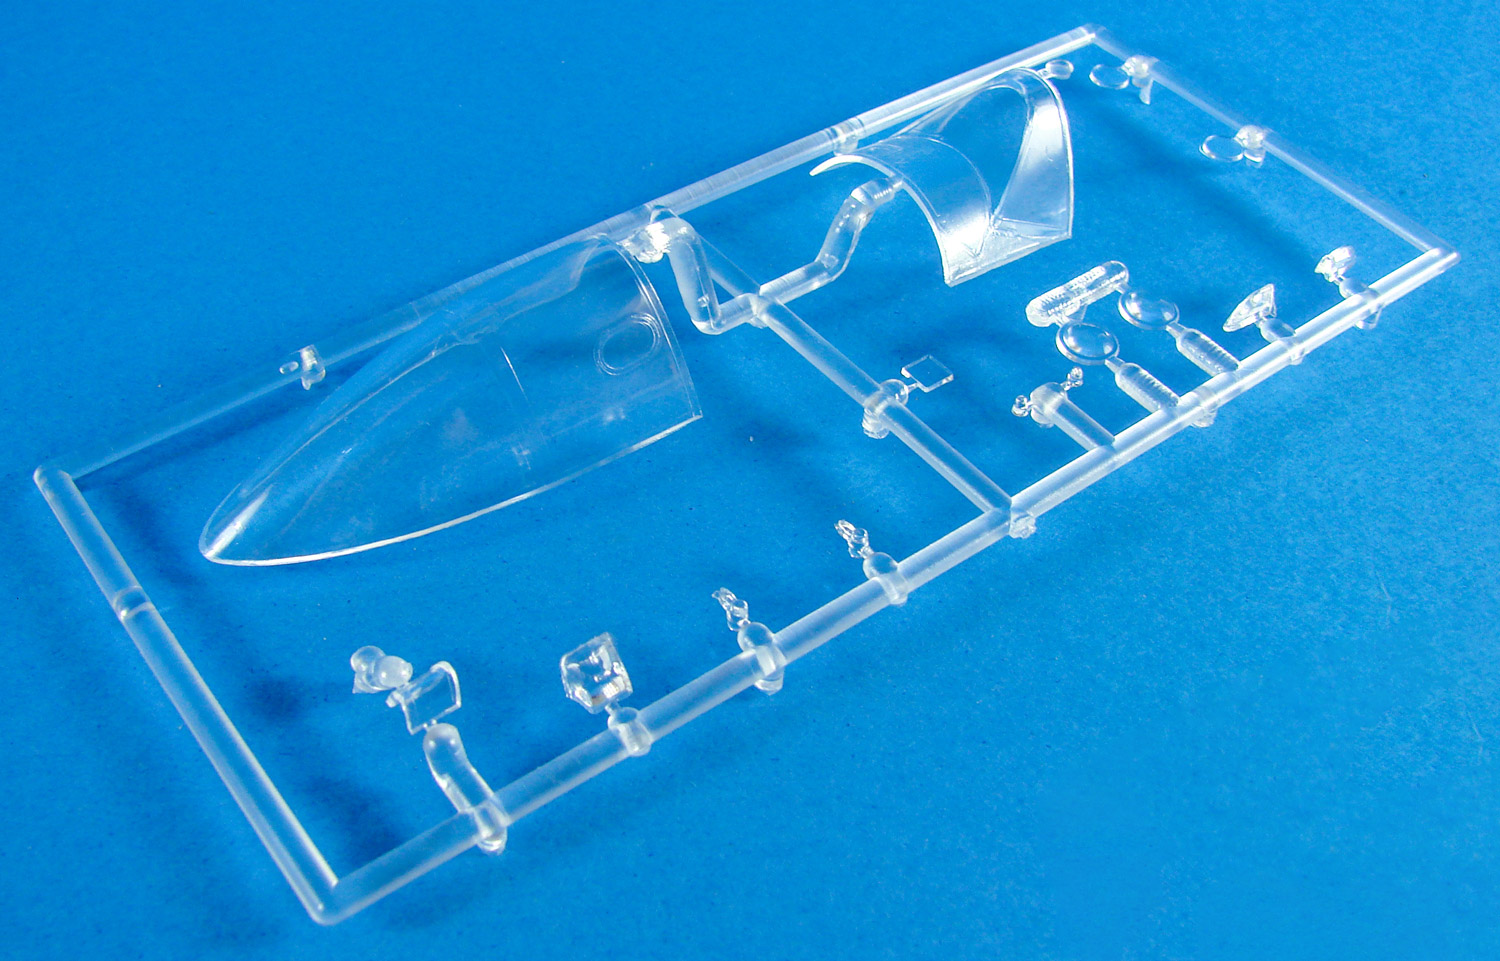
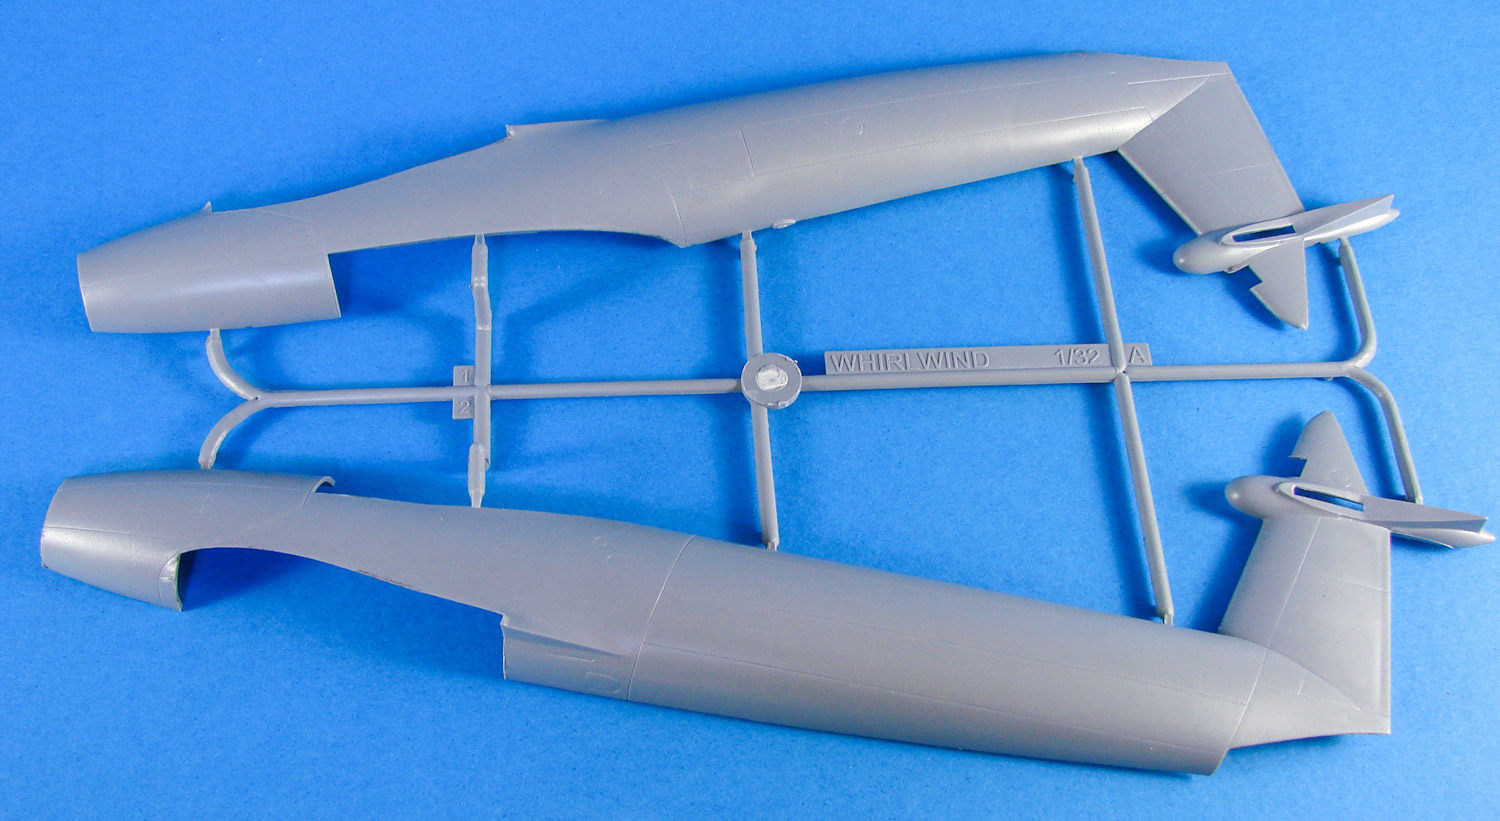
1:32 Westland Whirlwind F Mk.1 ‘Cannon Fighter’ Special Hobby Catalogue # 32047 Available from Artscale for €61,30 The Westland Whirlwind was a British twin-engine heavy fighter developed by Westland Aircraft. A contemporary of the Supermarine Spitfire and Hawker Hurricane, it was the first single-seat, twin-engine, cannon-armed fighter of the Royal Air Force. When it first flew in 1938, the Whirlwind was one of the fastest combat aircraft in the world, and with four Hispano-Suiza HS.404 20 mm autocannon in its nose, the most heavily armed. Protracted development problems with its Rolls-Royce Peregrine engines delayed the project and few Whirlwinds were built. Many pilots who flew the Whirlwind praised its performance. A 263 Squadron pilot said, "It was regarded with absolute confidence and affection". By comparison the test pilot Eric Brown described the aircraft as "under-powered" and "a great disappointment". The Whirlwind was also fitted with underwing bomb racks and were nicknamed "Whirlibombers". At least 67 conversions made from the original Mk I fighter. During the Second World War, only three RAF squadrons were equipped with the aircraft but despite its success as a fighter and ground attack aircraft, it was withdrawn from service in 1943. Adapted from Wikipedia The kit It’s been around 40yrs since I held a kit of a Whirlwind in my hand, with that then being the old 1:72 Airfix kit that was first released in 1958…..just 15yrs after the Whirlwind left service!! Special Hobby’s highly anticipated, large scale 1:32 Westland Whirlwind is the first injection moulded kit in this scale and had been mooted for a year or two before release. This one is packed into the same, large size box as their other 1:32 releases, such as the Tempest range, and the lid is adorned with a beautiful but simple painting of the aircraft over cloud cover, perfectly showing its lines. At some angles, the Whirlwind can look a little ungainly, but SH have made sure this image reflects the aircraft at its most menacingly beautiful. The kit contains NINE light grey styrene sprues, ONE clear sprue, a set of instructions and a single decal sheet. No resin or PE elements are present in this release. I presume that may come with SH’s potential Hi-Tech edition, as I do know there are several resin upgrade sets that will be released for this, as well as a set of masks from Special Hobby. Not all parts in this release will be used for this particular build, so I presume we’re going to see other editions, such as the Whirlibomber too….especially as bombs are included but zeroed out for use! I’ m not sure how viable it would be to build one with the parts included, or if there’s anything vital that’s not included in this release. Construction starts with the pilot’s office, as tends to be the case. With this one though, the cockpit floor is a separate entity which sits on the upper side of the wing centre section and the closed up fuselage with the remainder of the cockpit is then sat atop this, a little like how Special Hobby did their 1:32 Yak-3 fighter. The cockpit itself is superbly detailed. Fine rib and stringer detail is moulded within the fuselage halves as a starter. Internally, the cockpit comprises of detailed bulkheads, optional instrument panels for early and late versions, trim wheel, oxygen tank, amazingly detailed side console units with their levers, quadrants, switch banks, tail surface push rods etc. Of note are those instrument panels with their superbly rendered details, levers, bezels etc. The instrument faces are also blank, to accept the instrument decals that are supplied. Those are printed in one piece to cover the whole panel, but I’d look at perhaps punching out the individual dials so you don’t need to get the decal to conform to various raised and lowered details across different levels. To the back of the pilot are the flare chutes, also nicely reproduced here. You may just catch a glimpse of these behind the pilot seat, but I wouldn’t lay money on that. To the rear of the pilot, you also have the avionics sat on the turtle deck. The cockpit floor module is no less detailed, with over a dozen parts including nicely rendered two-part floor, rudder bar/torque rod assembly, pedals etc. The seat isn’t fitted until the airframe is assembled, again, in the same way as their Yak-3. This one comprises eight parts and will look great when built. The only problem is the kit provides no seatbelts! The control stick is also built and fitted at this ;late stage too. Externally, the fuselage details are very nice, with fine panel line engravings and good rivet detail. The nose of the Whirlwind is separate so the cannon can later be fitted. There will be a resin upgrade for this area which will detail the whole nose gun bay. The rudder is also separate too. Special Hobby have moulded a full-span wing which is assembled as traditional upper and lower halves. The ailerons have been moulded as part of the wings, as have the landing flaps. The latter would just add further complication as it would’ve needed the rear engine nacelles to sort of move with them, so that’s understandable why they didn’t bother with it. The airbrakes on the inboard upper wings, however, are separate and can be posed. Internally, the wings have their inboard engine intake parts and there are also sections of the wing spar structure that can be seen too, so it’s good to have captured that aspect. I’m a little at odds with some of the external surface textures on the wing. In all, they actually look very good, but looking at some photos of the machine, they seem to point towards things looking a little exaggerated with the raised elements, such as the wing fuel tank area, and the raised lines on the area to the outboard side of each nacelle. I think I would perhaps want to see if I could lessen the overall effect. Assembly of the stabilisers and elevators is traditional with an ability to pose these, should you wish. Building the engine nacelles looks straightforward, and thankfully, they’ve been designed so he undercarriage can be fitted after the main paint scheme is applied. The nacelles are also as well detailed internally, with the back of the Peregrine engine being included to mimic the full thing. There are no exhausts to speak of, but rather the slimline shrouds which were a hallmark of the nicely egg-shaped pods into which those engines fitted, without any real thing to ruin the lines. The props look like they are designed to be shown without spinner, if needed, as the inner hub details are very good, and the hub itself is built from five separate parts, not including the spinner backplate. Each prop has three separate blades too. The undercarriage assemblies look reasonably easy to sort, with some attachment points for the hydraulics lying towards the rear bulkhead, in the well ceiling. I don’t think too much fettling will be needed to get these into place and to ensure they’re level on both sides. Parts detail is very fine, and these will look great with a wash applied. Wheels are supplied as halves and have a weighted appearance to them. Lack of tread means they’ll present no problem in seam removal. The clear sprue is beautifully clear, and moulded nice and thin. The windscreen is moulded with the immediate fuselage area incorporated as is seen in kits such as Tamiya’s 1:32 P-51D, and of course, the canopy can be posed in either an open or closed position. Other parts on this sprue include the gunsight reflector, fin light cover, tail light cover, wingtip lights and underwing lights. Decals A single, Cartograf-printed decal sheet is included with markings for four schemes; two of which use the older style brown and green camo, and the other two using the grey and green scheme. The decals themselves are nice and thin, contain solid and authentic colours, and with minimal carrier film. As with anything Carttograf prints, these should present no problems. A small number of stencils are included, as are decals for both style of instrument panel. The included schemes are: Westland Whirlwind Mk.I, P6985, HE-J, No.263 Squadron RAF, Exeter air base, March 1941 Westland Whirlwind Mk.I, P7061, HE-A, No.263 Squadron RAF, Charmy Down airfield, September 1941. Westland Whirlwind Mk.I, P7118, HE-F, „Bellows Argentina No.2“, pilot S/L Eelse, No.263 Squadron RAF, Colerne airfield, Wiltshire, Winter 1941/42. Westland Whirlwind Mk.I, P7081, HE-E, “Bellows Argentina No.3”, No.263 Squadron RAF, Charmy Down airfield, October 1941. Instructions This glossy, 16-page A4 manual breaks down the Whirlwind into 73 constructional stages, all illustrated with clear line drrawings and small elements of colour to denote part numbers or areas requiring paint. The latter has letters throughout which relate to a key in the early part of the manual, listing Gunze paint codes. The last pages of the manual are tied over to the schemes, and printed in full colour for ease of use. Conclusion I’ve waited almost a lifetime for a large-scale kit of this beautiful and yet failed attempt at a powerful, cannon-equipped fighter, and I’m not disappointed. Special Hobby’s kit not only captures the Whirlwind’s awkward and slightly gangly lines (at certain angles), but also adds to this with excellent internal details and some very nice surface details. I do feel some external details are perhaps a little too heavy, but I can generally forgive that for what is a fantastic kit, overall. The engineering of this kit is so that there’s no awkward fit between the fuselage and wing, and the wing being full-length unit also helps with ease of assembly. It would’ve been nice to see separate ailerons as there are with the rudder and elevators, but this can be done with some ingenuity, should you wish. In all, a lovely kit of one of my favourite subjects. What’s not to like! My sincere thanks to ArtScale for the sample seen here. To purchase, click the link at the top of this article.


-2-1.thumb.jpg.b206093e688943bae6a33a5f37493fd9.jpg)
-2-4.thumb.jpg.bfa77646fb8b22df40a89b5eb3a39270.jpg)
-2-6.thumb.jpg.6b25042c4db1d8f630c1227552193392.jpg)
-2-11.thumb.jpg.3300387512e6e8031efdeecbb554689b.jpg)
-2-12.thumb.jpg.00000322936d0d3f2a702ed29c76cf87.jpg)
-2-13.thumb.jpg.732c9eeeabefef4d587bb557e572e532.jpg)
-2-14.thumb.jpg.c80fb55b0ad46b5968e0c6fe4bec0933.jpg)
-2-15.thumb.jpg.c42be0089f31f0d6035aa27e2bdf7f9e.jpg)
-2-16.thumb.jpg.484126a5064a012a4e776d0d524e61b9.jpg)

-
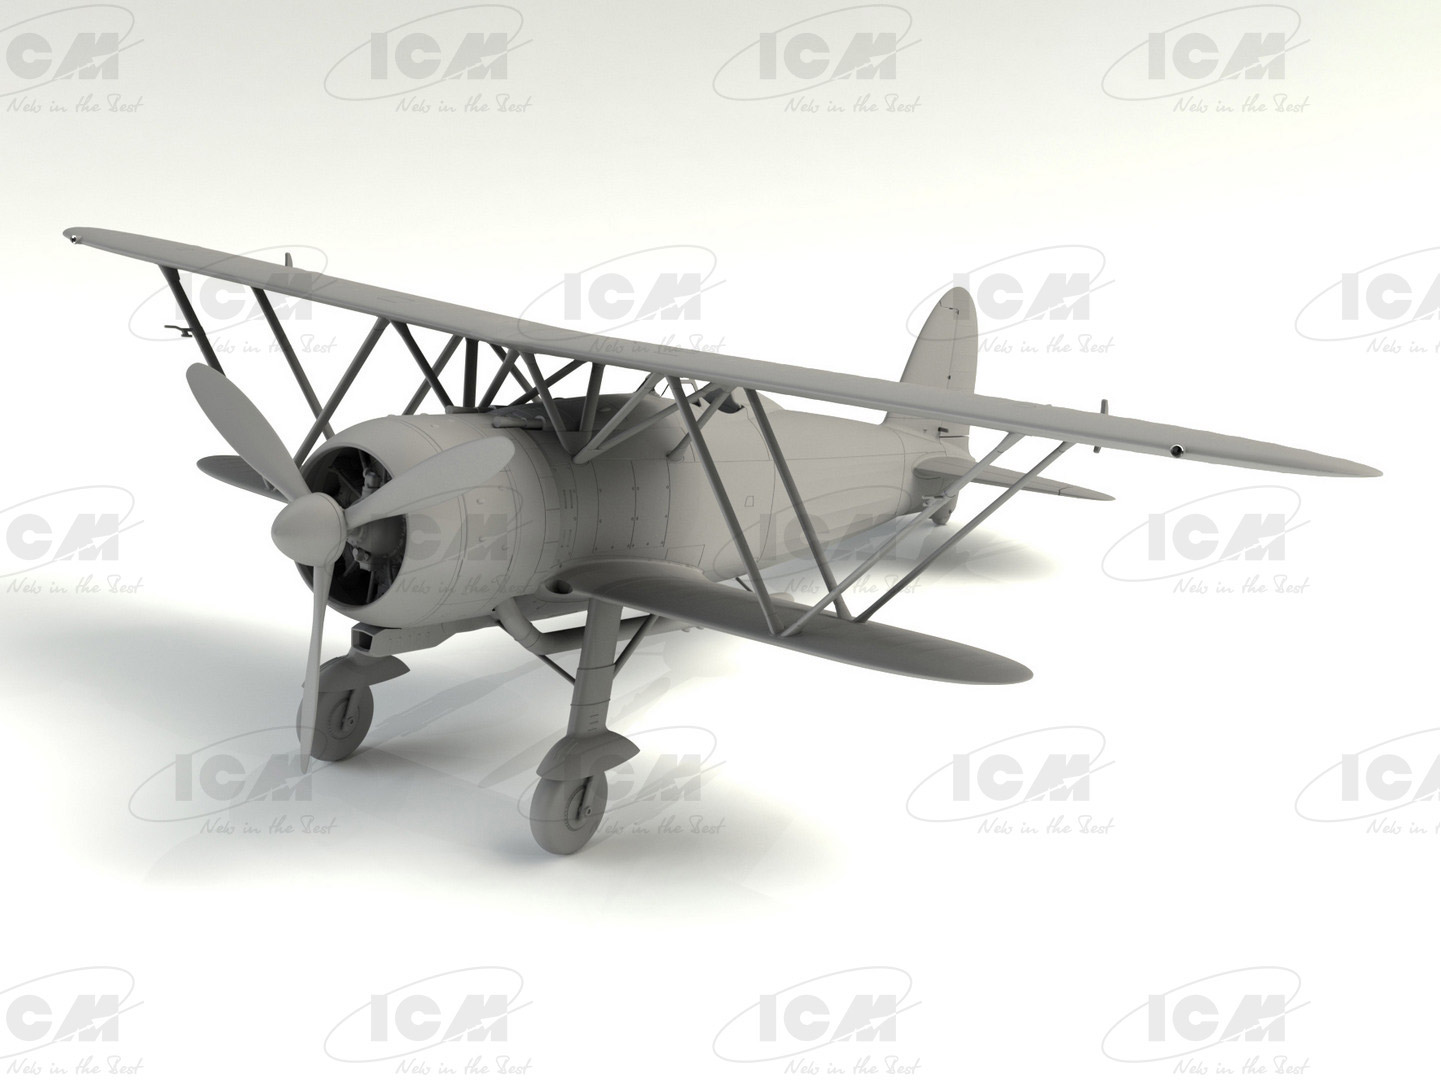
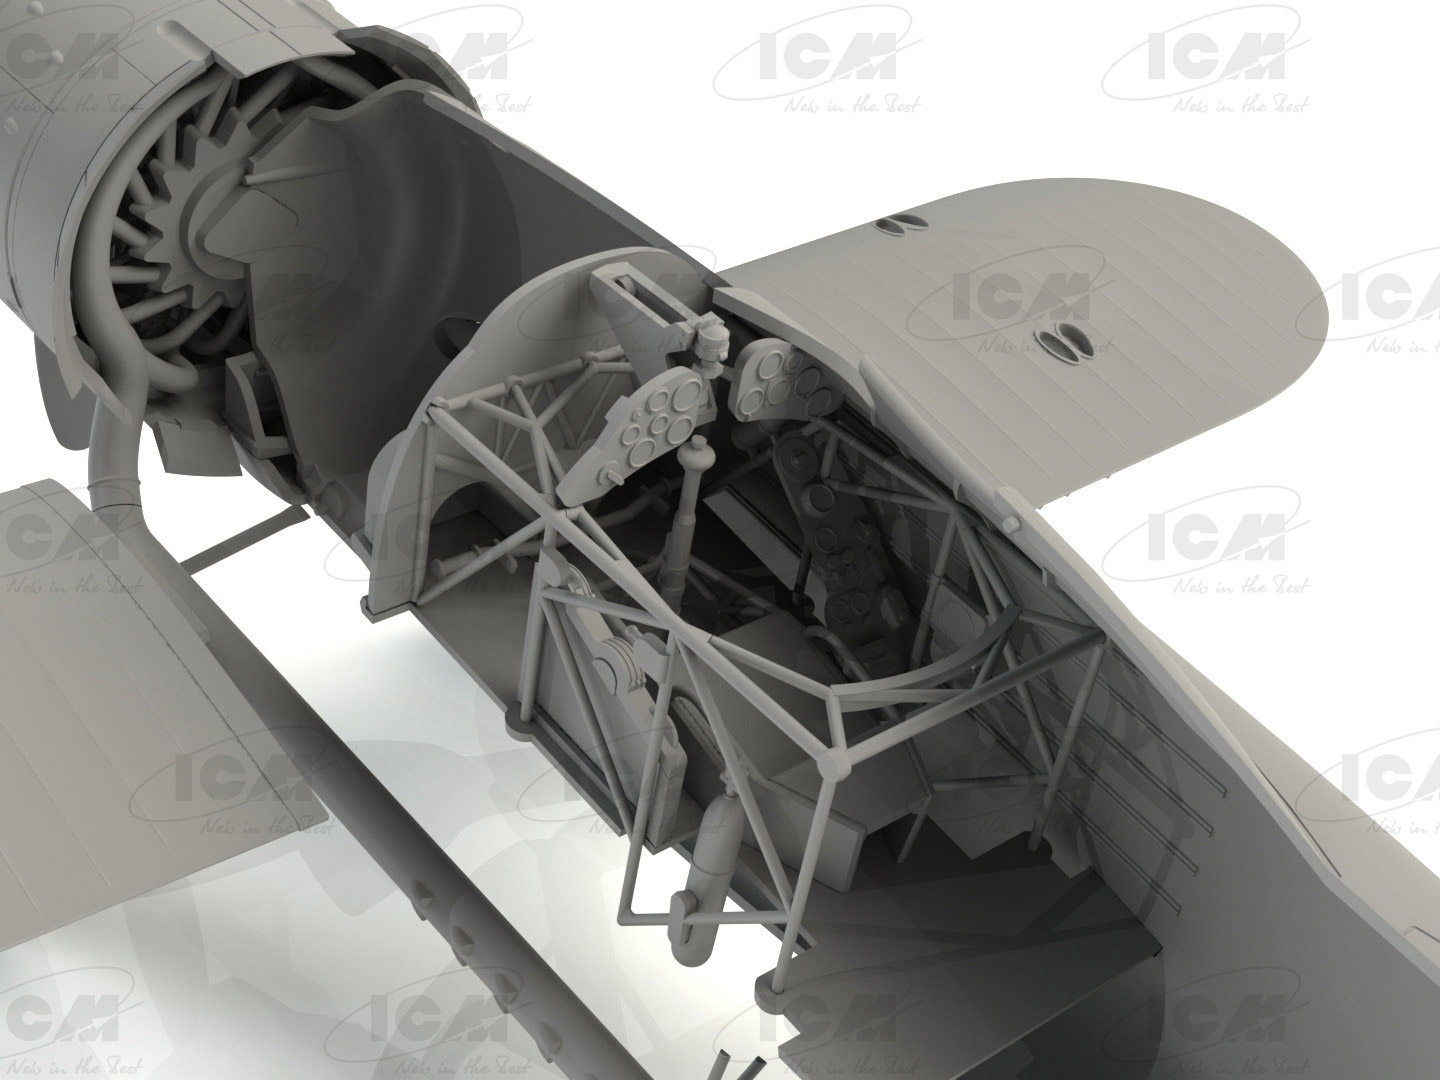
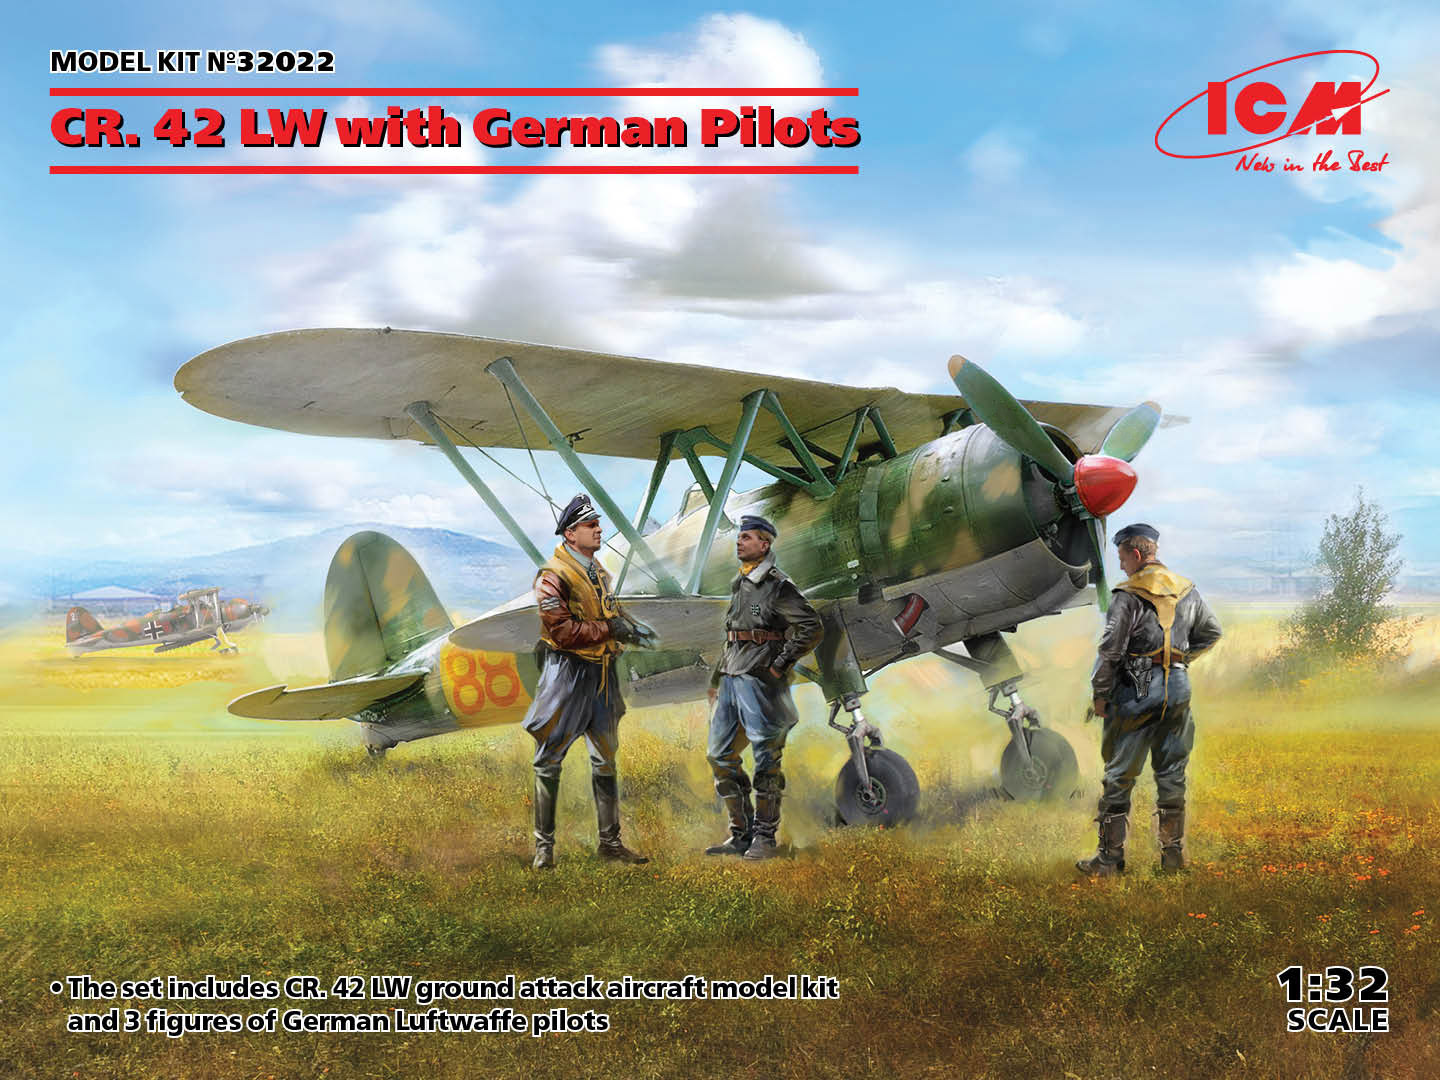
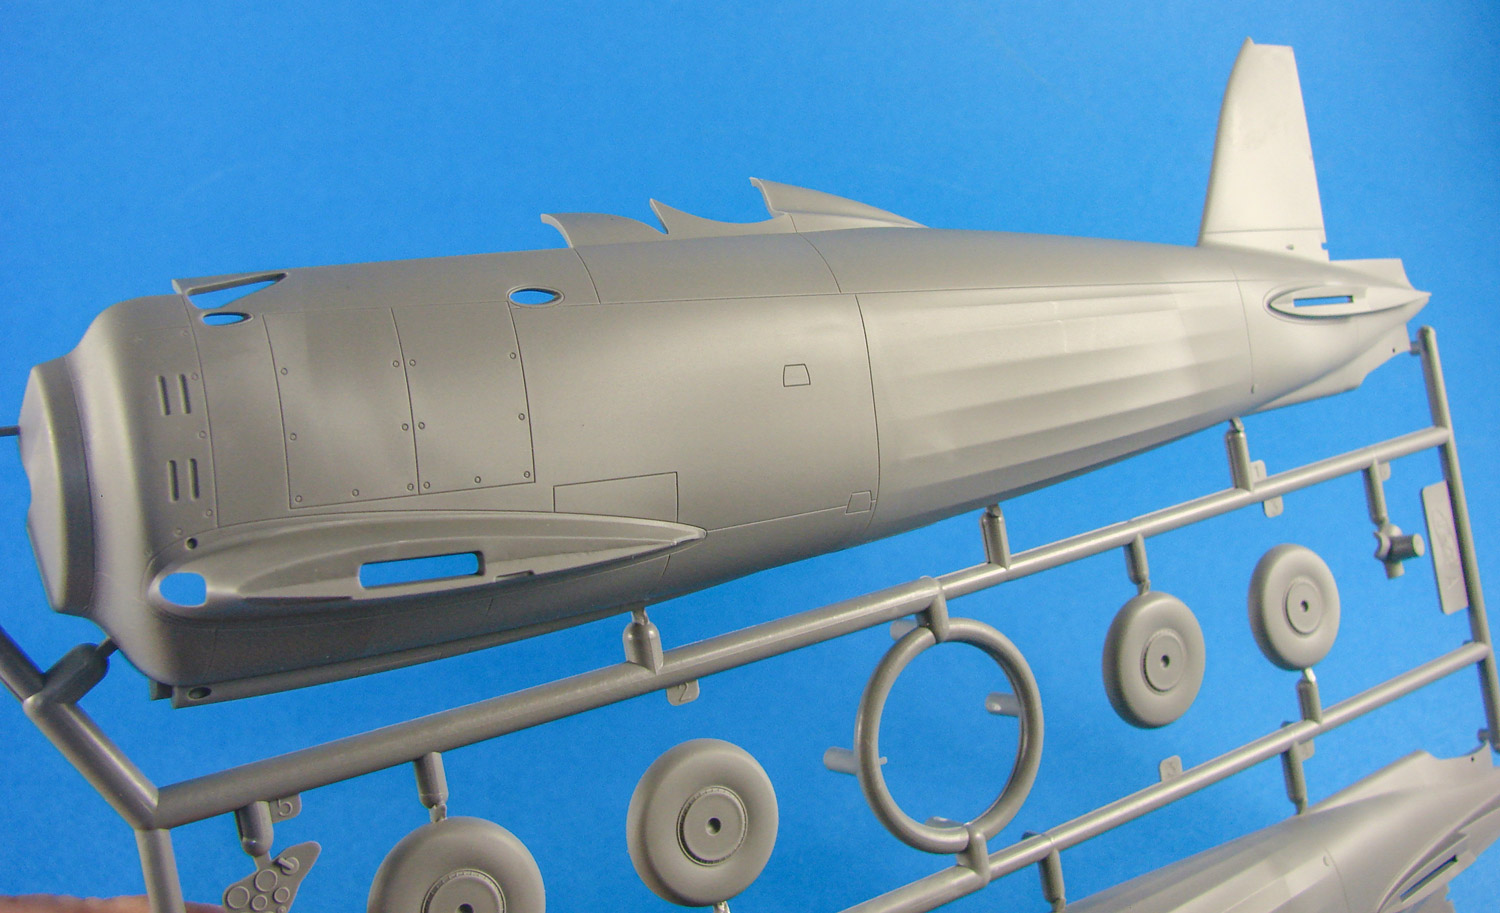
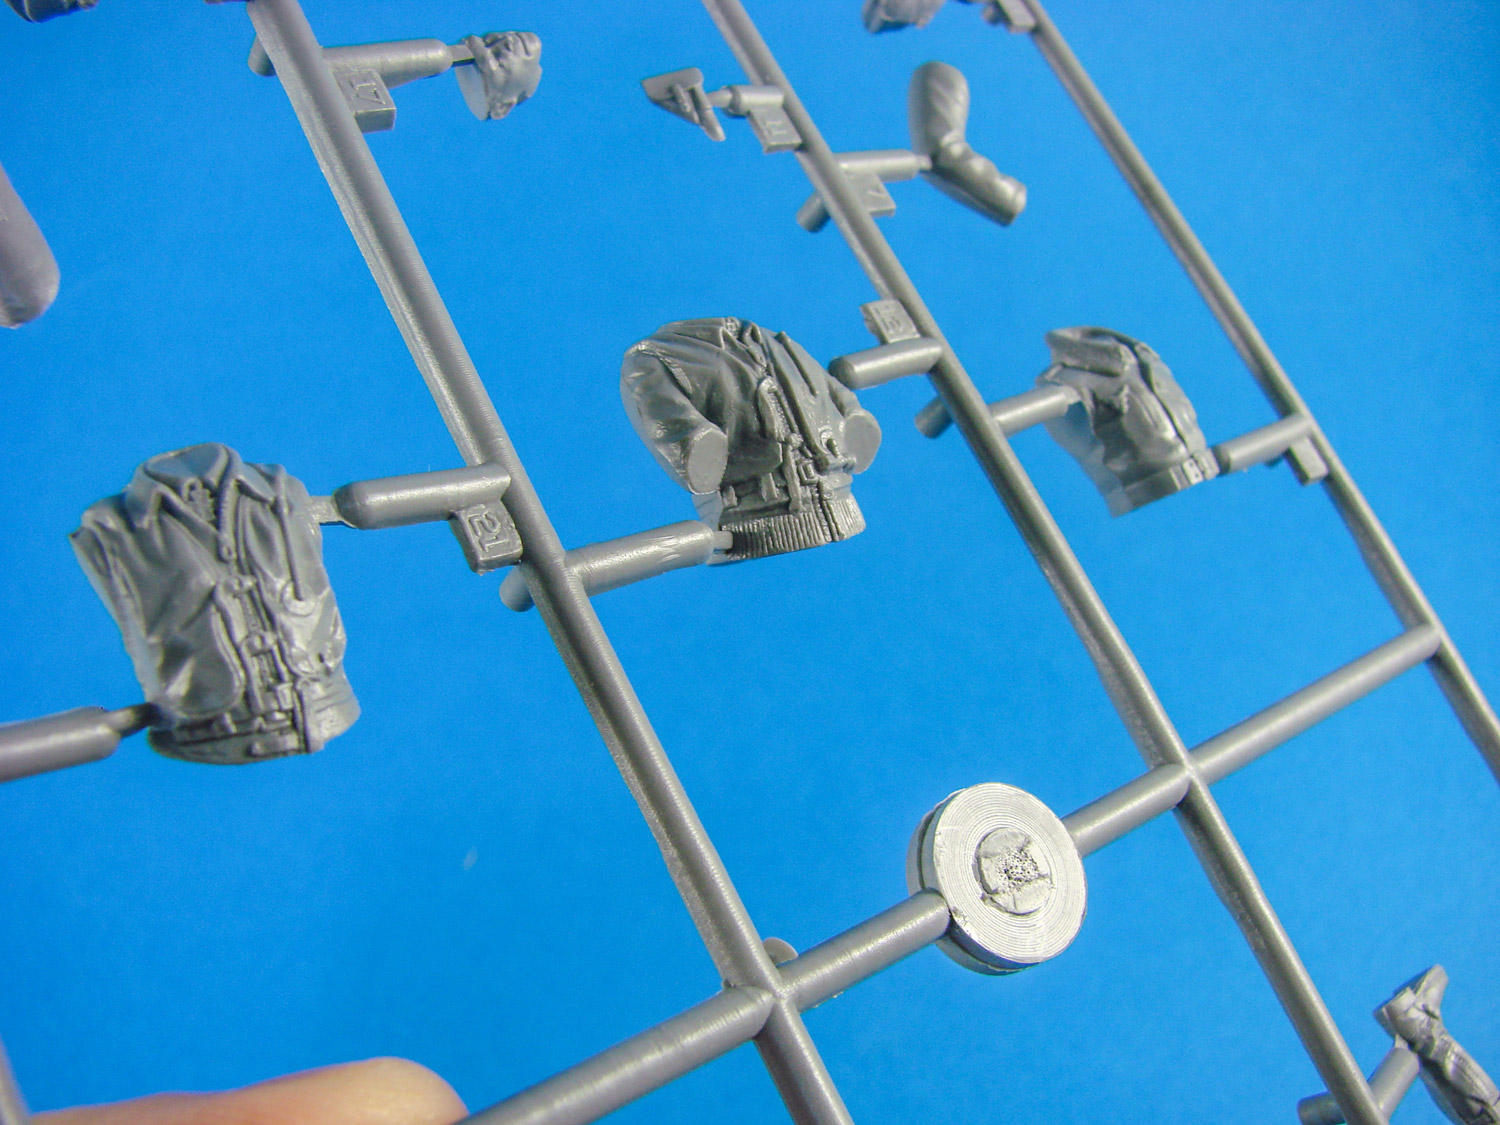
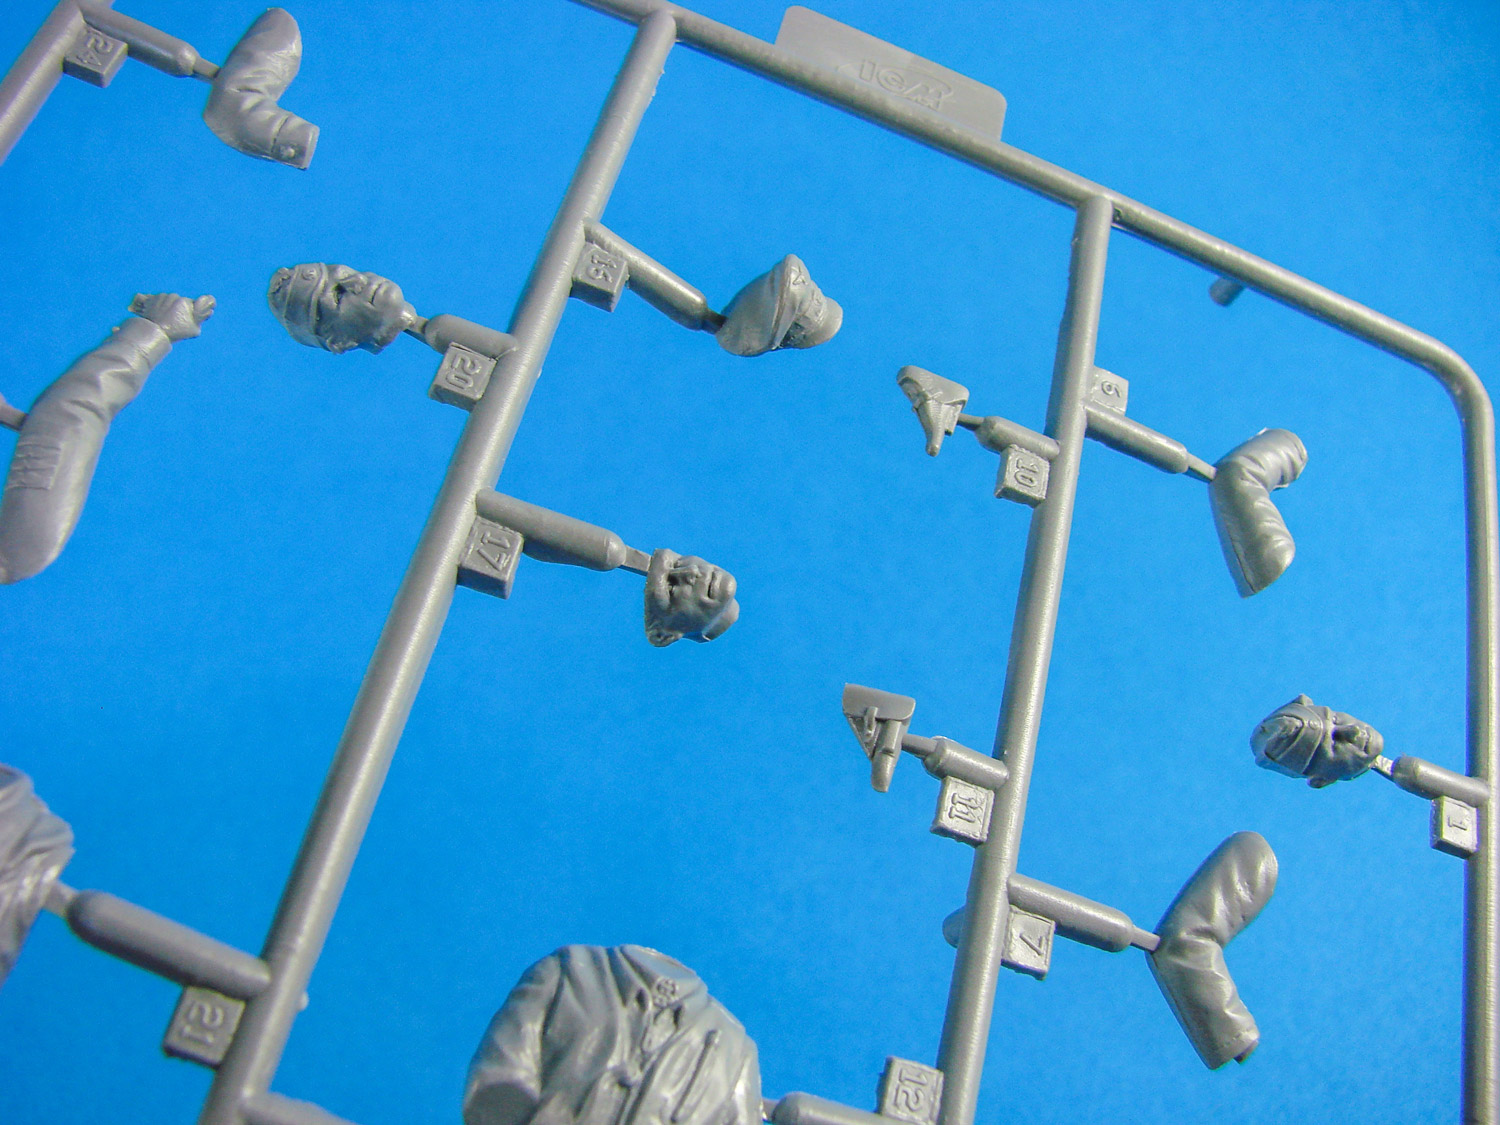
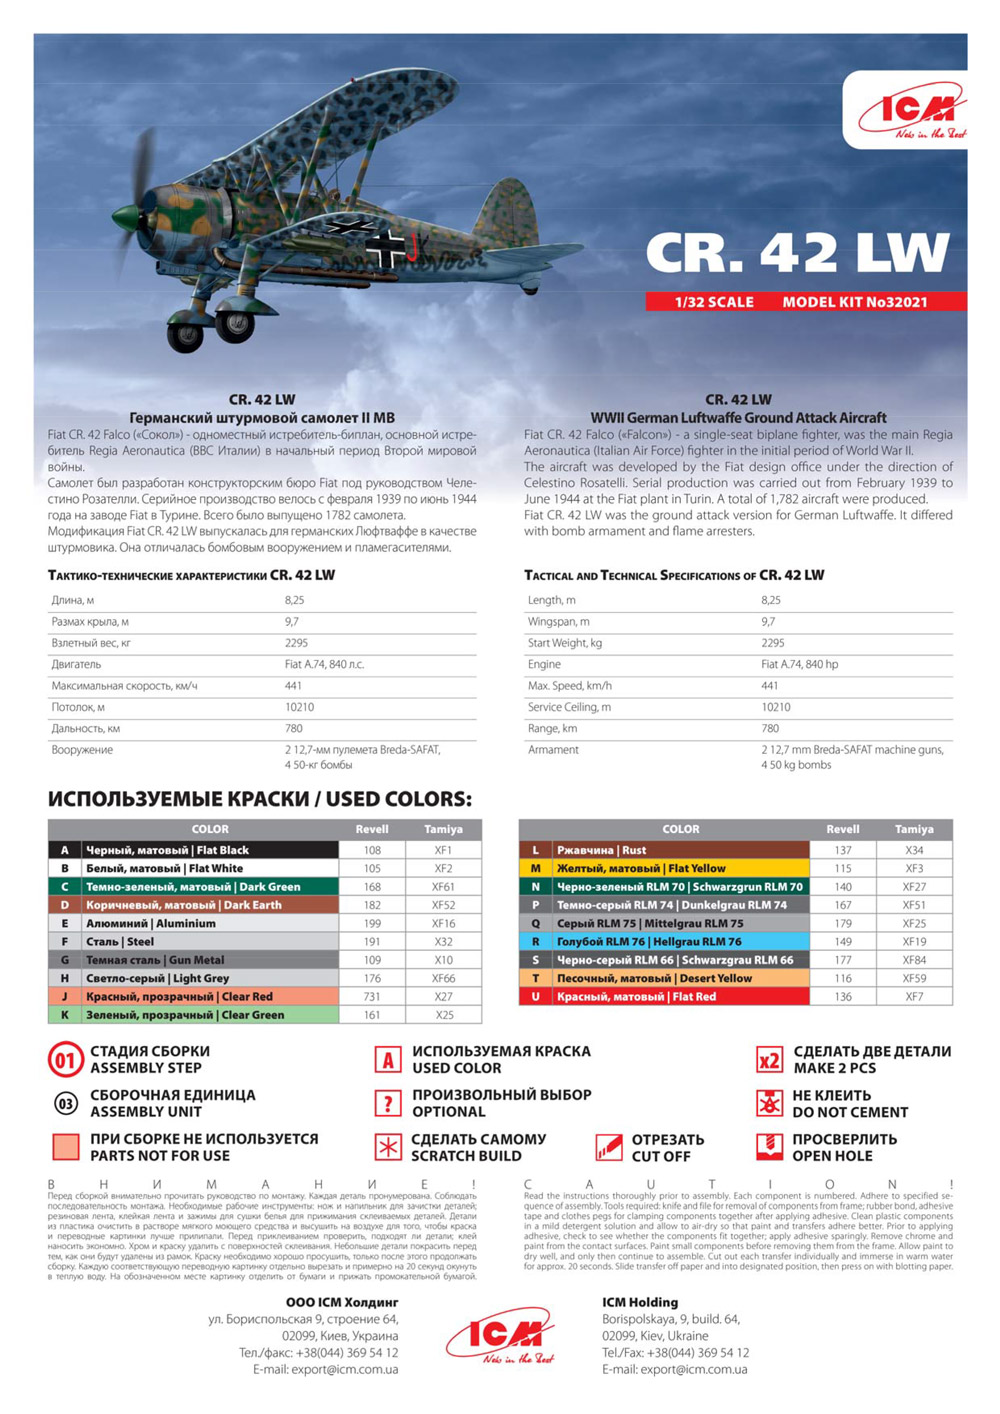
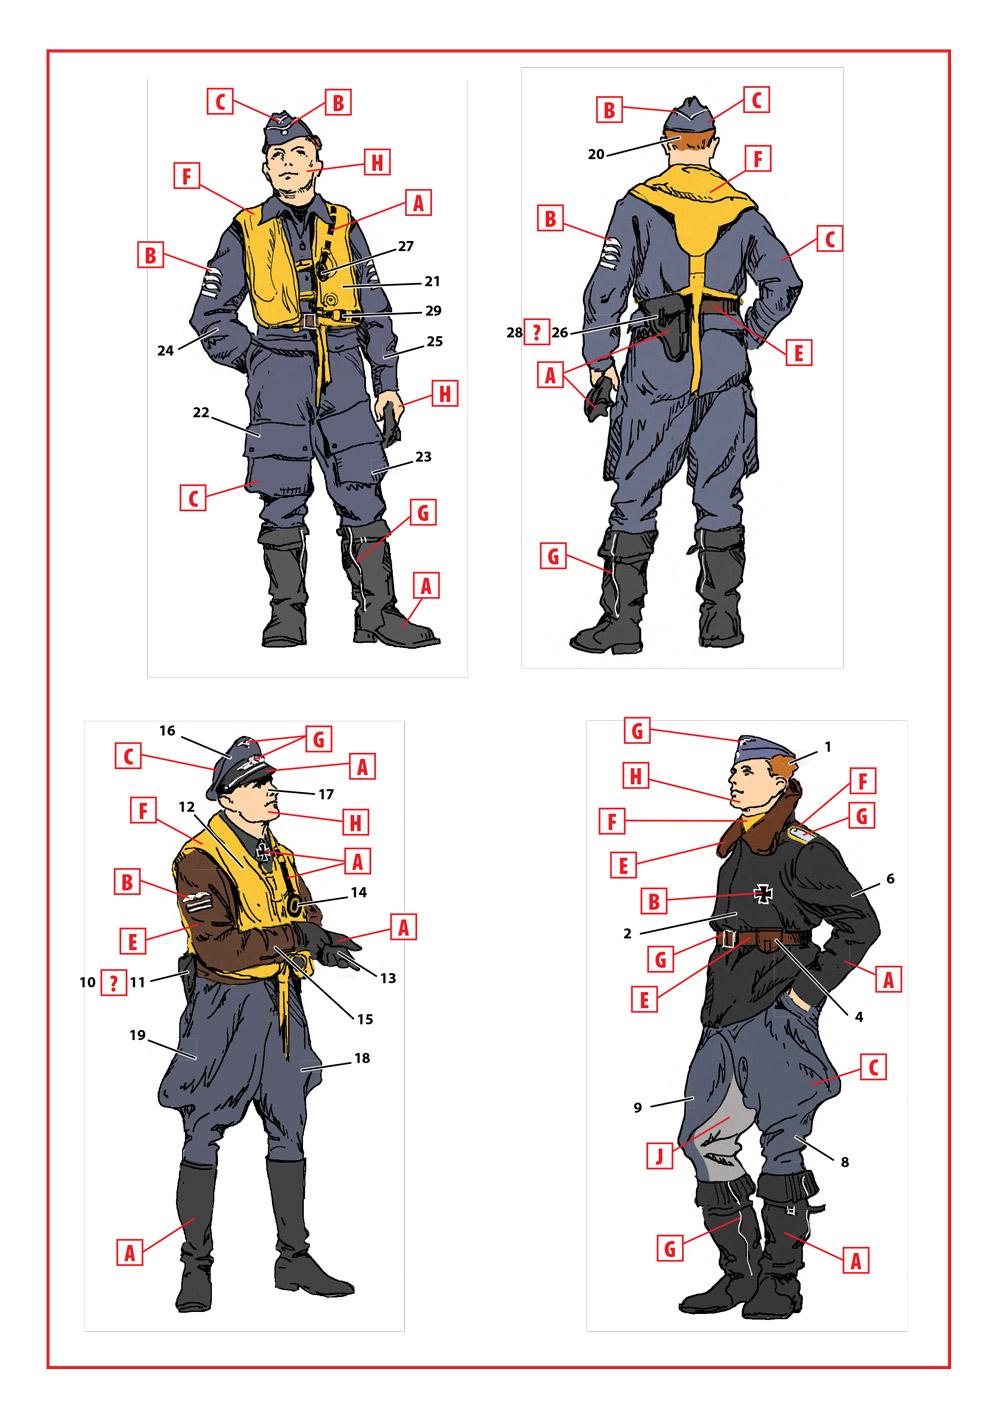
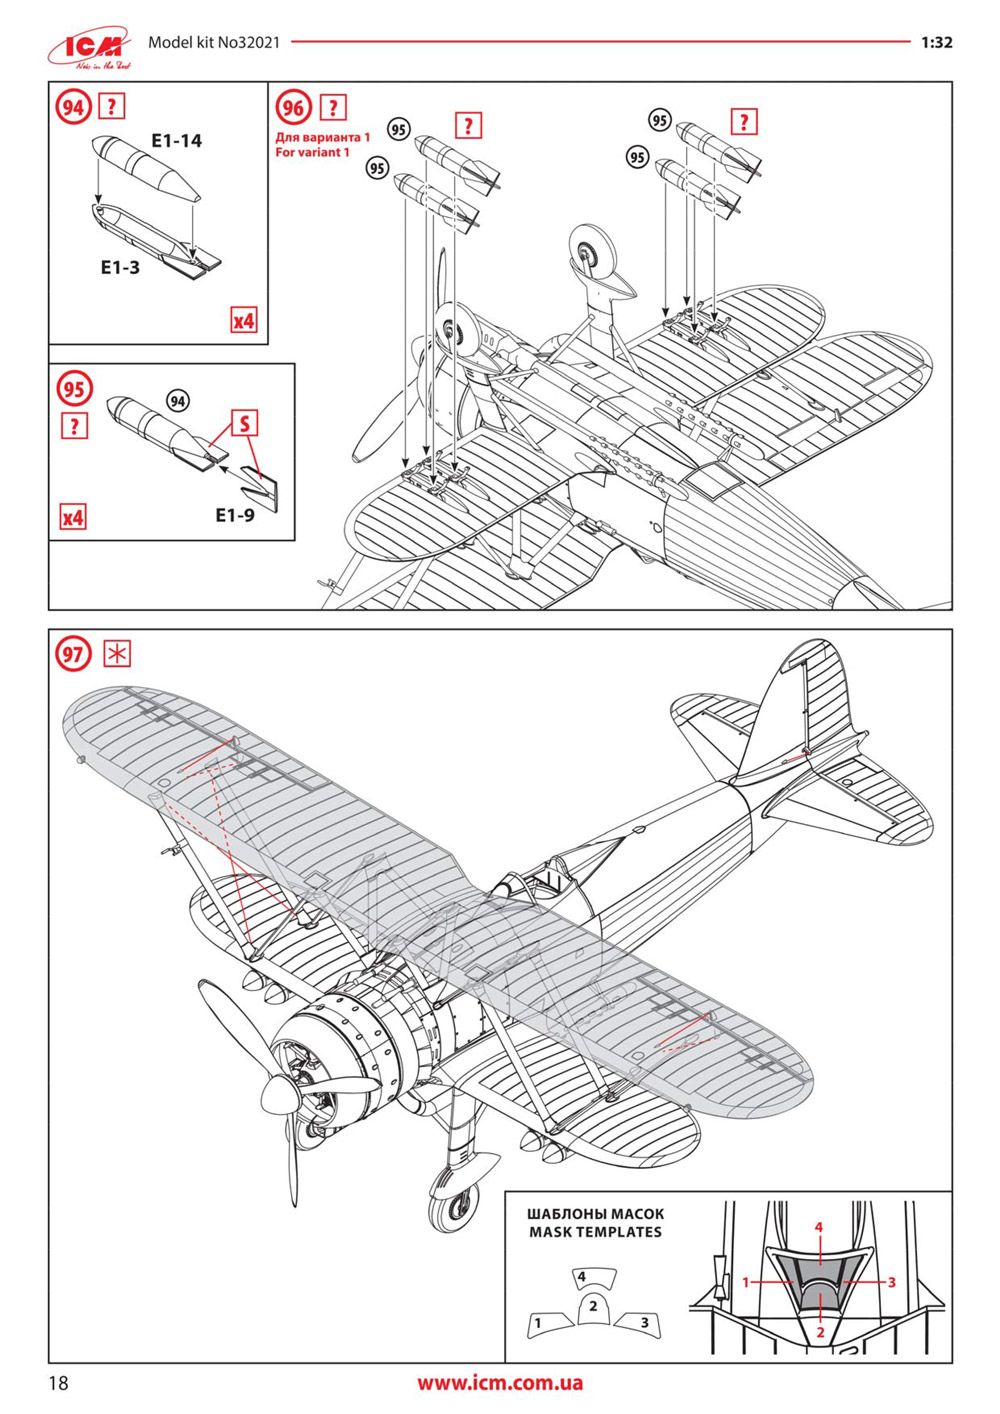
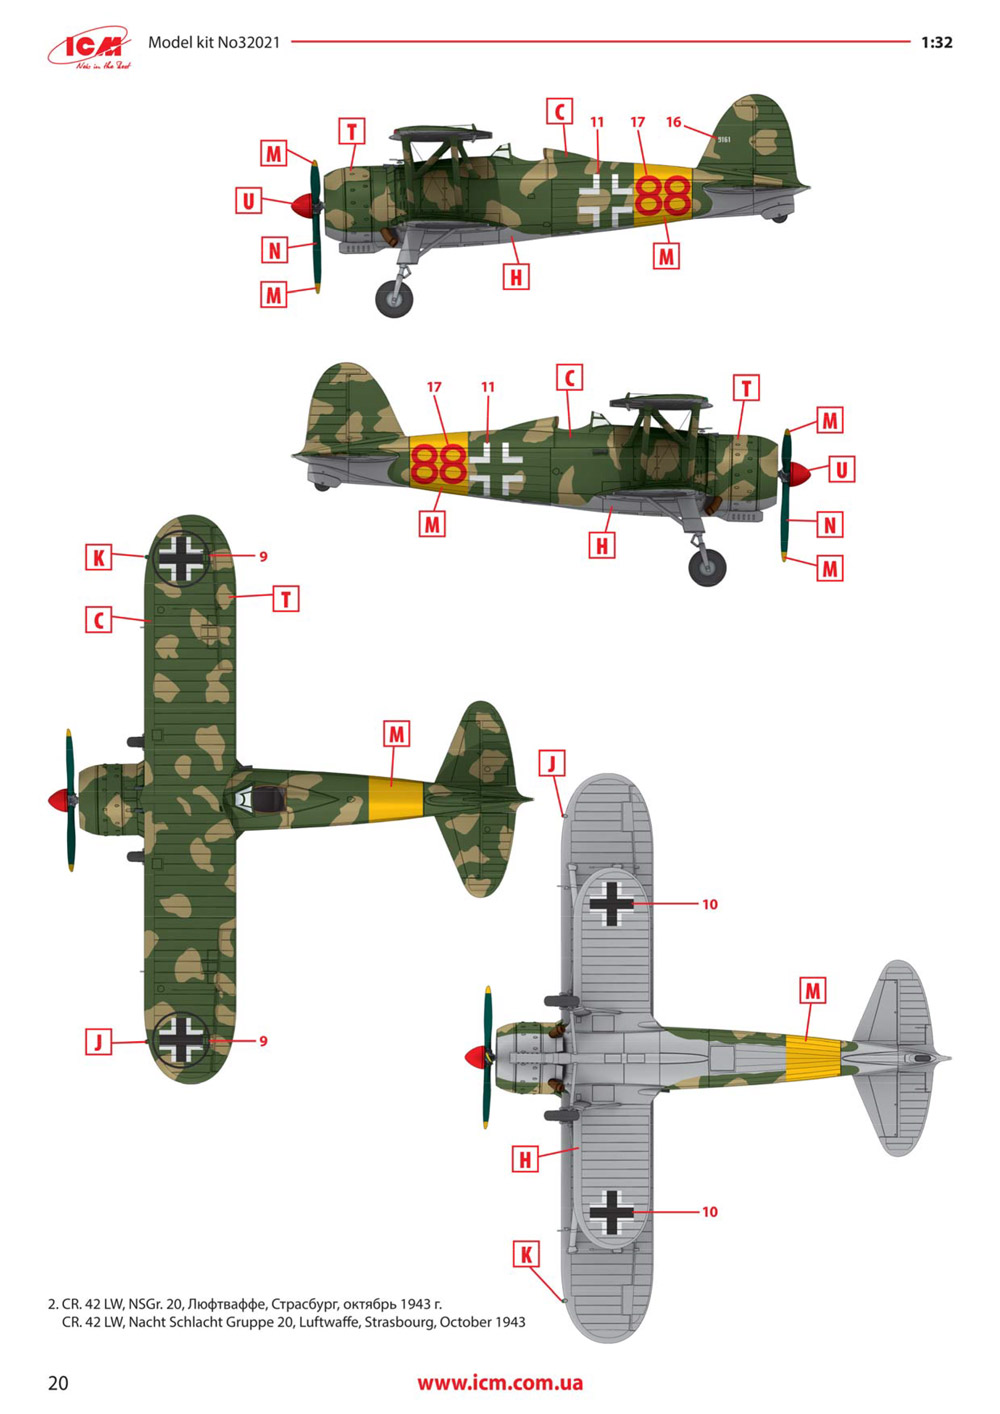
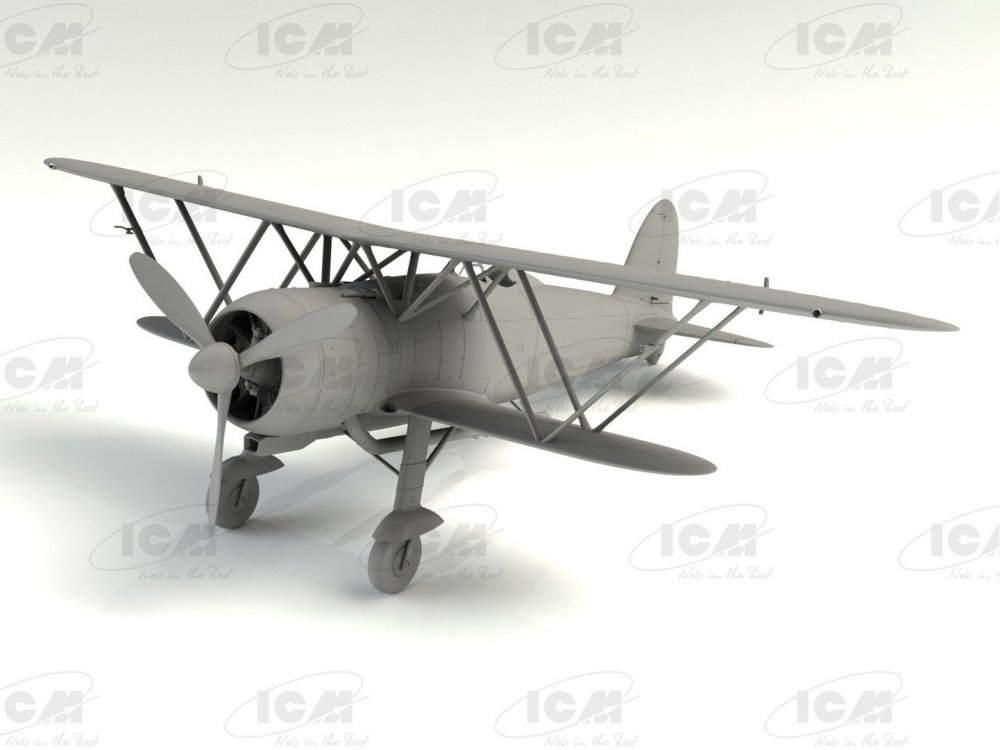
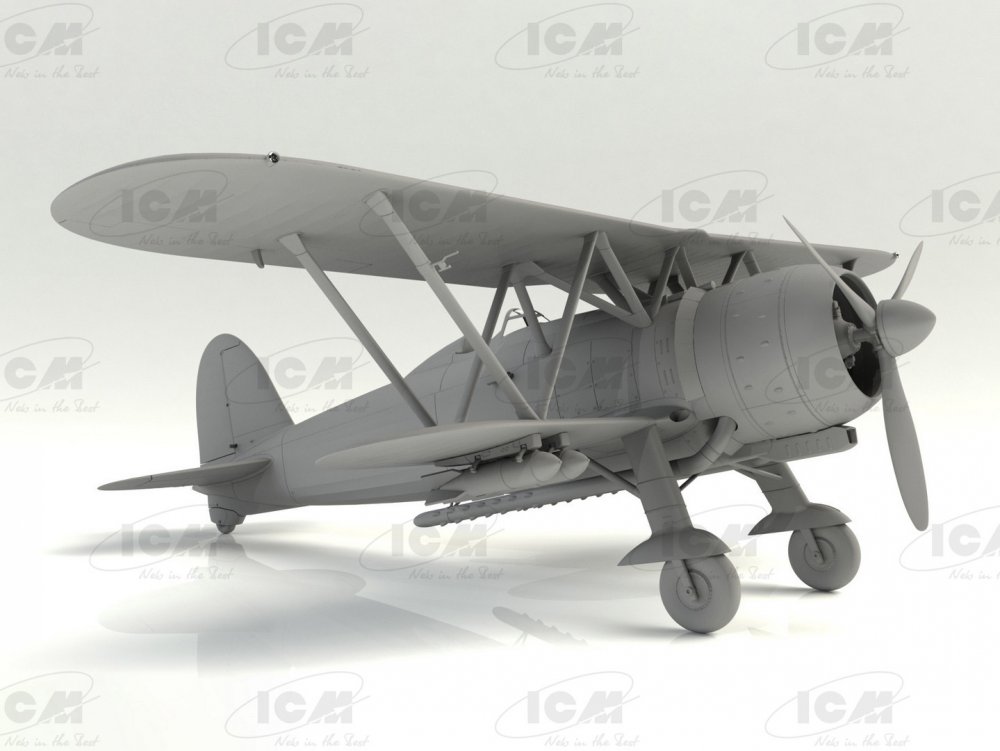
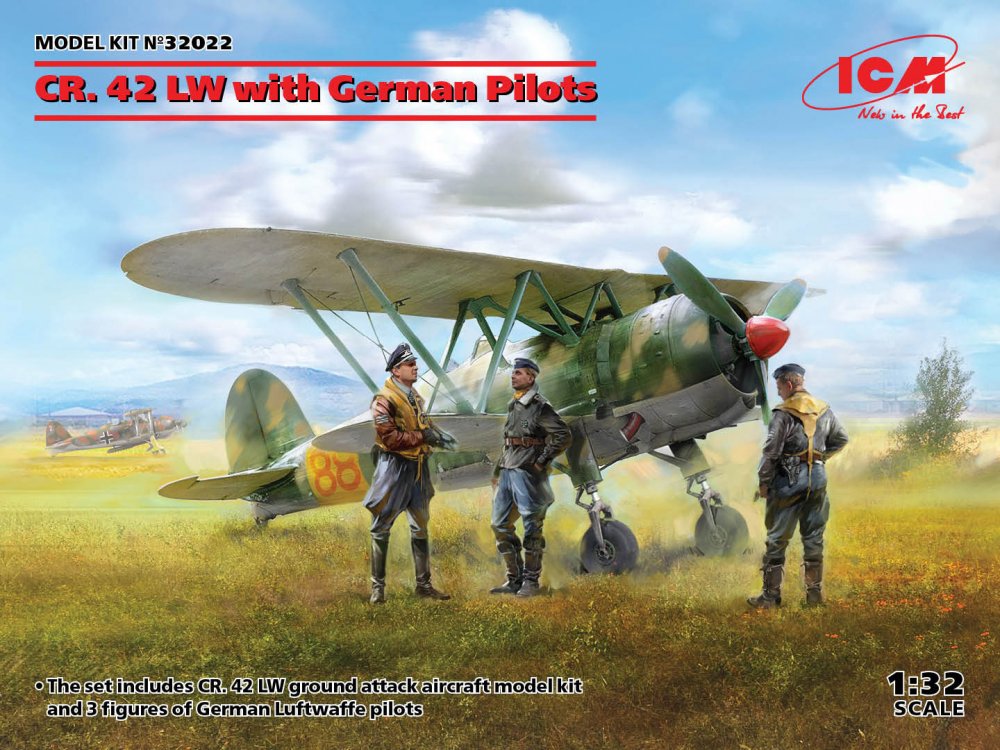
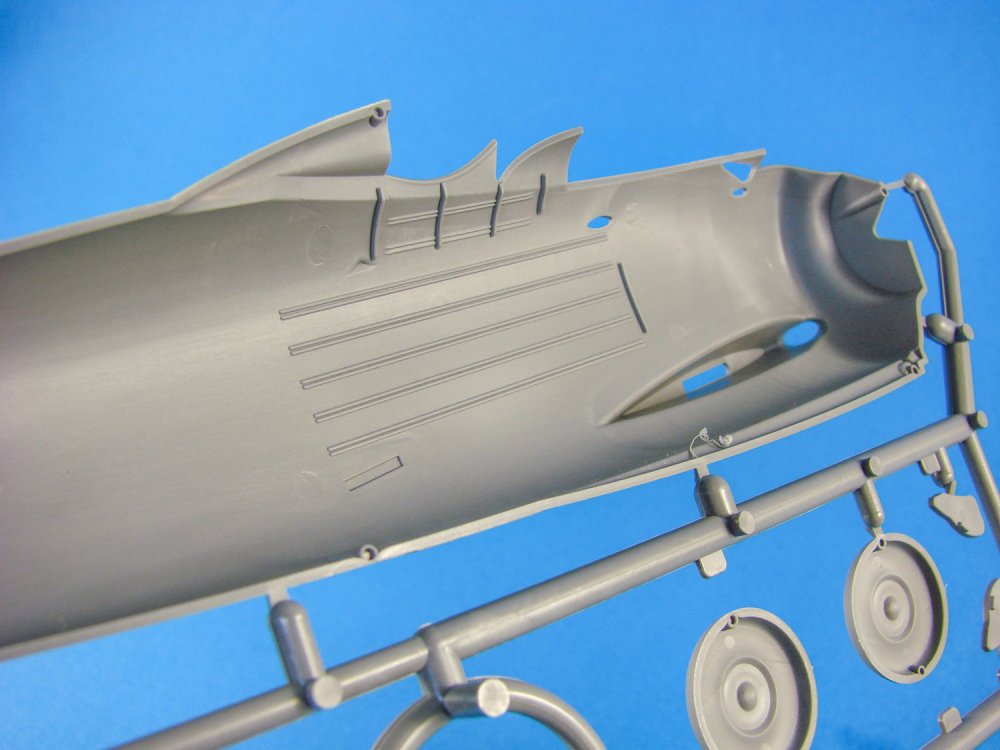
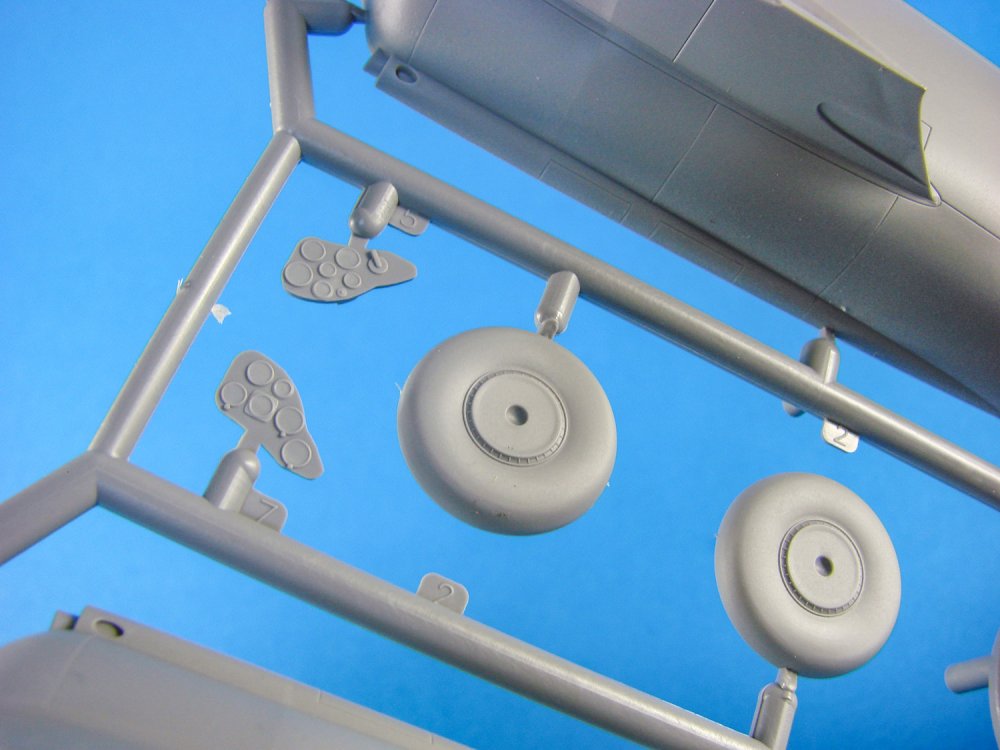
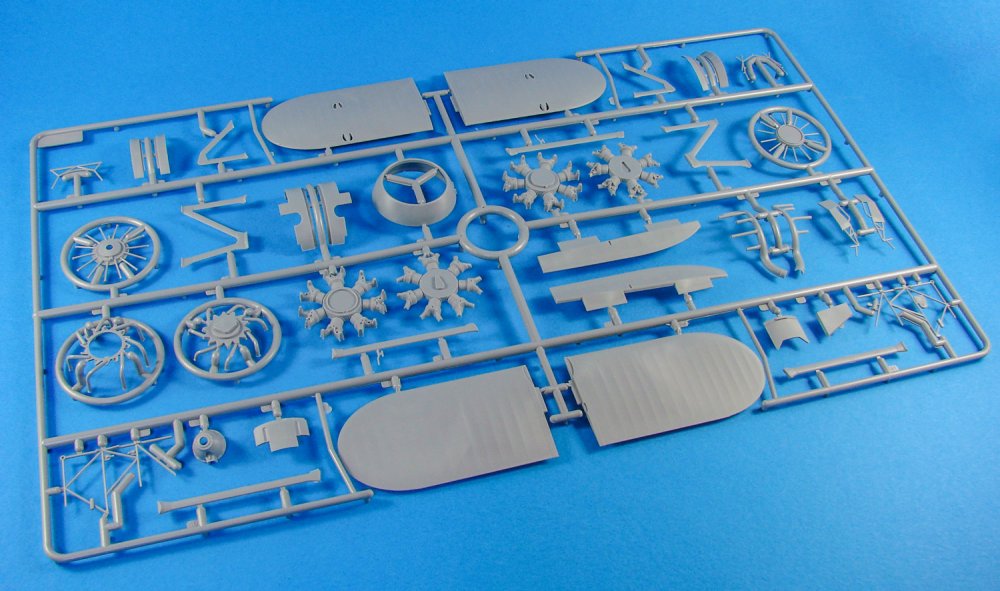
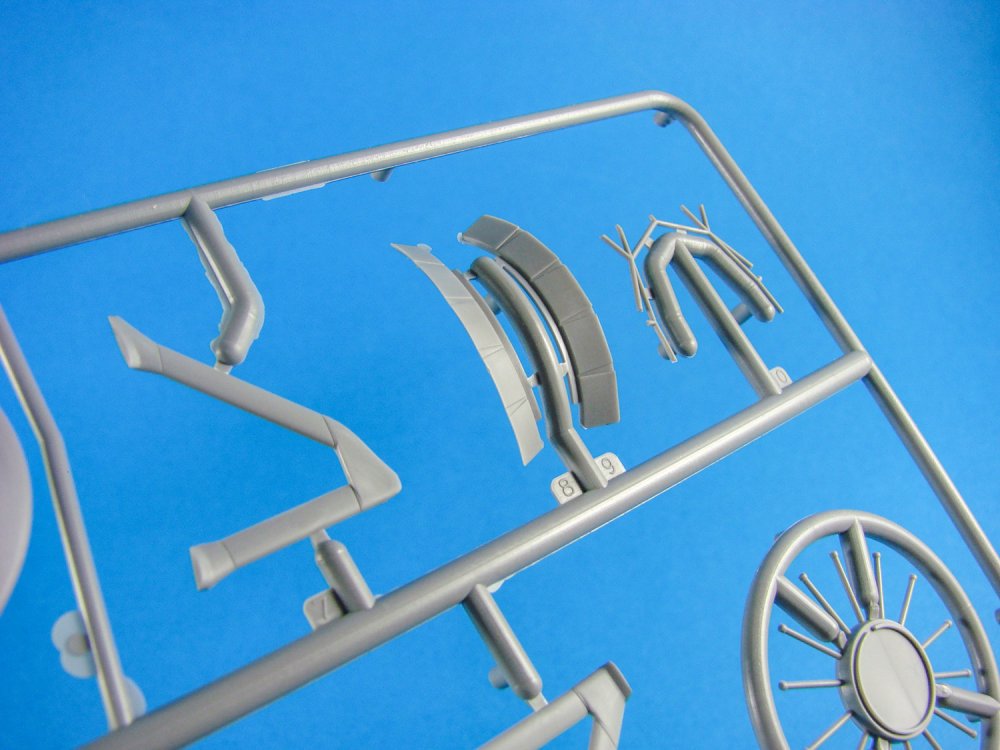
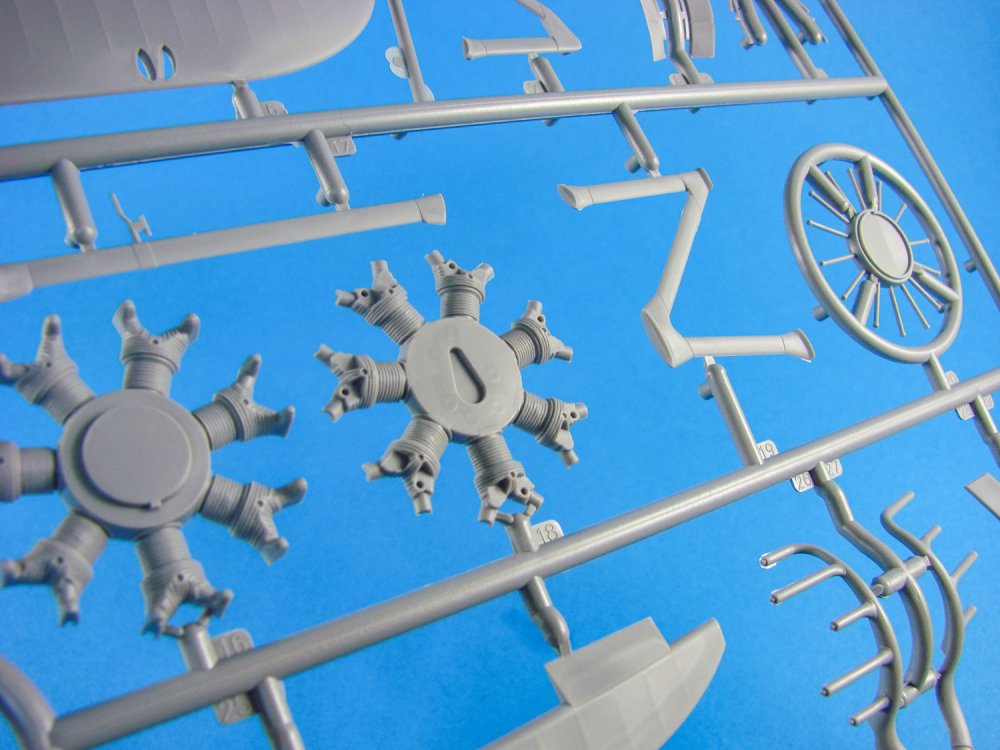
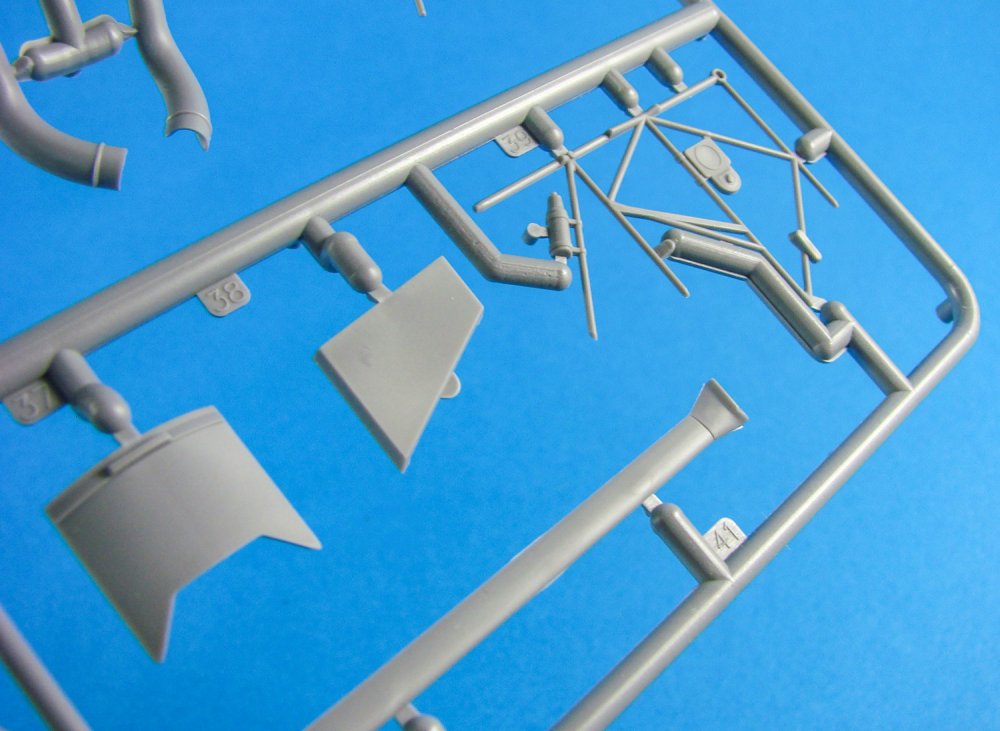
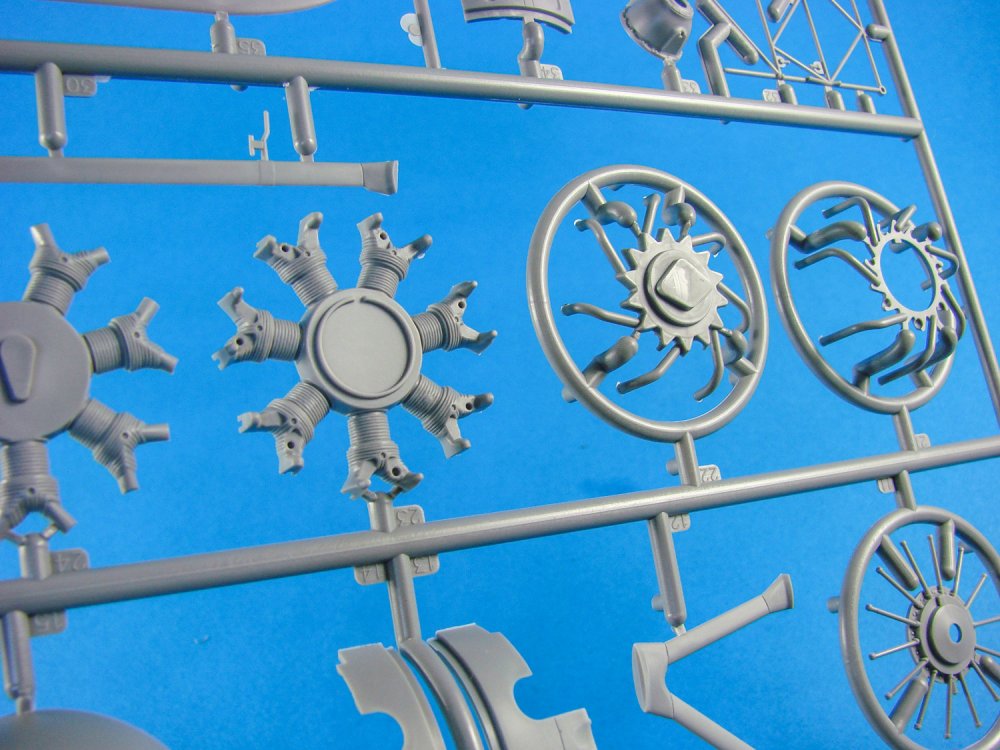
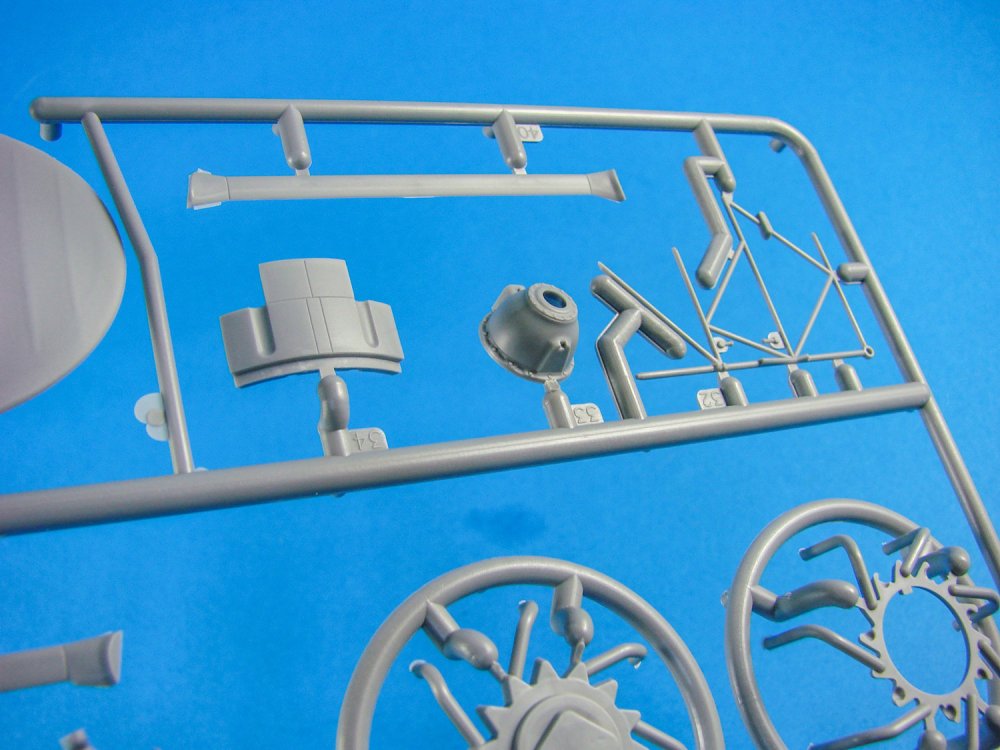
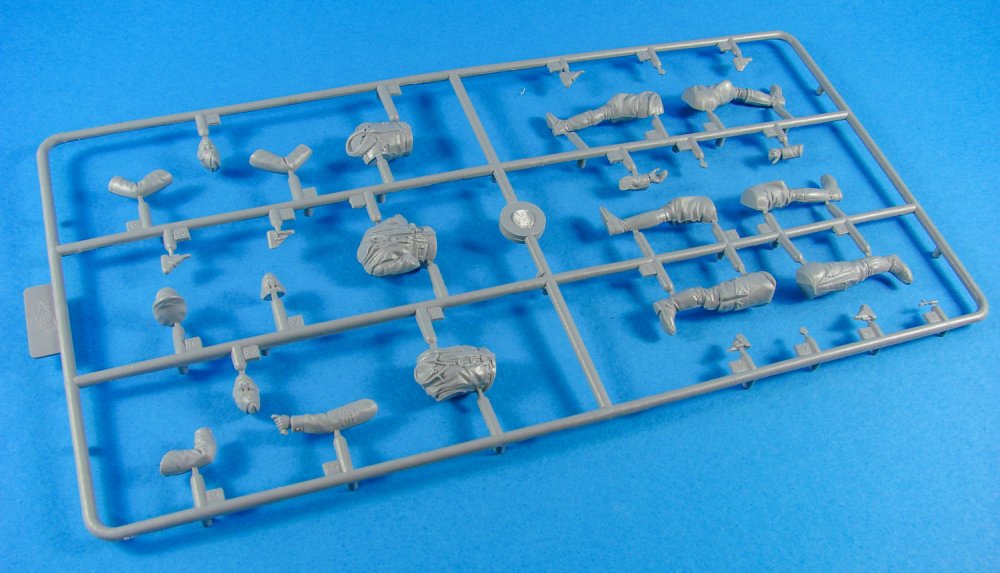
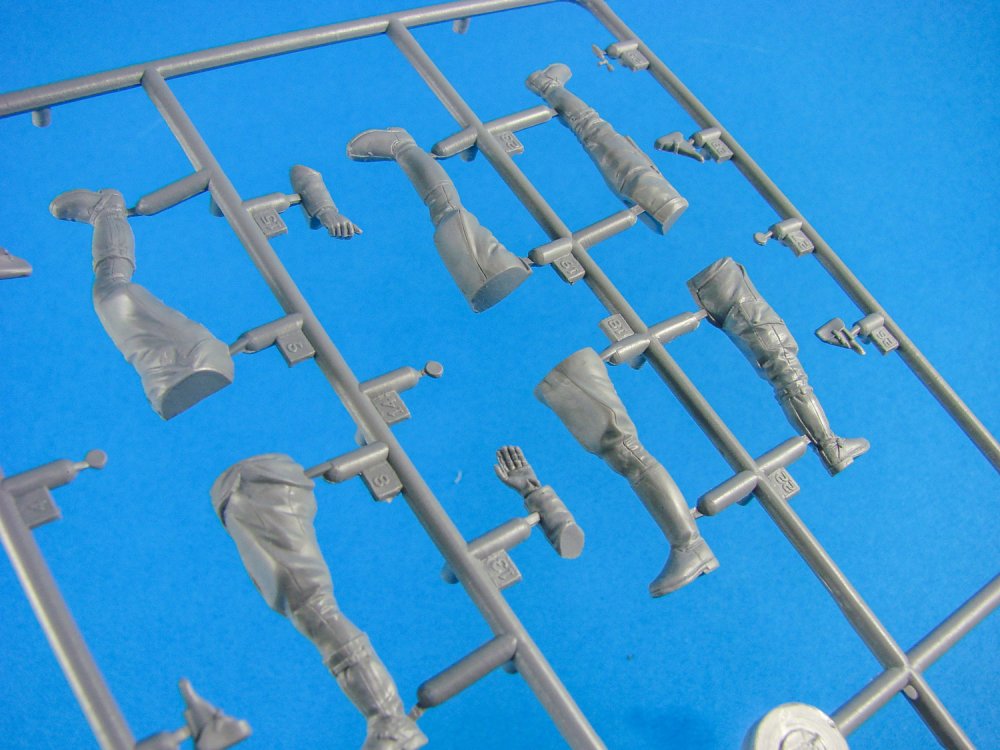
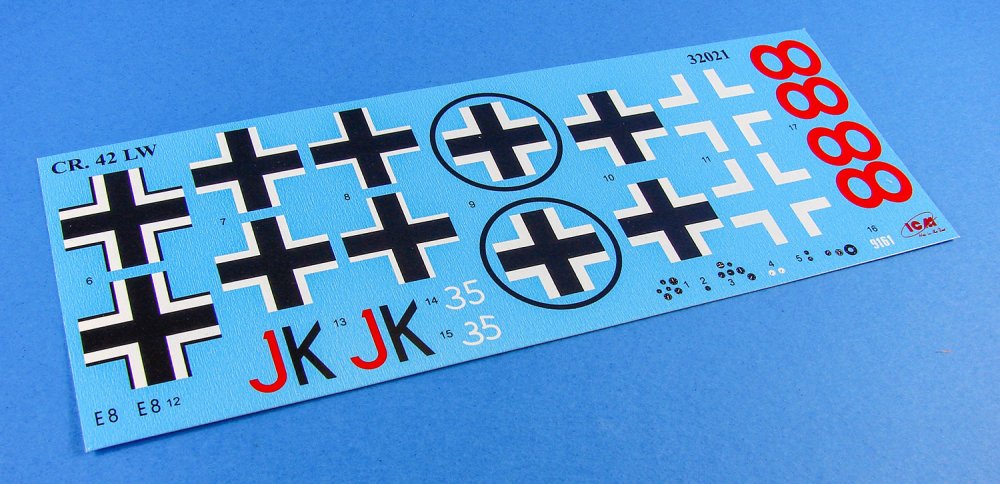
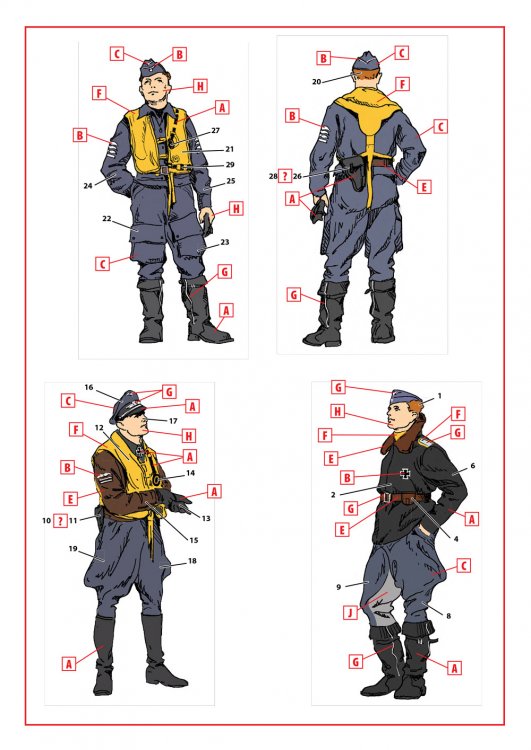
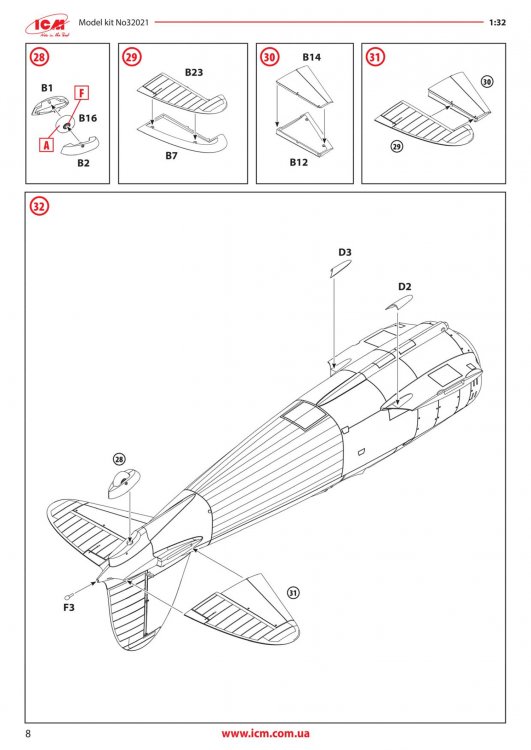
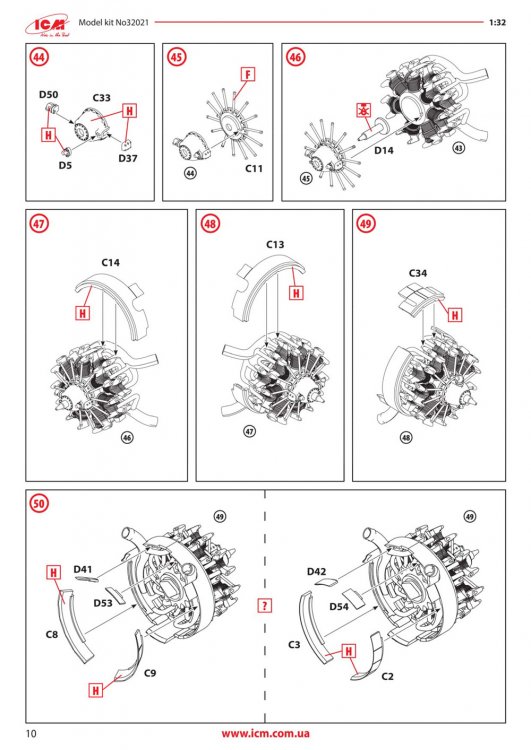
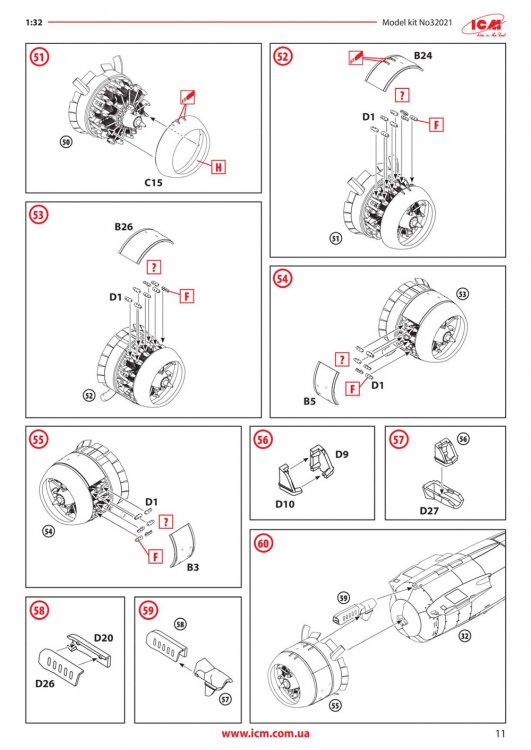
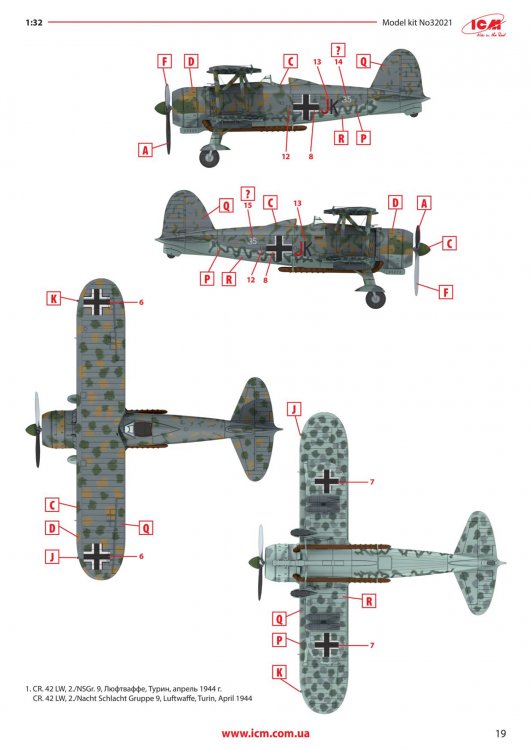
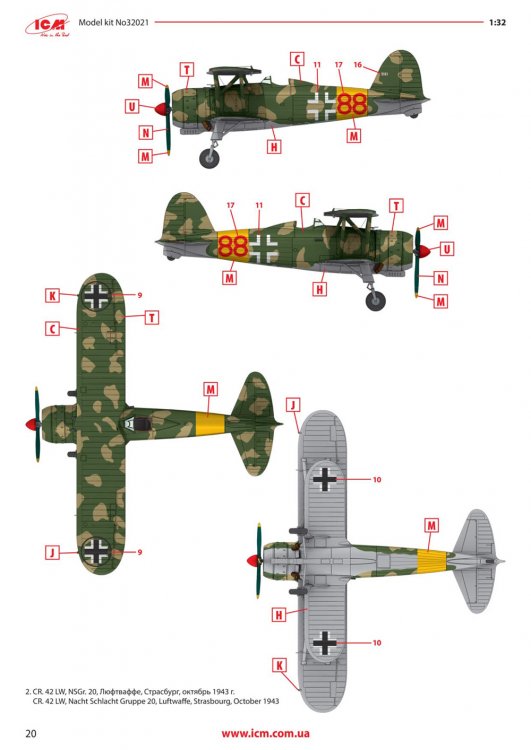
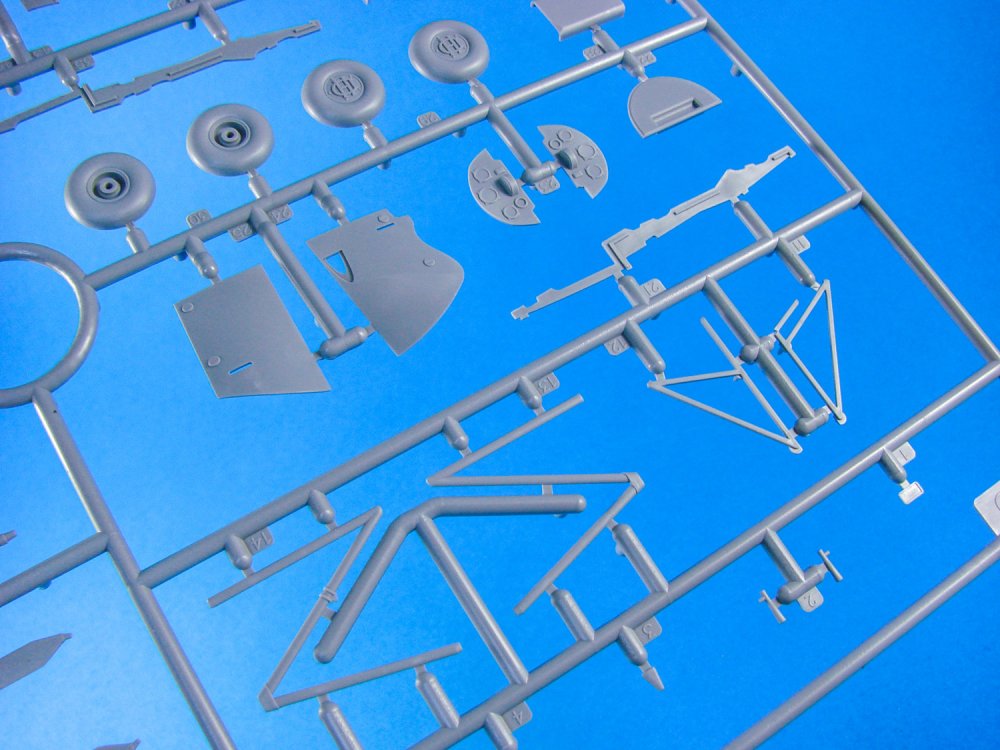
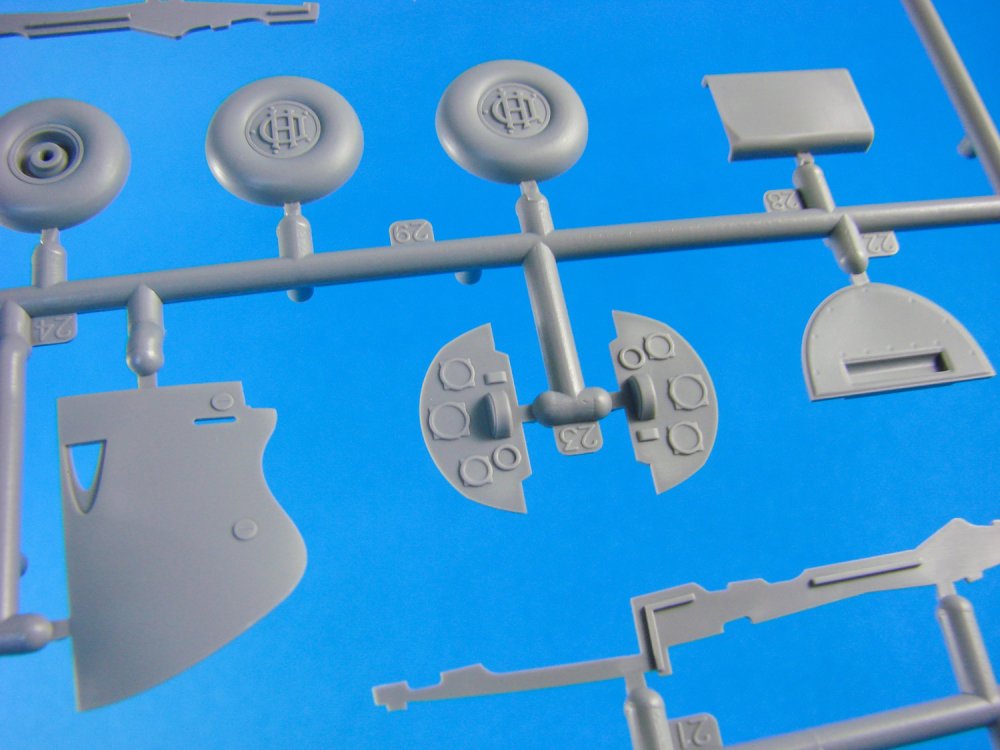
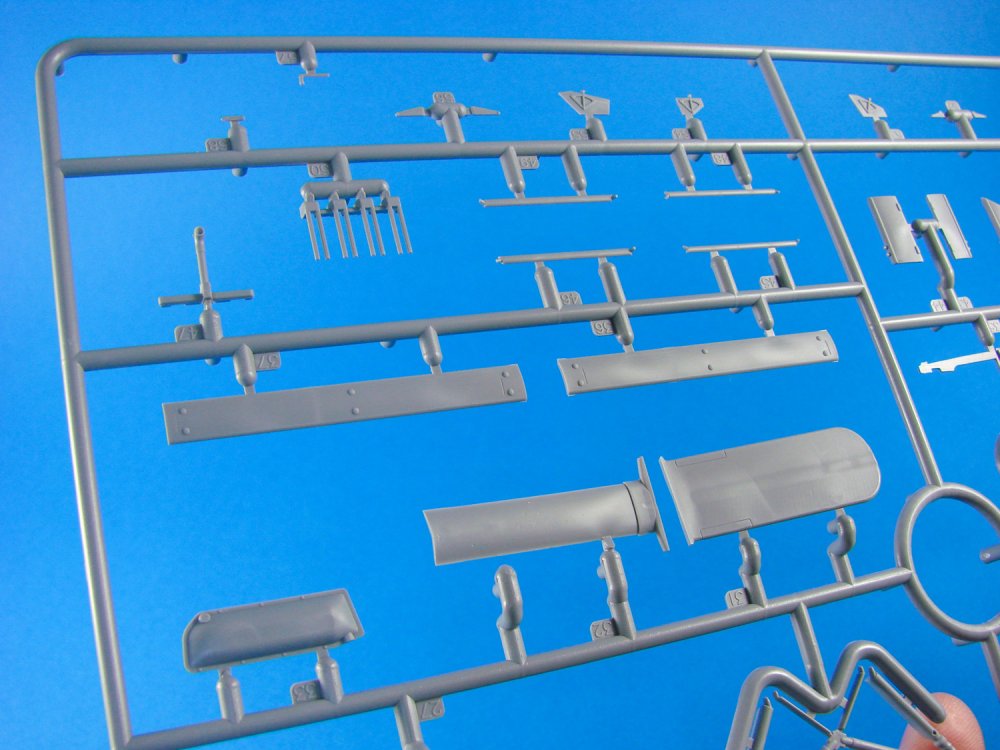
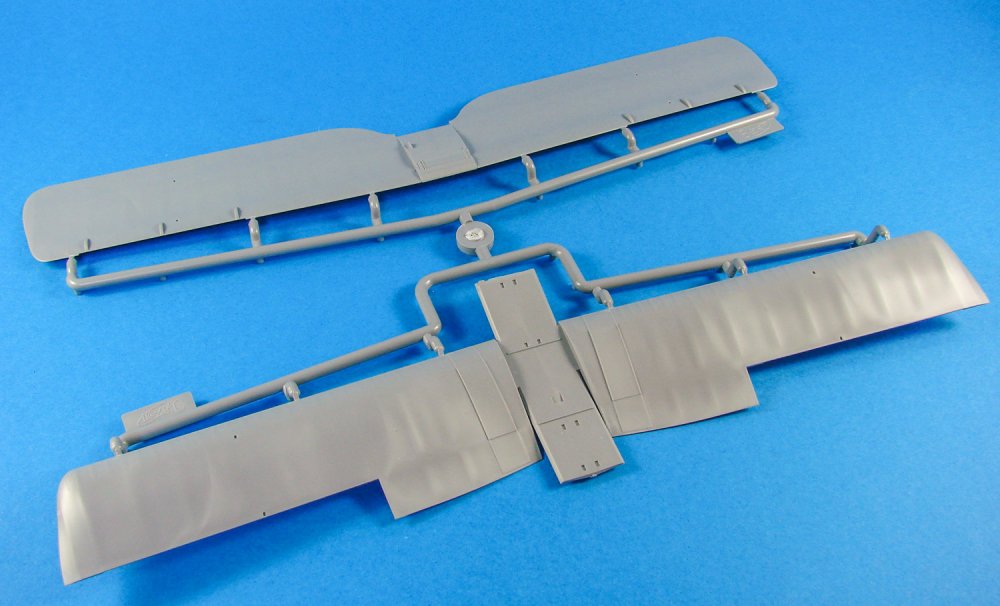
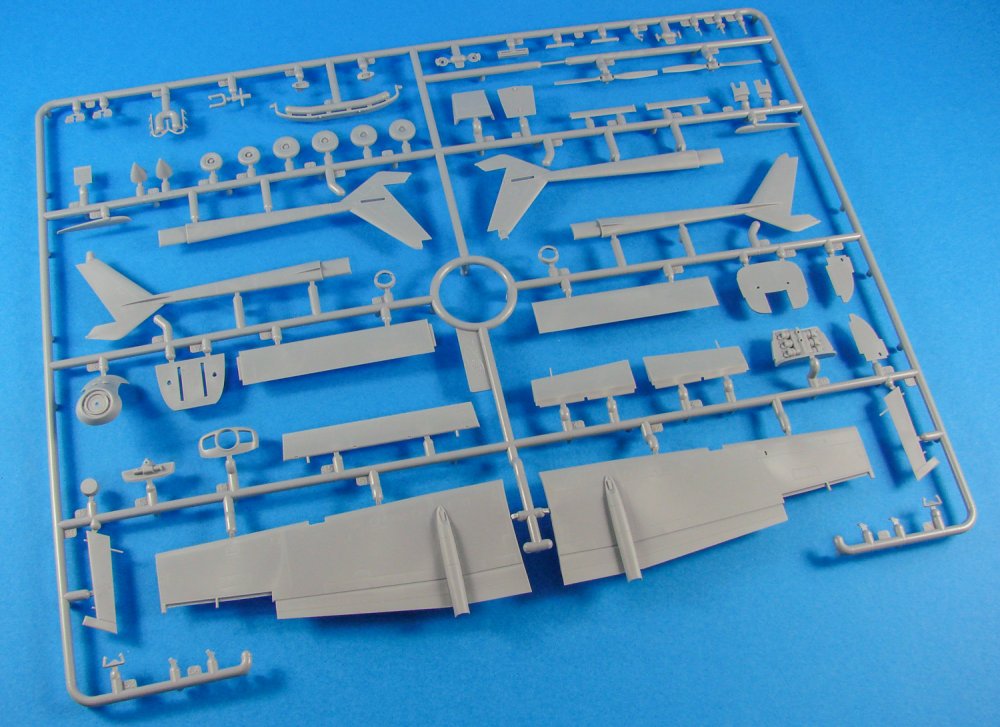
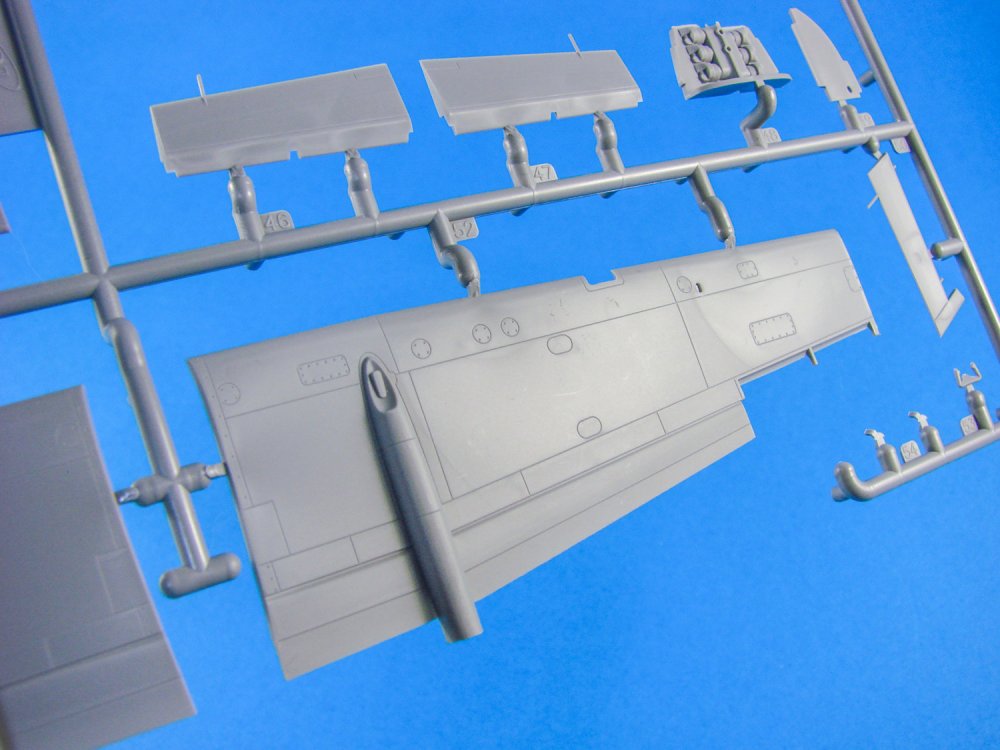
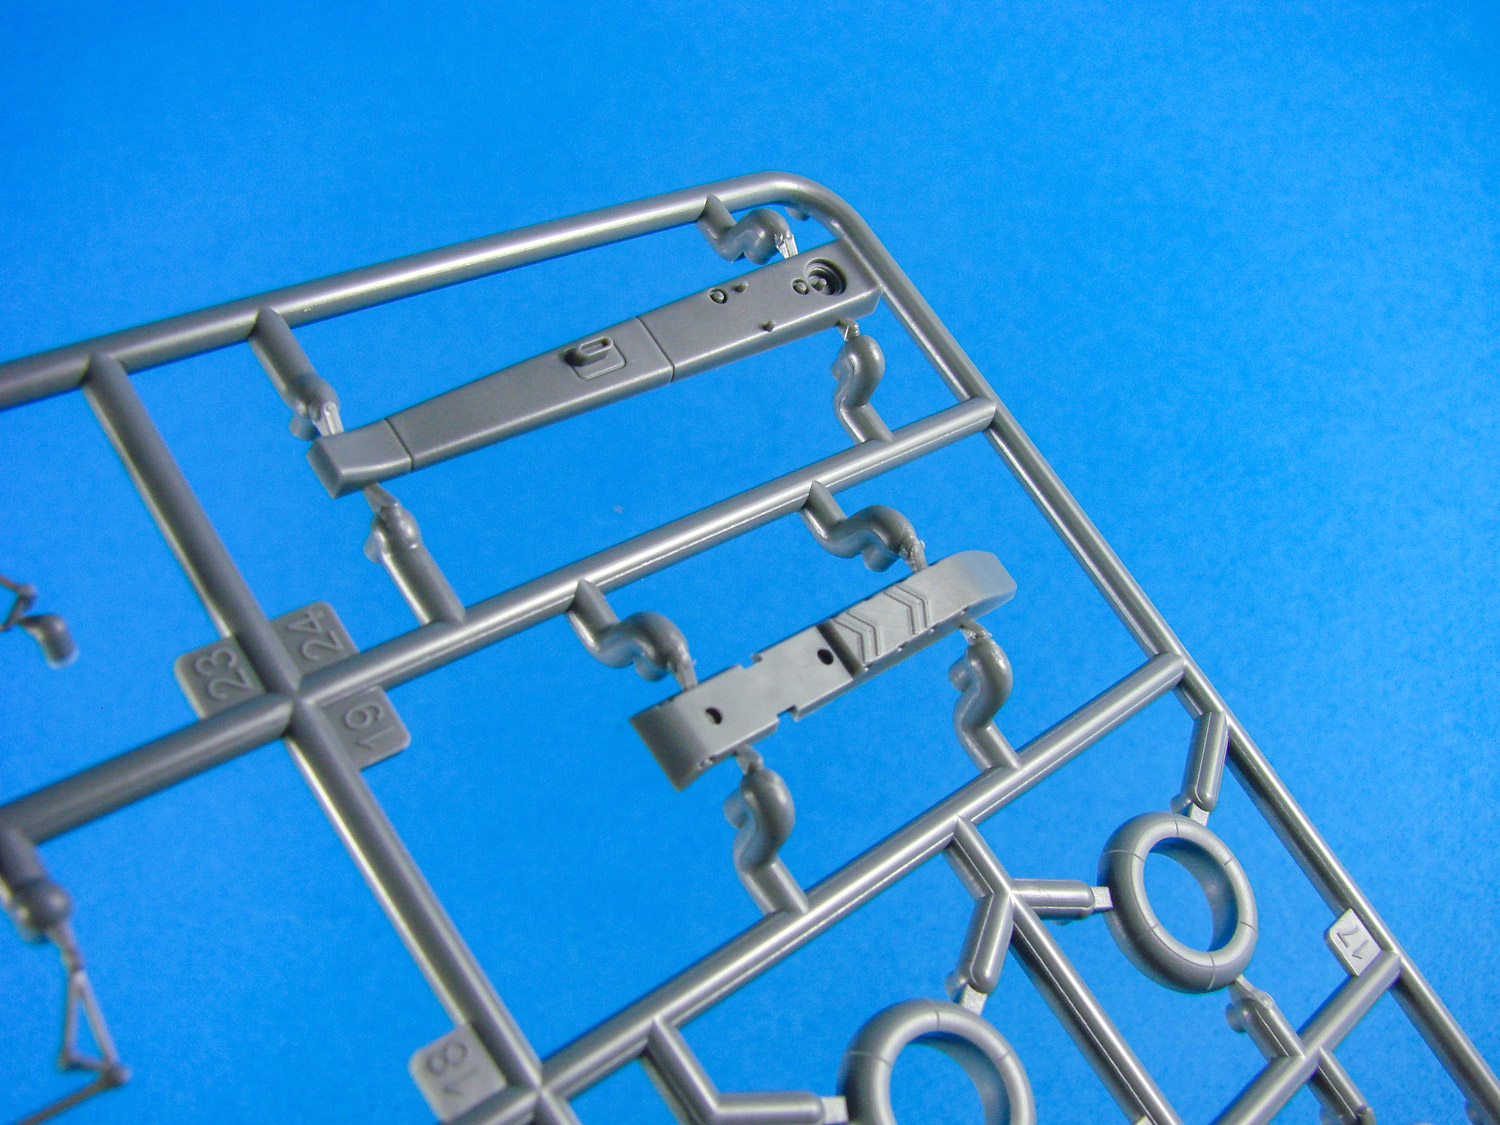
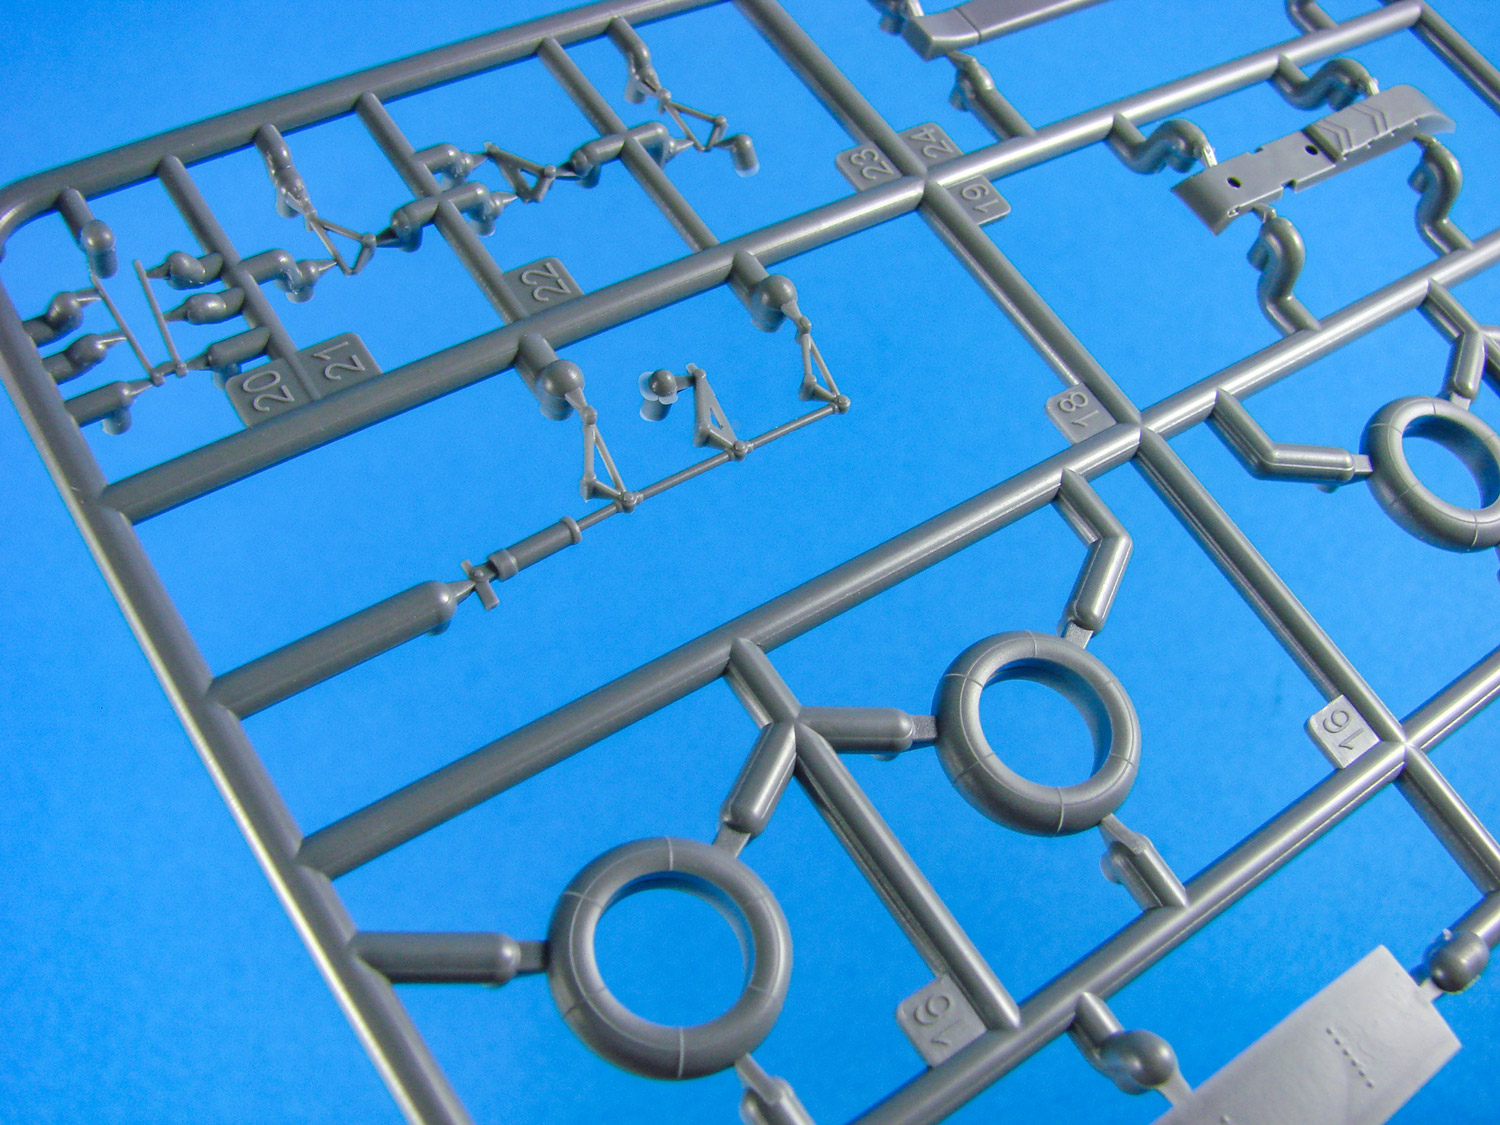
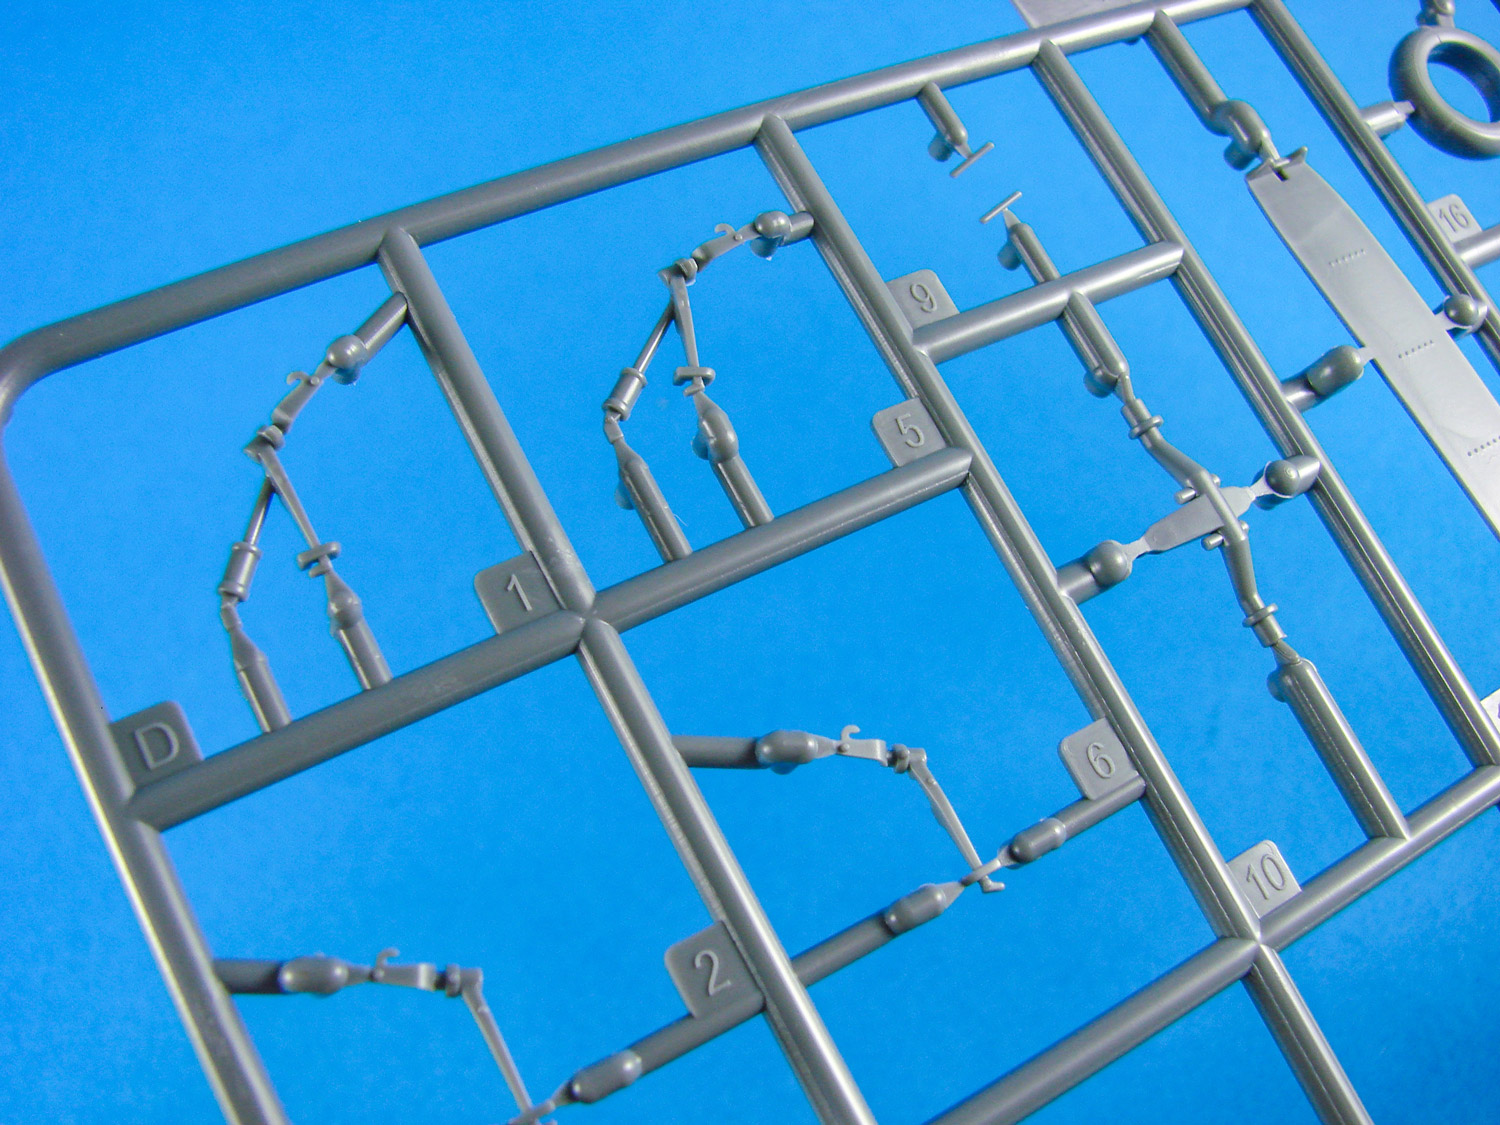
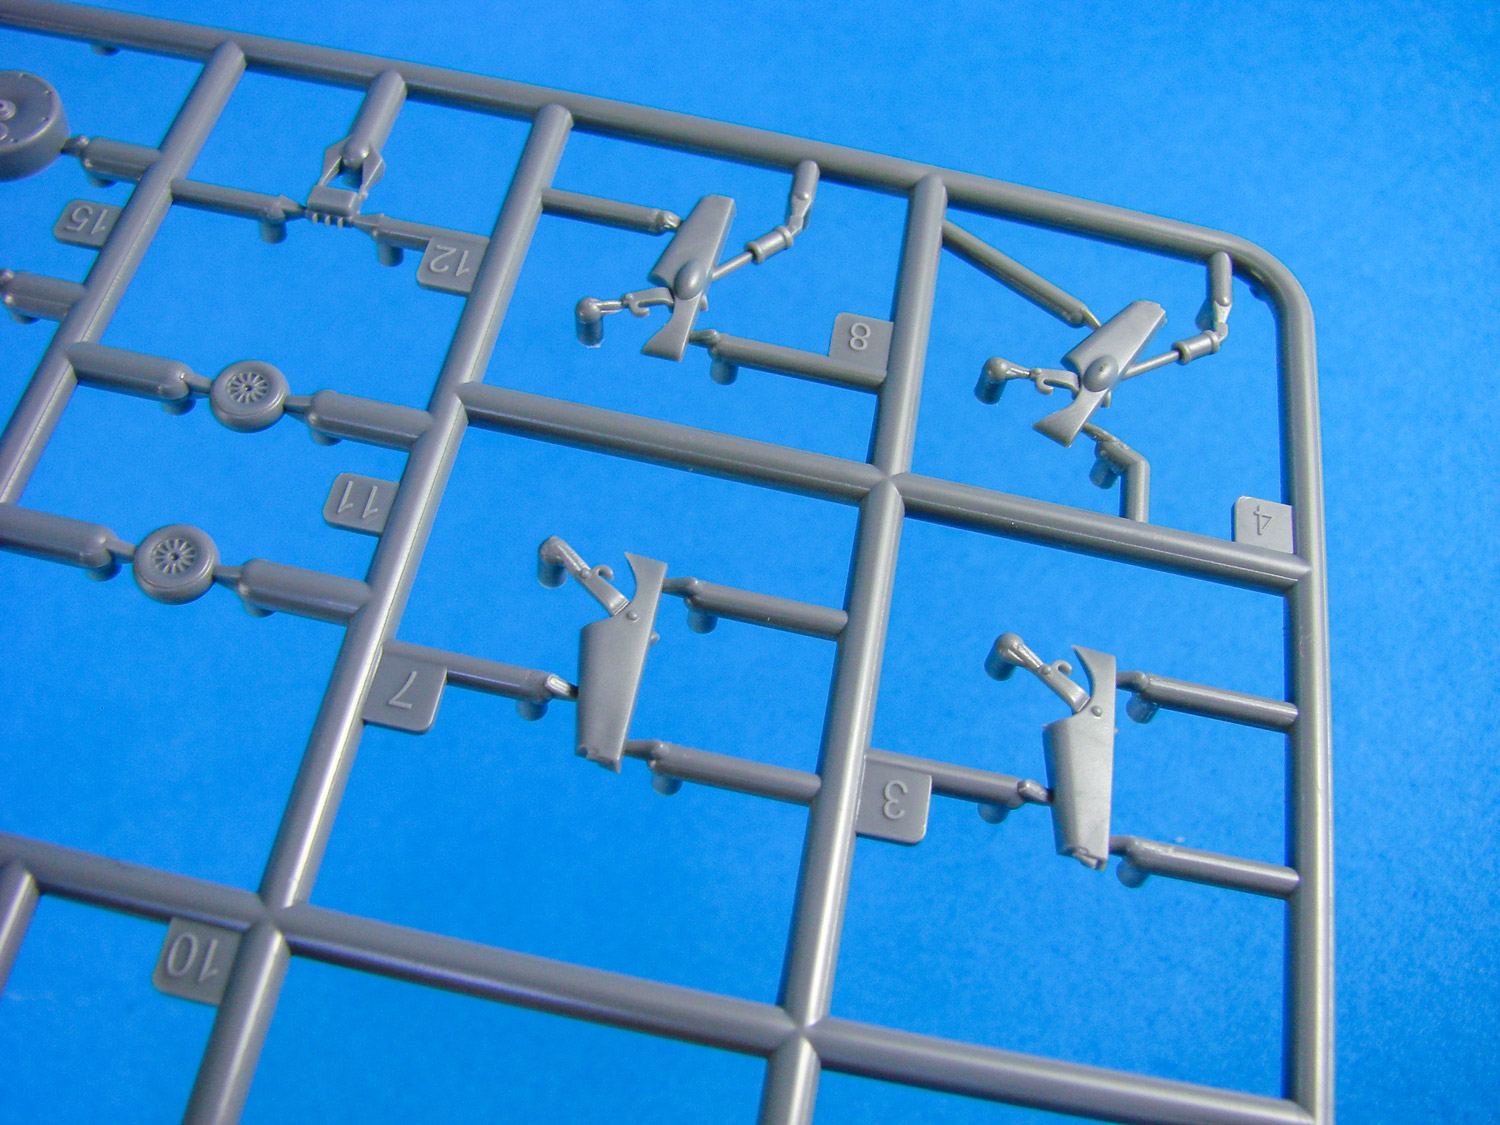
1:32 CR.42LW with German Pilots ICM Catalogue # 32022 The Fiat CR.42 Falco (Falcon) is a single seat sesquiplane fighter developed and produced by Italian aircraft manufacturer Fiat Aviazione. It served primarily in Italy's Regia Aeronautica both before and during the Second World War. The CR.42 was an evolutionary design of Fiat’s earlier CR.32 fighter, featuring a more powerful supercharged Fiat A.74R1C.38 air-cooled radial engine and aerodynamic improvements to its relatively clean exterior surfaces. The aircraft proved to be relatively agile in flight, a factor that had been attributed to its very low wing loading and a sometimes-decisive tactical advantage. RAF Intelligence praised its exceptional manoeuvrability, though it was technically outclassed by faster, more heavily armed monoplanes. Whilst primarily used as a fighter, various other roles were adopted for some variants of the type, such as the CR.42CN dedicated night fighter model, the CR.42AS ground attack aircraft, and the CR.42B Biposto twin-seat trainer aircraft. The CR.42LW was a Night harassment, anti-partisan aircraft for the German Luftwaffe, and the subject of this kit. The aircraft were equipped with exhaust flame dampers, a pair of 12.7 mm machine guns and underwing racks for four 50 kg bombs. 150 were built, of which 112 were accepted into service by the Luftwaffe. In addition to its service in Italy, the CR.42 was produced and entered service in smaller numbers with the air forces of several nations, including Belgium, Sweden and Hungary. By the end of production, in excess of 1,800 CR.42s has been constructed, making it the most numerous Italian aircraft to be used during the Second World War. The kit This is the third incarnation of ICM’s CR.42 kit, and already the second one to feature this specific Luftwaffe version of the Falcon. The difference here though is that we get an extra sprue with some German crew/pilots. In fact, the schemes in this kit are identical to the original ICM release, so this kit is perhaps aimed more at those who want this aircraft with the pilots than for anything else. Packaged into ICM’s extremely robust corrugated box with a folding and lock-tabbed lid, a glossy outer cover gives the final touch to this release. An attractive shot of a CR.42 at rest, along with three Luftwaffe crew, sets the pace for this, and the aircraft is shown without its famous wheel spats. Inside the box, six grey sprues comprise the CR.42 itself, and are packed into a single, re-sealable clear sleeve, with a seventh, clear sprue separately bagged within. A single sprue for the German pilots is also slipped within the main sleeve, bagged separately. To finish the package, an instruction manual and a single decal sheet are included. As tends to be the case with ICM kits, no PE is included with this release. Work starts in the cockpit, as is quite common, and ICM have created a very nice pilot’s office for this release, with a reasonably detailed seat (very unusual in style), control stick and linkage, rudder pedals etc. All is built around a cockpit floor which is fairly devoid of detail, and a bulkhead onto which has moulded tubular detail. On omission that is pretty evident are the seatbelts, so you’ll need to search for something suitable, perhaps from Eduard. When the cockpit floor is fitted out, the side wall frames can then be painted and slotted onto place, along with more elements that go towards creating what will be a tubular unit. The CR.42 instrument panel is split into two sections which sit either side of the pilot’s position. These feature blank instruments onto which the supplied decals will sit. The interior fuselage walls are nicely detailed with some raised structural details which will look very good alongside the tubular cockpit tub. Externally, the CR.42 really shines. The fuselage is moulded with nicely thin panel lines and fasteners, plus some great stringer/fabric detail on the rear fuse. Note the rudder is also a separate item so can be posed dynamically. Before gluing the lower wing sections together, you will need to open up a series of holes for the bomb cradles, should you wish to fit them. It’d be a shame not to. When it comes to the wings, rudder and elevators, that rib and fabric finish really does come into its own. At least to my eye, it’s everything I would expect to see in how it’s rendered. All control surfaces are separately moulded and totally poseable too. For a biplane, this is an easy one to build in terms of the rigid struts. Rigging is also a cinch too and could be managed by a beginner. That 14-cylinder air-cooled Fiat A.74 R.C.38 engine is also nicely represented too. Two banks of seven cylinders are built in the traditional halves fashion, then mounted together, along with the pushrod ring, dual exhaust outlet rings, exhaust and multipart hub. The rear cowl builds around the engine before mounting to the airframe. In fact, the whole engine is shown to be closed up before fitting, although you can of course opt to leave panels off. The insides of the panels aren’t detailed, so bear that in mind if posing open. Two different style of main gear strut are included, as are a spat-less and semi-spat version of the main undercarriage gear. A lengthened set of exhaust pipes is also included for one variant. Pilots Parts for three German crew are supplied also. Plastic moulding is excellent throughout with refined surface detail prevalent across all mouldings, and with thin, clear transparencies. With the optional underwing accessories et al, variant 1 is probably the scheme that’s the best to choose in terms of features. Instructions The 20-page manual contains 97 constructional stages for the aircraft, all in line drawing format, with selective shade and colour as occasional highlights. Colour identification is also clearly shown too, with the manual supplying colour codes for Revell and Tamiya paints at the beginning, plus descriptors for the colours. Parts maps are also included. Whilst no masks are included, the instructions does print a pattern for you to use as a guide to making your own. The closing pages of the manual show the TWO schemes. These are: CR.42LW, 2./Nacht Schlacht Gruppe 9, Luftwaffe, Turin, April 1944 CR.42LW, Nacht Schlacht Gruppe 20, Luftwaffe, Strasbourg, October 1943 Decals A single set of decals is supplied for these schemes. These are possibly printed in-house or local to ICM. Printing quality is good, with thin ink, minimal carrier film and good colour density. Instrument decals are also included. As tends to be the case with many manufacturers, no swastikas are included, so you’ll need to raid your stash for those. Conclusion I always thought the CR.42 to look quite ungainly, especially for a principal WW2-era fighter, but nonetheless, it’s great to see it now offered in 1:32, with all the detailing possibilities it offers, above the already nice levels of detail that ICM has created for us. Our sincere thanks to ICM for supplying the review kit seen here.


-
It's actually now allowed in the regular LSM build areas as it's a LARGE model, irrespective of scale!
-
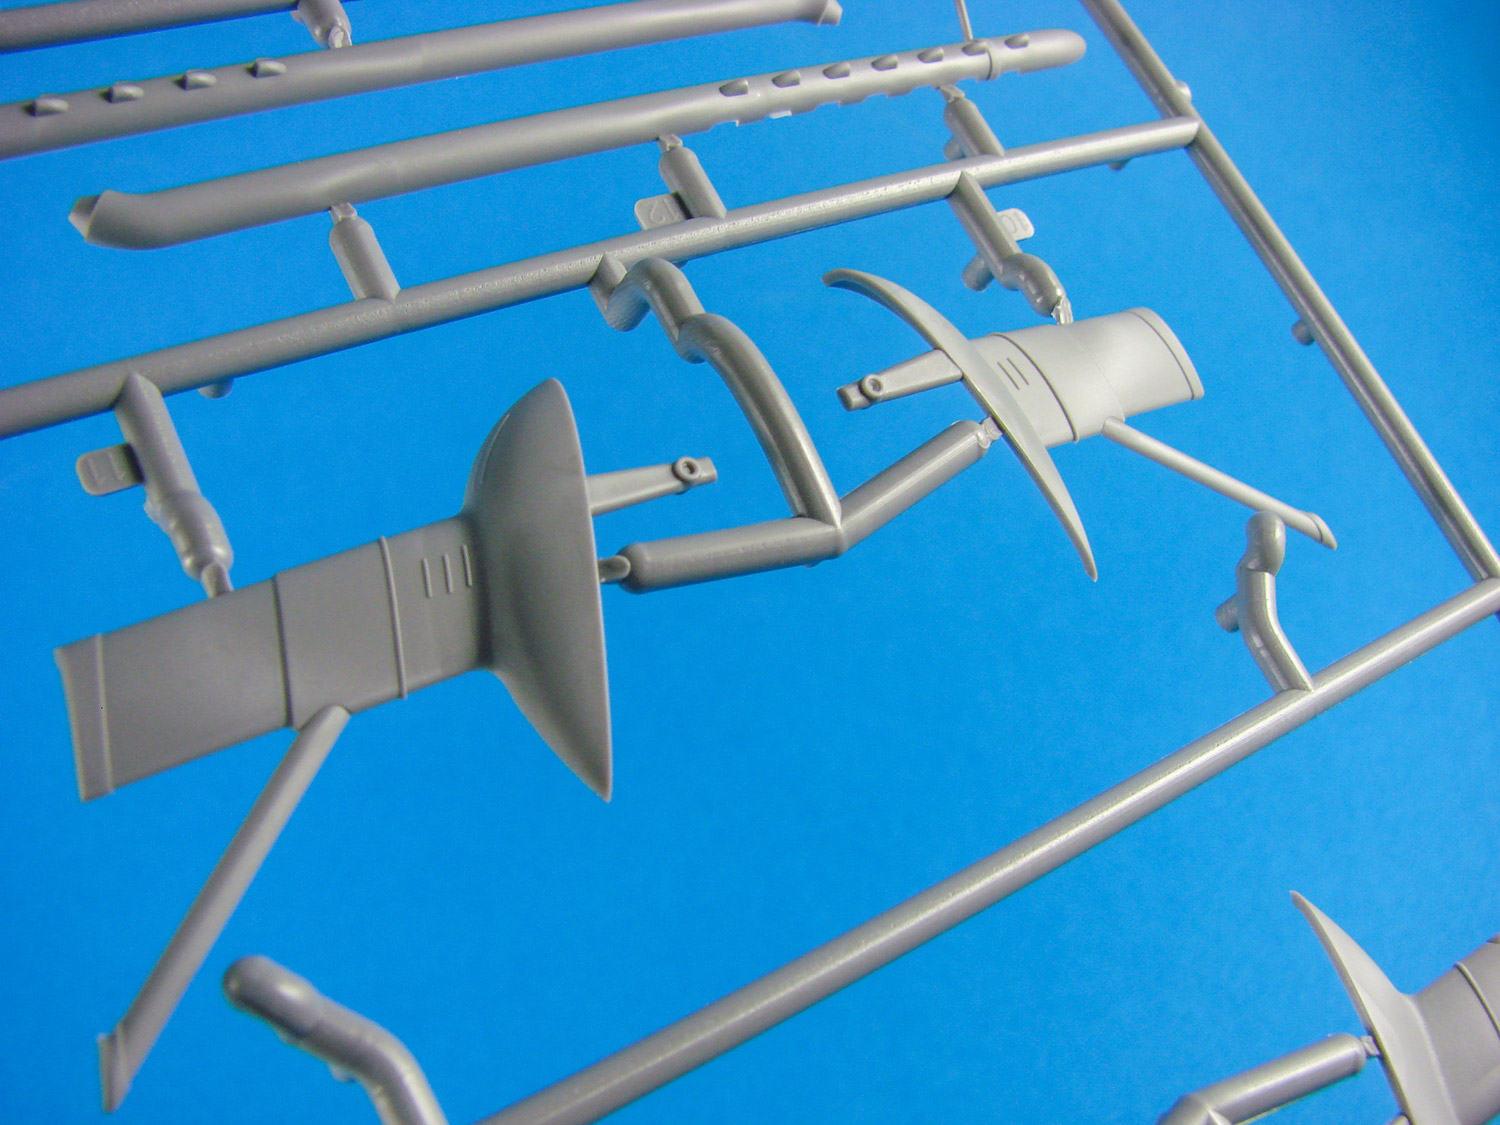
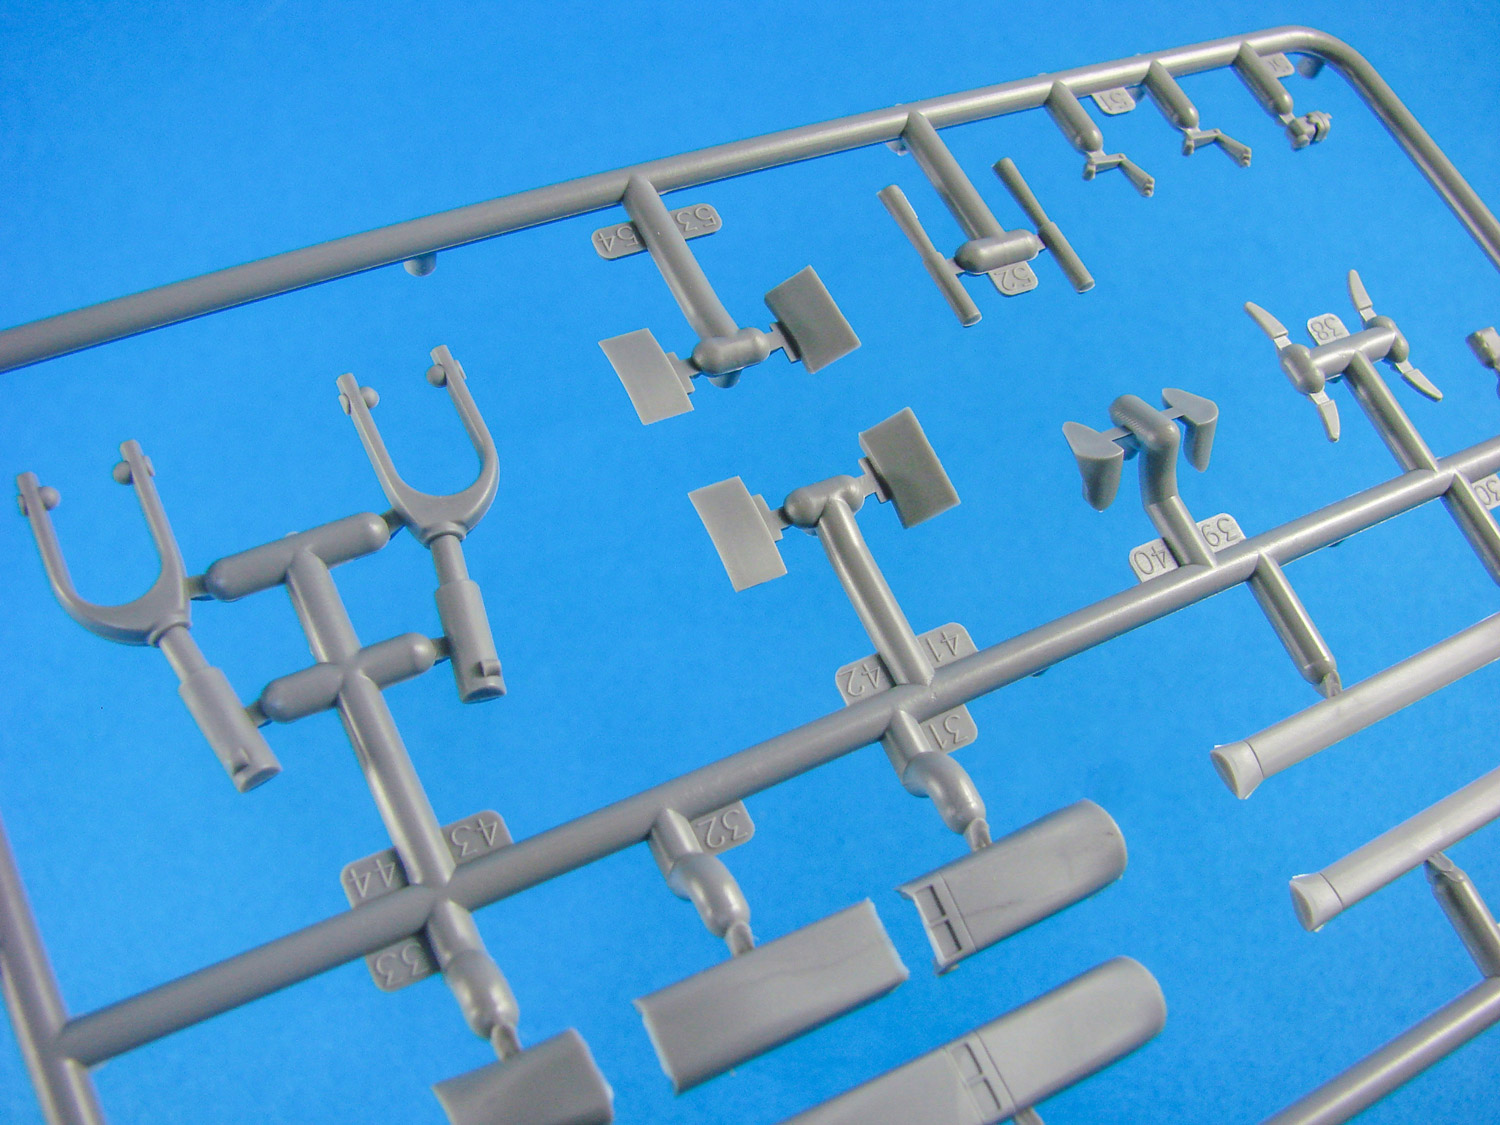
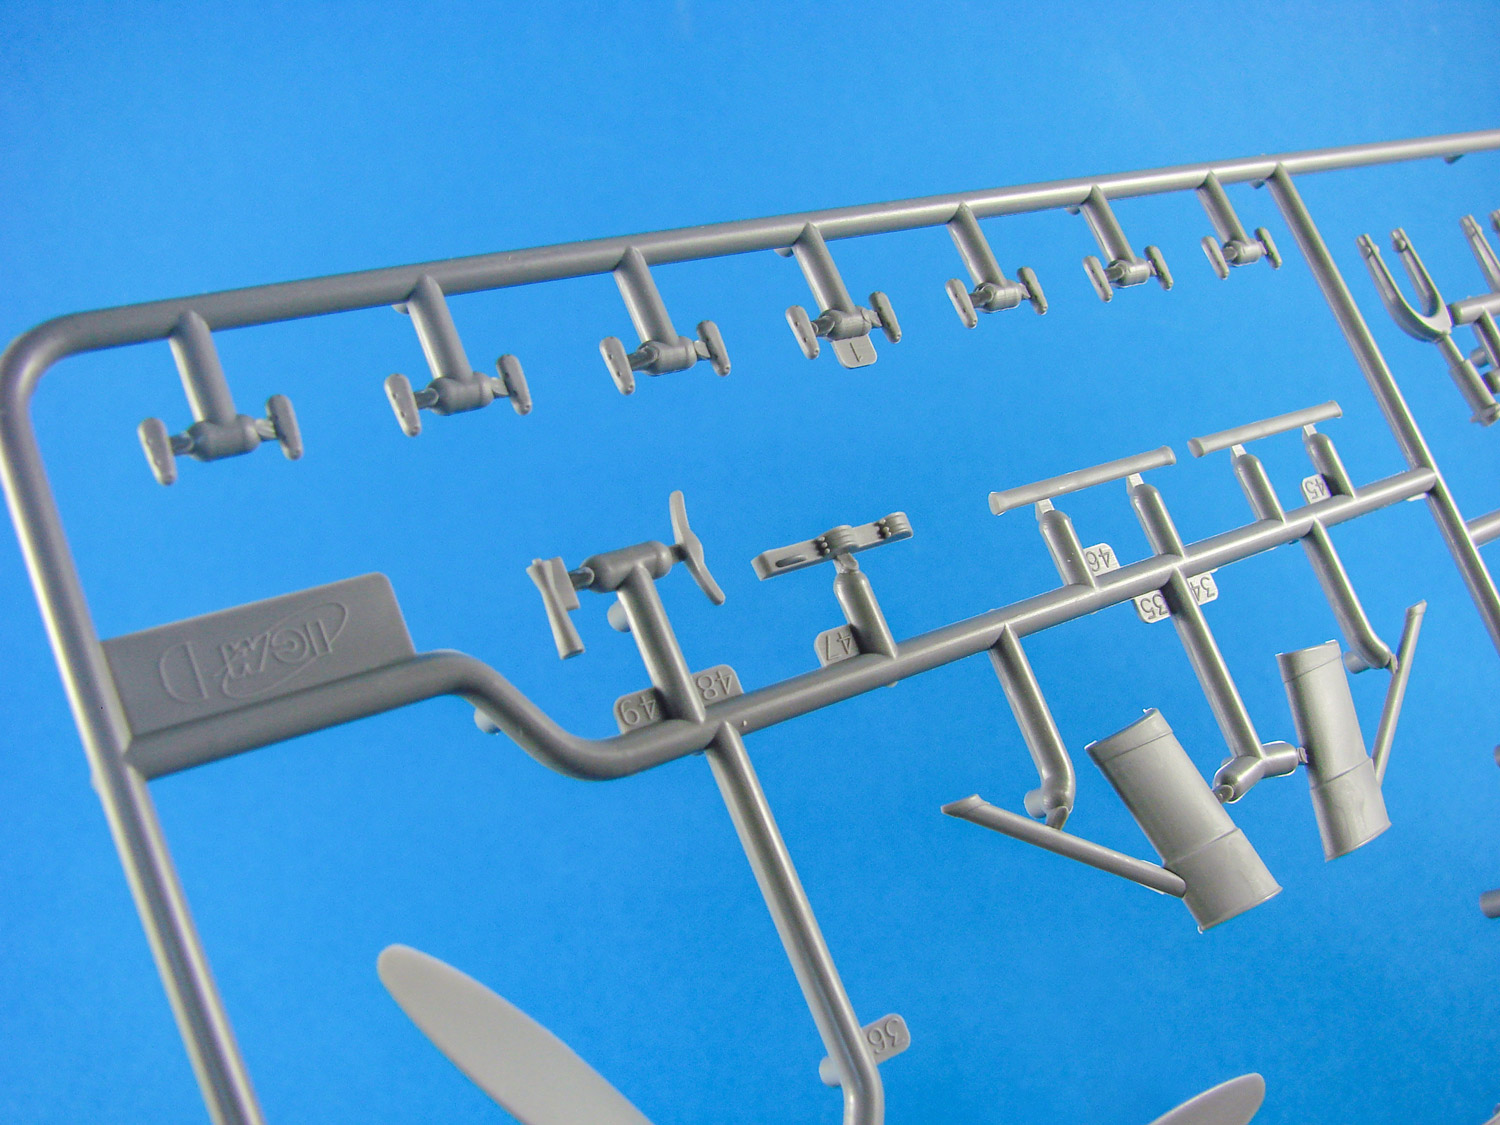
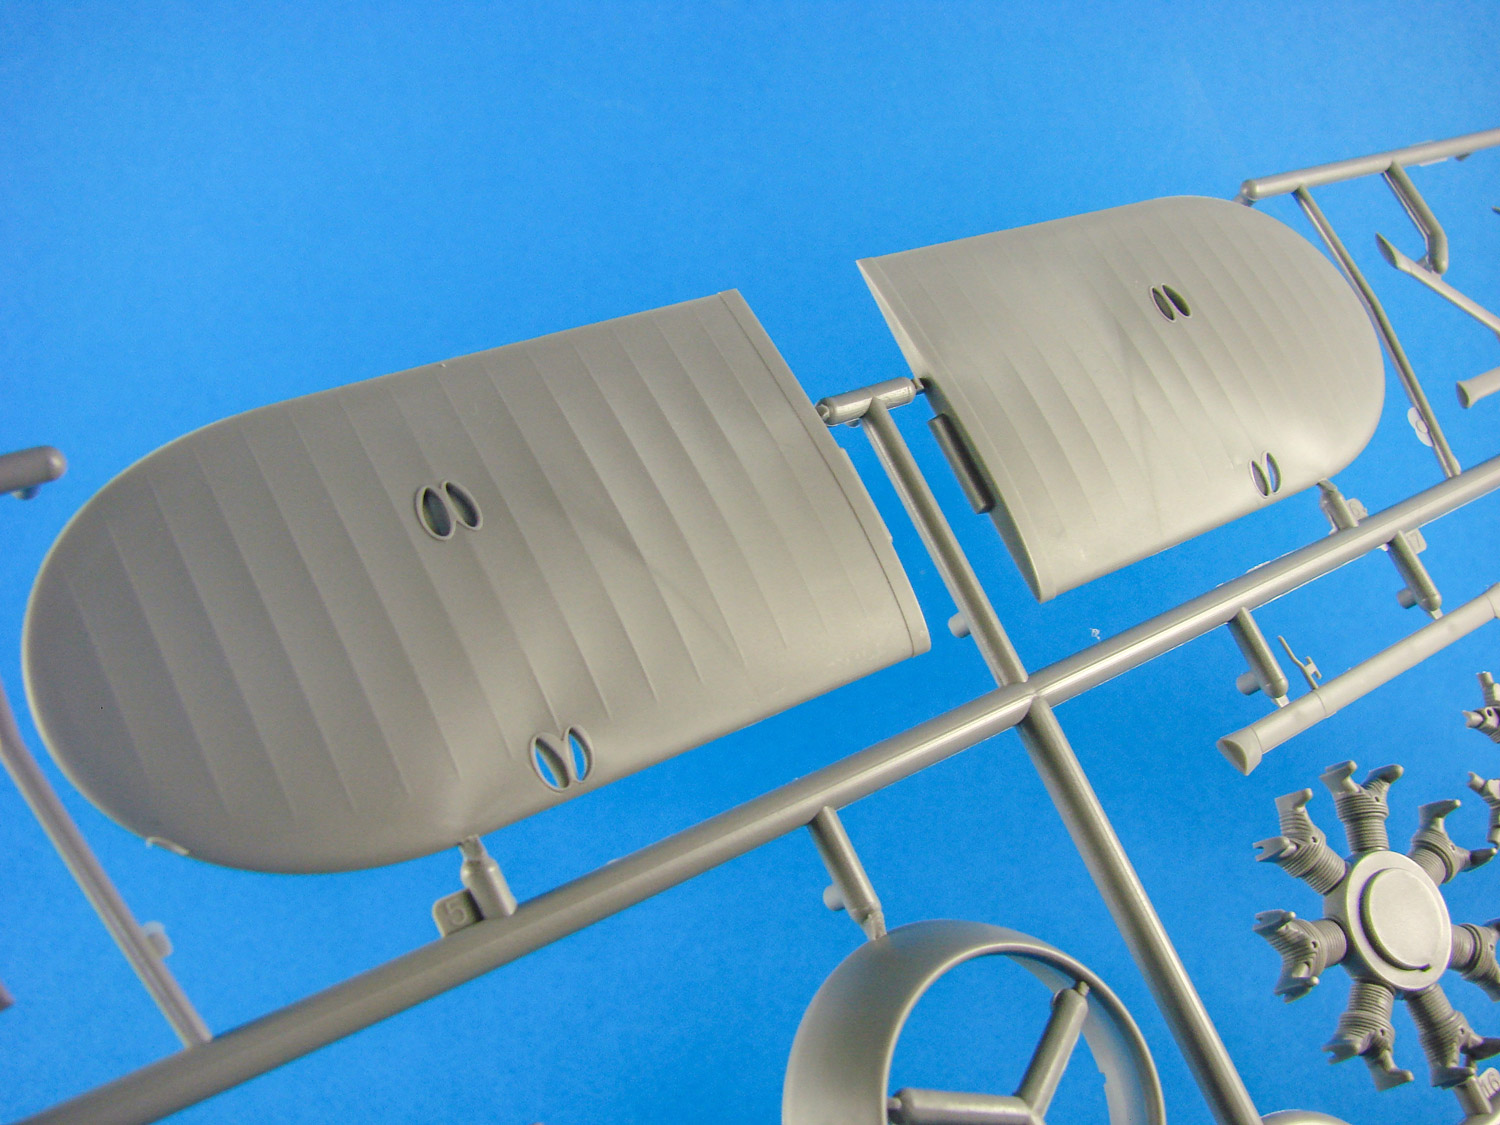
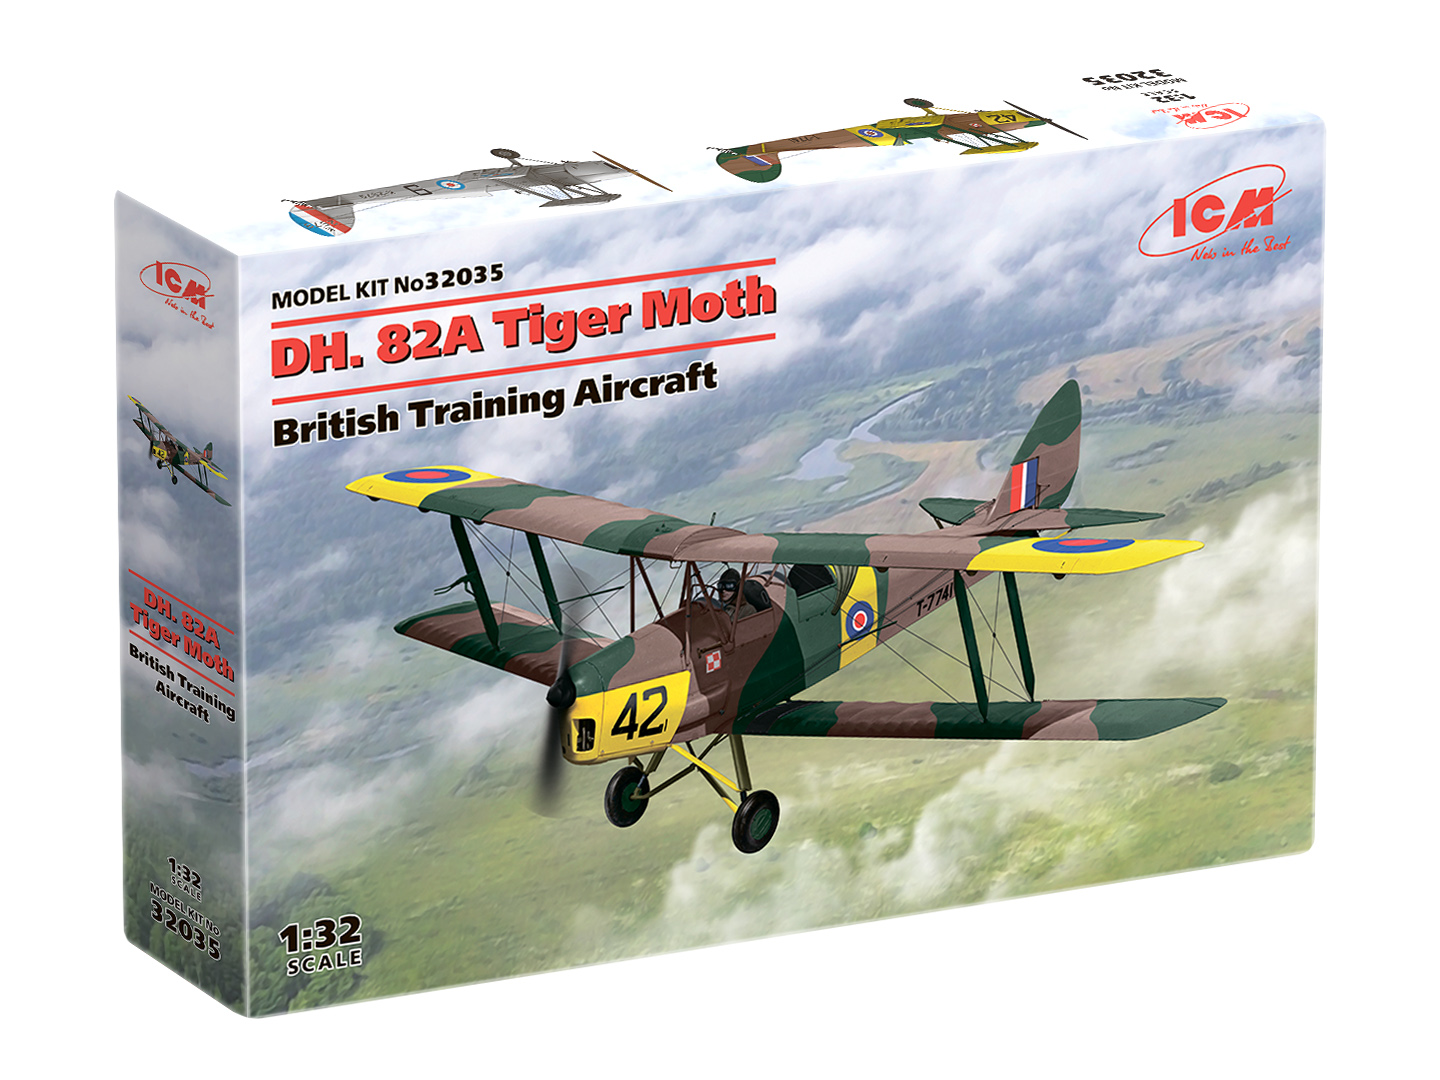
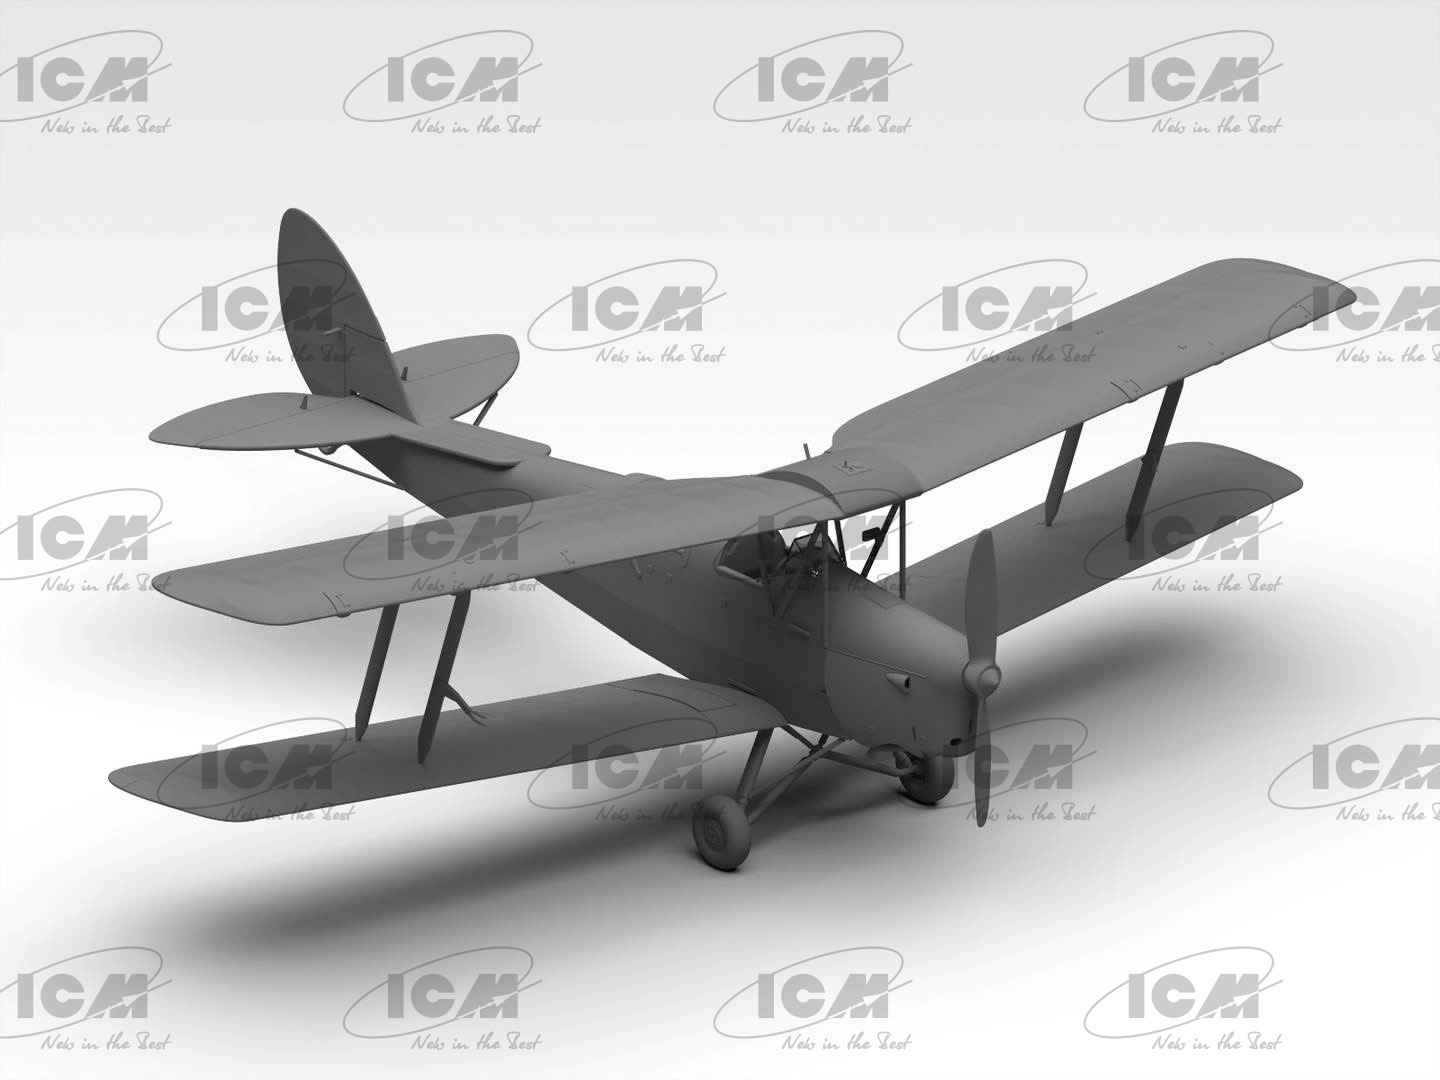
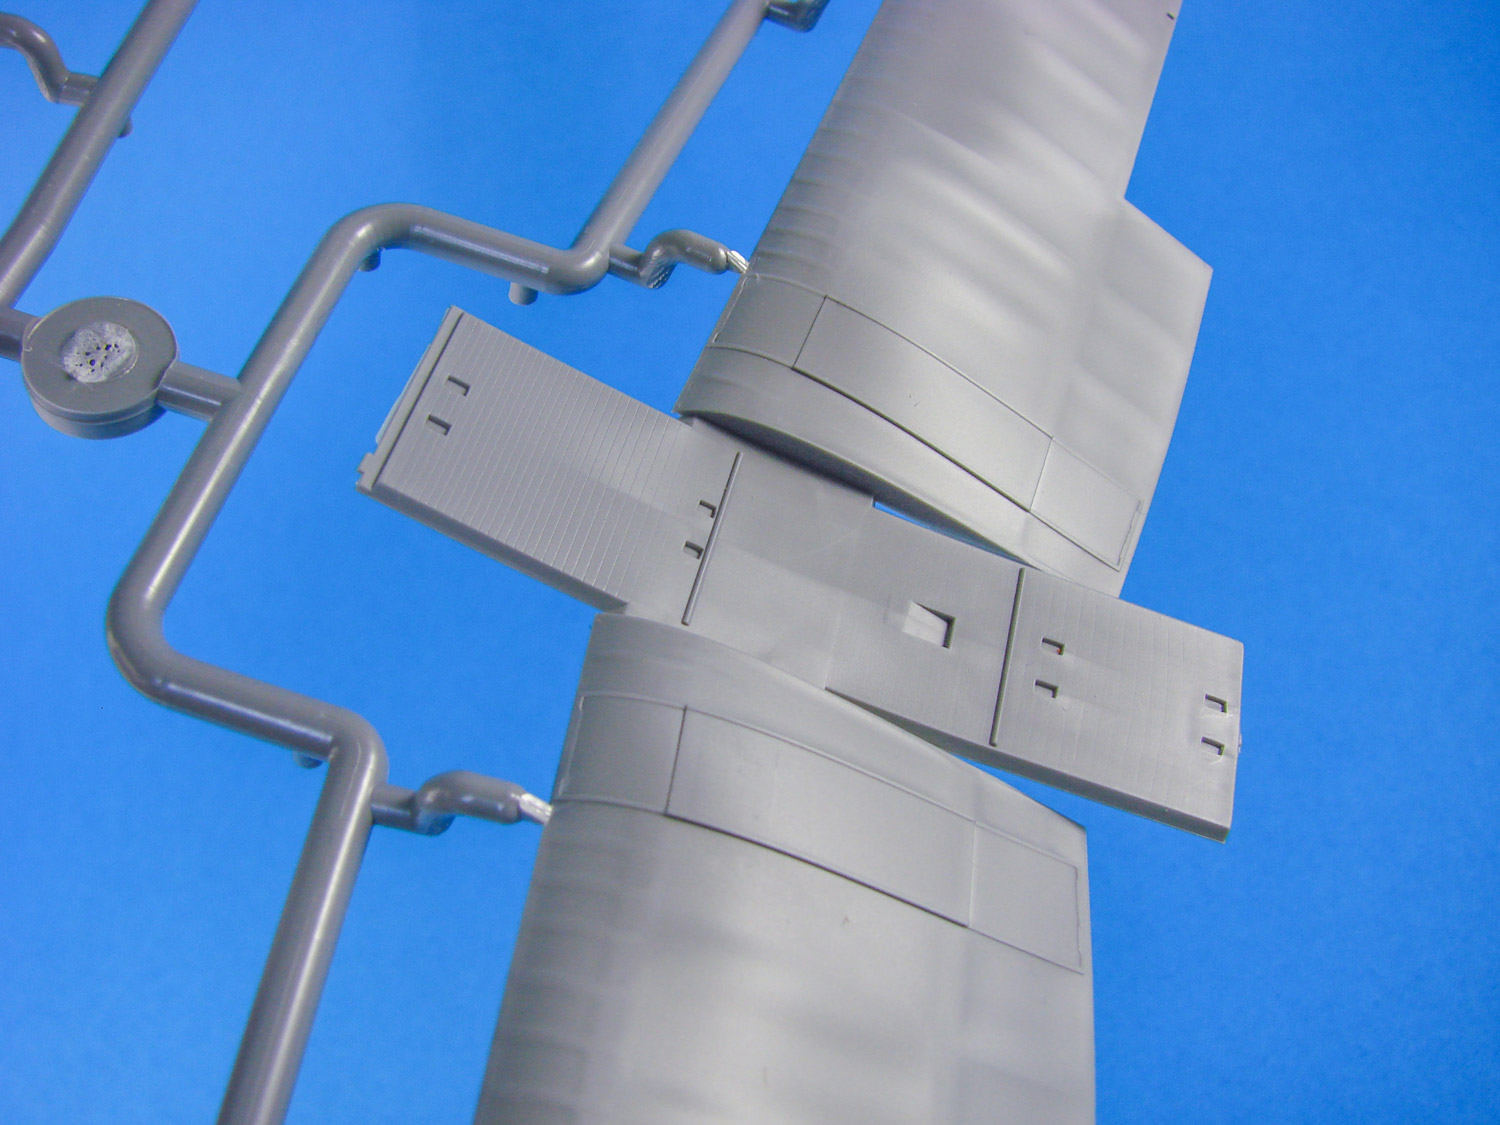
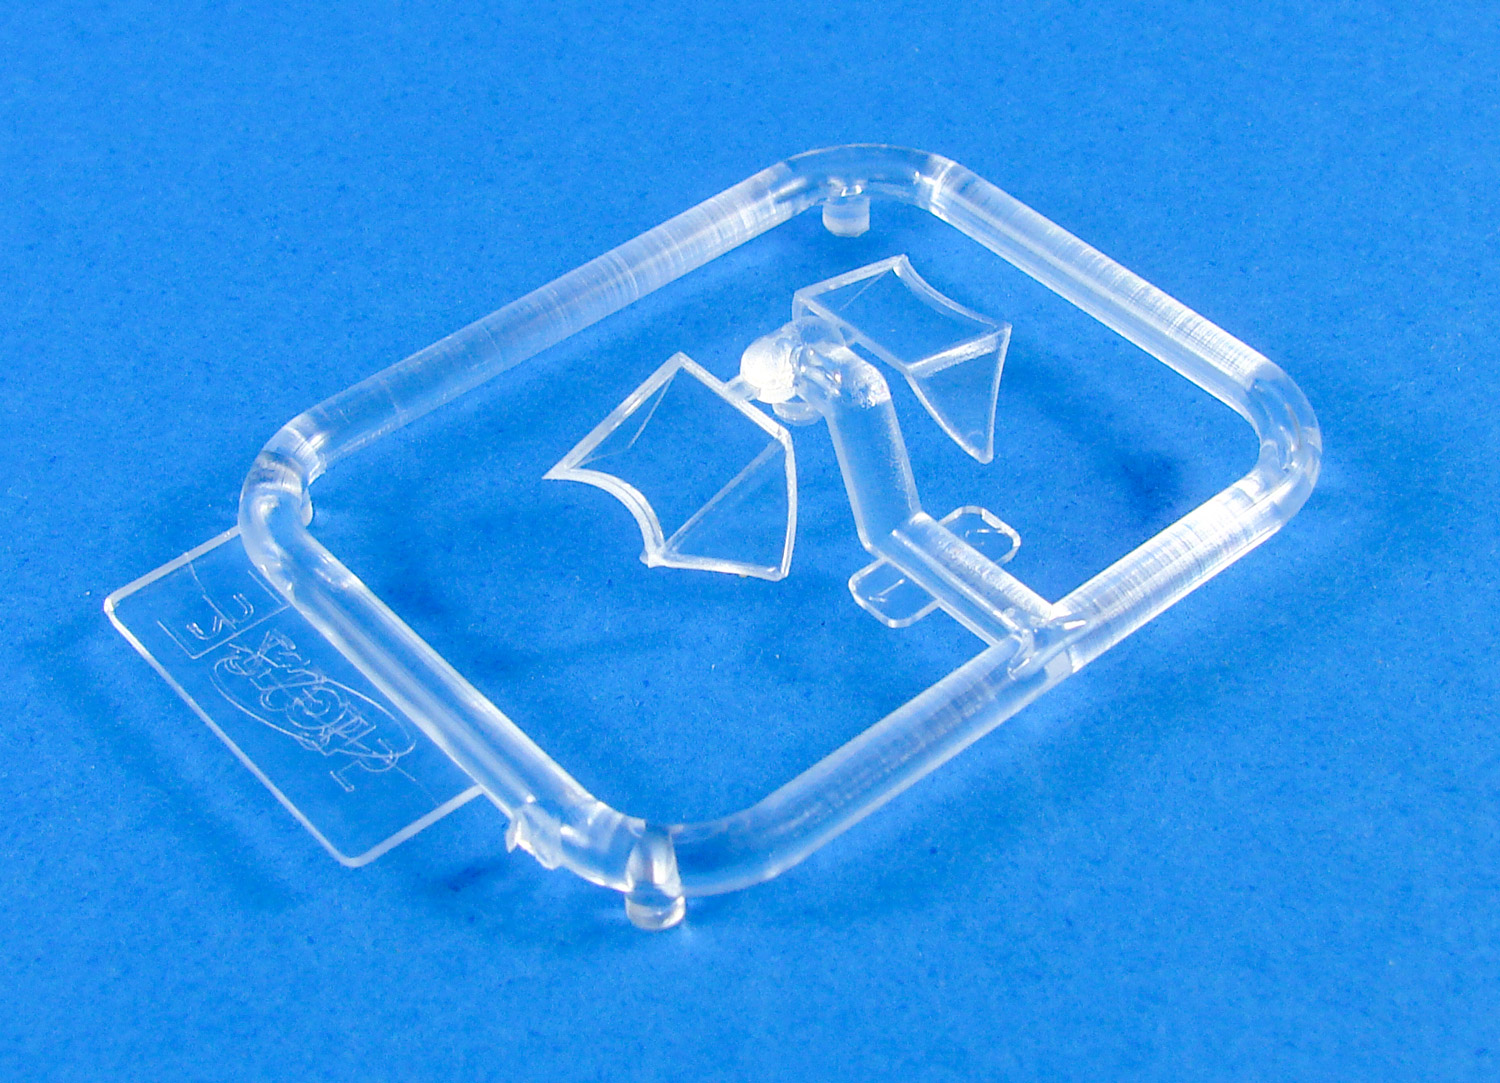
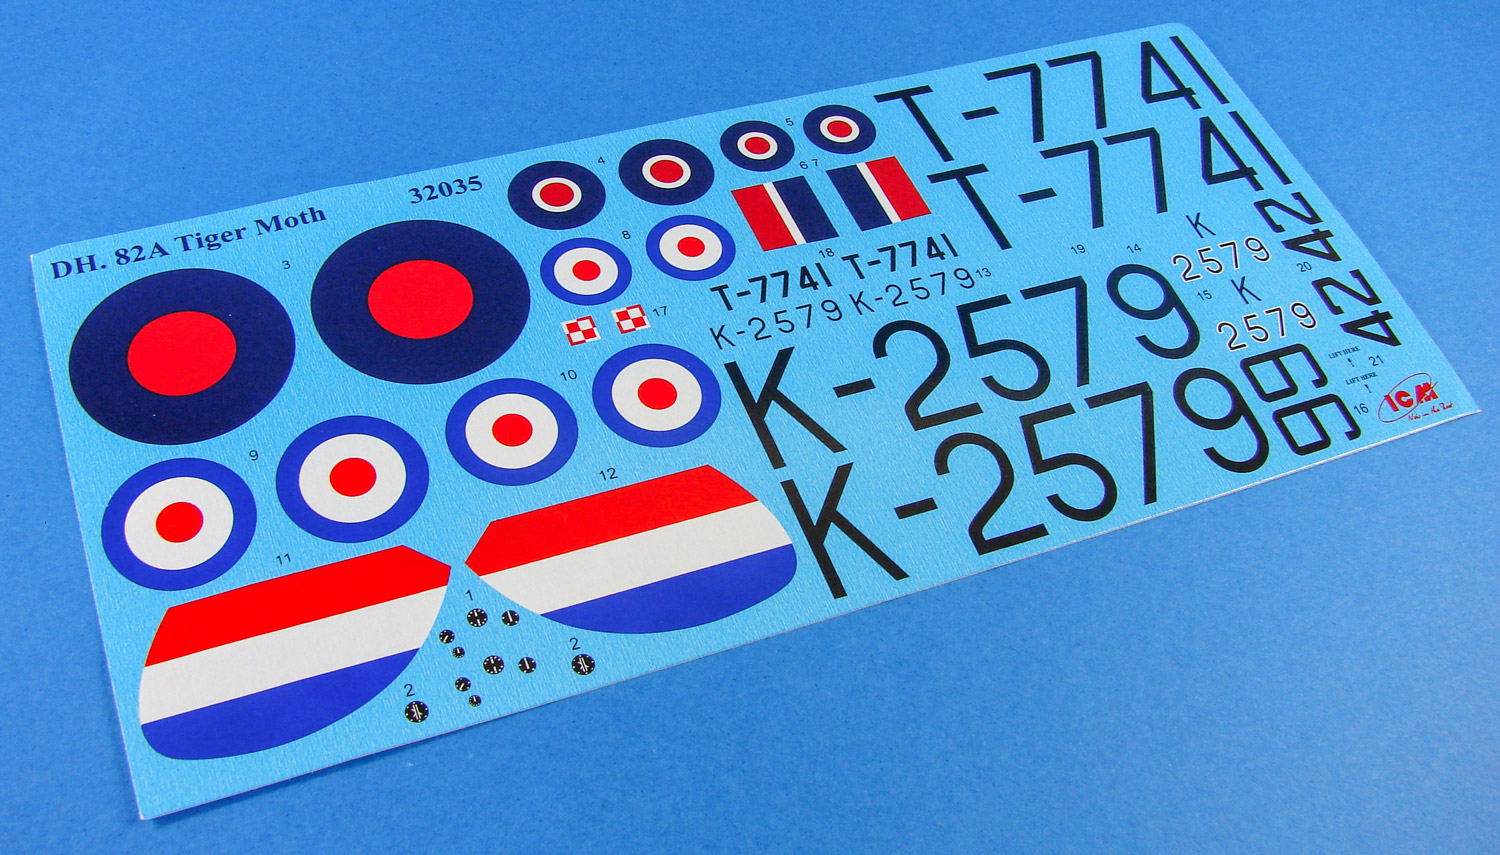
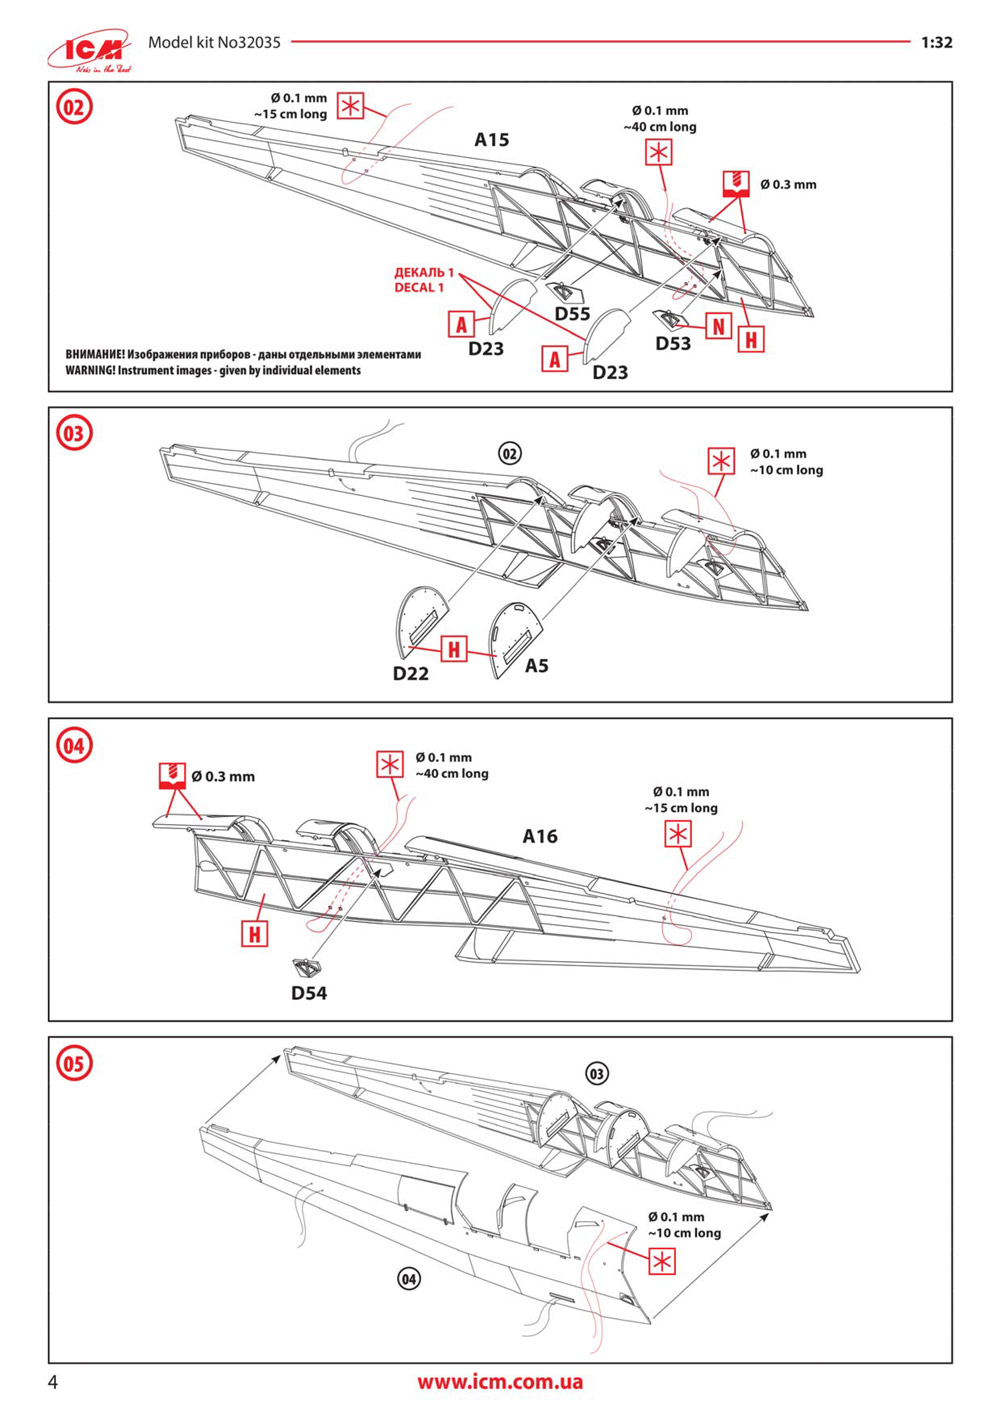
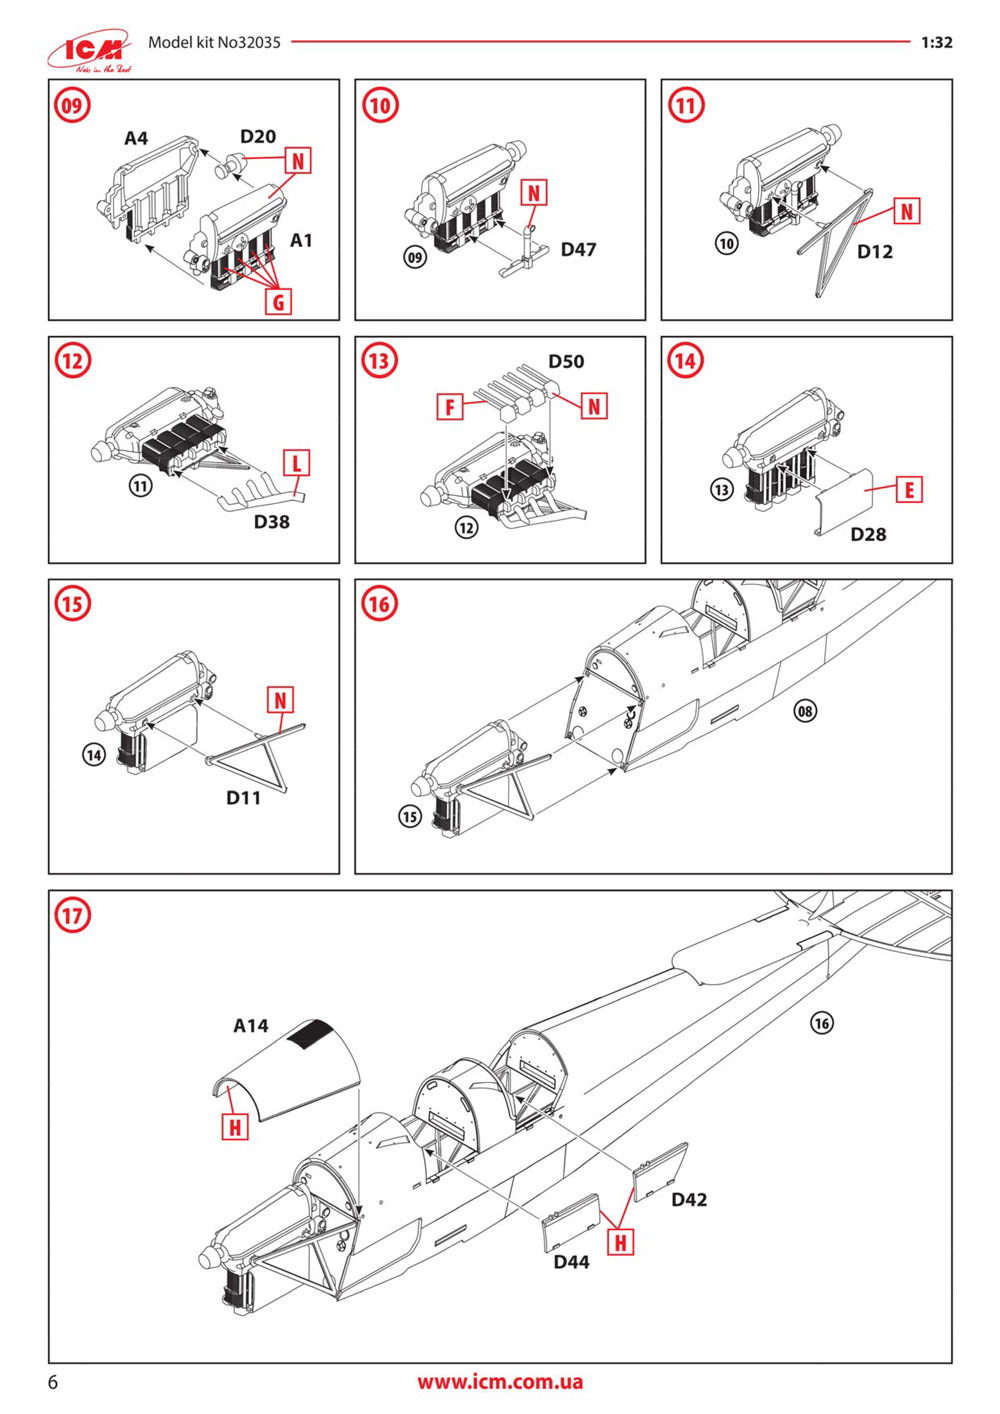
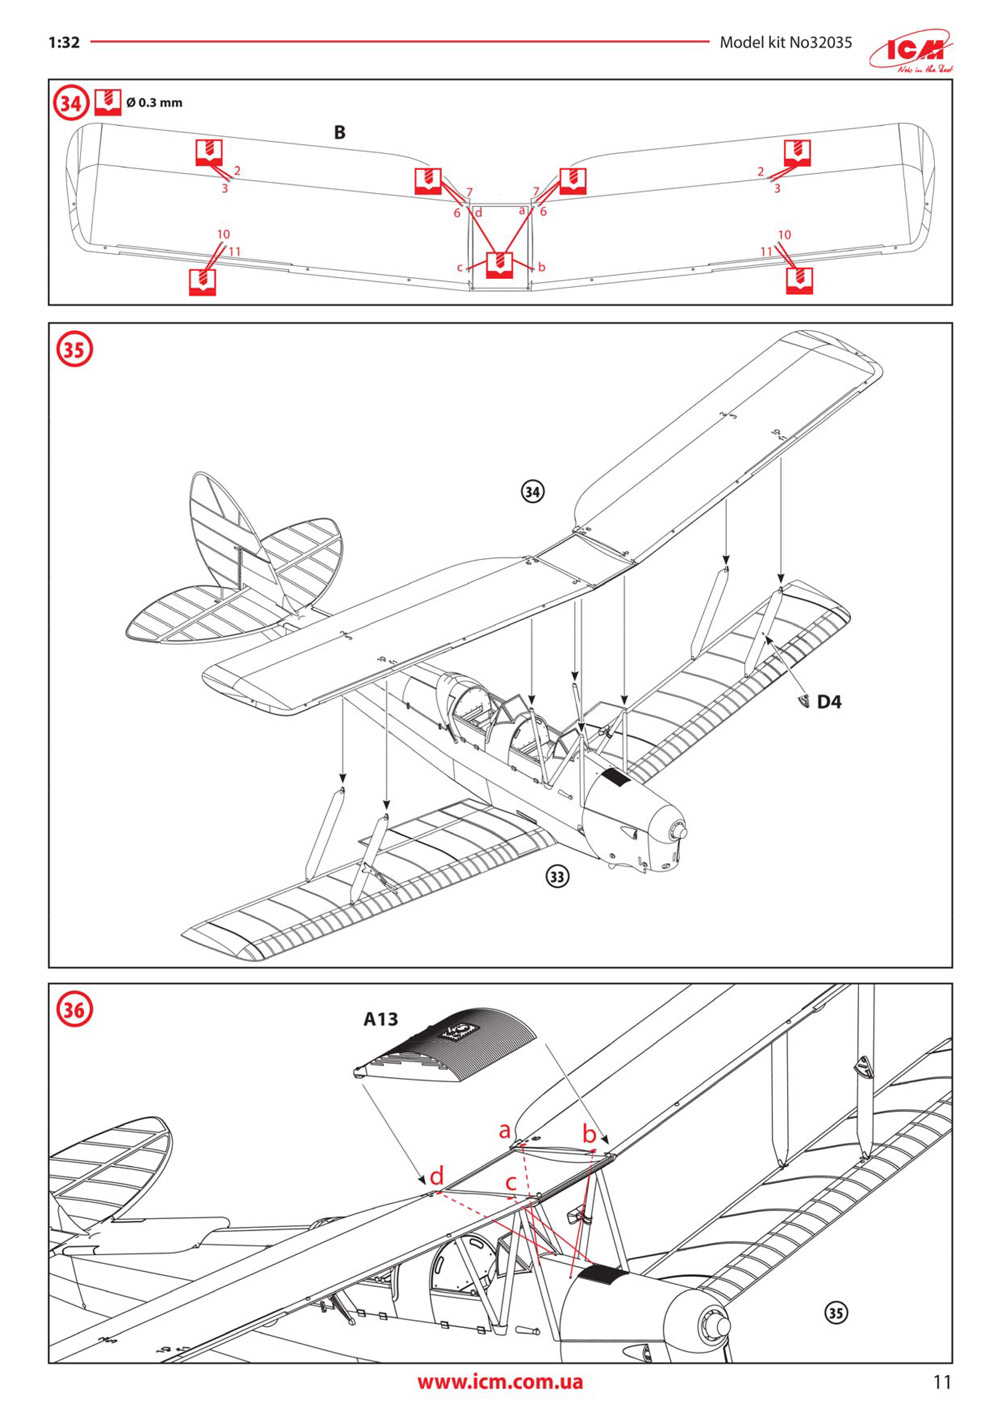
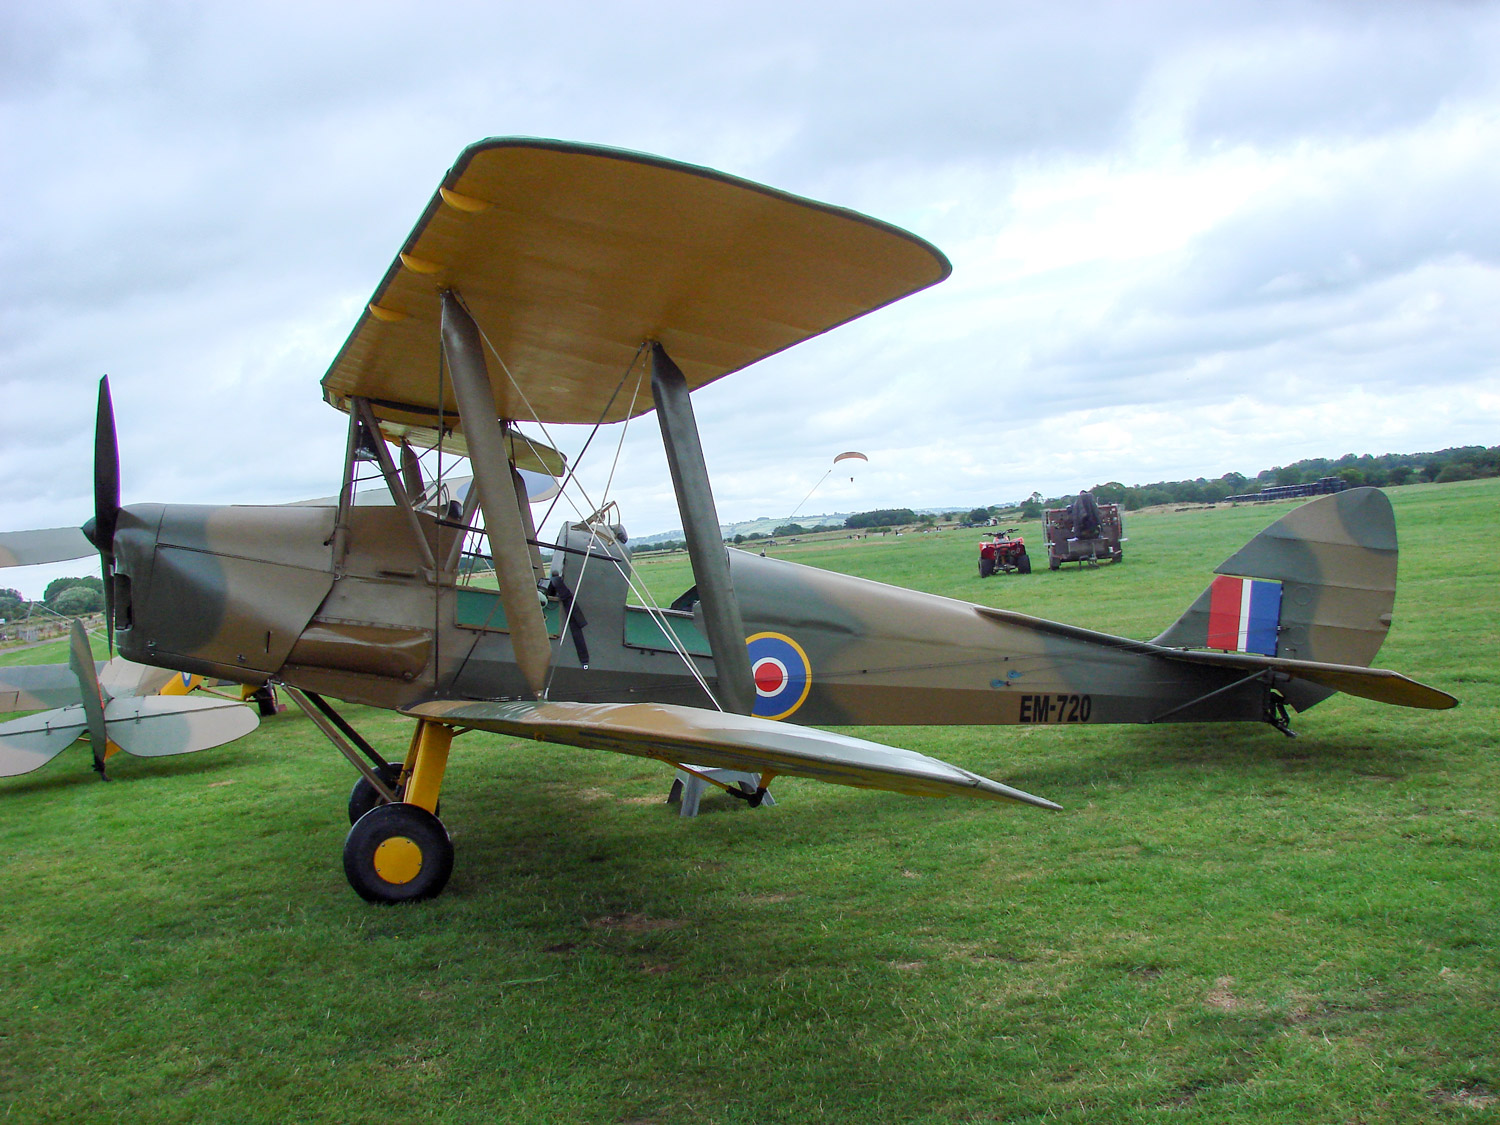
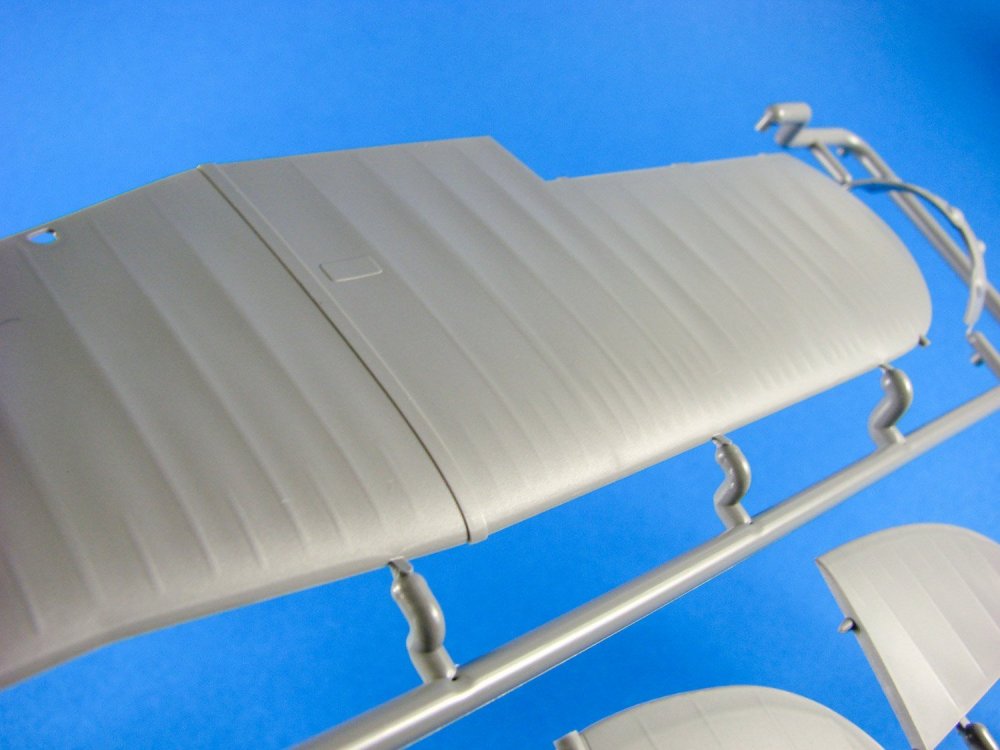
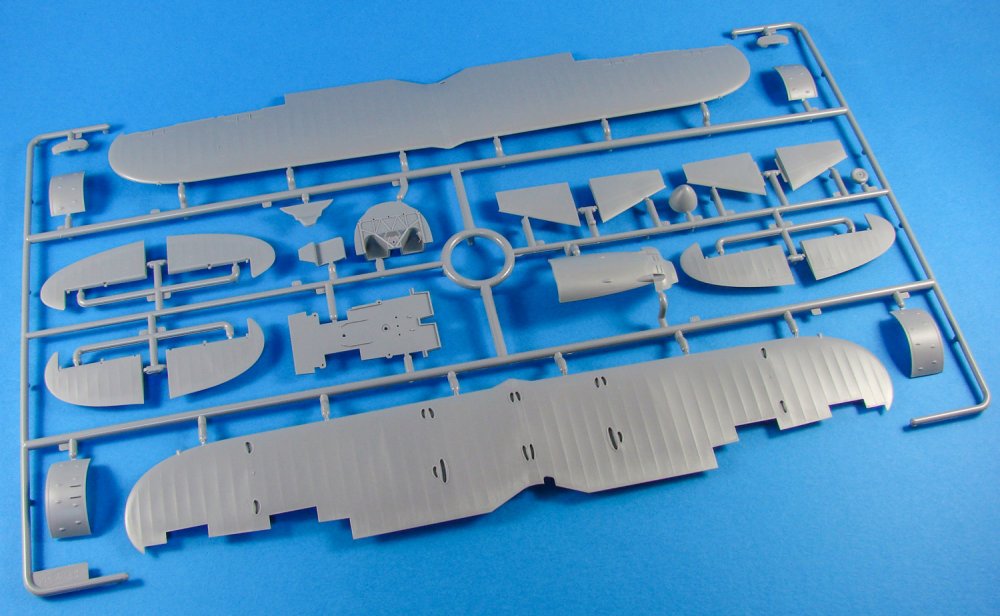
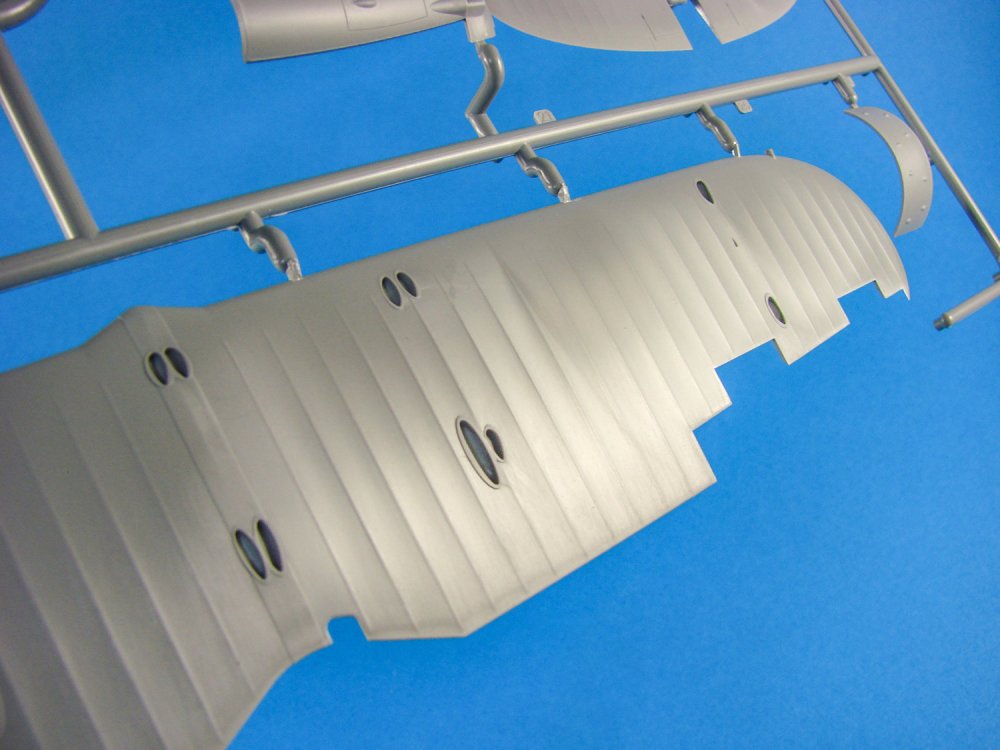
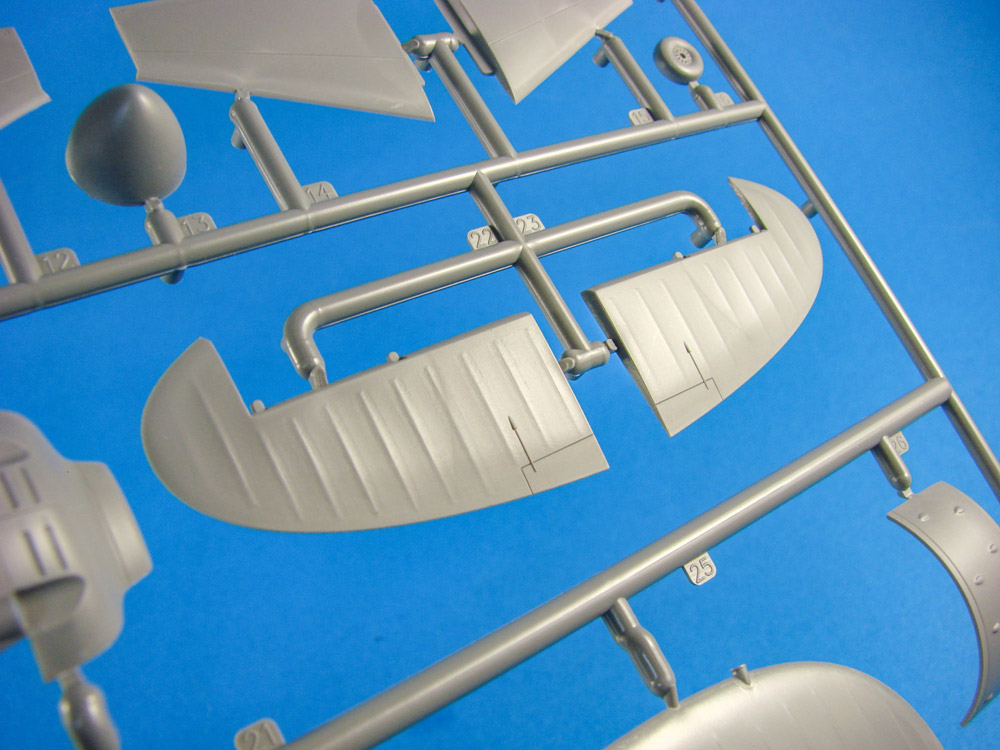
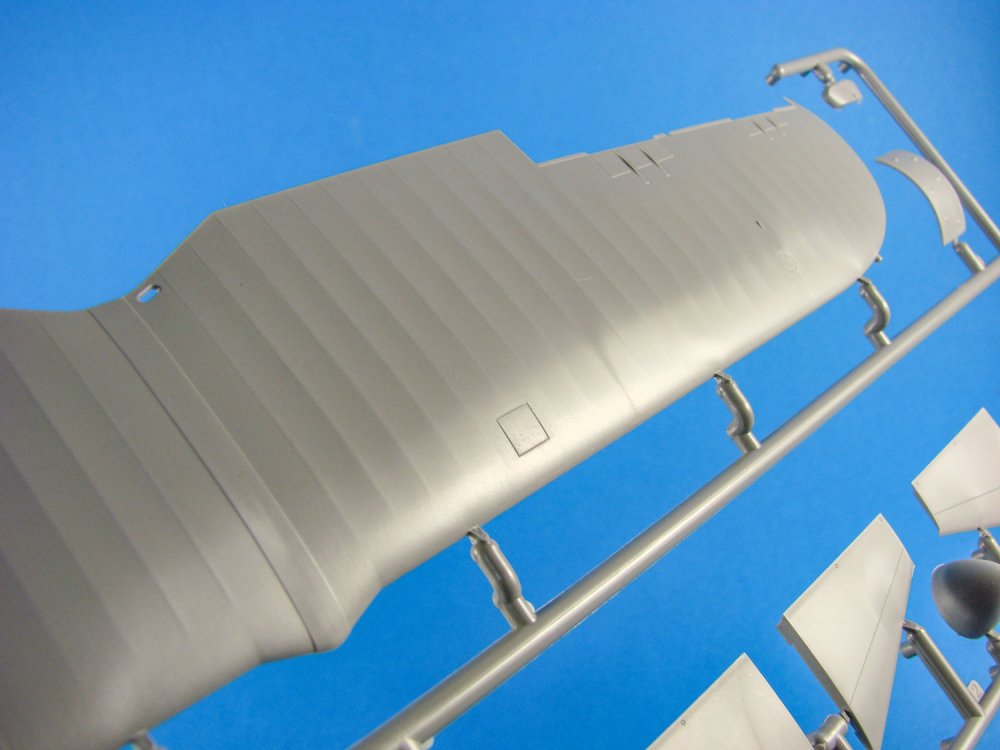
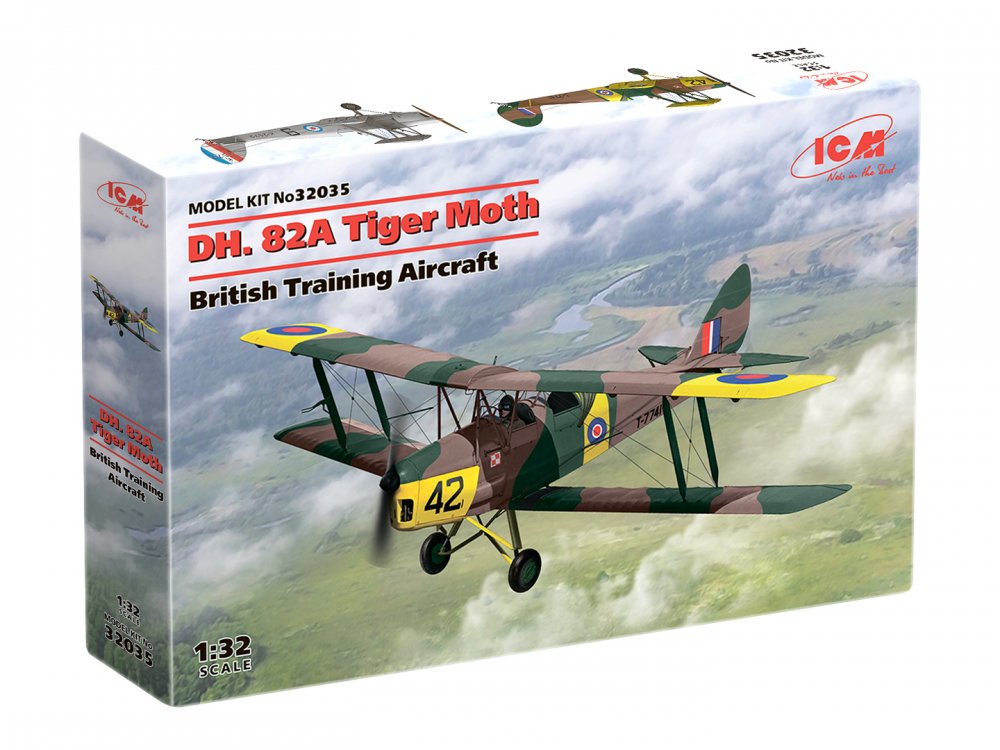
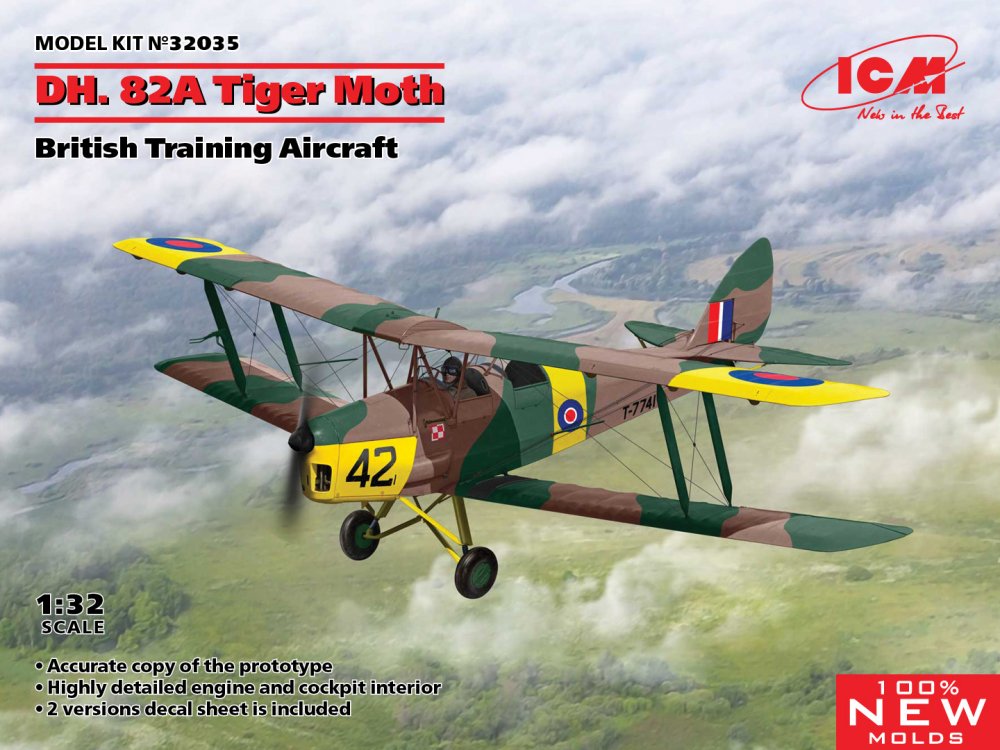
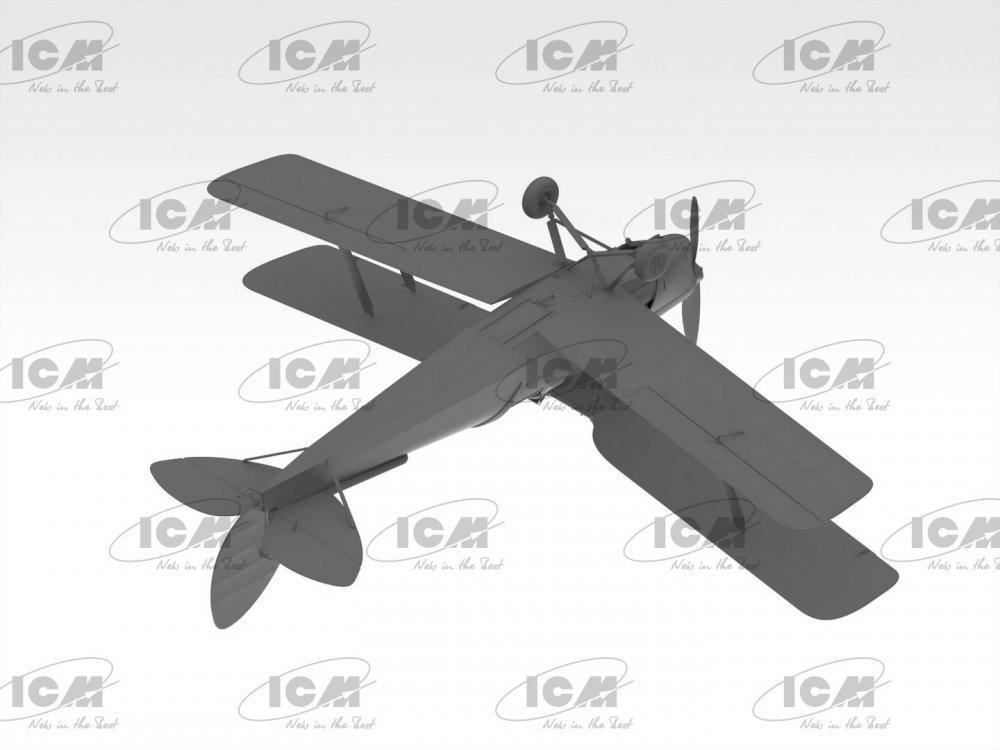
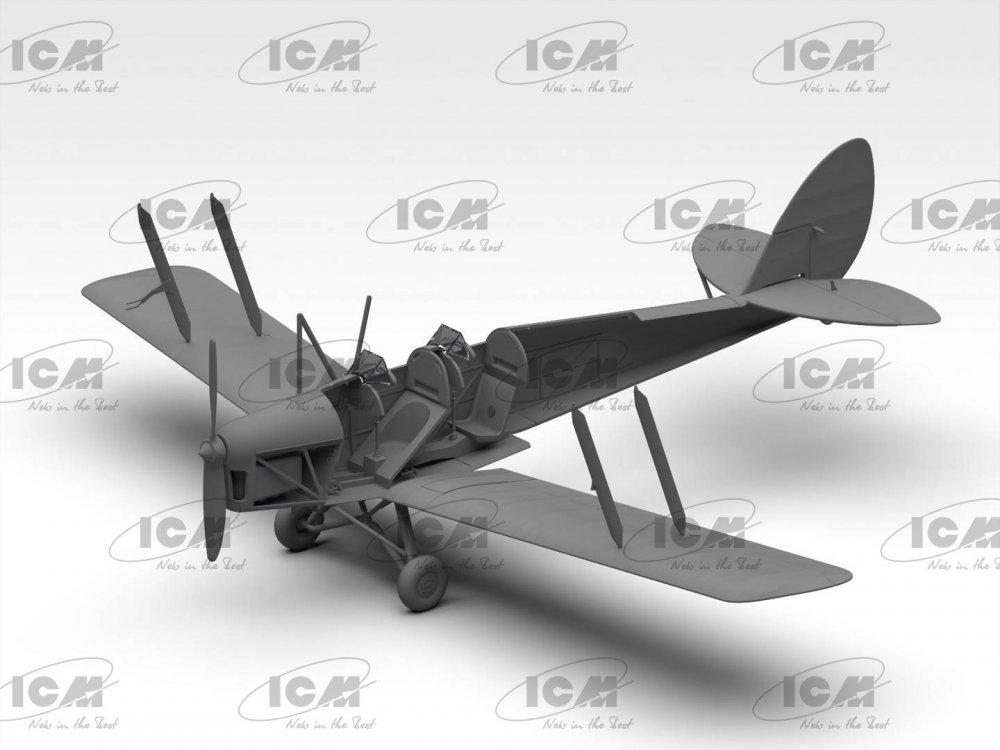
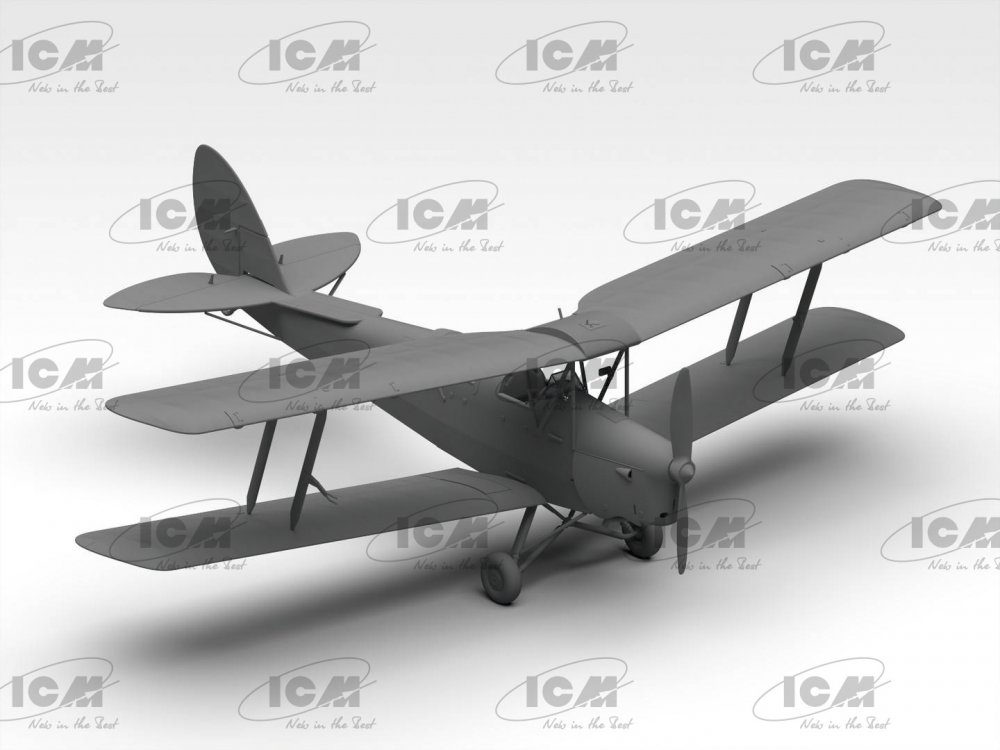
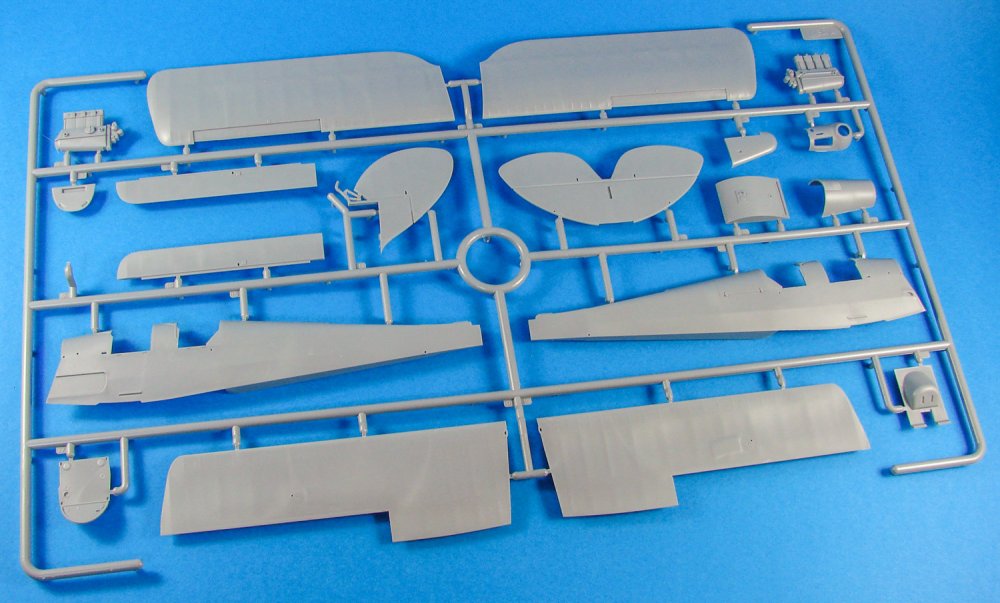
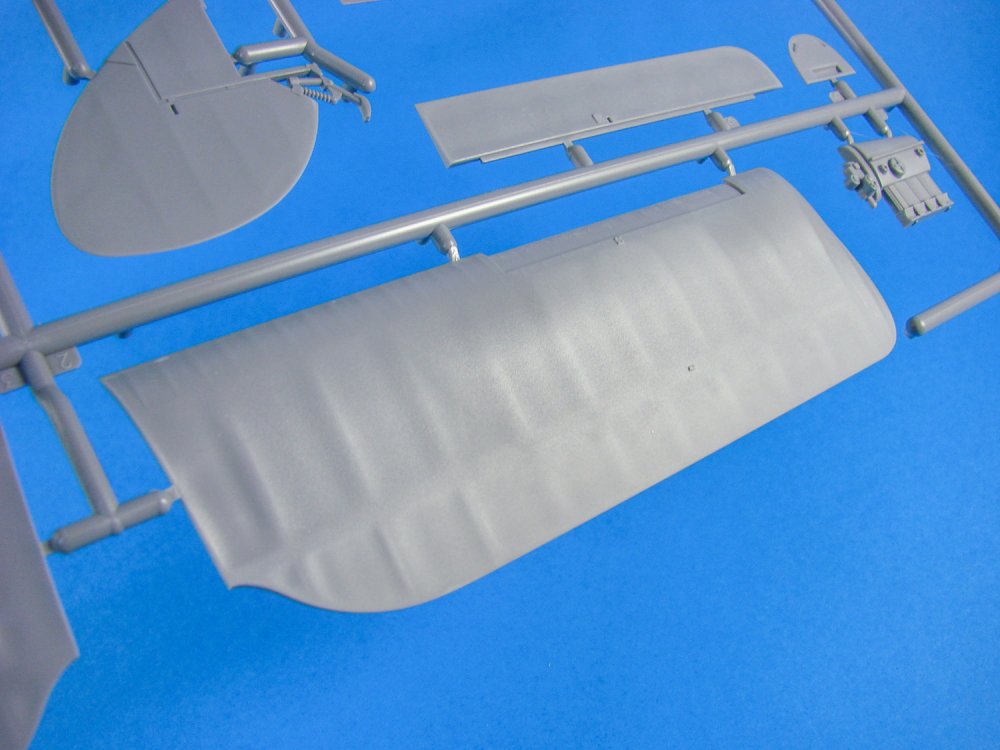
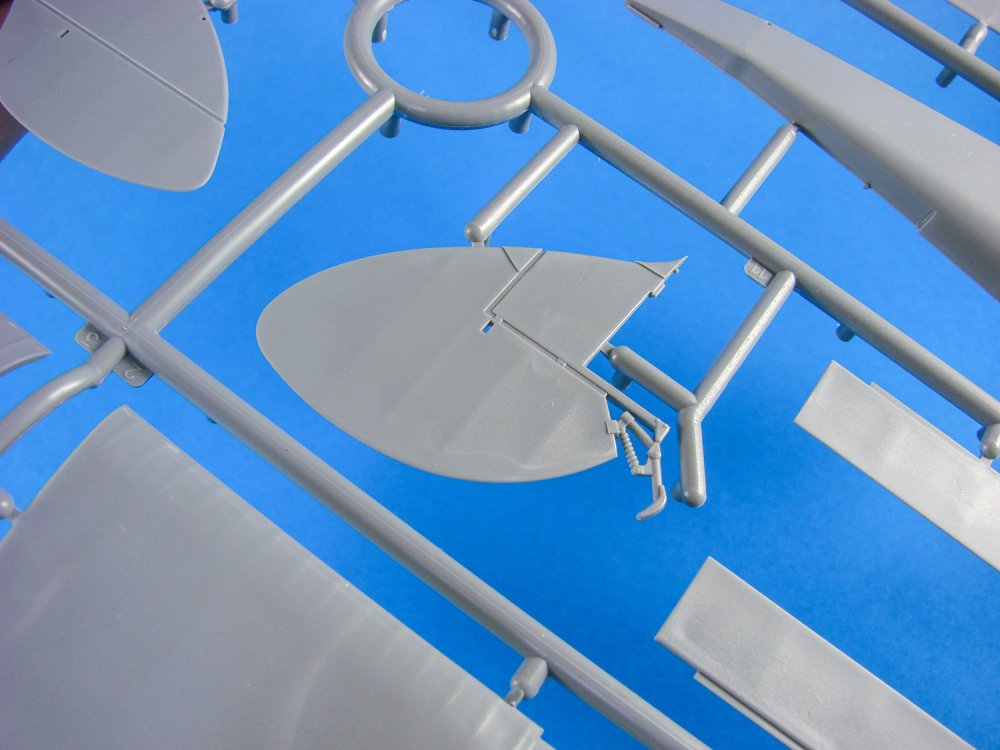
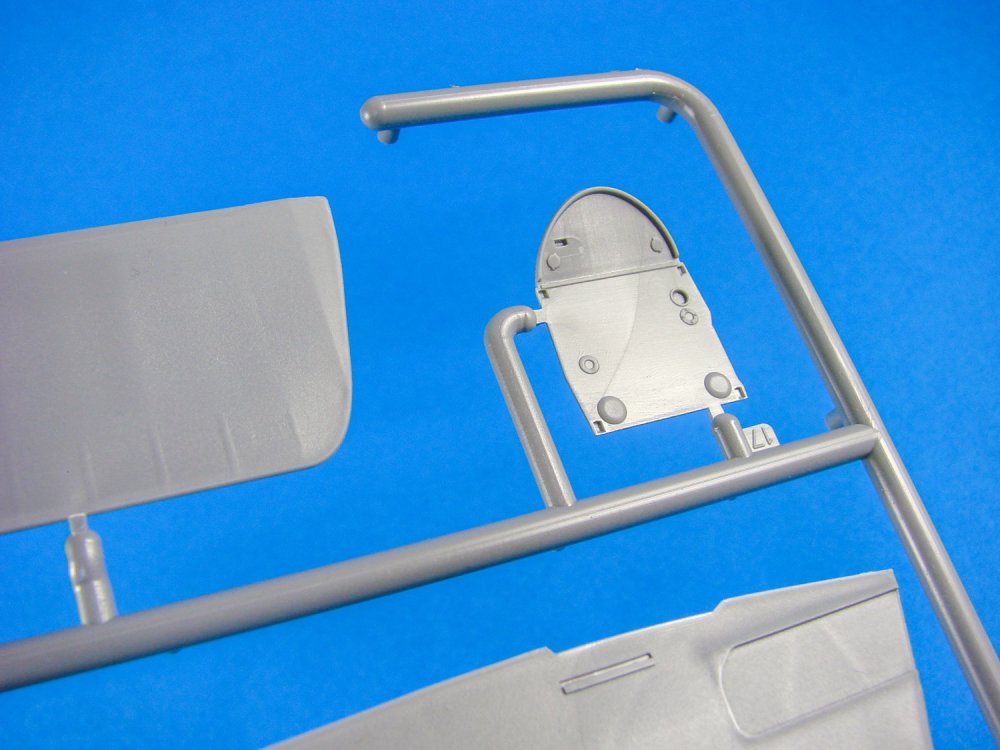
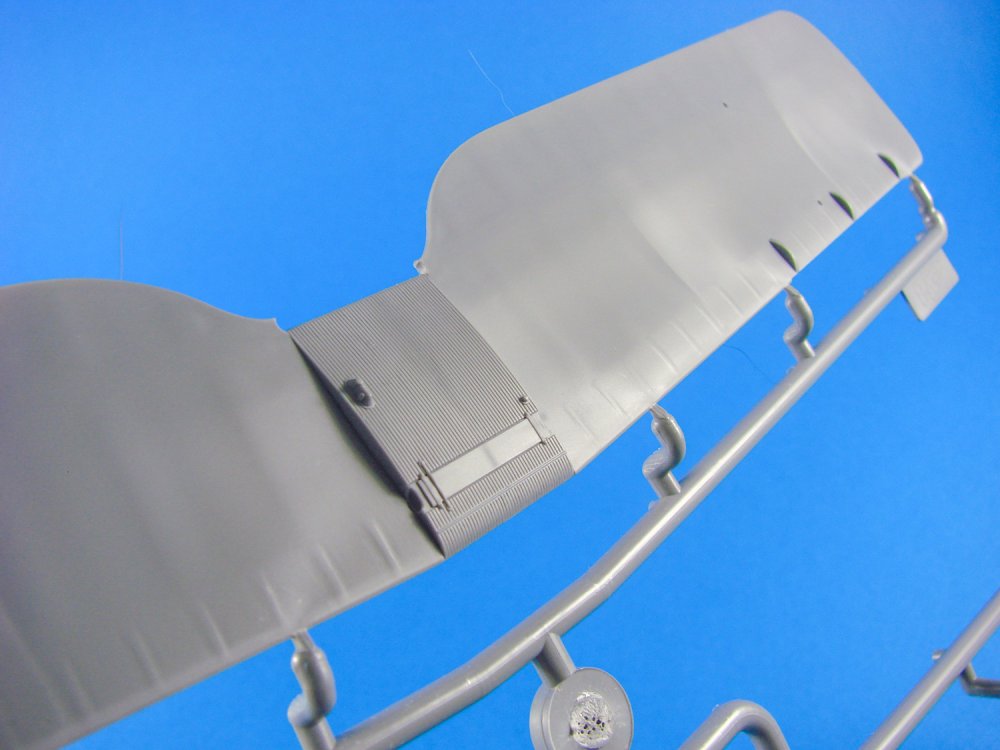
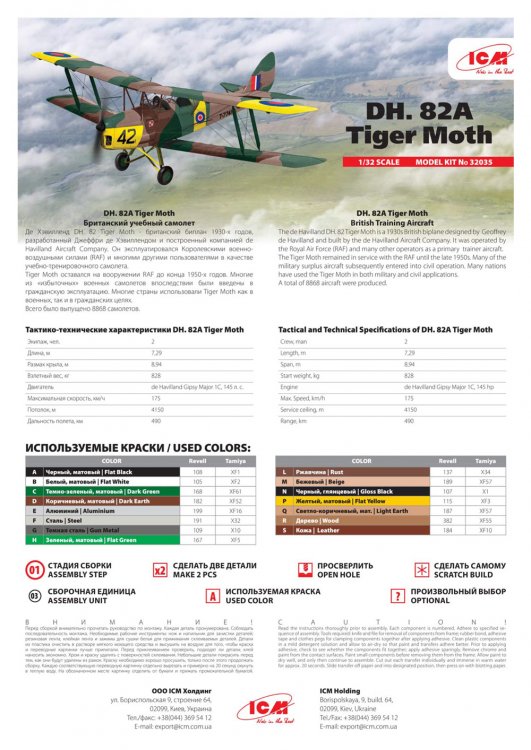
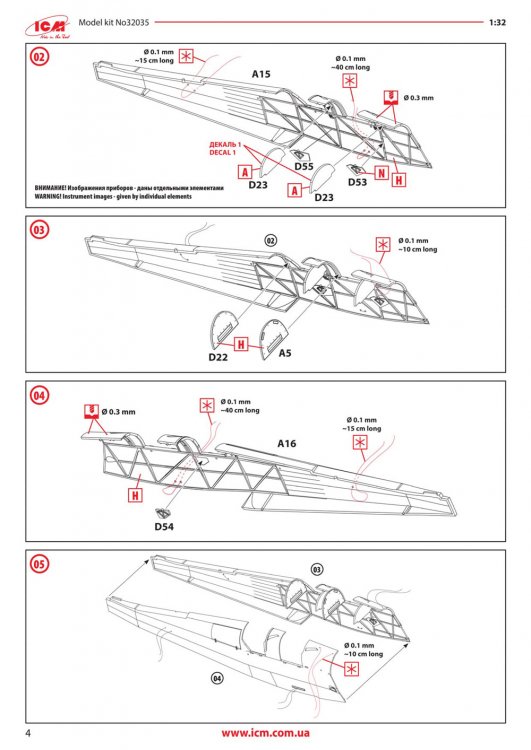
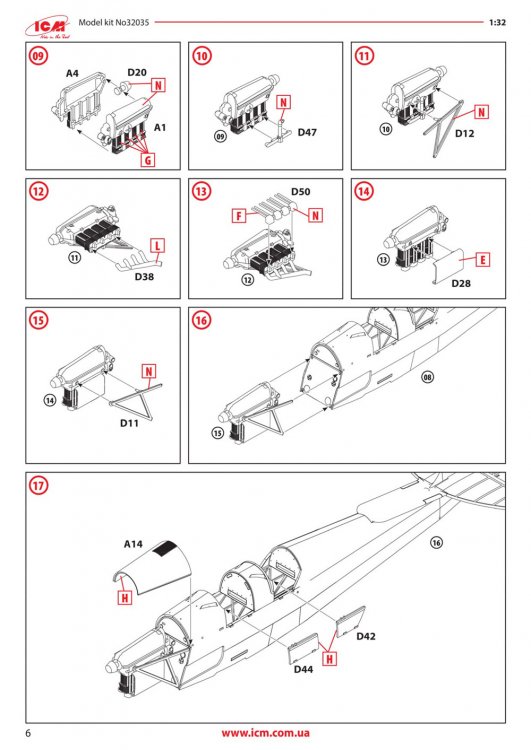
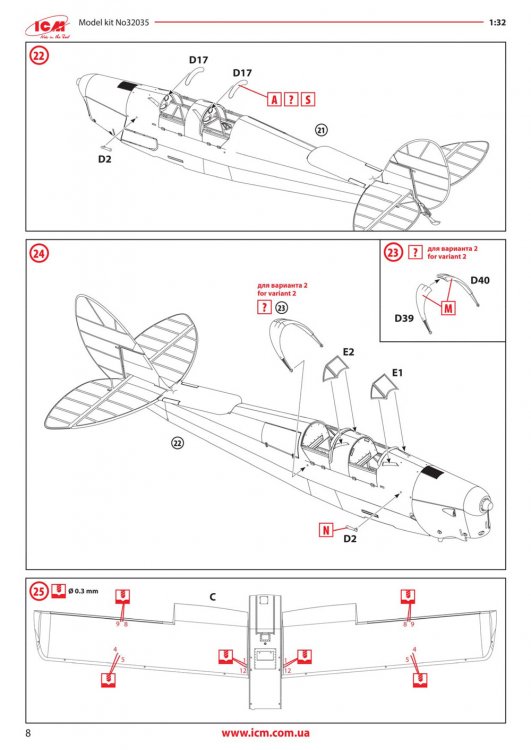
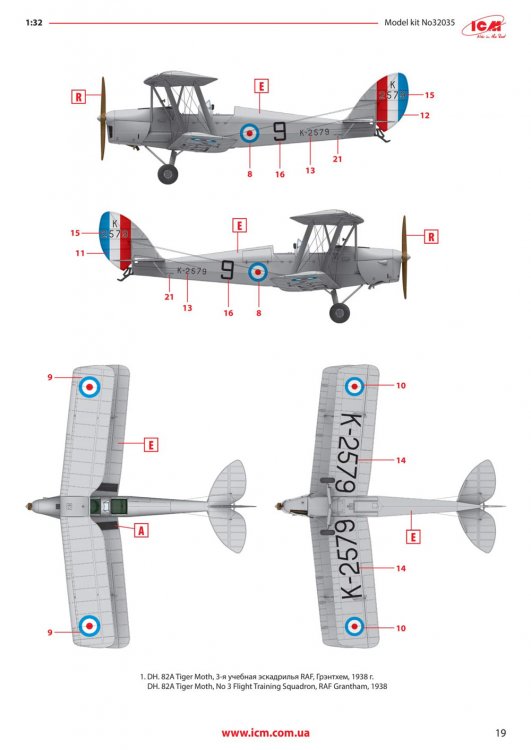
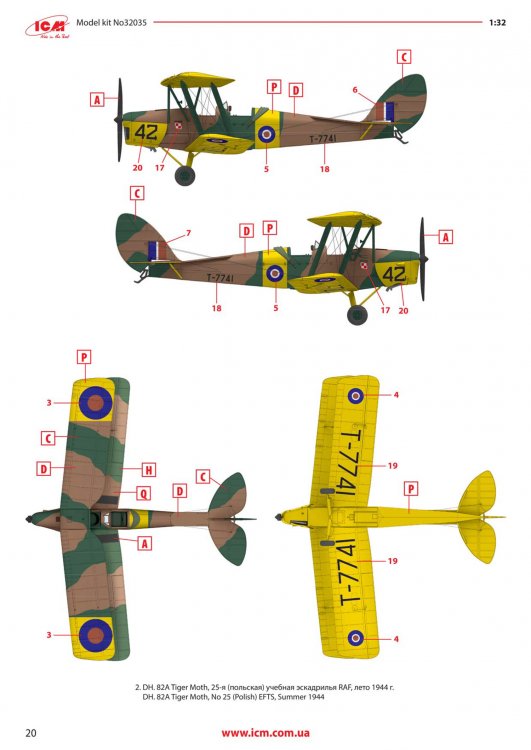
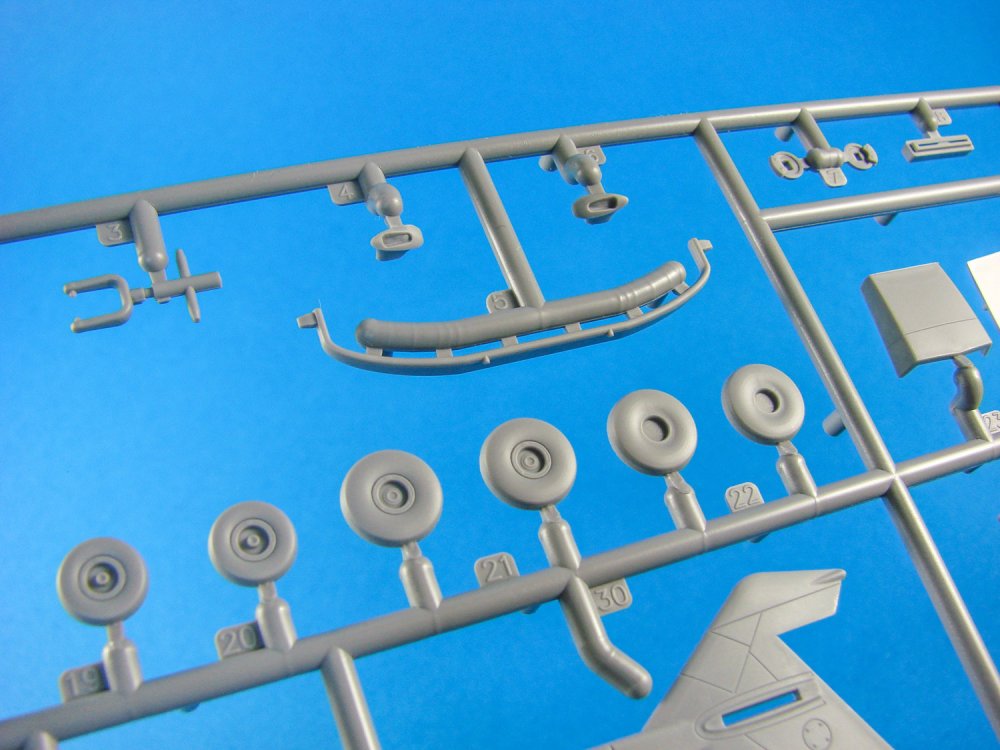
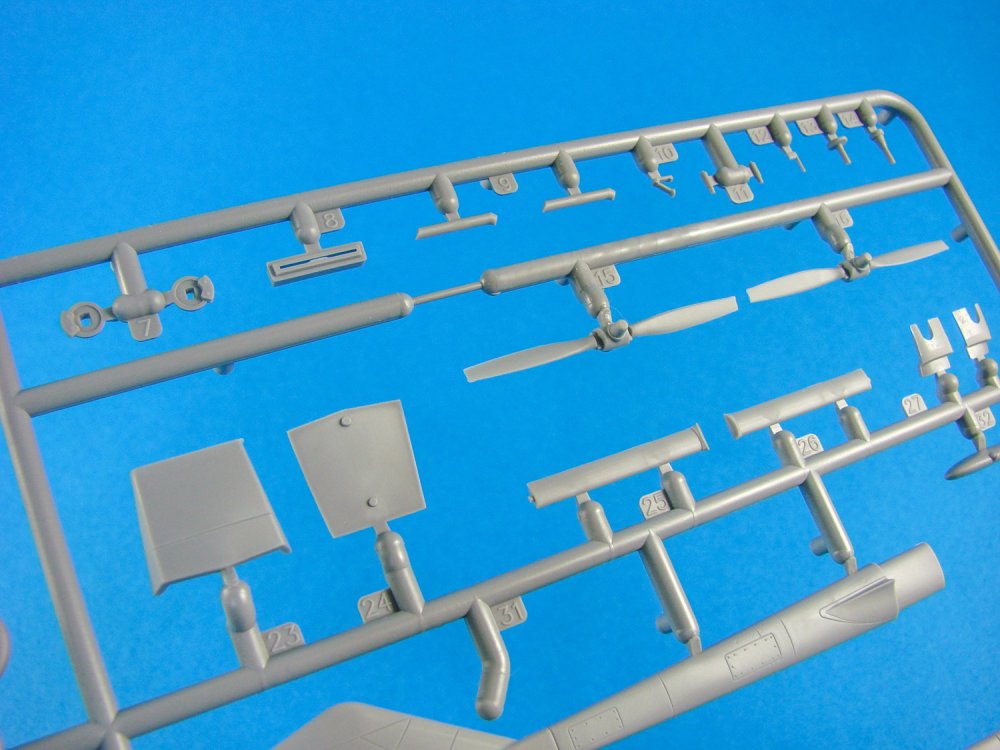
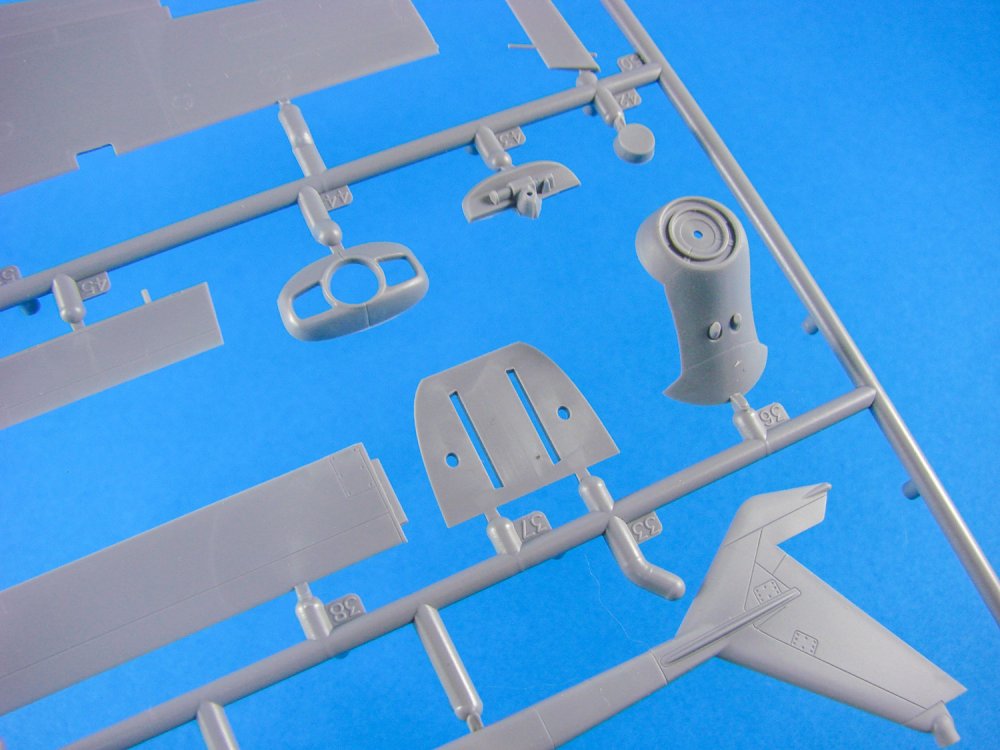
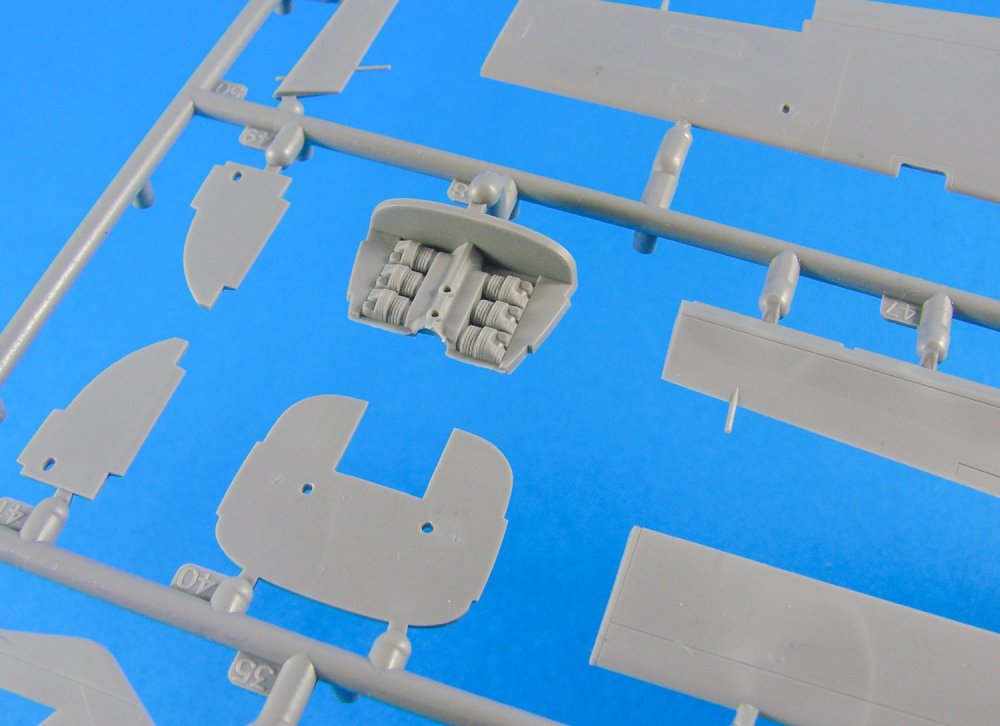
1:32 DH.82a Tiger Moth ICM Catalogue # 32035 The de Havilland DH.82 Tiger Moth is a 1930s British biplane designed by Geoffrey de Havilland and built by the de Havilland Aircraft Company. It was operated by the Royal Air Force (RAF) and many other operators as a primary trainer aircraft. In addition to the type's principal use for ab-initio training, the Second World War saw RAF Tiger Moths operating in other capacities, including maritime surveillance and defensive anti-invasion preparations; some aircraft were even outfitted to function as armed light bombers. Photo by Jim Hatch The Tiger Moth remained in service with the RAF until it was succeeded and replaced by the de Havilland Chipmunk during the early 1950s. Many of the military surplus aircraft subsequently entered into civil operation. Many nations have used the Tiger Moth in both military and civil applications, and it remains in widespread use as a recreational aircraft in several countries. It is still occasionally used as a primary training aircraft, particularly for those pilots wanting to gain experience before moving on to other tailwheel aircraft. Many Tiger Moths are now employed by various companies offering trial lesson experiences. The kit ICM’s new Tiger Moth kit is the first fully new-tool 1:32 injection moulded kit since Matchbox released theirs, back in 1978. I actually loved that kit so much that I built it several times in the different incarnations it offered, such as floatplane etc. In fact, I still have an unbuilt kit from that time. Revell have also re-boxed that kit a couple of times over the last years, but it’s getting a little tricky to find now. To say I was pleased when this was released, was an understatement. As with ICM kits generally, this is packed into a bomb-proof, rigid corrugated card box with an integral folding lid. This is all then covered with a high gloss product sleeve showing a military training machine riding high over the English countryside. Got to love some evocative art! This scheme is actually one of two offered in this kit. More on that later. Inside the box, there are THREE light grey styrene sprues packed into a single clear, resealable plastic sleeve, and a single clear sprue in its own sleeve that’s then popped into the main one. With this release, all parts within are slated for use. A quick scan of the instructions also shows you that a series of small holes for rigging cables, needs to be first opened up on the fuselage before any work really begins. I’m always forgetting to do this, even on my current project. Work starts in the cockpit area, as tends to be standard. Here’s where this kit is immediately different to the old Matchbox, in that it doesn’t actually have a fairly reasonable interior. The inside cockpit walls have the various constructional formers and stringers moulded in situ, onto which various other details are then glued, such as the instrument panels, throttle etc. The cockpit floor is actually built onto the centre section of the lower wing and doesn’t fit into the fuselage until after the latter is closed up. There are more details than the old Matchbox kit, admittedly, but I still think there’s more that should be in the cockpit than is provided here, having flown in a Tiger Moth myself, and also having built the 1:48 Airfix with the CMK internals. However, it’s definitely a starting position from which to add more if you wish. One real omission here are seatbelts, but that’s fairly common to ICM kits, and if you’re like me, you’ll try to find something suitable, such as fabric belts anyway. The fuselage is moulded with separate entry doors on both port and starboard, so those can be posed in any position you want, and a fairly reasonable engine is also supplied. A little lead wire and some TLC, and that should look really neat. Engine cowl panels can also be posed too, but you’ll need a short length of plastic rod to act as a panel prop. ICM has moulded both the stabiliser and elevator, and the fin and rudder, as single piece units, but this should be easy to fix if you wanted to pose them dynamically. The tail skid is also moulded to the rudder, as is correct. A nice touch is also the inclusion of the anti-spin panel that was fitted to the Tiger Moth from 1942 onwards, and typically retrofitted. The original section without this is also included. Despite the Moth having such thin wings, ICM has managed to mould them as traditional upper and lower sections, with the lower top, and upper bottom full-span sections. More holes will need to be drilled out for rigging points, and these are clearly shown on the instructions. ICM also suggest the lower top wing is fitted to the airframe before the upper panels themselves are attached, and the same for the lower bottom panels. I’m not too keen on that idea as I don’t want to be removing seams etc. on a model where that wing is just connected via a few struts. I’m pretty sure it can be built conventionally. It appears the only reason for this is fitting rigging wires (and perhaps tying them off within the wing itself). Surface details are really very nice, such as the rib and fabric, and the simple fuselage effect. Wings are also moulded with separate leading-edge slats. I also think the DH logo on the outer wheel hubs is also superbly done. There is no option not to have that, so if you wished to model a different machine to the supplied decals, then you’ll have to remove that. Whilst no masks are supplied for the two windscreens, templates are included to help you make these. Plastic moulding quality is excellent, with no real issue with ejector pin marks and flash etc. and the clear parts are super-clear with nice framing. Decals A single decal sheet is included in this release. I feel this is either printed in-house or locally to ICM. Quality looks perfectly ok to me, with nice, thin printing, colour density and register. Carrier film is also minimal too. Instructions A 20-page manual is included, with colour-printed illustrations for the TWO schemes, printed at the back of the book. All drawings are easy to follow and reference both Revell and Tamiya colours throughout. The Moth is broken down into 50 easy to follow stages, and rigging is explained in the simplest of terms for those who may be wary of it. Two schemes are included: DH.82a Tiger Moth, No.3 Flight Training Squadron, RAF Grantham, 1938 DH.82a Tiger Moth, No.25 (Polish) EFTS, Summer 1944 Conclusion It’s certainly good to see another injection moulded Tiger Moth after all these years, and this does fit the bull nicely. I do feel that seatbelts could’ve been included and maybe the cockpit a little busier too, but in all, it’s a very nice release and not too expensive either. ICM certainly appears to have captured the lines of this beautiful aircraft, and doubtless it will look superb once done. Dig out a little reference and tart up that cockpit a little, and all should be good. My sincere thanks to ICM for the review sample seen here. EXTRA IMAGES


-
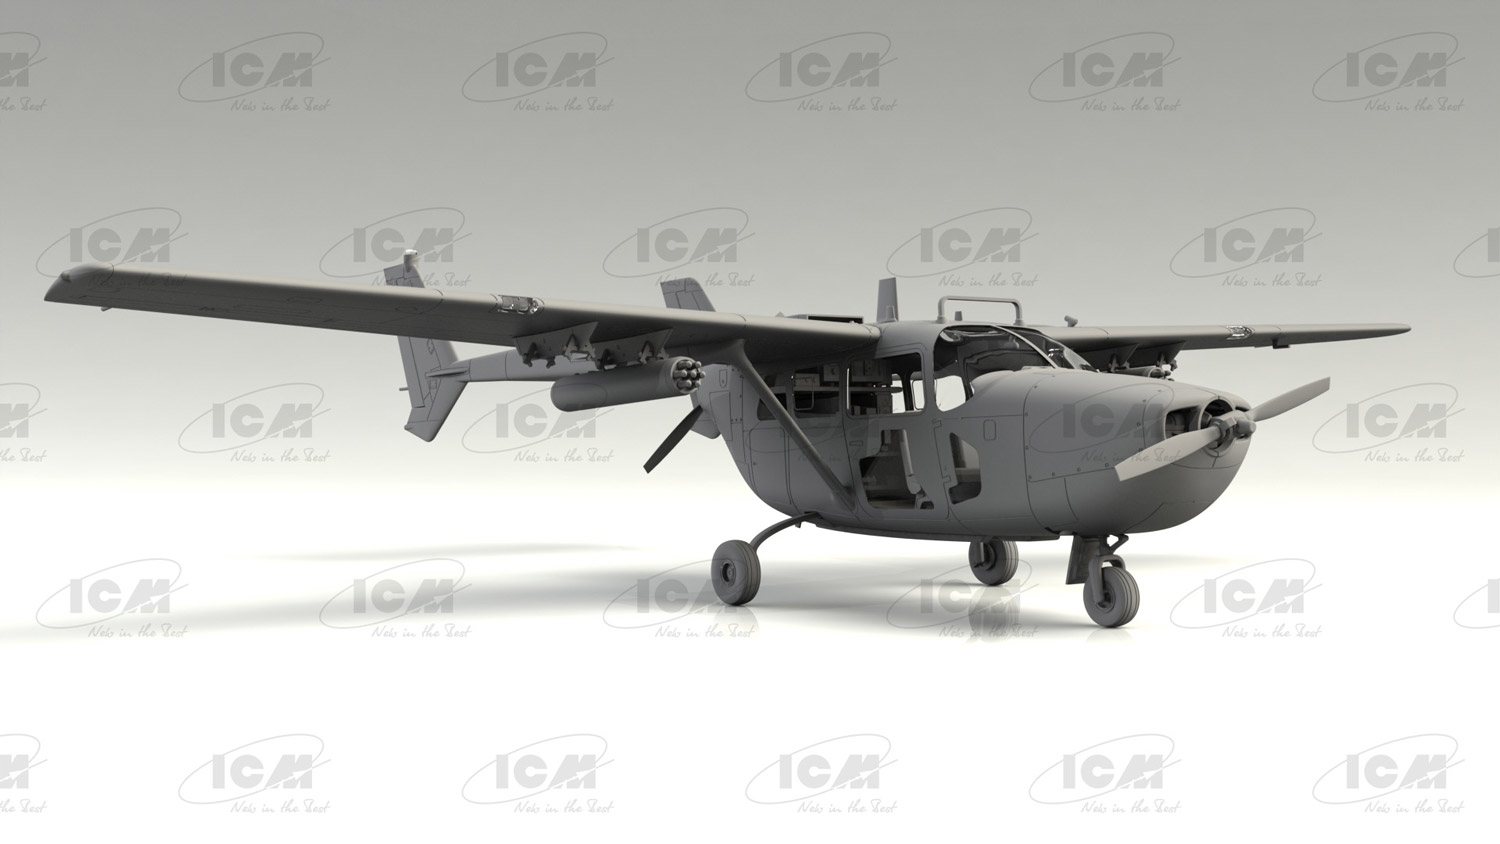
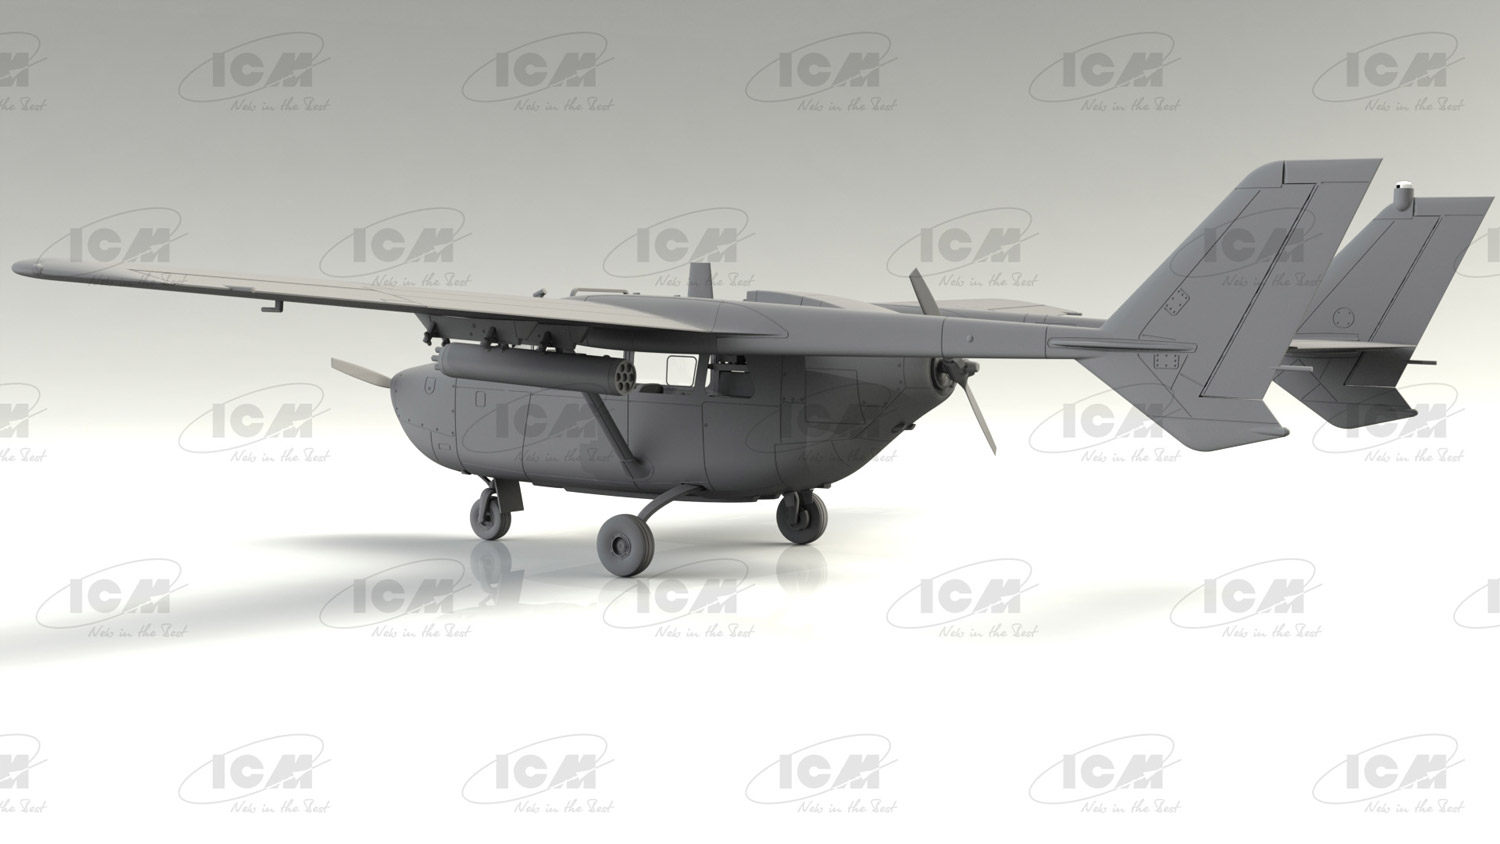
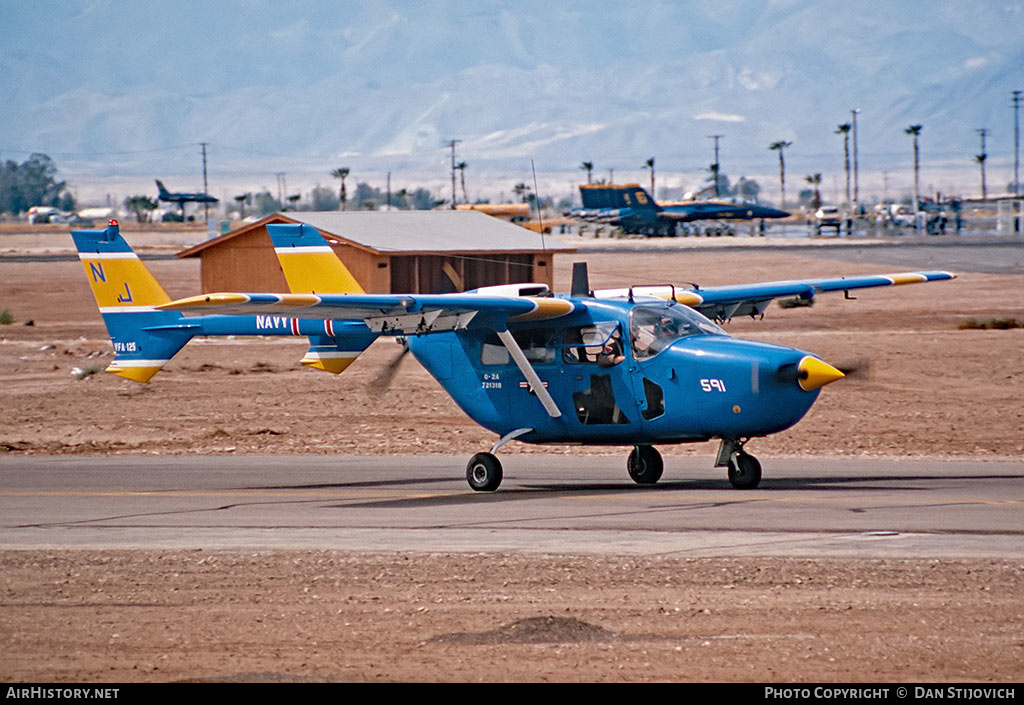
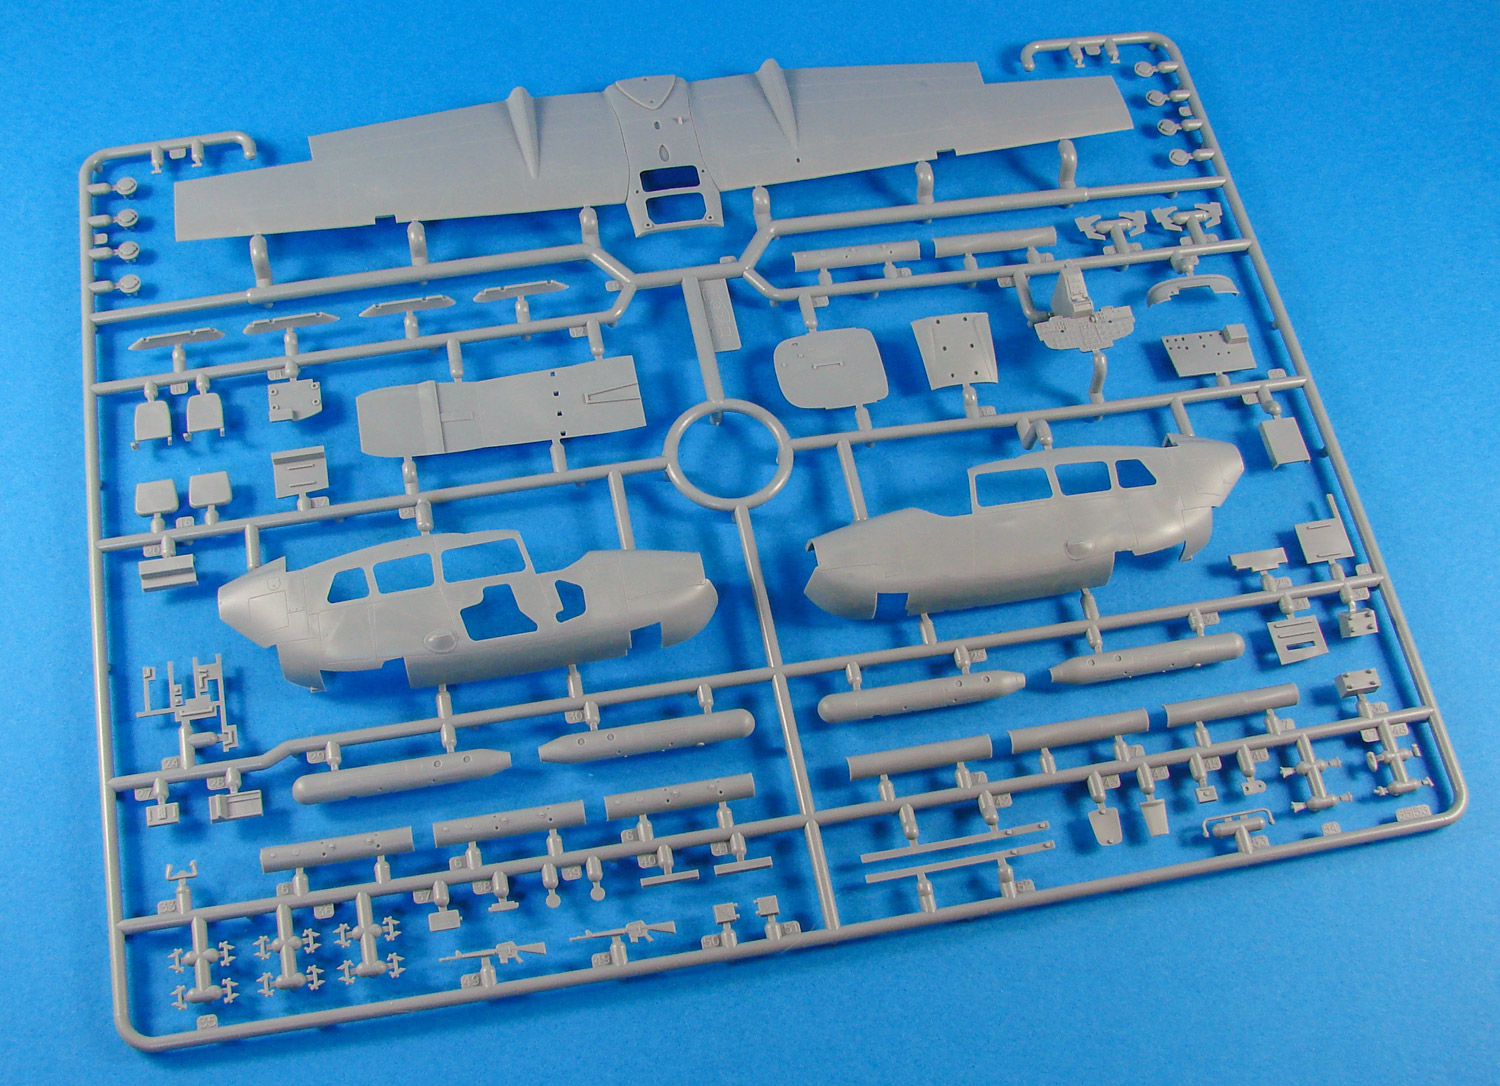
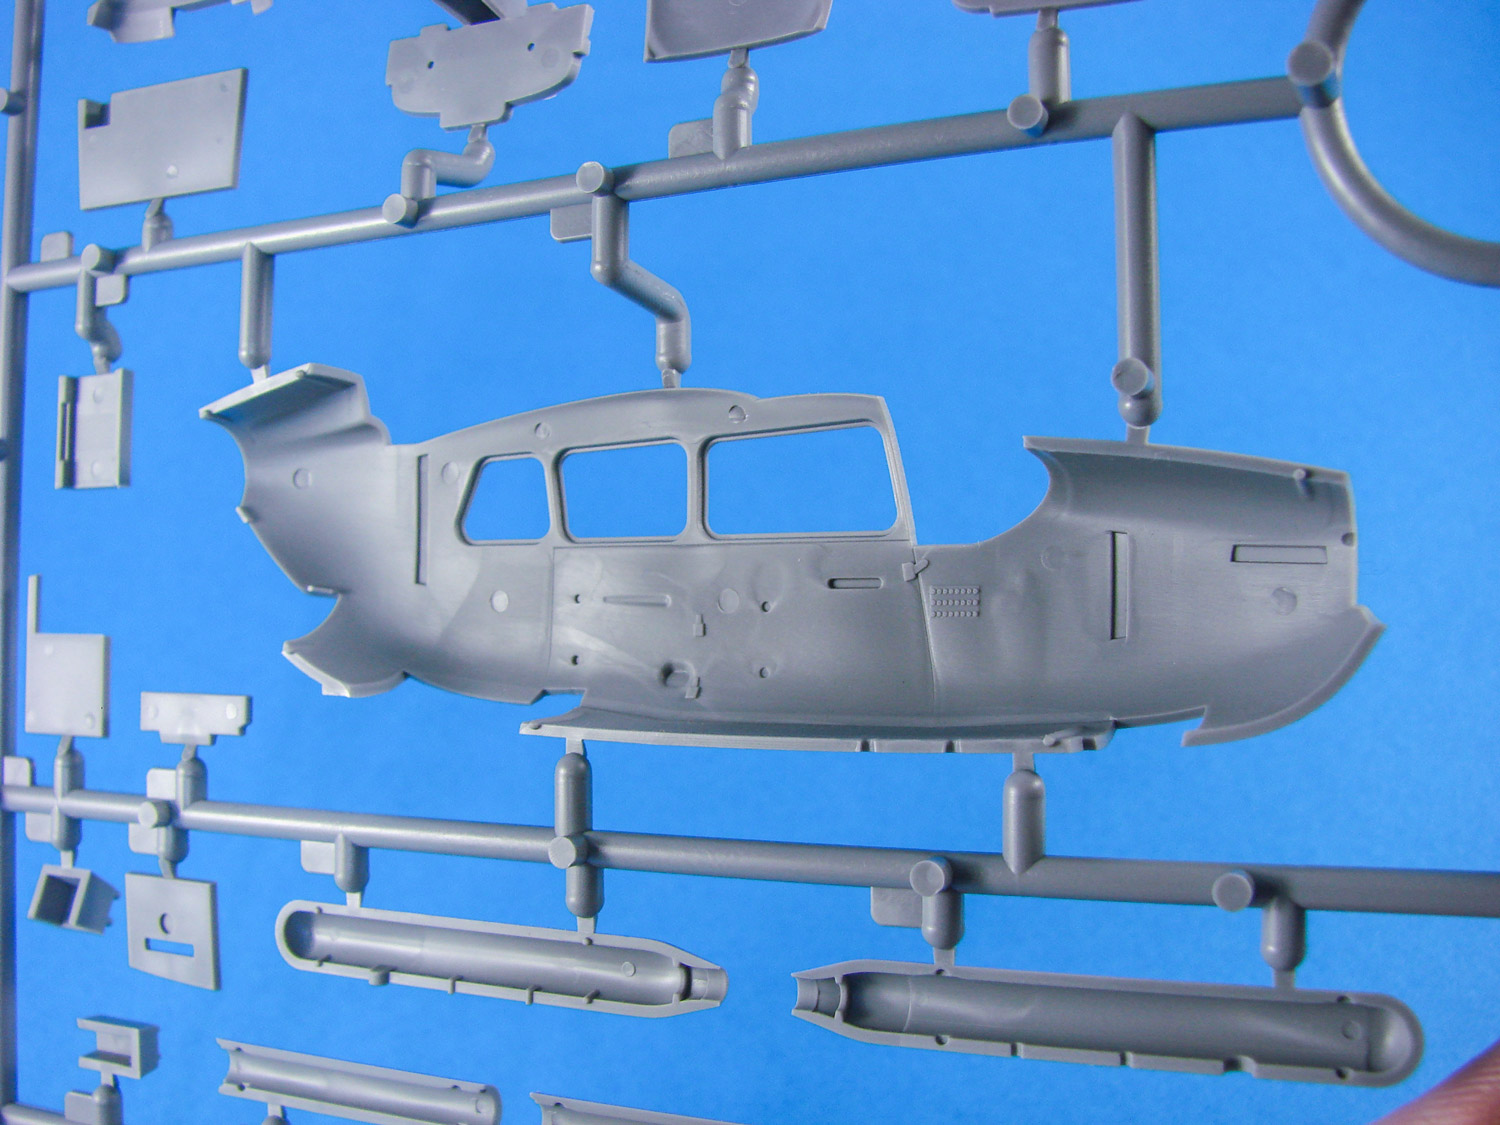
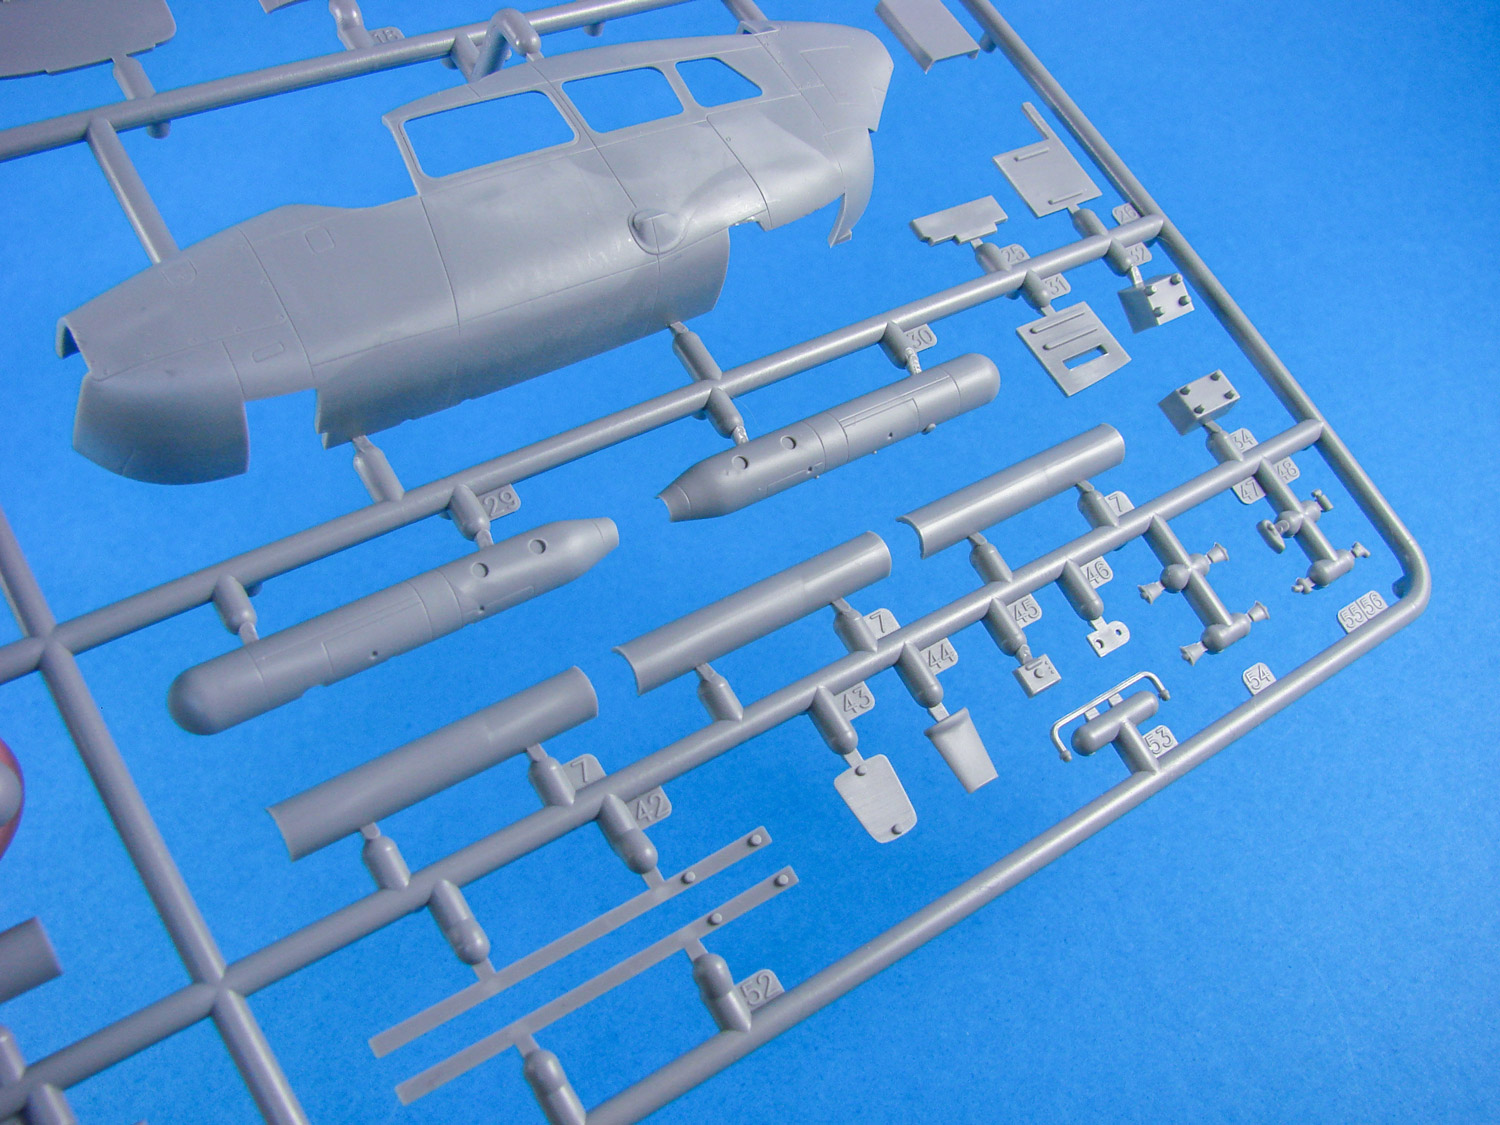
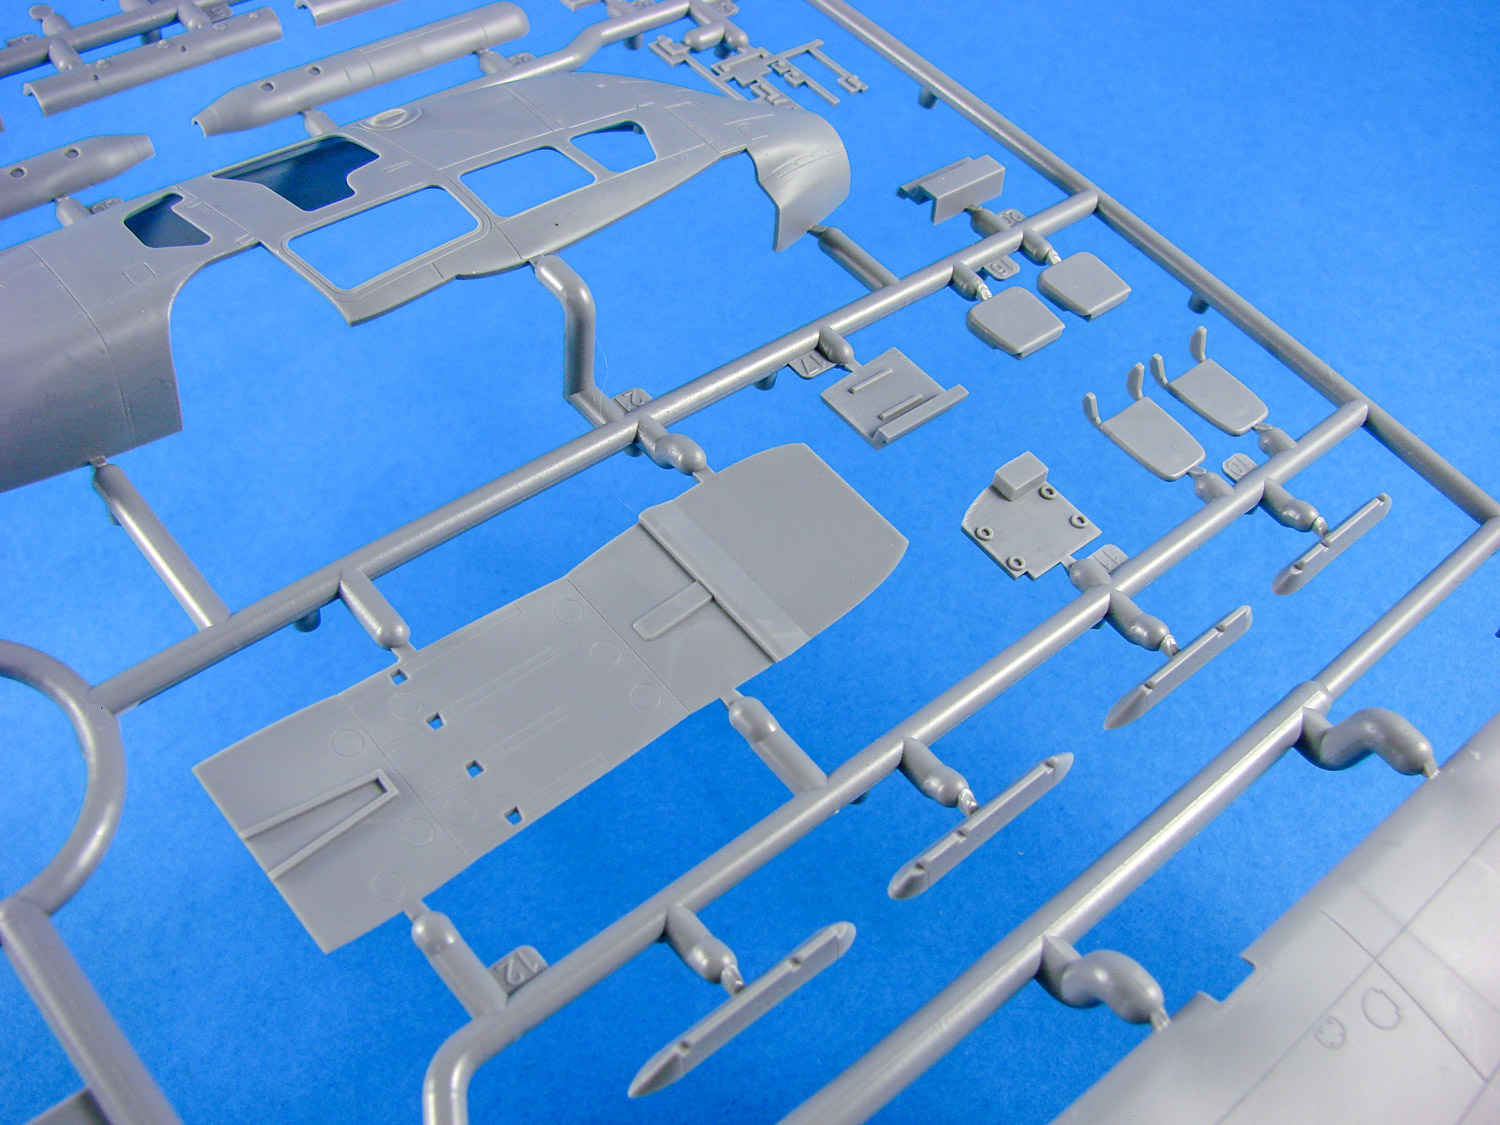
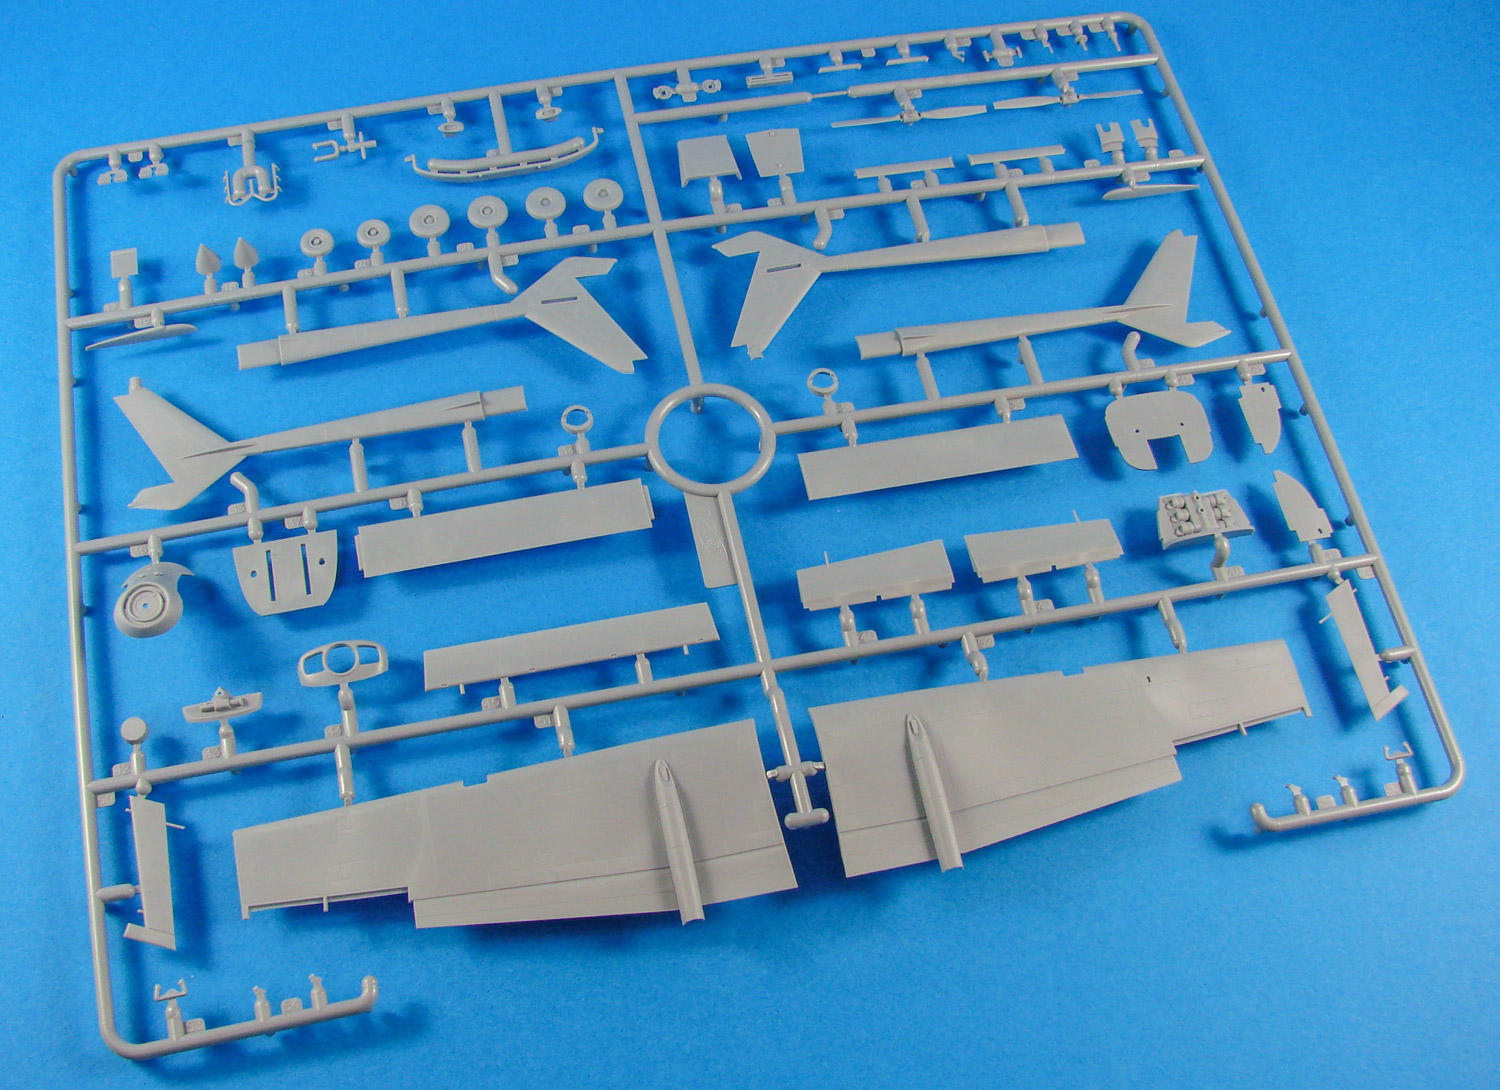
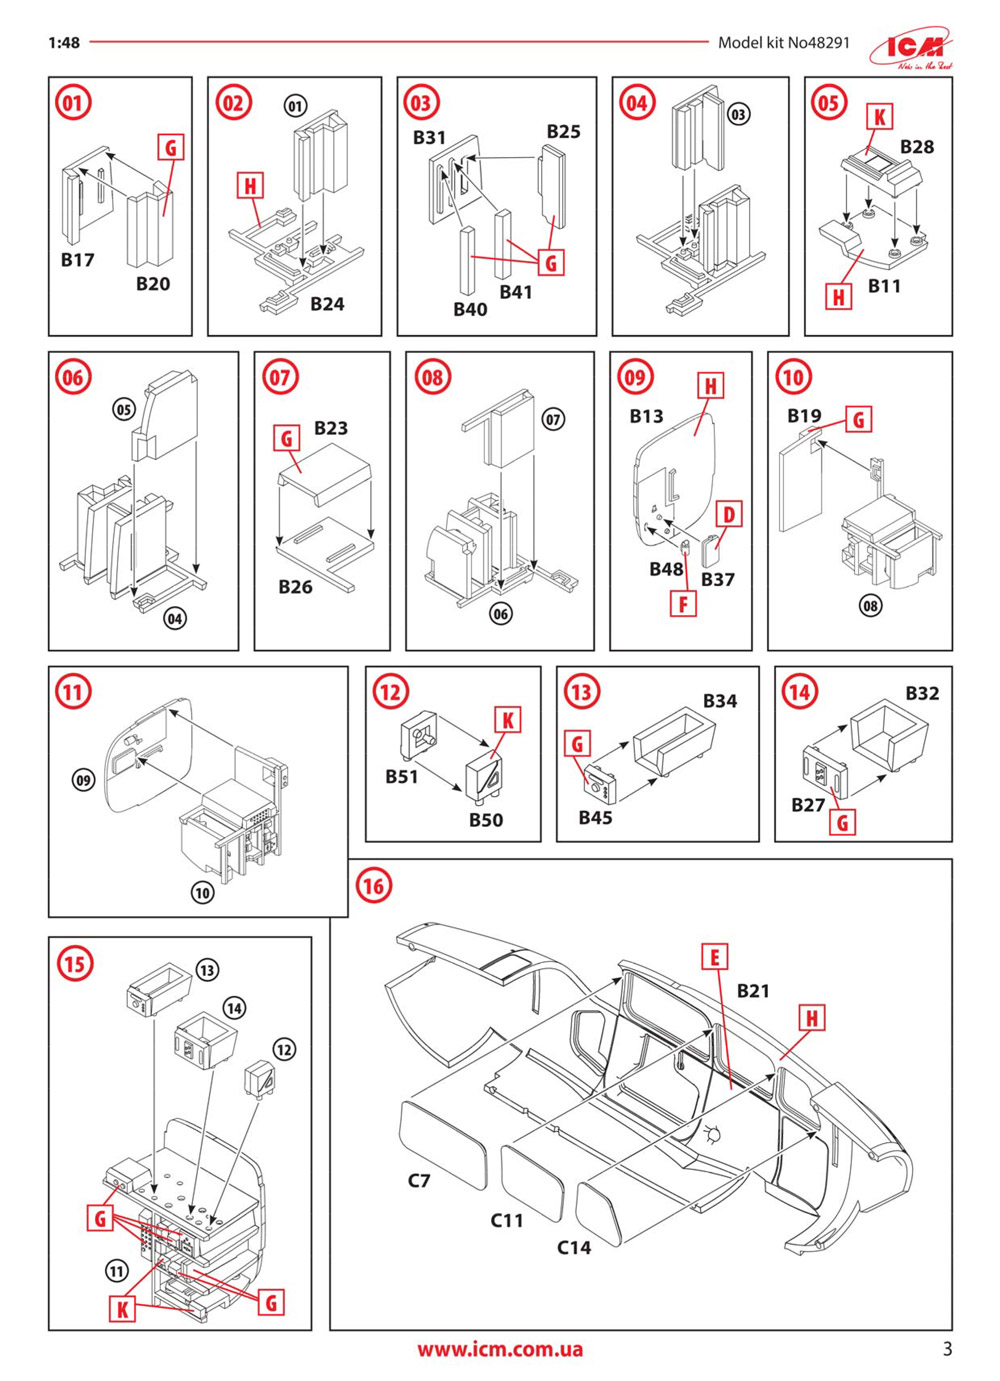
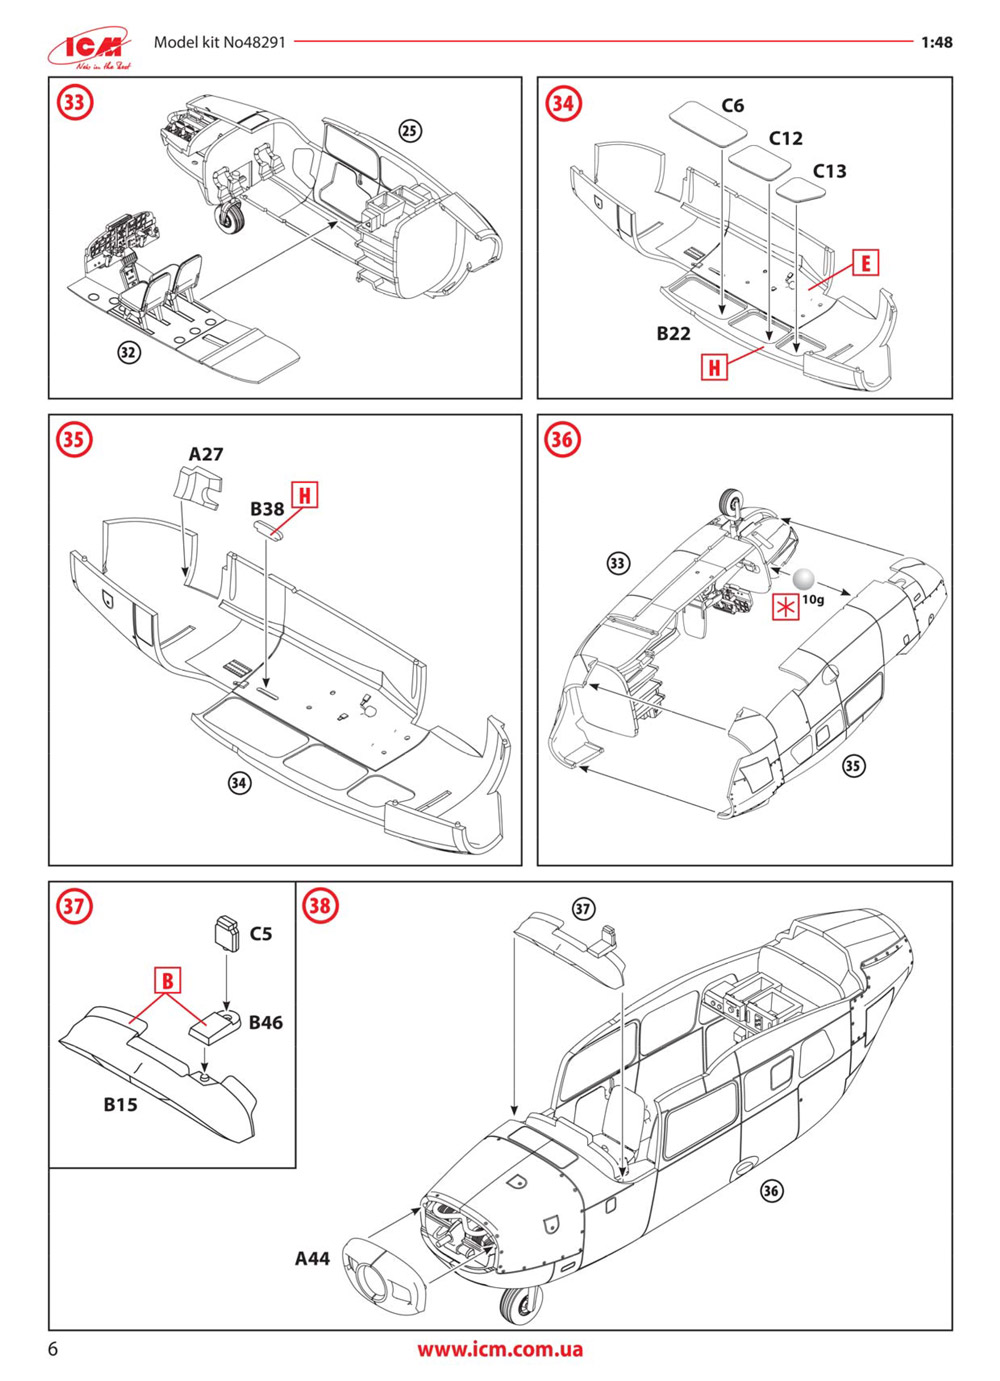
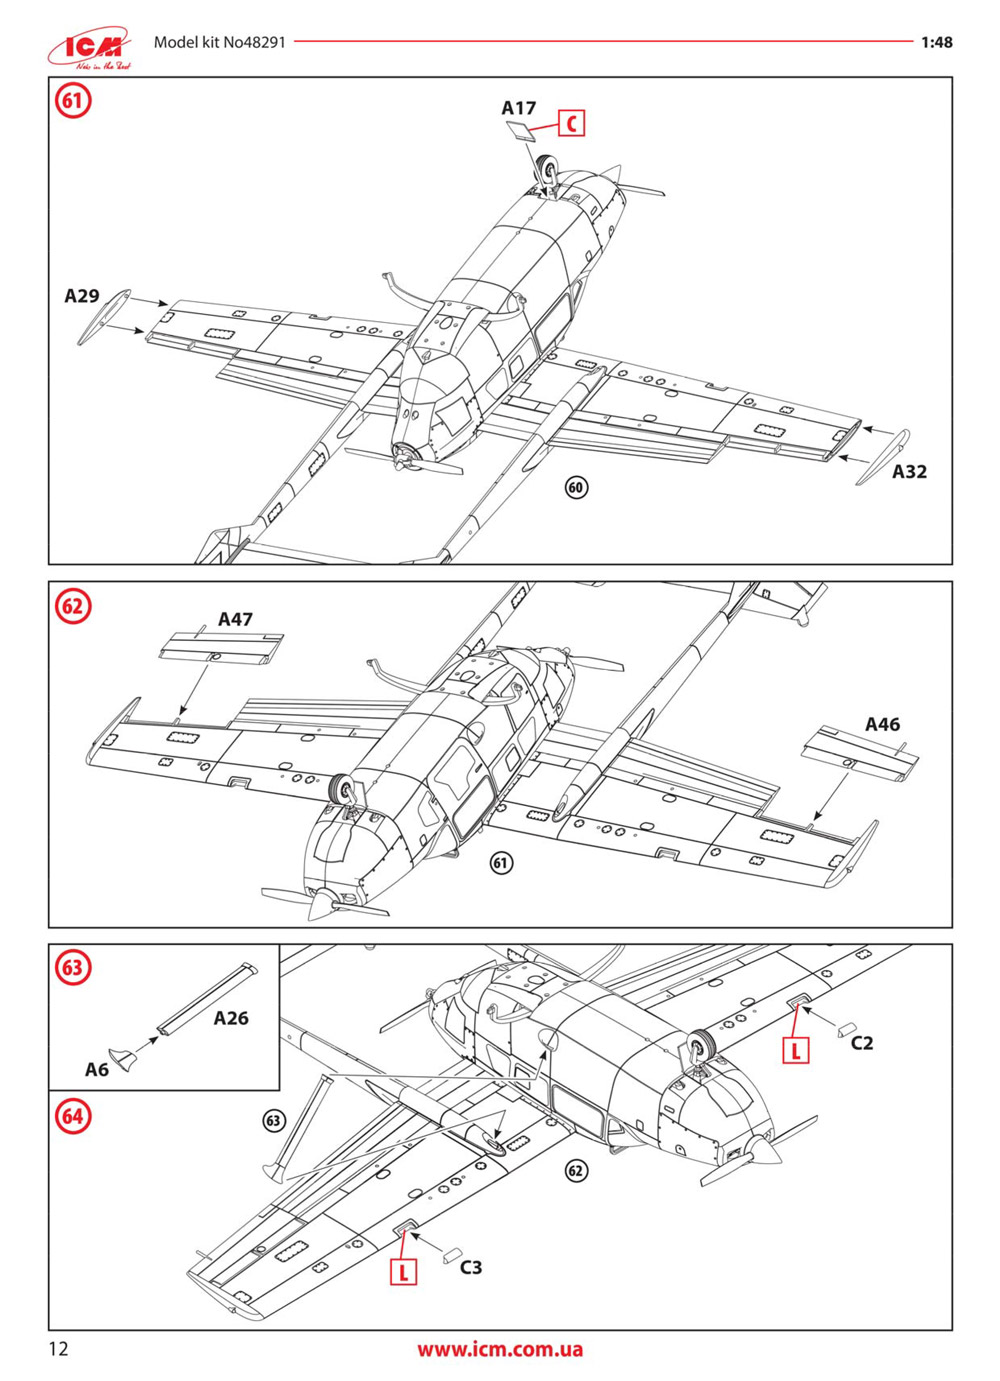
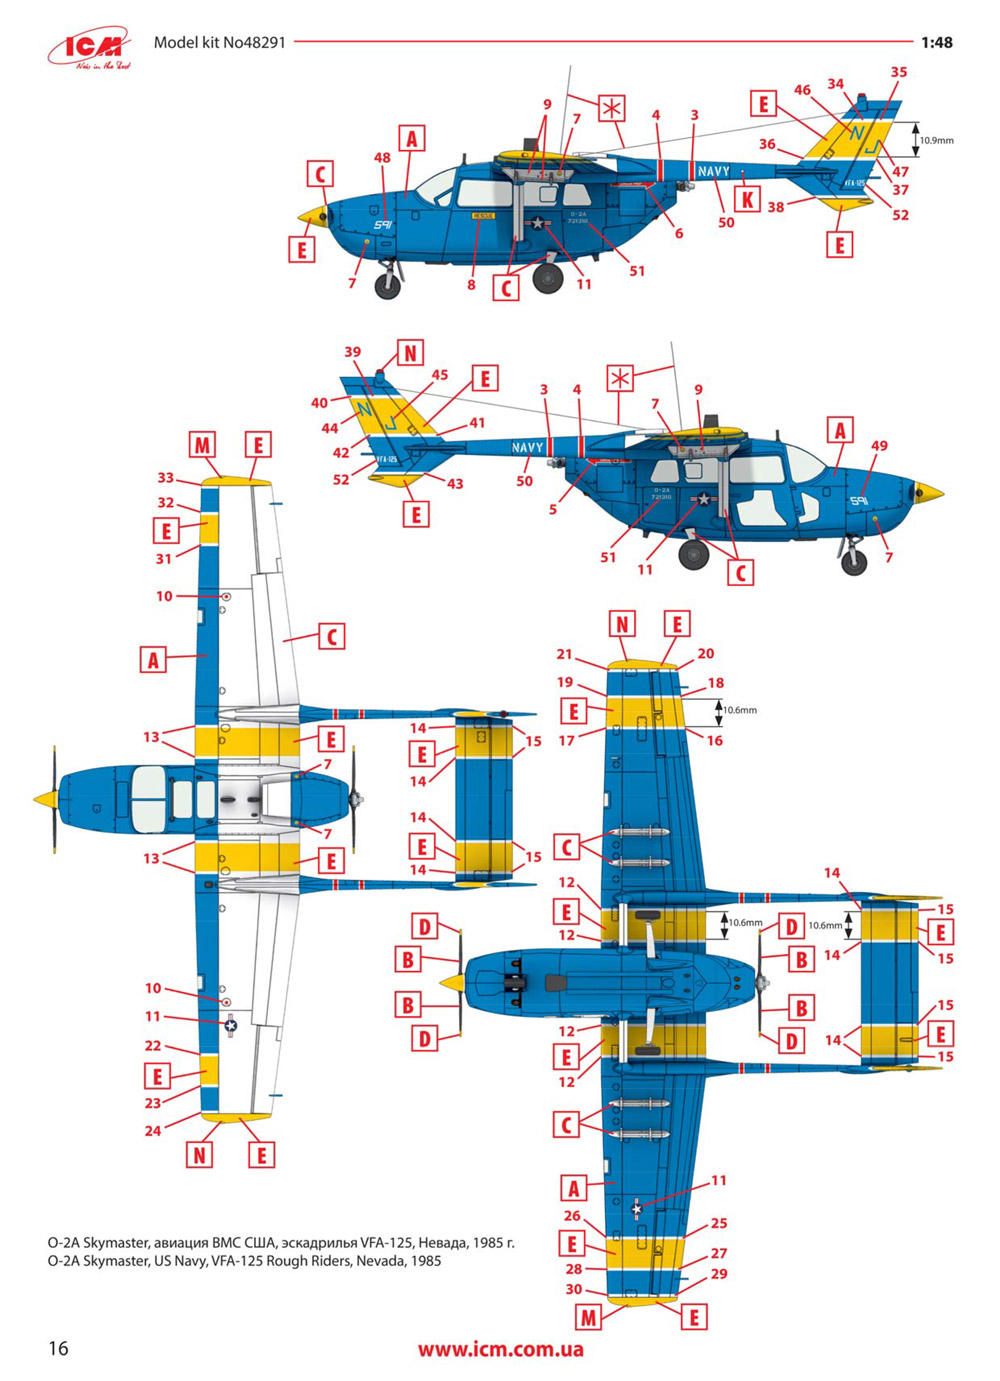
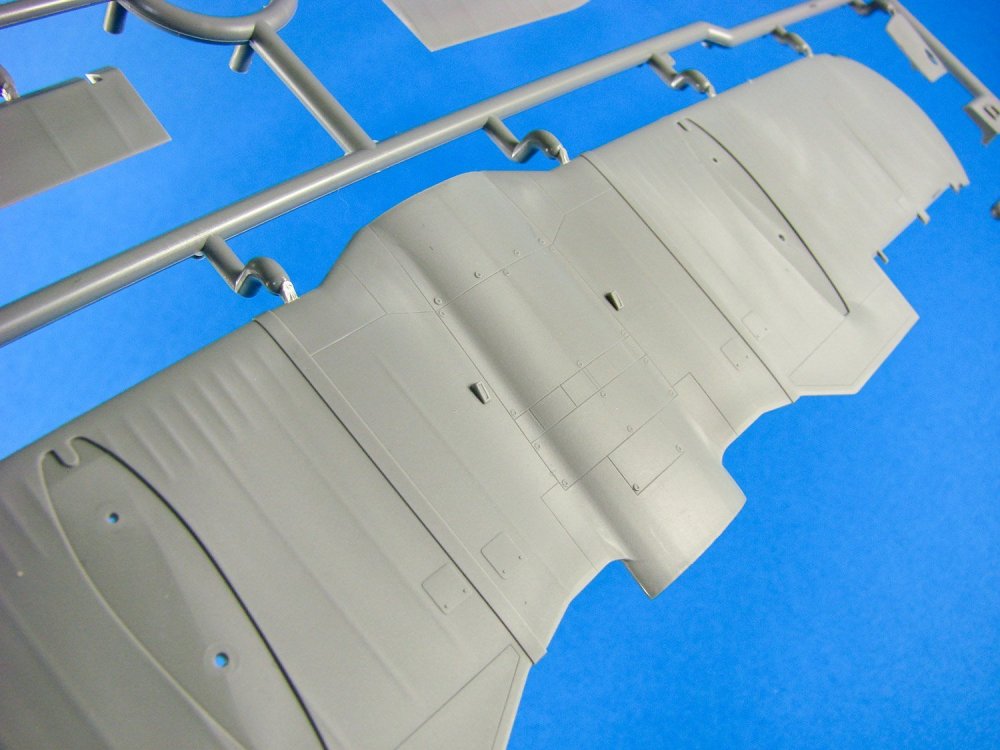
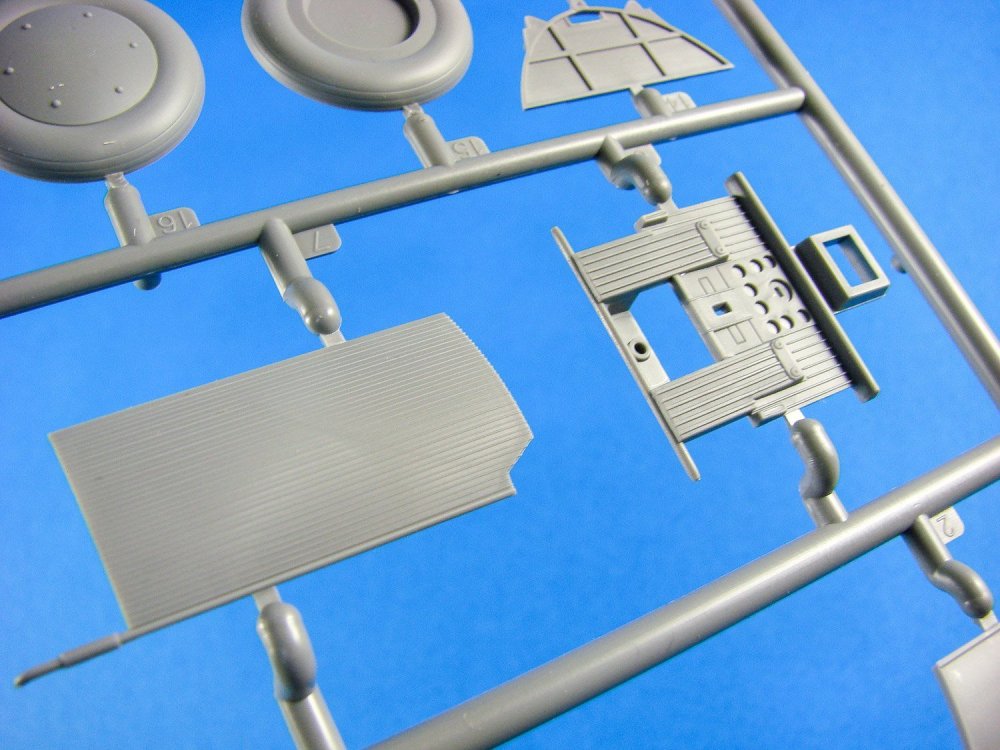
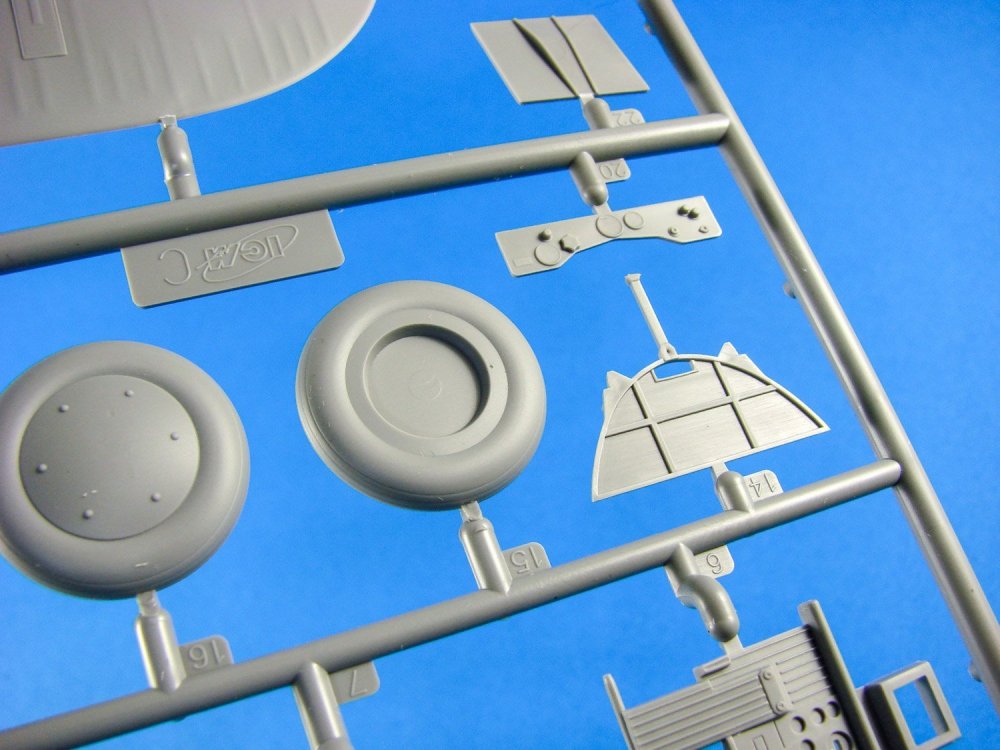
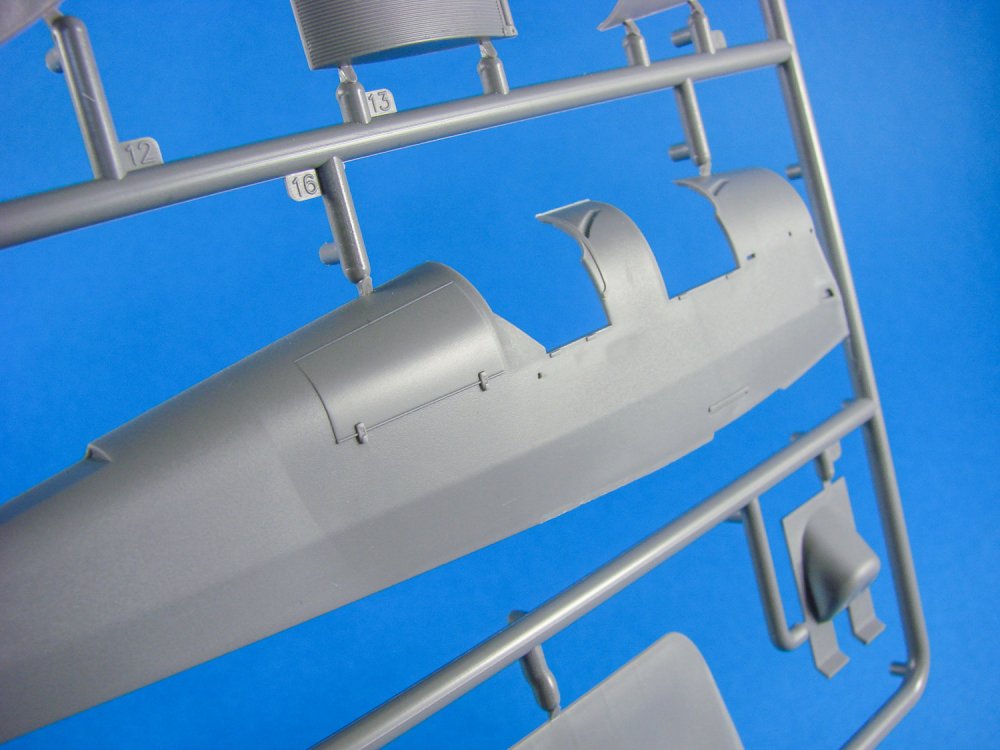
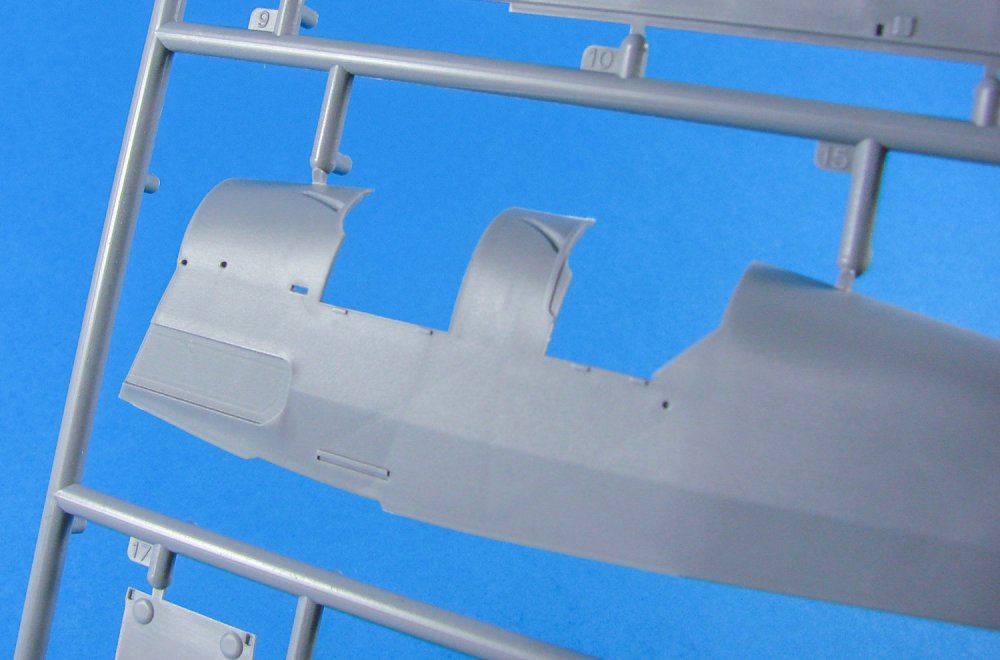
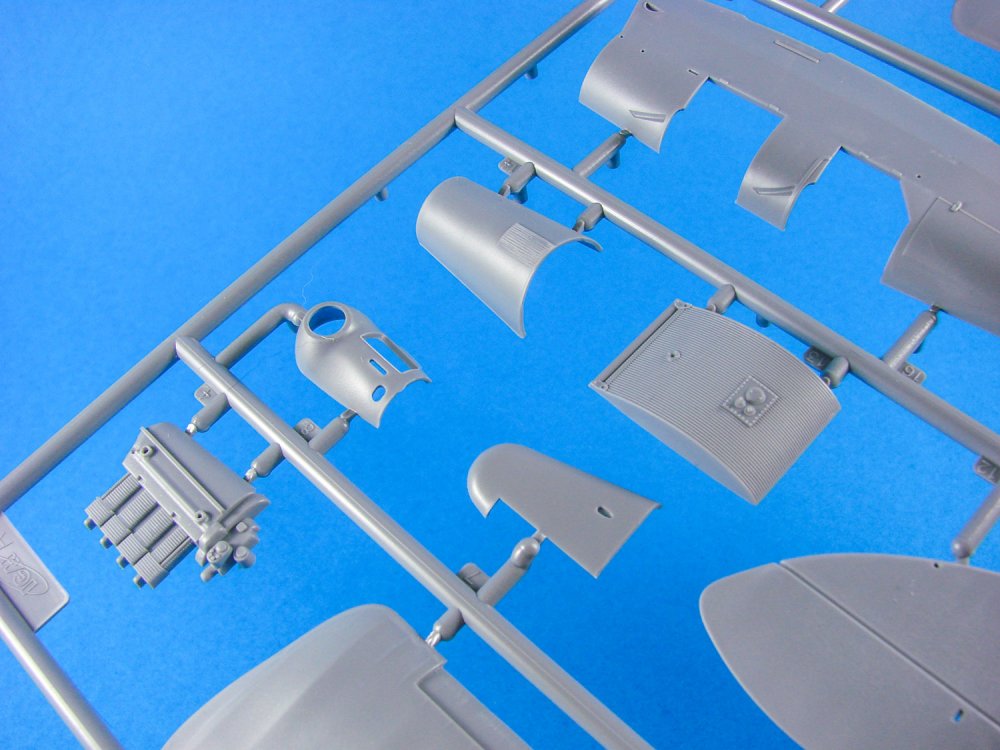
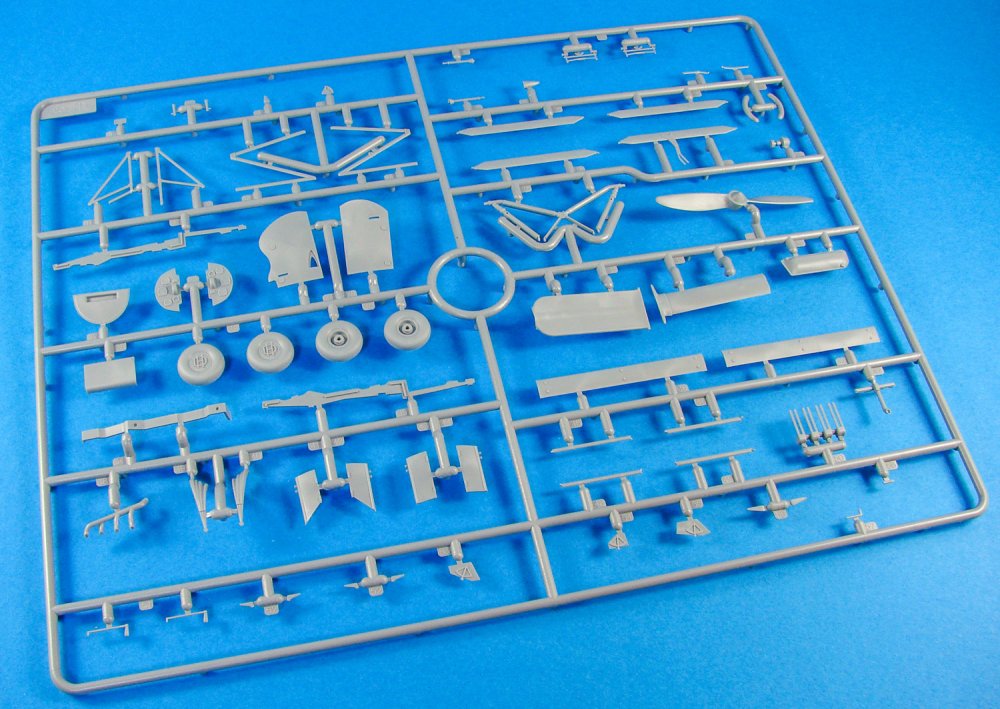
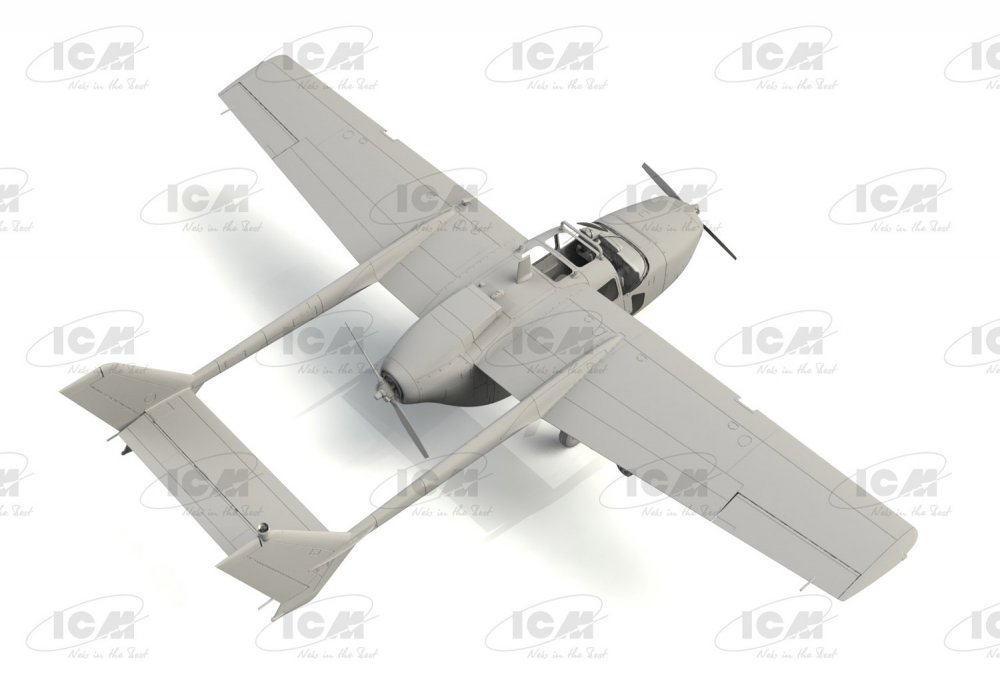
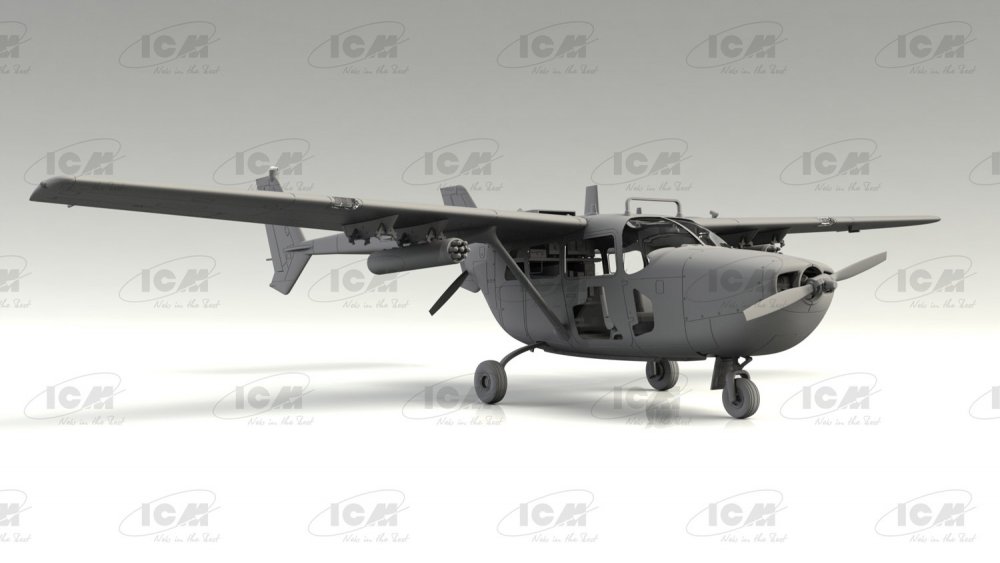
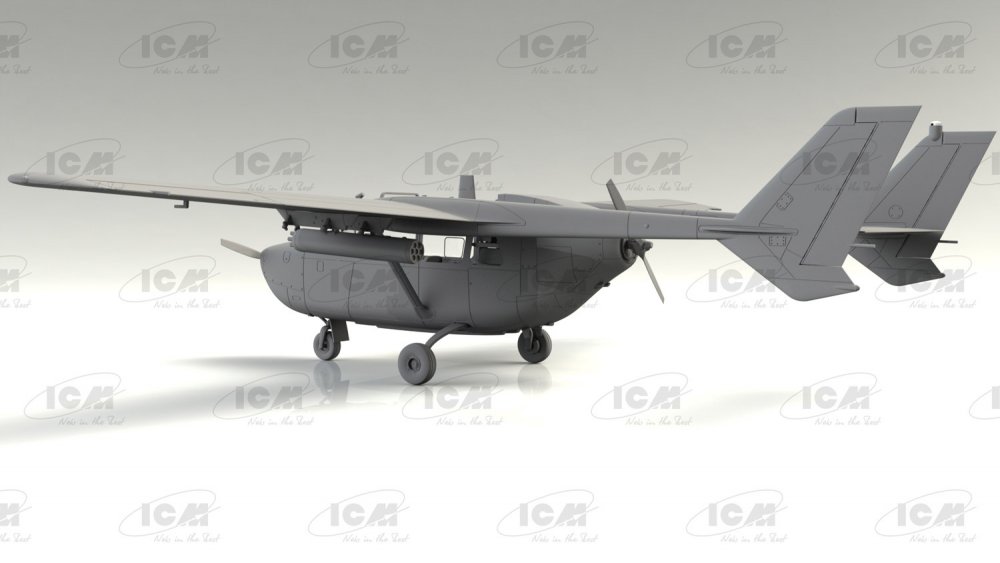
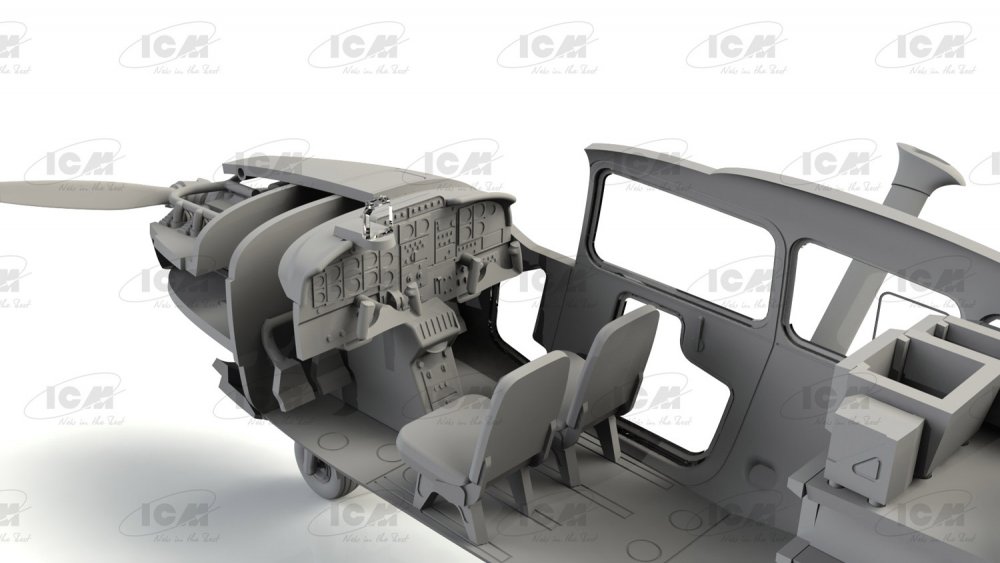
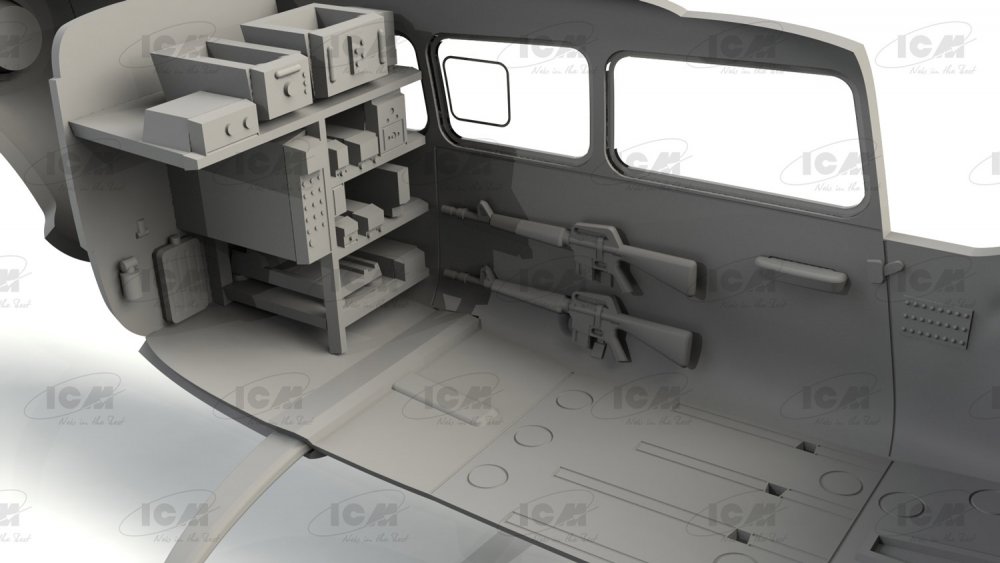
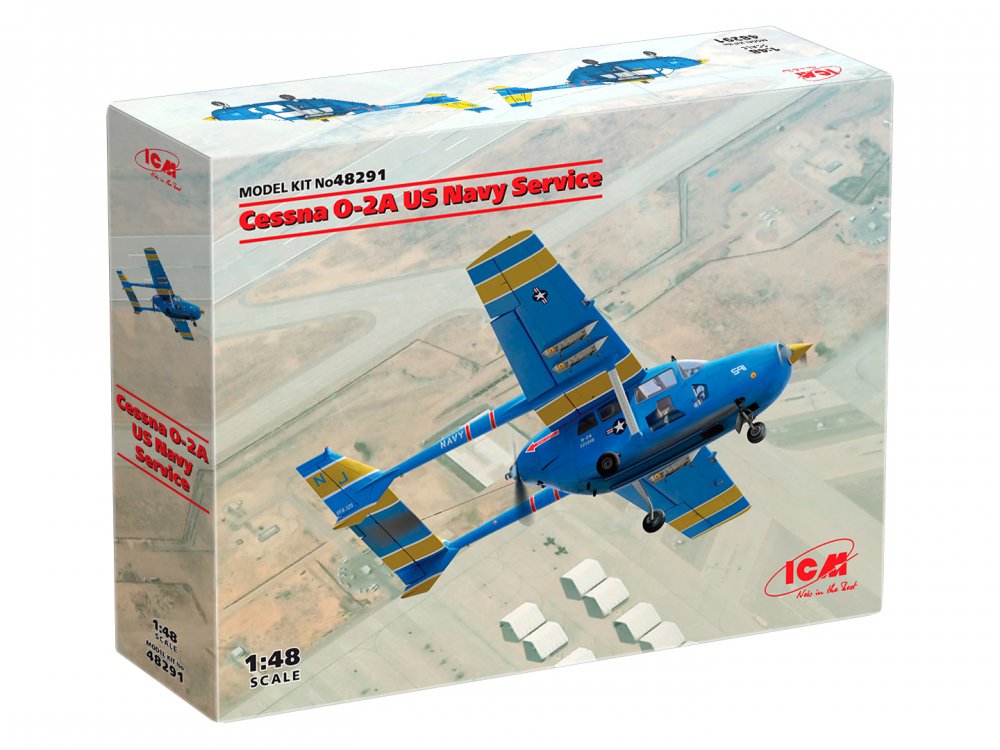
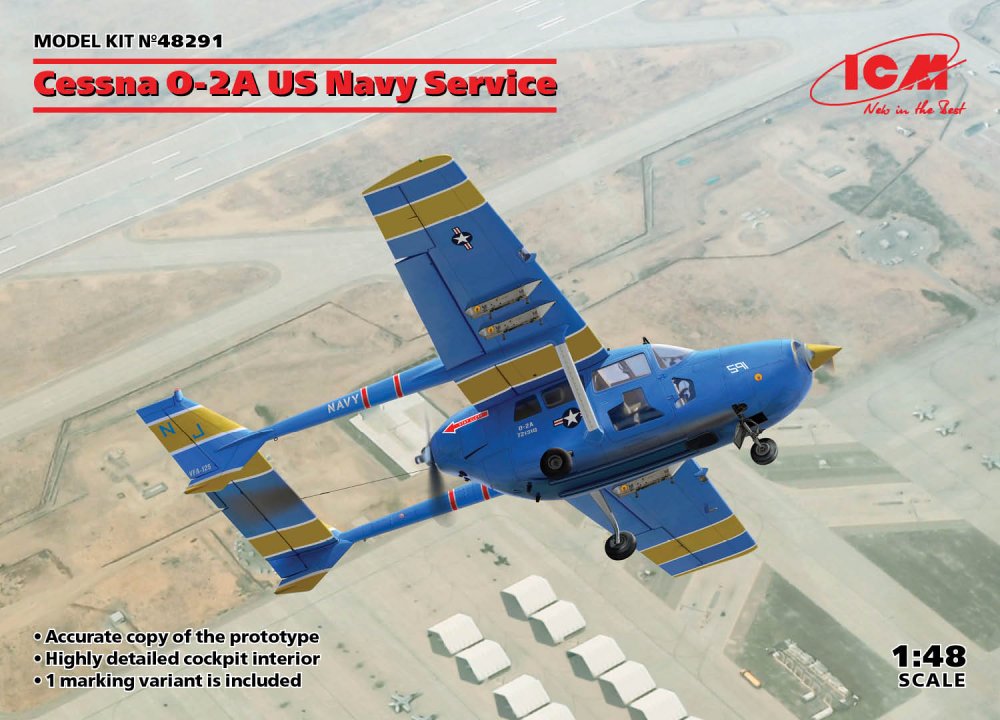
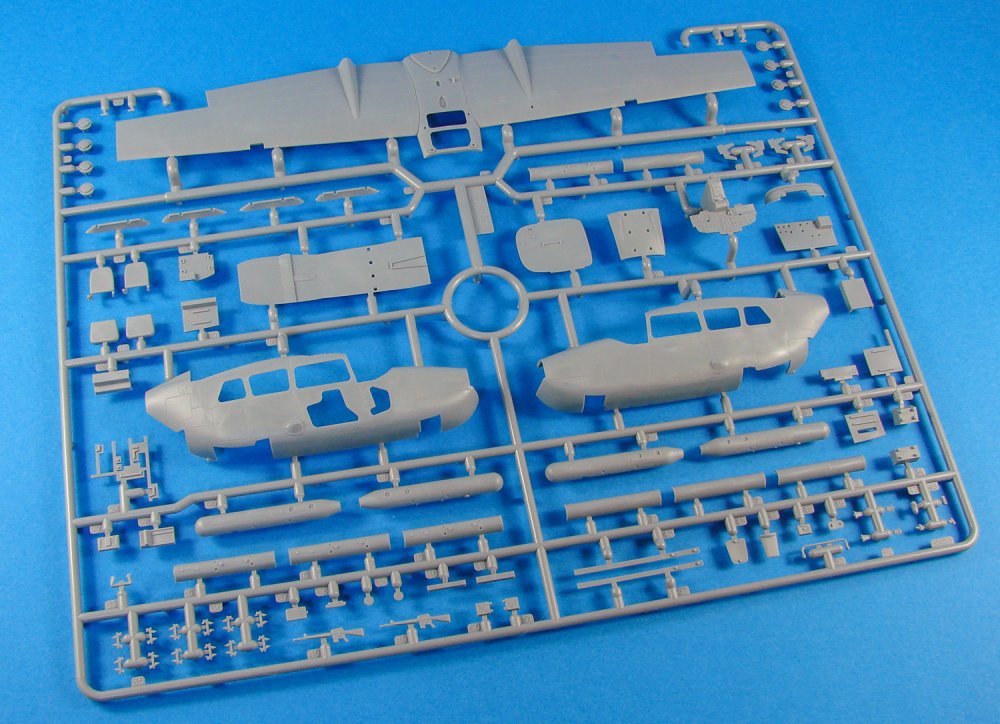
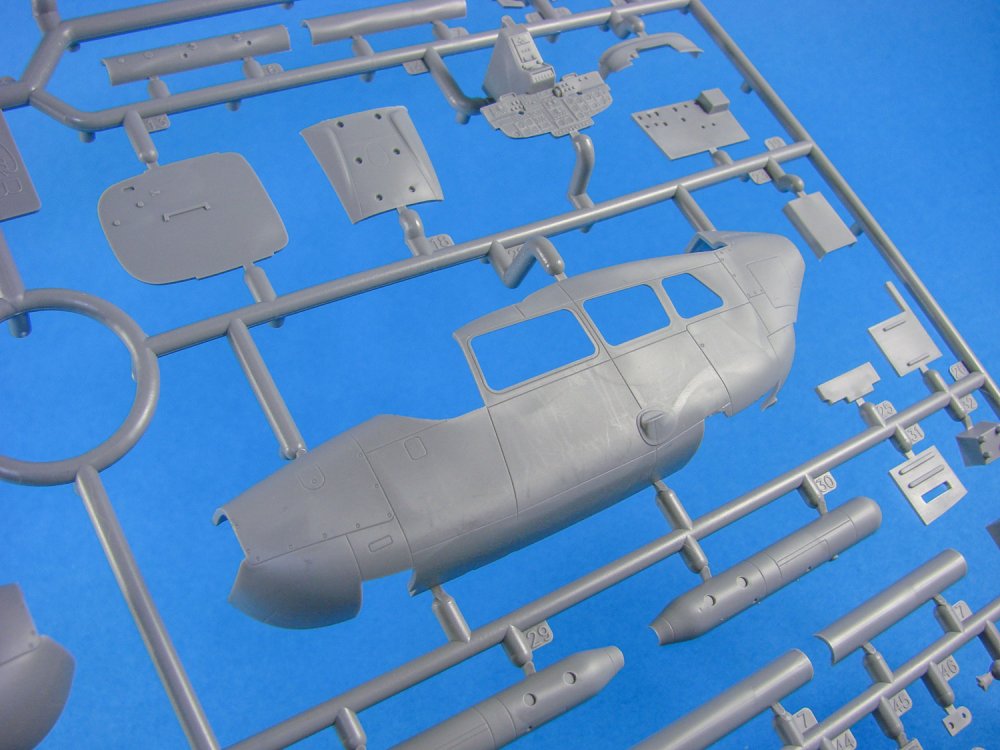
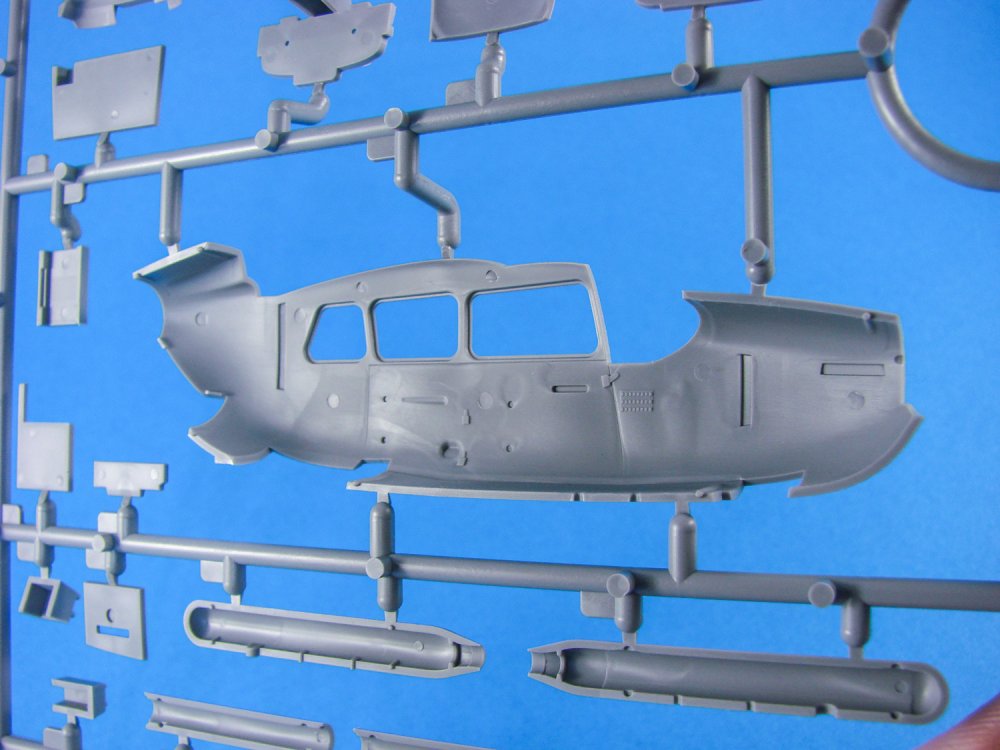
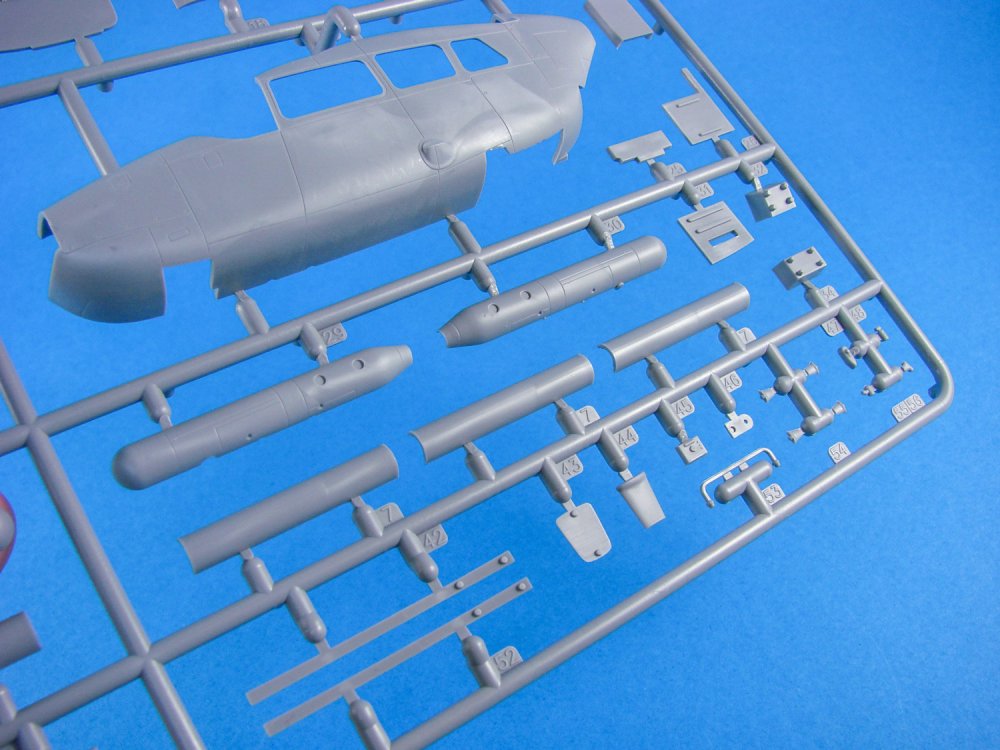
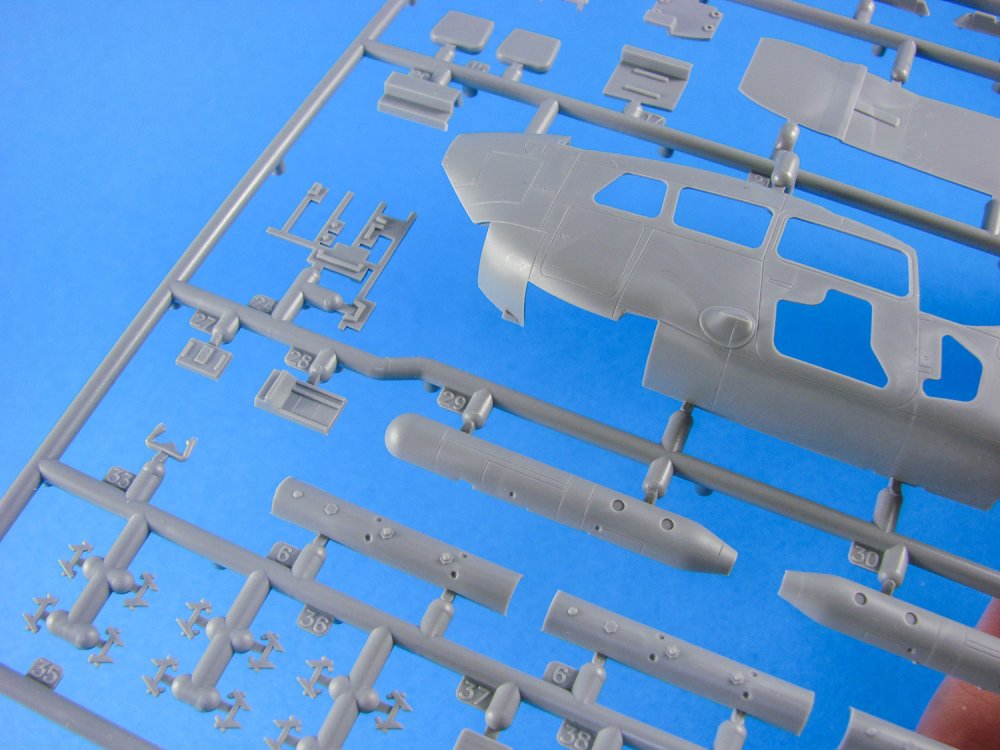
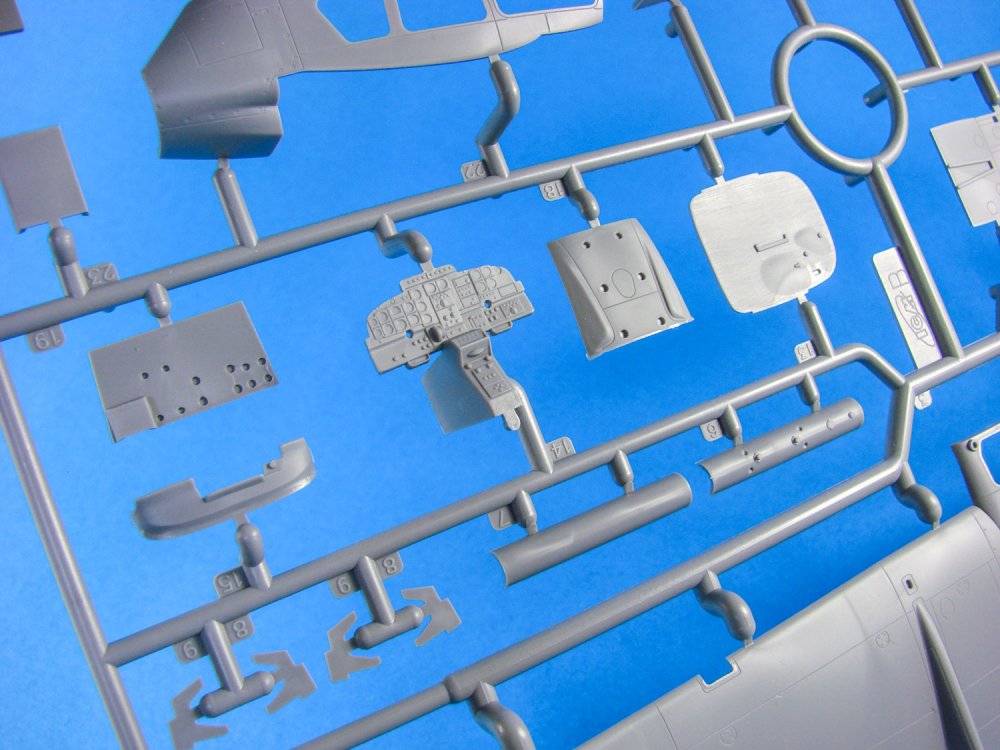
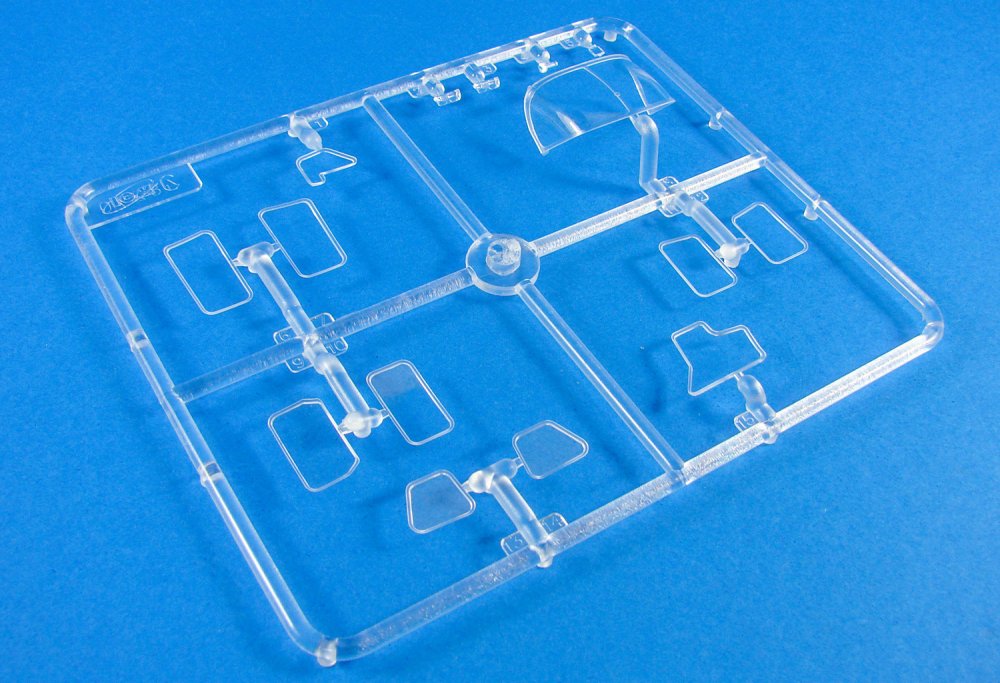
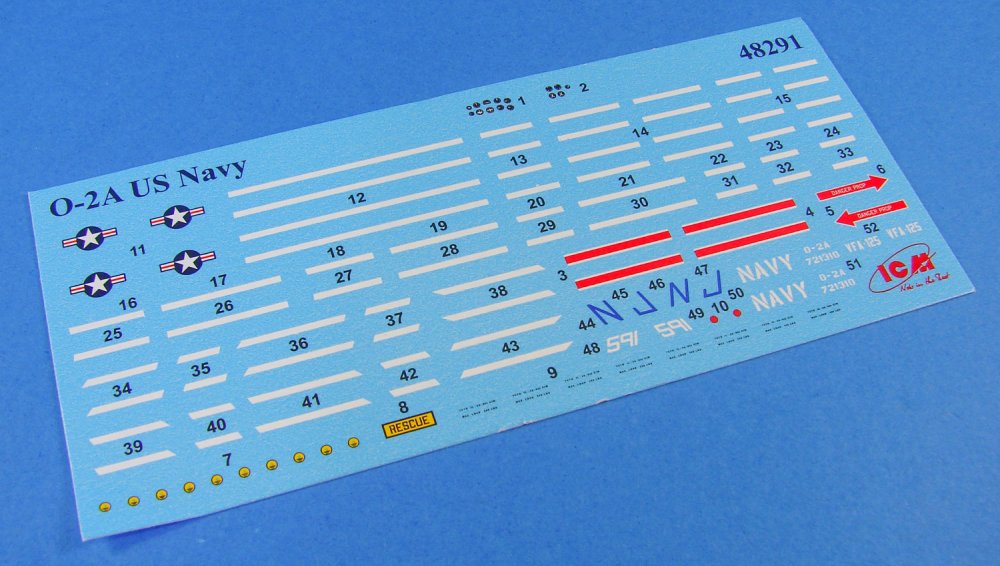
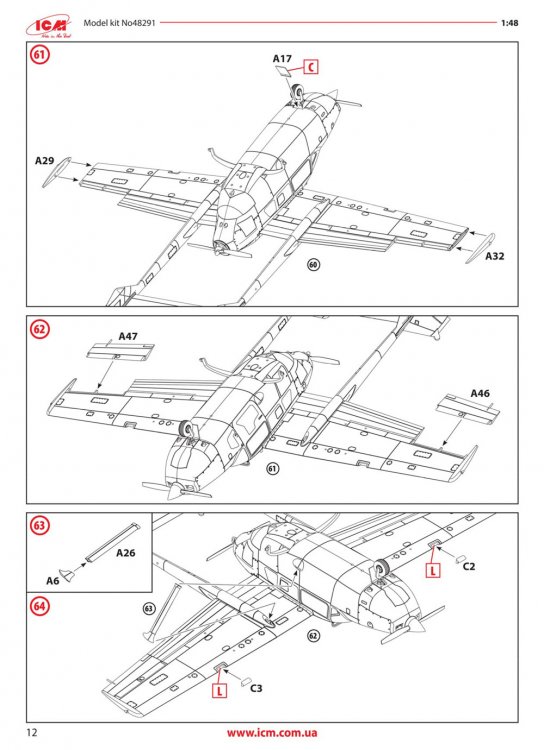
1:48 Cessna O-2A US Navy Service ICM Catalogue # 48291 The Cessna O-2 Skymaster (nicknamed "Oscar Deuce") is a military version of the Cessna 337 Super Skymaster, used for forward air control (FAC) and psychological operations (PSYOPS) by the US military between 1967 and 2010. In 1966 the United States Air Force (USAF) commissioned Cessna to build a military variant of the Skymaster to replace the O-1 Bird Dog. As with the civilian version, the Skymaster was a low-cost twin-engine piston-powered aircraft, with one engine in the nose of the aircraft and a second engine in the rear of the fuselage. The push-pull configuration meant a simpler single-engine operating procedure due to centreline thrust compared to the common low-wing mounting of most twin-engine light planes, and also allowed for a high wing, providing clear observation below and behind the aircraft. Modifications made for the military configuration included installation of single seating fore and aft (i.e. two tandem seats available for pilot and observer, vs. 6 seats available in the civilian version); installation of view panels in the doors (for improved ground observation); installation of flame-retardant foam in the wing-mounted fuel tanks (slight increase in empty vehicle weight; 3% reduction in available fuel capacity); installation of military communication and navigation equipment in lieu of available civilian equipment and antennas; deletion of propeller spinners; increased gross weight (5,400 lb vs. 4,400 lb in civilian version), with component strengthening as required to support the increase; and deletion of interior upholstery. Photo from AirHistory.net The first O-2 flew in January 1967 and the plane went into production shortly thereafter. Performance (especially at cruising altitudes) was degraded due to the added antennas and significant weight increase but was considered sufficient for the anticipated low-level operation. The O-2A version was designed for use in forward air control missions, featuring underwing ordnance hard points to hold rockets, gun pods or flares. 513 were delivered. The kit ICM’s O-2A was released last year, but we definitely thought this quirky little subject was worthy of a look, here on LSM. One thing ICM can’t be faulted for are the strength of their packages! As tends to be the case, this is packaged into a shallow but rigid corrugated card box with an integral folding lid. Over this is slipped the glossy product lid which shows the O-2A in its only scheme supplied in this release…and quite striking it is, clearly showing the underwing ordnance mounting points, which still look quite odd on a Cessna! Inside the box, there are TWO sprues of light grey styrene which are carefully packed into a single resealable clear sleeve. Within there also is a smaller sleeve containing one sprue of crystal-clear plastic parts. As there is another boxing of this kit, the instructions clearly show which parts are not for use in this specific release. The fuselage pod is where the fun starts on this kit, and this is almost fully featured. The plastic parts include an excellent avionics mounting rack for the rear cockpit wall, containing superb detail on those mounted units, as does the instrument panel with its dual yokes, and the two pilot seats. For the instrument panel, decals are also supplied. Of note here is the lack of supplied crew seatbelts in any form, whether moulded or PE. This model doesn’t actually have any PE at all, which isn’t unusual for ICM, so you will need to fashion something for yourself to suit this, as I can’t see anything on Eduard’s site which is specific. That moulded cockpit detail also spills out onto the interior walls of the fuselage, into which glazing recesses are clearly seen, meaning you will need to install those delicate parts quite early on in assembly. That shouldn’t be a problem though as any masking can be removed last, before the upper wing is fitted, which will then protect the interior from damage. Whilst there are no masks included for the windows, a cutting template is printed in the manual. I think I’d just prefer to tackle this myself though. The glazing sprue is superb…both neatly moulded, and super-clear, as well as suitably thin. Whilst the O-2A doesn’t have any engine representation for the rear pusher installation, it does have for the forward, which will be clearly seen through the engine cowl. ICM have recreated the bare bones of what will be seen through there, and it’s certainly more than enough for this subject. The engine is built as a pod which sandwiches between the fuselage halves, as is another pod for the nose gear assembly, incorporating the pilot rudder pedals on its rear wall. With the fuselage pod closed up, the rather fragile main gear legs can be fitted as a single piece. This looks ever so weak, so I would opt for a metal replacement such as THIS inexpensive brass set from Aerocraft Models. The wing is supplied as a full-span unit, with separately moulded ailerons. Before the lower panels are fitted, the full span part is fitted to the fuselage. Both boom units are then built and joined with a stabiliser (and separate elevator), and then offered up to the airframe. Those lower wing panels are then fitted. An unusual way of doing things, but I can see how this allows for more tweaking and alignment etc. should it be needed. The lower wing panels first need to have ordnance mounting point location holes opened up with a 1mm drill bit. Unusually, whilst the model is fitted with those hard points, nothing is supplied to fit to them, so you’ll need to do some research and a sift through your spares box to fulfil that possible requirement. All plastic parts are superbly moulded, with nice thin external panel lines etc. and internal detail standards are commensurate with what is expected in a modern tooling. Decals One sheet of decals is included, presumably printed in-house at ICM, or by a local vendor. Quality is very good, with nice colour density and definition, as well as registration. Carrier film is minimal too. Instructions A 16-page colour instruction manual is supplied, showing the O-2A spread out over 70 constructional sequences, in clear line drawing illustration. Drawings also also supplied which show the location of the masking sections from their template drawing. The scheme is printed in full colour and really shows just how pretty this machine is with its white, blue and yellow bands/panels. The single scheme is for: O-2A Skymaster, US Navy, VFA-125 Rough Riders, Nevada, 1985 Conclusion This is such a sweet little kit which has lots of excellent internal and external detail. The main gear legs definitely should be replaced, and apart from the absence of seatbelts, this really does hit the mark, as far as subject matter goes. It’s also quite an inexpensive kit too and would make a definite change from what we usually have on the bench. My sincere thanks to ICM for the review sample seen here. EXTRA PHOTOS/CAD:


-
- 2
-
-
Artscale have asked me to mention that they are wanting a US distributor. There has been talk with UMM and Sprue Brothers, but nothing has come from this, which is a real shame.
-
Fw190A-8 3/JG1 crash Vreeland
James H replied to JeroenPeters's topic in LSM 1/35 and Larger Work In Progress
I'll put the He 162 back in the attic then -
ASK Razor Saw holders (straight and asymmetric) Artscale See article for codes, links and prices I’m a sucker for nice tools, and one that is used most frequently in my arsenal is my trusty razor saw. I use this for all sorts of materials, including plastic, resin and now also wood. You sort of instinctively know when you need to get it from the tool rack, for those jobs where a knife would be too challenging, or cutters would be too destructive. They are great for making fine and precise cuts that remove an absolute bare minimum of material, unlike a regular saw. I also use mine to gently re-scribe any shallow and fine panel lines on plastic. Razor saws can be particularly good for that task and they don’t leave ridges of material behind like many regular scribers. Artscale recently sent me their two new razor saw releases to see what I thought, and it provided a useful comparison to the brand I currently use. That latter brand is actually very good and has blades and mount which are made from photo-etch stainless steel. For a handle, the tool is mounted in a regular X-Acto style handle. Two slightly different razor saws have been sent for evaluation. These are: Razor saw – Universal (200-T0020), €14,95 Razor saw – Asymmetric (200-T0021), €16.95 The ‘Universal’ style has a straight blade mounting system, whilst the ‘Asymmetric’ has an offset blade mount which is very useful for those awkward cuts, or for those where you want maximum visibility of the material being cut, without your own hand getting in the way. The razor saws sent for evaluation are complete tools and need no third-party handle. Black ABS plastic is used for the handles on these, and the whole tool is nicely balanced in the hand as well as being comfortable when gripped. The blades are also more rigid than the brand I currently use whilst looking every bit as thin…exactly the remit of a razor saw. In fact, these blades are 0.12mm thick). Both of the supplied saws are fitted with the same blade (ultra-smooth and extra smooth asymmetric – two different tooth/pitch sizes). That single blade is also that is provided in each of the saw packs, with replacements and different types being available both individually or in multi-packs. Both saws have a beautifully designed system of blade change which also doubles up to provide reinforcement to the blade itself. It’s also a single-tool system for changing the blade too, with a hex-head key provided. There are two hex screws which drop through a reinforcement plate and the blade, before screwing into a threaded reinforcement plate on the rear. This is handy as my current brand requires a small wrench and a screwdriver to change the blade. The blade mounting holes are also central to the blade, meaning each cutting edge can be used without having to reposition the blade in the handle. In use, the blade stays nicely straight without any awkward flexing, and it’s super sharp too. There is also a certain amount of freedom in positioning the blade in the tool, in case you want to set it to a certain depth of cut. Razor saw blades Artscale also included packets of the blades they currently supply for use with their new razor saw. I have the individual packets, although you can buy these in multiples on their website. Ultra-Smooth (symmetric) - €1,90 Ultra & Extra Smooth Radius (asymmetric) - €2,60 Extra Smooth (symmetric) - €1,90 Ultra & Extra Smooth - €1,90 Conclusion I’ve been after something to replace my current razor saw as the blades in that are way too easy to bend and buckle without the utmost care. Artscale’s new tools seem to answer that need perfectly, and the blade options are very useful too, depending on application. These new razor saws and very nicely made and feel right in the hand. They are also super sharp too! If you are in the market for a new razor saw, whether a replacement or your first, these would be a very good option to consider. Here’s the tool data sheet with more technical information for you. ASK-Handle-saw-pdf.pdf Sincere thanks to Artscale for sending these tools out for evaluation on LSM. To buy directly, click the links in the article.
-
Das Werk 1/72 S.M Unterseeboot U9
James H replied to JeroenPeters's topic in LSM-Related Reviews (military figures etc)
That looks a very cool kit. Weathering it will be fun -
HK Lancaster Dambuster finished
James H replied to Kaireckstadt's topic in LSM 1/32 and Larger Aircraft Ready for Inspection
Absolutely outstanding! Loving the finish on the black surfaces. How did you paint those? -
1/32 Scottish Fishing Boat.
James H replied to BigDan's topic in LSM 1/35 and Larger Work In Progress
Is that the Amati Fifie? -
I'd rather live a quiet life than in a bitch-fest like a certain site seems to often descend into.
-
I've never had anything borked in a WNW kit apart from some duff cabane struts on a D.VII. Those were so fragile. I must've reviewed dozens of different WNW and not seen anything like on this Mengnut kit.
-
Glad I steered clear of this. Banana wings, bent undercarriage and wing struts and bent Spandau. Thick decals. Some of the stuff I've heard about this kit.


-2-1.jpg.9763e7bb8990874a2b68b38a2bc546b1.jpg)
-2-4.jpg.a49fa5bfd9fa3b057ee9d7d53907ca24.jpg)
-2-6.jpg.a554583e4093b4fc2ca856569c68bcf4.jpg)
-2-11.jpg.425327f579a90ade076705d451e40da8.jpg)
-2-12.jpg.c63078ed05c9d126ac83a4d532eafd36.jpg)
-2-13.jpg.33372f9a23c051b456aa84b7c1750f8b.jpg)
-2-14.jpg.44b3dde59f38f2d70b26e9a98e80f20b.jpg)
-2-15.jpg.f387c4904541e7b884fbdb4d5c458e94.jpg)
-2-16.jpg.6b71633bab429aff67fd9d81cf5747c9.jpg)