
Umlaufmotor
-
Posts
303 -
Joined
-
Last visited
Content Type
Profiles
Forums
Events
Gallery
Everything posted by Umlaufmotor
-
 Unfortunately, I at one point got a pack of excellent resin bolts in the hand. From now on, I started to replace all indicated bolts on the motor against '"right" screws. Note the screws used on the original engine - two screws and two nuts on stud bolts per housing part. First the screws.................. ........................and now the nuts. Maybe not 100% in scale, but it looks on the model damn real. Servus Bertl
 -
We are now on the camshaft housing. The kit-rocker arms were removed with a fine Resin-saw and replaced by the beautiful parts of Taurus. These parts were very, VERY! carefully cleaned with sandpaper and steel wool. Note the position of the valves - open and closed. I used an original engine photo as a template to display the correct valve-timing. Servus Bertl
-
Thank you, Martin and Sasho! Further with the valves and valve springs. I used here for the first time a product of Taurus. I must say, this parts are excellently processed and cast. However, the resin valve springs had to be shortened, so that the rocker arms are not at the wrong angle. Important! The Mercedes-rocker arms are horizontal when the valve is not actuated. The motor is shown without installing the exhaust, therefore the exhaust flange bolts were removed. Remember, that in this case the valve stems will not forget - you can see them with no exhaust on the outlet side. Servus Bertl
-
One floor up - the row of the cylinders. The lower cooling water pipe was presented very simple. The clamps on the upper cooling water pipe are also molded on, on the left side only. This needs to be changed - so my thought. However, to replace the lower cast-pipe was real work......................................................................the correct diameter, the right angle when drilling, the horizontal direction of the tube, the low material strength at the edge of the cylinder ........................ Servus Bertl
-
The two vent pipe on the right engine side have also been revised. Not a must, these things are very nicely implemented by WNW - but as I said, the build developed a life of its own. The edge of the cap was something abraded. The parts of the vent pipe assembled but not fixed and glued. Servus Bertl
-
Some missing holes had to be added on the front of the engine. Servus Bertl
-
The oil riser pipe from the oil pan to the crankcase has been forgotten by WNW. But no matter -- with simple brass rod, a couple of small drills, various small pliers and some patience, this line could be laid. Servus Bertl
-
The connections for the oil lines to the air pump were also drilled. Servus Bertl
-
The sight glass for the oil level had also to be built scratch. Before the glass was installed, I have painted dark brown/black the inner edges of the sight glass and the oil-level-hole. Servus Bertl
-
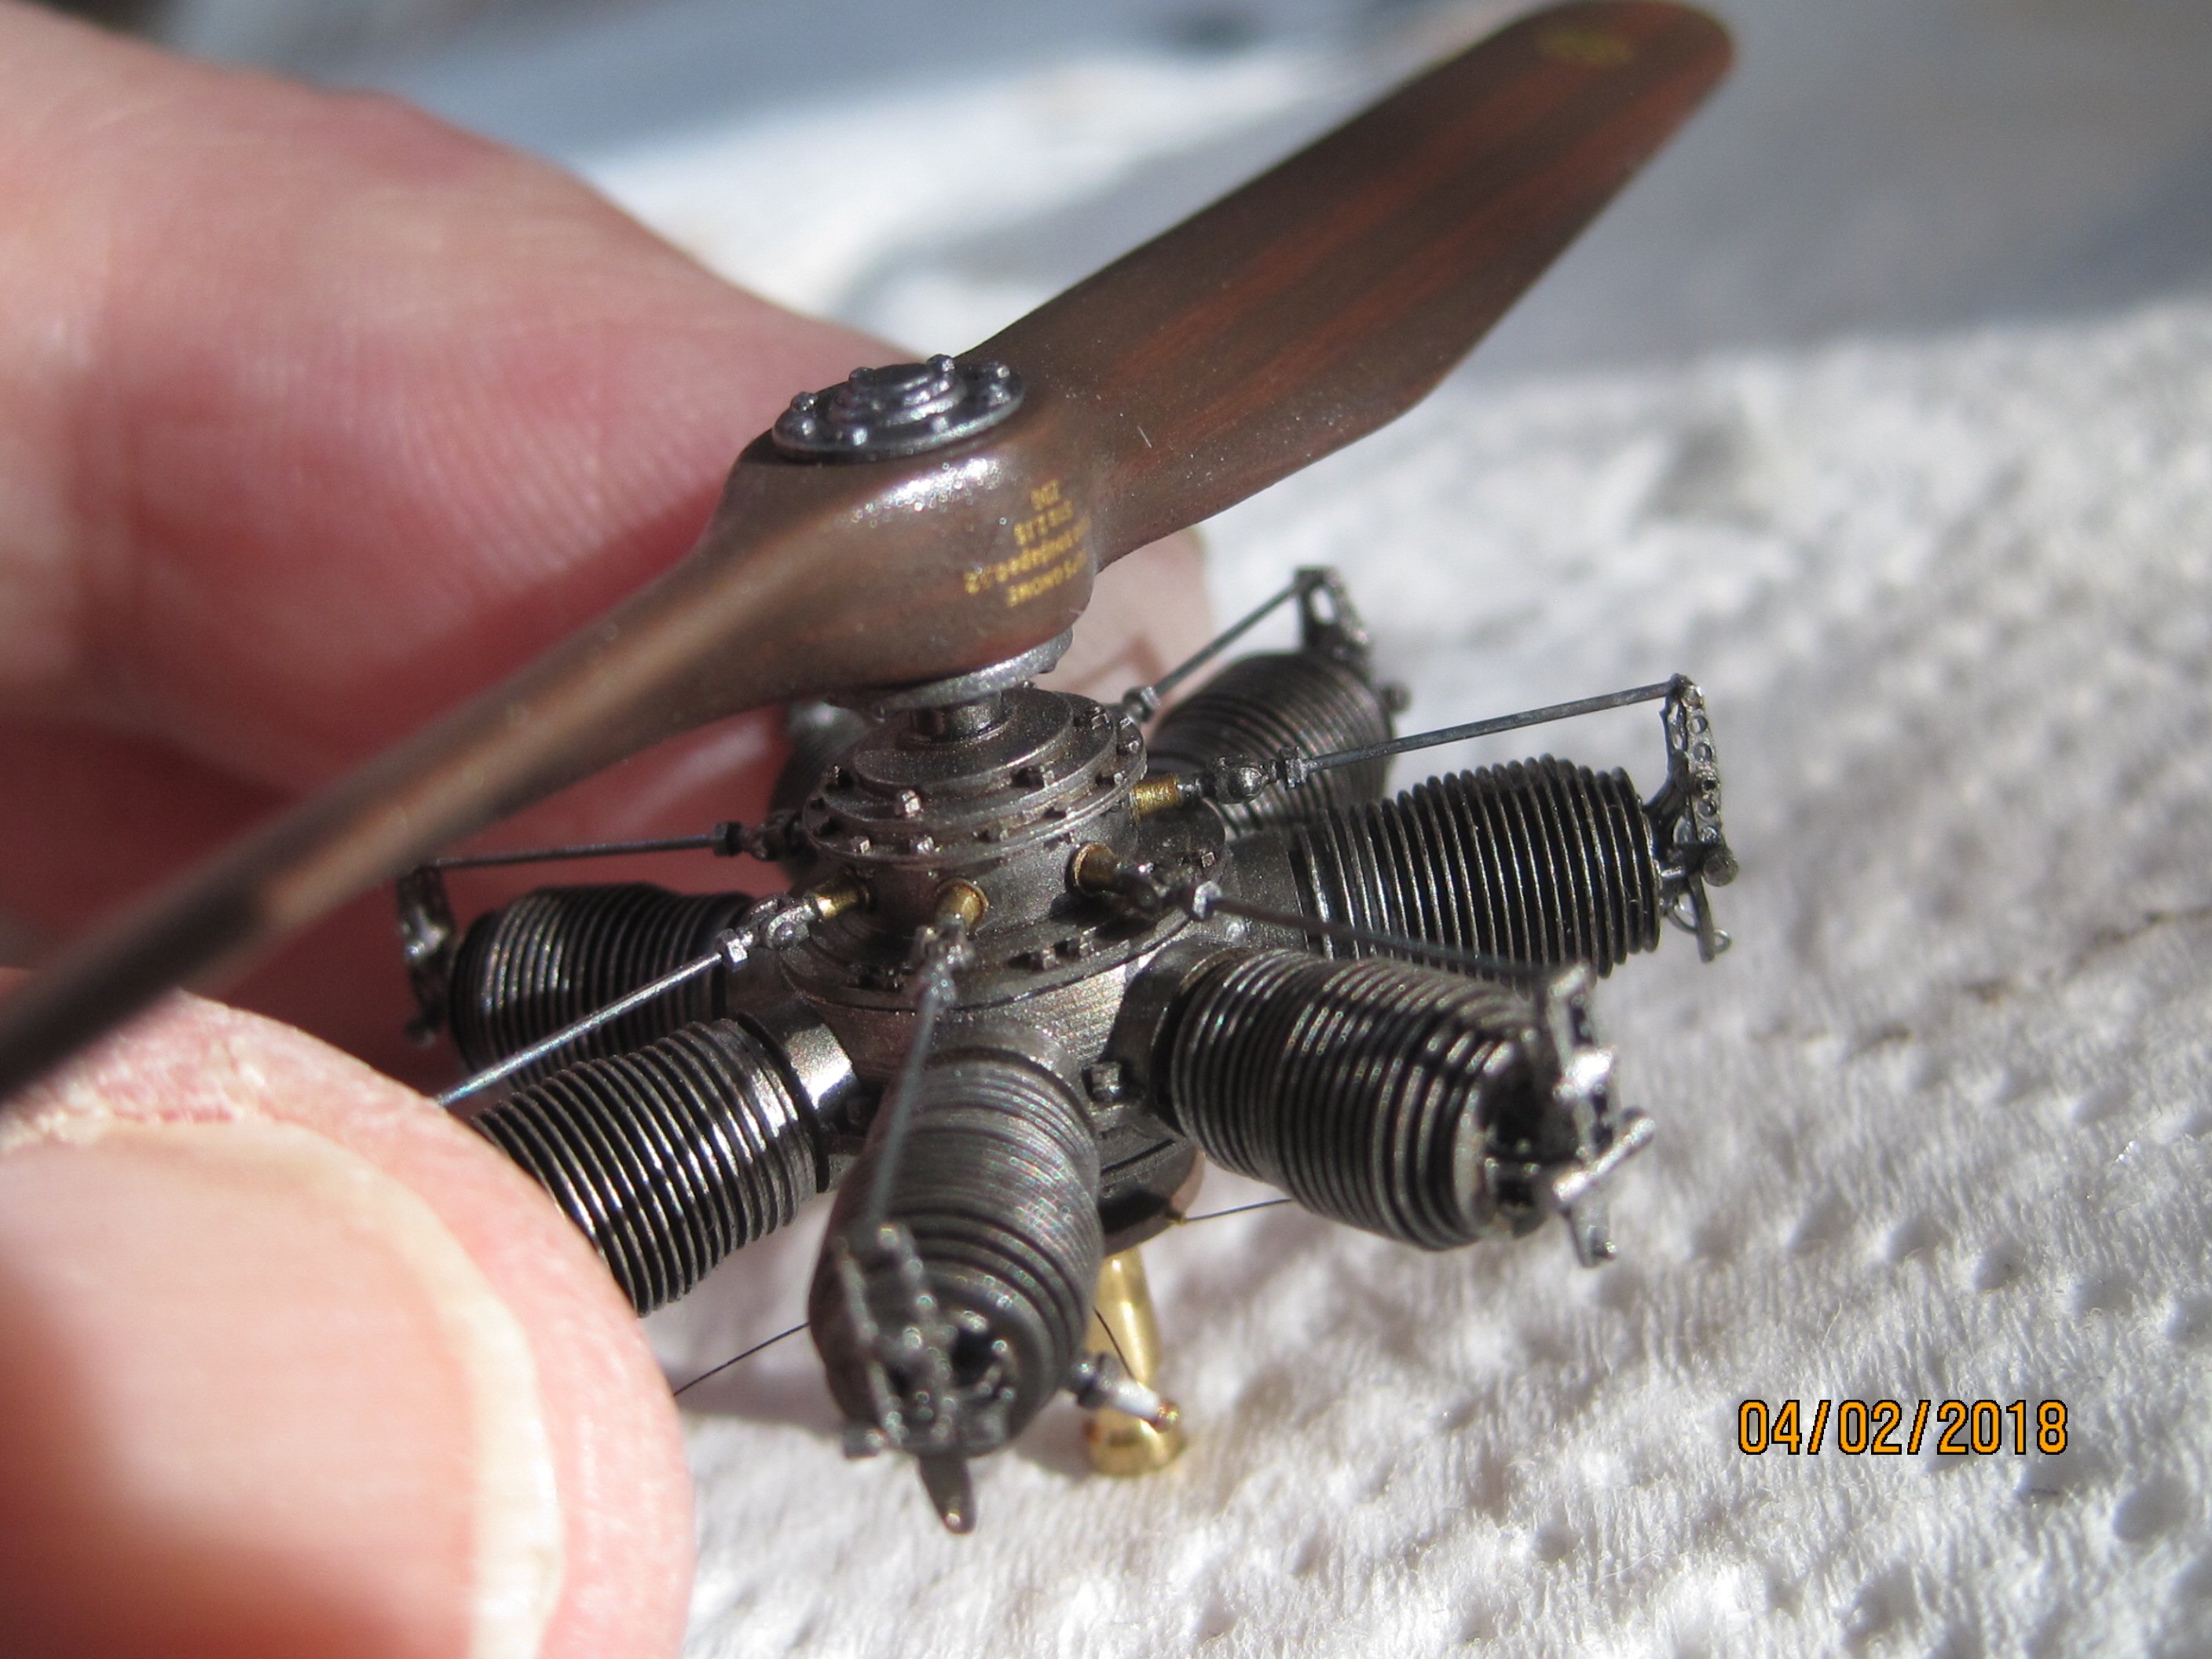
When I had finished the WNW Jasta 37 Pfalz D.IIIa "the worn-out old work horse", I made up my mind on the WNW Hansa Brandenburg W.29. Well, between these two I put in a small WNW OoB model - so my thought. My choice fell on the WNW Mercedes D.IIIa engine. Very finely detailed and available as a separate sprue - the best prerequisite for a "quick-build". Well, I started with it in August 2012 ..................................................and no, I am not finished yet. The thing developed a life of its own during the construction. It added up more and more small details . I used the original as a template as far as possible. First, the intake ports have been revised. But, see for yourself. Also the round rear intake was shown on the model. Servus Bertl
-
...............of course, only a joke ................. right? We all know, Tamiya tape is first-class material for masking. But it can also be used for other things. Here, for example as a Holder for the lubricant pump. A thin strip glued it, painted with RLM02, left and right of the pump two dark spots as screw - done. Or here, on the NW Mercedes D.IIIa - engine, thin strips of Tamiya tape serve as pipe clamps. Pipe sleeve at the cooling water pipe at the Pfalz D.IIIa. A thin strip tape, painted with NATO black. Pipe connection with Tamiya tape, painted with Mr. Metal Color "Iron", glued with super glue. Twisted Thin wire serves as the hose clamp. As you can see, not only as a masking tape - many things are possible with Tamiya tape. ...................... But, believe me - it does not substitute as toilet paper...................... Servus Bertl
-
....................................on engines, aircraft, components of aircraft, WW1, WW2...................... Look at this, is something for everyone. http://www.muzeumlotnictwa.pl/digitalizacja_archiwaliow/digitalizacja.php Servus Bertl
-
@Typhoonattack: The purchase of WNW kits happens ONLY with impulse and passion Servus Bertl
-
During my many visits to the museums, I noticed that the intake pipes at the Mercedes engines were manufactured offen of different materials. I have seen intake manifolds made from steel, brass sheet and copper. This applies, however, only the intake pipes which were not manufactured in two layers. I mean the intake pipes without water jacket in our case. The intake pipes were usually (not always) painted with a dark (black?) color. The museums in Munich and Oberschleißheim have some of these engines as exhibits . I liked very much the version with the dark painted copper intake pipes. I also wanted to represent this in the model. Some dents were attached to the intake manifolds at the WNW Pfalz D.IIIa - engine (see yellow arrows) . You know, I mean our old, rotten, worn-out workhorse ................ . The Kit-part intake manifolds were painted in several thin layers with Tamiya XF -6 " Copper". After that, some thin layers of Tamiya " Semi-gloss-black" were painted. After the paint had dried well , the black color was polished off - very, very carefully -, with very fine steel wool. But not polish-of everything of the black color! The dents must must remain black! Here the almost ready-of Mercedes D.IIIa engine from the Jasta 37 Pfalz D.IIIa. I tink, the copper/black intake manifold looks not too bad............. And here are the intake manifolds of the WNW Albatros D.V. The Albatros Mercedes D.III at an early stage of construction. Many, many details were added afterwards.......................... Servus Bertl
-
By the Wingnut Wings Pfalz D.IIIa " the old Jasta37 worn-out workhorse " I had to represent different layers of old (Pfalz silver-gray) and new paint (Jasta 37 black) believable. In factory new condition, the plane was silver-gray over all, the engine cowling was nature metal and the maintenance openings are painted green (close to RLM02 - green). Generally, I try to go the way, to build layers of color in the order as the real aircraft was painted. Back to the maintenance openings : This openings are made from sheet aluminum and painted with RLM02 in the original. It is clear that - over time - , the green color slightly peels off or scraped off . To stay as close as possible to the original, I made the maintenance openings from the aluminum of a simple tea light. A small hole was placed in the middle of the Disk. In this hole, a Eyelet made of thin copper wire was glued as a Fastener. It is better to use a silver wire, I had at that time only copper wire by hand. The Alu-Disk was painted with RLM02. Of fine steel wool and the color was polished off some scratches attached to the edges. This was followed by a layer of clear coat - then a layer of hairspray. Ultimately, even a thin layer of matt black. With warm water and a hard brush the hair spray was dissolved. Now I had black access cover where the underlying coating and the base material were visible. Servus Bertl
-
I love these little things like open fuselage or maintenance doors. Very well done, Jonathan! Servus Bertl
-
Wingnut Wings Salmson 2-A2 "USAS"
Umlaufmotor replied to Dave J's topic in LSM 1/32 and Larger Aircraft Ready for Inspection
I think, Dave has built the thing without Interior, Jereon. Servus Bertl -
Wingnut Wings Salmson 2-A2 "USAS"
Umlaufmotor replied to Dave J's topic in LSM 1/32 and Larger Aircraft Ready for Inspection
Something I'm doing wrong. Why you need only 17 days for a WNW- model, Dave - and I need more than 17 months? I think I need to relocate to New Zealand............................. Servus Bertl -
WNW Alb D.V 4578~17 Jasta B / E. Boehme
Umlaufmotor replied to BoMonroe's topic in LSM 1/35 and Larger Work In Progress
Like I said, Bo - totally crazy Servus Bertl- 35 replies
-
- 1
-

-
- ww1
- wingnut wings
- (and 2 more)
-
In the early years of aviation not too much emphasis was placed on camouflage. The fabric was brushed with clear coat and the sheet metal parts were untreated. Significantly more color came into play in the later years, - think of Richthofen's flying circus. The metal parts were also painted in the later years, of course. Well, here I want to show a way, how easy it is to represent unpainted aluminum. In this case, I use the products of Mr. Metal Color. First, the plastic surface is always primed with Mr. Metal Color Primer. This is very important for the polish colors to provide an adhesive surface. I use for presentation the aluminum the colors No. 218 "aluminum", No. 212 "Iron" and No. 213 "Stainless". The mixing ratio is approximately 70-75% Mr. Color Thinner and 30-25% No. 218 aluminum. We also need an old short-haired brush. However, the brush hair must be soft. After the "aluminum" color has been applied with an airbrush, we need about 5 minutes to allow the paint dries. Now our short-haired brush comes into play. At irregular spots "Iron" is dabbed. Rub the brush previously somewhat on a paper, the color should not spotted too heavily. Let the dots dry for a while. Now, the color is polished with a brush. The brush is placed on the surface. With gentle pressure!! and a rotating movement!!we polished the surface. Here the same work on the Pfalz wing - radiator Now the interesting part of the story: The longer polished the color at one point , the older affects the surface. So, that means you want a "new" finish - you have less polish . Would you like an old surface, which acts weathered and scratched , you have to polish longer. Here the engine cowling and the wing radiator from the WNW Pfalz D.IIIa . These aluminum parts are significantly different from the aluminum seat from the Fokker V.4. Exactly the same groundwork as on the Pfalz-parts.................... Let them also, the Pfalz had a hard life, -- and on the other hand, the seat of the Fokker, is brand new. NOTE!! The difference new-old, is performed only in the type of polishing!! Here the "new" aluminum parts of the Hansa Brandenburg W.29 I have added the color No. 213 "stainless ". That was just a test (the cowling parts are later over painted with light gray), but also looks pretty good in my eyes. Notice the reflections on the surface under different lighting conditions. For comparison, the wing radiator from the WNW Albatros D.V. Here was only painted with Tamiya "aluminum" and aged with gray pastel powder. Later, something washing with dark brown oil paint. First the Albatros radiator............... and here the Pfalz radiator. Typ of aging and weatherig are the same on both radiators. Decide for yourself which aluminum effect looks better. The polished surface must be sealed with glossy varnish (ca. 30-35% Mr. Metal Primer and 65-70% Mr.Thinner). The color can then no longer rub off when touched. Through the gloss varnish the surface appears like real metal . If you sealed with matt varnish, you destroyed the metal effect, the colors are matt and dull and the surface does not look like aluminum. Try it! The aluminum effect looks very convincing in my eyes, -- it's easy to do and it's not to much work. Servus Bertl
-
Wings Cockpit Figures Wings Cockpit Figures 2013 releases (Part 1)
Umlaufmotor replied to JayDee's topic in Aircraft Reviews
Really beautifully modeled figures. Unfortunately, - to paint figures halfway convincing, I have too little talent. I've tried it many years ago, but my figures looked like male Barbie dolls. Servus Bertl -
Little things which models bring to life.
Umlaufmotor replied to Umlaufmotor's topic in Hints and Tips
Bo, I like your Albatros air pump very well. The small thing is absolutely OK. I admire your skills, to recreate the original perfectly from different materials. That't realy great! -
I think, let the engine as it is. He looks realy great. The exhaust, Ssasho0, -- the exhaust looks absolutely convincing. Great job! Servus Bertl
-
WNW Alb D.V 4578~17 Jasta B / E. Boehme
Umlaufmotor replied to BoMonroe's topic in LSM 1/35 and Larger Work In Progress
Bo, every time I look at your Albatros, I think you're crazy...................................................................completely crazy ................................................................................ I love your work Servus Bertl -
Naked Build Me 163 Komet (Meng)
Umlaufmotor replied to JayDee's topic in LSM 1/35 and Larger Work In Progress
Looks awesome, absolutely awesome. But........................... I think the camouflage is missing? Servus Bertl