

lawman56
-
Posts
283 -
Joined
-
Last visited
Content Type
Profiles
Forums
Events
Gallery
Everything posted by lawman56
-
Smitty, another option would be to contact Ken at Pacific Coast Models. I know they distribute the HK B-25s and have an "upgraded kit" version that includes the nose weight. He may be able to get the weight for you, or point you in the right direction, at least. http://www.pacmodels.com/
-
Mike, I can't help you entirely, since I dry brush my chipping effects, but curious to know; are you certain the paint was fully cured? I've had similar issues when removing tape after masking off a pattern, and found either my basecoat wasn't fully cured, or I removed the tape at the wrong angle. Just bouncing some ideas.
-
John, If you look in the review section, you'll see Nigel has recently posted a review of the Eduard Brassin .50 guns for HK's B-17G. Fantastic set, and as they're designed to be placement specific, (turret, waist, tail, etc...), they should work on the B-25 as well. You also might want to try contacting him, as he did an aftermarket review of parts for the B-25 on a different forum. I'm sure he'd be willing to impart some of his knowledge. Hope this helps, and good luck!
-
 Anytime you feel slighted, Nigel, just let me know. I'd be more than happy to toss some slander your way..... Joe
 -
Since he's part of the overall diorama, I figured I'd post him here. This is my radio operator, who has dismounted in order to keep clear of the crew while relaying the fire mission orders to the gun chief.
-
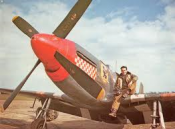
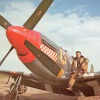
Like Tim, I built the Monogram B-25H as a teen, however, my fondness comes from the idea that some brilliant, (or foolish, yet lucky), soul found a way to mount an anti-tank gun under the flight deck and make things go BOOM! Lol...actually, I enjoyed the Monogram model as well. At some point I plan to do one of all 3 models HK is offering, I just happen to love the H most of all. The photos of the Air Apaches flying just off the deck and hitting Japanese shipping has always fascinated me!
-
First and foremost, Nigel, I'm so glad to see you here, I thoroughly enjoyed, and learned quite a bit, from your "self-funded" reviews! I like how you flipped the waist window. I"ve been struggling with the NMF vs. OD issue myself, but you've shown me a simple fix. Thanks! Opens a whole new set of options for me.
-
Thanks for the review Nigel. As always, I'm grateful you folks take the time to do this. I was contemplating the Master barrels, but 12-13 of them is really not cost effective. Not to mention, it would only solve the barrel issue, and leave me with having to detail HK's recievers. This solves all the problems. Reasonably priced, great detail, and recievers specifically molded for proper placement! As for the B-25, I'm hoping they do, but I'm holding out for the H model, so unless they also do the 75mm cannon, I may go with Master on that one!
-
1/32nd scale Halifax: *project complete*
lawman56 replied to ThomasProbert's topic in LSM 1/35 and Larger Work In Progress
Tom, Just thought I'd take the time to tell you that not only is your work on this Halifax fantastic, but the time you take with your students will make a bigger impact than you may know. As an 11 year old boy, I had a teacher who built 1/72 aircraft and hung them from his overhead light fixtures. This fascinated me, and he showed me some of them, along with showing my Scout troop what the hobby was all about. This fueled my desire to build and, more importantly, do the historical research regarding my subjects. All of this went on hiatus, however, when I joined the US Army at 18. Fast forward to 2005. After being diagnosed with PTSD stemming from my combat tours, my therapist asked what hobbies I used to have or would like to try. Immediately, model building came to mind. So I started back up. I believe my ability to totally immerse myself in a subject has helped me keep my sanity, and family, together. All the little things asscociated with PTSD are channeled through my hand and into my models. I've learned how to keep calm and patient. Things that the "fog of war", if you will, robs you of. I learned it so well, I was able to help a fellow vet build a diorama of the incident in Iraq that earned him a Silver Star. Building that diorama, has allowed him to regain some peace and closure. All because someone, like yourself, took the time to share his passion for his hobby. Thought you'd like to know. -
I'll say this much for that garish red color, if you miss something while painting, you'll see it well enough! The engine looks fantastic!
-
So, as promised, here's the pics of where I stand right now. With the exception of some weathering and such, the engine is mounted, the cockpit done, and fuselage together. I was working on the Spandaus, when my uncooperative fingers launched some tiny photo etch parts across the garage, which convinced me to put it up before I did any damage. Once I finish assembliing the guns, I can install them and get busy. I'm starting to get that excitement building up again, which is good! Thanks for looking, and as always, any criticism, good or bad, is welcome. I don't cry, (for long, anyway )
-
Here's a couple of the pics I had previously loaded when I initially started the build. I had built more, when my previously mentioned heart surgery put this on hold. I'll get some pics of where I'm at now as soon as I can. This is the kit Mercedes DIII engine with Taurus timing gear, intake nuts and HGW plug wires attached, prior to painting. Here's the right side control panel, after I modified it to creat switches. I used model railroad screws with a bent brass rod glued into the center to simulate the switch. Same panel after initial paint. I realized later that the top switch is actually a guage, so I've since replaced it. Resin seat, cushion, exhaust and intake manifolds. Here's the kit seat on the left, and the resin seat on the right. I really liked the cushion detail. And finally, a word to the wise. When bringing your plans for a building to work in order to tweak them, don't leave them where your co-workers can access them! Otherwise, you end up with a nifty sign and pilot drawn in.....
-
You and me both!
-
And once I get everything situated, I'll post what I've already accomplished and start running it as a WIP.
-
At the time this new thread had been established, I was about 2/3rds finished with my Priest and had started on the base, so I figured once I got most of the dio completed, I'd start posting here. The title of the diorama is "Raining Fire and Brimstone". Once completed, it will depict an M7 and crew as they lay down suppressive fire some where in Europe in the mid to late spring of 1944. Here's the basic base. An oval plaque that I had laying around. You'll see I've built a dam to keep my plaster from running everywhere. Here I've covered my base, added some slight contours and rolled my tracks into it. After which I noticed they were askew, so I leveled the right side out and re-did it after I took the picture. They next step, after removing the dam, was to paint the plaster in a basic chocolate brown. After the base paint dried, I brushed white glue on the surface and sprinkled a mix of Fine Dark Turf and Fine Medium Turf from Woodland Scenics onto the wet glue. I made sure to stay out of the track marks. I wanted to show ground that was wet from the rain, but not saturated. After the terrain dried, I applied Tamiya Mud from a stick, next to the track marks to simulate mud churned up by the vehicle. Here you can see some of that churned mud. At this point I've attached the vehicle to the base. Here's where I stand right now. I've applied more Tamiya mud pressed between the tracks and ground, and temporarily placed the radio. Next is more mud, grass and mud stuck on the tracks and hull, and spent brass. So far I've got 2 crewmen done. Still need to build 3-4 more and place them. Thanks for looking!
-
Is that a stash or a hobby store shelf?
-
DH2? You poor, looney man! Yet somehow you managed to maintain your sanity. There's hope for me yet!!!
-
I appreciate all the concern and offers to help. Trust me, I'm not too proud to ask! I just amaze myself, at times, as how much I forget. My first 1/32 aircraft in 30 years was the Tamiya Spit that I've posted here in the finished builds thread. So, naturally, I choose for my second, a Wingnut Wings kit and a crapload of resin and PE! Here's where my brilliance kicks in.... I've never built a WWI aircraft. I've never built anything engineered as well as Wingnuts. I've certainly never built something held together with a spiderweb. And I've been building 1/35 armor for so long, I've fine tuned my skills to that genre. But, I'll see it through. As my wife of 24 years likes to remiind me, it's not the first time I've lost my mind. Certainly won't be the last! As for my health, no worries. I had a heart attack 10 years ago, at age 36, so after a buttload of cardio caths, angioplasties, and 5 stents in the same artery, it was just a matter of time. I've learned to quit trying to figure out why, and just be grateful that I'm actually pretty healthy, work full time, have a great hobby, loving wife and kids, and 3 grandsons whose only two settings are "wide open" and "off"!
-
As some of you may, or may not, know, I purchased and started a WNW Albatros D.v that I plan to paint in Kissenberth's Jasta 16b markings. To make a long story short, I bought all kinds of neat doo-dads to doctor it up, to include Taurus' timing components, Masters Spandau, HGW details, and Old Propeller seat, exhaust and intake. I was making decent headway when I ended up in the hospital undergoing by-pass surgery. Once I returned home, I found my meds were causing my fingers to swell, which, needless to say, caused me to shelf the project until recently. Well, yesterday I took it back down, dusted it off, and took stock of where I was. I'm hoping to start on it again in the next week. This brought me to a realization. I had been trying to do too much, too soon. Let me explain. I have never built a Wingnuts kit before. The Alby seemed a logical choice, since I wanted something fairly straight-forward, with enough rigging to learn with, yet not so much I'd become overwhelmed, such as a DH2. I was swayed by all the neat resin and PE stuff that I love to use in my armor builds, and here is where I made a mistake. When I first started building armor, I used what was in the box at first. As I built more armor kits, I started to learn what details I wanted, and which ones I didn't. I became better informed, my research became more in depth and I started planning exactly what I wanted to see in a finished model or diorama. Apparently my brain went to poo when I saw the Albatros. Not being used to such quality right out of the box, I immediately looked for ways to improve it. Guess what? I forgot the basic KISS principle. Now that I've figured it out, as I start the project up again, I'll concentrate more on techniques like replicating wood grain in a propeller, (I'm still in awe of your work Bo), and attaching rigging and my home made turnbuckles.
-
Had you not mentioned how old the kit was, I never would have known. Great work!
-
I love the strategically placed green "splotches" in photo #1. Of course it's to obscure some sort of top secret model construction device......
-
Absolutely stunning!
-
WNW Alb D.V 4578~17 Jasta B / E. Boehme
lawman56 replied to BoMonroe's topic in LSM 1/35 and Larger Work In Progress
So now we know where all the kids Legos are going........ -
I could really use some "hands on" advice............
lawman56 replied to olfogey's topic in Modelling Discussion
Jim, I concur with Paul. At least give it a try. After my heart surgery in May, I had issues with my hands swelling to the point I could hardly hold an Xacto, so I shelved my WNW Albatros and concentrated on building things I knew I could do. Started with a 1/32 Tamiya Spitfire, and moved on to a 1/35 M7 Priest, (both of which are posted on this site). I found the more I did, the more limber my fingers became and the easier it got. Fontunately, my eyesight is still pretty good, although I do use a magnifier for detail work. Now I'm finally at the point where I'll be pulling that Albatros down off the shelf and starting back on it within the next month. Matter of fact, I've purchased the HK B-17 and some aftermarket, knowing that I'll be able to tackle it next. My only advice is to plug along with whatever you do. It may not be what you had envisioned, but it will be something completed, and will have created a standard for you to try and exceed on the next one. Best wishes and good luck, -
The weather has finally started to co-operate with me, so tomorrow I'll be shooting the Priest with Dullcote. In the meantime, I took a couple pics of the base, with and without the Priest, for those who might be curious about how I go about it. Here's the basic base. Essentially, it's a commercially made oval base I picked up and applied a single coat of stain around the edge. After that dried, I built a dam around it with tape and filled that with plaster of paris, (you can also use a fine sheetrock mud as well), mixed to the consistancy of yogurt, and poured it in. As it dried, I would manipulate it to create subtle contours. While still workable, I pressed my tracks into it, creating a path. Then painted it a chocolate brown, and using model railroad landscaping material, created the basic terrain. Since I want to depict a semi wet field area, I applied Tamiya mud from a weathering stick with the end of a kabob skewer that I had sanded flat. Here you see the Priest sitting in it's ruts on the base. Once I mount the vehicle, I'll go back and fill in the grassy area to the color and texture I want, then apply more mud with my makeshift applicator, working it in and blending it between the track and ground.