


SapperSix
-
Posts
293 -
Joined
-
Last visited
Content Type
Profiles
Forums
Events
Gallery
Everything posted by SapperSix
-
I have destroyed my liver at the Rocks a few times...I love this town.
-
These pictures were taken around midnight at the Kenai Peninsula on the Russian river a couple hours south of my home. A couple more runs will be done over the next few weeks. I had to come home and adult for a bit. I love summer in AK....
-
1/35 Sd.Kfz.251/4 Ausf.c with leFH18/40
SapperSix replied to SapperSix's topic in D-Day 75th Anniversary Group Build
The Kenai is cracking. Updates upon my return. https://www.adfg.alaska.gov/sf/FishingReports/index.cfm?ADFG=R2.Home -
RSO Radschlepper Ost - Having a Break
SapperSix replied to DocRob's topic in D-Day 75th Anniversary Group Build
You are making it look easy man!! Clean build. Excellent detail. -
1/32 Revell RF-4C 14th TRS
SapperSix replied to SapperSix's topic in LSM 1/35 and Larger Work In Progress
Sir Maximus Clunkmesiter, first of his name, breaker of F-5's, repairer of Lanc noses, builder of old green trucks..... I can not overstate the amount of help and insight from others I have received during this build. I have spent many hours looking at other builds, asking questions and receiving detailed answers from many on this site. My confidence and ability has grown only because of the gracious fellow modelers on this site. This build has been a series of firsts for me, the Phantom definitely provides vast potential. Strangely, during this build I have had recollections of my very youthful 1/72 Phantom builds. Hand painted pactra and testors bottles, one razor blade and some paper towels. The hobby has grown in to an amazing feast of art, technical information and history. One gets to decide how far they want to go to maximize their enjoyment. Thank you for your kind words dude....Here is to more modeling and a little bit of whiskey. -
1/32 Revell RF-4C 14th TRS
SapperSix replied to SapperSix's topic in LSM 1/35 and Larger Work In Progress
Thank you Gaz, I find that as I build this plane I want to start over. And I will. I will build another Phantom and take all I have been taught and learned to make it another step above. As always your input is of great help and appreciated. First hand experience is something I severely lack input from those who know has been a great boon to my build. -
1/32 Revell RF-4C 14th TRS
SapperSix replied to SapperSix's topic in LSM 1/35 and Larger Work In Progress
Thank you Harv, Given your experience and capability I take great weight in your kind words. -
1/32 Revell RF-4C 14th TRS
SapperSix replied to SapperSix's topic in LSM 1/35 and Larger Work In Progress
Aft Section....The pressure of the beading tool spit the seem again...(sigh) -
1/32 Revell RF-4C 14th TRS
SapperSix replied to SapperSix's topic in LSM 1/35 and Larger Work In Progress
Progress has been slow but productive. I finally figured out a path to the weathering for the war weary tail. Using Oils (burnt sienna, burnt umber, cadmium red, ivory black) a black and red brown wash, and Tamiya smoke. I re drilled the rivets and plugged them with a small piece of lead as noted in prior postings. After I sealed the base, post initial weathering, I went back with a bead tool to shape the lead plug. While I am sure there is a better way to do this, my initial push in to this lead down this path. In the end the initial shaping with the bead tool doesn't look too bad. My only complaint would be that the newly created rivet looks a little big compared to the washer. This picture shows the first lead plugs being shaped compared to the others that have yet to be shaped. Once shaped it will expose the lead color of the rivet making it easier to detail after a little clean up. Right side complete prior to detail and clean up. left side complete prior to detail and clean up. There is much still to do here. lots of clean up and detail. The aft section, past the tail hook, needs to be done up with rivets. Maybe I can figure a way to make the rivet smaller compared to the washer. In the end it will be blended with pastels to make sure its blended and given a much more flat look. -
Glad I wasn't the only one.
-
1/32 Revell RF-4C 14th TRS
SapperSix replied to SapperSix's topic in LSM 1/35 and Larger Work In Progress
Ordered the new beading tool a few days ago. As I figured I would need a few plans of attack. And with Gaz, and now you, saying they are worth the purchase I feel good about the move. As for the reinforcement strips, I happen to be scribing the main seem as it had grown shallow from other sanding. So if I had to scribe the actual seem, the reinforcement ones might as well get done as well. And hell, might as well do the rivets correctly. During my shade testing and color experimentation I noticed when I squeeze the Phantom ever so, the previously filled fuselage half seem came apart (Noted by the black penciled circle in the below photo). So this area is going to get a reset and fixed when all my assets are in place. I do very much appreciate your input and suggestions. Please mention any item you see that might need to be corrected or enhanced. I am here to learn. Input from knowledgeable people such as yourself is how I will get better and more accurate. Thank you.
-
1/35 Sd.Kfz.251/4 Ausf.c with leFH18/40
SapperSix replied to SapperSix's topic in D-Day 75th Anniversary Group Build
Found some things bought long ago. Not sure if the track will be of the right period. If the track in the kit is good to go I might save the AM for later. Off to make more of mess out of this endeavor. Hmmmmm..... -
Very cool. This will be fun to watch.
-
Will Tamiya P-51 tail fit the Revell kit?
SapperSix replied to JohnB's topic in Modelling Discussion
It might be just plastic....modeling as it is. Honor in all things. I certainly appreciate the kindness you guys show and have shown. Kudos to you all. Good luck with another sure to be great build John. -
1/35 Sd.Kfz.251/4 Ausf.c with leFH18/40
SapperSix replied to SapperSix's topic in D-Day 75th Anniversary Group Build
I was horribly lucky as my son bought it for my as a gift. I almost didn't build this kit because it is hard to come by. But, as with everything else I bought...she was bought to build. Hopefully, I can be a wonderful example of what not to do when you get yours. True and true....rounds on target, beers after. It is going to be fun for sure. The only limiting factor is the builder...the kit is wonderful. Hang out and keep me inline Doc...someone has to. -
1/35 Sd.Kfz.251/4 Ausf.c with leFH18/40
SapperSix replied to SapperSix's topic in D-Day 75th Anniversary Group Build
The traditional fondling of new plastic has begun. After some game planning and color scheme determination glue will certainly fly. -
RSO Radschlepper Ost - Having a Break
SapperSix replied to DocRob's topic in D-Day 75th Anniversary Group Build
Should I bring up how the determination will be made as to the dick issue? I mean that is a pretty serious historical concern! I am guessing there are some Navy types that are experts..... -
This is going to be cool.....I have my popcorn and whiskey.....Do your thing man!!!
- 22 replies
-
- 3
-

-
- 6 pound anti-tank gun
- d-day 75th anniversary group build
- (and 3 more)
-
1/32 Revell RF-4C 14th TRS
SapperSix replied to SapperSix's topic in LSM 1/35 and Larger Work In Progress
Thanks Harv, just placed an order. -
1/32 Revell RF-4C 14th TRS
SapperSix replied to SapperSix's topic in LSM 1/35 and Larger Work In Progress
Martin, I really appreciate the pictures. There is a lot of nuance in there that I am going to use. The Revell has neither the right rivets nor does it have the reinforcement strips at the panel joints. While I see that many reference pictures dont have the reinforcement strips I think it will add some character. So thin plastic stock has been ordered along with a good punch set up.... From other references I have found, the color has not looked as titanium as it does in the above picture. Although, my reading clearly states is is a titanium metal aft. I had thought about going with the below coloring and weathering to which I found pictures at some forgotten location. In comparison, it seems pretty drastic to what little I have been able to find. Most aft sections I have found appear to be super clean museum pieces.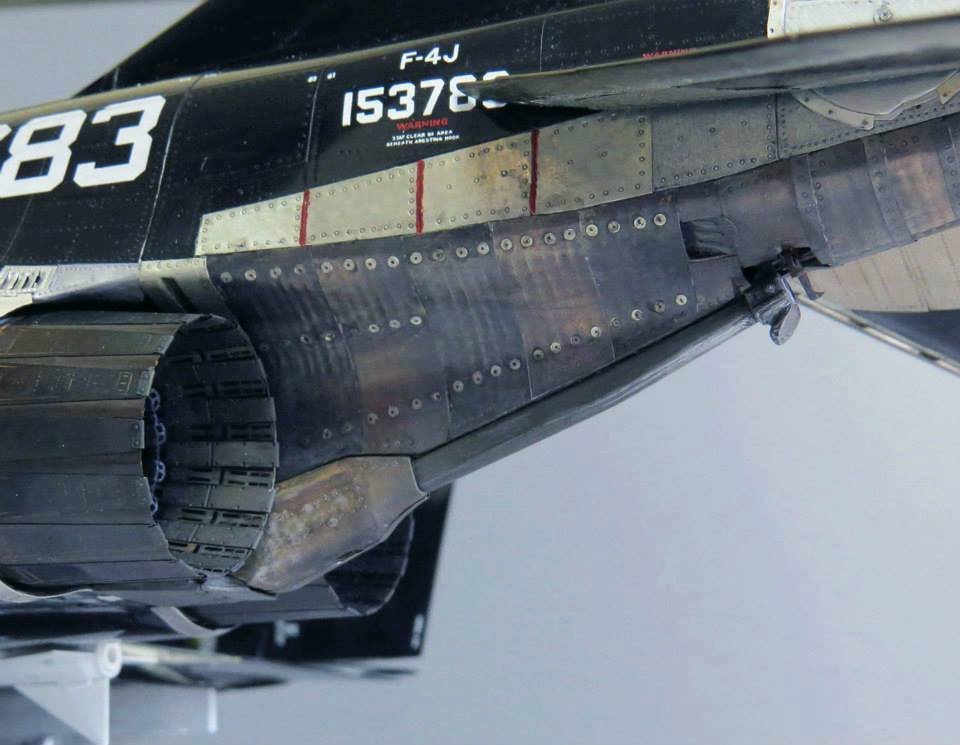
-
1/32 Revell RF-4C 14th TRS
SapperSix replied to SapperSix's topic in LSM 1/35 and Larger Work In Progress
Harv, where did you get that punch set? -
1/32 Revell RF-4C 14th TRS
SapperSix replied to SapperSix's topic in LSM 1/35 and Larger Work In Progress
Does anyone have a few good pictures of the sooty, black tail of a Phantom? I seem unable to find a good reference to replicate. I want to blacken her tail feathers as accurately as possible....Any help is much appreciated. -
1/32 Revell RF-4C 14th TRS
SapperSix replied to SapperSix's topic in LSM 1/35 and Larger Work In Progress
Thanks Gaz, Its been real fun and a real challenge. -
1/35 Italeri STAGHOUND Mark One
SapperSix replied to Martinnfb's topic in D-Day 75th Anniversary Group Build
Westmalle Triple.........I didn't hear anything else.

