


HubertB
-
Posts
2,979 -
Joined
-
Last visited
Content Type
Profiles
Forums
Events
Gallery
Everything posted by HubertB
-
 You’re obviously far ahead of me in the design of the engine . If you want to share the file, my offer to print it for free still stands. Hubert
 -
Wow ! I had not found this pic anywhere ! Thank you ! And dang, you are absolutely right ! So now, I have to modify the engine, or forget about my intended scheme, which is unlikely, because, frankly, olive drab schemes are not for me . I was procrastinating about a trivial issue, which was how to represent the ignition harness ring of the Mercury, not being convinced about the IBG-supplied PE. it’s good I did, in the end. Now I « just » have to design the GR engine, then 3D print it. At least I can focus on the cylinders (a bit of my nemesis, as I stalled for 5 years on the design of the P&W R-985 cylinder head) as most of the rest will not be that visible. I owe you a printed GR, for pointing me in the right direction. Follow this space and just ask me when I’m ready, if you are interested. Hubert
-
Hello Marcin, Thank you for your feedback and comments. I followed, in awe, your build threads of the early PZLs. Your work is absolutely outstanding, and far above what I am attempting. As far as the engine is concerned, I went through the documents I had about the prototype I want to represent, as I had some concerns about the way the cowling was painted, some representations having what would be the frontal exhaust ring of a Mercury engine painted, which would be an aberration given its nature. From what I have read, I have come to the conclusion that the prototype shown in Paris had indeed the Mercury engine, which was a bit of relief, in all honesty - I just hope it was not wishful thinking from my part . Thank you for the data on the wheels and radio compartment panel. I have been sidetracked lately by my experiments at 3D printing the components of a Travel Air Mystery Ship and a P&W R-985, but at least I have learned that designing and printing wheels is among the easiest things of kit design . I now need to find a way of removing the panel line of the radio compartment hatch without destroying the adjacent surface details. And in fairness, I’ll probably live with the kit’s stabilators, unless I can figure a way of designing a new one consistent in surface detail with the kit. Please do not hesitate to contradict my engine certainties for the Paris Air Show bird, if you have the data. Hubert
-
F.A.Q. Figure Painting Techniques By Kiril Kanaev
HubertB replied to Fran's topic in Tools, Books & Misc.
Now, because of this review, I am poorer because I ordered the book and some more items ! Hubert- 15 replies
-
- 2
-

-
- ak-interactive
- kiril kanaev
- (and 3 more)
-
Hey guys, I don’t want to be pedantic, but - first pic is a Horton - second pic is a Horten : I don’t know about you, but I see a difference bigger than an « e » or an « o » Hubert

-
You get my unreserved admiration for working in such a small scale, and what a result on top ! I was working one day on the capstan of a 1/600 Mauretania, and decided these scales were just too much pain for my strained eyes. Now, I focus on even smaller details ... in 1/32 scale Hubert
-
F.A.Q. Figure Painting Techniques By Kiril Kanaev
HubertB replied to Fran's topic in Tools, Books & Misc.
Very thorough review, Fran. Extremely well done and interesting. It looks like this the book to buy to get started, or make real progress, on figure painting. Hubert- 15 replies
-
- 2
-

-
- ak-interactive
- kiril kanaev
- (and 3 more)
-
Although, whereas the Horten is a real replica of the original, the Mustang’s structural details are a bit fancy for the most part. Which does not make the kit any less impressive. Hubert
-
Nice B-24. Congrats ! Hubert (although I personally cannot unsee the flat wing airfoil and funky wing incidence )
-
Now, that’s a lot of wheels. How do you even make a turn pulling this ? Hubert
-
A reminder that the Lukgraph Friedrichshafen FF33L, a WWI seaplane is due soon. And the RWD 14b is even closer. And Lukgraph have announced a DH 90 Dragonfly . A little brother for the Dragon Rapide, wow ! All 3 above are 1/32, of course. Hubert
- 161 replies
-
- 5
-
-

-
- greatwallhobby
- italeri
- (and 6 more)
-
Fokker E.V / D.VIII Parasol Mikro Mir 1/32
HubertB replied to DocRob's topic in LSM 1/35 and Larger Work In Progress
So purdy Hubert -
What is on your bench right now ? Share a picture :)
HubertB replied to Martinnfb's topic in Modelling Discussion
Viewed from this angle, this is an impressive broadside, which certainly would have a British battlecruiser Commodore slightly worried ... Hubert -
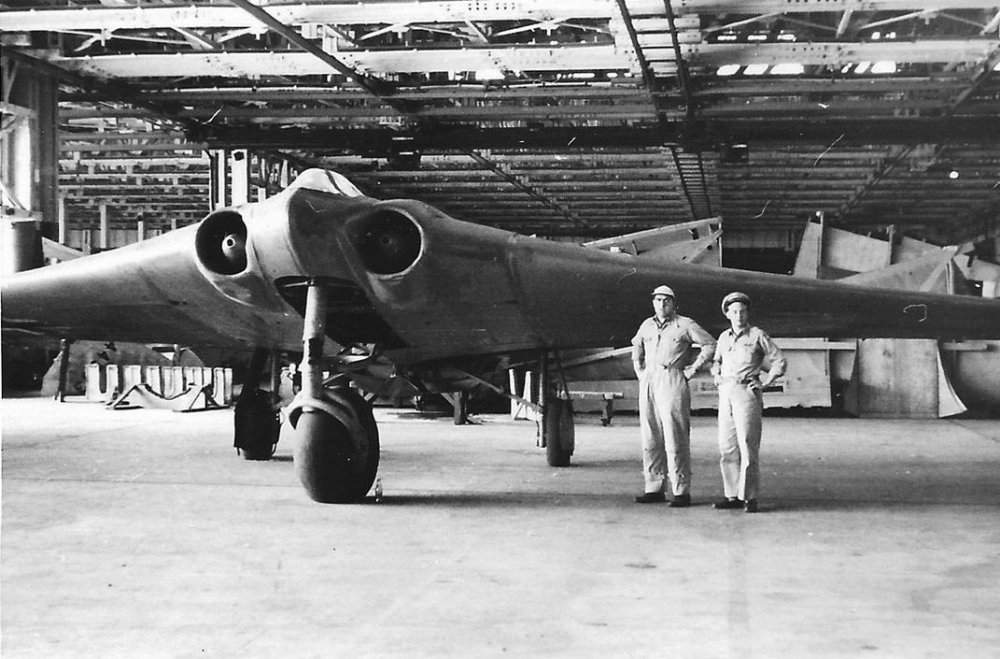
As I was looking for something else, I, literally, just unrolled a 1/32 drawing of the CF-100. I'd still be a taker, but , gawd, it is really a big, and I mean BIG, sob ... The other drawings in the same scale I unrolled at the same time looked small in comparison, even the EE Lightning ... Hubert
- 161 replies
-
- 4
-
-
-
- greatwallhobby
- italeri
- (and 6 more)
-
The day after I went to Shuttleworth for the Dragon Rapide, we went to the Newark Air Museum, and I had a photo spree on the Folland Gnat. Just another project still waiting to come to fruition. But, with - at last ! - the current interest in LSP trainers, who knows ? Anyway, here is the link to that album, of 282 pics only ( ) this time. If you wonder where the in-cockpit pics are coming from, no, they did not open the canopy, nor did they obligently cut the Gnat, for me. There was a section of the front cockpit, used for training purposes, I guess, displayed next to the Gnat, under the giant wing of a Fairey Gannet. https://hubertboillot.smugmug.com/Folland-Gnat-Walkaround-Newark-Air-Museum-052013 Hubert
-
- 1
-
-
De Havilland DH-89 Dragon Rapide - Shuttleworth Collection - May 2013
HubertB replied to HubertB's topic in Walkarounds
When reviewing the pics, some of them are actually not relevant for the DH-89. The day we visited, they happened to have in the same hangar DH-86 Comet G-ACSS, the London-Melbourne race winner, going through some maintenance. So I took pics as well. The red wing, and all pics of black-enamelled retracting undercarriage are for the Comet, not the Dragon Rapide. I'll leave them as they are interesting as well, IMHO. So that makes 410 pics of the Rapide, and 11 of the Comet Hubert -
I now regret to never have taken the plunge on the Skystreak, bot the Jetmads release and your sale, Mike. I am however like you on the Learjet, and have reserved one. And I'm game as well for the Skyrocket, and the Ouragan, and the Trident, if they ever come to fruition. I am still reserved about the X3. It looked spectacular, but ... Hubert
- 161 replies
-
- 3
-
-
- greatwallhobby
- italeri
- (and 6 more)
-
Thre is an excellent 1/32 (not 1/33) paper model of the Tu-95. Now, THAT would dwarf you, my friend Hubert
- 161 replies
-
- 4
-
-
-
- greatwallhobby
- italeri
- (and 6 more)
-
Some of you may know that I had initiated the project of releasing a 1/32 resin kit of the DH-89 Dragon Rapide. The project went as far as having a master created, then life, business and the ancillary choices associated with both came in the way. To cut a long story short, the - huge - step of moving from master to kit never came to fruition, all of my (un)doing . And then, Lukasz, of Lukgraph, had the very good idea of releasing its own kit, which was done last year, which folded definitely my project. Such is life ... In the preparation phase for this project, I, and the modeller producing the master, Martin Field, asked the Shuttleworth collection if we coud come, measure and photograph their Dragon Rapide, to which they graciously agreed, all for the price of just two entry tickets. I thank them again for their excellent welcome. We were able to crawl around, in and out of the Dragon Rapide, me with a camera, and Martin with a measuring tape, tees and squares. Attached is the link to the walkaround of the Shuttleworth Dragon Rapide I did that day, all 421 pics of it (which is why I did not download them directly on this site) I hope you will enjoy it. Hubert https://hubertboillot.smugmug.com/De-Havilland-DH-89-Dragon-Rapide-walkaround
- 1 reply
-
- 1
-
-
Here’s a brave man tackling a great subject Hubert
-
And the engine ahead of the crew compartment ... Hubert
-
The forerunner of the Merkava ! Hubert
-
That is pushing the hub concept far far far far along ... Hubert
-
1/32 Scottish Fishing Boat.
HubertB replied to BigDan's topic in LSM 1/35 and Larger Work In Progress
Man, I wish I could photoshop paint figures like you do . A fitting tribute to your outstanding build Hunert -
Made an order (not modelling related) in January in the US. This was a "made-to-order" product. It took two weeks for production and flying to Portugal ... and close to 4 weeks to clear the customs in Lisbon . I should get it tomorrow or Friday. Patience you must have, young Padawan ... Hubert

