NigelR32
-
Posts
407 -
Joined
-
Last visited
Content Type
Profiles
Forums
Events
Gallery
Everything posted by NigelR32
-

Short Sunderland MkII
NigelR32 replied to ThomasProbert's topic in LSM 1/35 and Larger Work In Progress
I always enjoy your builds Tom.. this is gonna be really enjoyable to watch. Think I'll put the kettle on and pull up a chair.. -
HK Models 1/32 Lancaster Hints, Tweaks and Tips,
NigelR32 replied to NigelR32's topic in Modelling Discussion
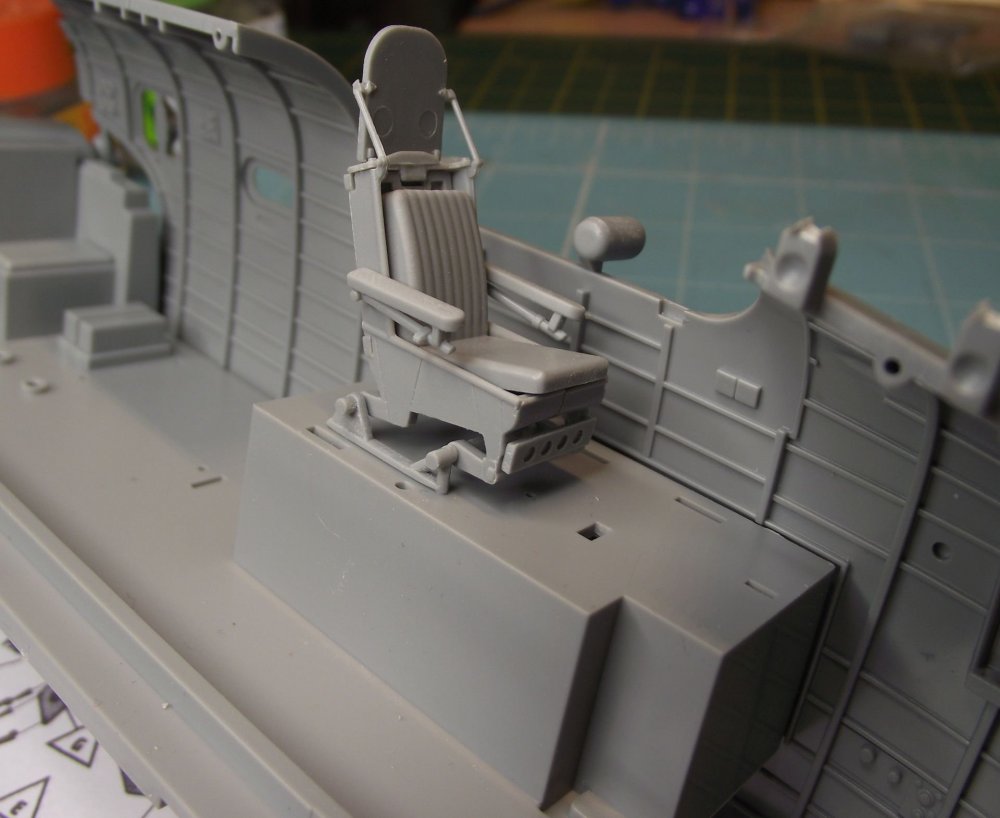
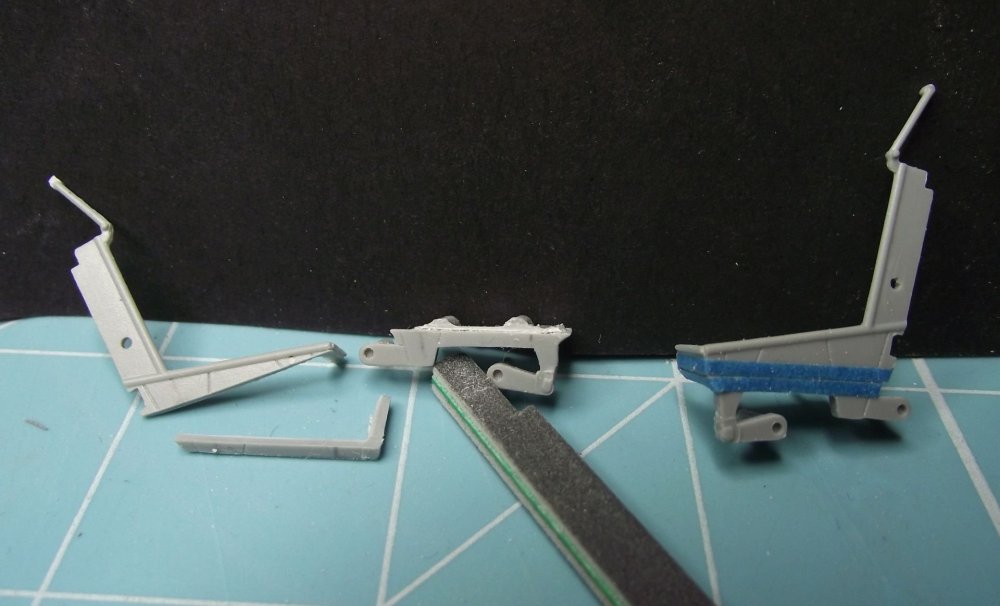
Thanks guys, your compliments are gratefully received. I'm looking at the floor and the engine controls "gearbox" now, which is the area of floor which protrudes into the bomb aimers area. Inside this "lump" there are many chains and chainwheels that transmitted mechanical movements for prop feathering and throttles etc back to the main spar and then left and right from there. The box that the seat sits on is not quite right, so I'll be cutting that up and starting again. Tell me guys, is this the right place to post this or should it be in a WIP thread? -
HK Models 1/32 Lancaster Hints, Tweaks and Tips,
NigelR32 replied to NigelR32's topic in Modelling Discussion
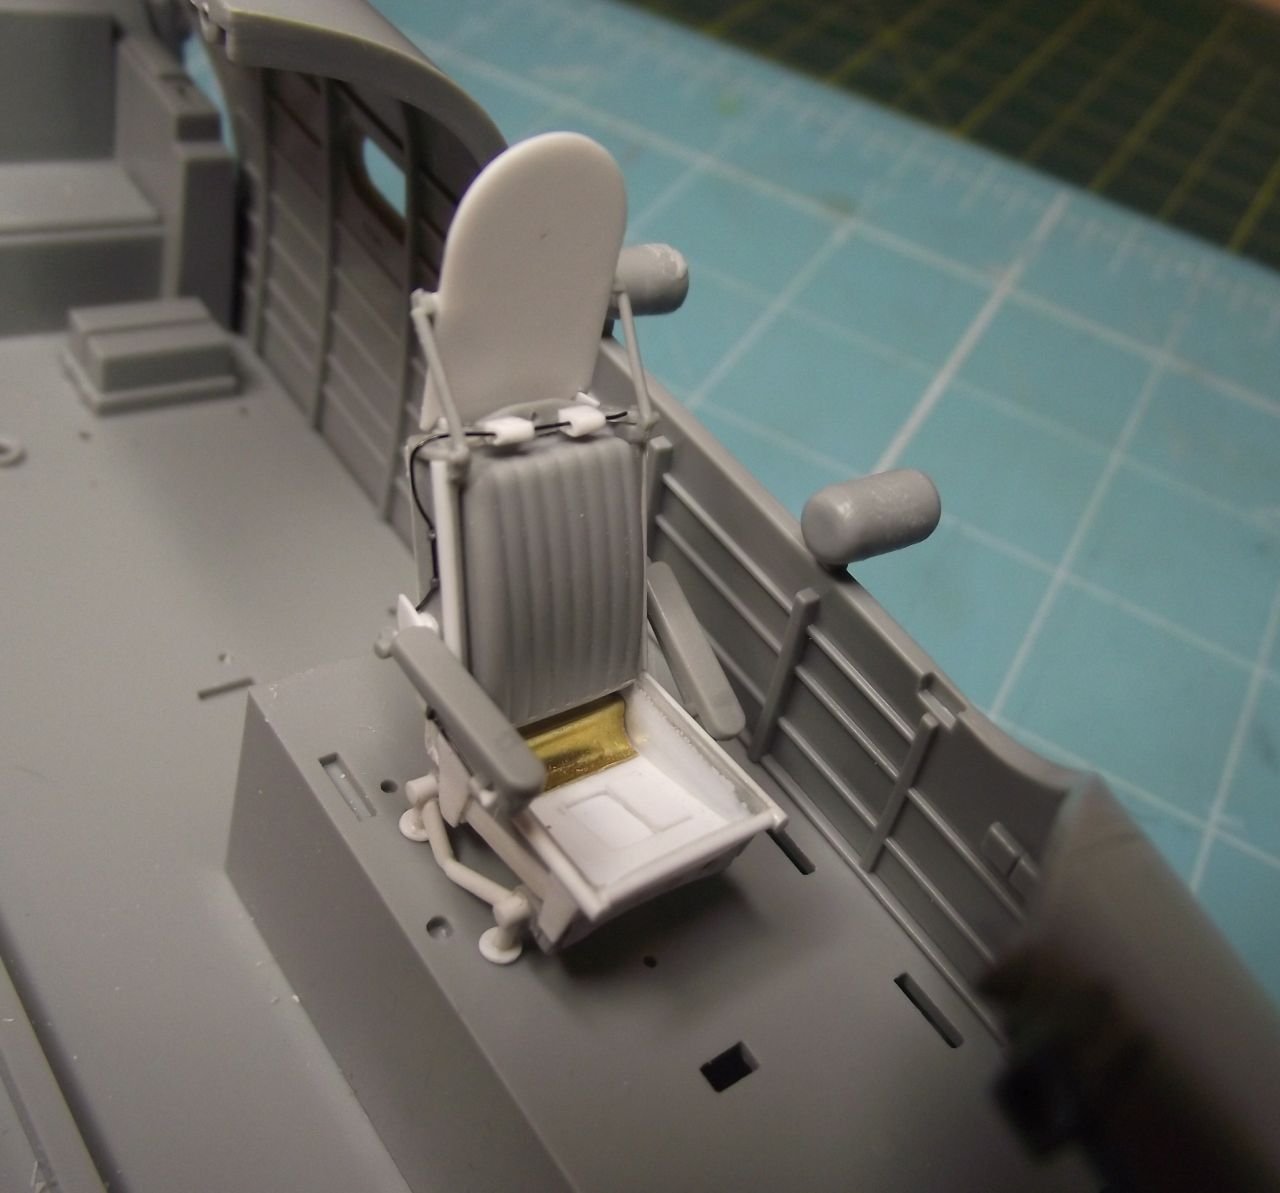
Thanks for the compliments and likes guys.. Well, I found a picture of the seat belt QR mechanism and corrected my corrective work.. The harness shoulder straps will loop around the horizontal bar, which, once the cable is pulled releases from the block behind it. I'm not really sure why they did this? Surely the shoulder straps would be clipped into the waist straps, so one would need to unclip them anyway?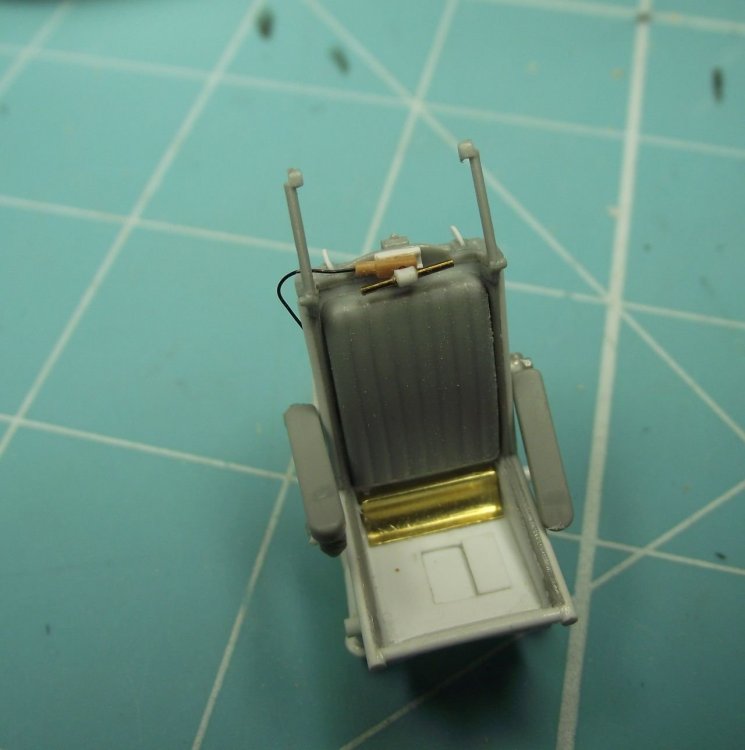
-
+1. I really would like to build that!!
-
hk models Lancaster B Mk.I, R5868, PO-S (S-Sugar)
NigelR32 replied to JayDee's topic in LSM 1/35 and Larger Work In Progress
Good planning on the engines Jim!! Doesn't the door open inwards and forward? -
hk models Lancaster B Mk.I, R5868, PO-S (S-Sugar)
NigelR32 replied to JayDee's topic in LSM 1/35 and Larger Work In Progress
Nice job James.. looking really good. I look forward to seeing the finished model, all weathered and dirty. Are you going for a closed up look or will you be opening the door and at least one engine cowling? -
I must be crazy, B-24J on the bench.
NigelR32 replied to 1to1scale's topic in LSM 1/35 and Larger Work In Progress
WOW is all I can say!! I've been away from the site for a couple of days, I come back and the whole fuselage has been chopped around!! I LOVE IT!! I would love to build along with you but I just know I shouldn't start ANOTHER kit. I'm just gonna keep watching and saving all your pics. Keep it up. -
HK Models 1/32 Lancaster Hints, Tweaks and Tips,
NigelR32 replied to NigelR32's topic in Modelling Discussion
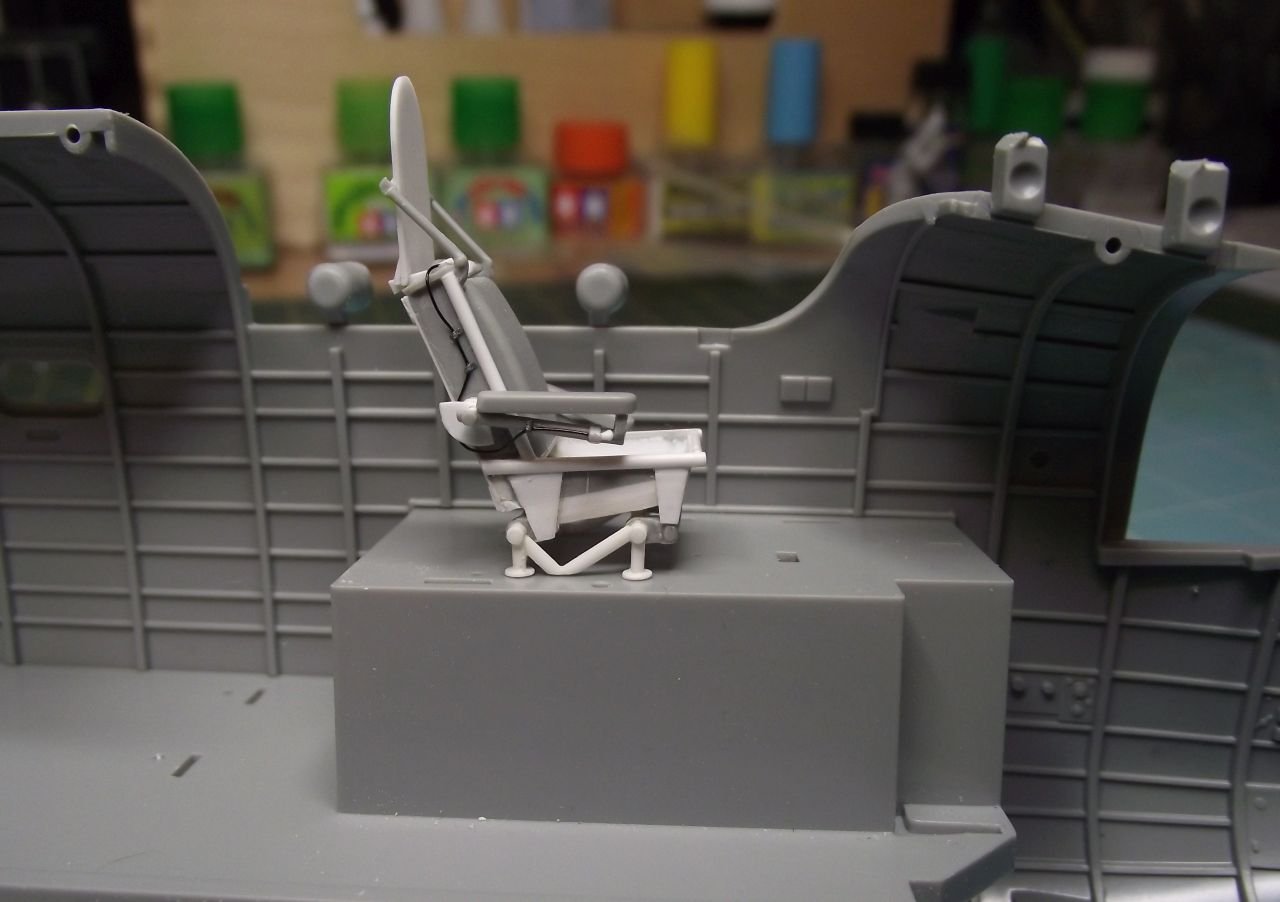
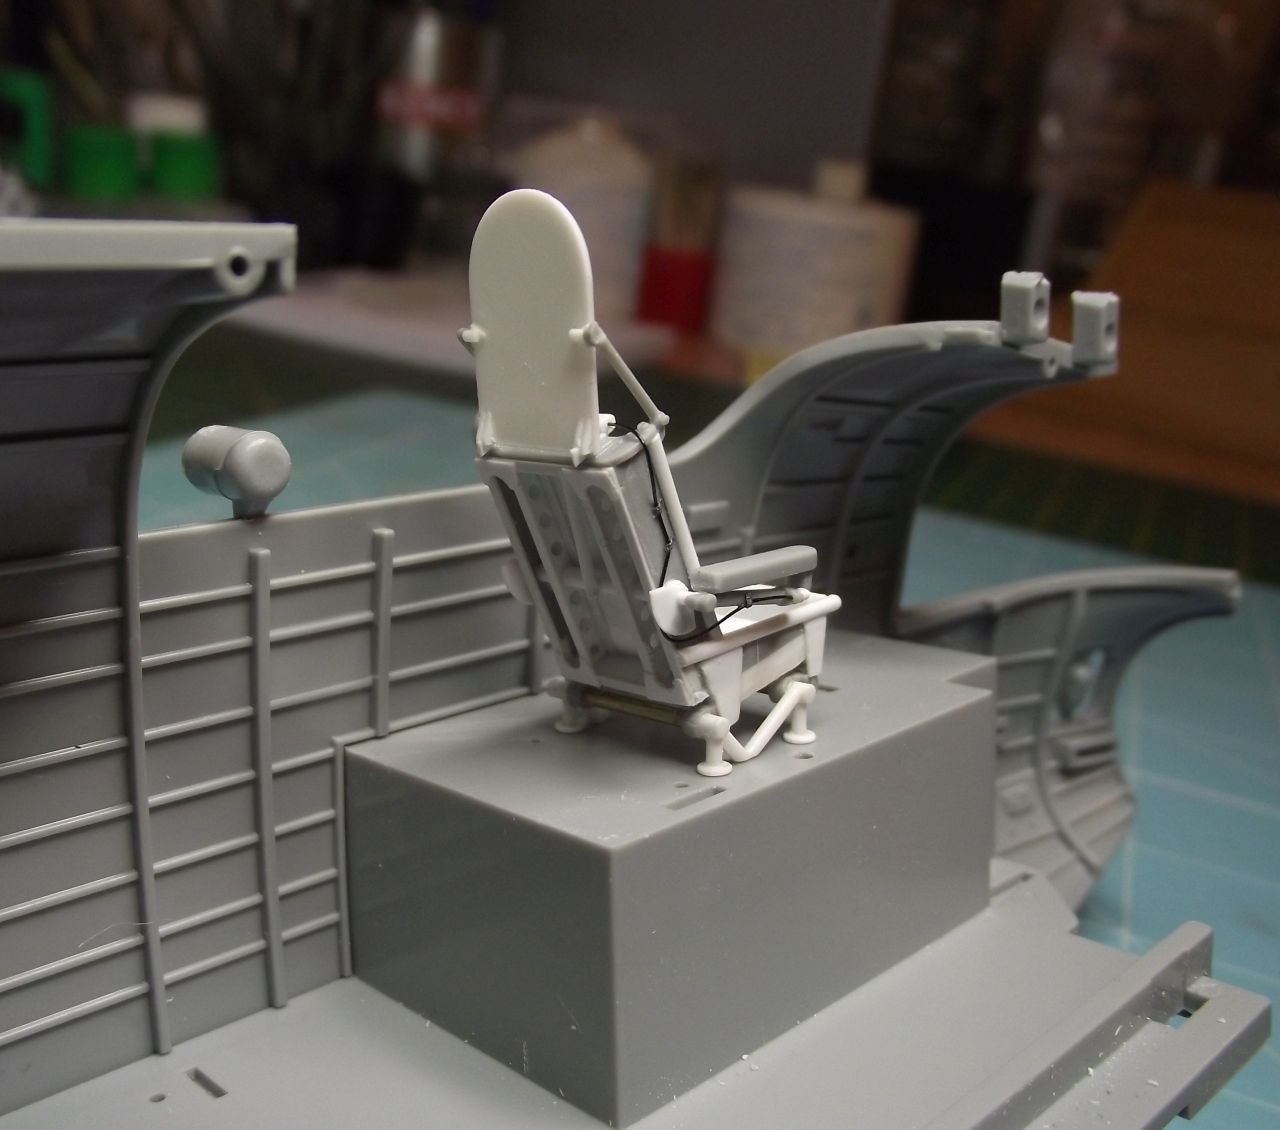
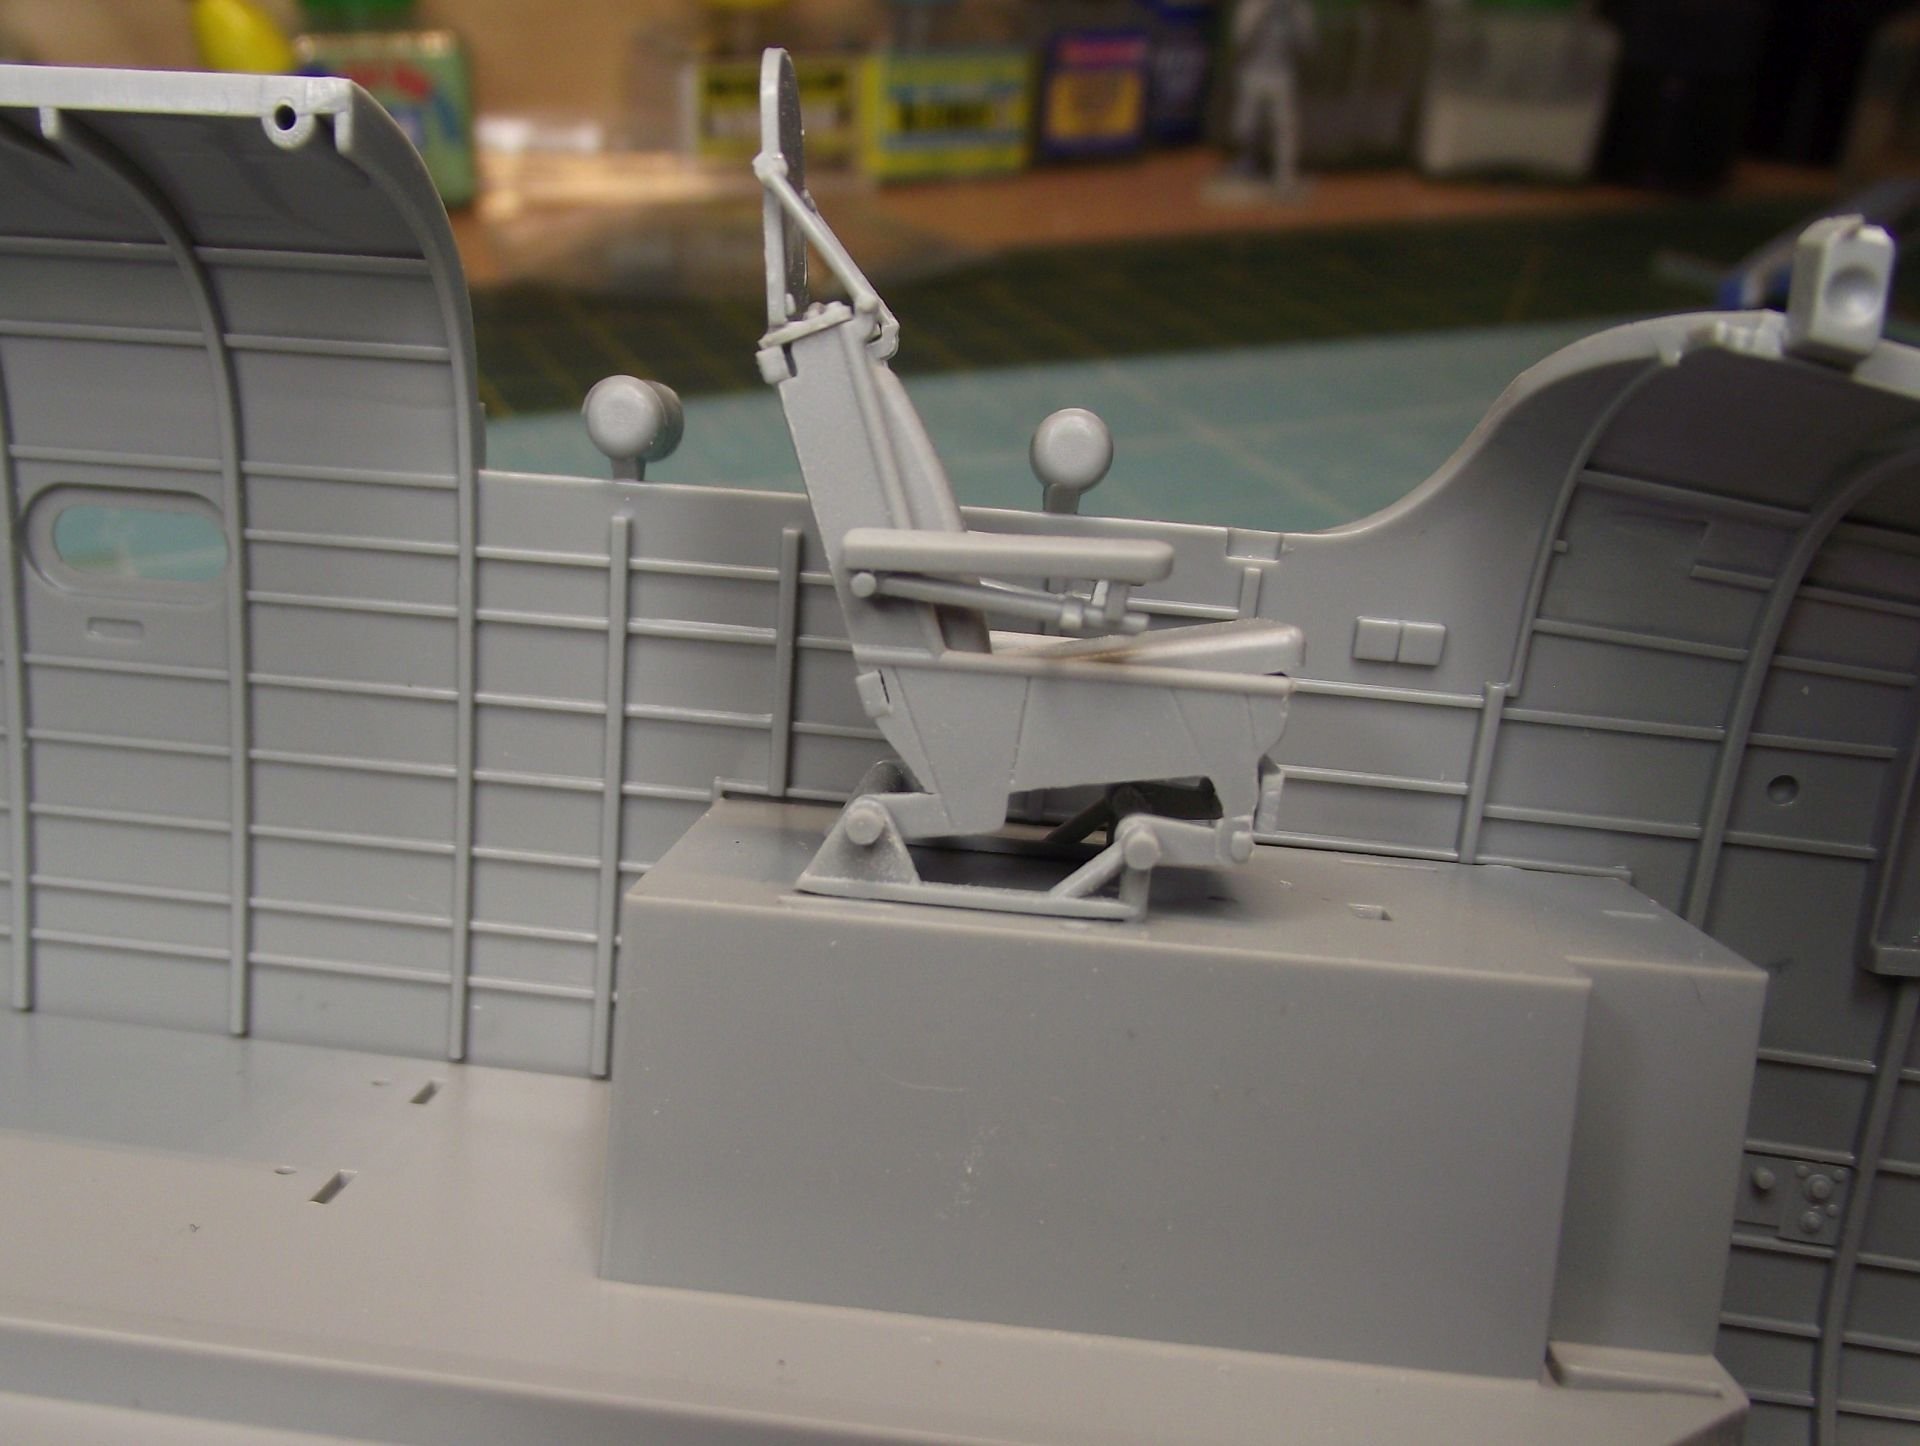
Hey guys, you probably wondered where I'd gone... OK, you hadn't even noticed.. Anyway.. I've been really busy on tweaking.. yes, tweaking. The pilots seat is, I believe, a lot more like the real thing now. Note seat is now lower in relation to fuselage side, but is still too high overall as the floor needs to be shortened and get lowered. I have gone crazy doing this.. I've built and rebuilt the bloody thing about three times, having noticed that I'd done one bit wrong, then redone it only to find I had it right in the first place!! The harness mount with the QR cable needs to be finished, but I cant find a picture that realy shows how it should look.. perhaps someone can help. I think the right side block will go and get replaced by a round piece and the left, port side block needs to be cut into two "blades"? Note the hole and patch in the seat base. Someone here mentioned this, which got me looking closer for it. (Armrests are not yet glued into position. Adding the holed structure in the back was fun, note the gussets in the corners. My scratch building isn't the best, but I got there in the end. I think all that is used from the kit is the back cushion and side frames. Now.. I need to finish it off and remove the rough edges and get some primer on it.. asfter i've sorted the harness mount of course. Thanks for looking.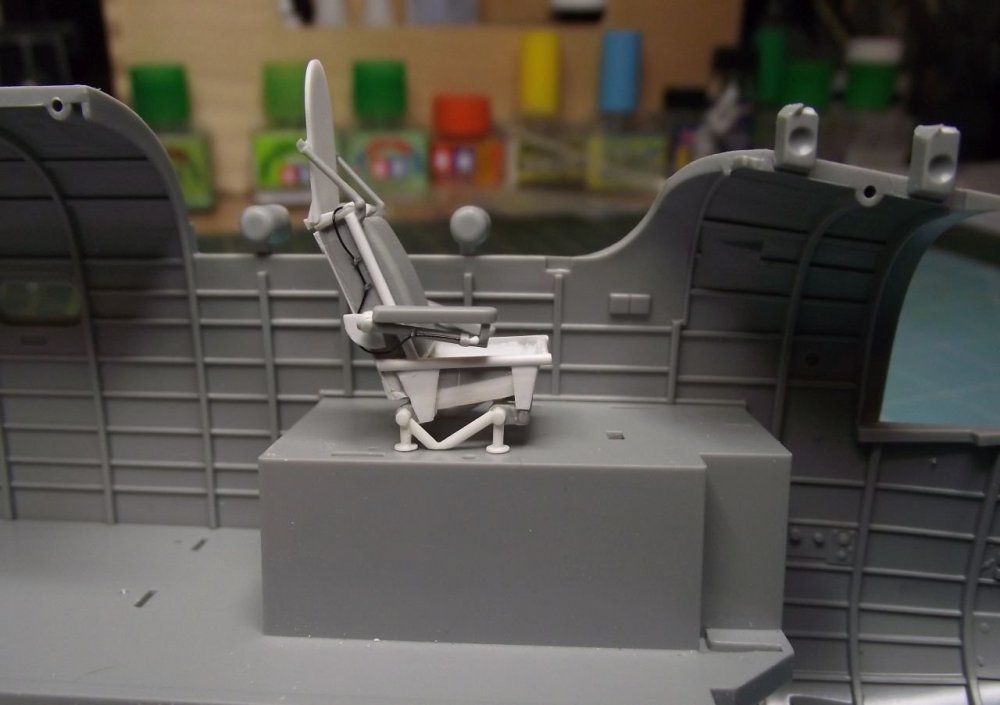


-
HK Models 1/32 Lancaster Hints, Tweaks and Tips,
NigelR32 replied to NigelR32's topic in Modelling Discussion
Hey David, I have been looking at this nearly all day, and believe me it is driving me crazy. The seat angle is actually spot on in my opinion. It is also the correct height from the base to the armour.. Obviously, I am expressing my opinion and I am not an expert. -
HK Models 1/32 Lancaster Hints, Tweaks and Tips,
NigelR32 replied to NigelR32's topic in Modelling Discussion
Hey guys, thanks for posting. The seat is 1.5mm too high, the platform is 2.5mm too high. If I was a more sensible Man I would have removed most of the seat support and leave the floor well alone, but, unfortunately I am crazy!! I reckon the width of the seat is OK, but the armour is 3mm too short. If you look at a pic of the armour folded down, the tip of the radius, now on the bottom, is nearly level with the bottom of the seat. -
HK Models 1/32 Lancaster Hints, Tweaks and Tips,
NigelR32 replied to NigelR32's topic in Modelling Discussion
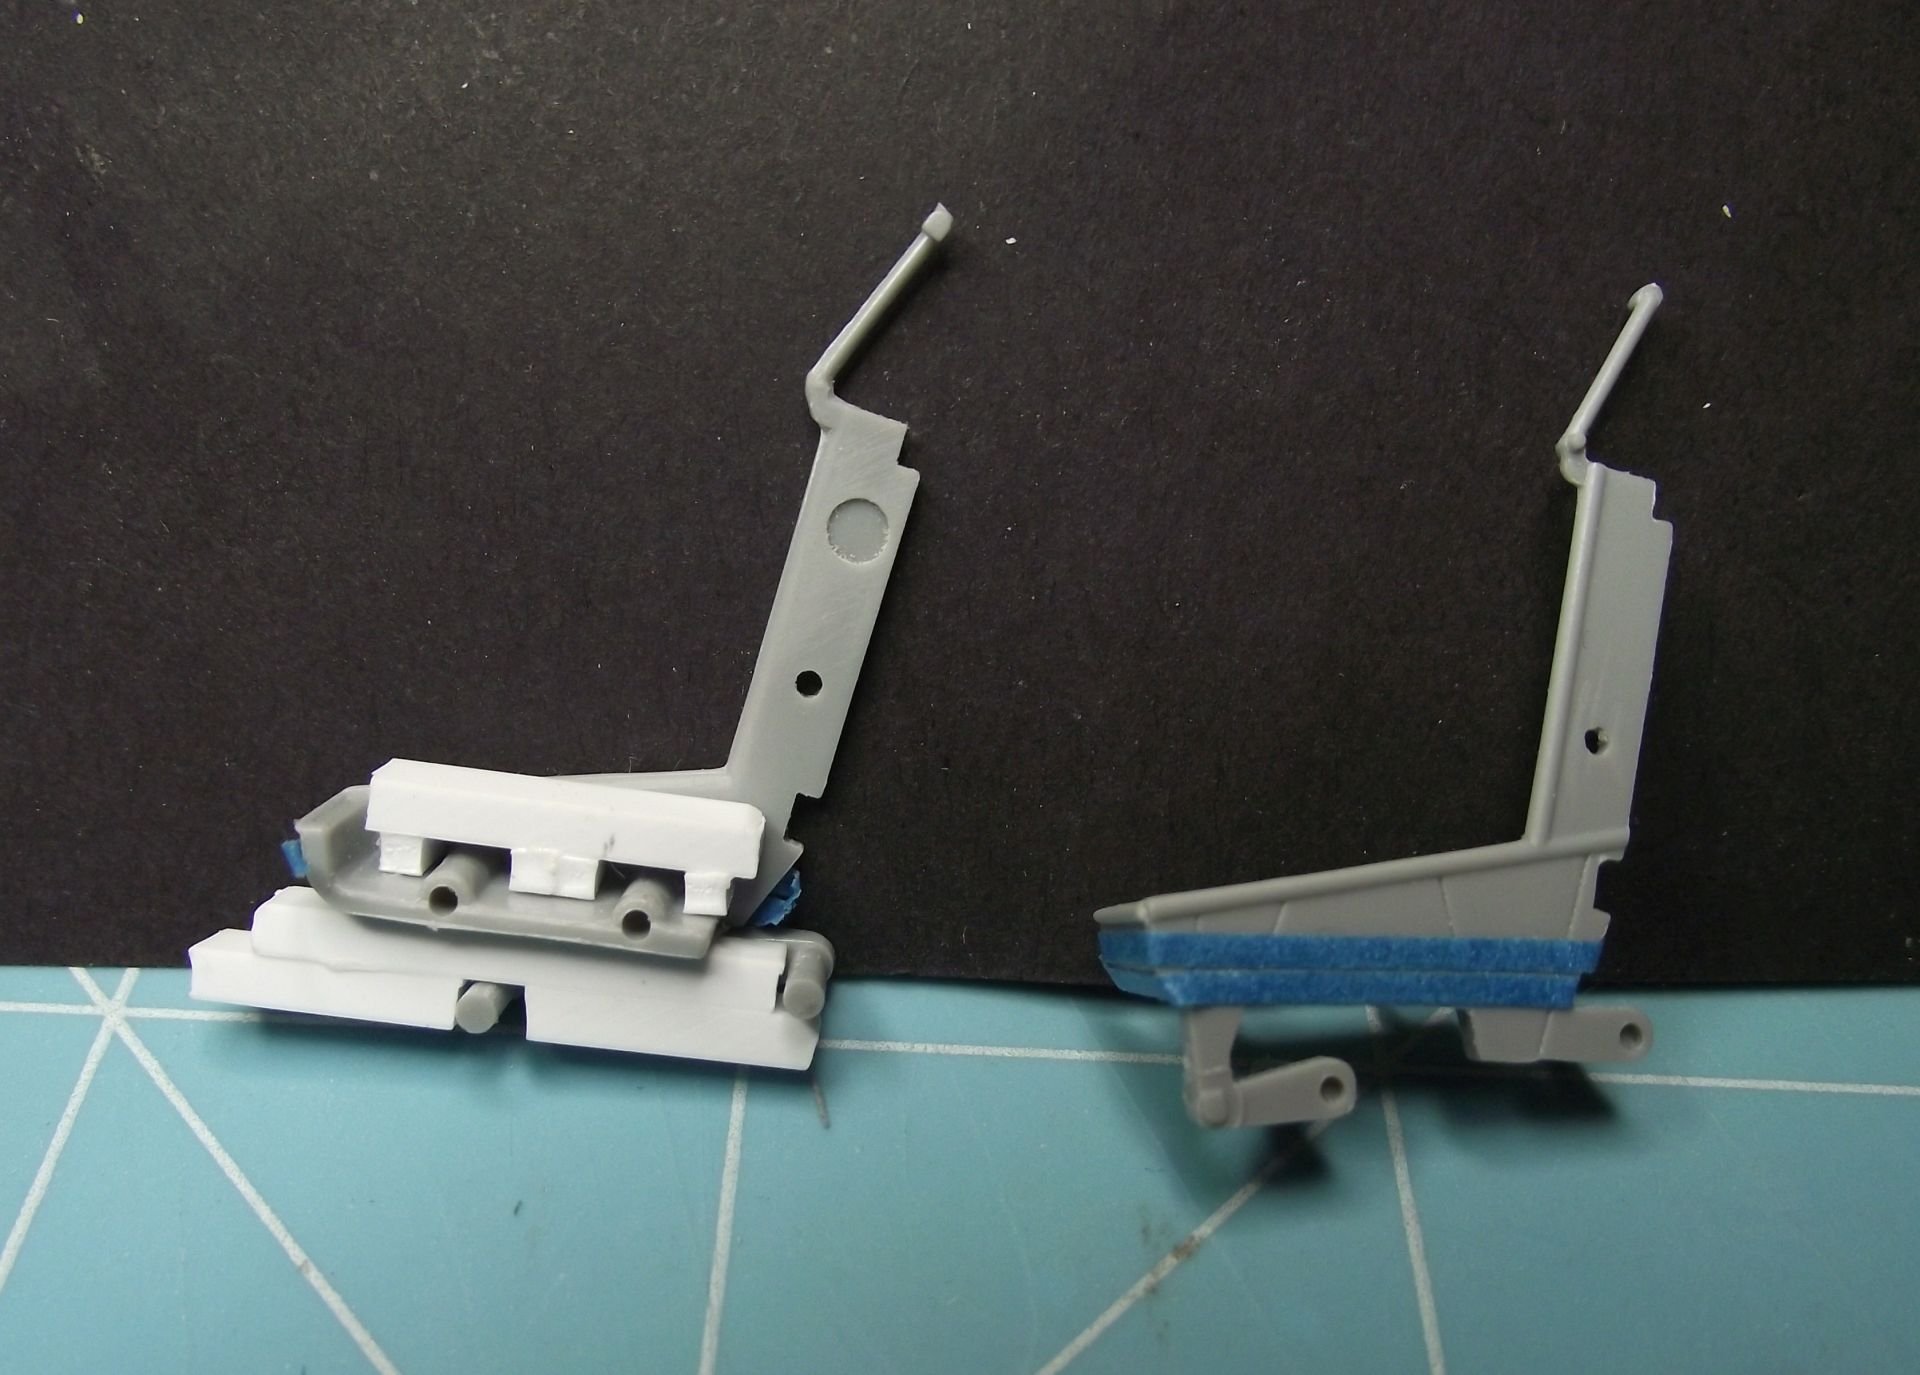
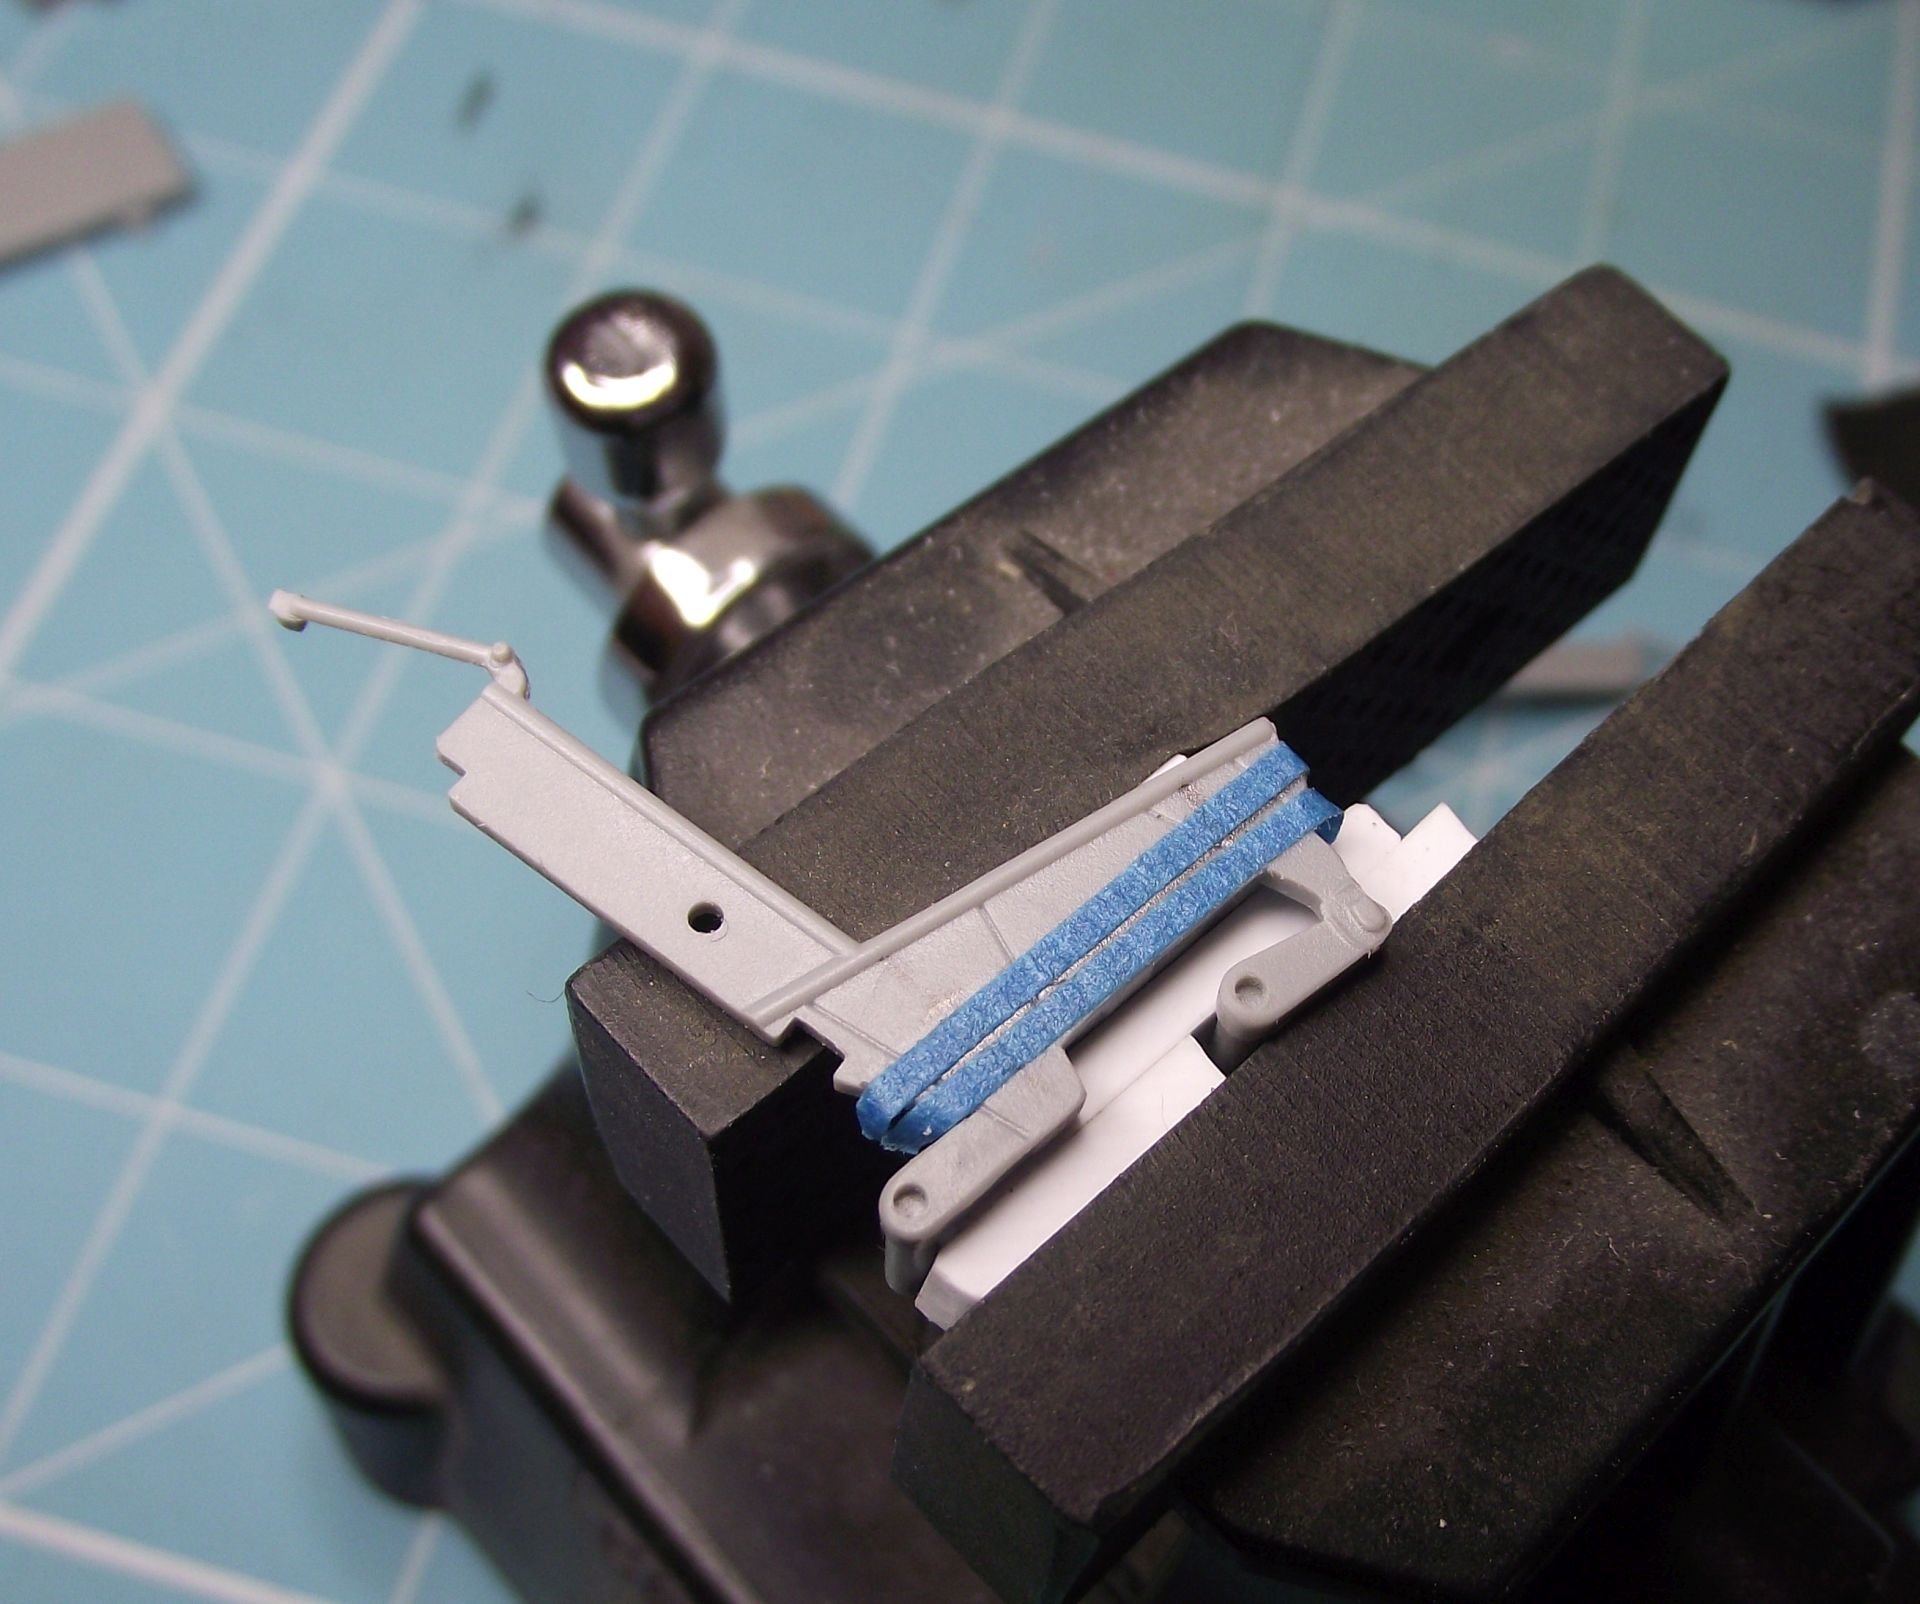
So guys, I suppose I've put it out there now, so I need to show you what I'm going to do about it. Some of you will think I'm crazy, but here goes anyway. You'll see that I enjoy the jigging and engineering side of things as much as I enjoy doing the mods.. Here we can see the seat is too high compared to the cockpit wall, or lower edge of the canopy. So, to start, we need to identify that the seat base is around 1.5mm too tall. A section needs to be planned and removed. Here I've taped the area to be cut out using 1mm tape. (Remember the saw blade is 0.25mm thick so theres my 0.5mm). On the left we can see the quick little jig knocked up enable the seat to be clamped into the vice for cutting. I believe if you want a successful straight and controlled cut, first you must hold what you want to cut. Like this... And now.. it's too late to change my mind. Next we need to look at moving the mounts and shortening the length. Thanks for looking...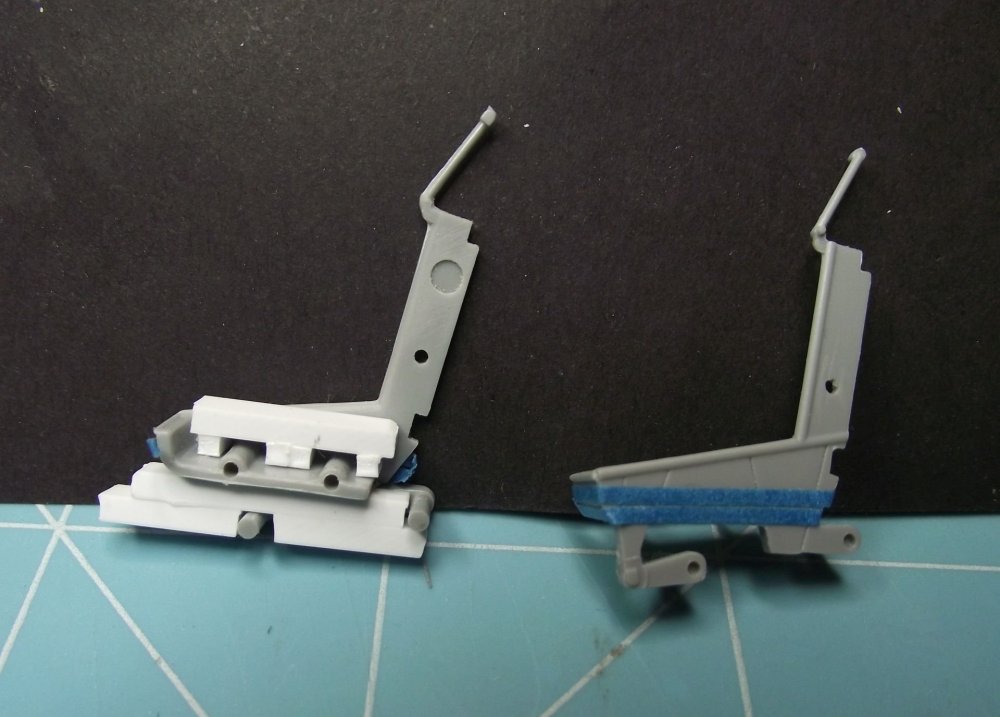


-
HK Models 1/32 Lancaster Hints, Tweaks and Tips,
NigelR32 replied to NigelR32's topic in Modelling Discussion
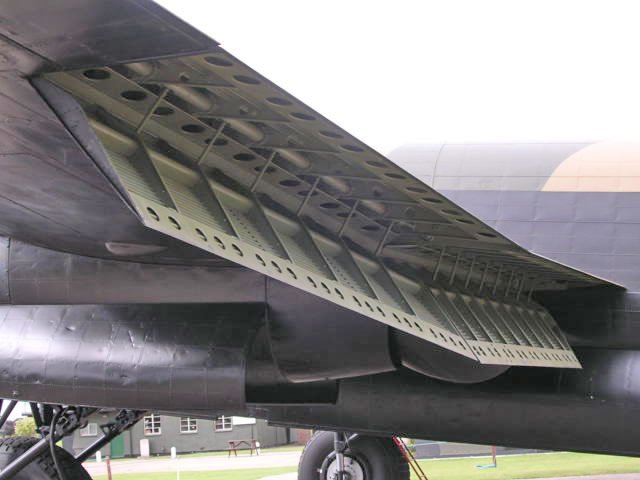
Here is a nice image borrowed from Google, of the real thing.. for information only.. Here are the kit flaps... with missing holes as pointed out by FME erk.. I guess this will make people want Eduard to step in even more?? Failing that, make some replacement strips and carve the kit plastic away. Failing that, build the model flaps up? Not sure if that would be accurate though?
-
HK Models 1/32 Lancaster Hints, Tweaks and Tips,
NigelR32 replied to NigelR32's topic in Modelling Discussion
Nice work Mike, That is exactly what I've been looking at this morning. This is what I've come up with.. do you agree? Kit vs Actual.. Seat Pan +4.5mm too long Seat pan height +1.5mm too high Plus floor is 2.5mm too high Armour plate -3mm too short In my opinion, the front edge of the seat is in the correct position relative to the IP, so the shortening of the seat pan will pull the seat back forward toward the IP. looking at side on pics of the Lanc it is clear the seat is too high and far back relative to the canopy framing. EDIT:- Just looked at your thread. You'll see what I mean regarding seat position relative to canopy framing/sill in post #60, first pic. -
HK Models 1/32 Lancaster Hints, Tweaks and Tips,
NigelR32 replied to NigelR32's topic in Modelling Discussion
Thanks James, Please keep an eye out for negativity here.. -
Hi Everyone, I thought I'd start a new thread much in line with Ernies thread on the B-24, regarding the HKM Lanc. Please post here your hints tips and tweaks for this model. There are already some great reviews out there on this model, some of which have pointed out some omissions and issues, but thankfully these all seem to be related to internal areas, so, at last we may well have a kit which at least has correct external shape. I would like Cees to jump in here and add a list of his known issues with the model, so if the mods can jump his reply to post #2 I would be grateful. I already have a couple of issues and omissions up my sleeve, all of which will be simple scratch building additions and simple modelling work arounds, but I'm going to keep these close to my chest until Cees has popped in.
-
I think we should also consider that this kit, although it has errors is extremely good value compared to other kits of a similar size. I can also confirm that Airscale will be launching a cockpit upgrade set very soon for this.
-
Thanks guys, glad you like it and thanks for subscribing. If you feel theres something I could do different please suggest it. It's easy to be critical without being negative, something you guys on here seem very good at. Rest assured, I used to do many reviewes in words and pictures.. this method of making video recordings is more involved, needs more preparation and is easy to cock up. The biggest issue is getting a good balance between "getting on with it" and not being boring, but still cover enough detail to make the review worthwhile. If you like a good rant, watch my A-7V german tank review where i go on about the Revell 1/32 G-6.
-
I must be crazy, B-24J on the bench.
NigelR32 replied to 1to1scale's topic in LSM 1/35 and Larger Work In Progress
+1 -
OMG!! What is going on?? I wonder if they are only going to do Big Ed sets? I put Eduard in the manufacturers and B-17 in the search box and no Brassin came up?? Maybe they're not going to do the Lanc and Libby after all??
-
hk models HK Models 1/32 Avro Lancaster Mk.1 (Part 1)
NigelR32 replied to JeroenPeters's topic in Aircraft Reviews
Thanks for taking the time to watch my videos and not complain about them. On the wing issue, I'm not sure if there is a problem or not?? There may have been a shift on the middle core of the tool, but I very much doubt it? It seems I am the only one to have had damaged parts, excepty for one other I know of but that was because the courier threw it over the customers gate!! I'm sure it's fine, I might see if I can stiffen it up on the inside, or parhaps ask HK for a replacement? I have made a start on the trim wheels. The larger forward facing one at least, where I have drilled a disc of plastic, put rods in it then coated it in sprue goo to get it all to look soft and moulded jelly like.. you know what I mean. the top one could be made from the spinner prop on a bomb, or perhaps the screw blades off a modern ship kit? I also thought of cutting the rim off the wheel a 1/43 scale vintage car and using the hub and spokes, but I dont have one??? As soon as I'm done I'll post pics of the wheels here. -
Hi Rob, Thanks for the update. You know what you've done don't you.. you've made me want to start it now!! I do enjoy a problem kit.. I'm currently finishing off a SOD Tamiya Spit Mk IXc.. yawn yawn yawn. Cut part off sprue, clean up, glue in place, repeat.. then if it had exposed pin marks, sink marks and gaps I'd rant that it's crap compared to other Tamiya kits.. there's just no pleasing some people..
-
Thanks Carl, I think I know why.. because they're so bloody expensive!! Most Big Eds cost more than the kit, especially with the big 1/48 kits. I'll go check it out.
-
Hi everyone, I've just noticed that the Eduard PE sets for the Meng ME163 Komet are now discontinued, which seems very early? I believe the kit actually came out in 2014? So, if you have one in your stash and want to tart it up with some PE, (The Eduard cockpit is gorgeous), you better hurry. Hannants are listing one interior left and the Big Ed has disappeared off their site. I just bagged a Big Ed set off Ebay for a song
-
I use the AK real color for military models and in my opinion it is the best out there. They also make a high compatability thinner, which interestingly doesnt thin the normal bottled AK colors... high compatability?? Oh yeah?? I generally thin the AK paint with around 60% thinner as it is a little thicker than Gunze and Tamiya, but it goes down really nice. Just my 2p
-
Ejector Pin Marks. Lots of kits have them all over the place, Companies like WNW and Tamiya generally do a gret job of hiding them, though WNW often completely avoid them. However lots of older kits and some newer ones from other manufacturers have them in very obvious places that are extremely difficult to get rid of.