BlrwestSiR Posted March 6, 2021 Posted March 6, 2021 Fantastic work Frank. Thanks for the step by step description on how you remove the thinner resin parts. Where did you get the razor saw you used? Carl 4
Trigger Posted March 6, 2021 Author Posted March 6, 2021 51 minutes ago, BlrwestSiR said: Fantastic work Frank. Thanks for the step by step description on how you remove the thinner resin parts. Where did you get the razor saw you used? Carl Hello Carl, I bought the razor saw at artscale.eu, the saw is made by Vallejo, I guess when you google "Vallejo tools" you might find a supplier nearby, the saw comes with 4 types of blades, Frank 1 2
Landlubber Mike Posted March 6, 2021 Posted March 6, 2021 Holy cow Frank, amazing work! I didn't realize such a model existed. I came close to bidding on a Pro Modeler Catalina, but I might instead keep my eyes out for one of these. Talk about an epic build of a really cool subject! Nice that the wings are truncated too - this subject at 1/32 must be a monster, especially with the full wings included. I just noticed that HpH has a full Catalina also, but I think I'd go with the cutaway. 4
harv Posted March 6, 2021 Posted March 6, 2021 ...How did I miss this. Frank, outstanding work. A joy to watch.....harv 4
Trigger Posted March 6, 2021 Author Posted March 6, 2021 58 minutes ago, Landlubber Mike said: Holy cow Frank, amazing work! I didn't realize such a model existed. I came close to bidding on a Pro Modeler Catalina, but I might instead keep my eyes out for one of these. Talk about an epic build of a really cool subject! Nice that the wings are truncated too - this subject at 1/32 must be a monster, especially with the full wings included. I just noticed that HpH has a full Catalina also, but I think I'd go with the cutaway. Hello Mike, I certainly would go for the cutaway version, otherwise in the full scale version all the detail will be locked inside, and that would be a shame, (all though the full version is a real monster with a massive span) Frank 5
Trigger Posted March 6, 2021 Author Posted March 6, 2021 46 minutes ago, harv said: ...How did I miss this. Frank, outstanding work. A joy to watch.....harv Thanks Harv, more footage under way... 4
Kaireckstadt Posted March 6, 2021 Posted March 6, 2021 6 hours ago, Trigger said: Hi there, Done some work on the Catalina, some work on the wing, some sub assemblies an for the most part cleaning up parts, priming them and put some paint on them, have a look, This is where I left of, lined the wing up on my cutting mat, fortunately this part of the wing is straight, so it was easy enough to line up the ribs on the cutting mat, and cut them to the right length, One of the ribs stuck out a little bit, I had to cut just a little piece of the base of this rib, and then glued it back together to make it fit. After that I could glue the end piece on the frames, one frame needed a little piece of plasticard, was cut just 0,10 th of a mm short, but it wasn't to difficult. Decided to put in the nose turret, it needed some trimming to fit properly in the fuselage, and then moved on to the turret itself, Test fitted it and masked the thing inside and outside so I could get some interior green on it, after that it was time to get some interior green on the inside of the fuselage, before putting in the bulkheads, it now was easy to paint without the bulkheads in the way, the tail section was quite an exercise with all those little gaps between the ribs, see for yourself , made a temporary jig to put the fuselage in to be able to move it around. Ashot from the other side, this thing is really big.... So now I can move forward getting the bulkheads in, painted a lot of the parts needed , and cleaned them up Well, that is pretty much how far the build is right now, I am now working on the cockpit and the pilot seats, but that's for the next time, greetz, Frank Fantastic build, Frank ! Your speed is impressive. I love to follow your awesome work. It‘s just sit back and enjoy! 5
Jackster Posted March 6, 2021 Posted March 6, 2021 One of my favourite aircraft! What a fantastic way to build it! Kudos to your razor saw skills Frank, that was amazing! Cheers Kev 4
Trigger Posted March 6, 2021 Author Posted March 6, 2021 1 hour ago, Kaireckstadt said: Fantastic build, Frank ! Your speed is impressive. I love to follow your awesome work. It‘s just sit back and enjoy! Thanks, will do my best, got some more time for the bench now because of the covid pandemic, and we have a curfew here in the netherlands after 21.00 hours, so trying to make the best of things, Frank 4
Trigger Posted March 6, 2021 Author Posted March 6, 2021 1 hour ago, Jackster said: One of my favourite aircraft! What a fantastic way to build it! Kudos to your razor saw skills Frank, that was amazing! Cheers Kev Thanks Kev, It's pretty nerve wrecking to, those parts are so fragile, I did break some of them, but that is inevitable with builds like this, you just have to work around that, and you do have to scratch build some parts, but that's also the fun in it, Frank 4
Peterpools Posted March 7, 2021 Posted March 7, 2021 Frank Brilliant and meticulous work. If I only had the talent Keep ‘em com Peter 4
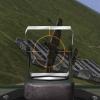
Trigger Posted March 8, 2021 Author Posted March 8, 2021 Hello Guys, small update on the Catalina, finished the ribs on the wing and put some paint on.... Now in the process of painting and test fitting interior details........... Just test fitting the some interior details, more to follow soon........ Frank 9
Kaireckstadt Posted March 8, 2021 Posted March 8, 2021 15 minutes ago, Trigger said: Hello Guys, small update on the Catalina, finished the ribs on the wing and put some paint on.... Now in the process of painting and test fitting interior details........... Just test fitting the some interior details, more to follow soon........ Frank Just awesome Frank! The build and your speed! 5
Peterpools Posted March 9, 2021 Posted March 9, 2021 Frank Absolutely brilliant work Keep ‘em comin Peter 5
Trigger Posted March 9, 2021 Author Posted March 9, 2021 8 hours ago, Kaireckstadt said: Just awesome Frank! The build and your speed! Thanks, I will try to keep up Frank 4
Trigger Posted March 9, 2021 Author Posted March 9, 2021 3 hours ago, Peterpools said: Frank Absolutely brilliant work Keep ‘em comin Peter Thanks Peter, Any news on your Sufa? 4
BlrwestSiR Posted March 9, 2021 Posted March 9, 2021 Stunning work. There's so much to see in the details. Carl 3
Administrators Fran Posted March 9, 2021 Administrators Posted March 9, 2021 Outstanding work!! I will be wachting tis closely as I have my cutaway Cat on my stash!! She is the Queen of Stash!! 4
Administrators Fran Posted March 9, 2021 Administrators Posted March 9, 2021 On 3/6/2021 at 4:40 PM, Landlubber Mike said: Holy cow Frank, amazing work! I didn't realize such a model existed. I came close to bidding on a Pro Modeler Catalina, but I might instead keep my eyes out for one of these. Talk about an epic build of a really cool subject! Nice that the wings are truncated too - this subject at 1/32 must be a monster, especially with the full wings included. I just noticed that HpH has a full Catalina also, but I think I'd go with the cutaway. I review it when it came out! https://forum.largescalemodeller.com/topic/3371-132-pby-5a-catalina-cutaway-limited-edition/ 2 1
Trigger Posted March 9, 2021 Author Posted March 9, 2021 1 hour ago, Fran said: I review it when it came out! https://forum.largescalemodeller.com/topic/3371-132-pby-5a-catalina-cutaway-limited-edition/ Hello Fran, i know you did The review, was very good, ever since then i wanted to buy The kit, but the price witheld me, untill now, i Will try to do the kit Justice, thanks for the comment, Regards, Frank 3 1
Landlubber Mike Posted March 9, 2021 Posted March 9, 2021 Yes, I just saw Fran's review and this kit is now moving up to near the top of the want list 3
Trigger Posted March 14, 2021 Author Posted March 14, 2021 Hi Guys, Making small babysteps ahead, all those details are very time consuming, put in the ribs in the rear of the plane with the hatch opening for the machine-gun, one of the ribs doesn't line up very well, (to far inward), will take care of that later, also placed the ejector tube, Placed an oxygen bottle with some airlines made of lead wire in the cockpit area, placed an instrument panel with wiring in the nose section, and placed some other closets and a little table nose hatch fitted, worked on detailing some bulkheads , placed two folding seats and a fire extinguisher well, that's about it for now, working myself through all the bits and pieces, (and there are a lot), so doesn't look like much but slowly I'll get there, More to follow, Frank 8
BlrwestSiR Posted March 14, 2021 Posted March 14, 2021 An incredible amount of detail and very clean building. Carl 4

Recommended Posts
Create an account or sign in to comment
You need to be a member in order to leave a comment
Create an account
Sign up for a new account in our community. It's easy!
Register a new accountSign in
Already have an account? Sign in here.
Sign In Now