Trigger Posted February 26, 2021 Share Posted February 26, 2021 I finally started on my cutaway Catalina from hph, it will be a real challenge, but I think this is a fantastic kit, and the Catalina is one of the most beautiful aircraft ever build. I won't bother by showing the parts in the kit because there are a number of reviews on this subject, so I will go on with the build, The manual of this kit is on cd, so I printed it, and I downloaded it on my I-pad, (very handy when you want to enlarge some build stages to see how the parts have to be placed) First started to put numbers on the resin sheets that hold the parts so they correspond with the numbers in the manual. I soon found out that there are a lot of numbers that just don't exist or have the wrong number, and a lot of parts just don't have a number. So you regularly are searching for parts that you need, and there are lot's of parts! I first started on the bulkheads ...... You really have to look and dry fit the parts a number of times before you actually glue them together, the bulkhead that you see now must line up with the landing gear housing, and it's really tricky to get that right. I painted the parts in interior green before placing them in the fuselage, because later on it will be very difficult Started by placing the ribs in place, and dry fit the forward bulkhead The center section and the ribs in pace on the center pylon, dry fit of the bulkhead Dry fitting the ribs in the rear section, and the rear bulkhead line up of the various bulkheads, (endless fitting, sanding, fitting, sanding etc) Placed all the ribs in the tail section Tail section almost complete The detail in this kit is insane That's it for now, I will soon have more pictures, sometimes I am working another part of this kit, I am now working on the wing and the engine, Greetz, Frank 18 2 Link to comment Share on other sites More sharing options...
HubertB Posted February 26, 2021 Share Posted February 26, 2021 Here’s a brave man tackling a great subject Hubert 6 Link to comment Share on other sites More sharing options...
GusMac Posted February 26, 2021 Share Posted February 26, 2021 Insane level of detail in this. Hat's off for getting started on this knowing what's to come. 6 Link to comment Share on other sites More sharing options...
Kaireckstadt Posted February 26, 2021 Share Posted February 26, 2021 34 minutes ago, Trigger said: I finally started on my cutaway Catalina from hph, it will be a real challenge, but I think this is a fantastic kit, and the Catalina is one of the most beautiful aircraft ever build. I won't bother by showing the parts in the kit because there are a number of reviews on this subject, so I will go on with the build, The manual of this kit is on cd, so I printed it, and I downloaded it on my I-pad, (very handy when you want to enlarge some build stages to see how the parts have to be placed) First started to put numbers on the resin sheets that hold the parts so they correspond with the numbers in the manual. I soon found out that there are a lot of numbers that just don't exist or have the wrong number, and a lot of parts just don't have a number. So you regularly are searching for parts that you need, and there are lot's of parts! I first started on the bulkheads ...... You really have to look and dry fit the parts a number of times before you actually glue them together, the bulkhead that you see now must line up with the landing gear housing, and it's really tricky to get that right. I painted the parts in interior green before placing them in the fuselage, because later on it will be very difficult Started by placing the ribs in place, and dry fit the forward bulkhead The center section and the ribs in pace on the center pylon, dry fit of the bulkhead Dry fitting the ribs in the rear section, and the rear bulkhead line up of the various bulkheads, (endless fitting, sanding, fitting, sanding etc) Placed all the ribs in the tail section Tail section almost complete The detail in this kit is insane That's it for now, I will soon have more pictures, sometimes I am working another part of this kit, I am now working on the wing and the engine, Greetz, Frank This is a real challenge and you made a perfect start! Looks really awsome. How bid is this beauty? 5 Link to comment Share on other sites More sharing options...
DocRob Posted February 26, 2021 Share Posted February 26, 2021 I've not seen too many builds of the cut away Cat. I was tempted often, but, it's to much for me. Keep up the great work. I'm sure you know about the one exhibited in NASM Pensacola Florida. Cheers Rob 12 1 Link to comment Share on other sites More sharing options...
GazzaS Posted February 27, 2021 Share Posted February 27, 2021 Nice start! I saw one at TOS a few years ago. It was amazing. 6 Link to comment Share on other sites More sharing options...
BlrwestSiR Posted February 27, 2021 Share Posted February 27, 2021 Fantastic start on a very complex model. 5 Link to comment Share on other sites More sharing options...
Trigger Posted February 27, 2021 Author Share Posted February 27, 2021 8 hours ago, HubertB said: Here’s a brave man tackling a great subject Hubert Thanks Hubert, it indeed is a daunting subject with lot's of interior detail, I hope I can persist to the end, I trie to be as careful as possible, because the parts are very fragile, and just by touching some of the finer parts you can ruin the details 5 Link to comment Share on other sites More sharing options...
Trigger Posted February 27, 2021 Author Share Posted February 27, 2021 8 hours ago, Kaireckstadt said: This is a real challenge and you made a perfect start! Looks really awsome. How bid is this beauty? it is almost 61 cm long so it is a real handful to move around, constantly worrying not to knock of any detail while handling 5 Link to comment Share on other sites More sharing options...
Trigger Posted February 27, 2021 Author Share Posted February 27, 2021 7 hours ago, DocRob said: I've not seen too many builds of the cut away Cat. I was tempted often, but, it's to much for me. Keep up the great work. I'm sure you know about the one exhibited in NASM Pensacola Florida. Cheers Rob I did see it on the internet and have used it a number of times to get good references for my build, the hph manual doesn't cover all the details so you need to do a lot of research to get thing right, thanks for the pics 5 Link to comment Share on other sites More sharing options...
Trigger Posted February 27, 2021 Author Share Posted February 27, 2021 5 hours ago, BlrwestSiR said: Fantastic start on a very complex model. It certainly is complex, you have to think two steps ahead before assembling parts, you kind of have to make your own way of the sequence in constructing the various parts 4 Link to comment Share on other sites More sharing options...
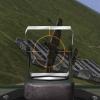
Trigger Posted February 27, 2021 Author Share Posted February 27, 2021 I started on the engine a sa sort of sub build and to be doing something else than placing ribs in the fuselage, after a while your eyes won't cooperate any more, si it's good to be doing something else. the engine itself is a fantastic piece of kit with awesome details, have a look for yourself..... used some brass and glued the cilinder heads in place Put some paint on Done some weathering with panel liner from Tamiya, makes the cooling ribs from the cilinders stand out a bit placed the guid plates where the ignition wires will run through Just to show the size of the engine, it's quite a fiddly job One ingnitio wire in place, bought those from Anyz, they produce braided wires that really makes the engine wires look real That is it for now, I am now placing the ignition ring and wires in place, so more pics to follow soon, Greetz Frank 8 1 Link to comment Share on other sites More sharing options...
Kaireckstadt Posted February 27, 2021 Share Posted February 27, 2021 1 hour ago, Trigger said: it is almost 61 cm long so it is a real handful to move around, constantly worrying not to knock of any detail while handling I really can imagine that! Had the same problems with my Lancaster.... 3 Link to comment Share on other sites More sharing options...
Kaireckstadt Posted February 27, 2021 Share Posted February 27, 2021 1 hour ago, Trigger said: I started on the engine a sa sort of sub build and to be doing something else than placing ribs in the fuselage, after a while your eyes won't cooperate any more, si it's good to be doing something else. the engine itself is a fantastic piece of kit with awesome details, have a look for yourself..... used some brass and glued the cilinder heads in place Put some paint on Done some weathering with panel liner from Tamiya, makes the cooling ribs from the cilinders stand out a bit placed the guid plates where the ignition wires will run through Just to show the size of the engine, it's quite a fiddly job One ingnitio wire in place, bought those from Anyz, they produce braided wires that really makes the engine wires look real That is it for now, I am now placing the ignition ring and wires in place, so more pics to follow soon, Greetz Frank Wow,that’s simply wow! Your speed is really amazing! And the results are awesome. Thanks also for the tip with the ignition wires! 2 Link to comment Share on other sites More sharing options...
mark31 Posted February 27, 2021 Share Posted February 27, 2021 very nice work will try to follow you i have the full kit over here for a few years now one day i will start it Mark 3 Link to comment Share on other sites More sharing options...
Bomber_County Posted February 27, 2021 Share Posted February 27, 2021 Frank, absolutely stunning start, I can imagine it’s very daunting but it’s going to be amazing........ 6 Link to comment Share on other sites More sharing options...
Peterpools Posted February 27, 2021 Share Posted February 27, 2021 Mike Will be following all the way - awesome start and easily will be the center of your display case when finished Keep 'em comin Peter 2 Link to comment Share on other sites More sharing options...
Jeff Posted February 27, 2021 Share Posted February 27, 2021 This is epic, requiring a very special skill set, awesome build...... 4 Link to comment Share on other sites More sharing options...
Trigger Posted February 27, 2021 Author Share Posted February 27, 2021 6 hours ago, mark31 said: very nice work will try to follow you i have the full kit over here for a few years now one day i will start it Mark Hello Mark, I wanted to buy the full kit at first, but I thought it would be a waste to close up all the detail when you put the fuselage sides together, I have seen one build on Large scale planes of someone who built the entire kit and opened up the Portside of the fuselage on a number of places to show the details, that must have been a real challenge, thanks for the response, Frank 4 Link to comment Share on other sites More sharing options...
Trigger Posted February 27, 2021 Author Share Posted February 27, 2021 2 hours ago, Peterpools said: Mike Will be following all the way - awesome start and easily will be the center of your display case when finished Keep 'em comin Peter Thanks for the response, it certainly will be the center of my display case, I actually have to make a case for it because of the size, just making my way through the wing section, pic' s to follow..... 3 Link to comment Share on other sites More sharing options...
Trigger Posted February 27, 2021 Author Share Posted February 27, 2021 As promised here are some pictures of the construction of the wing section, primed the insides that will be visible Wing halves glued together, needless to say there was a lot of fitting and sanding to be done, but this is the end result the frames painted interior green, ready to be assembled, ( it was a complete nightmare to get those of their resin casting sheets, and the to clean them up without damaging, they are so fragile) put the wing as flat as possible as to get the frames glued in the right position/alignment. I only glued the top part of the frame, the bottom part of the frame will be done when I flip the wing over, constantly aware of the alignment, if this is not done properly I will ruin this build, so moving on very carefully Not bad at all, now I have to glue the bottom part of the frames without messing up the alignment, very nerve wrecking job, when this is done I have to glue an end piece to the rear of the frames, I have to cut a piece of the frames to make it fit As you can see not all the frames have the same length, so I first have to line them up properly to make the end piece fit, that's for later on, more pictures to follow Here are some pictures how I remove resin cast pieces from their casting sheets.... for this example I used one of the bunks of the aircraft, I usually take a very fine razor saw as thin as possible and with very fine teeth, I'll start in the corner of the piece because there the resin is the thickest , the casting are very well engineered by the way, only the corners and at some points there is a lot of resin to hold the part to the sheet. Very fine razor saw The trick is to use as little force as possible and move the saw as gently as possible As you cab see, the part has very much resin in the corners, but not as much further to the middle, making it easier to saw What's left is a lot of clean up , I use a combination of sanding and scraping with a very sharp exact blade, for me this works well That's it for now, more to follow Frank 13 Link to comment Share on other sites More sharing options...
DocRob Posted February 27, 2021 Share Posted February 27, 2021 Outstanding skillful build, I raise my hat. Cheers Rob 6 Link to comment Share on other sites More sharing options...
Administrators Clunkmeister Posted February 28, 2021 Administrators Share Posted February 28, 2021 Just... WOW! I have the full kit, and much of that interior is absolutely invisible when complete. Stunning build so far! 5 Link to comment Share on other sites More sharing options...
Peterpools Posted February 28, 2021 Share Posted February 28, 2021 Frank Wonderful progress and thank you for the tutorial - surely will came in very handy for me. Keep 'em comin Peter 3 Link to comment Share on other sites More sharing options...
Trigger Posted March 6, 2021 Author Share Posted March 6, 2021 Hi there, Done some work on the Catalina, some work on the wing, some sub assemblies an for the most part cleaning up parts, priming them and put some paint on them, have a look, This is where I left of, lined the wing up on my cutting mat, fortunately this part of the wing is straight, so it was easy enough to line up the ribs on the cutting mat, and cut them to the right length, One of the ribs stuck out a little bit, I had to cut just a little piece of the base of this rib, and then glued it back together to make it fit. After that I could glue the end piece on the frames, one frame needed a little piece of plasticard, was cut just 0,10 th of a mm short, but it wasn't to difficult. Decided to put in the nose turret, it needed some trimming to fit properly in the fuselage, and then moved on to the turret itself, Test fitted it and masked the thing inside and outside so I could get some interior green on it, after that it was time to get some interior green on the inside of the fuselage, before putting in the bulkheads, it now was easy to paint without the bulkheads in the way, the tail section was quite an exercise with all those little gaps between the ribs, see for yourself , made a temporary jig to put the fuselage in to be able to move it around. Ashot from the other side, this thing is really big.... So now I can move forward getting the bulkheads in, painted a lot of the parts needed , and cleaned them up Well, that is pretty much how far the build is right now, I am now working on the cockpit and the pilot seats, but that's for the next time, greetz, Frank 11 Link to comment Share on other sites More sharing options...

Recommended Posts
Create an account or sign in to comment
You need to be a member in order to leave a comment
Create an account
Sign up for a new account in our community. It's easy!
Register a new accountSign in
Already have an account? Sign in here.
Sign In Now