DocRob
-
Posts
7,041 -
Joined
-
Last visited
Content Type
Profiles
Forums
Events
Gallery
Everything posted by DocRob
-
 You can't stay away from the fumes of Tamiya's Extra Thin for too long Peter . Good to have you back here, knowing your home has improved a lot through that lengthy period of renovation. My own experience is, if you started renovations, you have to pull through, whatever it costs. The tendency to be lazy afterwards with the remaining work, which was excluded is too overwhelming. After all the stress and spent time, it feels overly good to have a 'new' home as you like it to have. After lots of different building projects around the house last year, this year will be a bit more quite, but there will be a complete renovation of the rooms inside. It has to be done and afterwards, I will realize, how much improved everything is. I never build a 1/144 airliner and I really like to take one of the many seats and buckle in, to learn something new. It never occurred to me, that you should substitute clear parts with decals, but why not, as 144 scale clears may look a bit blobby. The Ukrainian outfit looks great and is a nice addition to the GB. Bummer with the Pilatus, I would have really liked to see it in this crazy livery, but I understand, that some kits are just not worth the effort, except you absolutely want to have one of these in your collection. Cheers Rob
 -
ICM 1/48 He-111 H-6 N.Africa campaign-Finnished
DocRob replied to KevinM's topic in Everything Ukraine Group Build
Looking good Kevin. Eduard has their manuals on their homepage as PDF file. You can zoom in as much as you want with theese. For example this is the link to their 'nose interior' set. There is an embedded link for the instruction sheet. He 111H-6 nose interior 1/48 - Eduard Store Cheers Rob -
Duchess of Kingston - Beauty of the Seas - Wooden Sailing Ship 1/64
DocRob replied to DocRob's topic in Non LSM 'WIP
It's not only the fast curing time, it's also, that I wanted to have a good wood to brass bond. Looking at the DoK build a bit more abstract, it allows the plastic model builder to use his learned skills more than usual with other wooden kits. Chris from Vanguard uses lots of PE and resin parts and techniques not too typical for wooden ship models. That's a great start to get accustomed with the subject for us. Not everything is new and different. I've seen traditional wooden ship builders complain. Why using an airbrush, why masking techniques, resin, CA, PE, burnishing the stuff,... What he actually does, is making wooden ship building easier accessible for us plastic glue sniffers. I used CA a lot through this build. I never especially liked the stuff before, but used it a lot when necessary while building plastic models with added resin or PE. With this build, I use CA more often than I really needed to, because I learned to enjoy the convenience of fast setting and good bond. You need to employ a good discipline while working with CA, to have no spills and residues in unwanted places, which is the downside of the stuff. Cheers Rob -
I used some KitsWorld parts on my recent Kai Phantom build for seat belts and other bits around the bang seats. I liked the belts, as they were good to work with, but other parts like handles were a nightmare, to soft, to stay proud. Bummer, because these parts are printed on both sides and would have made live easier. Cheers Rob
-
Duchess of Kingston - Beauty of the Seas - Wooden Sailing Ship 1/64
DocRob replied to DocRob's topic in Non LSM 'WIP
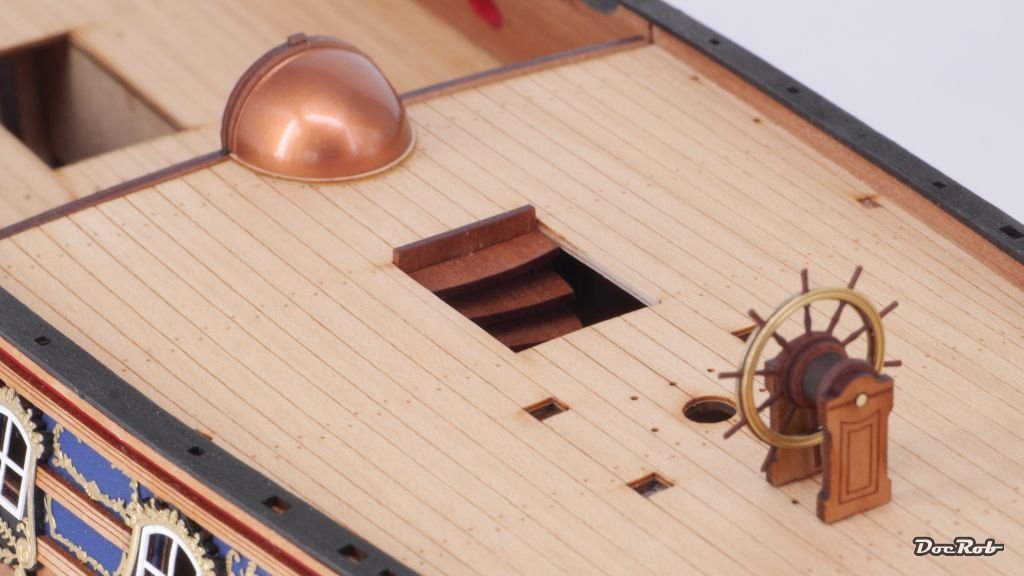
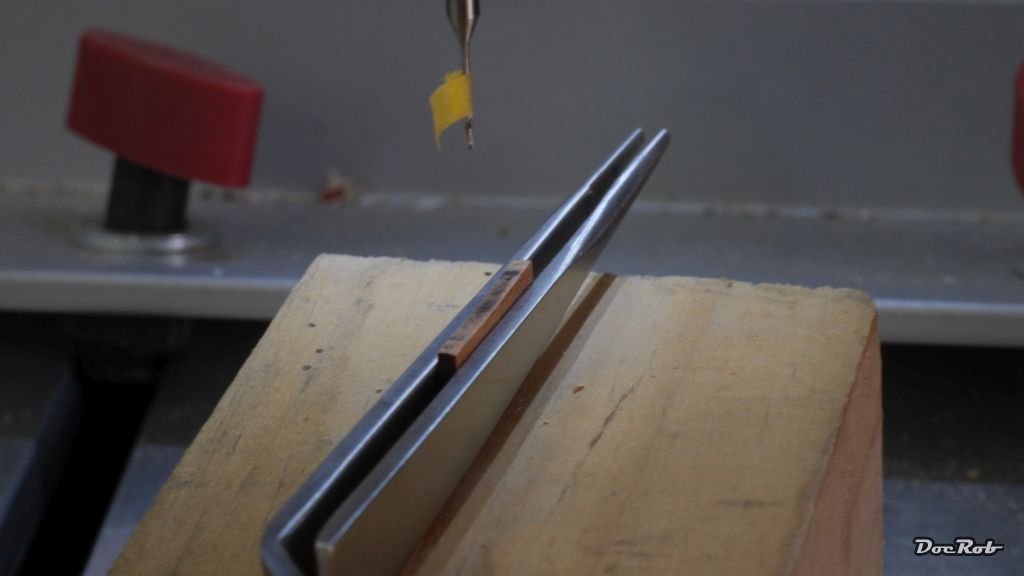
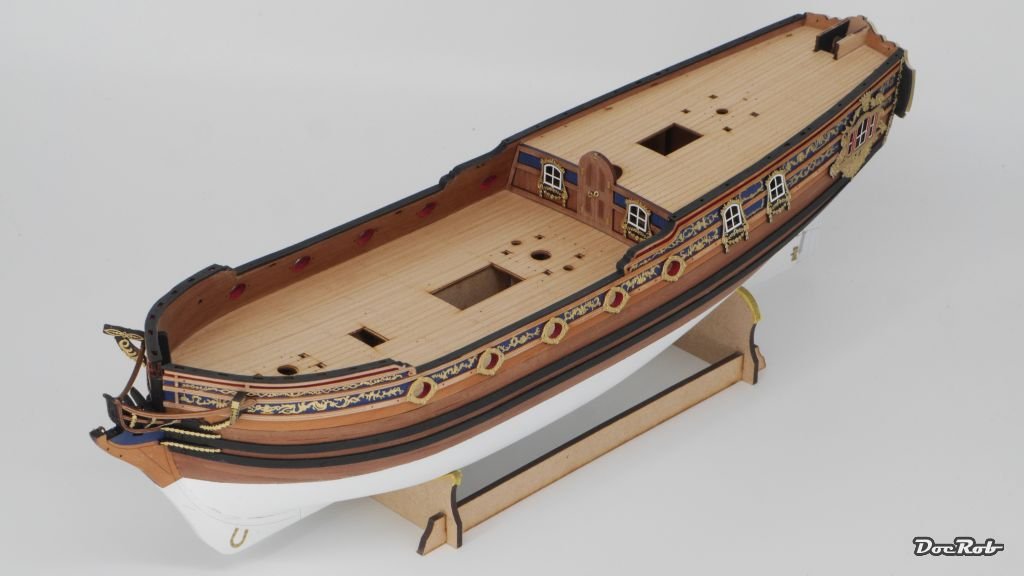
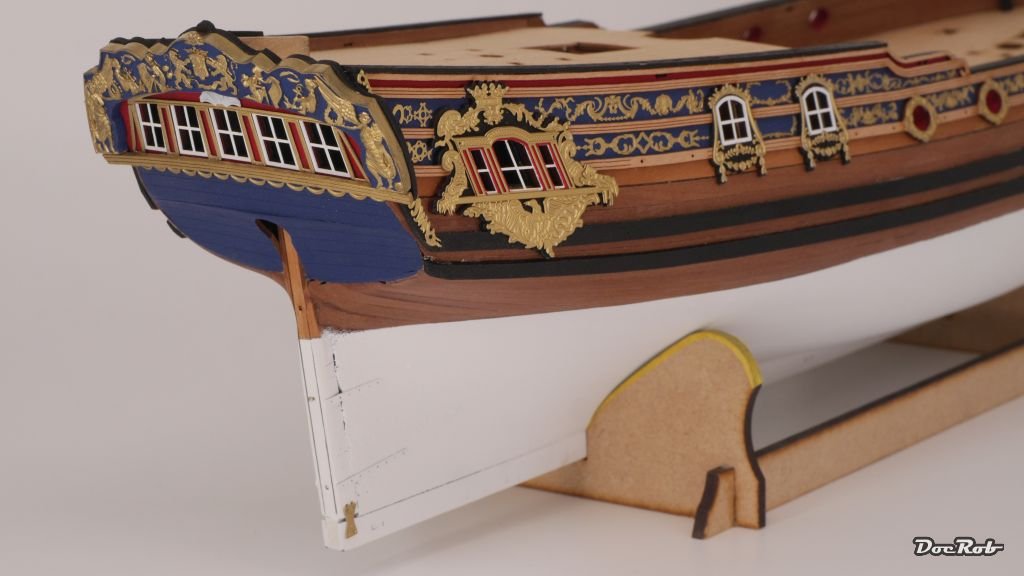
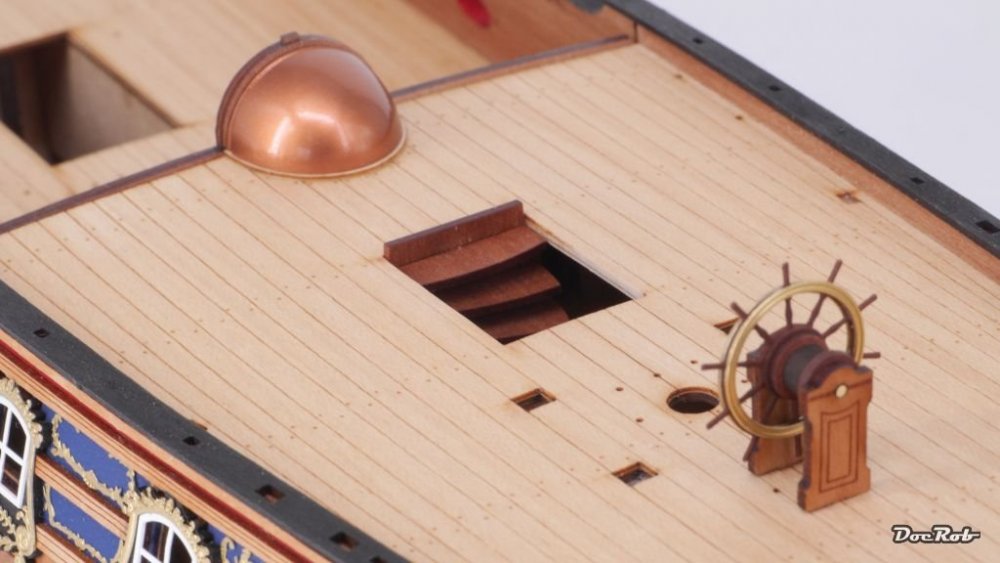
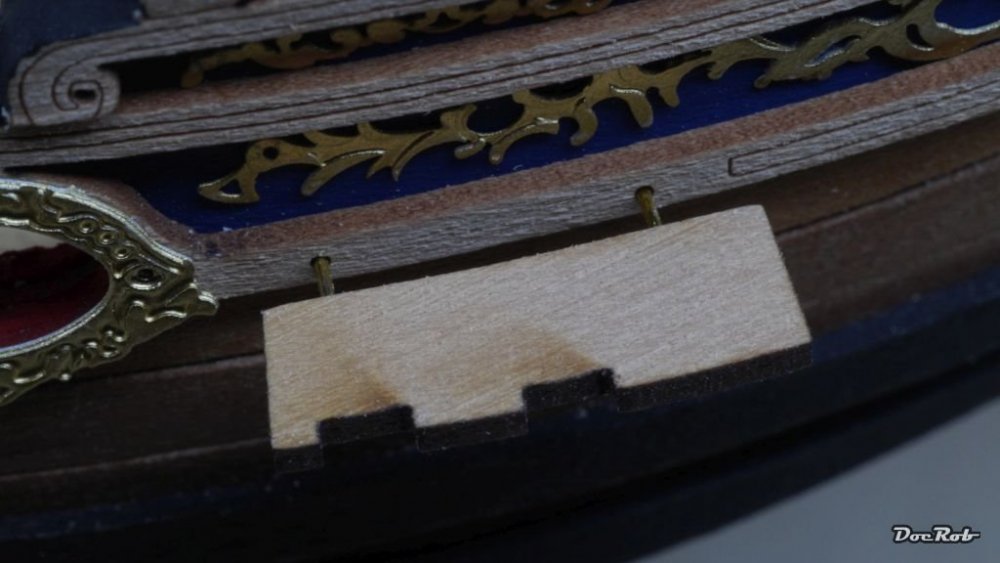
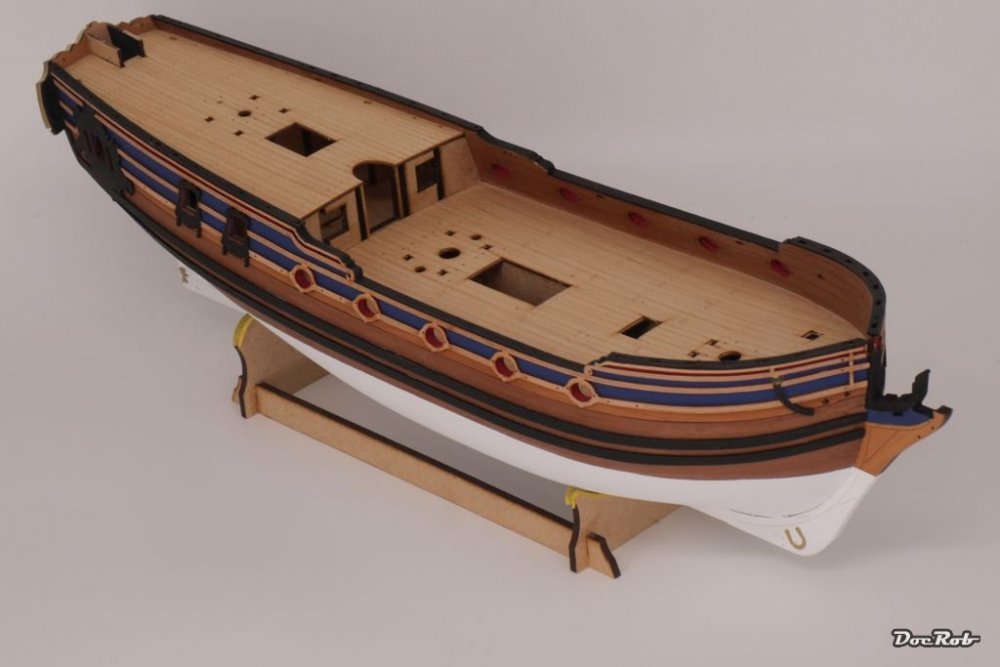
Now it's time to fit the deck with all the necessary clutter. first was the main staircase, which is wonderfully represented and I took a pic, before I inserted it. First I thought about thinning the single steps a bit, but you can't see too much and I skipped the thought. The stairs where only varnished, as I wanted a rich deep ton of wood. Here the staircase is inserted, but still lacks a railing. I also added the quarter dome on the backside of the entrance doors, which gor it's copper color with the again formidable and shining Vallejo Liquid Gold colors. The steering wheel assembly got painted and varnished, but is not glued on yet. Next there were the channels to install on the outside of the hull. These are made of 1,5 mm thick wood and need to be drilled with a 0,5 mm drill bit on the thin side, to accept bras rod for enforcement. I only have my big standing drill machine to do this, frightening. I hold the marked pieces with a self holding tweezer upright and drilled at the marked spots. This is, how the channels are assembled. After two nerve wrecking hours, I glued the channels on with CA and am very happy, that this step is done. Cheers Rob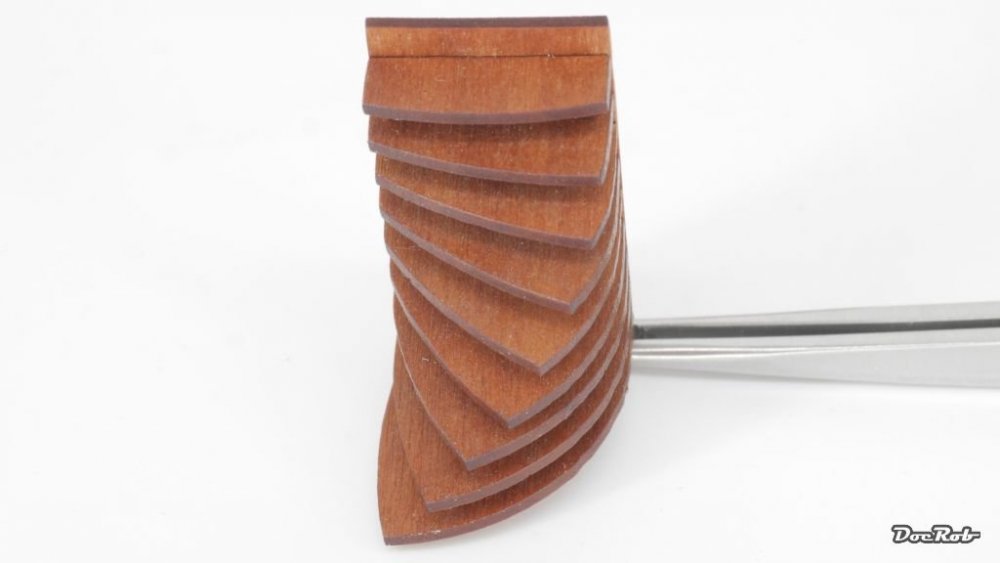


-
Duchess of Kingston - Beauty of the Seas - Wooden Sailing Ship 1/64
DocRob replied to DocRob's topic in Non LSM 'WIP
Thank you Kevin, she has her looks. Thank you Phil, I hope you could relax a bit this weekend. There is still some work to do, before I set the masts. It's the rigging which gives me the creeps. Cheers Rob -
I have only two Quinta sets and none from Red Fox, so I can't judge the quality, but found Red Fox overly expensive, given the fact, that no seat belts are included in their sets. Cheers Rob
-
Duchess of Kingston - Beauty of the Seas - Wooden Sailing Ship 1/64
DocRob replied to DocRob's topic in Non LSM 'WIP
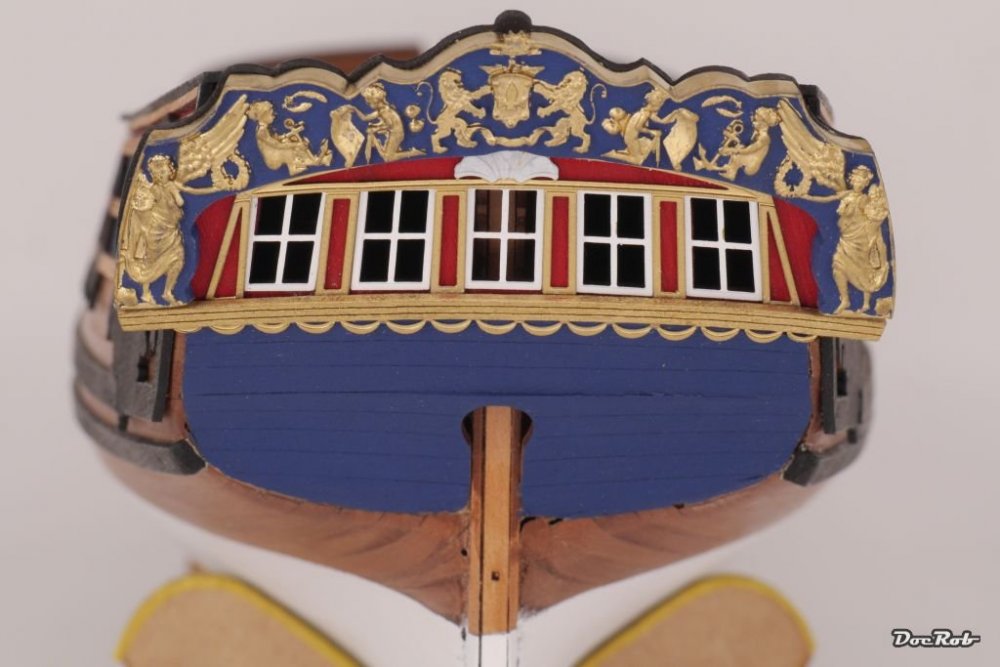
Indeed Martin, she starts to show the beauty of the name giving Duchess, who was often described as irresistible. Thank you Gus, after I thinned the stern rail to half thickness, I thought it would look good now. Somehow it ties the stern together, to put it in a transformed phrase from a movie sporting 'The Dude' . Cheers Rob -
Duchess of Kingston - Beauty of the Seas - Wooden Sailing Ship 1/64
DocRob replied to DocRob's topic in Non LSM 'WIP
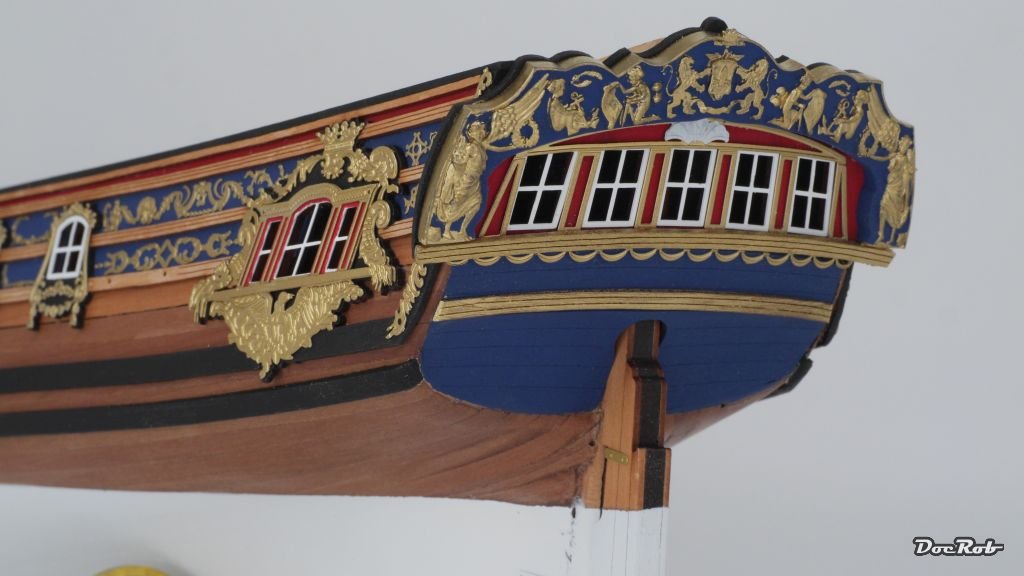
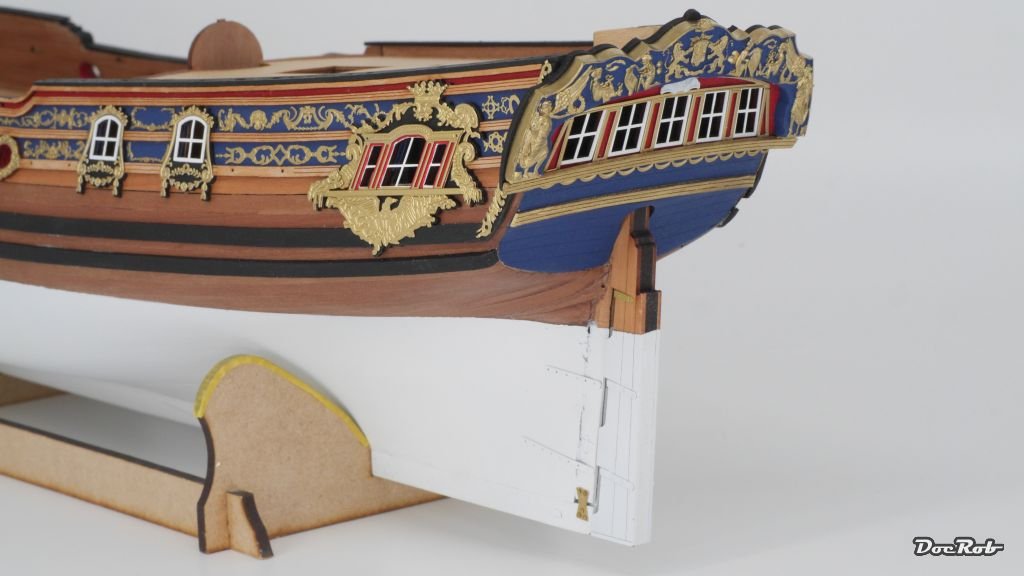
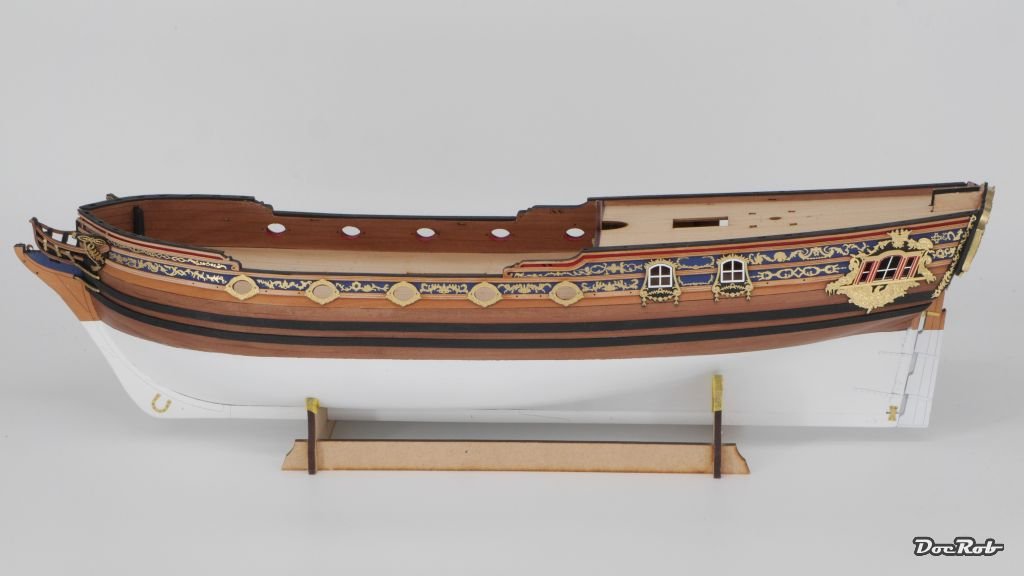
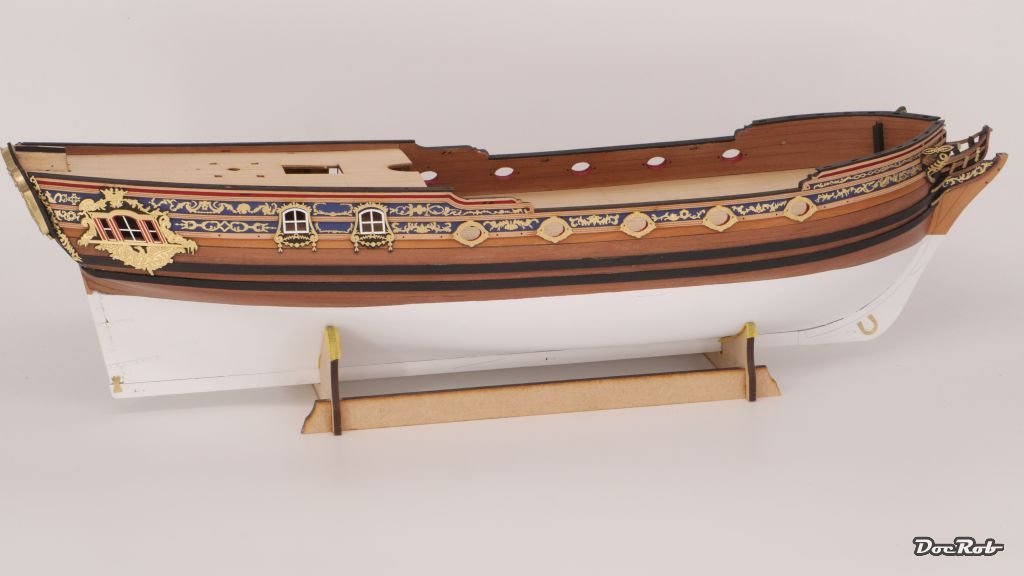
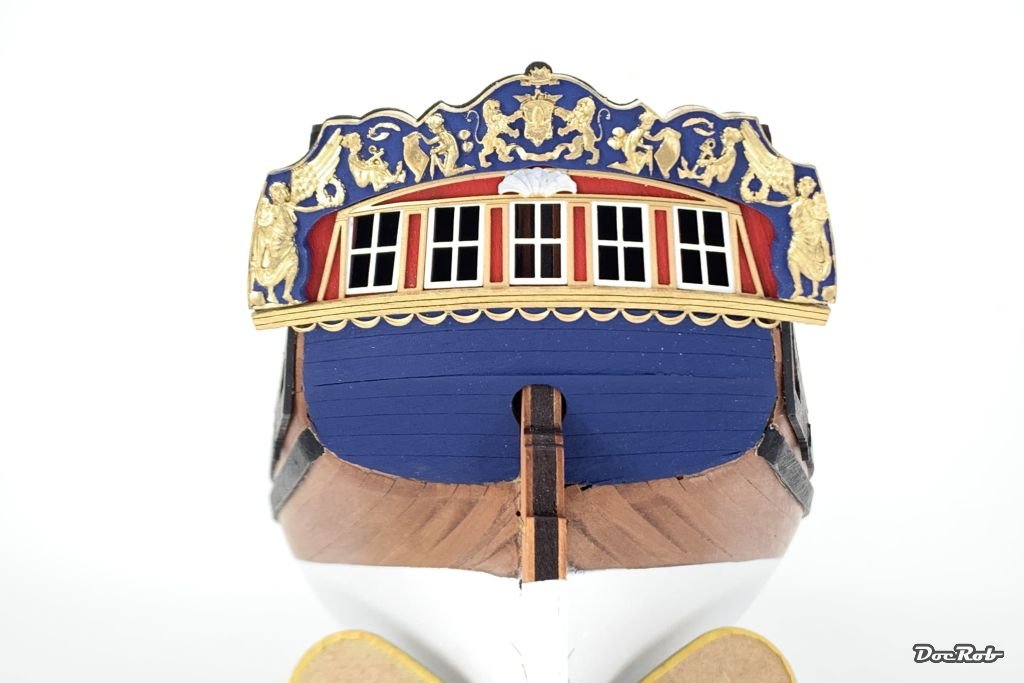
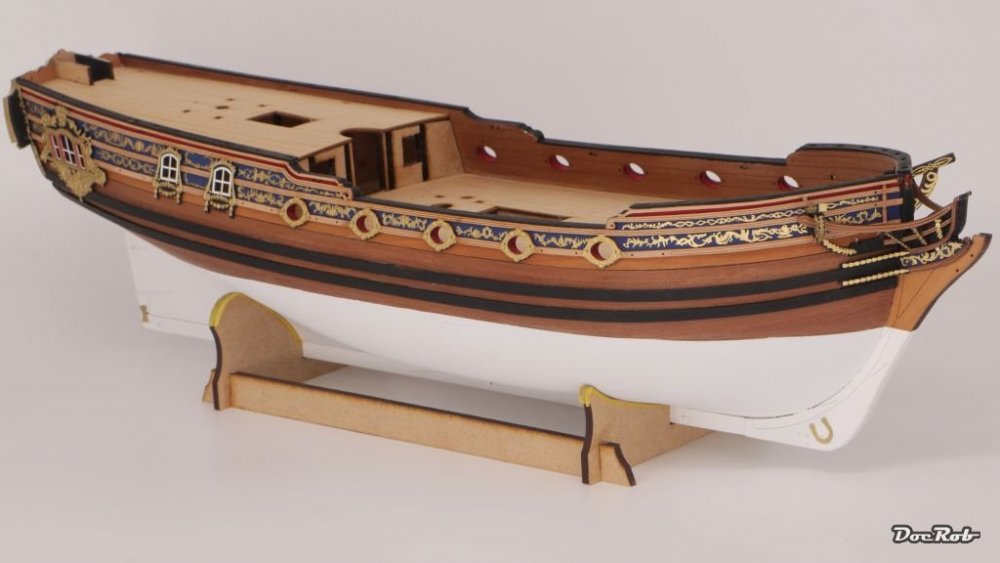
Page 47 of 80 in the manual and the text under the pics says 'Your hull should now look like this'. That means to me, a milestone is reached. The hull is complete after not even two month, much faster than expected. I added the mid deck bulwark, after assembling this with windows, decoration, hinges and lastly a tiny crown above the door. I managed to mount the rudder, which I finished with hinges made from PE before. The last addition was the now gold painted stern railing and then I again touched the gold paint up by brush, where I caused damage through handling, and here she is. Cheers Rob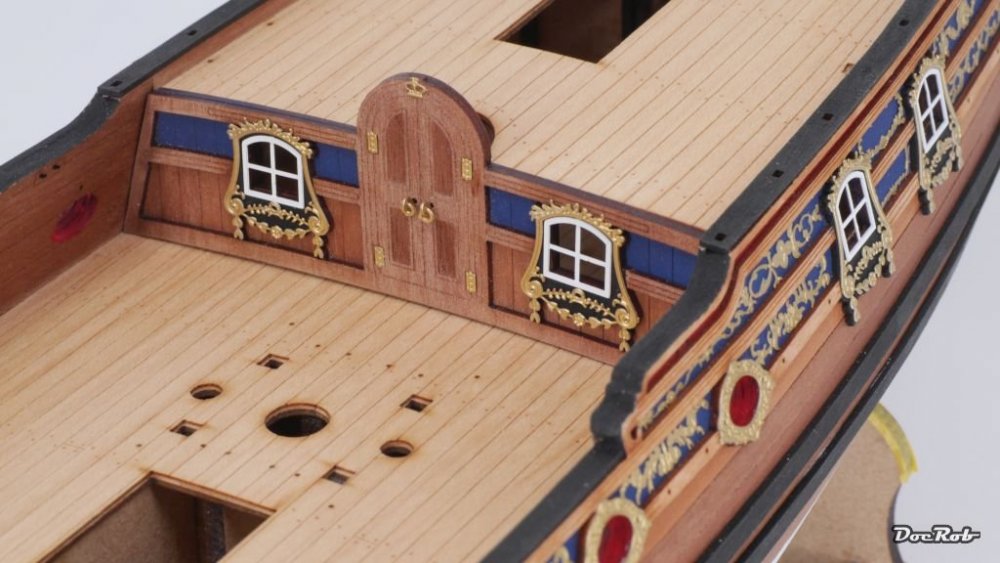


-
Duchess of Kingston - Beauty of the Seas - Wooden Sailing Ship 1/64
DocRob replied to DocRob's topic in Non LSM 'WIP
Muchas gracias Martin. Masts Gus, I haven't lost a thought about these until now, thanks for the brain bug . If you mean rigging by etc., I have a second brain bug now. Thank you Gary, in case of DoK, the length of the deck is almost the same as the height of the main mast. It doesn't look like, but the ship was really used for traveling from Calais to St. Petersburg more than once and seemingly also from Calais to Rome. The DoK was once nearly wrecked through a the heaviest storm of the century, moored near St. Petersburg, but thanks to Katharina the Great, the masts were rebuild and the ship repaired. Cheers Rob -
Duchess of Kingston - Beauty of the Seas - Wooden Sailing Ship 1/64
DocRob replied to DocRob's topic in Non LSM 'WIP
Thanks Gary, I added some more to the starboard side today, but I think that's all now. Cheers Rob
-
Duchess of Kingston - Beauty of the Seas - Wooden Sailing Ship 1/64
DocRob replied to DocRob's topic in Non LSM 'WIP
My bad Hubert. I had it glued wrong and the picture was taken, before I corrected the mistake. You have eagles eyes . Cheers Rob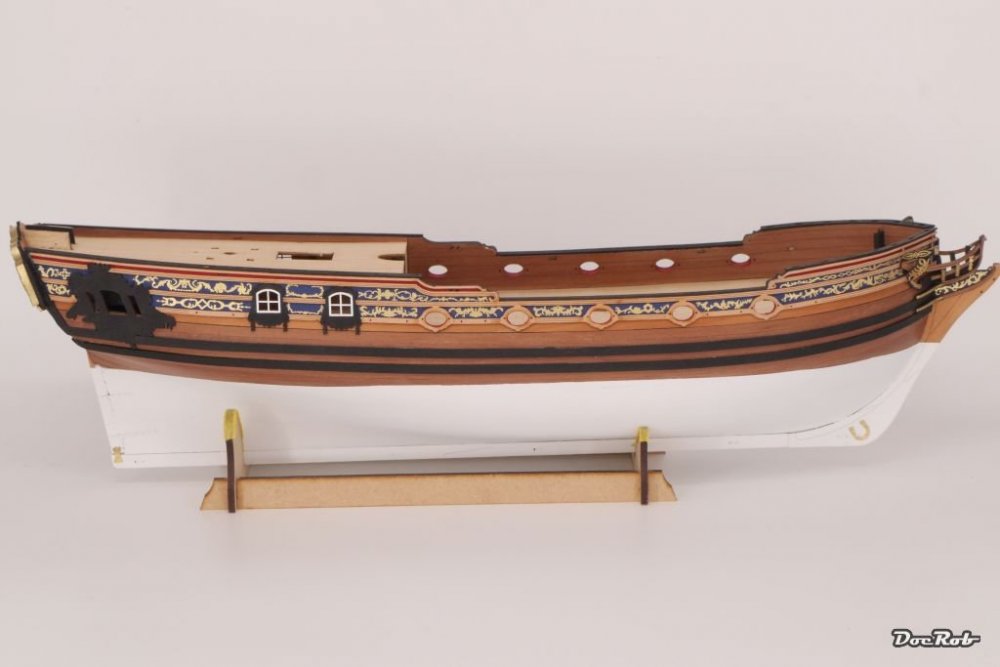
-
Wow Martin, looking great. Cheers Rob
-
Duchess of Kingston - Beauty of the Seas - Wooden Sailing Ship 1/64
DocRob replied to DocRob's topic in Non LSM 'WIP
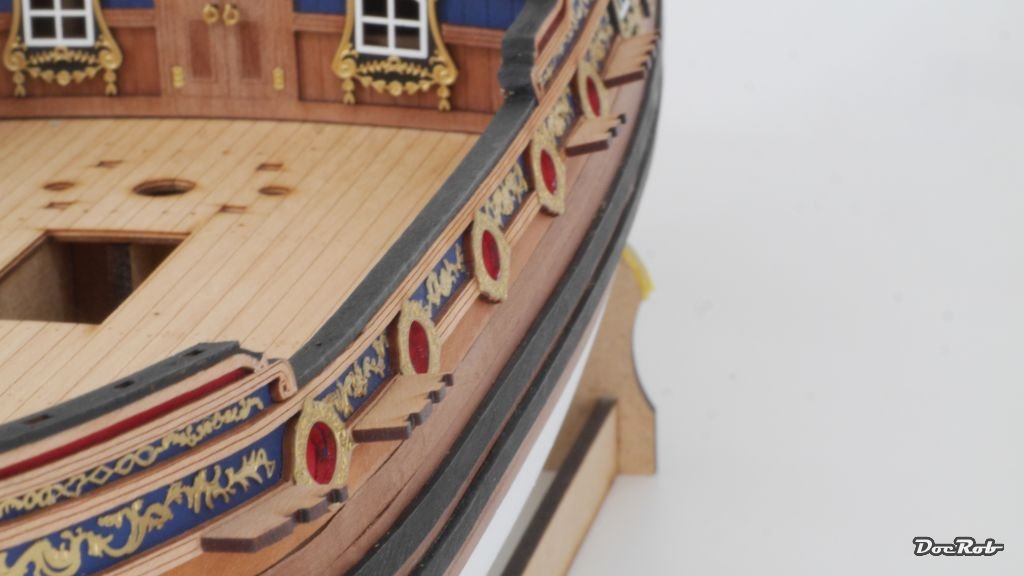
Today, I managed to apply most of the PE decorations to the hull . I decided to use CA instead of Future / Klear, as I do not trust the floor polish to adhere enough. I worked with a certain discipline, using always fresh liquid CA, used an applicator to put it on very thin, holding near the end of the part with a tweezer and place it with a toothpick pushing it on on the other side. This way, I had only one tiny smear and only, because I orientated the PE part wrong. There are two types of white window frames supplied, I mention it only, because I had not realized that, until I tried to glue them in. It's barely visible on the bench, but you will notice on the ship, as they are slightly angled. Cheers Rob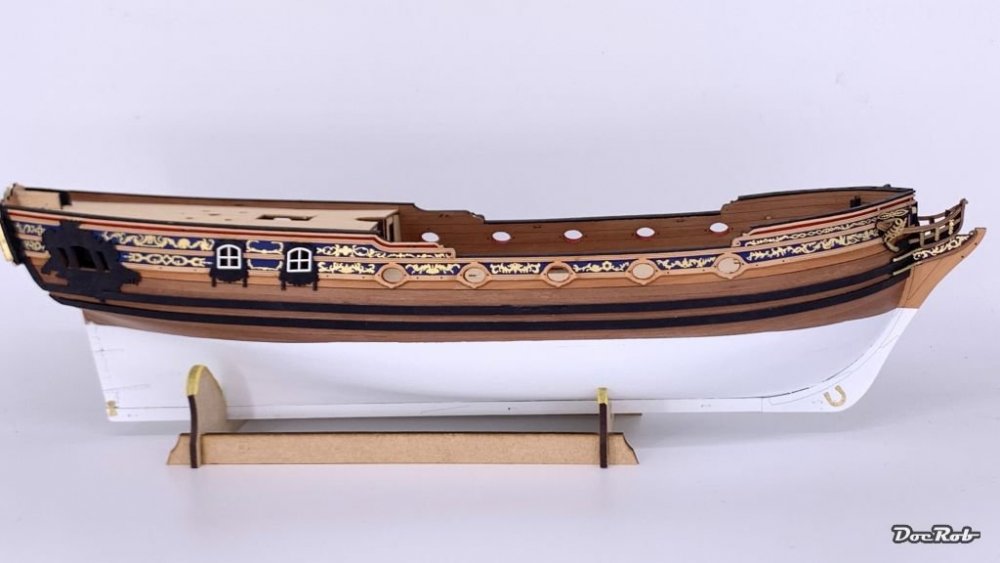


-
Duchess of Kingston - Beauty of the Seas - Wooden Sailing Ship 1/64
DocRob replied to DocRob's topic in Non LSM 'WIP
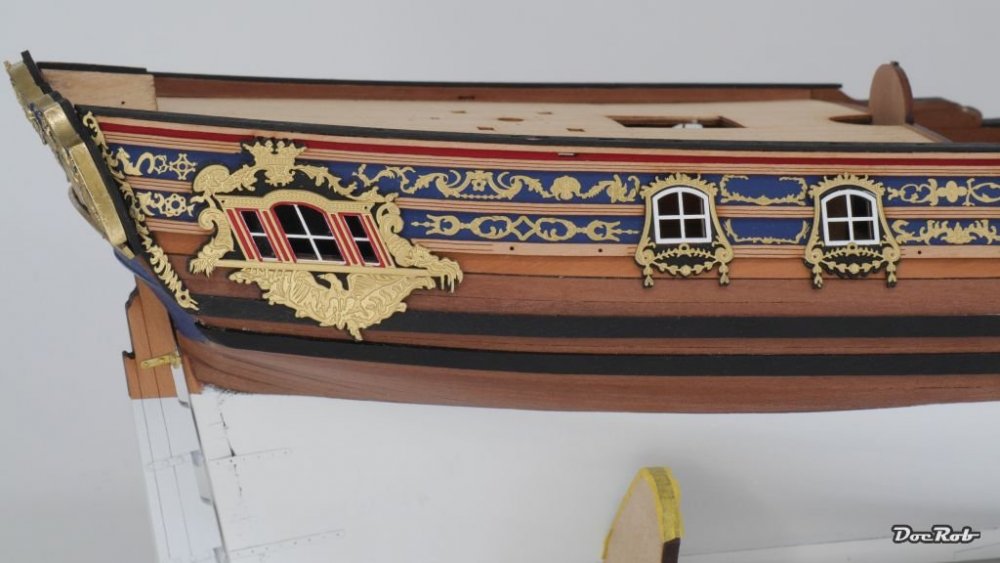
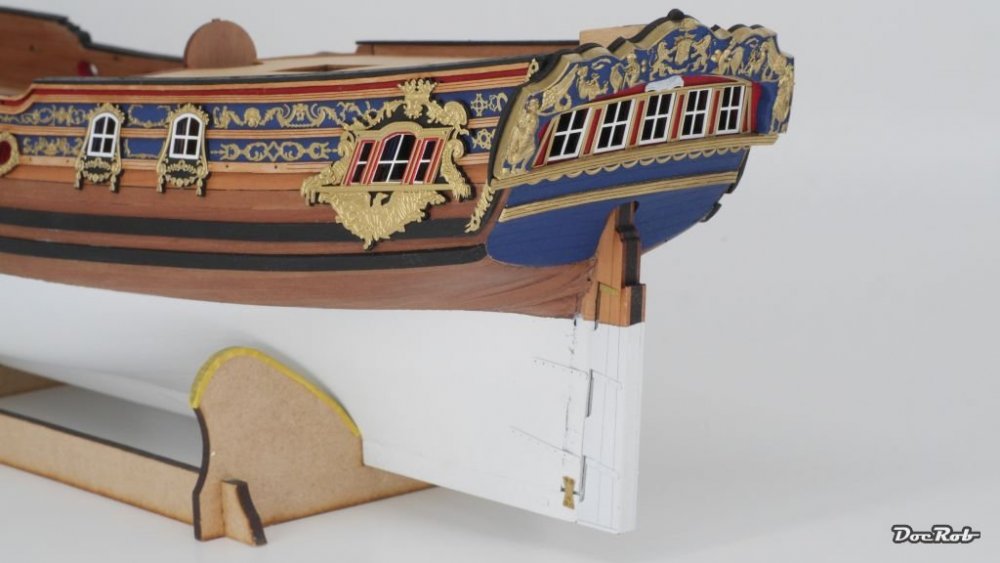
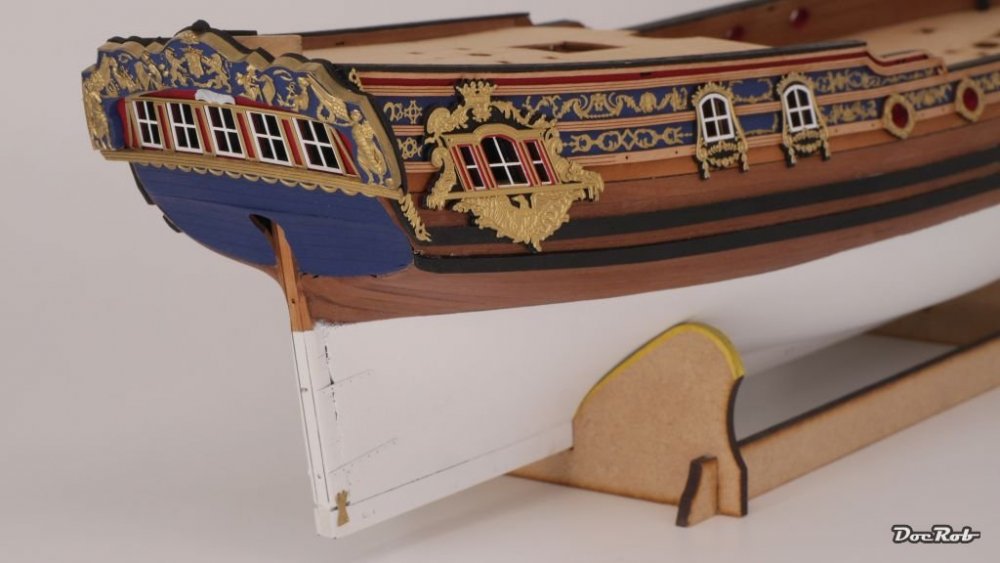
Thank you Hubert and Gus, the result of my little poll is clear and I will add the upper rail and skip the lower. In the manual, the lower halved one is perfectly straight and covers the seam, but my stern section came out a bit different, so it would look even more silly, to use the halved lower rails straight. I'm with you Gus, the lower ones disturb the lines of the stern. As I'm only applying the upper one, I will paint it gold and I will try to thin the wood a bit, because it looks a bit blocky from above. Cheers Rob -
I used some coarse steel wool, like on the first pic, when I airbrushed my Mig-31 and liked the effect. The risk of color flowing under a mask is practical zero and by varying distance and orientation, you have a truly random pattern. Another benefit is, you see the panel lines clearly while spraying and fill in marbled color for individual panels. Cheers Rob
-
Nice Martin, I look forward to the result. never tried salt myself while modelling, but more often while surfing . Cheers Rob
-
Duchess of Kingston - Beauty of the Seas - Wooden Sailing Ship 1/64
DocRob replied to DocRob's topic in Non LSM 'WIP
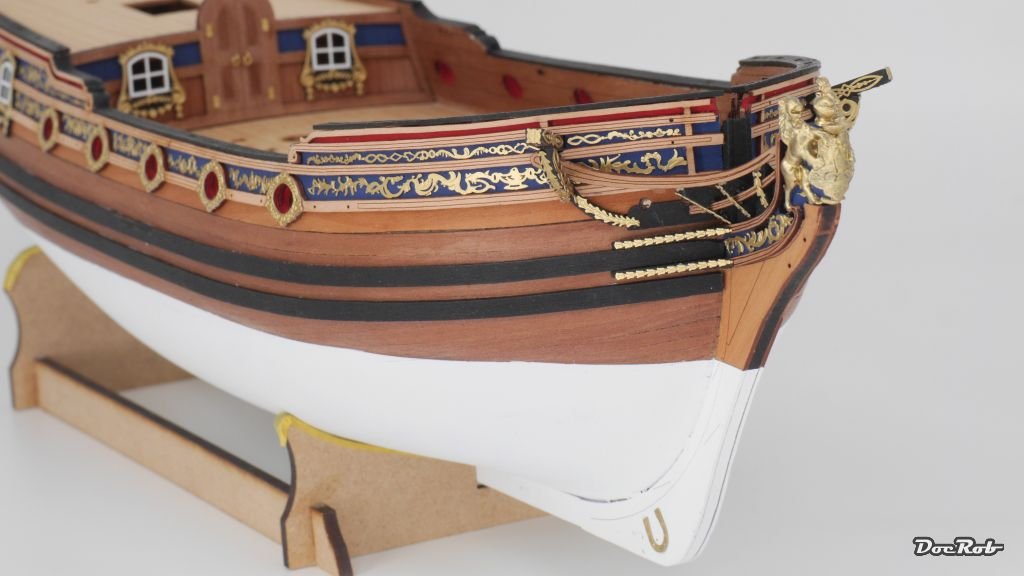
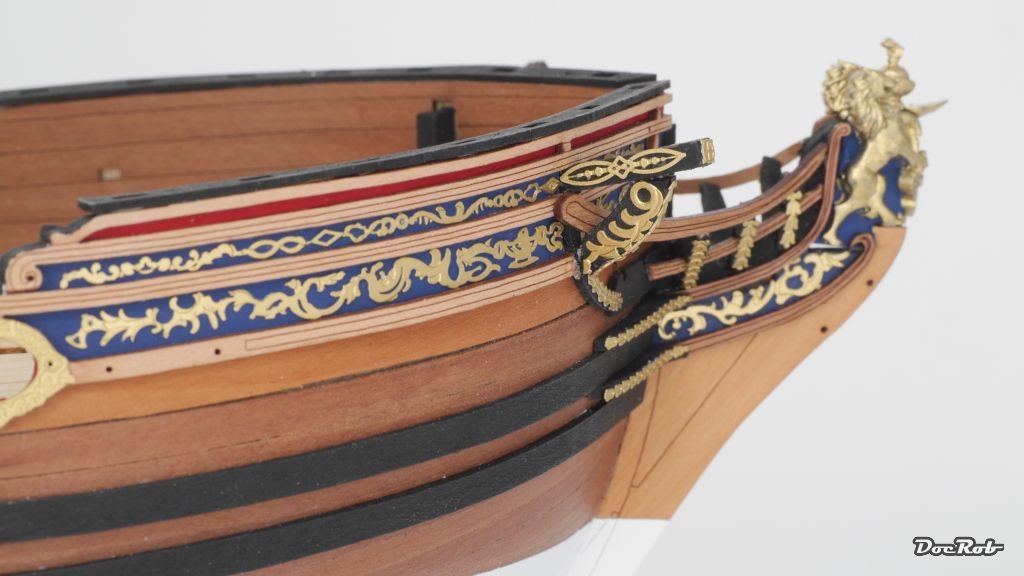
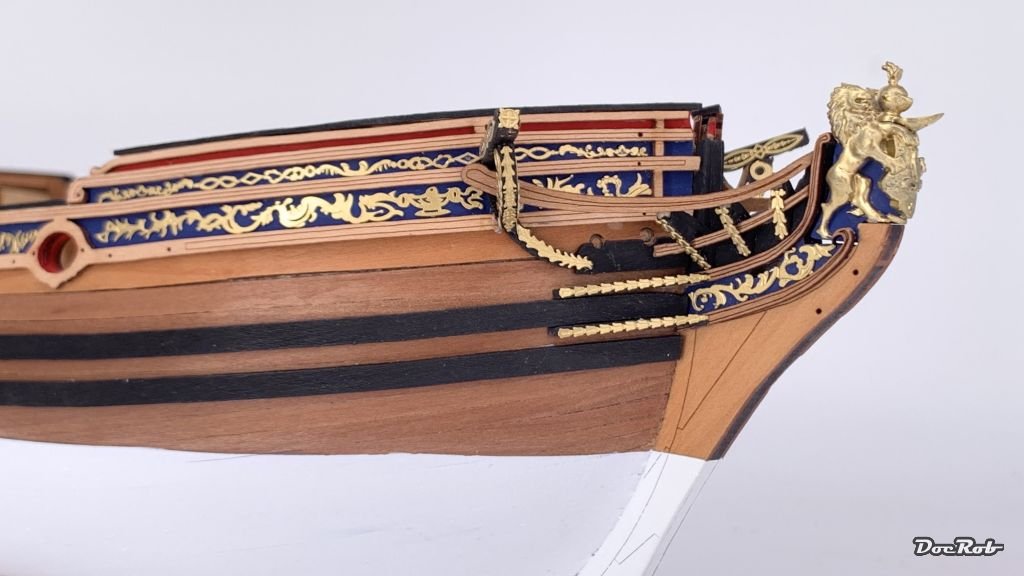
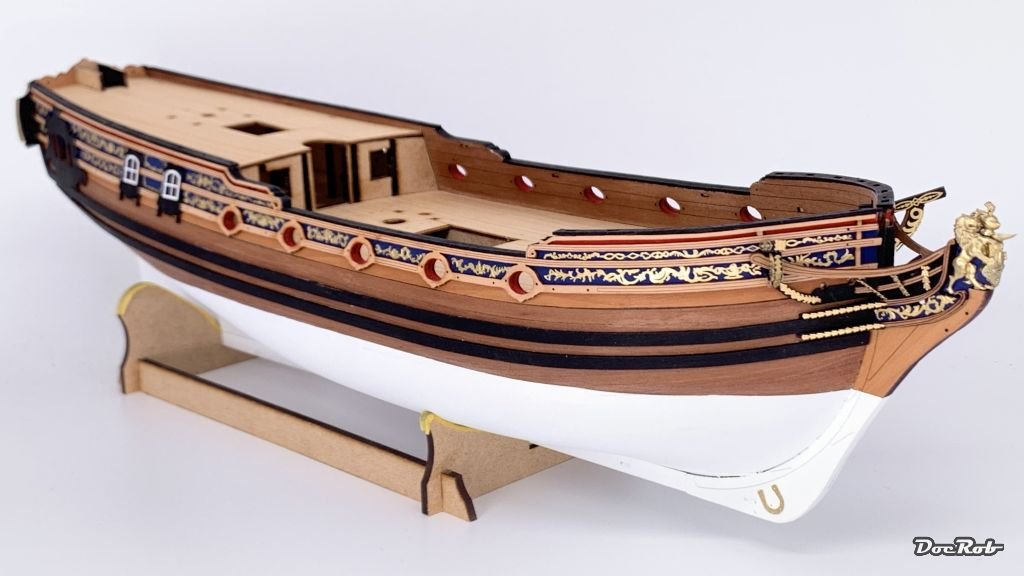
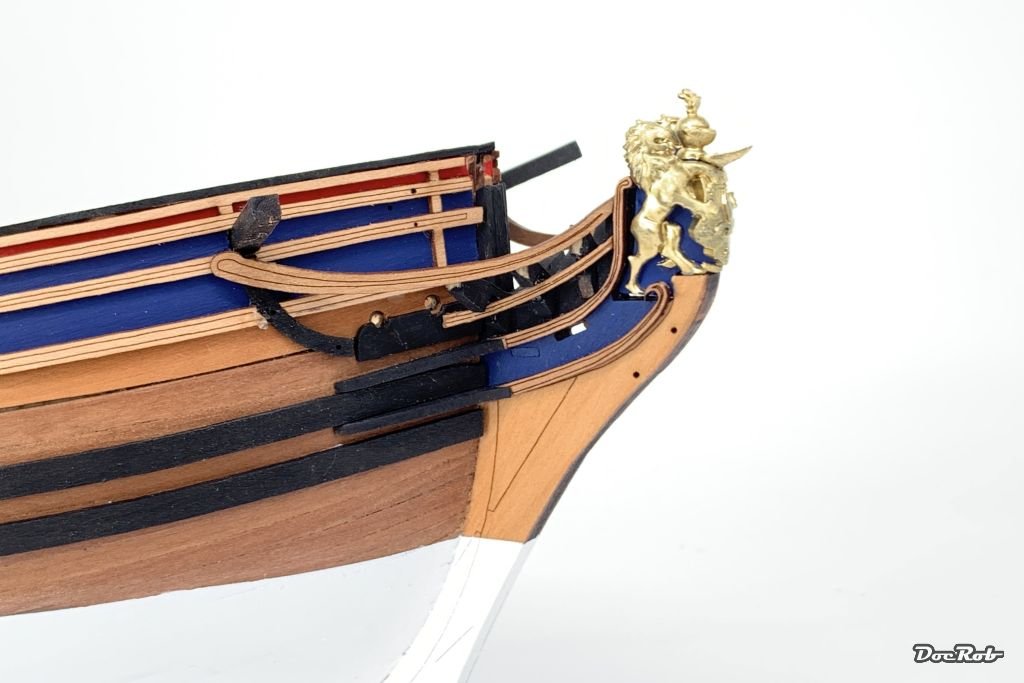
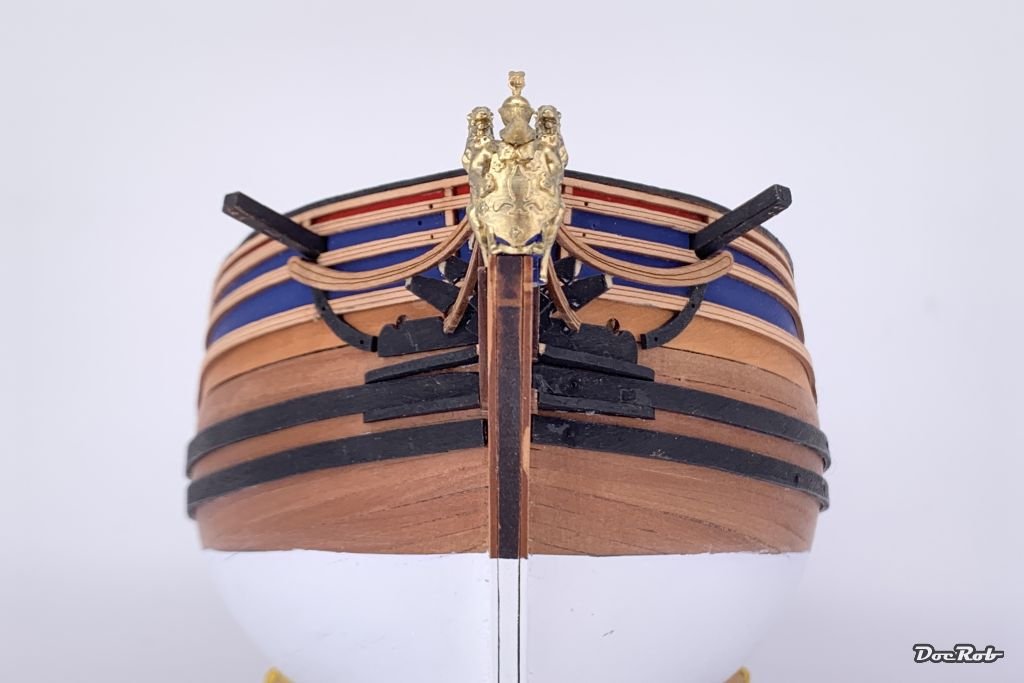
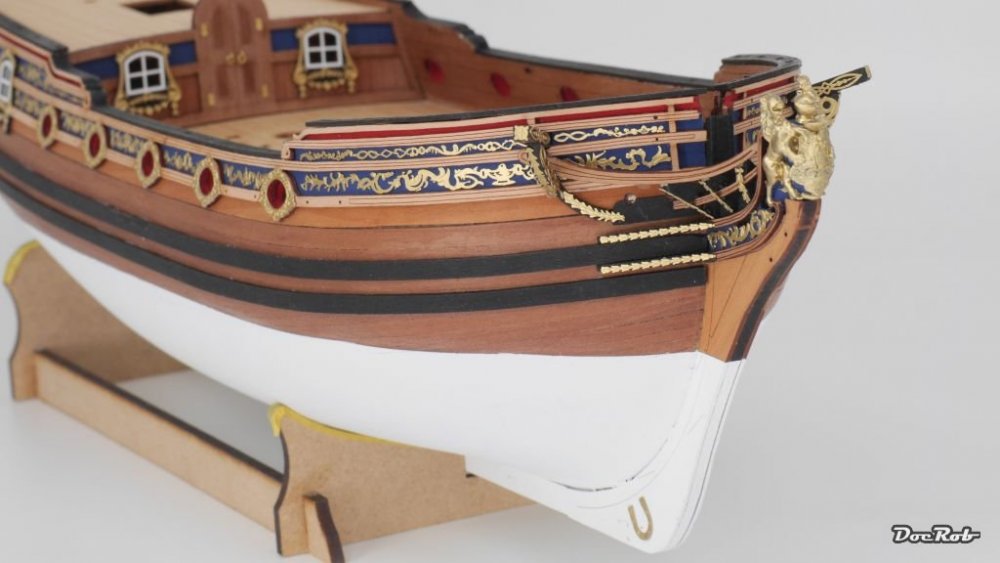
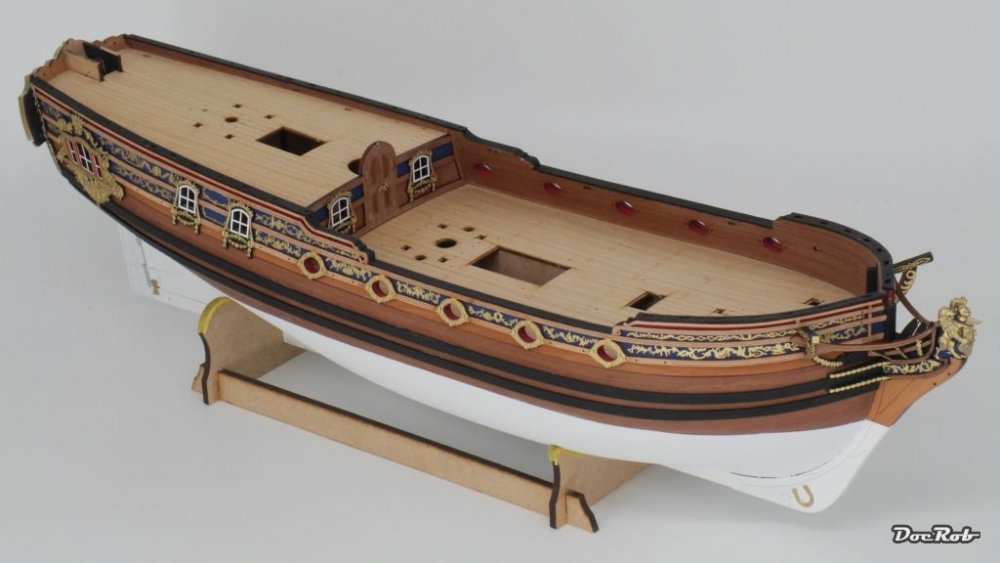
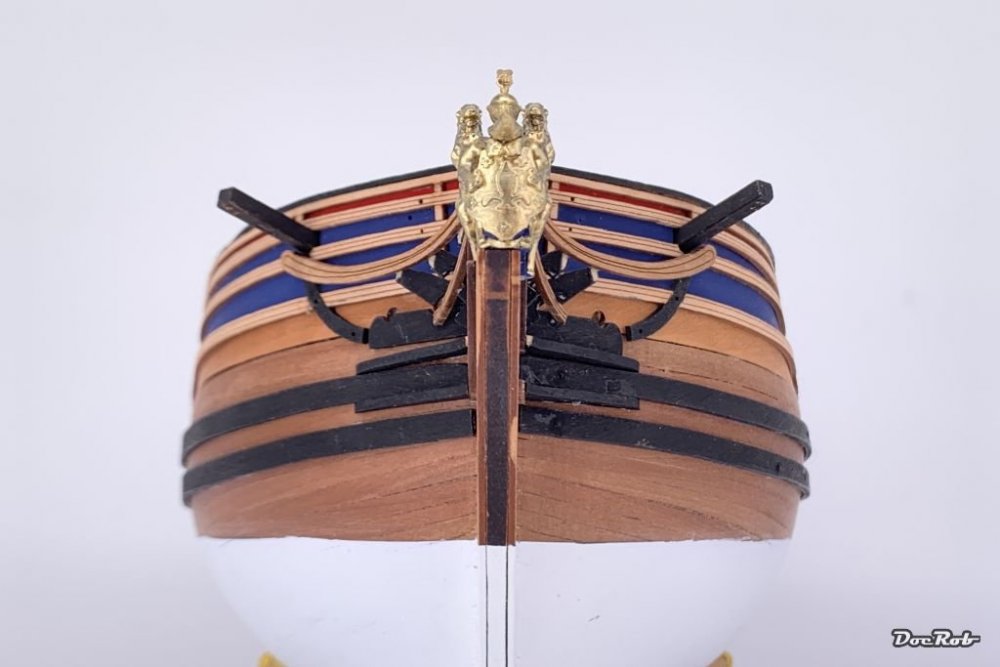
Today, I moved to the bow, where I assembled the prepared parts. The whole assembly is a bit delicate and in the pics there are still missing two supports for the protruding catheads, which wouldn't like to fit like I wanted. There is a minor mistake in the manual, which claims to glue on the decorative wooden rails, which curls in front of the Lions foot. If you glue them on on both sides you can't add the figurehead later, like it is supposed. I glued the rail only on one side as I like to add the figurehead very late in the build for safety reasons. Here are two pics of the stern, one with additional wooden rails and one without. As I'm still not sure, if I will mount them, I'm interested in your opinion. I have a little tendency to go on without the rails Cheers Rob


-
Duchess of Kingston - Beauty of the Seas - Wooden Sailing Ship 1/64
DocRob replied to DocRob's topic in Non LSM 'WIP
Muchas gracias señhores. This kit builds like an onion, you start with a frame, first and second planking, wooden decorations, PE-decorations. You add layer per layer to finish the hull. The design is exceptional clever. Cheers Rob -
I never thought it through completely, but wouldn't it be possible to paint the entire turtle in black, using a Molotow masking pen for masking the demacration lines and then spray the camo. If the Molotow masking pens adhere well enough, it should be possible. It was my first thought for a French Schneider tank, but then I changed my mind and will built it as Spanish Republican tank. Cheers Rob
-
IBG 1/35 French 1897 75mm field gun.🇫🇷
DocRob replied to belugawhaleman's topic in LSM Armour Finished Work
Nice little kit, it came out great with the near monochrome paintjob, which let the eye focus on the details. Cheers Rob -
Mono-Chrome 1/16th Scale Stug III ausf G
DocRob replied to Folkwulfe's topic in LSM 1/35 and Larger Work In Progress
To put it into a cheap rhyme, I love the look of your Stug . Earnestly, the tri tone camo is great and I can't wait for pictures with the figures and other details on. Cheers Rob -
1:32nd scale Fokker D.VI
DocRob replied to sandbagger's topic in LSM 1/32 and Larger Aircraft Ready for Inspection
Again a beautiful result with the Fokker, showing the usual mikeness fashion, which is like a good trademark of your builds. Cheers Rob -
Duchess of Kingston - Beauty of the Seas - Wooden Sailing Ship 1/64
DocRob replied to DocRob's topic in Non LSM 'WIP
I added some more decorations to the stern and put on the horseshoe and fish PE with pins and glue. I then prepared all the bow parts, which needed to be beveled in some cases and painted them black. The catheads were also painted and the holes, where they pass the bulwark were adjusted with a file. The Duchess of Kingston starts to look like a real lady, slowly. Cheers Rob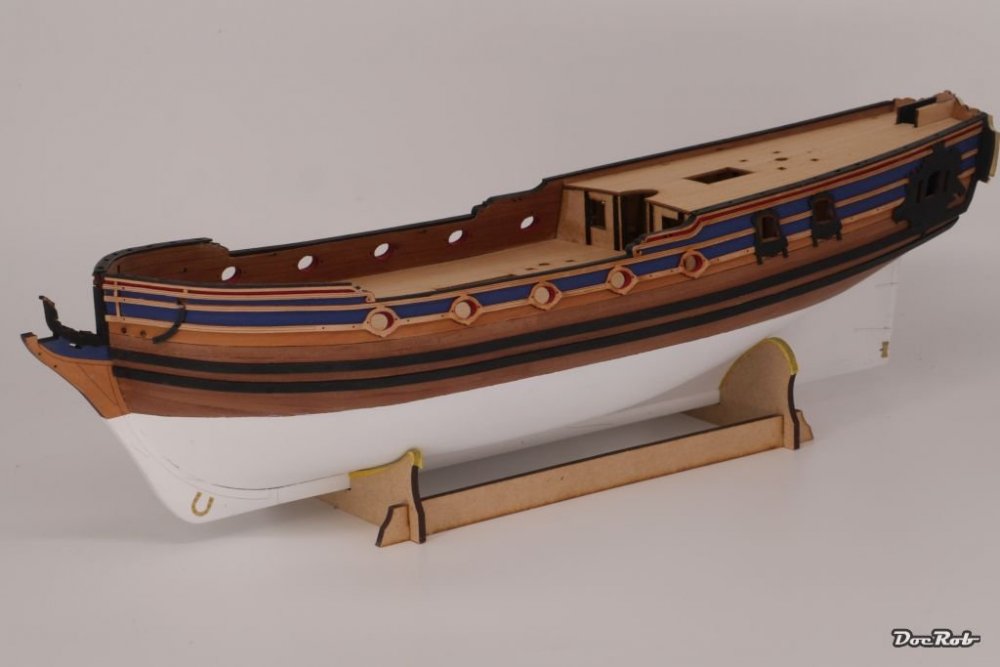

-
Duchess of Kingston - Beauty of the Seas - Wooden Sailing Ship 1/64
DocRob replied to DocRob's topic in Non LSM 'WIP
Thank you Kevin, if you are prepared and have a good plan, planking is demanding, but not frightening. When I understand it right, your Baltimore is a relatively modern ship, where there is paint on the planks, which is more forgiving, than a natural wood look. I'd like to see you Wip-ing your build. Cheers Rob