DocRob
-
Posts
7,126 -
Joined
-
Last visited
Content Type
Profiles
Forums
Events
Gallery
Everything posted by DocRob
-
A bit small to live in, compared to the sold house, I guess, but gratulations anyway, what a nice ride . Cheers Rob
- 2,036 replies
-
- 4
-

-

-
- car related stuff
- anything about cars
- (and 6 more)
-

Done - F-4EJ Kai Phantom - The Last of it's Kind ZM 1/48
DocRob replied to DocRob's topic in LSM 1/48 Work in Progress
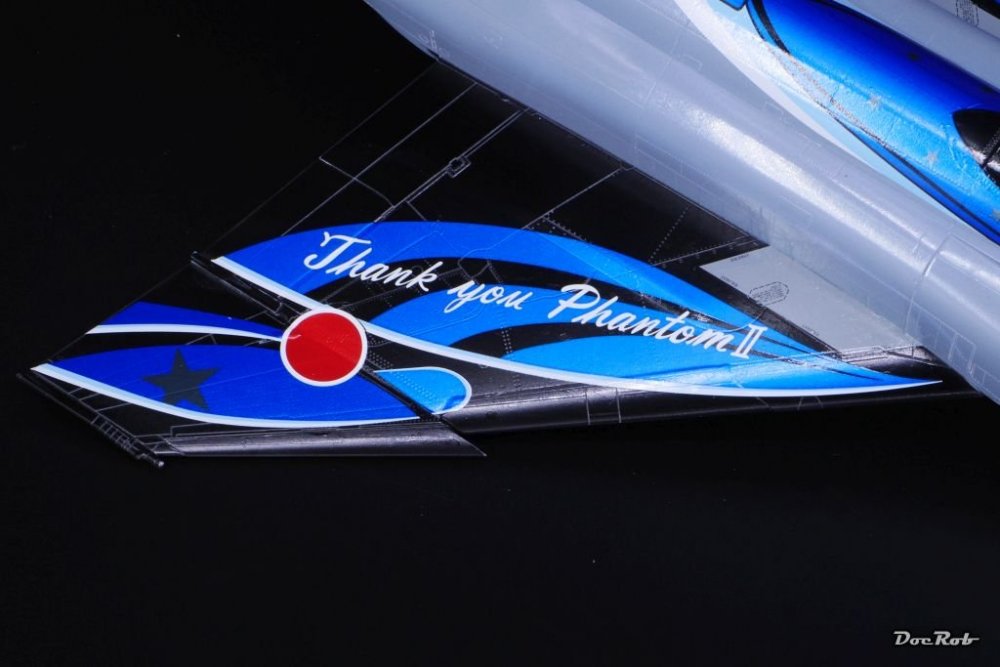
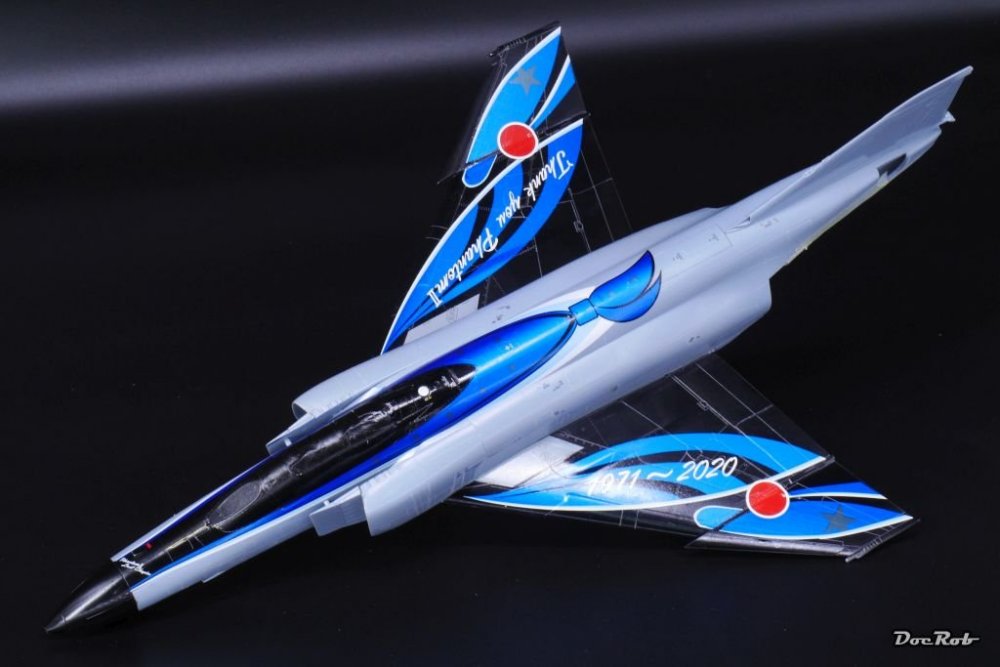
Thank you Kai, my head is spinning in the moment, after applying half the stencils on the upper wings. This is particular unpleasant, because on the black areas the decaling plan shows no panel lines and it's hard to find the correct places and to have them looking congruent on both sides. I developed a step by step system, to work through the different decal sheets in a proper order, color coding the stencils on the plan. I wont do a jet again soon, but I have said that before... . Cheers Rob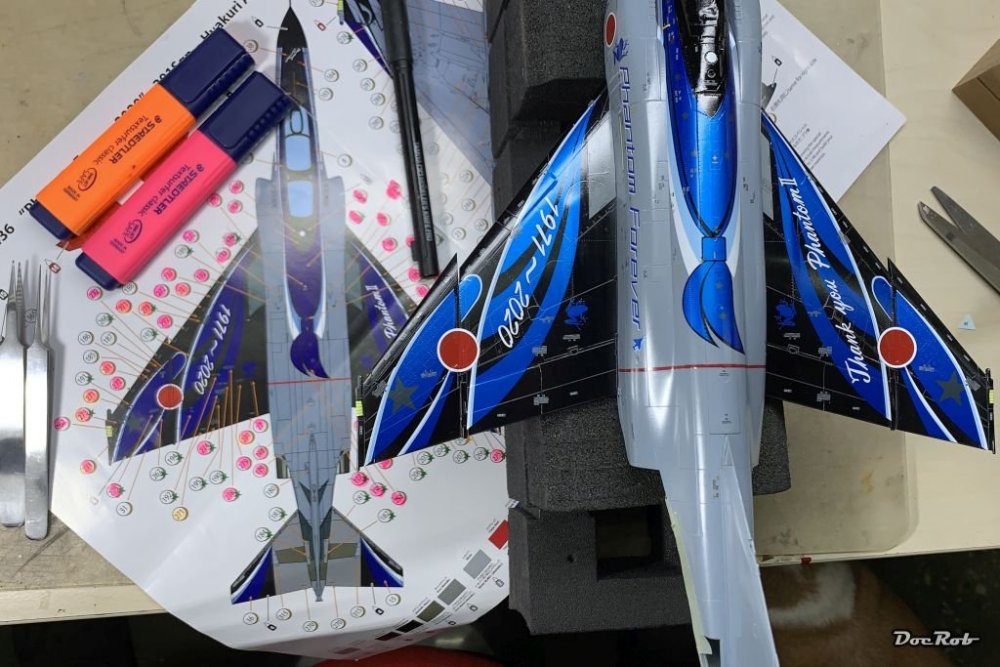
-
Dragon Panther A with Zimmerit
DocRob replied to GazzaS's topic in LSM 1/35 and Larger Work In Progress
Nothing boring about your Panther, it looks great. Good to see, that you are pushing with the figures. Cheers Rob -
Tamiya P-51 racer Bardahl Miss #49
DocRob replied to JohnB's topic in LSM 1/35 and Larger Work In Progress
Absolutely stunning looking bird. This Mustang will get all the attention on the shelf. I think, I've a new genre to discover. Cheers Rob -
Phew, this thing has a lot of guns. Nice Progress on the main assembly though and I haven't seen perfect fitting leading edge inserts in my modelling career, not even on Tamiya kits.
-
Done - F-4EJ Kai Phantom - The Last of it's Kind ZM 1/48
DocRob replied to DocRob's topic in LSM 1/48 Work in Progress
Muchas gracias amigos, I'm pleased that you like my work. @GusMac, the yellow Kai is as beautiful as the blue one and the stenciling, err, it has to be done, at least the decals are great, as is the decaling plan. @Bomber_County, I did the same, as it takes time to check and re-check stencil placement and you have to switch between decal sheets at times. Cheers Rob -
1:32nd scale Salmson 2-A2
DocRob replied to sandbagger's topic in WW1 1/48 and larger Ready for Inspection
I completely agree with Hubert, Salmson, figures and setting looking absolutely fantastic. I'm utterly fascinated, how you motor trough your builds, solving all issues methodical. The rigging is outstanding and the main reason, why I let the Salmson pass. Cheers Rob -
Done - F-4EJ Kai Phantom - The Last of it's Kind ZM 1/48
DocRob replied to DocRob's topic in LSM 1/48 Work in Progress
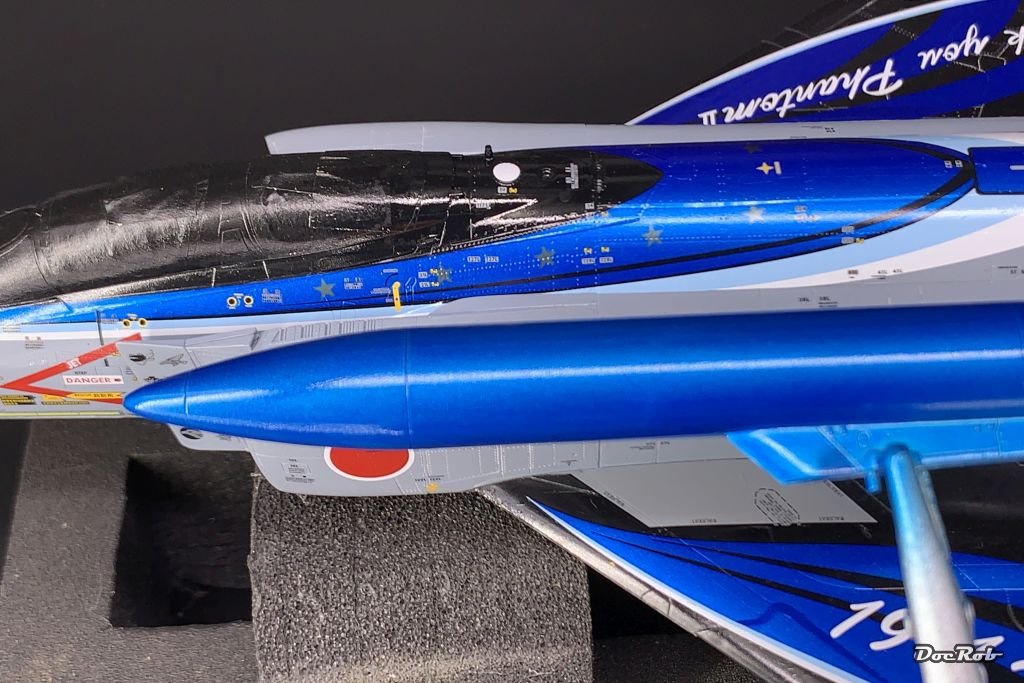
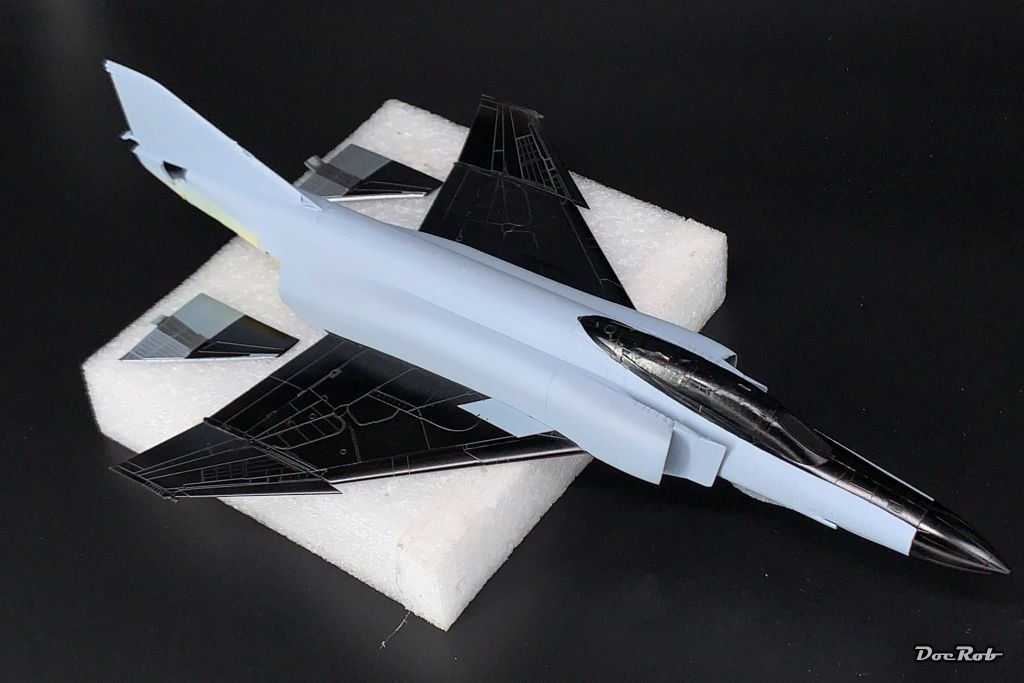
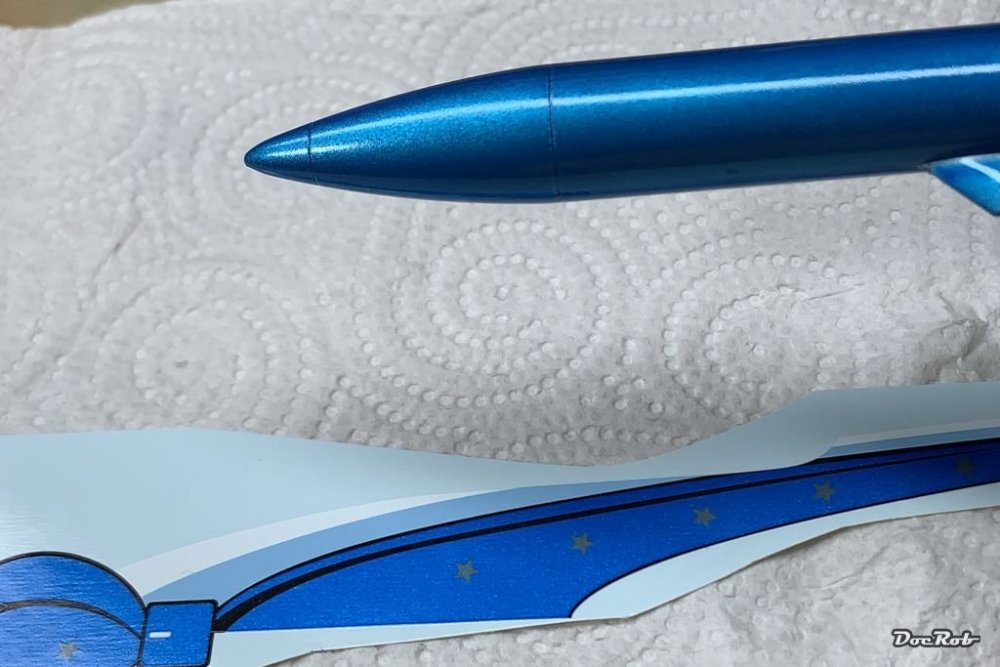
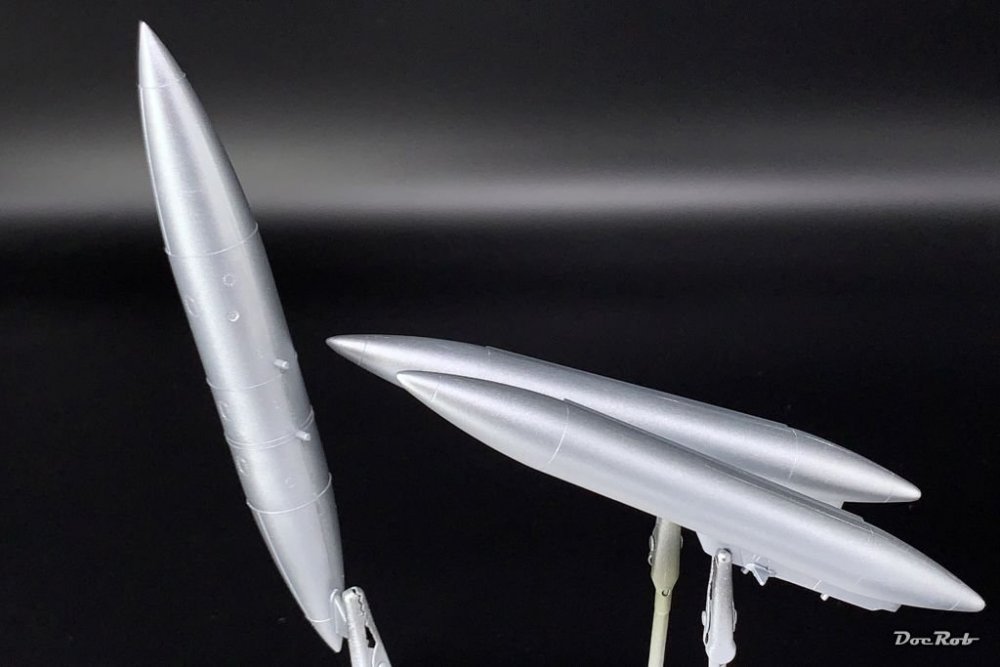
Muchas gracias hombres, the Kai Phantom really sports a very stylish outfit. Until stenciling time, I thought about building a second one with yellow livery (which will be released soon by ZM), but after this one, I have to rest my eyes. Yesterday, I noticed that while drying thoroughly, my painting idea for the external tanks was not good enough. The transparent blue, based on sparkling silver developed a slightly greenish tint. I sprayed two more layers of thinned transparent blue and now I am where I wanted to be. The match is good enough now. On pictures and even to the eye, it's hard to tell the difference, because of the glitter effect, which looks differently from every angle you look at it. The final gloss will be polished to match. Cheers Rob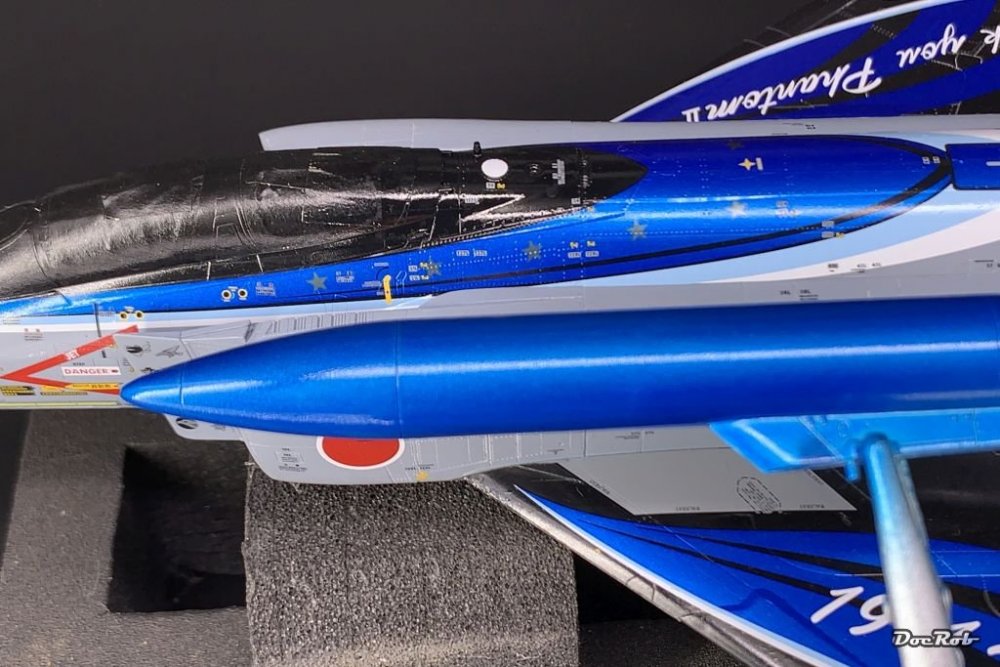
-
Done - F-4EJ Kai Phantom - The Last of it's Kind ZM 1/48
DocRob replied to DocRob's topic in LSM 1/48 Work in Progress
I definitely choose rigging a WWI aircraft, than stenciling a modern jet. In this case, at least, the decals are great and the supplied decaling plan is very helpful. Nonetheless, it's painful eye straining work . I managed to apply the upper fuselage and left side stencils. Normally, I cut my decals without guiding numbers, but not in this case, where it really helps to have the numbers present. Cheers Rob
-
Done - F-4EJ Kai Phantom - The Last of it's Kind ZM 1/48
DocRob replied to DocRob's topic in LSM 1/48 Work in Progress
Thank you Phil, indeed, preparation is the key to glossy and metallic finishes as well. It has been a learning curve for me, beginning with some car and bike models, where I learnt a lot. Last year, I added polishing to my skills and tools and it did a wonderful job on glossy surfaces and clear parts. No need to be jealous about the surf / modelling thing. We had sand storms for over a week, where the air is polluted dangerously with ten times more dirt and germs and whatever than the worst Berlin road in winter time. Besides, since a week, we try to have the garden looking like it looked before the storm and there still is no end in sight. The beach was the only place where there was no storm miraculously. It was surfing or staying home for more days without opening windows or doors. Cheers Rob -
Done - F-4EJ Kai Phantom - The Last of it's Kind ZM 1/48
DocRob replied to DocRob's topic in LSM 1/48 Work in Progress
Thanks Kai, the Kai Phantom is truly an extreme colorful bird and I don't regret the detour into jet territory. Painting and decaling reminds me a lot of car modelling, with the desired glossy and sharp contrasting finish in mind. Cheers Rob -
Dragon Messerschmitt Me-110D 1./Ergänzungs-Zerstörergruppe Værløse 1/48
DocRob replied to GazzaS's topic in Non LSM 'WIP
I like the Messerschmitt a lot Gaz. The slightly faded and well blended paintjob is outstanding. What amazes me most though, is that you kept the same painting style with the figures, as they are so well integrated. Sometimes figures do not fit the painting style of a plane, but not with yours. The whole setting is like looking onto a slightly aged color photo. Cheers Rob -
Engine and interior are looking very nice, lots of detail to catch the eye. Cheers Rob
-
RR Spey powered RAF Phantom conversion
DocRob replied to Wingco57's topic in LSM 1/35 and Larger Work In Progress
A great build all around. Your dedication shows everywhere and I really like the details like the resin canopies with their framing. Cheers Rob- 414 replies
-
- 3
-
-
- conversion
- phantom
- (and 1 more)
-
HK Models Lancaster Cockpit Section
DocRob replied to Winnie's topic in LSM 1/32 and Larger Aircraft Ready for Inspection
I like the result very much, Harald. You've done this impressive kit justice, with fine detailing and painting. I've thought about doing one Lancaster nose myself sometimes, as the whole thing is too large for me. Tasty push you gave me with yours. Cheers Rob -
Done - F-4EJ Kai Phantom - The Last of it's Kind ZM 1/48
DocRob replied to DocRob's topic in LSM 1/48 Work in Progress
Muchas gracias amigos, you don't hear me say it very often, but decaling is fun this time. Cartograph made a great job producing them and ZM provided very good plans for the application. The thorough preparation of the surfaces seems to pay off and I hope, I can get away without silvering. Cheers Rob -
Done - F-4EJ Kai Phantom - The Last of it's Kind ZM 1/48
DocRob replied to DocRob's topic in LSM 1/48 Work in Progress
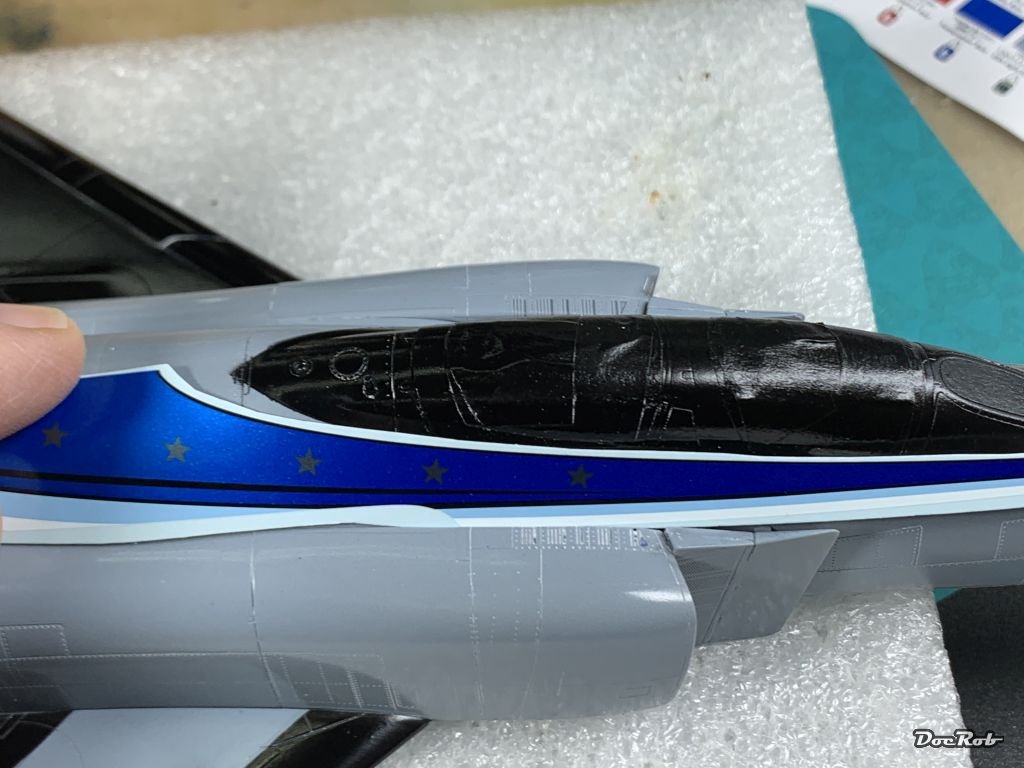
Decaling time, but oh no, I cut the canopy bordering decals and saw, that I sprayed the black part too small, so back to masking and some more gloss black Meanwhile, I sprayed the external fuel tanks with transparent blue over the sparkling silver and came close to the glitter blue of the decals, but not close enough and I will spray another pass of blue. Finally, I started with a bit of delay with decaling, starting with the largest decals on the wings and fuselage and added the fist stencils. You have to be aware, that some stencils are to attach under larger decals, which the painting and decaling guide clearly indicates. The Cartograph decals worked very good, where the large ones crumpled a bit after application, but with more drying time leveled themselves beautifully. The state of the pictures shows the decals only applied with Micro Set. I decide after finishing the decal stage, if I use Micro Sol on top. Cheers Rob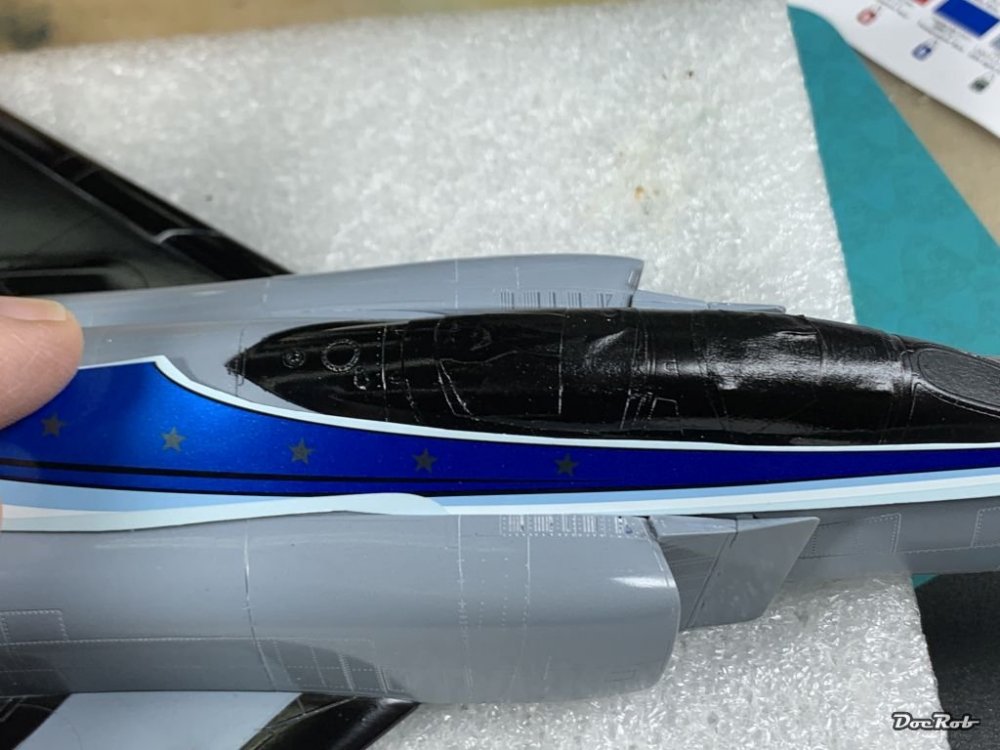
- 177 replies
-
- 12
-
-
-
Done - F-4EJ Kai Phantom - The Last of it's Kind ZM 1/48
DocRob replied to DocRob's topic in LSM 1/48 Work in Progress
Thanks Carl, me too. I want the best possible preparation for the decals, as there are many from huge artwork to tiny stencils. The decals are the key to the Phantom. Cheers Rob Muchas gracias Peter, I will definitely seal te decals before applying the panel liner. Flory washes (I don't know UMP) are water based, but they contain pigments, which can cause slight abrasion, which I don't want onto the Phantom's decals. After polishing the first coat of gloss, I found the panel lines to be pretty much intact, I hope for the best. Cheers Rob -
Done - F-4EJ Kai Phantom - The Last of it's Kind ZM 1/48
DocRob replied to DocRob's topic in LSM 1/48 Work in Progress
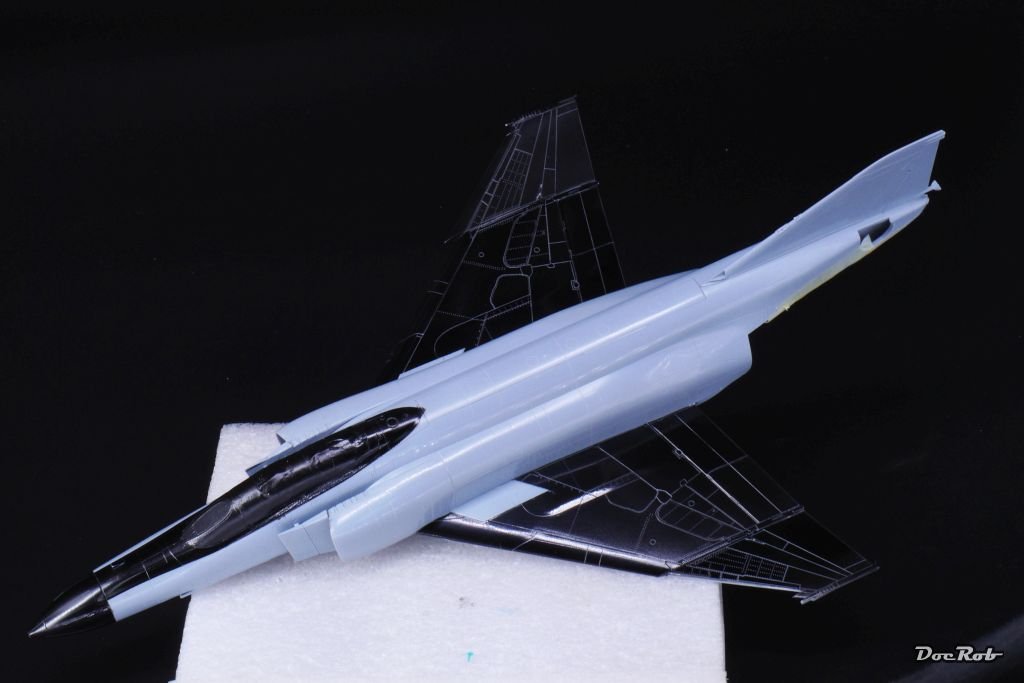
Thanks for your confidence in my abilities, John Meanwhile, I couldn't let off the Phantom and sanded and polished the bird to high shine gloss, first with wet sanding paper of 6000 and 8000 grid, followed by the Tamiya polishing compounds from coarse to finish. I really like the glossy appearance now and guess it will be perfect for the soon to follow decaling job. Cheers Rob
- 177 replies
-
- 10
-
-
-
Done - F-4EJ Kai Phantom - The Last of it's Kind ZM 1/48
DocRob replied to DocRob's topic in LSM 1/48 Work in Progress
Thanks for explaining your workflow Peter. Normally mine is more or less the same, albeit, I prefer to seal the decals before I apply washes or panel liners. In this case I'm not so sure, because of the fine panel lines and multiple clear coats before the panel liner. I will evaluate later, when the gloss is properly dried. With our reappearing sand storm, working on a model with shiny surfaces is not the best idea. On this plane, which is nearly completely covered with decals, I will prepare the decaling stage as best as I can, the gloss coat will be polished next. Concerning the AK Extreme Metal gun metal and the Tamiya kabuki residues, I really have no idea how that happened. The directly neighboring area of stainless steel is not affected at all, strange... With the storm outside, today is a surfing day. The east coast is relatively free of strong winds and the waves are bueno, so no sandblasting of the Phantom today. Cheers Rob -
Done - F-4EJ Kai Phantom - The Last of it's Kind ZM 1/48
DocRob replied to DocRob's topic in LSM 1/48 Work in Progress
Thank you John, I hope, I can keep it that way. The whole plane will be plastered with decals, sometimes in multiple layers. Cheers Rob -
Done - F-4EJ Kai Phantom - The Last of it's Kind ZM 1/48
DocRob replied to DocRob's topic in LSM 1/48 Work in Progress
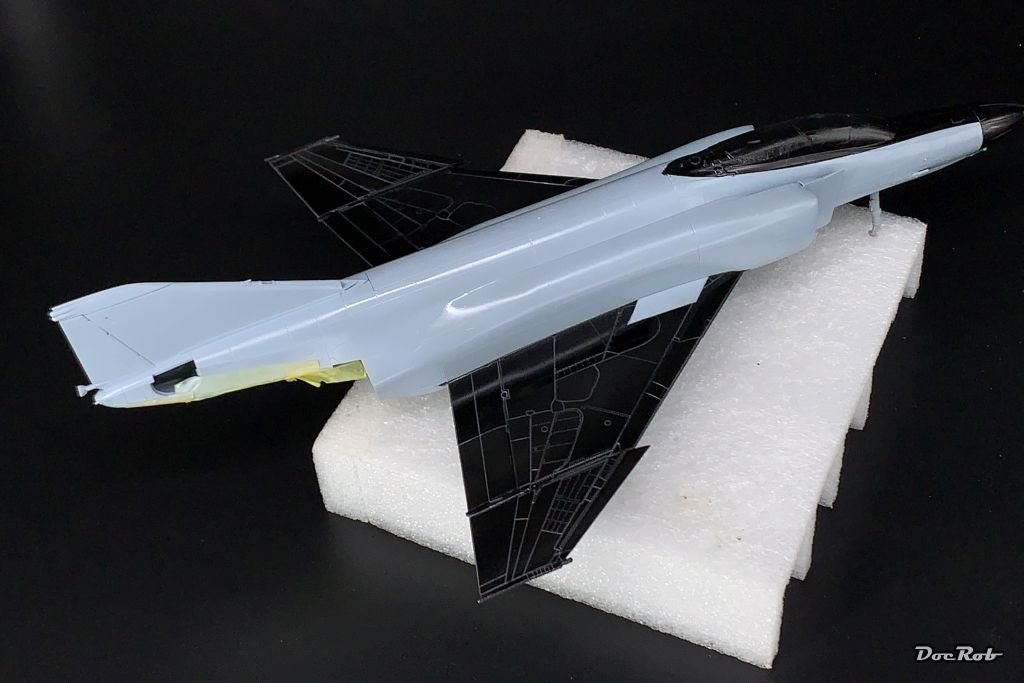
After polishing the wings, I gloss coated the whole plane with GX-100 from Mr. Hobby as (There is a question to you) a) base for black panel lining on the grey fuselage and underside and then apply the decals after another gloss coat. b) decals first and then gloss coat and panel liner. I'm not sure about, because, I don't like to loose the panel lines with more gloss coat layers above the decals. On the other hand the result will look better, when the decals settle into the panel lines and then get hit with panel liner. Cheers Rob Glossy bird
-
Done - F-4EJ Kai Phantom - The Last of it's Kind ZM 1/48
DocRob replied to DocRob's topic in LSM 1/48 Work in Progress
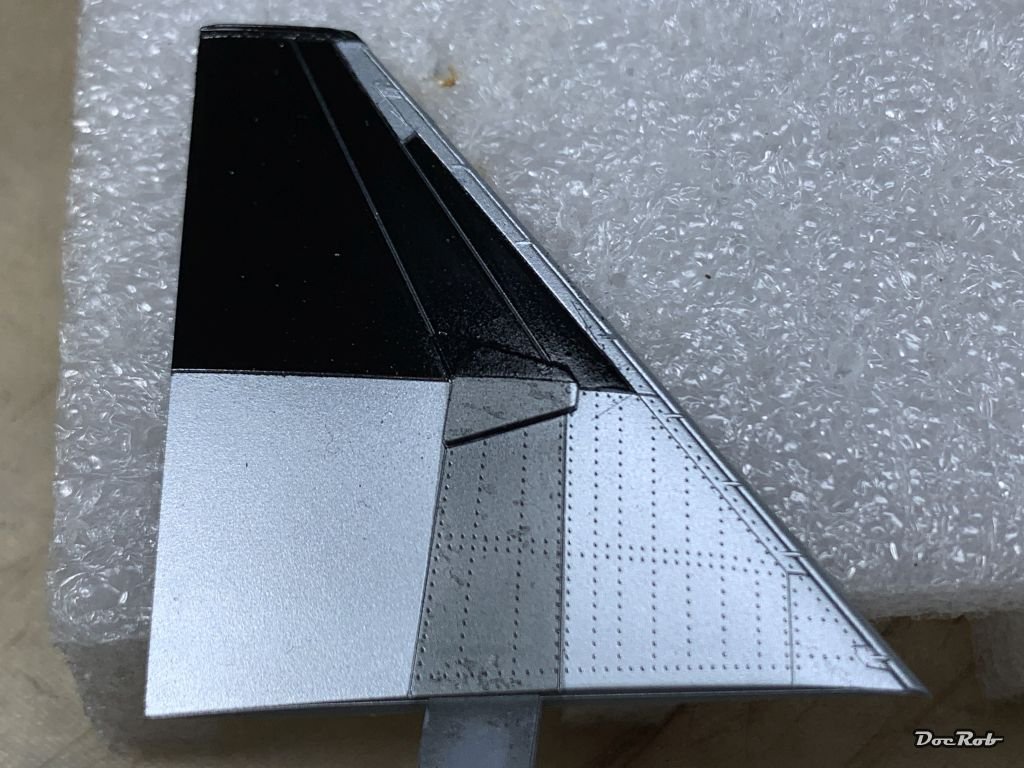
Phew, de-masking showed only a few places with the need for correction. Before I tore the kabuki off, I masked the cannon fairing under the nose and sprayed it flat black, where the rest of the black surfaces will be left glossy. The two parallelograms on the wings had some faults, but that was corrected after taking the pics. The external tanks were sprayed with Tamiya's sparkling silver from the LP range. I have to try to replicate the glitter blue metallic tone of the decals as good as possible. The sparkling silver has a slightly grainy appearance and might work as the desired glitter effect under some transparent blue, let's see... One oddity, I found was, that the Tamiya kabuki tape left glue residues onto the gunmetal sprayed parts, but not on to the steel colored areas directly besides. The Kabuki was only applied 24 hours before. Most of the residues could be cleaned with alcohol, but it had to be swabbed very carefully, as the alcohol affects the bordering Tamiya LP gloss black. Cheers rob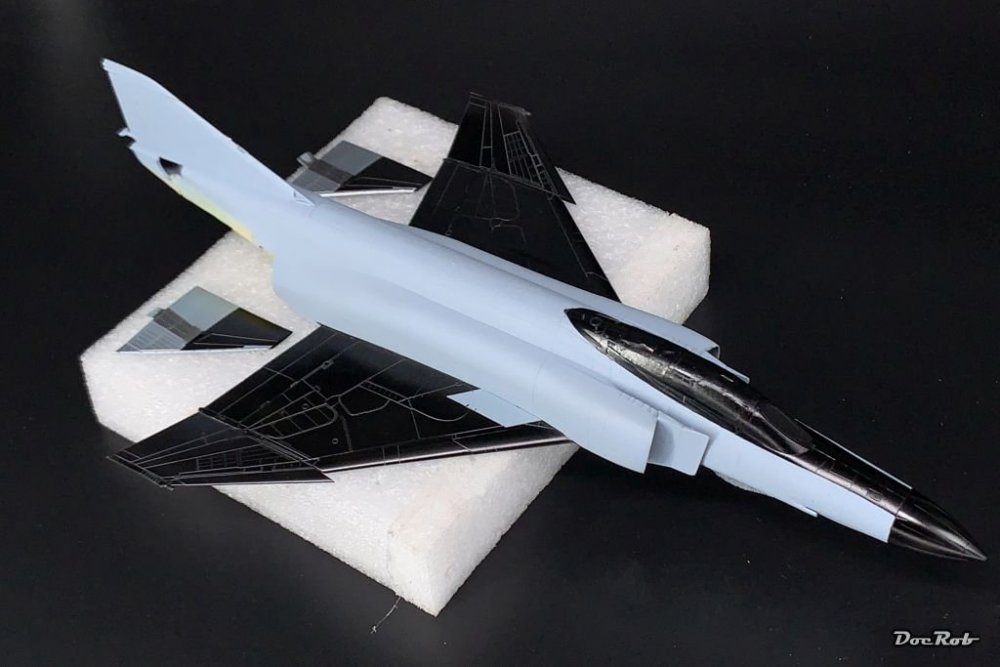

-
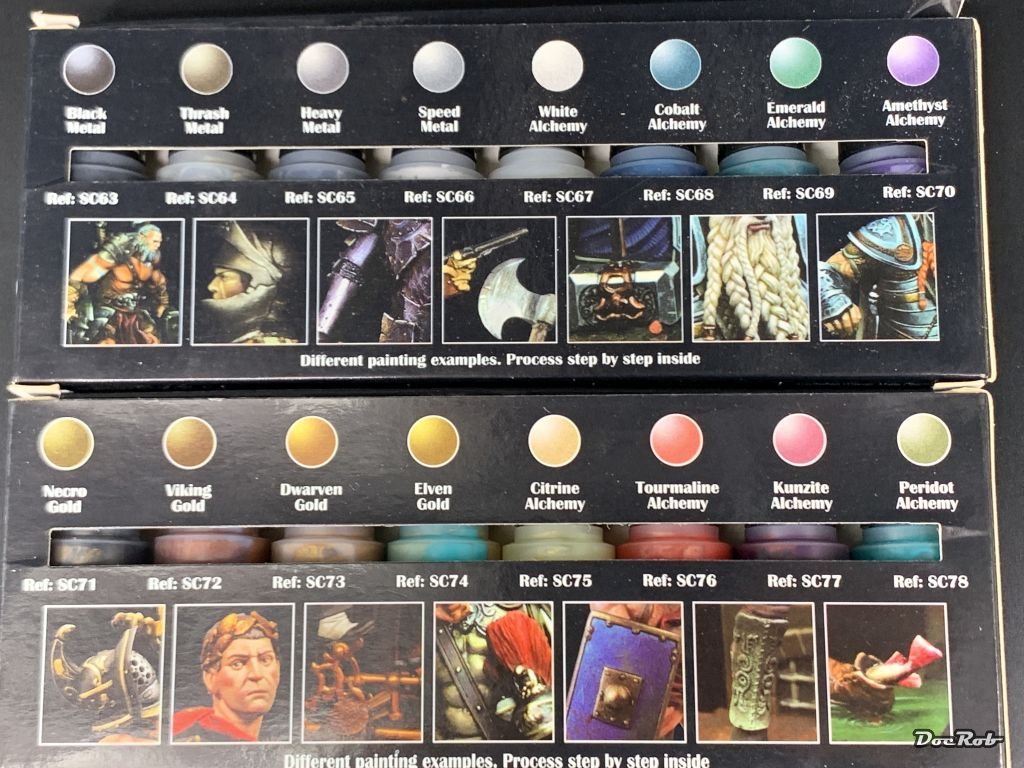
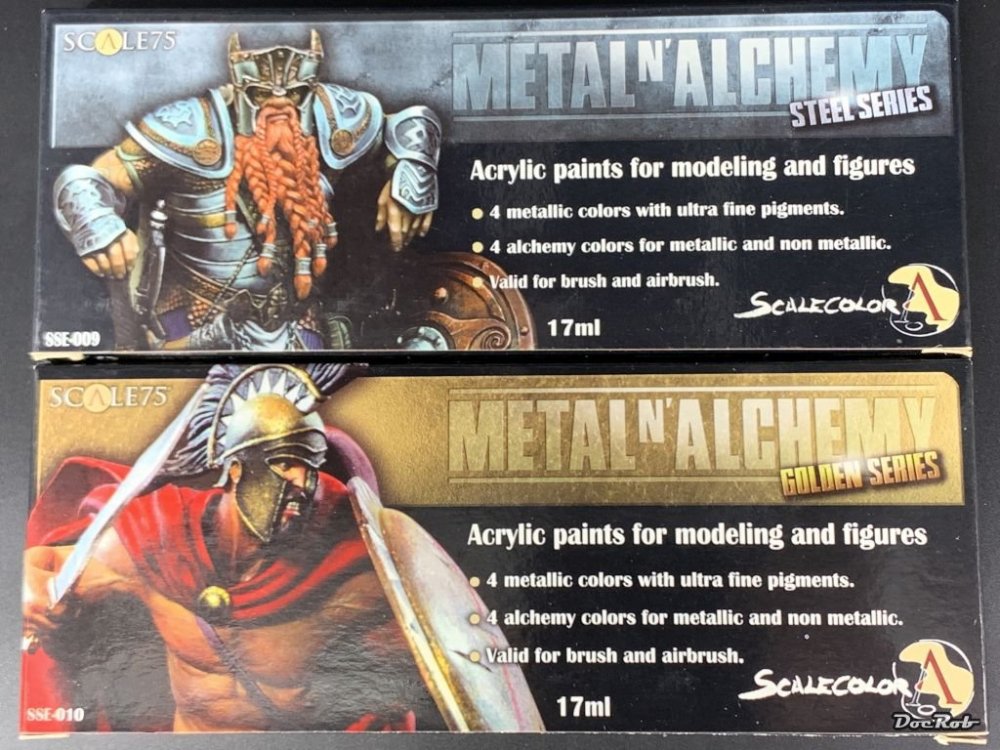
Tough one, as far as colors for airbrushing metallic, there has been a huge development in the last years with Alclad and AK's Extreme metal colors to name as the finest. These colors are not usable with paint brushes though. For me that means, I tray to use the airbrush as much as possible. For brush painting I have no clear recommendation. I found some of the Tamiya X colors were relatively good, but others are not. Grain and equal application are the decisive topics with these. One of their silvers, I can't exactly remember, is decent (I think chrome silver, which is silver but not chrome) and another, possibly aluminum is terrible and the worst was bronze. For figure painting and detail painting by brush, I often use these sets by Scale 75, which cover evenly and relatively well. Another product which comes in handy at times are the AK metallic waxes, which are best applied by brush, piece of cloth or cotton swab. They cover well, but are hard to get with an even shine over larger surfaces, but the metallic appearance is better than most brushable paints. Cheers Rob

-
If that's your most expensive footwear, poor dog . Cheers Rob