DocRob
-
Posts
7,127 -
Joined
-
Last visited
Content Type
Profiles
Forums
Events
Gallery
Everything posted by DocRob
-
How cool, I could do another P-47 in Portuguese markings. Cheers Rob
-

Done - F-4EJ Kai Phantom - The Last of it's Kind ZM 1/48
DocRob replied to DocRob's topic in LSM 1/48 Work in Progress
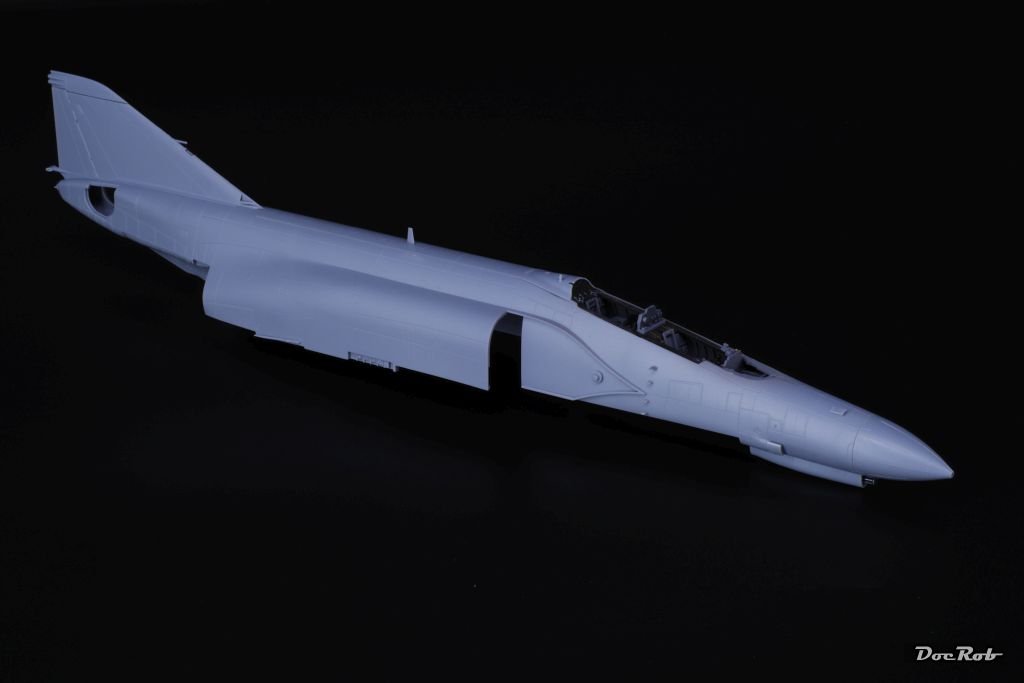
Finally, I glued the fuselage halves together, after checking the fit of the cockpit. No problems here, the fit is very good. There is a spine insert for the back of the fuselage, which is very clever, as there is no seamline to be dealt with. I added the nosecone and some intakes and fairings, most of them specially designed for the Kai Phantom, therefore to be found on an extra sprue for this edition. ... and some decent shots of the cockpit from a tripod with is a necessity at least in these smaller scales. Cheers Rob

-
Done - F-4EJ Kai Phantom - The Last of it's Kind ZM 1/48
DocRob replied to DocRob's topic in LSM 1/48 Work in Progress
Thanks Gus, I was actually lying, when I answered Martin, that this was my first pit decal job. My Mig-31 turned out ok with the supplied decals, but the Cartograph decals of the ZM Phantom are superior. They are great to work with and are robust enough for the treatment. The only difficulty is placement. You slide the flat decal onto a well protruding surface and then you have to shrink it in place. It's hard to foresee the correct positioning, before shrinking the decal into place with heat and solutions. One or two of mine are slightly off, but it's barely noticeable. Cheers Rob -
Done - F-4EJ Kai Phantom - The Last of it's Kind ZM 1/48
DocRob replied to DocRob's topic in LSM 1/48 Work in Progress
Thank you Peter, nothing against these iconic two seaters. I'm not much of a jet guy, except some of the very early ones, but a F4 or F14 keep me tempted, along with some grubby Russian heavy metal like the Mig-31 I built some years ago. I don't know, if the ZM kit is holding up to Tamiya's standards, but to me it looks pretty good and well worth to be build. Cheers Rob -
617 Sqn Tornado Dambuster 70th
DocRob replied to Kaireckstadt's topic in LSM 1/35 and Larger Work In Progress
Very nice scratch job on that back plate, looks pretty convincing. Cheers Rob -
Ferrari 330P4 Open top 24Hrs Daytona 1967
DocRob replied to mark31's topic in LSM 1/35 and Larger Work In Progress
This engine is looking absolutely fantastic, Mark. Cheers Rob -
Done - F-4EJ Kai Phantom - The Last of it's Kind ZM 1/48
DocRob replied to DocRob's topic in LSM 1/48 Work in Progress
Thanks Martin, it's my first go at decaling cockpits, but given the great quality of the decals, there is no real need for AM here. Cheers Rob -
Done - F-4EJ Kai Phantom - The Last of it's Kind ZM 1/48
DocRob replied to DocRob's topic in LSM 1/48 Work in Progress
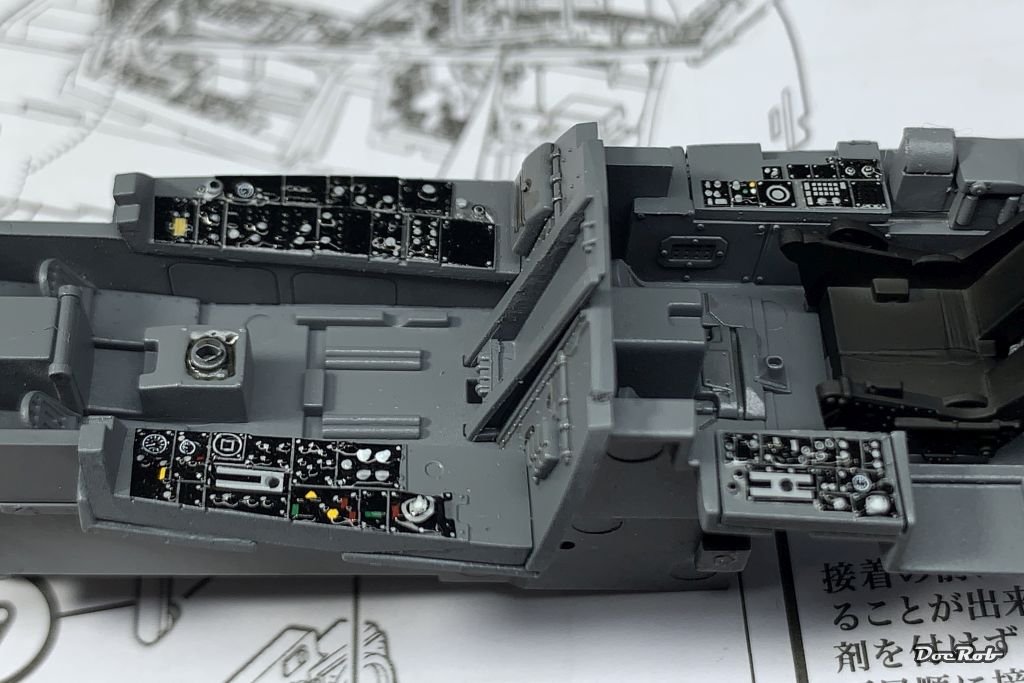
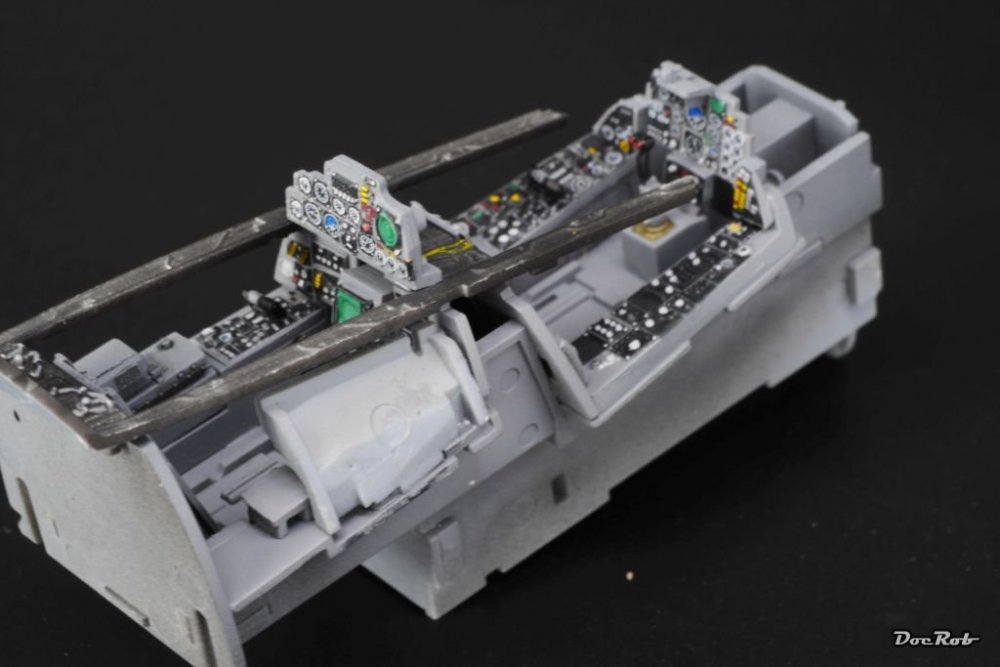
The next step was sealing the decals with a matte coat, adding and painting levers and control sticks, along with some detail painting. I used a sharpened toothpick for the first time for painting of knobs like the red ones on the control sticks and various knobs on a side panel. Sorry for the lousy picture quality. I promise to use a tripod for detail shots more often. I reviewed the pics, when it was too late and the fuselage was closed. Cheers Rob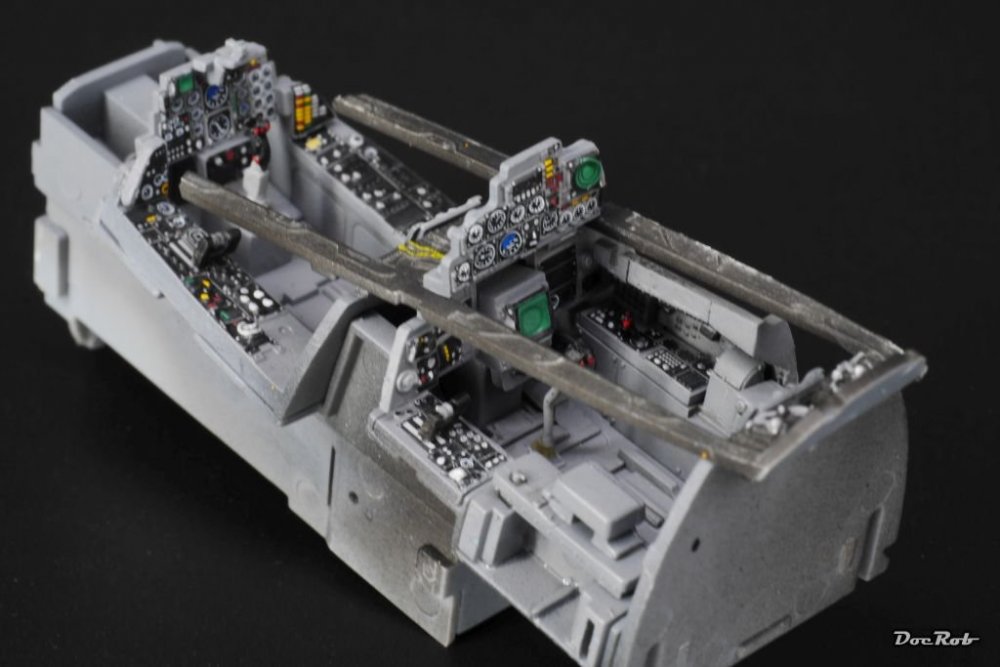
-
Done - F-4EJ Kai Phantom - The Last of it's Kind ZM 1/48
DocRob replied to DocRob's topic in LSM 1/48 Work in Progress
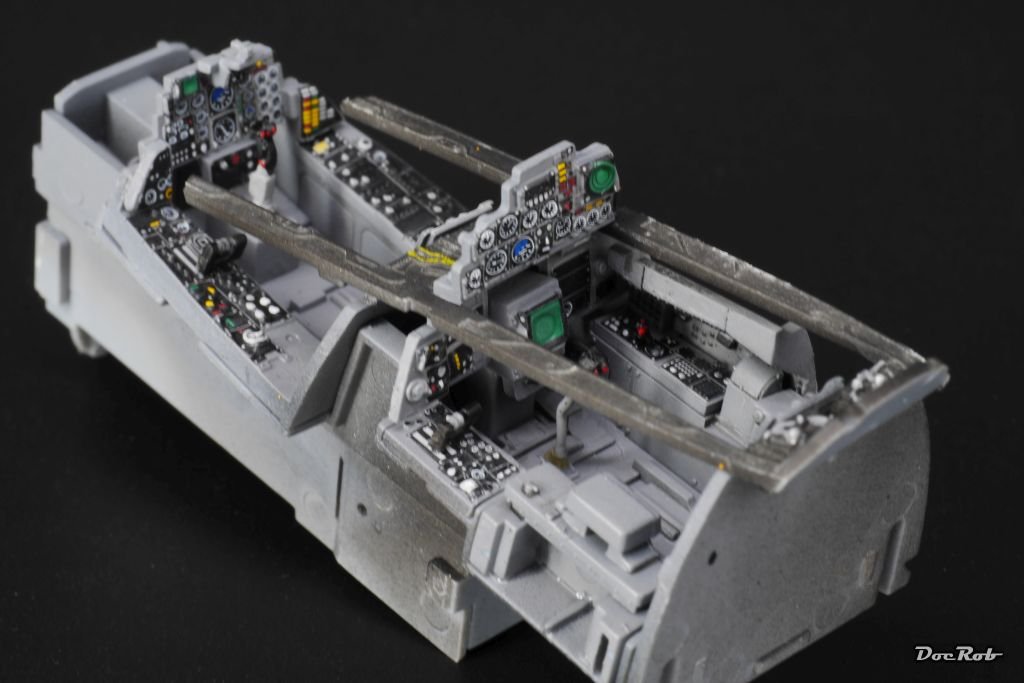
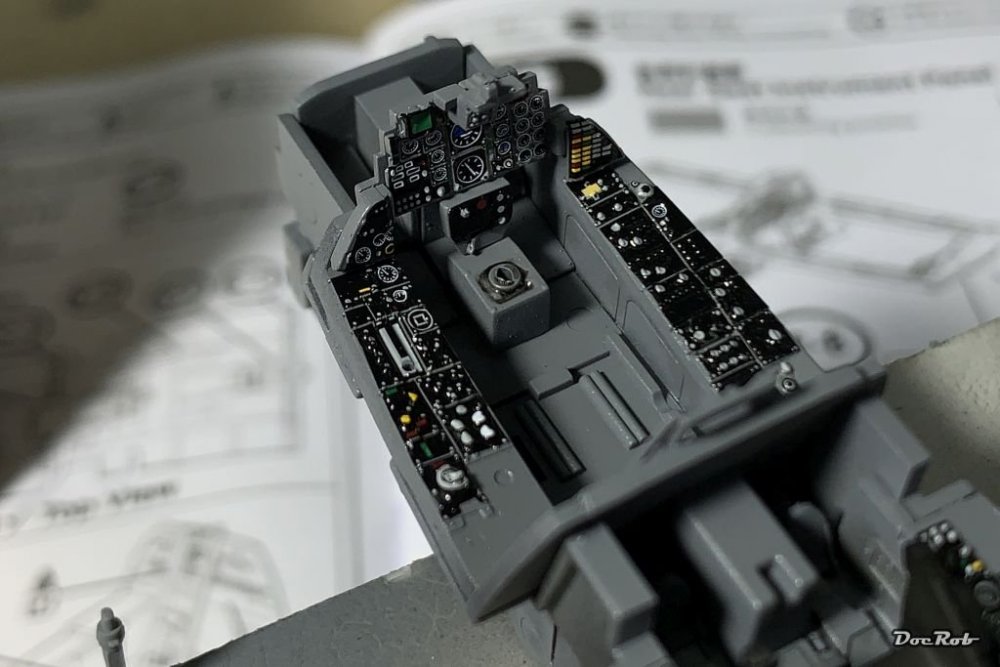
First, I cleaned all the cockpit parts, which are very well detailed, with lots of raised detail. I glued the tub with the side panels, but left the instrument panels off for easier painting and decaling. Most cockpit parts were sprayed with Tamiya's dark sea gray and then gloss coated for decaling the consoles and IP's with the supplied decals. The decals worked superb with the help of Micro Set and Sol and a hairdryer. They conformed to the raised details and look at least as good, as colores PE. With the added levers and bits, I prefer the representation to flat PE. Here the decals are still unsealed and glossy, after application. Cheers Rob

-
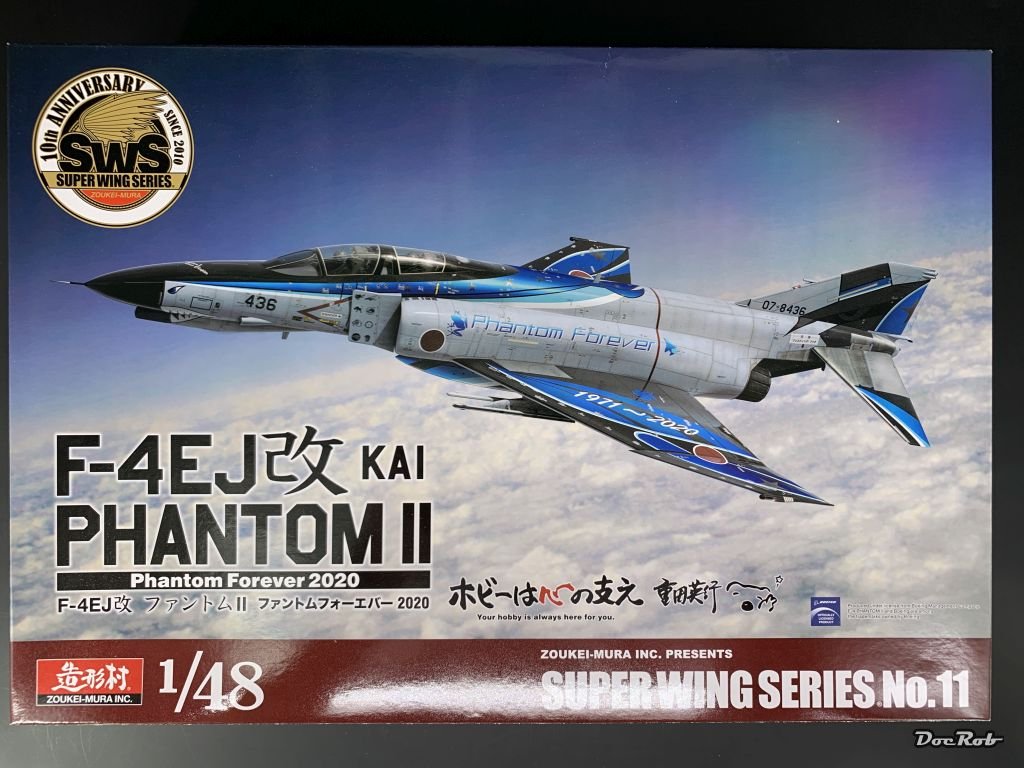
Sayonara F-4 EJ and welcome Señhores to a new WIP. The Phantom has been there all my life, at least it felt like. When I was a kid, we often spent our holidays in the north of Germany by the sea, where the land is flat and the Phantoms were flying very low, often with supersonic speed. You can imagine, I was deeply impressed. First there was this roaring sound becoming louder and louder, than one or two F-4's passed and than there was the bang, how cool, except for the people living there. I have an Eduard boxing of an F-4 in my stash, with a lot of goodies, but when I saw the ZM Kai Phantom with the farewell livery, I was immediately sold and felt the urge to build promptly. I love the disco glitter blue markings, which are well represented on the huge Cartograph made decal sheet. There is a second sheet with markings, stencils and fabulous Instrument panel decals. Now a few month later, the Kai sneaked onto my bench and I started to build. Browsing through the box is pure joy, everything is well packed and the grey plastic has very sharp details and no flaws of any kind. The manual is a bit over informative in places and shows every detail from various angles, but misses some tiny bits of information, but this is nitpicking. I preferred the color printed manuals of the 32 scale birds of ZM, but like the Phantom's plastic way more than the sometimes soft detailed sprues of my long ago built TA-152. What's really missing are seat belts, which I bought from Kits-World, canopy masks, which were purchased from New Ware and as an add on some Res-kit burner cans. Next up, cockpit and engines. Cheers Rob

-
Exactly like Peter says, the paintjob looks great and will really shine with decals and weathering. Cheers Rob
-
Beautiful looking hard edge camo and the white markings are contrasting great. Good to hear, that the fit is so excellent. Cheers Rob
-
Mono-Chrome 1/16th Scale Stug III ausf G
DocRob replied to Folkwulfe's topic in LSM 1/35 and Larger Work In Progress
Again nice work on the Stug. I just saw, that there is a figure set out from das Werk for their Stug. Interestingly they don't mention it on their website neither does Scalemates. The usually well connected shop of Modellbau König has them listed and available. I thought I let you know. StuG III Crew & Infantry Set 1/16 (modellbau-koenig.de) Cheers Rob -
I don't like using liquid mask for canopy masking. Some react with Future dipped clear plastic over time. If there is a Kabuki set available, I will buy one but not the vinyl stuff, which shrinks and doesn't follow the contours good enough. If there are no Kabuki sets available or no money to buy, I cut masks with cutting templates, if the framing isn't protruding well, If it does, I cut Kabuki tape directly onto the canopy, very carefully with a sharp blade. You see, I'm Kabuki addicted, it's precise, no color is running under, when pressed on with a wooden toothpick and no side effects with Futurized canopies. Cheers Rob
-
Mono-Chrome 1/16th Scale Stug III ausf G
DocRob replied to Folkwulfe's topic in LSM 1/35 and Larger Work In Progress
Great progress, with the tracks out of the way, there is no braking now until the finish . Cheers Rob -
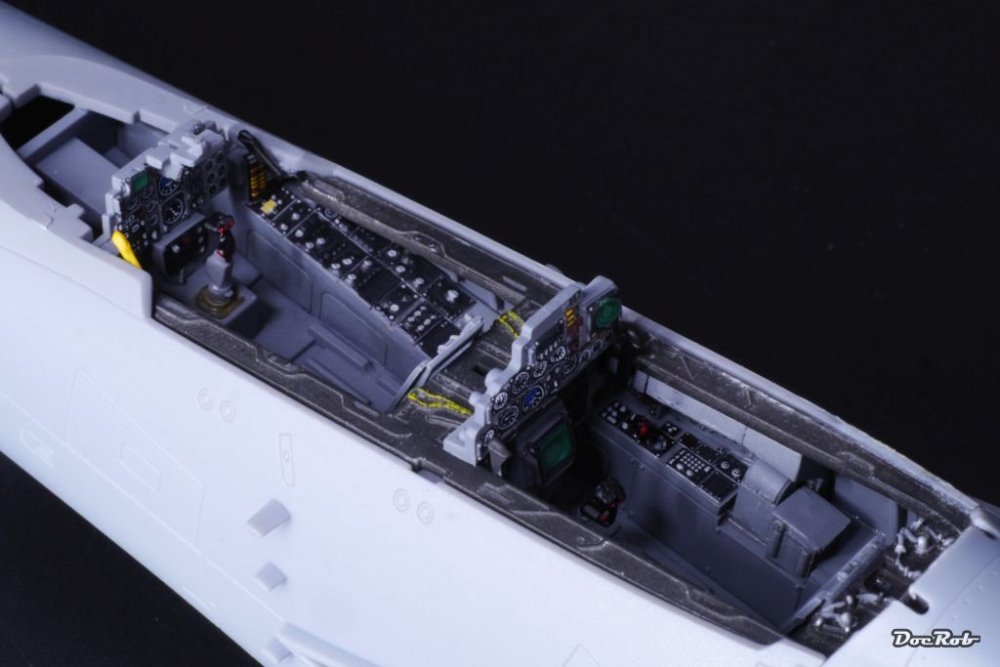
Very nice start of a very interesting plane , Peter. Having just received my -D, I make myself comfortable in your WIP-zone. The pit is looking great with the Quinta detail sets. The 3D effect is just more realistic than flat PE. Cheers Rob
-
Fw190A-8 3/JG1 crash Vreeland
DocRob replied to JeroenPeters's topic in LSM 1/35 and Larger Work In Progress
Supercool. Great detail, love it. Cheers Rob -
You didn't miss a beat Peter, I only started the Kai Phantom yesterday. I'm not at my best in the moment and have a bit of a hard time to force me to the bench. So I haven't planned on a WIP and I don't think, a 48 scale Phantom would raise much interest. That is where I am at the moment. I painted the tub and gloss coated everything for the superb kit decals, which still look glossy, as they are not sealed and still drying. I like the look, no need for a Quinta set and once coated, looking better than flat PE . Cheers Rob
-
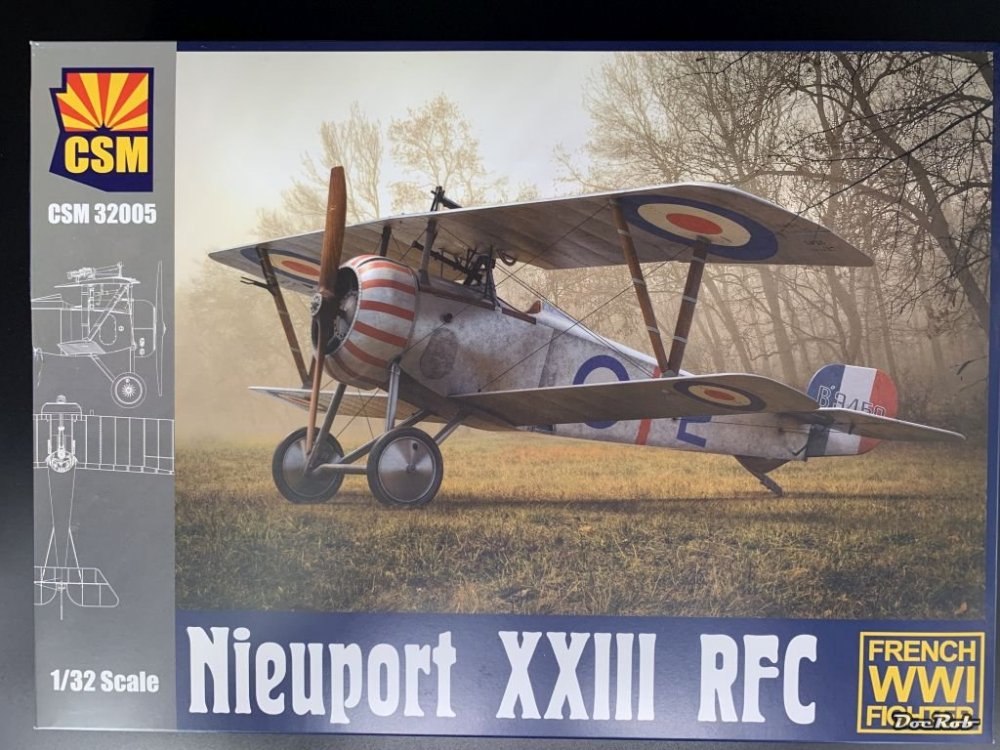
Thanks Peter and yes, I couldn't build only planes or armor all the time. I like to pick my personal cherries in the modelling world. I would love to see you wip the Tomcat build, naturally with my new kid in stash, no matter mine is a -D. The Nieuport looks great in the box and rigging is not too bad on these planes. Actually, I like rigging. I've considered starting my huge WNW AEG night bomber as a winter project, but not sooner as new year. In the moment I started with the cockpit of the ZM Kai Phantom. Cheers Rob
-
Revell P-51D Mustang - 2nd time around
DocRob replied to Peterpools's topic in LSM 1/35 and Larger Work In Progress
Nice Peter, The red front is balancing the yellow tail, that looks tres cool. Since you've solved the bright color issues, there should be no more obstacles in finishing the Mustang. Painting yellow can be a nightmare. I tend to prime a thin white coat under yellow, at least, if there are different colored underlayers, like with your bird. Tamiya X and XF-Yellow are very translucent and on my first try, I liked the AK RC color yellow better for opacity. Cheers Rob -
Thanks Carl, I browsed through the kits and yes, the Belkits instructions seem to be a bit confusing. I used a hair dryer on decals before, but never used hot dampened cloth. I may try that, as it sounds completely reasonable. Luckily the decals are printed by Cartograph. Cheers Rob
-
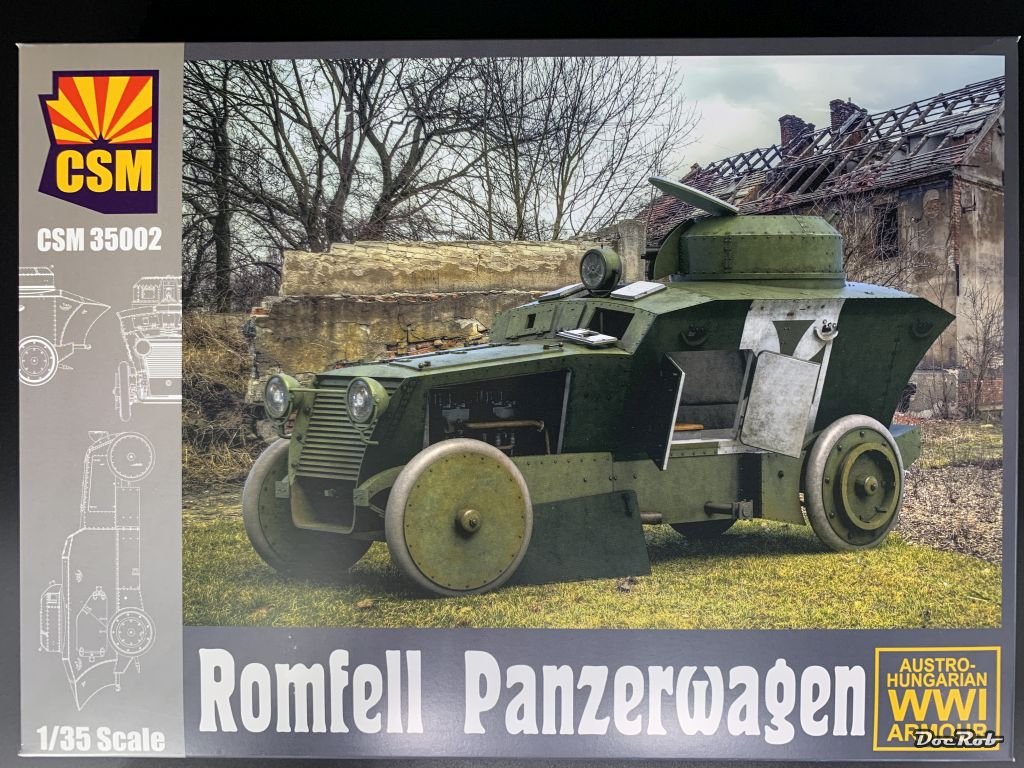
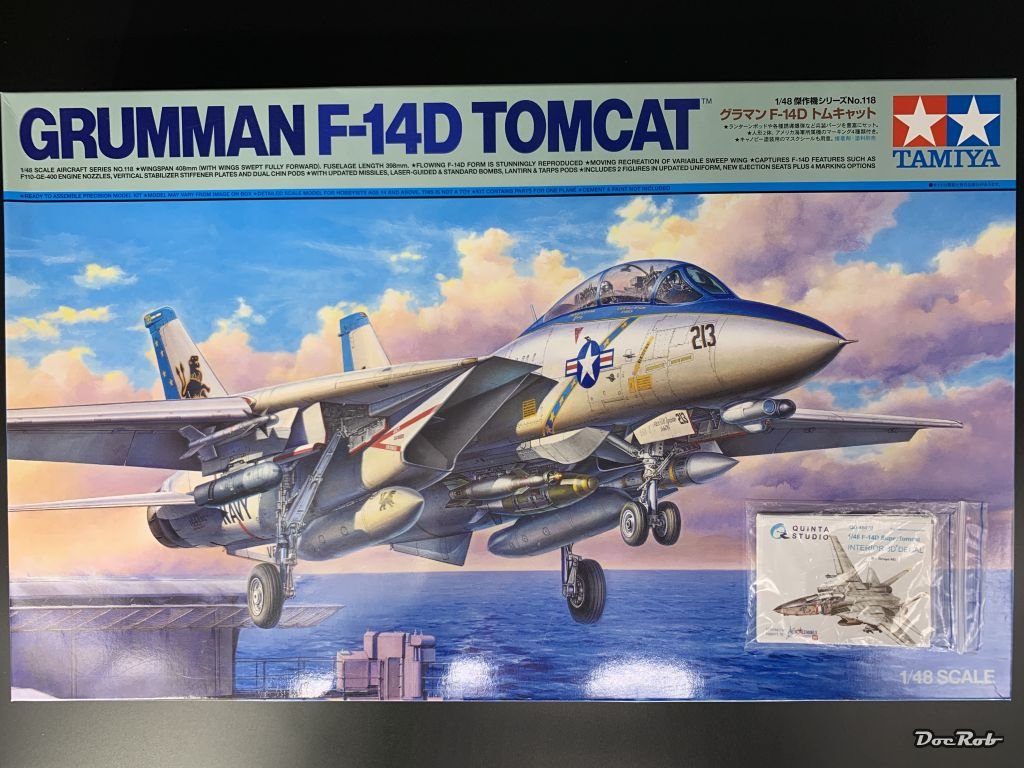
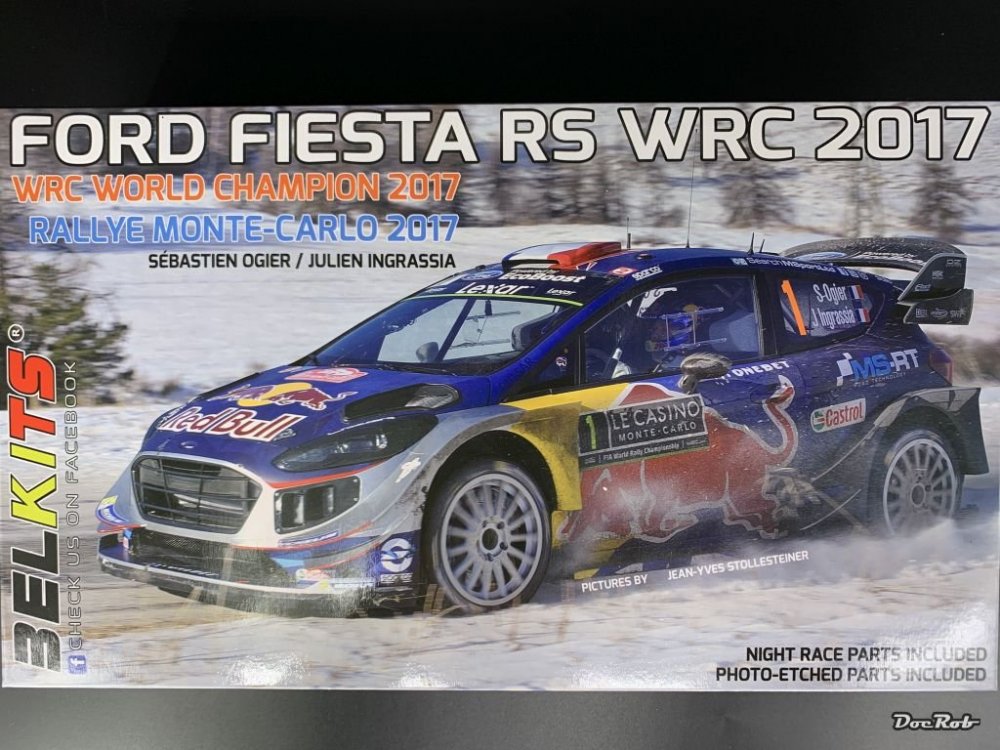
Black Friday killed my wallet , but would I happen to buy all these kits (and some colors) another day, I would file bankruptcy by now . The more I see (and have) of the Copper State Model kits, the more I love them. Plastic looks perfect, the subjects are right down my alley and the manuals are the best in business , even better than WNW ones. I read somewhere, that the Romfell looks like a Steam Punk Bat Mobile and it does. I'm not sure, I build it as a replica or go the Steam Punk way, which was my initial idea, when I saw it announced. Uhuuu, 48 scale, stone him. I couldn't resist, The Tomcat, the Romfell added with some RC colors and shipping was less than the Tomcat normally costs, I couldn't let this pass. Finally something else. A demanding car kit, with a simple paintjob (only base color), but delicate decals, which plaster the whole body, sometimes with multiple layers. Cheers Rob


-
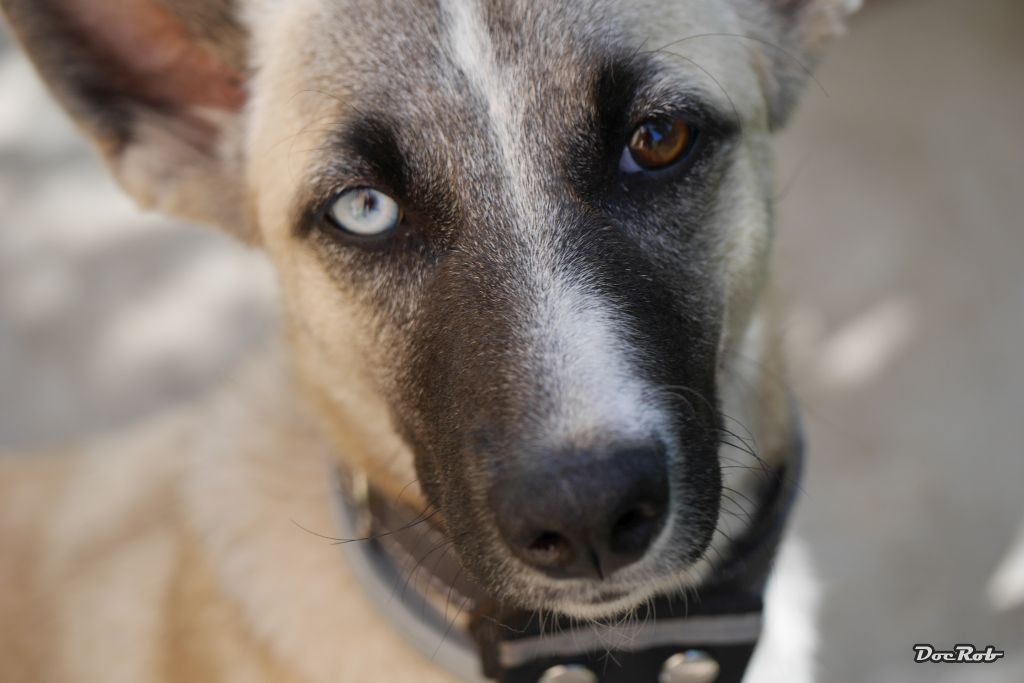
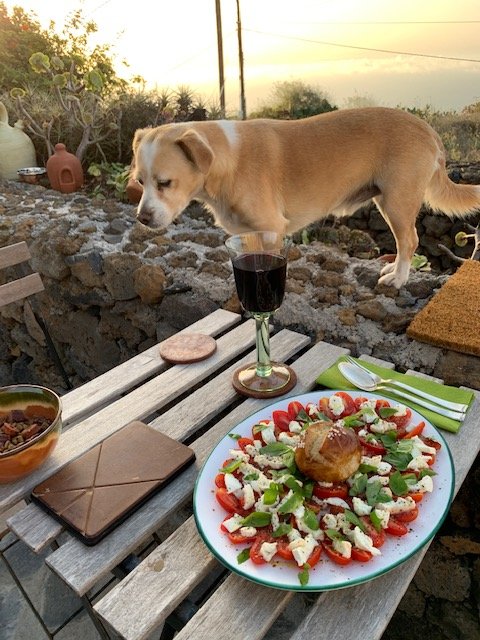
In Berlin, I never had a dog, but on my island, a young Lobo Herreno, a very special breed of sheep dogs appeared one day in my garden. We had her, Nora, for six month and then she vanished. She was unbelievable intelligent and very special with these different colored eyes. And this is Lenny, our dog, we have since he was a puppy of four weeks. He is from the local animal shelter and with us for five years. Not as intelligent as Nora, but he's just cute and great fun. He may not look like, but he's tough as well, running for umpteen kilometers through the mountains with me, even doin some extra rounds.-. Cheers Rob

-
I have this one too and I'm really eager to built it, but the rigging... I also have among other goodies for the FE.2b these figures, which I plan to use, as they are the most dramatic duo in resin history . The Fighting Fees Pilot/Gunner for Fe.2b, Wings Cockpit Figures RFC07 B (scalemates.com) Cheers Rob
-
What is on your bench right now ? Share a picture :)
DocRob replied to Martinnfb's topic in Modelling Discussion
Thanks Phil, I build up residues with mud / earth washes, with added pigments in different earth shades. I start with the darkest and as a last step, everything got blended with mineral spirit. This way the impression of build up residues becomes more 'real', as it flows more into the corners and hidden places, where dirt will always accumulates. Well the figure, I have the feeling, I let the guy down, being well printed and all, but after all the eye issues, I'm eager to have the Tankette and driver off the bench. Cheers Rob