DocRob
-
Posts
7,041 -
Joined
-
Last visited
Content Type
Profiles
Forums
Events
Gallery
Everything posted by DocRob
-

Done - F-4EJ Kai Phantom - The Last of it's Kind ZM 1/48
DocRob replied to DocRob's topic in LSM 1/48 Work in Progress
As I only wanted the seat detailing, I opted for KitWorld this time and wanted to use the kit decals for the pit. When I build the Tamiya Tomcat, I will try the Quinta set. I found the KitWorld 3D decals to difficult to use in 'free space', like the pull circles for the top of the seats, because they curl up, when contacted with CA. Your thoughts about ZM are exactly like mine, Peter. Way over the top in parts and missing out big time, like with the seat belts. But I see a big improvement plastic wise compared to my ZM TA-152 build. The non clear plastic is absolutely fantastic and that's good news. Cheers Rob -
Saw this an hour ago and liked it, I may be tempted. Cheers Rob
-
Dragon Panther A with Zimmerit
DocRob replied to GazzaS's topic in LSM 1/35 and Larger Work In Progress
Great idea, forming the metal sheet after the plastic. When I saw the pics, I, like you immediately searched for a way, to replicate the hinges, which look too coarse. One way would be to put some mud on, but I would have tried to shave the parts off te plastic, before forming the sheet over. How rigid is your used foil? Do you have to be very careful while handling the model? I have a nice collection of lead wine caps, which is a great material to replicate details and cloth, and maybe smaller fender parts like yours. At least, it's an excuse for opening wine bottles in the evening . Cheers Rob -
Must be a nightmare, to get everything aligned on the cabins, Rich. Again, a great example of your scratchbuilding abilities. Cheers Rob
-
M4 A4(t) (using 1:35 Dragon M4A4 kit)
DocRob replied to marcopreto's topic in LSM Armour Finished Work
Like Gaz said, great build and even better figure painting skills. Cheers Rob -
Done - F-4EJ Kai Phantom - The Last of it's Kind ZM 1/48
DocRob replied to DocRob's topic in LSM 1/48 Work in Progress
I went through some troubles on the way to finish the cockpit and have to rant a bit. I bought some Kits-World 3D decals for the seatbelts and other bits and found that there is no manual whatsoever supplied. I tried to assign the Kits-World decals according to different Eduard manuals and failed. What is this company thinking. What might work on a Fokker Dr.1, is a no go on the delicate multi part belt system, like the Phantom's. I assembled one with a fantasy layout and decide later after touch ups, if I can get away with it under the closed canopy. The other option is to loot my -B Phantom's resin seats, but I guess, it's a different type. As I want to go on with the build, buying new seats is no option, as they take minimum two weeks to arrive here. Another rant is directed to Zoukei Moura. There is no seatbelt option in the kit, no decals, no PE, no molded on belts. Okay by me, but they could have provided a harness layout in their other ways over precisely manual. Enough ranted, I will look for solutions now. Cheers Rob -
617 Sqn Tornado Dambuster 70th
DocRob replied to Kaireckstadt's topic in LSM 1/35 and Larger Work In Progress
That Tornado pit looks really lifelike. The extra details and the believable positions of the crew render a perfect busy workplace. Cheers Rob -
I have the Infini cutting templates and like them a lot. Lots of masking tasks can be cut with these. Sometimes, when I'm using the circular one for smaller circles, the blade jumps out of the grove easily if not working full concentrated. I have a set of metal etched templates from Voyager which are more forgiving in that regard. Priceless tools, both kinds, specially for cutting tiny strips for wooden WWI props. Cheers Rob
-
Very cool ride, gratulations Ryan. My JK Unlimited has two tops, but since we stripped the hardtop, we are perfectly happy with the soft top. It's way easier to open, without the necessity to store the hardtop parts in the car. The soft top even weathers storms without complains and too much noise. Mine has leather inside, which I really like. Was part of the package as it's a special edition, called JK Edition, which are the last 1250 JK's built. Cheers Rob
- 2,035 replies
-
- 3
-

-
- car related stuff
- anything about cars
- (and 6 more)
-
Nice collection. I really like the ResKit stuff, great quality and a steadily widening portfolio. I want to try Kelik 3D decals for my Gloster Gladiator. Seems to be affiliated with ResKit. Cheers Rob
-
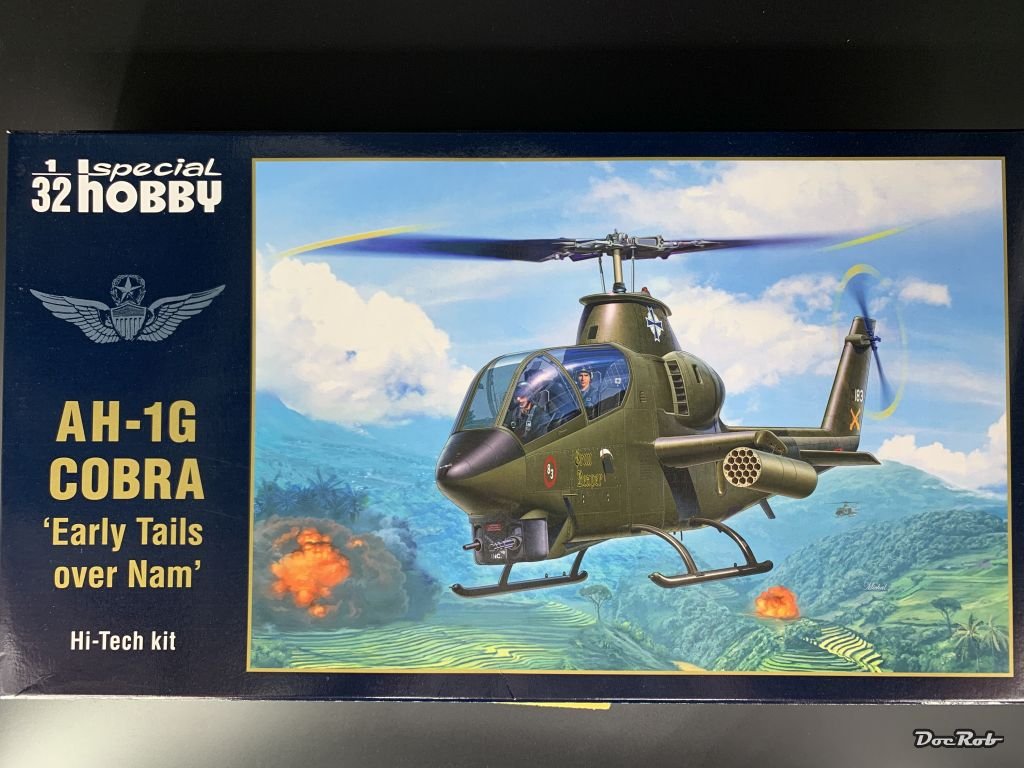
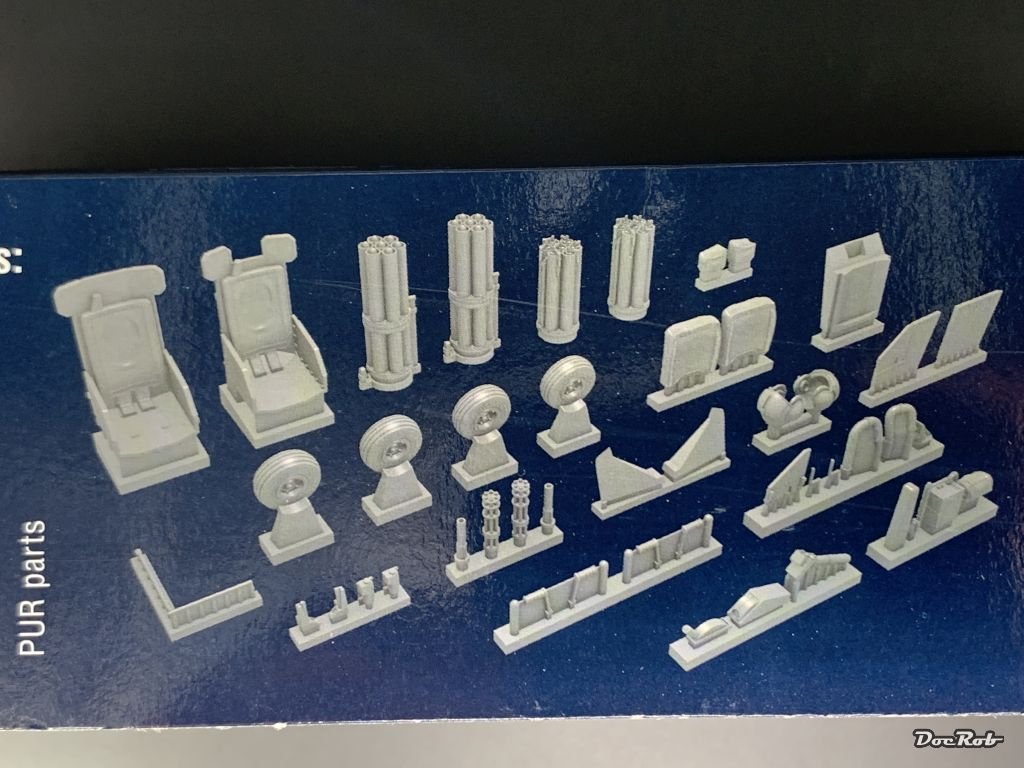
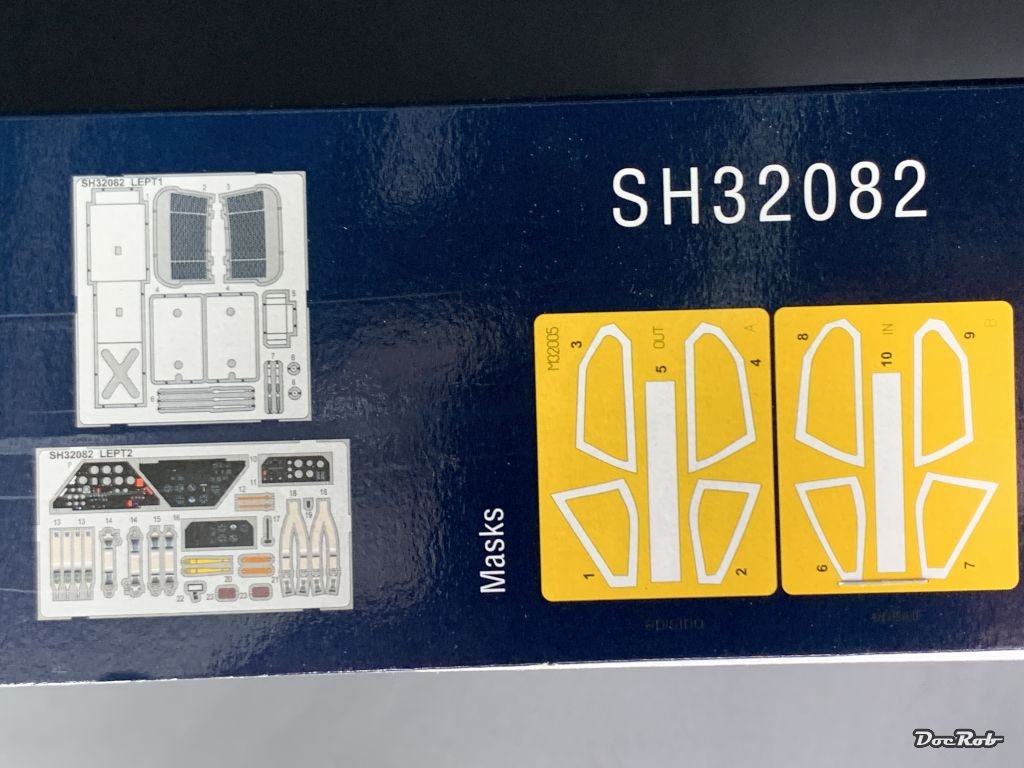
As much as I like helicopters and their mechanics, versatility and abilities in real live, I had not much love for them in large scale. That changed a bit, when I saw the Cobra issued by ICM and I was finally sold, when Special Hobby released the ICM plastic along with resin parts, 3D printed parts, color PE, in- and outside masks and new decals. For a bit more than 40€, I got a complete package of the Cobra, unbeatable. Cheers Rob


-
Done - F-4EJ Kai Phantom - The Last of it's Kind ZM 1/48
DocRob replied to DocRob's topic in LSM 1/48 Work in Progress
Thanks Peter, I almost forgot the fogging issue due paint or whatever, thanks for the warning. I will try to only glue the canopy in place on two or three tiny dots, if I need to pry it open. I will use Tamiya Lacquer and Lacquer gloss, so I want to be on the save side. Cheers Rob -
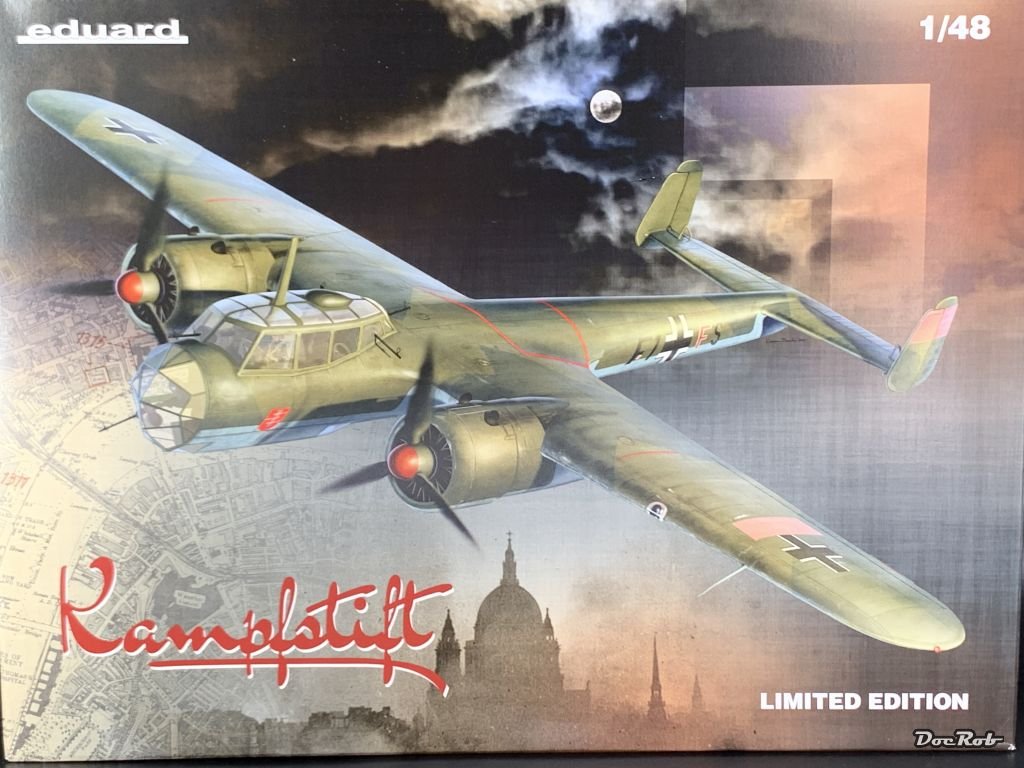
The Ju looks beautiful Phil, makes me want to start my Do-17. Cheers Rob
-
Done - F-4EJ Kai Phantom - The Last of it's Kind ZM 1/48
DocRob replied to DocRob's topic in LSM 1/48 Work in Progress
Thanks Carl, I never would have thought, that lacquer thinner isn't causing any damage to the clear plastic. Good to know, my clear canopy toolkit expands momentarily . Cheers Rob -
Done - F-4EJ Kai Phantom - The Last of it's Kind ZM 1/48
DocRob replied to DocRob's topic in LSM 1/48 Work in Progress
Thanks Phil, Amazon.co.uk has them listed. They are not from UK vendors though. Is that a problem? I buy from big A's German-, Spanish-, UK- and US-site and had only some probs with the US based side. I hate to admit my dependency of Amazon, but retail isn't the strong side of my island . Cheers Rob -
Take care, could be a mini Facehugger from Alien. Cheers Rob
-
Done - F-4EJ Kai Phantom - The Last of it's Kind ZM 1/48
DocRob replied to DocRob's topic in LSM 1/48 Work in Progress
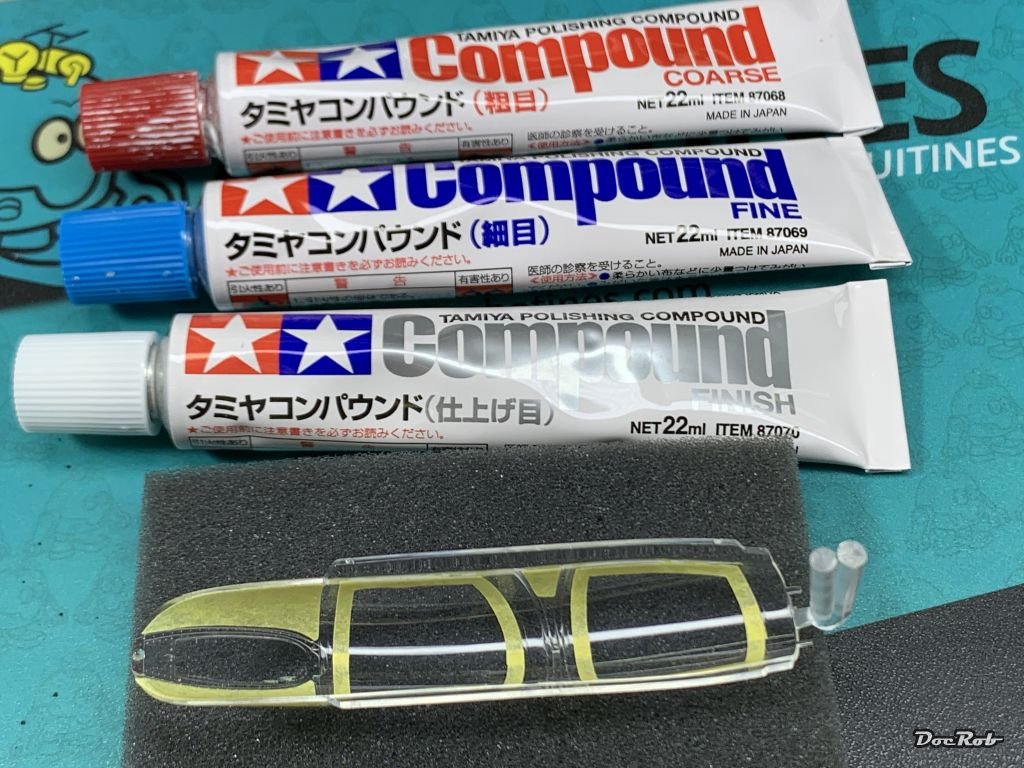
Thanks Martin, it was, after half the peeling was done, I was about to bin the thing, but I too much want to finish the Phantom. The good thing, I learned a lot again, this time about scary things like sanding canopies and later polish them. These Tamiya polishing compounds are so good and real canopy savers. I will try their polishing wax, which is still in the mail somewhere, on the finalized canopy outside for a high shine result. -
What is on your bench right now ? Share a picture :)
DocRob replied to Martinnfb's topic in Modelling Discussion
If your looking for a 17, this is the go-to kit, ICM plastic with all the goodies and decals. I will pull mine from the shelf soon. Cheers Rob
-
Done - F-4EJ Kai Phantom - The Last of it's Kind ZM 1/48
DocRob replied to DocRob's topic in LSM 1/48 Work in Progress
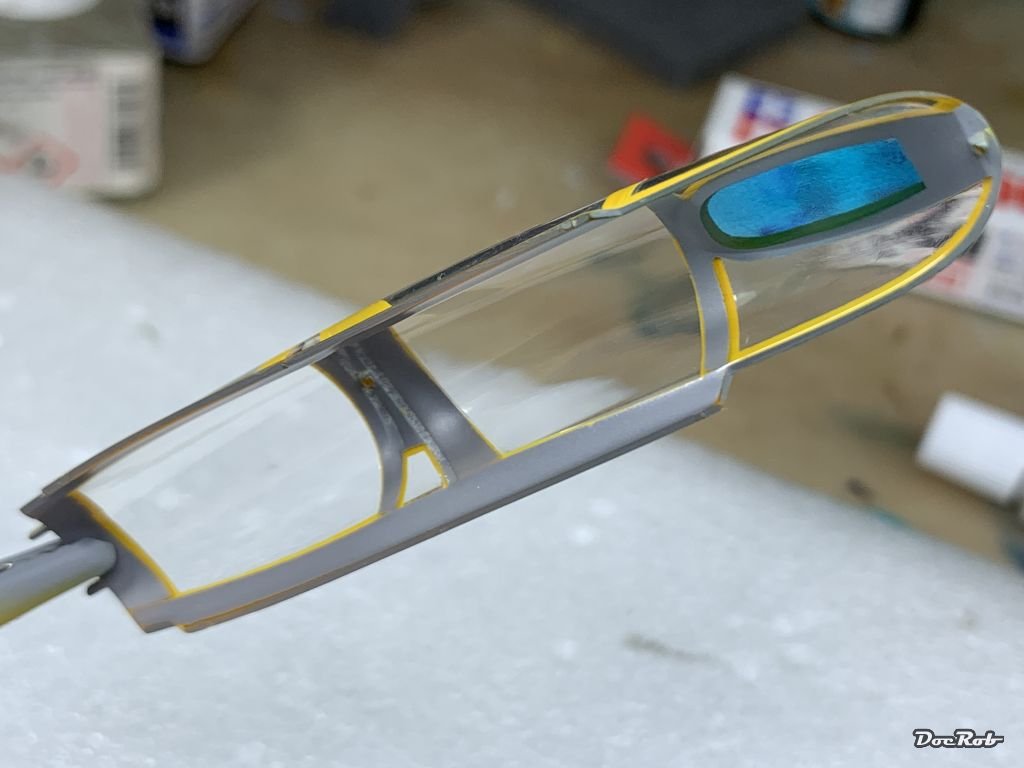
Bad things happen, in modelling and otherwise. When I peeled off the masks first thing in the morning, I was shocked, how well the liquid mask stuck. It was from a new bottle of Mr. Masking Neo, stuff I used before often. I had to use flattened wooden toothpicks to remove the gum and after an hour of frustrating peeling, the canopy looked like a total mess, scratches and smears everywhere, unusable. First, I thought about using alcohol, not for me, to clean up, but fear to smear the color and still had to deal with the scratches. Miraculously my eyes went to the Tamiya polishing set, still on my bench and I tried it on the canopy from coarse to fine and lastly finish. It worked. The colors were not smearing and I removed all the scratches and residues that way, indeed a miracle and made my day. This stuff is a phenomenal canopy saver, which is highly recommended by the way. Lessons learned, the liquid mask seems to bite into the polished canopy surfaces and I will use Kabuki to fill in the final masking from the outside for the black exterior color. Cheers Rob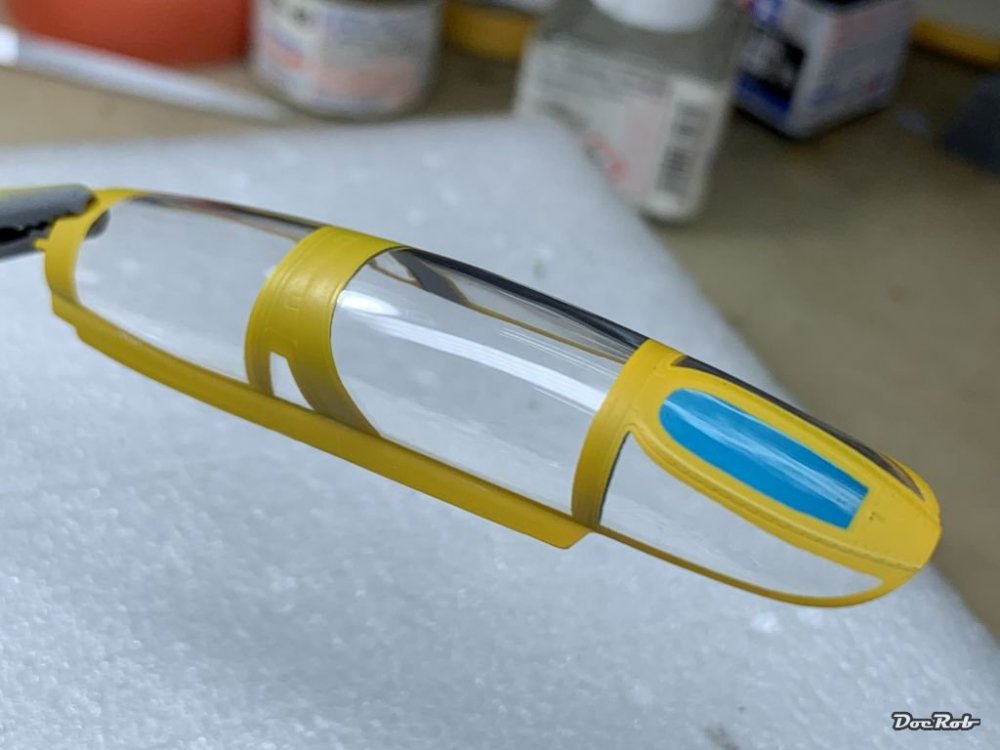

-
Dragon Panther A with Zimmerit
DocRob replied to GazzaS's topic in LSM 1/35 and Larger Work In Progress
Looks perfectly regular irregular to my eye. With paint on and normal viewing distance it will shine. Cheers Rob -
copper state models 1:32 Caudron G. III - Copper State Model
DocRob replied to Fran's topic in Aircraft Reviews
I have sworn to myself, that I will let the Caudron pass, as I did with the 48 scale seaplane. I have the Fe.2b from WNW in my stash with the strong intention to build it. Another stringback? I'm a weak guy and I've to honor the braveness of CSM, who supplied me with some of the finest kits in the last year. Thanks for the review Fran, very well made. Cheers Rob -
Done - F-4EJ Kai Phantom - The Last of it's Kind ZM 1/48
DocRob replied to DocRob's topic in LSM 1/48 Work in Progress
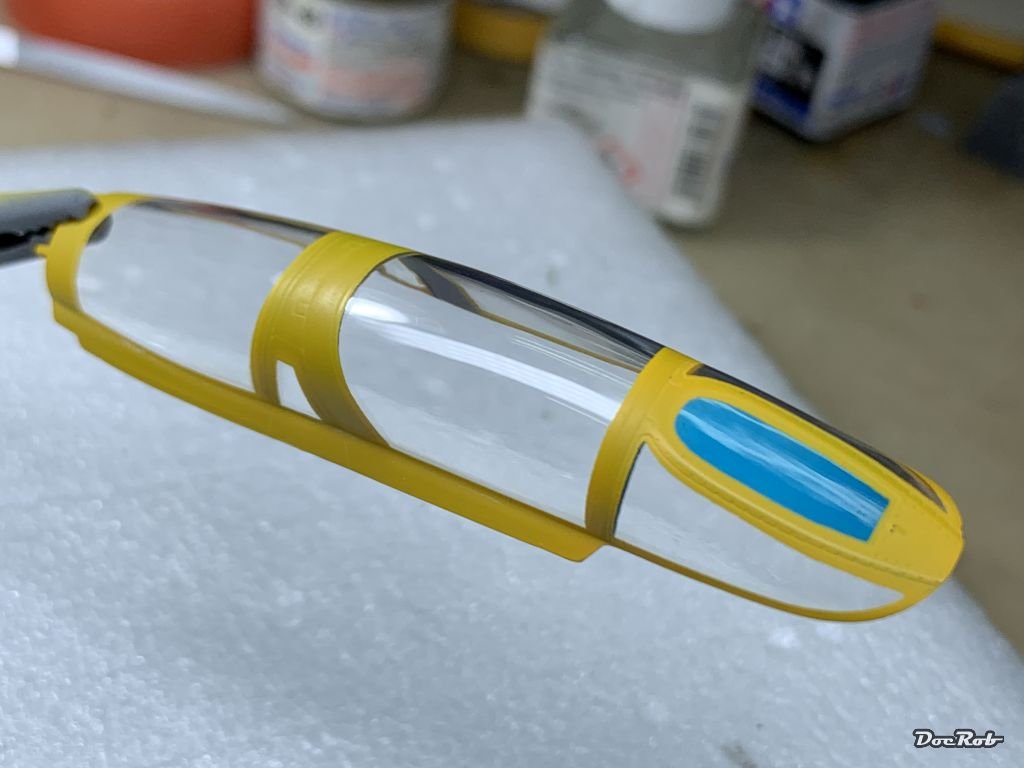
Thanks Martin, it's not unmasked yet . The good thing, If I fail with the closed canopy, I can use the open version for a second try. Generally, I have to say, the clear parts are not the strong side of the kit. details are softer in parts and there is a slight blur, even more noticeable in the one piece canopy, not to mention the scratch. I've seen worse of course, but I expected a bit more, given the quality of the rest of the styrene. The softness is noticeable on the canopy sides, so maybe ZM made a compromise with preventing a middle seam in mind. Cheers Rob -
Done - F-4EJ Kai Phantom - The Last of it's Kind ZM 1/48
DocRob replied to DocRob's topic in LSM 1/48 Work in Progress
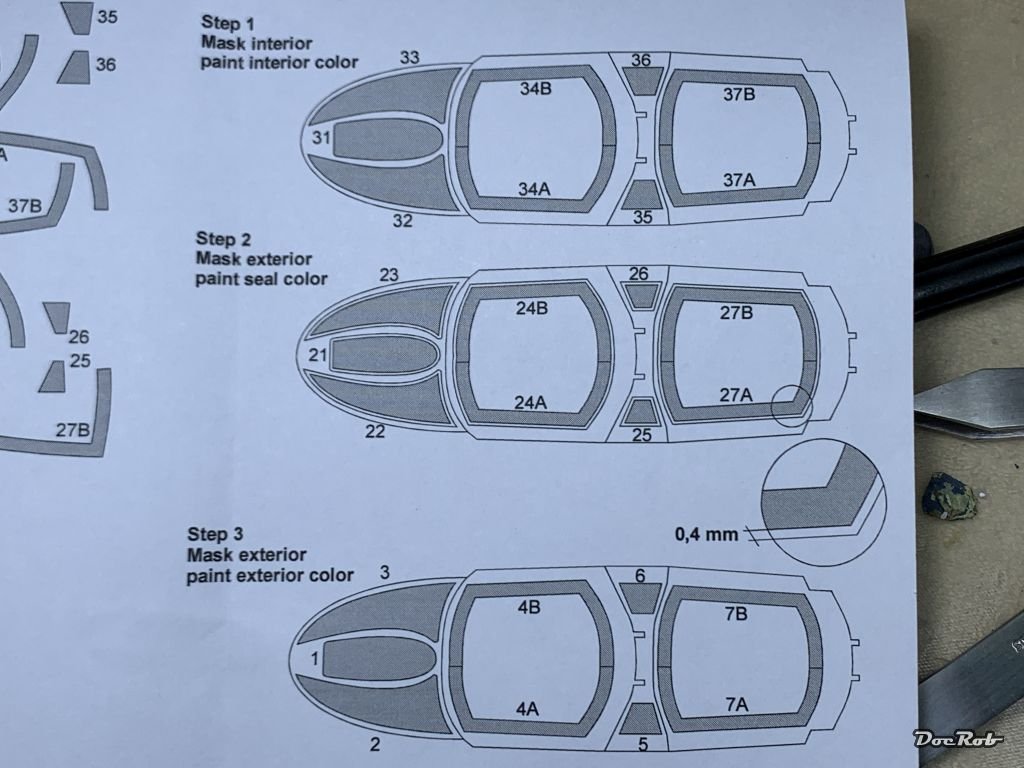
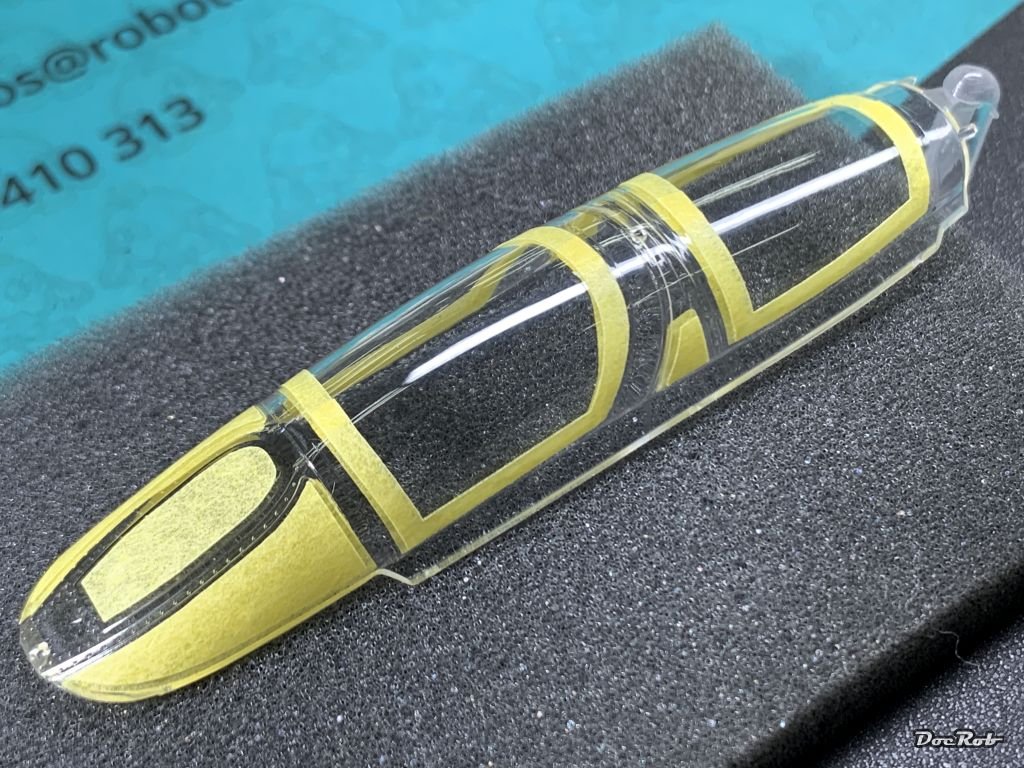
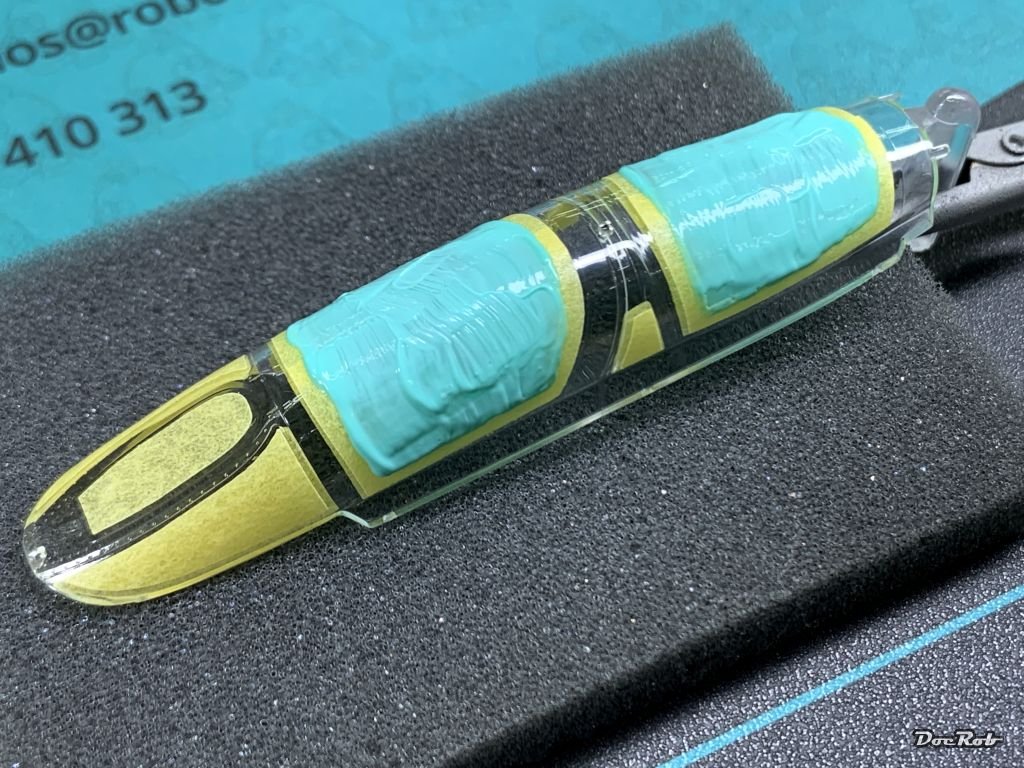
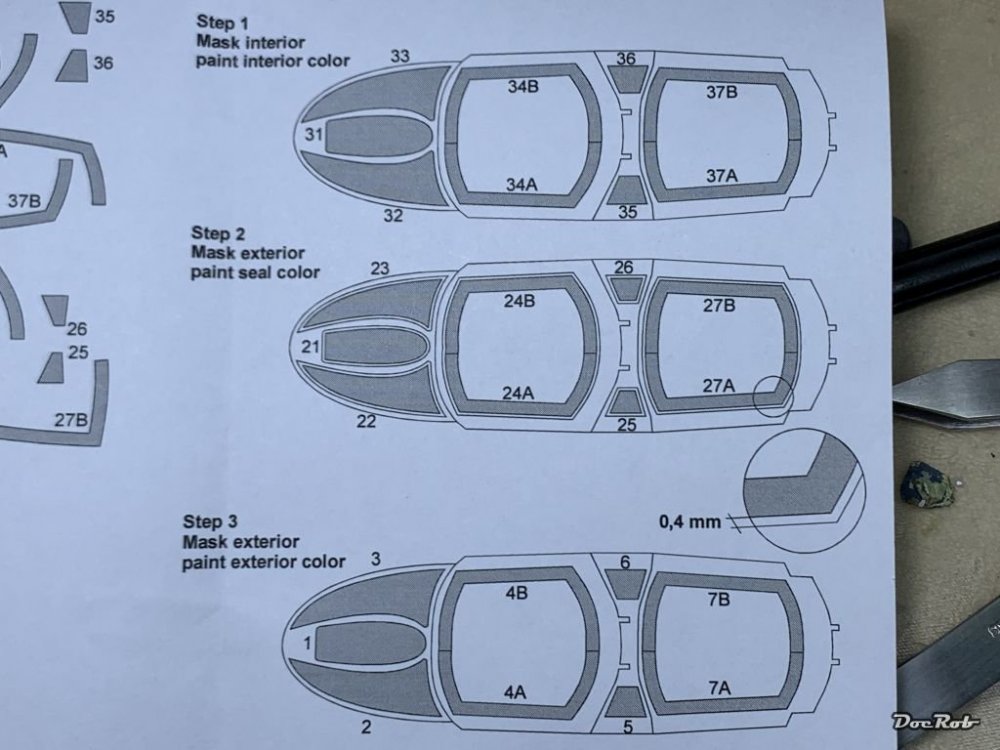
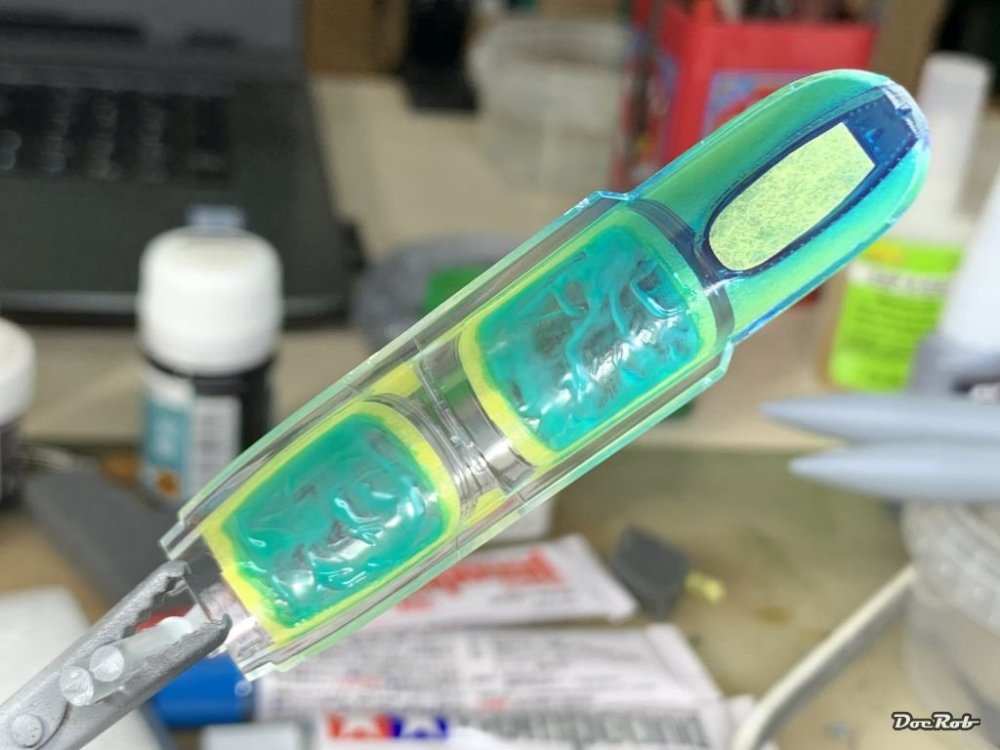
Whoosh, change of plans. Instead of torturing myself with masking for the blue wings and cockpit section, I tried to be a bit meaner to myself and start with the canopy. At first I found some tiny scratches on my just unpacked closed canopy and then another larger one. I decided to build the cockpit closed, so it was time for wet sanding with 8000 grit paper and then polishing with the Tamiya polishing pastes. The masks I use are from NewWare and include three sets, for the inside, for the seals on the outside and finally the exterior color. First I applied the inner masks with the exception of the to tint windsreen Next I applied the outside seal masks and covered the main canopies with liquid mask, inside and outside. Then sprayed the windscreen with thinned Tamiya clear blue from the inside. Applied the inner windscreen mask for protection. And finally sprayed the outside seal yellow and the inside dark sea grey. Next, the masks will be removed and the canopy installed, after inserting the bang seats and some more cockpit detail and then masked again from the outside with the third set of masks for the exterior color. I'm lucky that I studied in a university for some years, as the process and the mistake free processing made my head swirl . The masks fit and adhere perfectly and are a definite recommendation. Newware has other sets, without the sealing, if you prefer using the provided decals or decide not to depict the seals. Cheers Rob


-
I think we have two things happening here. First being the use of foul language, after the removal of the post, which I think caused the ban. I feel that 99% of us know how to behave and have the senses, what language is appropriate in a forum full of members with different backgrounds, lives and interests beside modelling. In reality, I like how this aspect works here, between model talk, some joking and teasing and of course OT stuff. OT is always problematic, specially when it washes into modelling threads and it needs some instincts to keep the balance. Second, is a bit more complicated to my eye, even here in LSM. To my understanding, this is an open minded place, where you exchange knowledge, techniques, product reviews, gossip, etc., on a subjective base or on a felt objectivity of the author. There are lots of members here, who don't mind, if their threads are used, to widen the subject. That can be everything from personal experiences, pics, links, critique, etc.. What I cannot say, is how much you 'own' your own threads. Is it only because I started lets say a WIP, that no other slightly off topic posts is allowed and where starts a topic to be OT? Is it an added historical picture, I already had in my reference and therefore do not need it? This s only a slight appeal about the joy of an open minded forum. In fact to my liking there are a few members, presenting WIP's or some other threads, but merely contributing to other's threads. Personally, I would like a bit more of interaction, but I understand, everybody has a different approach and time frame to the hobby and LSM. Generally speaking, I like it here and I like the typical laissez faire atmosphere, but maybe there are some open topics which need to be discussed about forum culture. I invite everybody to add critique, pics, opinion, jokes, own or others experiences, techniques, help or whatever to my threads. Cheers Rob
-
That's the one. Here in Europe it's still available in places. Cheers Rob