DocRob
-
Posts
7,127 -
Joined
-
Last visited
Content Type
Profiles
Forums
Events
Gallery
Everything posted by DocRob
-

What is on your bench right now ? Share a picture :)
DocRob replied to Martinnfb's topic in Modelling Discussion
I never thought about the value of my kits. I buy them to build them and even when I know, that some will never be built, I would not sell them. I bought them for a purpose, had an idea, how to finish them. I guess, I'm kind of a hoarder. It's the same with my vinyl's, I sometimes I look for the raise of their prices, specially the rare ones, but would never sell one, because I bought them for their real purpose, to be heard. Cheers Rob -
Very nice progress, this edgy style splinter camo has a nice contrast to the rounded shapes of the Henschel. What I see is mouthwatering, I can't wait to start mine. Cheers Rob
-
1:32nd scale Salmson 2-A2
DocRob replied to sandbagger's topic in LSM 1/35 and Larger Work In Progress
Thanks again Mike, I used Aviattic's Lozenge with linen texture on different occasions and know about the amount of extra work needed to apply them. Not only the linen sheets need to be cut to size, the ones which are specially printed to suit a certain type of aircraft have to be cut, they are only cookie printed. It's quite some extra work, but the results are the best you can achieve, like you show with your builds. The positive I found with Aviattic's decals is, they are very robust and very easy to work with and react very good to Micro Set and Sol. I even like the tiny bit of flex, they offer. I only had no idea, how translucent the basic transparent linen sheets are. The Lozenge qualifies for pre shading, but I never would have thought, that you can paint a camo under the linen and the colors stay mostly unaffected. Cheers Rob -
Dragon Panther A with Zimmerit
DocRob replied to GazzaS's topic in LSM 1/35 and Larger Work In Progress
Kaiser is maybe the best excuse, not to deal with ill fitting Zimmerit , he's so cute. Cheers Rob -
Thanks for the review. When the Mk. I came out, I was not immediately attracted, but that changed rapidly, when I saw a silver doped version of the Gladiator. I bought the kit and share your positive reception about it. The only little drawbacks, I found were, that no seatbelts are included and liking the idea by ICM to include cutting templates for the canopy masking in the manual, found out, that there are none in the Mk. I instructions. No biggies, it's a great kit for a reasonable price and looks like it ill be a nice and straightforward build. Cheers Rob
-
Nice choice Phil, I ever wanted to build a decent 32 scale Lysander. I built one as a kid, I guess it was a Matchbox kit in 72 scale, but I'm not sure. I love the quirky design and am eager to see, what you do with this one . Cheers Rob
-
1:32nd scale Salmson 2-A2
DocRob replied to sandbagger's topic in LSM 1/35 and Larger Work In Progress
Thank you Mike, your information comes in handy, as I have to order some Aviattic linen decal sheets for different projects, like the Stahltaube and a Fokker E.III. The result is as you showed very convincing with the linen texture showing through paint and decals. Cheers Rob -
1:32nd scale Salmson 2-A2
DocRob replied to sandbagger's topic in LSM 1/35 and Larger Work In Progress
Hi Mike, a Happy New Year to you, your work continuous with the same high quality in 2022. I don't know, if I understood the painting and decaling process right. Did you first paint the camo, gloss coat it, decal it with insignia and markings and finally apply the Aviattic linen decal, before semi matte coating overall? Is the linen decal so translucent? I only used Aviattic's lozenge decals with linen texture and these were relatively opaque. Cheers Rob -
Beautiful paintjob Phil, the North Africa scheme looks great. Cheers Rob
-
Dragon Panther A with Zimmerit
DocRob replied to GazzaS's topic in LSM 1/35 and Larger Work In Progress
That looks sweet Gaz, somehow I have a soft spot for Panthers and Jagdpanthers. The pattern of the Zimmerit looks nicely uneven. Cheers Rob -
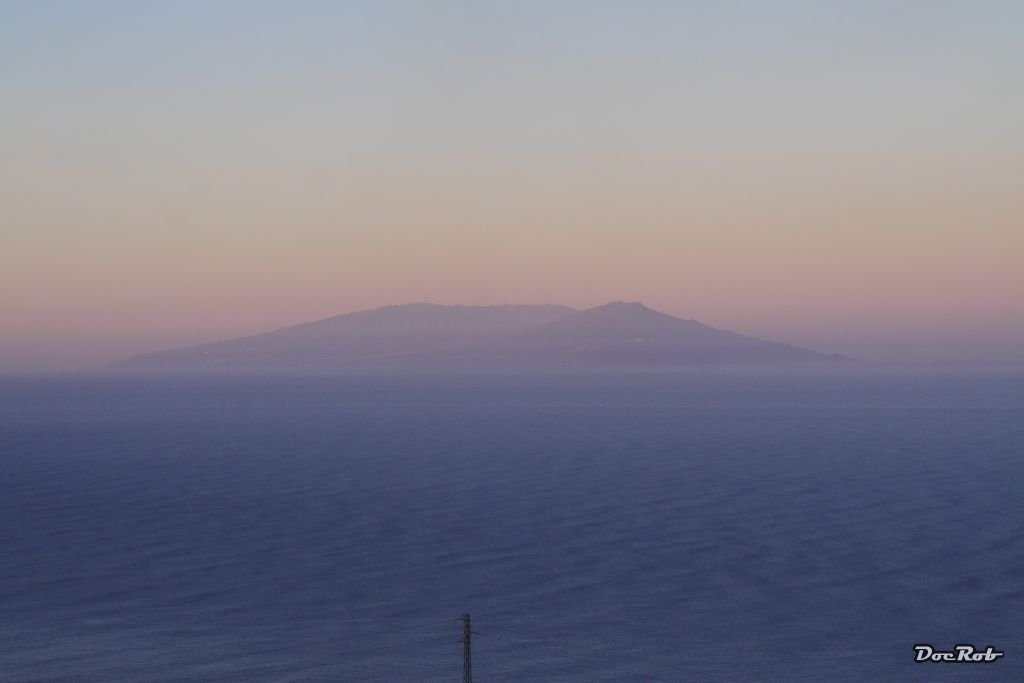
Volcano eruption on La Palma, my neighbor island
DocRob replied to DocRob's topic in General Discussion
Thanks Phil. we really do. Cheers Rob -
Sometimes, it has to be that way Peter, and it mustn't be bad modelling wise. a break can fire you up again and let you feel the love for the hobby more intense. I had some building projects here over the last year, which were exhausting, but rewarding too, because my wife and me, we realized the projects together and the results where very enrichening for our lives, like the new sea view terrace with adjoining room for meeting friends or having a barbecue for ourselves. I wish you luck with your redo project, to get rid of all the accumulated weathering effects . Cheers Rob
-
Done - F-4EJ Kai Phantom - The Last of it's Kind ZM 1/48
DocRob replied to DocRob's topic in LSM 1/48 Work in Progress
Thank you Carl, it's a lot of fun to me, replicate metals and the Extreme Metals are the perfect tool for that. Among their realistic shines and mostly very fine grain, the best about them is, like you said, their durability. No fear about masking and working on them for weathering. I love working with trustworthy colors. Cheers Rob -
Done - F-4EJ Kai Phantom - The Last of it's Kind ZM 1/48
DocRob replied to DocRob's topic in LSM 1/48 Work in Progress
Thanks Gus, these colors are great and will look perfect on your P-47. When I remember right, I used them first on my Dottie Mae P-47 some years ago. It was not without issues, but that was all my fault and I learned a lot since then, about how to work with metal color. Cheers Rob -
Done - F-4EJ Kai Phantom - The Last of it's Kind ZM 1/48
DocRob replied to DocRob's topic in LSM 1/48 Work in Progress
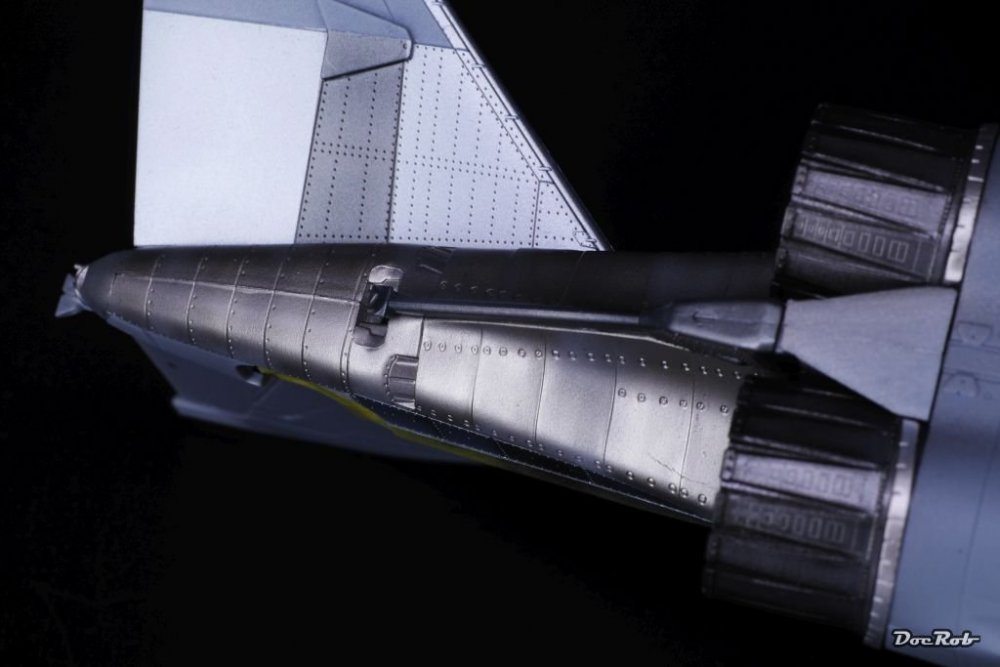
Thank you Gaz, I know, these Phantoms tend to look really dirty under their tail feathers. Lots of soot, mostly streaked in vertical direction. I want to have a 90% new looking paintjob for the high contrasting KAI F-4. I will do the rest of painting and decaling, before I decide, how far I go with my metal weathering. I'm pretty sure about a pin wash, but maybe add pigments and streaks. The actual state is only the metallic base, where the materials show, with their heat treatment and their slightly uneven surfaces. Cheers Rob -
Done - F-4EJ Kai Phantom - The Last of it's Kind ZM 1/48
DocRob replied to DocRob's topic in LSM 1/48 Work in Progress
Thank you Peter, it's really not that hard to do. I look at various photos of the real thing, try to imagine which materials were used and in which way they were fabricated, assembled and used and try to figure out a plan, how to put my formed picture into scale reality and then it's tail and error . Cheers Rob -
Volcano eruption on La Palma, my neighbor island
DocRob replied to DocRob's topic in General Discussion
Happy New Year and to us it's even more happy as the volcano eruption on La Palma is over. There is no activity since almost two weeks and the people of La Palma can continue to rebuild their houses and farms and clean the ashes. We have a kind of small heat wave in the moment and today it is a perfect day, with very good sight and no wind and La Palma looks like it ever looked before the volcano and there is no huge cloud of smoke and ash over the island. Cheers Rob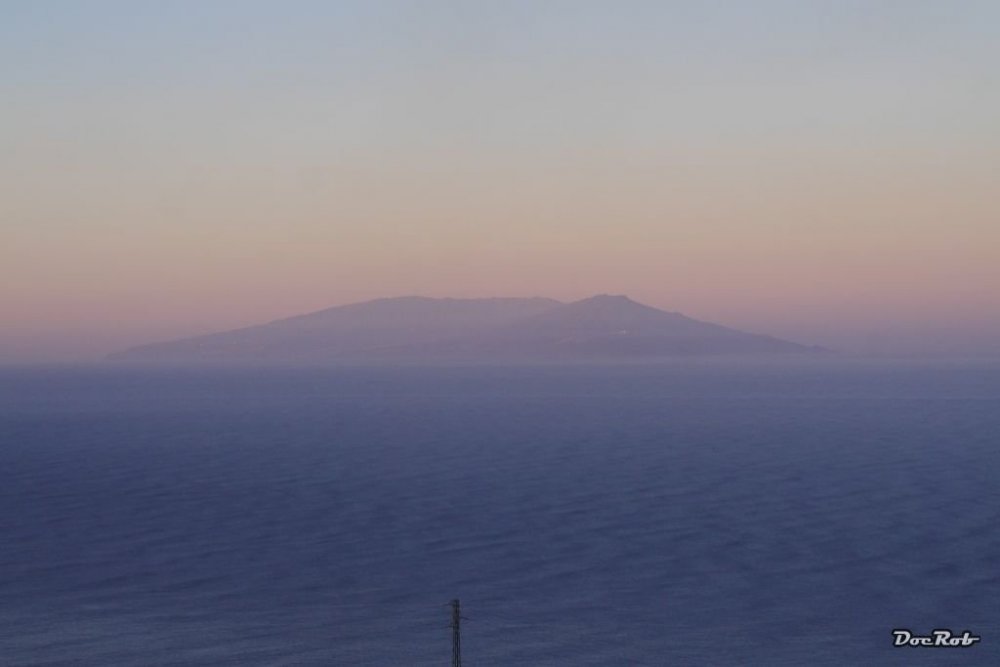
-
Done - F-4EJ Kai Phantom - The Last of it's Kind ZM 1/48
DocRob replied to DocRob's topic in LSM 1/48 Work in Progress
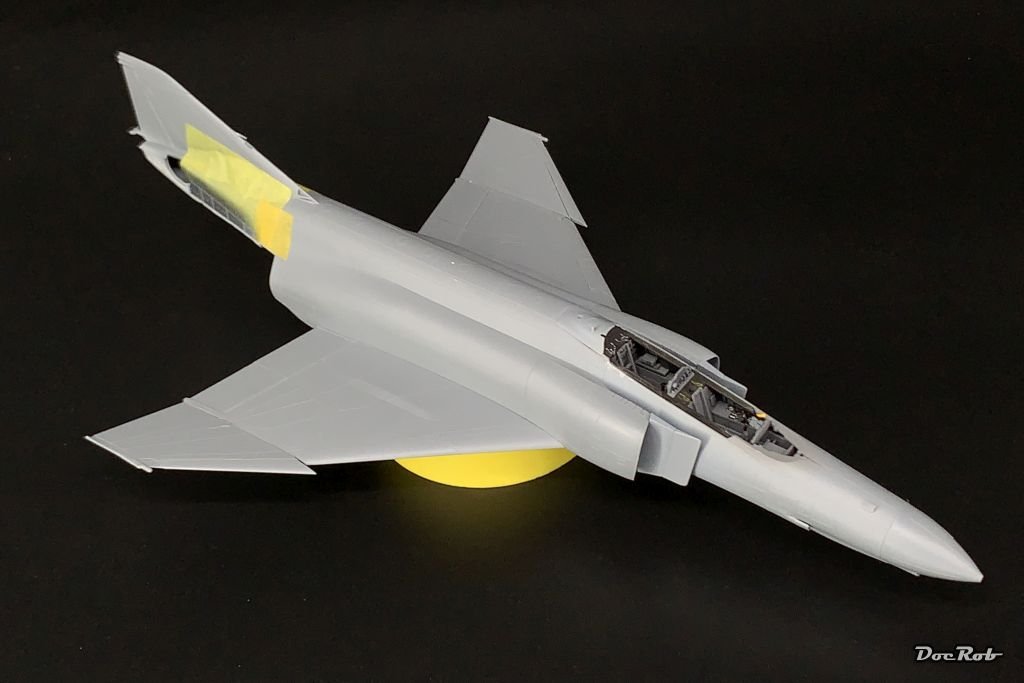
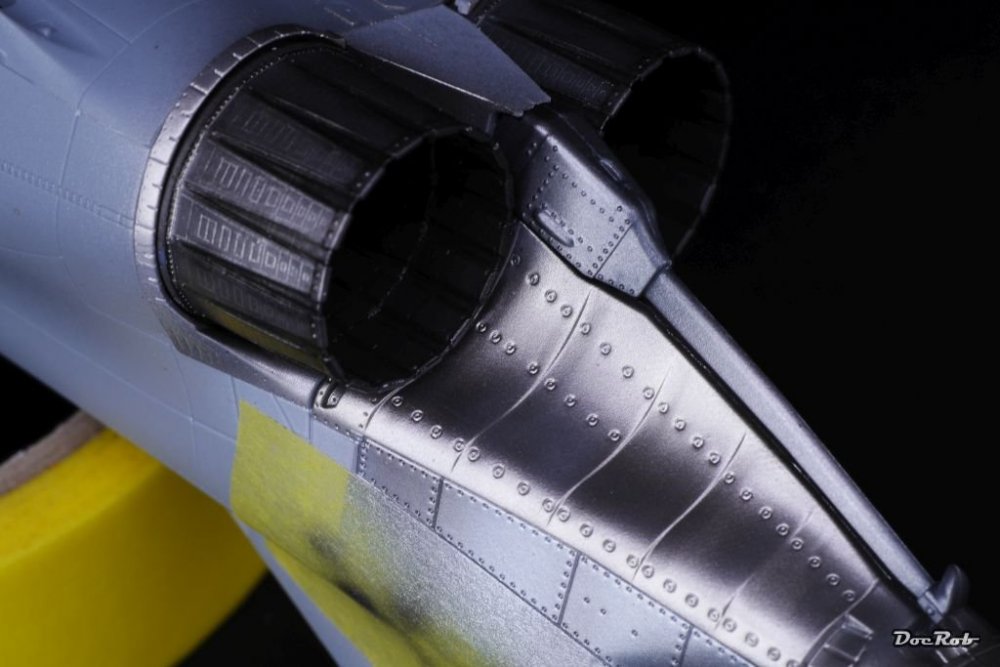
Happy New Year to you too Phil. The pictures show only a mock up, the engines and nozzles, along the circular fairings, the hook and the tail wings are not glued yet. I will mask the metallic fuselage section next and continue with applying the grey fuselage color. The metal panels are so easy to mask, because the panel lines are deeply carved. It takes only Kabuki tape and a sharp blade to retrace the panel line with. As good as the engineering is, I don't like the manual, as being overinformative. There are complet pages about angling the tail wings or slats correctly, with a myriad of diagrams, so that I always have the feeling to have something missed after two pages of manual, having only glued five pars together. Cheers Rob -
Done - F-4EJ Kai Phantom - The Last of it's Kind ZM 1/48
DocRob replied to DocRob's topic in LSM 1/48 Work in Progress
Muchas gracias Hombres, I can't leave metal surfaces alone in modelling, guess that's my old engineer instinct . Making materials look right has become my favorite task in modelling and metal leads by far, followed by wood, cloth and leather. I wish, I could bring myself to pay so much attention to other aspect of modelling, like figure painting,... Oh god, that could be a New Year' resolution . Cheers Rob -
What is on your bench right now ? Share a picture :)
DocRob replied to Martinnfb's topic in Modelling Discussion
Yeah, the sponge chipping sucks and you forgot to add holes for the nails as well . Earnestly, painter, spectators and paint box are looking great. Happy new year my friend. Cheers Rob -
Done - F-4EJ Kai Phantom - The Last of it's Kind ZM 1/48
DocRob replied to DocRob's topic in LSM 1/48 Work in Progress
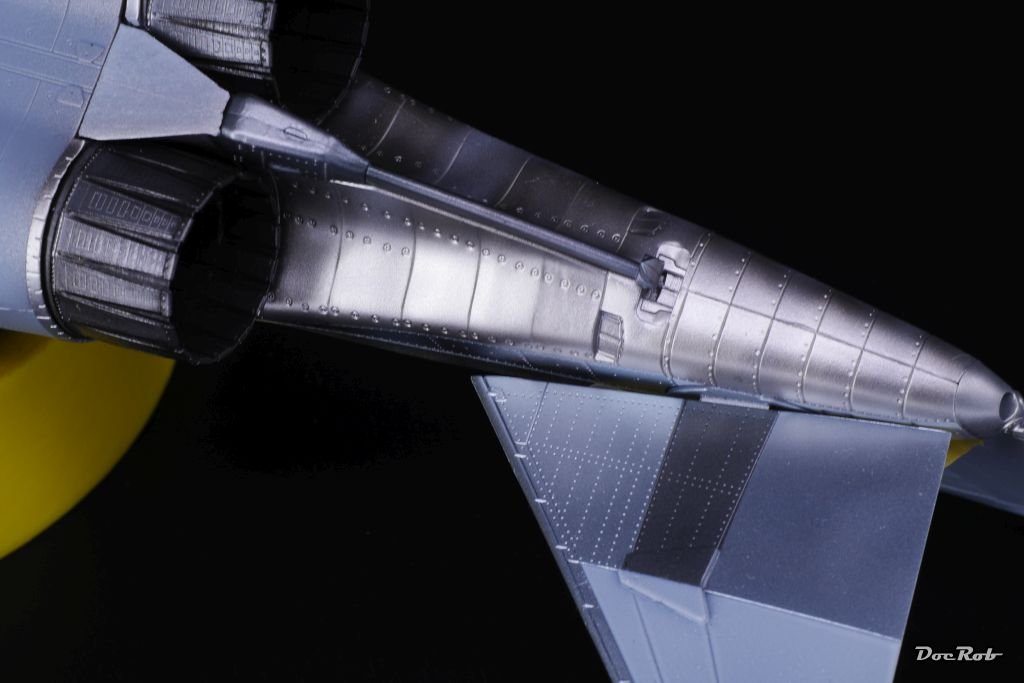
Some year end shiny glitter metal work was due today. The tail section of the Phantom got my preliminar interpretation of the real thing. I used different metal shades all from AK's Xtreme metal range. The upper areas beside the tail wings were sprayed stainless steel, along with the tail wing protection, where the middle part was masked off and sprayed gun metal. The protective sheets around the nozzles, where sprayed with titanium and accentuated with pale burnt metal. After all was dried, I did some soft panel picking with jet exhaust mixed with titanium, to create the illusion of not totally flat appearing sheets. All metal areas will be masked and later, after airbrushing the fuselage finally treated with some pigments and maybe panel liner, depending the overall look. One word about the formidable Xtreme Metal colors. On many occasions, I used them, they were very good to spray, have very fine grain and dry fast. I even went so far, because on my other builds they were very durable, to mask onto them with Tesa and Tamiya Kabuki tape without de tacking and had not the slightest lift at all, great stuff Happy New Year mi Amigos! Cheers Rob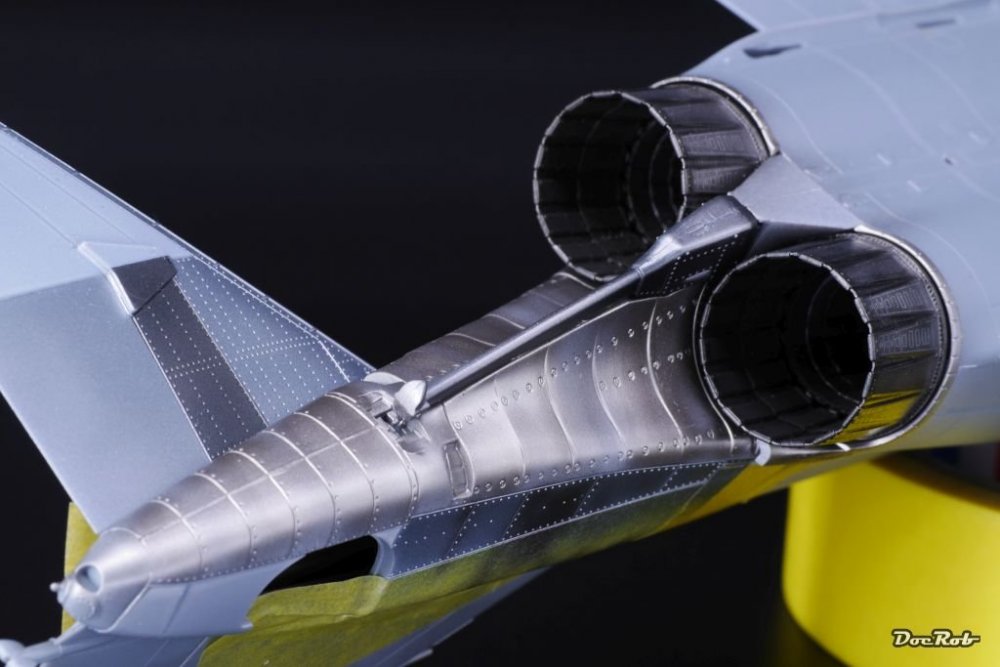

-
Done - F-4EJ Kai Phantom - The Last of it's Kind ZM 1/48
DocRob replied to DocRob's topic in LSM 1/48 Work in Progress
Plastic gluing instead of metal painting today. Due to Kalima weather with lots of dust and sand in the air, I continued assembling the wings with all flaps and ailerons and slats and prepared the parts for the air intakes. I then sprayed the inside of the intakes dark ghost gray and applied some more of the color in the recesses behind the intakes, to make painting easier later on. Then I glued the intakes in place and have to raise my virtual had again into the direction of ZM, for their great engineering and perfect fitting kit. Cheers Rob
-
Done - F-4EJ Kai Phantom - The Last of it's Kind ZM 1/48
DocRob replied to DocRob's topic in LSM 1/48 Work in Progress
Thanks Gaz, I never had much luck with removing panel line wash after application to my liking. In this case it meant to pick up all the rivets in the wheel well, one by one, phew . Cheers Rob -
Done - F-4EJ Kai Phantom - The Last of it's Kind ZM 1/48
DocRob replied to DocRob's topic in LSM 1/48 Work in Progress
Fit is absolutely fantastic until now Carl, these ZM Phantom kits are way superior to the TA-152 I built and better engineered as well. Cheers Rob -
Done - F-4EJ Kai Phantom - The Last of it's Kind ZM 1/48
DocRob replied to DocRob's topic in LSM 1/48 Work in Progress
Thanks Peter, I sure could do more detailing work and will add some detail painting later, but I will not go overboard with this build. Cheers Rob