DocRob
-
Posts
7,045 -
Joined
-
Last visited
Content Type
Profiles
Forums
Events
Gallery
Everything posted by DocRob
-

Cobra Coupe - Le Mans - Model Factory Hiro 1/12
DocRob replied to DocRob's topic in LSM 1/35 and Larger Work In Progress
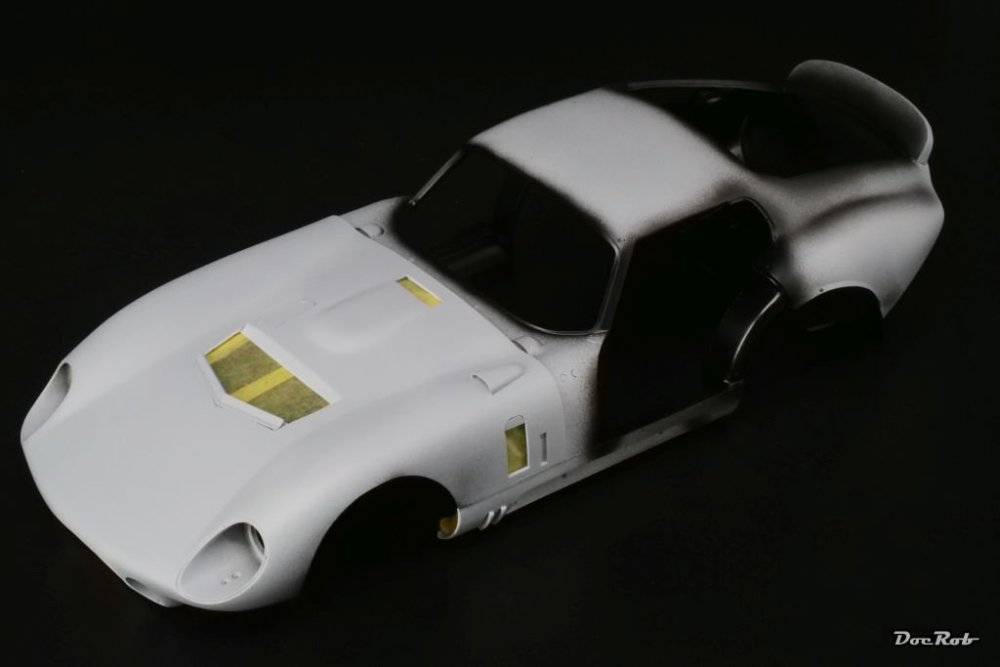
Thank you Carl, I didn´t find a single dust particle, but unfortunately two tiny color dots on the bonnet, so another coat is needed. Maybe, I try to carefully polish that away. The benefit of living remote is relatively dust free air and the normally high humidity here also helps. The Number Five colors dry within minutes, which also reduces the risk of dust in the paint. Cheers Rob -
Cobra Coupe - Le Mans - Model Factory Hiro 1/12
DocRob replied to DocRob's topic in LSM 1/35 and Larger Work In Progress
Thank you FA, the color is strange somehow. It looks different with changing lighting. My good camera renders it completely wrong, equal how I parameterized. I had to use my IPhone instead, which did a slightly better job. Cheers Rob -
Cobra Coupe - Le Mans - Model Factory Hiro 1/12
DocRob replied to DocRob's topic in LSM 1/35 and Larger Work In Progress
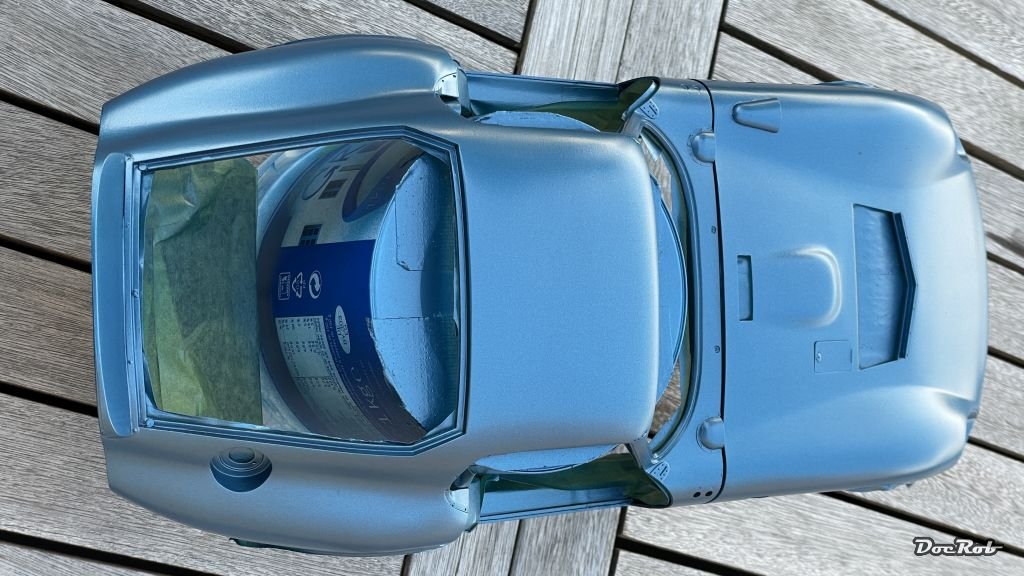
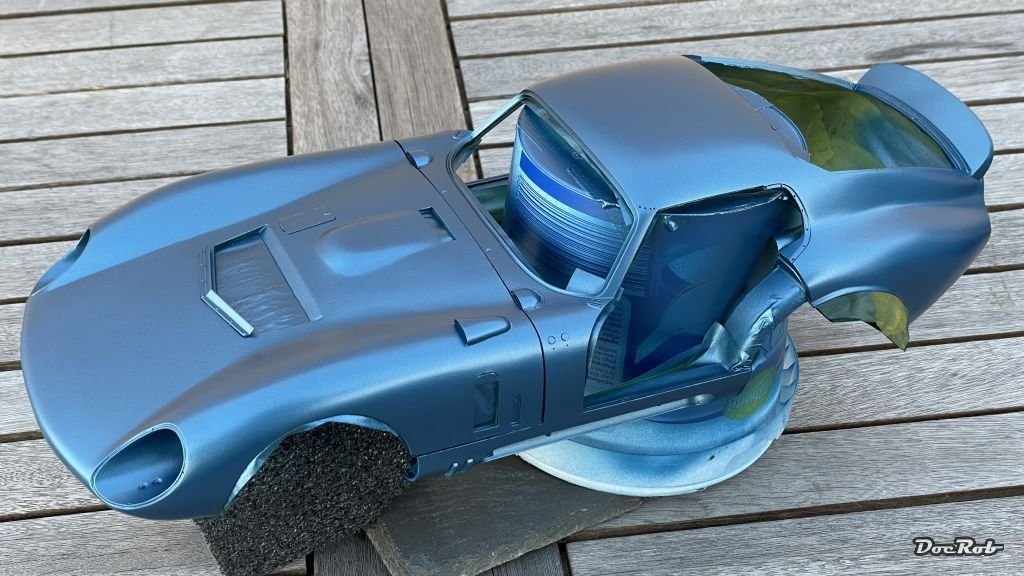
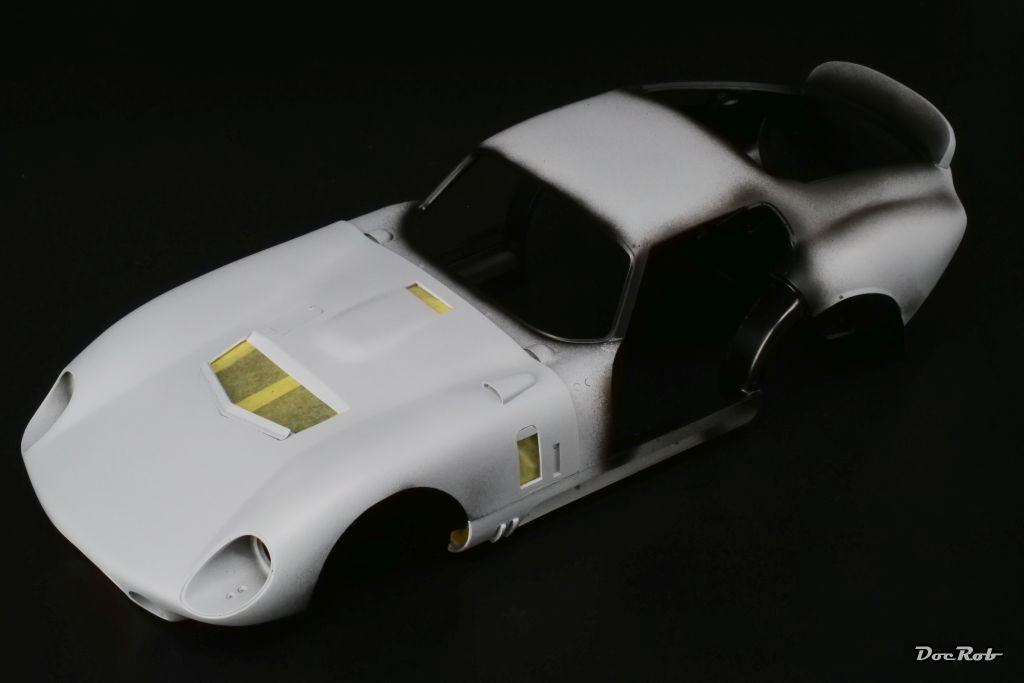
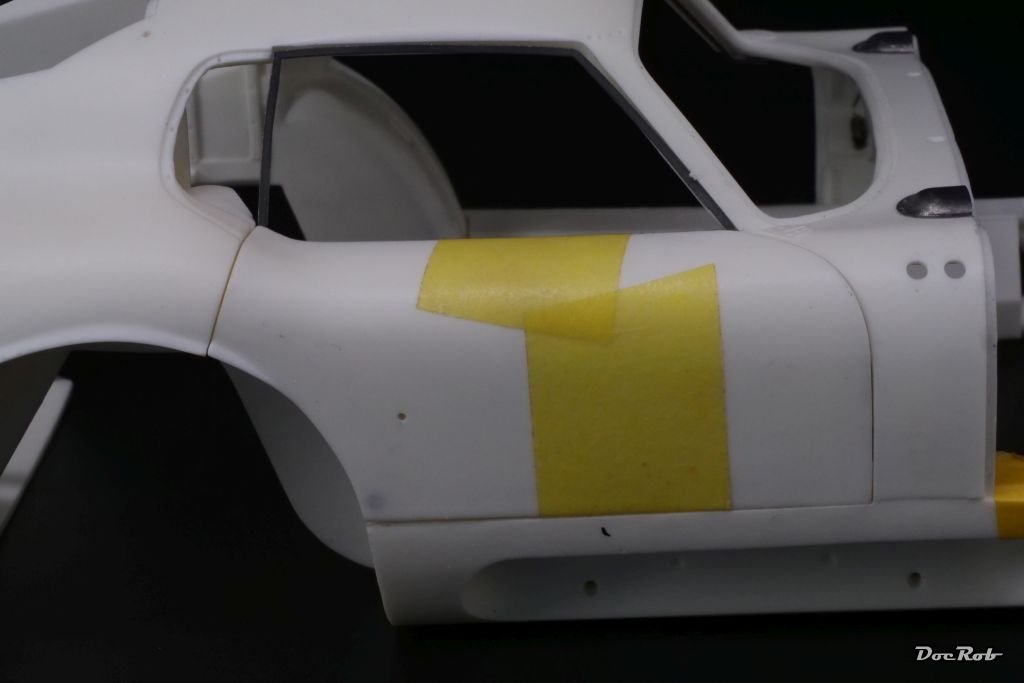
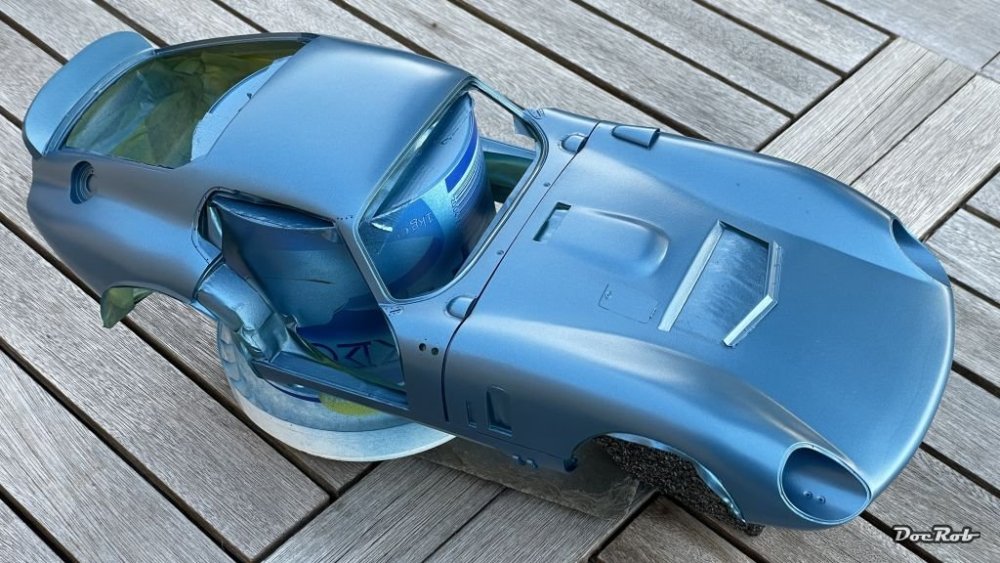
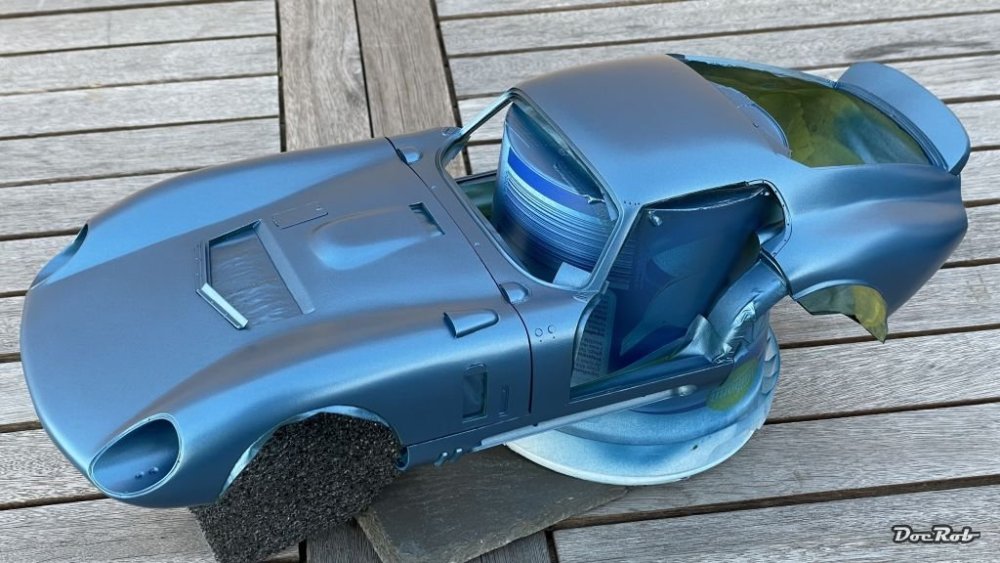
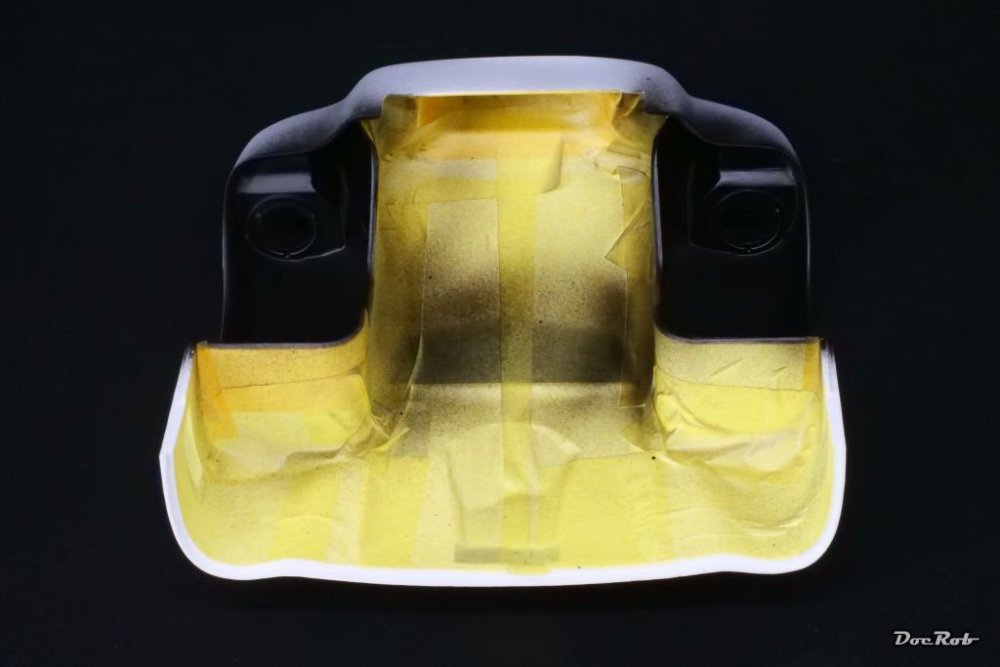
After an intense masking madness session, to protect the interior, I started with the body color. I fear, there will be color lifts with the interior, despite cleaning the resin properly, thorough priming and airbrushing, but this needs to be addressed later. It´s also one of the reasons, why I didn´t mount some of the ready painted inner fairings, before painting the body. A Kind Of Blue from Miles Davis was my soundtrack for the paintjob I used Number Five´s Cobra Blue as the main color. Other than with classic plastic kits, I had not to fear reactions with the resin and could coat a bit more liberal. I airbrushed three medium coats with a drying time of about 20 minutes in between. Number Five colors are ready to spray, but I added about a third of leveling thinner after some testing. They spray very fine and even, with extremely fine metallic grain and dry semi matte and fast. At first, I thought, coverage would be not too good, as the black overspray shined through the first coat, but after some minutes, the paint leveled and became more opaque. Besides the horribile smell, (I always wear a respirator) I absolutely love my first experience with Number Five colors. Besides, I used only one 30ml jar of color for the big Cobra, which is great to my eye. After checking, I found some tiny dots on the bonnet and will lay on a fourth coat tomorrow. Cheers Rob
- 418 replies
-
- 10
-

-
What is on your bench right now ? Share a picture :)
DocRob replied to Martinnfb's topic in Modelling Discussion
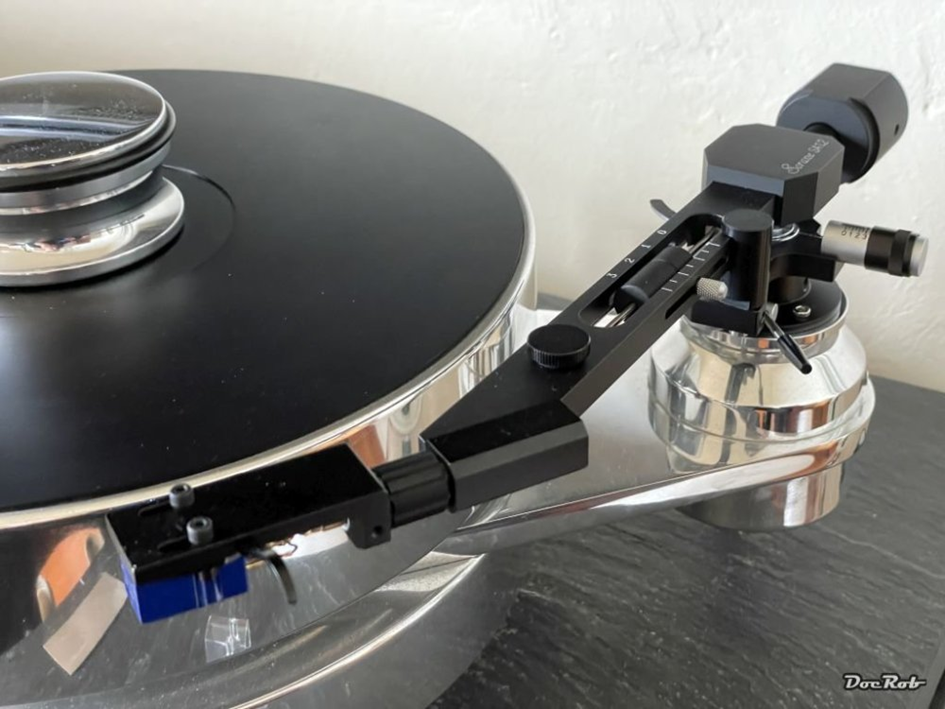
Are there young people around here, Hubert . I´m one of these, at least concerning your description, albeit turning 60 this year. I always had turntables around me. Now there are only two in the house and the depicted modified Transrotor is my main player for my huge vinyl collection as the everyday player. With a better tonearm now. The possibilities to optimize are equal to what you can do to a basic kit in modelling, sheer endless. Cheers Rob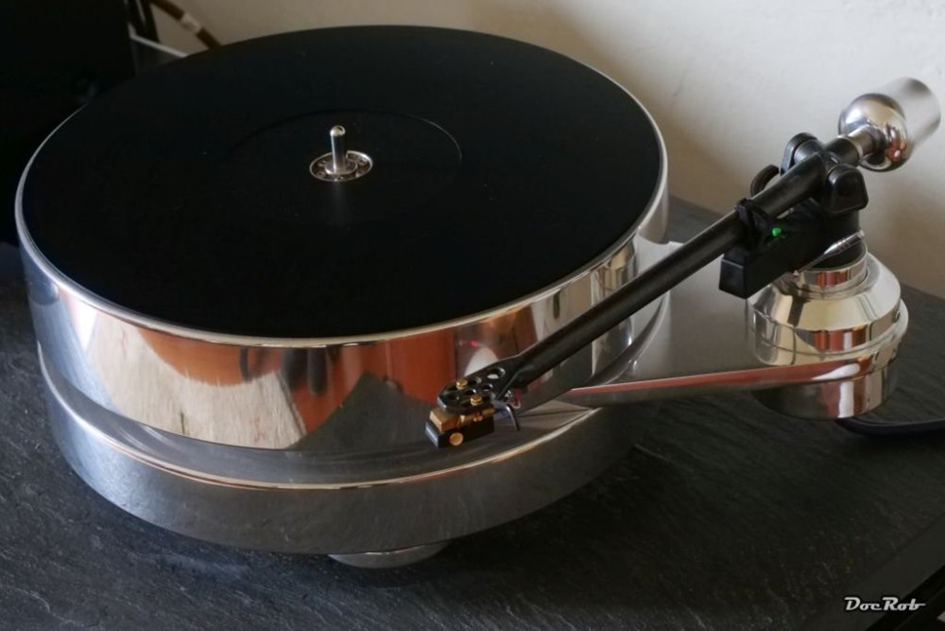
-
What is on your bench right now ? Share a picture :)
DocRob replied to Martinnfb's topic in Modelling Discussion
Luckily my veneer Rega Planet is a hand driven top loader. You just pull up the dampened starship Enterprise lid and insert the CD. It still sounds veeeery good. Goodluck with you unblocking your tray. Cheers Rob -
Cobra Coupe - Le Mans - Model Factory Hiro 1/12
DocRob replied to DocRob's topic in LSM 1/35 and Larger Work In Progress
Thanks Carl, I hope it will not lead to four trials, like with your Beat. I have only three jars of the body blue metallic. Chris and Mike, don´t come too close with your crumbling popcorn, which will ruin my paintjob Cheers Rob -
Wow Carl, four times, I wouldn´t have had the patience. Luckily, it looks good now and progress will be more trouble free from now on. Cheers Rob
-
Cobra Coupe - Le Mans - Model Factory Hiro 1/12
DocRob replied to DocRob's topic in LSM 1/35 and Larger Work In Progress
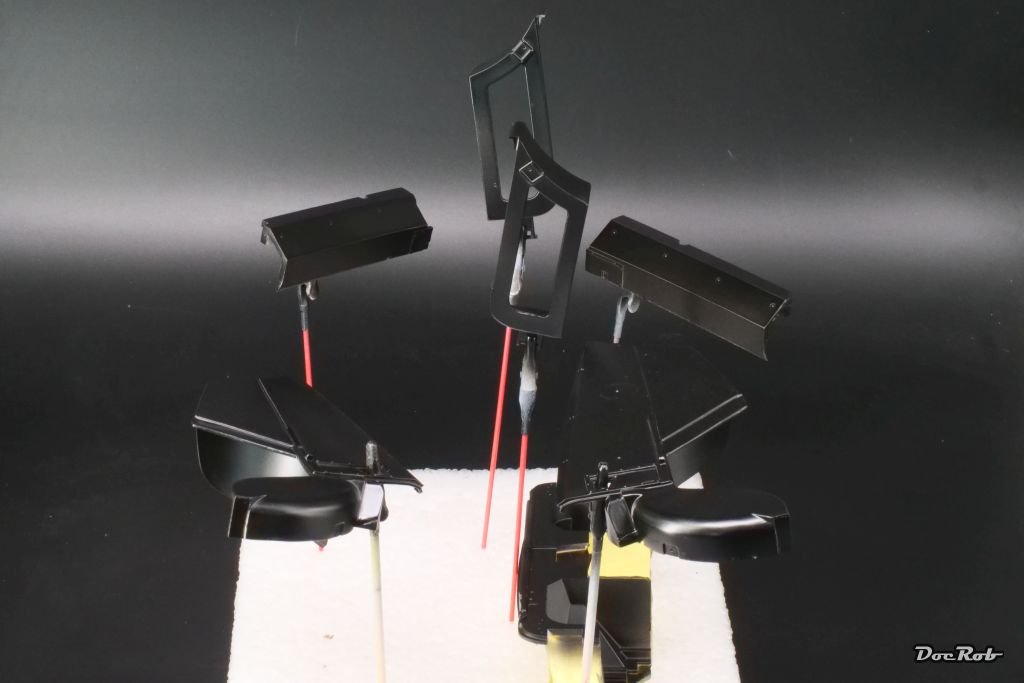
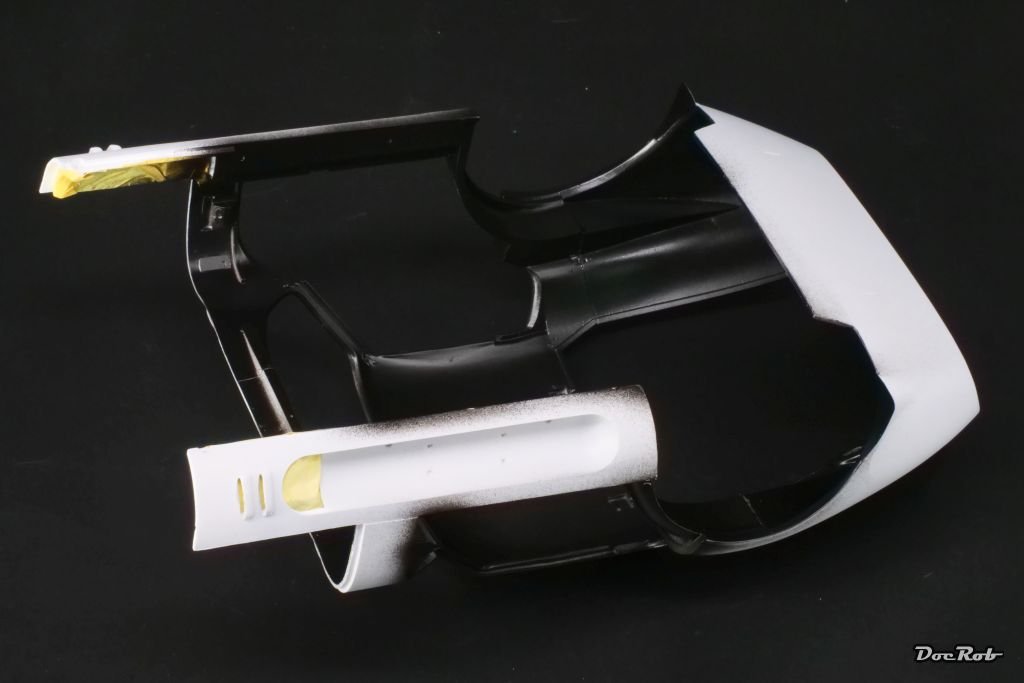
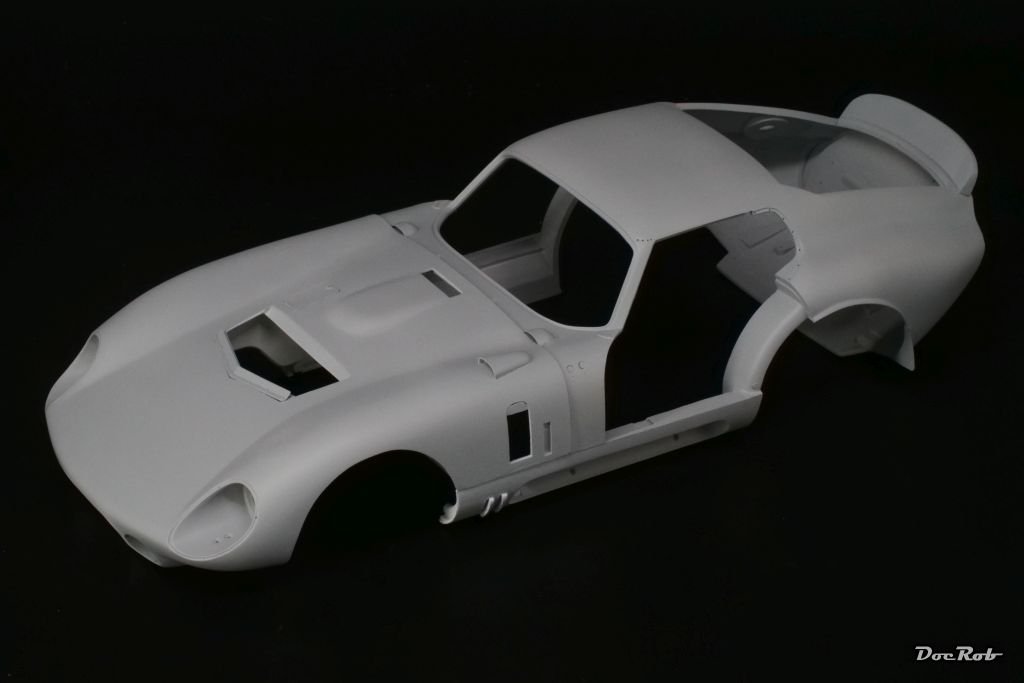
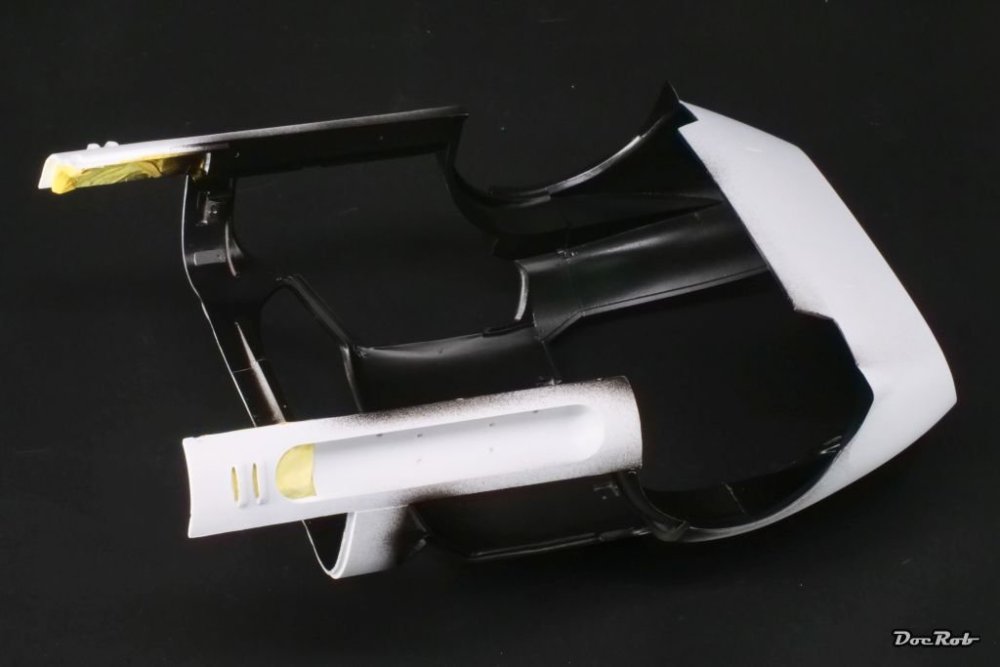
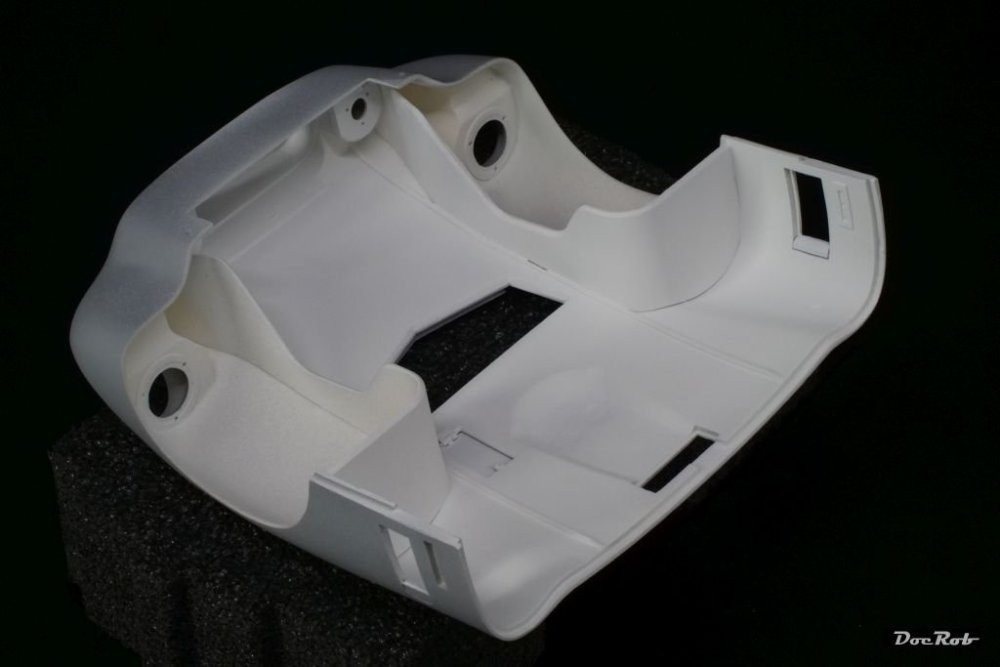
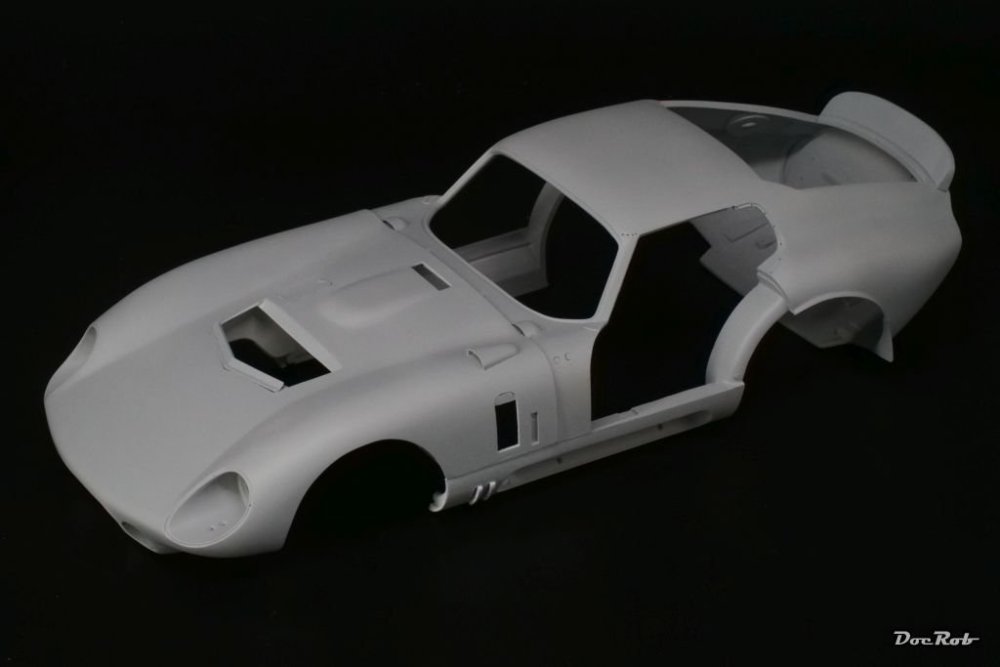
The painting stage has finally begun . I cleaned all the resin body parts in warm soapy water with a large brush and sponge first and then primed everything with Mr. Surfacer 1500 grey. After drying, I sprayed the white sections with Tamiya´s XF white (bonnet inside and firewall and small parts of the main body) These areas got masked then. Finally, I sprayed two jars of Tamiya´s excellent LP-5 semi gloss black onto the inside of the wheel wells... ... and the inside and window framing of the body. Some interior parts got also sprayed during that session. Next will be an intense masking session for the interior and a lot of praying, there are no paint lifts after. Cheers Rob
-
Impressive work, FA. I like really like your weathering technique, which seems simple to do, but meriting great results. Maybe it´s not that simple, but you make it look like . You seriously started modelling in 23. Cant wait to see what you do in lets say 10 years. Cheers Rob
-
Eduard Spitfire Mk. XVI Bubbletop 1/48
DocRob replied to CANicoll's topic in LSM 1/48 Work in Progress
I don´t decant it and usually spray two light coats with some minutes of drying time in between. With the smell, I can´t help you, it´s worse than lacquers . Don´t take too much time for adding the paint onto the dried hairspray. After a week or two, it becomes harder to activate the hairspray with dampness. Sounds complicated, but really isn´t. It´s a great weathering technique, as it is like the real thing, layered and abrasion is from the outside to the inside, like in real life. With paint chipping you add the chips in form of brushed or stippled or sponged paint, which often doesn´t look correct. Cheers Rob -
Eduard Spitfire Mk. XVI Bubbletop 1/48
DocRob replied to CANicoll's topic in LSM 1/48 Work in Progress
Nice progress, Chris. You should test your weathering method on a scrap piece. Depending on the used colors, you may have a herd time scratching / sanding through the camo layer. I would recommend hairspray here. I had difficulties erasing the camo paint of my battle suit from the sandbox built, even with hairspray. Another thought, wouldn´t there be primer. I don´t know which color for a Spitfire, but when I sprayed my Corsair, I used aluminum as a base layer, then hairspray, then primer color, activated with dampening and then scratched and weathered, then hairspray again, followed by the top camo coat, again dampened and weathered. As a result, I got a multi layered chipping, showing lots of primer color and where the abrasion would have been the strongest, there was bare aluminum. Cheers Rob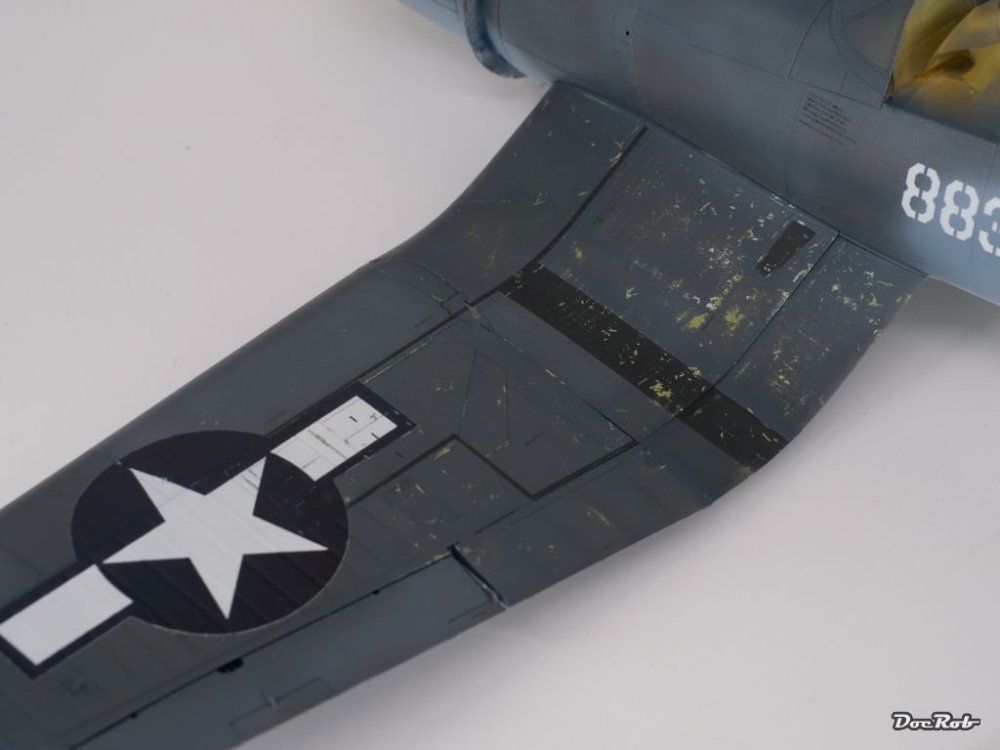
-
I like the old school F1 cigars as well, Phil. I have an 1/20 Ferrari 312 from MFH and still contemplate about buying their 1/12 Eagle T1G, the most beautiful of the F1 racers of this period . Cheers Rob
-
Cobra Coupe - Le Mans - Model Factory Hiro 1/12
DocRob replied to DocRob's topic in LSM 1/35 and Larger Work In Progress
Absolutely Hubert, I forgot to mention the buggers are absolutely brittle and break sometimes when you drop them on the workbench. Unfortunately it seems hard to find good HSS drills with small diameters in larger quantities. I once bought a box from China with drill bits from 0,3 mm up to 2,5 mm. Not expecting much, I was disappointed even more, as the smaller ones were only cut from a blank, seemingly with a wire cutter. They had no tip at all. Cheers Rob -
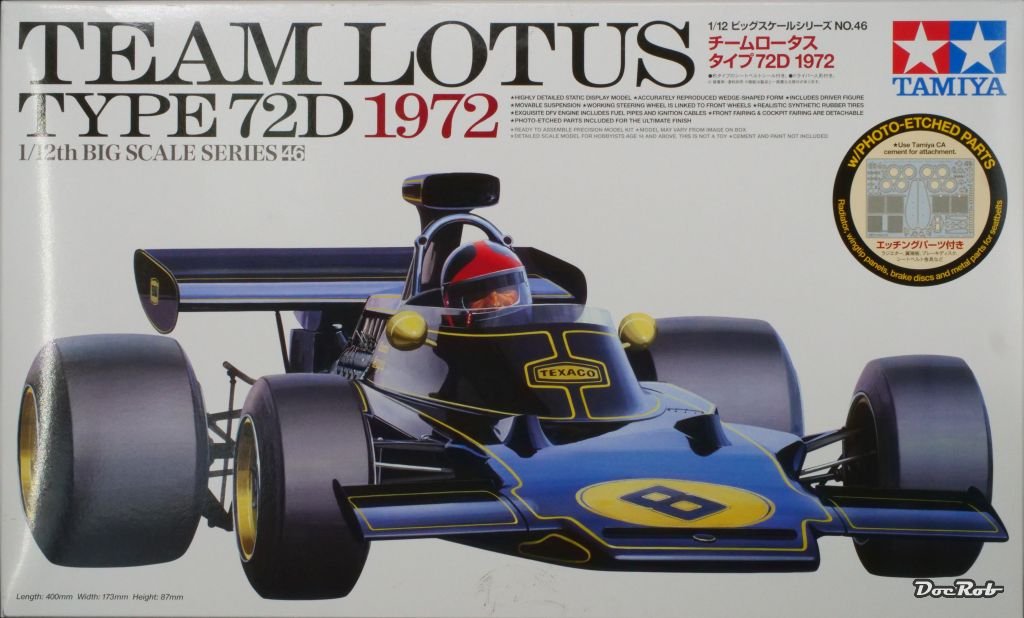
Not my most liked F1 car, but it´s a classic and I couldn´t let it pass for a good price. Most of Tamiya´s 1/12 re-releases are sold out now and I didn´t want to feel sorry, when it happens with the Lotus. Other than the Brabham BT44 and Porsche 935 the decals are not printed by Cartograph, but are looking good. Despite this, I ordered a complete set of decals from TB Decals of Italy, which include tobacco sponsors and markings for other drivers and races. There are also cheaper, partial decal sets out there, but I didn´t want to mix the gold tones with the Tamiya ones. The kit looks a bit simpler than the F1 Renault RE20 Turbo which I built, but it´s an old kit and I guess, building it will need extensive clean up work. I plan to include MFH Aluminum funnels (also not included, other than with the BT44 with the same engine) and of course wires and tubing along with connectors. Cheers Rob

-
Cobra Coupe - Le Mans - Model Factory Hiro 1/12
DocRob replied to DocRob's topic in LSM 1/35 and Larger Work In Progress
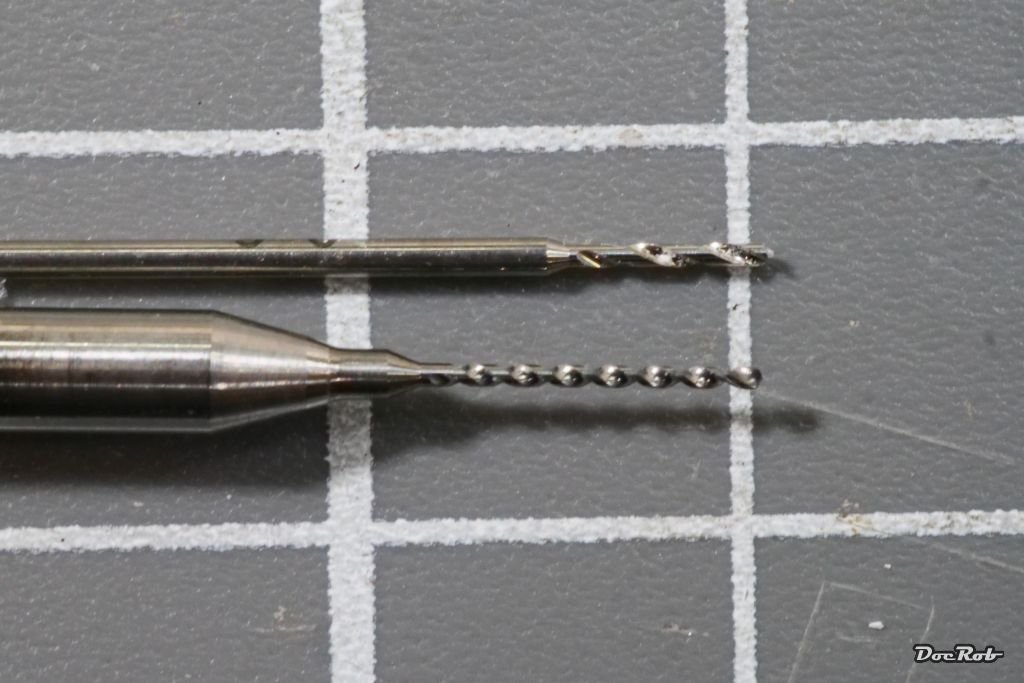
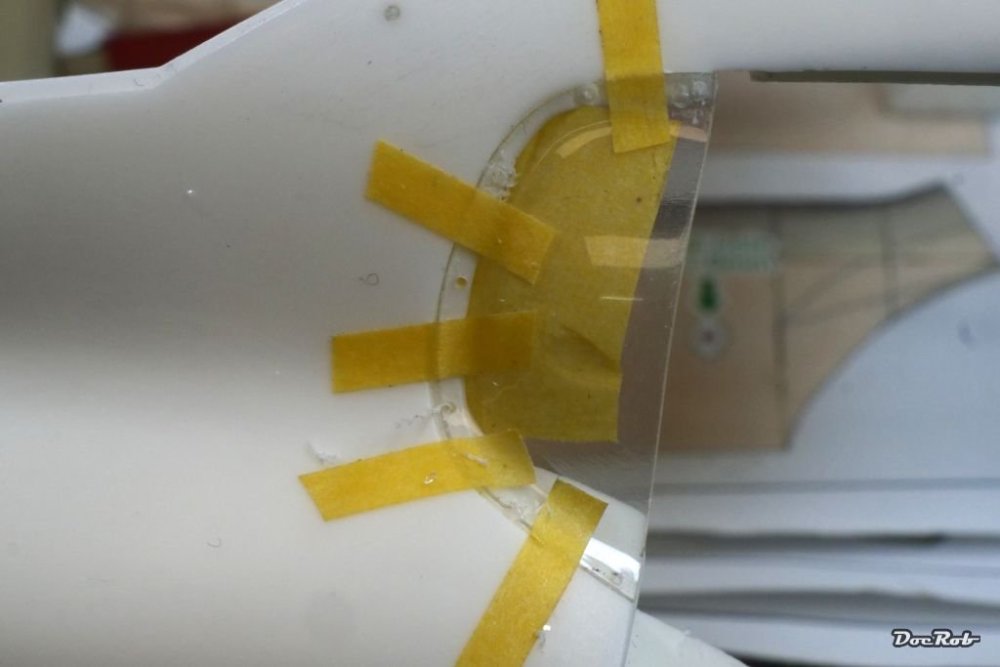
Hopefully these are the last preparations before entering the painting stage, but as often, there was one step back, before advancing. I had to remove the already installed internal framework and internal rear view mirror, because they would have interfered with masking the inside of the body later. I finalized cutting the transparent air scoop vac parts with a pair of fine scissors, sanded them to fit and dry fitted them for drilling holes for the rivets. The first side, I drilled with a 0,6 mm DSPIAE drill bit, which tended to lift up the clear part, when drilling through. I changed to a Tamiya 0,6 mm drill bit for side two and got much better results. No lifting and dramatically less burr, which is a pain to remove with these clear vac parts. When you compare the drill bits, the Tamiya is of the classic HSS style and angles, where the DSPIAE bit is like all the other PCB board drill bits and not good for drilling thin materials, as it "eats" into the material and leaves a lot of burr. Cheers Rob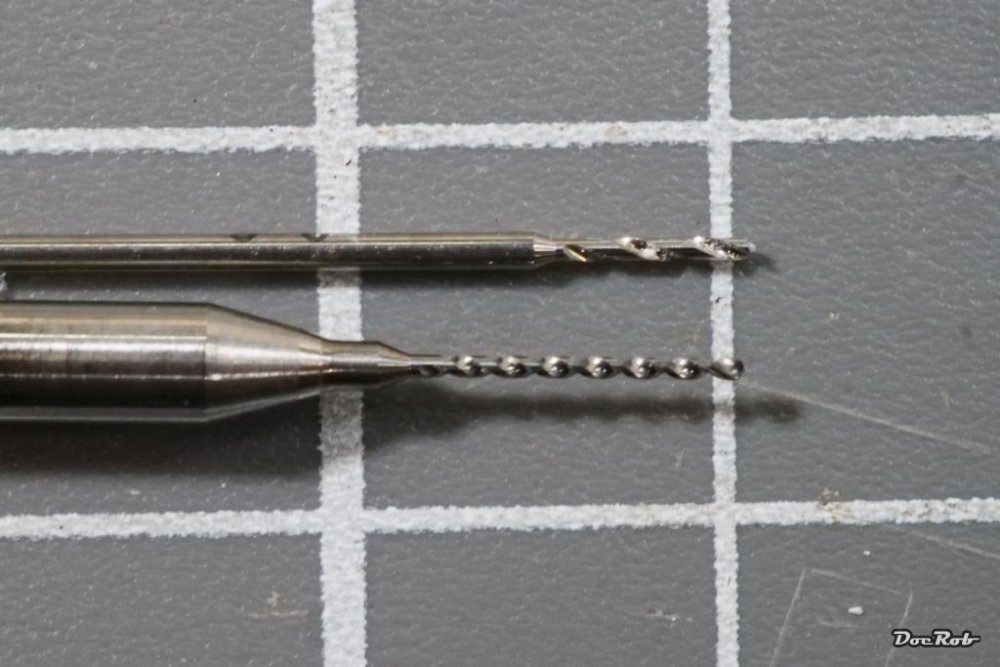
-
Bummer with the dust, Carl. The color looks like what I had in mind of your car. Cheers Rob
-
Cobra Coupe - Le Mans - Model Factory Hiro 1/12
DocRob replied to DocRob's topic in LSM 1/35 and Larger Work In Progress
Muchas gracias amigos, I hope, I will not overdo it with my unrealistic even gap approach . I know, the originals were build up in a hurry and I guess, perfect fit was not the utmost goal. Finally there will be enough potential for errors and I will eliminate as many as possible before entering the painting stage. Cheers Rob -
I went back to my slide rule, as my veneer Texas Instruments calculator (with the sexy red colored display) eats 9 volt batteries like Garfield Lasagne . Seriously, I only have a non digital set of calipers. No batteries and always reminding me of my days as a young engineer. Cheers Rob
-
Wow Mike, the liquid masked camo came out fantastic. I wanted to buy this kit as well and thought about, how to do the scheme, but had no final idea, how to tackle it. Luckily the kit was sold out and I only got the Eastern Front version . The kit engine seems to have a much smaller diameter than the resin one. Does it fit under the cowlings or do they have thinner ones? Cheers Rob
-
Cobra Coupe - Le Mans - Model Factory Hiro 1/12
DocRob replied to DocRob's topic in LSM 1/35 and Larger Work In Progress
Thank you Carl, I hope, I don´t need to chop of more parts, to get the bonnet fit. With a few more steps, I think the painting stage is on the horizon. Cheers Rob -
Cobra Coupe - Le Mans - Model Factory Hiro 1/12
DocRob replied to DocRob's topic in LSM 1/35 and Larger Work In Progress
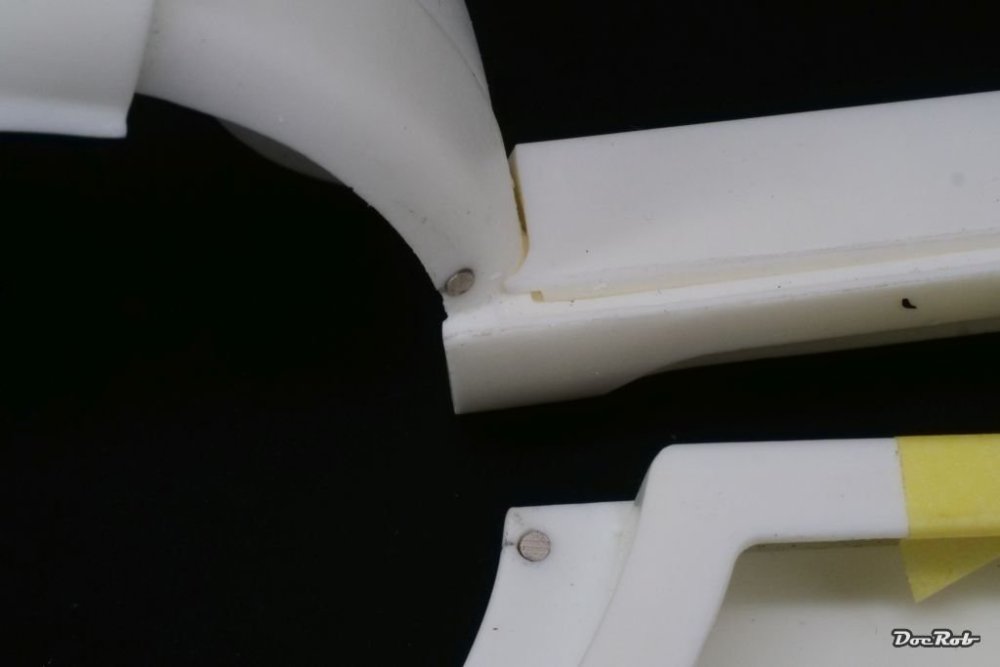
Today, I prepared all the parts, which will be added to the firewall. Again lots of cleanup work and naturally drilling holes for mounting the parts and adding tubes and hoses later. Besides, I added tiny magnets to the rear hatch and the doors. The magnets have a diameter of 2 mm and are 1 mm thick. The doors were pre-drilled with a 2 mm drill bit and cautiously finished with a 2 mm milling cutter, to not drill through the door with the drill bits front cone. You can see the magnet shine through in the doors side view, it was close. The magnets will definitely help, to keep the doors in aligned in good position when closed. Cheers Rob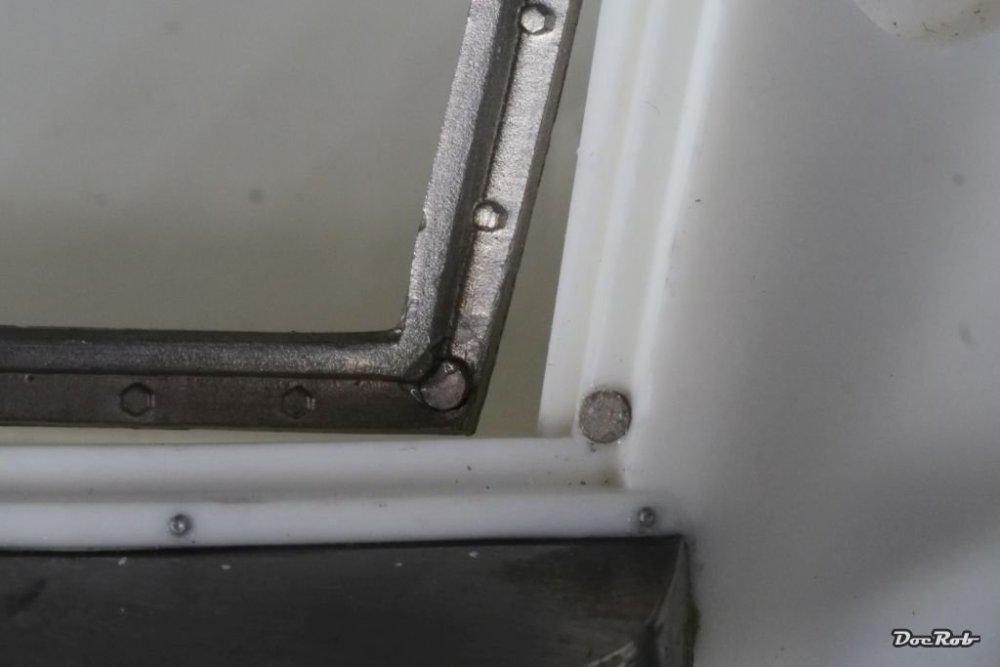

-
Cobra Coupe - Le Mans - Model Factory Hiro 1/12
DocRob replied to DocRob's topic in LSM 1/35 and Larger Work In Progress
Thank you Mike, but I already milled and sanded away as much as possible from that area of the bonnet. It is now paper thin. Cheers Rob -
Cobra Coupe - Le Mans - Model Factory Hiro 1/12
DocRob replied to DocRob's topic in LSM 1/35 and Larger Work In Progress
Thank you Martin, if it would be the real engine, I would be rich . MFH engines are the best you can get and great fun to build. They have separate engine kits in their portfolio, but that is too much special interest for me. Cheers Rob -
Cobra Coupe - Le Mans - Model Factory Hiro 1/12
DocRob replied to DocRob's topic in LSM 1/35 and Larger Work In Progress
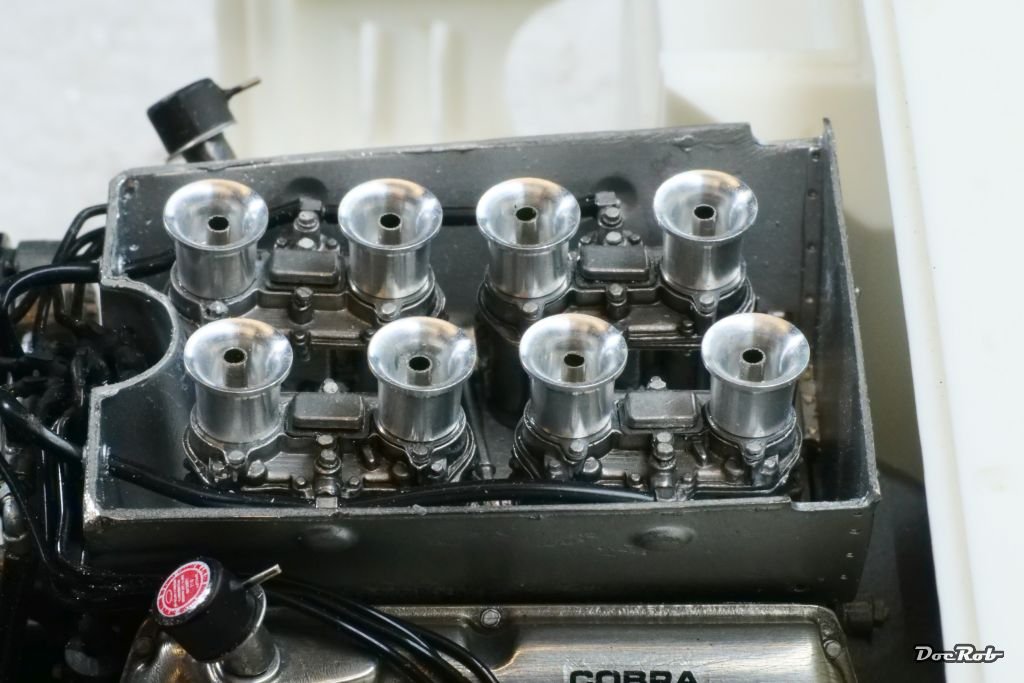
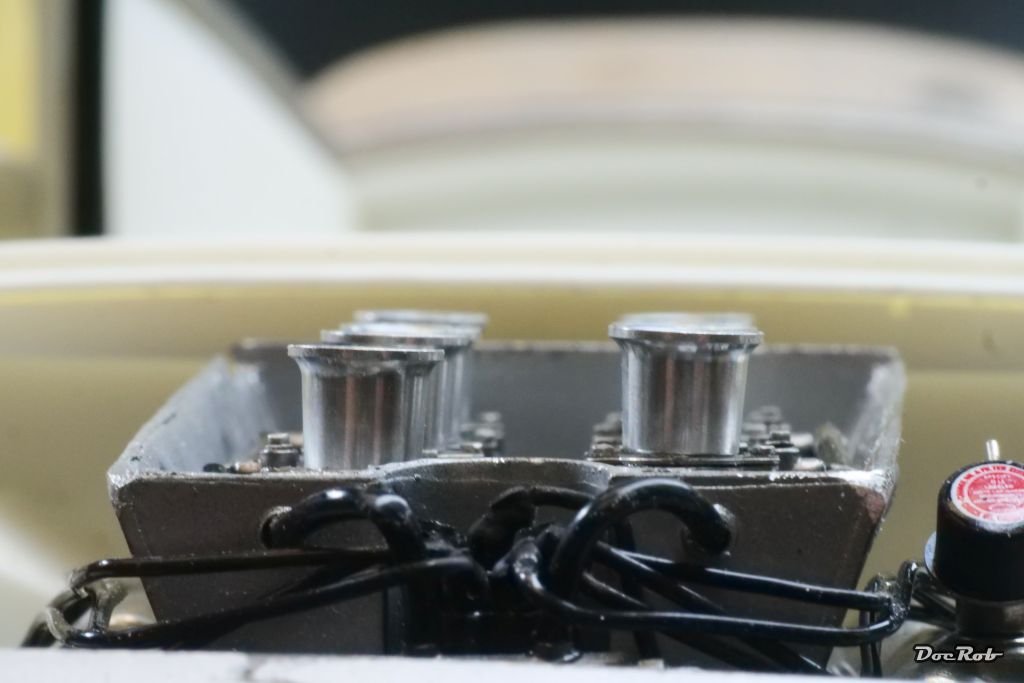
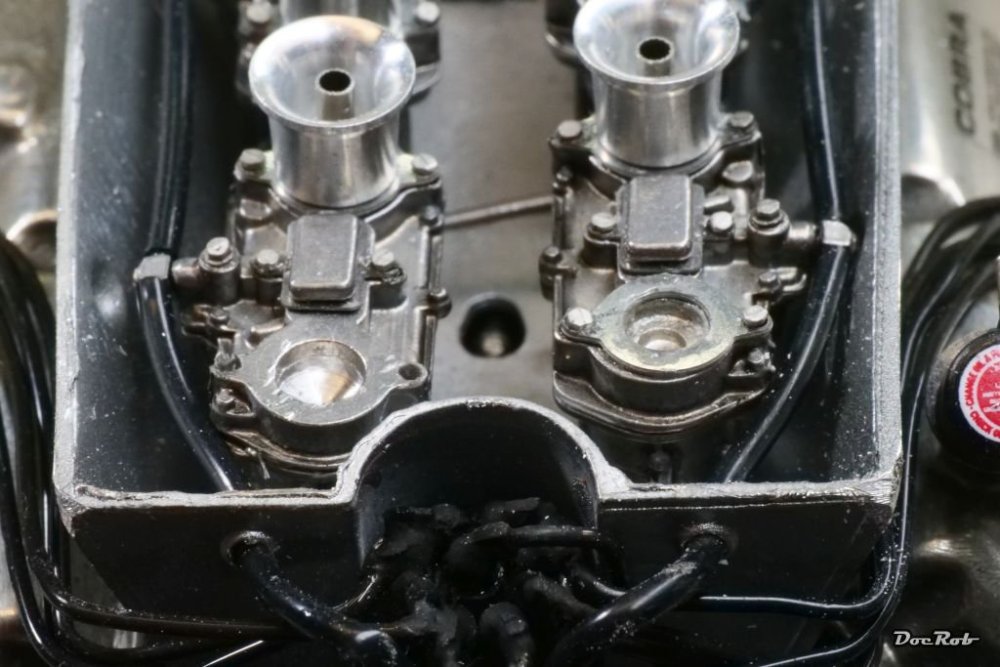
Poco a poco (little by little, like they say here where I live. I forgot to include the engine firewall into my final? assembly check. Getting everything together with the firewall, is extremely delicate, like a 3D puzzle, but after a lot of shuffling and breaking some pats off, it fits. Next, I reworked the areas of the bonnet, which connect with the chassis hinges for a better fit. Some modifications of the existing parts were needed. I also tested, how I could fit my first vac formed window in place with double sided transparent adhesive tape, which didn´t look promising at all. I need some better tape and luckily my wife flies to Berlin next week, where it is easier to get hold of better stuff. Finally, I found another method to lower the obstructing first cylinder funnels a tiny bit for a better bonnet fit. I removed the PE seal? under the aluminum funnel with a sharp blade and deepened the holes, which accept the funnels first with a 2 mm drill bit, then the outer diameter with a 3 mm drill bit (left side without PE and drilled out). As you can see, the front left funnel sits a bit less than a millimeter deeper, than the others. Not a lot, but it sure helps. I reglued the funnels and the rivets besides and like the result. You have to know, that something is missing to find it. Cheers Rob

-
After searching a bit, it seems, Ebbro filed for bankruptcy last spring, which is really sad news. I haven´t build any of their kits, but have three in my stash ( My beloved Citroen 21 DS, a Lotus 49c and now the Lotus 88b). Good luck with the leveling thinner, Carl. It´s terrible if you can´t restock and supplies are going low. Cheers Rob