DocRob
-
Posts
7,045 -
Joined
-
Last visited
Content Type
Profiles
Forums
Events
Gallery
Everything posted by DocRob
-

Cobra Coupe - Le Mans - Model Factory Hiro 1/12
DocRob replied to DocRob's topic in LSM 1/35 and Larger Work In Progress
Thank you both, this is the most critical phase of the build and I will take my time to sort it out. First thing, I had to reassemble the rear hatch again, because you cant reach it´s hinges with the body mounted onto the chassis. The hinges are hold in place with tiny screws, which wore out the resin. I had to fill the holes with CA and redrill, a task, I fear, because the body is thin, where the hinges are and I don´t want to drill through the rooftop. The glass won´t be too difficult to add later, I hope. At least, it makes no difference, when to add the windshield to my eye. The rear hatch may prove a bit more difficult, as there are more than twenty rivets to add through the vac clear part into the frame. I don´t want to pre drill, because I don´t know for sure, how the vac parts markings for the rivets align with the framings hole indicators. I will use double sided clear adhesive tape for installing the clear part onto the frame. This way, I can drill the 0,6 mm holes for the rivets and the tapes residues hold the tiny rivets in place, without the necessity of adding CA and mess things up. At least, that´s the plan . Cheers Rob -
Cobra Coupe - Le Mans - Model Factory Hiro 1/12
DocRob replied to DocRob's topic in LSM 1/35 and Larger Work In Progress
That was not meant as a critique, Carl and Hubert, I was only referring to Kevin´s post. Everyone has it´s own schedule and personal live to carry on. I also have times, where I don´t post a lot due to different distraction. There have always been busy and lazy times here. What I really criticize, is the GB handling here on LSM. I think, I attended five, but only one of these was officially finished (Wet GB) and one was preliminary finished (Twins GB) without ever being finalized. The Sandbox GB is also pending since month and I came to the resolution, not to attend future GB´s or attend but extract myself from competition. Cheers Rob -
Cobra Coupe - Le Mans - Model Factory Hiro 1/12
DocRob replied to DocRob's topic in LSM 1/35 and Larger Work In Progress
I hope, the hiccups don´t lead to not being able to join chassis to the body, Kevin. Everybody is building quietly at home, not posting their secret projects . BTW: Wasn´t there a Sandbox GB ending some month ago, without any results? Well the Twins GB wasn´t officially ended either. Cheers Rob -
Cobra Coupe - Le Mans - Model Factory Hiro 1/12
DocRob replied to DocRob's topic in LSM 1/35 and Larger Work In Progress
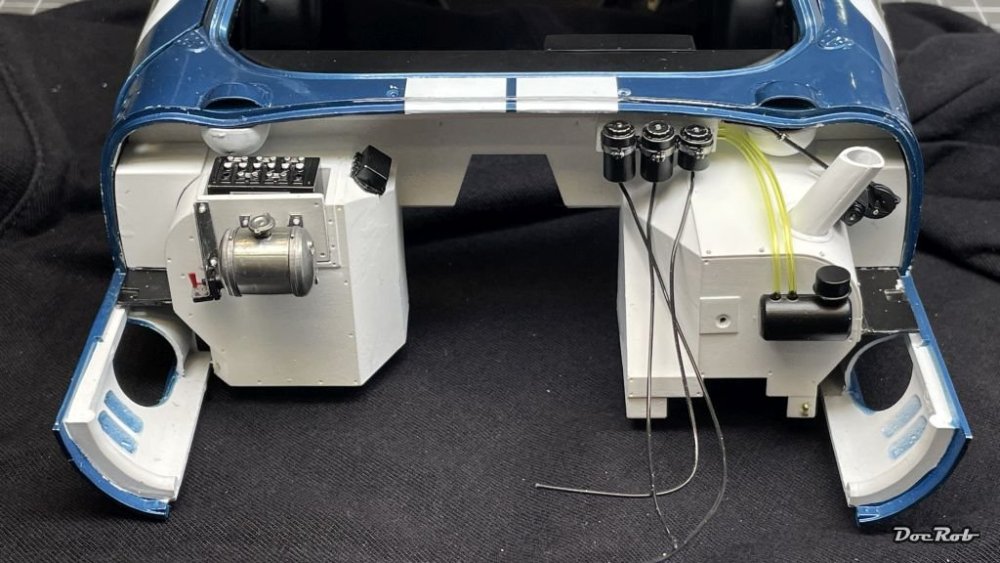
Today, I made the first attempt of a very crucial step, with marrying the body to the chassis. As you can imagine, there are a lots of contact points on the chassis, around the firewall, under the instrument panel, the rear body framing, the rollcage, ...., to cut it short, I failed. Now I´m inspecting everything for color abrasion, which might show problematic areas, which may need to be tweaked. Fortunately, I didn´t brake too many parts, but the rear hatch framing needs to be reinstalled. I´m very happy, that I didn´t follow the manual with the rear hatch window and windshield installed. before joining the chassis and body. It would have been a nightmare to handle the heavy kit with these mounted. Before all this, I finished the shoulder straps of the seat belts, which is an easy task with the supplied PE buckles, belt material and double sided tape, which holds the belts perfectly together and in place. I finished the steering wheel with a coat of Tamiya´s clear orange onto the dried oil colors and then assembled the PE and center knob. That was more difficult then expected, but finally it worked. The clear center part is made from resin and was not clear at all from the beginning and had some tiny scratches. I polished the lens with Tamiya´s polishing compounds and adhered it with Pledge on the decals. Next were the wheels, which were sprayed with Tamiya´s semi matte black (LP-5). After two hours of drying time, I didn´t want the paint to cure too much, I swiped the rims with cotton swabs and cotton cloth, slightly dampened with Tamiya lacquer thinner and cleaned off the polished areas. Cheers Rob

-
Another P-40E to P-40K build!
DocRob replied to ScottsGT's topic in LSM 1/35 and Larger Work In Progress
Nice finish, Scott, she will be a beauty. I like the way, you transferred the camo scheme. I originally wanted to recommend Tesa masking tape professional, which I use for this kind of jobs, as it is cheaper than Tamiya kabuki tape, but near as good, but they don´t produce the 40mm wide anymore, it seems. I have some rolls left, but there is only the 25 mm variant available. Only the "professional" variant of masking tape is up to our needs. tesa® Masking Tape Professional - tesa Cheers Rob -
Cobra Coupe - Le Mans - Model Factory Hiro 1/12
DocRob replied to DocRob's topic in LSM 1/35 and Larger Work In Progress
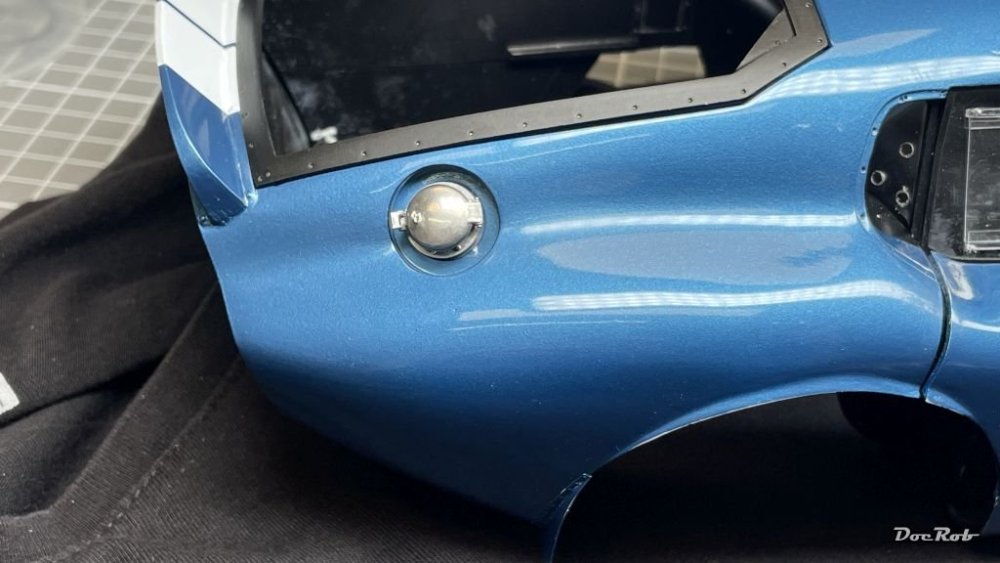
Thank you Chris and Carl. You can call me a liar, there are only 18 parts involved . The tank filler cap is really working, just open the tiny latch on the left and put in the juice - errr - not now, because the tank isn´t installed right now. After priming some interior parts for later stages, I had an idea about how to deal with the wheels. They are made from cast white metal and were cleaned in the tumbler polisher at the beginning of the build. I thought, I have to give them a bit more shine, to keep the eyes trained on the wheels, letting some other mistakes skip . Hand polishing proved difficult and I found, a conical head M4 screw holds the rims in place in my accumulator drilling machine. Then I sanded the wheels with fine grit sanding sponges, followed by polishing with Autosol polishing paste on a cotton rag. Now, I like the result. Later the wheels will be airbrushed in black and then I polish off the higher parts which are now shiny. Of course, before airbrushing the rims will be cleaned properly. the polished left one on the pic has a lot of dirt accumulated. Cheers Rob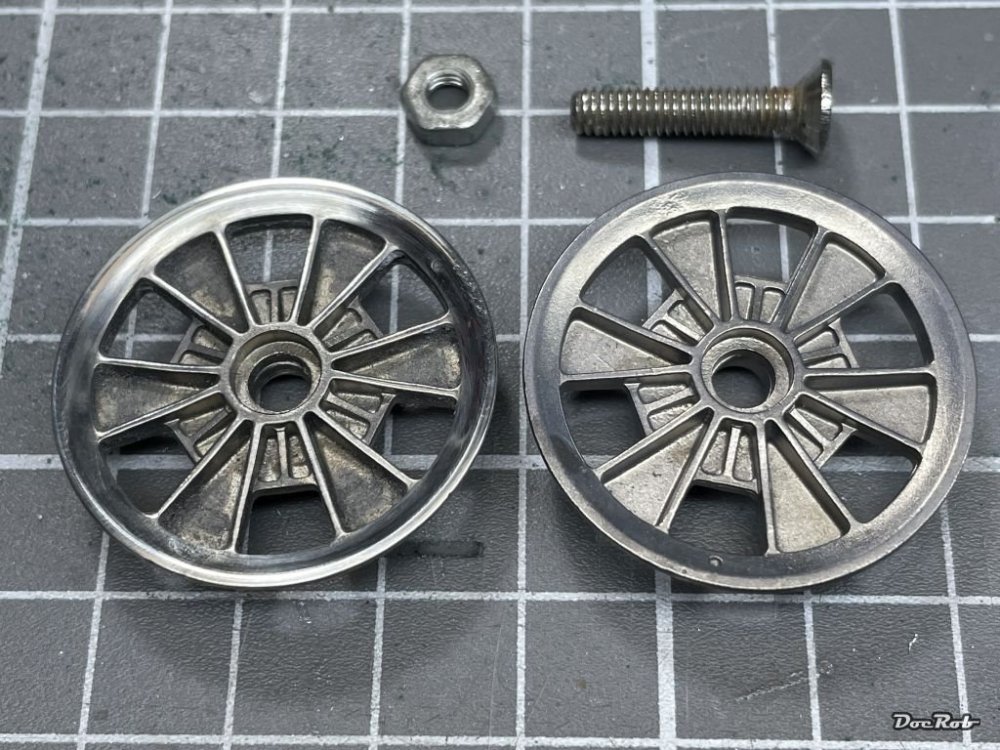


-
Cobra Coupe - Le Mans - Model Factory Hiro 1/12
DocRob replied to DocRob's topic in LSM 1/35 and Larger Work In Progress
I will dig deeper into the primer thing, Scott. Thanks a lot for your explanations and sharing of experiences. The primer easily lifts off the white metal parts and a bit less easy from the resin. A light sanding job might help, where possible. You are absolutely right about letting painting mistakes happen and forget about them temporarily. There is nothing you can do, when the paint is wet. I try to minimize airbrushing errors due to proper preparation, but yeah, there is Murphy lurking around the corner . Cheers Rob -
Cobra Coupe - Le Mans - Model Factory Hiro 1/12
DocRob replied to DocRob's topic in LSM 1/35 and Larger Work In Progress
Poco a poco, I grind my way through the Cobra build. Today, I assembled the tank filler cap, a seemingly small task, but it involved about twenty parts and is functionally. I polished the cap itself with Autosol metal polish and added the numerous etched parts and rivets. Then I started with the steering wheel, which got primed, airbrushed in a mix of red brown color and sand. After drying, I applied several layers of dark brown and red brown oil colors, thinned with fast drying thinner for a realistic looking wood texture. Tomorrow, I will apply a clear coat as finish. Finally, I repaired the damages to the firewall and pinned the lower side to the door fairings with brass rods for enforcement, to close the gaps in this area. Cheers Rob
-
Cobra Coupe - Le Mans - Model Factory Hiro 1/12
DocRob replied to DocRob's topic in LSM 1/35 and Larger Work In Progress
Thank you Scott, always great to hear some pro tips. I have not a lot of experience with car bodies, be it in real size or large scale. I will try to lay my hand on some etch primer, being it in small bottles from Tamiya or Mr. Hobby or from my mechanic, who also does body repairs. It´s fantastic, to read about how the stuff works, I had no idea. Unfortunately, the adherence on resin isn´t great either. I cleaned all the parts with alcohol, to get rid of cast residues, but I didn´t sand the parts. I will test the etching primer for sure. Cheers Rob -
Cobra Coupe - Le Mans - Model Factory Hiro 1/12
DocRob replied to DocRob's topic in LSM 1/35 and Larger Work In Progress
Muchas gracias amigos, The fumes of CA are not really trapped into the body. There are openings everywhere, there is no windshield and no rear window and the chassis is still missing. I never had an effect that strong. Maybe it has something to do with a very high humidity here, it´s about 95%. I use the same CA (Colle 21) since years for everything from wooden ships over plastic, resin and metal. Even with normal plastic kits, I often use it for ready painted parts and had no issues so far. Cheers Rob I will look into the VMS products -
Cobra Coupe - Le Mans - Model Factory Hiro 1/12
DocRob replied to DocRob's topic in LSM 1/35 and Larger Work In Progress
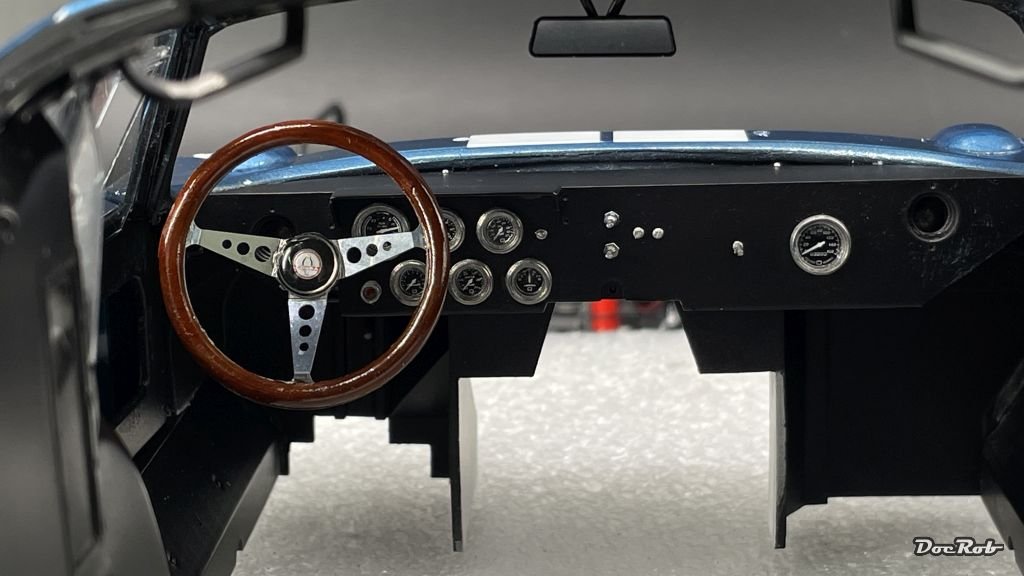
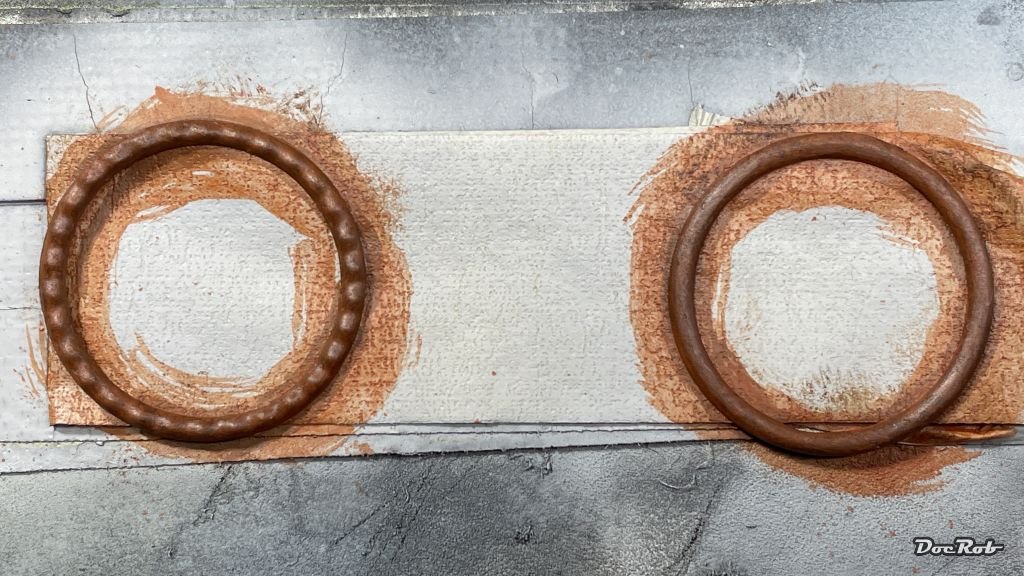
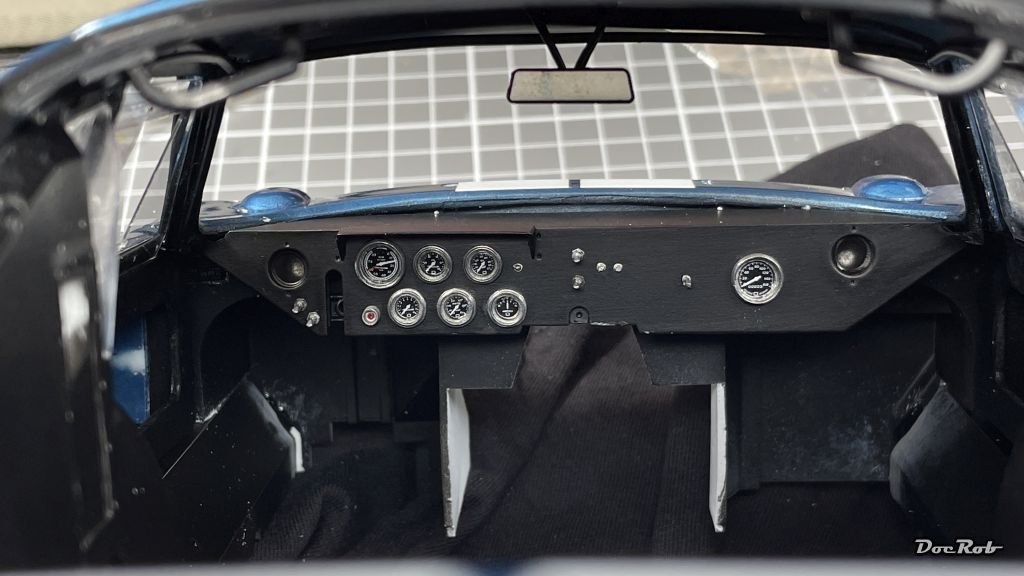
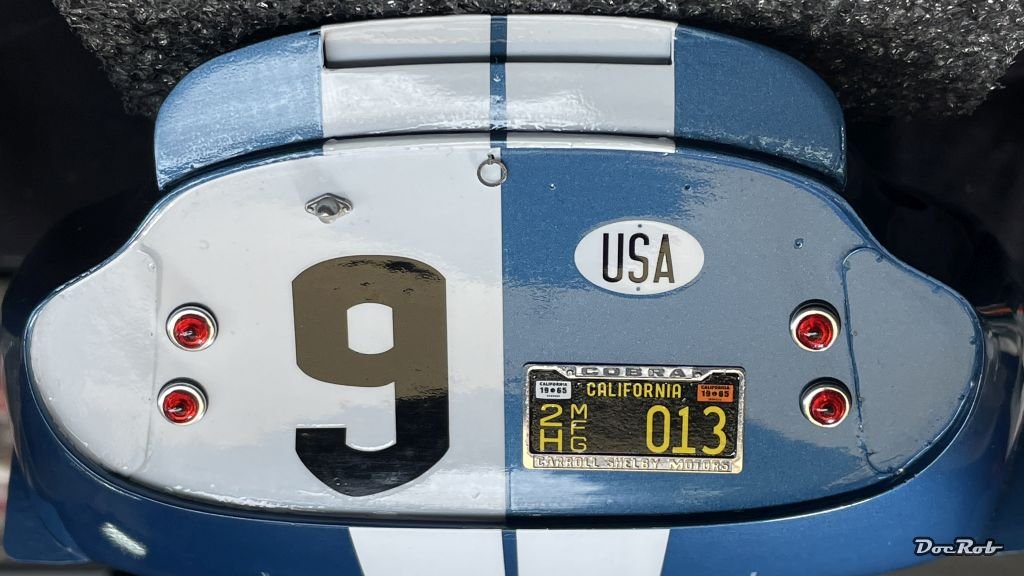
To do something productive and without destruction, I added details to the rear area. The rear lights were painted with Tamiya clear red, have a turned aluminum base and a small rubber ring around. Next was the feared addition of the firewall, which fitted after a lot of sanding and grinding and is held in place wit a screw. Of course, there are a lot of scratches to be repaired. I also knocked off some parts during the process, which will be added later. Then, I added the dashboard, which luckily was an easy task. Concerning CA fumes, if you are spotting into the foot wells, you notice chalky white residue. I never experience this kind of CA-fogging before and I always use the same glue and used the semi matte black often. Strangely the fogging reaches very far from the gluing area. Cheers Rob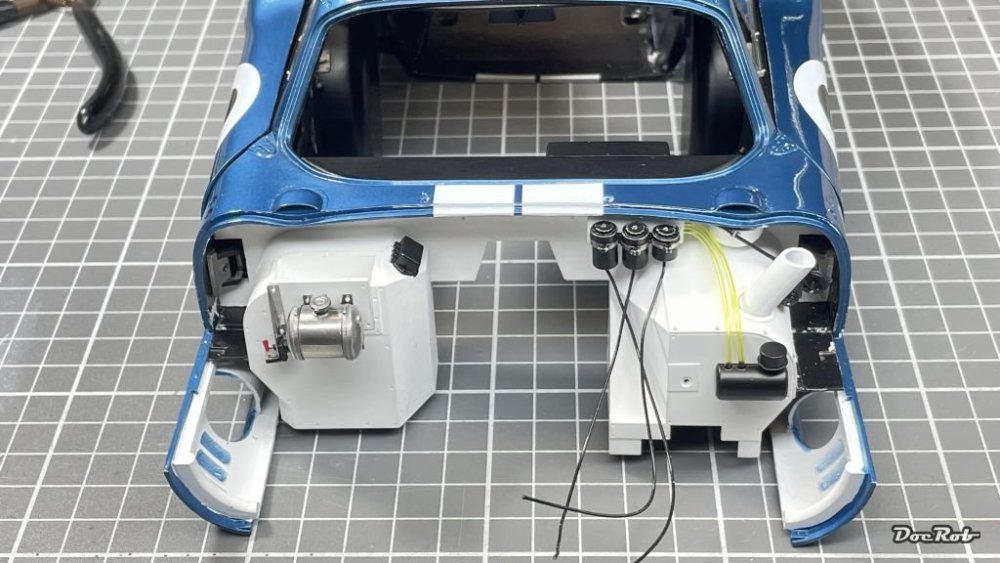

-
Cobra Coupe - Le Mans - Model Factory Hiro 1/12
DocRob replied to DocRob's topic in LSM 1/35 and Larger Work In Progress
Thank you Chris, I will respray, where possible. The Tamiya LP-5 semi matte black has a distinctive sheen and a marker would be visible. In some delicate areas, I will use a brush. Cheers Rob -
Cobra Coupe - Le Mans - Model Factory Hiro 1/12
DocRob replied to DocRob's topic in LSM 1/35 and Larger Work In Progress
Thanks for your supportive words, Carl and Chris. It´s nerve wrecking to prepare and finish all the sub assemblies, only to partly destroy them again and again during test fitting. Tolerances are extremely tight and that there is everything made up like in the real car doesn´t help either in the way of complexity. I will try to do my best salvaging the build. For some reason, the primer and paint doesn´t adhere well on white metal and resin. Scratching and paint lifting is easily done, even with Kabuki masking, which I always de-tacked thee times. One of the CA marks on the body, I might be able to polish out. but the other resulted in a paint lift down to the resin. I oversprayed it carefully and will clear coat later, but it will remain visible. I had white CA fogging onto black painted parts, which look ugly. I will see, how much I can overspray there later on with a minimum of masking, because of the risks of paint lifting. Cheers Rob -
Cobra Coupe - Le Mans - Model Factory Hiro 1/12
DocRob replied to DocRob's topic in LSM 1/35 and Larger Work In Progress
Thank you Paul, no need to feel sorry, sometimes you win, sometimes, you loose, that´s the way with challenges. There is still a chance to finish the Cobra halfway decently, but not how I wanted to finish it. I should have chosen a simpler kit, but the success with the Crocker motorcycle made me greedy. The Cobra is not the easiest choice, but others got it done, so I hopefully will pull through, however the outcome. Cheers Rob -
Cobra Coupe - Le Mans - Model Factory Hiro 1/12
DocRob replied to DocRob's topic in LSM 1/35 and Larger Work In Progress
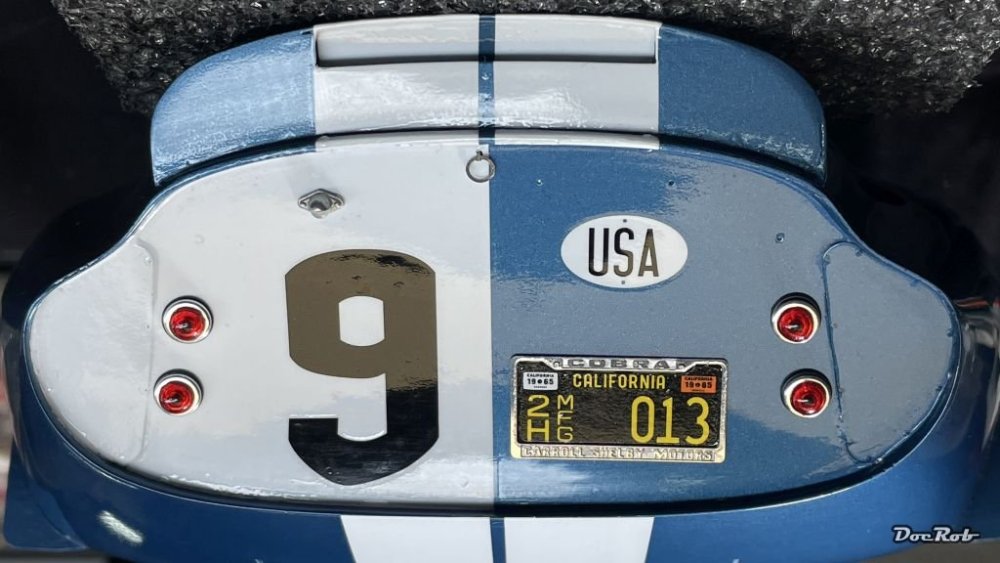
The picture may looks like pure happiness, but it isn´t. I feel overwhelmed by the Cobra right now. Test fitting results in damages and abrasion and when I glue the parts in place, they don´t fit like planned. To add to the miserable situation, I have lots of paint lifts and fogging on the paint from CA glue. I have two spots on the body, where I fingerprinted CA glue onto the body paint and lifted or distorted the finish. I´m more than a bit frustrated. This is the sequence of building where everything is supposed to fit but doesn´t. I have to grind resin away, to get a halfway decent fit for the doors. Most of the problems occur during fitting the inner body fairings. Nonetheless, the rear hatch and the doors with windows got installed. I´m now down to maybe 80% of my achieved look and my border of tolerance is nearing quickly. I hate to make corrections for flaws, but with the Cobra, it is necessary. Don´t get me wrong, the design of the kit is fantastic, I´m just not up to it. Cheers Rob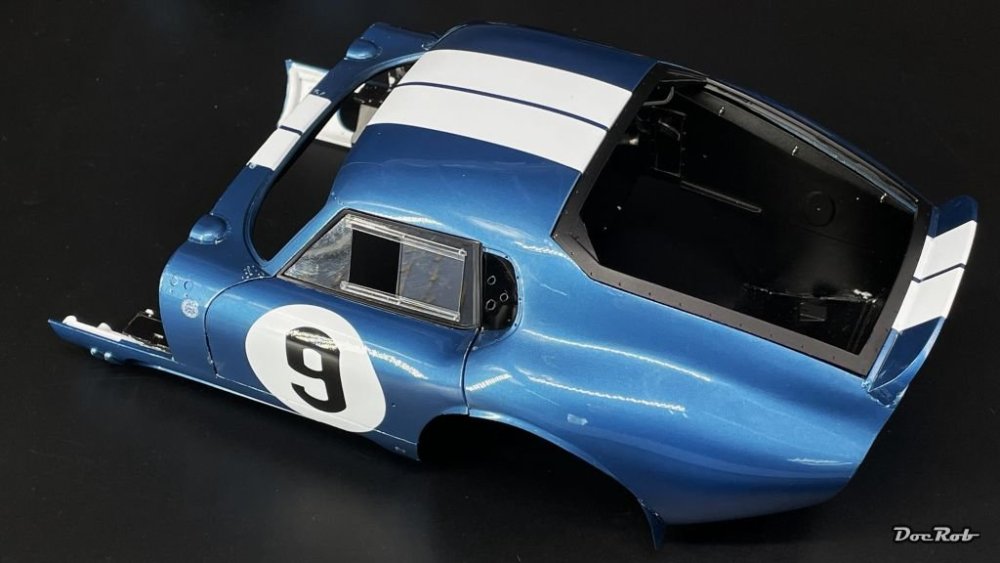
-
Cobra Coupe - Le Mans - Model Factory Hiro 1/12
DocRob replied to DocRob's topic in LSM 1/35 and Larger Work In Progress
Thank you Carl, when my wife was in Berlin some weeks ago, I let her bring different types of double sided adhesive tape back. Some transparent, some black widths spreading from 1mm up to 19 mm. Very helpful with this build and not to get sent to my island. Like you mention, the level of detail can be demanding with these kits, specially finishing the body with all the sub assemblies and mounting everything onto the chassis are steps, which need to be well planned ahead. Did you finish your Porsche? I´d like to see more of it. Cheers Rob -
1:32nd scale Caproni-Pensuti AP-1
DocRob replied to sandbagger's topic in LSM 1/32 and Larger Aircraft Ready for Inspection
A triplane with three cylinders and a lot of rigging, what´s not to like, Mike. I wonder, how flying in this tiny apparatus must have been felt. Fantastic work again Mike and I love the guy sitting by his table. Cheers Rob -
What is on your bench right now ? Share a picture :)
DocRob replied to Martinnfb's topic in Modelling Discussion
Sleek looking plane, Carl. Should be finished soon. Cheers Rob -
Cobra Coupe - Le Mans - Model Factory Hiro 1/12
DocRob replied to DocRob's topic in LSM 1/35 and Larger Work In Progress
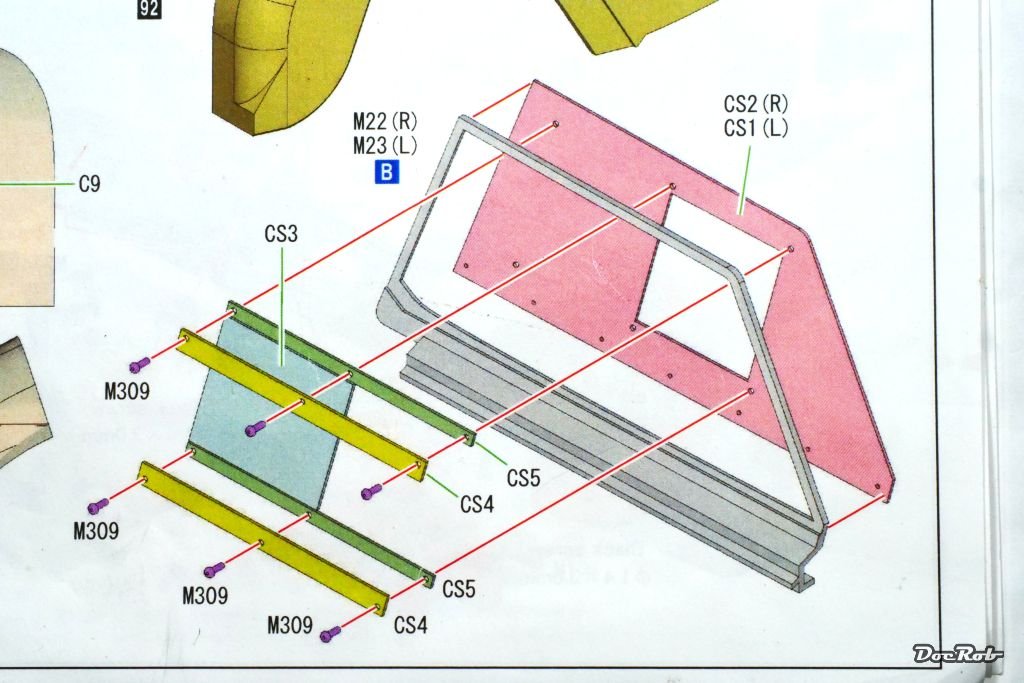
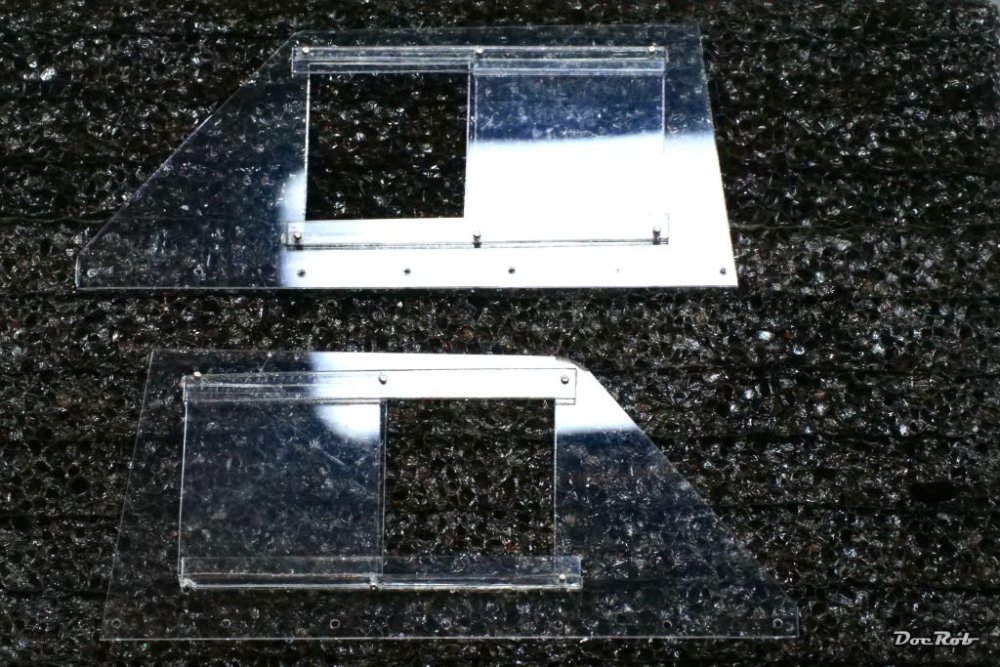
This build is like a rollercoaster ride sometimes. After checking my building sequence again (very important), I decided, it´s time to add the doors, which means, I have to deal with the side windows, a task, I really feared and I was right to do so. This is, how it should be done. After drilling all the holes for the rivets with a 0,7 mm drill bit, you cut all the window panes and fairings for the sliding window from a luckily pre printed clear acetate sheet. This proved to be not so easy, it was hard, to have all the strips look equal. I tried first to use my DSPIAE profile cutter, where the blade bet slightly with the long cuts and rendered the parts unusable. I moved on to use a steel ruler and a new scalpel blade then. But how to glue everything together and align the parts perfectly, for fitting in the rivets. I decided to improvise a bit. I skipped the spacers (CS5) and used 1mm wide double sided clear adhesive tape instead. To reach the sufficient thickness, I had to apply two strips onto each other. These strips with the CS4 parts were then glued onto the window pane, trying to fit the pre drilled holes. With the second strip in place, I re-drilled the holes again, now with a 0,6 mm drill bit through the adhesive tape and then inserted the rivets. Luckily the residues of adhesive tape in the holes fixed the rivets. Unfortunately, cutting and assembling must be made on a relatively hard surface and that lead to scratches. The result looks horrible, but I think, I have to live with that, re doing the strips would result in more scratches on the window panes and I don´t have spare acetate. The only upside, the windows actually slide . Cheers Rob
-
Cobra Coupe - Le Mans - Model Factory Hiro 1/12
DocRob replied to DocRob's topic in LSM 1/35 and Larger Work In Progress
Thank you Carl, the Cobra is a demanding project for sure. I can´t understand anymore, why I shied away from rigging my Duchess of Kingston wooden sailing boat . Cheers Rob -
Cobra Coupe - Le Mans - Model Factory Hiro 1/12
DocRob replied to DocRob's topic in LSM 1/35 and Larger Work In Progress
Thank you Gus, Paul and Chris. Today, I rubbed on the Tamiya polishing wax and the shine became another bit brighter. I´m happy with the finish, but now I have to deal with doors and windows, another daunting act. Cheers Rob -
Cobra Coupe - Le Mans - Model Factory Hiro 1/12
DocRob replied to DocRob's topic in LSM 1/35 and Larger Work In Progress
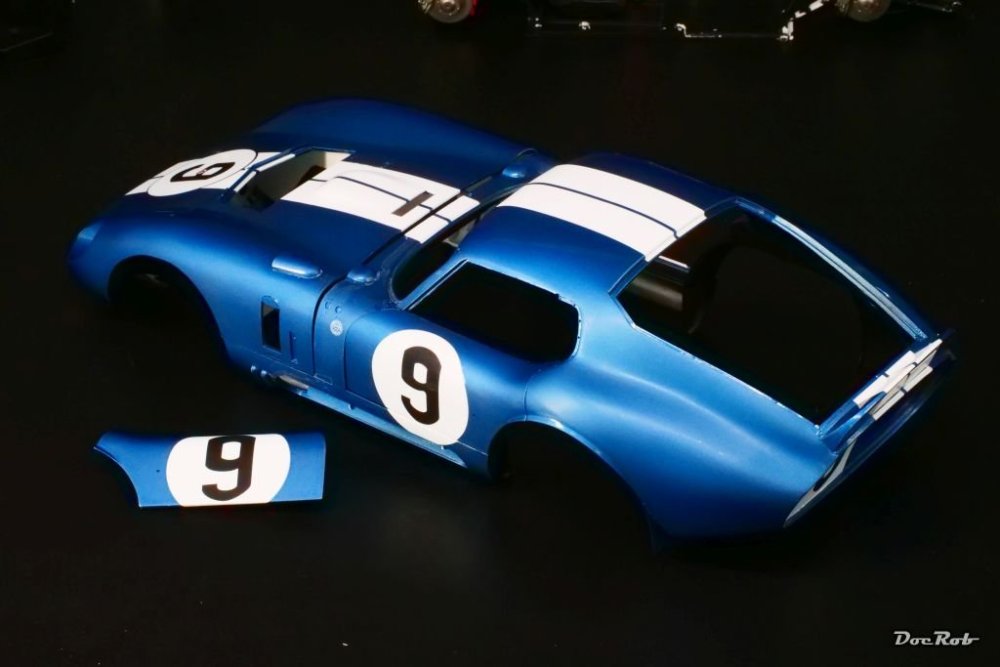
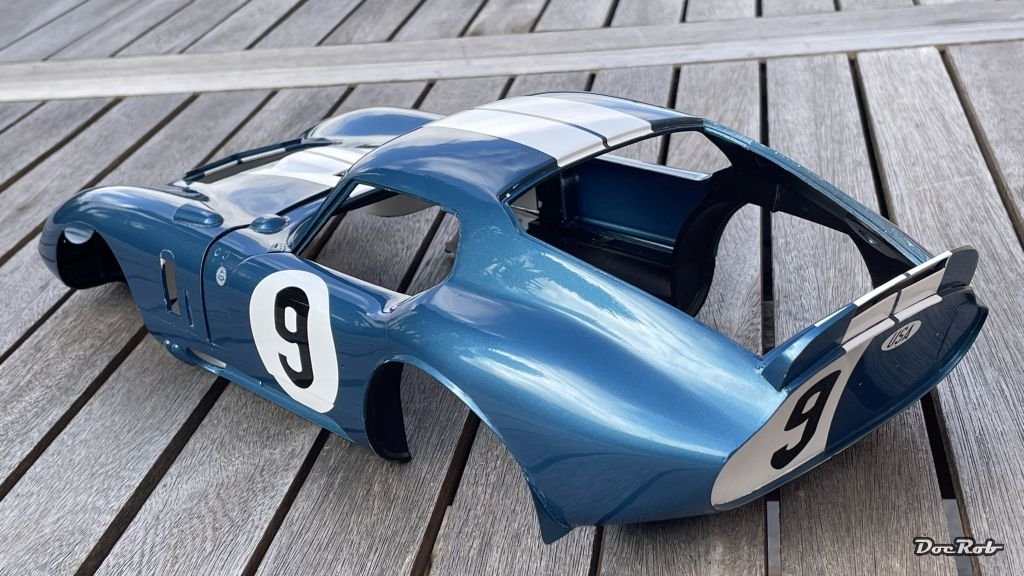
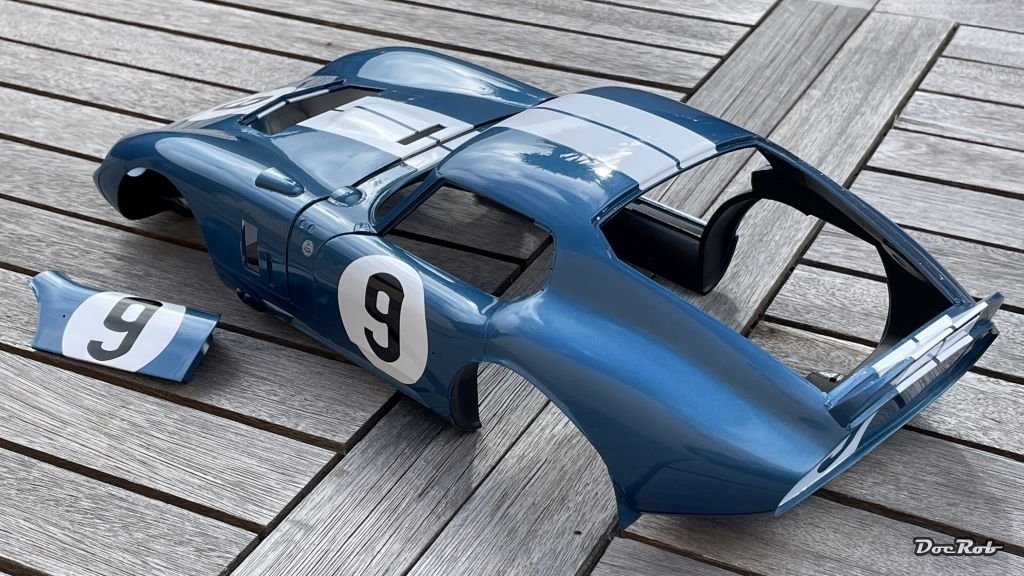
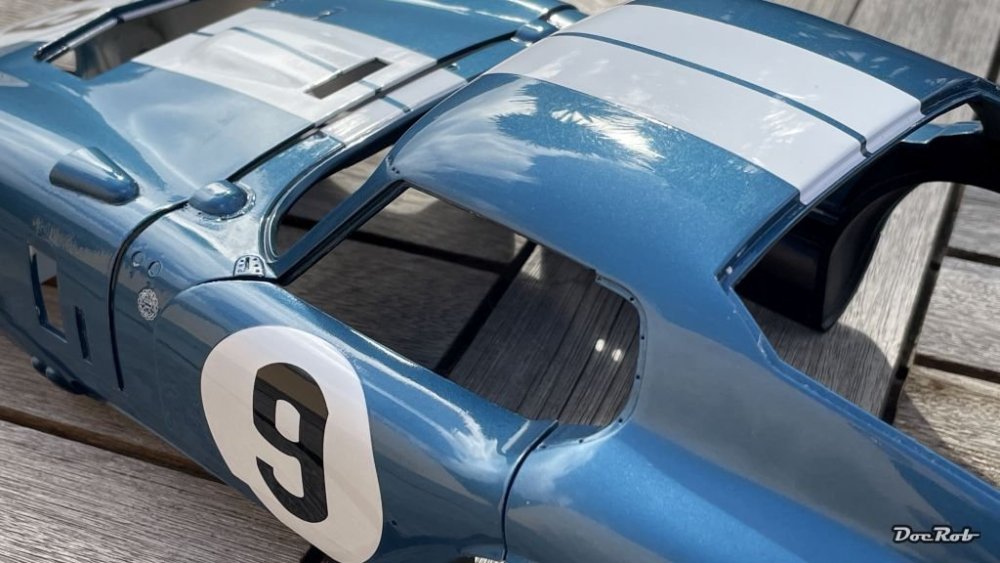
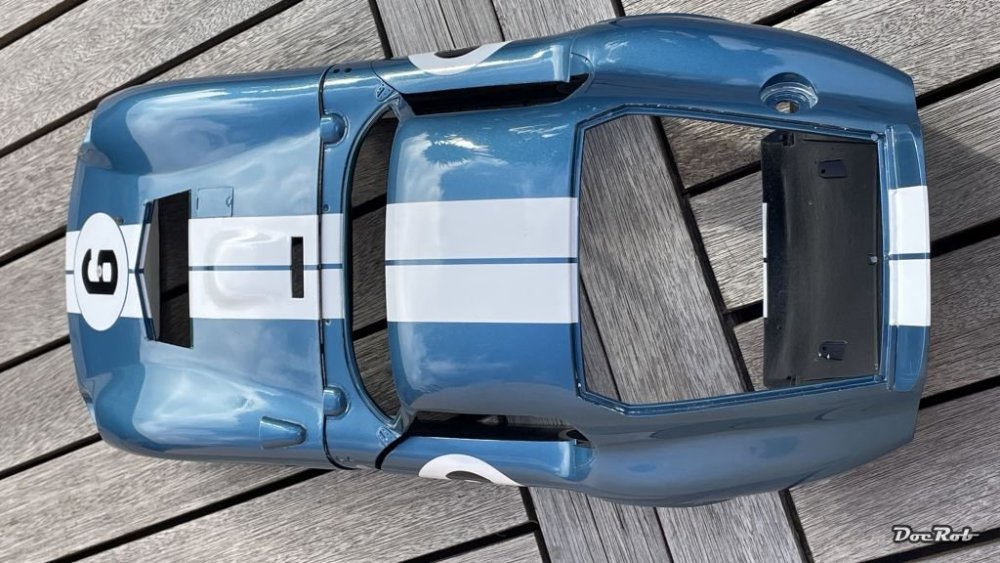
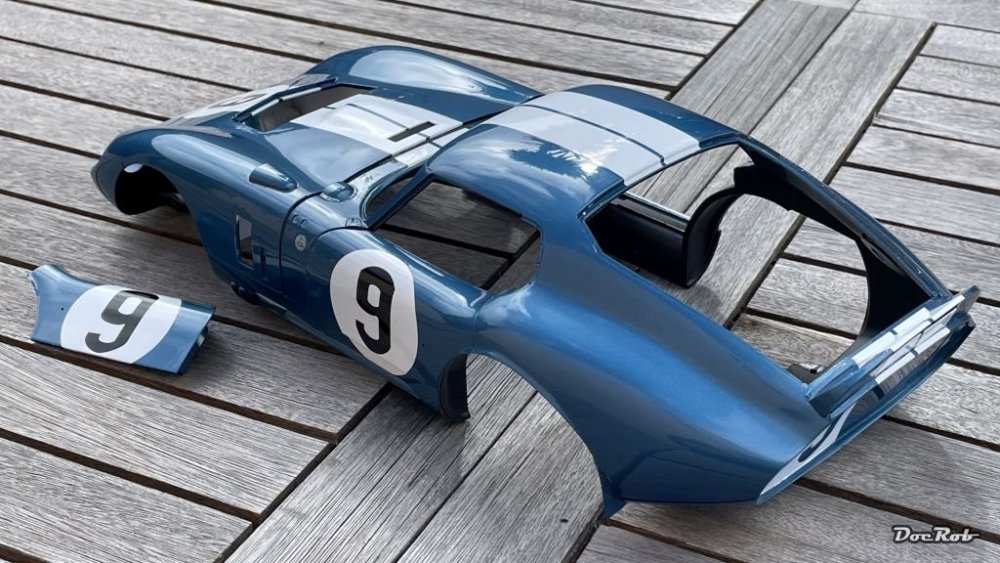
I am really happy now. Since about two month, I´ve been working on the Cobra´s body and now, the shell is ready so far. I put in a lot of elbow grease to achieve the finish, but like I said, it paid off and now, I have a squeaking mirror shine finish, only faltering the bright sunlight outside, to let it really shine. After the first and most intense 4000 grit wet sanding round, I let follow the 6000 grit and the 8000 grit wet sanding job, followed by the three Tamiya polishing compounds coarse, fine and finish. For now, I left out the final waxing, because I have to permanently handle the body and will apply it last. And now out onto the terrace, shaking some cocktails for my wife and me, to loosen the arms Cheers (litertrally) Rob
-
Cobra Coupe - Le Mans - Model Factory Hiro 1/12
DocRob replied to DocRob's topic in LSM 1/35 and Larger Work In Progress
Thank you Mike, the level of detail is really high with this kit, but this has it´s price when it comes to mounting everything. The complexity of the tasks sometimes let my head spin . Cheers Rob -
Cobra Coupe - Le Mans - Model Factory Hiro 1/12
DocRob replied to DocRob's topic in LSM 1/35 and Larger Work In Progress
Thank you Carl, it´s not done yet. I still have to fine sand and polish the rest of the body, but I have high hopes for a good finish. Cheers Rob -
Cobra Coupe - Le Mans - Model Factory Hiro 1/12
DocRob replied to DocRob's topic in LSM 1/35 and Larger Work In Progress
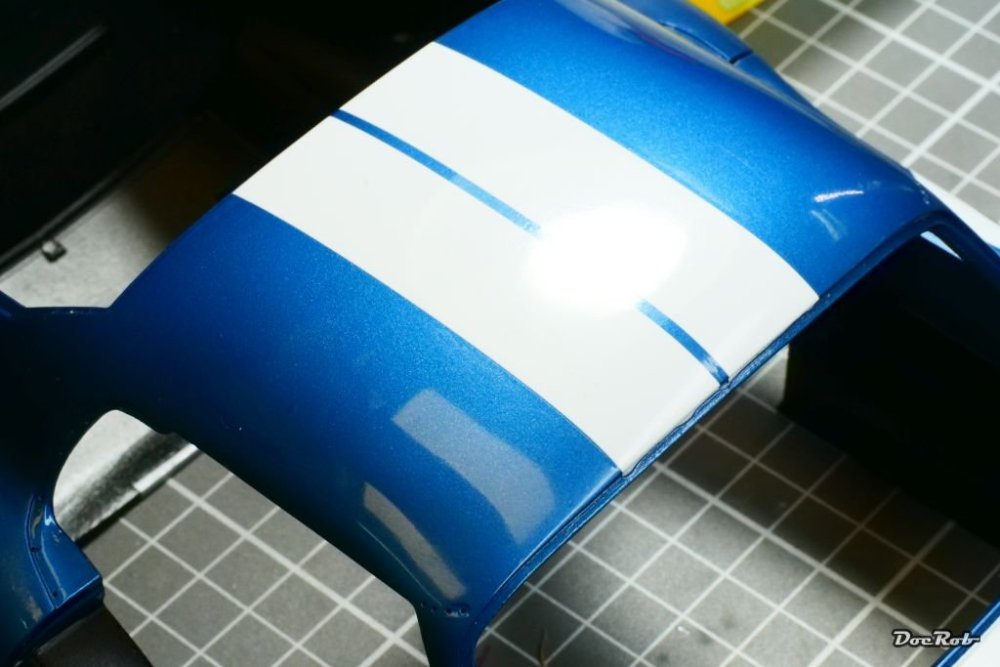
I´m not very experienced, when it comes to finishing car bodies and for a while, I debated with myself about leaving the clearcoat as it is. It looked very good and had a high sheen, but it was not perfect. Out with the sandpaper and polishing compounds. I started to wet sand the whole body with 4000 grit sandpaper, which made the surface nice and even, but also dull. Of course, I tested my approach first on a lower body part, than on the roof, using 6000 grit sandpaper next, followed by 8000 grit. Then I rubbed in the Tamiya polishing compounds from coarse to finish and added some Tamiya polishing wax last. Yep, looks good, not the slightest orange peel effect left and a high shine polish. When ready, I will take some outside pics in the sunlight, which show the effect better. Cheers Rob