DocRob
-
Posts
7,045 -
Joined
-
Last visited
Content Type
Profiles
Forums
Events
Gallery
Everything posted by DocRob
-

Cobra Coupe - Le Mans - Model Factory Hiro 1/12
DocRob replied to DocRob's topic in LSM 1/35 and Larger Work In Progress
Thank you Mike, right now, I´m detailing the engine area further with plumbing and wiring. There is definitely a lot stuff under the hood. Cheers Rob -
Cobra Coupe - Le Mans - Model Factory Hiro 1/12
DocRob replied to DocRob's topic in LSM 1/35 and Larger Work In Progress
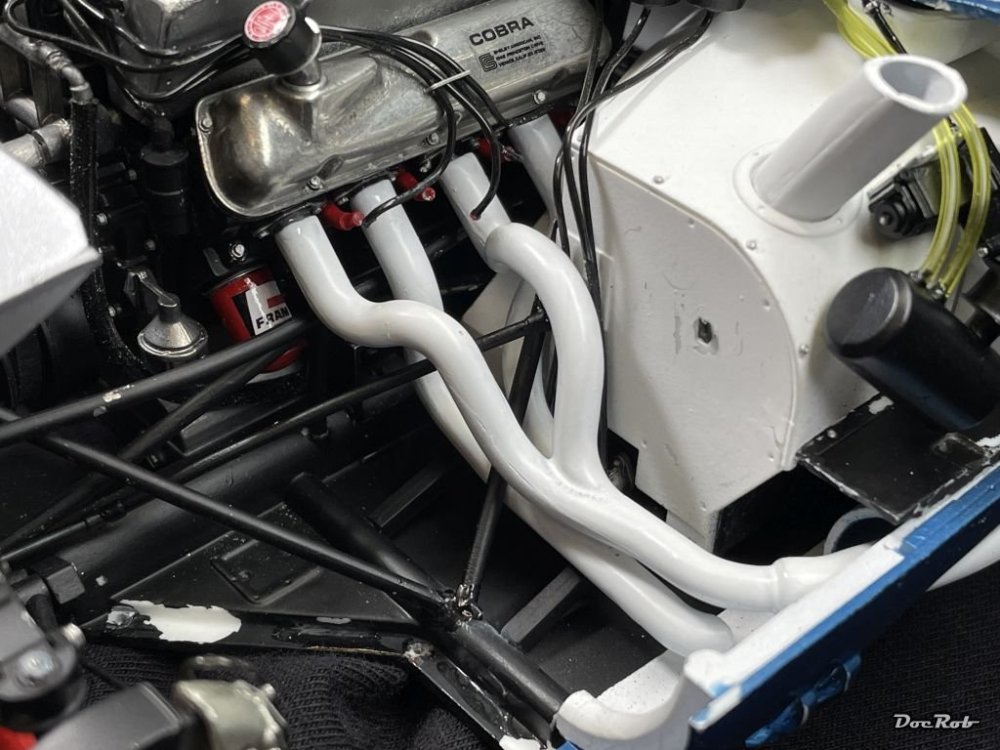
Thank you Chris, the whole exhausts were white, at least in 1965. Later some chassis had polished metal ones. My chassis was painted white in the engine area, where others were painted silver. The change for a bigger block seemed to have been not so easy in the confined compartment. Cheers Rob -
Cobra Coupe - Le Mans - Model Factory Hiro 1/12
DocRob replied to DocRob's topic in LSM 1/35 and Larger Work In Progress
Thank you Hubert, these spaghettis are definitely al dente, which was part of the problem. There are two manifold parts for each side and you have to explore, how to fiddle them in. It took some time to find out how, even with the extra sequence description. That MFH provides updated manual information shows, that they are really building the kits, which is good to know. Cheers Rob -
Cobra Coupe - Le Mans - Model Factory Hiro 1/12
DocRob replied to DocRob's topic in LSM 1/35 and Larger Work In Progress
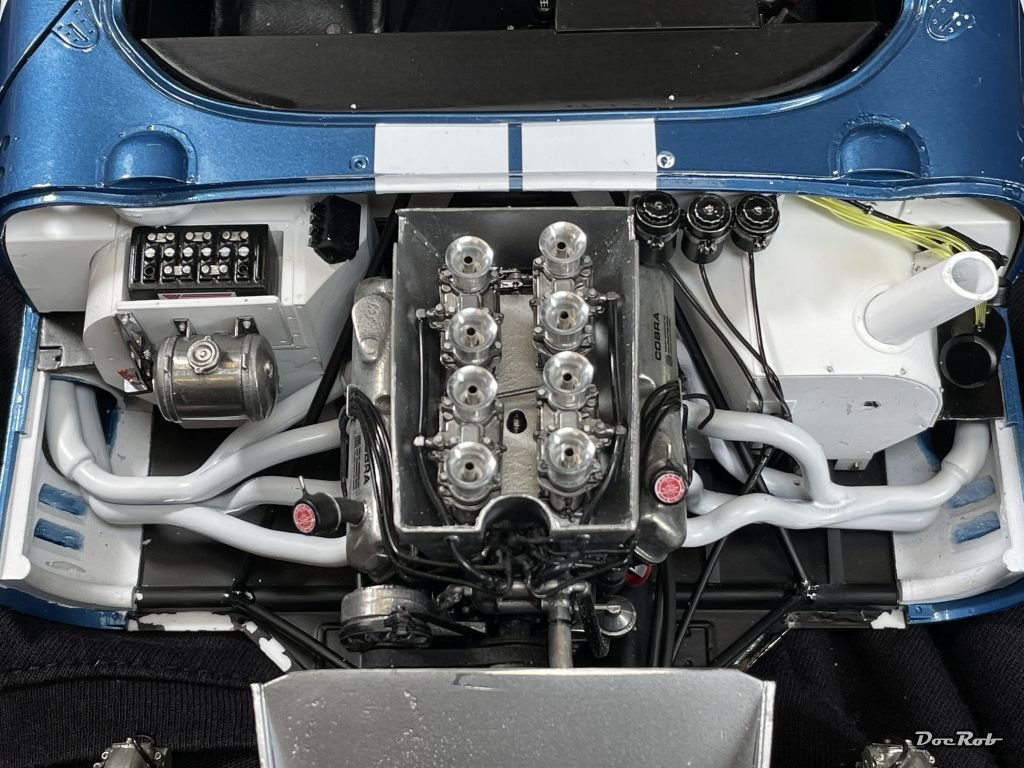
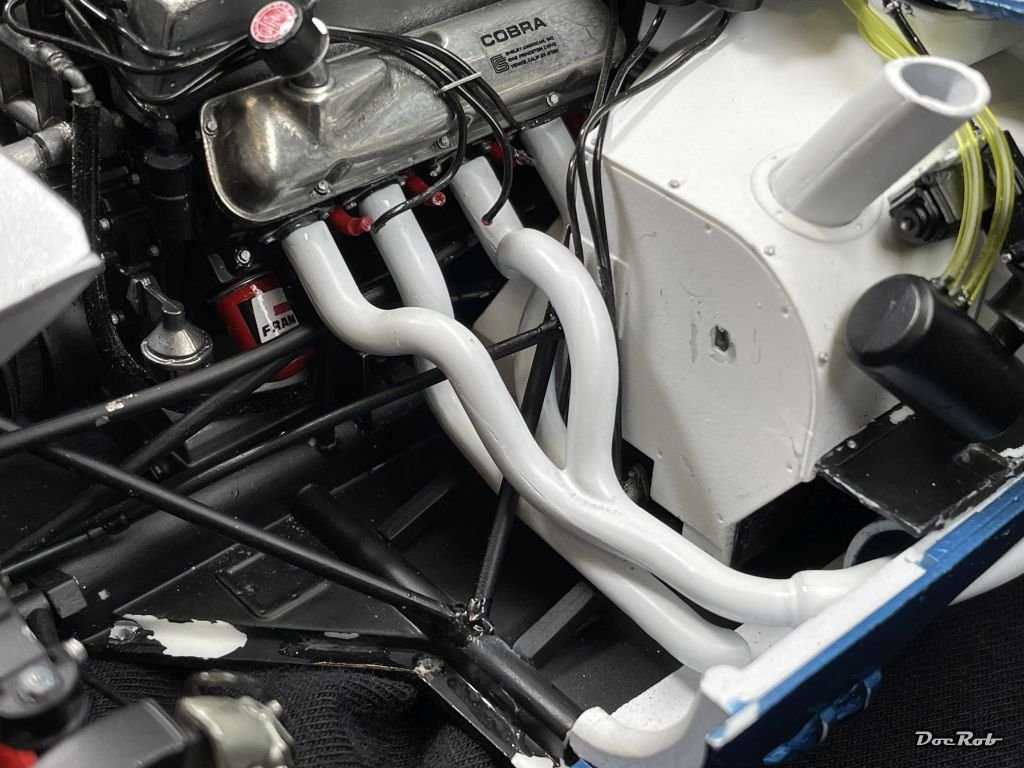
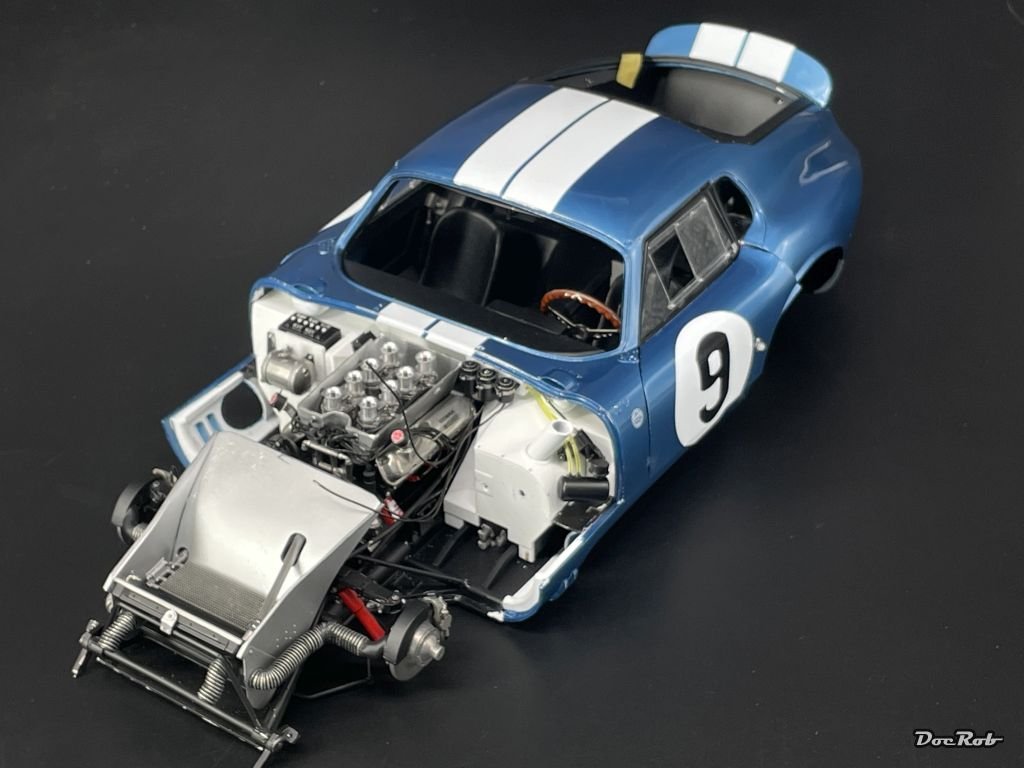
Exhausts and manifolds, an assembly, I didn´t look forward to, because it´s multiple parts in very confined space. I took my time, dry fitting the manifolds before painting. After airbrushing all in Tamiya lacquer matte white, there was no way around continuing. Fortunately there is an additional manual page provided by MFH, which shows the sequence, how to mount the parts. With the sketches in the normal manual, I would never had made it. Especially the right side was delicate, as there are frame rods and the steering column to add, which are all intersecting, it´s a true 3D puzzle. It took some time and some damages occur during the process, but somehow I got it done finally. Mind, these are bench shots without touch ups and repairs, which will be done after test fitting the side pipes. Cheers Rob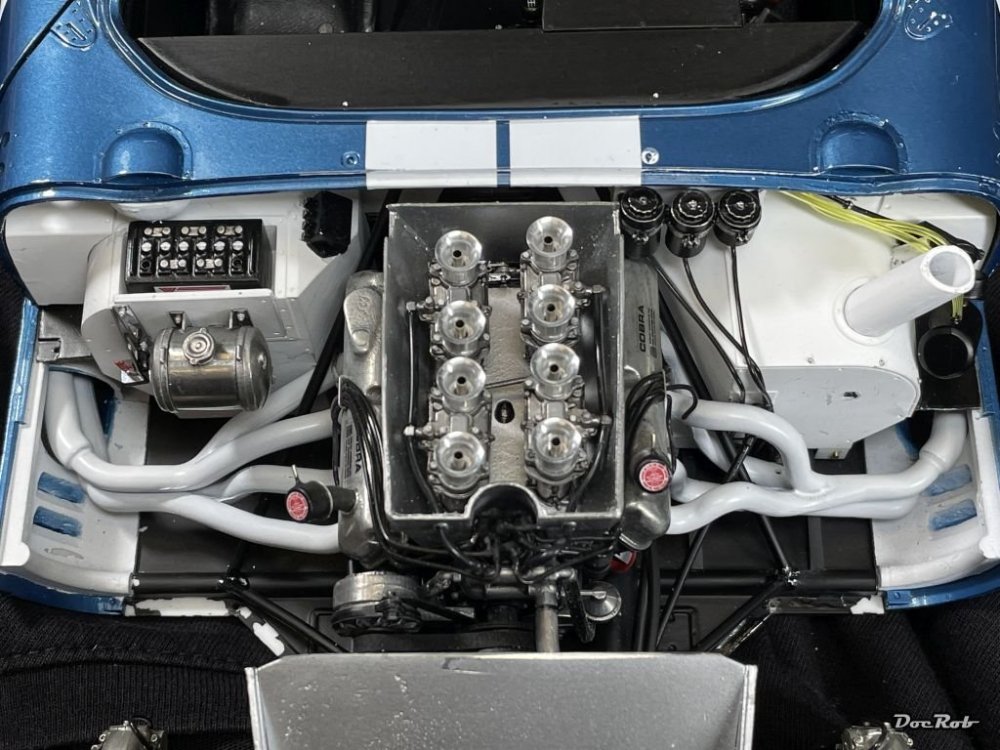
-
Cobra Coupe - Le Mans - Model Factory Hiro 1/12
DocRob replied to DocRob's topic in LSM 1/35 and Larger Work In Progress
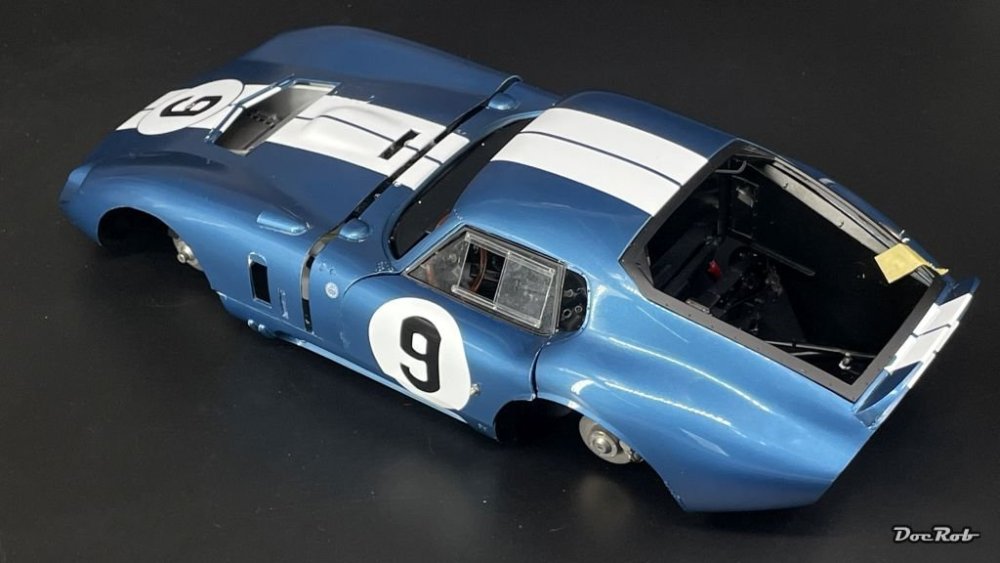
First there were experiments with hard tops on normal Cobra roadsters to increase their speed. That became necessary, because Shelby wanted to compete in Europe, where the track designs were different. Longer race laps and higher speeds called for better aerodynamics. It proved, the hard tops were not enough and so Peter Brock designed an all new body, the Cobra Coupe. The first one was built on the chassis of a Cobra roadster in the US and proved fast, but underwent several aerodynamic changes, cumulating into the new rear spoiler, which added some needed rear downforce. Brock claimed, the design, specially the cut tail end was based on German constructions from the 30´s and he seemed to be right with his approach, gaining more than 20 miles top speed and reduced gas consumption. The remaining five chassis were built in Modena (Italy), because there were no capacities in the US. Cheers Rob -
Cobra Coupe - Le Mans - Model Factory Hiro 1/12
DocRob replied to DocRob's topic in LSM 1/35 and Larger Work In Progress
Pretty scary stuff, Carl. I think unsecured load was very common in past decades, but the situation bettered. What also changed is the power and aggressive driving style of transport vehicles. Back in Germany it was sometimes scary to had a white van in your vicinity. They were a symbol for traffic rudeness. Cheers Rob -
Cobra Coupe - Le Mans - Model Factory Hiro 1/12
DocRob replied to DocRob's topic in LSM 1/35 and Larger Work In Progress
I wouldn´t call it frustrating, Chris. Usually the research done by MFH is pretty decent and I tend to rely onto their information. The instructions show two different chassis, #2601 for different races and my #2286 for Le Mans and always refer to their differences. Cheers Rob -
That´s a very contrasting camo Gus, but it came out great. Your weathering efforts blend the colors a bit, which I really like. Cheers Rob
-
Eduard Spitfire Mk. XVI Bubbletop 1/48
DocRob replied to CANicoll's topic in LSM 1/48 Work in Progress
The oil stains came out great, Chris. You will recover from the little mishaps and turn out a beauty. I usually spray the prop tips first and mask them off to spray the rest of the prop long before decaling. This sequence works best for me and allows consistent weathering on tis and blades together. Cheers Rob -
Cobra Coupe - Le Mans - Model Factory Hiro 1/12
DocRob replied to DocRob's topic in LSM 1/35 and Larger Work In Progress
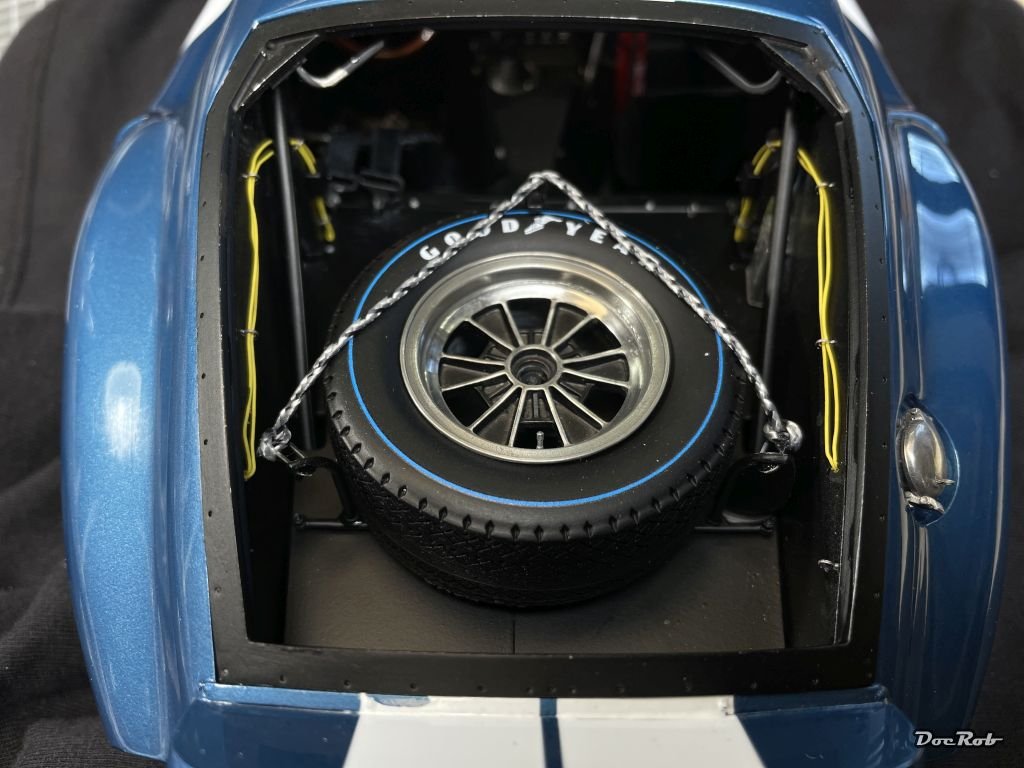
Thank you Chris, I also did some research, but find it hard to get conclusive evidence about some details, as all the built chassis were different and were often modified later on. In your picture and the other rear section shot of your source, I can´t even see evidence of a spare tyre rack. I found some pictures on Rare Shelby Daytona Cobra Coupe to Auction - Racing Vintage Cars for chassis #2601, which show the rack, but without the possibility to add a center lock. There is also no evidence of the rear light wires on the sides of the trunk. It seems difficult to build the #2286 chassis to 1965 standard without compromises, which is ok for me. Cheers Rob -
Cobra Coupe - Le Mans - Model Factory Hiro 1/12
DocRob replied to DocRob's topic in LSM 1/35 and Larger Work In Progress
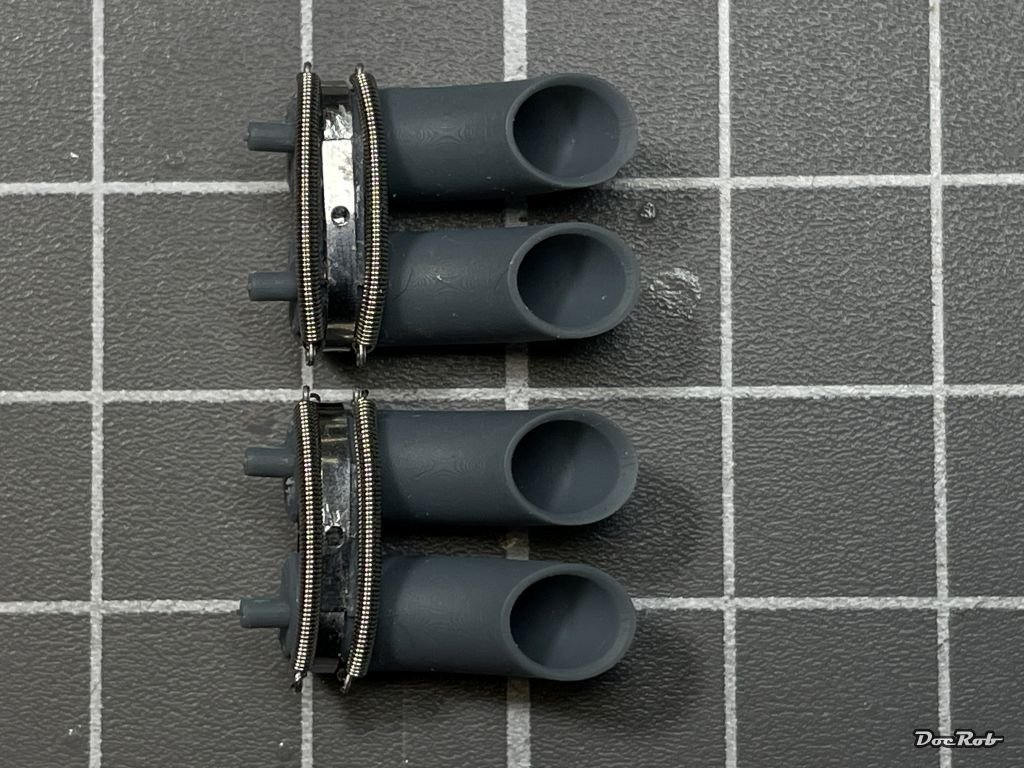
The rear section got finished with the spare tyre rack. I´m not sure about the rope and have to find some pictures of the real car to verify, but this is, how it is shown in the manual. I don´t want to have a collision with that huge heavy tyre behind my head. Next, I started to prepare the exhausts. The manifolds are made from white metal, which has to be fitted into the confined space of the engine compartment. The side pipes are produced from resin and the exhaust ends are 3D printed which added PE- and rivet fittings. Every time, little coil springs are involved, it gets creepy. These buggers are really hard to fit into the PE fittings properly and you don´t want them airborne. Anyway, here are the end pieces. Cheers Rob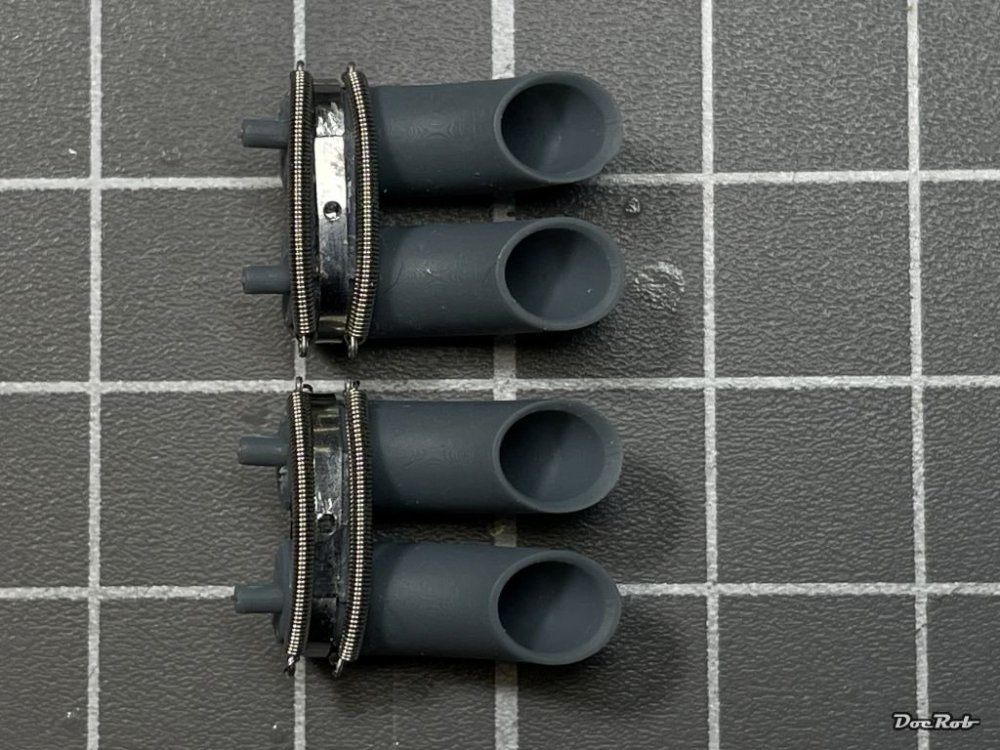

-
Cobra Coupe - Le Mans - Model Factory Hiro 1/12
DocRob replied to DocRob's topic in LSM 1/35 and Larger Work In Progress
Thank you Gus, I searched for Bob Smith epoxy and - who would have guessed - came up empty for my rock in the sea. I will try to get something similar though. I used 2K epoxy from Pattex in the past, which worked well for some cases, but pulled said "strings". When I´m building the Cobra, I often need a drop of CA every ten minutes, which makes working with epoxy really uncomfortable. For larger parts, it may be doable. Cheers Rob -
Cobra Coupe - Le Mans - Model Factory Hiro 1/12
DocRob replied to DocRob's topic in LSM 1/35 and Larger Work In Progress
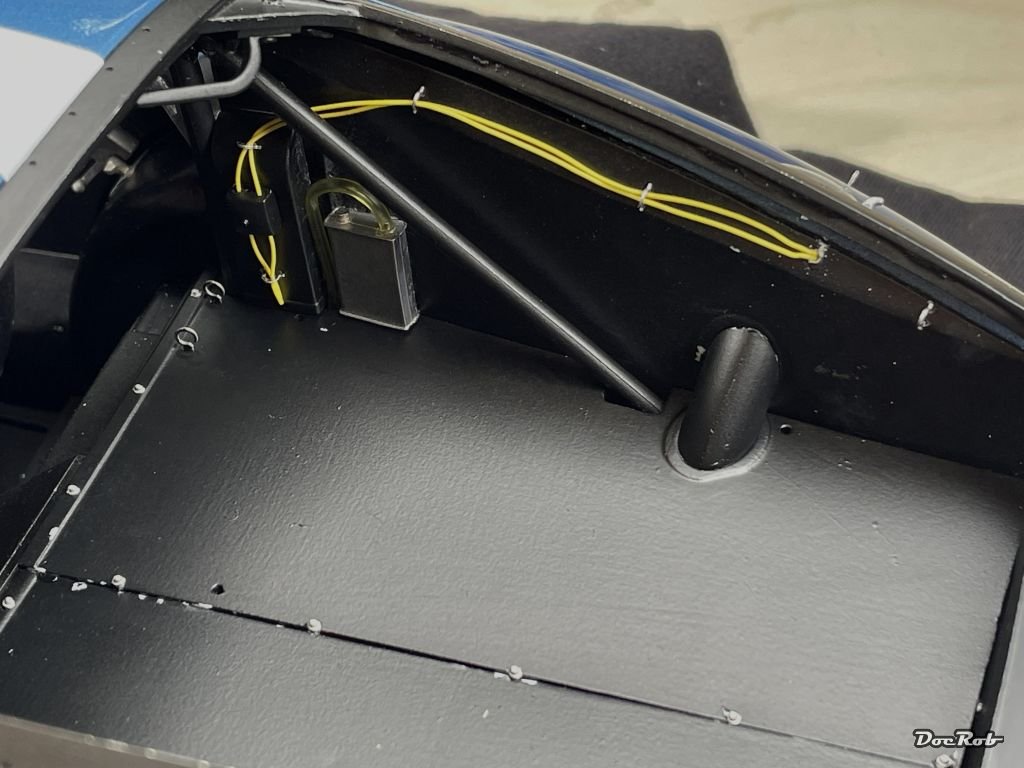
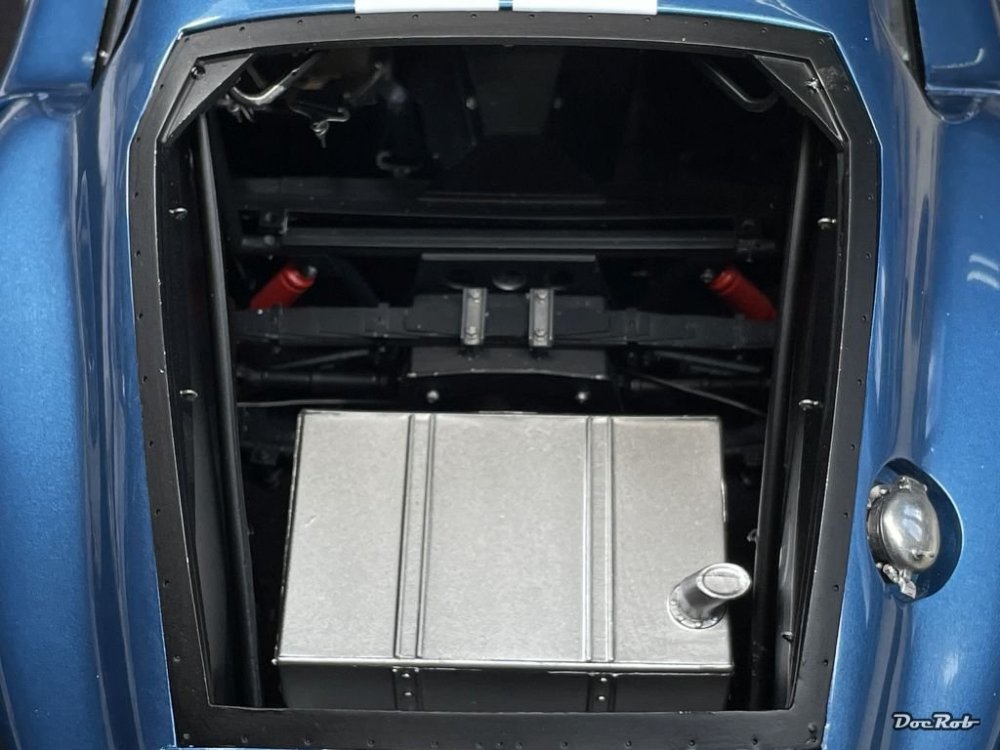
I decided to let the implications of the exhaust system stew for a bit and went to the rear interior area. There is an internal framing down under the tank, which is connected with the chassis as well as the body and it fits like a glove. The framing holds the tank, which I only painted in aluminum without detailing, because it will never be seen again. Next, the right and left rollcage bars were added, not too easy, but they also fitted perfectly, which shows how good the engineering is. The difficulty with these parts, it´s all black in there and you have to use an extra light for proper orientation. Now the tank got covered with a two peace (smart) flooring, which also has a lot of fittings for the seat belts and seat supports as well as rivets added. I then added the wiring for the backlights onto the rear air ducts. Unfortunately not enough yellow cable was supplied and I decided to drill a hole and let the cable end there. Last was the small oil tank with it´s tubing and now it will be time to install the spare wheel. But this will be done after some touch ups. Cheers Rob
-
Cobra Coupe - Le Mans - Model Factory Hiro 1/12
DocRob replied to DocRob's topic in LSM 1/35 and Larger Work In Progress
Thank you Mike, yeah the tank filling cap issue, now that I counted the parts, I´m a little disappointed too . I may order some VMS CA, but usually I really like my Colle 21 very much. It´s not too thin, bonds very good with everything and has the perfect curing time for my liking. The epoxy, I have to try and I´m sure, it works great. The downside, you need it permanently, mostly in small doses so has to prepare it, while getting the CA bottle is fast. My reduced experiences with epoxy is, that it often pulls strings (don´t know of a better term in English), which can be fatal. I tried to source some metal primer. All of my usual online shops have it in their portfolio, often different brands, but none are available. I will ask a friend, who is a car mechanic and body repairman about it. Cheers Rob -
Rest in peace Harv, from what I know of you, you were a generous standup guy of character. I would have liked to meet you personally. Rob
-
Cobra Coupe - Le Mans - Model Factory Hiro 1/12
DocRob replied to DocRob's topic in LSM 1/35 and Larger Work In Progress
I will try to monitor the situation further on. Surely, the Cobra cries for a lot of CA everywhere. Since I´m working on the interior, I have lots of chalky residues and there were no windows hatches or doors mounted at the time, so a relatively good airflow was allowed. The residues occur mainly on Tamiya LP-5 semi matte black and yes, this type of residues show best on black background. Working on the chassis, which is along all the fairings and framework airbrushed with the same color, I didn´t had these troubles. Work on the chassis was done in the end of summer with potentially far less humidity in the air, which is now about 90-95 percent. Cheers Rob -
Looking good Kevin. For larger areas yo can also use a fiber pen, which is also useful, to get paint off gluing surfaces. Cheers Rob
-
Cobra Coupe - Le Mans - Model Factory Hiro 1/12
DocRob replied to DocRob's topic in LSM 1/35 and Larger Work In Progress
Thank you Chris, I´m always astonished, how long this car looks and is. I hope I can finish it without causing anymore damage. There are countless areas for touchup accumulating and especially those with body color will be problematic. I will keep the ventilation idea in mind and will experiment a bit. It is so weird, because all of the used primers, colors and glue are the same, I used for a long time with nearly no issues. Cheers Rob -
Cobra Coupe - Le Mans - Model Factory Hiro 1/12
DocRob replied to DocRob's topic in LSM 1/35 and Larger Work In Progress
Thank you Carl, I should keep your idea about the jack stands in mind, when I´m not able to install the exhausts or roll cage parts in the back , which seems to be very difficult, due to the confined space and limited accessibility, but lets see. As a "reward" for adjoining the chassis and body, I poured some champagne with self made raspberry vodka, a signature drink of the Ritz bar in Paris from the 30´s of the last century for my wife and me Cheers Rob -
Cobra Coupe - Le Mans - Model Factory Hiro 1/12
DocRob replied to DocRob's topic in LSM 1/35 and Larger Work In Progress
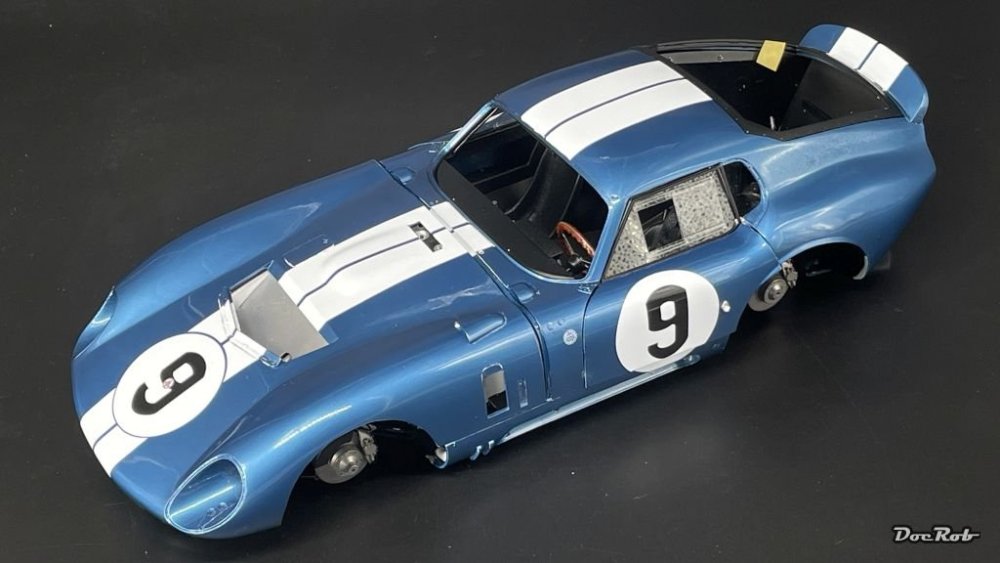
Today, I had the second attempt with adding the body to the chassis. Yesterday, I tried to identify the obstructing parts and gave them a little workover. This is not like you can pull the body off the chassis as often as you like. All the tolerances are really tight and it involves a lot of bending causing nasty sounds to get it right. When the body was halfway into position, I used a lot of finger force to push everything carefully into place and added screws into pre drilled holes. There were not too many damages to report, only some more scratches and one or two parts knocked off. It´s hard to describe, but there are so many elements all around, which have to fit, I expected worse, but it was no walk in the part and it´s about make or break with the Cobra. The engineering is fantastic, I don´t know how they are able to do it, this is not the average " I close the fuselage of my plane job". Attentive readers might see, there were parts removed from the firewall. This is necessary due to the preparation for installing the exhaust system, the next obstacle in this confined space. There is an additional sheet in the manual, showing the sequence of every part, but I couldn´t make it properly during test fitting. Anyway, I´m lucky, I managed to marry the body to the chassis without too much fuzz. The bonnet is only laid on and the doors need some fine tuning later on. Cheers Rob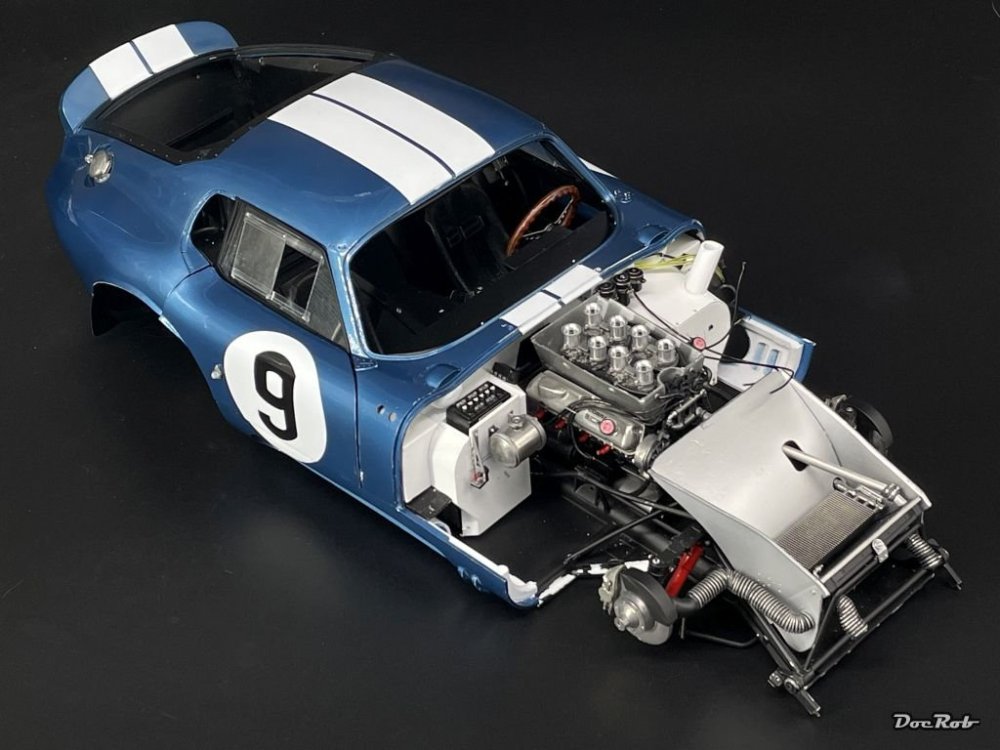

-
Cobra Coupe - Le Mans - Model Factory Hiro 1/12
DocRob replied to DocRob's topic in LSM 1/35 and Larger Work In Progress
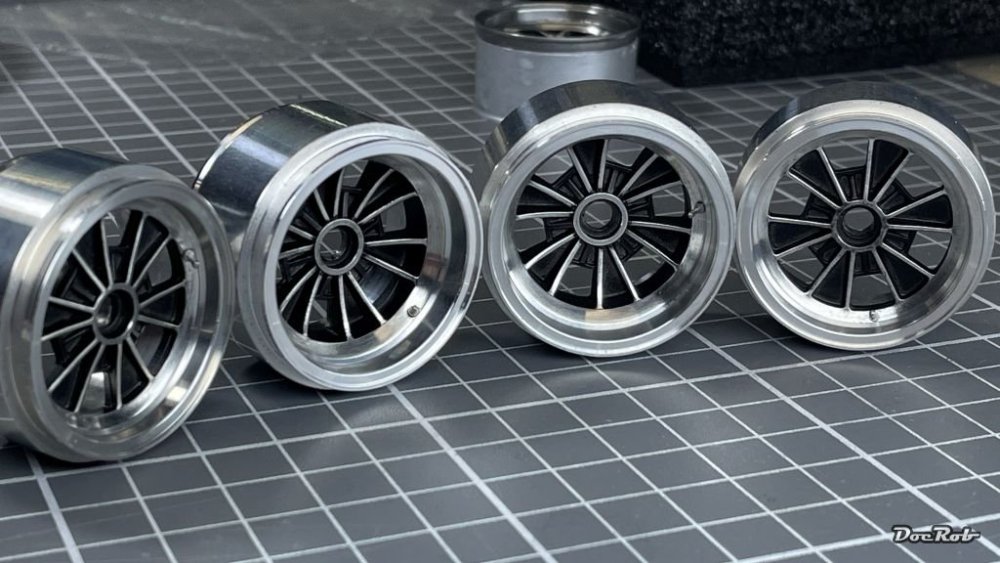
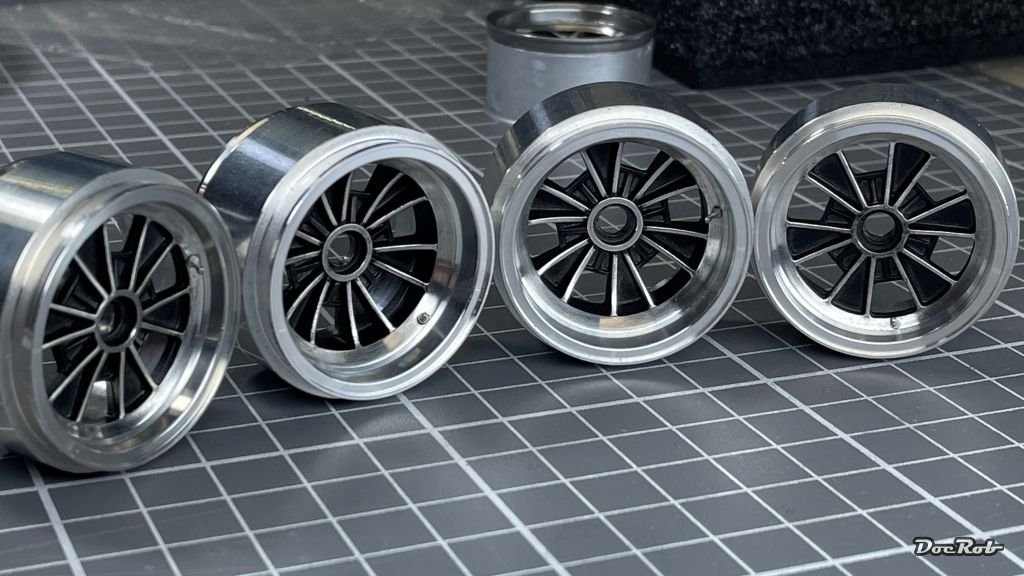
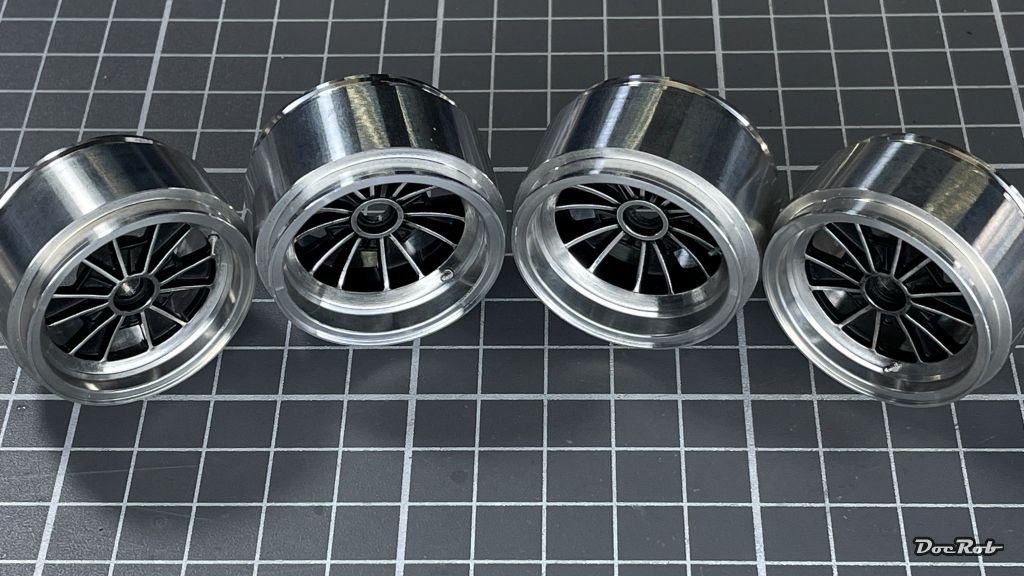
Thank you Chris, the rims were made of near polished turned aluminum and it would have looked wrong to not polish the inner parts and having a sharp contrast between the two. Your suggestion on the fogging issue sounds good and I will try it out. Unfortunately, about everything on this build is glued with CA and this on permanently base. I have to see, how practicable the spray booth or ventilation is. Most of the fogging arose hours after application of the CA, strangely. I also looked into the VMS CA descriptions. They claim to be a bit less aggressive, but have a longer curing time, which I don´t like, because often it´s so difficult to hold the parts in place long enough. Cheers Rob -
Cobra Coupe - Le Mans - Model Factory Hiro 1/12
DocRob replied to DocRob's topic in LSM 1/35 and Larger Work In Progress
I´d like to see things finished properly, Hubert. I don´t like to have a looming shelf of doom and unfinished GB´s fell into the same category. Like you, I generally enjoy a themed group build among fellow modelers most, there doesn´t need to be a winner or prize. That is why I said, I may attend to future GB´s but off the competition, if there is one, not eligible for winning or prizes. I´m also not on FB and other social media platforms and never will be. Cheers Rob -
Very nice, decaling came out great. Cheers Rob
-
What is on your bench right now ? Share a picture :)
DocRob replied to Martinnfb's topic in Modelling Discussion
Can´t see any Christopher Lee dental work on that squirrel, Hubert. The nut shouldn´t contain any blood, also . Cheers Rob -
Cobra Coupe - Le Mans - Model Factory Hiro 1/12
DocRob replied to DocRob's topic in LSM 1/35 and Larger Work In Progress
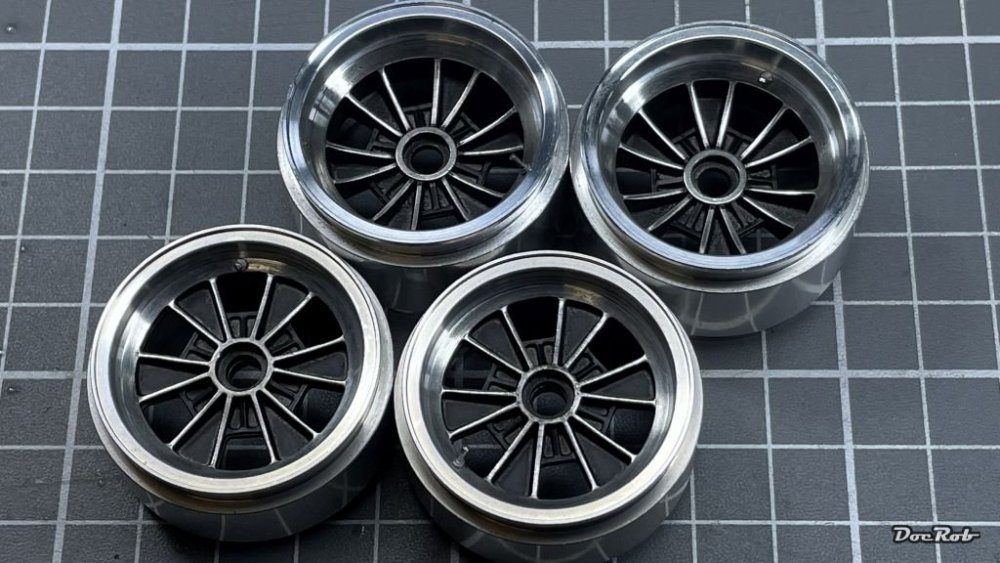
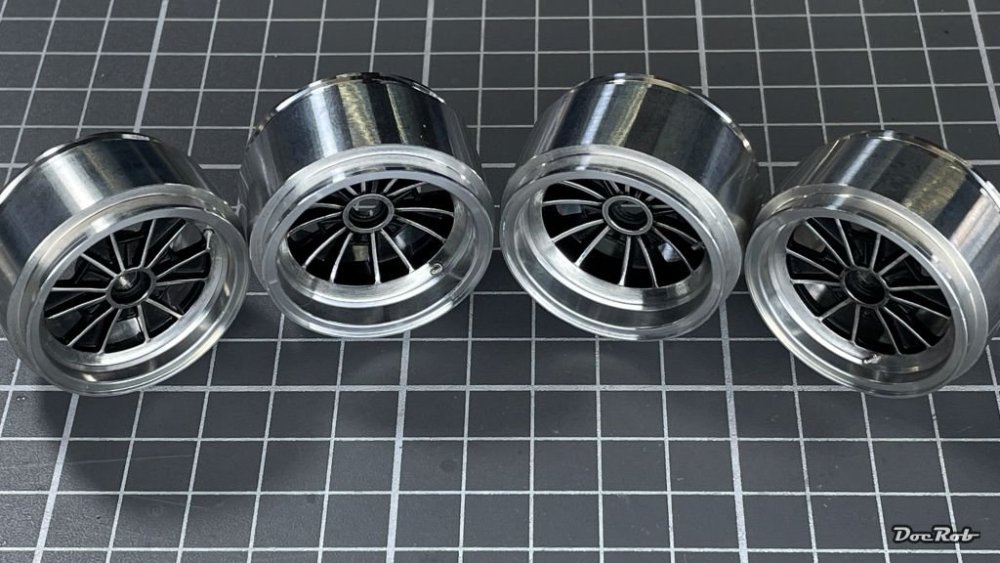
I finalized the rims with installing the painted and polished center parts into the turned aluminum rim. I also added the air valves, but didn´t add the tyres for now, because I fear, the CA fumes might affect them. Cheers Rob