DocRob
-
Posts
7,082 -
Joined
-
Last visited
Content Type
Profiles
Forums
Events
Gallery
Everything posted by DocRob
-

Honda RC166 - Tamiya - 1/12
DocRob replied to DocRob's topic in LSM 1/35 and Larger Work In Progress
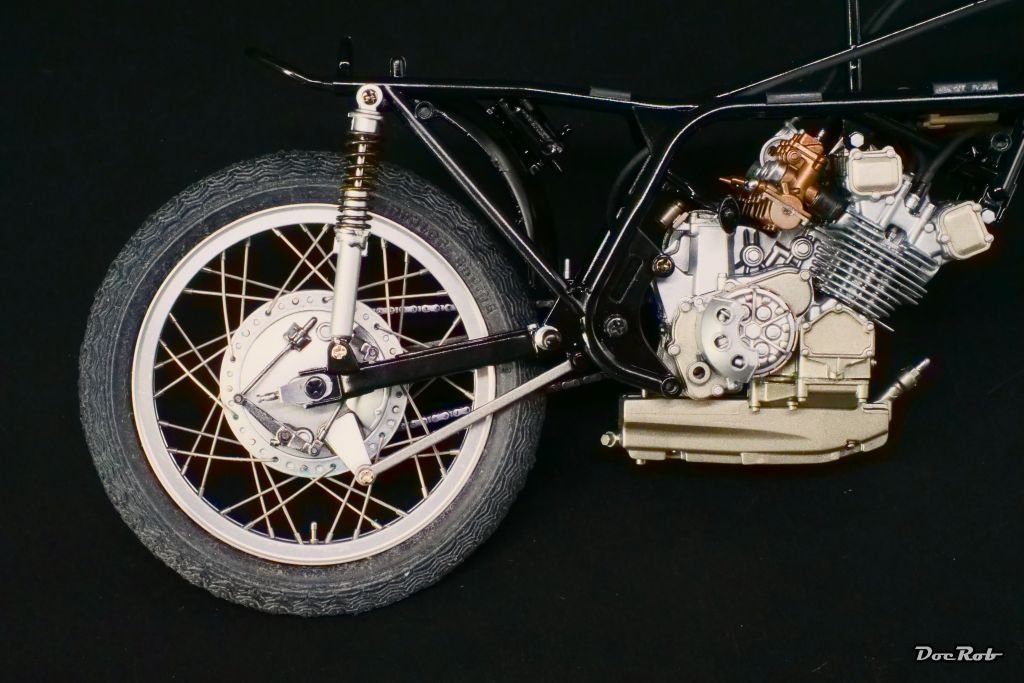
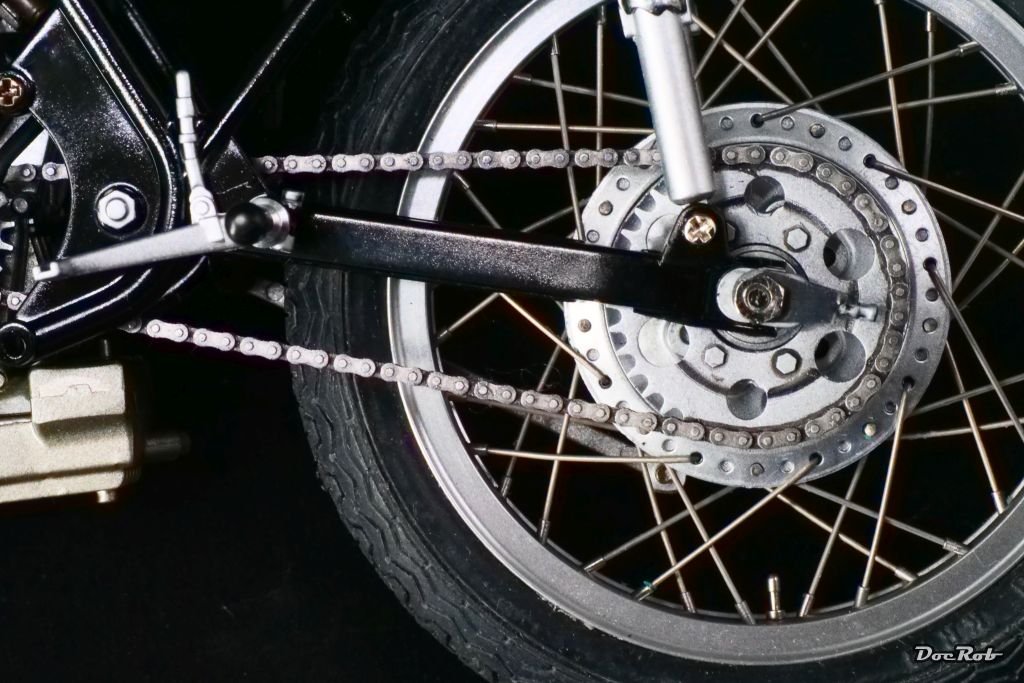
What I especially like about bike kits are the different metal finishes, you need to let it look realistic. Here, I used aluminum, titanium a mix from jet exhaust and copper and chrome, all from the AK Extreme Metal range. Chrome got a undercoat of gloss black, the others were sprayed directly onto the plastic. I was lazy, avoiding masking and sprayed the 3D printed chain in aluminum complete with the chain sprockets. The chain should look like steel and was therefore treated wit a heavy dose of black panel liner, followed by Uschi chrome pigments, which I rubbed in. The tyres received a treatment with a grey Flory wash, to enhance the detail and let them look a little less plastic like. The fit and engineering is still fantastic and putting together the kit is pure joy. Cheers Rob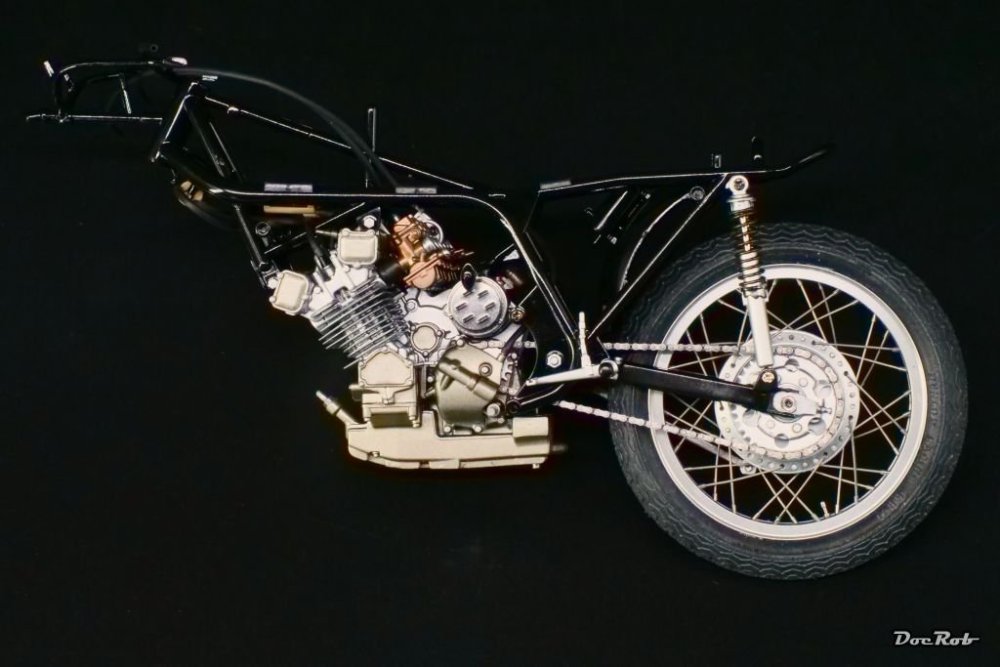

-
Honda RC166 - Tamiya - 1/12
DocRob replied to DocRob's topic in LSM 1/35 and Larger Work In Progress
It is a really beautiful kit, Mike. Unfortunately, the extra sets are hard to get, actually. Some years ago, it was the same, but then suddenly they were available in Japan, where I bought them. Cheers Rob -
Eduard Spitfire Mk. XVI Bubbletop 1/48, RFI!
DocRob replied to CANicoll's topic in LSM 1/48 Aircraft Ready for Inspection
Fantastic result, Chris, your Spitfire is a beauty. I like the beautiful weathering. Cheers Rob -
Mk.I Spitfire BoB
DocRob replied to Rod Bettencourt's topic in LSM 1/32 and Larger Aircraft Ready for Inspection
Looks fantastic, good that you are no photographer, if you were, we wouldn´t post our meagre pictures anymore . Best of all, paint, finish and weathering match perfectly. Cheers Rob -
Honda RC166 - Tamiya - 1/12
DocRob replied to DocRob's topic in LSM 1/35 and Larger Work In Progress
Thank you Gus and Carl, the wheels look very good indeed and it was worth the extra work. I don´t know, where the difficulties arose. I guess there were tiny tolerances with the jig. I´m happy, that it´s done now and fortunately there is no "ping" test necessary, as it´s not Mike Hailwood´s live depending on it. Cheers Rob -
Honda RC166 - Tamiya - 1/12
DocRob replied to DocRob's topic in LSM 1/35 and Larger Work In Progress
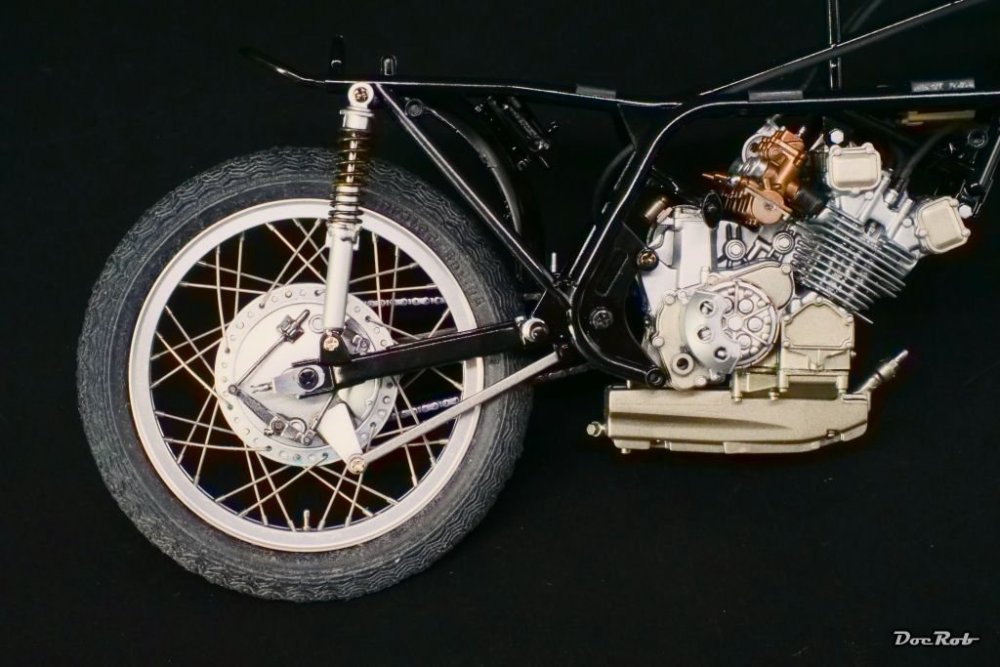
Today, I finished the second wheel, but somehow, it was a chore. I had lots of difficulties to fiddle in the shorter spokes, one half being a fraction of a millimeter to short, the other half too long, that they needed heavy bending, to get them into the rims holes. Anyway, it´s done now and looks better than the plastic wheels for sure. Cheers Rob
-
Honda RC166 - Tamiya - 1/12
DocRob replied to DocRob's topic in LSM 1/35 and Larger Work In Progress
Thank you Hubert, the RC166 is not only special, it´s also a really beautiful bike ...and don´t forget, it had oval Pistons, Carl. Cheers Rob -
Honda RC166 - Tamiya - 1/12
DocRob replied to DocRob's topic in LSM 1/35 and Larger Work In Progress
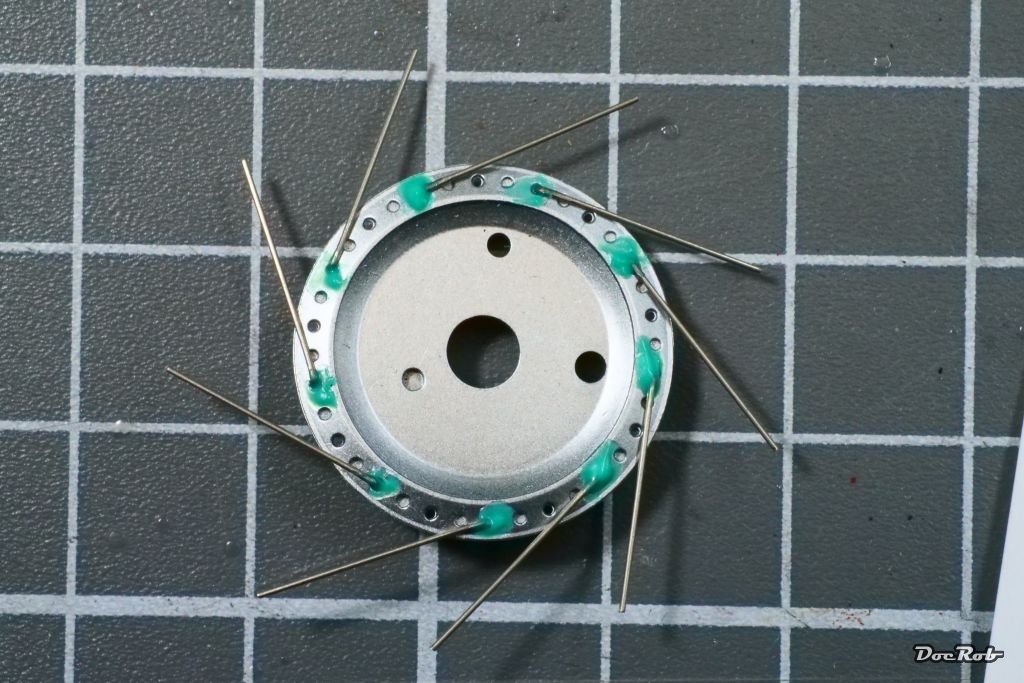
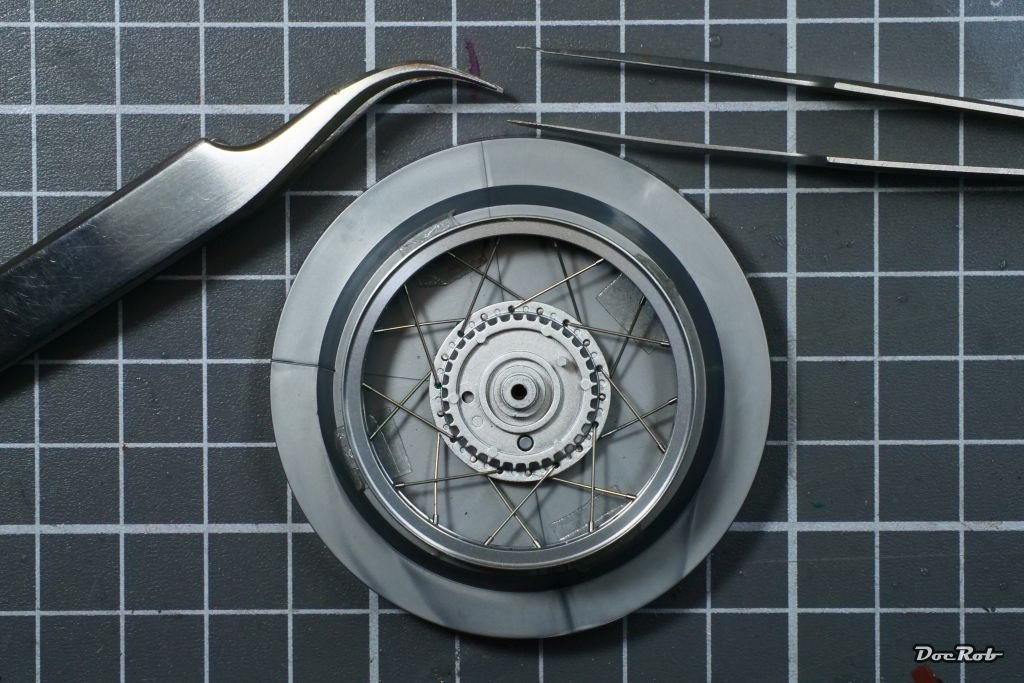
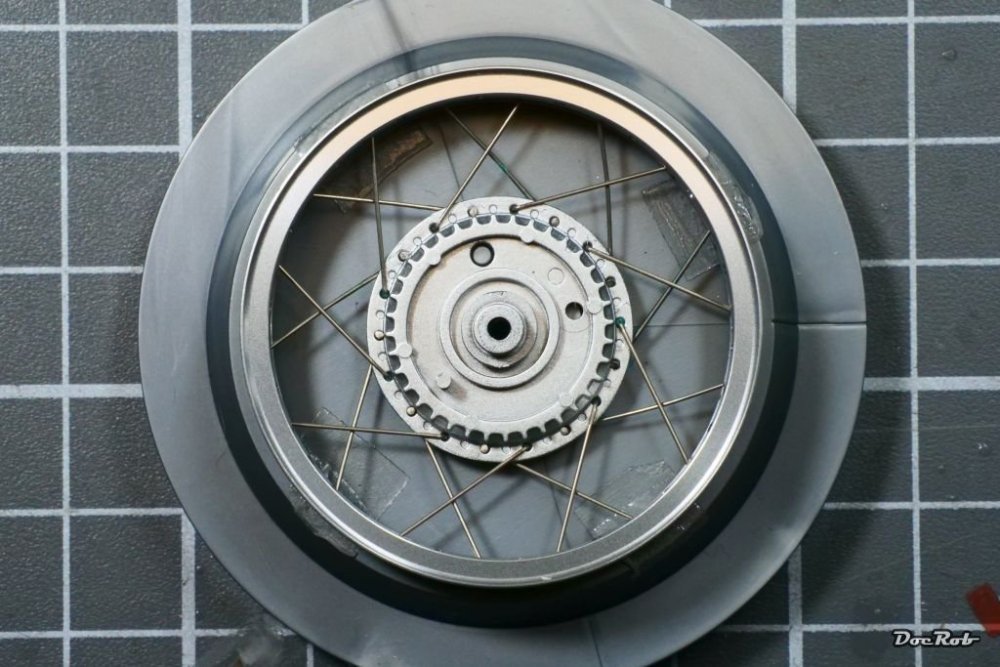
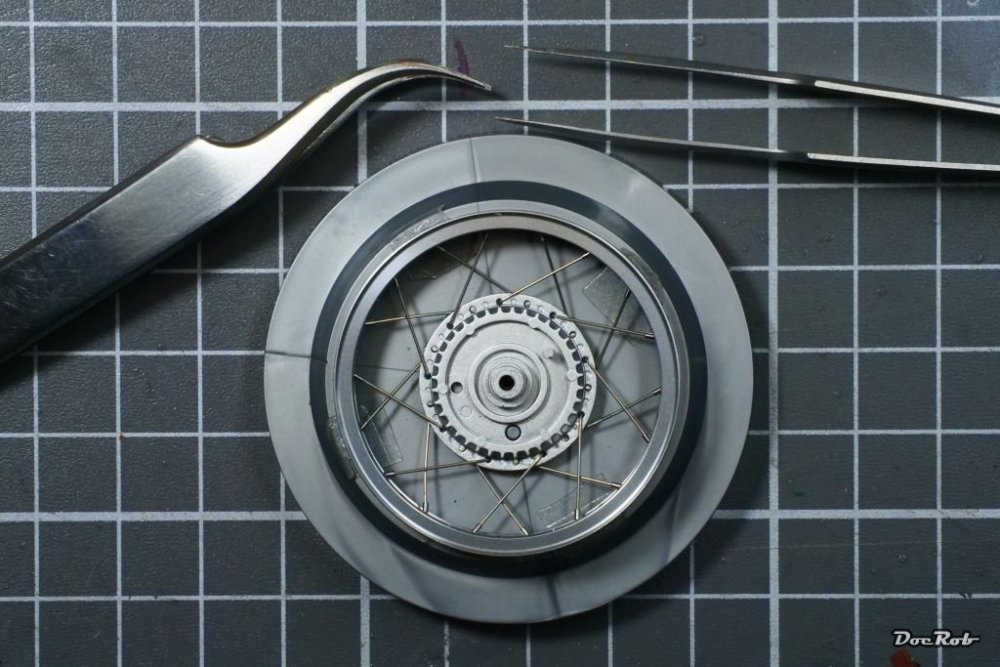
Today, I finished the front wheel any difficulties and started with the rear wheel. After fiddling the spokes into the rim, I secured them with liquid mask and set the rim and spoked hub into the rim. Next, I inserted the spokes carefully into their holes in the rim, where some needed slight bending. Then the troubles began, while I tried to add the firs spoke nipple, some spokes flipped out of their holes in the rim, nasty. It was caused by slight movement of the hub in the jig and therefor, I used some blue tac to fix the hub like shown on the picture. During applying the nipples, a straining task, two spokes came completely loose from the hub, caused by too small heads, which slipped through the hole. Somehow, I got them fiddled in with a lot of swearing. On the pic below, one is still missing, but I fixed it now. Cheers Rob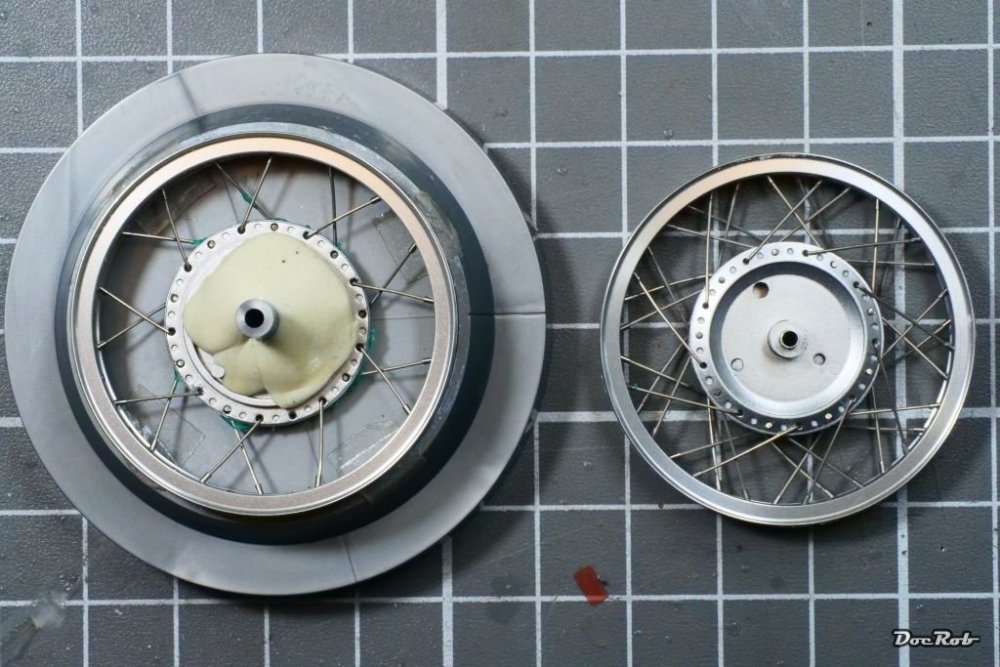
-
Beautifully done, Gus, I have to start one myself soon, if I ever build a plane again . Cheers Rob
-
Phew, close shave on rescuing the Hornisse, Kevin. The cockpit looks great, even after the accident. Cheers Rob
-
Honda RC166 - Tamiya - 1/12
DocRob replied to DocRob's topic in LSM 1/35 and Larger Work In Progress
Muchas gracias Count, The extra sets seem to be hard to find right now, so yes, your mentioned offer was a good one. I had the kit for a while, searching for the extras, which were available in Japan two years ago for good prices, but are seemingly gone now. Cheers Rob -
Honda RC166 - Tamiya - 1/12
DocRob replied to DocRob's topic in LSM 1/35 and Larger Work In Progress
Thank you Paul, the kit is a beauty and would look nice out of the box. The Tamiya extra sets raise the bar though. you can´t substitute metal for metal. The spokes are made from stainless steel and don´t need to be cut or bent. The chain set, I won´t use, it seems to be very delicate to assemble and after the MFH Crocker´s chain experience, I try to exchange motorcycle chains only for 3D printed ones. For the RC166, I have a Falcon Model chain set. Cheers Rob -
Probably my next MFH project. Today, I received that beauty directly from the Company. It took five days to be delivered to my doorstep an absolute record, the big A takes as much time to even start shipping an ordered product to my place. The Brabham BT45 wasn´t a successful car, but it looks absolutely cool. 70´s formula one cars were so different from each other. The BT45 followed the very good BT44, which had the Cosworth DSV 8cylinder engine implanted. The 45 was redesigned for accepting a Alfa Romeo flat 12 engine, which was cheaper (or even free) for Brabham. Unfortunately the engine was not very reliable and the BT45 was not so popular. I´m more attracted by design so for me, the car is a clear winner. Cheers Rob


-
Honda RC166 - Tamiya - 1/12
DocRob replied to DocRob's topic in LSM 1/35 and Larger Work In Progress
Next, I started with the wheels, an extra set made by Tamiya to substitute the not too shabby kit wheels. But what looks better than plastic, right, metal. The rims are turned and the spokes are pre lengthened and pre bent. I recommend to study the manual very thoroughly and check twice, as it is easy to make mistakes. There is a line engraved into the jig for alignment with the valve and I nearly interpreted a cast blemish for the marking. First you add the spokes to the ABS hub and roughly align them correctly. The manual calls for using whit glue to fix them temporarily, but I thought, I try masking fluid instead, Worked great and will be easy to remove. After the second of four sets are aligned in the opposite direction, it´s time to put the rim and the spoked hub into the jig. With a pair of tweezer and very light bending of the spokes, you insert them into the rims holes. Finally, you add the spoke nipples from the outside. I used an old, very sharp pair of tweezers for that, holding the nipples by their middle hole and inserted them. Sometimes, a little wiggling with the spoke was necessary to insert the nipple properly. Then the nipples were secured with CA and whoops, half a wheel is finished. Cheers Rob
- 61 replies
-
- 10
-

-
Honda RC166 - Tamiya - 1/12
DocRob replied to DocRob's topic in LSM 1/35 and Larger Work In Progress
Thank you Kurok and FA, these recent Tamiya motorcycle kits are phenomenal. I built a Ducati some years ago as my first motorcycle kit and then got hooked. Every now and then, there will be one on my bench. Cheers Rob -
Honda RC166 - Tamiya - 1/12
DocRob replied to DocRob's topic in LSM 1/35 and Larger Work In Progress
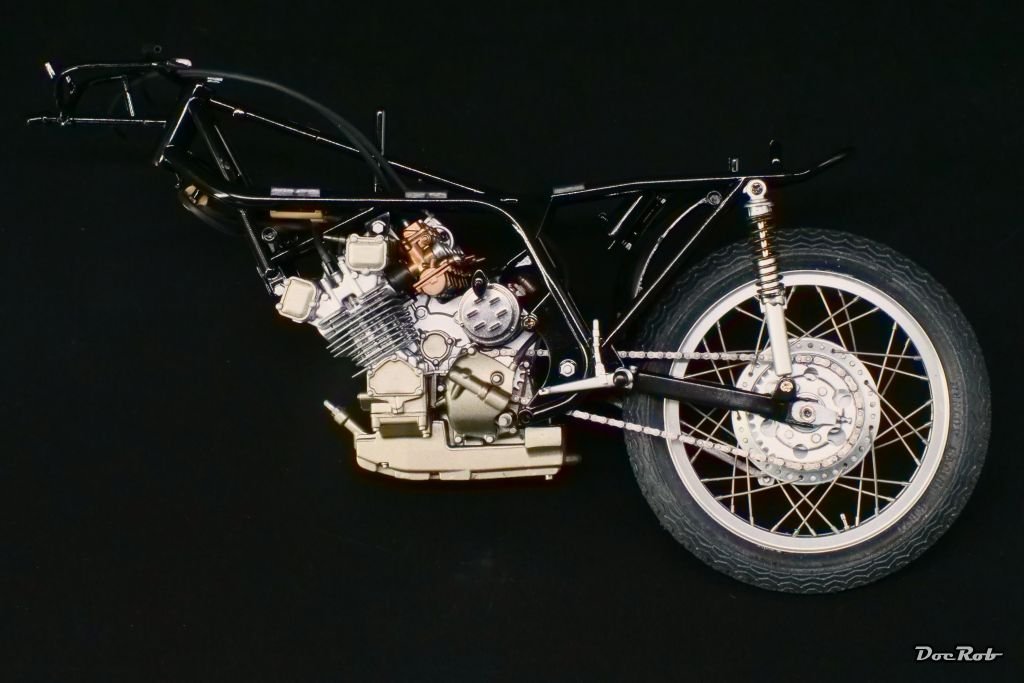
The engine got a bad hair day with the tubing. I used the supplied vinyl tube, albeit it may be a bit on the thick side, but I want a relatively quick build and not hassle with preparing all the connectors with tiny brass rods. Not much of it will be visible, anyway. The frame was sprayed with Tamiya LP gloss black, which again was perfect with it´s shiny finish. The light brown "things" might be capacitors, if I´m not wrong, which will be connected with the spark plug wires. The footrests are made from turned aluminum and are supplied with the original kit, nice touch, Tamiya. Cheers Rob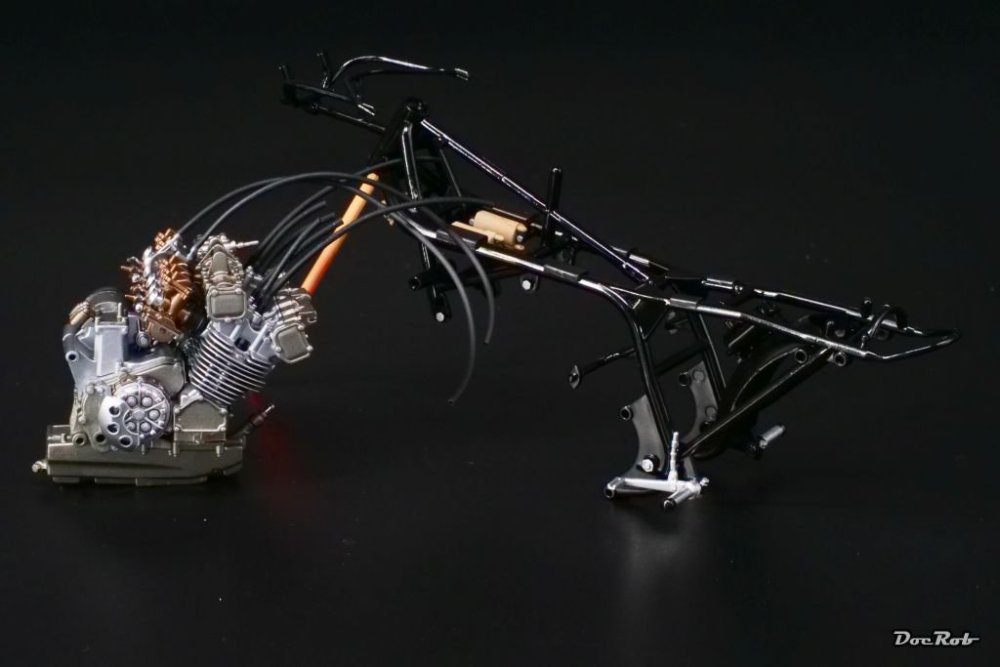
-
Honda RC166 - Tamiya - 1/12
DocRob replied to DocRob's topic in LSM 1/35 and Larger Work In Progress
Thank you Carl and FA. The precise fit and great engineering make that engine a pleasure to build. I thought it would take much longer, being used t very demanding and lengthy builds lately. It was intended to be an in between build. The engine sound must be - unique - I guess, unlike you compare it to dentists drilling machines. Cheers Rob -
Honda RC166 - Tamiya - 1/12
DocRob replied to DocRob's topic in LSM 1/35 and Larger Work In Progress
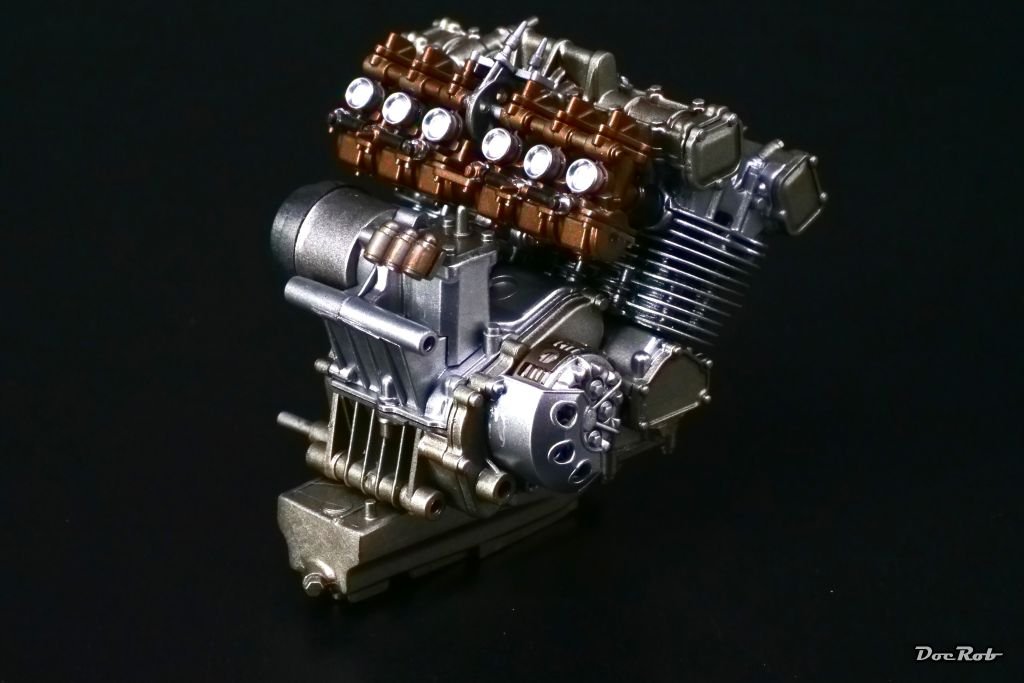
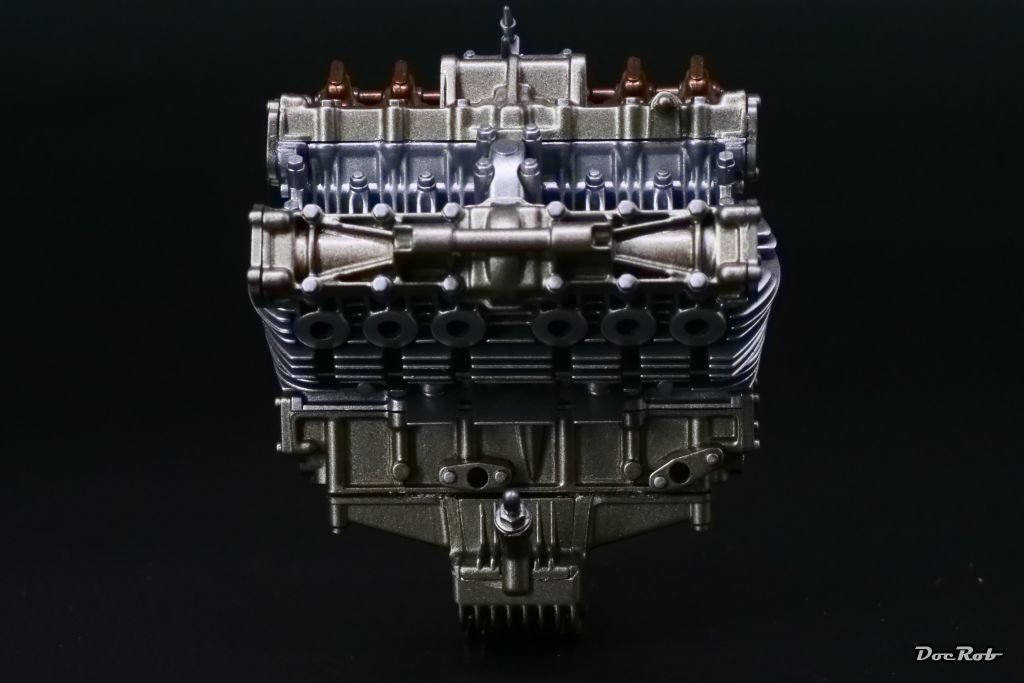
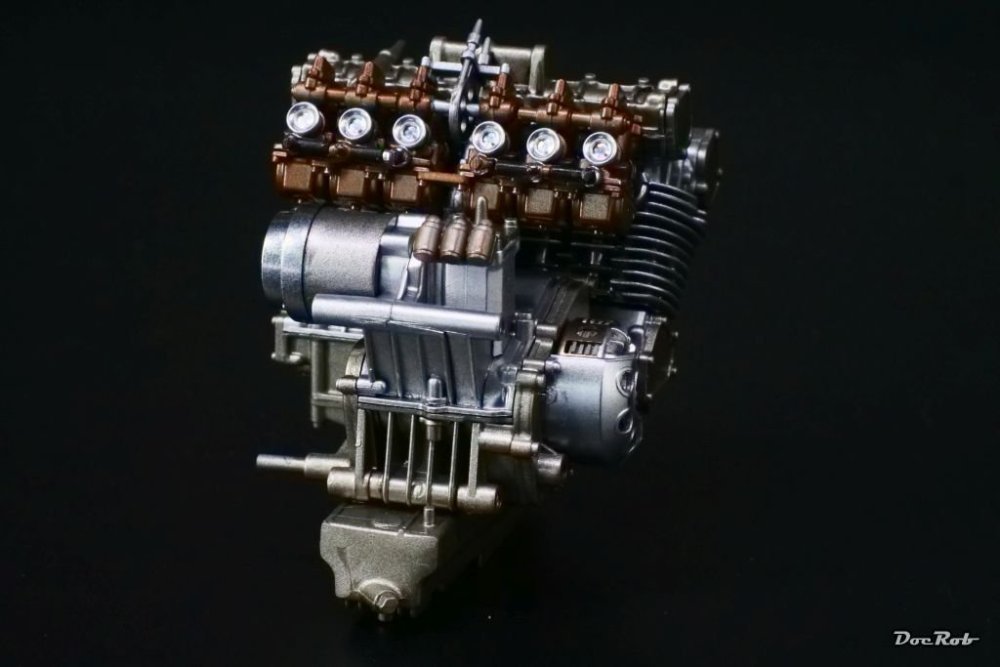
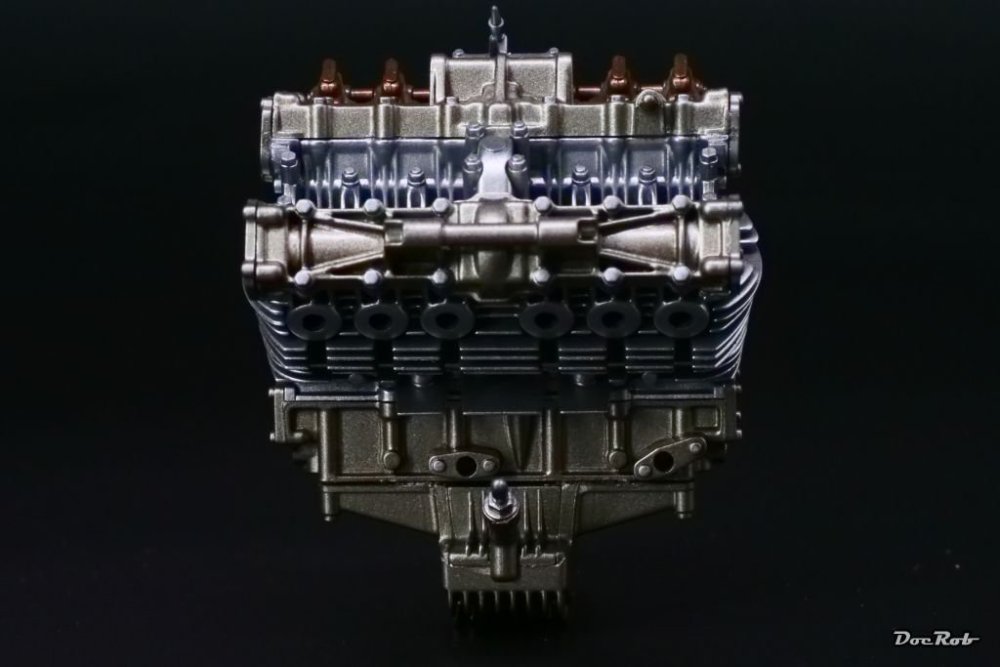
I started with the engine and I have to say, this kit is absolutely fantastic, even by Tamiya´s standards. I built their big F4-U and the 1/48 P-38, which were excellent kits, but the Honda is even better. The engine is very complex, but so well engineered and the parts are fitting perfectly. The cooling ribs are a piece of art and are only possible to be casted in plastic, as there are several thin parts, which get stacked onto each other, genius. I used Extreme Metal colors for the engine, matte aluminum for the block, titanium for the oil pan and other parts and a mix from titanium and copper for the carburetors. The air funnels are turned aluminum and the clutch consists from PE clutch discs and a pre fabricated metal cage. I used a brown panel liner for accentuation and painted all the screwheads with silver. Cheers Rob


- 61 replies
-
- 10
-
-
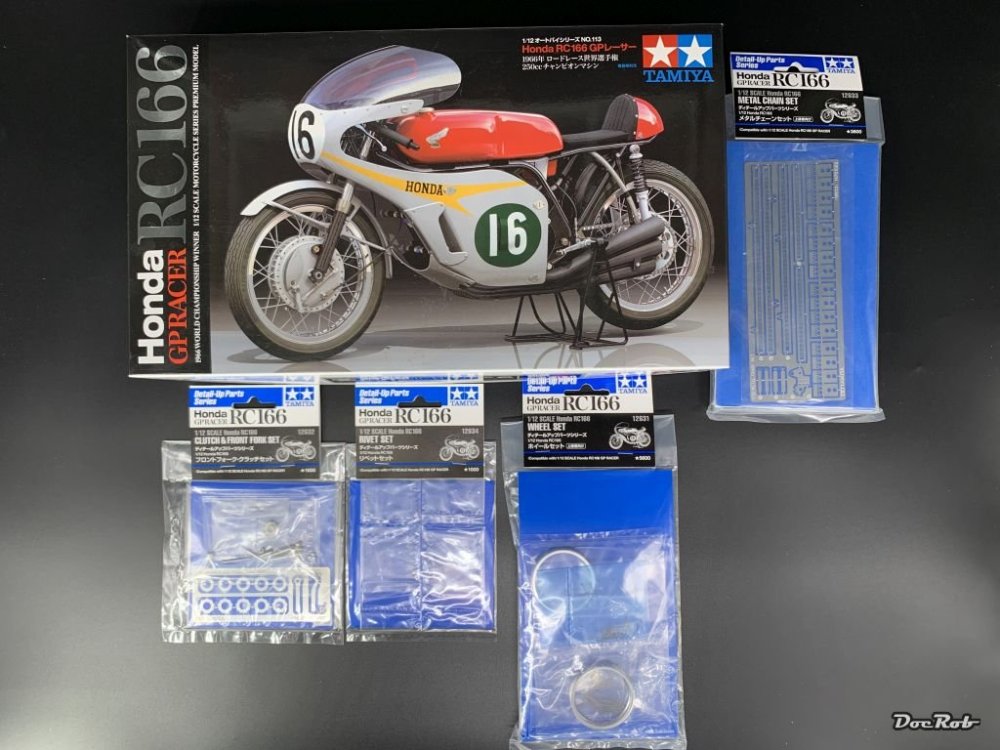
Since a while, I desired to start the build of the famous Honda RC166 from Tamiya, driven by Mike Hailwood, who won the world championship in 1966 and 1967 with this bike. What a change after the big Cobra of the same scale, I finished recently. Instead of the big block, there is a tiny machine build in, but it´s very special. It has a displacement of only 250 ccm but has six cylinders, generating about 60 PS with a max of 18.000 revolutions. The max. speed was 245 km/h. The Tamiya kit dates back to 2009 and I will add all the available extra sets from Tamiya, which I got for relatively small coin directly in Japan. There is a set of metal parts for the front fork, clutch and air intake funnels, another for the metal spoke wheels, one for the numerous metal rivets and one for building up a PE chain. The latter I won´t use, because I have a 3D printed chain set from Falcon. Cheers Rob
-
That weird chroming and pre printing is strange, shouldn´t be too hard to get it right with such a relatively well known subject. Interesting, that they used ABS, Carl. I didn´t knew, there existed ABS glue from Tamiya. In my recently started Tamiya RC166 build, there is a sprue in the spoked wheel package, which is labeled ABS, maybe, it was easier to produce it with the tiny holes for the spokes this way. Other than that, I never came across ABS parts. Cheers Rob
-
Had to put down the dog... and another relocation
DocRob replied to Winnie's topic in General Discussion
Sorry to hear about your loss, Winnie. I have been there last year and like Gus and Kevin said, I never felt so miserable with the loss of relatives. Beloved pets are like inner circle of the family. Fortunately a sweet cat, which was around for a log time, but was always chased away by hour dog, took it´s place and adopted us soon after he died and took some of the weight off our shoulders. Rob -
First raced one year after the Cobra Coupe in Le Mans. Great project, Carl and the surgery came out nice as well. Cheers Rob
-
How I envy you about having a LHS in reach, Carl, even more with Alclads for that price. I have problems getting Alclads at all, no matter how expensive, but I´m happy for you . Cheers Rob
-
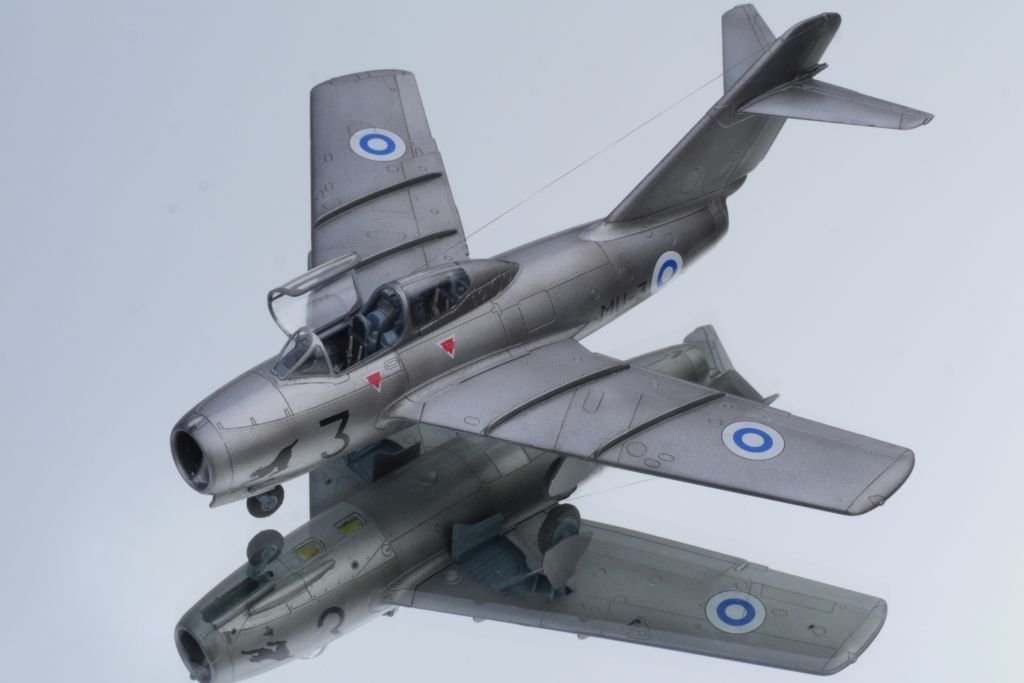
Nice to be in a aircraft museum again, even virtually. Thanks for showing. Many moons ago, I built that tiny 1/72 Finnish Mig 15 UTI from an Eduard kit. It was my first natural metal finish. Cheers Rob

-
Cobra Coupe - Le Mans - Model Factory Hiro 1/12
DocRob replied to DocRob's topic in LSM 1/35 and Larger Work In Progress
I´ve seen that video too, very interesting. The BT44B is on my immediate building list as well, possibly my next project. I love the aggressive looks of the BT44. Like you, I have so many choices in 1/20 or 1/24, but will end up with 1/12 more likely. There is the MFH Lotus 77 or the MFH Brabham BT52B or even the MFH Williams FW16. The Jordan 191 is also a very sleek car, but I don´t have one in my stash. Not my cup of tea. Some days ago, MFH showed a French flag on their site for the April release and I had high hopes for a Citroen DS, maybe in rally outfit or even an Alpine A110, but I was expecting something like the MS670, because they already have the engine ready, as it is more or less the same like in the Matra MS11 F1 car. If I really can convince myself about the toyish Matra blue, it would be the MS11 for me with the visible 12 cylinder engine beauty. Cheers Rob