JeroenPeters
-
Posts
4,831 -
Joined
-
Last visited
Content Type
Profiles
Forums
Events
Gallery
Everything posted by JeroenPeters
-

1:32 Fw 190d-9
JeroenPeters replied to polsen's topic in LSM 1/32 and Larger Aircraft Ready for Inspection
That is the best 190D i've seen in some time. Love it!! -
I-16 Type 5
JeroenPeters replied to Johann's topic in LSM 1/32 and Larger Aircraft Ready for Inspection
ISM? Is that an ICM kit? Lovely scheme of a very early type of this plane. What scale is it? -
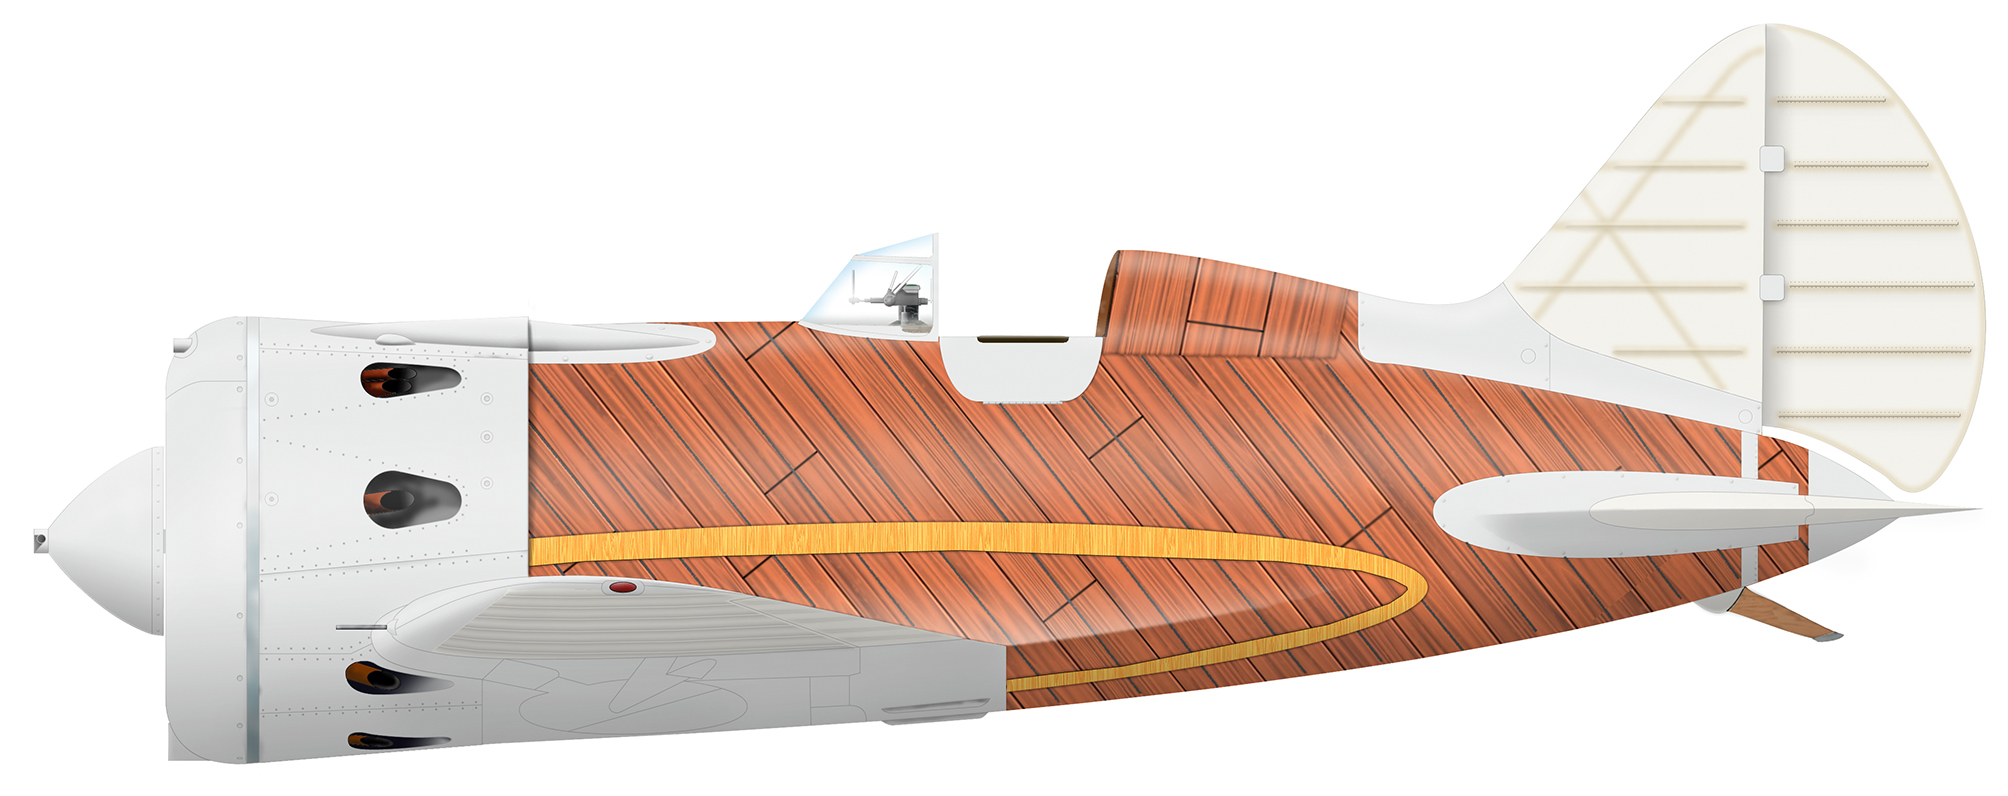
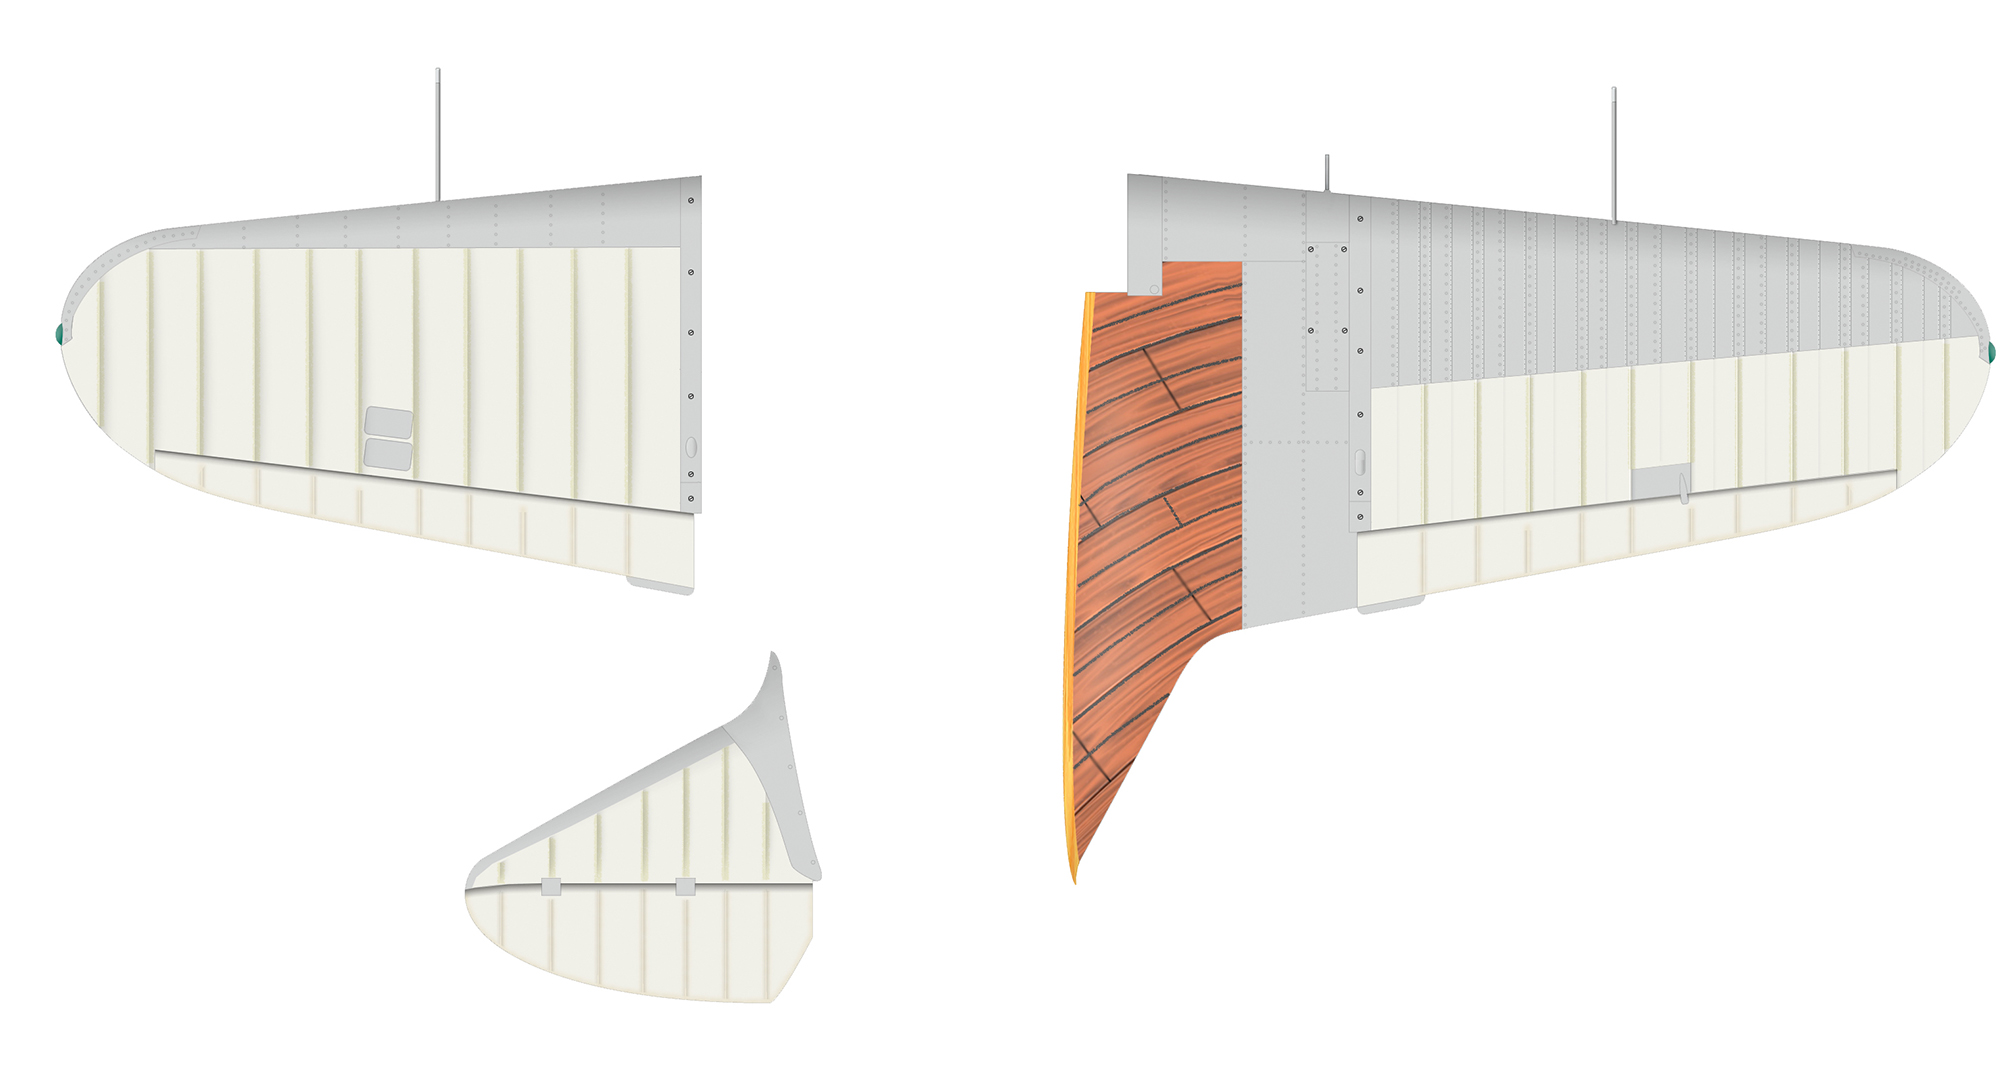
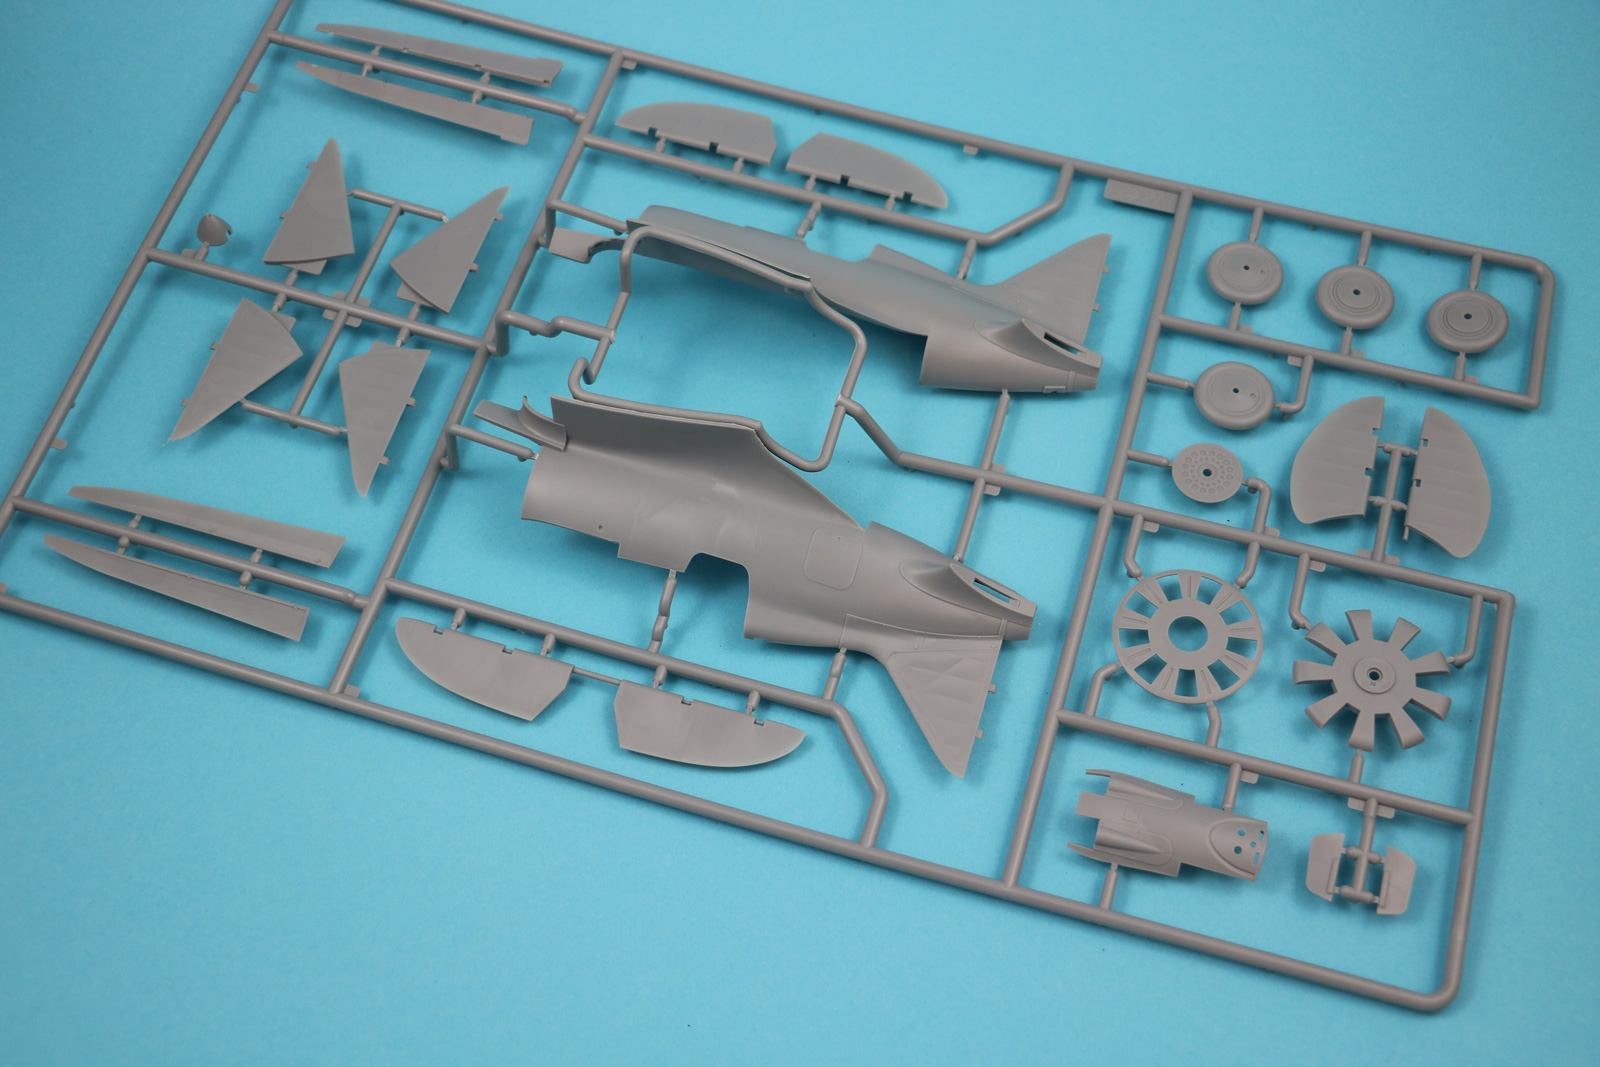
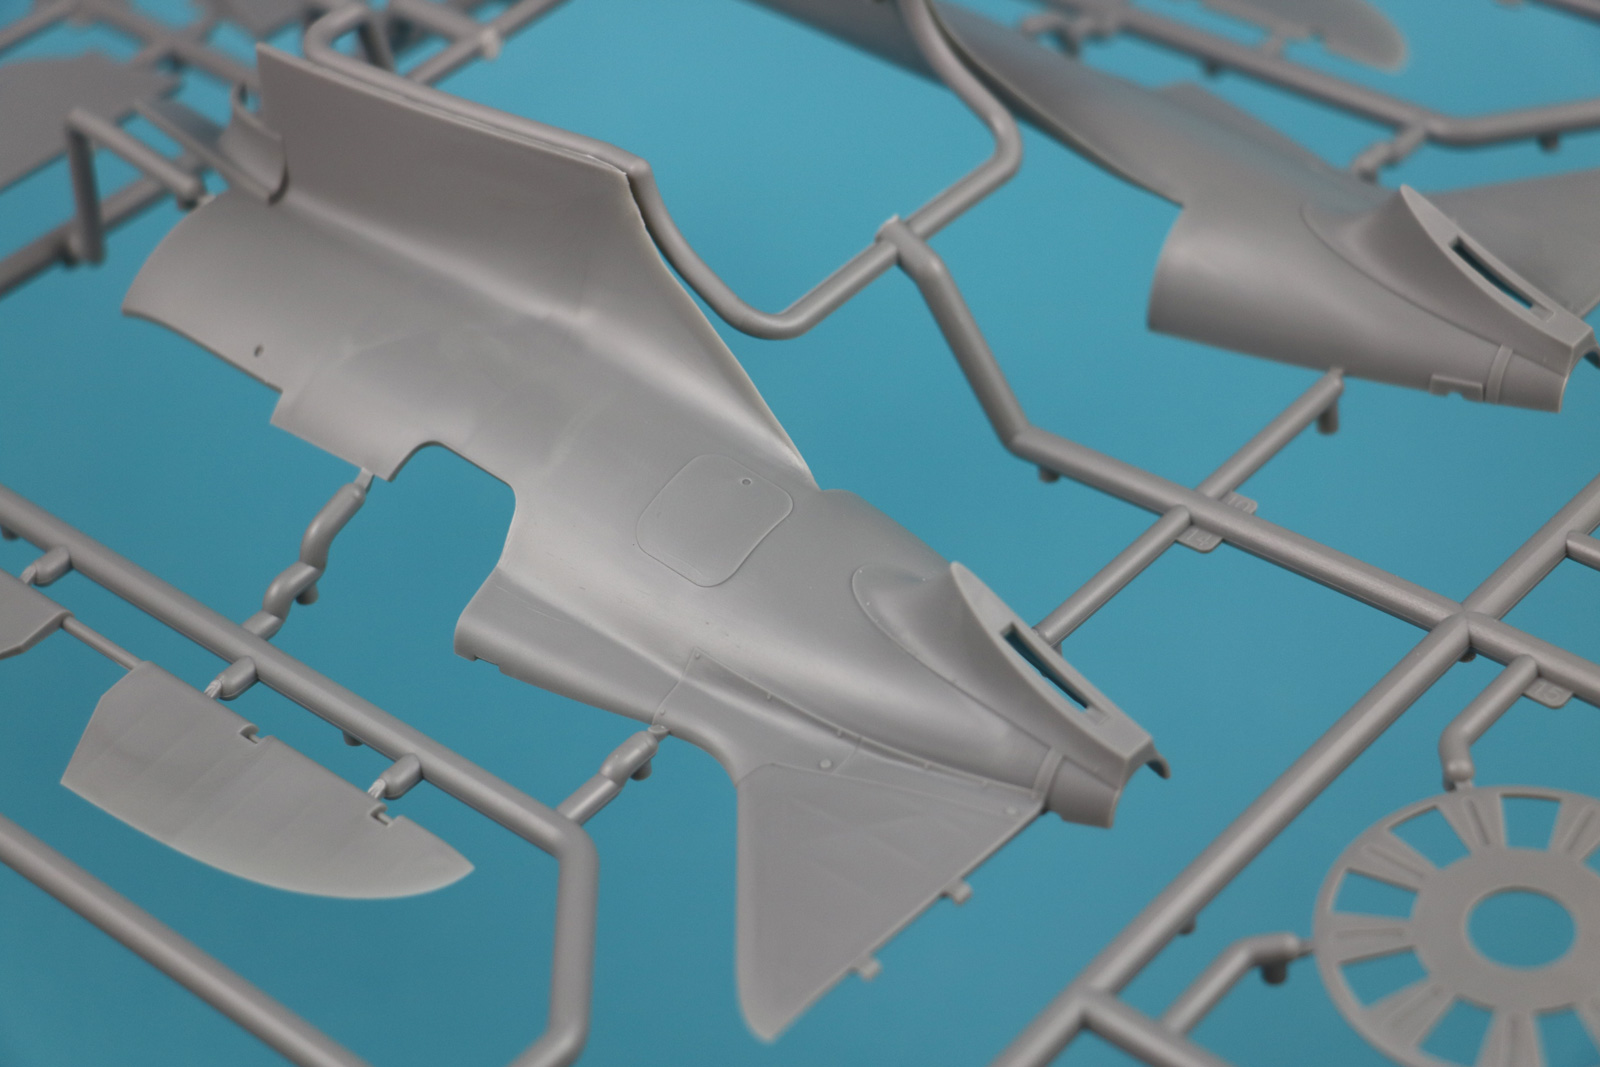
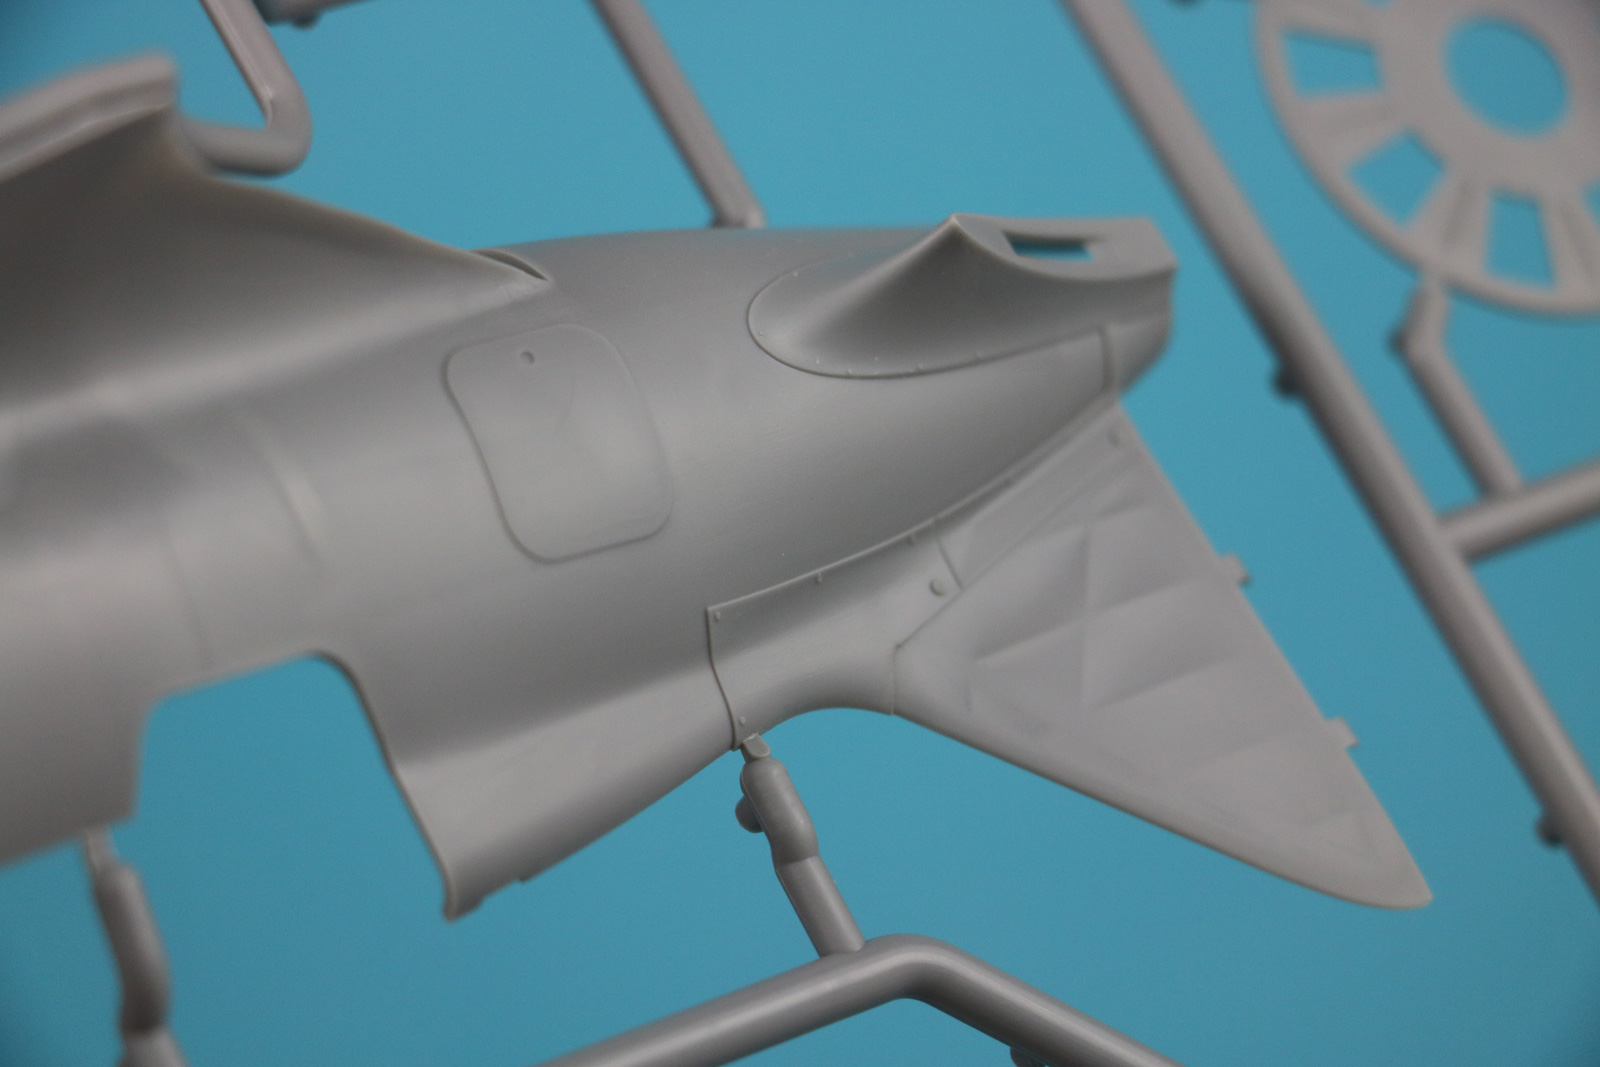
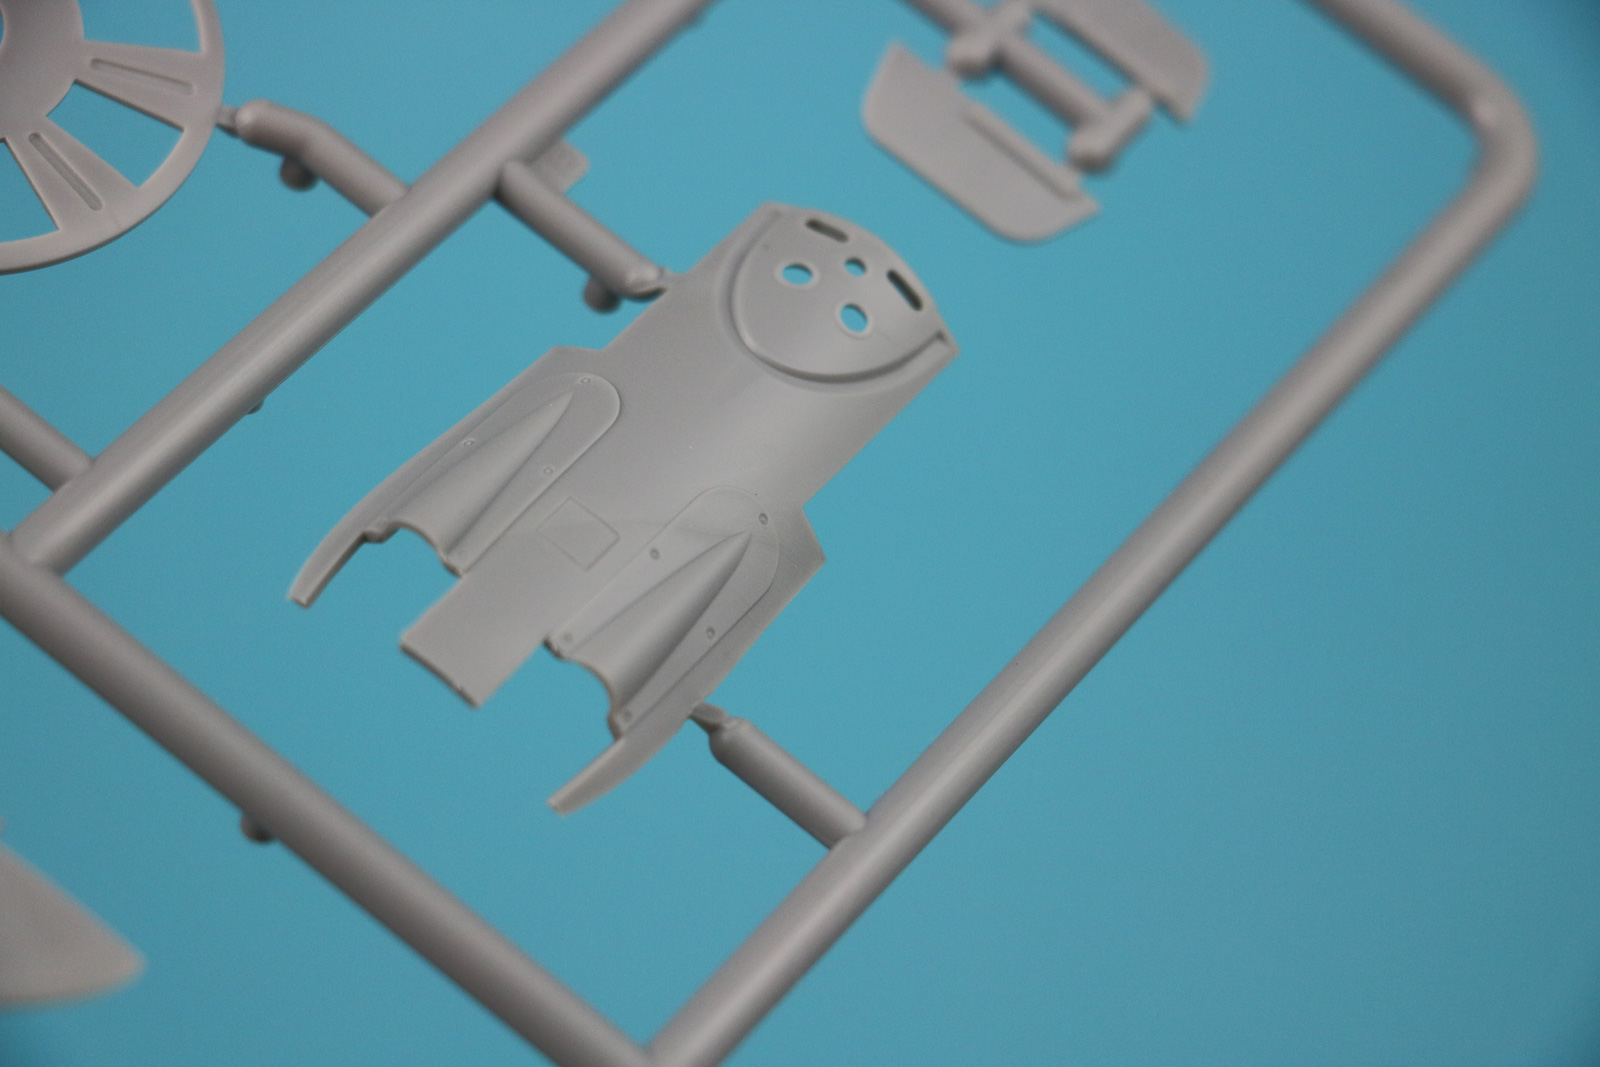
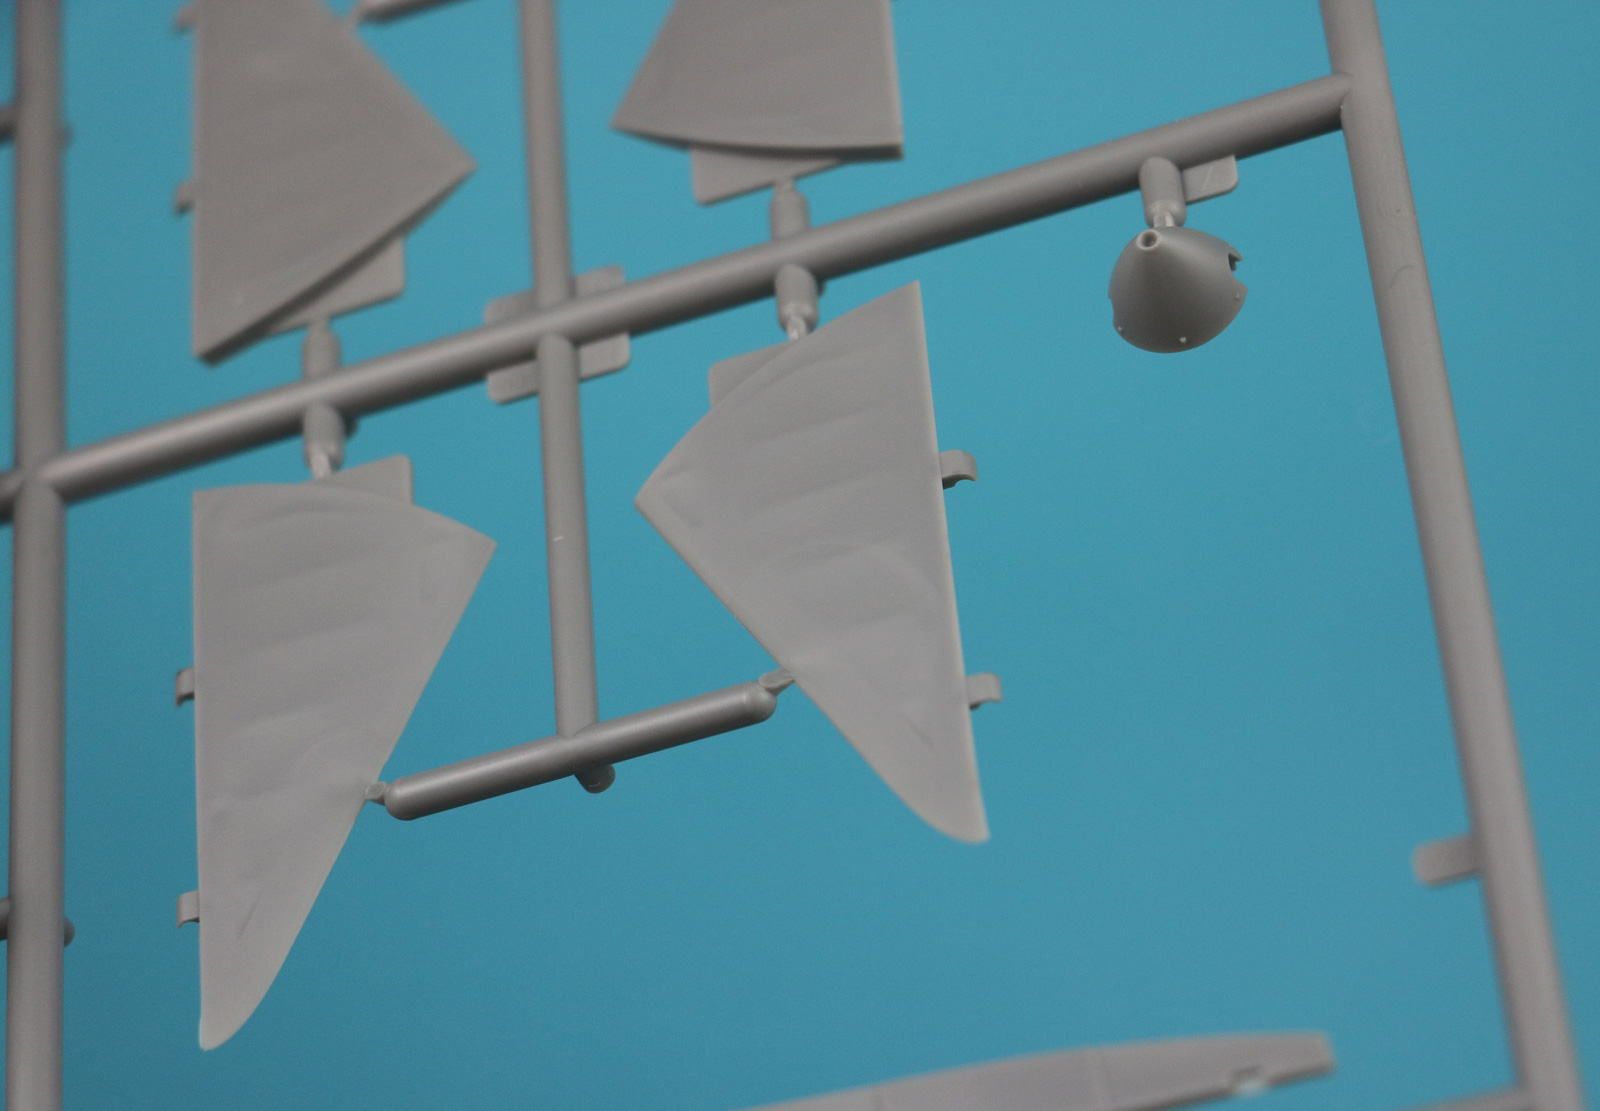
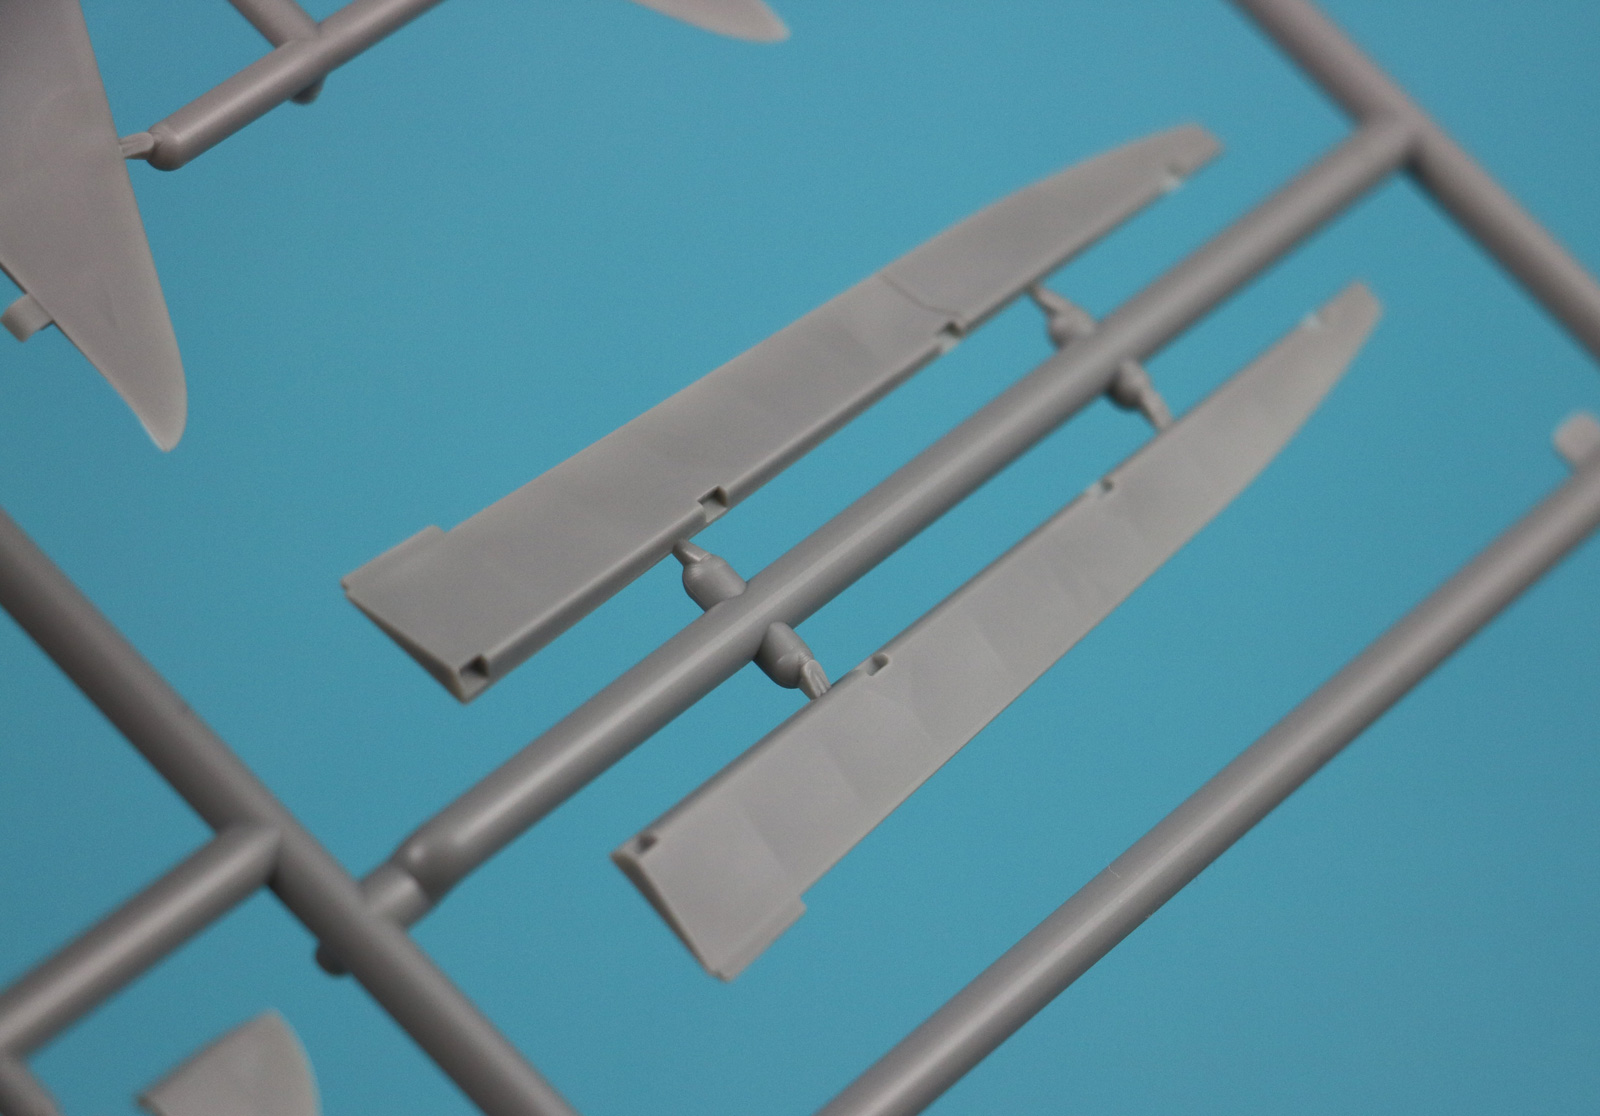
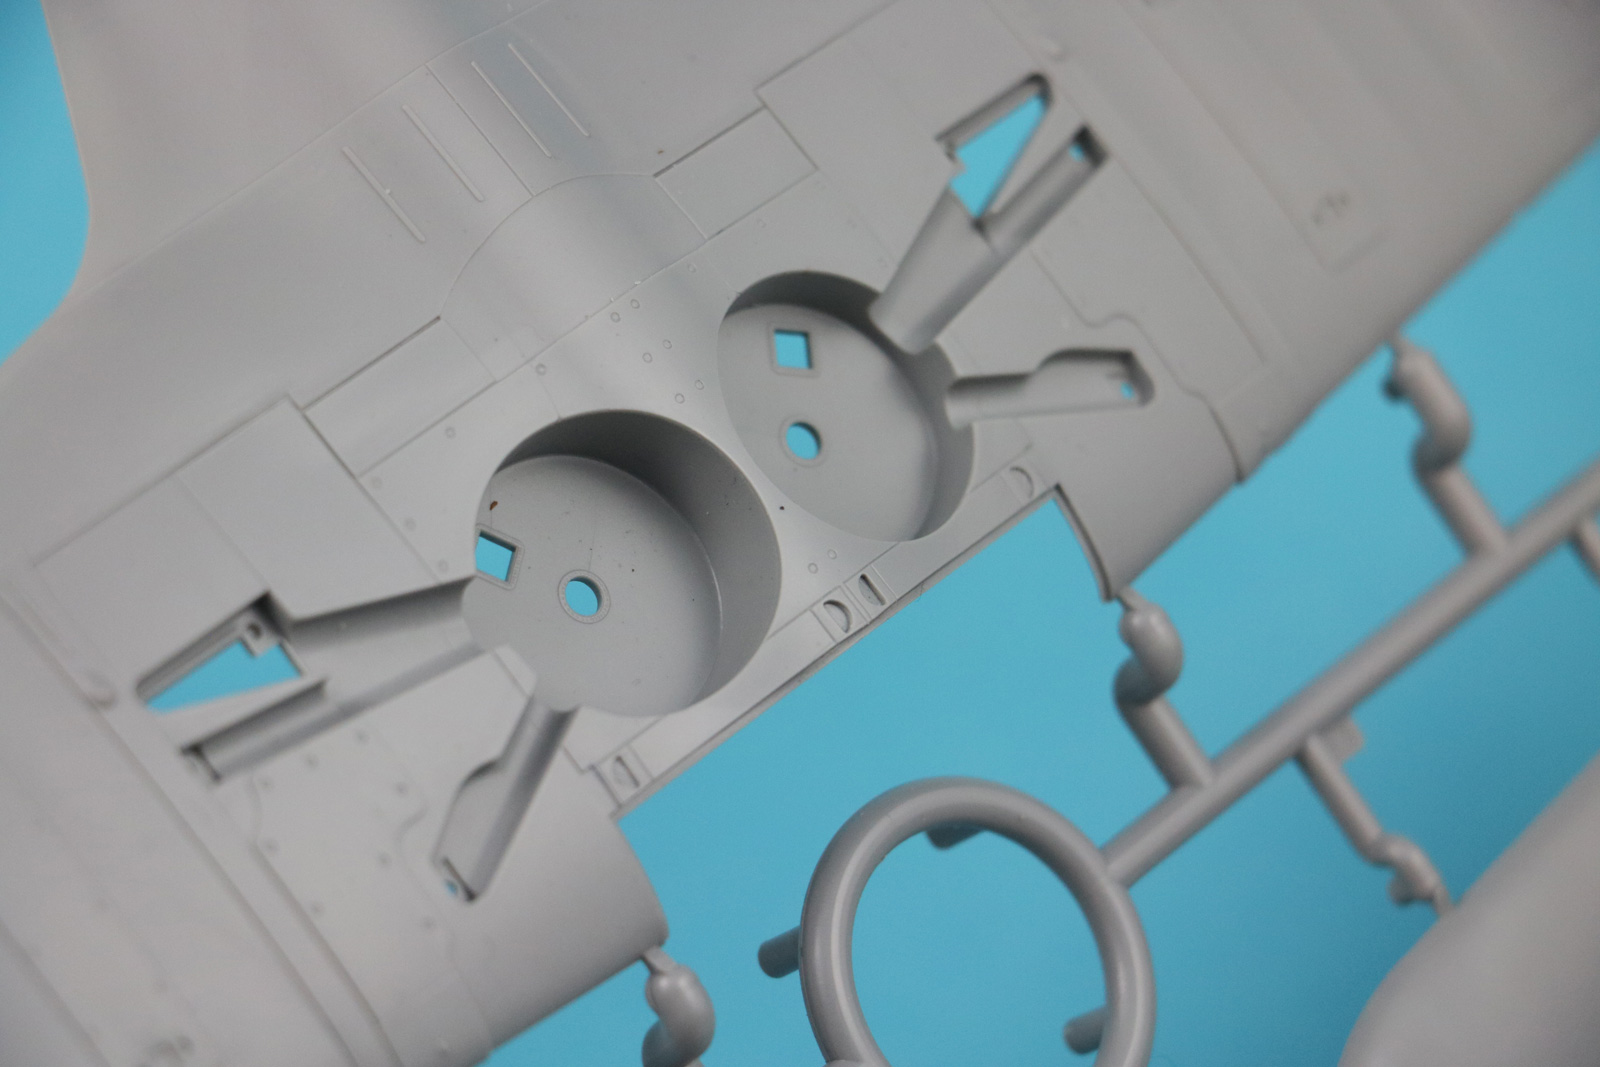
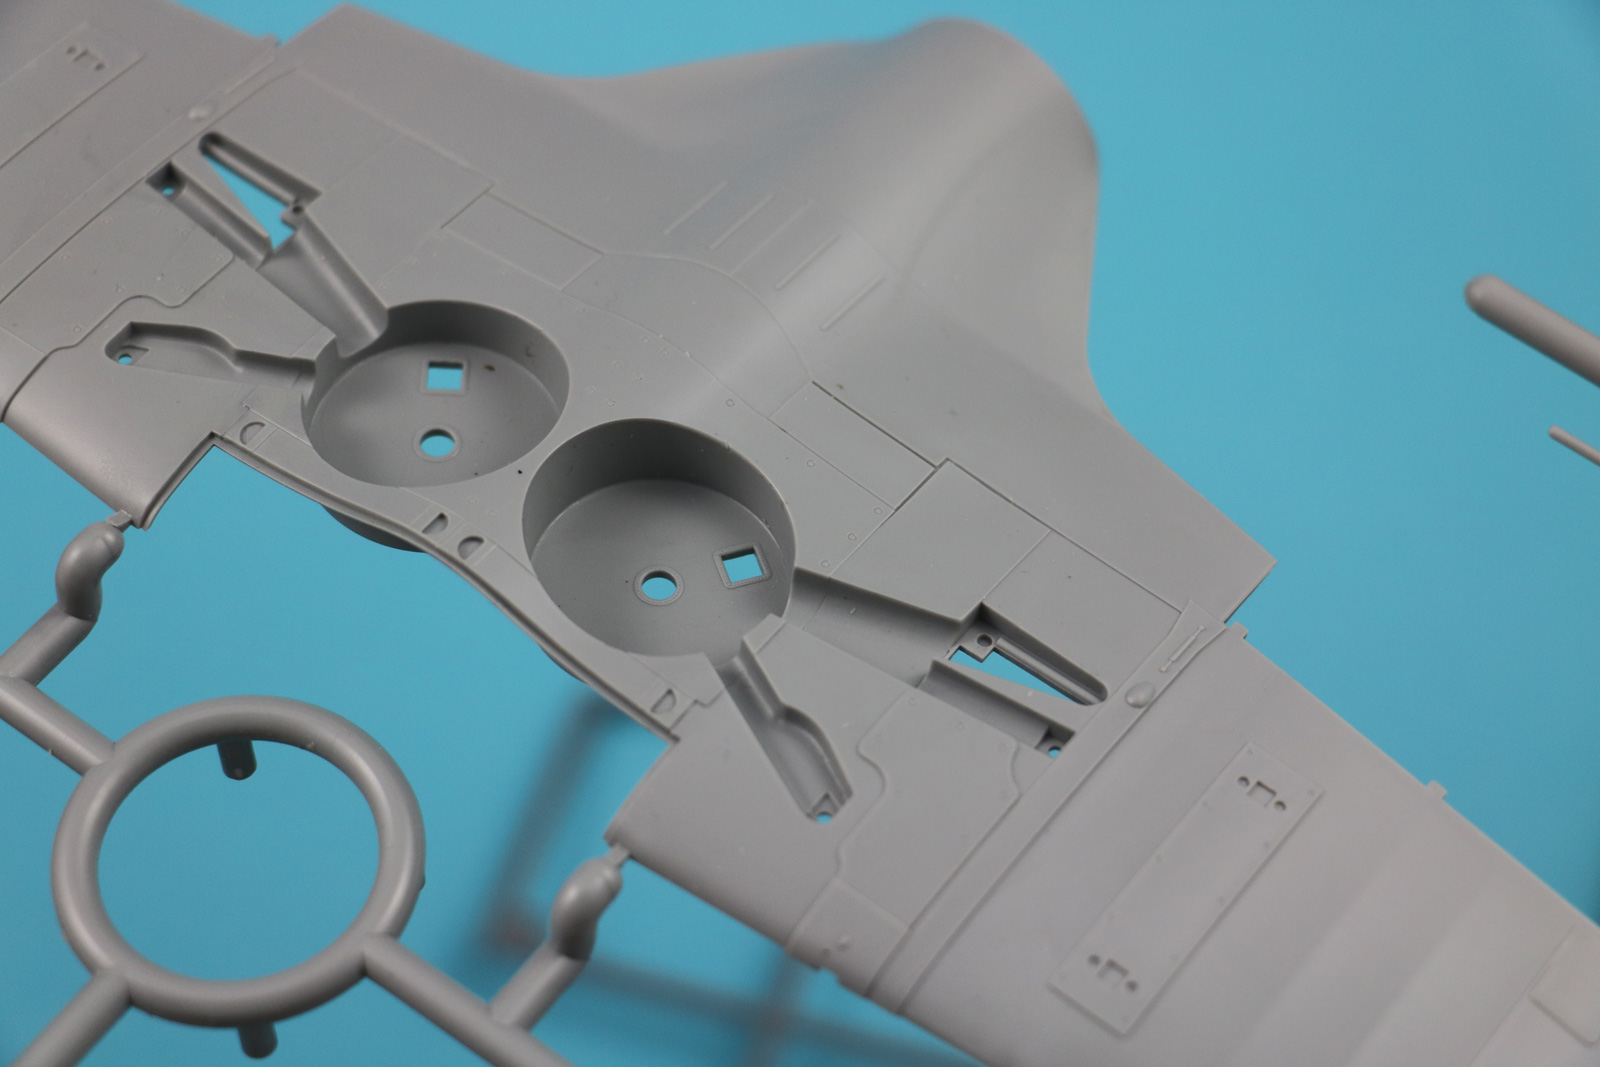
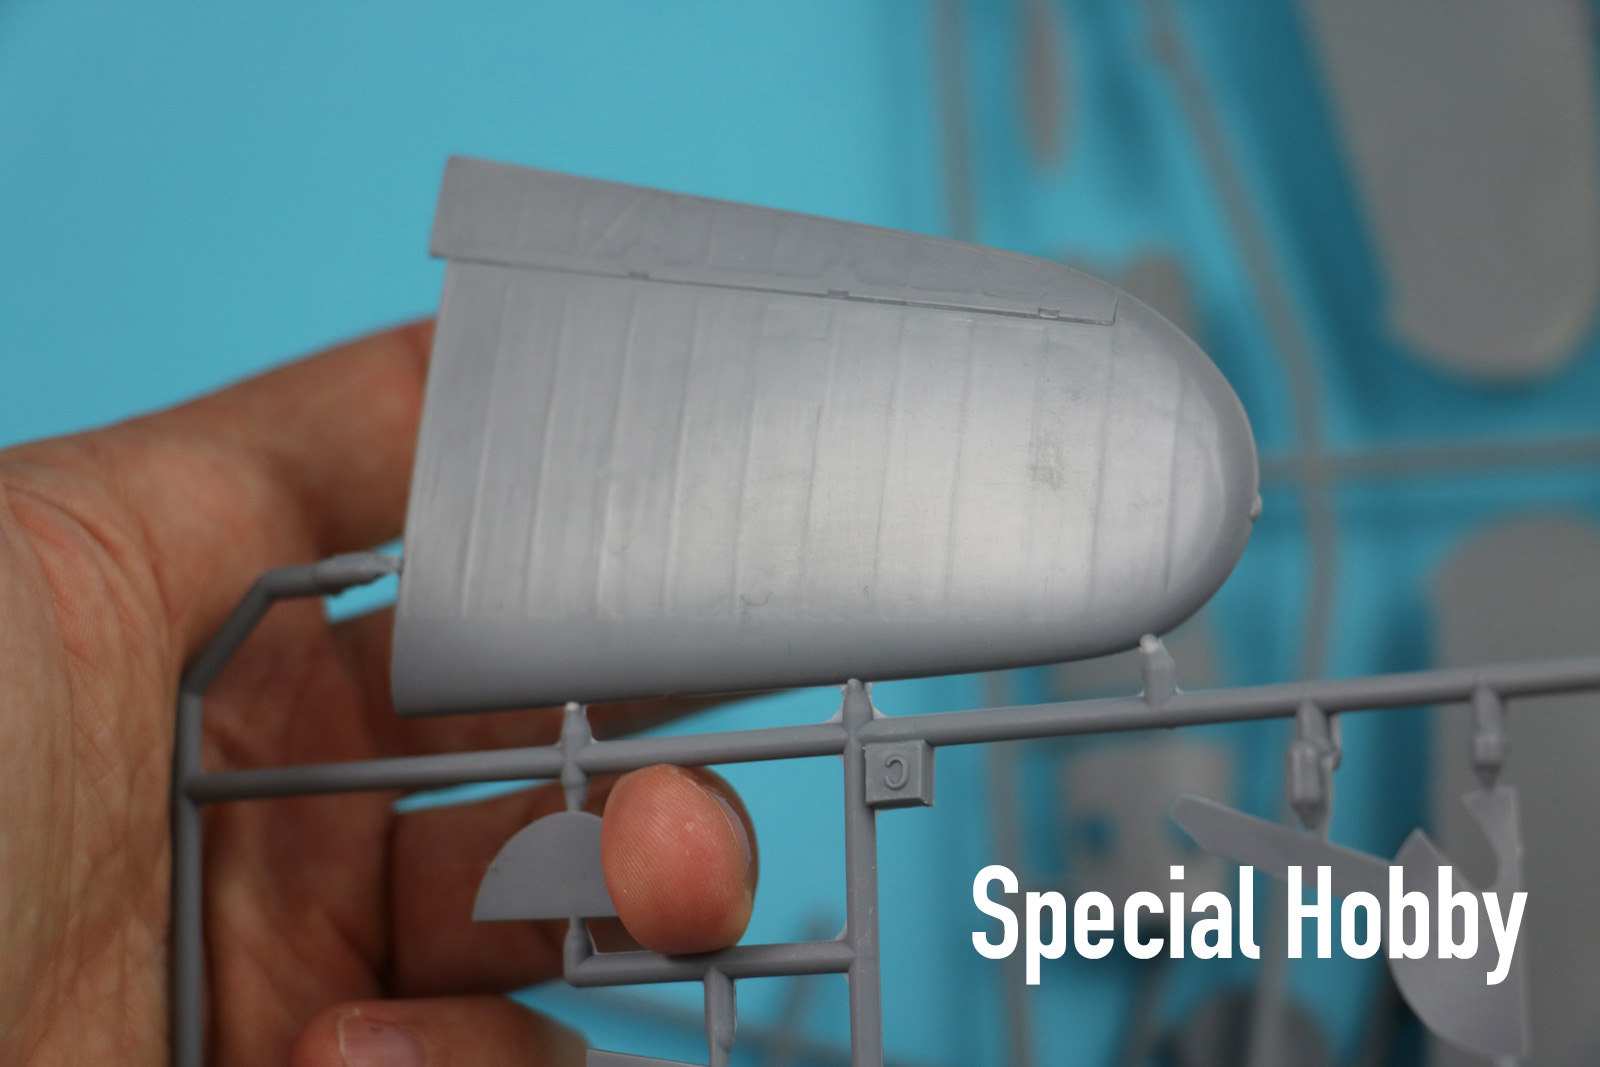
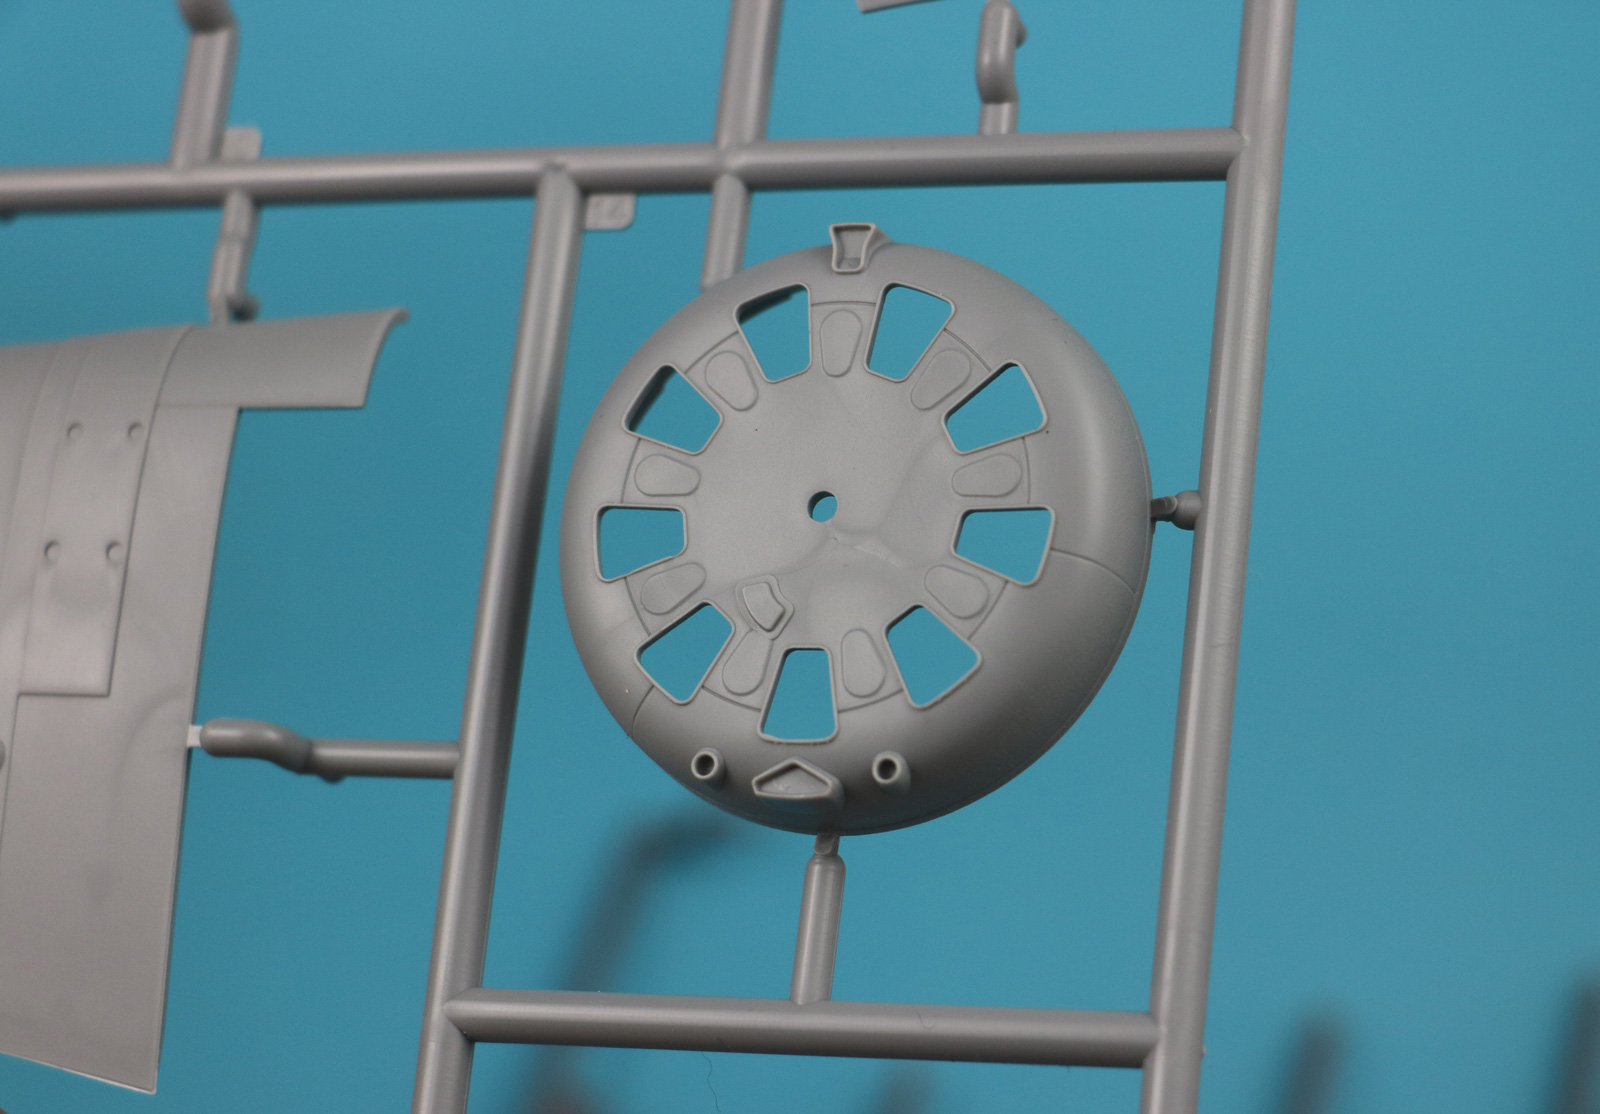
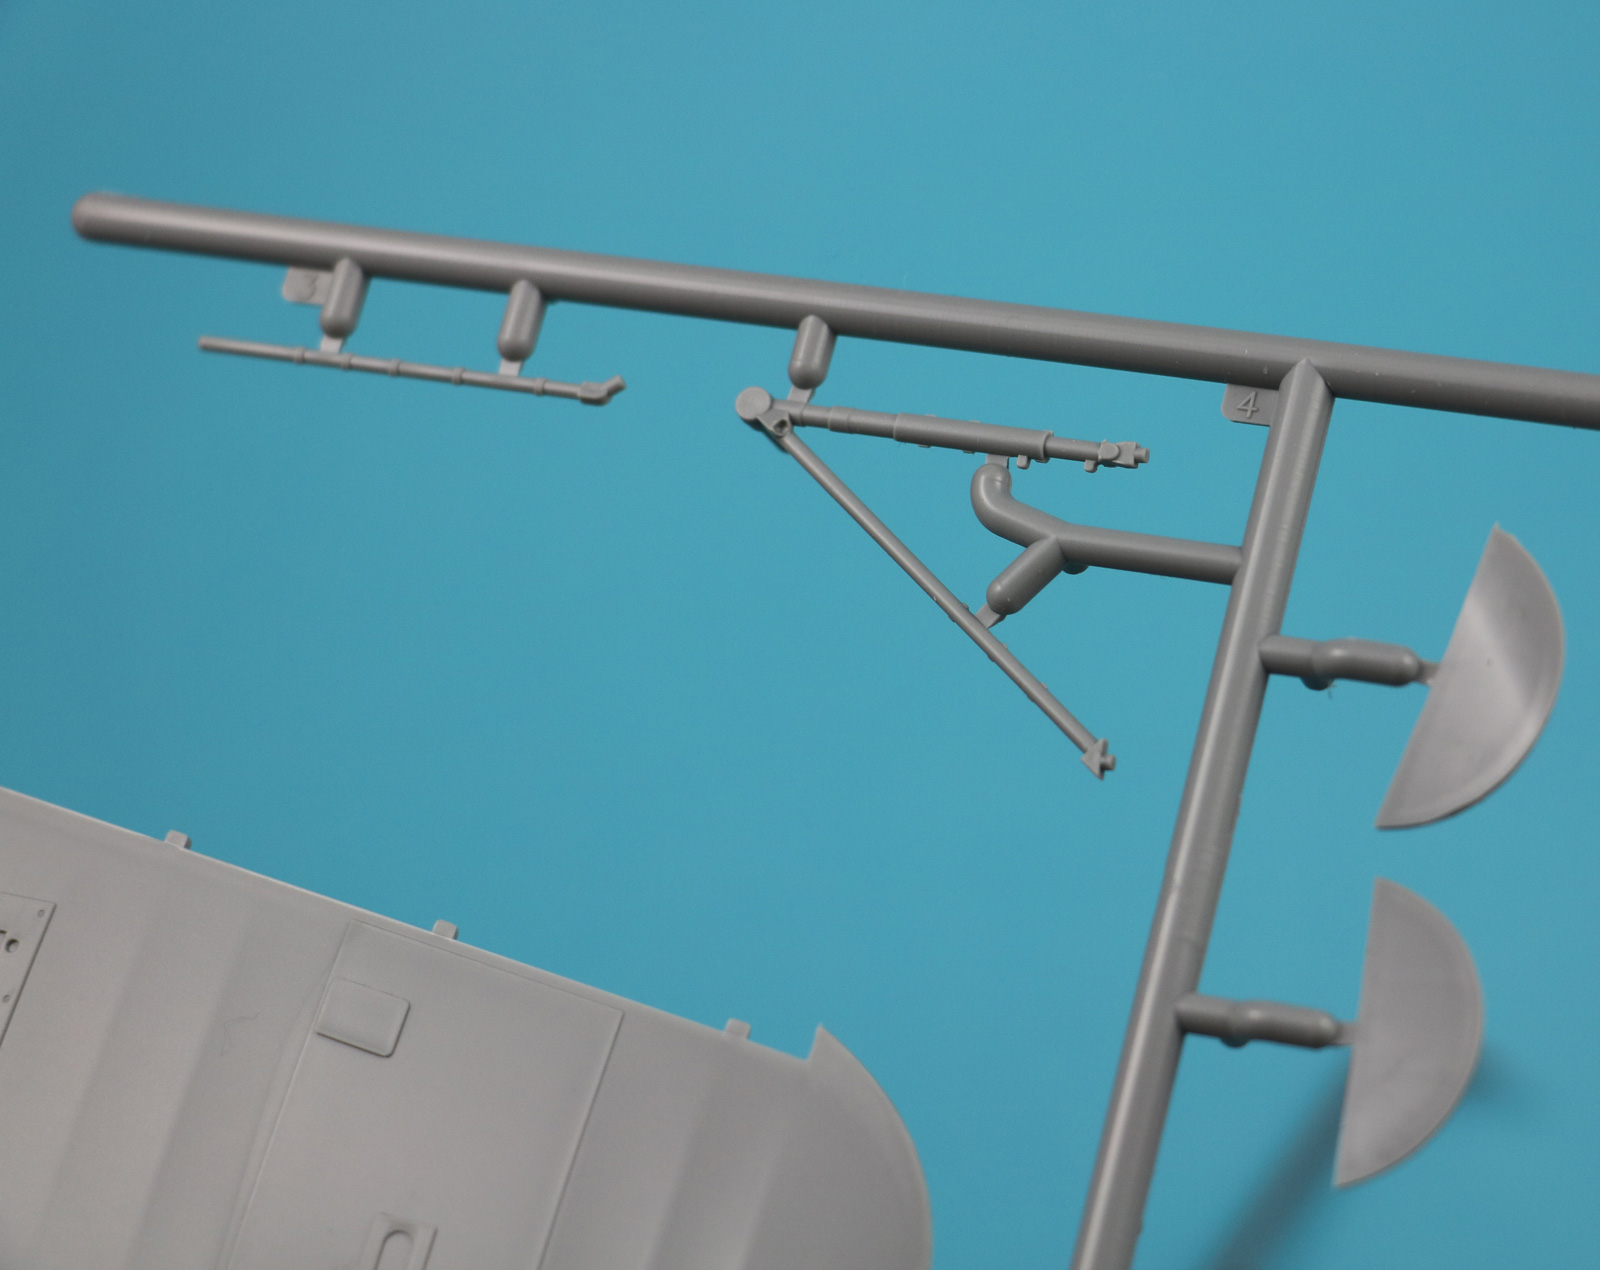
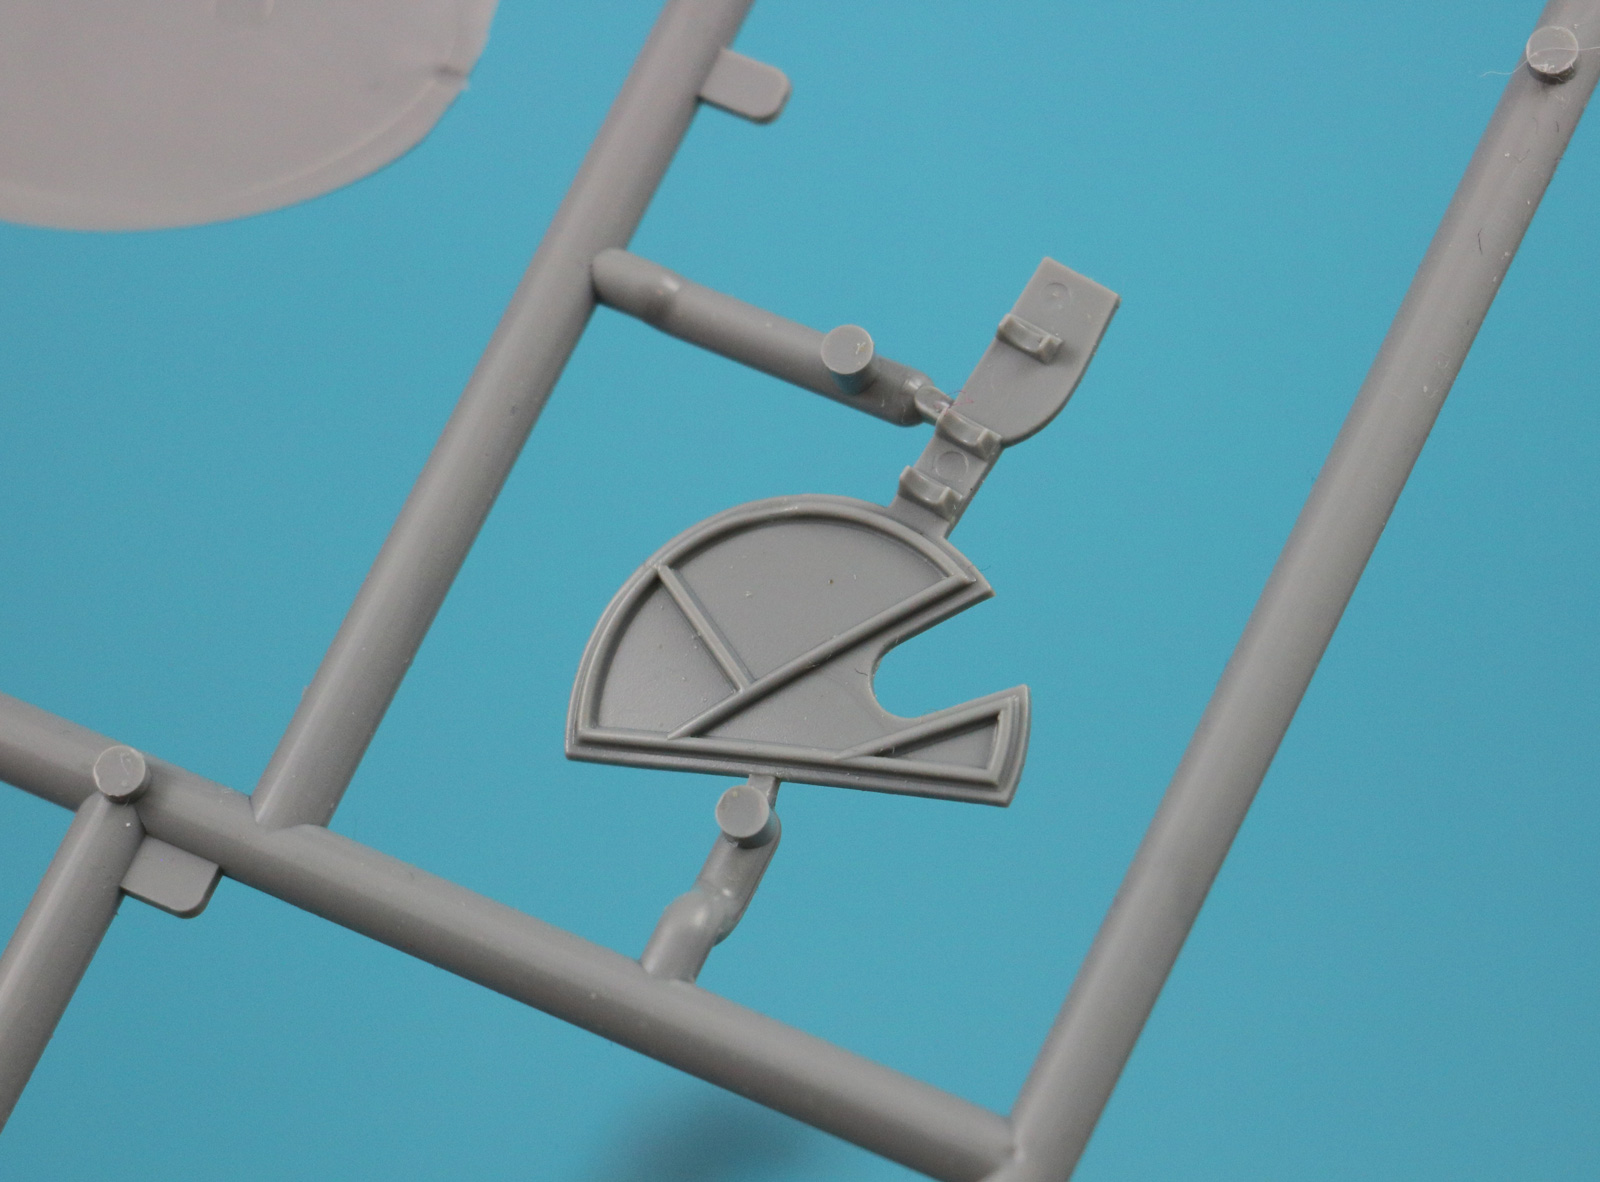
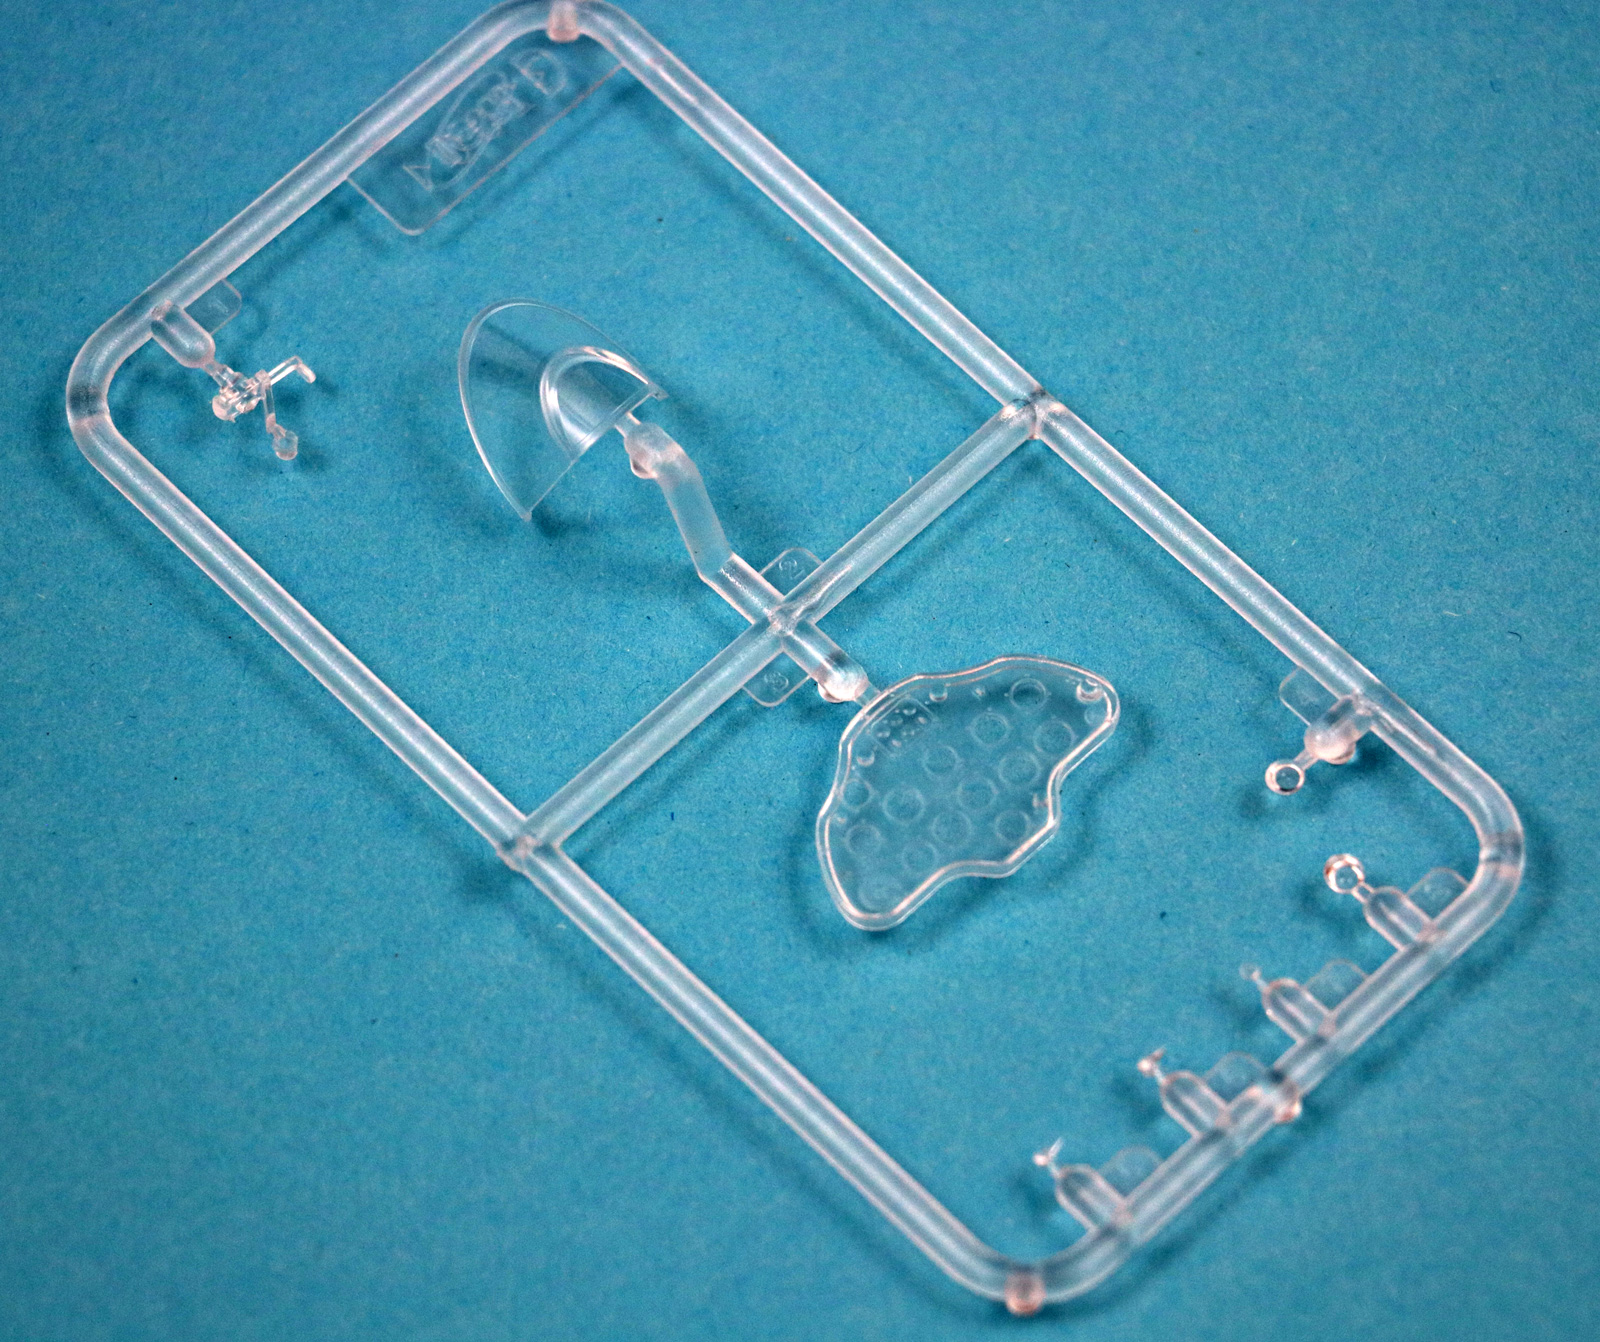
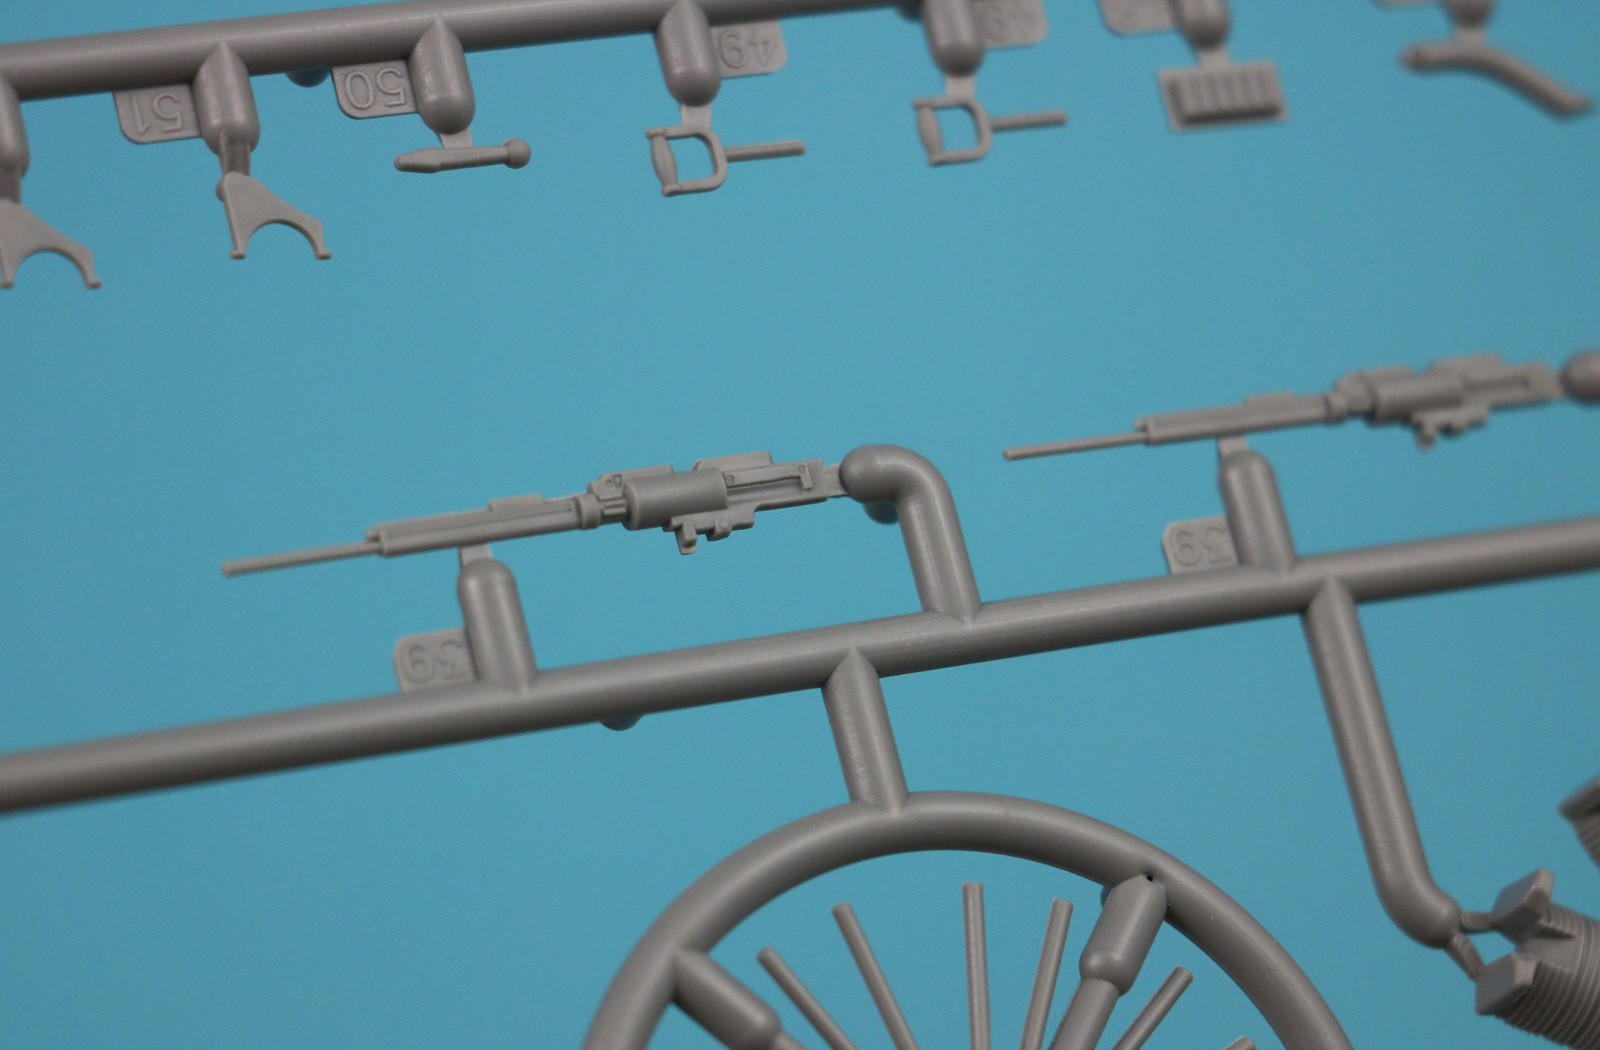
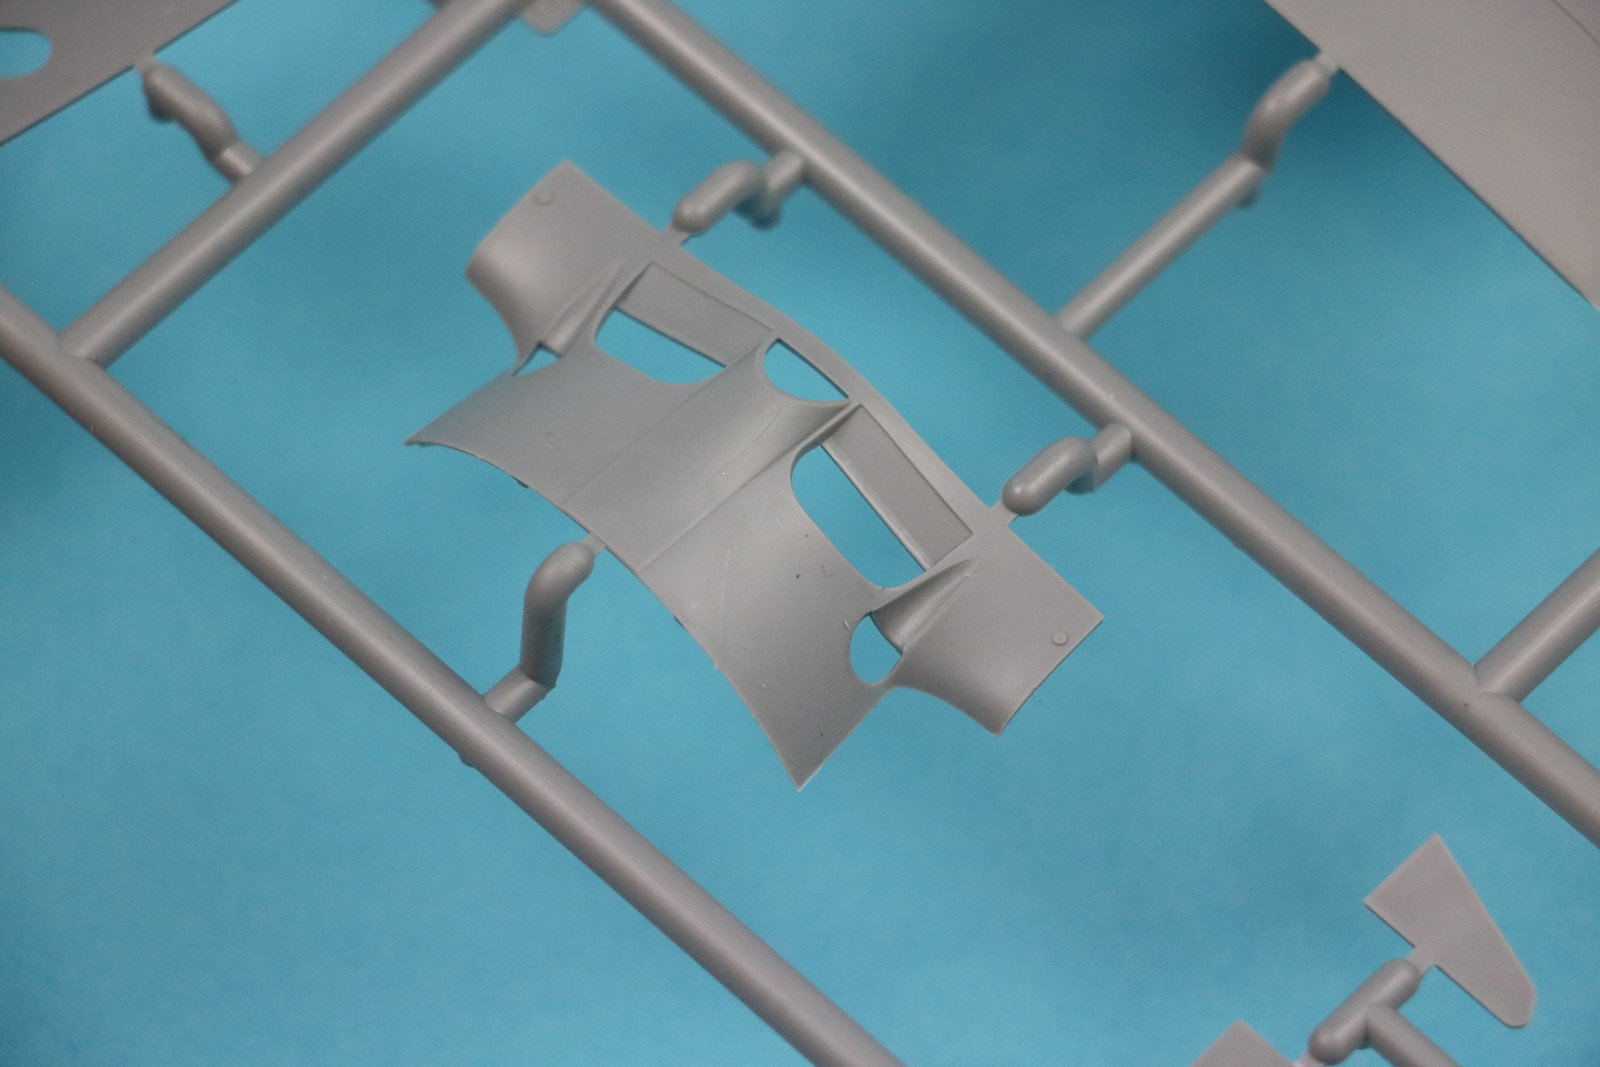
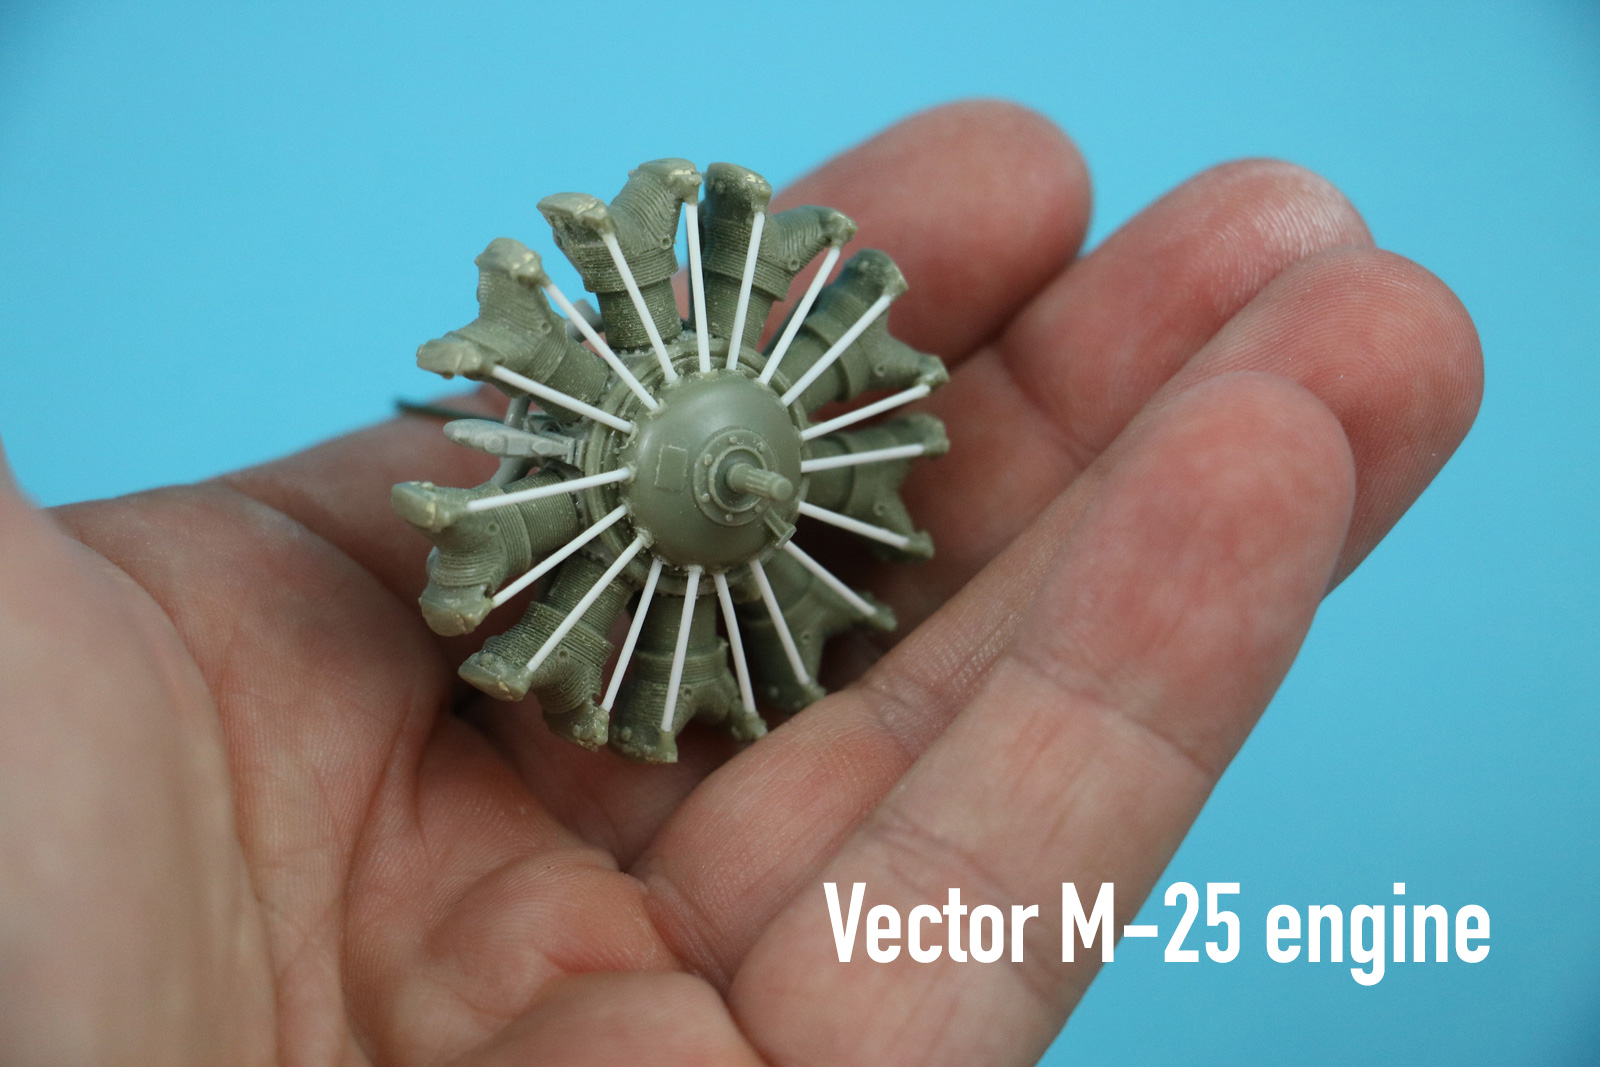
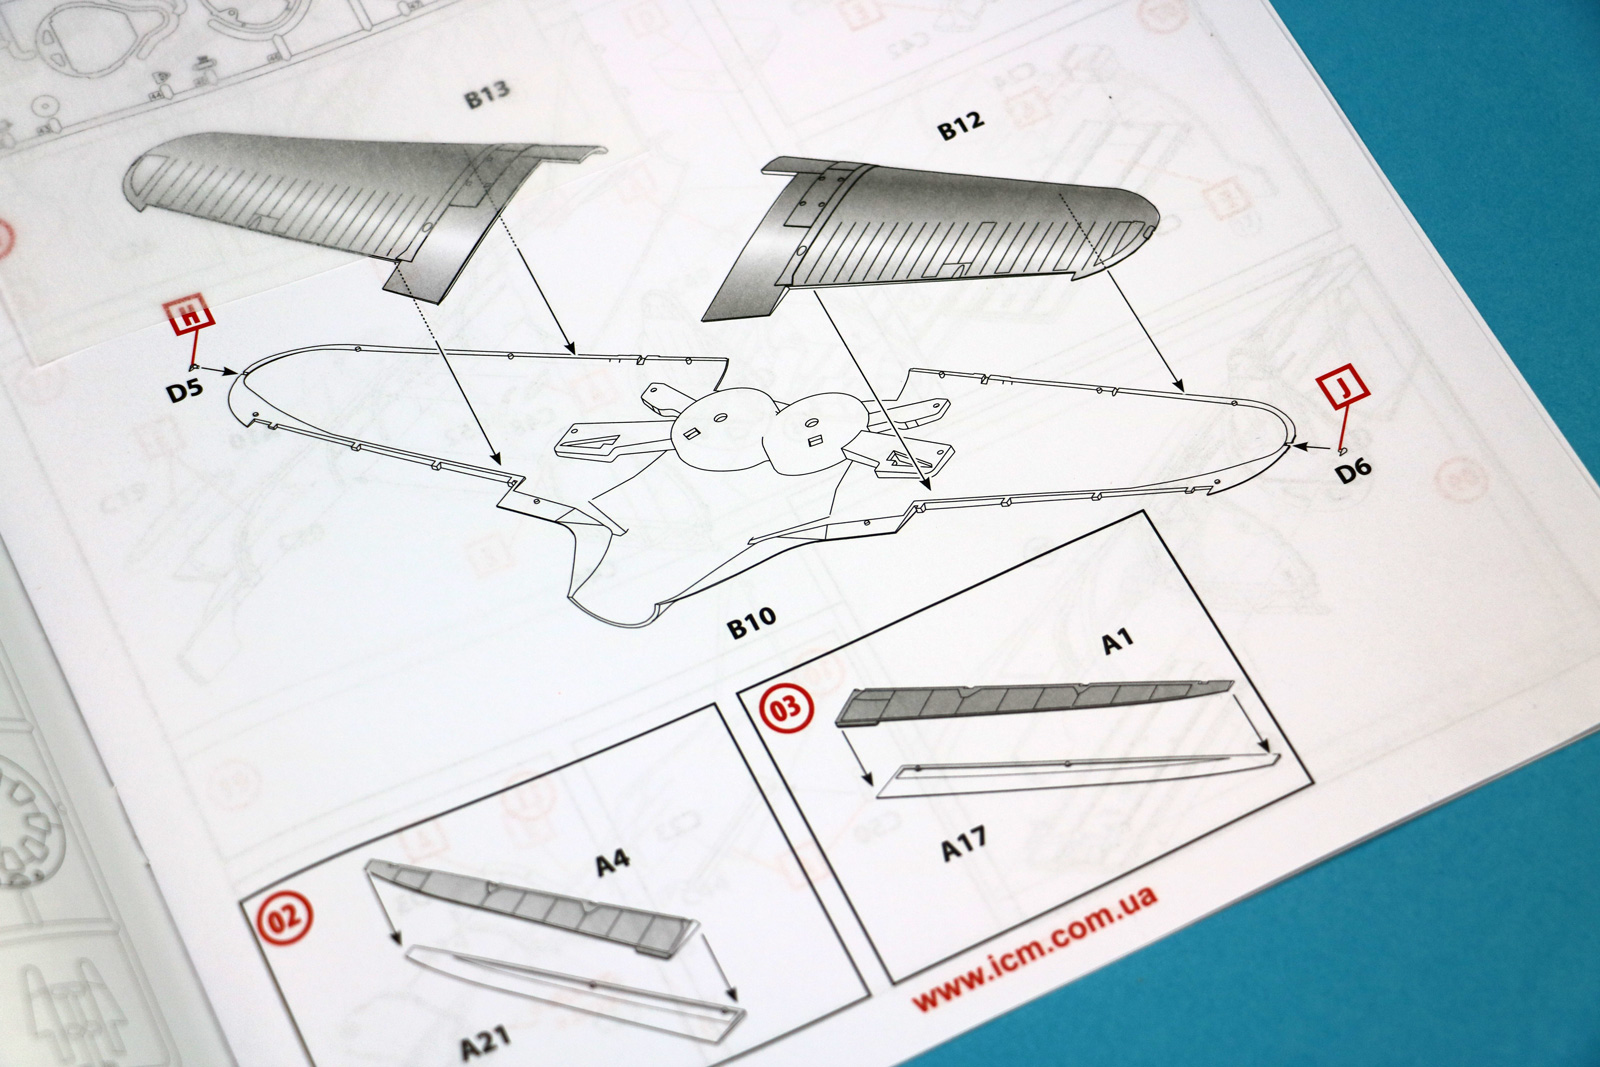
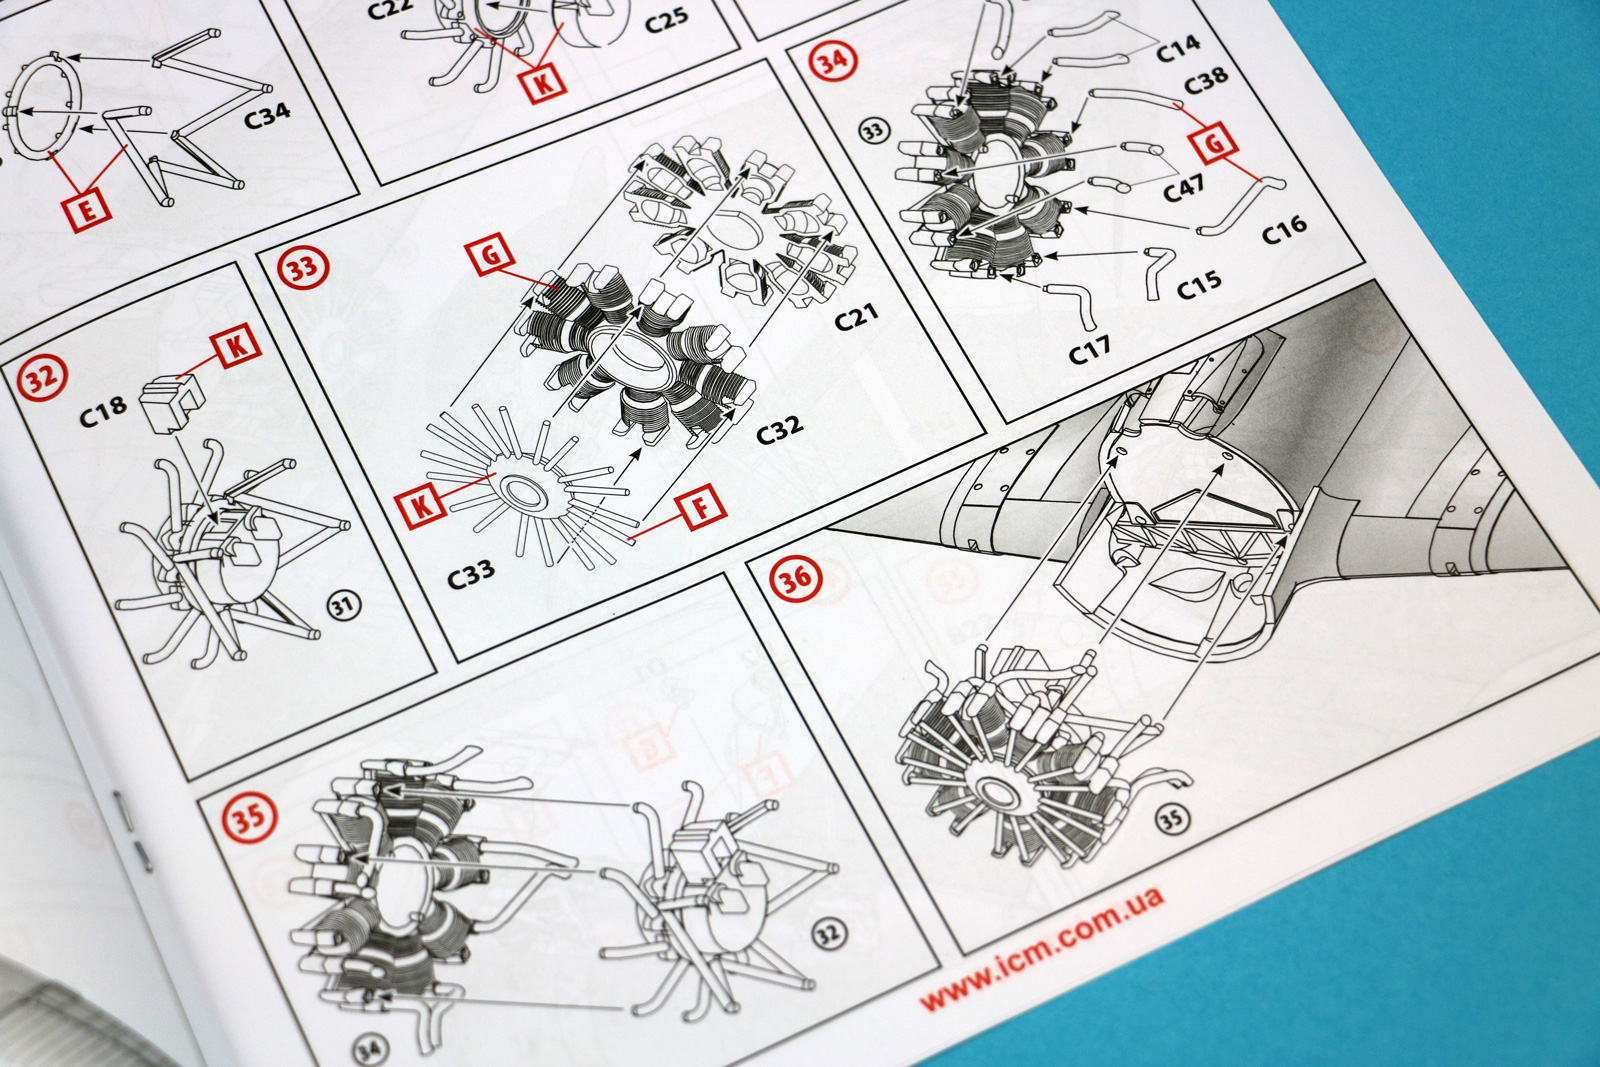
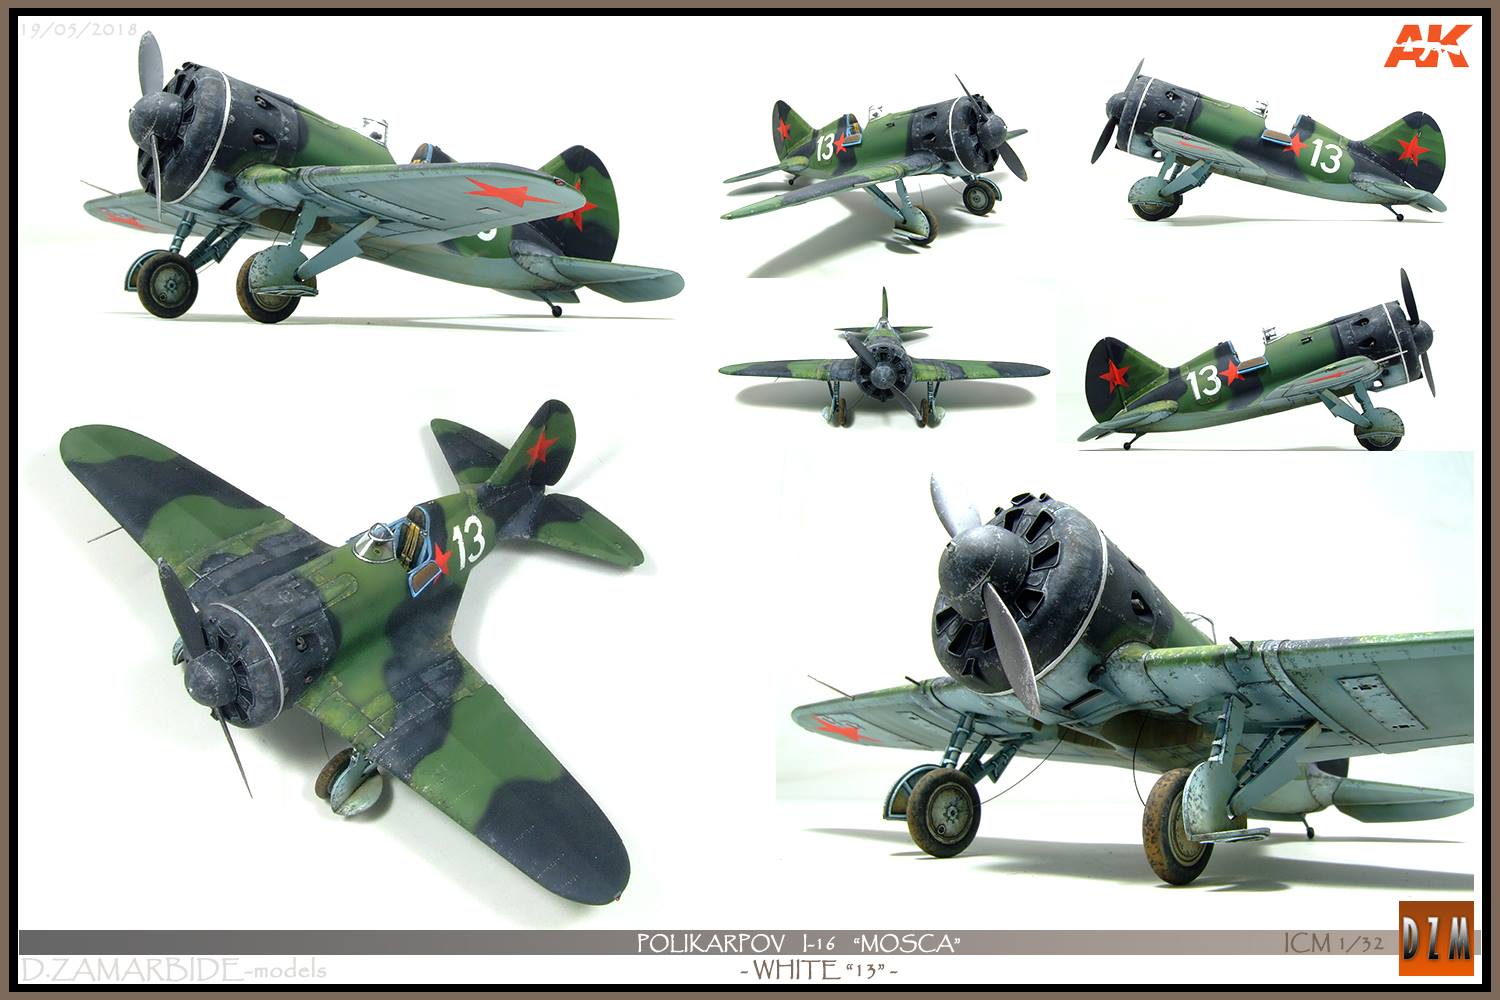
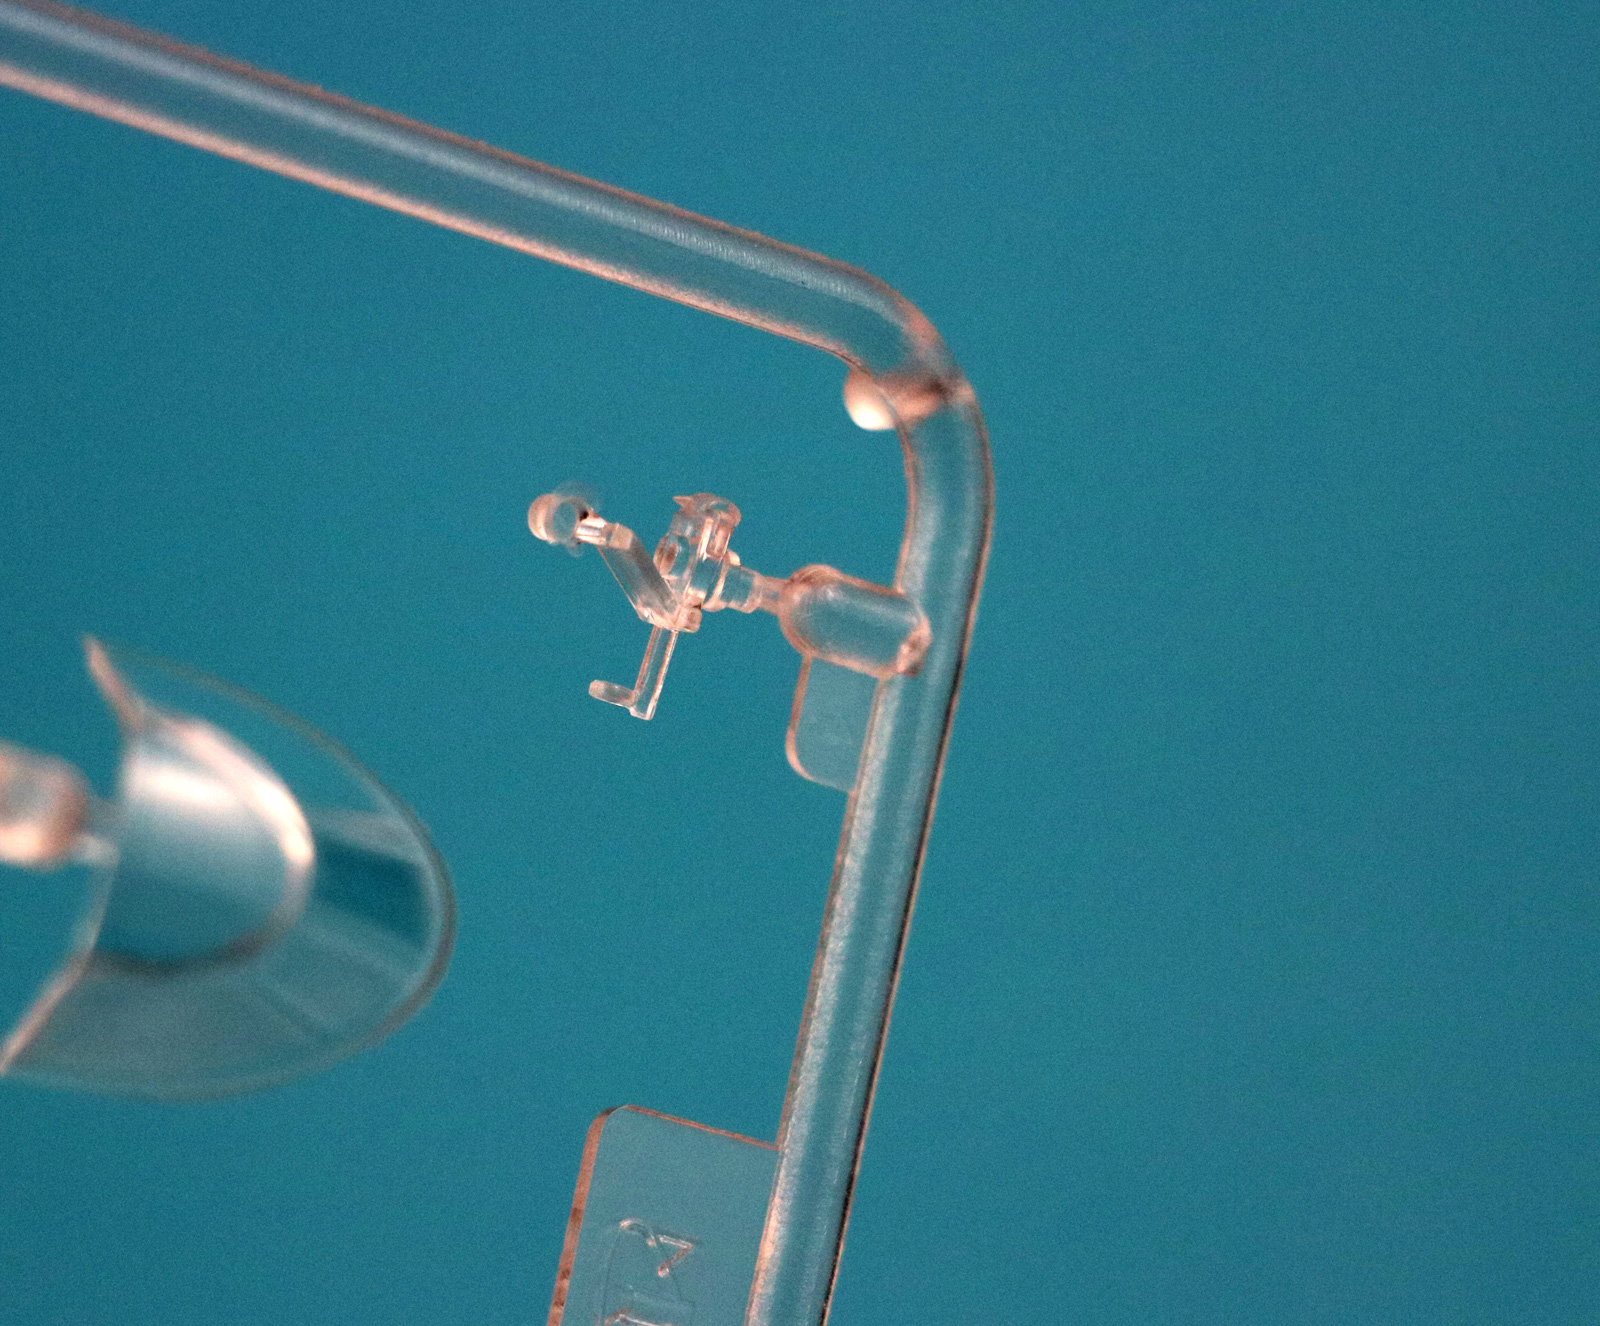
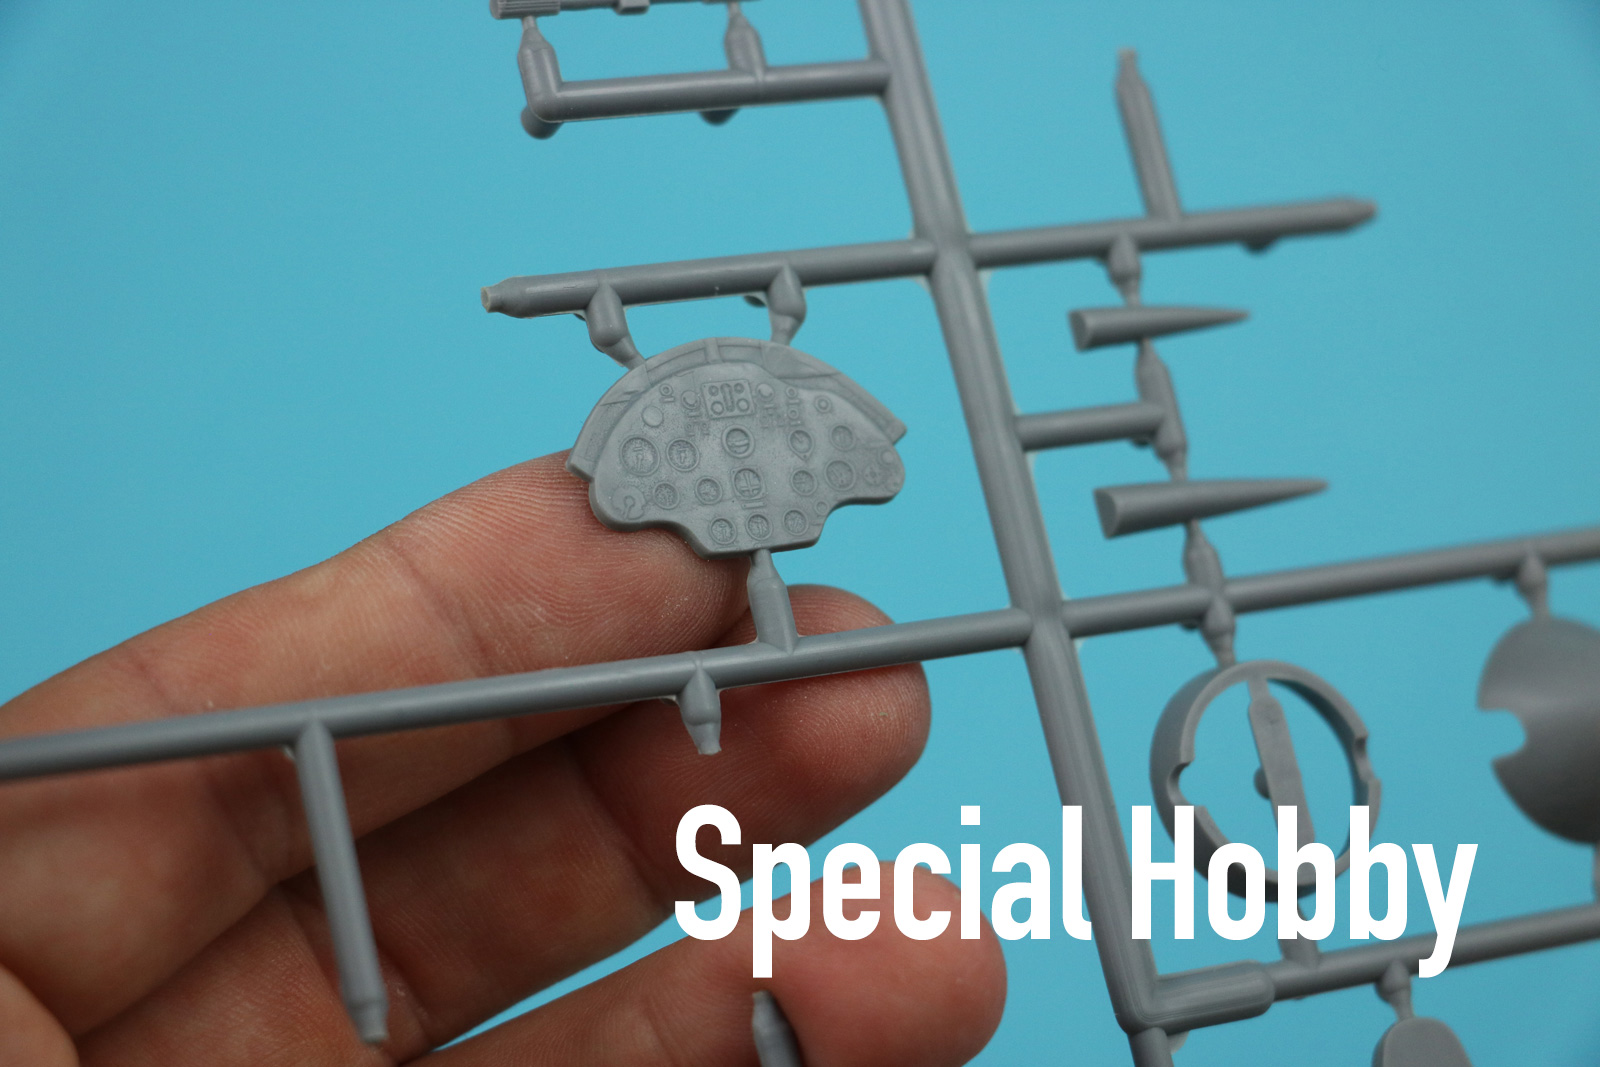
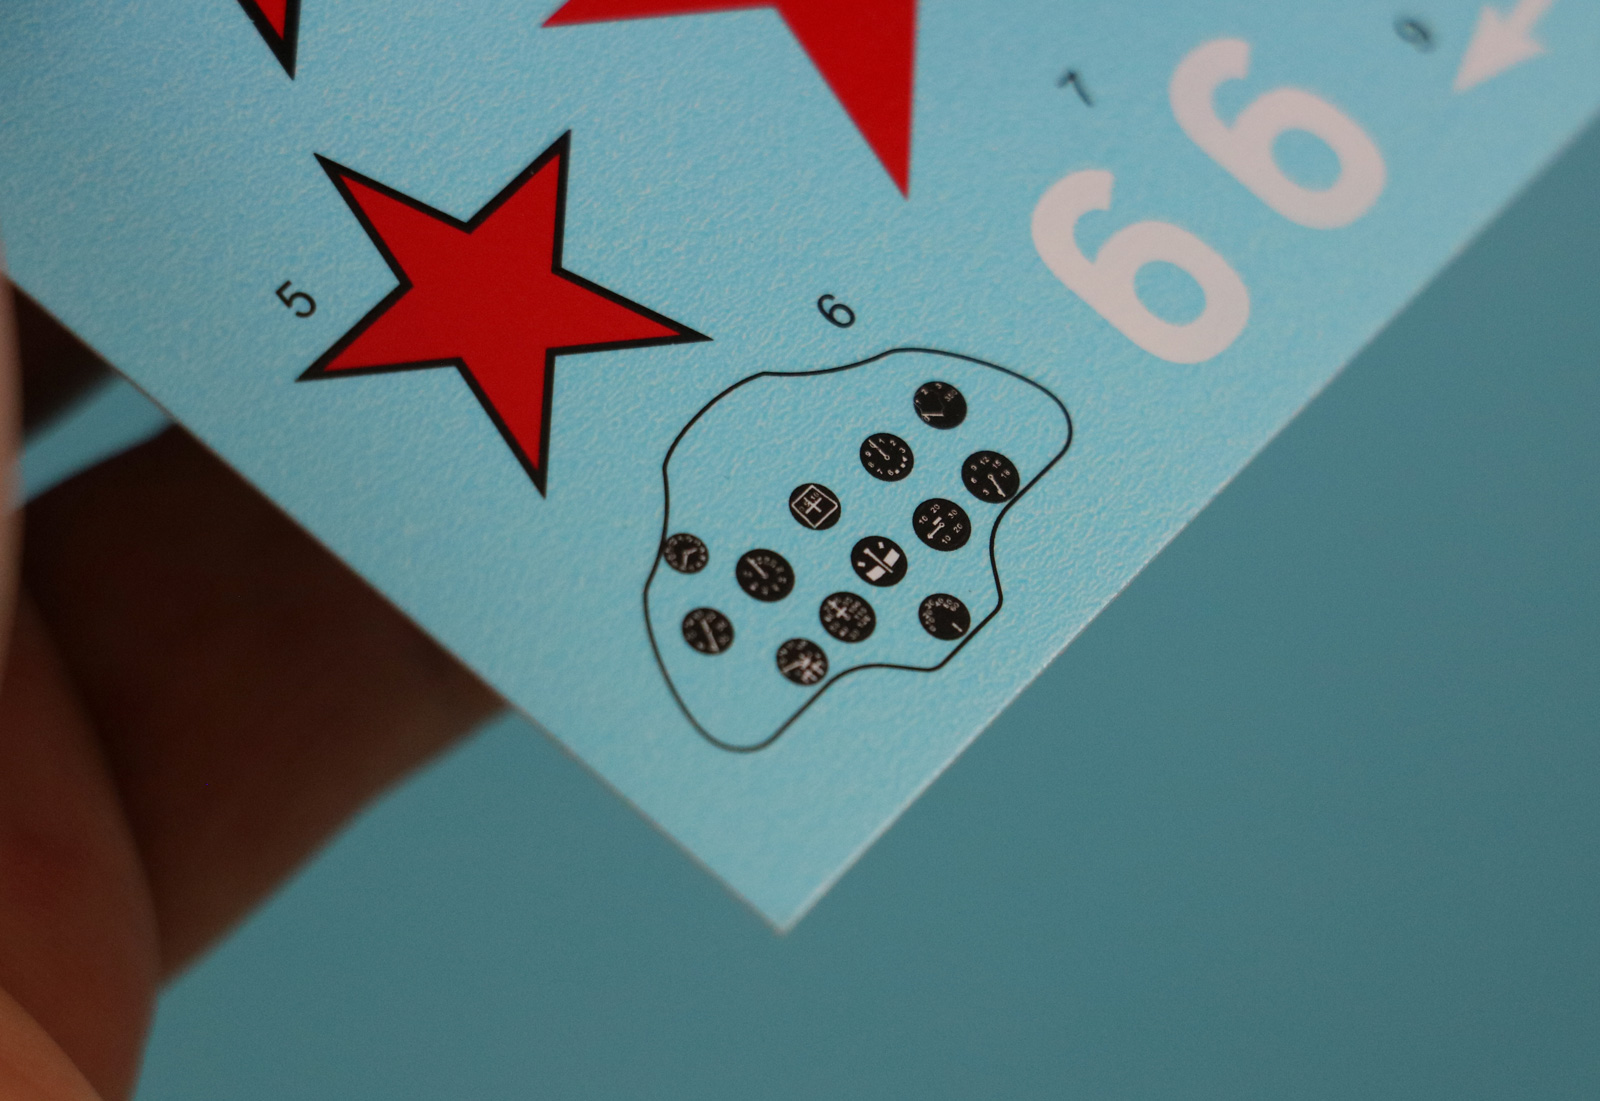
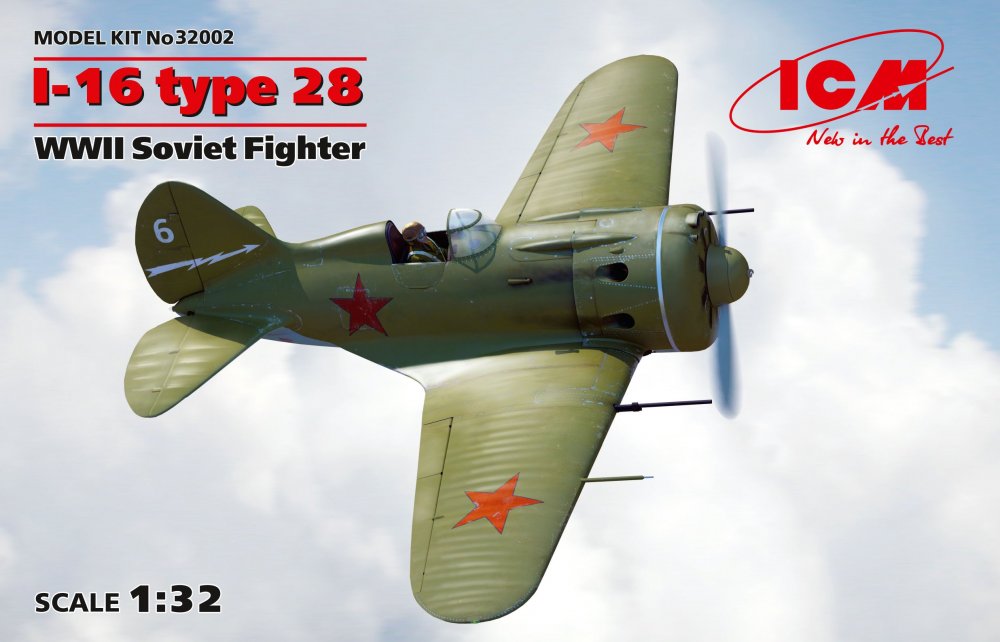
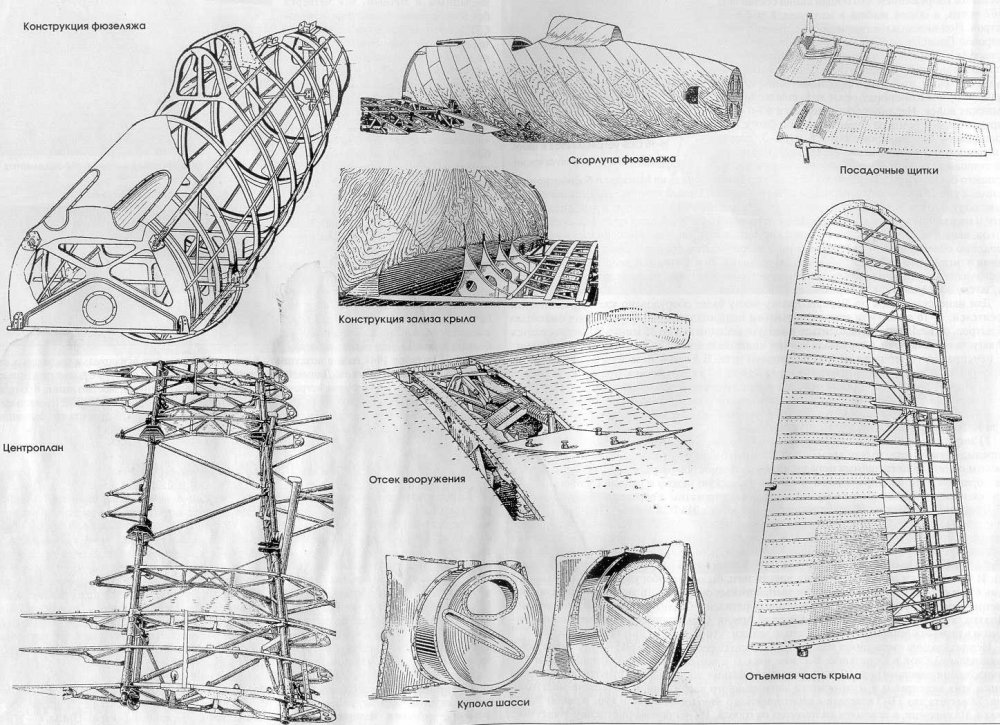
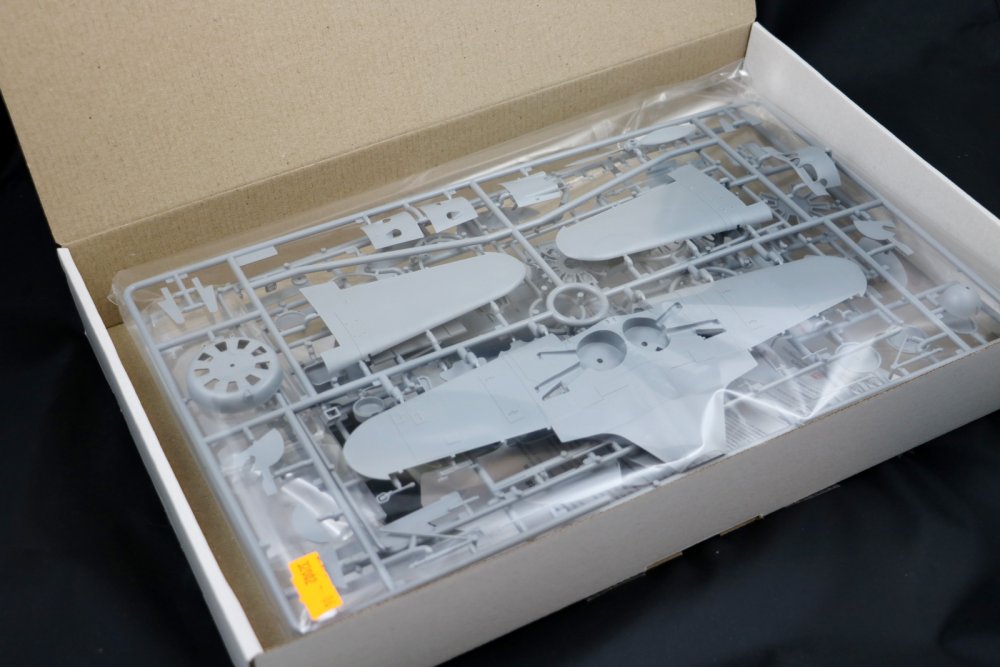
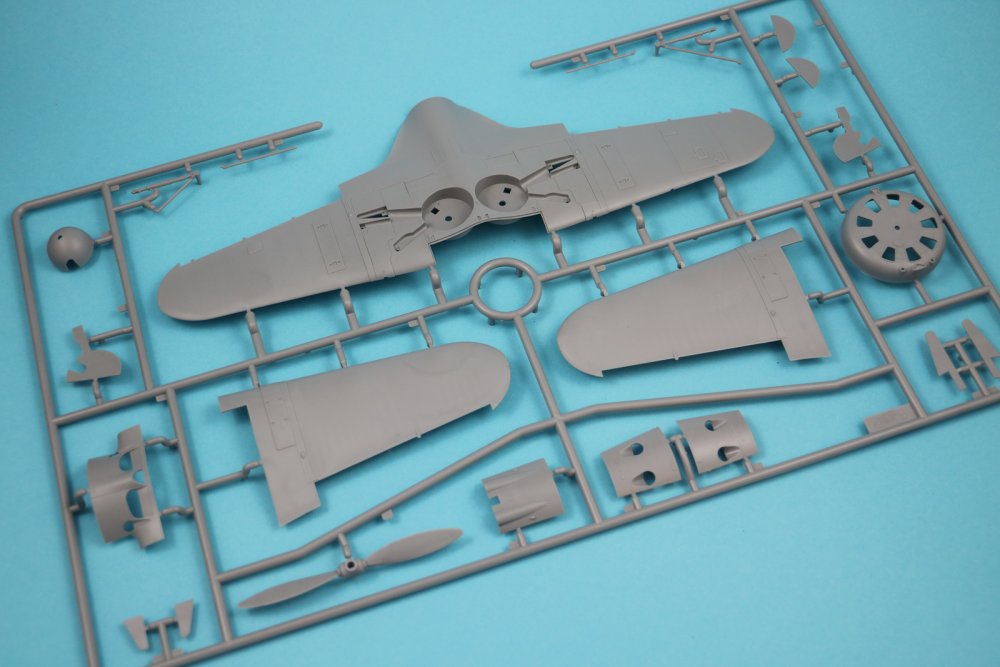
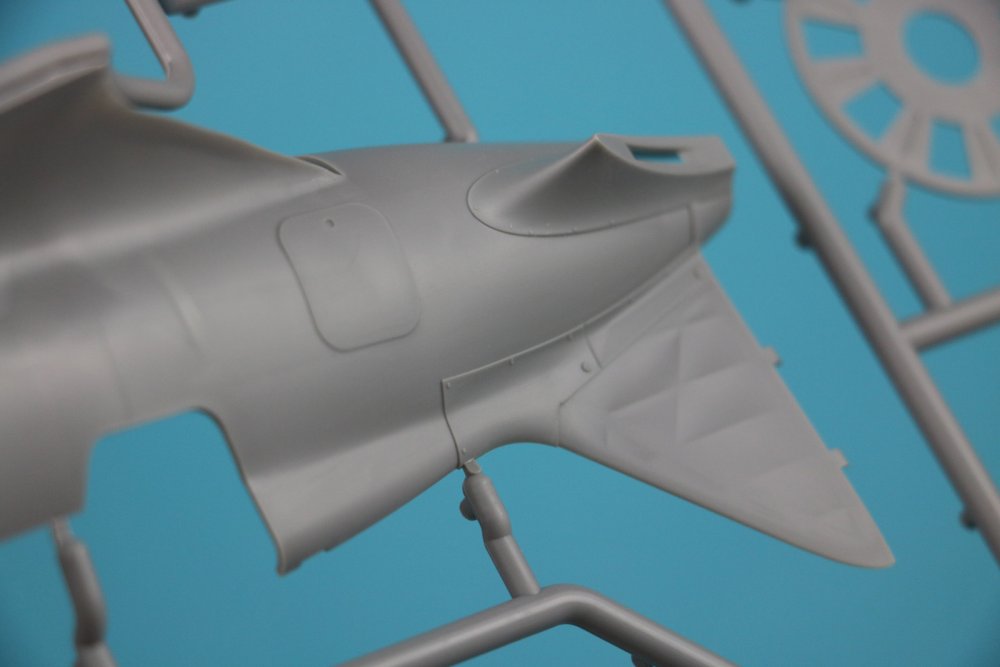
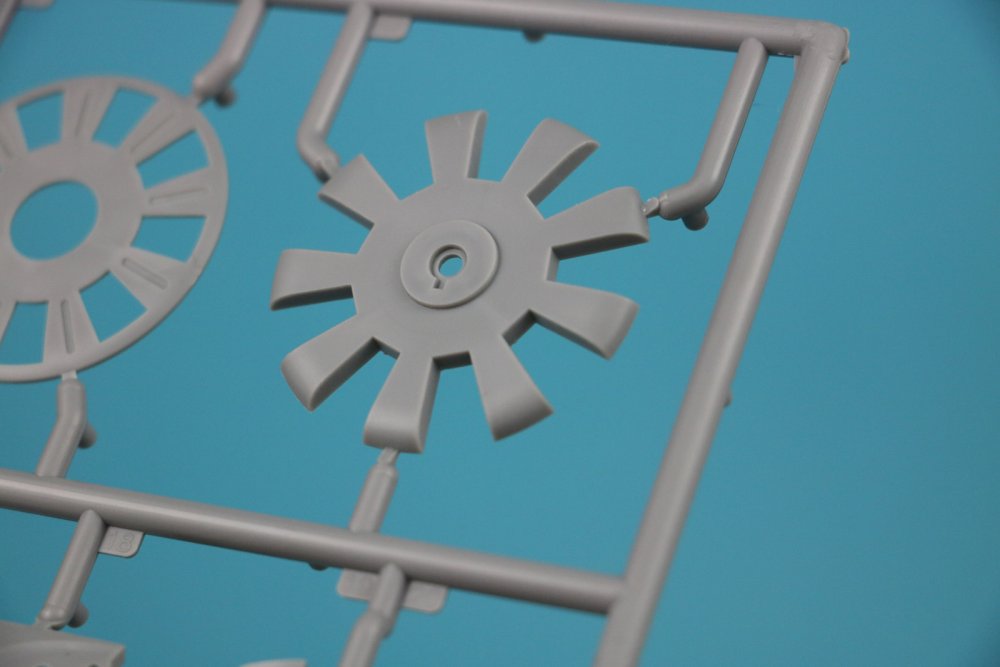
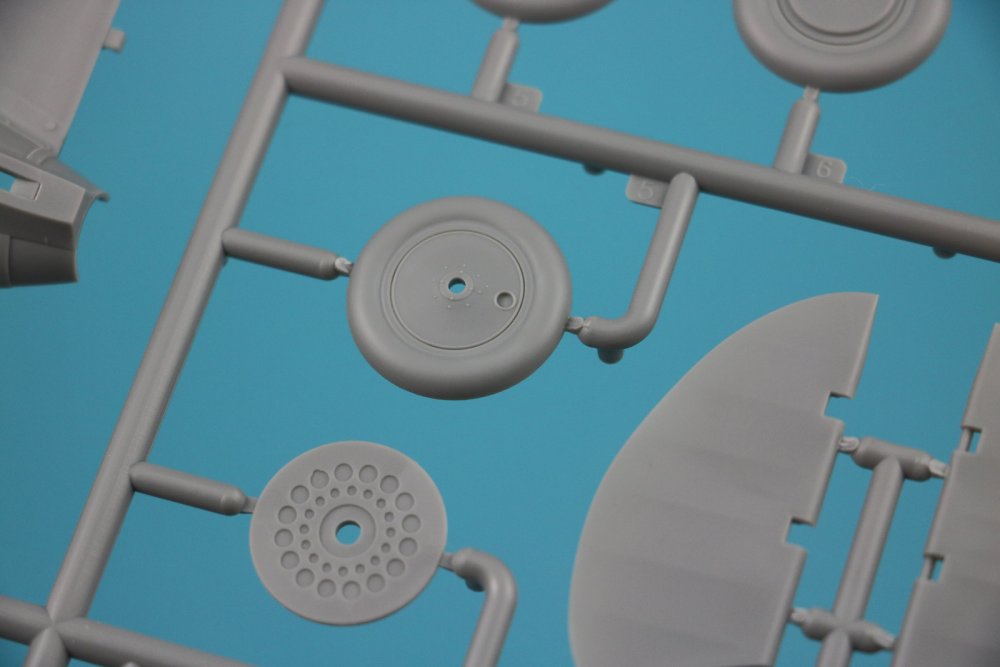
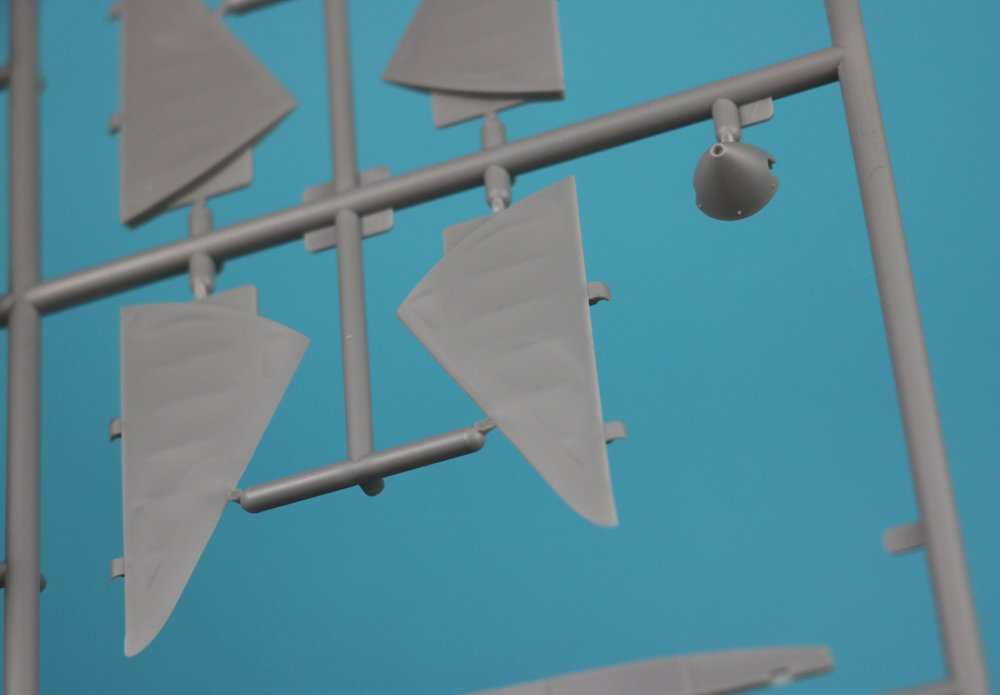
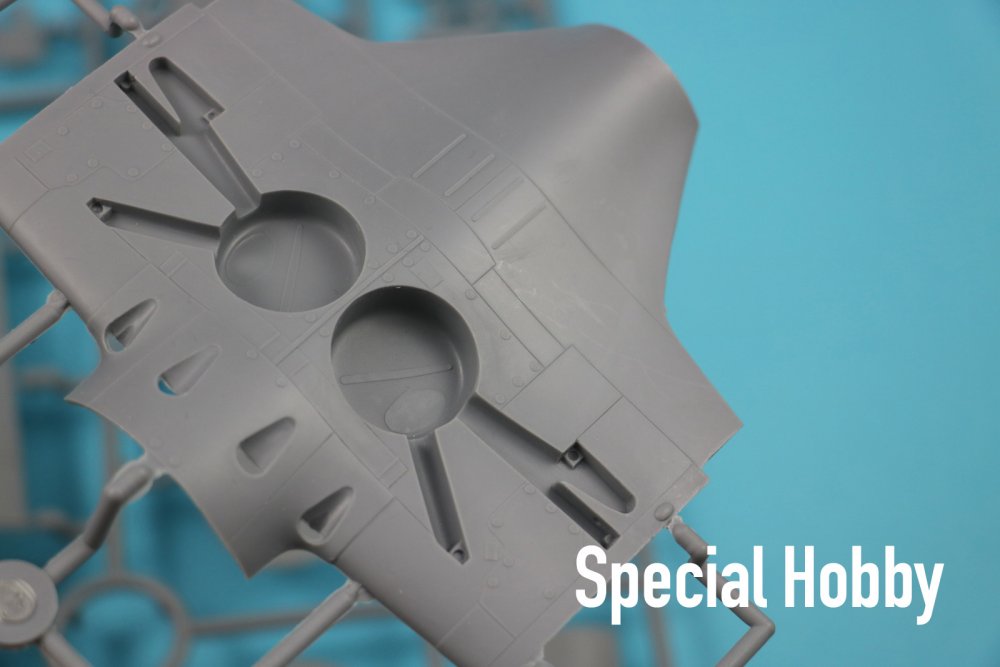
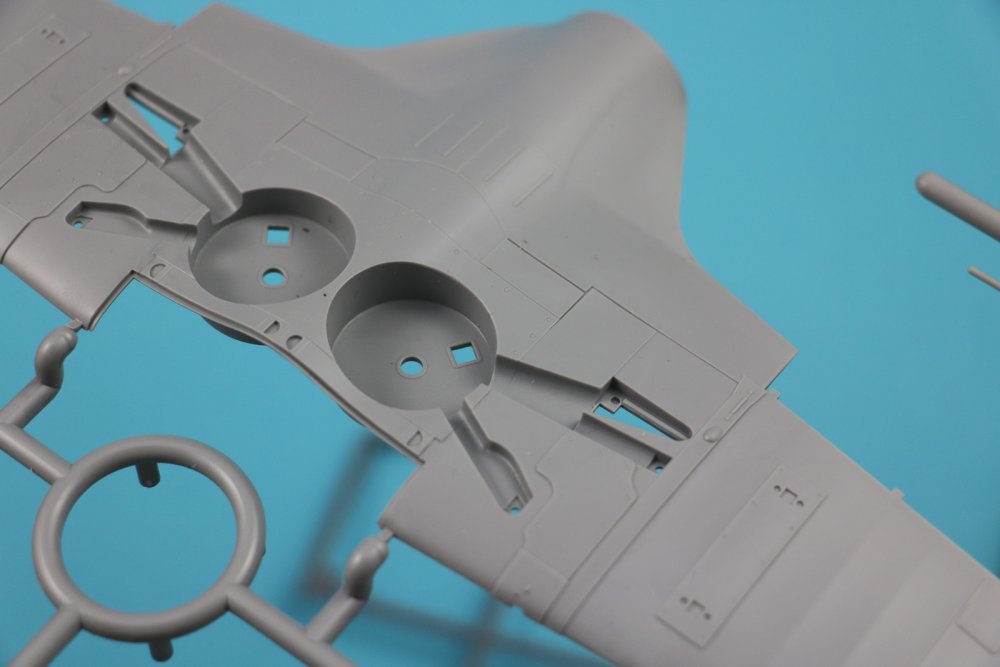
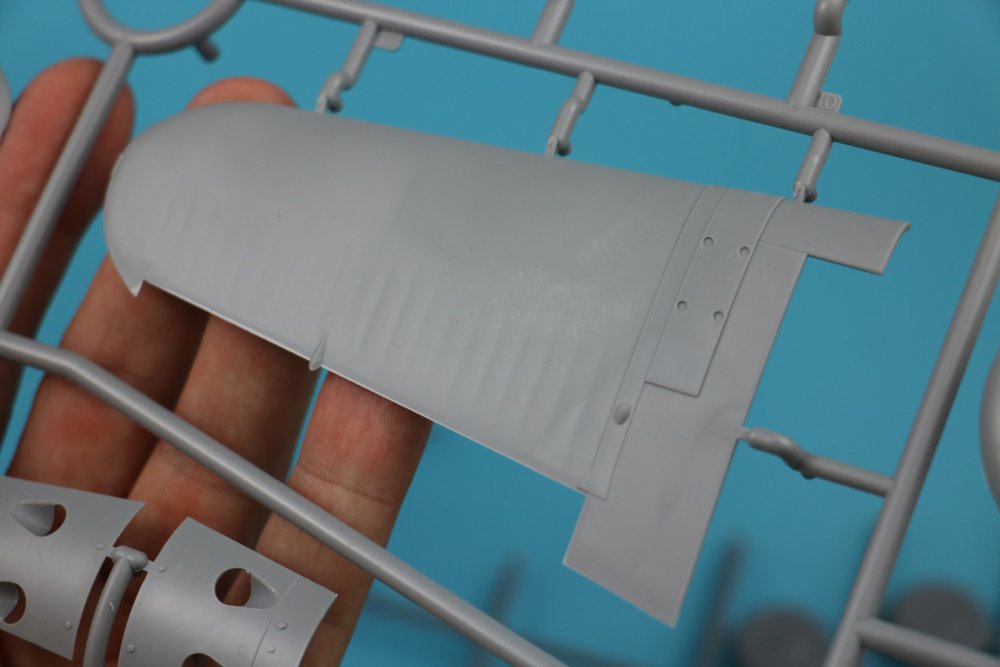
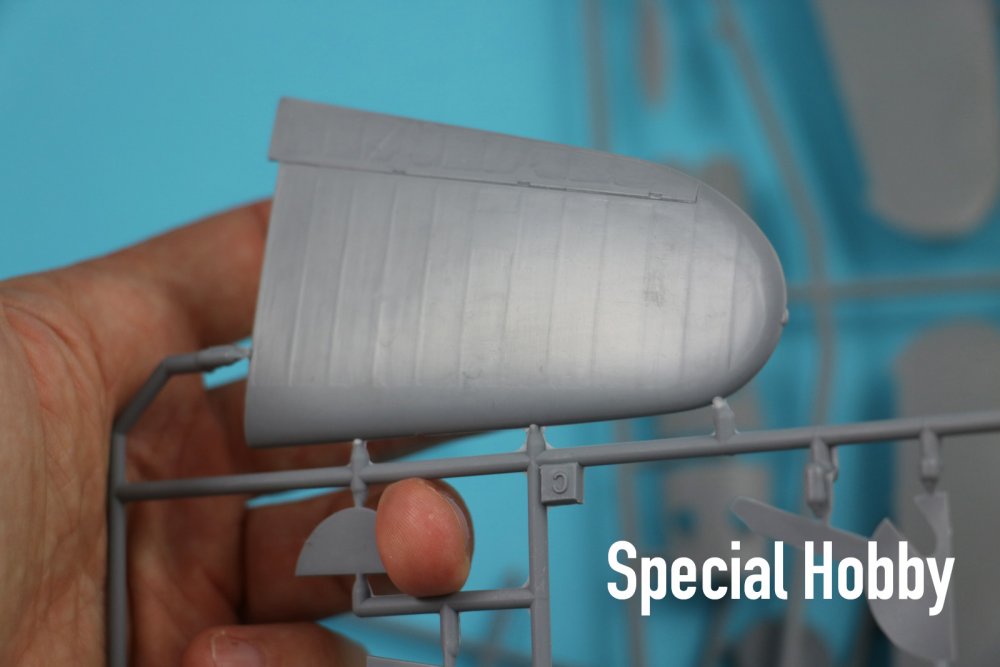
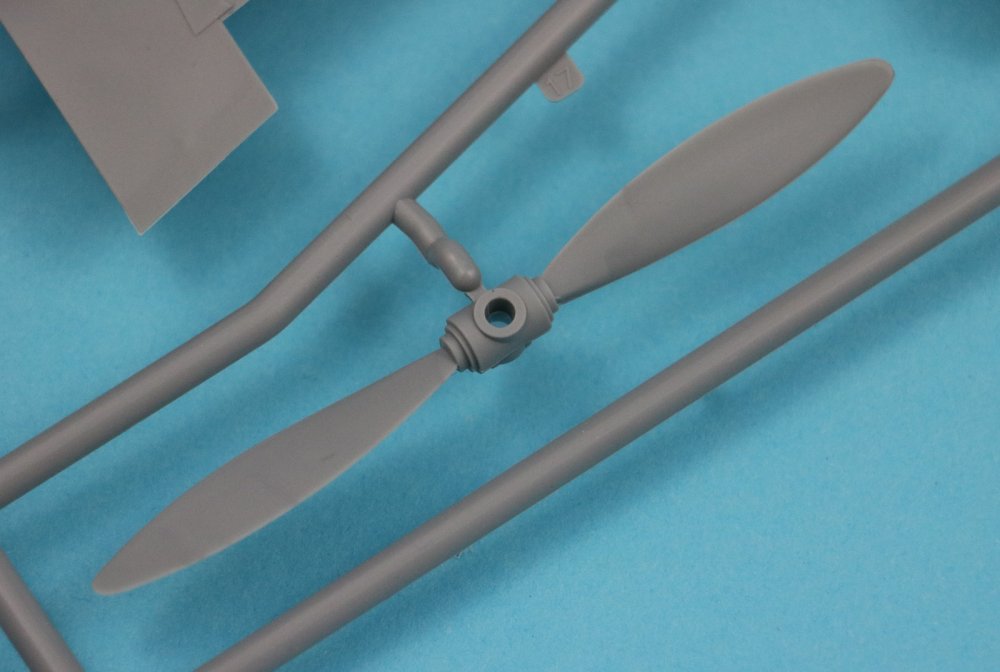
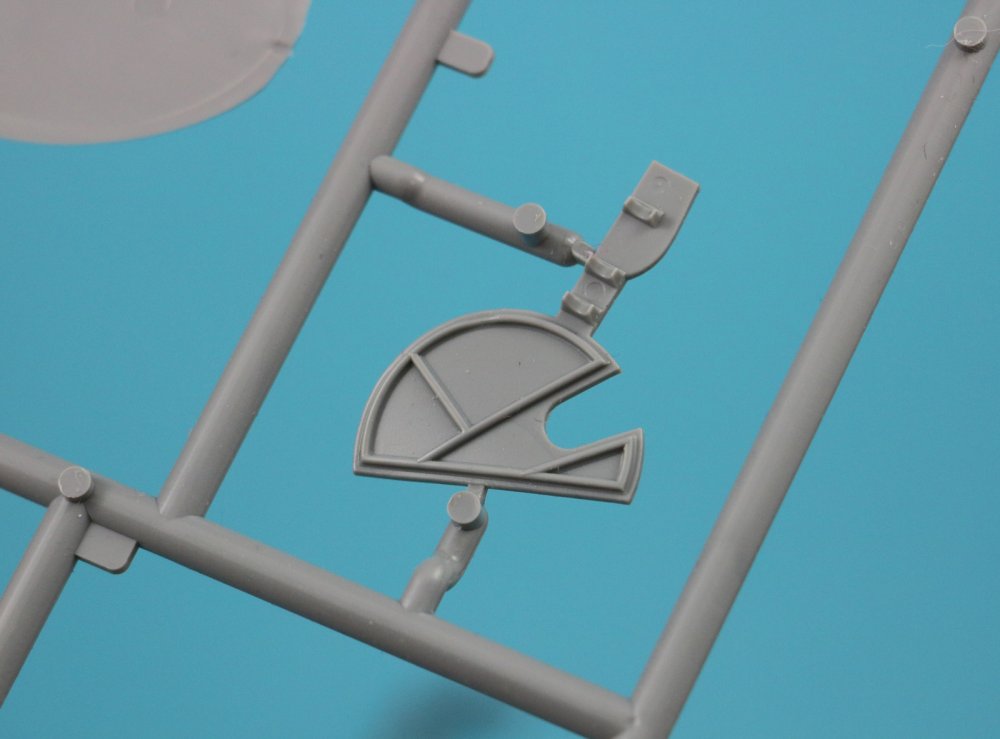
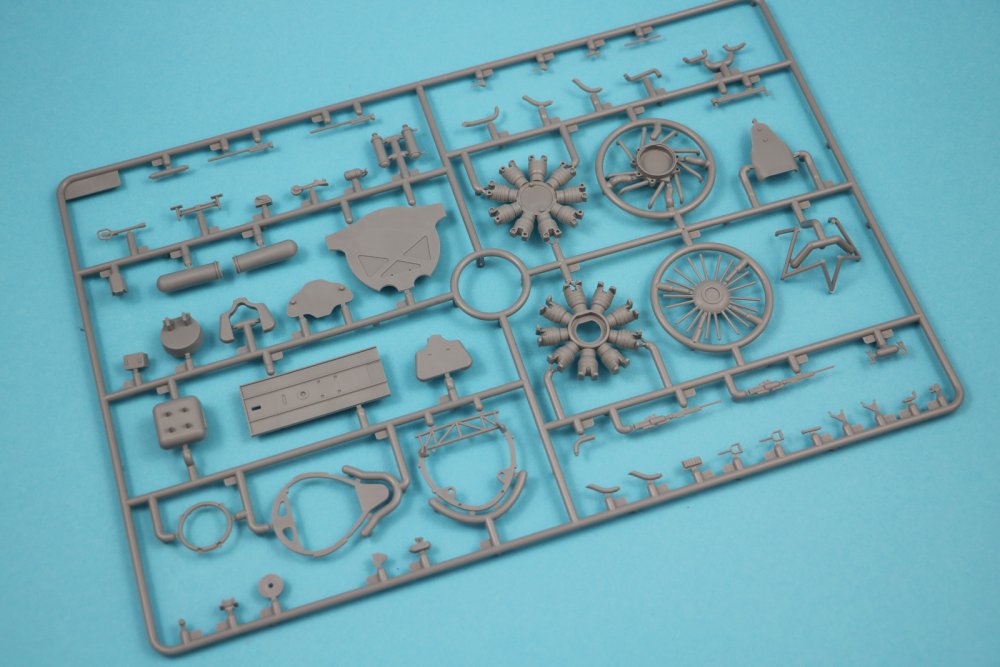
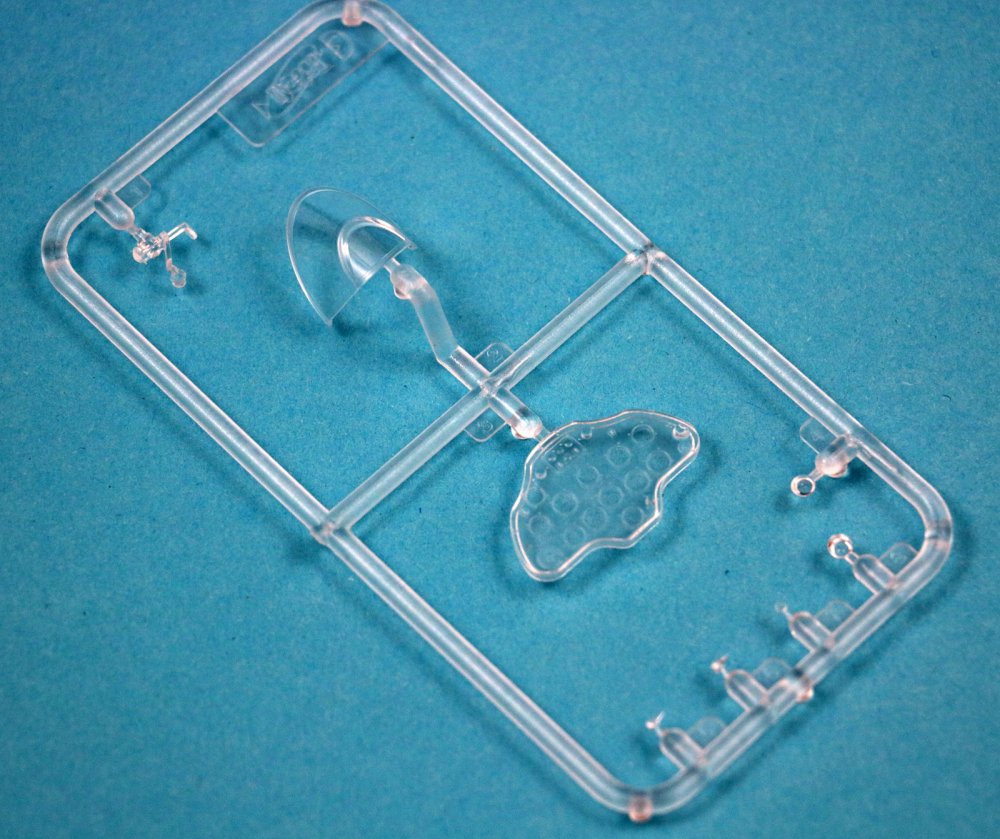
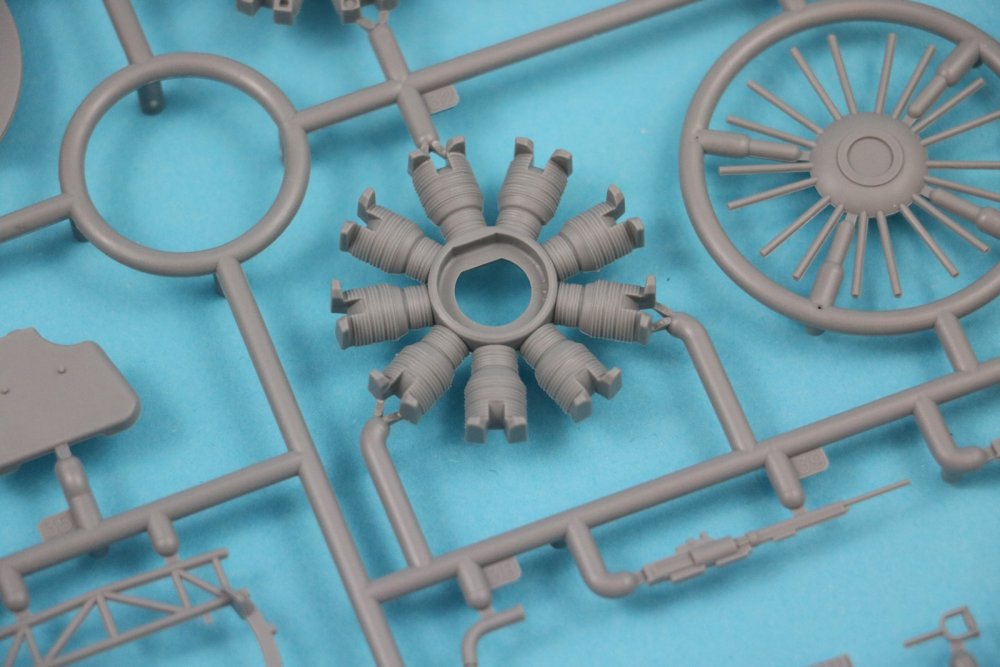
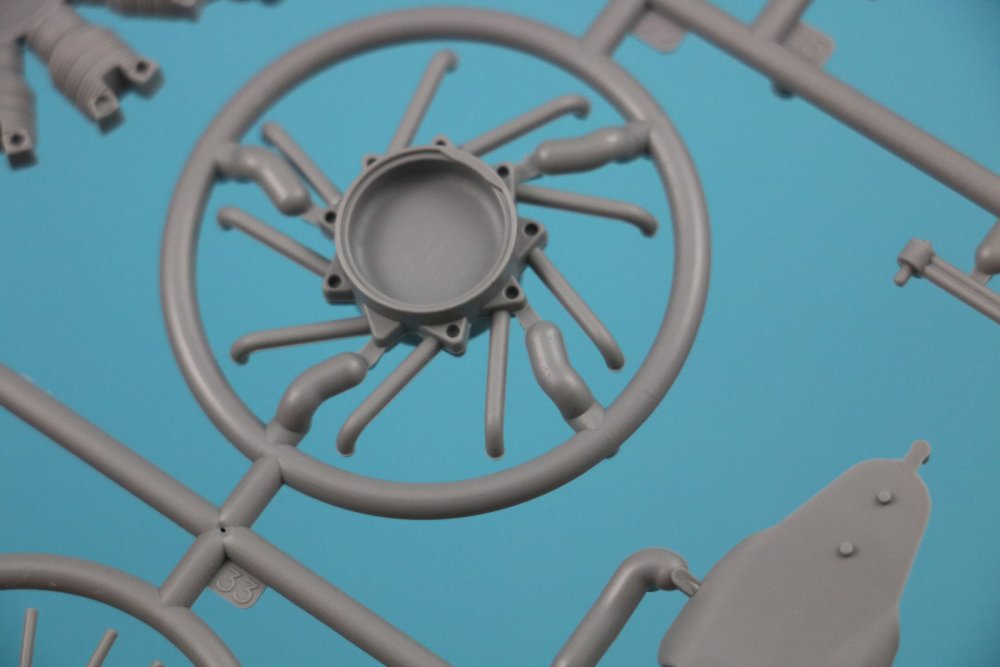
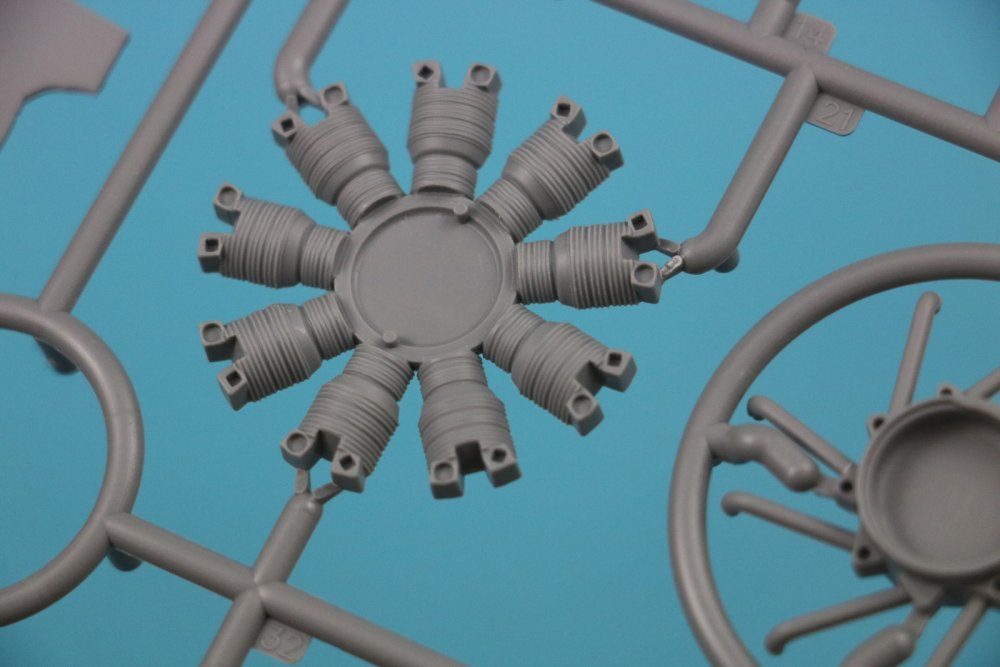
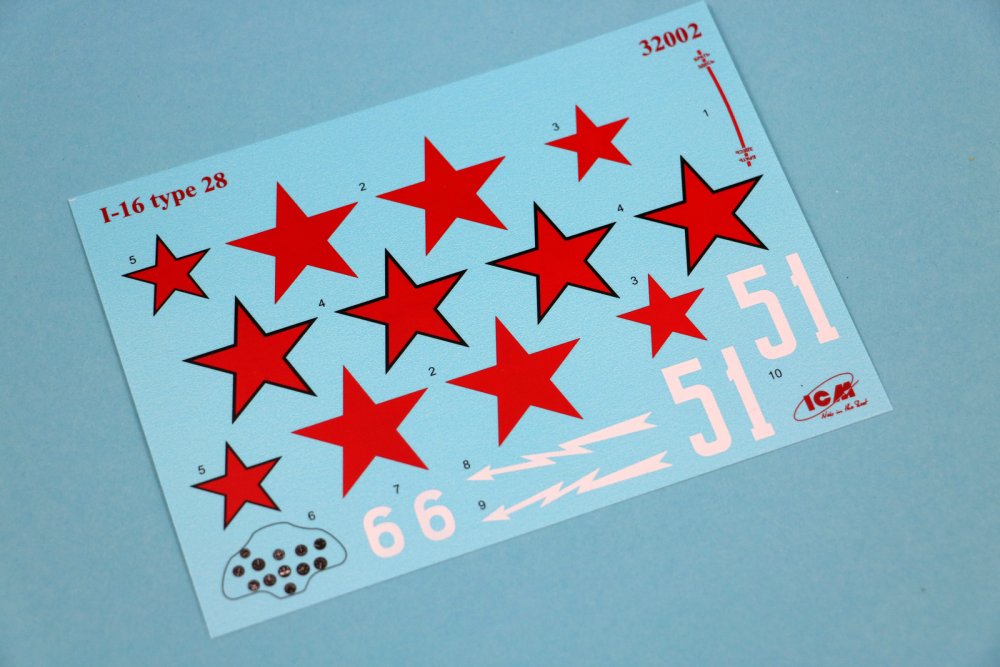
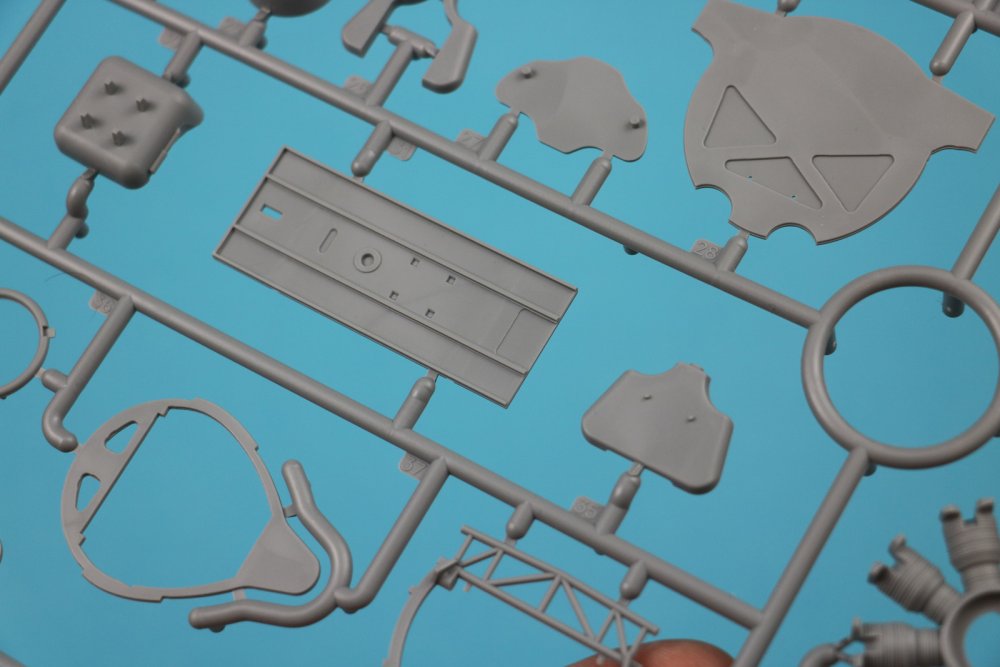
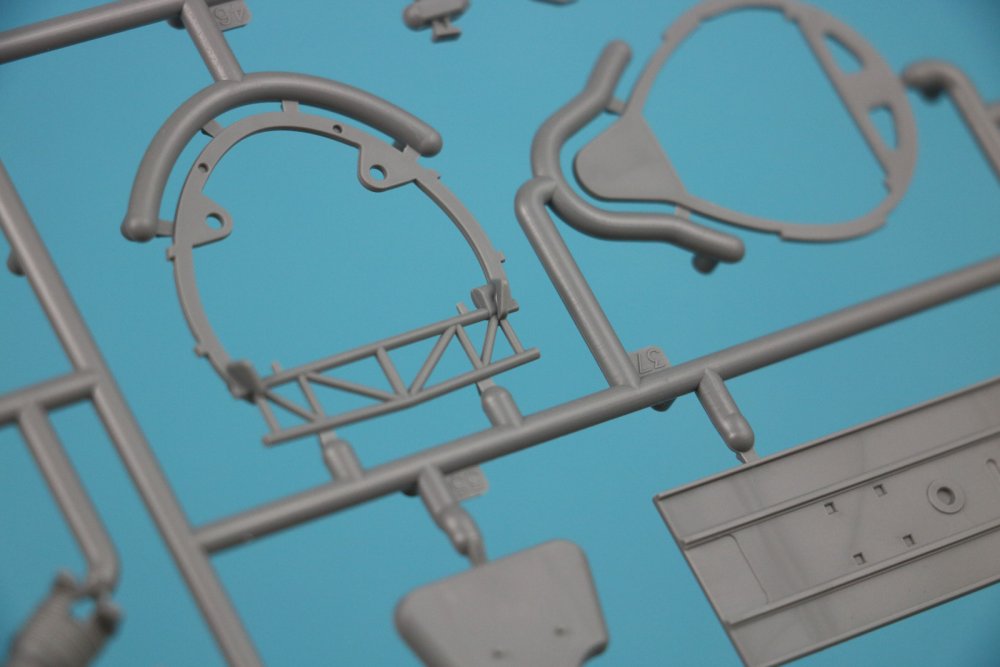
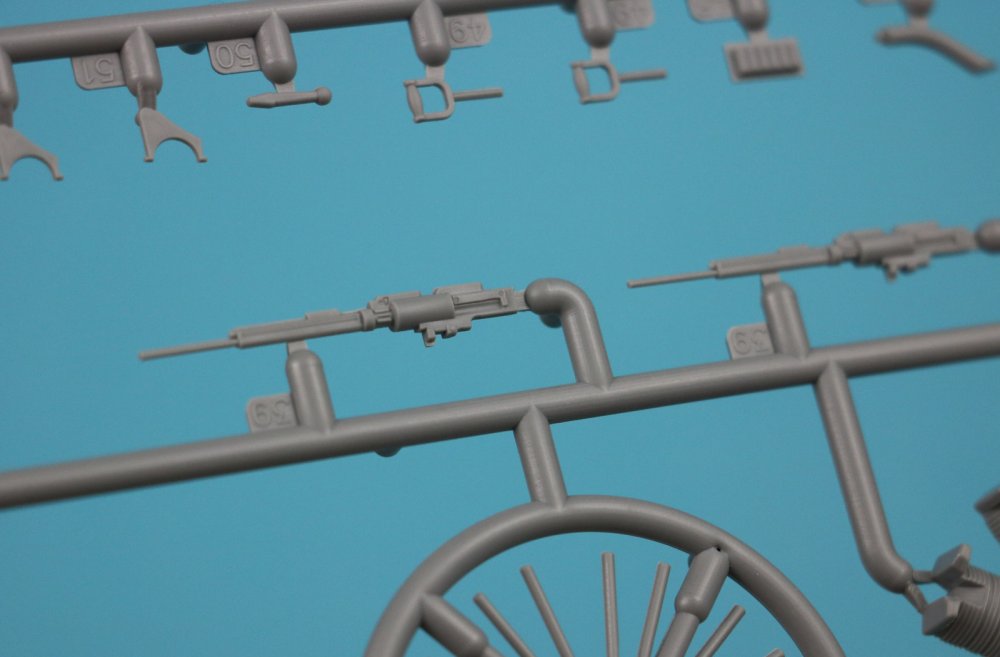
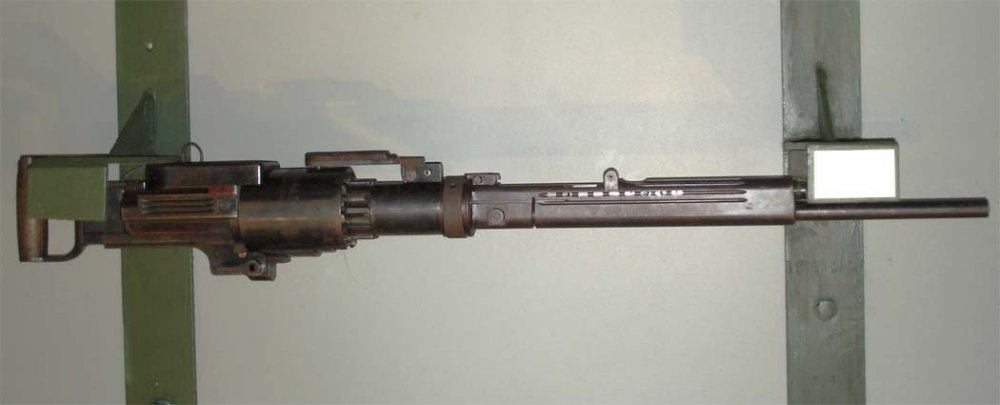
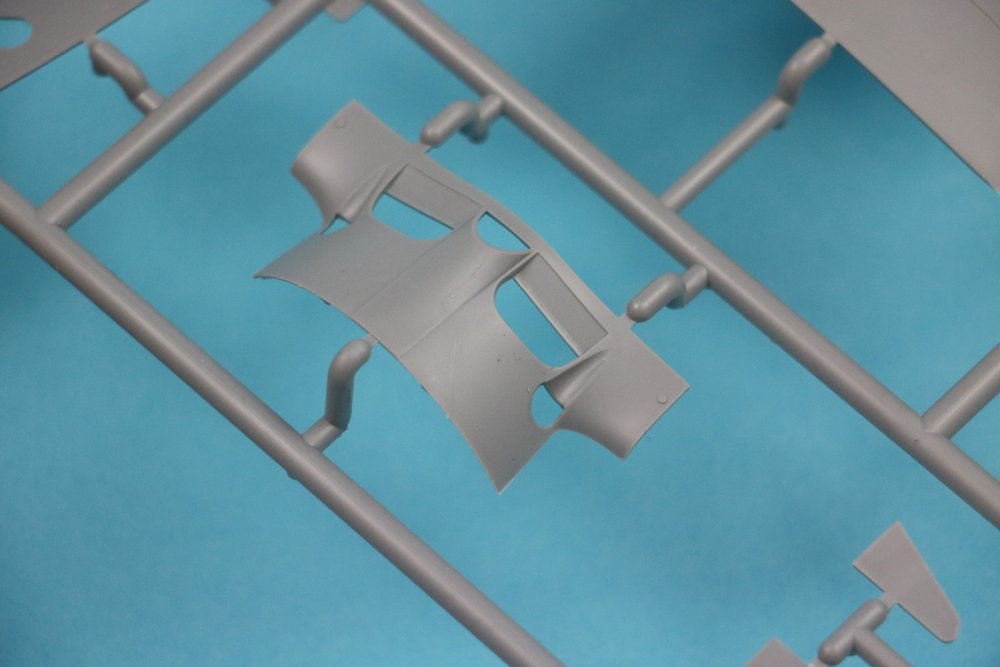
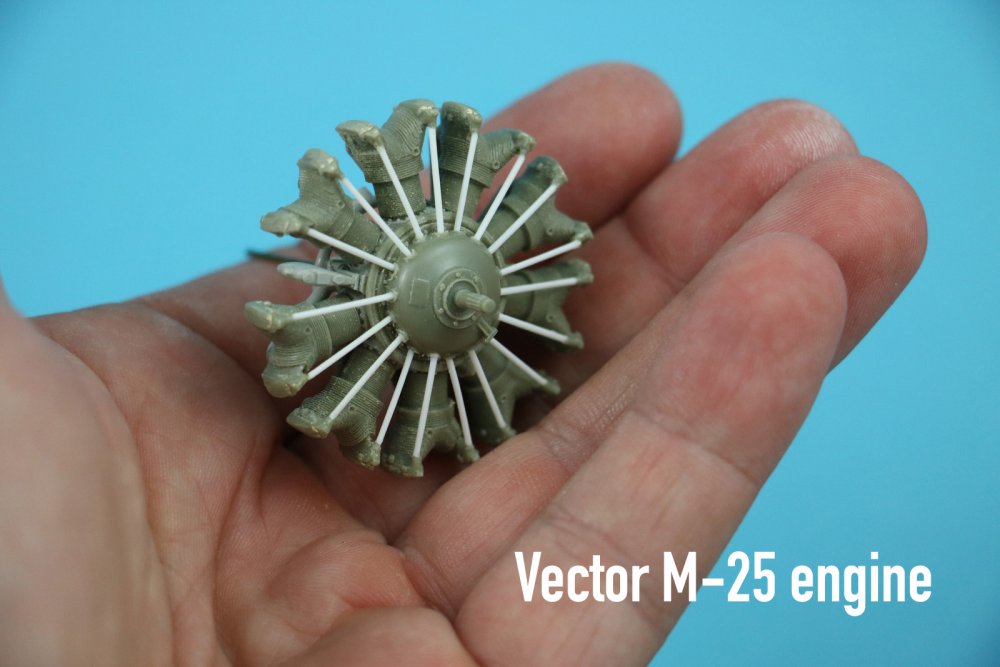
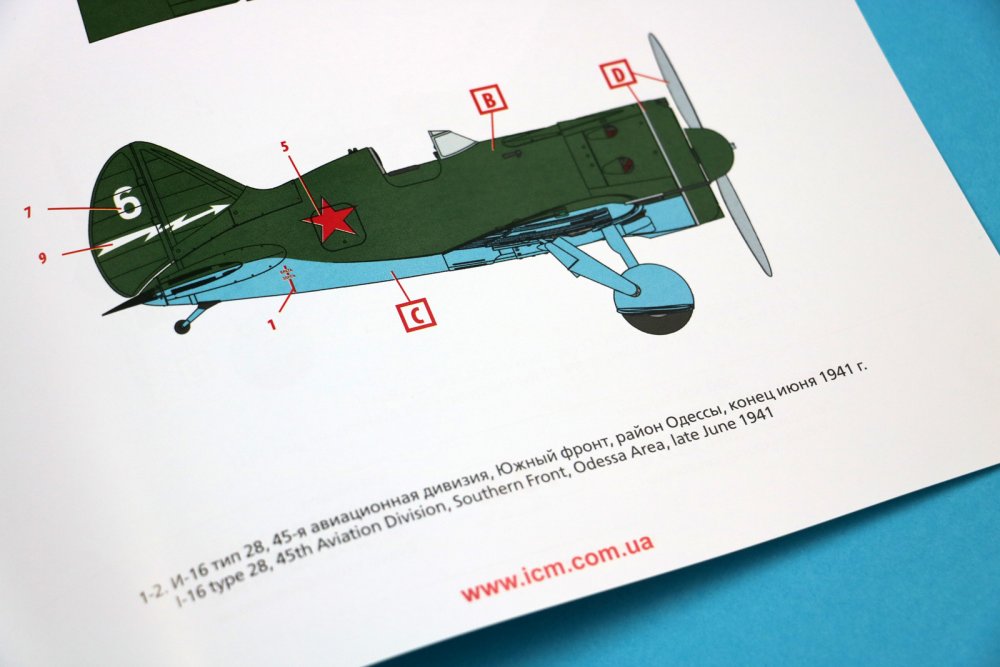
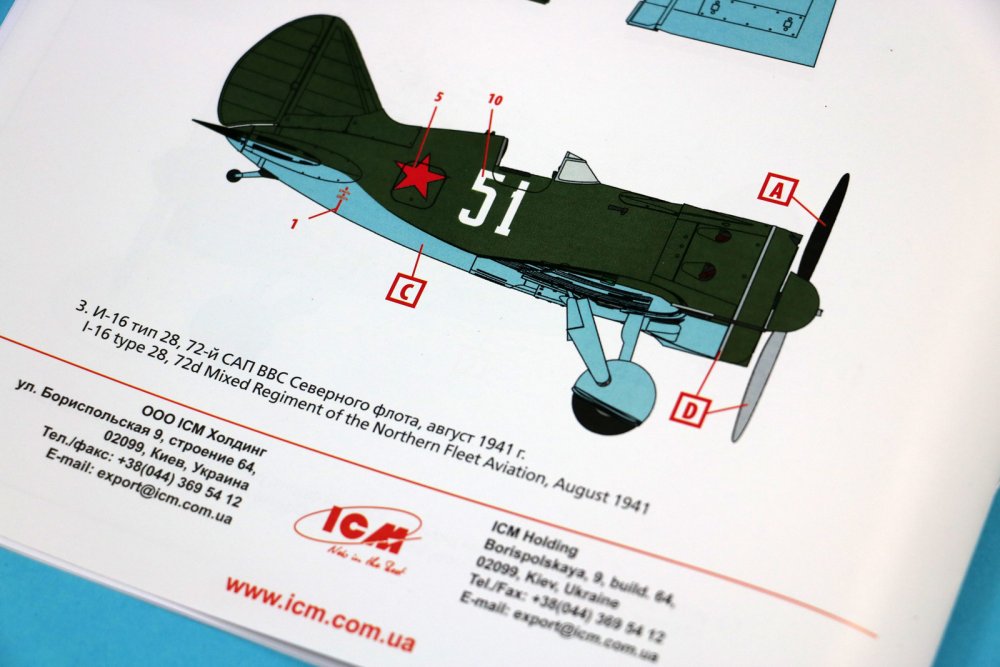
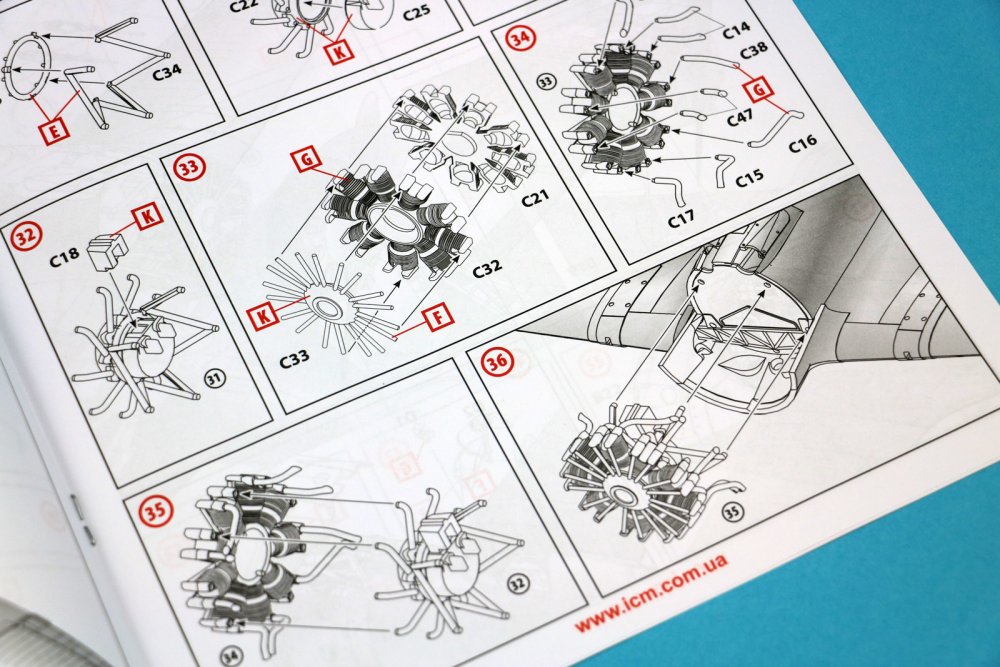
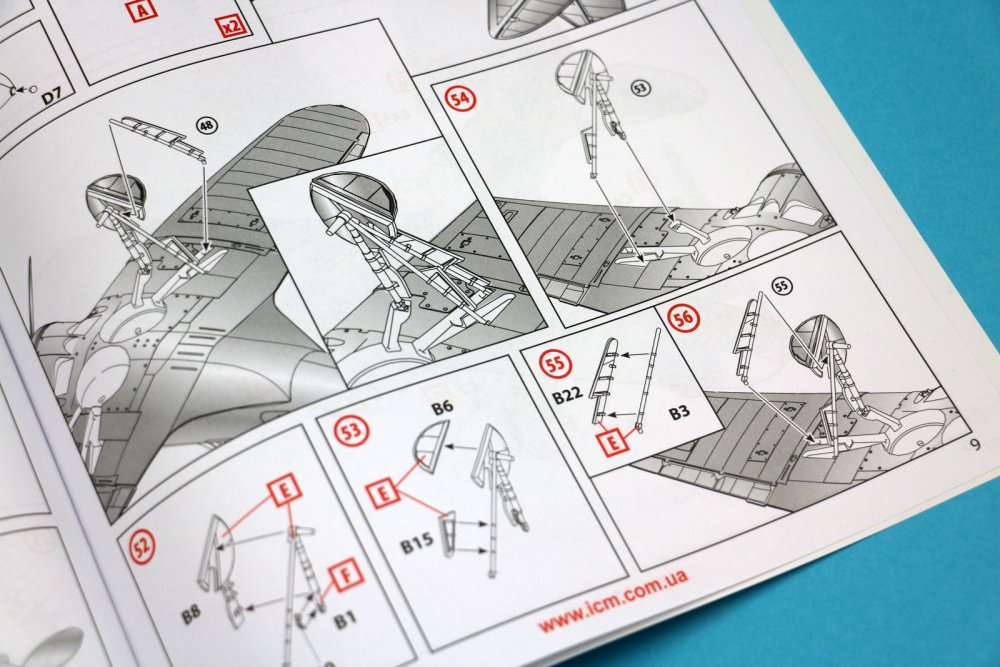
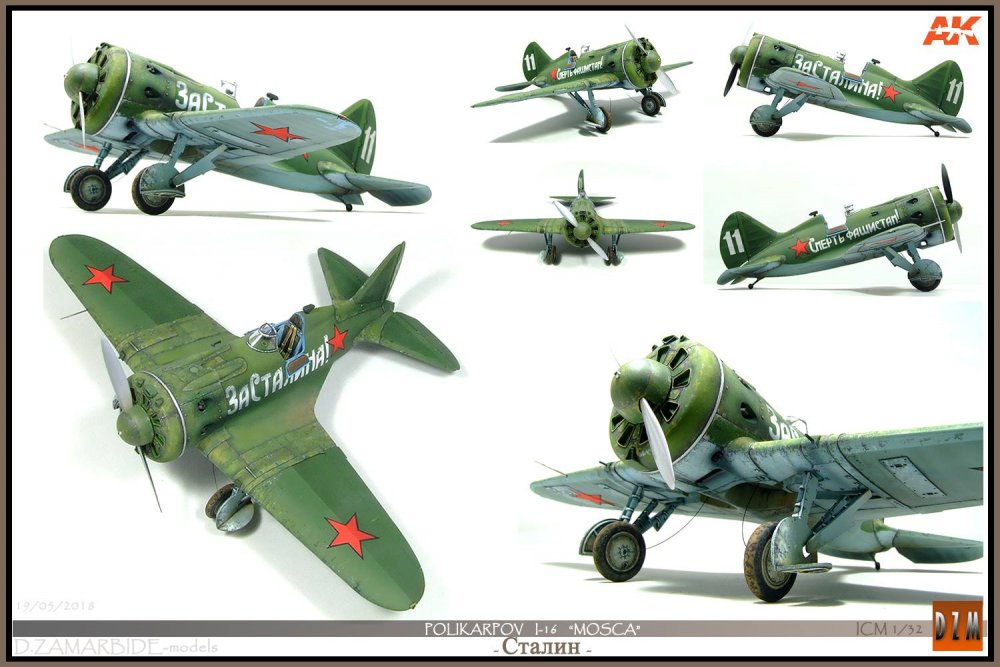
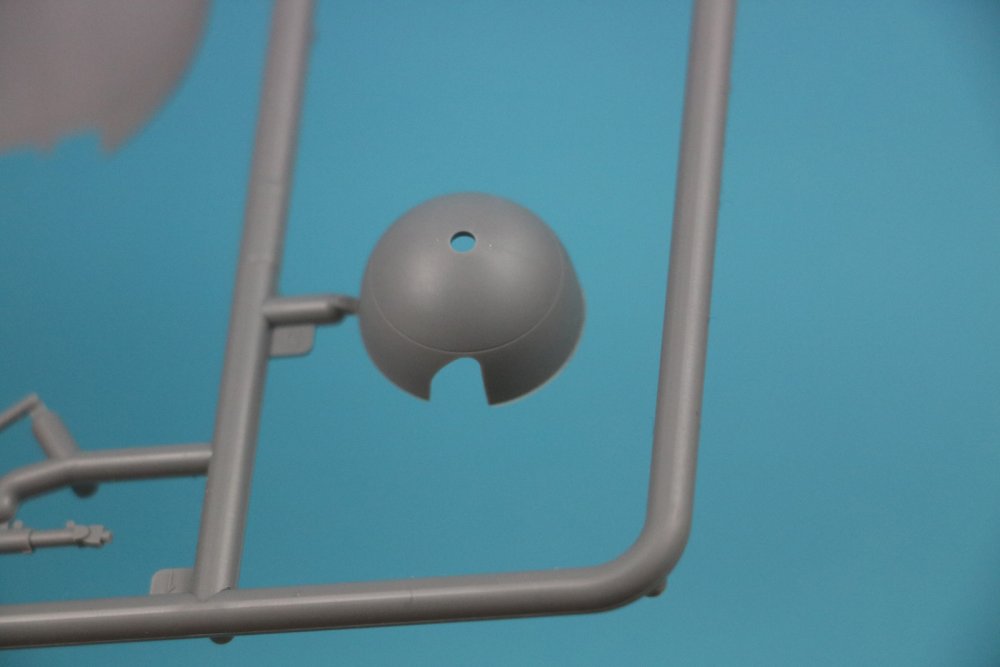
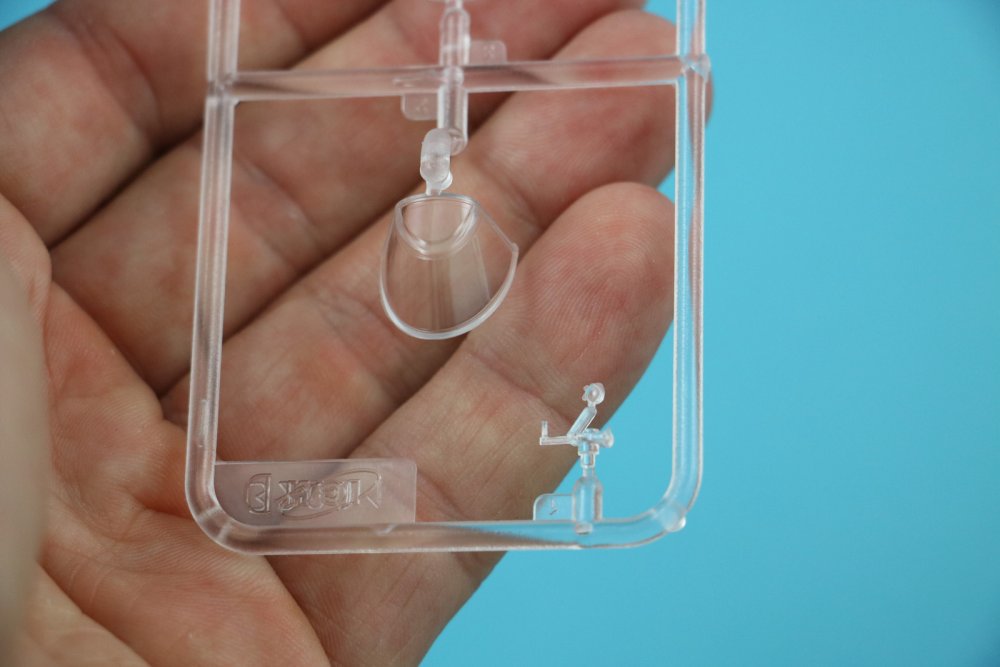
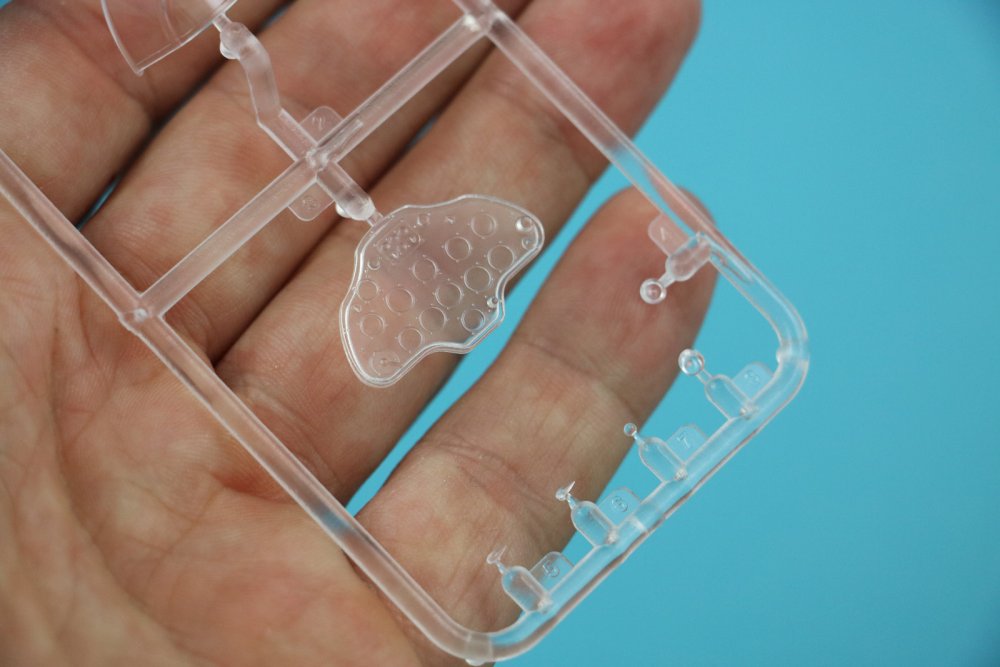
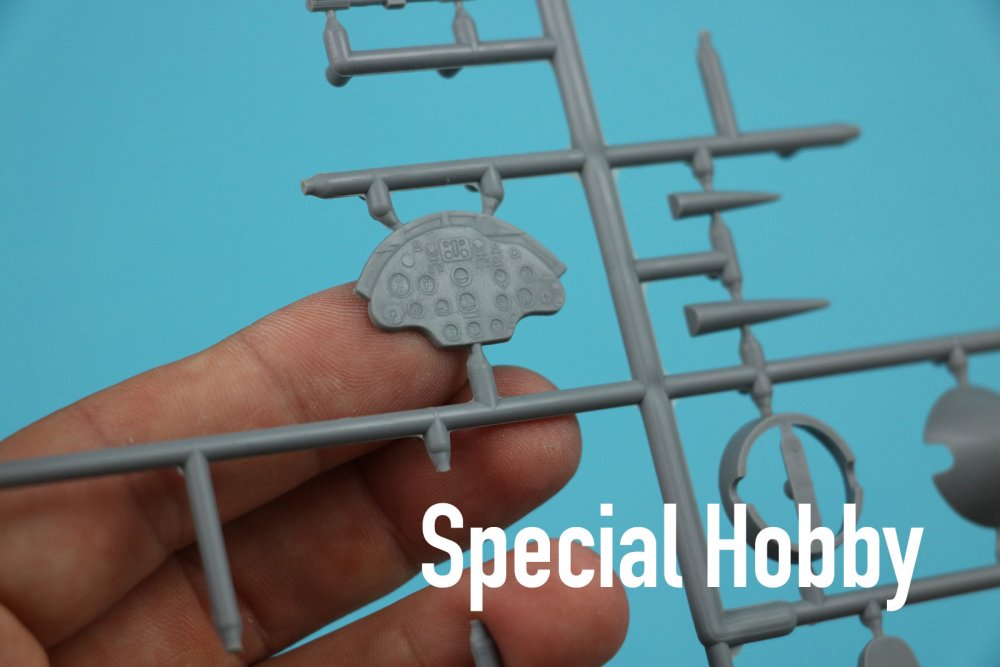
1/32 I-16 type 28 ICM Catalogue No32002 Available from Hannants for € 37,63 Introduction The I-16 was one of those designs that pushed the envelope and paved the way for new fighter designs. A closed cockpit, monoplane design, metal plating and a retractable landing gear. It’s licensed built Wright Cyclone SR-1820 9 cilinder engine (Shvetsov M-25) with it’s large diameter made the I-16 look short and stubby. This didn’t give the plane the menacing look of sleeker designs, but it proved it’s worth nonetheless. A whole series of improvements followed the first designated production type of the I-16 type 4. Most changes were made in the engine and guns / cannons. The type we’re looking at today however is the type 28. It differed from the type 24 (also released by ICM and reviewed by James Hatch here) only in armament: 2x ShKAS and 2x ShVAK. The ShKAS being a 7.62mm machine gun and the ShVAK being a 20mm cannon. The ShKAS mounted in the nose and ShVAK mounted in the wings. The major differences between the early type 10 and the late model 24 and 28 are the presence of flaps, a tailwheel instead of skid, a second cockpit door on the starboard side and the Shvetsov M-63 engine replacing the M-25 version. The different materials used in this plane make it perfect to model ‘without paint’. We see a laminated fuselage, linen, aluminium and putty. The method of the laminated fuselage is basically the same as we saw on WW1 Albatros fuselages and even the WW2 Mosquito fuselage. Not that easy to replicate due to the angled wooden planks, but if you manage to pull it off, you’ve got a winner. I managed to find a pagethat shows the different materials. The Kit Let me start by saying that the I-16 has been covered pretty decently before by Azur and Special Hobby. Having built the Special Hobby kit I know the detail is quite sufficient and that there are numerous detail sets to spice it up. Eduard has done various sets for the cockpit, exterior and masks which I can all recommend. You can also get yourself a Yahu Models instrument panel and HGW harnesses. Vector has done a great Shvetsov M-25 engine (which fits the type 10/17. I myself managed to get my hands on a few sets by Contact Resine (a French company) which include a thin cowling, cockpit set and wheels. In line of order, these kits have been released of the I-16: 1997 – Azur released the I-16 Type 10 2004 – Special Hobby added new parts and released the type 10/17 2008? – Special Hobby added new parts and released the type 24 2008? – Special Hobby added new parts and released the type 10 with ski’s (Finnish service) 2011 – Special Hobby added new parts and released the type 10/17 (Chinese & Japanese service) 2017 – ICM releases a fully new tool kit of the type 24 (review by James Hatch) 2017 – Revell releases this same kit (type 24) under their brand with new decals 2018 – ICM added new parts and releases this new type 28 When you lift the box top, a full closed internal box appears, which give it a sturdy construction. Only four sprues (including the clear sprue) make up this kit. The first thing that strikes is the quality of the moldings. No flash anywhere. Really crisp moldings. Since I have an unbuilt Special Hobby I-16 in the stash, I decided to make some comparisons. Sprue A This sprue contains the fuselage halves, tail, rudder, cowling, wheels and ailerons. The tail was fabric, so we see some sagging between the ribs of the tail. Not too much. The nose / cowling had radiator louvres. I like that you get to pose these open or closed by rotating the louvre disc inside. A feature that is not present on the Special Hobby kit, where it’s always closed. Why? Because the Special Hobby kit doesn’t include an engine and this kit does! Also: this kit offers separate ailerons (and separate elevators). Also not an option in the Special Hobby kit. The I-16 had a mostly wooden fuselage. This means there are not a lot of rivets to be found. In that sense the Special Hobby and ICM fuselage don’t show a lot of discrepancies. You do however get some more detail in the ICM wheels. I also have Fabflight resin wheels which show a complete different bolt layout. Make sure you study your references before changes out the wheels. You’ll find a lot of alterations exist. The top cowling is supplied as a separate piece. This enables you to show of the guns and engine. I bought myself (and built) the Vector M-25 engine once. The Type 28 featured the M-63 engine though, so it wouldn’t be right for this version. Still, I love the detail that comes with this kit! Engine mounts are included, guns, so you’ll only have to add a few wires and scratch the fasteners of the cowling to do a decent open engine model! Fuselage halve: Top cowling: Radiator louvres: Wheels: Ailerons: Sprue B Here we have the wings, more cowling parts, prop, gear, prop hub and wheelbay doors. The wheelbay doors show some more pronounced detail than the Special Hobby ones’. An interesting difference comes to light when you look at the bottom mid wing section. Delicate rivet detail on the ICNM kit versus round discs on the Special Hobby kit. The surface texture of the main wings is almost non existant on both kits. As said: a nice feature of the ICM kit is that the ailerons are provided as separate parts, enabling you to pose them up or down. The gear legs are really nice and way nicer than the Special Hobby ones’. Crisp and detailed. Underwing surface detail: Compared to Special Hobby: Upper wing detail: Compared to Special Hobby: Radiator: Prop: Gear legs: Wheel doors: Sprue C and D Wow! The Shvetsov M-63 engine. A real gem. Pretty complete right out of the box. The ShKAS guns (see my photo for reference), lovely exhaust stubs. It’s all there. When we look at the cockpit we are greeted with the same level of detail and completeness. Or aren’t we…? I’m kinda missing seatbelts here! A quite prominent and visible feature in this open cockpit. I don’t understand this, because everything else seems to be there. The instrument panel is a transparent plastic part. Transparant? Why? Decals are provided for the instruments, so this part might as well have been grey plastic. I would recommend getting the Yahu or Eduard offering for this part. Other than that the cockpit is up to par with the big brands. The windscreen is lovely. Really clear and with a nice sharp edge for the cockpit framing. The Shvetsov M-63 engine: Compared to my Vector M-25 engine: Cockpit floor: ShKAS guns: And here's the real deal: Cowling underside: Spinner, typical for type 28: Gunsight: Windscreen: Instrument panel: Compared to Special Hobby: Decals Decals for two schemes are provided. Both rather dull to be real honest. A dark green top and flat light blue underside. Both sporting the red star and white numerals. Still, if you look at the work of Daniel Zamarbide Suarez, you might get some inspiration to turn dull green into a lively scheme! The decals look great but don’t seem to be printed by the usual suspects. Still, for a subject like this, I would recommend spraying the insignia on. But who am I? Scheme 1: I-16 type 28, 45thAviation Division, Southern Front, Odessa area, Late June 1941 Scheme 2: I-16 type 28, 72nd Mixed Regiment of the Northern Fleet Aviation, August 1941 Instructions: Overal: This kit is an improvement over the older Special Hobby kits. In terms of fit, detail and molding quality. The fact that it includes a full engine, lovely cockpit, guns, separate ailerons etc… very welcome. The only thing I don’t get is the omission of seatbelts. With only a few upgrades (instrument panel, seatbelts) this kit can be turned into a winner. Check out Daniel's work: Highly recommended. Our sincere thanks to ICM for providing this kit for review.


-
oh wow! You're making real progress. Lovely to see some colour on her.
-
HPH model 1/48 scale B-36 Peacemaker !
JeroenPeters replied to IainMackayDall's topic in Modelling Discussion
I've held it in my hands at Telford last year. Insanely large...- 32 replies
-
- 4
-

-
- b-36
- peacemaker
- (and 1 more)
-
Insane! Nice way to show all the insides.
-
Takom Sd.Kfz.171 Panther Ausf. A Early
JeroenPeters replied to daz greenwood's topic in LSM 1/35 and Larger Work In Progress
damn... the detail in this kit is insane. Nice start! -
1/48 Wellington Mk.X (He727 NA-K)
JeroenPeters replied to JeroenPeters's topic in LSM 1/35 and Larger Work In Progress
Working on the bomb bay. Man... this stuff is impressive!! and here’s the aluminium plate that will go onto the wooden base.
- 304 replies
-
- 3
-
-
- wilnis crash
- trumpeter
- (and 1 more)
-
Roden Cessna O-1 Birddog 1/32
JeroenPeters replied to WattsNZ's topic in LSM 1/32 and Larger Aircraft Ready for Inspection
Looks great to me! Well done! -
1/48 Wellington Mk.X (He727 NA-K)
JeroenPeters replied to JeroenPeters's topic in LSM 1/35 and Larger Work In Progress


- 304 replies
-
- 7
-
-
- wilnis crash
- trumpeter
- (and 1 more)
-
1/48 Wellington Mk.X (He727 NA-K)
JeroenPeters replied to JeroenPeters's topic in LSM 1/35 and Larger Work In Progress
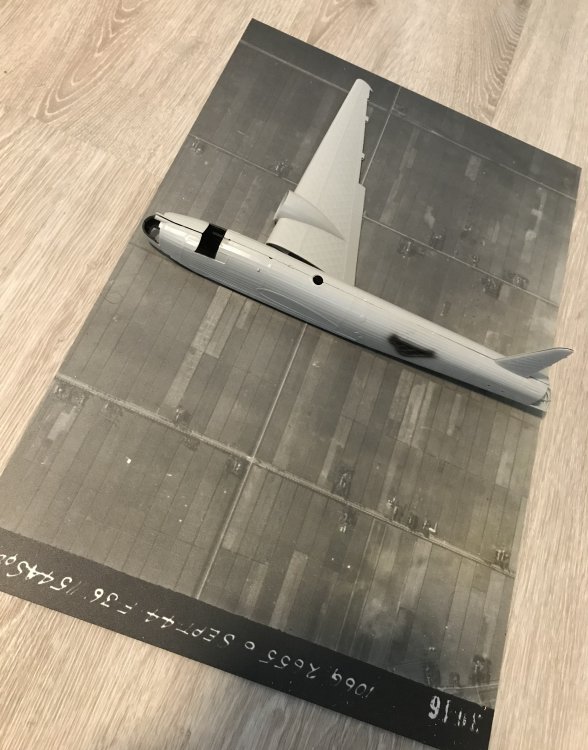
I can imagine. The detail is amazing. Just ordered a 40x60cm print of this photo on aluminium. I will have this aluminium plate mounted on a thick wooden base. The location of the crash will be marked by a silver pin. The model will be placed on top. Along with the cowling engine flap- 304 replies
-
- 1
-
-
- wilnis crash
- trumpeter
- (and 1 more)
-
1/48 Wellington Mk.X (He727 NA-K)
JeroenPeters replied to JeroenPeters's topic in LSM 1/35 and Larger Work In Progress
After a long search I found a 1944 aerial RAF recon photo of Wilnis. Bought it for 50€ and is worh every pixel. 6000x6000 pixels in size. Taken a little over a year after the crash. this photo will be printed onto wood and form the base. The crash site (now marked in red) will be marked by a silver pin.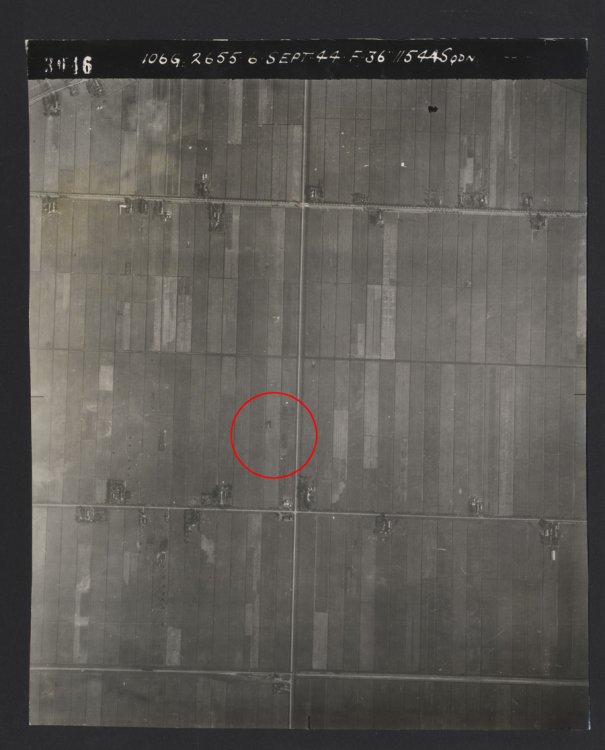
- 304 replies
-
- 3
-
-
- wilnis crash
- trumpeter
- (and 1 more)
-
1/48 Wellington Mk.X (He727 NA-K)
JeroenPeters replied to JeroenPeters's topic in LSM 1/35 and Larger Work In Progress
I know... but if i fix those too this thing will never get done! ....- 304 replies
-
- 2
-
-
- wilnis crash
- trumpeter
- (and 1 more)
-
1/48 Wellington Mk.X (He727 NA-K)
JeroenPeters replied to JeroenPeters's topic in LSM 1/35 and Larger Work In Progress
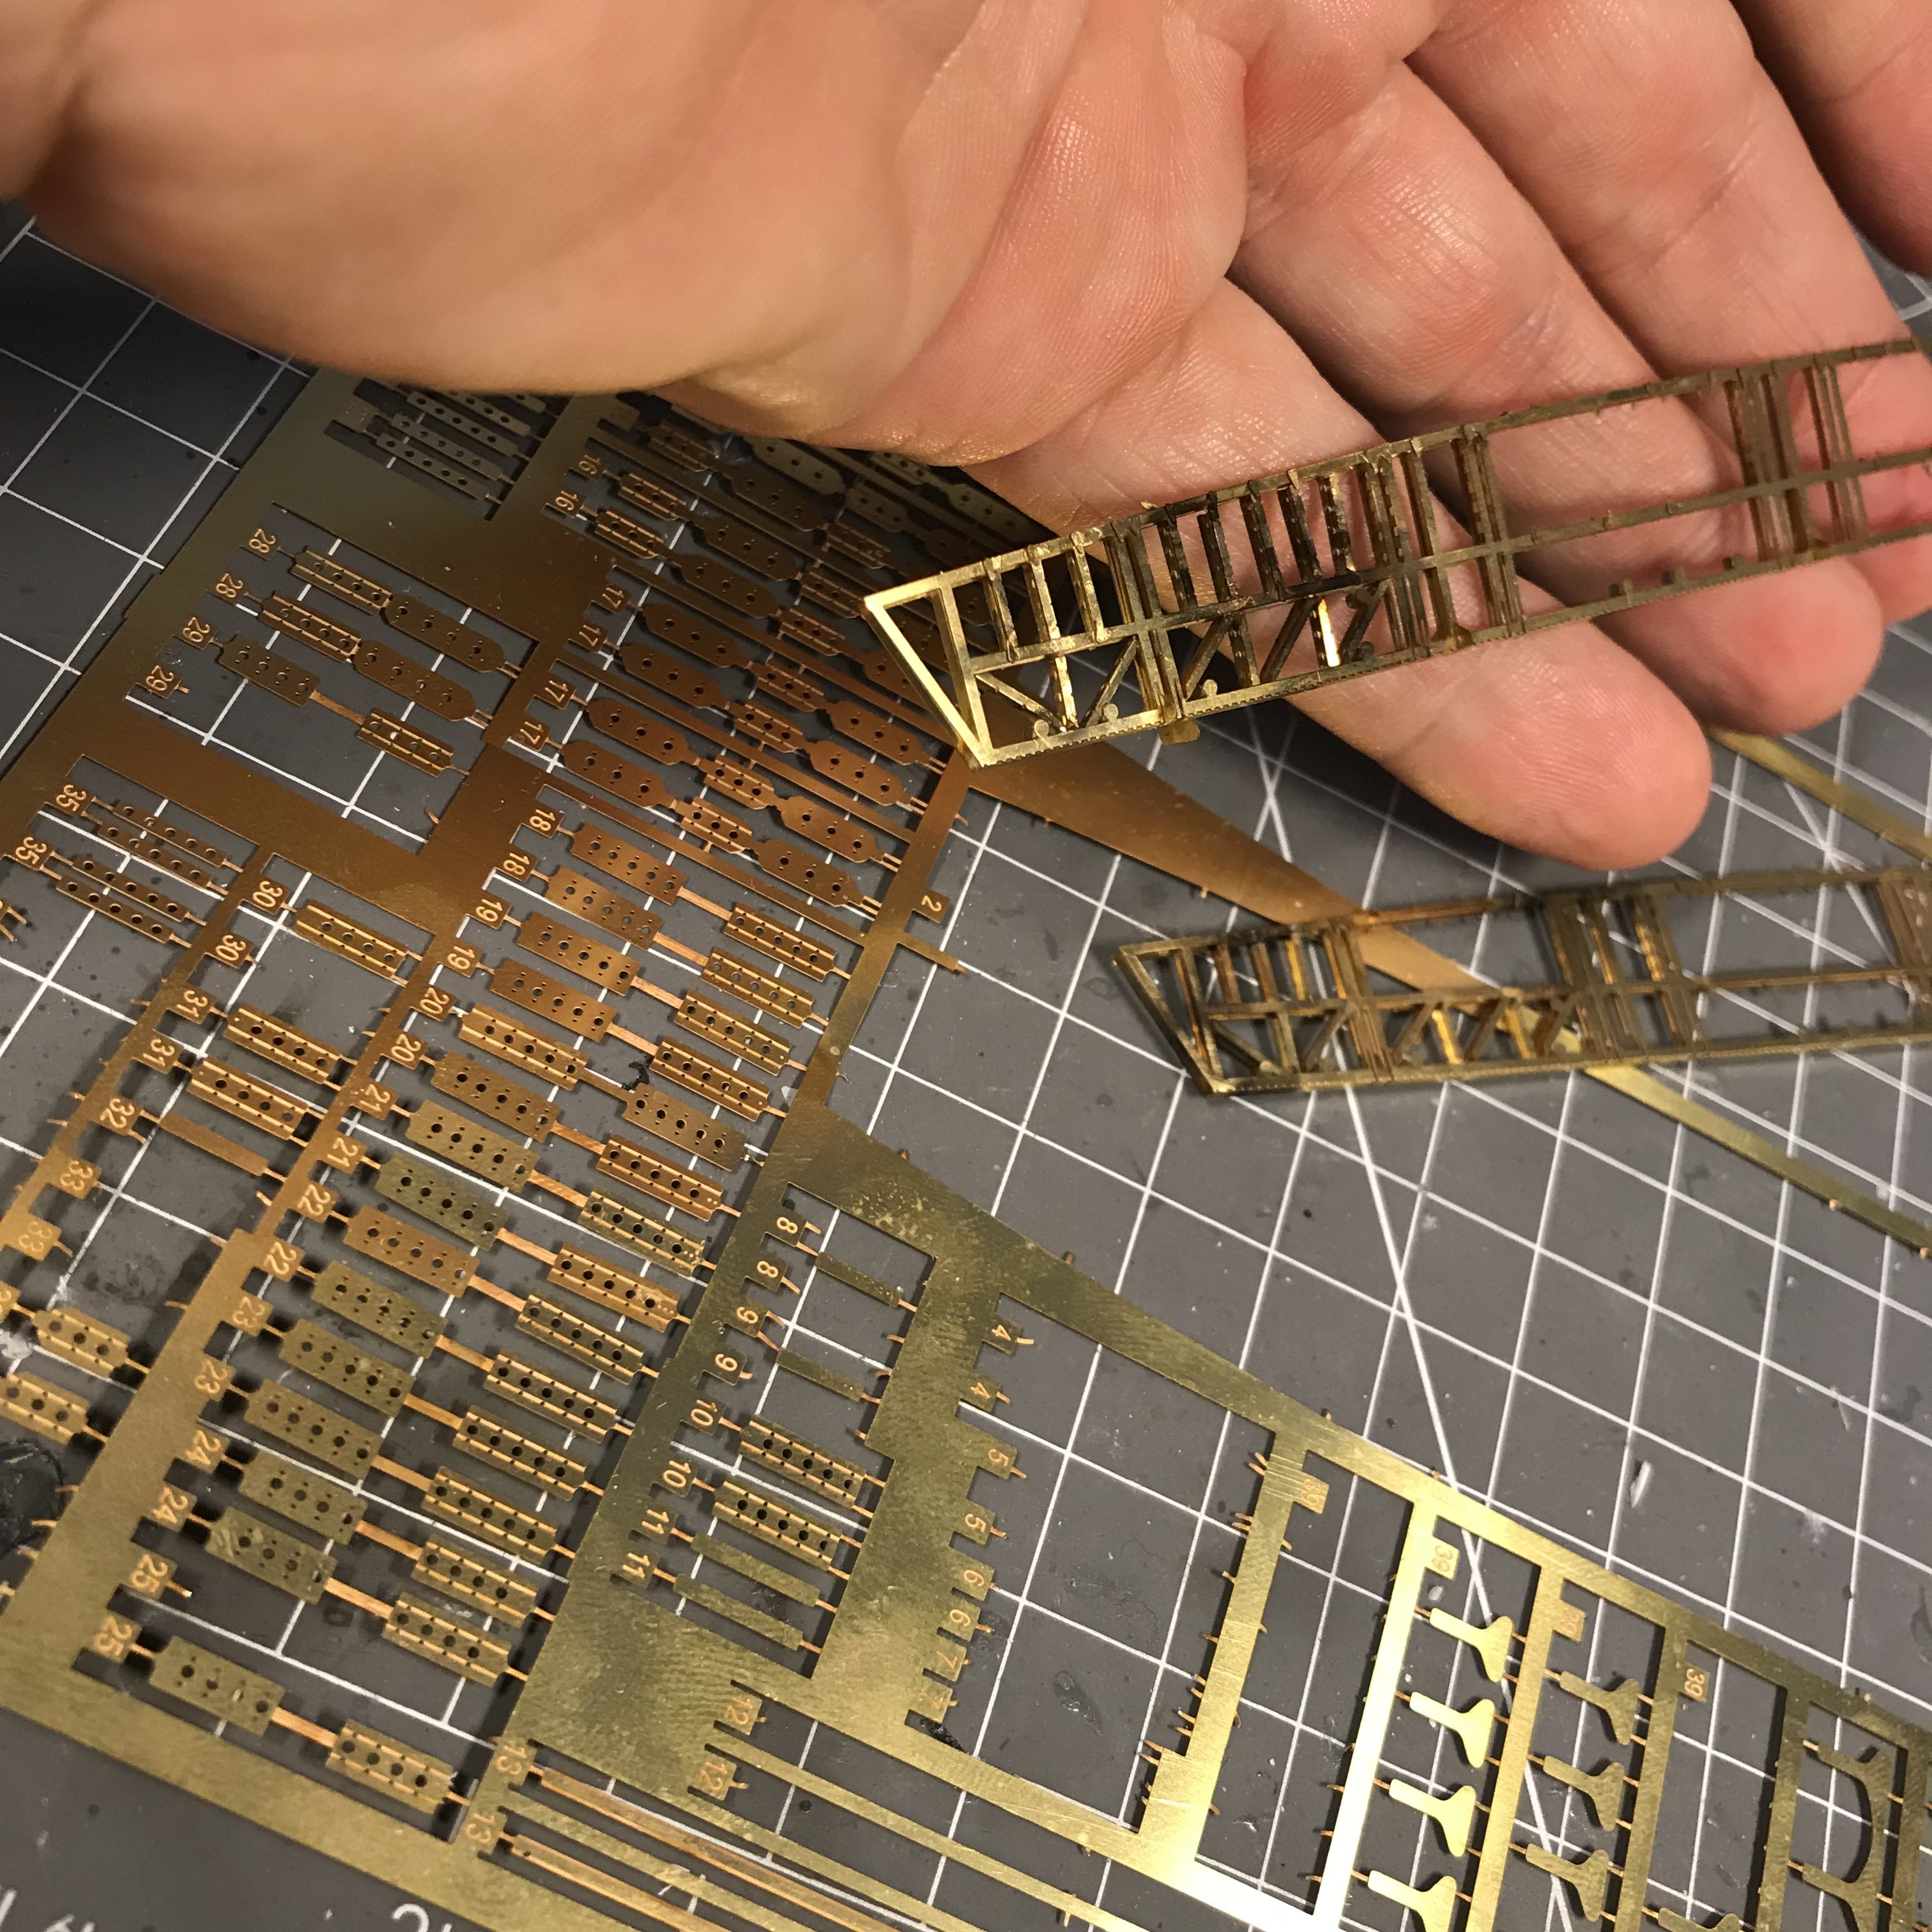
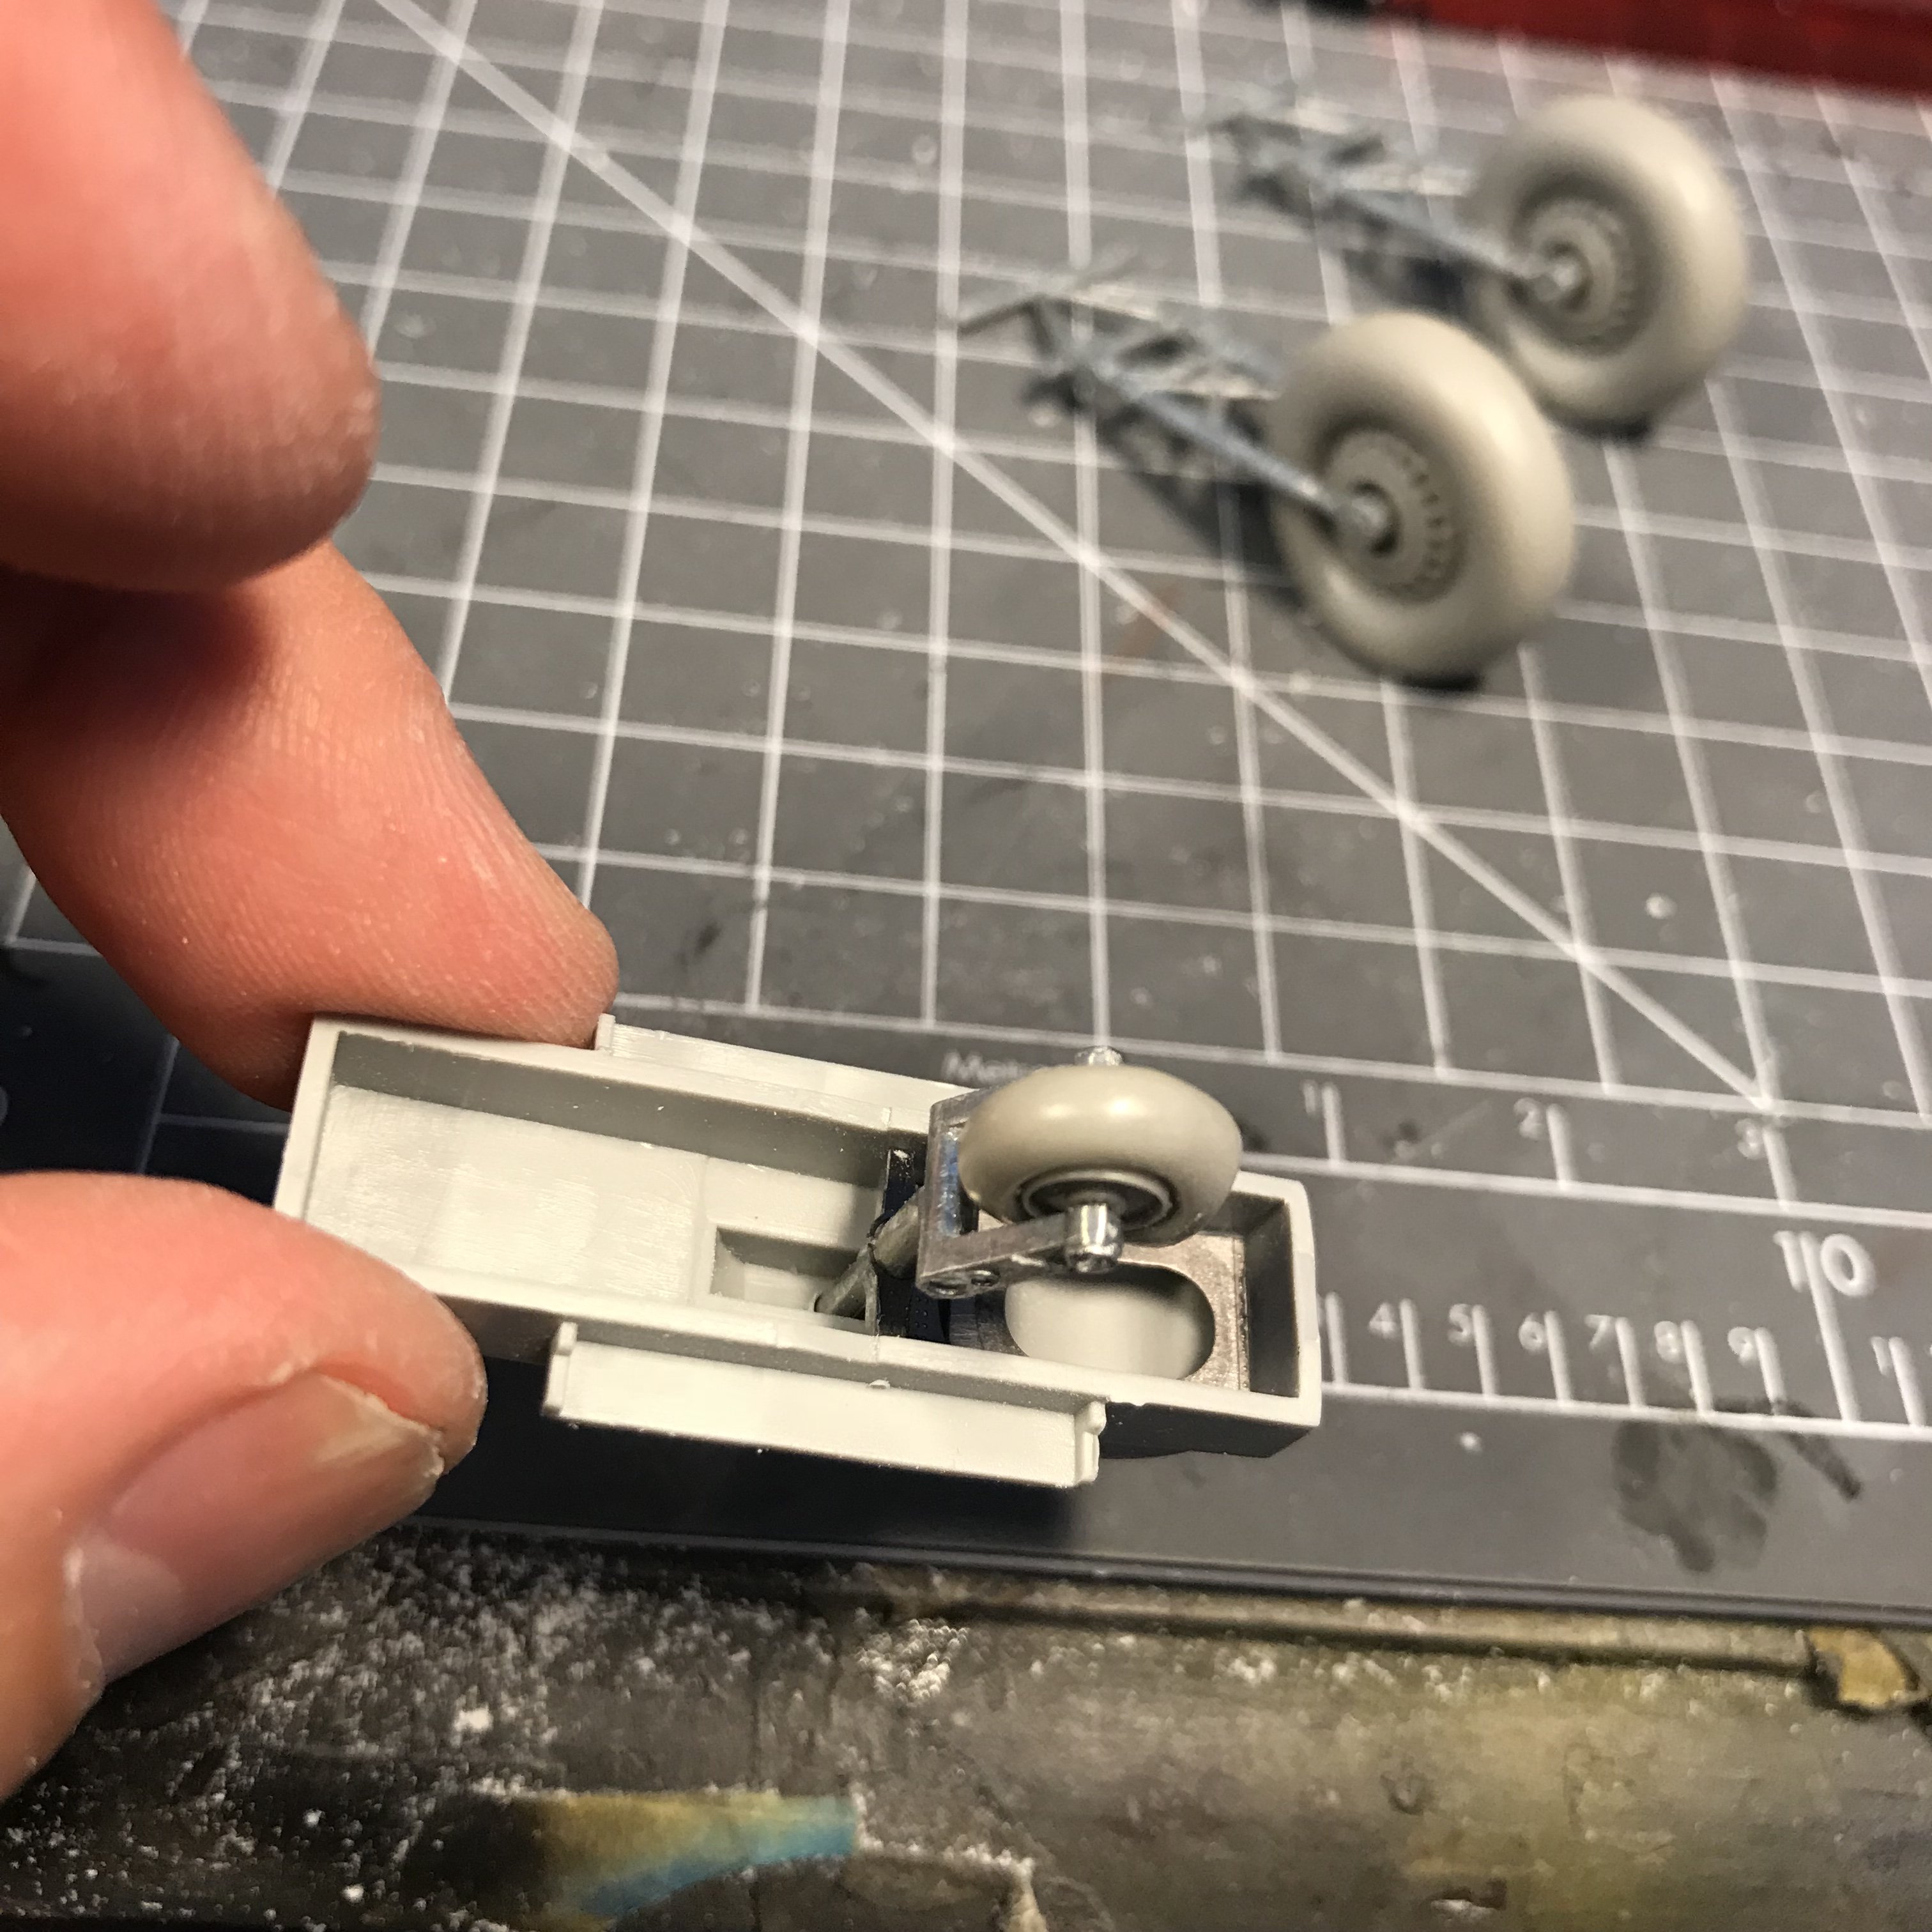
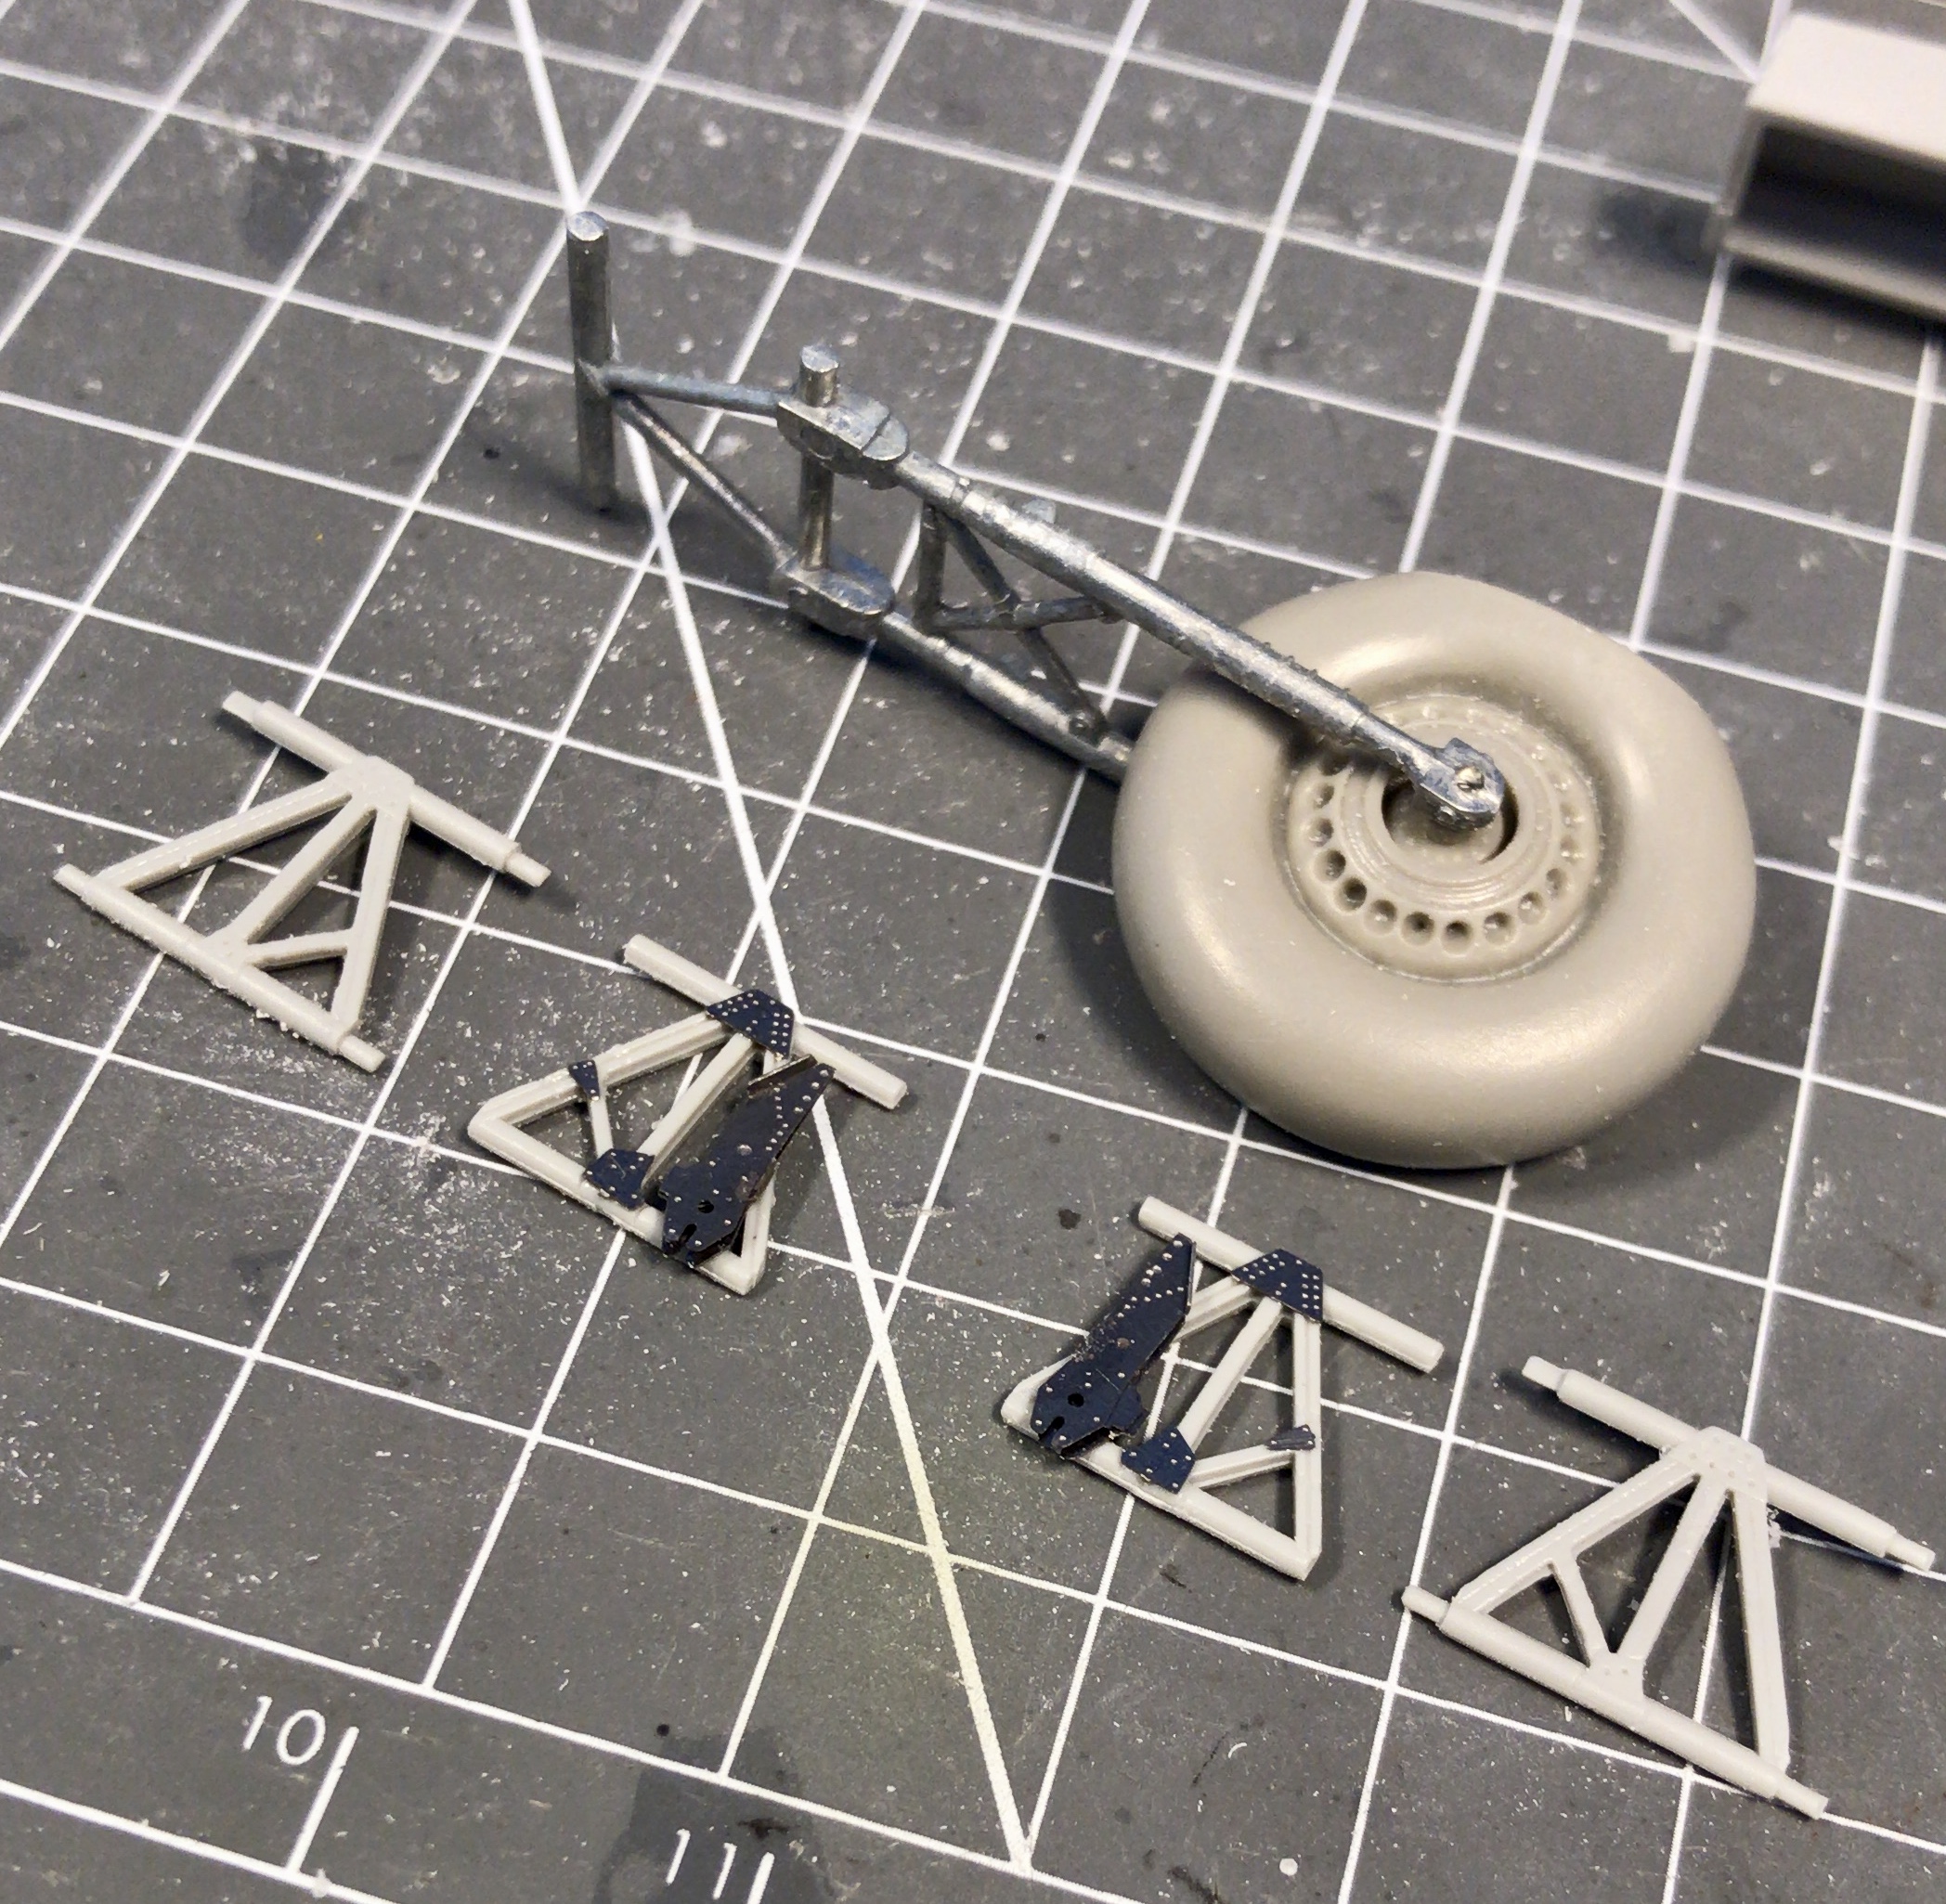
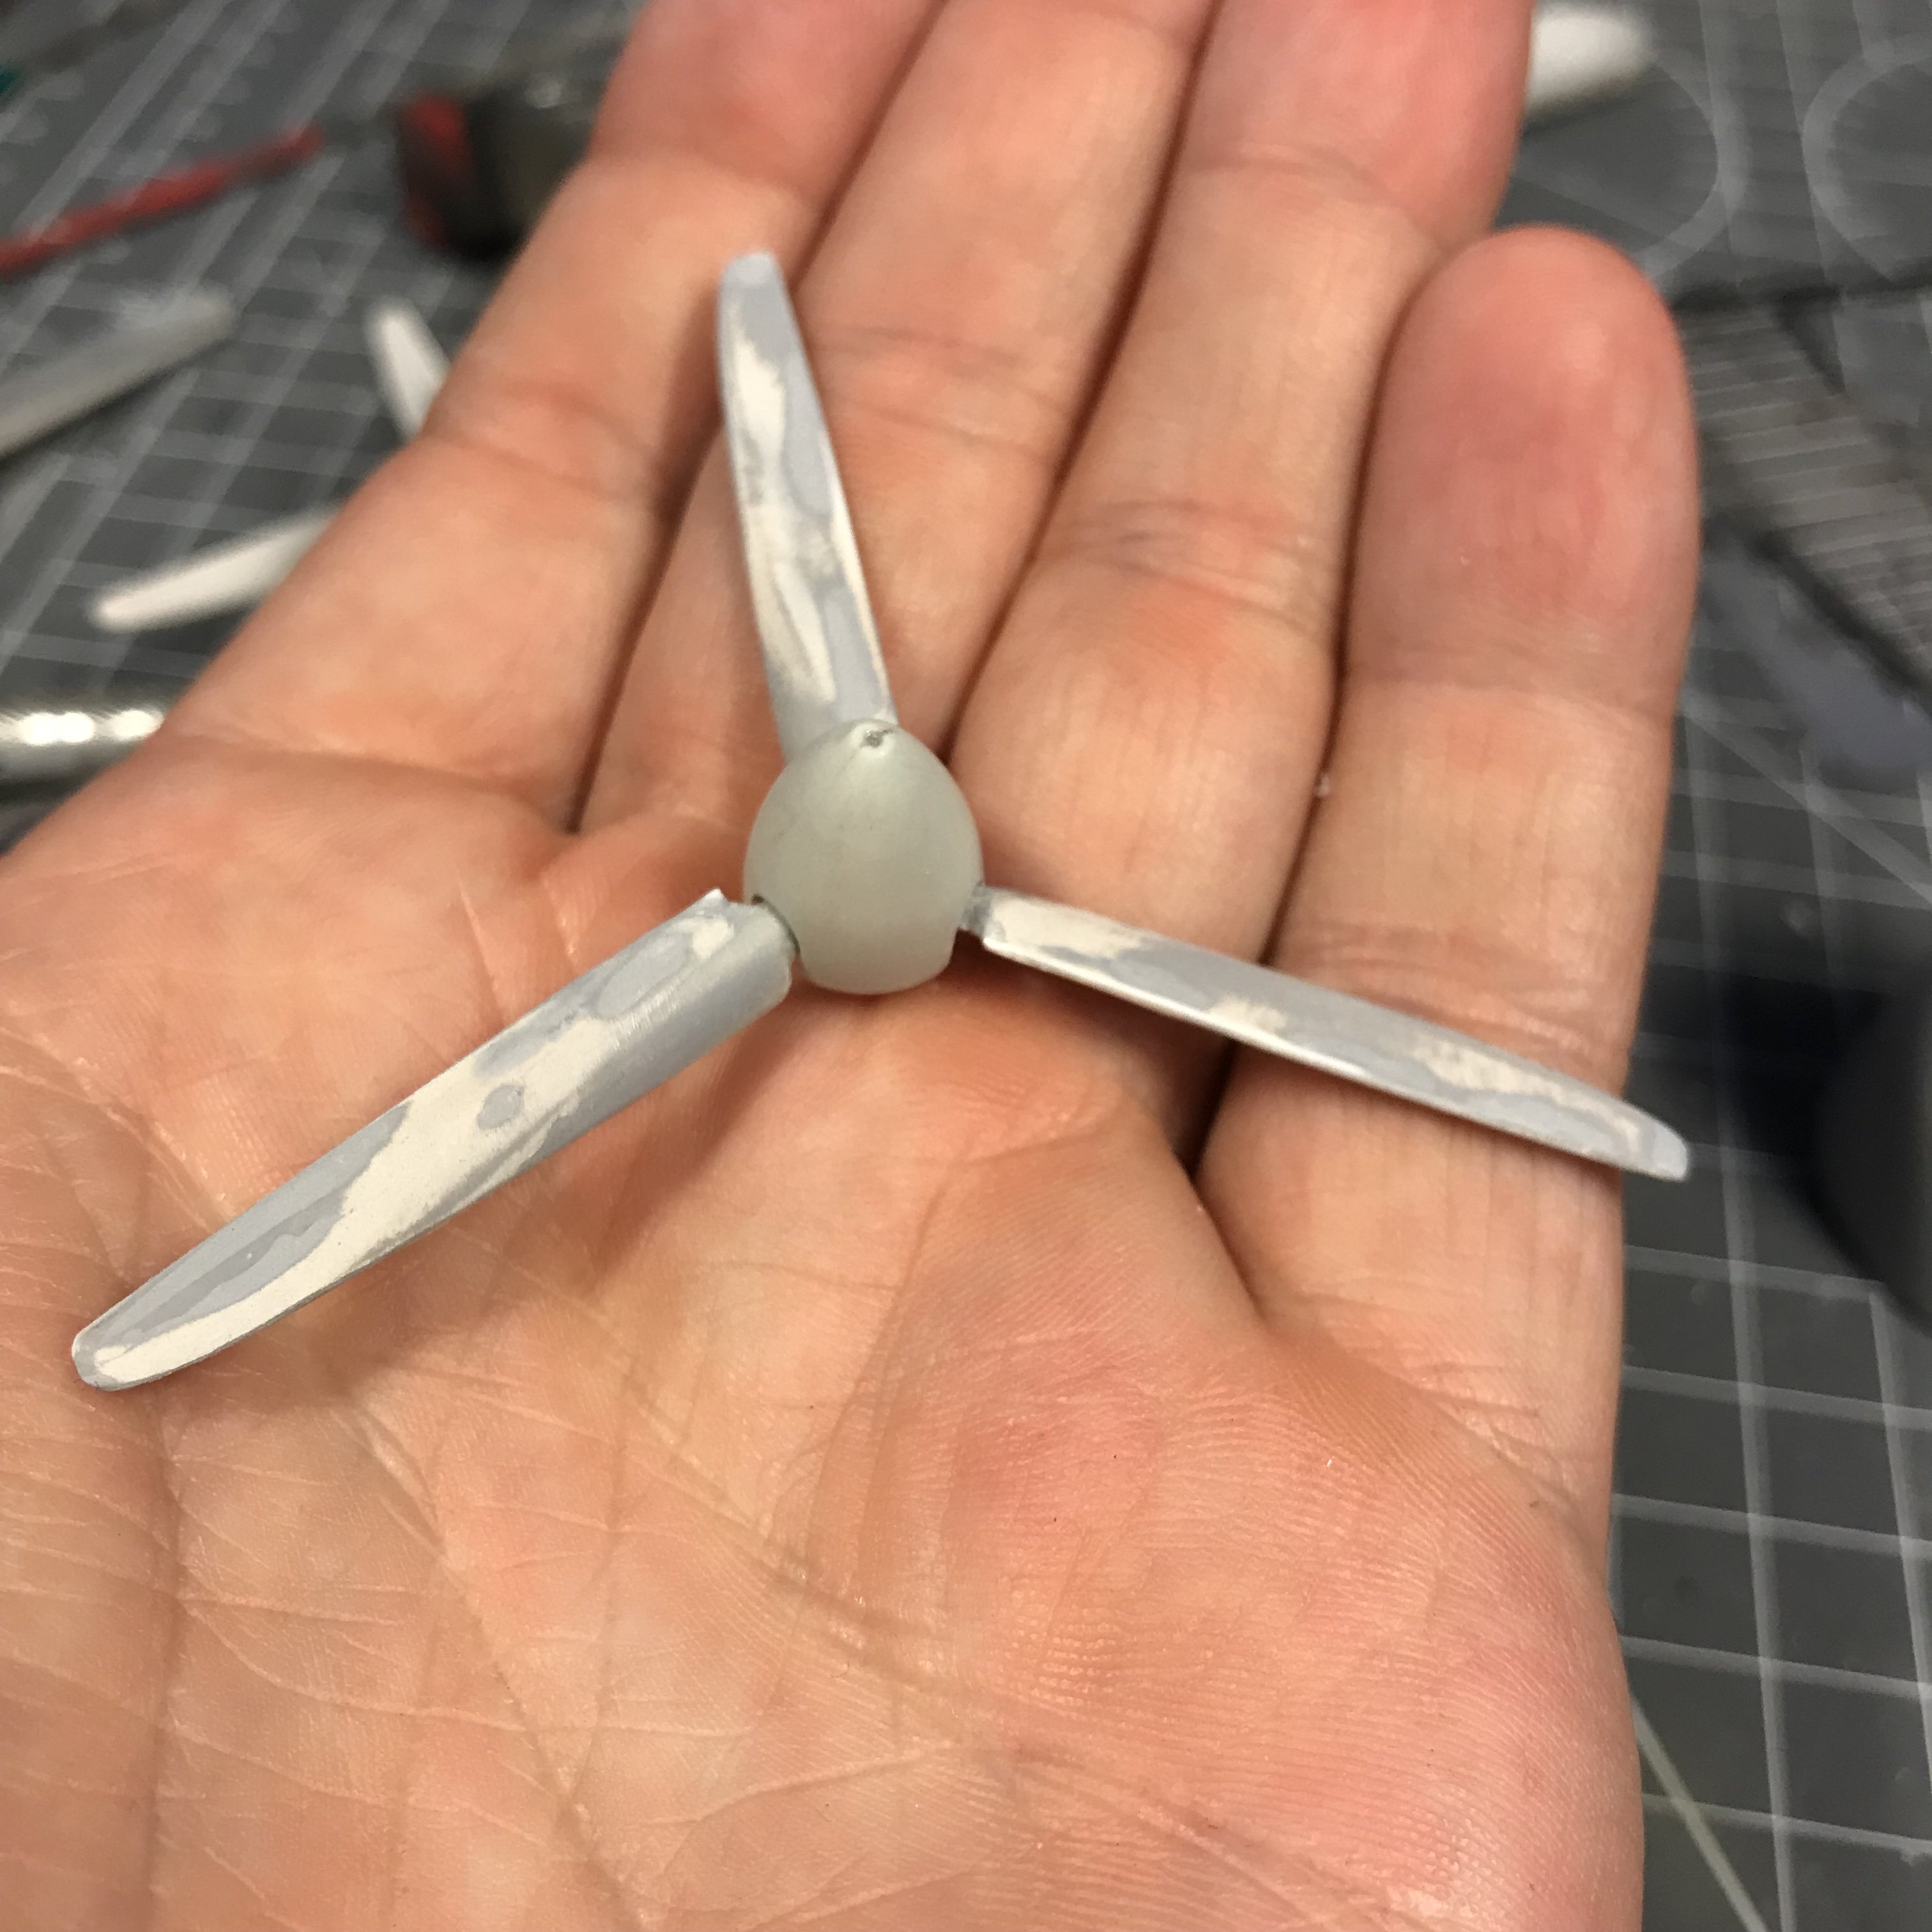
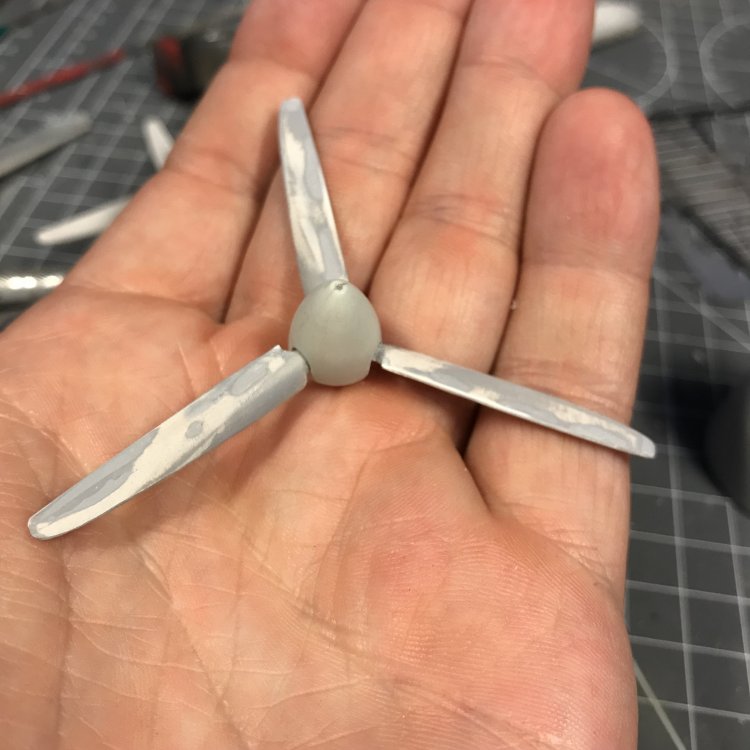
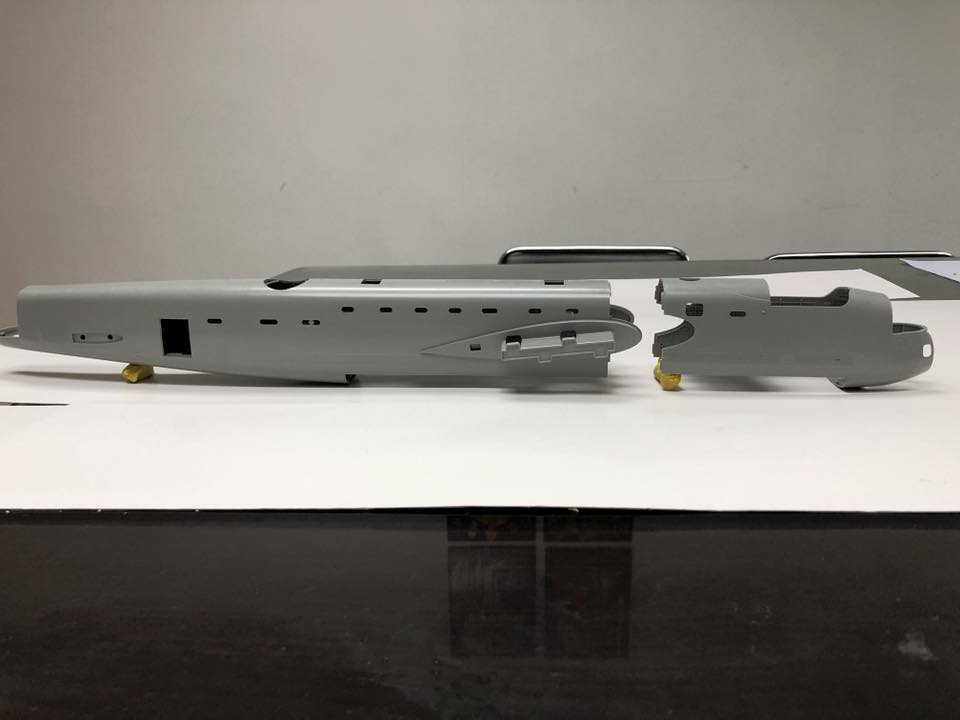
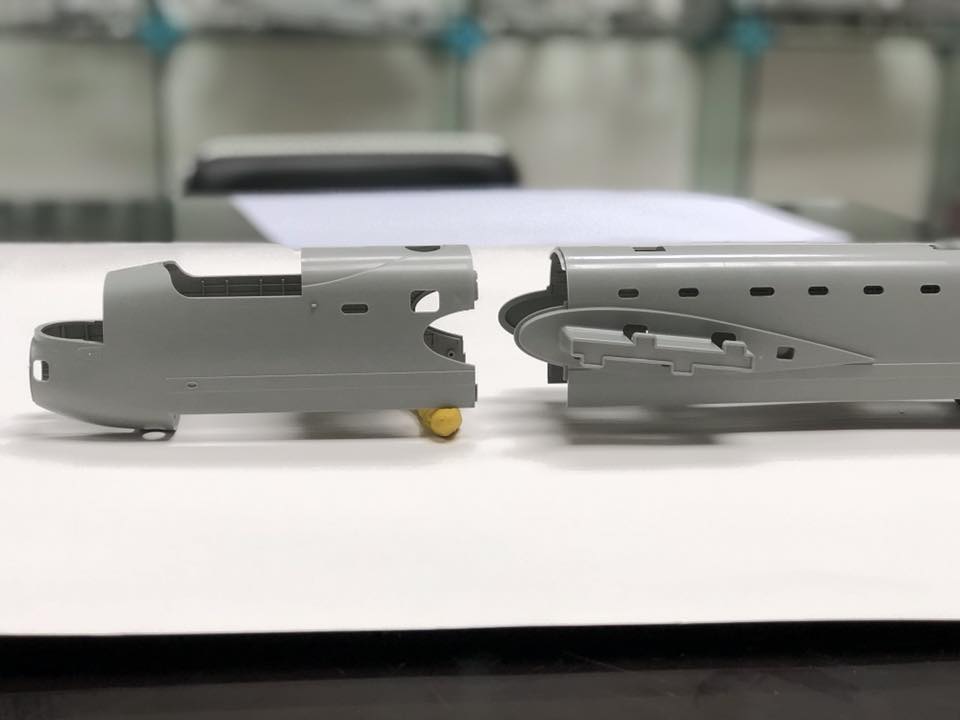
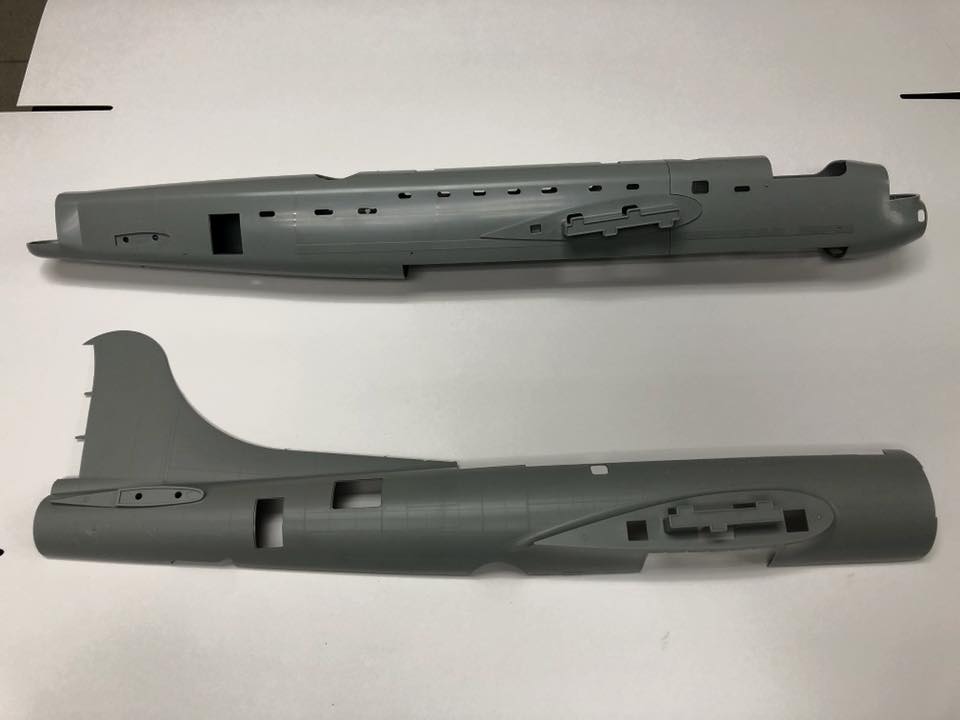
Props are done! Started work on the gear. Lots of PE in this department as well. Also fitted tge resin wheels. Just need to lesten the weighted tire effect a little.

- 304 replies
-
- 4
-
-
- wilnis crash
- trumpeter
- (and 1 more)
-
hkm PREVIEW: 1/32 Avro Lancaster B. Mk.I
JeroenPeters replied to James H's topic in Aircraft Reviews
Really great to see all that detail. Great to see just plastic actually! Lovely preview! -
1/48 Wellington Mk.X (He727 NA-K)
JeroenPeters replied to JeroenPeters's topic in LSM 1/35 and Larger Work In Progress
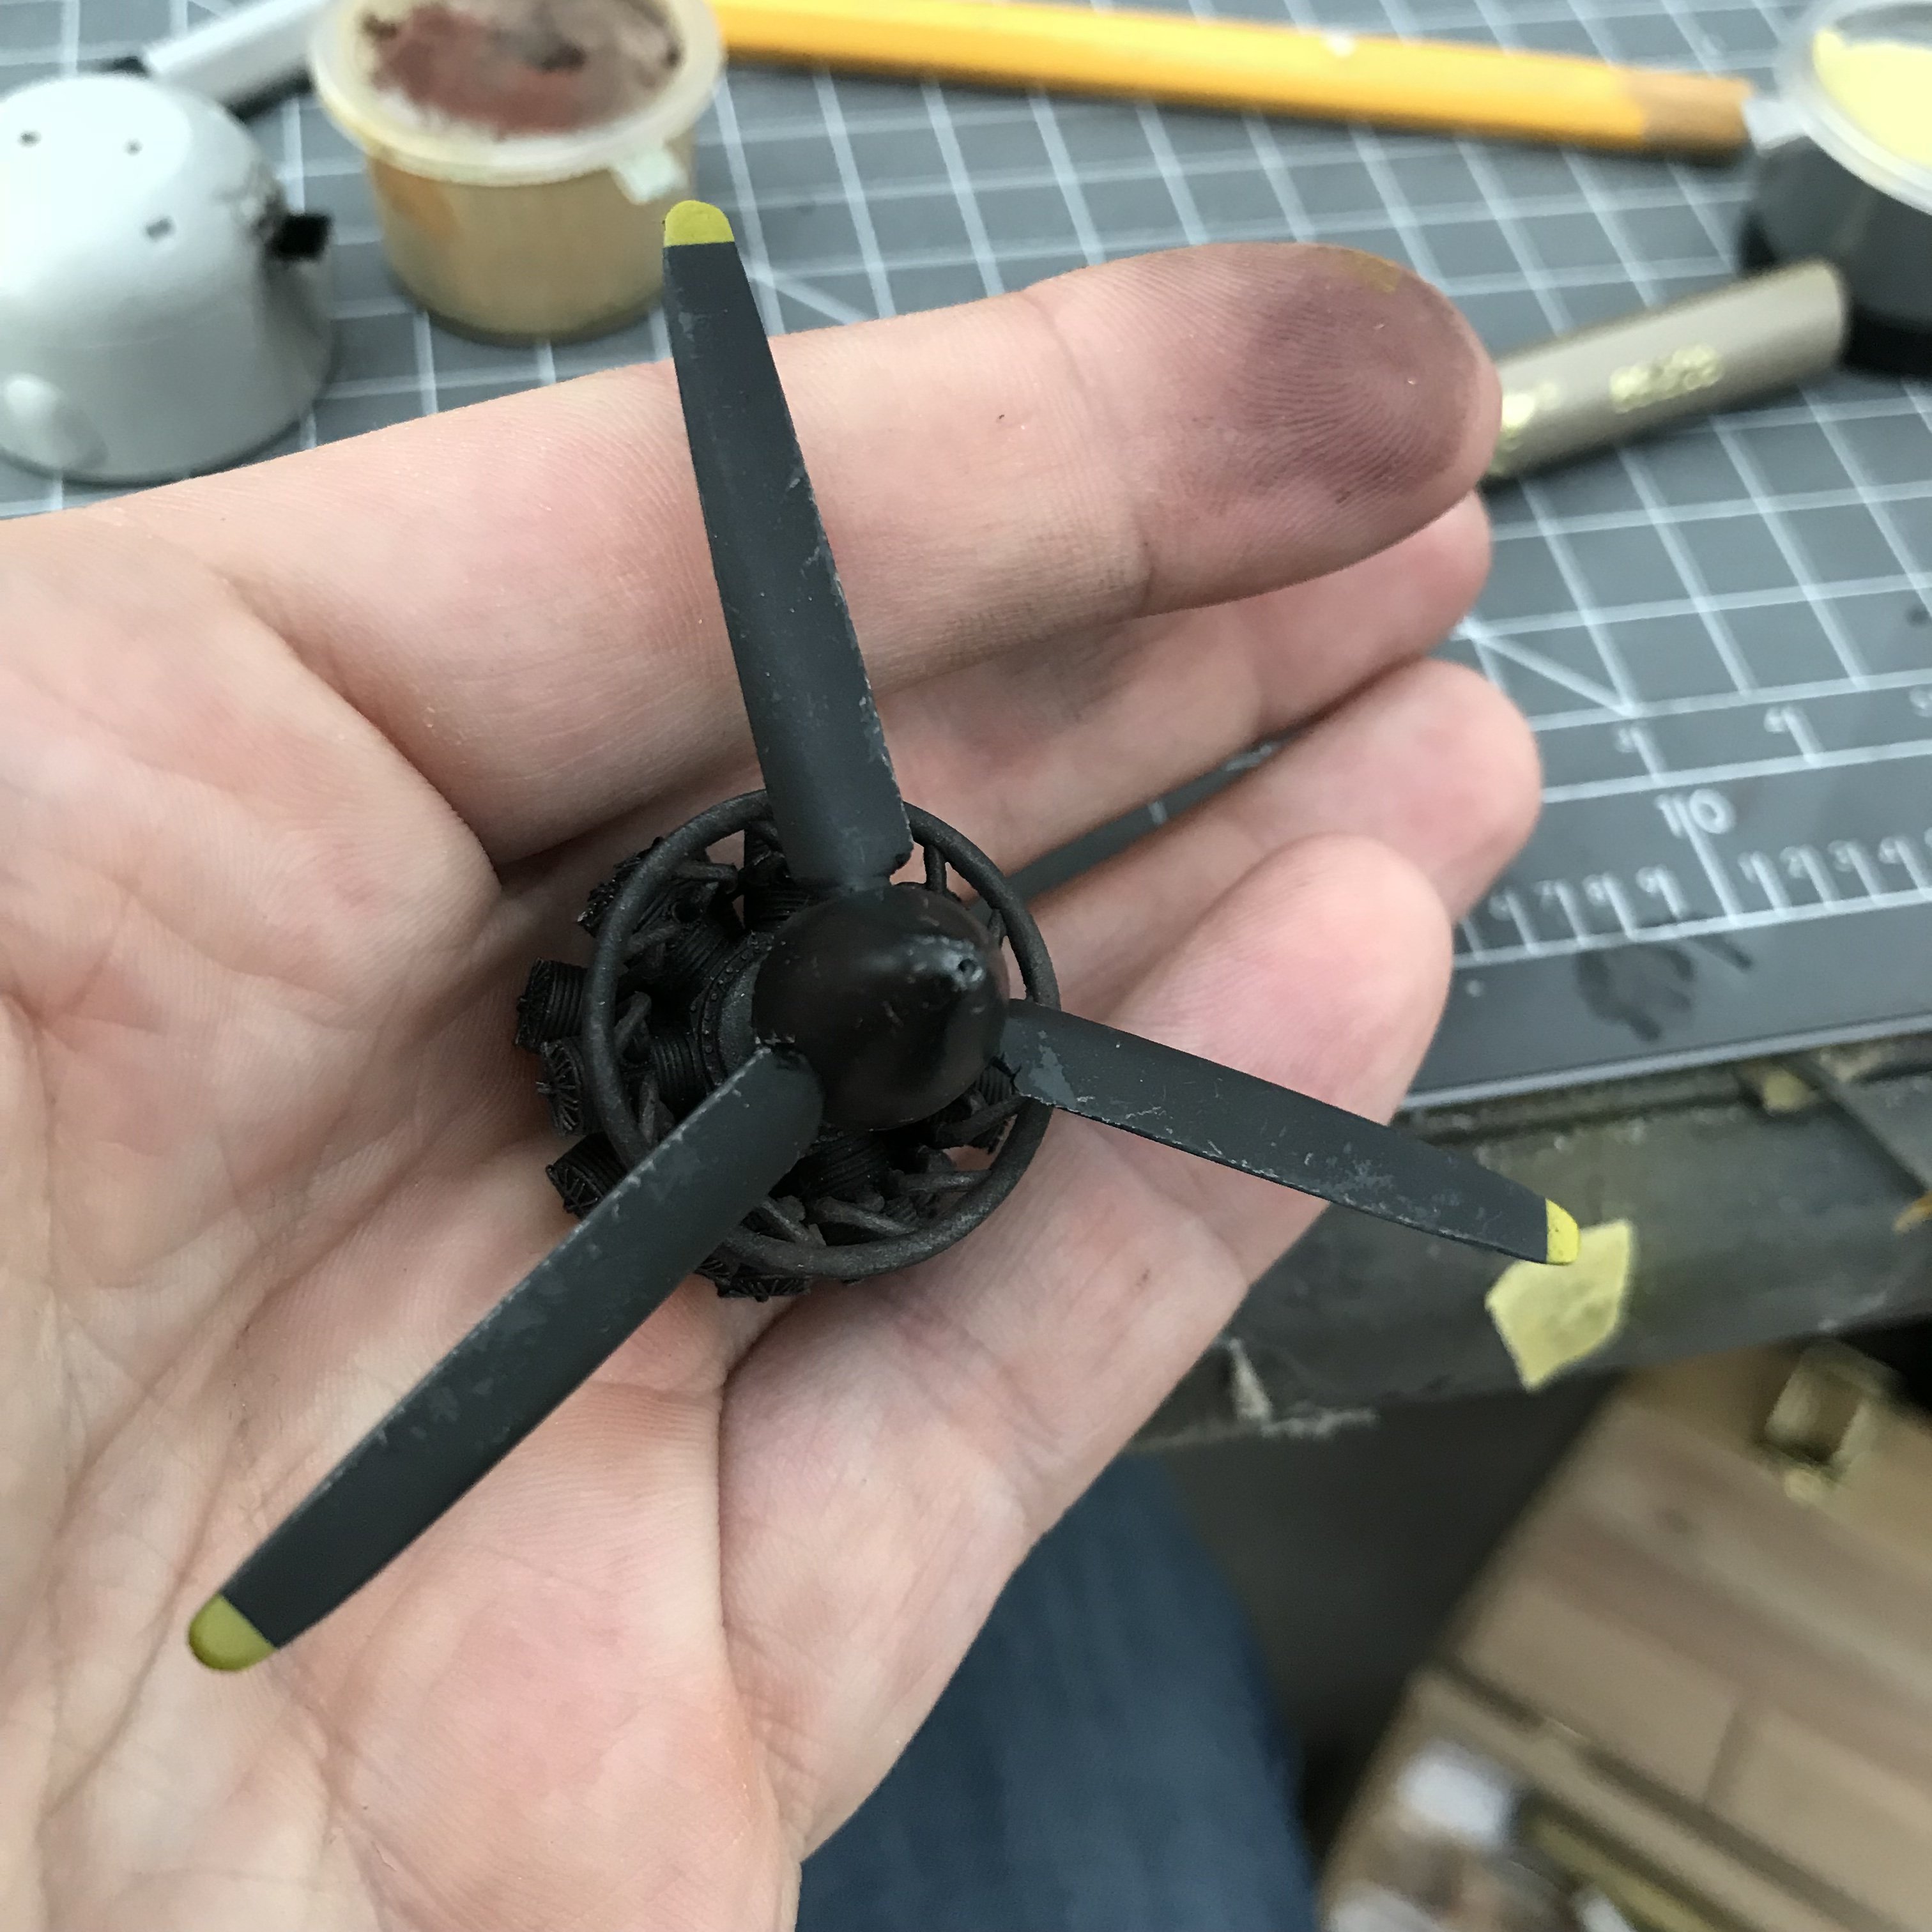
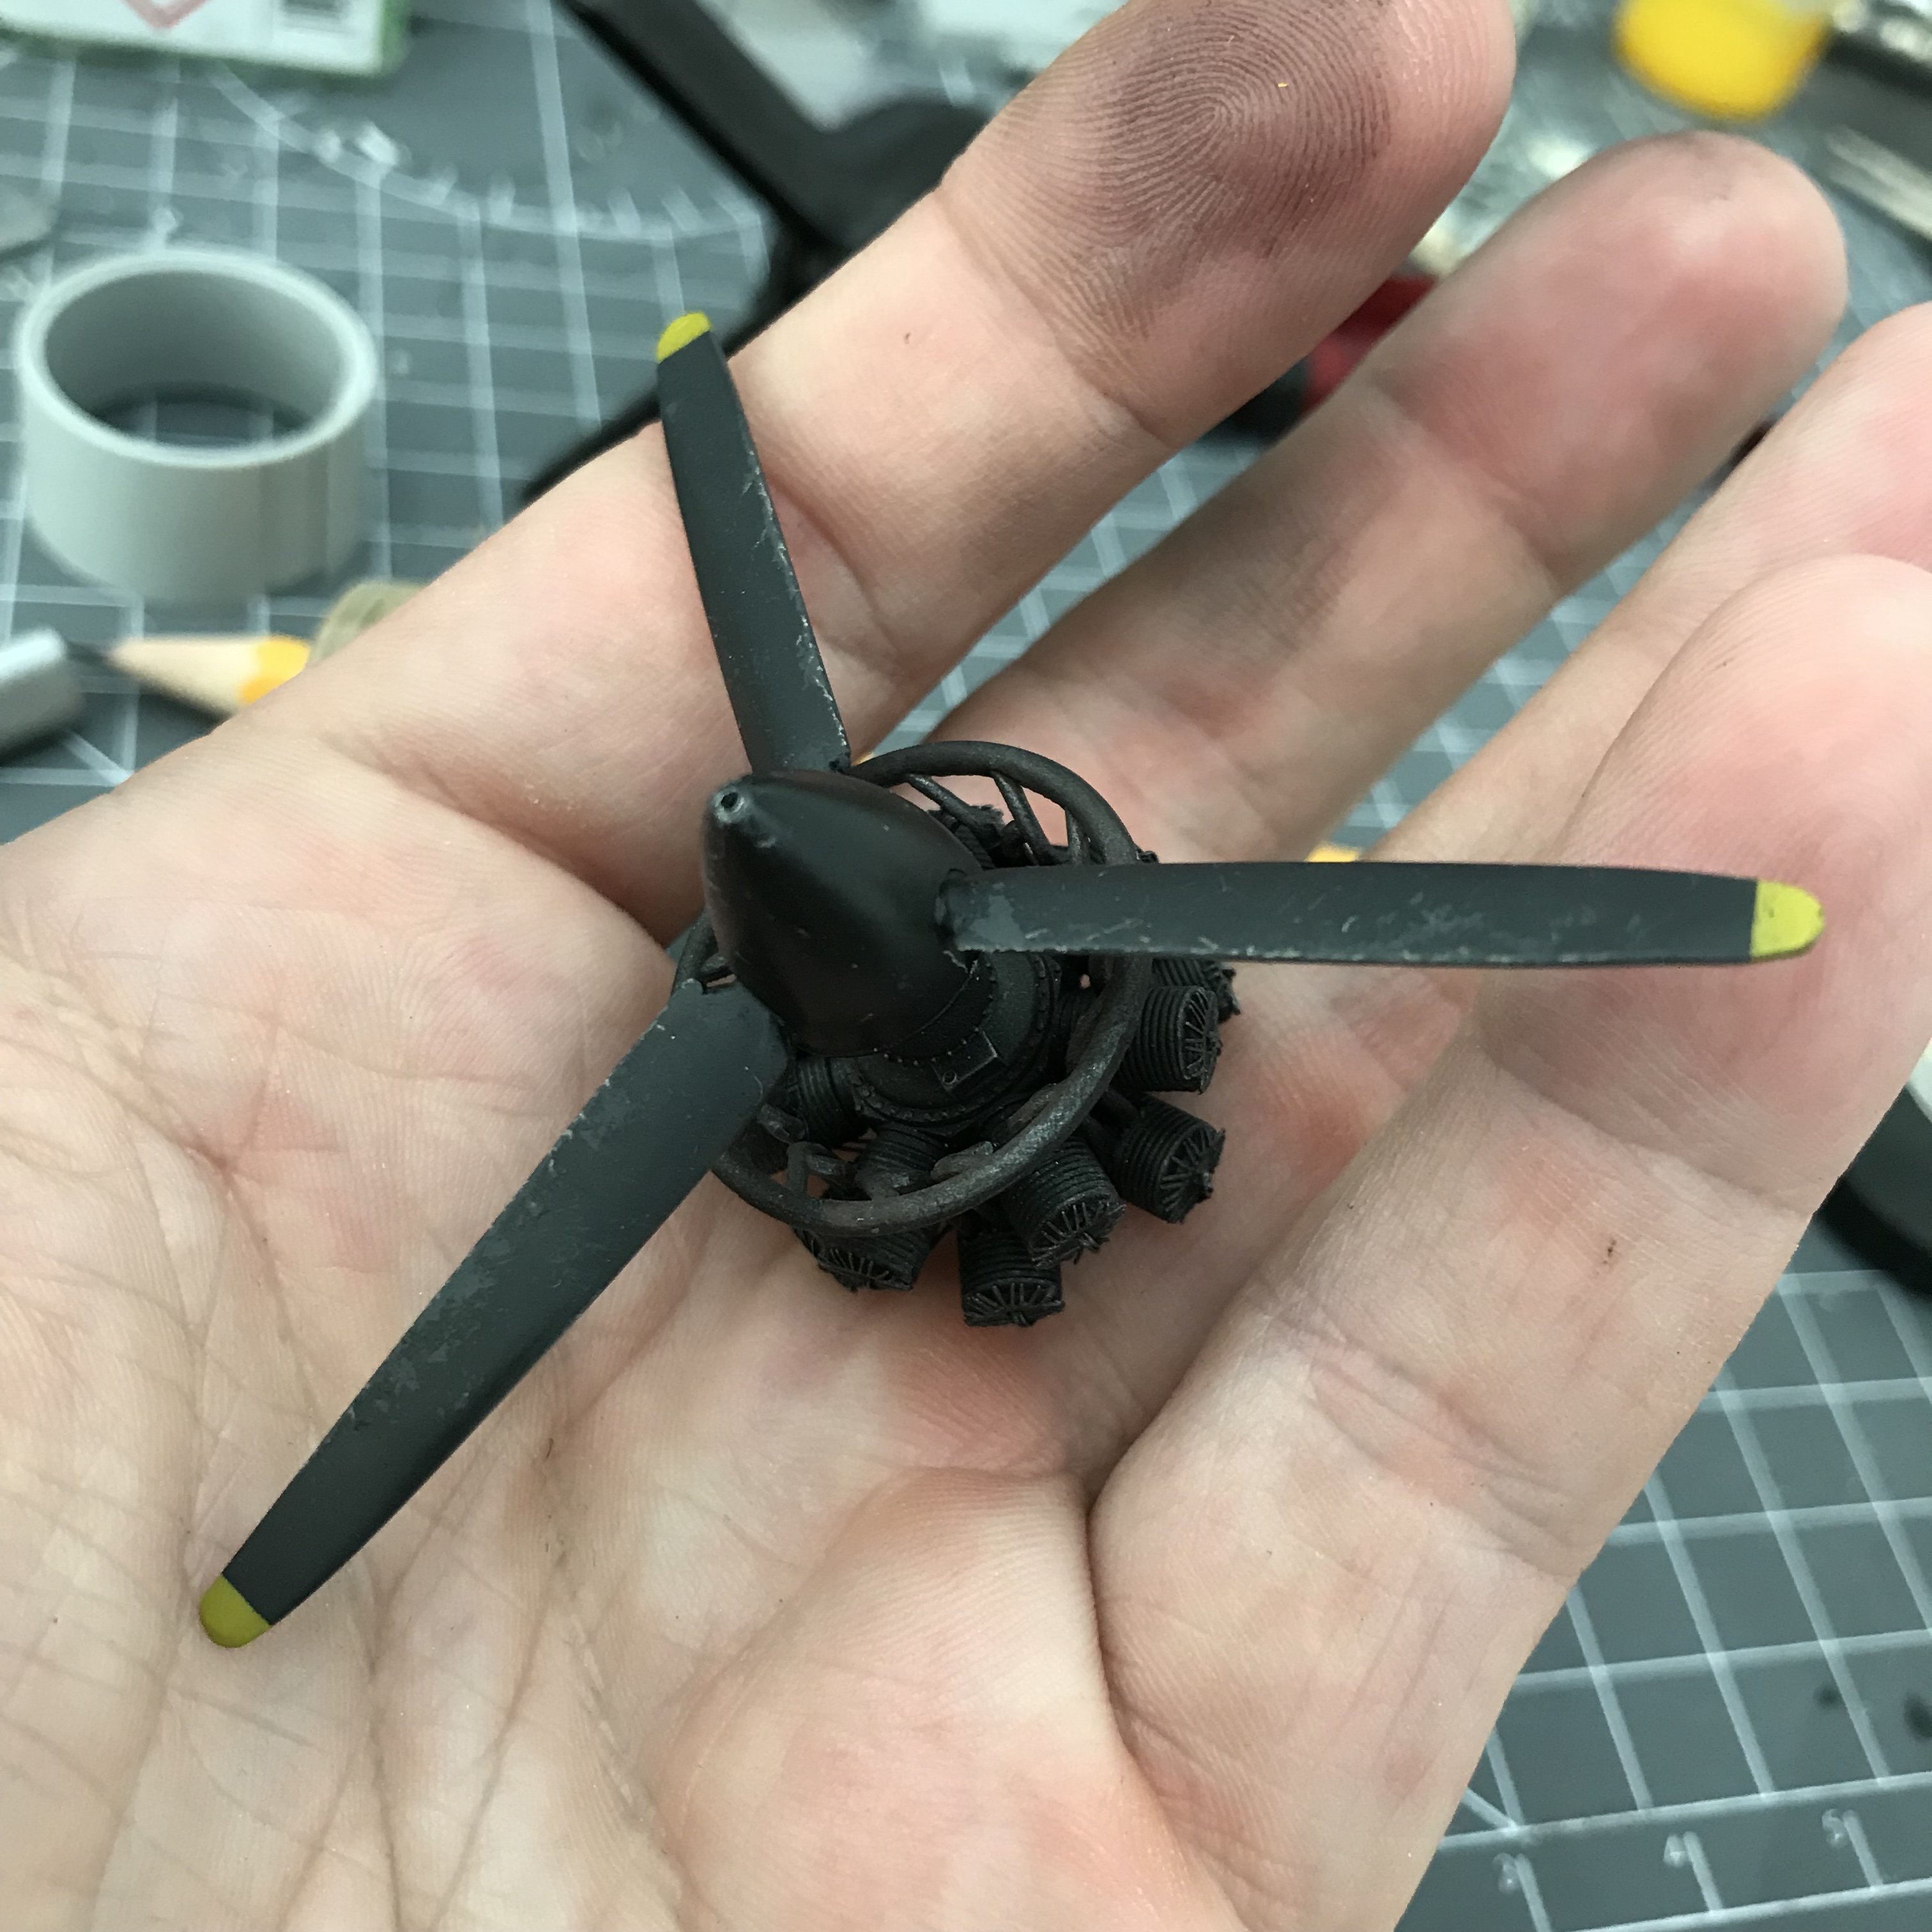
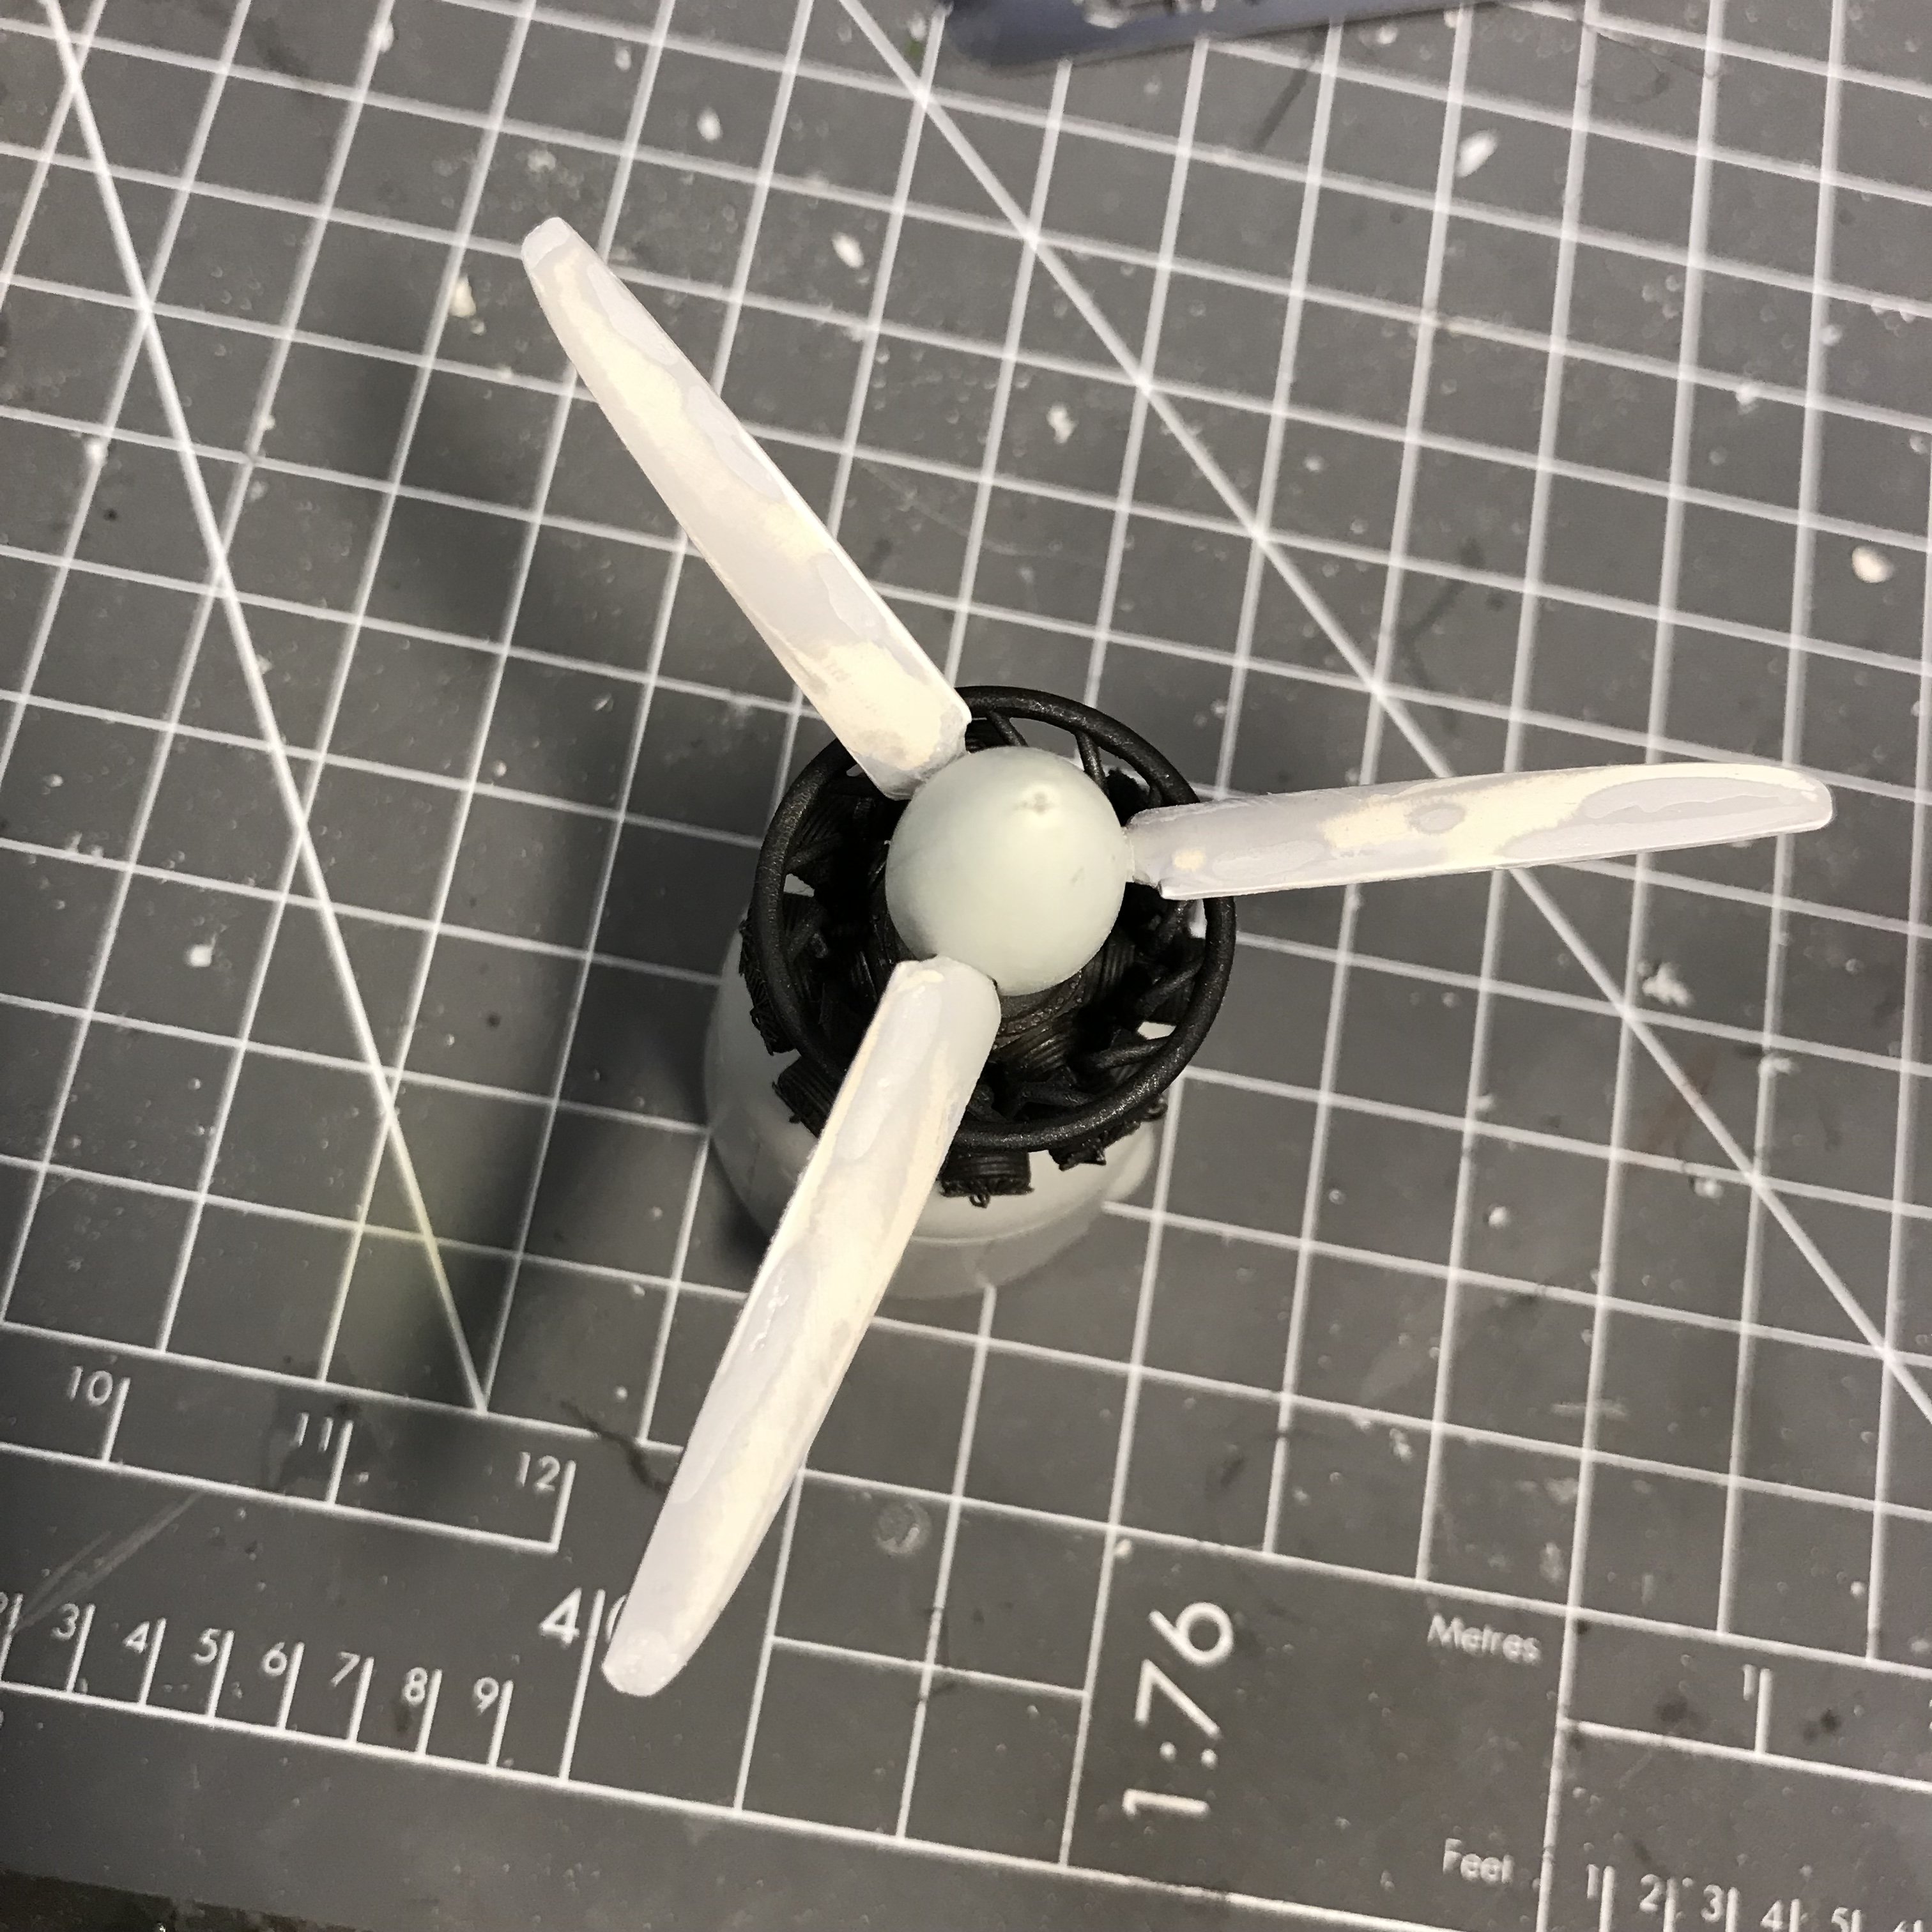
Started work on the props and spinners. Please note that the proper spinners and rotol prop for the mkX version are not included in this kit. This means broadening the props with Evergreen strips. I added putty and mr Surfacer and am smoothing them out now. The spinners i fashioned from 32nd scale Luftwaffe bombs.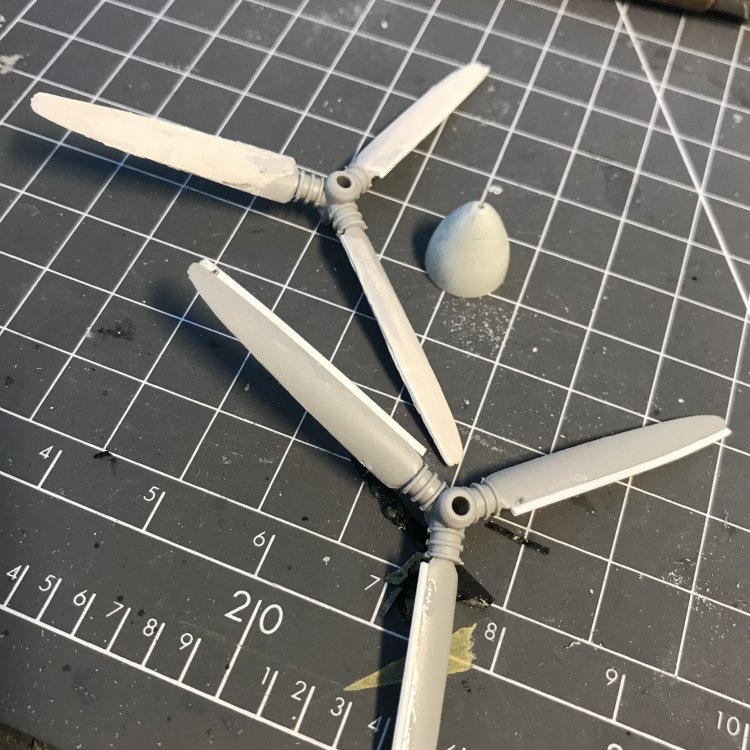

- 304 replies
-
- 7
-
-
- wilnis crash
- trumpeter
- (and 1 more)
-
Halberstadt and Aces from WNW in 2018?
JeroenPeters replied to Pup7309's topic in General Discussion
Really cool! -
outstanding! Can't wait to see one built!
- 1 reply
-
- 1
-
-
from what i see here Special Hobby is about to compete with the best brands out there. Nice!
-
Yesterday Hong Kong Models released a few early test shot pics of the Lancaster fuselage. Without reading the accompanying text people started asking for surface detail, which will be added later. Just the way some surface texture was later added to the Mosquito. Stay tuned.
-
takom 1/35 Panther Ausf. A Early Production, full interior
JeroenPeters replied to James H's topic in Armour/AFV Reviews
What an AMAZING kit±!±| (and review ) -
1/48 Wellington Mk.X (He727 NA-K)
JeroenPeters replied to JeroenPeters's topic in LSM 1/35 and Larger Work In Progress
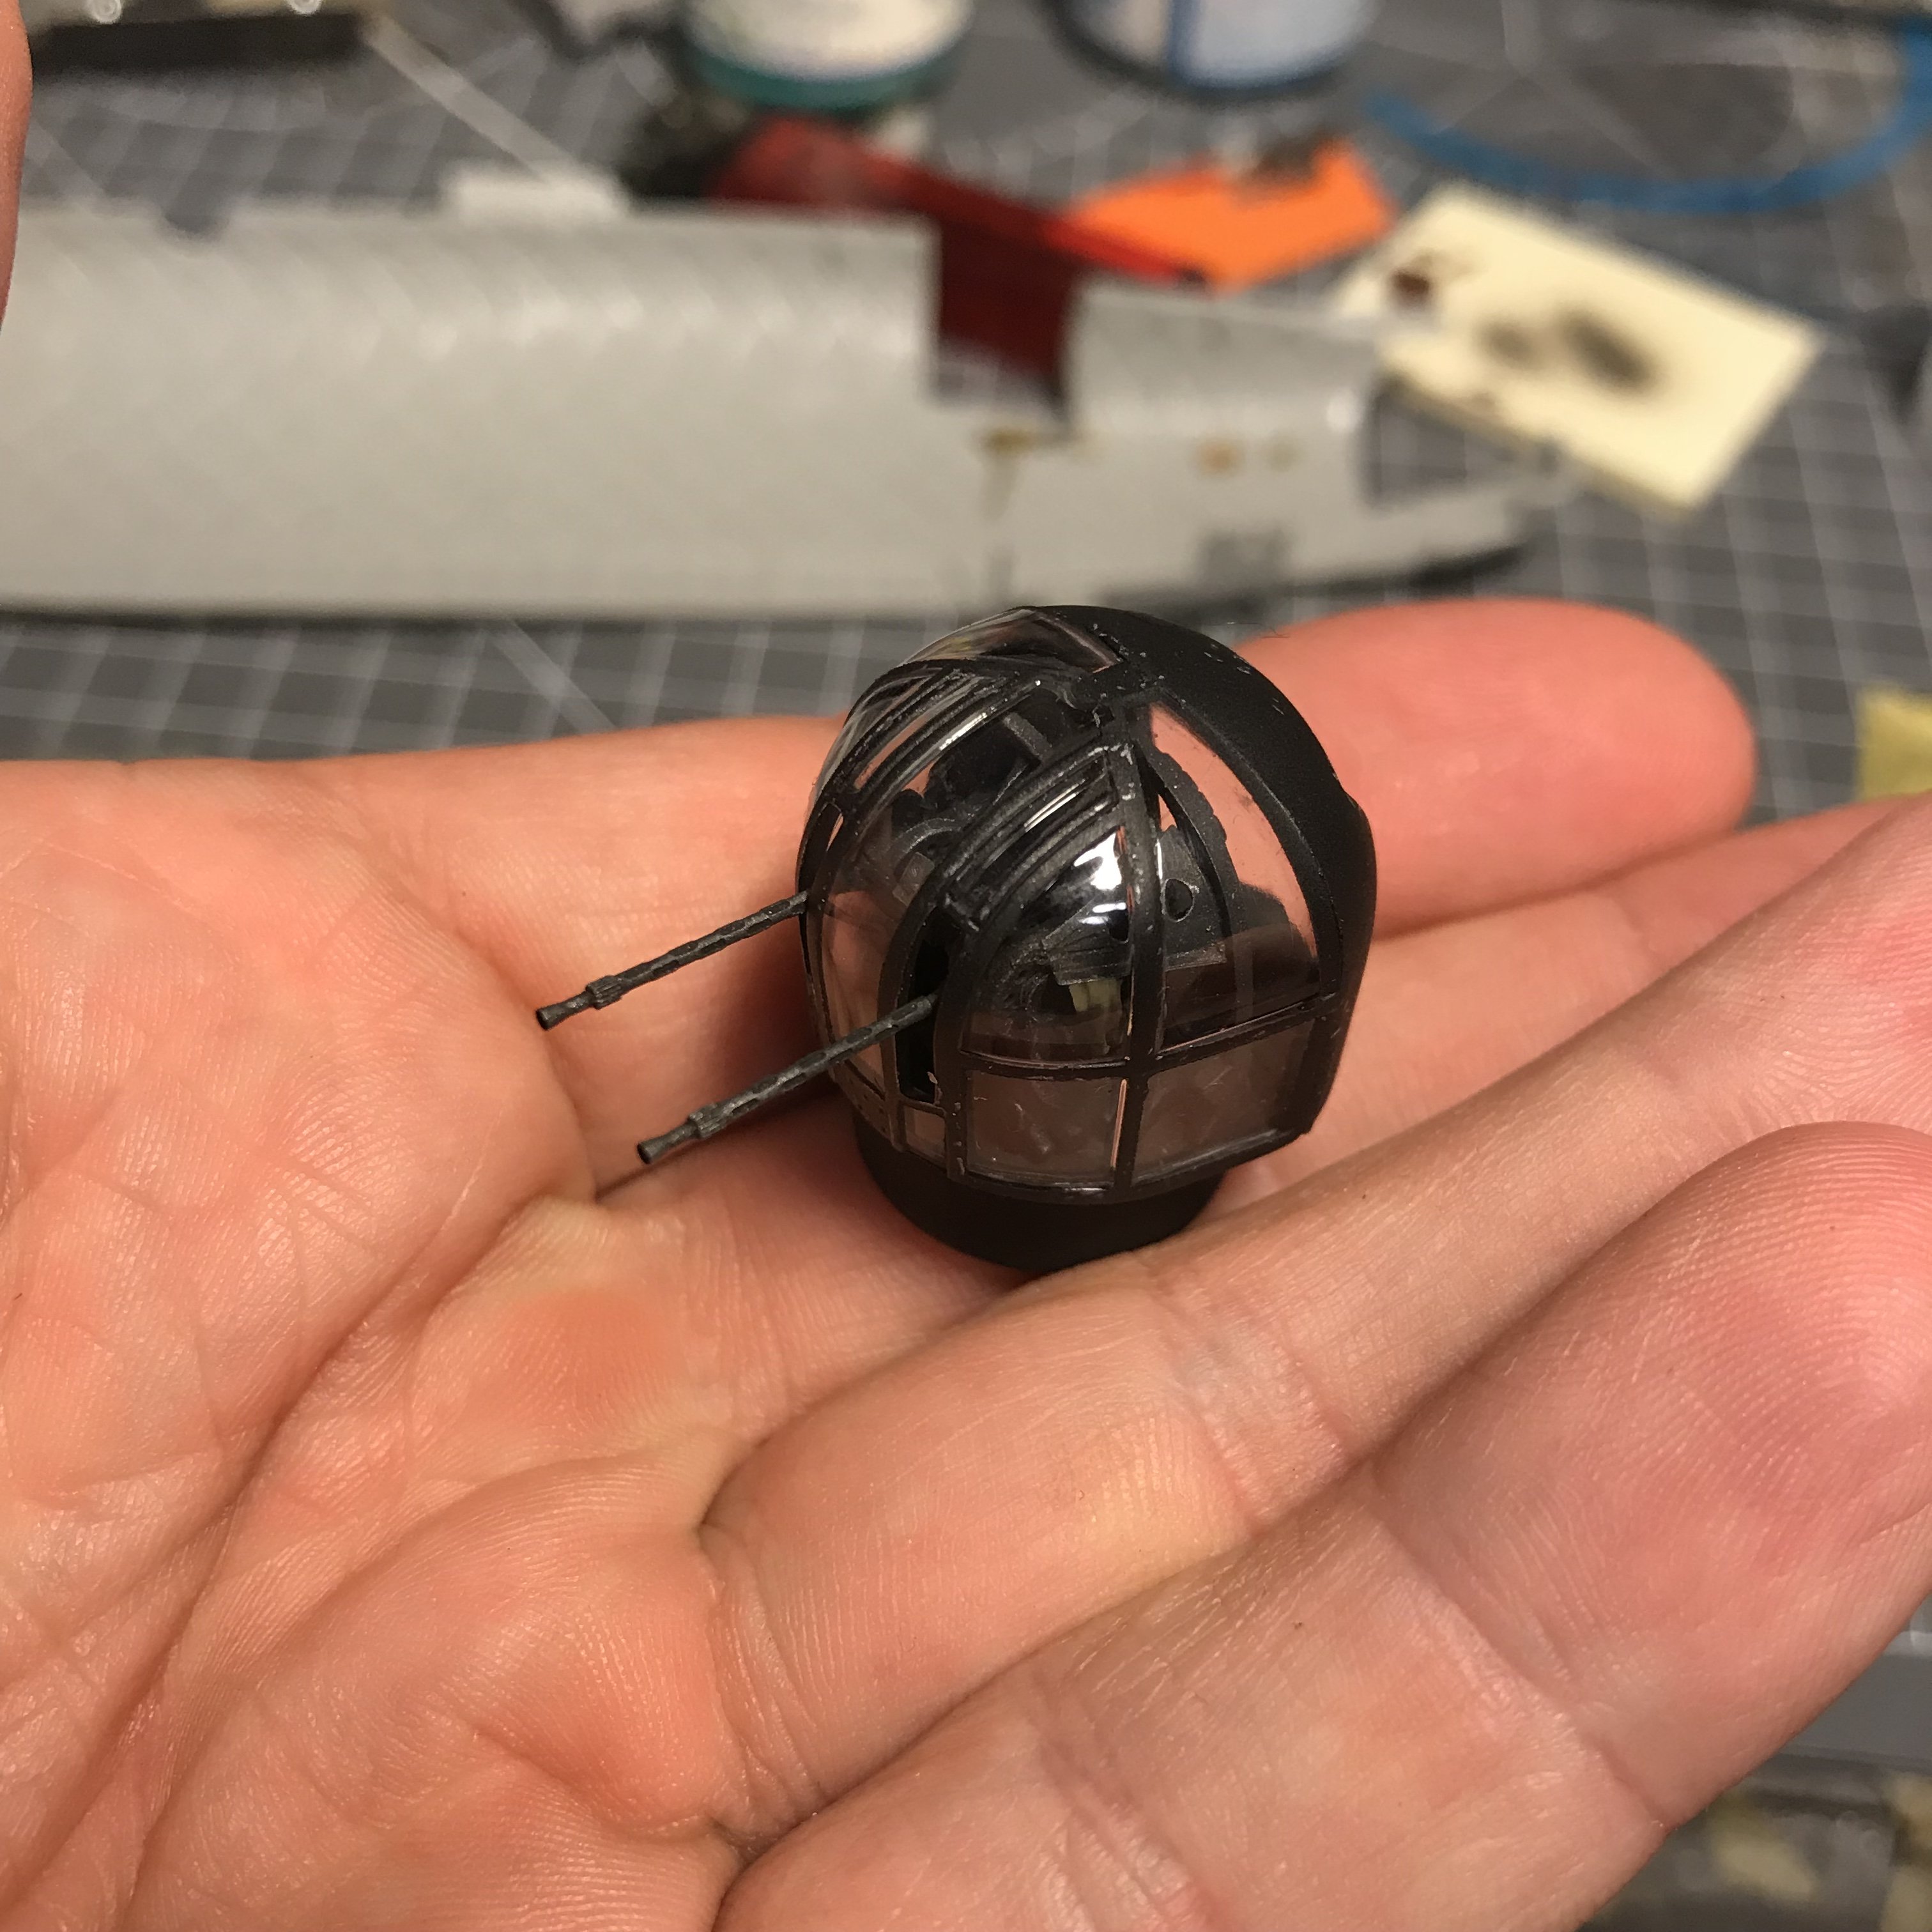
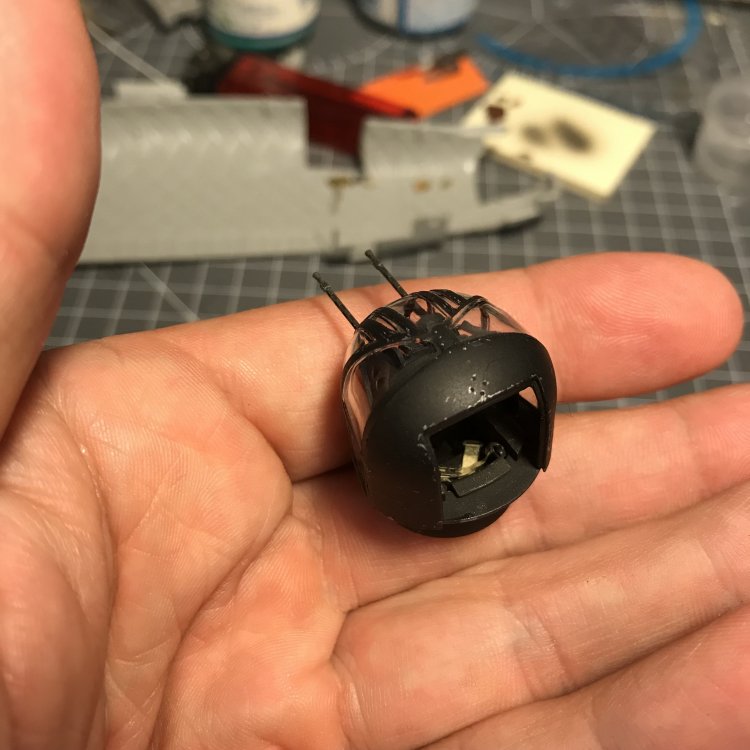
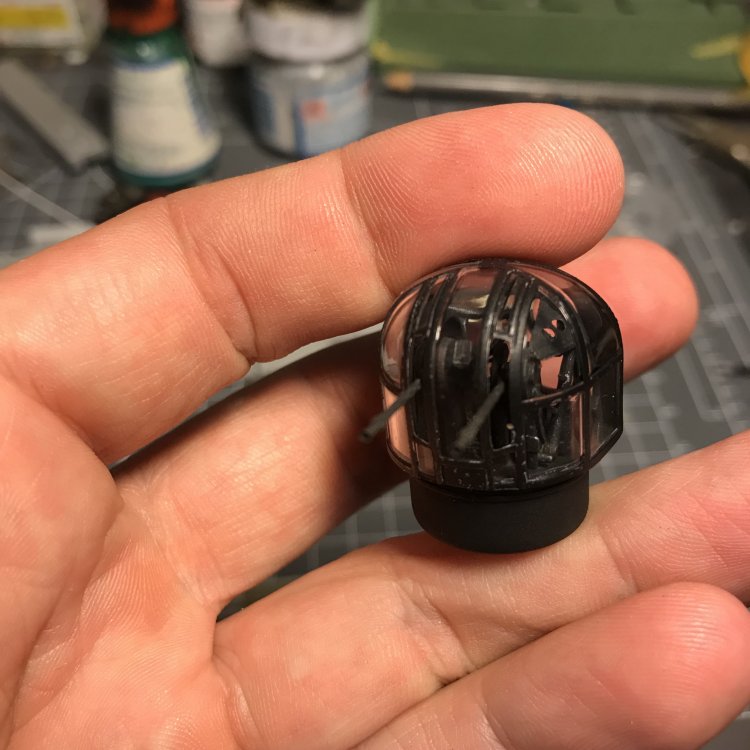
Hi Gus, i use fine solder wire to apply the glue. When it builds up too mich at the end, i cut it off. here’s the finishes nose turret. Only needs the doors, but i’ll install them at the end. I’m posing the nose turret in a 90 degree angle so the doors will point outside the fuselage.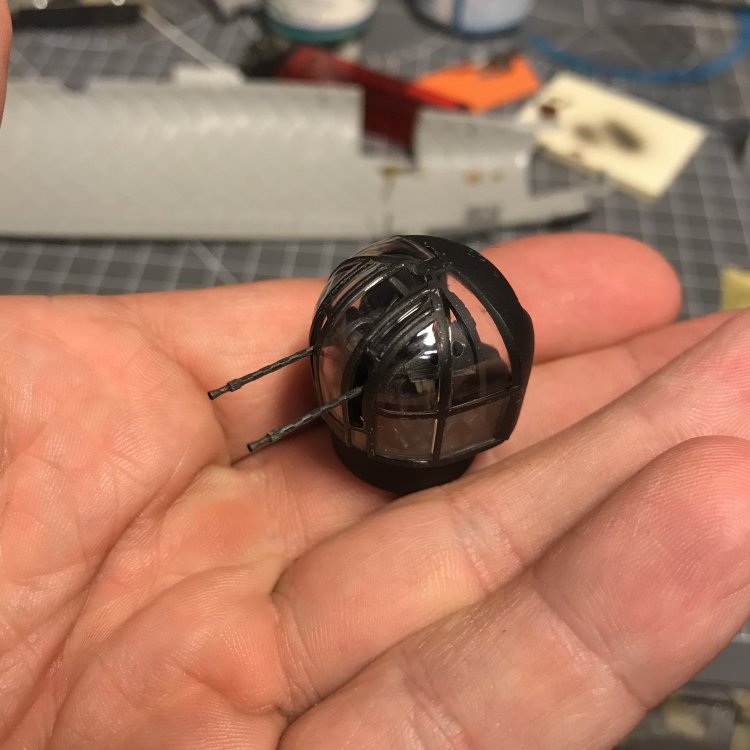
- 304 replies
-
- 9
-
-
- wilnis crash
- trumpeter
- (and 1 more)
-
impressive and lovely work. Those tracks are definately worth the effort. Cheers.
-
sweeeeeet!
-
Bleriot 11- 1/10 scale.
JeroenPeters replied to dolly15's topic in LSM 1/35 and Larger Work In Progress
oh that is lovely. Is this a complete scratch build?