DocRob
-
Posts
7,127 -
Joined
-
Last visited
Content Type
Profiles
Forums
Events
Gallery
Everything posted by DocRob
-
The Hetzer with it's simple undisturbed shapes should be easy to mask. Like Carl said, there are some mask sets out there. I used J's Modelwork masks on another build an they worked with a little bit of improvisation. You can also opt for disc camo, where Uschi van der Rosten has stencil masks. Cheers Rob
-

Border Models Lancaster B.1 "Victorious Virgin"
DocRob replied to Winnie's topic in LSM 1/35 and Larger Work In Progress
The cockpit looks great and busy, nice work. The detail of the parts is amazing. There is a lot of glass over the innards, which will allow a lot of detailed views. Cheers Rob -
Chikuma - Tamiya - 1/350 - IJN Heavy Cruiser-Finished
DocRob replied to KevinM's topic in Non LSM 'WIP
These Japanese ships do have some beauty and you nailed them Kevin. All the extra detail pays in the detail pics. Painting and weathering looks all convincing, great job. I've also to build my first WWII ship. I have some in stash and I think the USS Arizona will be first, with a wooden deck, lots of PE and figures. Cheers Rob -
You'll like the Hetzer Paul. I built the Academy one some years ago, a pretty easy build and I expect the same from Tamiya. Mine was not German though, instead from the Czech resistance without gun. Cheers Rob
-
Nice progress Scott, it starts to look like a Texan and the kit seems to be decent at least. Cheers Rob
-
Just catching up with your great work on the Starfighter. The pits looking great with the added detail and seat belts. I used KitsWorld details for my 1/48 ZM F-4 and found the belts itself not too shabby, but didn't like protruding parts like levers and pull rings, as they are too soft and tend to bend. PE is better suited for this. Cheers Rob
-
Duchess of Kingston - Beauty of the Seas - Wooden Sailing Ship 1/64
DocRob replied to DocRob's topic in Non LSM 'WIP
Thank you Kevin, I have this build pinned along others, which guided me through my build. MSW is really a great source of knowledge, when it comes to ship modelling. Cheers Rob -
Duchess of Kingston - Beauty of the Seas - Wooden Sailing Ship 1/64
DocRob replied to DocRob's topic in Non LSM 'WIP
Thank you Kai. It's very true, I change my subjects frequently as I get bored easily. I hate redundance and boring routine. I try to learn a bit (sometimes a lot as with the DoK ) from every build and some of my builds, I started only to incorporate new techniques. My interest are wide spread and I build only what appeals my immediate interest. If you have only the slightest interest into wooden ships, you should try one. There are kits for every level of builders out there in great quantity. The build of the DoK was extremely rewarding, in fact one of the most satisfying builds, I ever started. Cheers Rob -
HEMTT M1142 Tactical Fire Fighting Truck
DocRob replied to mark31's topic in LSM 1/35 and Larger Work In Progress
Quite an interesting beast Mark. I like those working vehicles, where function rules clearly over design. Cheers Rob -
Special Hobby Whirlwind
DocRob replied to Peterpools's topic in LSM 1/35 and Larger Work In Progress
You are on a run now Peter, the kit needs a bit of extra work and your solutions seem to work out perfectly. For drilling out cannons, I use the tip of a triangular scalpel blade and turn it, after hitting the middle to have a mark for the drill bit. Cheers Rob -
So, you finally got one of your grail kits that just came out…..
DocRob replied to ScottsGT's topic in General Discussion
Would be cool to see that one as a kit, but mainly your pic gave me the idea to replicate wet tarmac for an airplane dio as an experiment. I will store that in my mind for ruture use. Cheers Rob -
Bronco Comet dio - 2nd Fife & Forfar Yeomanry, Petershagen 1945
DocRob replied to GusMac's topic in LSM Armour Finished Work
I like your dio a lot Gus, nice color rendition and modulation on the positively cluttered tank. The base could have been a tad smaller for my liking, to concentrate more on figures and Comet, but as Martins pictures show, the setting is perfectly believable. Cheers Rob -
Texan interior is looking great Scott. I'm buckled in for your WIP, as I have one of these in stash along with an Eduard big set. I will build mine as a Portuguese bird with decals from Zotz. Good to learn of the merits and shortcomings of the kit through your build. Cheers Rob
-
I do Gary, what a fine display. The foiling looks very realistic and there is the very slight ribbing in the foil, which makes the Mig look even more metallic. Foiling one, painting nil . The figures and Gaz fit like a glove. Cheers Rob
-
What is on your bench right now ? Share a picture :)
DocRob replied to Martinnfb's topic in Modelling Discussion
Indeed, like Harv said, very cool. Cheers Rob -
What is on your bench right now ? Share a picture :)
DocRob replied to Martinnfb's topic in Modelling Discussion
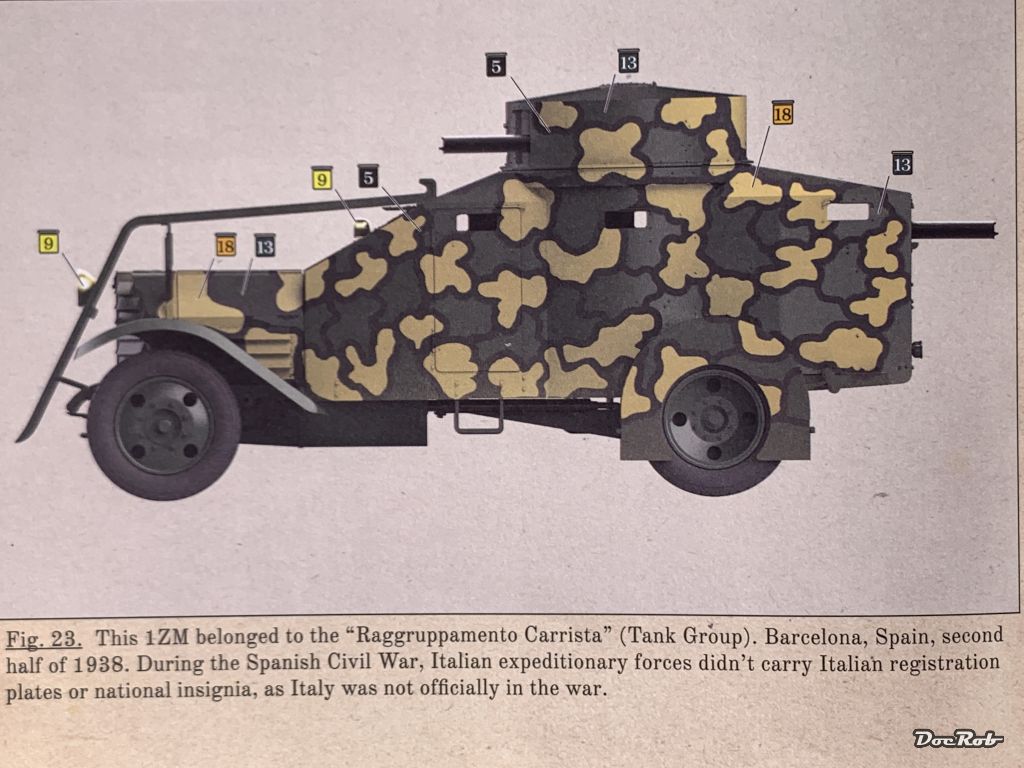
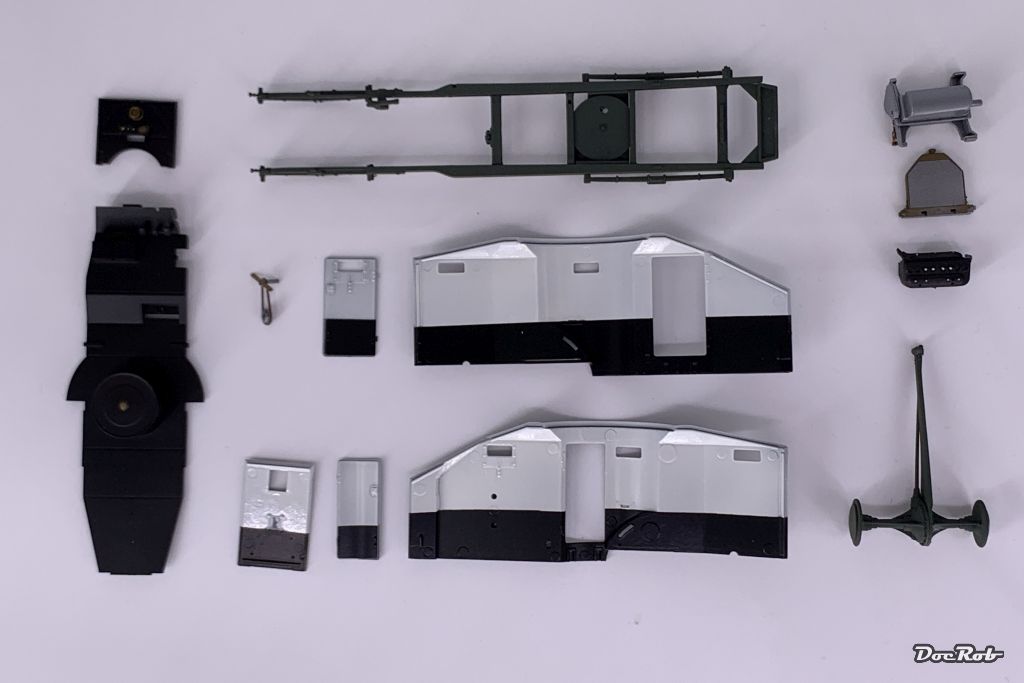
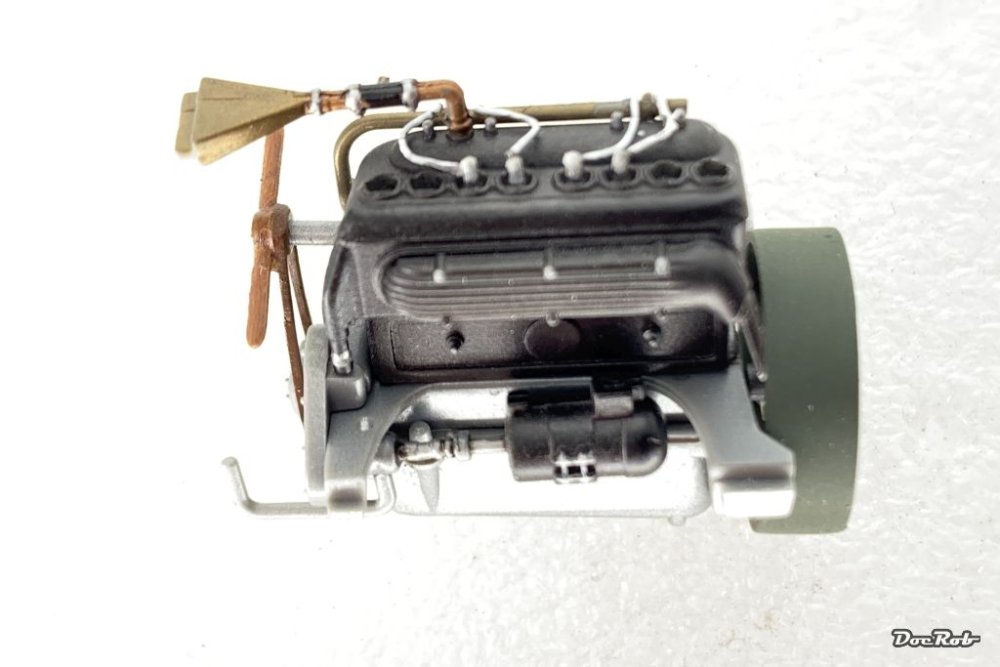
I hope for something like this Carl, if I my plan for the camo works out. It's a WW1 Italian Lancia, used in the Spanish civil war. The kit is from Copper State and it's a little gem. Cheers Rob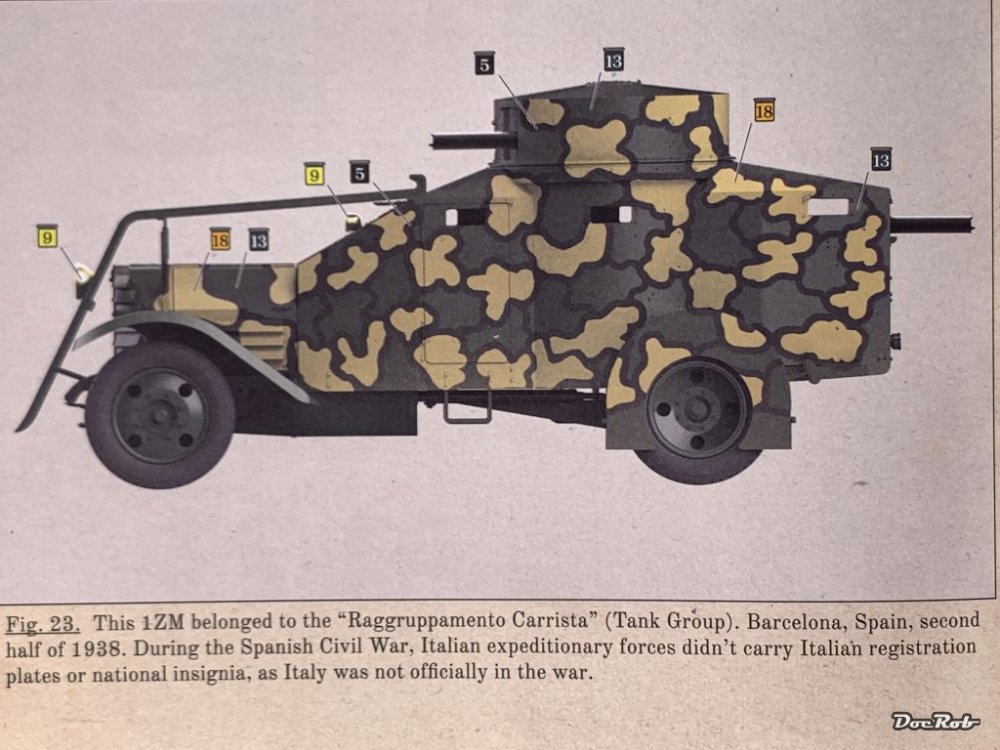
-
So, you finally got one of your grail kits that just came out…..
DocRob replied to ScottsGT's topic in General Discussion
Holy grail kits, oh yes there are some which mean more to me than the others, some built, some on and off the bench and some still in the box. Built: 1/32 Mir Fokker D.VIII with all the goodies. It was so much fun to build this mediocre base kit into something special with soldering struts, ... 1/144 Nautilus submarine from Pegasus, where I had so much fun, working with a lighting kit and replicating the different non ferrous metals. 1/32 WNW Hansa Brandenburg W.29, where I went all in with weathering and satisfied my desire for replicating different materials, wood, metal, cloth... On and off: 1/32 Fly Arado 234, simply because it's the most interesting and advanced plane for it's time. 1/64 Duchess of Kingston wooden sailing ship from Vanguard Models. It was so rewarding digging through all the wood, PE and resin. 1/20 Hasegawa Ammoknight, which took me to some of the most interesting paint experiments and needs the figure (s?) to be painted Shelfies: 1/64 HMS Sphinx from Vanguard Models. The quality of these kits is simply amazing and it's a post ship, means, I feel like a true captain after the build 1/32 WNW AEG G.IV in night lozenge camo 1/24 Ebbro Citroen DS 21, because it's my favorite car Cheers Rob -
What is on your bench right now ? Share a picture :)
DocRob replied to Martinnfb's topic in Modelling Discussion
Finally I found some time and hit the bench with an in between build. The Duchess of Kingston will be continued in late autumn with more time at hand to start the rigging, which I will do fully concentrated. An now to something really strange... Sorry for the bad pics. Cheers Rob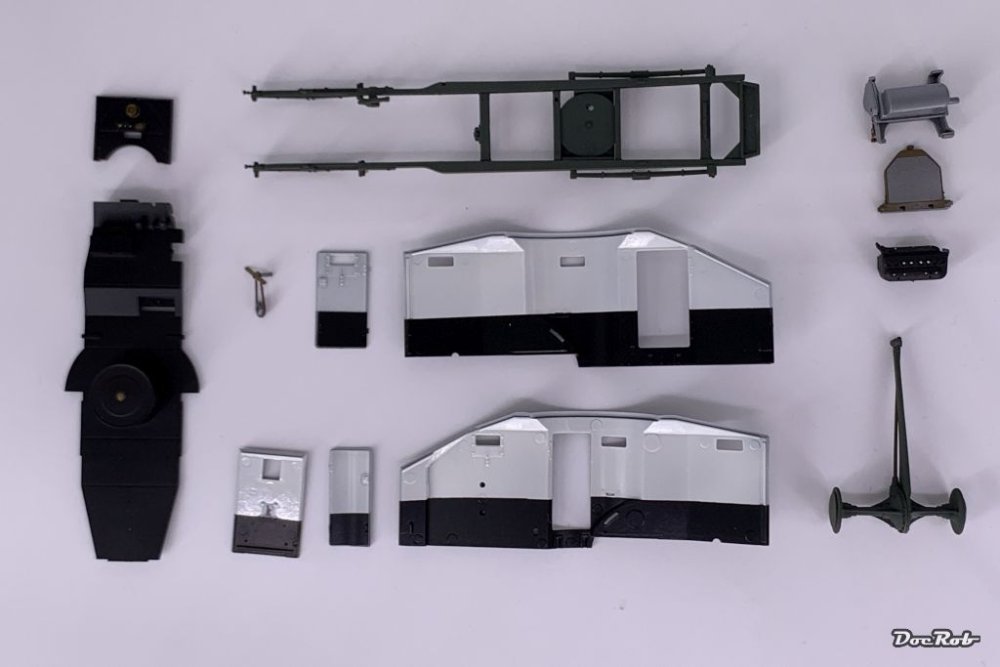
-
What is on your bench right now ? Share a picture :)
DocRob replied to Martinnfb's topic in Modelling Discussion
You'll love the egg Carl. Bought one last year and use it a lot for meat, fish and pizza and baking bread. Yes it's perfectly suited for pizza with dry heat, best I had home made. Today we will have some solomillo, that's beef fillet along with baked potatoes and home made sour cream and with the dying heat, I smoke some salmon, while adding chips of beech tree for the aroma. Sometimes, I add a little dried fig wood to enhance the taste of beef with it's aromatic smoke. Well, I'm getting hungry, I have to feed my egg, to feed me . Cheers Rob -
Special Hobby Whirlwind
DocRob replied to Peterpools's topic in LSM 1/35 and Larger Work In Progress
Your cruising now Peter, You mastered some obstacles and what shows is a Whirlwind. It will be a stunner for sure with your tamiyaesque talents . Cheers Rob -
Happy birthday Bill, I have this kit in stash since years and I'm eager to build it soon. I had it on the bench sometimes but got away through other projects. I skipped the first two questions, but I still have a wood / metal or museum version in my mind. Decisions, decisions... Cheers Rob
-
That ties it together Gary, the wipers look great. There can't be an effect without a reason . The pilot is very well depicted, your constant work with figure painting sure pays off, he looks extremely good in 48 scale. Cheers Rob
-
What is on your bench right now ? Share a picture :)
DocRob replied to Martinnfb's topic in Modelling Discussion
I have to admit, I've never done a winter camo, but have lots of kits which I will paint in winter outfit. The method of application was different, either by brush or airbrush, but mostly after the rollout, I guess. I would try hairspray / chipping technique. Finish the underlying camo, apply chipping fluid / hairspray, than different shades of white, dense mottled on with the airbrush and then remove some of the whit paint with different abrasive tools on the dampened surface. Another option is the salt technique and there are washable colors available from AK for example. I have some of these, but never tried them. BTW. Nice looking Stuart, Paul. Cheers Rob -
1:48 Revell (ex-accuratte Miniatures) B-25 C "Casper Flash"
DocRob replied to Fran's topic in Non LSM 'WIP
Wow, beautifully done Fran. Nice detailing painting and weathering, I like builds like yours, where everything clicks in the end for a great result. Cheers Rob -
Nice grimey GAZ, Gaz , I like the wiped areas on the windshield, but where are the wipers? Cheers Rob