DocRob
-
Posts
7,041 -
Joined
-
Last visited
Content Type
Profiles
Forums
Events
Gallery
Everything posted by DocRob
-
Beautiful little plane you made there. You're absolutely right, not a lot of bench space needed for these. Cheers Rob
-

Duchess of Kingston - Beauty of the Seas - Wooden Sailing Ship 1/64
DocRob replied to DocRob's topic in Non LSM 'WIP
Today, I continued with the 18ft cutter, which is indeed very tiny. I beveled the spars with a sanding stick and applied the first planks. The manual recommends wood glue for the task, I think because the MDF spars will be torn out later. I decided to use CA on the bow and the last two pearwood spars and wood glue for the rest. The planks were first glued into the slot with CA-glue. I used my plank bending pliers cautiously for a little pre bending and twisted the plank between my fingers, which seems to soften them a bit. After the CA on the bow cured, I glued the plank onto the rest of the spars. The next planks will be tapered and beveled, but I wanted one full plank first. Meanwhile, I used the curing times to test, if the appropriate yarns fit through the deadeyes, which they luckily did after a little cleanup with a 0,5 mm drill bit and applying some wood glue on to the end of the yarn. Cheers Rob -
Duchess of Kingston - Beauty of the Seas - Wooden Sailing Ship 1/64
DocRob replied to DocRob's topic in Non LSM 'WIP
Thank you Peter, even the steadies sealegs get shaky sometimes, but all seems manageable. The planks are made of 0,6 mm pearwood, laser cut and maybe 3 mm wide. Cheers Rob -
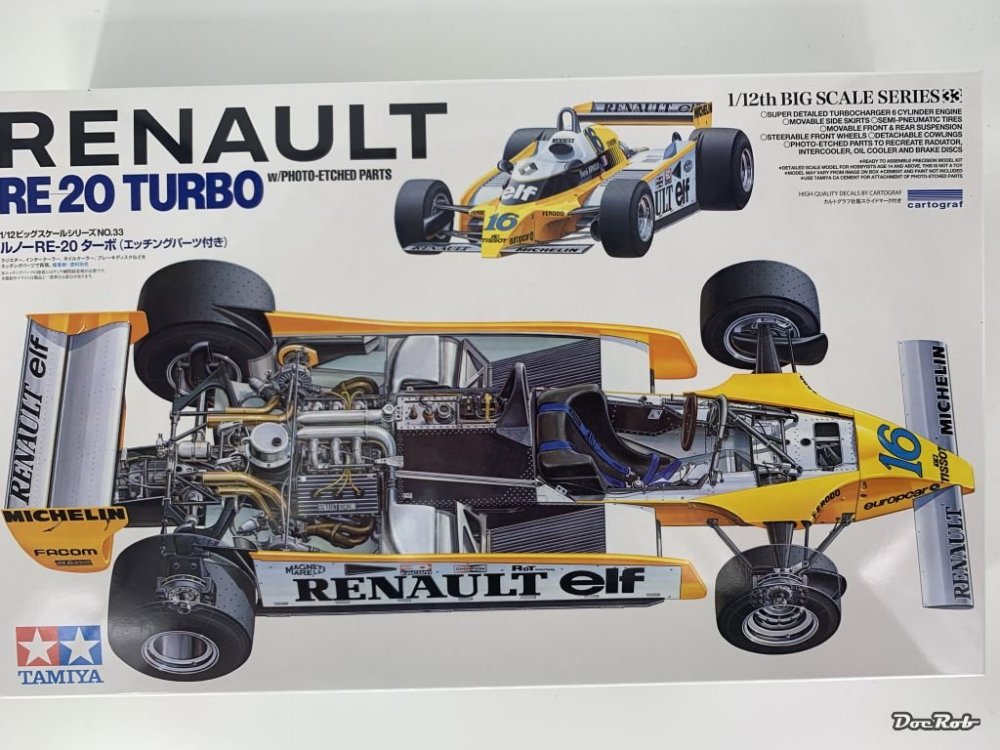
Today, this beauty arrived. It's a reedition of the Tamiya Renault RE20, which originally appeared 1981 on the market. My edition has Cartograph decals and luckily there is no tobacco ad missing, cause there were none. No decals for the tire markings are included, but they are engraved on the rubber tires, same as with the Brabham kit. Plastic looks fine in the box. I'm not the biggest fan of these turbo charged monsters, but these LS Tamiya kits are too good to let them pass. They will release two more Tyrells soon, one is the six wheeler. I'm eagerly waiting for a re edition of a McLaren MP4, 5 or 6 in 1/12. The second hand prices for these are crazy. Cheers Rob
-
I've heard, the Tyrell six wheeler is about to be re released soon in 1/12. Sorry Peter for the OT. We should start something own for the Tamiya 1/12 kits. Tamiya: Model car kit 1/12 scale - Tyrrell Ford P34 Tyrrell Racing Team sponsored by ELF #3, 4 - Jody Scheckter (ZA), Patrick Depailler (FR) - FIA Formula 1 World Championship 1976 (ref. TAM12036) | SpotModel as well as the Tyrell Ford 003 Tamiya: Model car kit 1/12 scale - Tyrrell Ford 003 Tyrrell Racing Team sponsored by ELF #11 - Sir John Young 'Jackie' Stewart (GB) - Monaco Formula 1 Grand Prix 1971 (ref. TAM12054) | SpotModel Cheers Rob
-
Oh, there is the 1/6 version from Dragon. M4A3 (105) Howitzer Tank, Dragon 75046 (2013) (scalemates.com) Cheers Rob
-
Lately we've seen more and more 16 scale kits being build here. A lot of them are produced by Takom, whose Chinese (Japanese) Tankette I built lately. It was an enjoyable experience and I just found on Scalemates, that two more 16 scale kits are supposed to surface this year. The Jeep is made by Takom and the video shows it with engine and figure, nice touch. The other kit is from Andy's Hobby Headquarters and it's still in pre production status. It's a M4A3E8 Sherman in 1/16. Cheers Rob
-
Duchess of Kingston - Beauty of the Seas - Wooden Sailing Ship 1/64
DocRob replied to DocRob's topic in Non LSM 'WIP
Than you Peter, I really feel relieved, that I made it to this point of the build, without running into serious trouble. The rigging frightens me a bit, but having mastered the build until here, gives me some well needed confidence. Yesterday I cut the spars from their panels and added the keel of the cutter. The small jig is part of the kit and should help to plank the boat with tiny planks. Let's see, how this will work out. Cheers Rob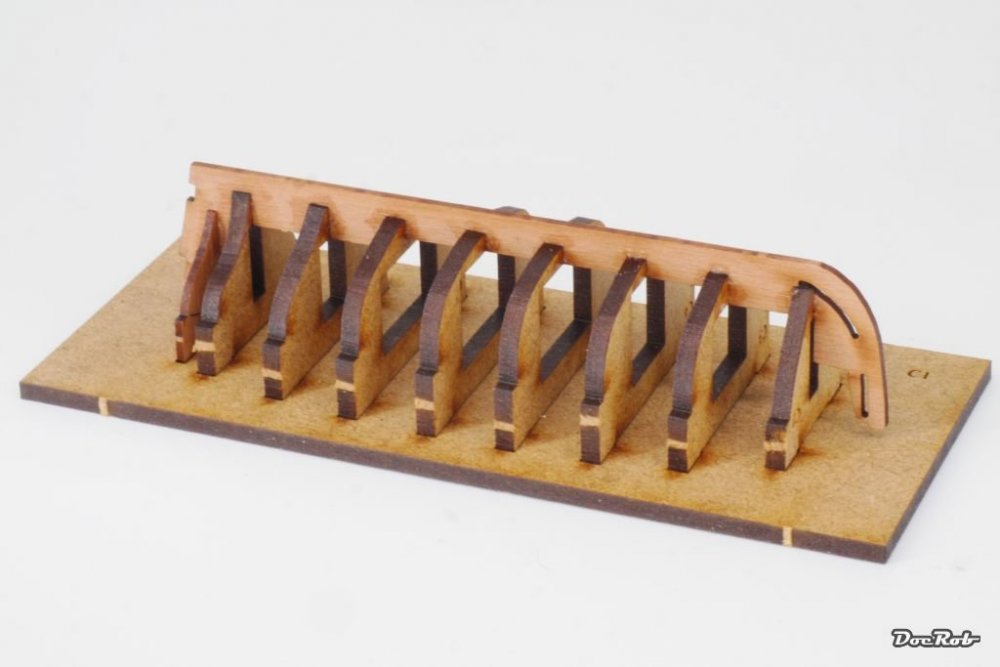
-
Totally OT, other than sporting some yellow, but I know you will like it Peter. The Tamiya 1/12 Renault RE20 became available. Mine is already ordered and somewhere in the mail. Cheers Rob
-
Duchess of Kingston - Beauty of the Seas - Wooden Sailing Ship 1/64
DocRob replied to DocRob's topic in Non LSM 'WIP
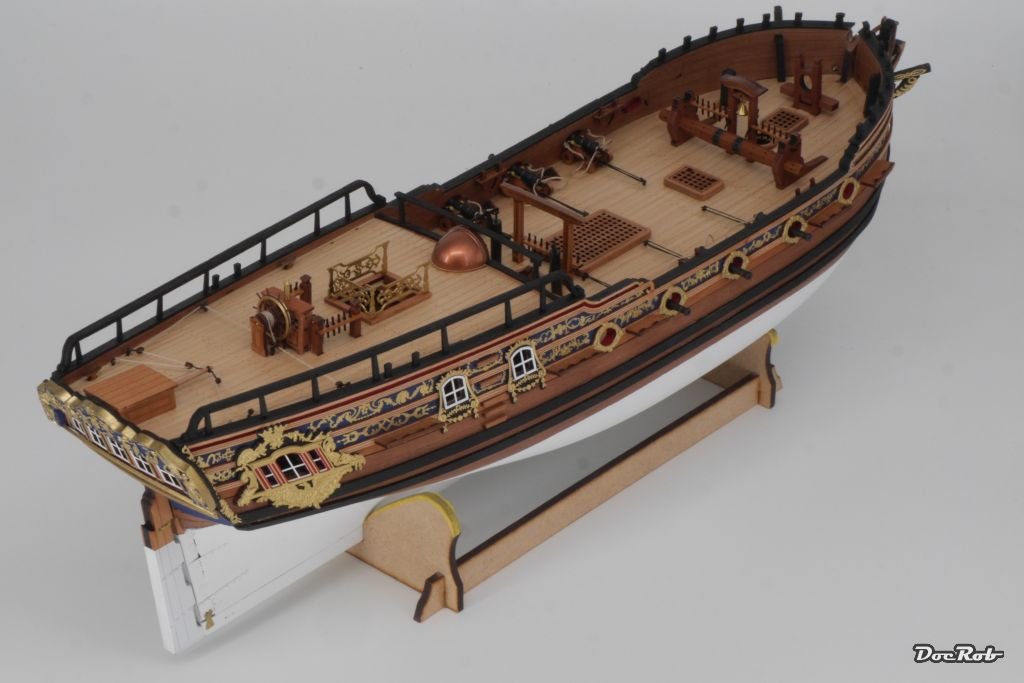
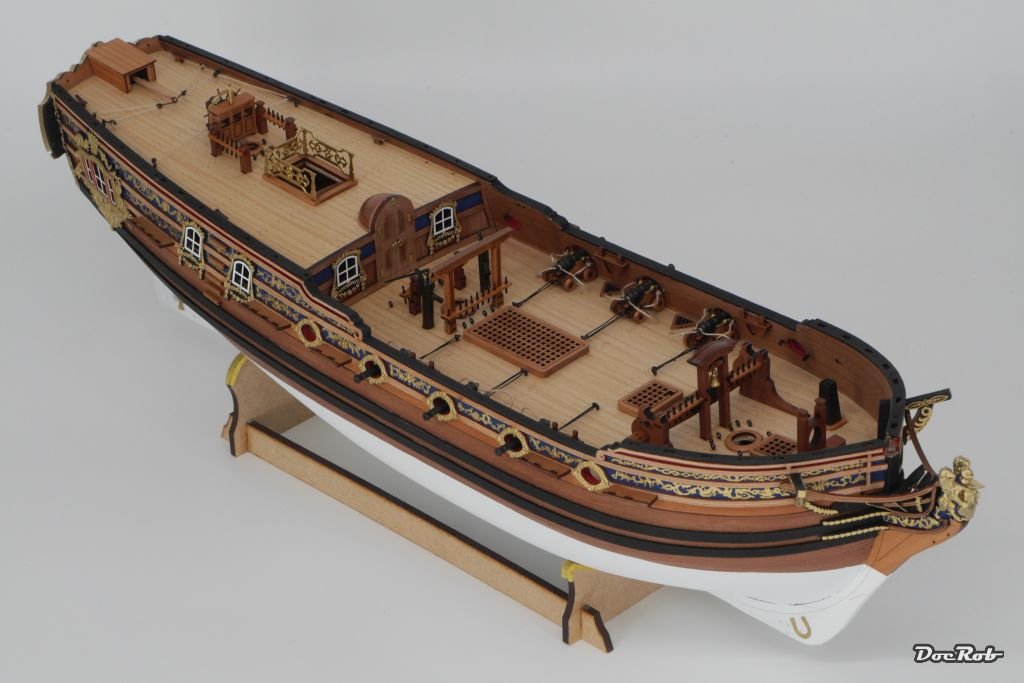
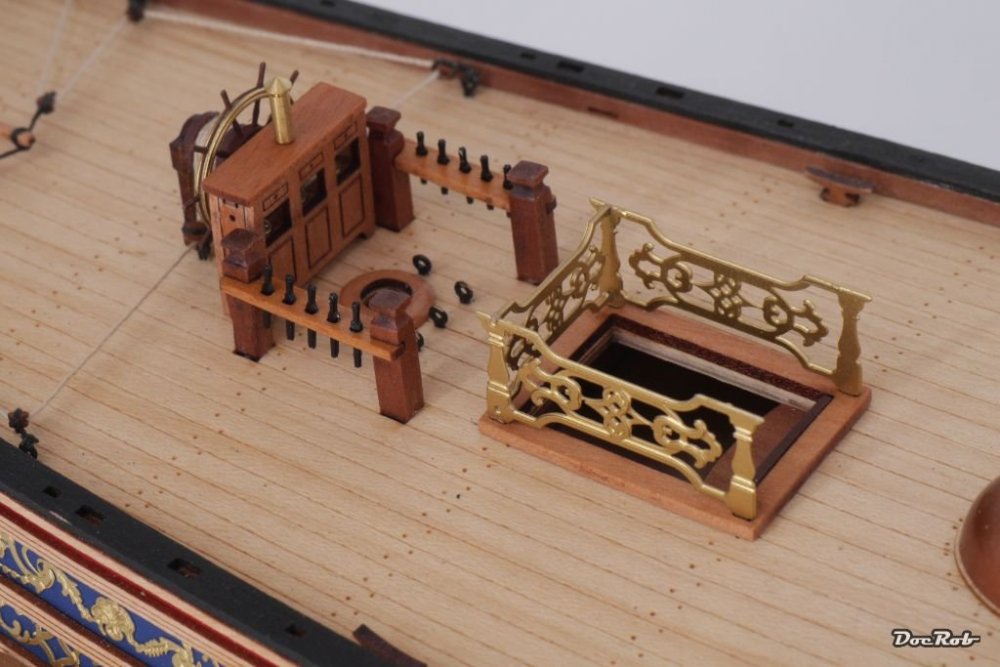
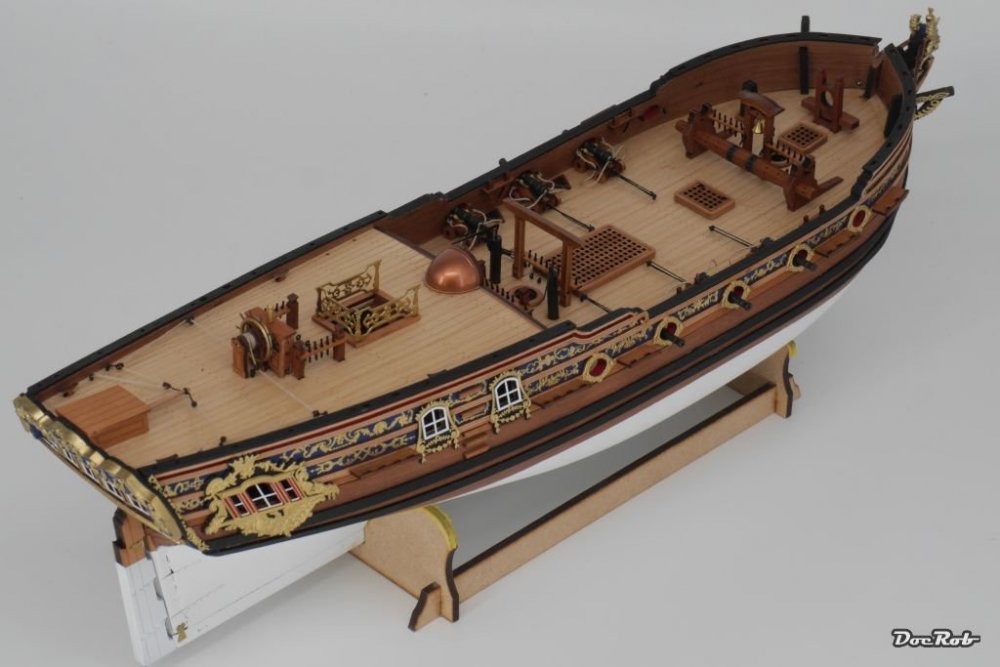
When the manual shows some totals from different angles and claims 'your ship now should look like this', you know you've achieved something. I have to admit, I'm a bit proud of what I built over the last three month. The kit design and good materials help a lot to lead a relative beginner through the build, as does the fantastic manual and the detailed plans. I added the railings for the aft deck, the ladders between the decks and bulwark pollards. With the exception of the ladders, all were airbrushed matte black before assembly. The side railings were difficult to slot in, as the contour of the railing is curved and the material of the pillars is very thin and brittle. I broke two or three while cleaning up the sandwiched railing parts. Somehow I got them slotted and glued with CA, three pillars at a time and broke only one. After dabbing the sweat from my eyebrows, I made more or less the same pics like in the manual. Now it's time for rigging and giving the masts and yards the correct contours, but maybe I'm distracting myself from this and build a small boat to mount on the main deck. This is not part of the kit, but Chris from Vanguard sells these boats which are build planks on spar-frames, as separate kits. I chose the 18ft cutter for DoK. Cheers Rob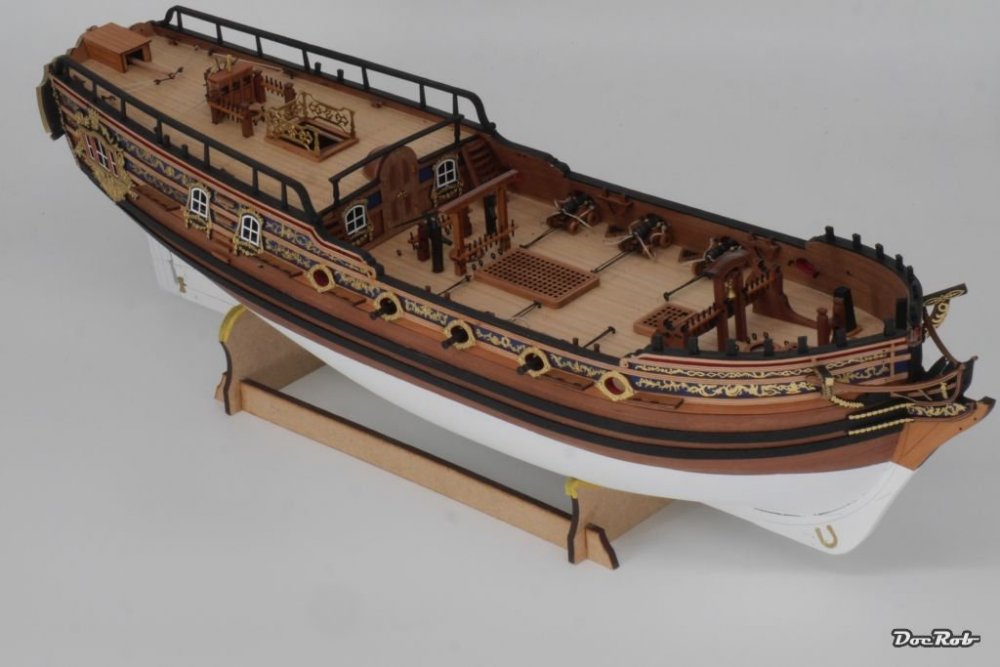


-
Duchess of Kingston - Beauty of the Seas - Wooden Sailing Ship 1/64
DocRob replied to DocRob's topic in Non LSM 'WIP
Thank you Peter, I made some little improvements to the kit. like the rigging and other stuff, but what you get is a brilliant kit like it is. The deck details were time consuming, but fun mostly. You can start to imagine walking on the decks of the Duchess of Kingston. Thank you Phil, it's great to have you on board on this fun yachting experience. Cheers Rob -
That looks like a perfect finish Peter. The decals will marvel on that surface. BTW: I always liked the LifeColor acrylics. They spray very smooth and issue free. Cheers Rob
-
ICM 1/48 He-111 H-6 N.Africa campaign-Finnished
DocRob replied to KevinM's topic in Everything Ukraine Group Build
Looking great Kevin, but can't help with the Tamiya pastels. I bought three packs lately, but haven't used them since. So naturally, I'm interested in your results and observations. Cheers Rob -
Yours is at least rounded a bit, hence the bucket, my JK is only bricks . The design has it's benefits, I rarely need sunglasses, because of the vertical windshield and the car is much cooler inside, than these modern piece of soap formed glass domes. Cheers Rob
- 2,035 replies
-
- 4
-

-
- car related stuff
- anything about cars
- (and 6 more)
-
Duchess of Kingston - Beauty of the Seas - Wooden Sailing Ship 1/64
DocRob replied to DocRob's topic in Non LSM 'WIP
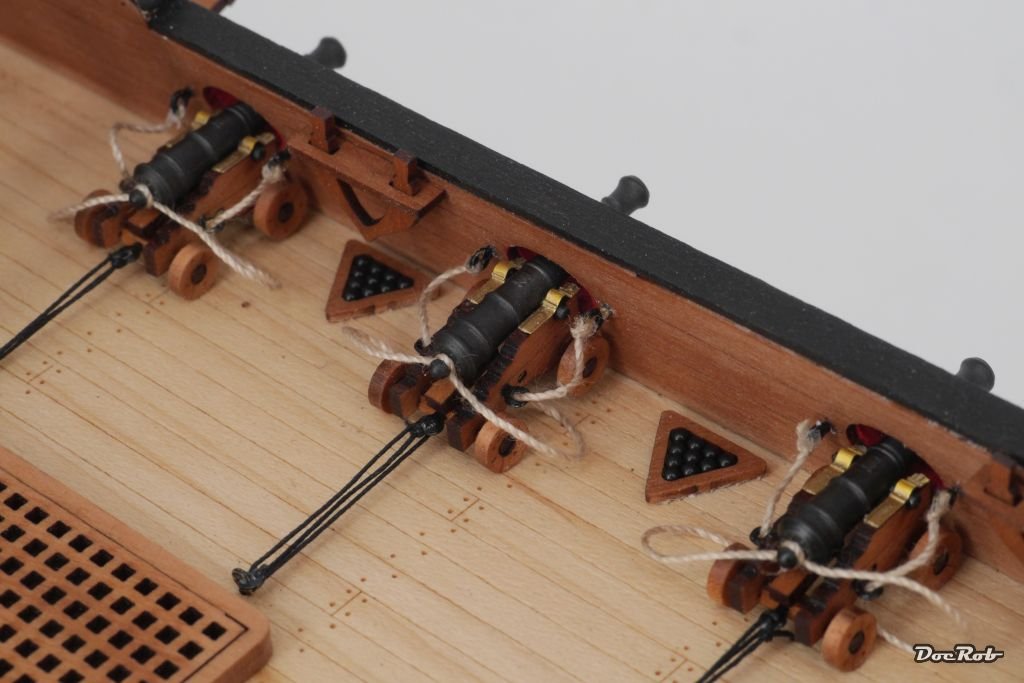
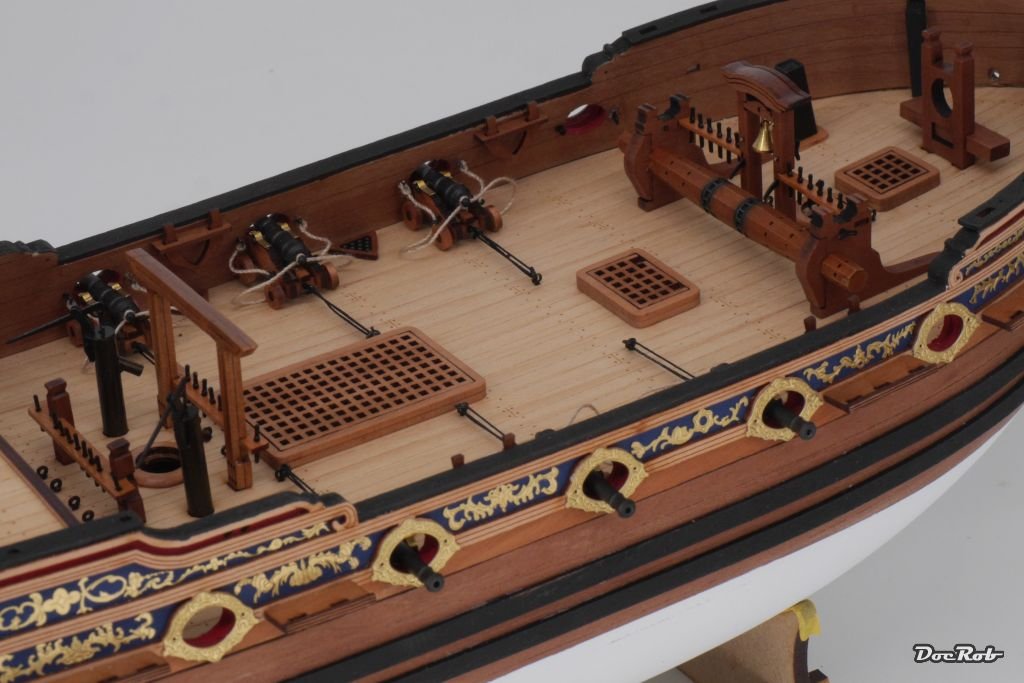
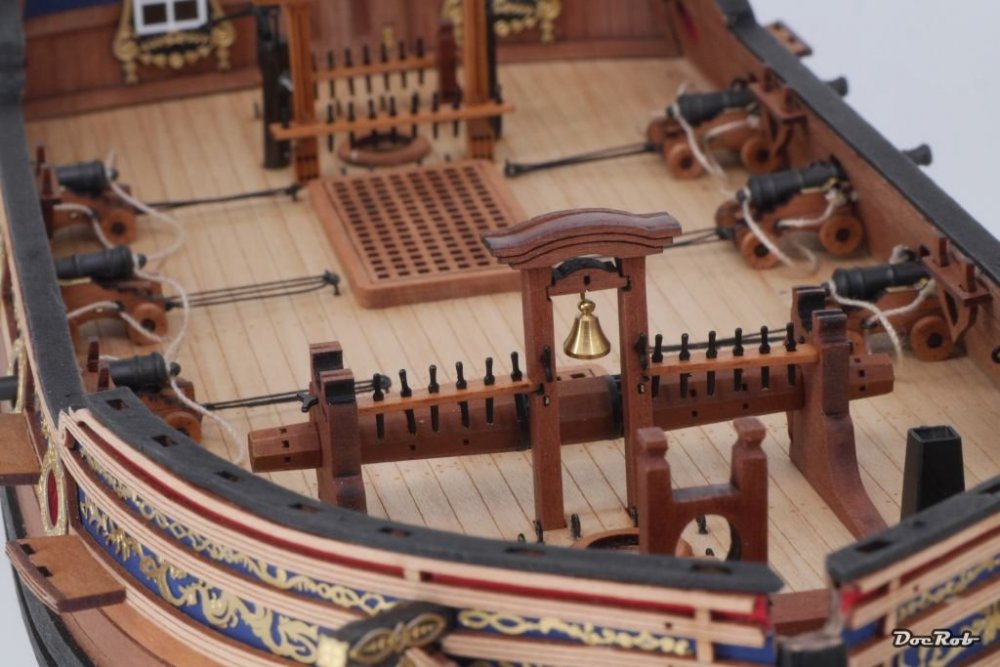
Thank you Hubert and Gus, I also had the urge to play a game of snooker, while adding the cannon balls. Not possible on my island though, there are only some lousy pool tables. I thought a lot about how to apply the cannon ball filled triangles and decided to use double sided adhesive tape. Thank you Gary, I thought about some crew members, but haven't found fitting ones. The DoK will be fully masted and rigged, but without sails. There are no sails provided in the kit and I have to admit, mostly cloth sails do not look good and scale wise realistic to my eye. Cheers Rob -
Duchess of Kingston - Beauty of the Seas - Wooden Sailing Ship 1/64
DocRob replied to DocRob's topic in Non LSM 'WIP
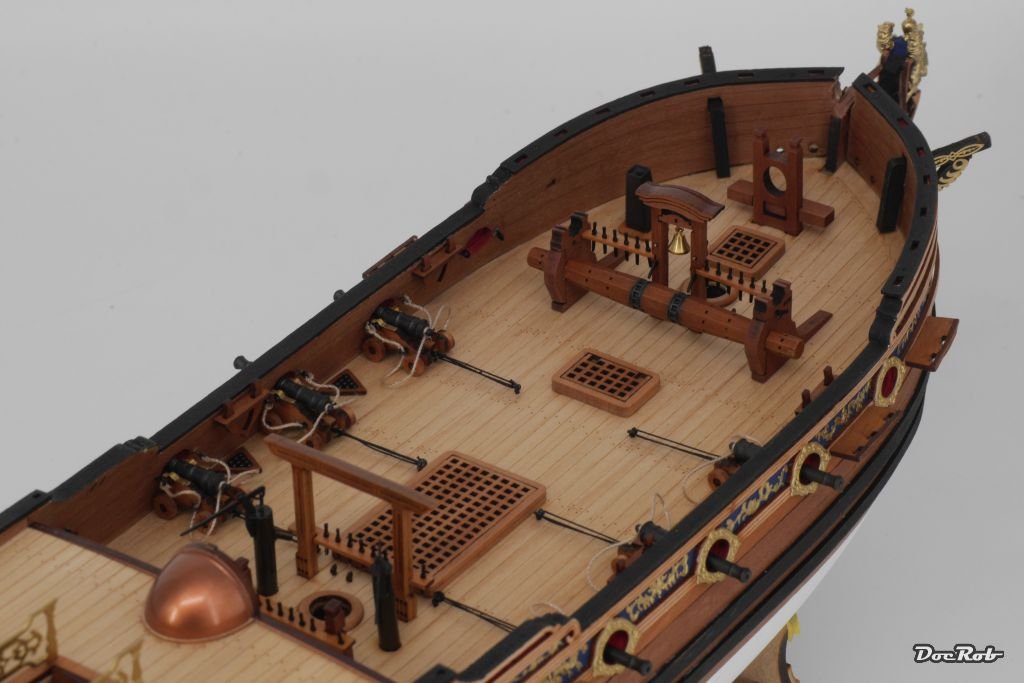
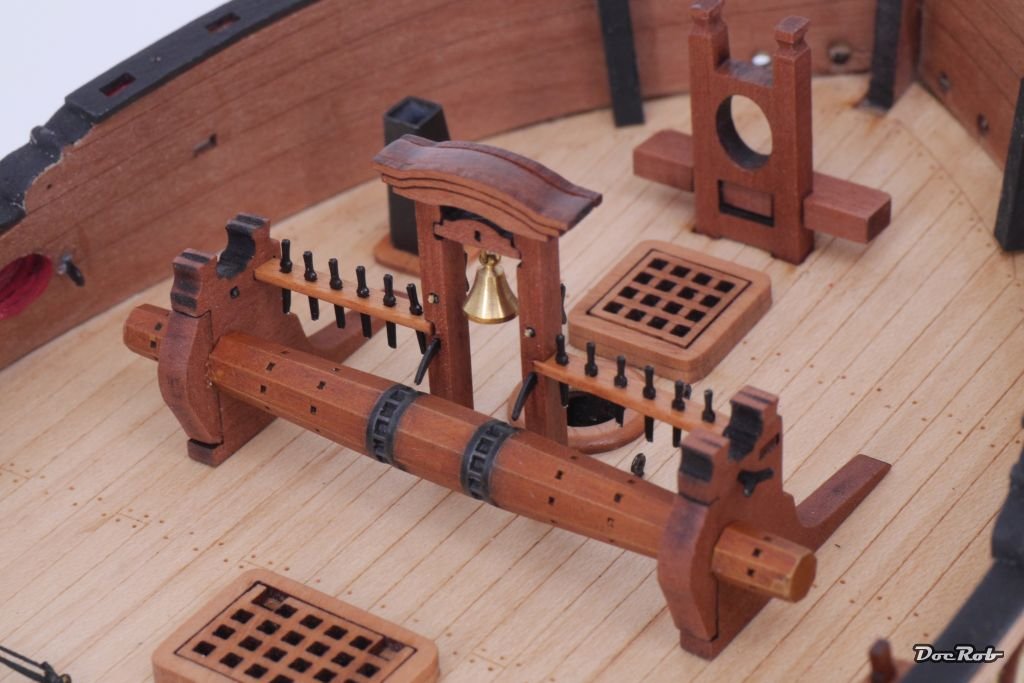
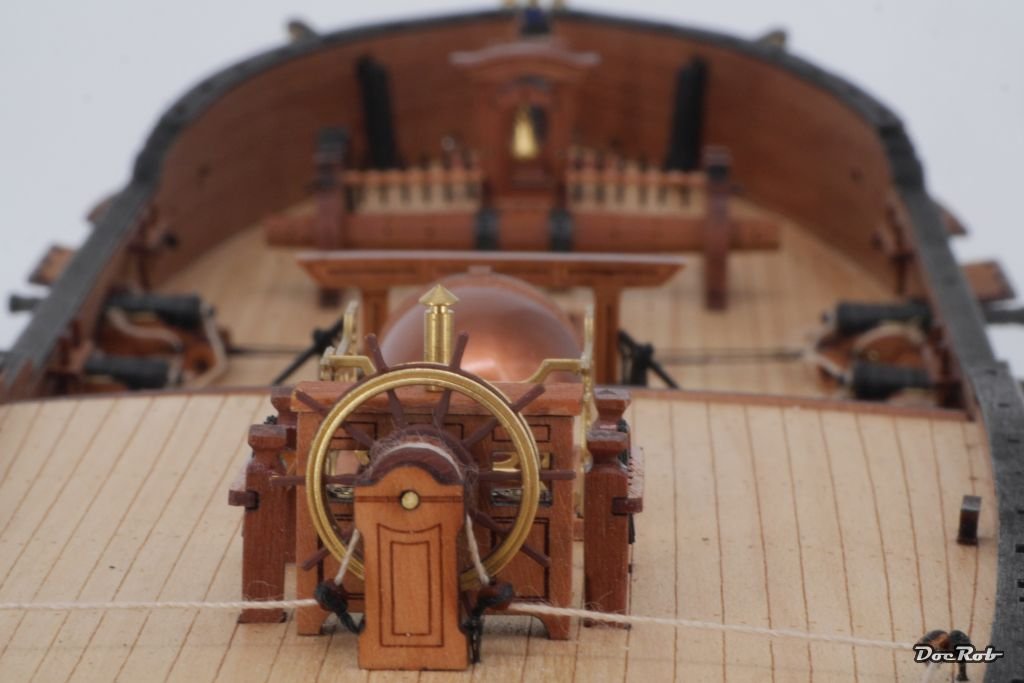
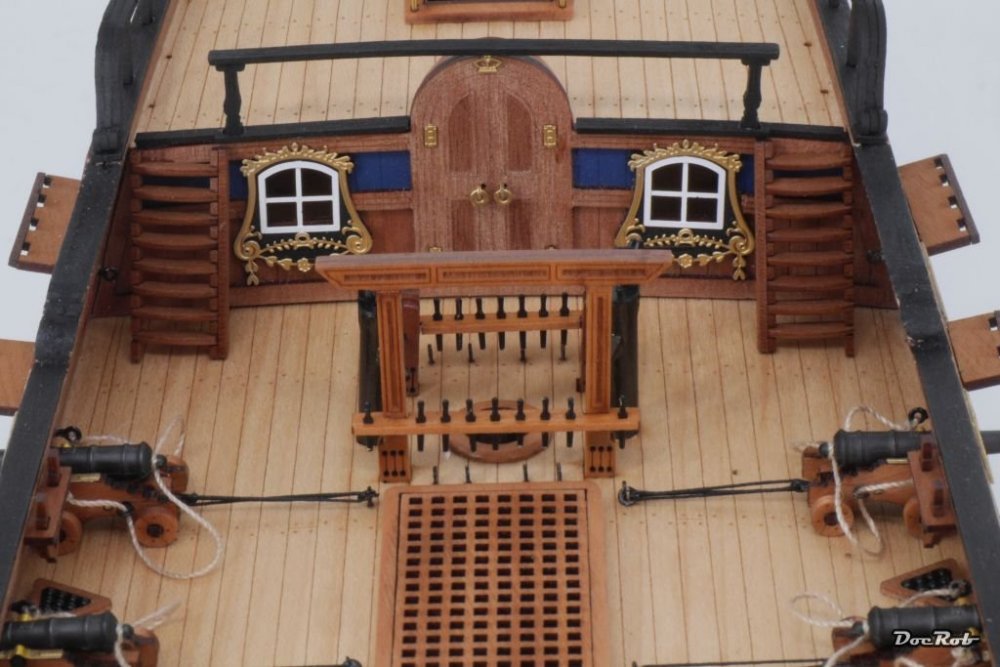
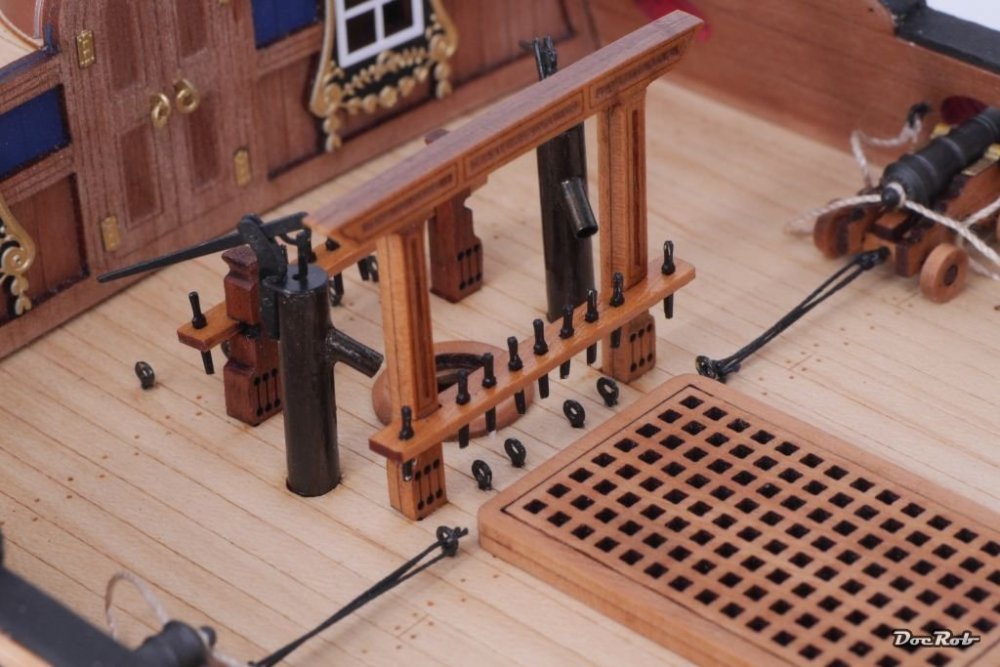
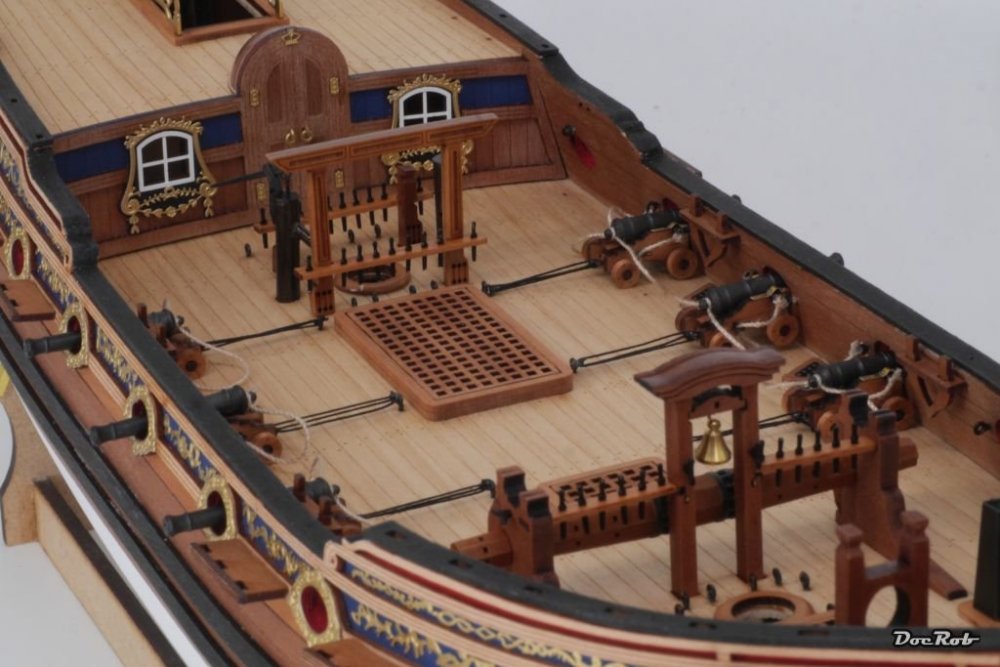
Another milestone is accomplished, the deck assemblies were installed completely over the last days. The guns were added, like seen above, now with their cannon ball triangles added and all the belaying pins went into the holes of their banks. I decided against gluing in every single pin, but used some wood varnish instead, brushed on. On to the pics: And some detail shots: Cheers Rob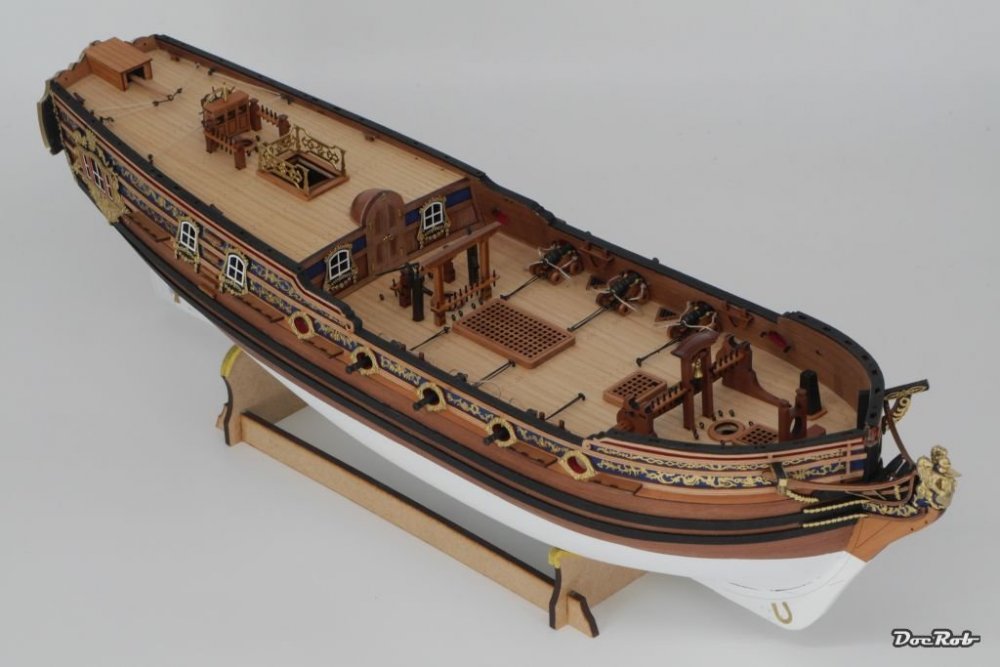


-
ICM 1/48 He-111 H-6 N.Africa campaign-Finnished
DocRob replied to KevinM's topic in Everything Ukraine Group Build
I like it a lot Kevin and I don't find it has too much contrast. With masks removed and decaling, the eye is more distracted and with a pronouncing weathering all will look good. Cheers Rob -
Dragon Jagdpanzer IV 70 (A) Kit 6015 COMPLETE
DocRob replied to GazzaS's topic in LSM 1/35 and Larger Work In Progress
Keep on the good roll with the PE and metal stuff Gary, Your detailing looks supercool and yes, I glued some track links on with no brackets at all , but also tried a more realistic approach once or twice. Cheers Rob -
Very nice build. I like the metal finish with the Argentine livery. Great work on that tiny plane. Cheers Rob
-
I toured a lot of times with a good friend of mine, he on his Harley Sportster and me on my KTM 950 Supermoto. The only thing both bikes had in common, was the fun they made driving. We ate lots of kilometers over the years, on German, Austrian and Czech roads, doing week trips without using highways. Sometimes I went to the north sea in the first warm spring days, only to jump into the ice cold sea and ride back to Berlin, 700 km's a day, only for fun. The KTM was a blade, fast, light, reliable and could go around corners like nothing else and was able to go up to 200 km/h without wobbling, a hard to achieve thing, given the high Supermoto shape of the bike and no wind protection at all. One other prominent feature were the breaks, they did, what they were made for perfectly, even without ABS. Sometimes we exchanged bikes and I learned to steer the Sportster like you described Ernie. To go fast on curvy mountain roads with the Sportster needed a lot of cojones though, as the brakes were a nightmare and the acceleration was downright poor. That meant, no breaking, if it can be avoided, to not have to accelerate that chunk of metal again. Sounds terrible, but wasn't. I never would have changed permanently to a Harley, but it was real fun to drive her, sound and vibrations are absolutely cool and the low center of gravity makes them easy to handle (not the case with yours, I think). Would I have lived in the US, I think, I may had owned a Harley myself, but commuting in Berlin and having lots of bad or curvy roads, other bikes were a better choice. Fond memories as I have promised my wife not to buy a motorcycle on my island, where driving can be really dangerous. Cheers Rob
- 2,035 replies
-
- 4
-
-

-
- car related stuff
- anything about cars
- (and 6 more)
-
Dragon Jagdpanzer IV 70 (A) Kit 6015 COMPLETE
DocRob replied to GazzaS's topic in LSM 1/35 and Larger Work In Progress
I can't find these clamps looking too bad, Gary. You are over magnified and sensible . These tiny parts will look great under primer and paint. Nothing wrong with the exhaust straps. They are no more than a welded piece of bent flat iron in reality. Cheers Rob -
I second Gus, your Tram starts to come together beautifully. The solution with the floorboards is great, Miniart should have thought about it a bit more. It's hard to see at he pictures, but aren't there any beams under the floor, to form a chassis? I sometimes thought about buying one of the Tram kits myself, but I can't stand repetitive work, if it can be hindered. For the same reason, I skipped the Roden Greyhound bus, as much as I like the design and braveness to produce such a kit. Speaking in wooden ships, I would never do ships bigger than let's say a heavy frigate, certainly no HMS. Victory. Cheers Rob
-
Duchess of Kingston - Beauty of the Seas - Wooden Sailing Ship 1/64
DocRob replied to DocRob's topic in Non LSM 'WIP
That sums it up pretty good Hubert. I think, there was a big relief with the introduction of breech loading. The process of fixing, loading, hauling in firing position, aiming, waiting for a good roll of the ship, firing, cleaning, ..., must be laborious and dangerous as well, only added by noise and fume. Not nice, having a leg entangled when a 32 pounder is firing. I left the ropes for pulling the gun to the gun port out, by the way of simplification. In 64 scale, I think this is ok, not even knowing if these cannons ever were fired on the real one. Cheers Rob -
Duchess of Kingston - Beauty of the Seas - Wooden Sailing Ship 1/64
DocRob replied to DocRob's topic in Non LSM 'WIP
Whatever OSHA is, the deck of a sailing boat is no dancehall . I wonder which curses the seamen had in mind for their decadent passengers. Cheers Rob -
Duchess of Kingston - Beauty of the Seas - Wooden Sailing Ship 1/64
DocRob replied to DocRob's topic in Non LSM 'WIP
Thanks Peter, the ladder looks definitely better than before. I considered doing this for the main ladder as well, but you cannot see it, descending into the hull. I'm no expert for cannon rigging, but reading the thread above, Martin provided and other sources, these ropes should be taut. The cannons must always be fixed on a rolling ship, Fire is the worst enemy of a wooden ship, but the second worst is a loose cannon running free on the deck, so I think taut is correct. Cheers Rob