DocRob
-
Posts
7,127 -
Joined
-
Last visited
Content Type
Profiles
Forums
Events
Gallery
Everything posted by DocRob
-
 The beast looks like a tractor and you did everything to support that look. Nice peace of used metal though. I like your worn leather technique for the headrest. Cheers Rob
 -
Hobby Boss 1/32 Northop P-61
DocRob replied to Nat Wale Plaia's topic in LSM 1/35 and Larger Work In Progress
Wow, nice job, I hope everything will be all right fitting the nice interior into the fuselage and closing it up. Cheers Rob -
Clap hands and welcome to the world of the large scale nuts . Your Meteor is eye candy, the pit looks like a well used work place and the metal finish seems real. Cheers Rob
-
That's what I thought too and your build is not obsolete as well. It's always something special to have created it on your own, you know the Frankenstein thing, it's aliiiiive . Cheers Rob
-
A Wee Side Project: the Airfix Car Door Tiffie
DocRob replied to Uncarina's topic in LSM 1/35 and Larger Work In Progress
Looking great, and thanks for sharing your observations about the dreaded cowling alignment. I will let the engine rattle unfixed till everything is in position . Cheers Rob -
zoukei-mura 1:32 Kawasaki Ki-45 Kai Tei Type 2 "Toryu"
DocRob replied to JayDee's topic in Aircraft Reviews
Nice review James and indeed some areas seem to be improved a lot compared with older ZM offerings like the dashboards, cockpit area in general and weapons. It seems that other than in older offerings there is only very limited necessity for fishing (pricy) ZM-AM, with maybe the exception of the wheels. It would have been great to add separated gauges for the instruments like they did before on some kits. Thanks for showing Cheers Rob -
Eduard P-47D Thunderbolt "Dottie Mae" WIP
DocRob replied to a topic in LSM 1/35 and Larger Work In Progress
Hi Danny, can't wait to see the Jug progressing. Your WIP triggered me to get me one as well and it will be started soon. The NMF is looking good. The metal finish looks very fine on your pictures, what type (brand) colour has been used? Cheers Rob -
Airfix is planning new Hellcat in 1/24 !
DocRob replied to Martinnfb's topic in Modelling Discussion
this is the link to the Airfix product page https://www.airfix.com/uk-en/grumman-f6-f5-hellcat.html In my imagination I'm forming a way to build this one. One side of the plane represent the Hellcat weather beaten with raised gear in flight modus, the other side will sport a folded wing, open cowlings and lowered wheels and a clean state while being maintained on a carrier deck. No idea for the canopy yet , but there is still some time till the F6 hits the shelves. Cheers Rob -
Airfix is planning new Hellcat in 1/24 !
DocRob replied to Martinnfb's topic in Modelling Discussion
Looks great Martin, I've hoped for a decent Hellcat in large scale for a long time (Tamiya 1/32, do you hear me), but we might have a contender here. It seems to sport "stressed surfaces" and decent detail and a folded wing option. As longer as I devour the pictures on the Airfix site I can hear a voice in my head, 'buy me'. Can't wait for the R-2800 Double Wasp in this scale. On Airfix.com it's on pre order status. Cheers Rob -
Nice solution with the pillows, that is the most comfortable curing kit I ever saw, my kits are a little jealous . Cheers Rob
-
FINISHED!!! Revell 1/48 B-29 finished in Bare Metal Foil
DocRob replied to JohnnyK's topic in Non LSM 'WIP
Wow, eye candy, the result you achieved is perfect. You can't beat the real material for the surface. It seems like the hard way to foil a plane, but it sure looks great. Cheers Rob -
British Rocket – Captured ME-163 - MENG 1/32
DocRob replied to DocRob's topic in LSM 1/35 and Larger Work In Progress
Thanks Carl, that is very interesting and fits what's said in the interviews with Eric Brown, it sounded to me that he flew the Komet under power. I have to get me a copy of 'Wings of the Luftwaffe'. My decision to leave the engine off, is more or less made, because I don't think that the ME-163 which Brown flew in Germany would have been one with a yellow belly, are there any pictures? Thanks Peter, the first step back to the bench after some time is always a little strange for me, but then it gets synced again. Cheers Rob -
Well spoken Martin, you brought grofacking to a new level, pro-grofacking . Cheers Rob
-
Aren't we all grofackers once in a while, all except Martin, because he ruined everything by actually applying paint on his I-16 which was actually waiting to be grofacked . Cheers Rob
-
British Rocket – Captured ME-163 - MENG 1/32
DocRob replied to DocRob's topic in LSM 1/35 and Larger Work In Progress
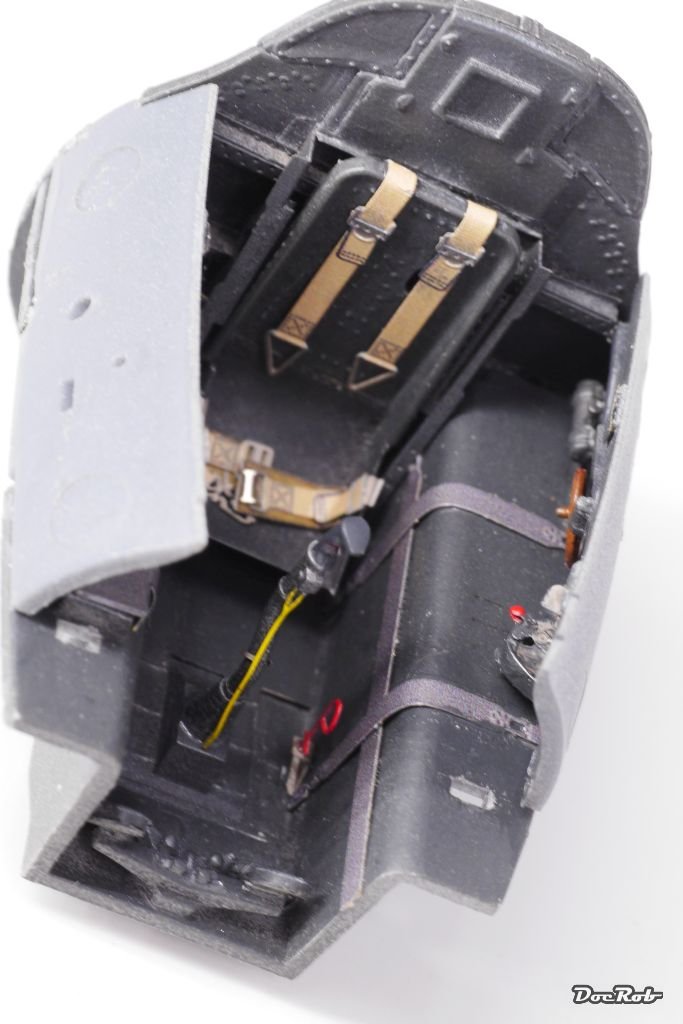
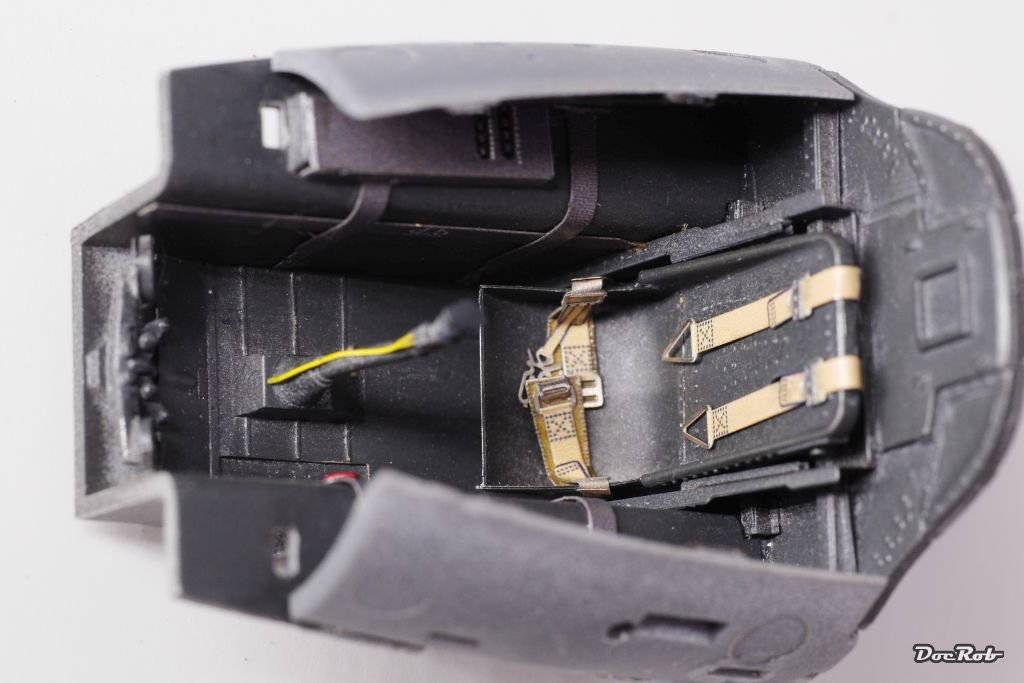
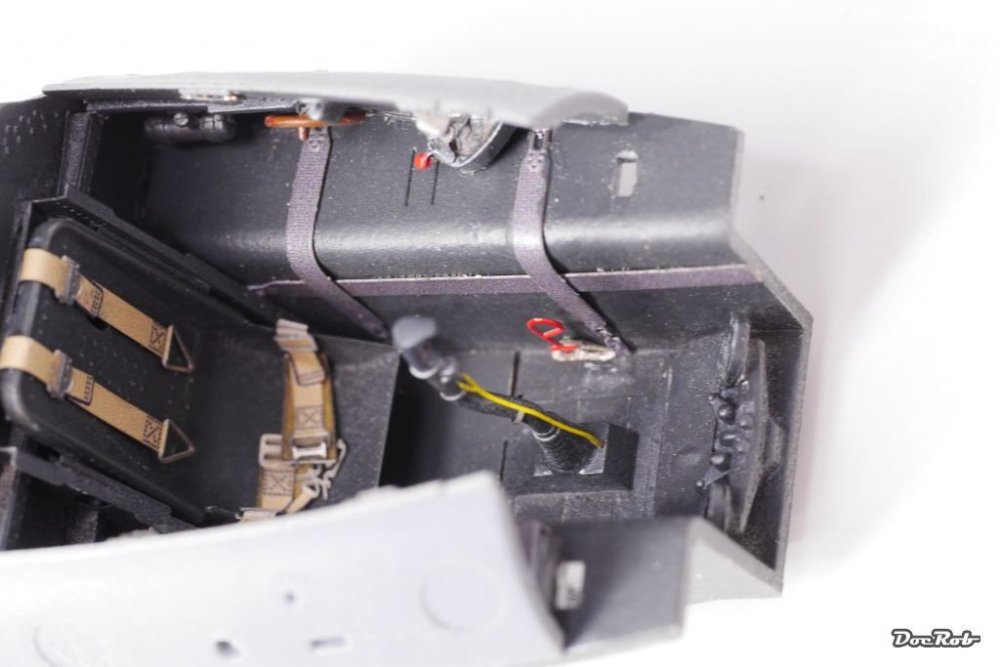
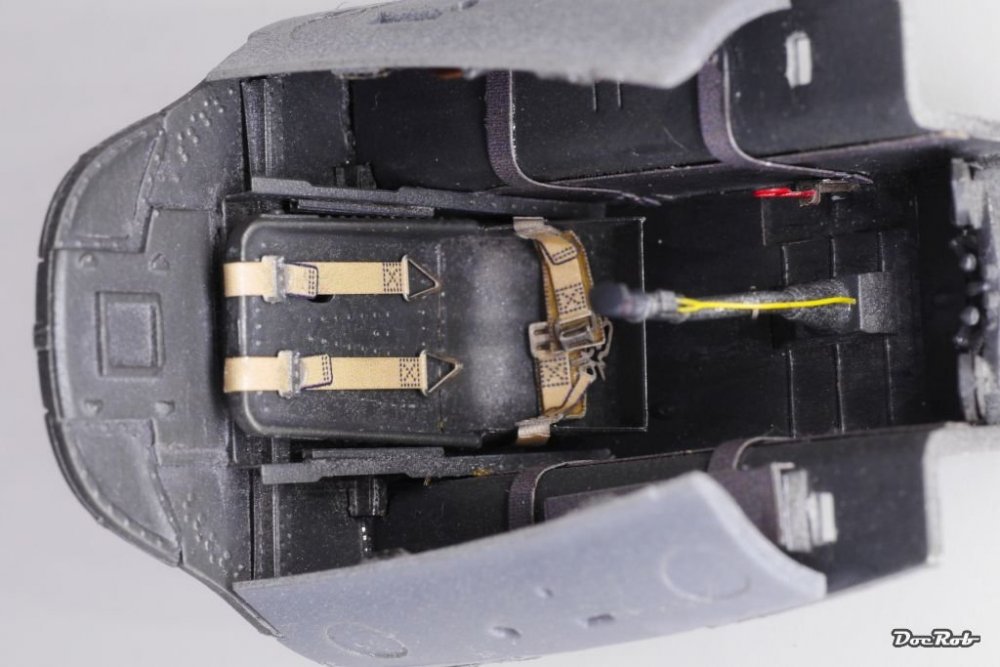
No updates since two month. Other things, mostly summer connected, came between me and the little rocket. Now the days get shorter and the ocean a little colder it's time to hit the bench again. I assembled parts of the cockpit and did some detailing with PE and some painting. It starts to look like a workplace now, but there are still some details to be added. As much as I like the varying german camos as much I dislike their depressing grey cockpits, so I have to speed up to get it done. Cheers Rob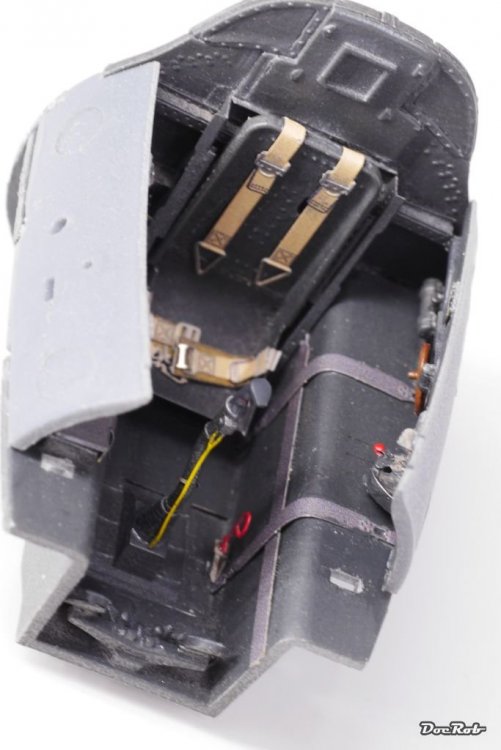

-
Hi Phil, I built the TA-152 recently and presented her here, combined with a very personal view about the kit, building and painting it. Like Wumm I think it's the 152 to get, but the kit is not without flaws and shortcomings. https://forum.largescalemodeller.com/topic/5434-ta-152-zoukei-moura-finally-done/ Some more stuff for digging deeper should be in here. https://forum.largescalemodeller.com/topic/5340-ta-152-zoukei-moura-132-my-first-zm/ I'm out of the Würger Party because of that build, but there are waiting two F8's for me, but that's for later. Cheers Rob
-
Tamiya 1/32 F4U-1A VF-17 #5
DocRob replied to Daywalker's topic in LSM 1/32 and Larger Aircraft Ready for Inspection
Beautiful Corsair, Frank. Nice job on painting and weathering. Those US Navy birds are a great canvas for deploying new techniques, magnifique. Cheers Rob -
Tamiya F4U-1D Corsair: Update: 2/1019
DocRob replied to Peterpools's topic in LSM 1/35 and Larger Work In Progress
Nice work on the pit Peter, it looks absolutely great. You are right, there is nothing like building a Tamiya Corsair to get the Mojo stirred again. No need for grinding in the cockpit area, but I did anyway with my Birdcage, using the even better Brassin cockpit, but actually this was only a vanity thing, the provided one is absolutely great for a non-resin one. Sometime ago I did a little walkaround right here, with some pics I made in Pensacola of the mentioned plane. https://forum.largescalemodeller.com/topic/4925-f4u-1a-national-naval-aviation-museum-pensacola-fl/?tab=comments#comment-63136 Next build should be a F4-Phantom to stay in the F4 pattern . Cheers Rob -
Noice , and shortening the wheel struts looks right to me. The paintjob looks good and well blended, perfect rendition of a unique bird. Cheers Rob
-
Beautiful, one of the examples where the technique of applying foil perfectly matches the streamlined subject. Putting foil on a plane seems to be 'en vogue' in the moment. Having used Bare Metal Foil only for some detail work, I might got tempted to jump the wagon and try a little project. Back to your Ryan, which is a stunner and the contrast between metal and the yellow wings opens the eyes Cheers Rob
-
1:32 Hansa-Brandenburg W.29
DocRob replied to sandbagger's topic in WNW and WW1 Ready for Inspection'
Thank you Mike, I read (and downloaded) your great log, and will use it as a guideline in places. I might go with the Aviattic decals, but in the case of the W.12 this will be an expensive enterprise. As it is double winged, I think it will take two sheets of naval hex (I like the faded one too) plus one sheet in a darker shade, because the tail section of the W.12 seems to be covered in a darker toned linen. Maybe that could be achieved with preparing the kit surface a little darker. Cheers Rob -
1/48 Wellington Mk.X (He727 NA-K)
DocRob replied to JeroenPeters's topic in LSM 1/35 and Larger Work In Progress
Nice, I like the 'bordering' effect in the green blotches of the camo, if it's to much it looks like you don't know how to use the airbrush, but here it adds and gives some depth. Chees Rob -
SBD-3 clear Edition Trumpeter OOB
DocRob replied to Martinnfb's topic in LSM 1/35 and Larger Work In Progress
Stunner, I have to agree with Harv, leave her that way, love the look. Cheers Rob -
Followed your build with lots of interest. What a beauty you got in the end, a clear winner. Cheers Rob
-
1:32 Hansa-Brandenburg W.29
DocRob replied to sandbagger's topic in WNW and WW1 Ready for Inspection'
You nailed the Brandenburg and put her into a great fitting setting. The way the W.29 is weathered looks like a lot of seaspray and weather influences and supports the authentic look of the dio. I have the W.12 in my stash along with some goodies and the same Copper State figures and have planned something similar for mine. I will download your WIP as a well appreciated guide. Do you think the Aviattics are a must, because I'm undecided and interested to hear your opinion. Cheers Rob