DocRob
-
Posts
7,048 -
Joined
-
Last visited
Content Type
Profiles
Forums
Events
Gallery
Everything posted by DocRob
-
Why Murdock are you wasting your time then. Member since 2013 and this piece of art is the second post. To bored to check the first one, but I'm sure it is another gem. Rob (without cheers)
-
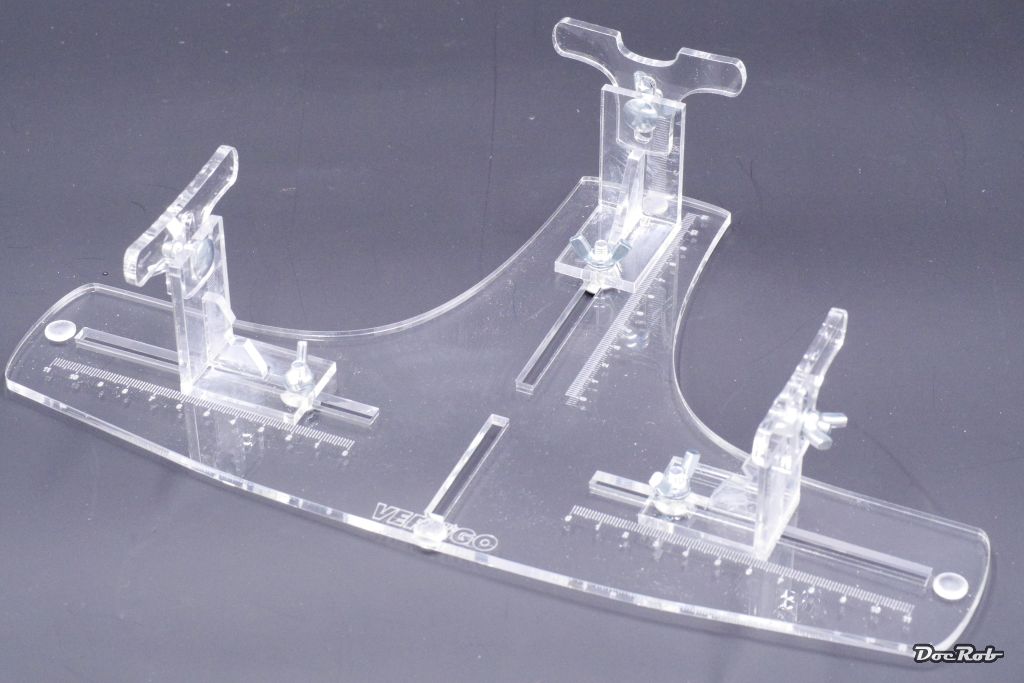
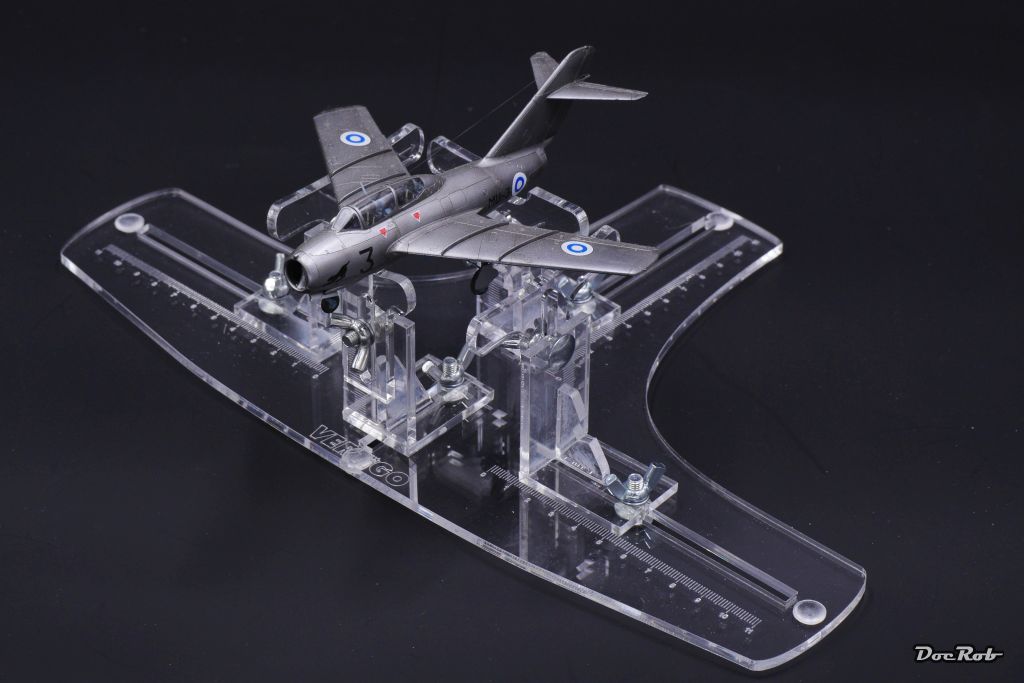
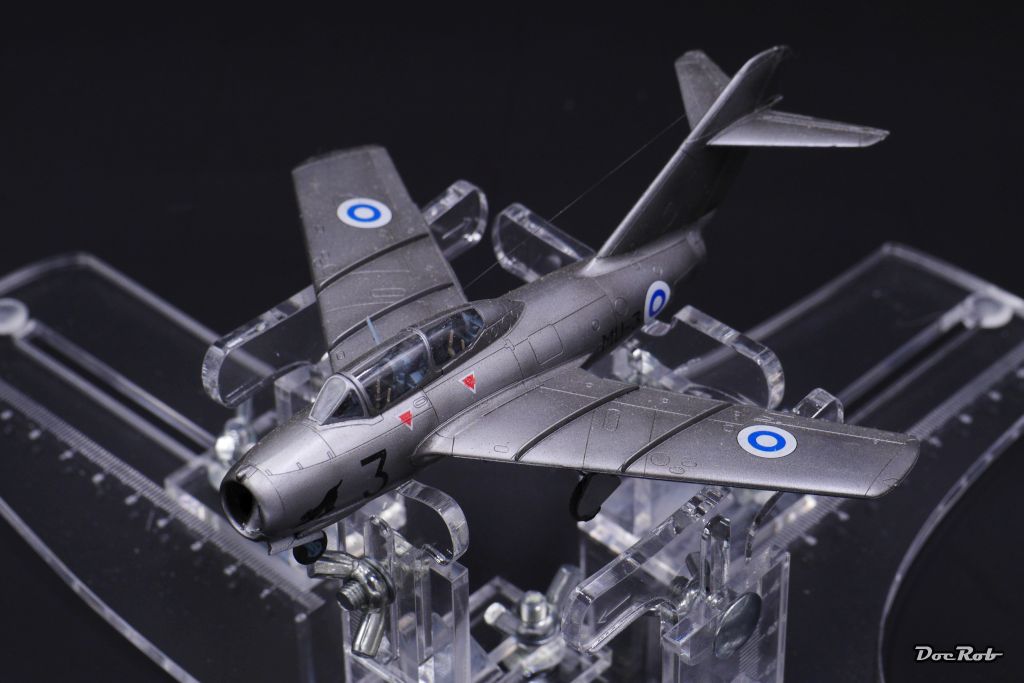
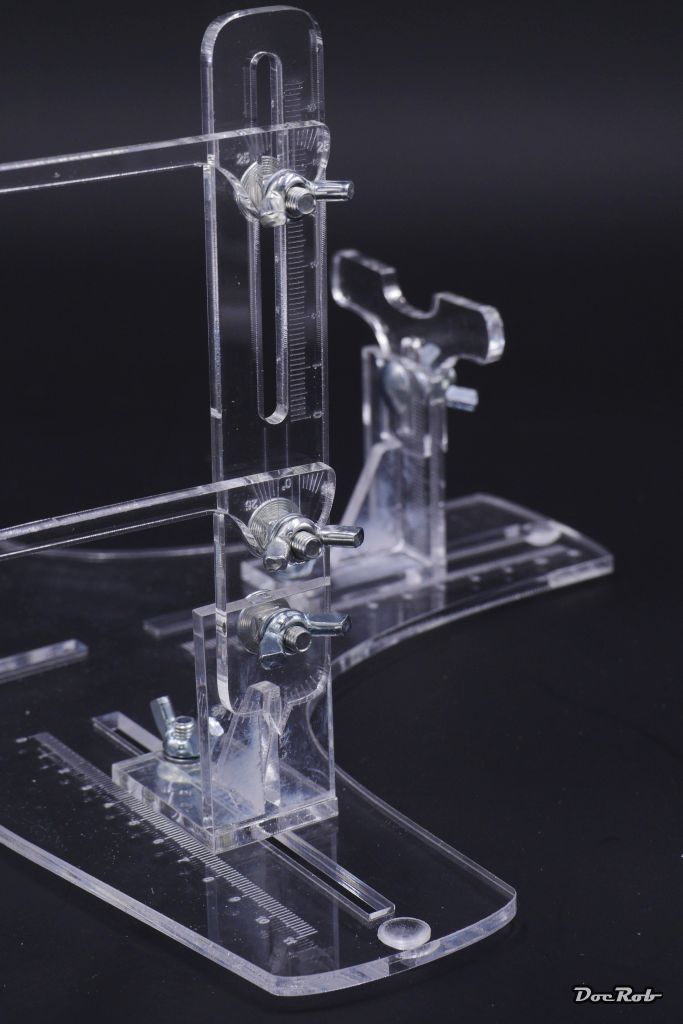
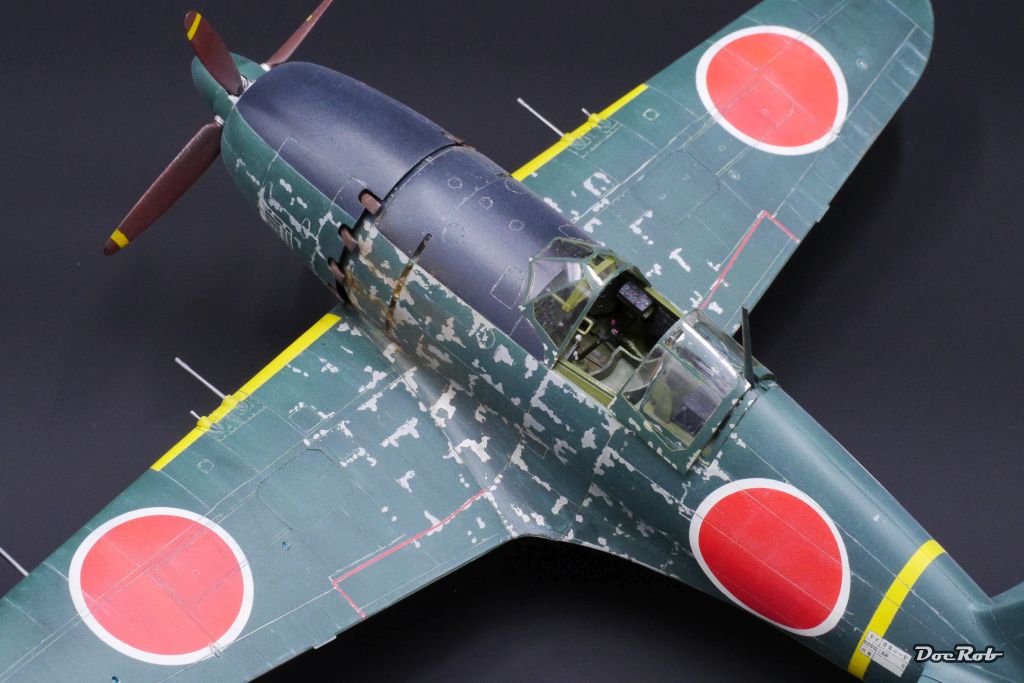
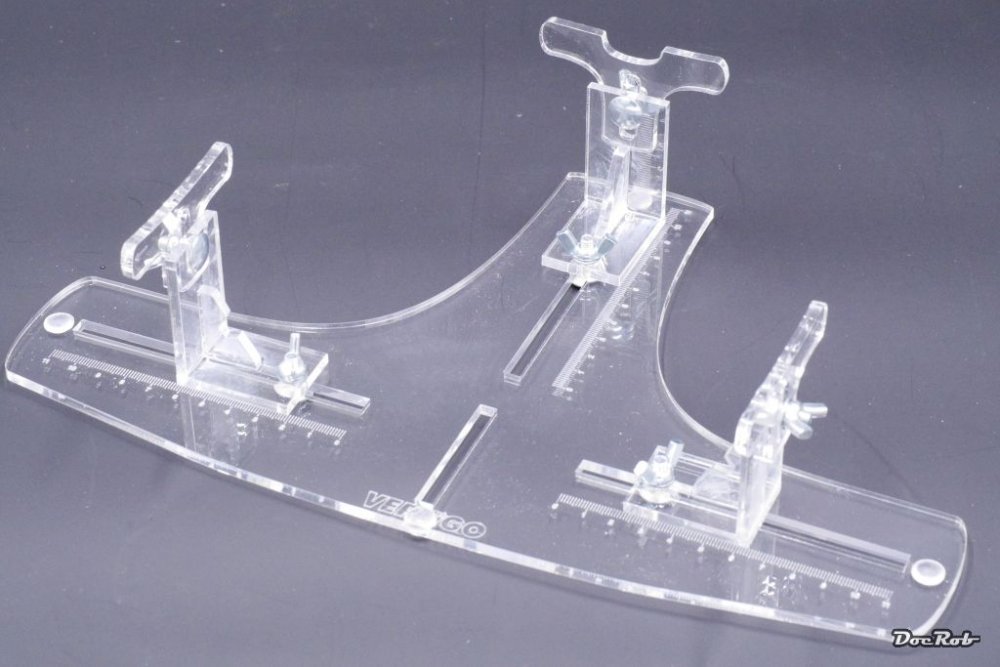
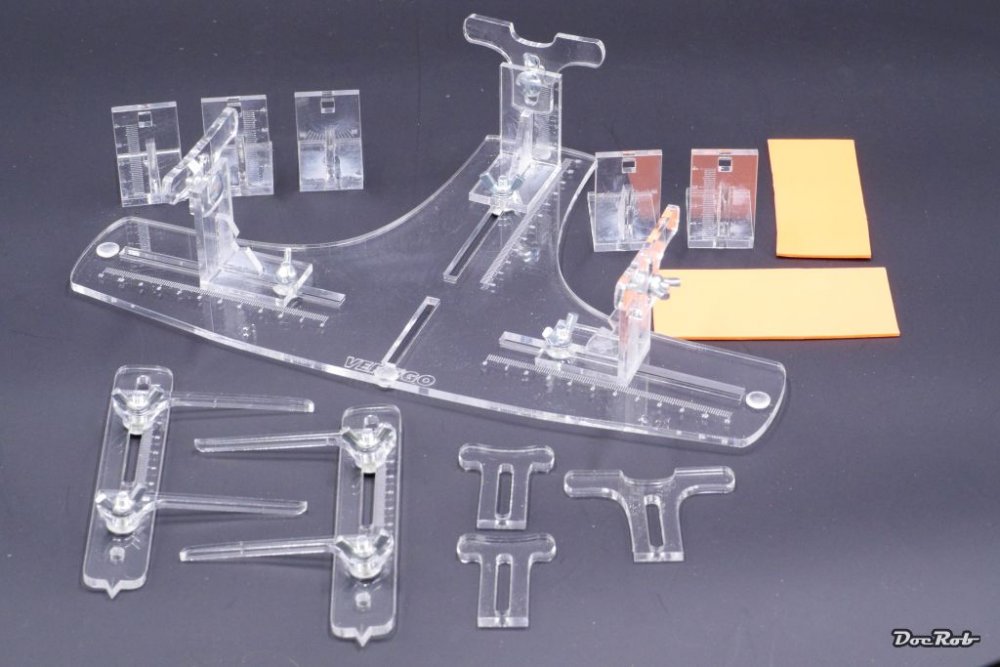
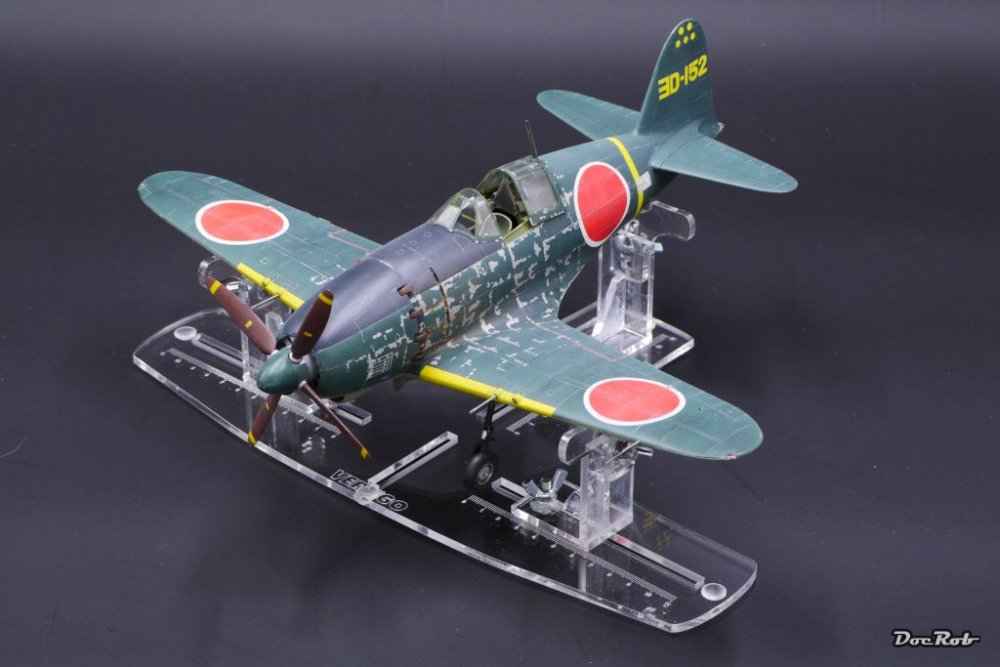
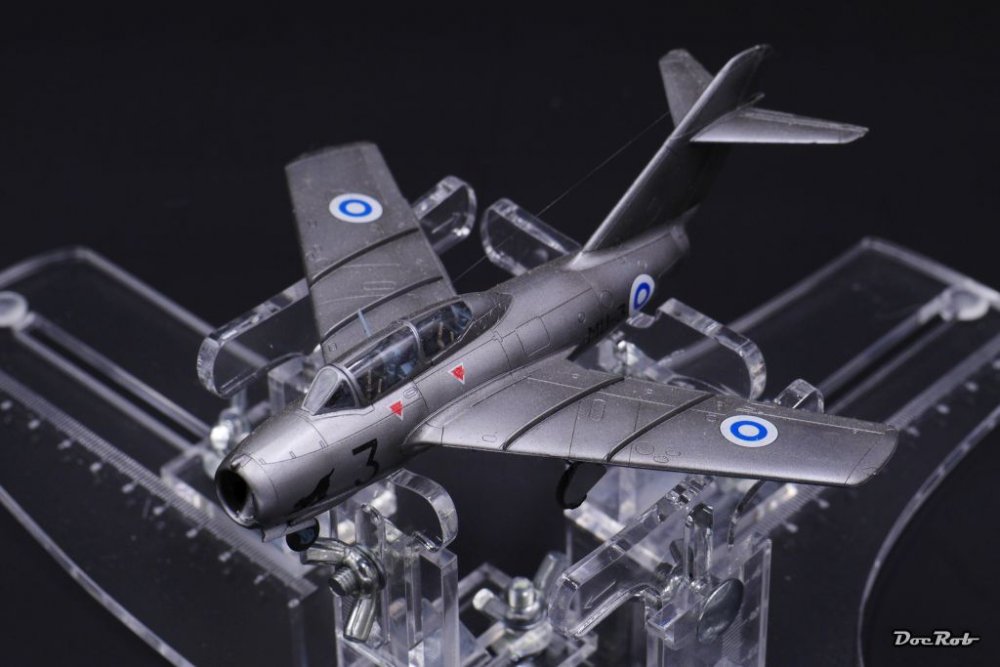
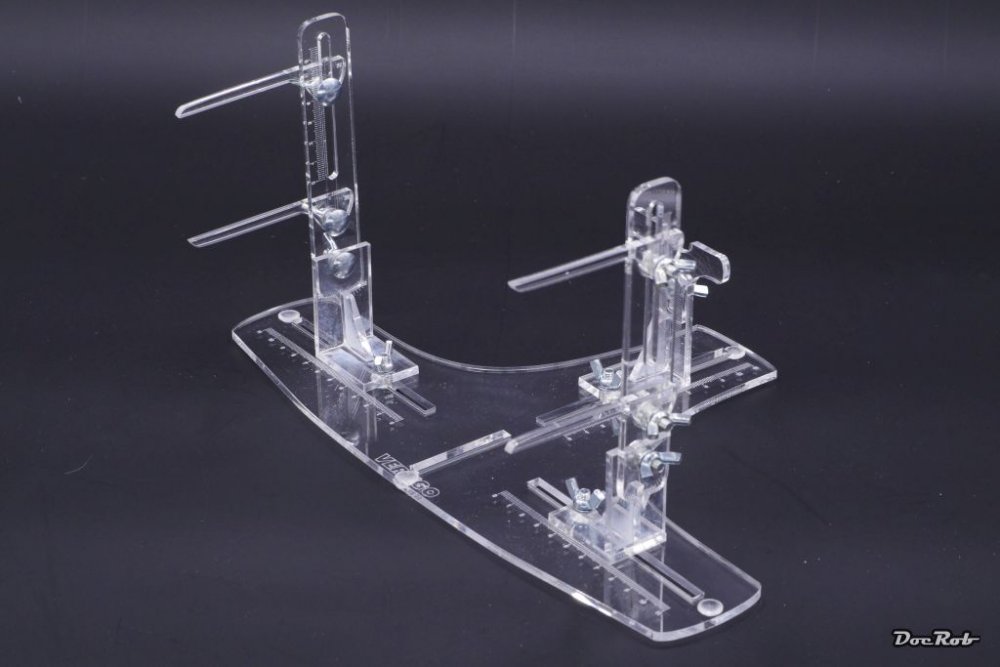
Hola Plastic Cement addicted Community, Since some weeks I tried to figure out which kind of jig would be the best and most flexible to assemble, paint and rig single and double winged planes of different sizes and shape (hope to avoid a triplane ). I tried to contact a member of LSM because I liked his construction of a metal moveable arm with an attached metal jig, but the attempt to made a contact failed (https://forum.largescalemodeller.com/topic/3175-bos-model-claw-by-johan-bos-aka-pfuf/) and so I did some research about jigs and ordered one made by Vertigo. I recently recieved the package from Slovak company Vertigo-miniatures which included two separate sets of jigs. "EVO 3224 (VMP007)" is the basic jig for monoplanes and "Upgrade set Basic+EVO for 3224 (VMP011)" enables you to enhance the jig for biplanes. http://www.vertigo-miniatures.com/vertigo/eshop/15-1-VERTIGO-JIGS) The Package includes the very cleanly contured transparent acrylic parts, some of them with engraved scales on, lots of screws, some rubber feet and some foam material for protecting the models. The acrylic parts are one sided secured with an adhesive foil, which has to be removed before assembly (If the parts are engraved the protection foil is always on the other side). You have to glue all the angled parts and the traverse triangles. The manual suggests to use CA glue (which I did) or Epoxy glue. Since I didn't use Future before glueing with the CA, I got a little fogging on the transperencies, but hey, it is a tool, so no harm done. All in all the assembly took me about an hour and there were no difficulties to master after reading the A4 printed manual sheets. Everything fitted perfectly and no parts were missing. As an ex engineer I would have liked a better quality for the screws, but the included ones do the job. That's the parts count of the two packages without the screws. The monoplane setup Biplane setup With Hasegawa 1/32 Raiden for size comparison (three point fixation). The jig is labeled for 1/24, 1/32 and 1/48 scale, but my tiny 1/72 Mig-17 finds a save place too (four point fixation). Some more details Scales are engraved preciesely and you can adjust all the angles. My final thougts are, that the jig is a very flexible tool which will act as the often mentioned third hand in many cases of assembling, painting and decaling and yes, rigging, without ruining your bird by permanetly touching it and break loose tiny parts (own experience). It is robust and widely adjustable and will adopt to nearly every kit. The T-shape of the parts supporting the kit give you the possibility to secure your kit with a rubber band. You would have guessed, that I higly recommend these Vertigo jigs, although I will construct a one armed one myself in some future time, especially made for maximum flexibility while airbrushing kits. Cheers Rob


-
- 3
-

-

-
Wow, that looks bad and if I look for the covered rivets the decals seem realy thick. Cheers Rob
-
Another little gem as you are staying with the Brits and again nice attention to detail. I like the exhausts and the plumbing. What have the issues with the decals been? I try to avoid kit decals and use masks for roundels and letters. For some future builds I will have a shot on HGW wet transfers and hope for better results. Cheers Rob
-
Wow, I like your Mossie a lot, very nice paintwork and attention to detail and I like the all open (show me everything) aproach. A great way to start your LSM stint, welcome by the way. If you allow a little criticism, there is to much shine on the uniform of the pilot for my liking and the wheels seem to shine a little too. Maybe it is the lighting or a flash. Cheers Rob
-

Airfix hawker typhoon Mk.1B 1/24
DocRob replied to coolboxx's topic in LSM 1/35 and Larger Work In Progress
Hi Darren, impressive work on the camo and a great idea about the masking. As I saw the first pictures of ocean gray I thought what the heck, but then it clicked . We share the same preferences for the airbrush, mate. A magnificent tool, I like even better than my old Rotring ones, which are engineered more refined, but are not so easy to use for modelling. They are better to use with inks and other non pigmented colors. Cheers Rob -
Gloster Meteor Mk.III
DocRob replied to joeg's topic in LSM 1/32 and Larger Aircraft Ready for Inspection
A very nice Meteor, I like the paintjob. Cheers Rob -
Airfix hawker typhoon Mk.1B 1/24
DocRob replied to coolboxx's topic in LSM 1/35 and Larger Work In Progress
Hi Gus, make sure that all four barrels are in the packet. I had just a single barrel in my package and had to return it for annother one. My dealer told me that there is a batch of mispacked ones around. Cheers Rob -
Airfix hawker typhoon Mk.1B 1/24
DocRob replied to coolboxx's topic in LSM 1/35 and Larger Work In Progress
Thanks Mate, I will keep your advice in mind. Cheers Rob -
Airfix hawker typhoon Mk.1B 1/24
DocRob replied to coolboxx's topic in LSM 1/35 and Larger Work In Progress
Hi CB, nice job on the Tiffy, everything is looking great. Love the look of the wing guns. Did you had any problems with the fitting of the fuselage parts? The complicated nose shape cries for such issues. Cheers Rob -
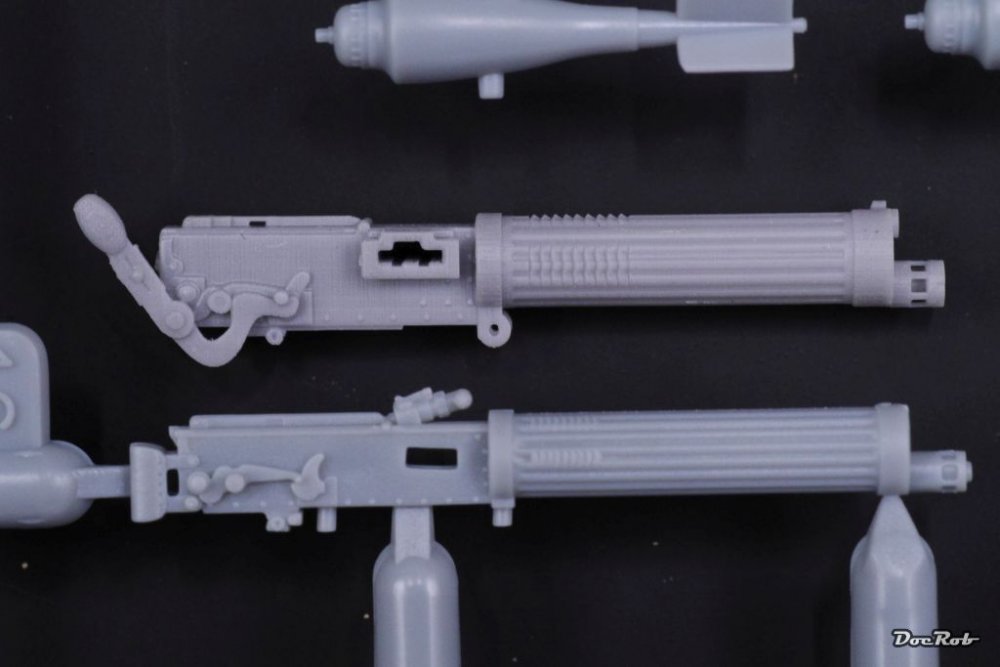
Hi Rick, I will not comment the right selection of the GP Turnbuckles, as I'm no expert and I think others more into the subject will answer. Where I can be of help is your question considering the quality of the GP guns. For some of my WNW Kits i chose the GP guns and I went the extra mile to make a little photo comparison for the D VII and the Snipe. Spandau 08/15 GP-No. 32060 vs. WNW for the Fokker Vickers British HylandType B GP-No. 32062 vs. WNW for my Early Snipe For me there is a clear advantage to the GP guns, especially the 08/15 with that perforated cooling parts. For my Brandenburg W.12 I will use ABER Brass 08/15 cooling jackets and barrels combined with the WNW plastic. The good thing on brass is that you can use burnishing fluid to blacken it to a very convincing look, much better than airbrushed. So is it worth the extra money, you have to decide for yourself, but given the very visible appearance of the weapons on a WW1 plane I will milk my budget. Cheers Rob

-
F-16 Block 32 "Blizzard" Aggressor
DocRob replied to Uncarina's topic in LSM 1/32 and Larger Aircraft Ready for Inspection
Nice and colourful result you achieved here. That has to be an agressor scheme, as it is hard to imagine where that camo should blend in . Is it true that the scheme continues on the lower fuselage half too? Cheers Rob -
Trumpeter 1/32 A1-J Skyraider
DocRob replied to WattsNZ's topic in LSM 1/35 and Larger Work In Progress
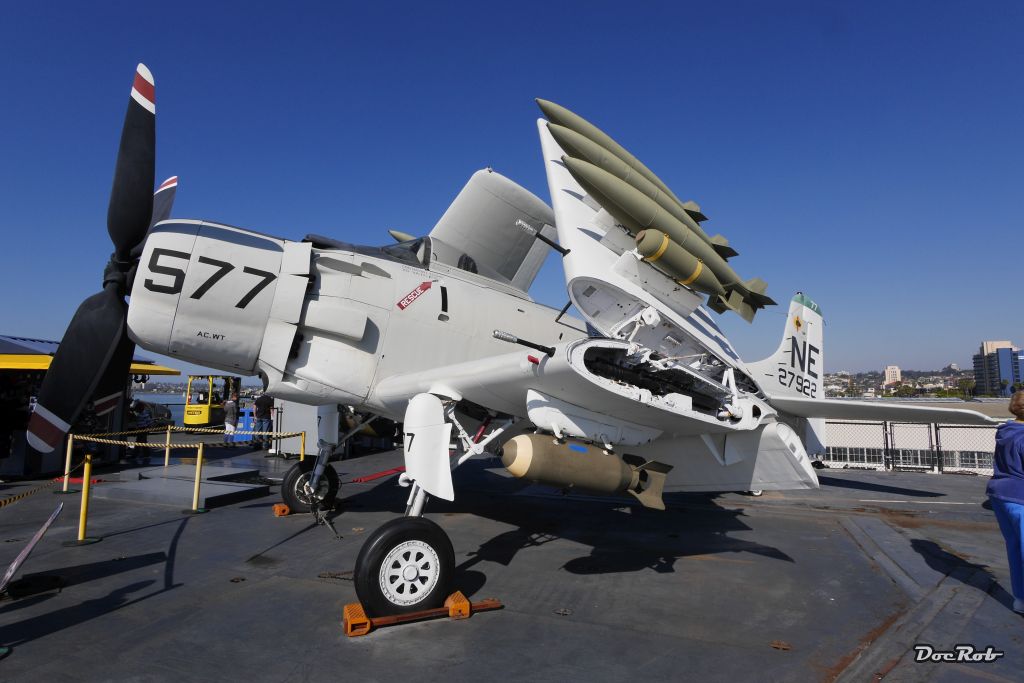
Little teaser, to get a look at the real thing. Shot was taken on Deck of USS Midway, towed in San Diego.
-
Trumpeter 1/32 A1-J Skyraider
DocRob replied to WattsNZ's topic in LSM 1/35 and Larger Work In Progress
Nice progress on the Skyraider and lots of fine detail work included, chapeau. The name Skyraider is always a little irritating and misleading to me, because it looks like a tractor and lacks the elegance of it's name. Nonetheless a very interesting and tempting plane. Cheers Rob -
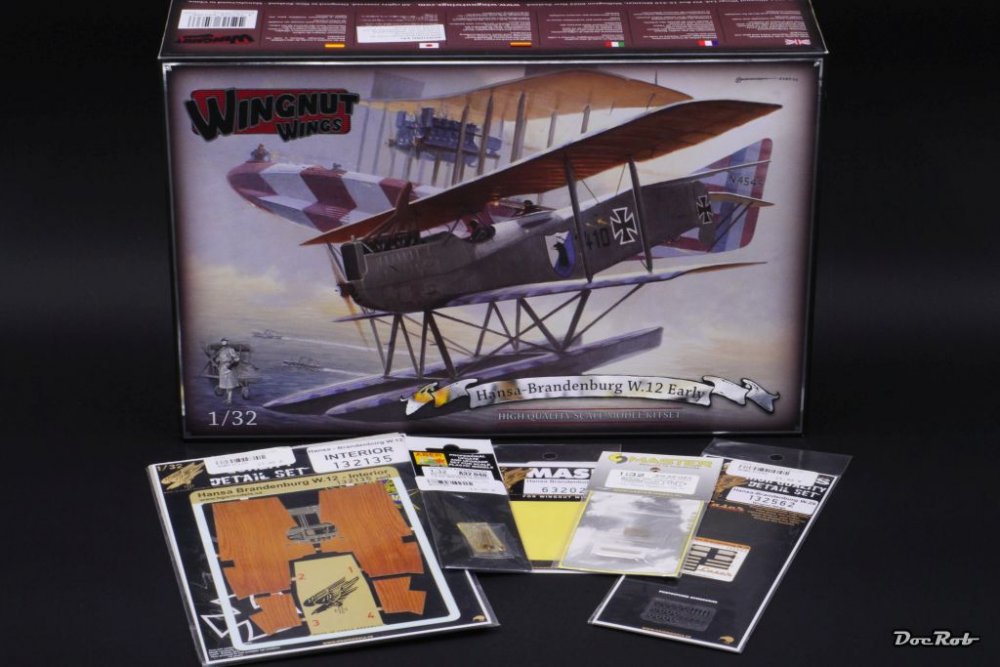
I'm a happy man, the correos (post) brought me this beauty today withe some AM. I was sad, I missed the W.29, but after a period of getting myself convinced, that I can live with an upper wing , I hit the buy button as I'm not up to the Duelists-Package containing the W.29 and the (much loved, but modelwise feared) Felixstowe. I added some Aber 08/15 MG and a Master Parabellum, some masks and (Oil color coward), an interior set from HGW containing wood decals and some PE and some fabric belts made for the W.29, but they seem to fit here too. I have no plans when to start, but it will be a pleasure build, I'm sure, great subject, not much rigging, nice schemes, why waiting? Cheers Rob
-
Trumpeter 1/32 TBM-3E
DocRob replied to joeg's topic in LSM 1/32 and Larger Aircraft Ready for Inspection
Nice TBM, welcome to LSM and thanks for sharing that beautiful Avenger. I really like the colour scheme and the finish. One of these days I have to get me one too, since I was tempted at least a dozen times Cheers Rob -
There is no way for modelling without a beer , one of the most underrated aspects in our hobby. I see future releases of the kind like Ammo or MIG titeling "Beer drinking and Finishing". And there is still room to improve, have I mentioned the heavy tin foil of wine bottles, just perfect for modelling, I seem never able to find the collected ones, so I have to open another bottle . It has become an adault hobby, no question, seperates the men from the boys. Cheeeeeers Rob
-
Looking good, like one of those Hasegawa-Feelgood-Kits. Sometime it is comforting to not have to think about the plastic and to fully concentrate on the finish. Cheers Rob
-
Looking nice Gus, the Barak is developing very well. I like the camo scheme and yes, the human eye mostly has an advantage above these digital cameras . Shading effects are always difficult to depict with a camera. By the way, congrats to your festivities. Cheers Rob
-
Wow, can't wait to see this one progress. Cheers Rob
-
J2M3 Raiden Hasegawa Finished
DocRob replied to DocRob's topic in LSM 1/32 and Larger Aircraft Ready for Inspection
Hi Bevan, I used the Maketar masks for my Corsair build (https://forum.largescalemodeller.com/topic/4920-another-corsair-daphne-c-no-7-flown-by-james-cupp/) and the Raiden is the second time. They are trouble free to use, exactly fitting, pre cutted and adhere perfectly right. In the Maketar shop you can chose between Kabuki style or vinyl masks-sets. I went for the Kabuki (paperesque) ones, because I believe they dont shrink and they don't bent as much as the vinyl ones. If you plan to purchase them there is no need to buy seperate mask sets for the canopies, because they are included. I have some more sets in my stash (1/24 Typhoon, DO 335, and generic Sets for Ensignia), because I don't trust decals that much. Using masks allows you to be much more defined and subtle about blending these parts in. No silvering, no mirroring under a matte coat and no transfer film is bueno for me, albeit I will give the HGW Wet Transfers a try in future projects. Cheers Rob -
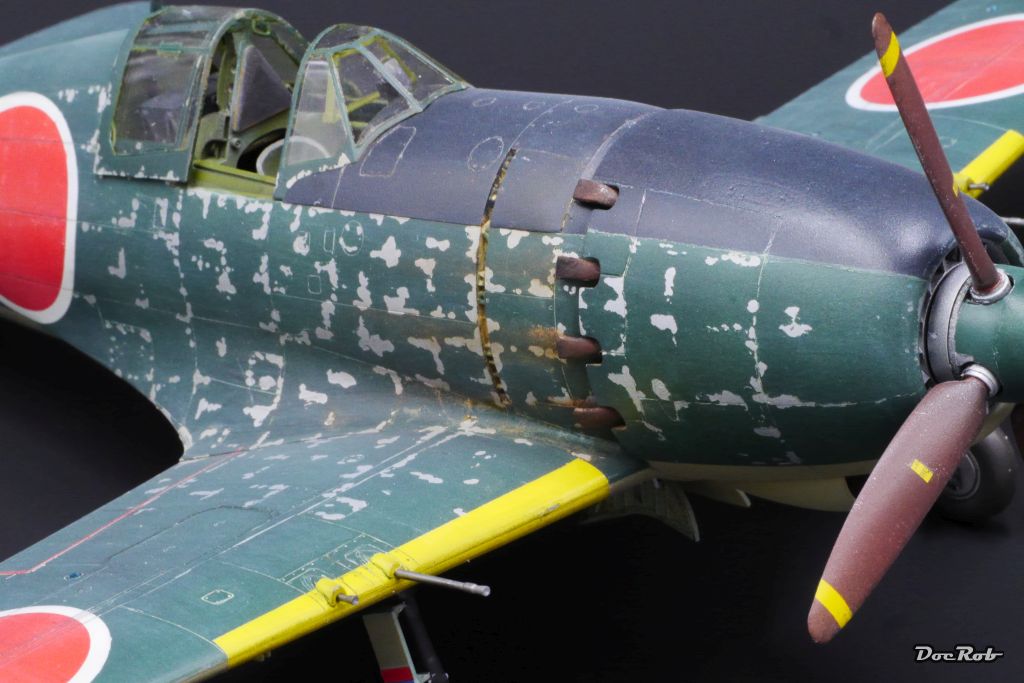
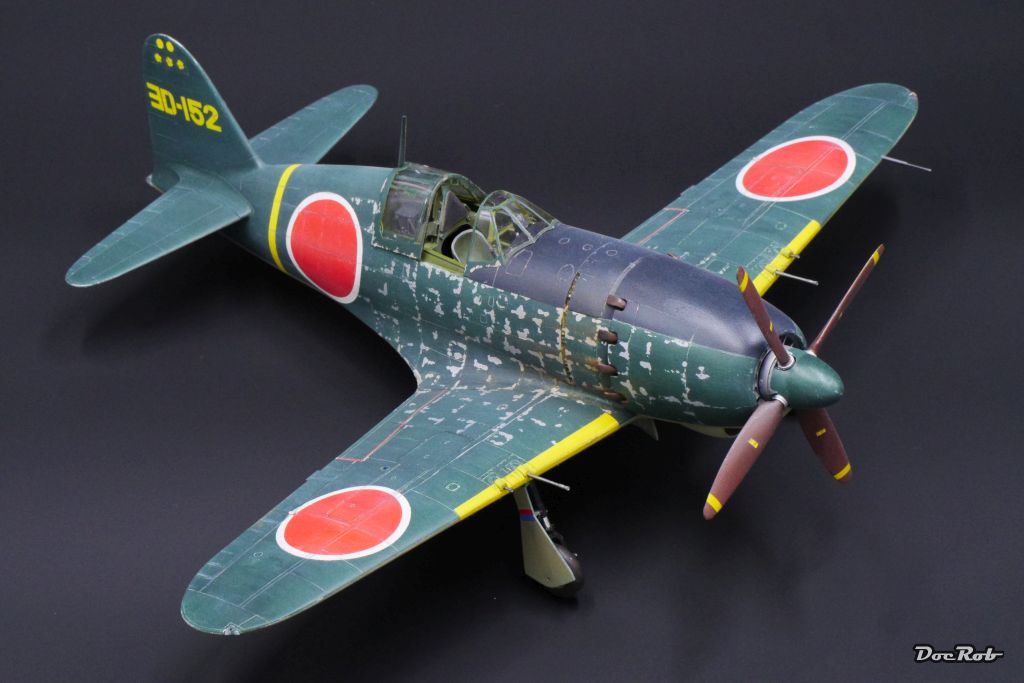
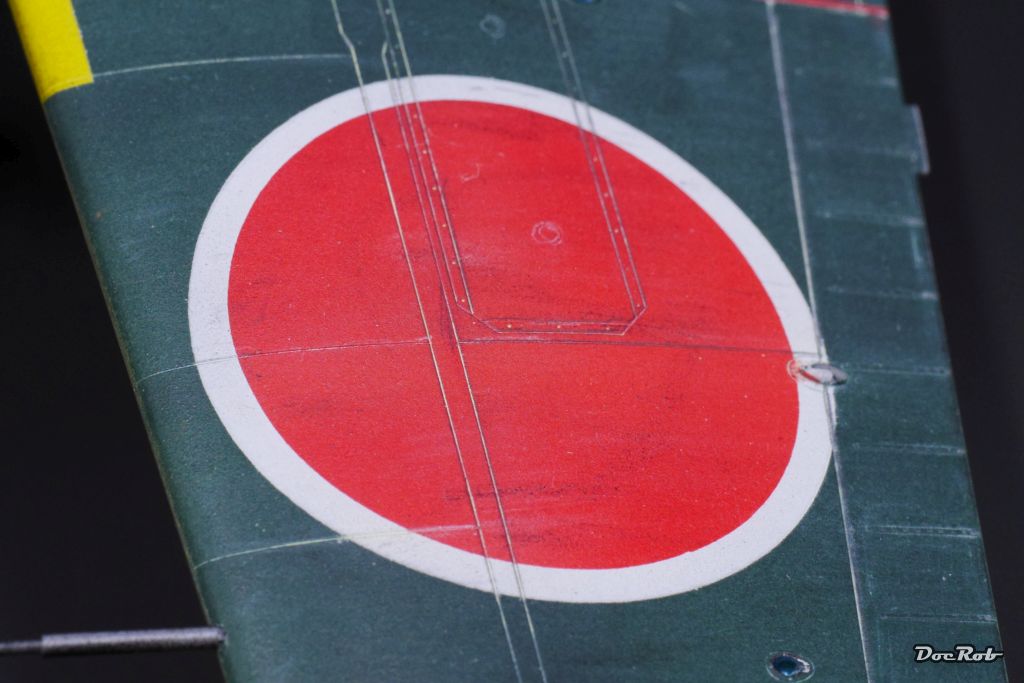
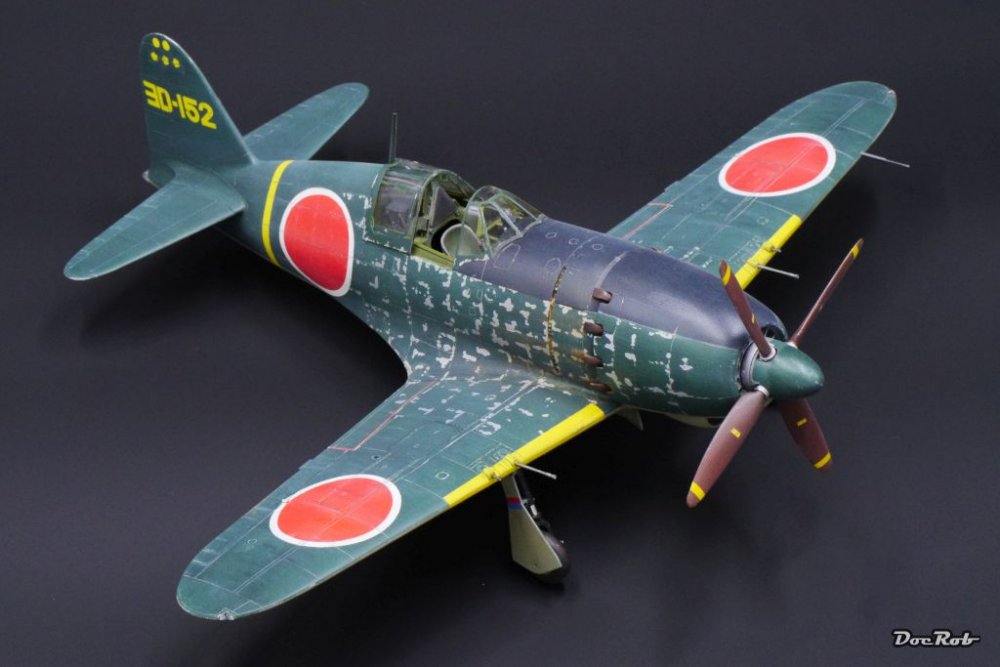
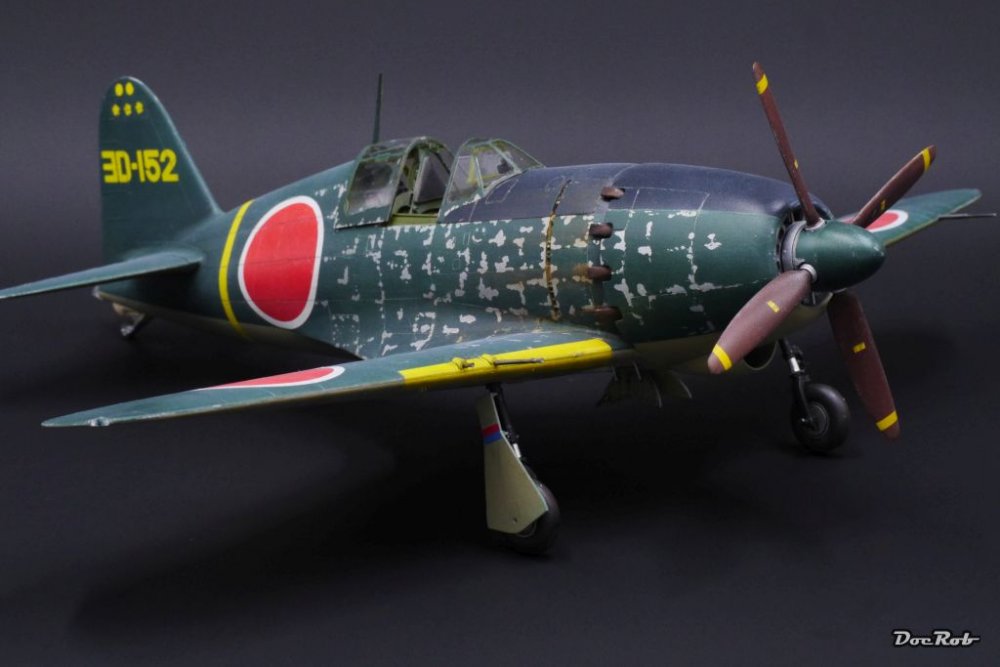
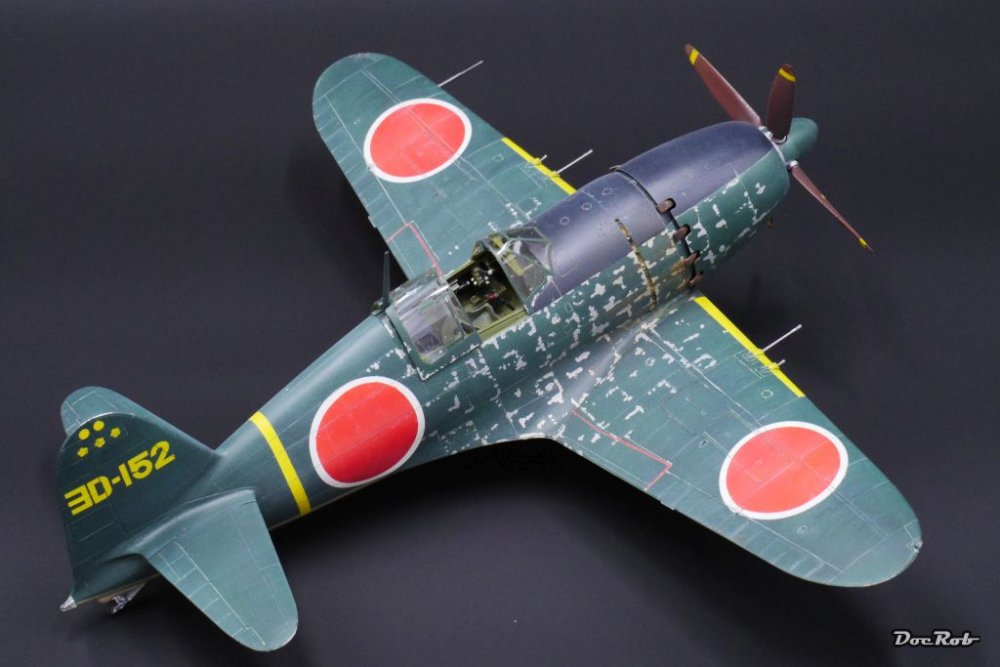
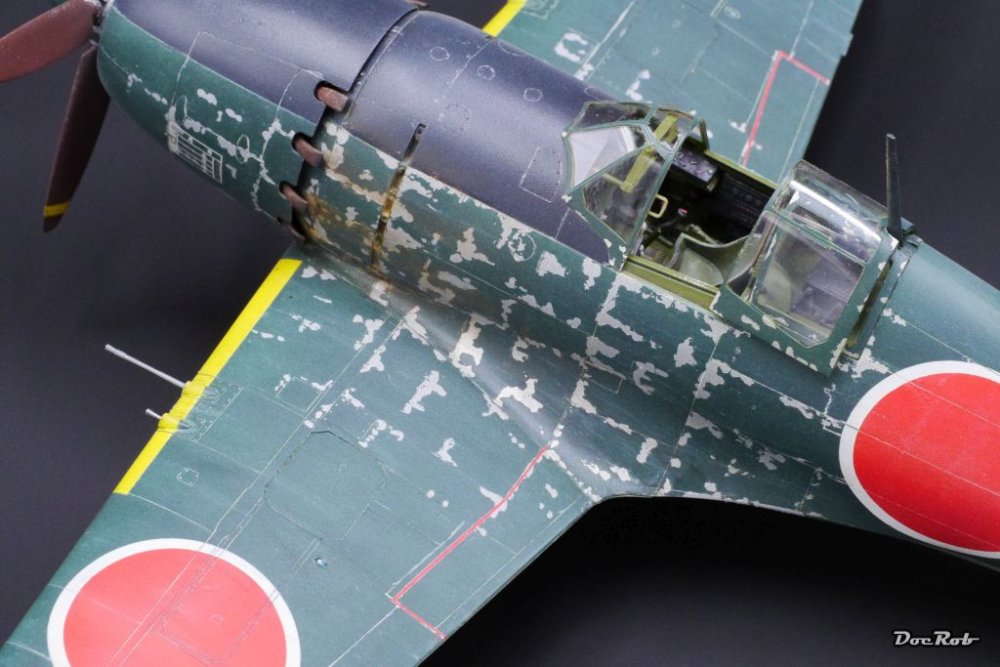
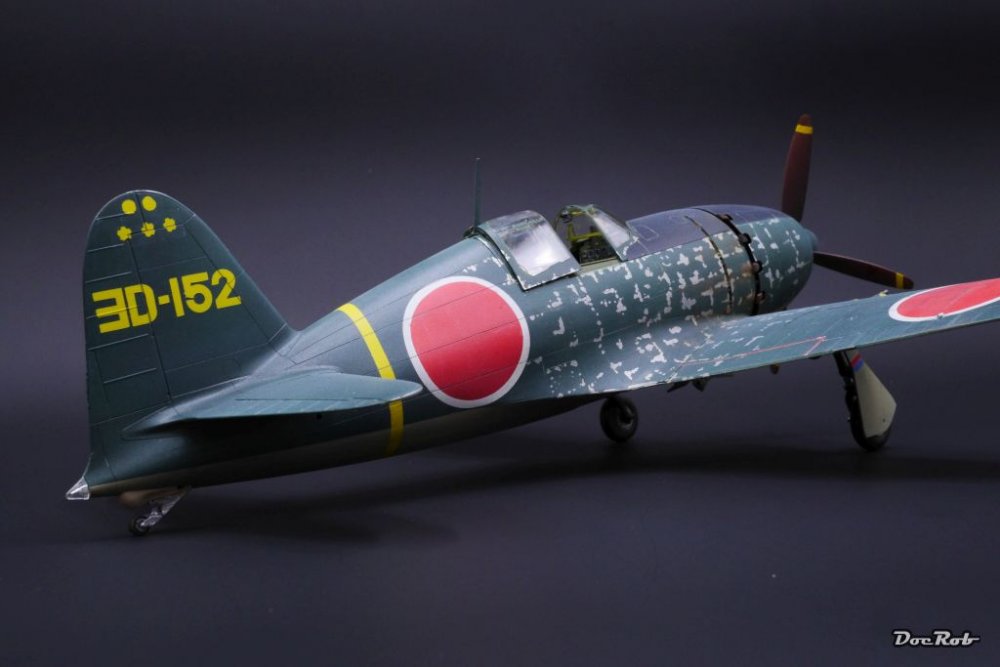
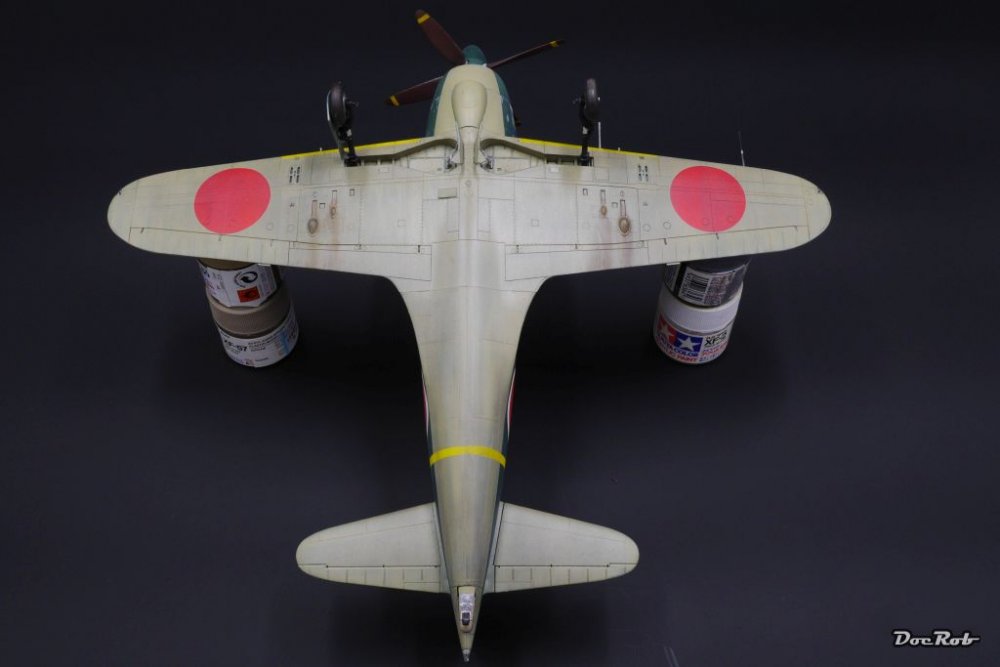
Hola Senhoras e Senhores, the review of James H reminded me that I owe you some pictures of my recently finished Raiden. So here is the result of my first WIP in LSM.https://forum.largescalemodeller.com/topic/5192-hasegawa-j2m3-raiden-in-between-build/ The built and painting was very enjoyable and problem free. Fit, design and detailing where on the money. The only slight downside is that you have to close some openings in the cowling for a change of armory and some cuts have to be made to mount the guns in the wings instead. Not a biggie, but what I didn't like too much was the absence of seatbelts, as I planned an OOB-build. When the painting of the included pilot will be finished, i will address that subject. I decieded against using decals and used Maketar masks instead. Feel free to critizise. Recommendations for enhancing my techniques are also very welcome. Cheers Rob


-
Hi Jeroen, next to the kit and some AM I own the Zoukei Concept Notes in my stash. http://volksusastore.com/webstores/scale/index.php?dispatch=products.view&product_id=4154 There is more detail about the Horten in this one then in others about different planes e.g. TA-152, covered by Zoukei Moura. Lots of historic and museum shots, a 1/48 technical drawing and some different builds of the model, which tackle different techniques by the way building the Hortens. The Zoukei Horten seems to be based on the measurings of the one on display in the Smithsonian Museum in the United States. I havent really decieded about how to finish mine, options are a non covered, stripped one, or a ready to flight one. Have fun with yours Cheers Rob
-
Will this one be another wingless effort? Cheers Rob
-
Trumpeter 1:32 Grumman Wildcat
DocRob replied to Mish's topic in LSM 1/32 and Larger Aircraft Ready for Inspection
How many stars do I count, one, three, yes Five Stars for your build . Nice