DocRob
-
Posts
7,041 -
Joined
-
Last visited
Content Type
Profiles
Forums
Events
Gallery
Everything posted by DocRob
-
I haven't heard recent recordings, but have seen them live on stage several times in Berlin some years ago. I liked the concerts and like their analogue approach while recording in studio with vintage equipment, which is audible in their vinyl's. Louis Armstrong, such a character, what a voice, love his recordings, which are so soulful and plain beautiful. All of that and Beethoven is music to be best digested on a good turntable or live on stage. Cheers Rob
-

Trumpeter F4F-3 Late - 1/32nd
DocRob replied to Bomber_County's topic in LSM 1/35 and Larger Work In Progress
Nice Phil, but these flaps can be fiddly and you should work out the sequence of bendings very thorough, guess how I know. Cheers Rob -
Beethoven and Scotch seem to be not the best match for airbrush sessions. I like both, but not while working on kits. I like the paintjob minus the spill and I think Martin is right, with some very light sanding and respraying all will be fine. Have to go to prepare a Tuxedo and have some Kitty Daisy and Lewis on the turntable. Cheers Rob
-
Nice work on that beautifugly plane Phil, the design is - err - lets say unique , but I like the shape of the Lysander and the work yo put into yours. About the wings, I would say, a lot depends on the scheme you chose. The wing struts are maybe more in the way, than the wing itself. Cheers Rob
-
Duchess of Kingston - Beauty of the Seas - Wooden Sailing Ship 1/64
DocRob replied to DocRob's topic in Non LSM 'WIP
Muchas gracias Carl, it is indeed very different, from our usual stuff, but I like to widen my skills permanently and get easily bored with too much repetitions. In the moment the DoK build feels great and keeps my wandering mind occupied. Cheers Rob -
Duchess of Kingston - Beauty of the Seas - Wooden Sailing Ship 1/64
DocRob replied to DocRob's topic in Non LSM 'WIP
Thank you for the tip Mike, the tool looks absolutely gorgeous, sturdy and good to handle. I will try to buy one or to grind a bit on an old pair of pliers. I suspect my self made tool is not overly robust with the protruding brass tube. You are absolutely right about re using the pins. My tool drives them in halfway, same like it looks with these pliers. Cheers Rob -
Duchess of Kingston - Beauty of the Seas - Wooden Sailing Ship 1/64
DocRob replied to DocRob's topic in Non LSM 'WIP
Thank you Phil and I have my doubts about my ability in planking as well. You might not have done yourself a favor, building a tiny ship, which naturally leads to tiny radii and a lot of tapering and beveling of planks. I guess yours had only one planking, which is more difficult to get a decent result off, than double planking, where you can sand and fill the first layer and using very fine strips of noble wood for the decorative second planking. I hope, I can manage to find solutions for the difficult parts of the build, trying to plan ahead and peek a lot in other build descriptions, mainly in MSW. The very same . Cheers Rob -
Duchess of Kingston - Beauty of the Seas - Wooden Sailing Ship 1/64
DocRob replied to DocRob's topic in Non LSM 'WIP
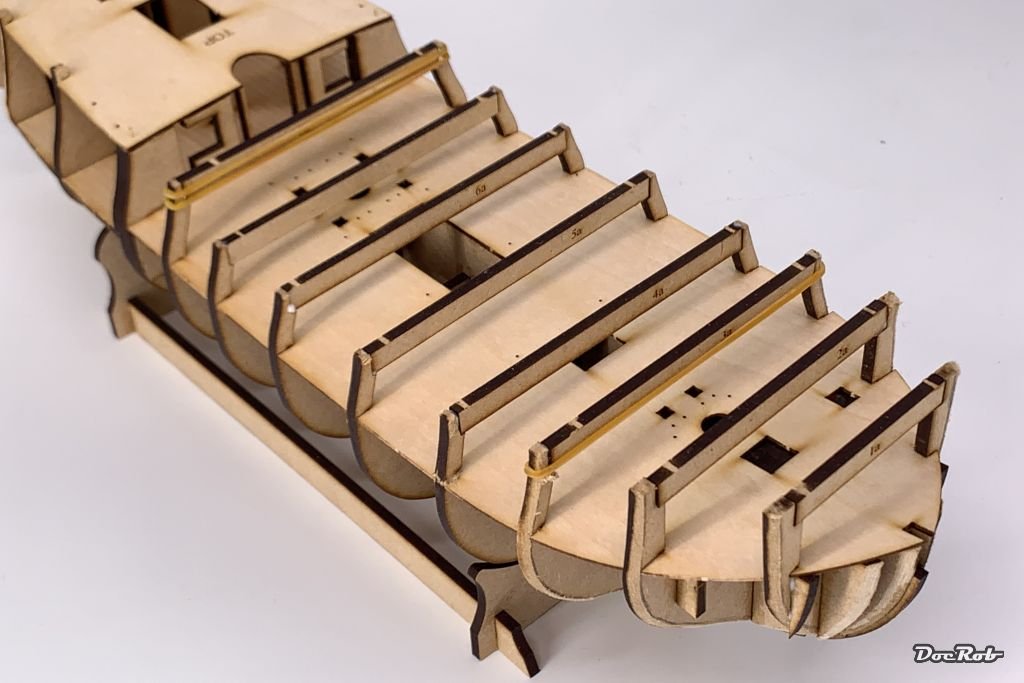
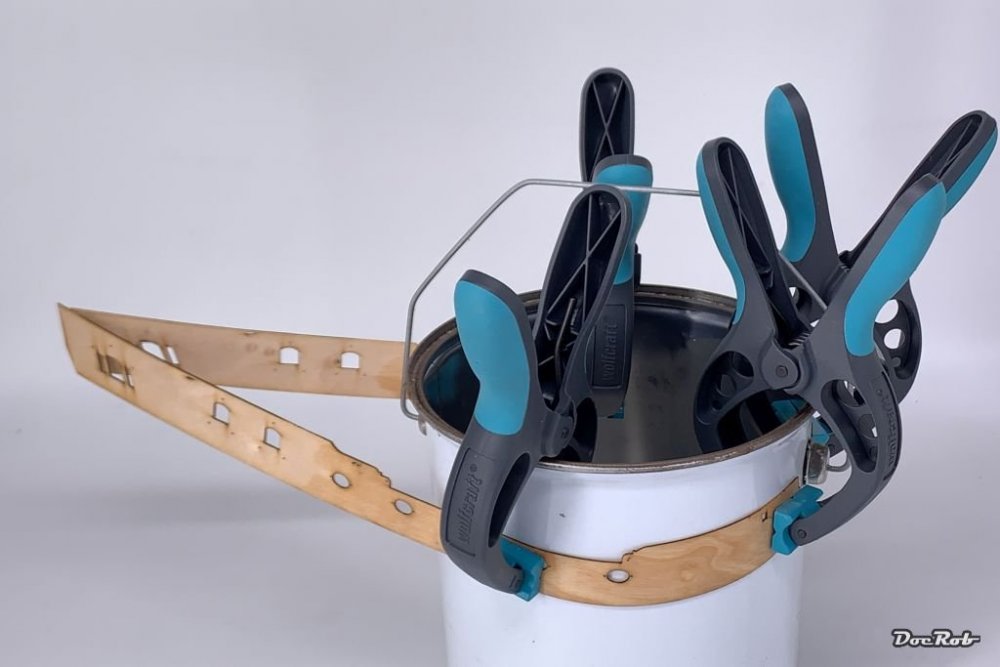
We had a very cold day yesterday and I decided, a bit of sanding would warm me up a bit and it did. Using 120 grit sanding paper on a block or simply by hand, depending on the curvature of the hull, I produced a lot of dust (using a mask), while shaping the spars and filler blocks smooth to accept the planking later. After three hours, I liked the result and checked with a plank, if all is fine. I will review the result today, as I think, these steps of preparation are critical for a good planking job. Planking starts with the upper bulwark pieces, which following the manual, I soaked in hot water for 30 minutes and then clamped it to a tin and leave the parts for drying for a whole day, lets see, if this will be sufficient, as there are many more parts, which will be pre bended this way. Cheers Rob

-
Dragon Panther A with Zimmerit
DocRob replied to GazzaS's topic in LSM 1/35 and Larger Work In Progress
Like Kai, I like the setting of the figures close to the tank. I probably wouldn't let them march in the near exact row, they form on your base. The size of the base isn't too small, I may would make it even more crammed with an old boulder wall on the side, to have a condensed atmosphere. Large bases with unused space, often look uninteresting to my eye. Dio setting is not only about being overly realistic, it's also a snapshot, like a photographers view and a photographer wouldn't want a boring picture. Cheers Rob -
What is on your bench right now ? Share a picture :)
DocRob replied to Martinnfb's topic in Modelling Discussion
This is what's in the Special Hobby boxing. Good enough for me, with maybe a bit of drilling out the barrels. Yours look big on the pic compared to the tools, but maybe this is only optical illusion. Cheers Rob
-
Duchess of Kingston - Beauty of the Seas - Wooden Sailing Ship 1/64
DocRob replied to DocRob's topic in Non LSM 'WIP
Ernie started a WIP on Speedy Peter. Cheers Rob -
Duchess of Kingston - Beauty of the Seas - Wooden Sailing Ship 1/64
DocRob replied to DocRob's topic in Non LSM 'WIP
Thank you Peter, by the way, I discovered the wheel - err - bummer, it's existing since a long time, somebody told me . Actually time was the trigger, as I need the pin pusher soon and to get one to my remote part of the world would have taken three weeks, I guess. Generally, I like to work with metal and wood, specially very fine things. When I was in my late teens, I made a mini replica of my Camera (Minolta X-700) from brass. It was only three cm wide and consisted of ca. 20 parts. By the time, I started my apprenticeship as an engineer and had access to all the machinery needed and it was one fun project among others. Cheers Rob -
Duchess of Kingston - Beauty of the Seas - Wooden Sailing Ship 1/64
DocRob replied to DocRob's topic in Non LSM 'WIP
I followed your progress with Speedy by the time Ernie and am really sorry to hear about your setback. Will it be possible to remove the boxwood planking or do you plan to sand it down or even do a third planking onto it. Thanks for the warning about the rudder, I will check that out on my DoK when planking. When I see all the angles and curved contours, specially in the stern area, I have some sweat pearls on my forehead. The manual though claims, that only one plank has to be tapered in the aft area, let's see... Cheers Rob -
Duchess of Kingston - Beauty of the Seas - Wooden Sailing Ship 1/64
DocRob replied to DocRob's topic in Non LSM 'WIP
I didn't knew about the Mr. Kopecek' passing. Sad news, I bought the saw and mitre blocks a year ago and they became irreplaceable tools on my bench. Cheers Rob -
What is on your bench right now ? Share a picture :)
DocRob replied to Martinnfb's topic in Modelling Discussion
I would go for brass barrels, as I like to burnish it. It looks way better than painted. Cheers Rob -
Duchess of Kingston - Beauty of the Seas - Wooden Sailing Ship 1/64
DocRob replied to DocRob's topic in Non LSM 'WIP
I always have to be prepared, so I build my own pin pusher to easier set the tiny brass nails in place and be able to push them into the wood without the nail slipping away, while holding it with tweezers or pliers. I used Albion Alloys brass tube with a inner diameter of 1,1 mm and micro sawed it in my tiny mitre (which will come in handy for making my own turnbuckles). I inserted a 1 mm brass rod of appropriate length and glued it into the tube with CA. This assembly was then glued into a round wooden grip, et voila, pin pushing the easy way. Cheers Rob
-
Duchess of Kingston - Beauty of the Seas - Wooden Sailing Ship 1/64
DocRob replied to DocRob's topic in Non LSM 'WIP
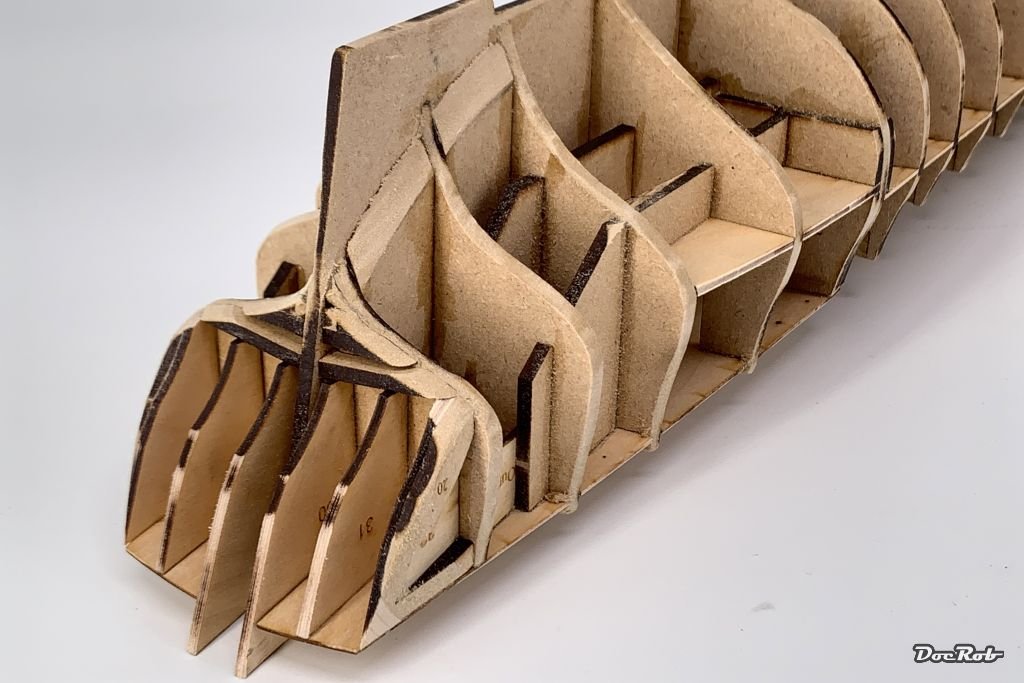
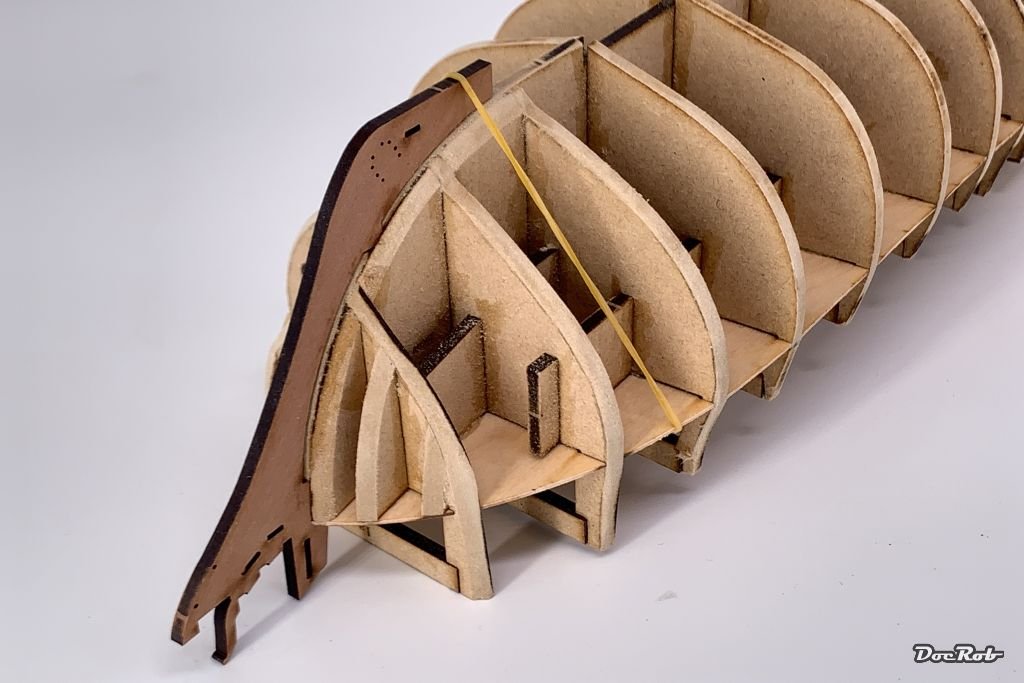
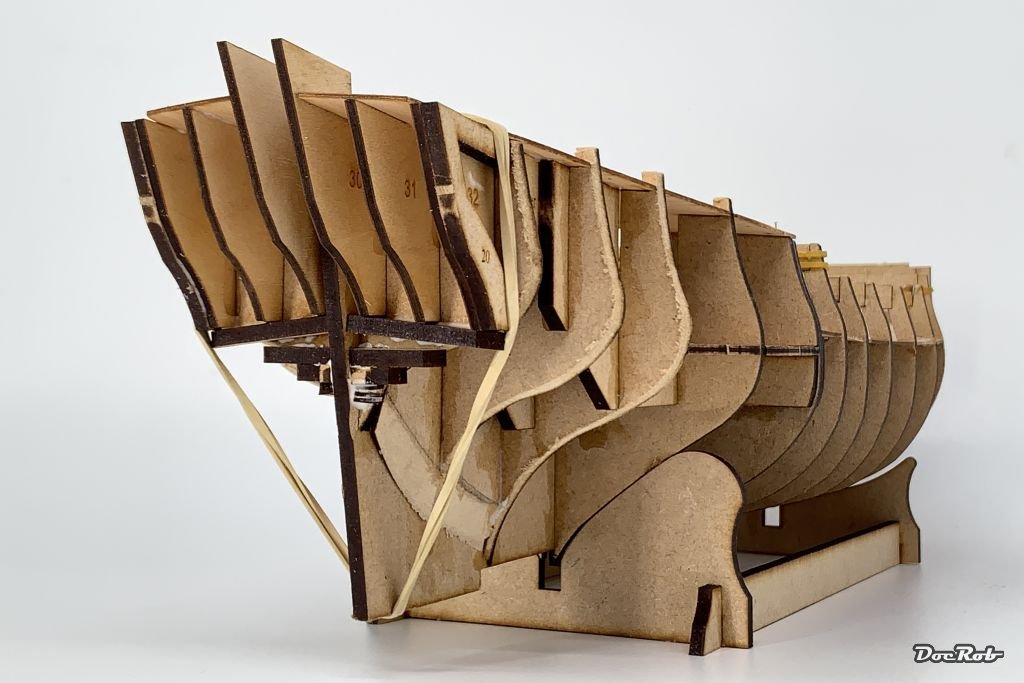
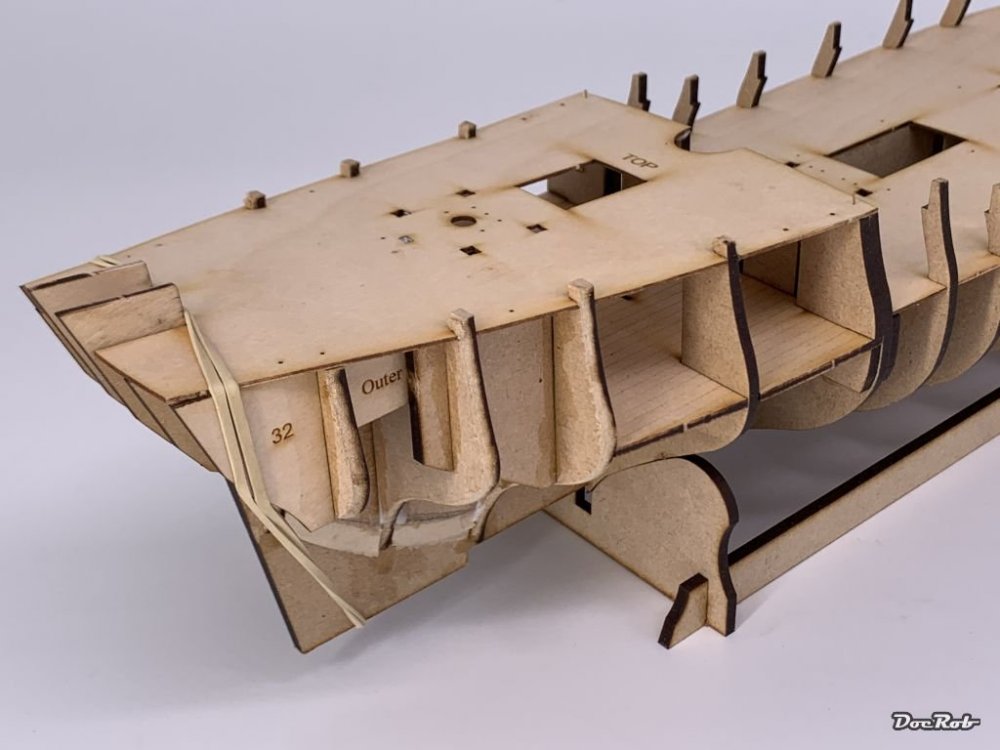
There are more stabilizing and pre-forming elements to be added, like these beveled supports in the critical curved aft part. For the beveling, I marked the wooden parts, slotted in place, with a pencil, removed them and used my very effective disc sander to grind the angles right. All the beveling is not final and one of the next steps, is sanding the whole hull framework to accept the planks properly. Next, I added the aft deck and glued it down, slightly warped and therefore forced to contour with brass nails and rubber band. I have to think about a nail pusher of some sort, because getting the brass nails into the wood is not that simple, as the wood is quite durable. I need lots of nails for the first planking and I will construct something from brass tube with a wooden handle. Some stern support details where added, to help getting the shape of that area right later Again clever thinking by Chris were the temporary bulkhead support beams, which allow to sand the outer contour of the hull to be sanded and later planked without breaking the fragile parts during handling. They were glued in place and will be removed later along with the bulkhead tabs above the deck, to accept the planked decking. Now it's curing time for the glue, to have a durable base for the following hull sanding. Cheers Rob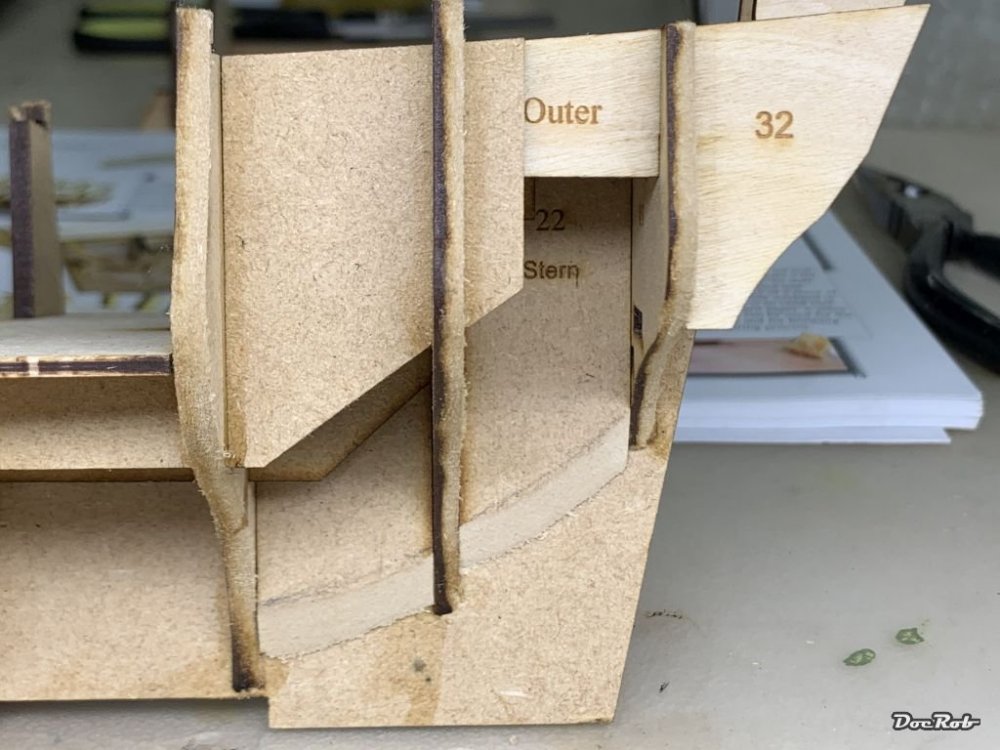


-
Sorry, I got that wrong, Carl, four Spitfires, phew... Cheers Rob
-
Duchess of Kingston - Beauty of the Seas - Wooden Sailing Ship 1/64
DocRob replied to DocRob's topic in Non LSM 'WIP
I never tried an ISUP until now and due to stormy conditions it will have to wait in the bag for some days. I thought, it's a nice break for calmer days, where proper surfing or bodyboarding is not possible. Due to the changing climate, we had more of these calm days with small waves and almost no wind lately. There's lot's of pittoresque coastline to discover on my island. My dog loves the sea as much as me, but only up to the belly. He runs into waves and back out, but doesn't like to swim, so for now, no passengers planned. Cheers Rob -
Duchess of Kingston - Beauty of the Seas - Wooden Sailing Ship 1/64
DocRob replied to DocRob's topic in Non LSM 'WIP
Thank you Gaz, building wooden ship is quite a change for me, but not completely new to me. I build a Billing Boats trawler in my twens and some wooden RC boats, when I was even younger. Some years ago, I started to build a wooden Kutter, but temporarily set the kit aside with the first planking finished. I have two 350 scale ships in stash a German Zerstörer and the Queen Elisabeth (the warship along with an Italerie 1/35 Vosper boat along loads of AM for all these kits, but shied away from ships until now. That's especially funny as I love the sea and all connected things. Last week, I thought about purchasing the new released USS Arizona from Eduard, which is old Hobby Boss plastic, but has lots of goodies added, which may leave only a wooden deck to desire. Cheers Rob -
Duchess of Kingston - Beauty of the Seas - Wooden Sailing Ship 1/64
DocRob replied to DocRob's topic in Non LSM 'WIP
Thank you Ernie, bummer with the Speedy's planking. I'm a bit afraid of the planking too, specially with the tapering and beveling of the second planking, in my case that's pear wood. Let's see about the decorations, which will be demanding and there is another part of the build, which is frightening me a bit. It's about the finish of the wood, where I might try shellac for the wooden appearance, but have to find a way to prime the wood properly for painting and airbrushing with colors. The Amati Fifie, which I believe is designed by Chris is on my list as well as the Sphinx, but only if I succeed with the DUK. Cheers Rob -
Duchess of Kingston - Beauty of the Seas - Wooden Sailing Ship 1/64
DocRob replied to DocRob's topic in Non LSM 'WIP
Thank you Hubert, I had the same thoughts about the comparison of the DUK-kit with Tamiya's finest, directly after opening the box then and even more now, when I started the build. I chose the Vanguard kit as the first attempt in wooden ships since a long time, as the perfection of it is absolutely helpful and the manual is full of good tips and hints. Cheers Rob -
I ordered my Kelik IP for the Gladiator three weeks ago, when there was (relative) peace in Ukraine and received it yesterday with the war ongoing. Strange times, where it feels harder and harder to concentrate on trivial things like modelling. Cheers Rob
-
...and that from the man, who once had SEVEN P-40's on the bench, along some other projects, I think you chicken out Carl . You'll love the MikroMir Fokker. I built it last year and it was one of the most satisfying builds ever. The kit isn't perfect and the build is demanding but rewarding all the same. Cheers Rob
-
Dragon Panther A with Zimmerit
DocRob replied to GazzaS's topic in LSM 1/35 and Larger Work In Progress
I hope you are feeling better now with your jab issues and that the flooding situation has become better too. I like your fashion show above with all the attention you put into the clothing. I really like to see, how everything comes together in the end. Cheers Rob