DocRob
-
Posts
7,054 -
Joined
-
Last visited
Content Type
Profiles
Forums
Events
Gallery
Everything posted by DocRob
-
Tail section looks great with the PE grills, Harv. Sometimes it's a shame, that you have to paint the nice brass shine of the PE. Cheers Rob
-

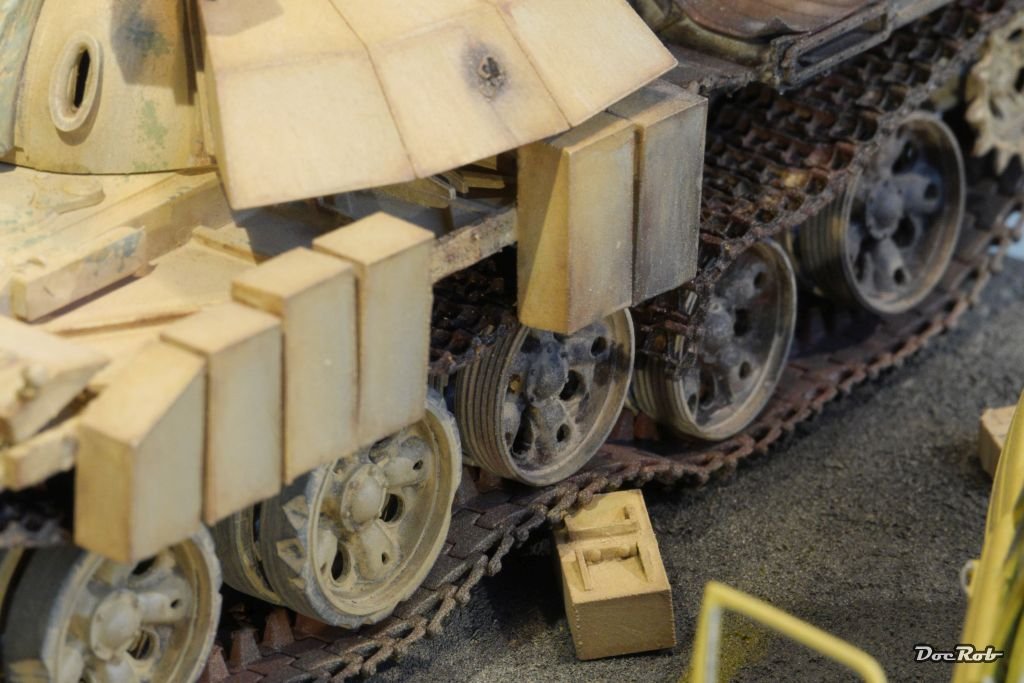
Франкентанк Т-34 in 1/35 scale
DocRob replied to GazzaS's topic in LSM 1/35 and Larger Work In Progress
I made one attempt on a burnt out tank and it was a lot of fun. You can play with corrosion, smoke and heat faded colors. With good imagination about what heat does to the used materials, it's not that hard to achieve great results. Your prepared T-34 looks like a great canvas to apply some damage. That's what I've done to my T-55 Enigma some years ago. Cheers Rob
-
Some good thinking on hollowing the sleeves and slight color variations on multi person displays, I like your approach, Gaz. I will follow your face painting clinic with interest, as I suck in this area, which often keeps me from finishing planned dios with figures. Cheers Rob
-
Revell P-51D Mustang - 2nd time around
DocRob replied to Peterpools's topic in LSM 1/35 and Larger Work In Progress
Somehow I knew, the wings would be a task in itself to get the build ongoing. You seemed to have managed the obstacles nicely, Peter, as the wings absolutely look the part. I'm a bit like Gaz, I would question myself at least more than once to buy another Revell kit. Building itself is not my favorite part of the hobby and often bores me. Spending extra time with that phase, needs a satisfactory explanation for myself, like in the case of the Arado 234, that there are no other players and I want to build one. It's good to hear, that scribing went well and I will benefit from your experiences with the Tamiya engraving tool, thanks for that. Sharpen the UMM scriber shouldn't be to hard, if necessary. I imagine a Japanese grinding stone with one coarse side and the other to hone the material would do the job, with careful strokes in the correct angle. Cheers Rob -
Arado 234 Nachtigall on Speed
DocRob replied to DocRob's topic in LSM 1/35 and Larger Work In Progress
Thank you Peter, I'm not very eager about cutting clear parts, but somehow managed to not break the part, thankfully. This kit is really a mixed bag, with so so plastic and absolutely marvelous resin parts, but hey, I really love the 234 and thought about buying another one to build a single seater with winter camo, which would ease the build by far. Cheers Rob -
Arado 234 Nachtigall on Speed
DocRob replied to DocRob's topic in LSM 1/35 and Larger Work In Progress
You make me curious Carl, as you seemed to have built a Fly Arado, but no pics. Thank you for the generous offering concerning the clear part. For now, I think, I will make a clear hatch from some other material, as I think this would be a removable hatch without hinges, that wouldn't be too challenging. The FLy part has the misaligned engravings, which had to be removed and polished out. I let you know for sure though, when ran out of options with that part. Cheers Rob -
Arado 234 Nachtigall on Speed
DocRob replied to DocRob's topic in LSM 1/35 and Larger Work In Progress
I have some PE templates too, which are thinner than my steel ruler and will be fit for the job. Circles are another breed, I think, you cant use the Tamiya engraving tool for that. I think this is only possible with a pointed tool like a needle. Cheers Rob -
Arado 234 Nachtigall on Speed
DocRob replied to DocRob's topic in LSM 1/35 and Larger Work In Progress
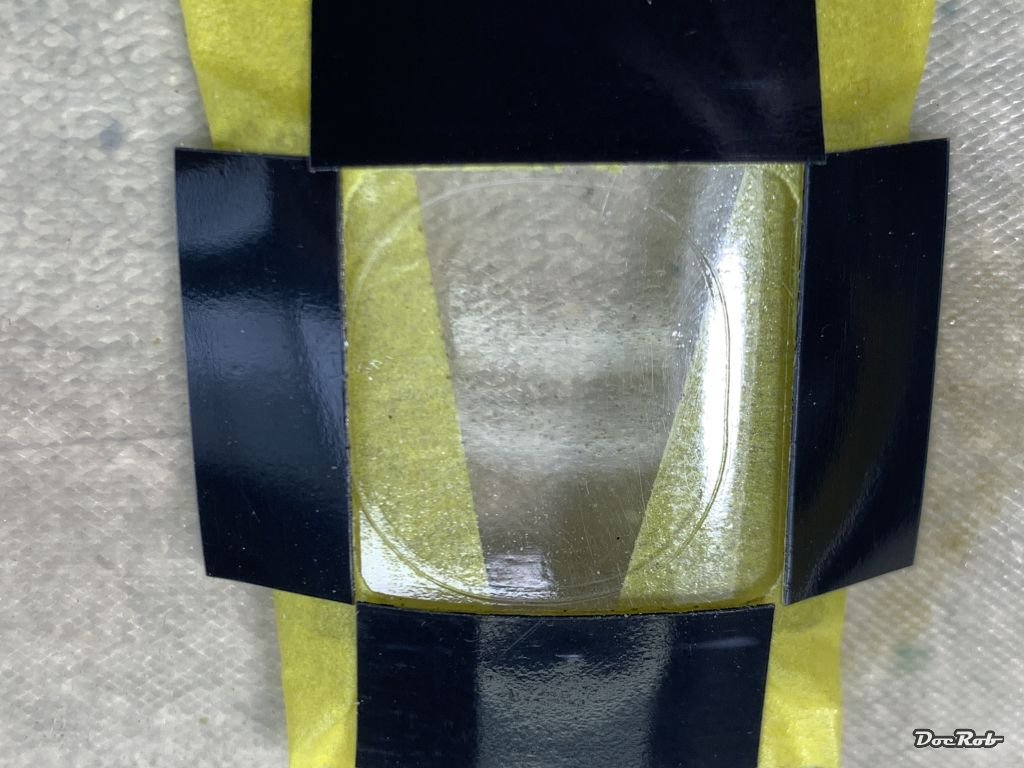
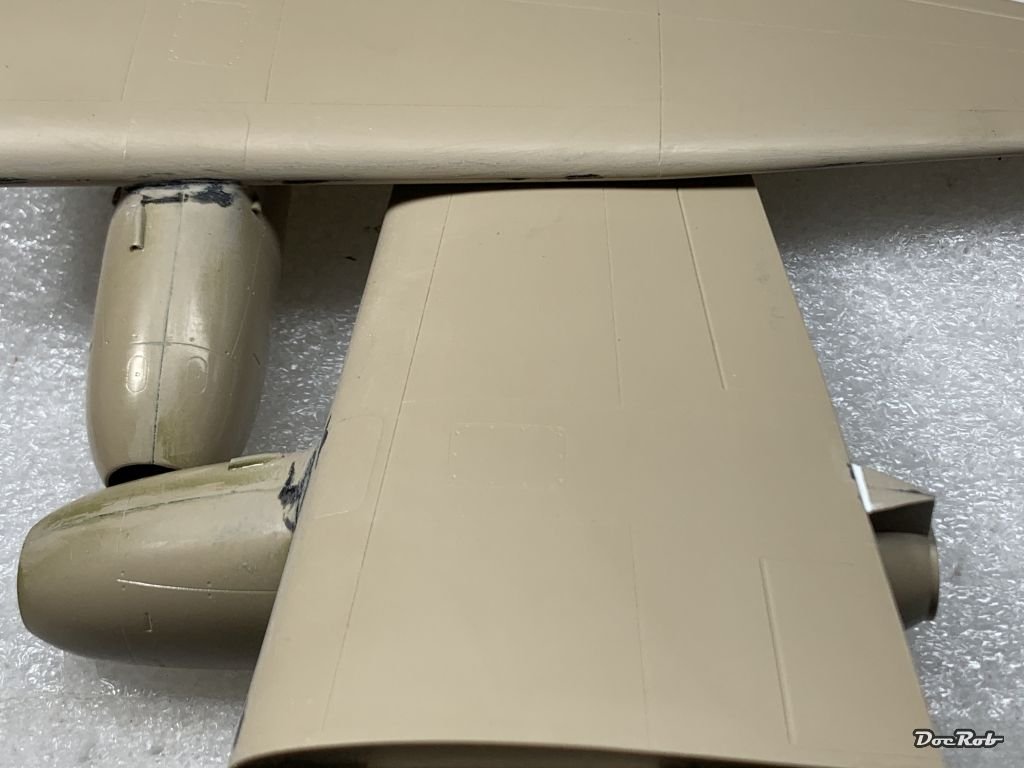
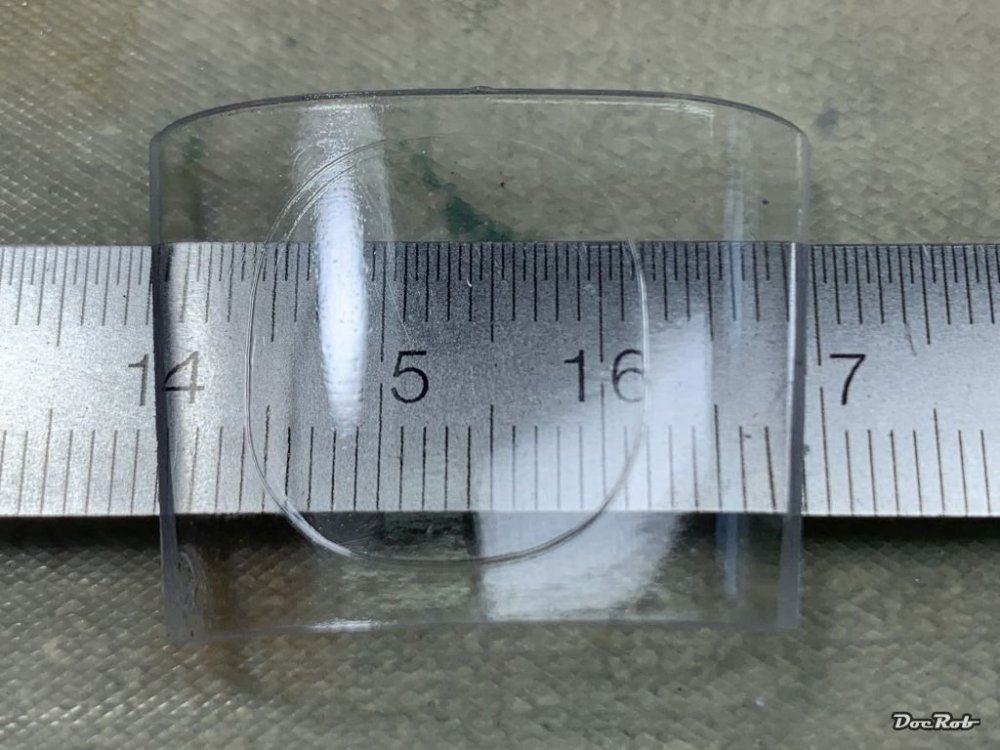
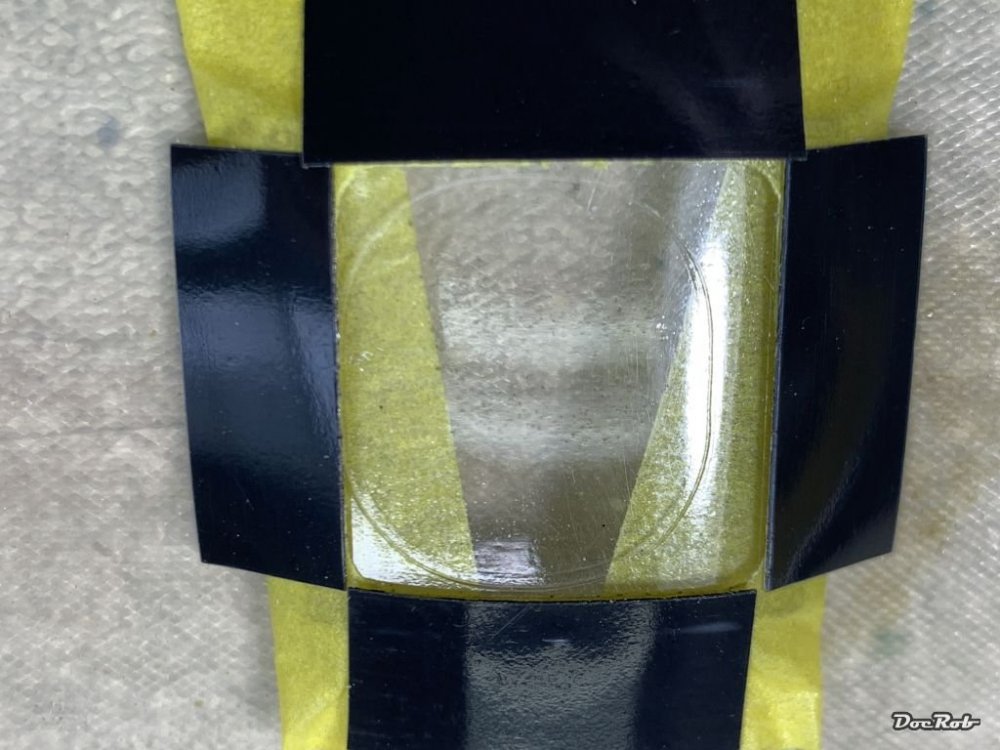
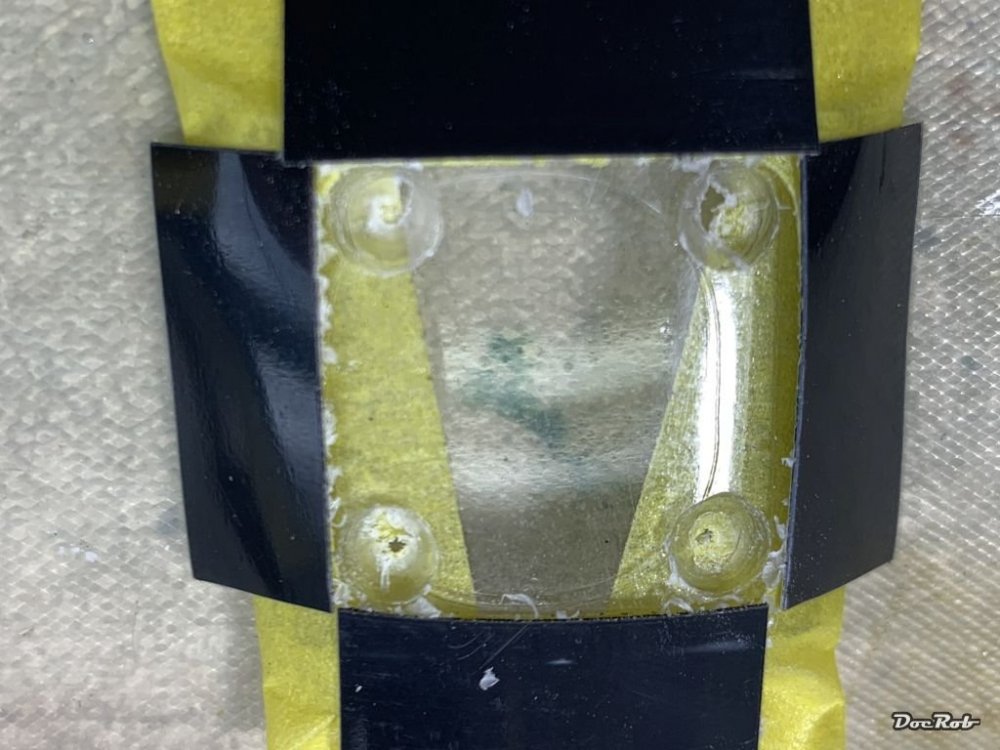
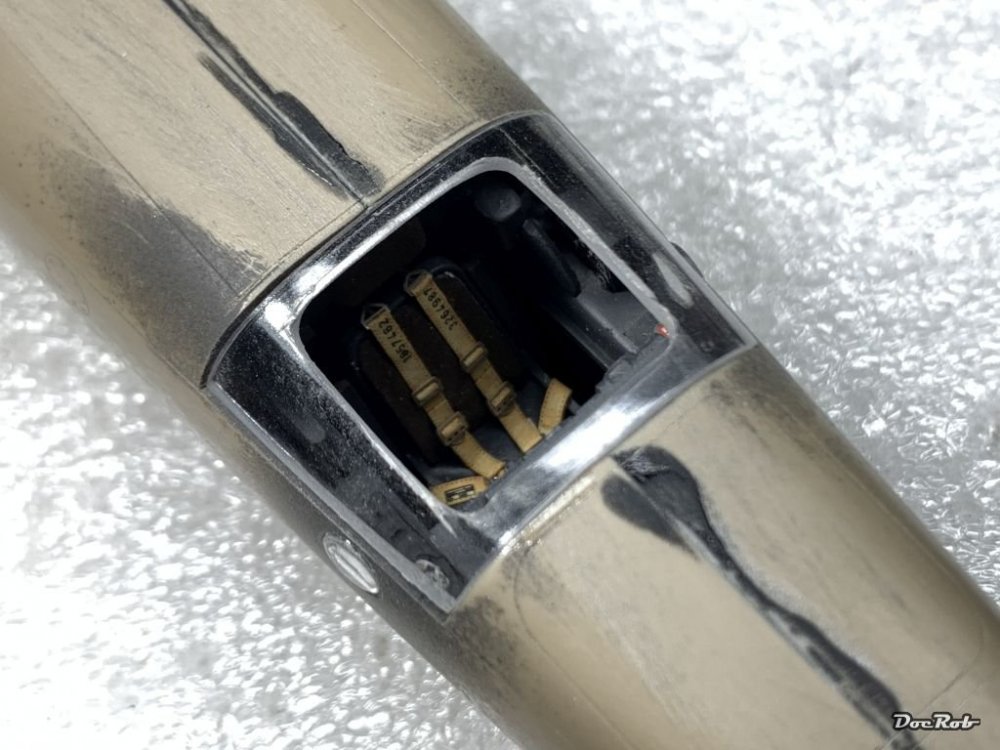
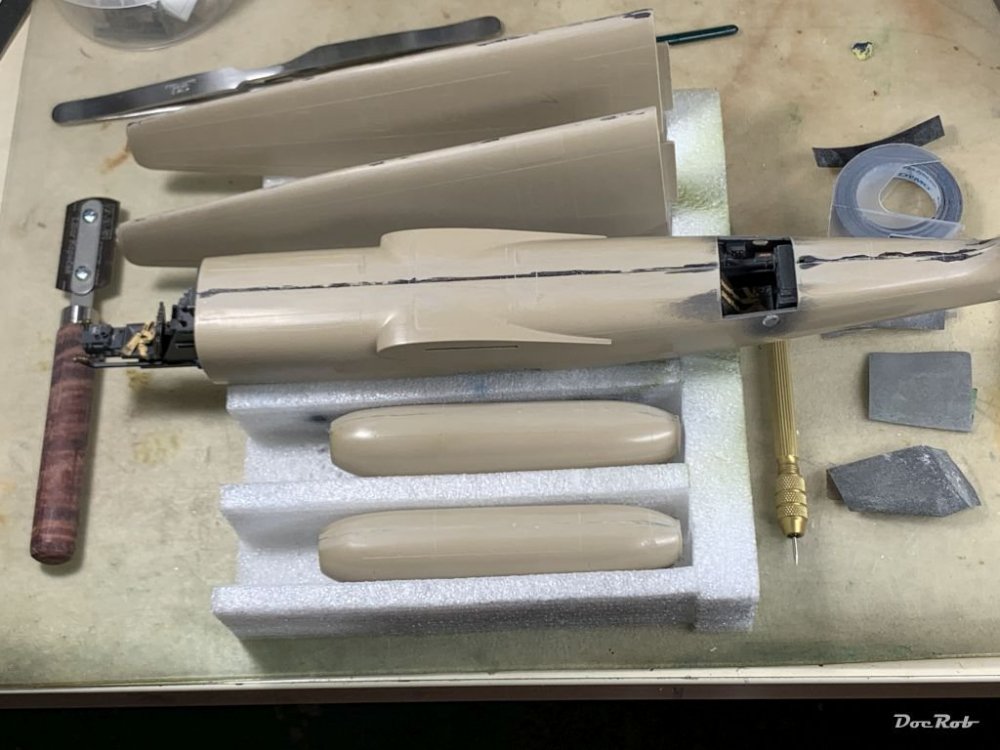
Decision time, I prepared the star shaped antenna, where I had to sand the clear lens conical to fit the base, but then opted for the tear shaped clear canopy with the Naxos radar under it. I tried to collect more information, about how the Nachtigall's where equipped, but tend to say, as they were experimental, they were different antennas used, maybe for evaluating. Same goes for the bomb sight, which some seemed to have had and others not. So it will be the FuG 350 with Naxos antenna , but in the position of the star shaped radar. Next was the operators cabin, which I wanted to show open. In another forum was a build thread, which mentioned, that the engraved opening in the clear part is not orientated in the middle and inspecting mine it isn't by far So I decided to make my own opening and as the shape and size of the original are not very clear either, I masked a rounded rectangle on the clear part, mainly because I felt that the engraved opening wood have been very narrow anyway. I added Dymo tape as a cutting guide. Then I drilled first 1mm holes near the edges, which then were widened with a 4mm drill bit and then cut along the straight lines with a Dremel and different PE saws, razor saws and scalpel blades. That was done very carefully, with only light pressure, as the remaining plastic is very narrow.. ... and finally, that's how the opening looks. The part will be painted in RLM 66 on the inside and then glued in place. Along the way, I glued the nacelles to the wings and filled the gaps with black CA and Perfect Putty, and sanded everything to shape. Cheers Rob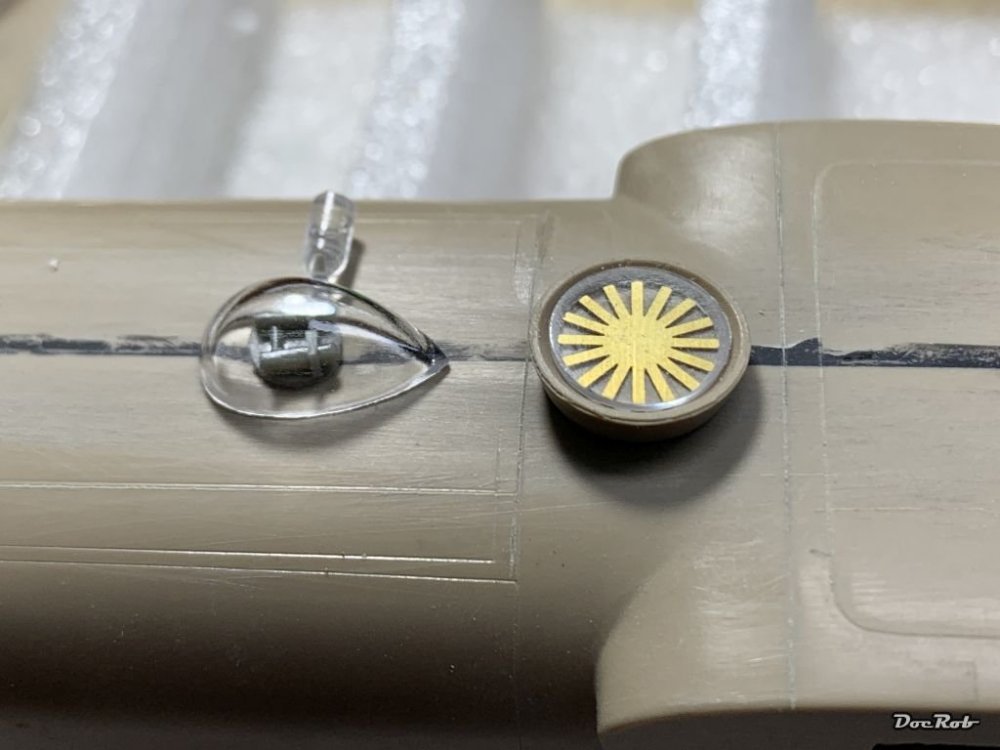
-
Arado 234 Nachtigall on Speed
DocRob replied to DocRob's topic in LSM 1/35 and Larger Work In Progress
Thank you Peter for commenting so promptly on the Tamiya engraving blade. Guiding the blade can be a bit difficult as you say with Dymo tape. and sometimes a metal ruler doesn't bend enough. There is no perfect tool out there . Cheers Rob -
I am a surfer, but would never put that thing under my boards . Cheers Rob
- 2,036 replies
-
- 6
-

-

-
- car related stuff
- anything about cars
- (and 6 more)
-
Arado 234 Nachtigall on Speed
DocRob replied to DocRob's topic in LSM 1/35 and Larger Work In Progress
Good to know Carl, but I was expecting that, being made from hardened steel. What I like about the design is that it's small, to get into places, that are not accessible with other tools and that it is cutting dragged, so it's easier to get straight cuts. Speaking of cuts, using my needle for scribing, which sometimes is necessary, leads to a half risen and half cut panel line, I do not like as much. You can sand down the rissen part or level it with some Tamiya Extra Thin, but it's not actually cutting the material, which I expect the Tamiya engraver to do. I haven't used the UMM scribers and think they will be difficult to purchase for me, but they follow the same operational path, as I can see it, but I don't feel they are comfortable to handle with a blade for a grip. The razor saw, I like very much, as it is easy to keep a straight line with it and it obviously cuts, which is a good thing, but they are only usable on convex surfaces. Cheers Rob -
Your little Marder looks really busy with the figures, which suits it very well. I always found it very difficult to put a figure into a crammed space in a believable pose. Your crew is looking convincingly good though. Cheers Rob
-
RCAF Liberator GR Mk VI
DocRob replied to BlrwestSiR's topic in LSM 1/35 and Larger Work In Progress
Very good, now you reach the areas that will be visible in your build. Can't wait to see you doing your magic on these. Cheers Rob -
Just love those Swedish splinter camos, but don't have the cojones to do one of my own. Cheers Rob
-
Arado 234 Nachtigall on Speed
DocRob replied to DocRob's topic in LSM 1/35 and Larger Work In Progress
Muchas gracias Peter, I looked for the UMM and I can imagine, that these are good to work with. I think, the principle of dragging the cutting wedge, helps to get straight panel lines. I spent some time in the net looking for good solutions and decided, I will try the Tamiya engraving blades, which follow the same principle, but their cutting head is hardened tungsten steel and tiny, so it's possible to use them in confined spaces and on complicated shapes. They are not usable for working with templates, but for this, I have the needle type scriber. Cheers Rob -
Arado 234 Nachtigall on Speed
DocRob replied to DocRob's topic in LSM 1/35 and Larger Work In Progress
Thanks Peter, is there still a free place in the IHS-club, I'm even willing to bully myself in . I will look up your tools, as I only have the two, I described above. I do have lots of PE templates and metal rulers to produce straight lines, but what I scribe with my tools is by far worse than the kit provided scribings. The good news at least to me, is that most of the tiny mistakes, which are easily seen with a magnifier on the bare plastic under good lighting, will hide somewhere under paint and weathering mostly. In the end, it's the appearance of the hole model, when finished and that's a sum of applied skills and scribing panel lines is only one of them. Cheers Rob -
Arado 234 Nachtigall on Speed
DocRob replied to DocRob's topic in LSM 1/35 and Larger Work In Progress
Thank you Gentlemen, with all that volcanic ash in the air, you need only a piece of cloth to sand down plastic . It's not that bad, fortunate winds made the ash hit my island only for two days, but there is a permanent acid taste in the mouth and that's not caused by the kit. I've no idea, why I never had to scribe a lot on my kits, as there were bad ones among them, but until the Arado I got spared. Yeah I know, learn something with every build, but I have to do better with the scribing. BTW: what are your favorite scribing tools. For straight lines on konvex surfaces I like the razor saw, on others, I used the needle, sometimes guided with Dymo tape, but feel very uncomfortable, because I sometimes loose track and slip with the needle. @Kai, I don't think the Fly kit is as bad as the Mirage, it's demanding and far from perfect, but where I expect to have lots of swearing with Italerie's shortcomings, it's just a 'let's do it' approach with the Arado. Cheers Rob -
Arado 234 Nachtigall on Speed
DocRob replied to DocRob's topic in LSM 1/35 and Larger Work In Progress
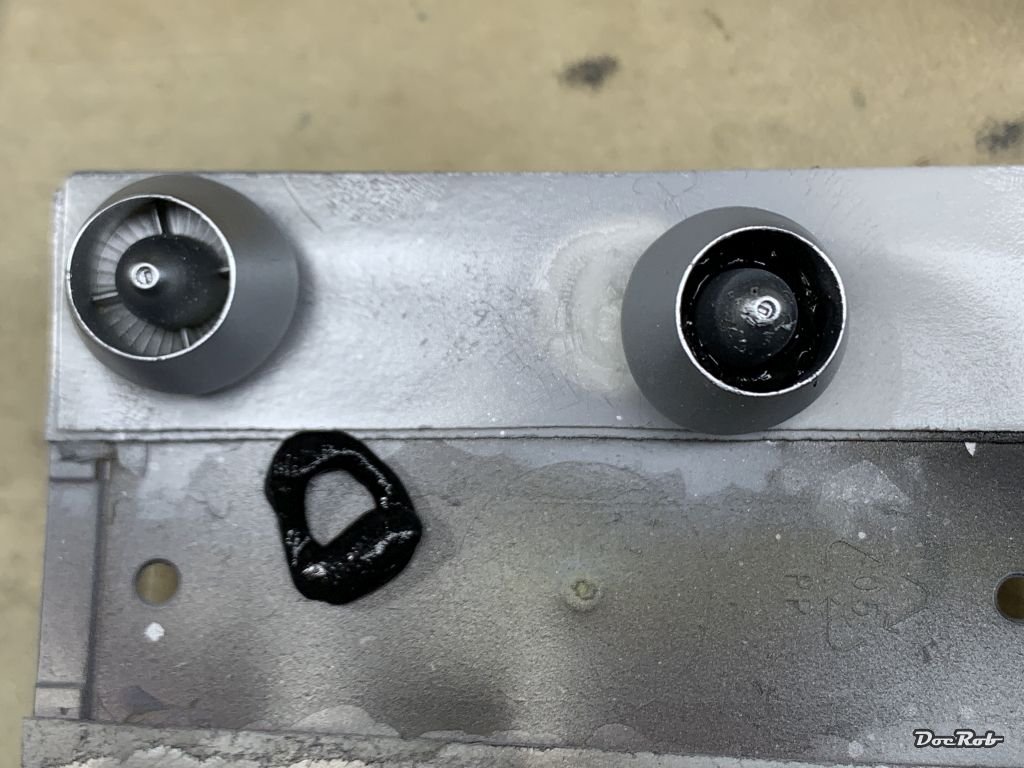
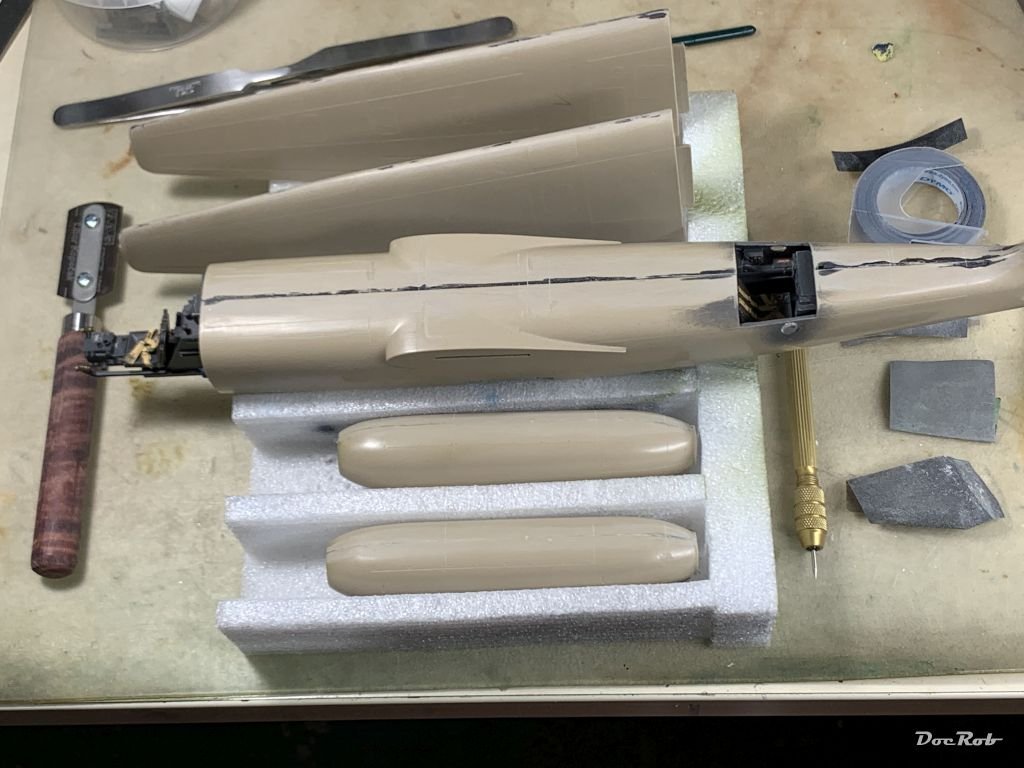
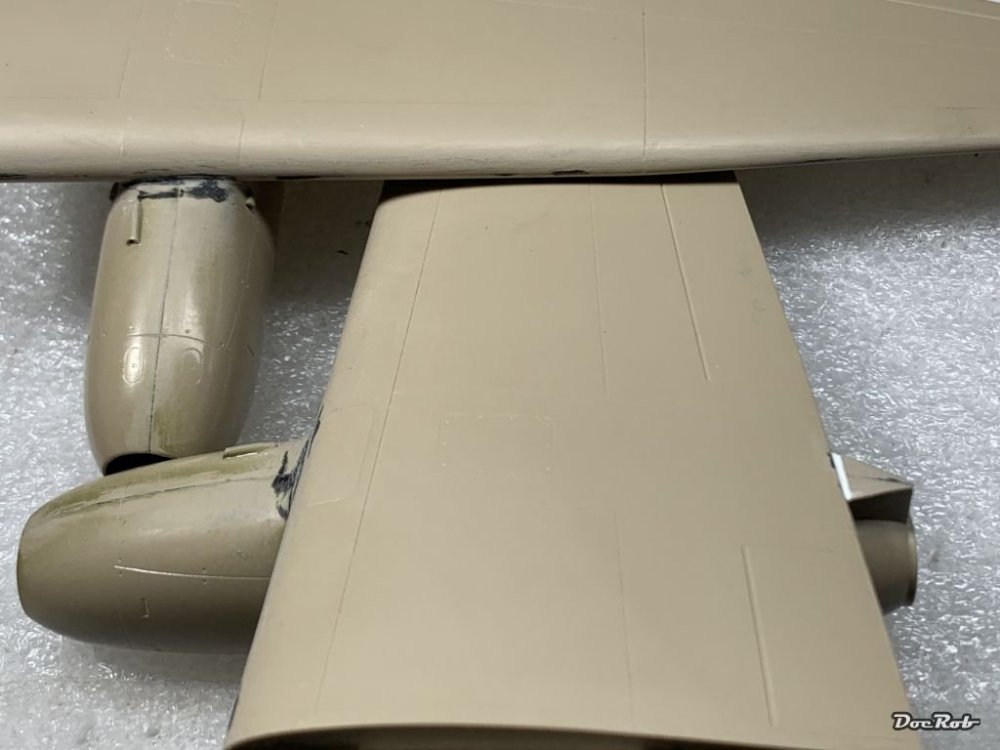
Today was elbow grease day, lots of sanding, virtually everywhere and a bit of airbrushing, to assemble the nacelles with their resin inserts. I thought about, how to paint the cones green, after I sprayed the fan deep into the intake with steel color. I formed a ring of Panzer Putty and pushed it in, which did the trick. All halved plastic components had little steps or tiny gaps, which I covered with black CA and sanded and sneezed a lot, not without destroying a lot of panel lines, which lead to another task, I'm absolutely not comfortable with, rescribing. I managed to achieve a so so result. which I hope will be sufficient under primer and paint. I never scribed so many panel lines before and after starting with the needle, I switched to the razor saw, wherever possible. Cheers Rob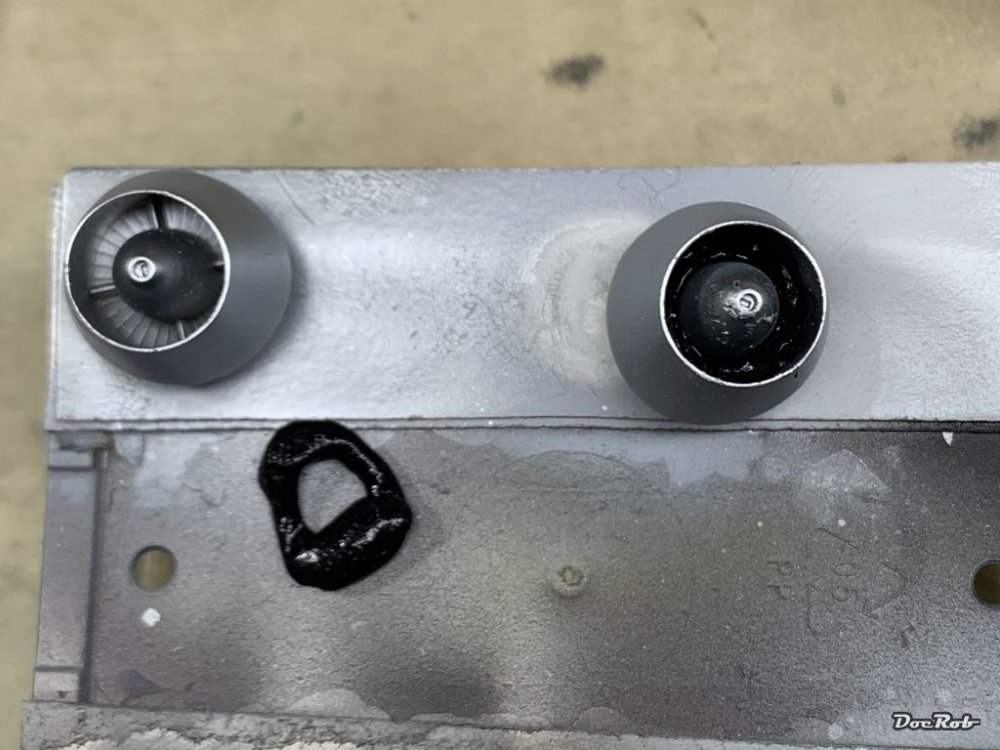
-
RFM Panzer IV Ausf H (Early)
DocRob replied to Bomber_County's topic in LSM 1/35 and Larger Work In Progress
Nice Phil, the camo is looking great with the added bits and pieces to give more contrast. Let the dirt fly . Cheers Rob -
That's how everything comes together. Nice display, I like it. Cheers Rob
-
For you non-foil guys... you know who you are....
DocRob replied to GazzaS's topic in Modelling Discussion
Indeed very interesting, I might give it a try, possibly on a post war 48 scale racing Spitfire XVI. The fragility of the finish is an issue for sure. Thanks for posting. Cheers Rob -
Arado 234 Nachtigall on Speed
DocRob replied to DocRob's topic in LSM 1/35 and Larger Work In Progress
Freestyling without consequences, right down my alley, Hubert . If you cant do it right for sure, declare yours as right. Earnestly, that started to be my thinking too. I've not decided on the variant as of now, but have to do soon, so still every input is welcomed. Cheers Rob -
Arado 234 Nachtigall on Speed
DocRob replied to DocRob's topic in LSM 1/35 and Larger Work In Progress
Good to have you on board Gaz, and yes, the thread dates a while back . Cheers Rob -
Arado 234 Nachtigall on Speed
DocRob replied to DocRob's topic in LSM 1/35 and Larger Work In Progress
Indeed Phil, but it was meant as a build, with others in between. There are kits on the SOD, where I ask myself, why I haven't binned them, but others like the Nachtigall, which always magnetizes me to continue. Cheers Rob -
Arado 234 Nachtigall on Speed
DocRob replied to DocRob's topic in LSM 1/35 and Larger Work In Progress
Thank you Carl, for browsing through your sources. Sadly it seems to add more fog to an already misty area. The graphic from the Vailiant Wings book seems to indicate towards a glass topped radar star, like on the HE-219. The profile of the SM FE coded plane, the one, I will build, is not clear in that point, but shows the bombsight under the nose, where I read, this was not equipped on the nightfighters. I seem to hunt a mystery plane and you are absolutely right, the night fighter Arados are not well documented, but that's maybe because they were a fail and only a handful were converted. Cheers Rob