DocRob
-
Posts
7,082 -
Joined
-
Last visited
Content Type
Profiles
Forums
Events
Gallery
Everything posted by DocRob
-

Ferrari 330P4 Open top 24Hrs Daytona 1967
DocRob replied to mark31's topic in LSM 1/35 and Larger Work In Progress
You have a thing for extra rivets Mark . The dashboard looks great, love the red Dyno type signs for the levers. Are these decals? Cheers Rob -
Ducati Panigale S - Italian Speedster - Tamiya 1/12
DocRob replied to DocRob's topic in LSM 1/35 and Larger Work In Progress
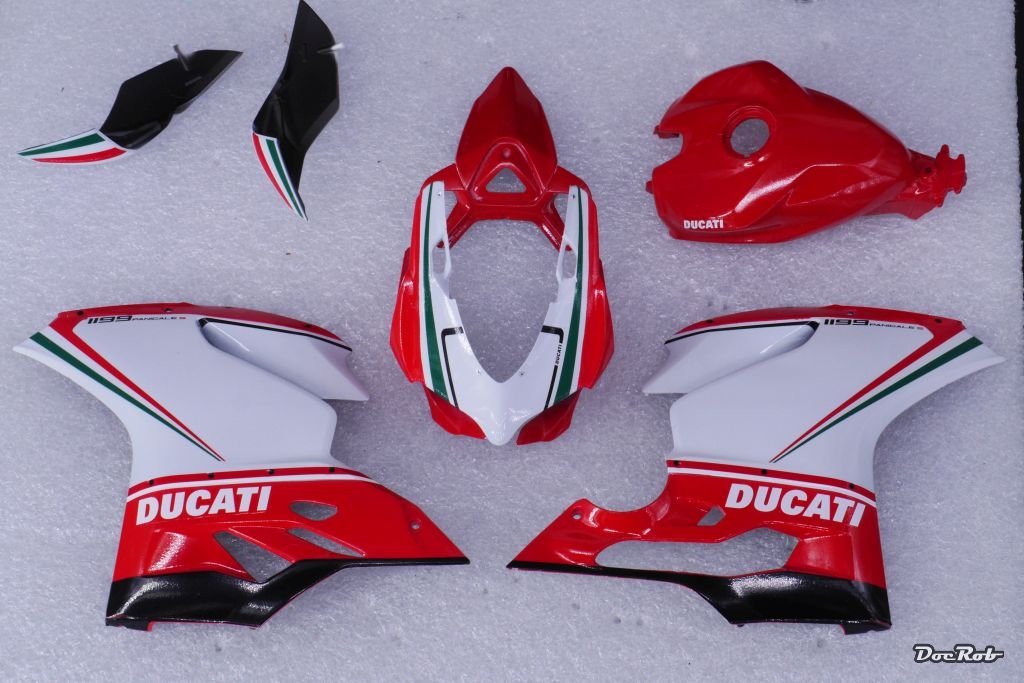
Thank you Gaz, there is a hint of an overspray on one line, but it's barely noticable. I decaled all the mayor components today and have to say, the decals work perfectly, the best I ever used. In fact they are so good, I'm not convinced to take the risk and gloss coat them. What do you think? Even the huge complicate contured black part of the side fairing is a decal. On the pictures the paint finish looks coarse and I wondered why, because in natural light, it looks flawless. I found out it's because my lighting box has hundreds of LED's, which give the impression of orange peel on the glossy surfaces, phew. Cheers Rob

-
What is on your bench right now ? Share a picture :)
DocRob replied to Martinnfb's topic in Modelling Discussion
Missing the wheels on the right one, but there still is some sprue showing . The uneven twins look great as they are Carl. Cheers Rob -
Fly Hurricane IIc re-do done
DocRob replied to JohnB's topic in LSM 1/32 and Larger Aircraft Ready for Inspection
Never thought about a redo, but your Hurricane shows, it can be a good idea, specially when something was nagging all the time, that just felt not right. Great job on the painting. Cheers Rob -
Ducati Panigale S - Italian Speedster - Tamiya 1/12
DocRob replied to DocRob's topic in LSM 1/35 and Larger Work In Progress
Muchas gracias Kai, fingers crossed for the decals and even more with the gloss coat . Cheers Rob -
Well worked with the heavy machinery Harv, now let the fun part begin. Cheers Rob
-
I'm all eyes John, I have a P-39 in stash and pulled the box out more than others recently. Cheers Rob
-
Gottfreid Weiroster Bf 109G6 R6 Revell 1/32
DocRob replied to GazzaS's topic in LSM 1/35 and Larger Work In Progress
If you still need to drill, even after Martins great idea, it pays, to center the markings for the holes with the point of a sharp blade. This way, the drilling process is more controllable. Cheers Rob -
Czech Air Force L 29 Delfin 'Tiger Meet', Eduard 1/48
DocRob replied to BradG's topic in Non LSM 'WIP
Definitely a looker, great paintjob on a very nice airframe. Cheers Rob -
Ducati Panigale S - Italian Speedster - Tamiya 1/12
DocRob replied to DocRob's topic in LSM 1/35 and Larger Work In Progress
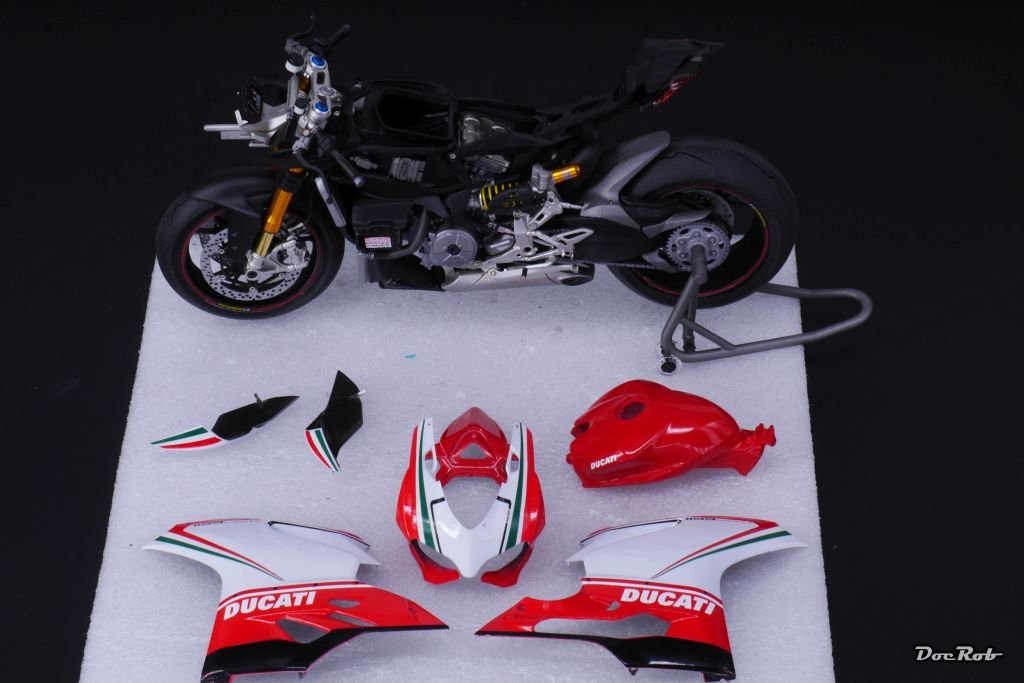
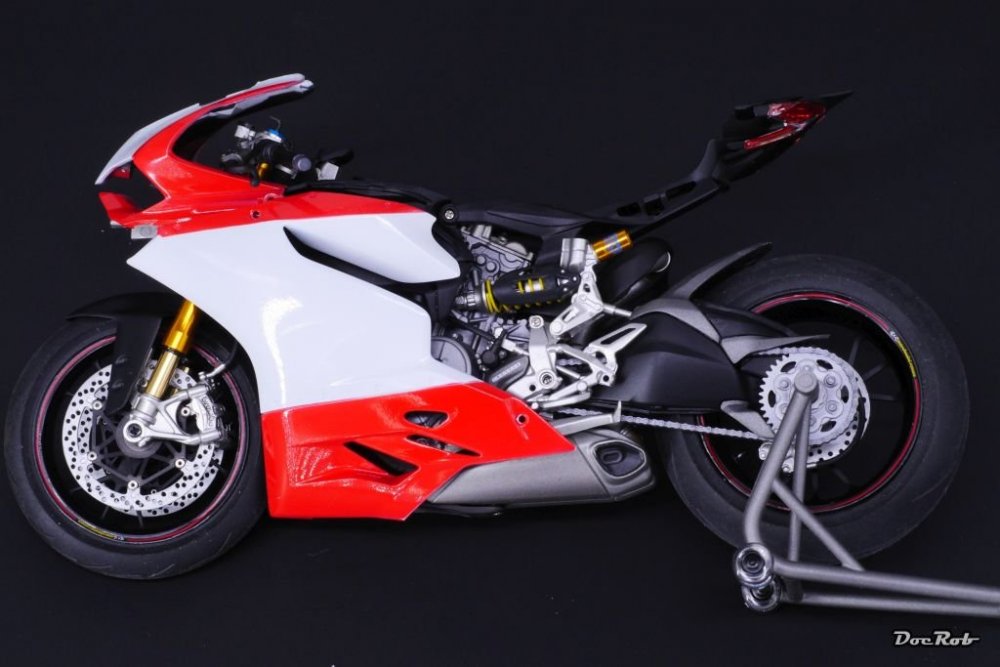
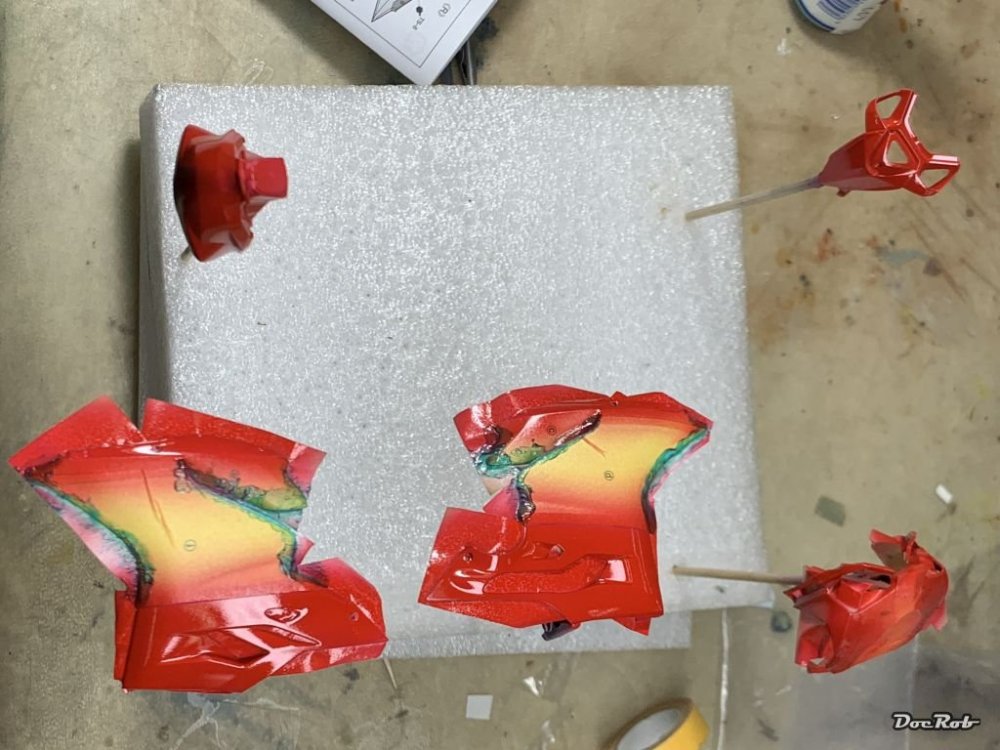
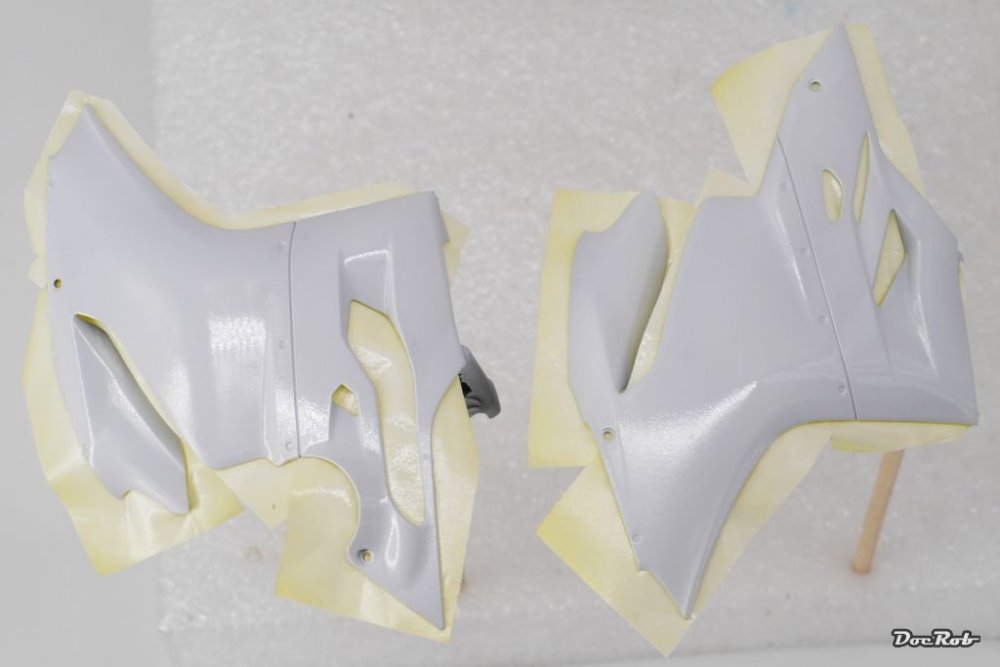
It's a pleasure Mark. I was very anxious, what I find under the masks, as I'm not used to work with that kind of bright colors and shiny finishes. To get the tension out, I have to say all is good and well. The red came out fine and there was no overspray and, what's even more important, the side fairings fitted the front fairing with their color areas. This could only be approximated with the masks on. The pics show the finish, before I polished, which was done carefully and separate for white and red, as I noticed quite some abrasion, while polishing the red parts, which I didn't want to smear onto the white. I managed to polish through the red color of the tank in two spots and had to repaint it. A mock up with the fairings on the flat lying bike. Cheers Rob
-
Ducati Panigale S - Italian Speedster - Tamiya 1/12
DocRob replied to DocRob's topic in LSM 1/35 and Larger Work In Progress
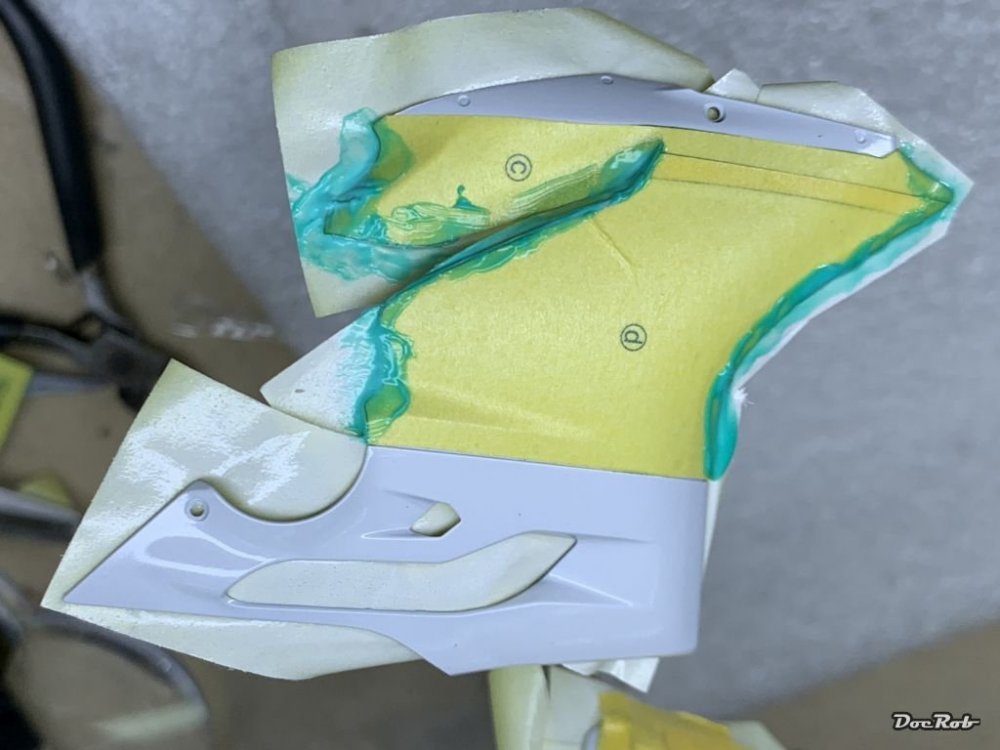
Hi Peter, I've had worse masking jobs, but I felt like I let myself down. I cut the complicated masks from hand, without checking, if there is a simpler way to do the tasks, only because the supplied masks looked so complex. In fact there are only six slightly curved color borders to mask, a task which could've been easily done with Kabuki tape much more simple. Sometimes I have to question my own foresight and intelligence . Cheers Rob -
Ducati Panigale S - Italian Speedster - Tamiya 1/12
DocRob replied to DocRob's topic in LSM 1/35 and Larger Work In Progress
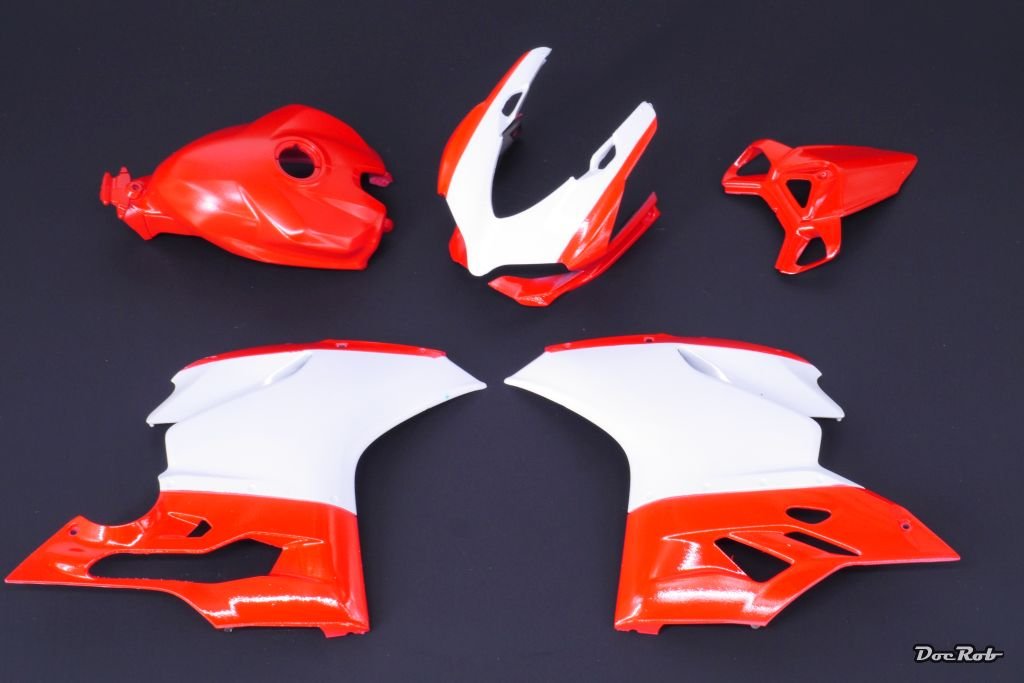
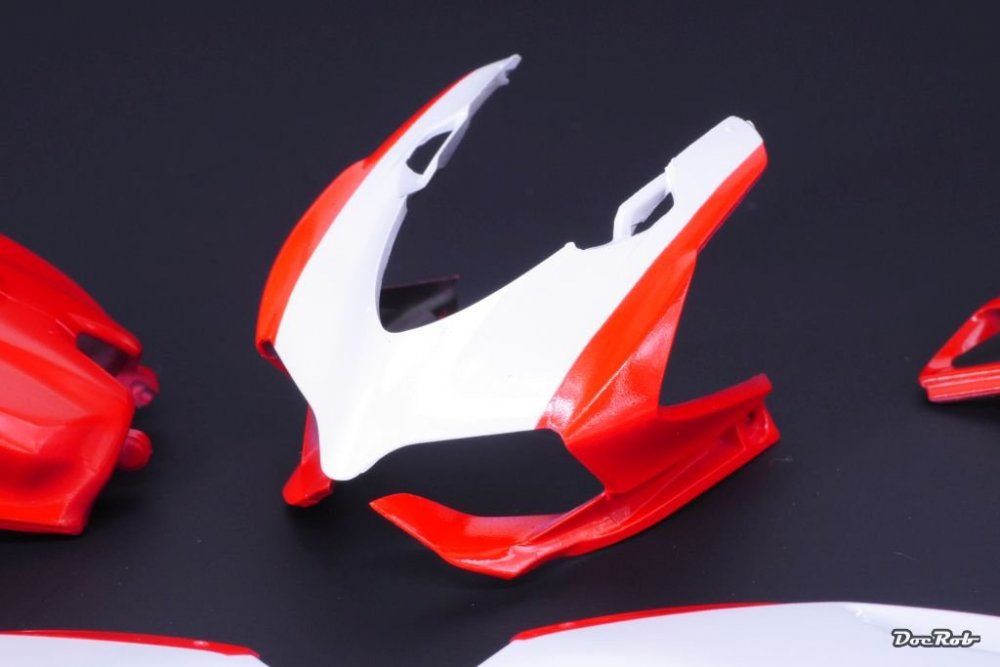
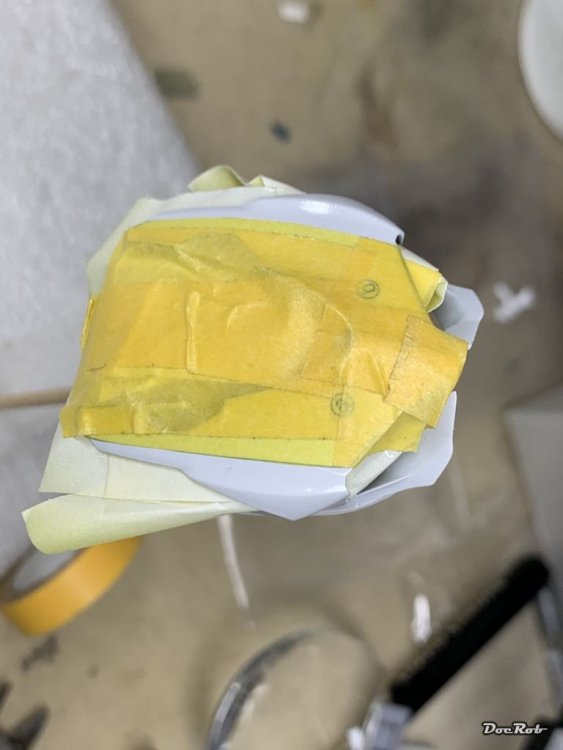
@Peterpools and @mark31: Thank you Peter and Mark. I continued with the preparation of the red sections on the fairings. I used the kit supplied mask, which I cut with a new blade before. I have to say, for the next time, I will make my own masking from Kabuki tape, because it's much simpler to do. The intricated shape of the masks mislead me this time. What you really need is a slightly curved upper and lower line on the side fairings and and two lines to mask on the front fairing, easily done with some tape. The provided masks needed to be covered around the edges with some additional tape and/or liquid mask, to hinder overspray seeping in, which wouldn't have been necessary with tape. Next I sprayed on the Italian red from Tamiyas LP range mixed with about two thirds of leveling thinner and got a nice and shiny surface. And now it will be demasking time Cheers Rob Insides were covered to protect the semi gloss black, before applying the gloss white to the outside. This is the look of the supplied masks. I felt it necessary to protect the edges with liquid mask as small amounts of plastic were showing. The front fairing was additionally taped around the nose and to protect the canopy rim. Better red than dead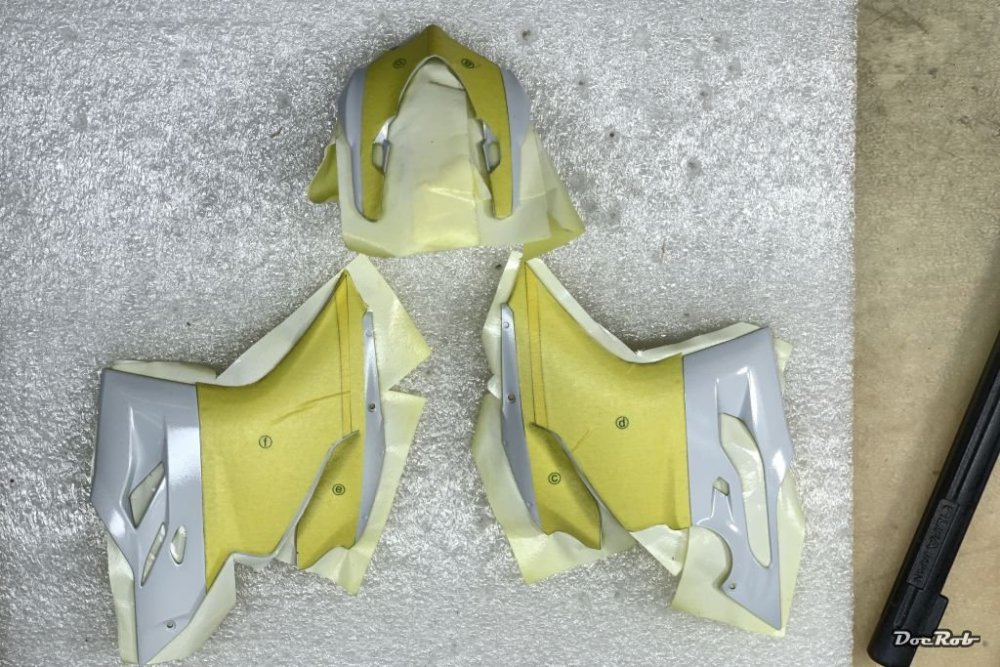
-
Ducati Panigale S - Italian Speedster - Tamiya 1/12
DocRob replied to DocRob's topic in LSM 1/35 and Larger Work In Progress
Muchas gracias Amigos. After the white color has completely dried, I will apply the masks and then it's time for Italian red. Afterwards I will polish the fairings in preparation for the decals. Due to the high gloss quality of the Tamiya lacquer paints, that may not be necessary, but I don't want any orange peel effect and polishing reduces the bordering effects of the colors. BTW: @Carl: Tamiya offers some kits with pre cut masks. The Ford GT MKII has some, but I don't know if other recent releases have any supplied. Cheers Rob -
Atlas Cheetah E Scaleworx Conversion
DocRob replied to GusMac's topic in LSM 1/35 and Larger Work In Progress
Bad thing is Gus, you shared it with us , that's at least three pages in your thread about how that could happen and how to fix it with heavy machinery . Honestly, with your cracking paintjob, you could have glued the undercarriage to the upside and nobody would have spotted. Cheers Rob -
Nice result with the first cuts Harv, almost there , just joking. On my Fly Arado build, I noticed that the plastic is quite thick and a bit on the brittle side, but good to cut and saw. Dyno Tape helps a lot, hindering scratch marks, but be careful on clear parts, where it leaves residues. Cheers Rob
-
SH Tempest Mk.II HIgh Tech Kit
DocRob replied to Peterpools's topic in LSM 1/35 and Larger Work In Progress
You know for sure, but in case you haven't heard, that it is easier to fiddle the belts into the PE-loops, when these are still not cut from the 'sprue'. Cheers Rob -
Ducati Panigale S - Italian Speedster - Tamiya 1/12
DocRob replied to DocRob's topic in LSM 1/35 and Larger Work In Progress
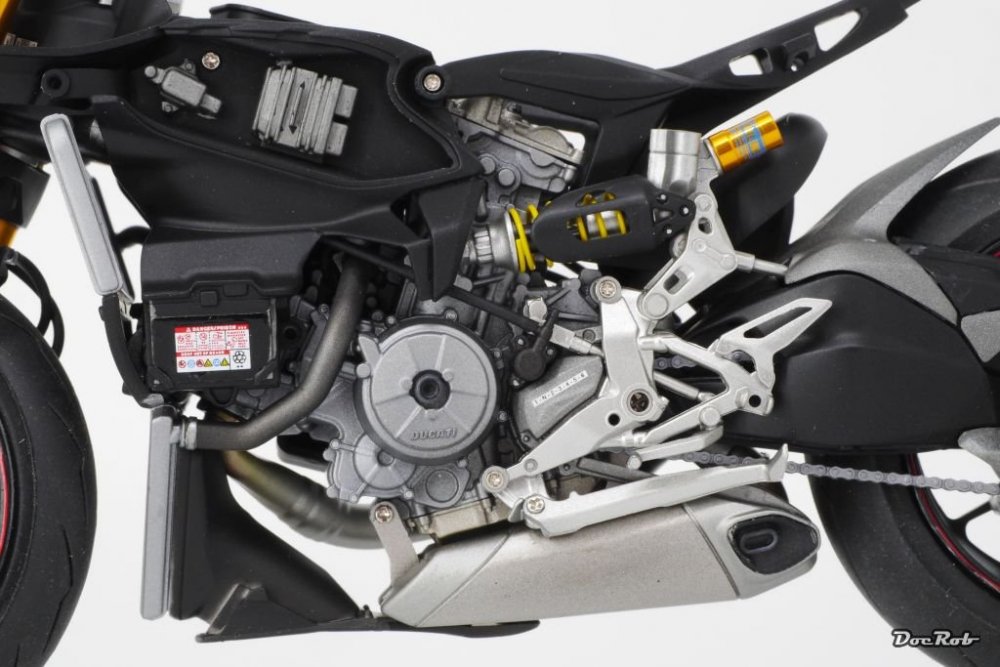
@Peterpools Thank you Peter Today I installed the stinger of the scorpion with the tail light and prepared and painted the body parts. The inside of the fairings was airbrushed with semi gloss black and after drying was secured with kabuki tape. Then I applied some gloss black as the first outer color onto the fairings. I used Tamiya's lacquer gloss white with Mr. Leveling thinner and got a nice glossy finish. Cheers Rob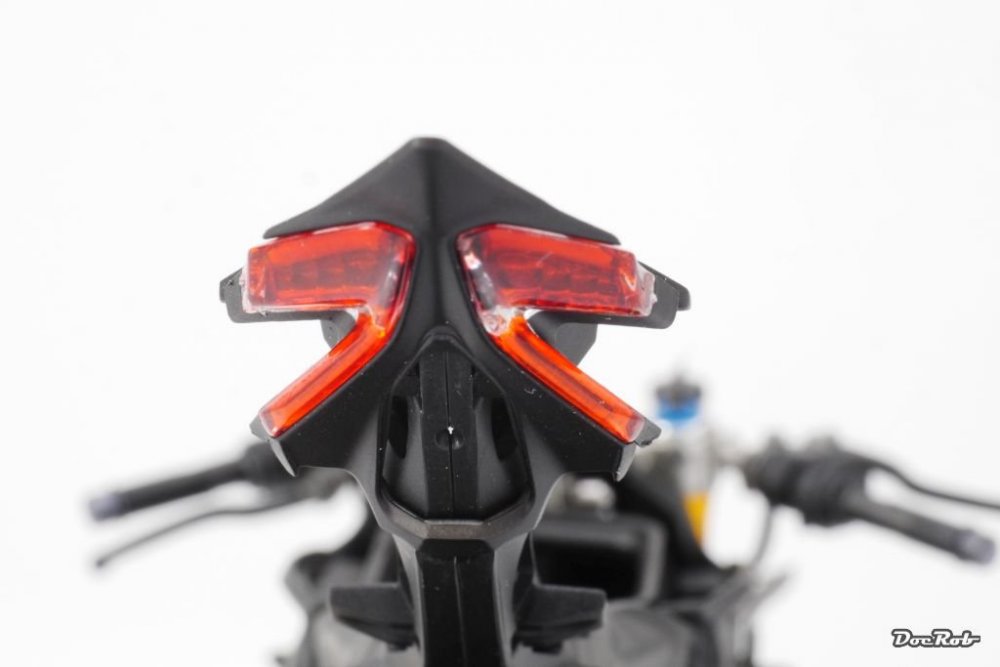
-
Ducati Panigale S - Italian Speedster - Tamiya 1/12
DocRob replied to DocRob's topic in LSM 1/35 and Larger Work In Progress
Muchas gracias Gaz. For the moment, I like the white background, but will change to black again later, as it's easier to meter the exposure for the pics. The black background got dirty and I have to thoroughly clean it. I like natural light pics as well, but direct sunlight often leads to unrealistic looking shadows and brutal contrasts and is harder to meter, specially on macro photos. Cheers Rob -
Ducati Panigale S - Italian Speedster - Tamiya 1/12
DocRob replied to DocRob's topic in LSM 1/35 and Larger Work In Progress
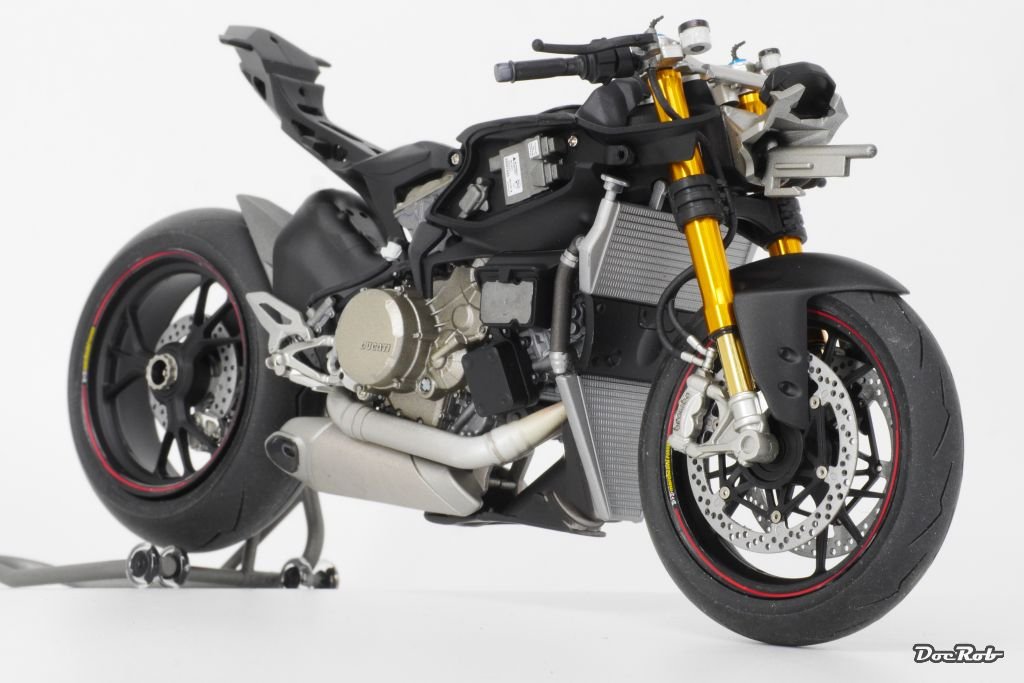
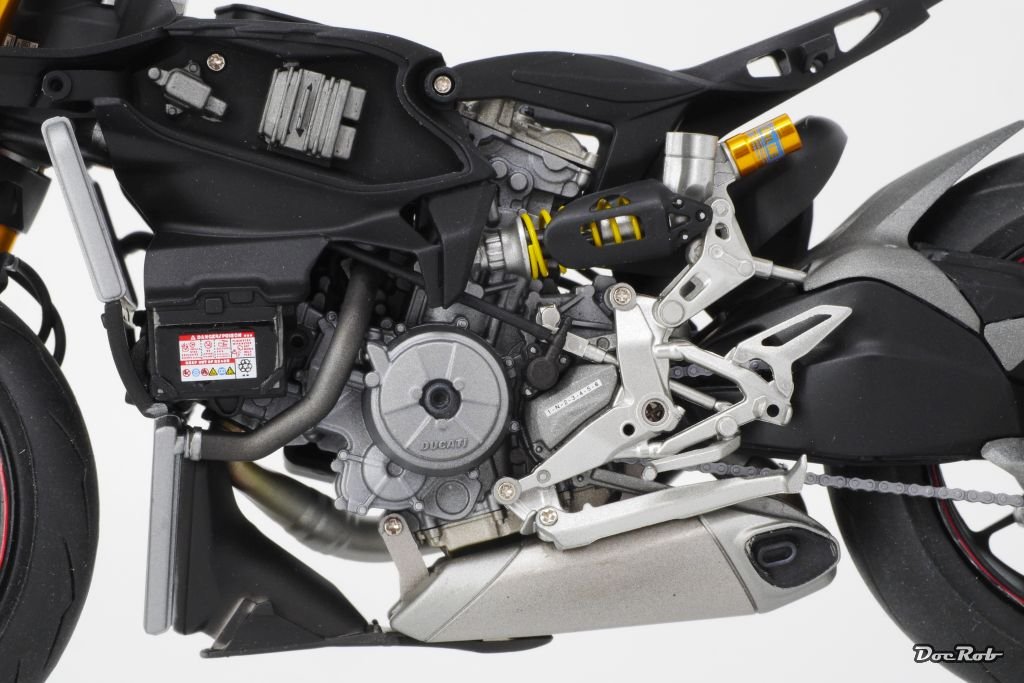
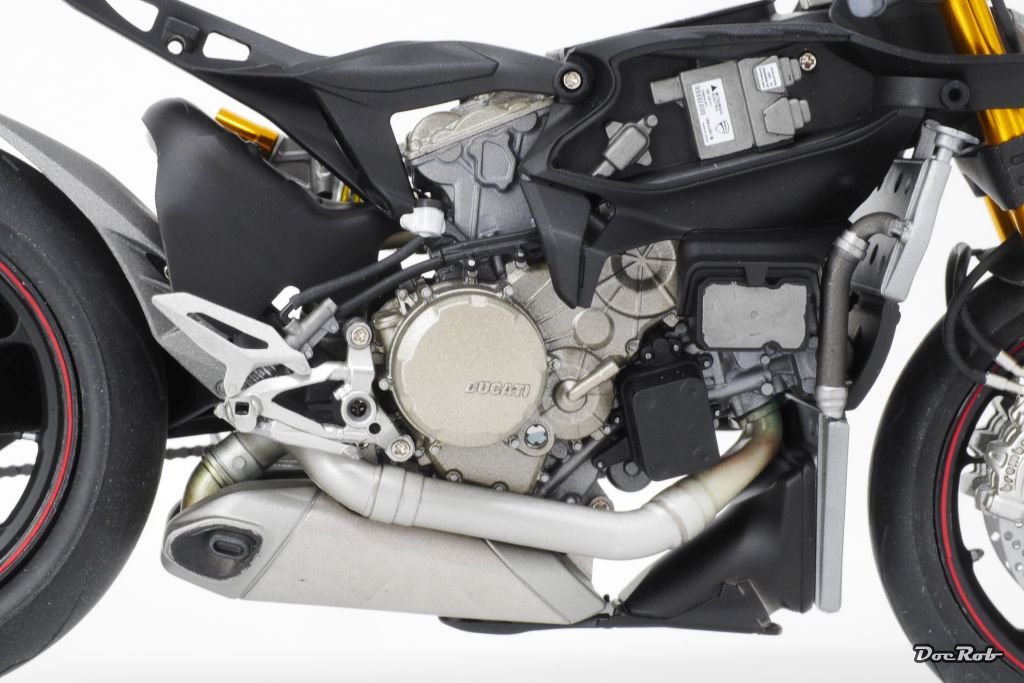
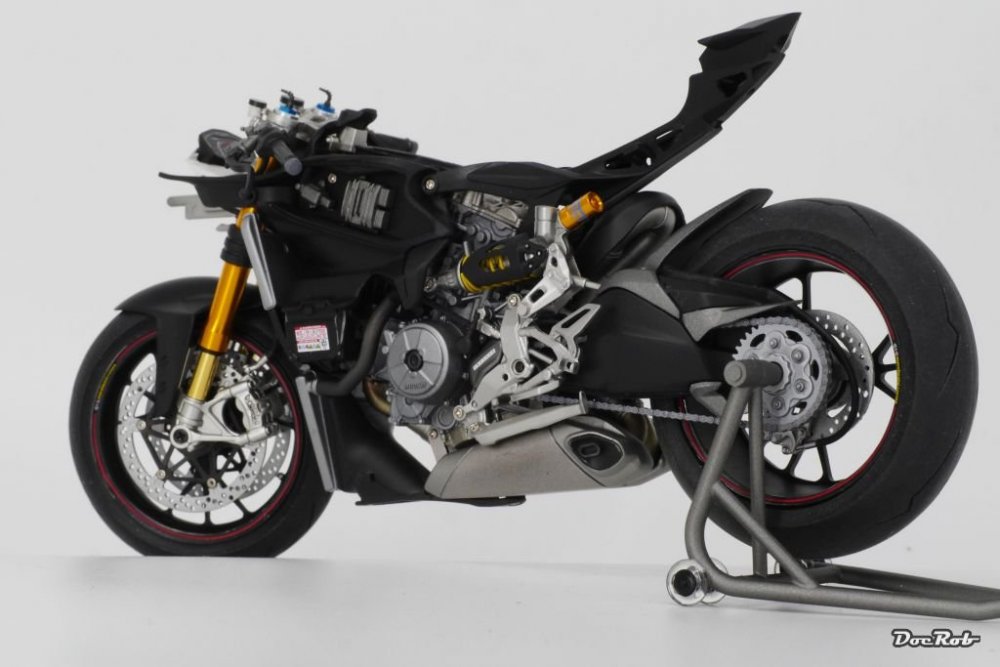
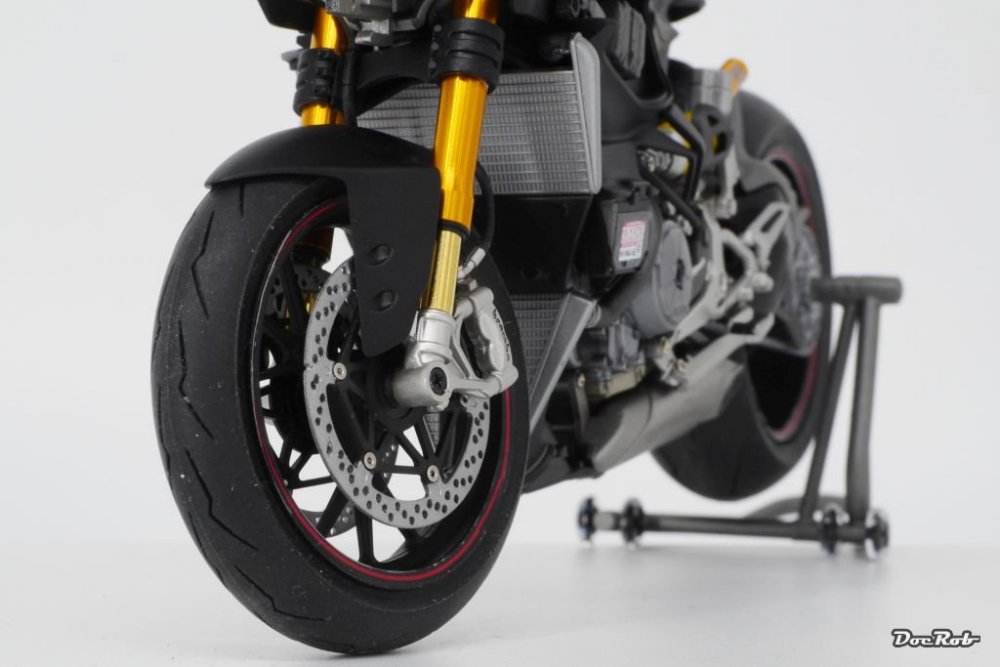
Sad times, I started to add frame parts and inner fairings, which will, added with the body parts hinder the sight onto the engine. The god news, all fairings are screwed on, so they are removable, which is good to know, but I guess, I will never remove them, when ready. I prepared the black based parts for all the lights with a reflective coat of Molotow chrome marker. They must be filled with quicksilver, as they look sooooo chrome, amazing . The only downside, I found with these on another build is, when you apply them on the backside of clear parts, they look grainy and a good chrome paint does a better job. I like that Tamiya is providing Kabuki masks for the body painting, but would prefer, if they could be pre-cut. I had a nerve tangling half hour yesterday to cut the delicately curved masks. Bye bye engine It's hard to show the chrome effect on a photo, but the shine of the Molotow markers is like the real thing. Cheers Rob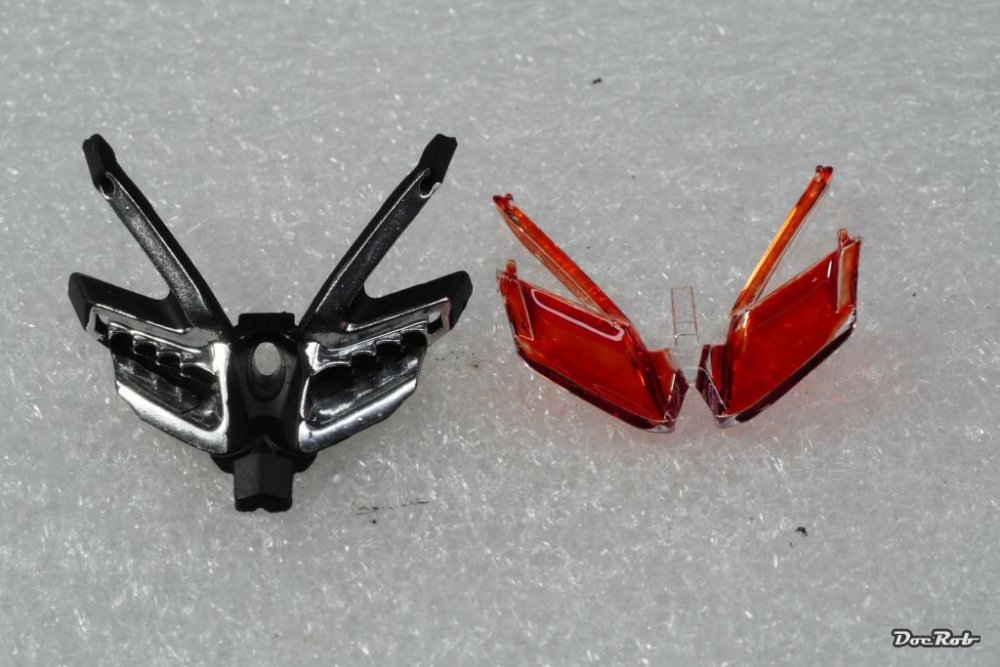


-
Yup, first the white and then the blue. You need to be precise with the masking for the blue, not to have some unwanted white framing. Your masks look a bit loose on the plastic, Be sure to make them adhere well, that no color might run under. Cheers Rob
-
SH Tempest Mk.II HIgh Tech Kit
DocRob replied to Peterpools's topic in LSM 1/35 and Larger Work In Progress
These interiors look great Peter. Nice subtle shading and a lot of detail please the eye. I like the SH manuals for getting an idea about a build, but they seem to be tricky, when it comes to details. Cheers Rob -
Gottfreid Weiroster Bf 109G6 R6 Revell 1/32
DocRob replied to GazzaS's topic in LSM 1/35 and Larger Work In Progress
Very ikeaesque Gaz . By the way, they have manuals to download, which could help with the proportions. The chair would clearly benefit from narrower strips. Cheers Rob -
This mat really ties the room together . Cheers Rob
-
That depends Harv. There are lots of factors going in the decision for using the right tool. How big is the section to cut, is it flat or curved, which material and thickness has the material, do i need the separated part. These are only some questions to answer first. I use different tools, ranging from sharp scalpels over fine saws, sometimes drill bits and grinding tools or Dremel blade saws. I often use Dynotape for marking the cuts and protect the remaining plastic. My goto if possible tool is a razor saw, which cuts so fine, that you can use the cut part, for e.g. a cowling. Cheers Rob
-
Gottfreid Weiroster Bf 109G6 R6 Revell 1/32
DocRob replied to GazzaS's topic in LSM 1/35 and Larger Work In Progress
Wow, very cool paintjob and it even camoes the false shapes of the kit . Gutsy call to spray the walk lines with masks, but it payed in the end. She will look great and will make you forget all the issues, this subpar kit has. After all, it's somehow good to see, that not all the kits out there are perfect. Being in my third Tamiya build in a row, I have the feeling, that a kit which needs a bit more of extra work, should be next. The most fun generating project overall in the last years was the Mikro Mir Fokker D.VIII, where I could be very creative about finding solutions for the kits weaknesses. Cheers Rob