DocRob
-
Posts
7,016 -
Joined
-
Last visited
Content Type
Profiles
Forums
Events
Gallery
Everything posted by DocRob
-

Ducati Panigale S - Italian Speedster - Tamiya 1/12
DocRob replied to DocRob's topic in LSM 1/35 and Larger Work In Progress
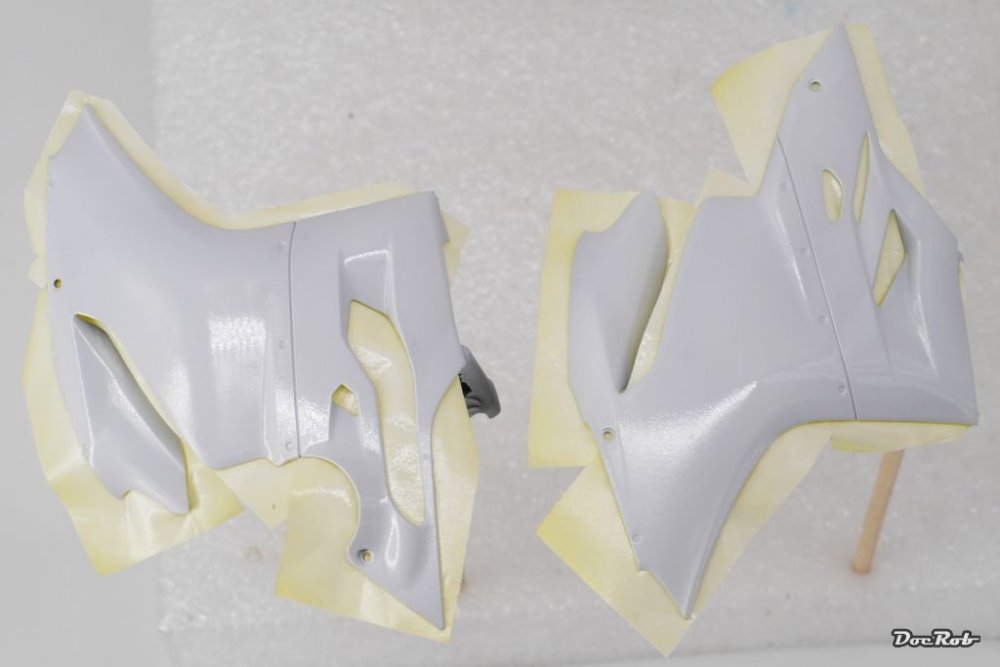
@Peterpools Thank you Peter Today I installed the stinger of the scorpion with the tail light and prepared and painted the body parts. The inside of the fairings was airbrushed with semi gloss black and after drying was secured with kabuki tape. Then I applied some gloss black as the first outer color onto the fairings. I used Tamiya's lacquer gloss white with Mr. Leveling thinner and got a nice glossy finish. Cheers Rob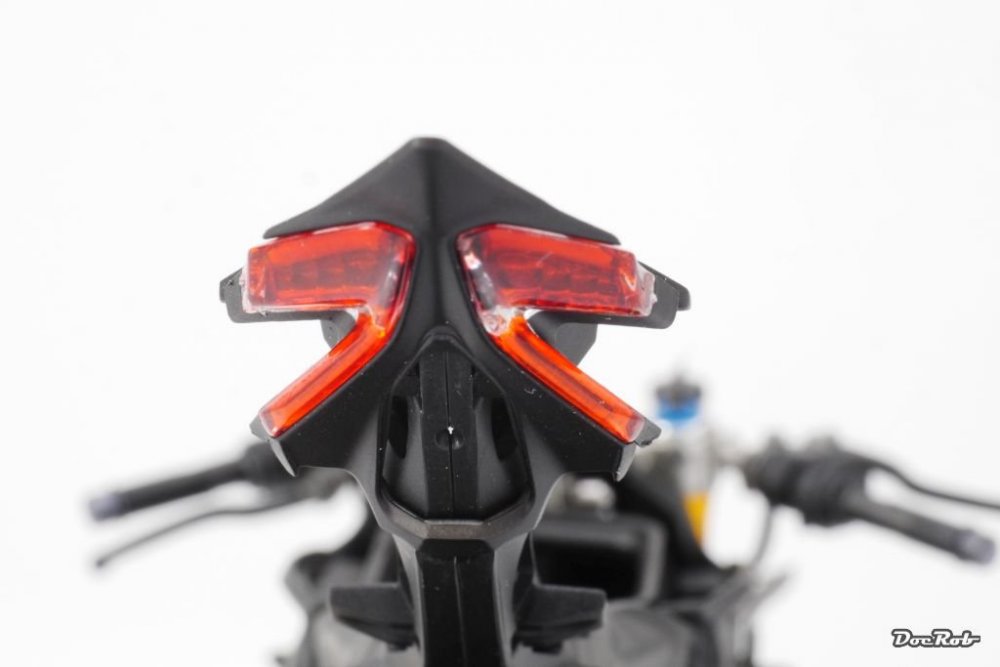
-
Ducati Panigale S - Italian Speedster - Tamiya 1/12
DocRob replied to DocRob's topic in LSM 1/35 and Larger Work In Progress
Muchas gracias Gaz. For the moment, I like the white background, but will change to black again later, as it's easier to meter the exposure for the pics. The black background got dirty and I have to thoroughly clean it. I like natural light pics as well, but direct sunlight often leads to unrealistic looking shadows and brutal contrasts and is harder to meter, specially on macro photos. Cheers Rob -
Ducati Panigale S - Italian Speedster - Tamiya 1/12
DocRob replied to DocRob's topic in LSM 1/35 and Larger Work In Progress
Sad times, I started to add frame parts and inner fairings, which will, added with the body parts hinder the sight onto the engine. The god news, all fairings are screwed on, so they are removable, which is good to know, but I guess, I will never remove them, when ready. I prepared the black based parts for all the lights with a reflective coat of Molotow chrome marker. They must be filled with quicksilver, as they look sooooo chrome, amazing . The only downside, I found with these on another build is, when you apply them on the backside of clear parts, they look grainy and a good chrome paint does a better job. I like that Tamiya is providing Kabuki masks for the body painting, but would prefer, if they could be pre-cut. I had a nerve tangling half hour yesterday to cut the delicately curved masks. Bye bye engine It's hard to show the chrome effect on a photo, but the shine of the Molotow markers is like the real thing. Cheers Rob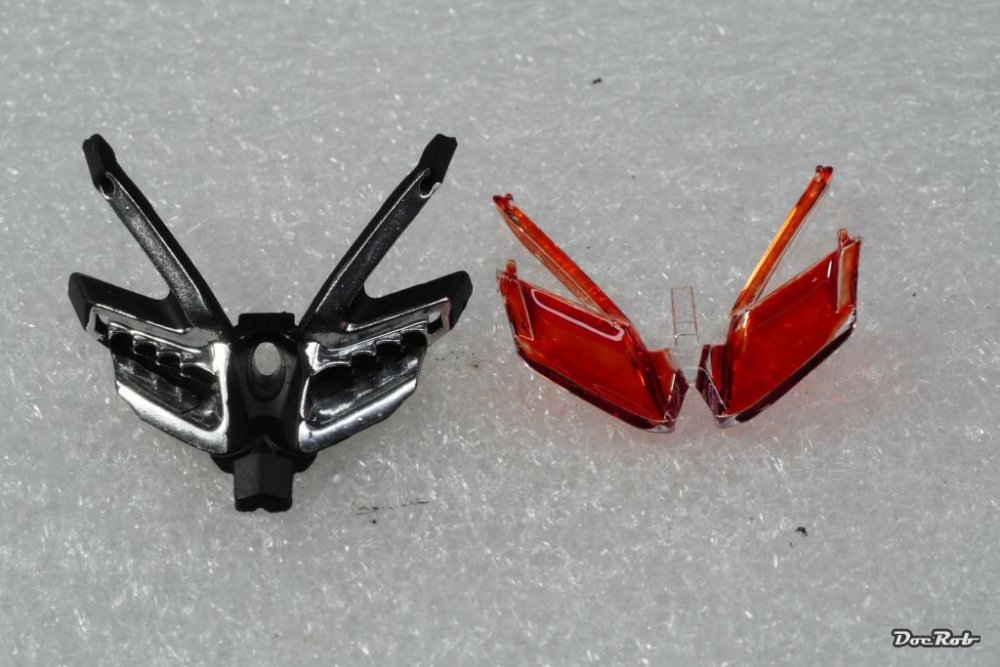


-
Yup, first the white and then the blue. You need to be precise with the masking for the blue, not to have some unwanted white framing. Your masks look a bit loose on the plastic, Be sure to make them adhere well, that no color might run under. Cheers Rob
-
SH Tempest Mk.II HIgh Tech Kit
DocRob replied to Peterpools's topic in LSM 1/35 and Larger Work In Progress
These interiors look great Peter. Nice subtle shading and a lot of detail please the eye. I like the SH manuals for getting an idea about a build, but they seem to be tricky, when it comes to details. Cheers Rob -
Gottfreid Weiroster Bf 109G6 R6 Revell 1/32
DocRob replied to GazzaS's topic in LSM 1/35 and Larger Work In Progress
Very ikeaesque Gaz . By the way, they have manuals to download, which could help with the proportions. The chair would clearly benefit from narrower strips. Cheers Rob -
This mat really ties the room together . Cheers Rob
-
That depends Harv. There are lots of factors going in the decision for using the right tool. How big is the section to cut, is it flat or curved, which material and thickness has the material, do i need the separated part. These are only some questions to answer first. I use different tools, ranging from sharp scalpels over fine saws, sometimes drill bits and grinding tools or Dremel blade saws. I often use Dynotape for marking the cuts and protect the remaining plastic. My goto if possible tool is a razor saw, which cuts so fine, that you can use the cut part, for e.g. a cowling. Cheers Rob
-
Gottfreid Weiroster Bf 109G6 R6 Revell 1/32
DocRob replied to GazzaS's topic in LSM 1/35 and Larger Work In Progress
Wow, very cool paintjob and it even camoes the false shapes of the kit . Gutsy call to spray the walk lines with masks, but it payed in the end. She will look great and will make you forget all the issues, this subpar kit has. After all, it's somehow good to see, that not all the kits out there are perfect. Being in my third Tamiya build in a row, I have the feeling, that a kit which needs a bit more of extra work, should be next. The most fun generating project overall in the last years was the Mikro Mir Fokker D.VIII, where I could be very creative about finding solutions for the kits weaknesses. Cheers Rob -
The foiling job makes your 104 exceptional, she's a real stunner. Cheers Rob
-
LED Klingon Battlecruiser planned... need some lighting advice.
DocRob replied to GazzaS's topic in Modelling Discussion
Cool project Gaz, I only build one model with LED lights, the Nautilus submarine, where I bought a dedicated lighting kit, because I'm not much into electronics. It was easy to install with some required extra work. Most important is to check for unwanted light emissions. I don't know, which kit you have, but there are lighting kits out there for Klingon battlecruisers. I can imagine that my submarine with it's maybe 15 LED's would run for three days with one 9V batterie. Only one example: Amazon.com: Polar Lights - Star Trek Klingon K't'inga Lighting Kit 2T (Upgrades to kit POL950), 1:350 (MKA031M), White : Arts, Crafts & Sewing Cheers Rob -
RFM Panzer IV Ausf H (Early)
DocRob replied to Bomber_County's topic in LSM 1/35 and Larger Work In Progress
Painting is always a little tough with these not up to the task and therefore upgraded with skirts and whatever addons Panzer IV's. Will it be a tri tone camo? I wish you luck with the airbrushing and I'm sure you will master it. Cheers Rob -
Ducati Panigale S - Italian Speedster - Tamiya 1/12
DocRob replied to DocRob's topic in LSM 1/35 and Larger Work In Progress
Thank you Kai, I will definitely build another bike kit soon , but have no idea which. My favorite bikes doesn't exist in plastic. Im looking forward to painting the body parts too and if I fail with these, I will convert the Ducati into a naked bike, which suits me as well. I only had naked bikes for real, to me the best thing is, having a good fitting leather gear, a great powerful naked bike and the wind blowing, a curvy mountain road ahead, can't beat it. The rim decals are only so-so, from very close they are not perfect, but I spare you the view. Thank you Peter, I maybe expressed myself not too well, the kit is well engineered and not overly difficult to build. It's only, that you have to chose a different approach than with most planes and armor builds. It took me a while to adopt, but now I really enjoy the different approach needed as a welcomed new variety. Thank you Mark, you should give it a try. In your able hands, I'm sure, there is a gem in the making. Have I mentioned, that I would really enjoy to follow a build of one of the Hiro bikes . Mille gracie, Carl. The Ducati Monster was always a bike, which I really liked, but couldn't get me comfortable on it, as the proportions of the bike are a bit strange and it fits better to smaller people. This was my last bike in Berlin (Sorry no own pics, I shot analog by this time). It's like a sharp blade, raw power, but with a perfect balance, stability and precision. You could go 200 km/h without any bad reactions from the bike, which is a good thing given the long fork and rear suspension. It may not look like, but the KTM is exceptional comfortable for greater guys and I drove more than once 500-700km day trips. In the city, the KTM handles like a bike, being light weight and powerful and it sounds like a Harley on speed, I would love to built the KTM as a model, but there is none. Cheers Rob -
Ducati Panigale S - Italian Speedster - Tamiya 1/12
DocRob replied to DocRob's topic in LSM 1/35 and Larger Work In Progress
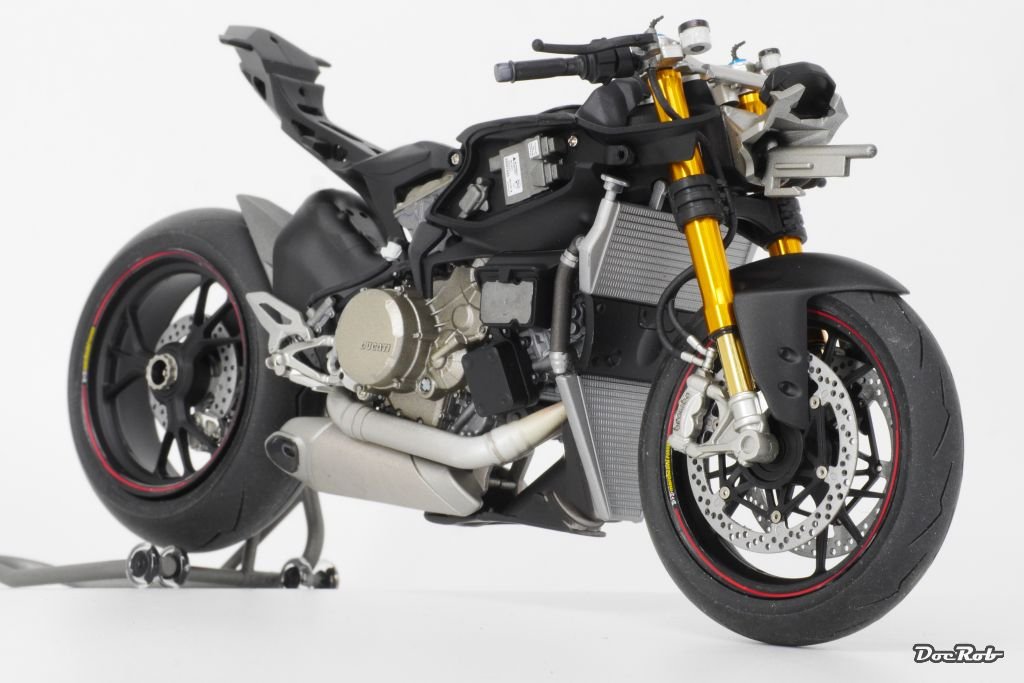
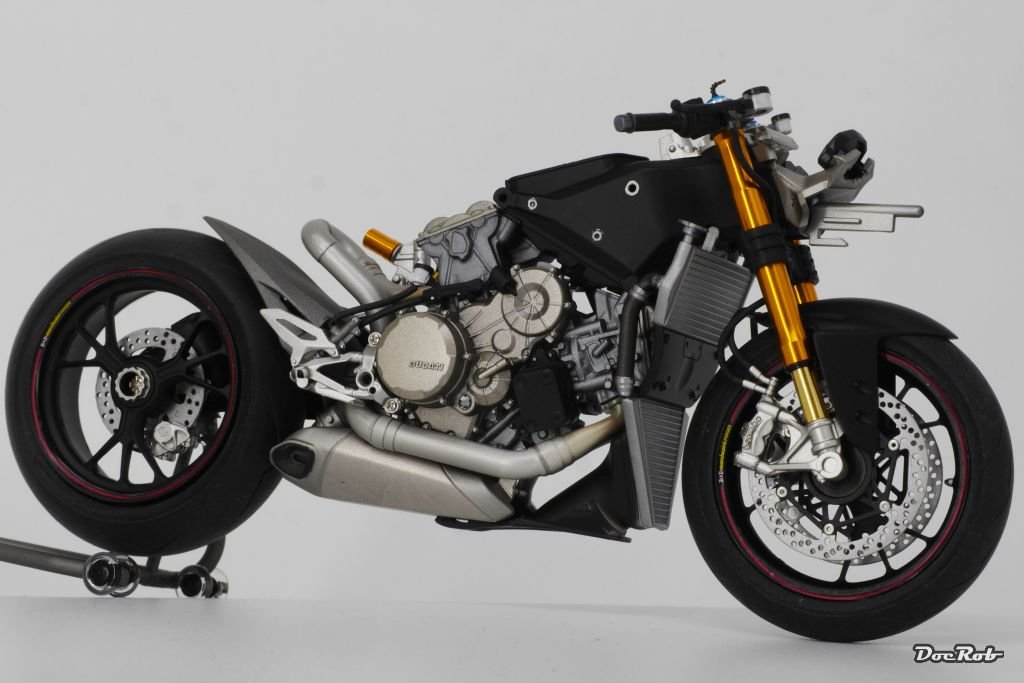
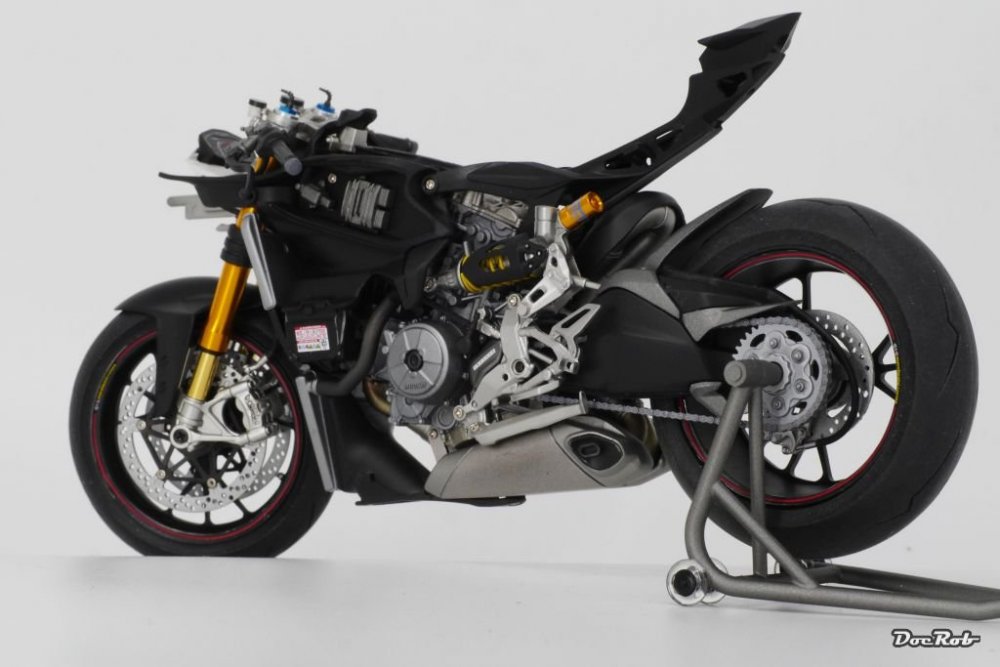
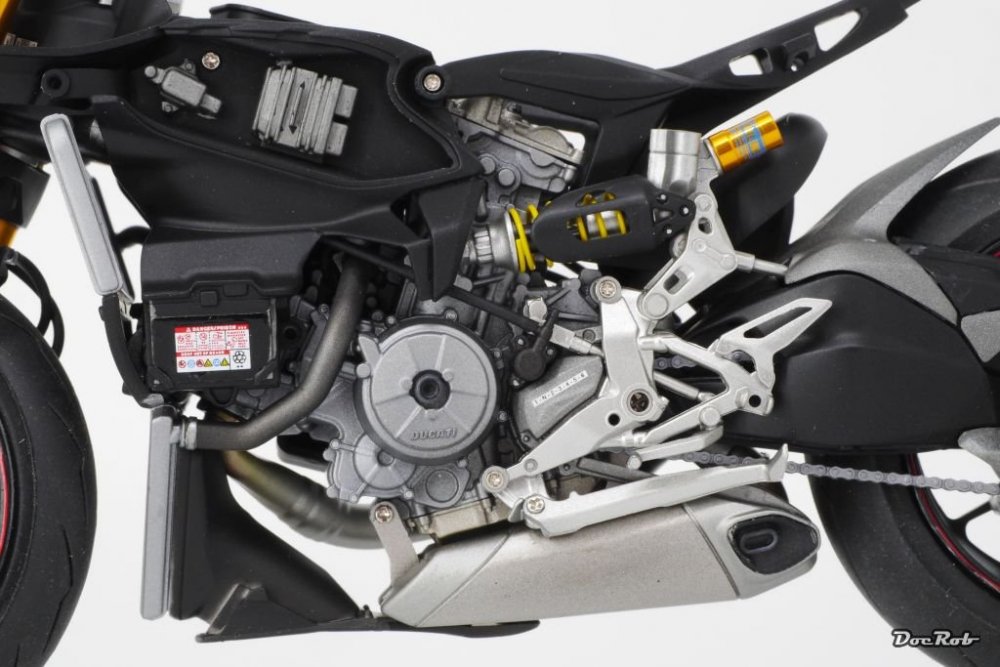
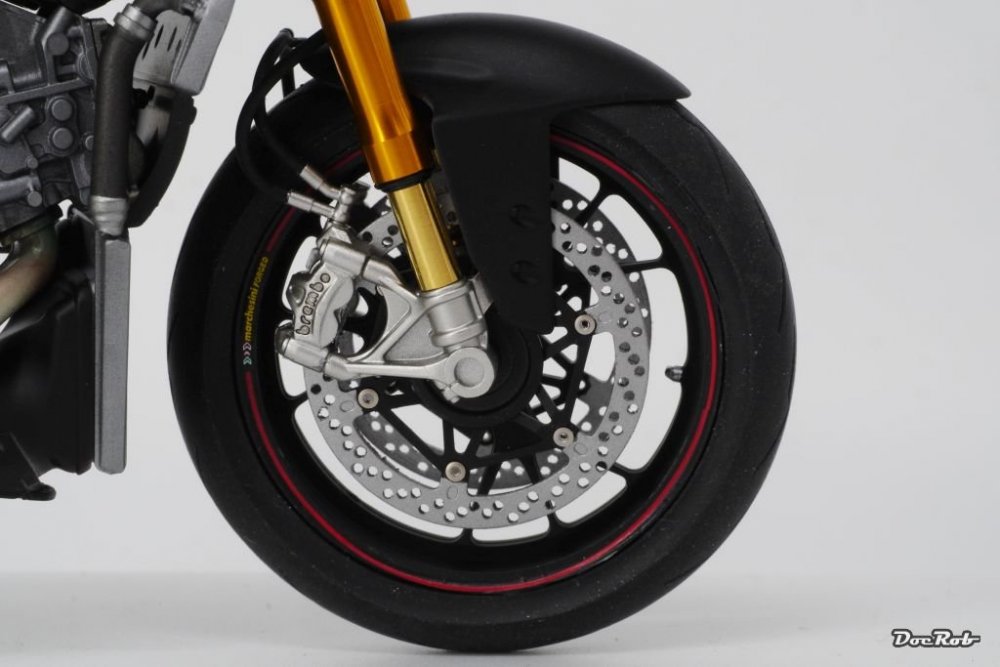
The beast has wheels, for my taste not much more is needed, other than a seat and the ignition key. I love naked bikes and wouldn't store my lengthy bones behind a plastic body, but this is another story. The red stripes for the rims are segmented decals and they gave me some head scratches. Fit of the decals is good, but due to a bit of carrier film extending, it's difficult to blend them in, even with Micro Sol. I did the best I could, without ruining the finish of the rims and then applied some semi matte coat on the decals as they were to shiny. You have to be very attentive through the build. One example is the front wheel. You start painting the rim and and then drill, build and paint the breaking disks, which look nearly equal, but are not. before gluing these on you add the tire, which has a direction as well, which corresponds to the decal on the rim. If you follow the manual very closely, everything will fit, but there are some trap doors for the 'I prepare everything and then assemble' type of guys, guess how I know. More than once, I had to remove a part, which was securely glued in place . I want just emphasize, this is a different type of kit, where assumptions are not made lightly like with most planes. For the luckily supplied vinyl tubes, it pays, to fix the tube on a to assemble part and after gluing it in place, you have only to fiddle in the other side. Cheers Rob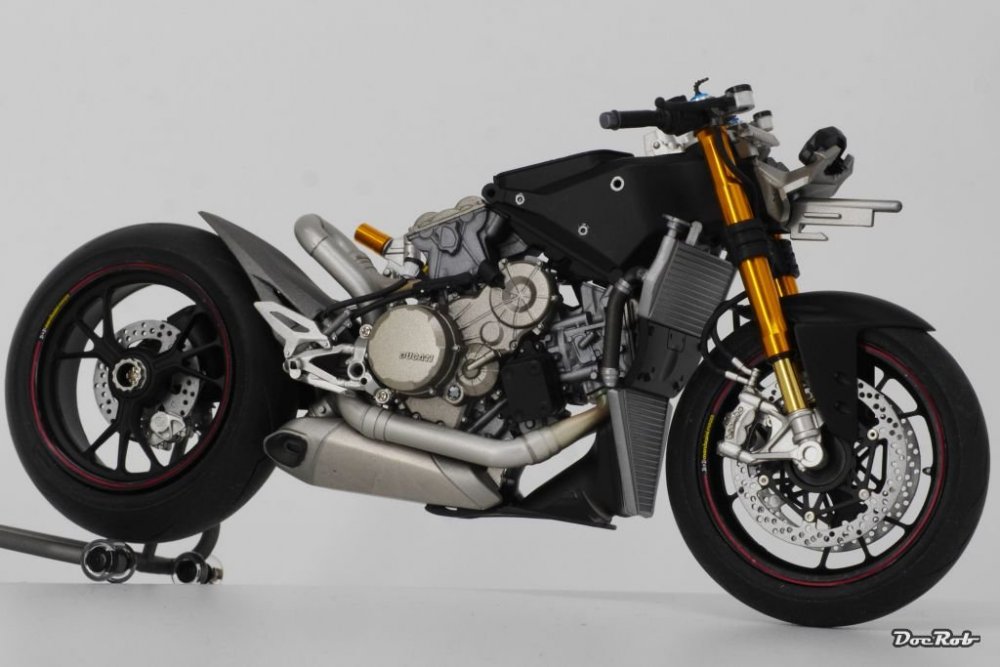

-
Ducati Panigale S - Italian Speedster - Tamiya 1/12
DocRob replied to DocRob's topic in LSM 1/35 and Larger Work In Progress
Thank you Peter, well appreciated from one of the masters here. Cheers Rob -
Ferrari 330P4 Open top 24Hrs Daytona 1967
DocRob replied to mark31's topic in LSM 1/35 and Larger Work In Progress
That engine looks absolutely great Mark, I have to build one of those Hiro kits, when I'm grown up . Cheers Rob -
Ducati Panigale S - Italian Speedster - Tamiya 1/12
DocRob replied to DocRob's topic in LSM 1/35 and Larger Work In Progress
Thank you Carl, it's good to have so many good looking paints, waxes and metals for replicating metal surfaces, but in the end, nothing beats the real thing, if it's made so well like Tamiya provided here. Thanks Phil, I think a visit on Ducati.com would help for sure, but take care biking is addictive and reduces bench time . Cheers Rob -
Ducati Panigale S - Italian Speedster - Tamiya 1/12
DocRob replied to DocRob's topic in LSM 1/35 and Larger Work In Progress
Oh, that is from the manual, my subpar pics follow later . Cheers Rob -
Ducati Panigale S - Italian Speedster - Tamiya 1/12
DocRob replied to DocRob's topic in LSM 1/35 and Larger Work In Progress
Thank you Gentlemen, I'm a bit afraid of first the delicate rim decals (thin red stipes), which I started yesterday and the painting of the body, which of course has to have a great shiny finish, after lots of masking painting and decaling. Building bikes is somehow different to planes or armor. There is no in and out, no cockpit and wheel wells to finalize close the fuselage and then paint the outside. A bike is open and close at the same time, combining lots of different materials, textures and finishes in a very confined space. It's harder to keep the overview, specially with such a delicate and complicate machine, like a modern super bike. It's a burden and fun at the same time, as replicating materials in plastic is one of my driving forces in modelling, you couldn't ask for more . Cheers Rob -
Gottfreid Weiroster Bf 109G6 R6 Revell 1/32
DocRob replied to GazzaS's topic in LSM 1/35 and Larger Work In Progress
You can produce good pictures with an Iphone too. I often use mine, when I'm too lazy to pick up the camera and lenses. I found, that color rendition is better with my Iphone, than with my Panasonic Lumix system, using the default settings. When photographing with the phone, I don't use the normal camera app, instead, I use ProCam (five well spent Dollars, when I remember it right), which allows to use manual settings for the more important settings, like white balance for color rendition and F-stop, to control the depth of field. It also helps to incorporate a 2x zoom with the phone's camera for natural looking pictures of close ups, concerning the angles. If you use the normal wide angle settings, the picture doesn't look right. Cheers Rob -
Mirage 2000D saved from the shelf
DocRob replied to mark31's topic in LSM 1/35 and Larger Work In Progress
Excellent paintjob Mark. I like the pre shading effect. To judge the grey is difficult from the pics, on some it looks bluish on another light gray, but I'm sure, you will make the grey fit. Cheers Rob -
Nice and clean build John, the finish is perfect, I can't be bored by Corsairs. Cheers Rob
-
Ducati Panigale S - Italian Speedster - Tamiya 1/12
DocRob replied to DocRob's topic in LSM 1/35 and Larger Work In Progress
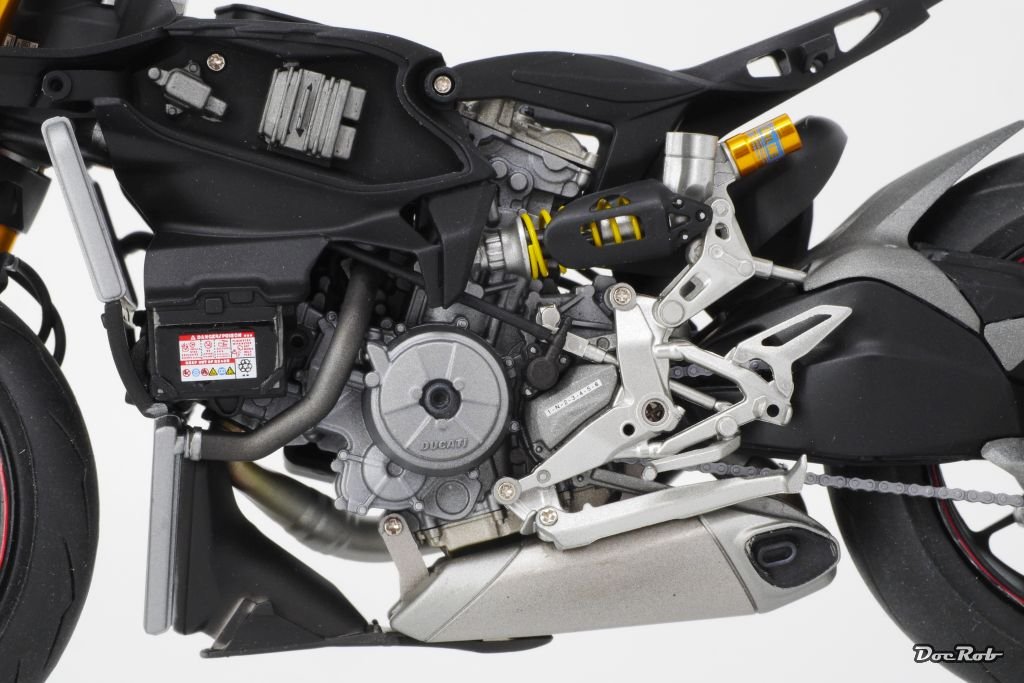
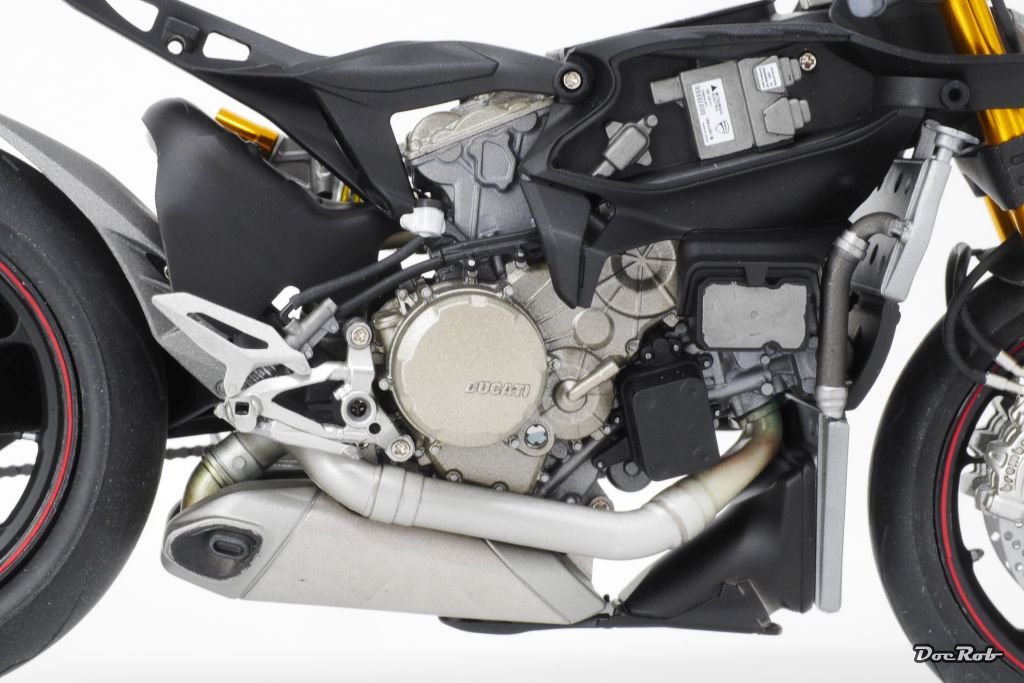
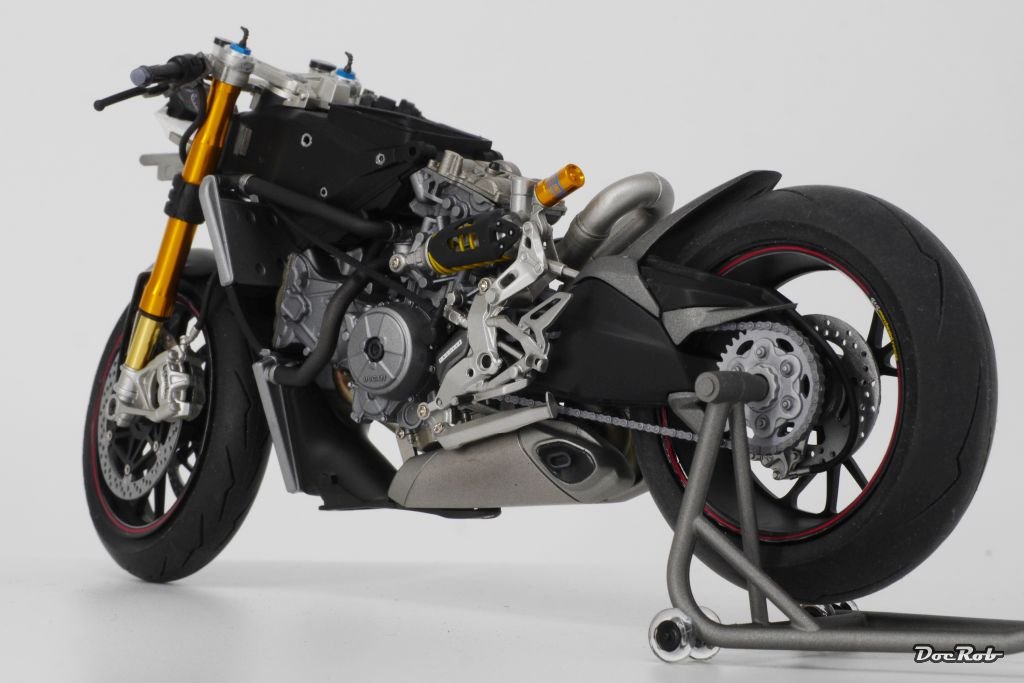
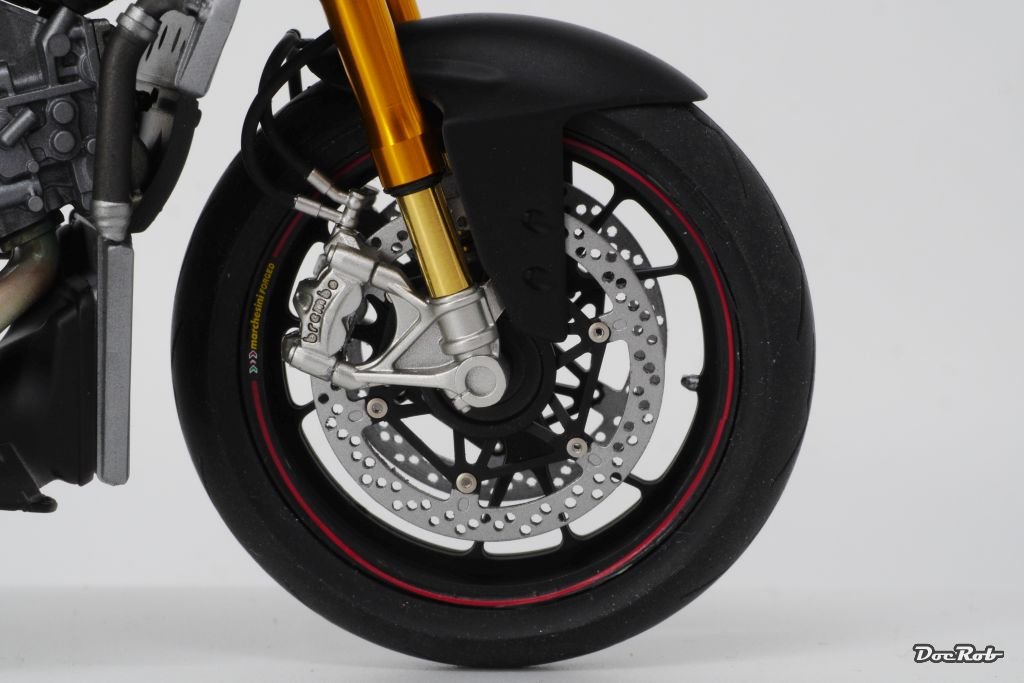
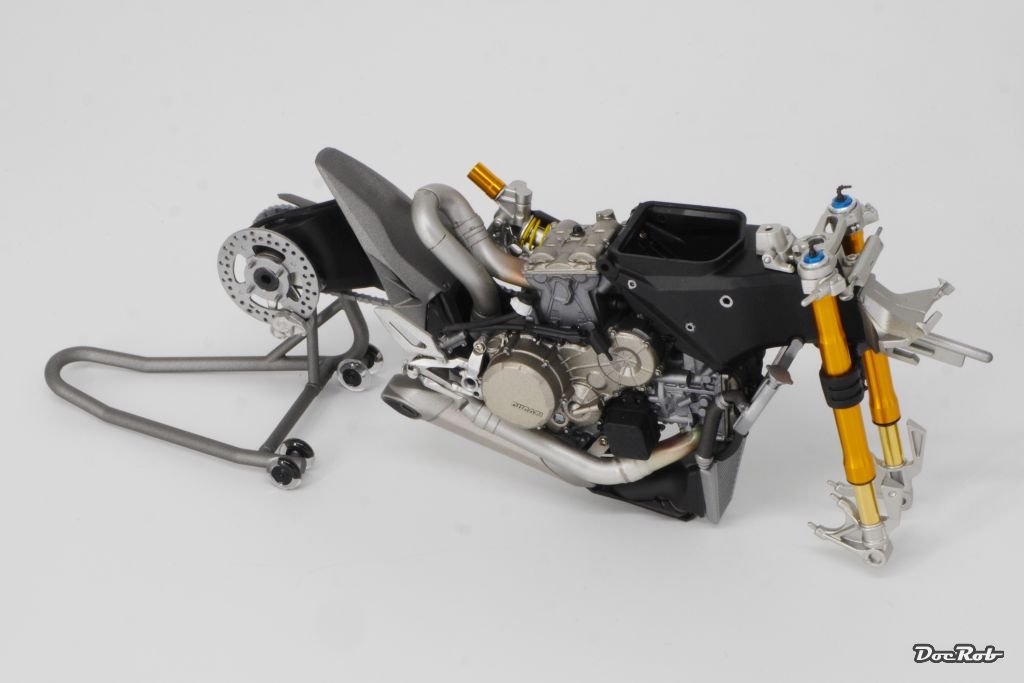
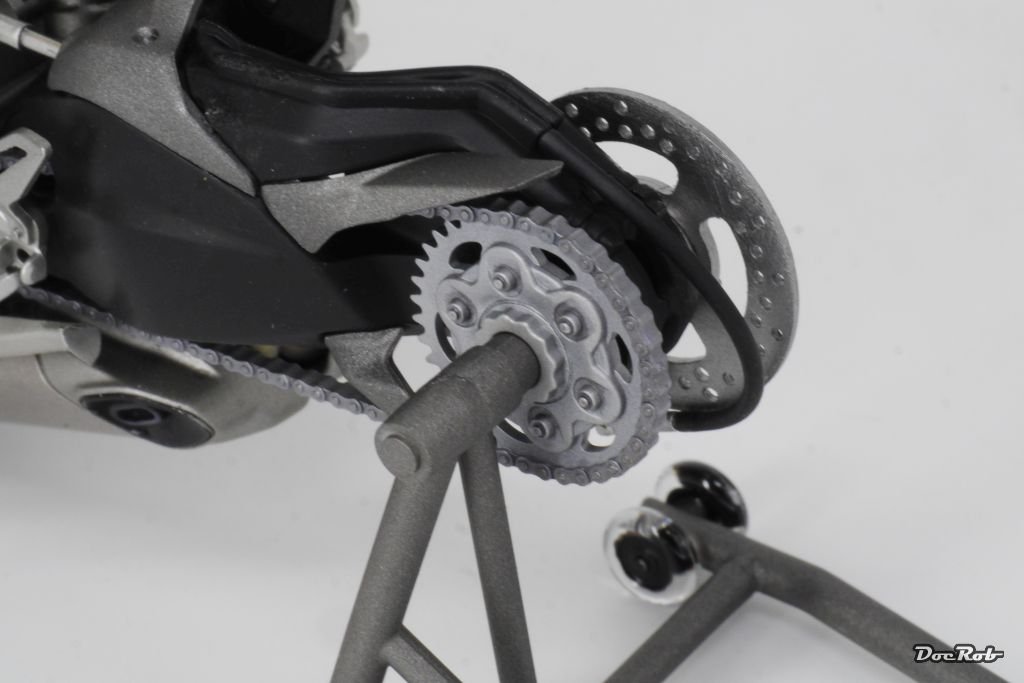
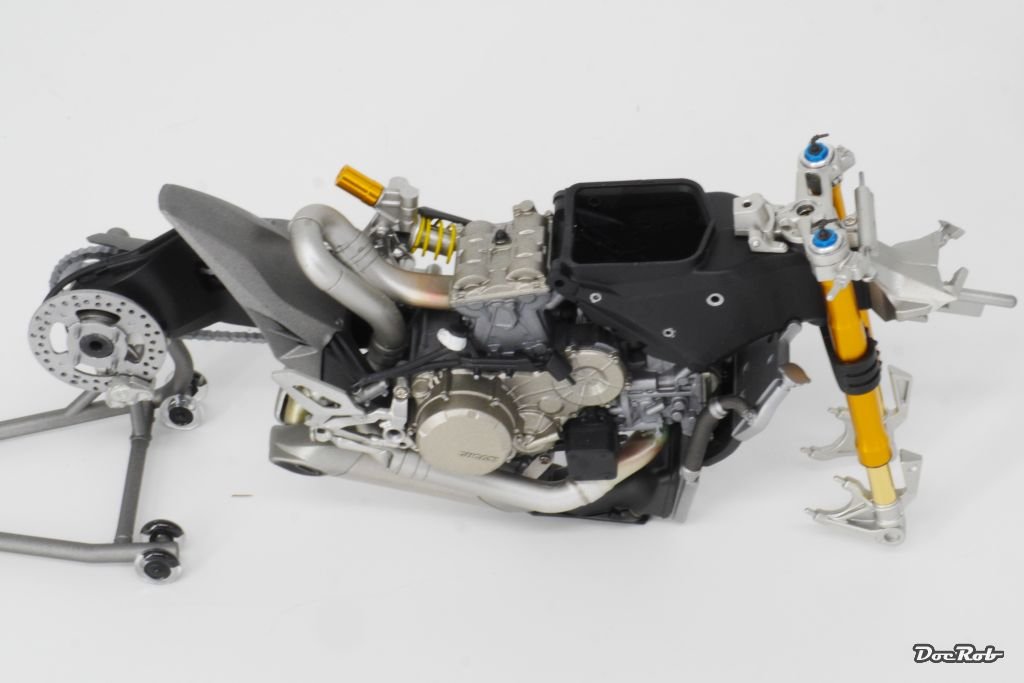
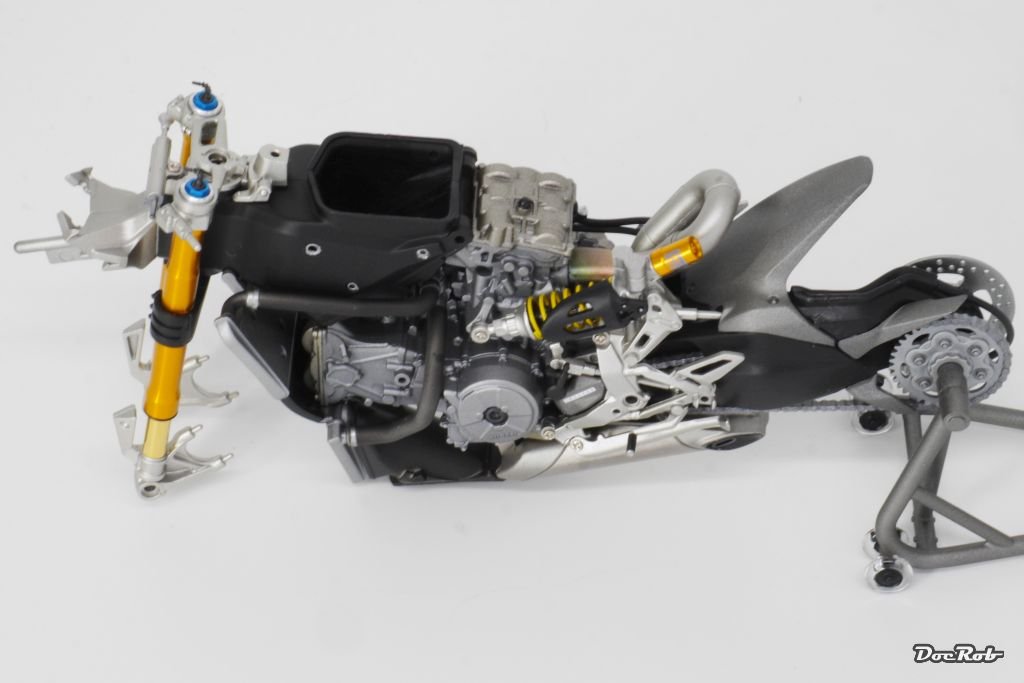
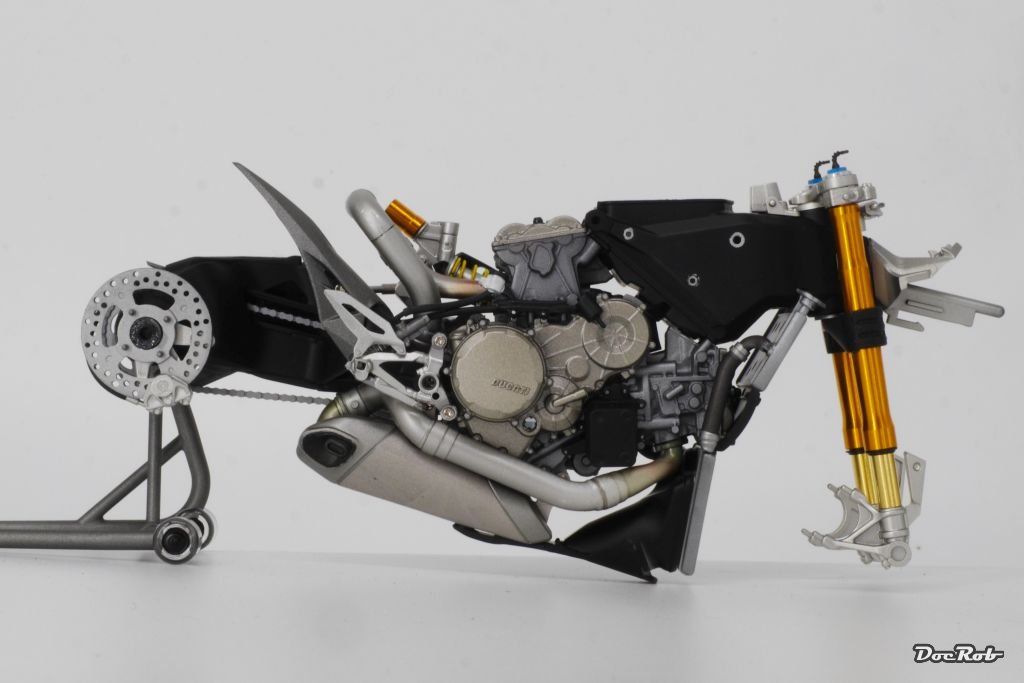
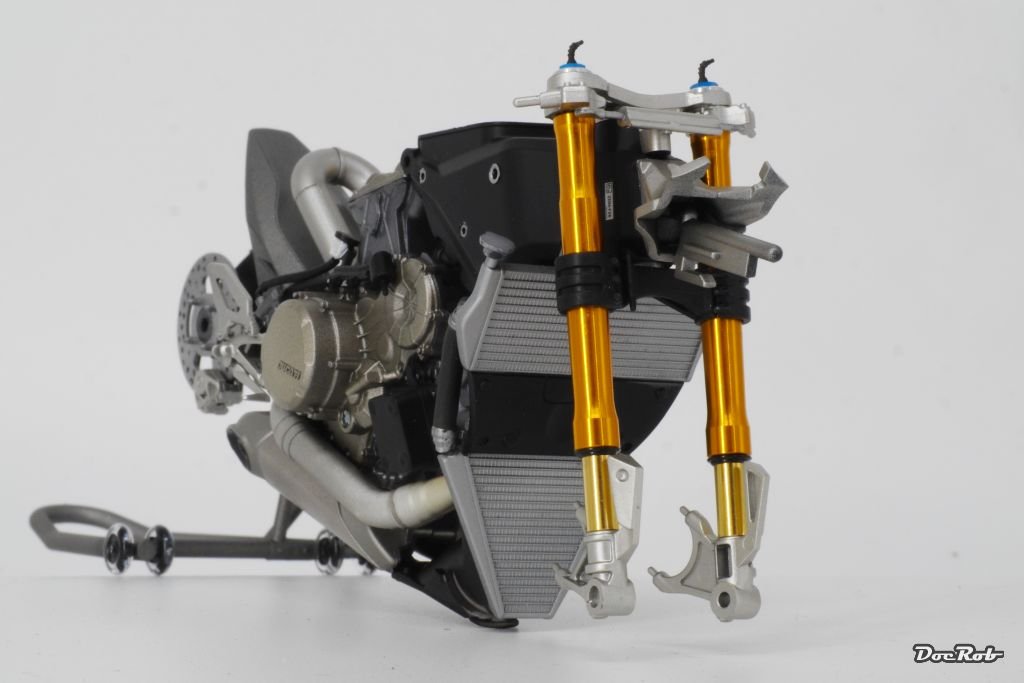
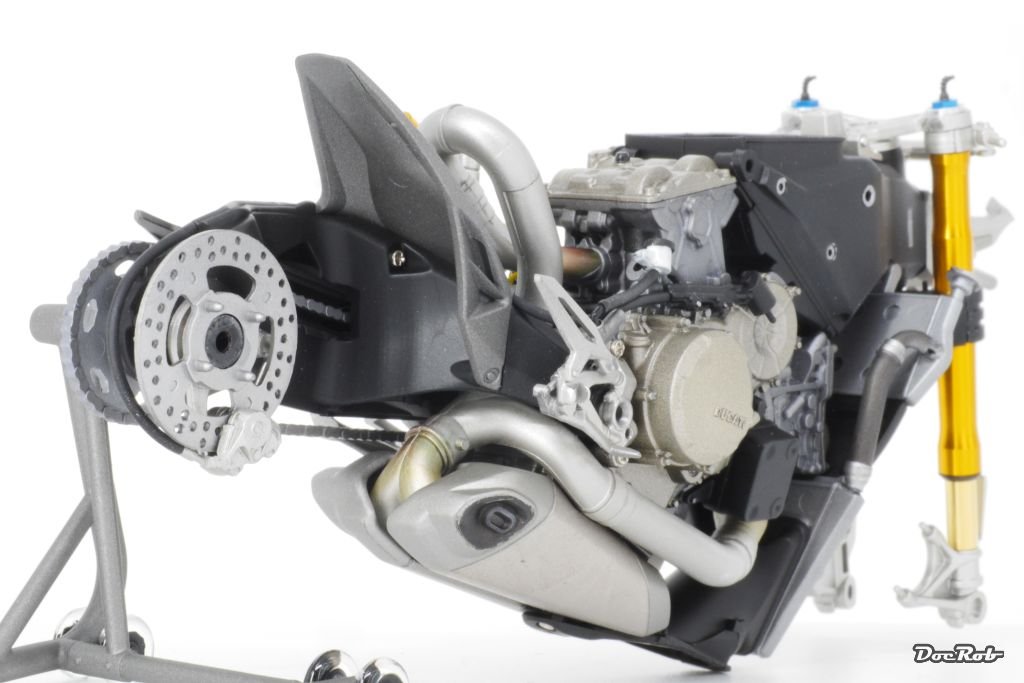
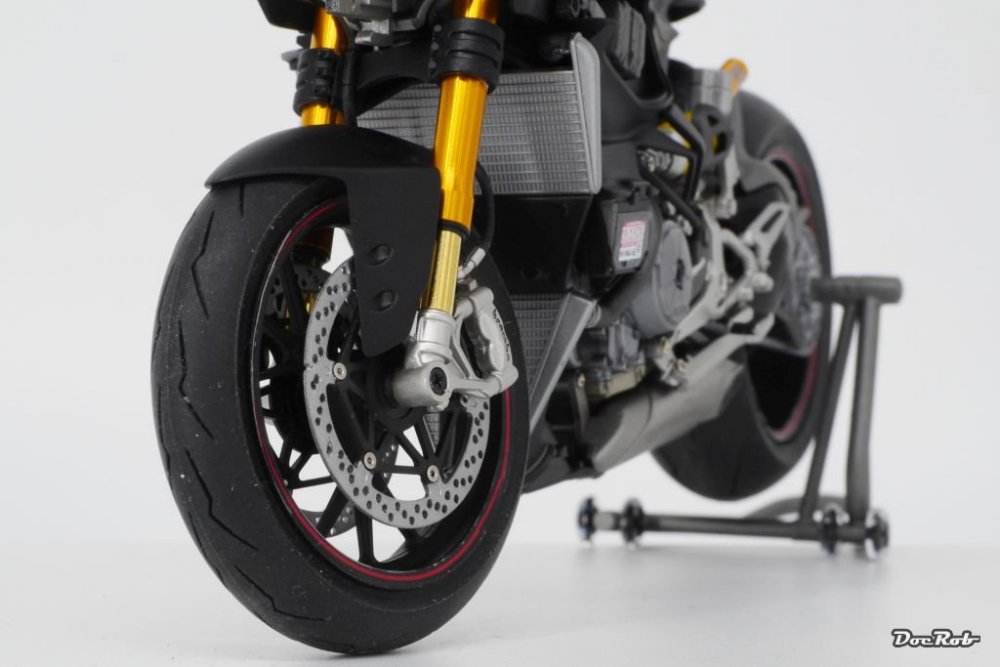
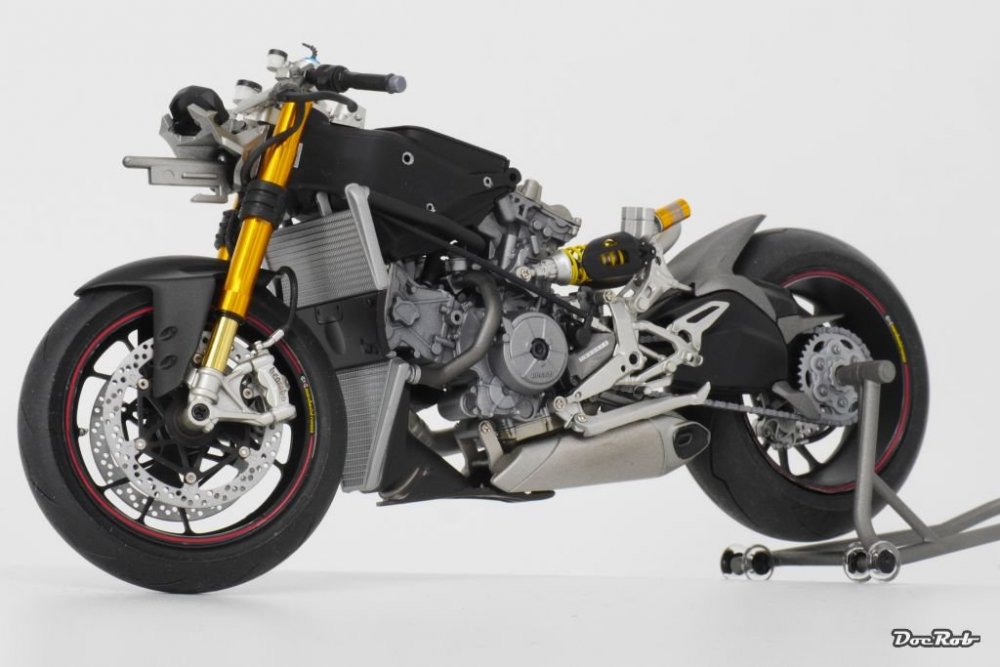
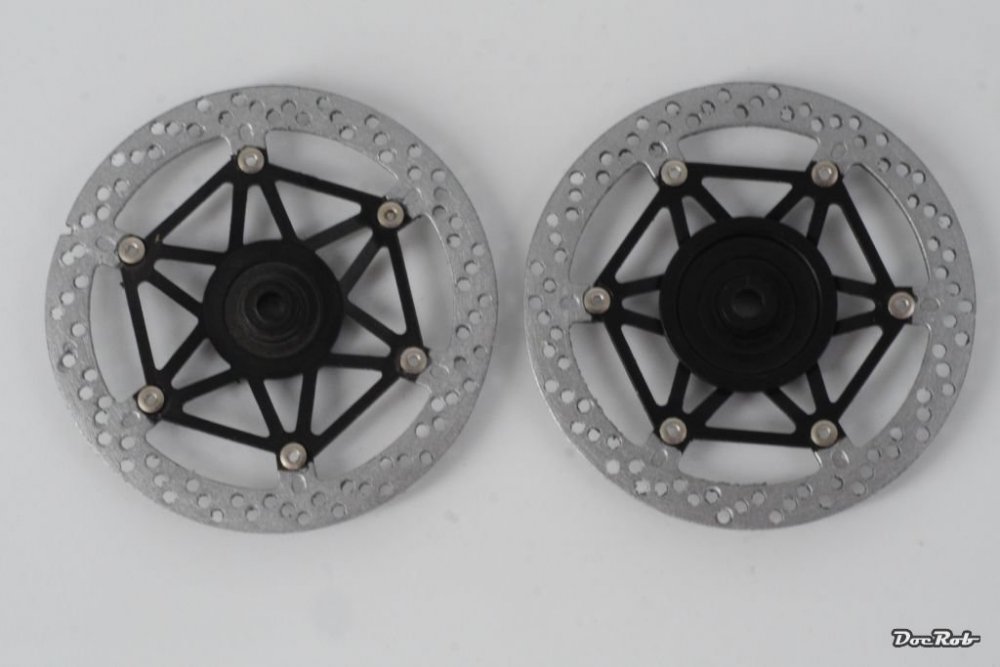
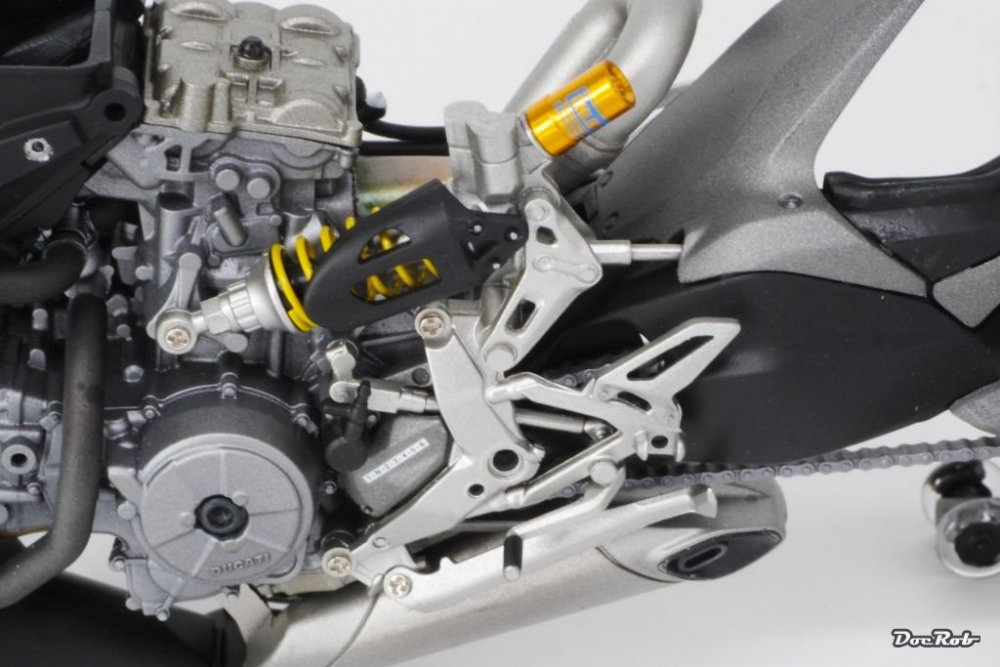
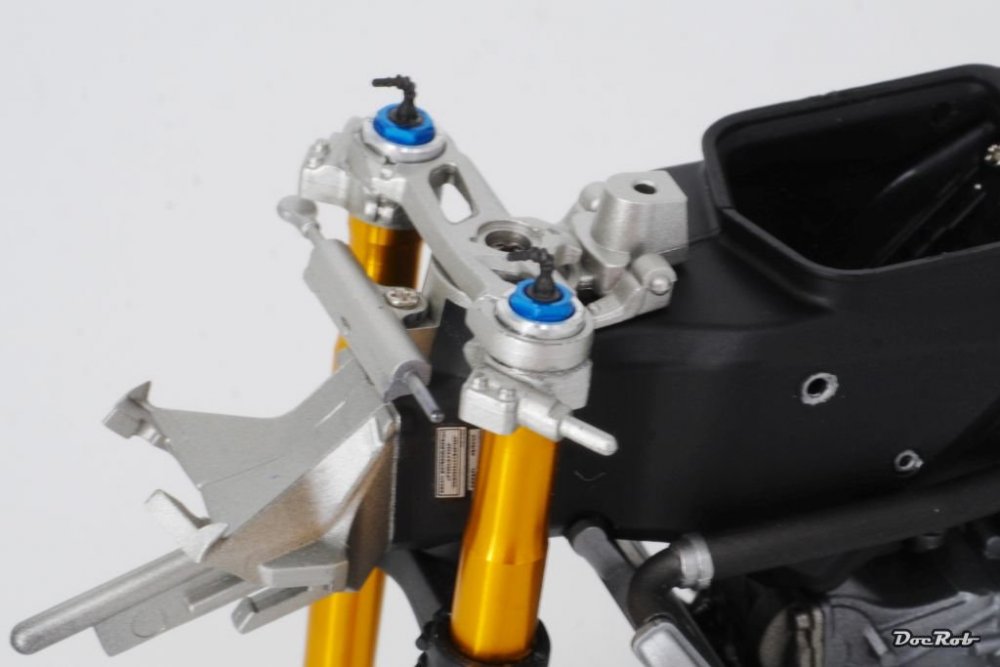
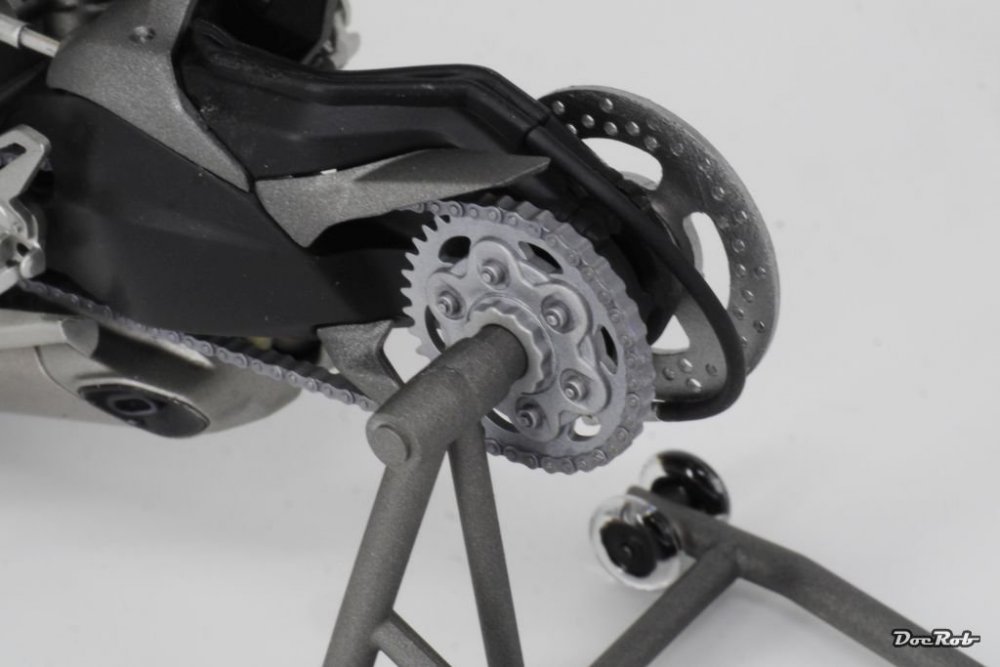
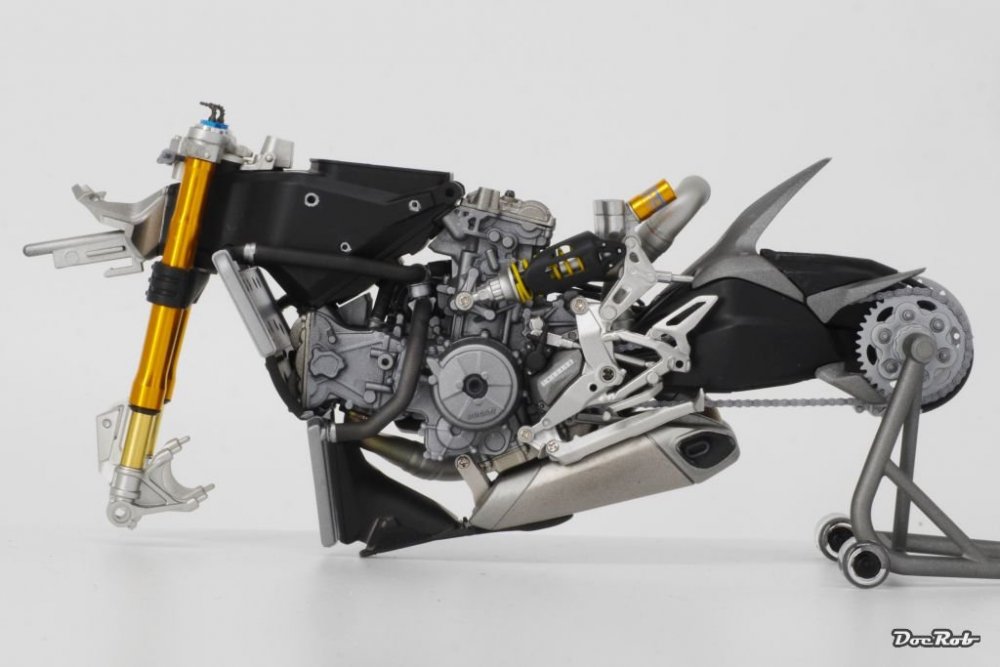
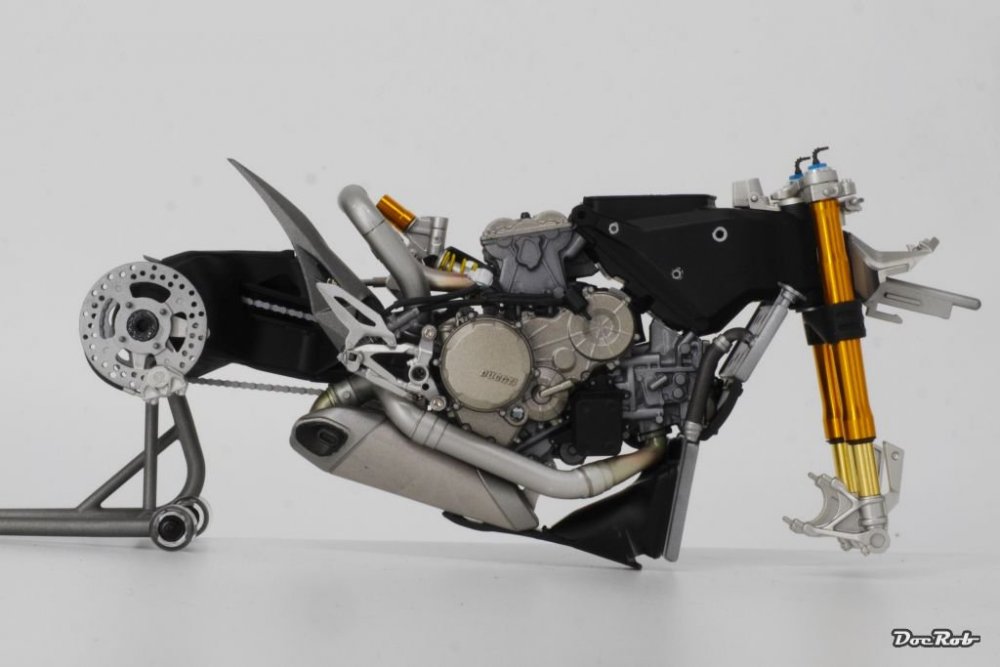
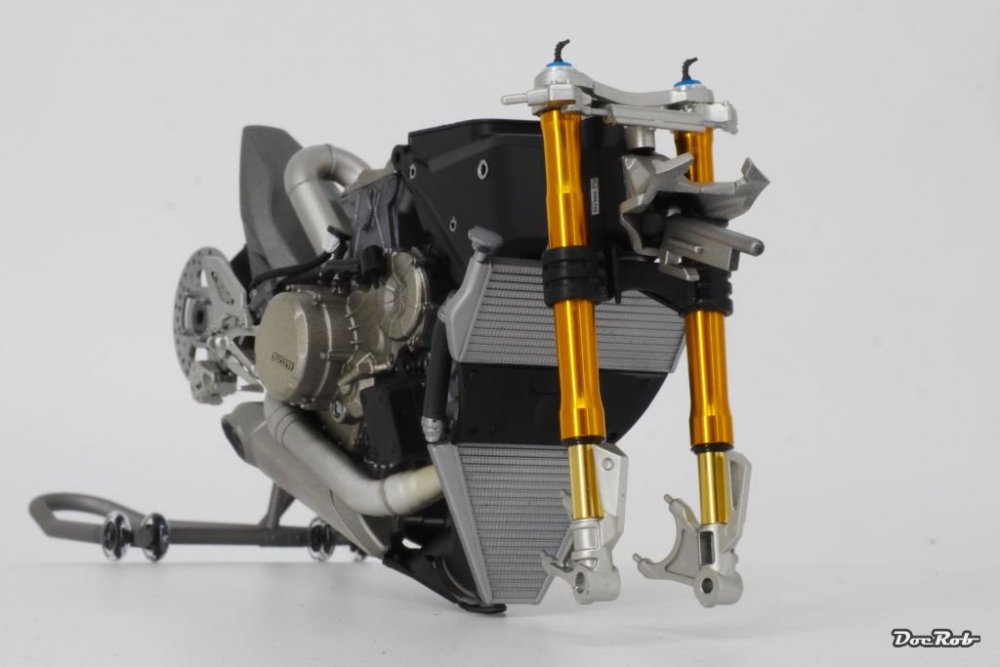
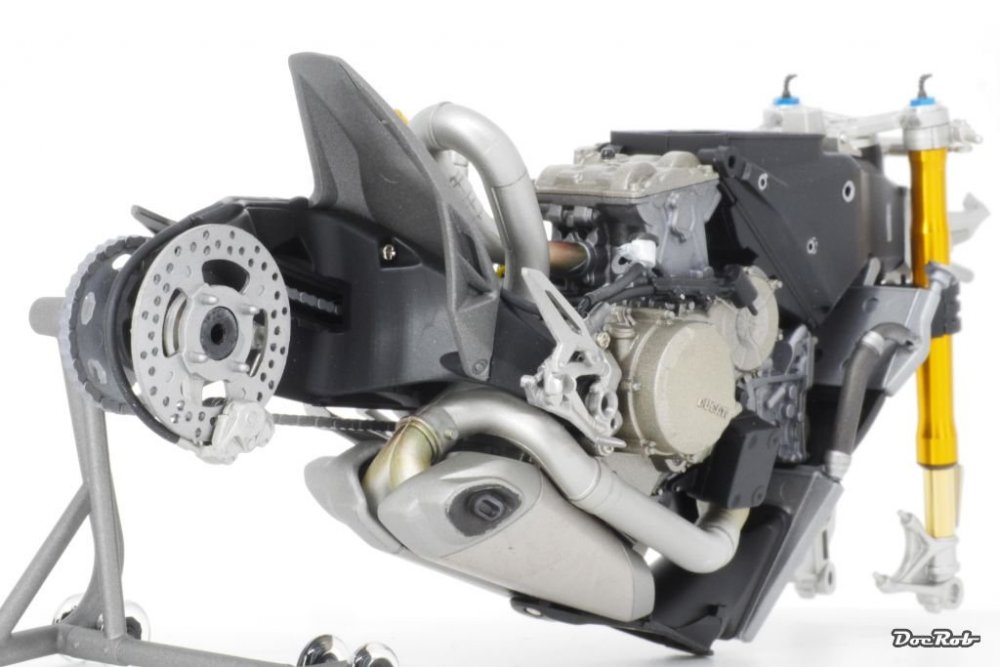
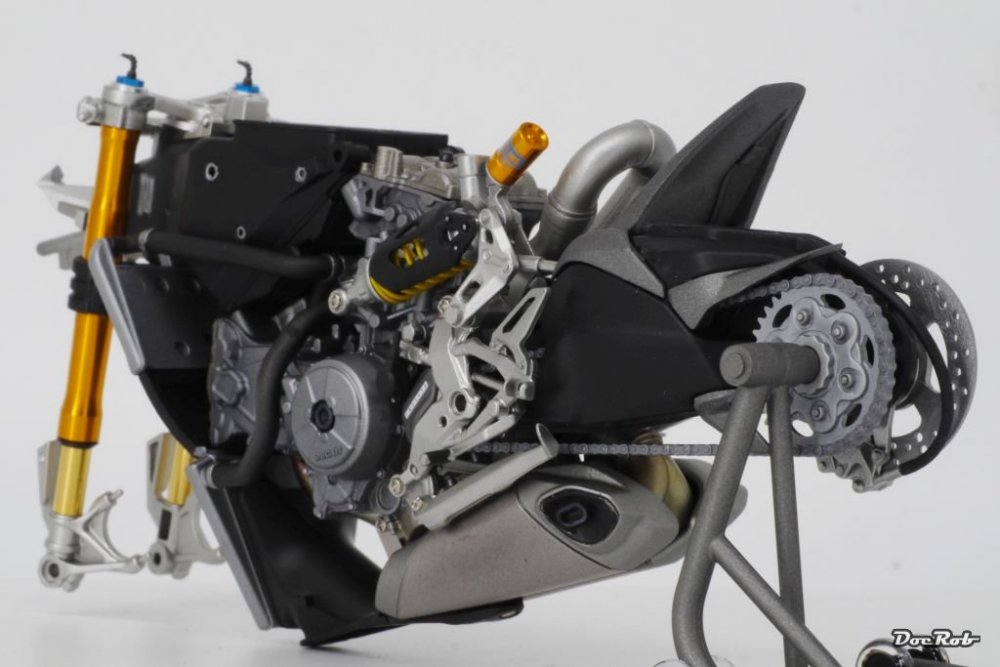
The last days, there was a lot of work, but not much to show. I sprayed lots of parts semi matte black and others in titanium silver and aluminum and painted a lot of details. The kit is great, but not easy to build and paint. you have to be very attentive and concentrated, to orientate everything right, with all these complex shaped parts. Another difficult task is to glue all the painted bits and pieces with their delicate surfaces, without glue residues showing. I managed to have that on one part. The extra metal fork set looks great and is a nice, but not essential addition to the kit. In the fork set are also included a turned and anodized oil reservoir for the rear damper and some tiny turned and drilled screws for the braking disks. The tiny bits and pieces for the front fork. The aluminum rings around the blue anodized parts have six drill marks from above, amazing. Here are the finished front braking discs, with the applied aluminum screws for vibration absorption. You can't see all the details, like the suspension axle, which was chromed for a better look, The oil reservoir is made of turned and anodized aluminum with an Öhlins decal. Chain and chainwheel and rear brakes. Cheers Rob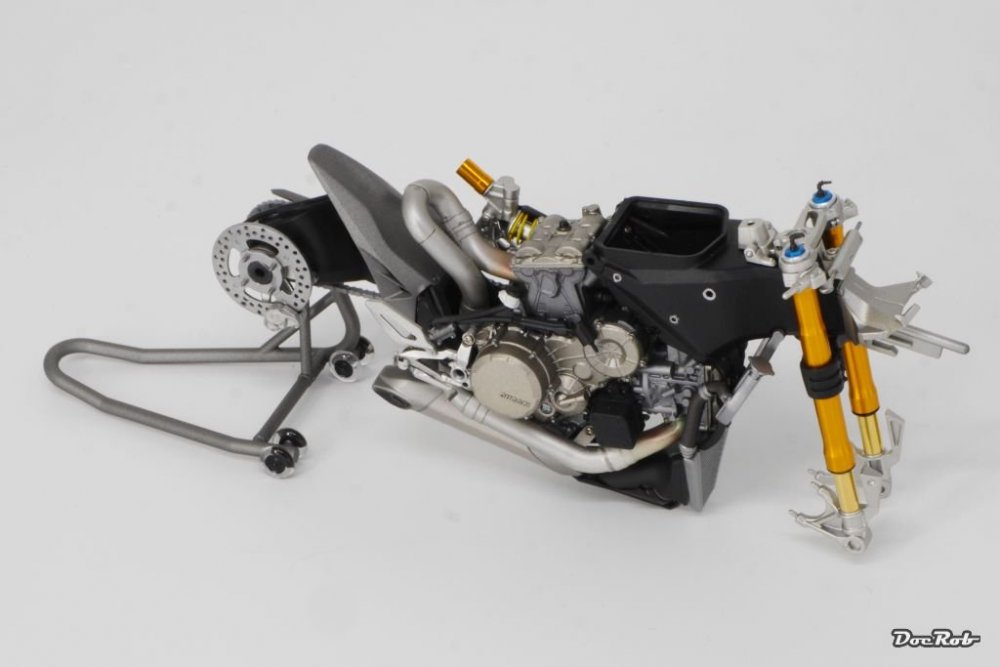


- 79 replies
-
- 10
-

-

-
Im waiting for this to happen too, but ordered the new release of the old 1/12 Brabham BT44 kit yesterday. @Ernie, OT off, sorry . Cheers Rob
-
Gottfreid Weiroster Bf 109G6 R6 Revell 1/32
DocRob replied to GazzaS's topic in LSM 1/35 and Larger Work In Progress
Vielen Dank mein Herr, your detail work looks splendid. I use Revell contacta clear for clear parts, which seems to be similar to white glue for wood. Since last week, I feared, that the bond could be not strong enough, but then I had the canopy fogging issue with my KI-61 (not caused by the glue) and I was not able to remove it, without using brutal force. For the position lights, I use the same technique, but for a newer looking plane use a silver coat on the backside of the clear part. Cheers Rob