DocRob
-
Posts
7,048 -
Joined
-
Last visited
Content Type
Profiles
Forums
Events
Gallery
Everything posted by DocRob
-

Das Kamel - Hansa Brandenburg W.12
DocRob replied to DocRob's topic in LSM 1/35 and Larger Work In Progress
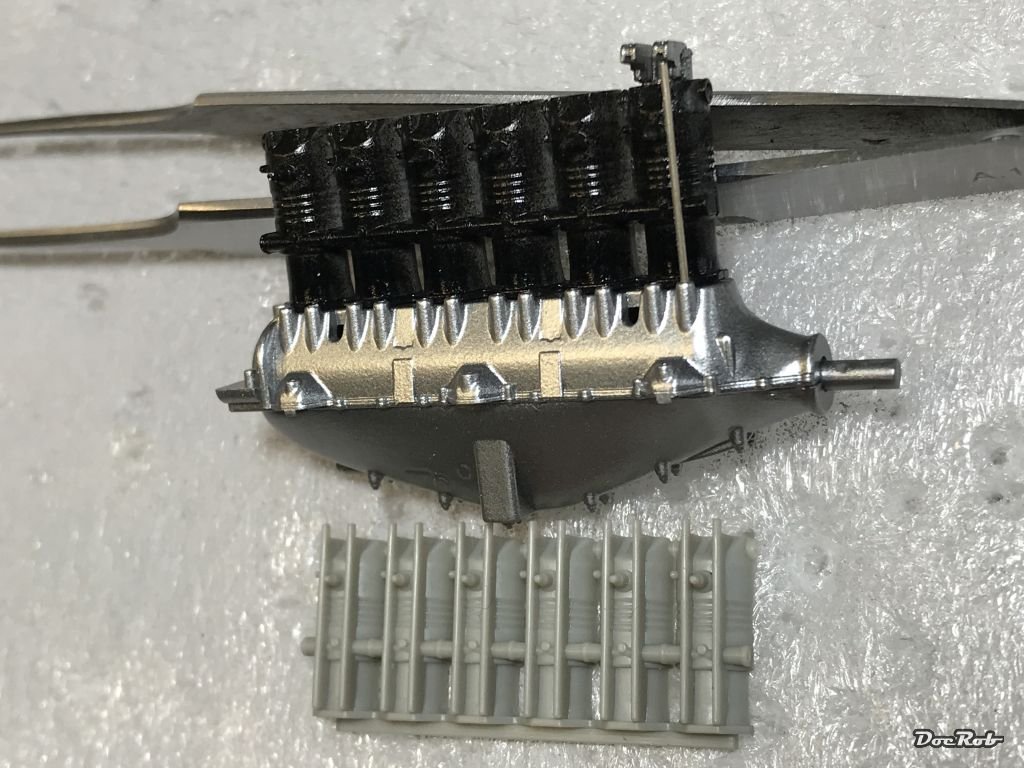
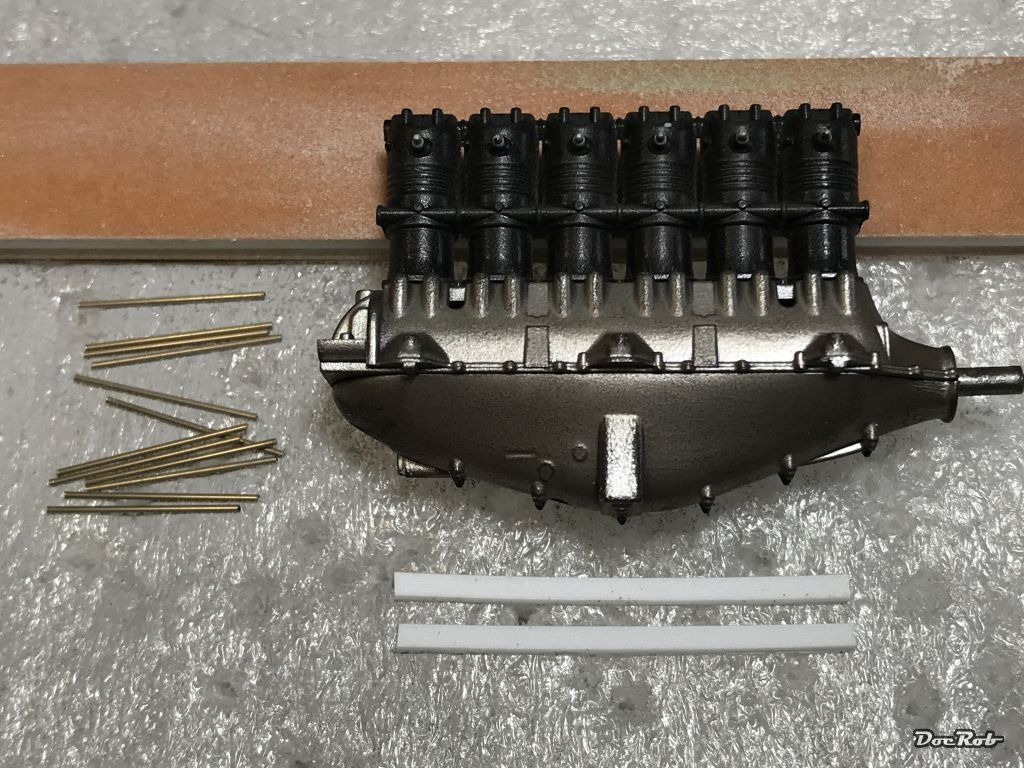
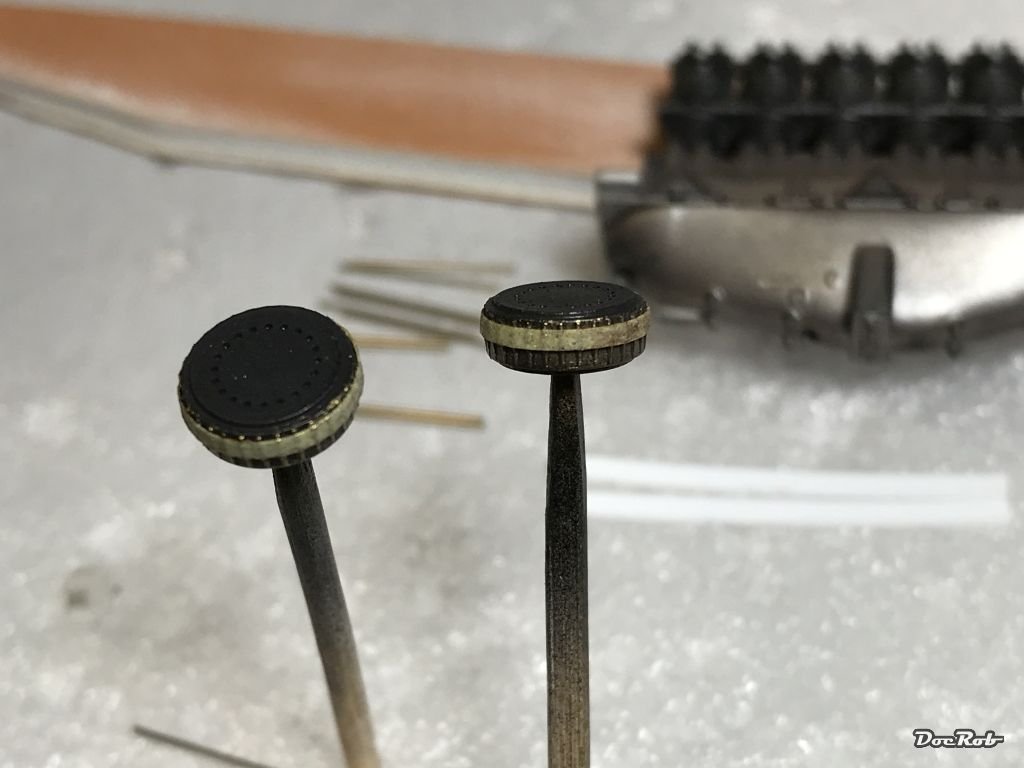
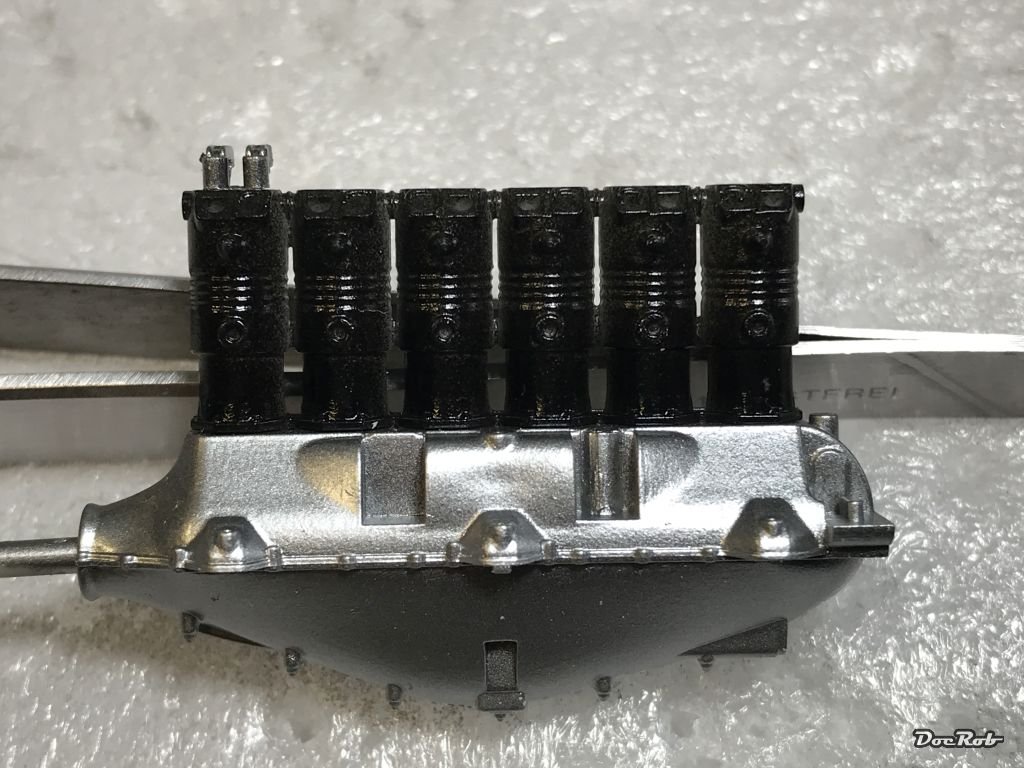
It's about time to start with the engine now. WNW provides a plastic half of the cylinders with the push rods casted in. That part is highly prominent on the engine and utterly gruesome. The good news is, that there is an 'unused' spare part of the same cylinder block half without the rods, so you do not have to do a lot of surgery. The main part of the engine was sprayed with Xtreme Metallics Aluminum, the bank of cylinders is Tamiya's semi gloss black. I drilled 0,5 mm holes into the housing to install the pre cut (13,3mm length) nickel silver tubes, wich will look perfect, with their high sheen finish. I also cut two strips of 0,5 mm styrene for the wiring harness. These are not present in the kit, but are shown in the b&w pics in the manual. Because it will be more difficult to weather the engine, with all details attached, I dusted different types of pigments on, namely track brown, smoke, old aluminum and steel. This will be refined later. I also painted the spark plugs for a little contrast. The springs or more the missing representation of the valve springs, I will try to address in a simplified way. As you can see on the upper left side of the pic, these are only cylinders without any spring detail, again, highly visible. I thought about cutting these away and make my own springs out of wire, but cutting these parts would make them very fragile, so I decided to try to fake paint the springs, either with a very thin marker or a pencil onto the already applied stainless steel paint. Last but not least and to finish the interior, I painted the spare drums for the observers Parabellum MG. After painting and some wash and pigments, I applied a 0,5 mm strip of Kabuki tape, as a canvas strip, holding the rounds. this was then painted and dirtied up. Cheers Rob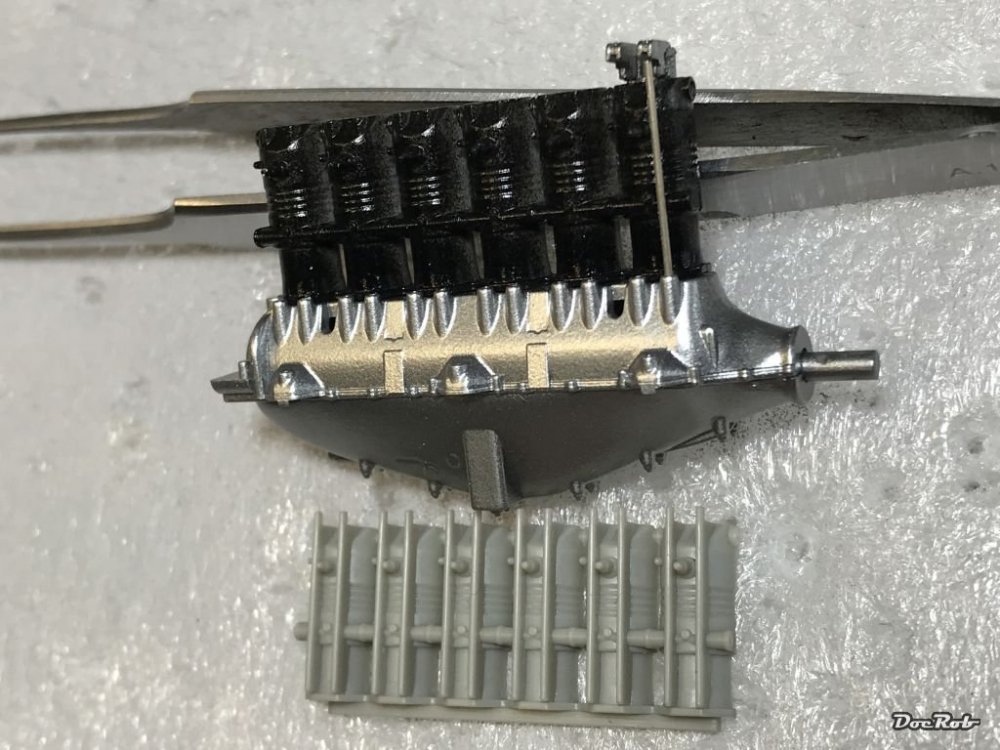


-
Das Kamel - Hansa Brandenburg W.12
DocRob replied to DocRob's topic in LSM 1/35 and Larger Work In Progress
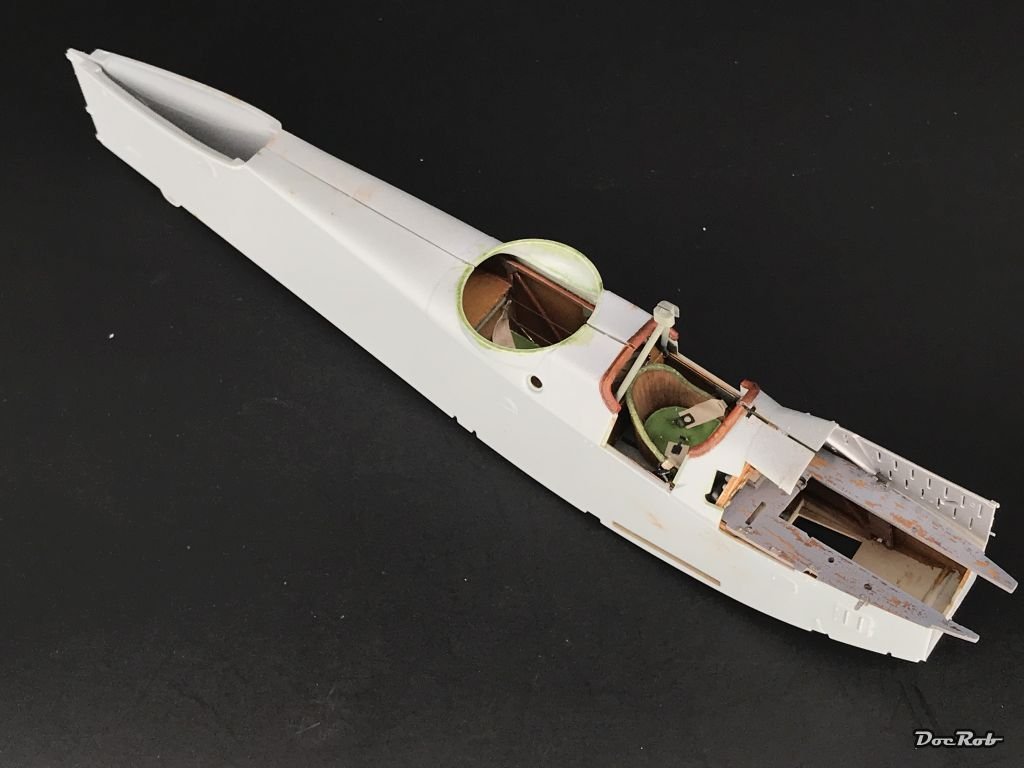
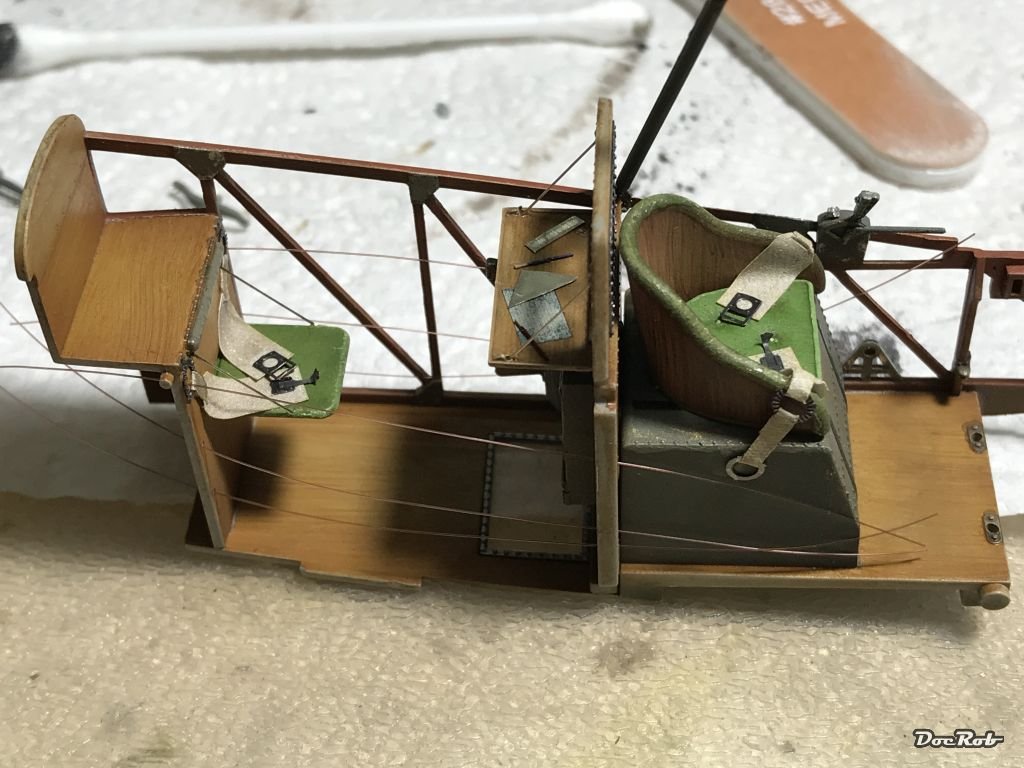
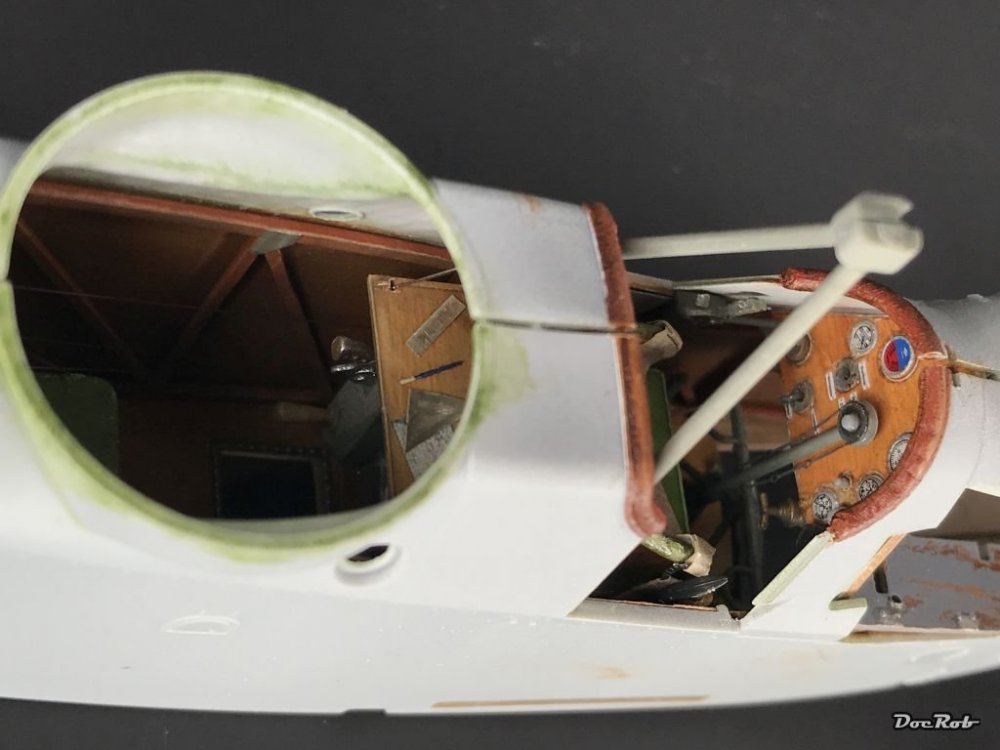
The internal rigging was a fiddly affair, but now everything is taut and glued. The steering column is not in it's final position, that will be glued in place with the steering wheel added. That's about what shows of all the interior work after closing the fuselage. Luckily it seems, that everything fits here, the small gap can be closed with only a slight amount of pressure, a crucial step in WNW builds. Next step will be the engine, which will be modified, as the stock one has it's noticeable simplifications. Cheers Rob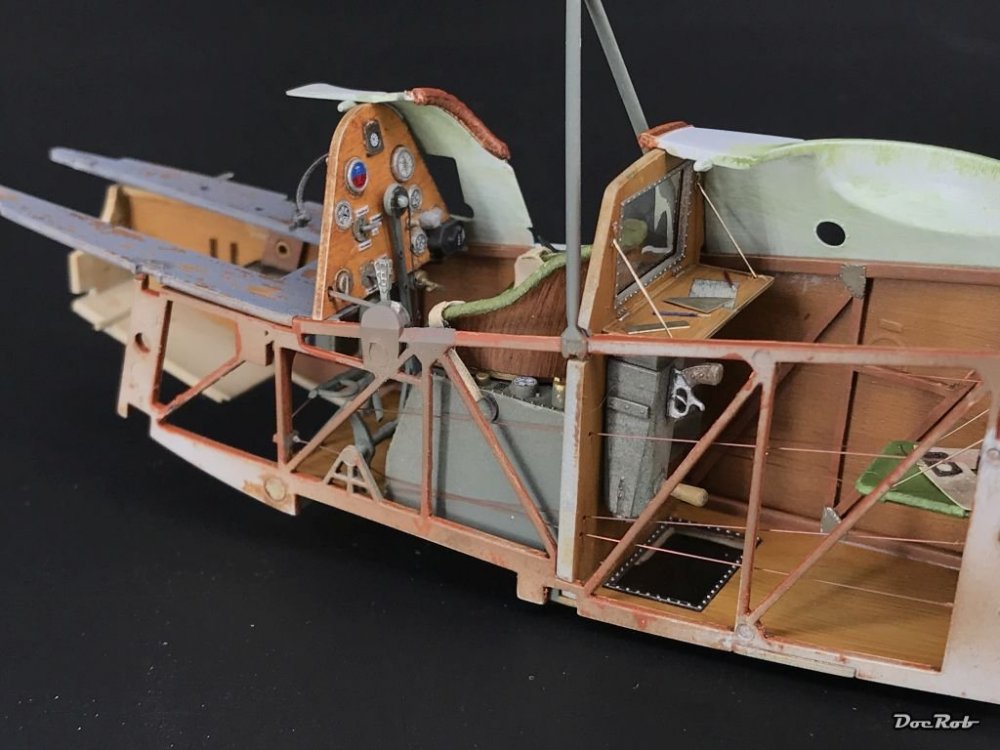


-
Smooth looking paintjob, this beast will look great when finished. Cheers Rob
-
When I paint metals, I start with a new looking finish of colour or wax on primer and try to achieve the most realistic looking metallic sheen. Then there is weathering and ageing the metal. With copper and brass, everything is about patina, which can be best achieved with blue and green washes and mainly pigments. A good guide for copper ageing is made by the talented builder Fichtenfoo. http://fichtenfoo.net/blog/in-progress-»-fish-sub-»-copper-patina-»/ I hope that helps, as a Renault FT is as close to steam punk as possible . Cheers Rob
-
Das Kamel - Hansa Brandenburg W.12
DocRob replied to DocRob's topic in LSM 1/35 and Larger Work In Progress
Thanks Norman, and welcome to the forum . I'm pleased, that you like the Kamel build, as I enjoy it a lot. Cheers Rob -
I don't know what you have in mind, but I had a recent project, which involved a lot of non-FE finishes, that might help. Most of it was sprayed, but I used lots of pigments an pastes and hand painting to get the project done. Cheers Rob
-
I tried too, but without success. For brush painting I use different products, depending the conditions. True Metal waxes from AK, metallic colours from Scale 75 (acrylics), sometimes dilluted Tamiya metallics, and lots of different Pigments, where the Uschi van der Rosten are the best, but only available for steel, chrome and iron tones. Brushing metallics is not so easy, I found, the finer the grain, the better the results. Even different Tamiya Aluminum tones are very different in the outcome. I try to airbrush metallics as much as possible and here are the AK Extreme Metals my go to, great shine, fine grain and very durable and especially durability wise, they are better than most of the Alclads. Cheers Rob
-
Das Kamel - Hansa Brandenburg W.12
DocRob replied to DocRob's topic in LSM 1/35 and Larger Work In Progress
Thanks Carl, perfect, I will try to get those. Cheers Rob -
Das Kamel - Hansa Brandenburg W.12
DocRob replied to DocRob's topic in LSM 1/35 and Larger Work In Progress
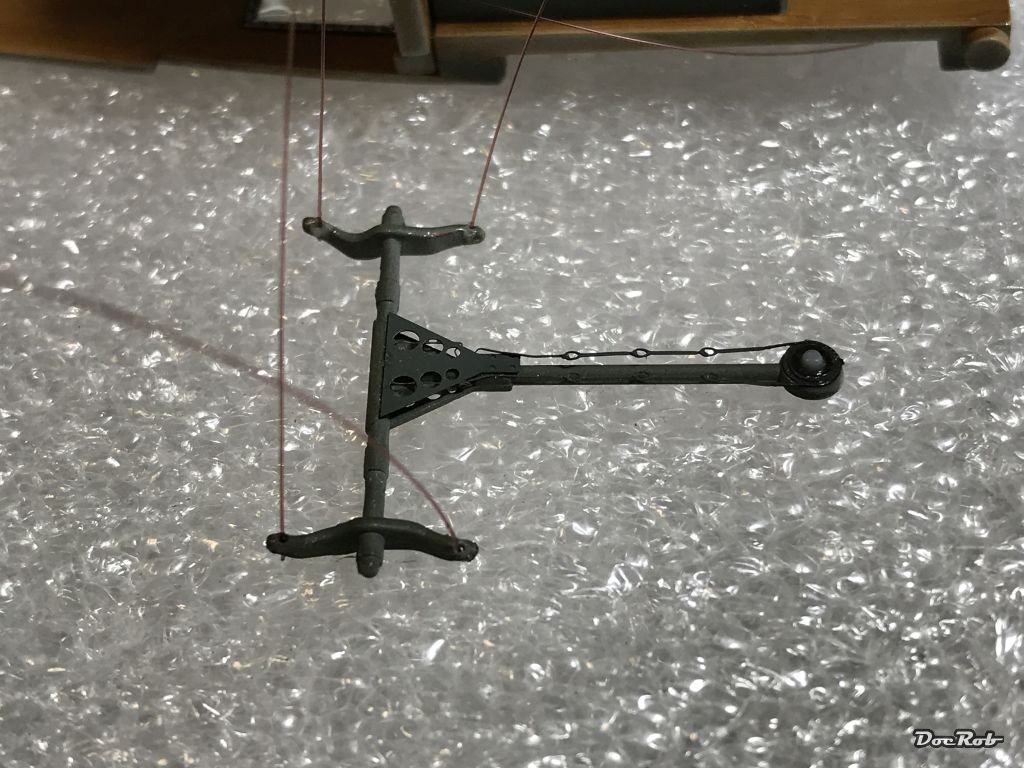
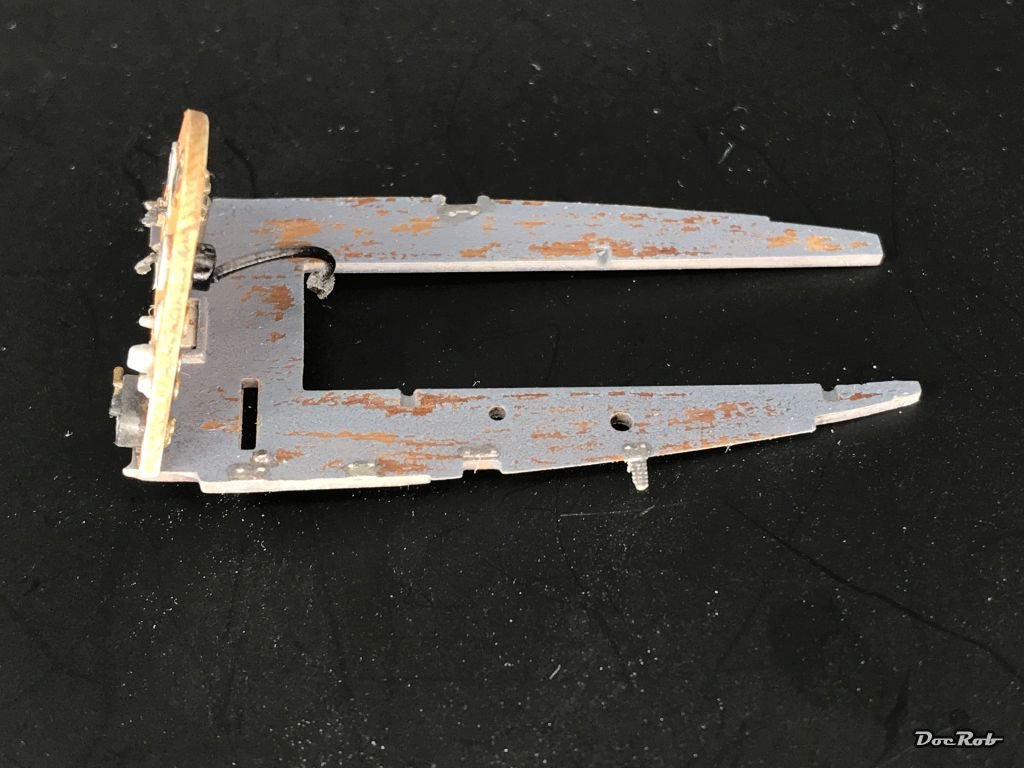
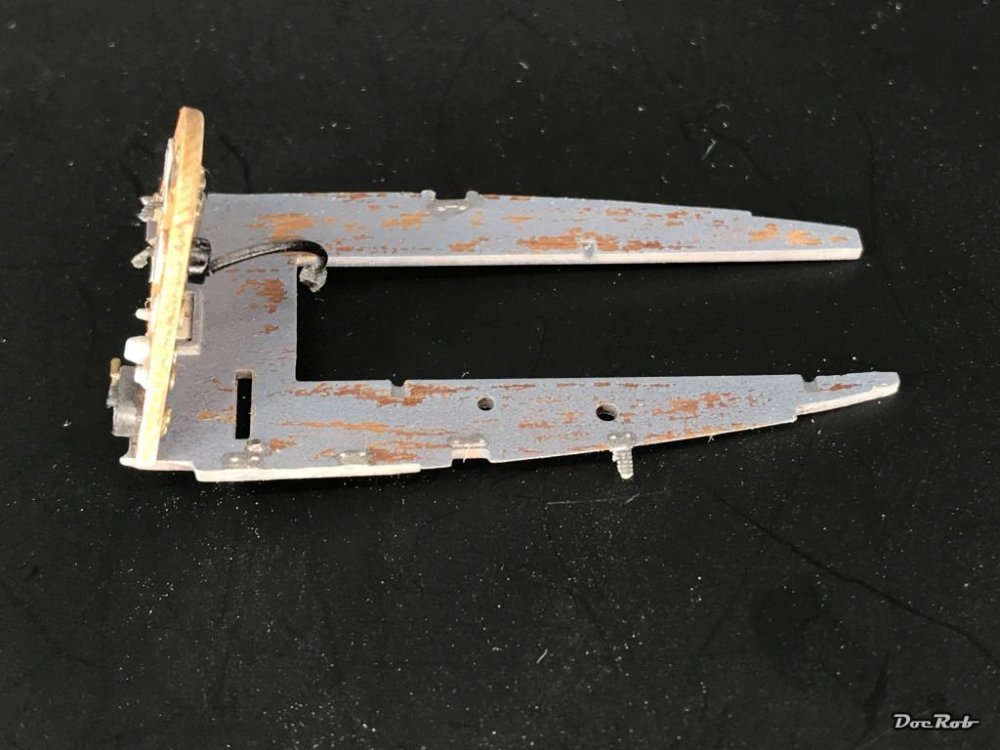
Today I managed to do some little things, I didn't dare yesterday. After thinking about the attachment of the control wires, I decided to give it another try with drilling the horns. If that wouldn't have worked, I would have sliced the ends of the horns to glue the wire in. I got sthem drilled somehow with my 0,2mm bit and glued the fishing line in with CA and left it to cure. The rudder pedals got tiny holes then and I drilled the return rollers in the frame part as you can see for putting around the rudder wire. Then I dirtied up the white parts of the interior with olive green and light gray oils. Cheers Rob

-
Share how COVID-19 Quarantine has affected you.
DocRob replied to 1to1scale's topic in General Discussion
A beautiful and strange game. When I lived in Berlin, I was playing Baseball in the German League System for 25 years. On one occasion, while having a training camp at the old Olympic fields in Berlin, there was a Cricket club training the place beside us. We decided on a mixed session an it was weird. We hardly could hit the hurled balls of the Cricket players, but the had the same difficulties hitting our pitches with their paddles. We had loads of fun with the guys and lots of beer in the intercultural apres drinking and a bulk of nice memories. Cheers Rob -
Nice work, some modern jets are really intriguing. After I built my Mig-31, I was thinking of building a -D Super Tomcat from AMK. The kits are so great, that building them is a breeze. In some areas, I found the engineering was even better than with the Tamiyas . But then there is always decaling and stenciling on these modern thingies and finishing one eats as much time as other more demanding builds. Anyway, I'm eager to see, how yours turn out. The pit looks great and when I understand you correct, it will be a flying display. Cheers Rob
-
Great stuff, I'm buckled in and will learn a lot from you. Seeing all these metal parts, I have to bow to your braveness. Cheers Rob
- 31 replies
-
- 4
-

-

-
- model factory hiro
- mclaren
- (and 1 more)
-
Das Kamel - Hansa Brandenburg W.12
DocRob replied to DocRob's topic in LSM 1/35 and Larger Work In Progress
Thanks Bill, these drills look good, they are so short, they won't bend a lot. I use a 0,2mm drill in a pin vise. The drill bends a lot and it's difficult to start drilling, even pinning the hole with a needle before. If you set the drill deep enough into the vise, there is no bending anymore, but you can't see where you drill. I will look, if I can find your kind of drill somewhere. Cheers Rob -
If your camera has spot metering and an AE lock, you can experiment with metering the correct light balance of the parts of the picture, which should be pronounced. If that fails, you have to do something about the lightning, because mostly, the difference between light and dark parts of the setting is too harsh then. If all this doesn't work out, you may be able to make a good pic of the foreground, a good pic of the background and melt them in a photo software. Cheers Rob
-
Das Kamel - Hansa Brandenburg W.12
DocRob replied to DocRob's topic in LSM 1/35 and Larger Work In Progress
Thanks Gaz, they should know where to go . That was done spontaneus, because I cracked the table. I looked at my bench in a slight horror, to see the rest of the silver PE- sheet lying there. The first good thing I had out of my HGW stuff with this build . Cheers Rob -
Das Kamel - Hansa Brandenburg W.12
DocRob replied to DocRob's topic in LSM 1/35 and Larger Work In Progress
Thanks Bill, it's so easy to break these frames and on the W.12 there is a strut protruding from the frame to support the upper wing, guess what happened... . About the wiring, I thought the same way until I saw, how tiny the horns on the steering column are. I seem not to be able to drill a 0,2 mm hole into it for fixing the fishing line. How did you solve that problem? Thanks Carl, in the moment the leather padding is only painted to have it done for the inside. I think for the outside, I will use liquid mask and if there are irritations after peeling the mask, I will redo it, easy with oils. Cheers Rob -
Das Kamel - Hansa Brandenburg W.12
DocRob replied to DocRob's topic in LSM 1/35 and Larger Work In Progress
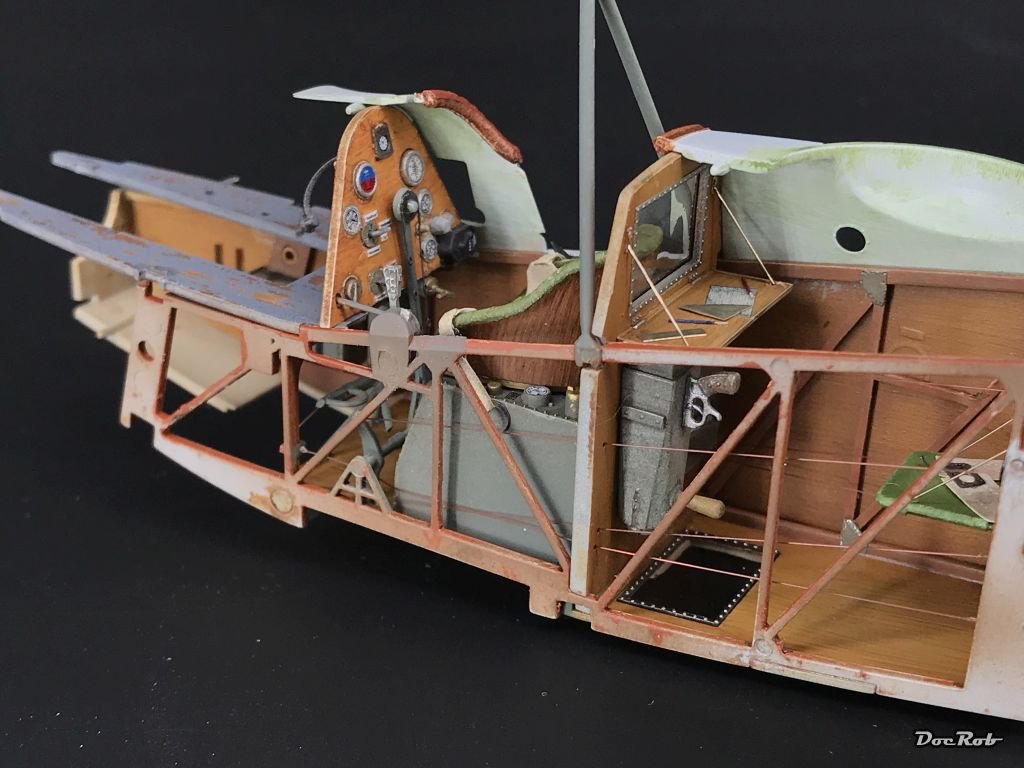
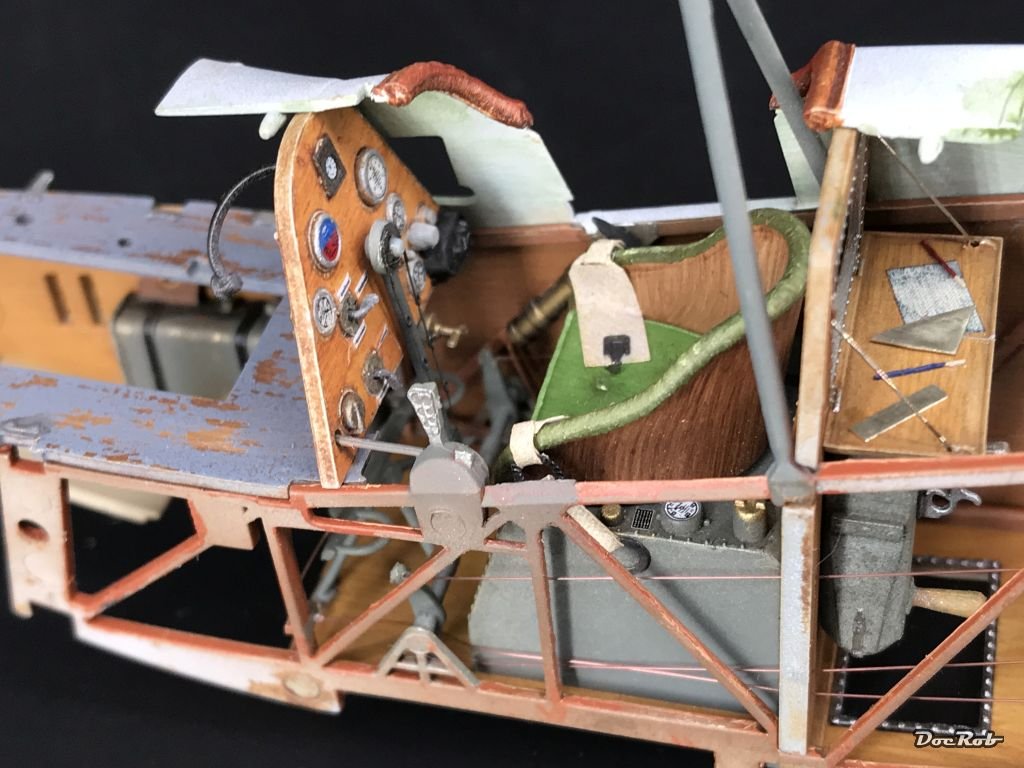
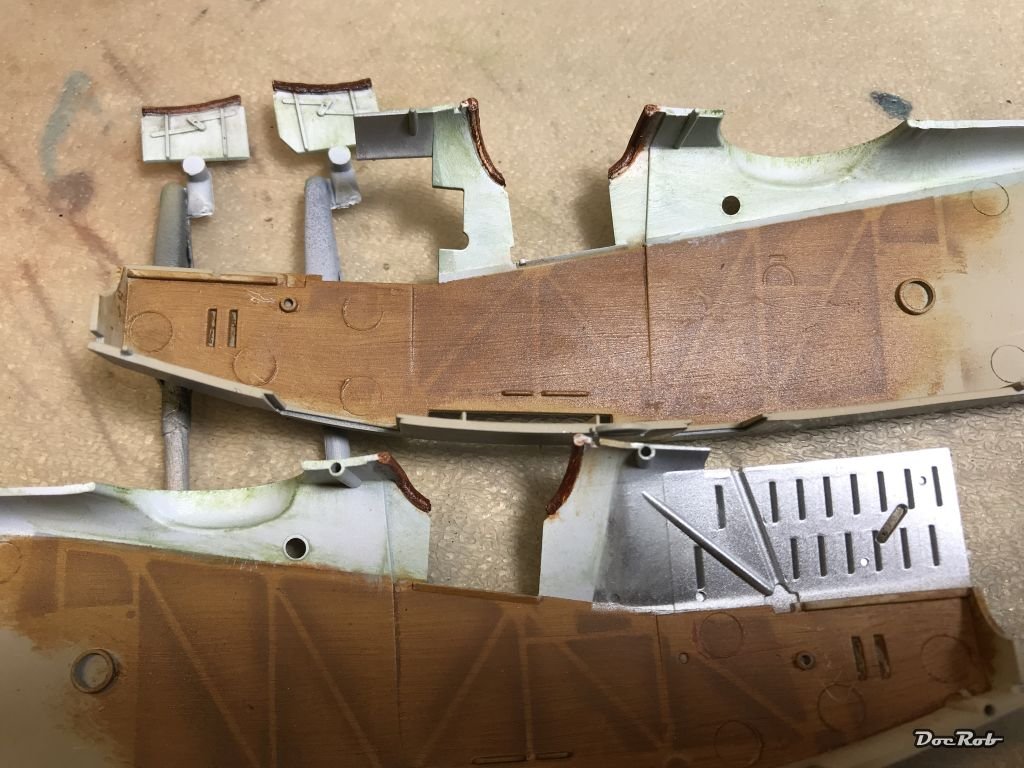
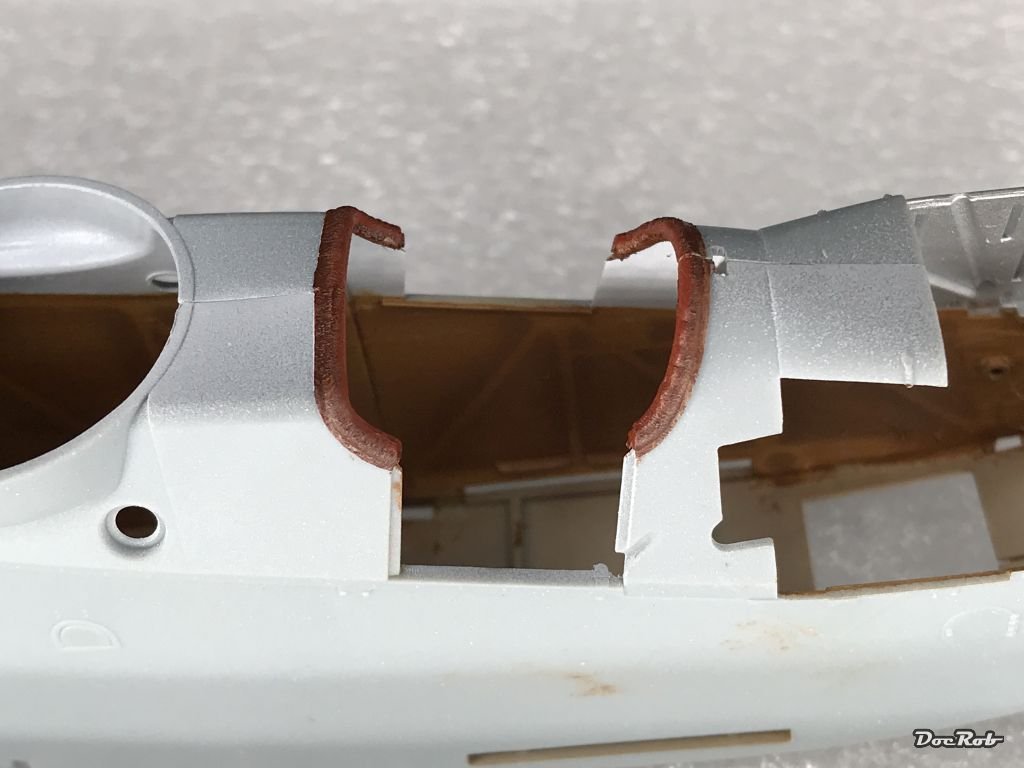
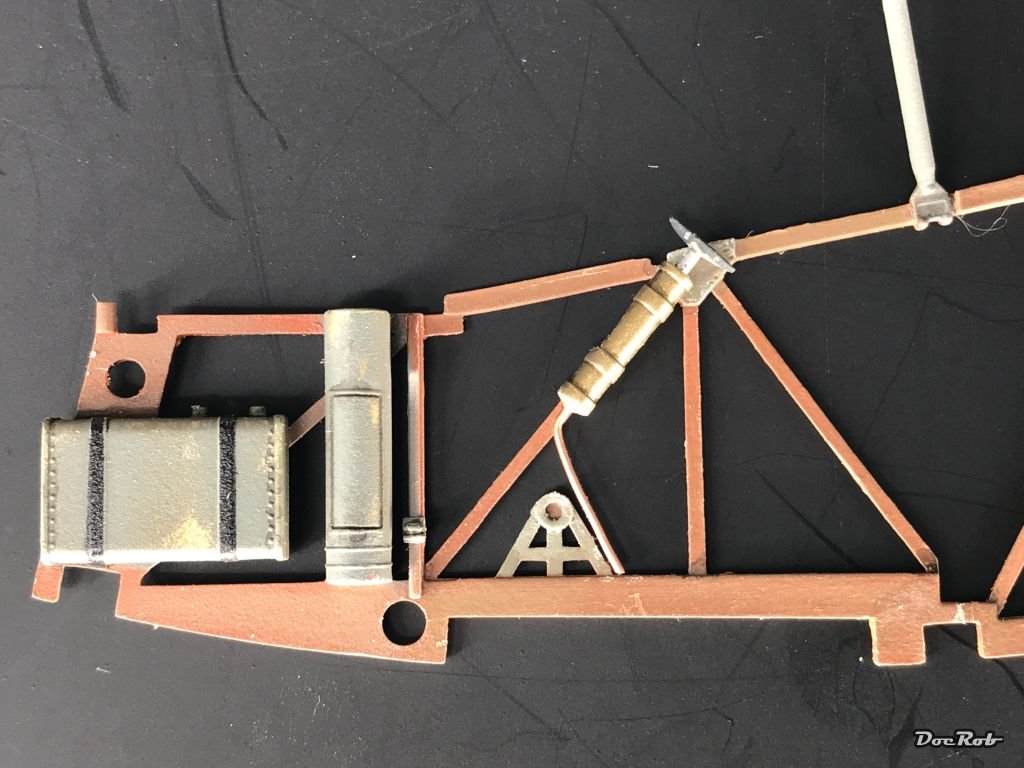
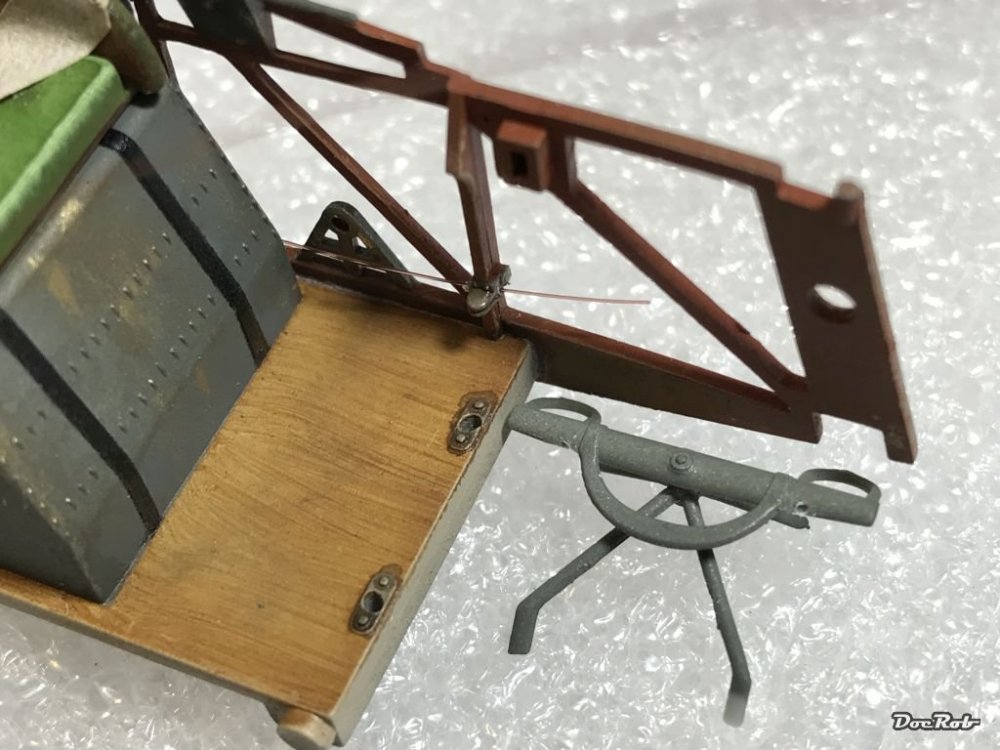
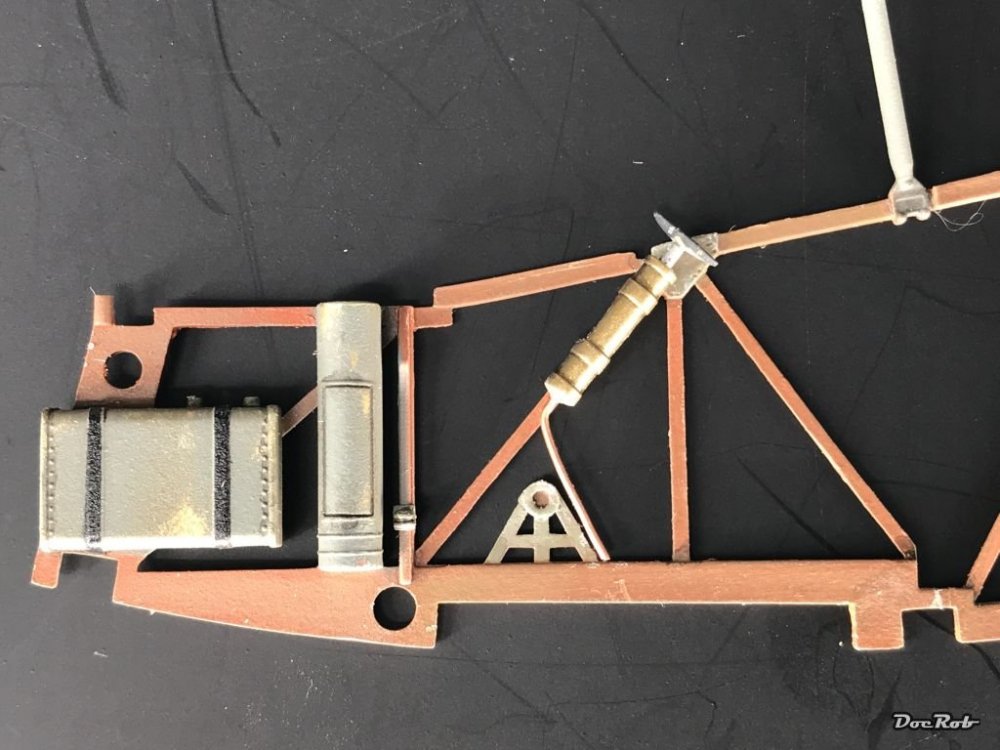
I start the preparations to finish the interior. There's a lot of detail work involved, most of it will be for the 'I know it's there' thing . I dry fitted a lot with the frames and engine mount, to guarantee, that the fuselage will close properly, a critical point of a WNW build and this is no exception. I pre-fiddled in the steering cables, using fishing line, which has a natural stiffness, but have no idea, if I will be able to connect them with the steering column, when the framing is closed. The backside of the IP was finished and glued to the hairspray chipped engine mount. I may chip a little bit more, but will definitely add oil stains, some pigments and some salt residues, when the engine is finished to get a matching look. You have too be very concerned of the process of the build and not forget a certain step at a certain time. A last minute thought was, that I have to paint the leather cushion better before closing the fuselage, so I did with oils. When everything is dried, I will age the white inside areas and give the leather a dark wash. The fuel pump was added, along with a copper wire fuel line. I managed to break that fragile frame some days ago and repaired it today Cheers Rob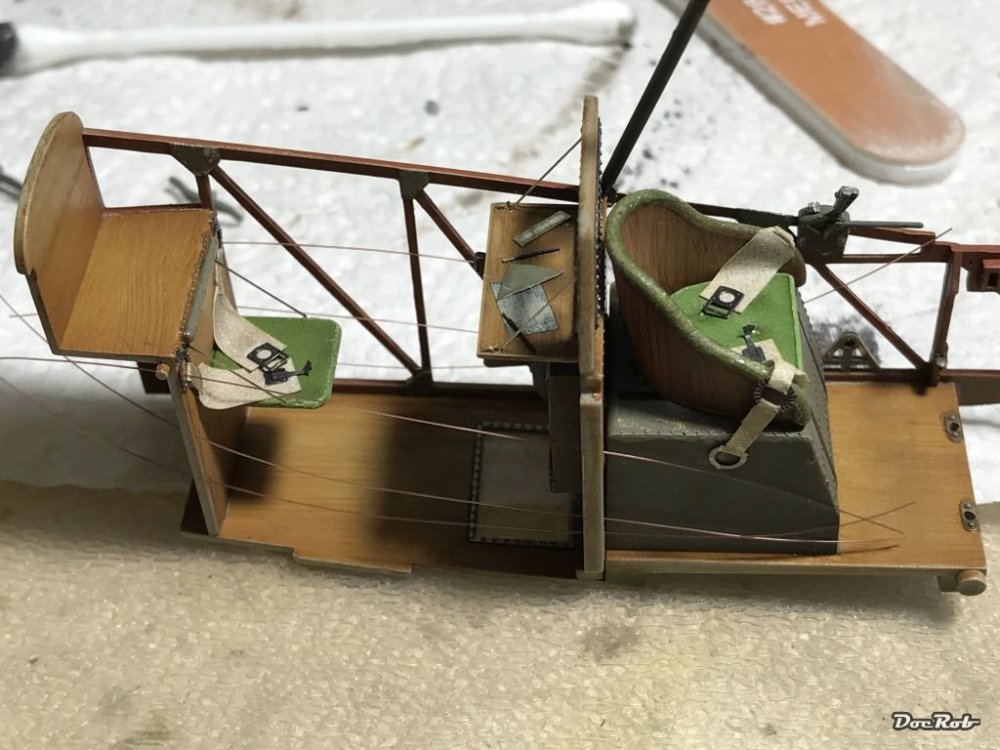

-
Das Kamel - Hansa Brandenburg W.12
DocRob replied to DocRob's topic in LSM 1/35 and Larger Work In Progress
Gracias Señhores, the pencils were made of 0,2 mm nickel silver rod, which I cut too short for the folding mechanism of the table, so I decided to make something good out of it. Cheers Rob -
Does your compressor has an air tank, mine (25 years old) with a tank, runs the pump only once in a while while spraying. My compressor has an water trap, were there are a few drops in after a day spraying. As I said, we have often 80-90% humidity, but the temperatures are not very high. All these experiences lead me to think, that maybe some of the bad spray days, I have encountered once in a while, are connected to humidity at least in parts. I will try to look a little closer, if there is a relation. In my Berlin days, where the air was much drier, specially in wintertime, I had a completely different set of problems, mostly connected to dust and static.. Now my biggest problem is clogging with acrylic paints. Xtreme Metal colours though, don't have that prob.
-
What is on your bench right now ? Share a picture :)
DocRob replied to Martinnfb's topic in Modelling Discussion
Heavy Metal Carl, I hope you WIP it. Cheers Rob -
All the best Harv, we'll wait for you finishing the Würger with new sharpness . Cheers Rob
-
Das Kamel - Hansa Brandenburg W.12
DocRob replied to DocRob's topic in LSM 1/35 and Larger Work In Progress
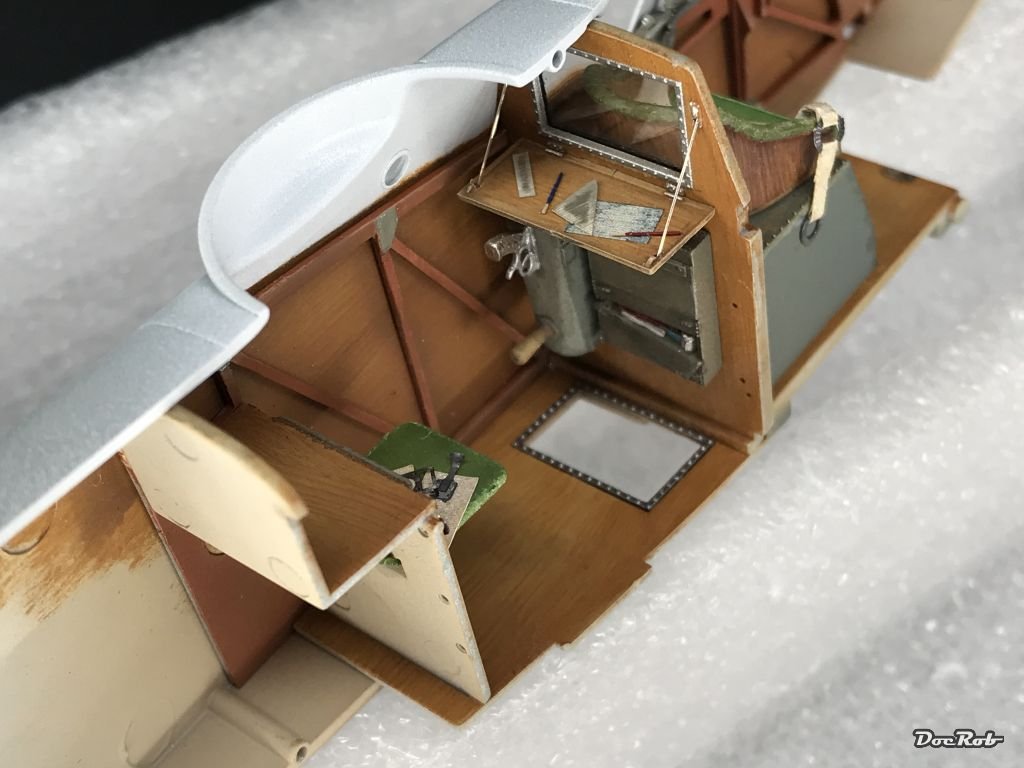
Thanks Carl, I was tempted to put an ashtray in and a glass of brandy , but instead went with my ruler and triangle made of spare PE, mainly because I managed to break the folding table, and the triangle covers the crack. I added some pigments to the wood, to add depth in the corners and some tear in the areas, where the usage wood show and went strictly matte with the varnish this time. I'll have the cigar and the old brandy after dinner on the terrace and contemplate how I will tackle the already started engine. Cheers Rob -
Das Kamel - Hansa Brandenburg W.12
DocRob replied to DocRob's topic in LSM 1/35 and Larger Work In Progress
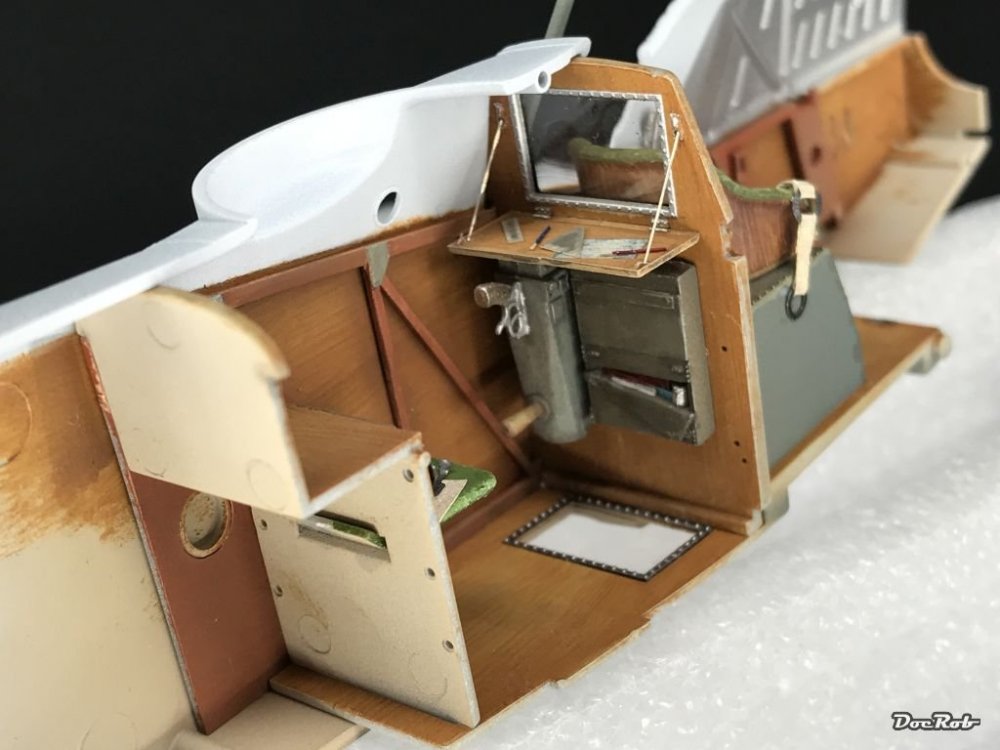
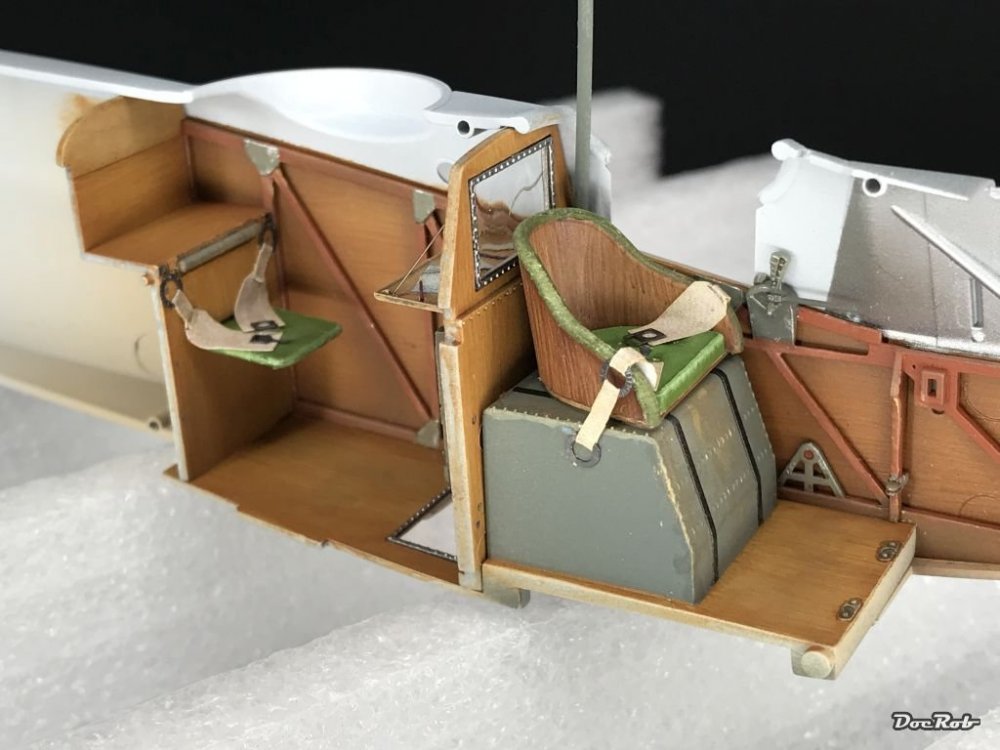
The interior is almost complete now except for wiring, steering column and some touch ups. I added some details to the foldable table, like a ruler and pencils. Again I was not very impressed with a HGW product, the seatbelts look not to good, and didn't take a wash, to pop the detail like other of the same company did. It was a set for a W.29, guess I couldn't get one by the time. Tomorrow I will decide, if I use the WNW ones or leave it at that.. Cheers Rob

-
I was really astonished by that, we often have up to 90% humidity and no problems while spraying. The good thing with humidity is, there is less dust in the air. Cheers Rob
-
Booooooring, no virgins involved, but I have to admit, these pencils are great, never used the colours though. Cheers Rob