DocRob
-
Posts
7,048 -
Joined
-
Last visited
Content Type
Profiles
Forums
Events
Gallery
Everything posted by DocRob
-
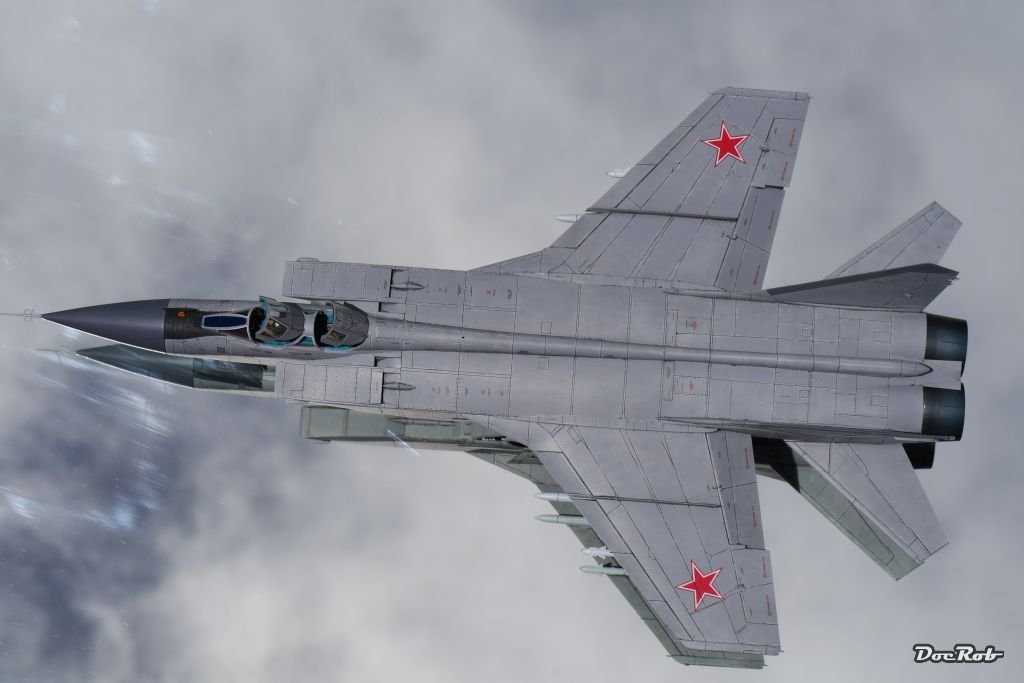
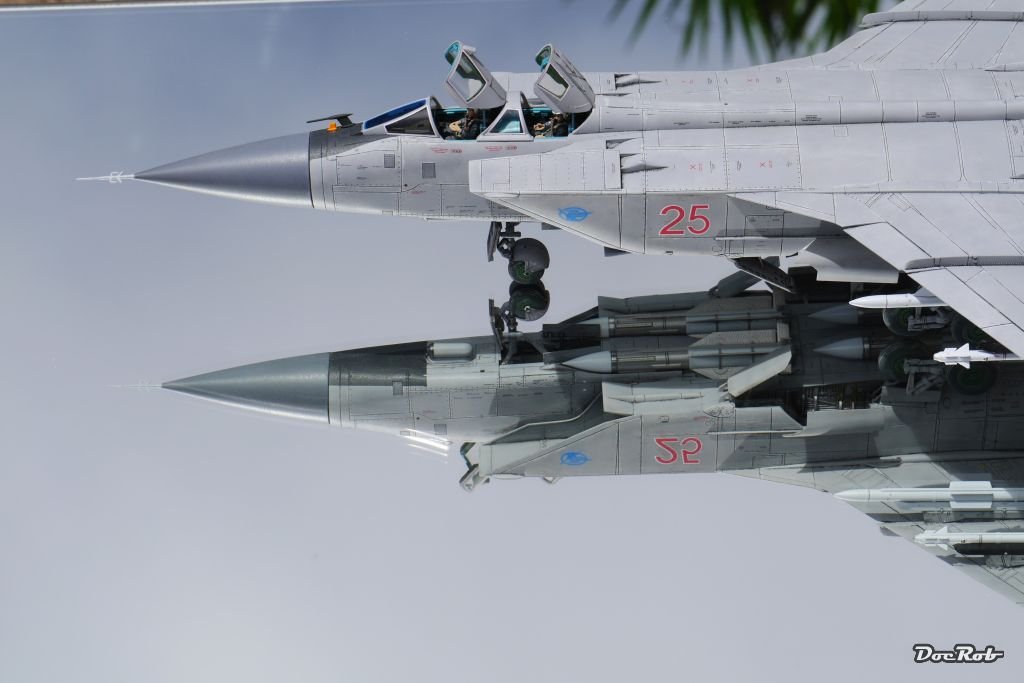
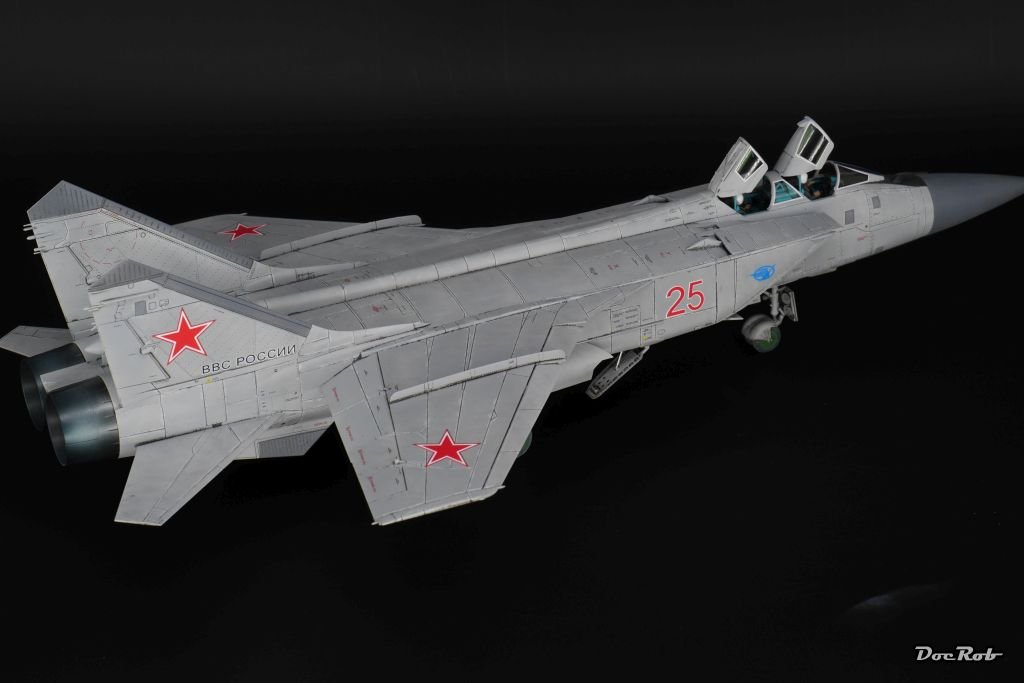
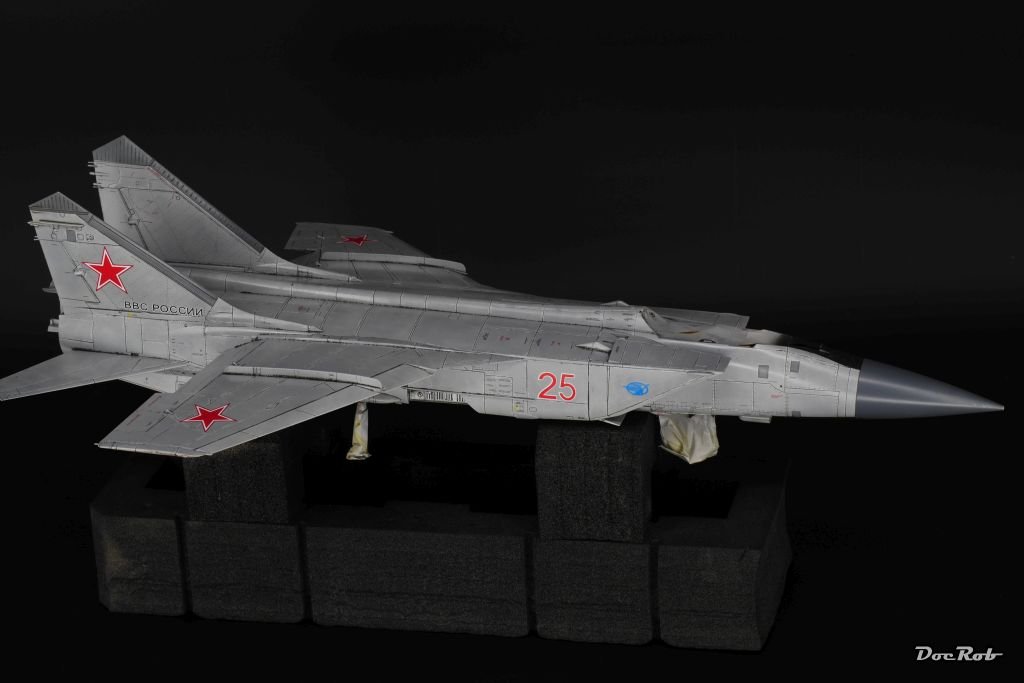
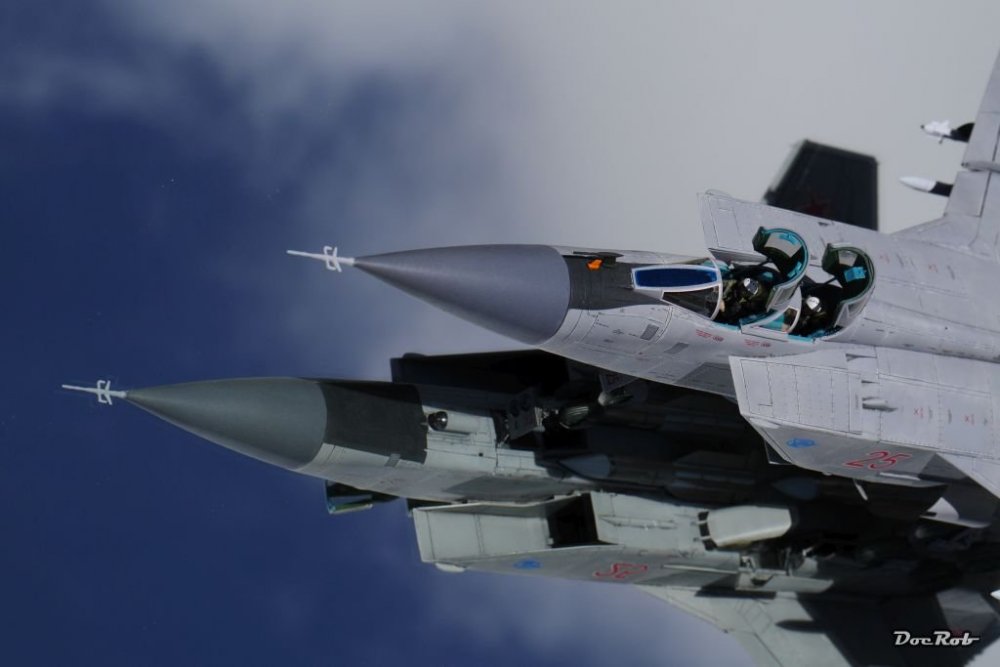
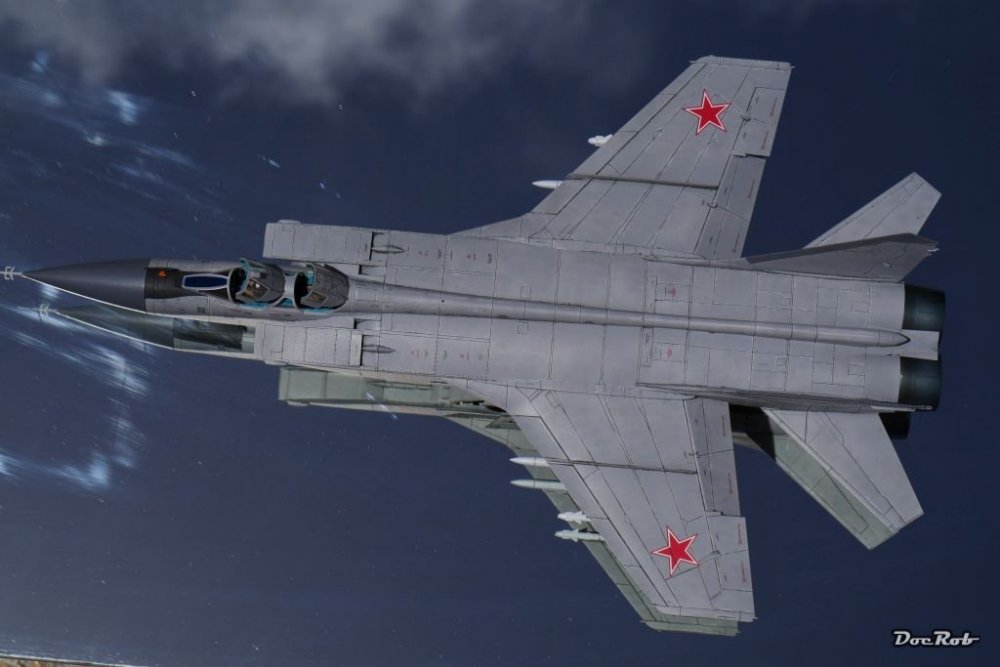
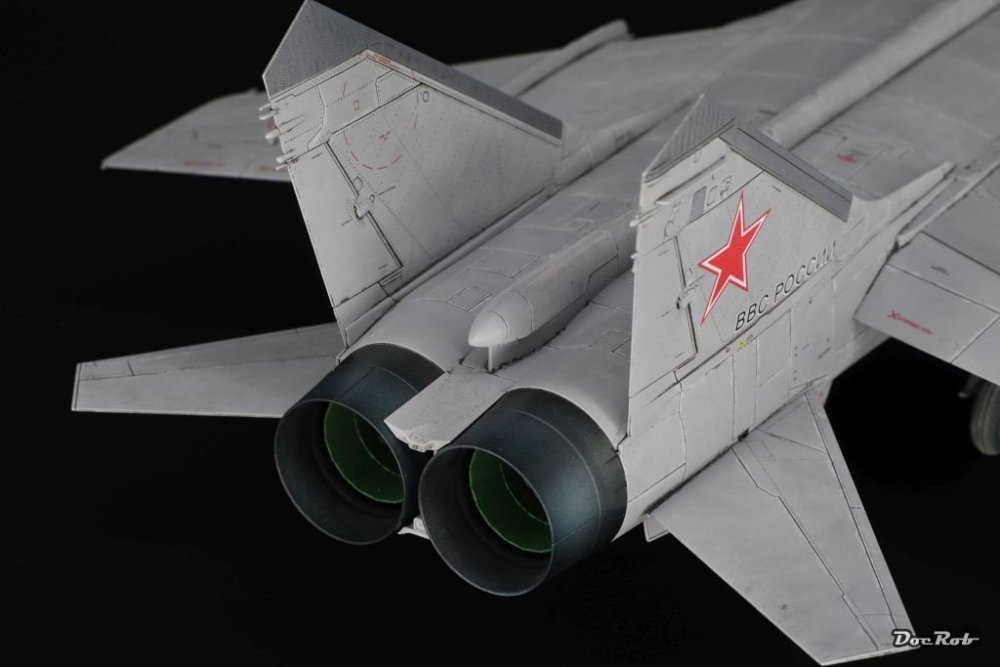
Thanks Gaz, the Mig-25 is looking like the skinnier twin sister of the Mig-31, but I think a comparison of the measurements will point otherwise. It's a huge beast. I will do some better real light pics soon, the last were taken while the not very light Mig threatened to get blown off the mirror by a strong wind, not optimal for a relaxed photo shooting atmosphere. Cheers Rob
-
You are in deep trouble I guess, you are in the league for NQLSM (Not quite Large Scale Modeller) . As there is no cure for it, just do it, equal what scale, it's about fun and even these tiny thingies offer that. Thanks Phil, I did a 1/144 build recently, the Nautilus, am I beyond help? Cheers Rob
-

What is on your bench right now ? Share a picture :)
DocRob replied to Martinnfb's topic in Modelling Discussion
Das ist der Hammer Cheers Rob -
You are welcome, but don't forget to clean off any residues, especially fingerprints with alcohol, other ways, you will be able to be identified later . A5 off topic end. Cheers Rob
-
That was not meant to provoke you, it's just a different approach, I liked to have one bike for every purpose, commuting (loved to ride the Berlin city highways in the night, with lots of curves and tunnels), trips up to two weeks and shredding rubber in tight curved mountain areas. A friend of mine, who I toured a lot with had a Harley, and sometimes we changed bikes and had fun, but felt wrong on each others the bike. I haven't overseen, that you mentioned a cruiser, but to me it has to be one bike only, I couldn't stand to have to choose. By the way, these old KTM big twins sound like a Harley on speed. I honestly love the custom work going into your bike and the craftmanship, just not my pair of shoes. Cheers Rob
- 2,035 replies
-
- 3
-

-
- car related stuff
- anything about cars
- (and 6 more)
-
Welcome to the D-Day 75th Anniversary Group Build!
DocRob replied to Mikester's topic in D-Day 75th Anniversary Group Build
Why not, it's not that there happened a lot in the last half year, if I see it right. Cheers Rob -
I appreciate the craftmanship and art which goes into these bikes, but I would never want to ride one. For European mountain roads, there is nothing better than a lightweight powerbike like this. I had one in Berlin and it was perfect for fast city commuting, sharp as a stiletto and more comfortable than it looks. It was one of the last ones with carburetor and had a perfect balance with 115 horsepower and less than 200kg with almost twenty liters of gas in it. I sold it heavy hearted, and quit biking, due to some other risky hobbies I have. This was not mine, but it looked very similar. Cheers Rob
- 2,035 replies
-
- 6
-
-
- car related stuff
- anything about cars
- (and 6 more)
-
Welcome to the D-Day 75th Anniversary Group Build!
DocRob replied to Mikester's topic in D-Day 75th Anniversary Group Build
We have already spoilt the title of the thread, Will the GB end sometime or do we wait for the 100th anniversary . Cheers Rob -
Nice Harv, it never gets more boring than applying RLM66, which to my eye is the dullest colour there is, but it has to be done on German planes and later you get rewarded with mottling or other advanced camo stuff . These belts can be a pain, but I'm sure you know, that they are best assembled with the PE still on the fret. Keep on rollin' Cheers Rob
-
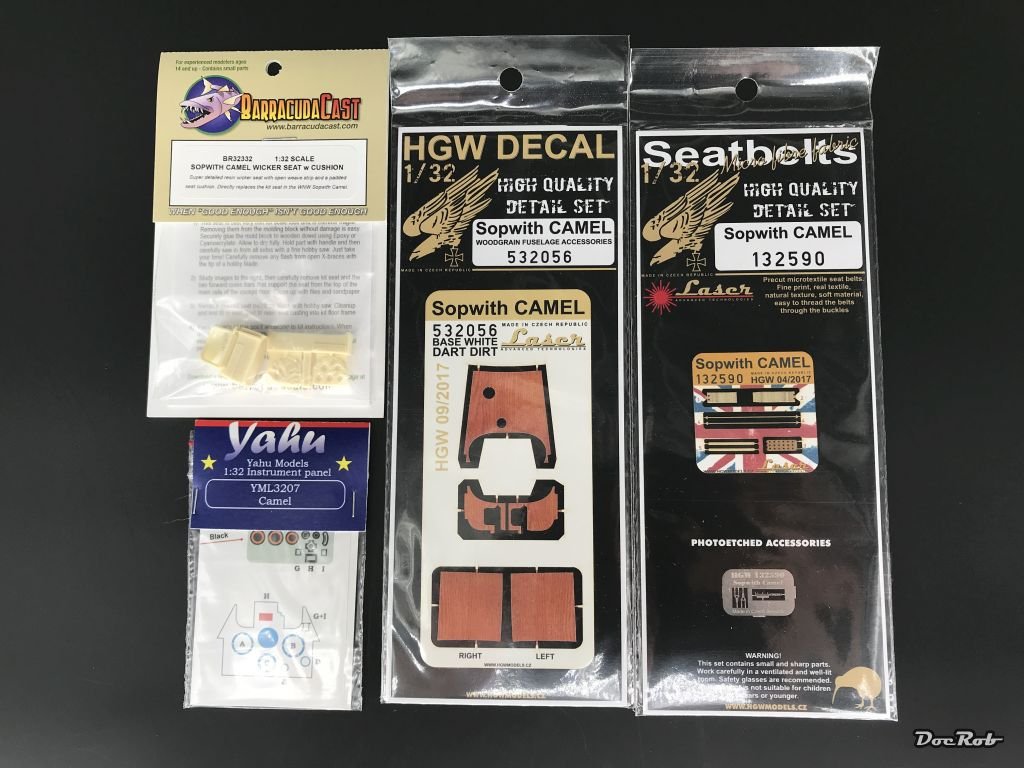
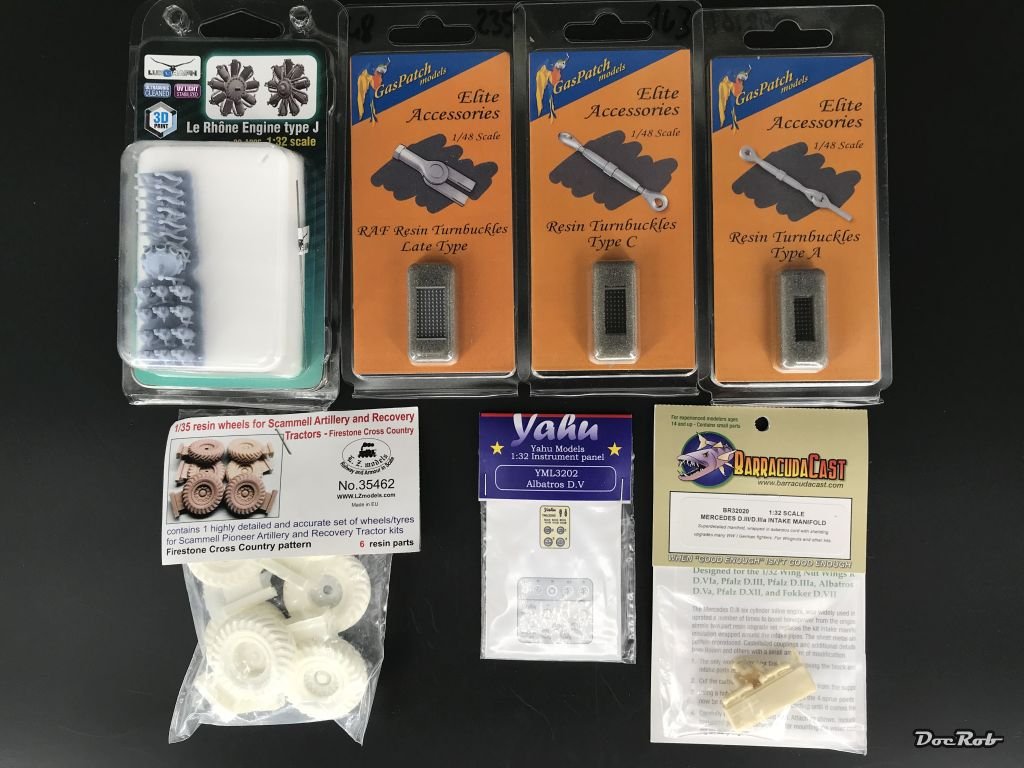
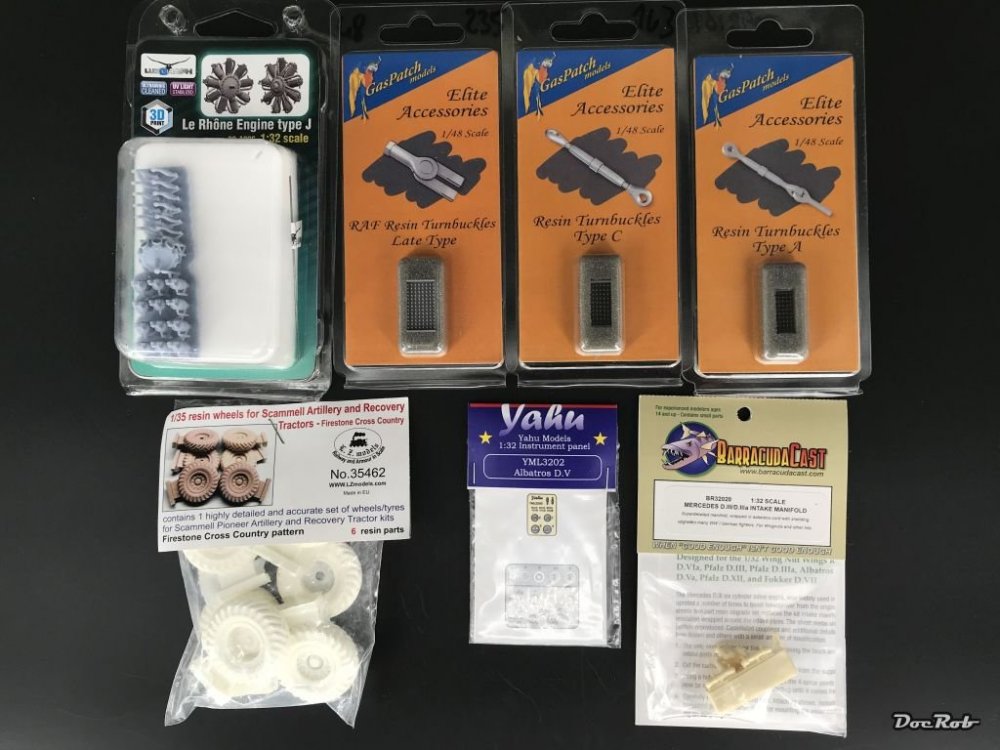
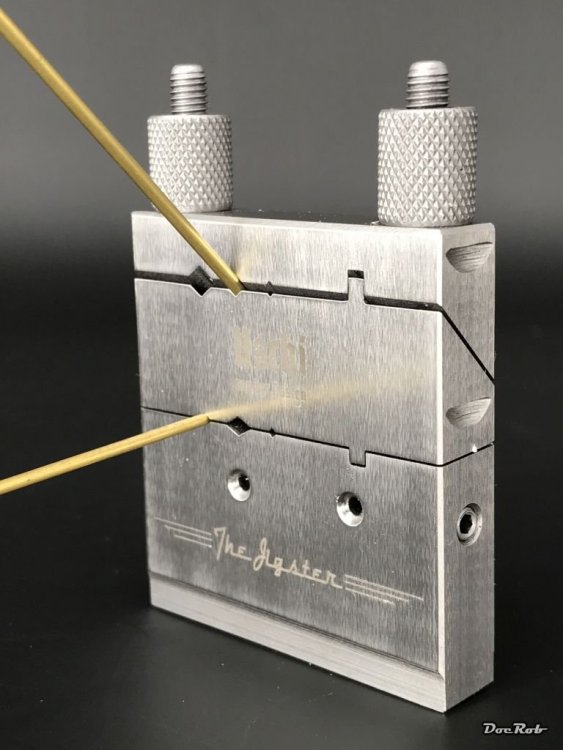
Today I received a lot of small stuff mostly for WW1 projects. But first of all, I got a Uschi van der Rosten Jigster, a tool which was unavailable for years. I tried to buy one in my Belin years and failed, but now these little precision tools are available again. It came packed well oiled, like a piece of machinery and is made fur cutting or grinding all kind of rods and tubes in a precise angle of 45 or 90 degrees. The rectangular cutouts can be used to exactly angle for example tin parts, foils or plastic sheets. The two circular holes are for fixing the Jigster on a bench with two bolts, while securing with the side screws, or to put an angular rod in to as a stop angle to lengthen multiple parts evenly. I will use it for a lot of brass work, mainly struts for WW1 planes and as a third hand for soldering precisely and yes I'm a tool nerd . Some AM for my Clerget Camel The Lukgraph engine will be used in either a Roden Fokker DR. 1, a Micro Mir Fokker E.V / D.VIII or said Clerget Camel. It depends on the quality of the kit engine and the fit under the cowling. Some turnbuckles, firstly resin ones and 1/48 for me and an IP and Manifold for my Albatros D.V and last but not least, a set of resin wheels for my Scammell. Cheers Rob

-
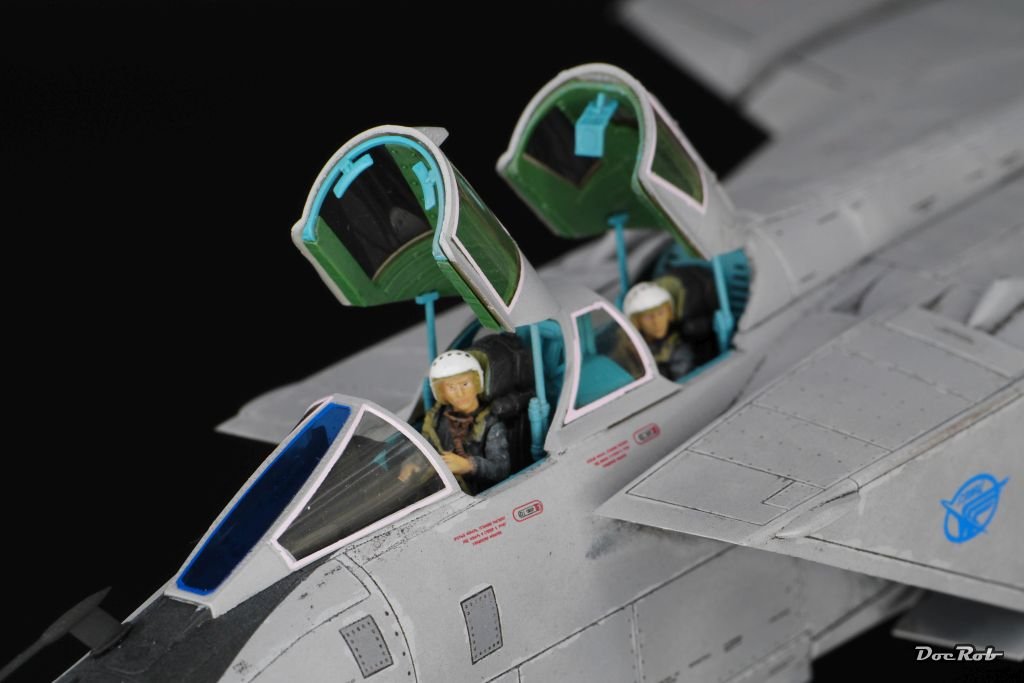
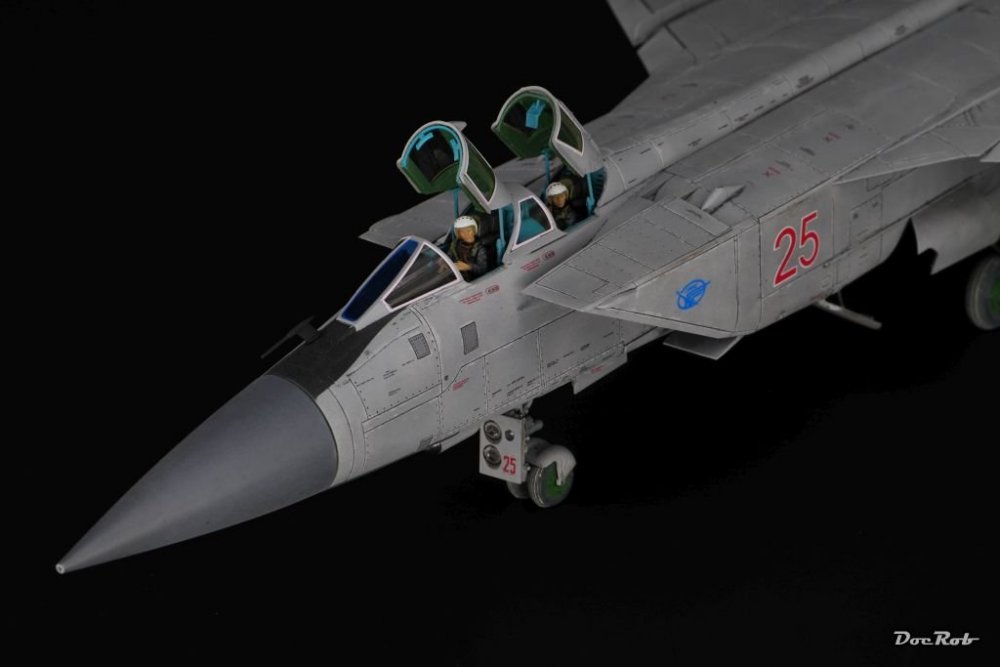
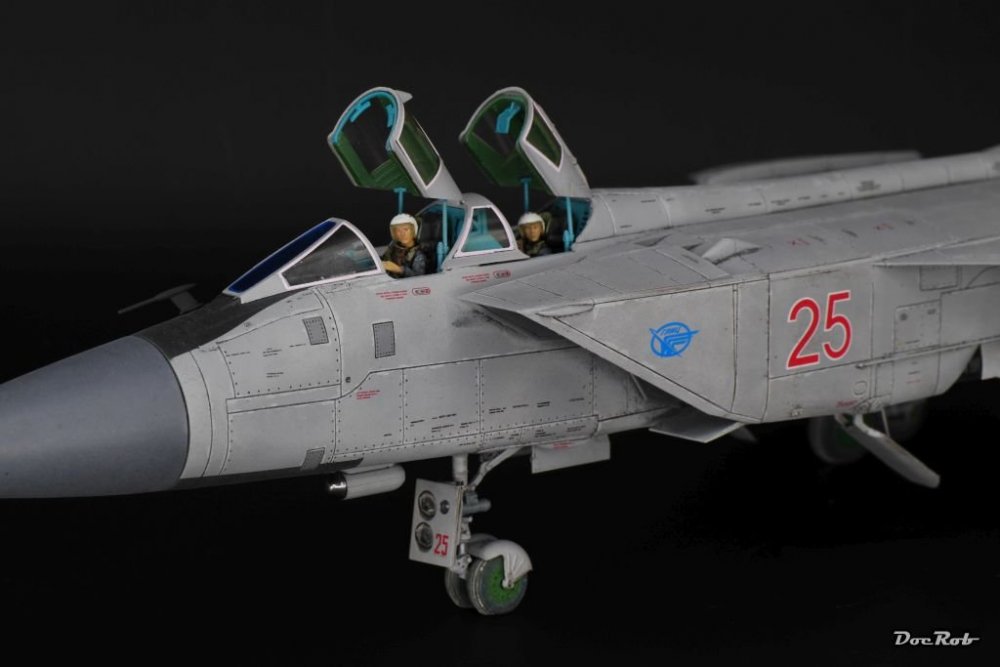
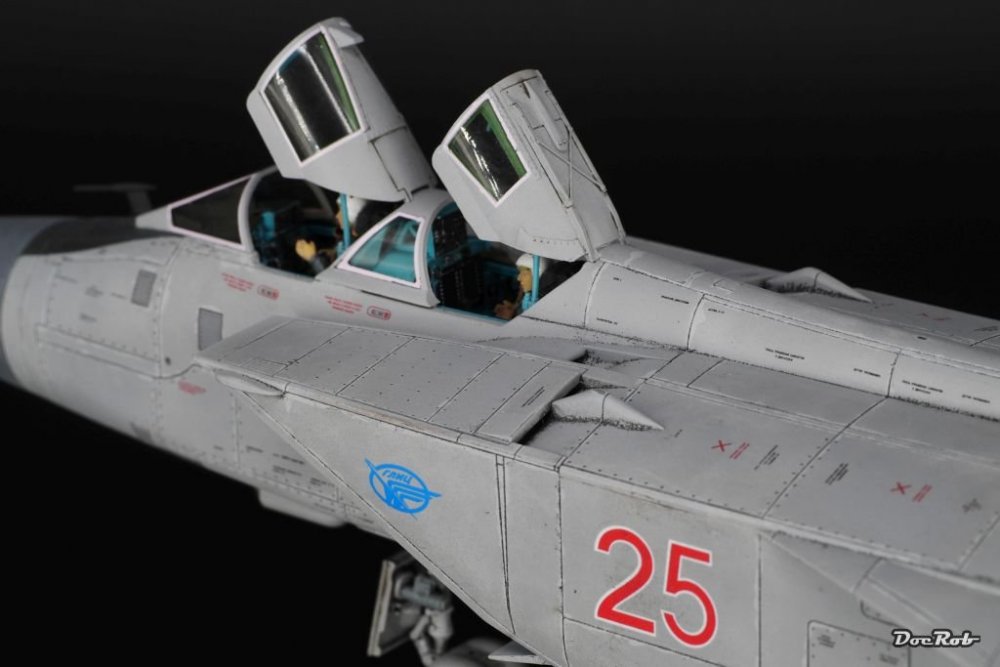
Interesting, why only Russian cockpits are painted that way then . Cheers Rob
-
Some more pics out in the sun. The wind was blowing so strong, that the Mig moved on the mirror and the lighting was not optimal, so maybe one more session with better conditions. Cheers Rob


-
1/32 Revell RF-4C 14th TRS
DocRob replied to SapperSix's topic in LSM 1/35 and Larger Work In Progress
Great attention to detail with lots of eyecatchers on your F-4. Replicating the result of that malfunctioning airbrush is a nice touch too. Cheers Rob -
Thanks Harv, it was mostly a real fun project. The kit is almost perfect and while building, I was often thinking about buying the AMK Super Tomcat as well. After stenciling, I feel, I have to do something different now and be back with large scale. I will browse my stash later, but the WNW Hansa Brandenburg is likely to be next in line. Cheers Rob
-
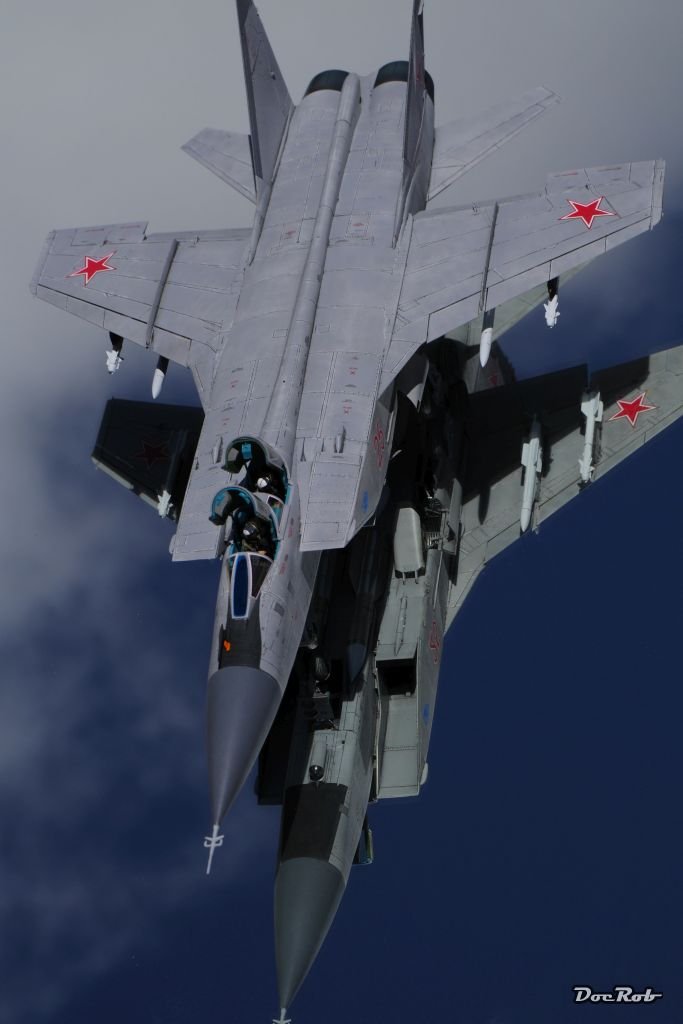
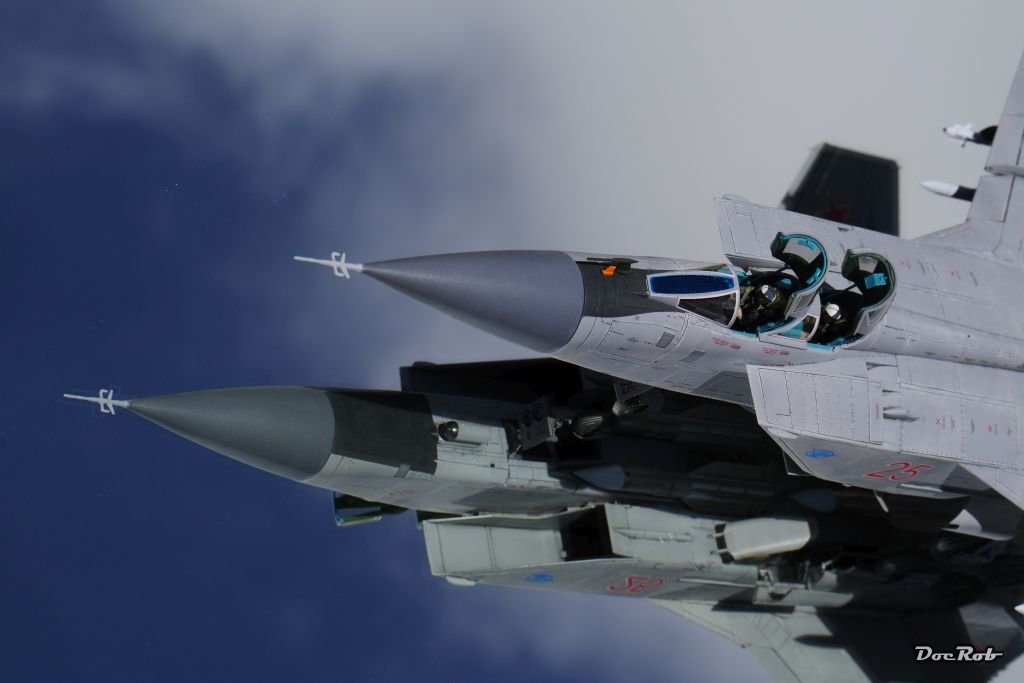
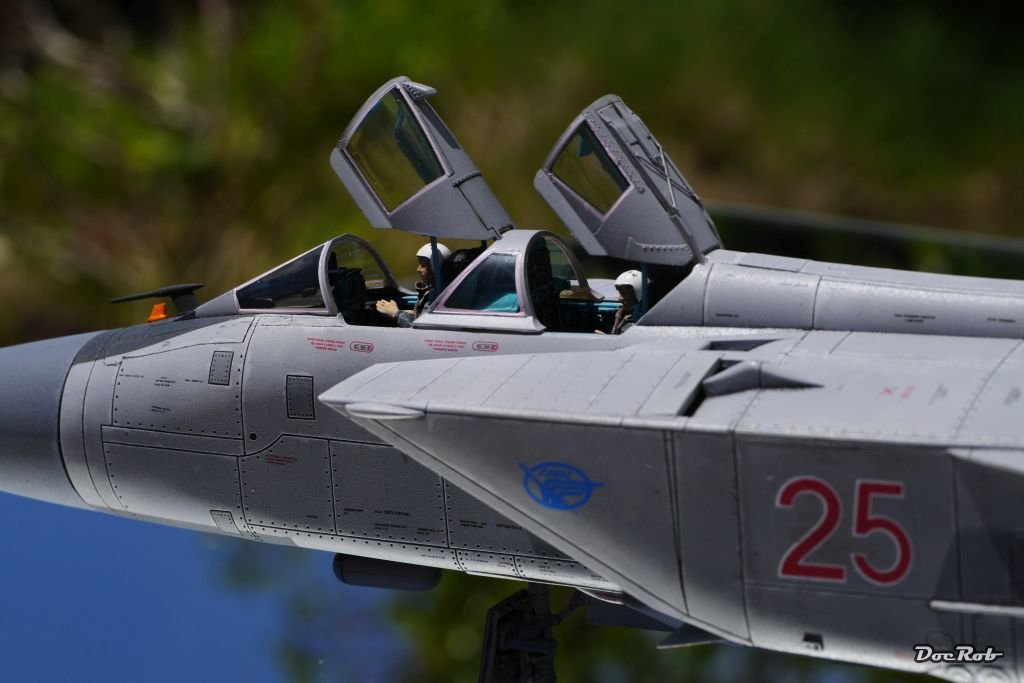
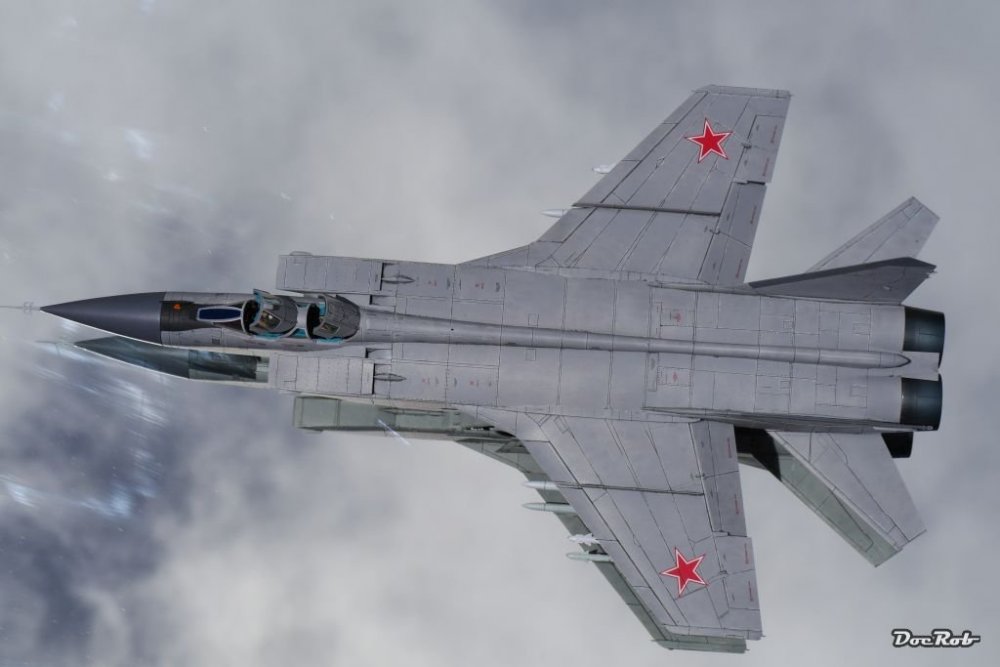
Thanks Gus, I wonder how John Deere looks in Cyrillic , but you are right, the green looks similar. In the canopy area you have both, the Deere green and the Russian turquoise, I wonder how the pilots could maintain concentration under these circumstances. The Mig-31 sure is a big beast, which was the main reason to build it. To me it represents the absurdity of the cold war like non other. It's fast, it's lethal, but it felt that a third of the Soviet GDP had to be used to build and maintain it. Cheers Rob
-
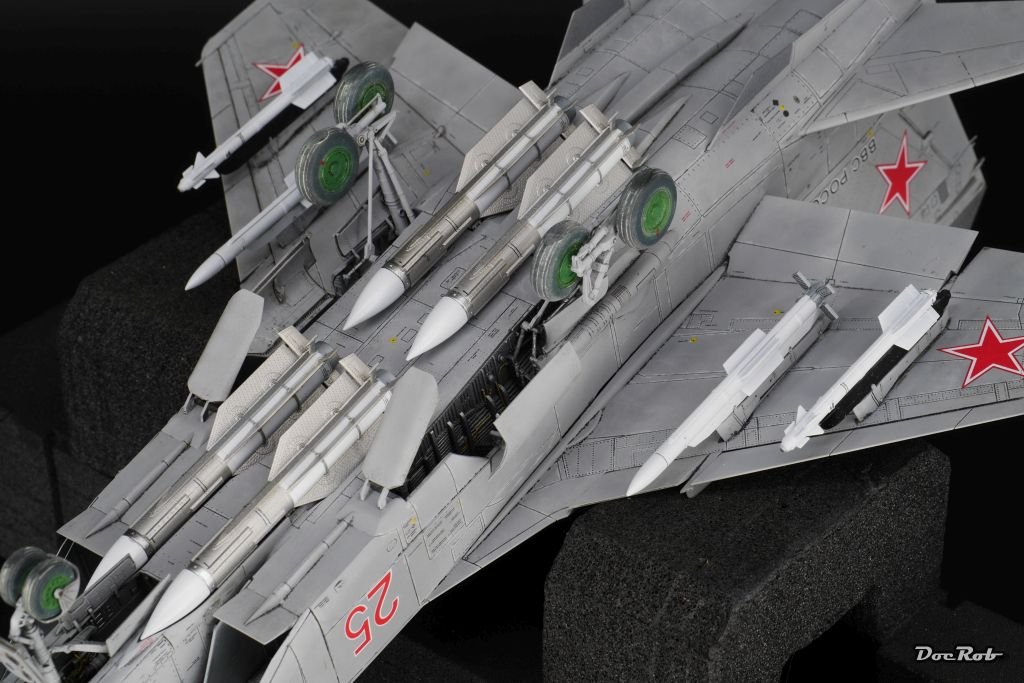
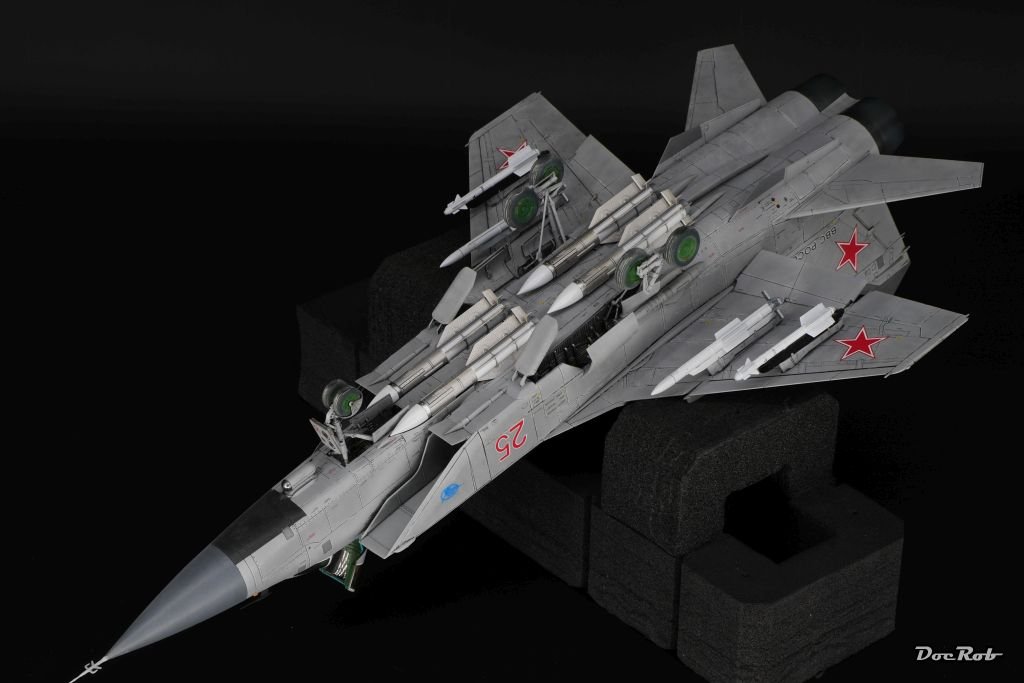
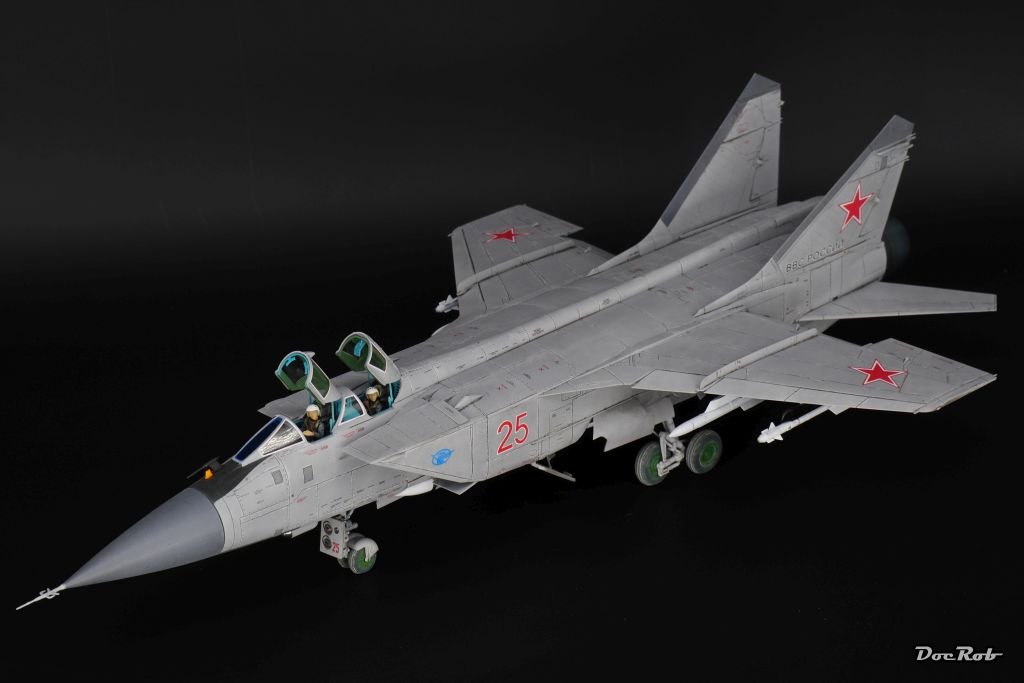
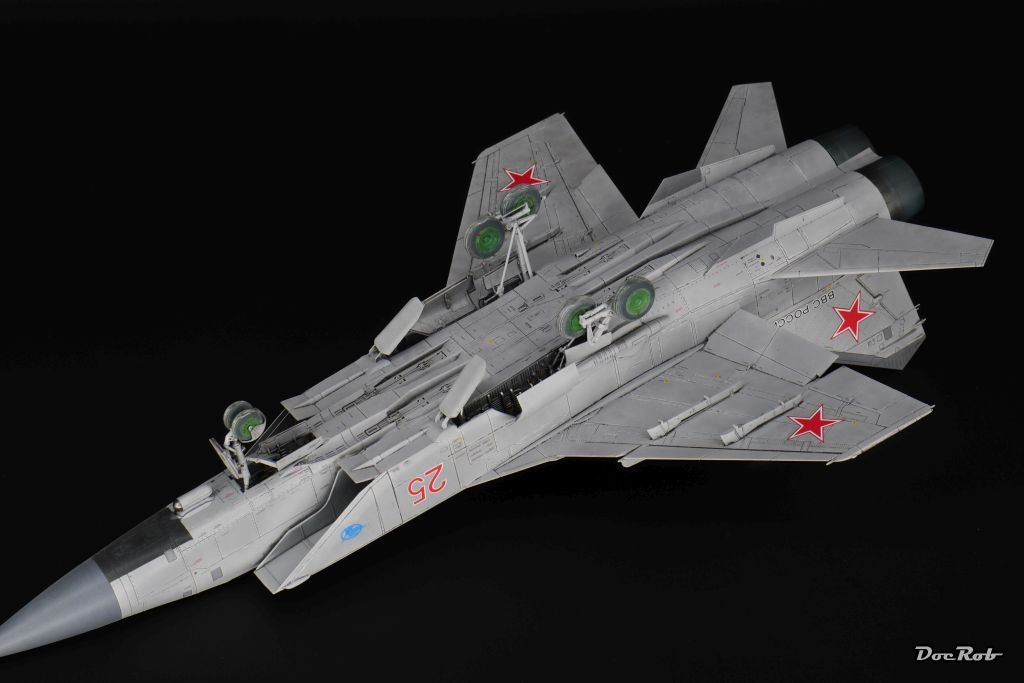
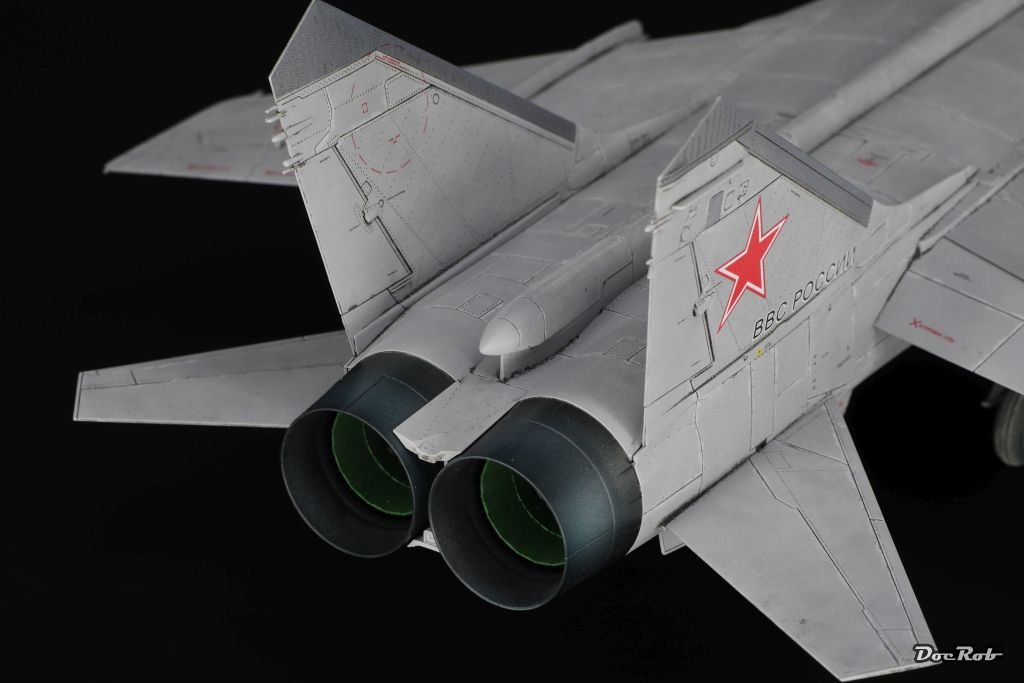
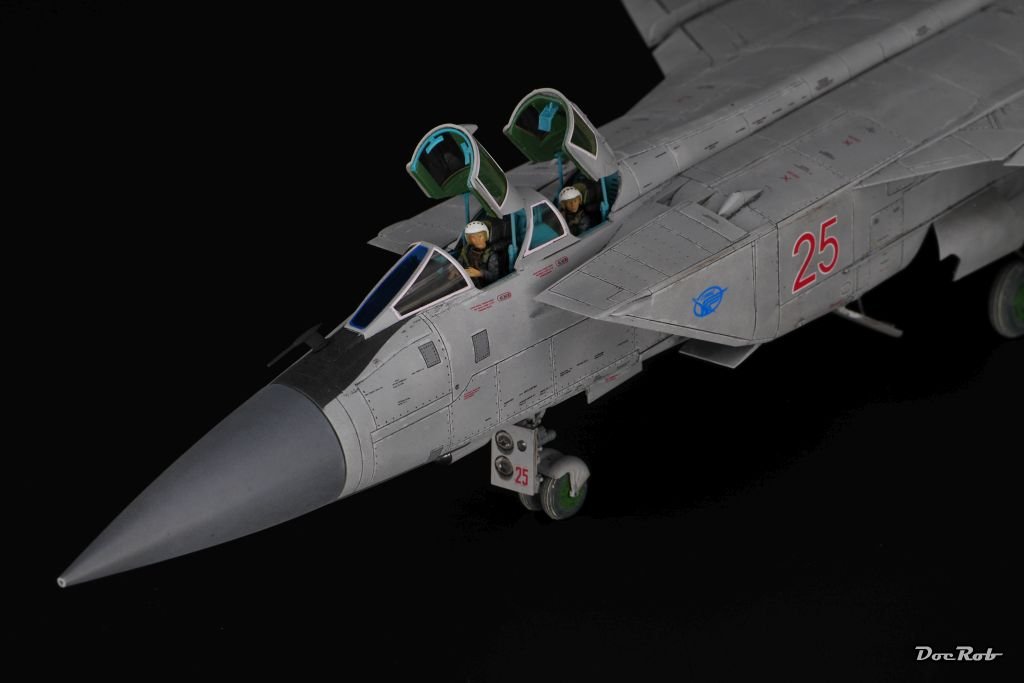
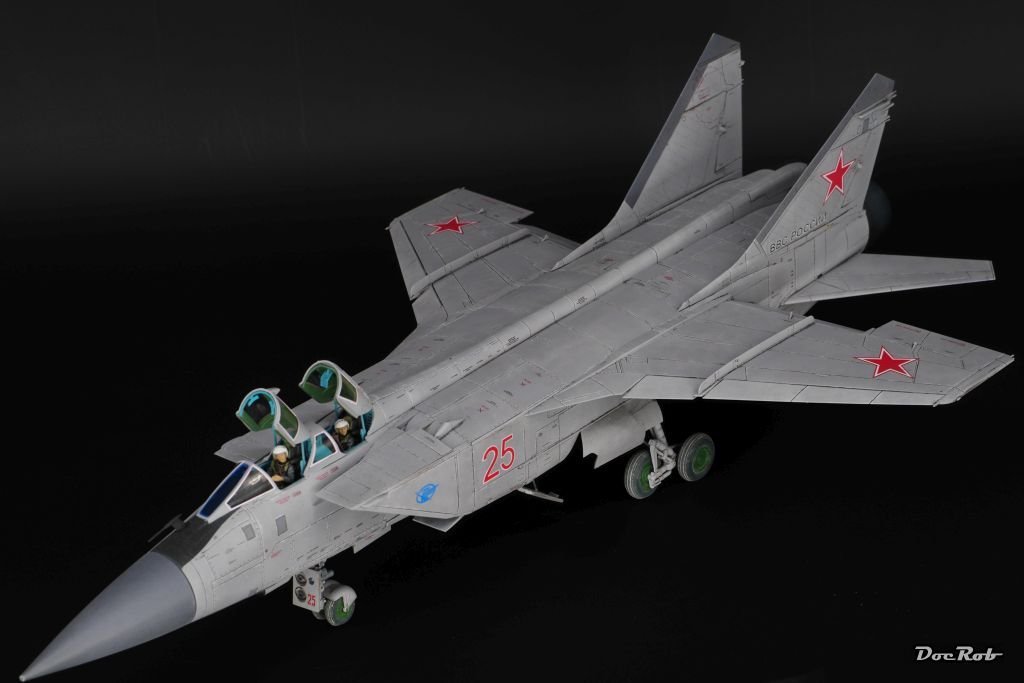
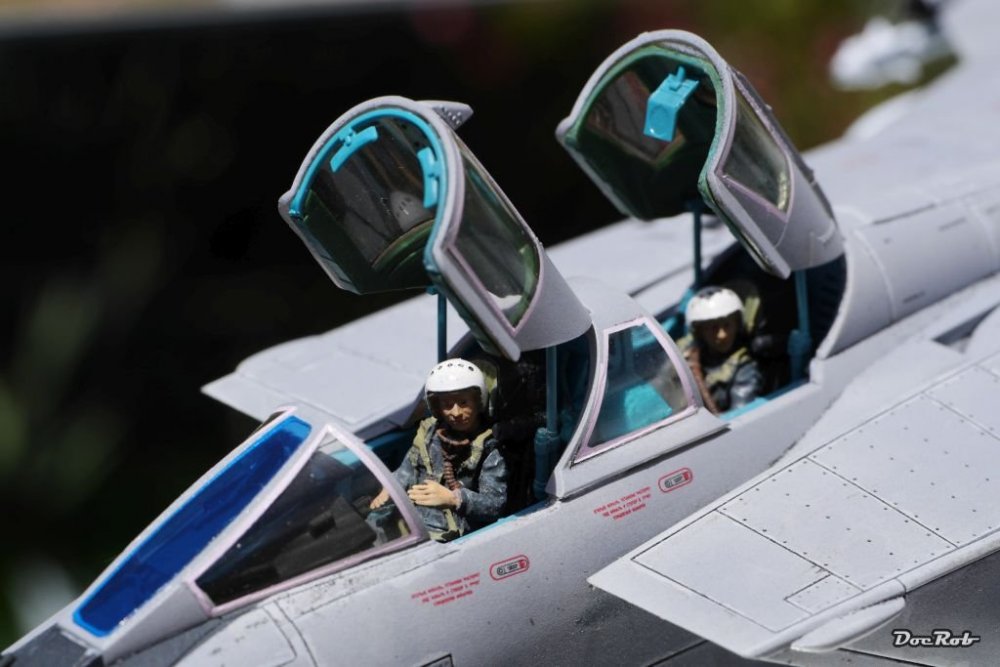
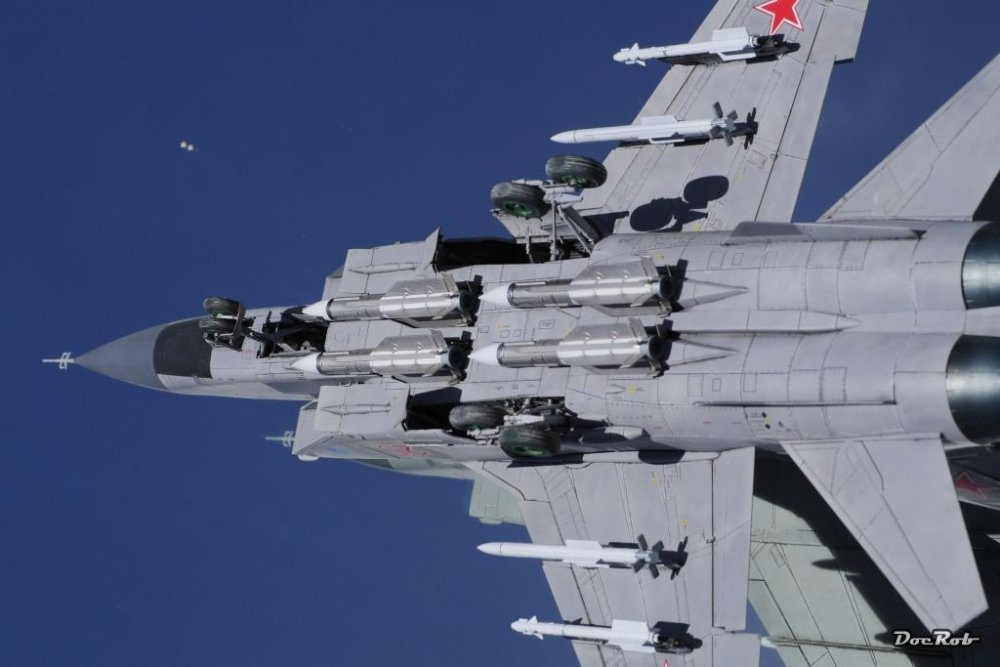
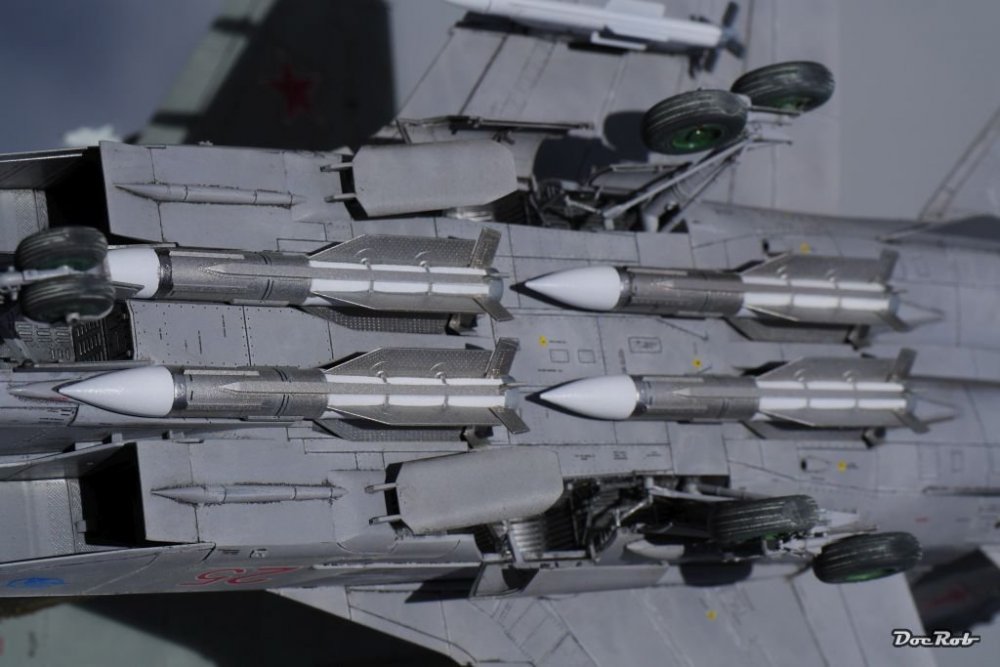
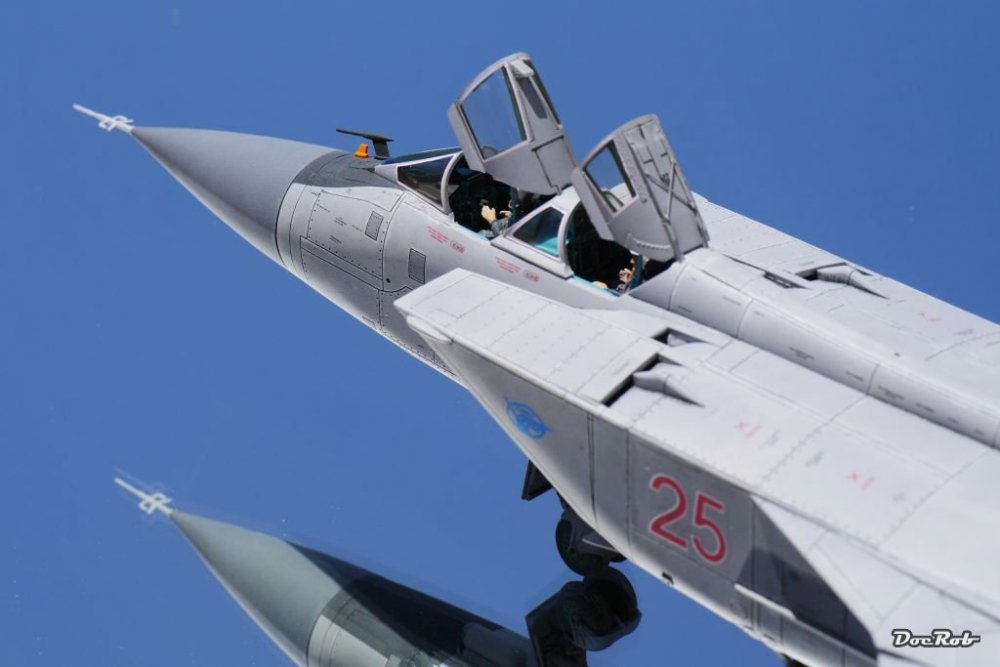
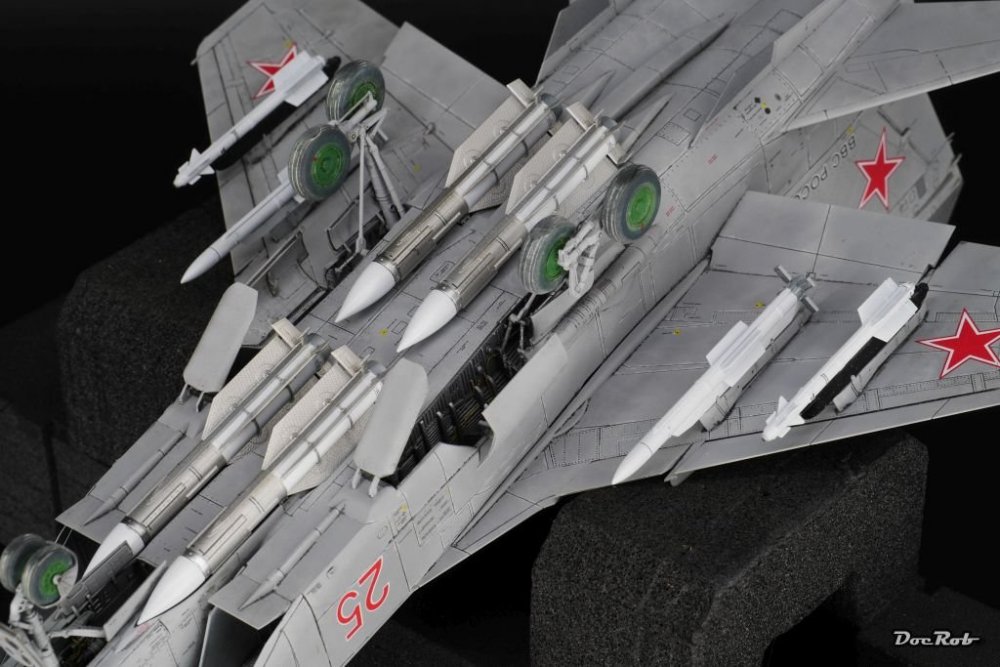
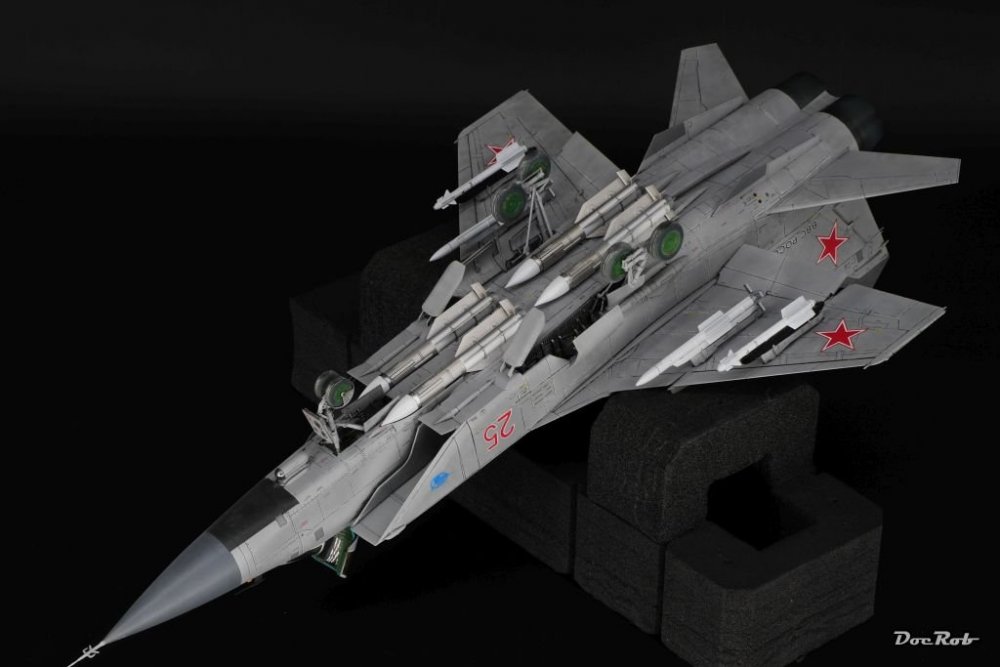
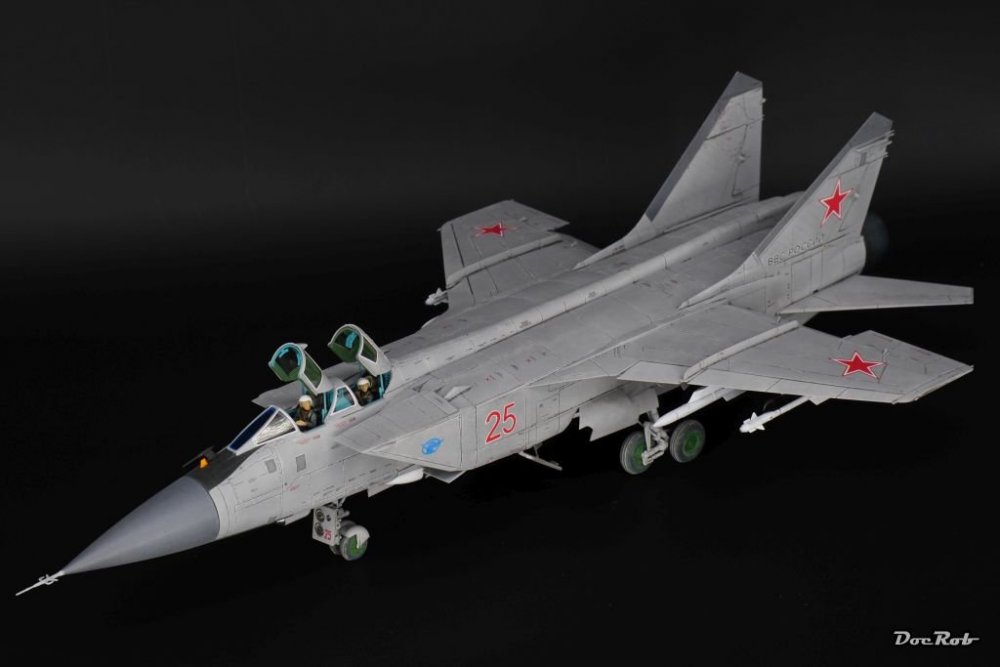
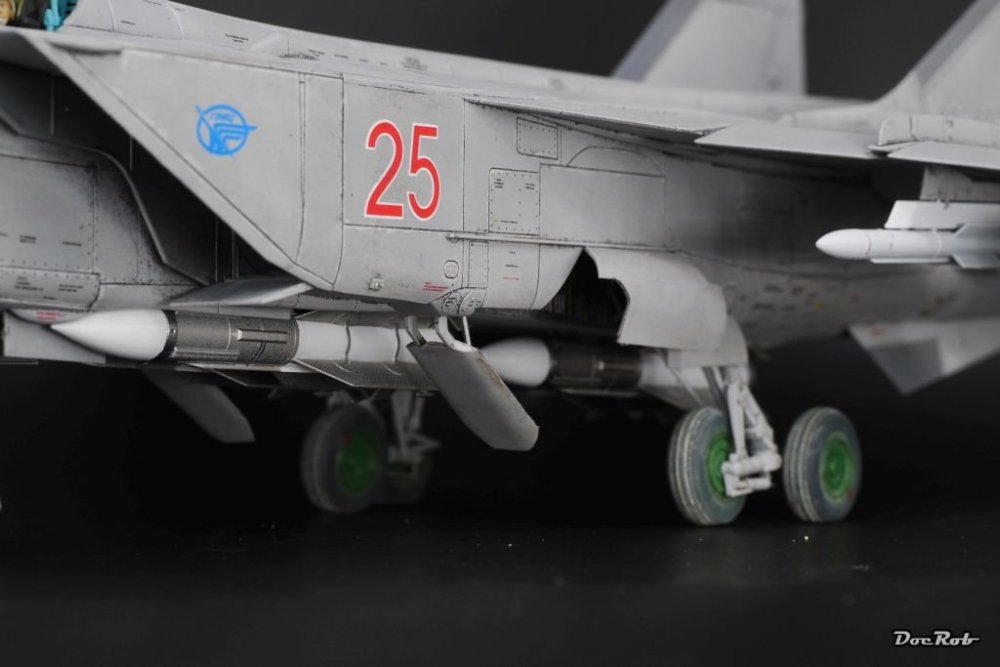
The beast got it's claws and some antennas and a pilot tube and beside some minor touch ups and better pics, I call the Mig done. Cheers Rob
-
Thanks for your kind words and there is a lot of truth in it. As modelers, we have to overcome obstacles, with nearly every build we start, be it new techniques or bad mishaps. The thousands of little steps until finishing a kit are never pure routine. Not to underestimate is the help I got from you guys, it's a comforting thought, that every problem that arises or every failure I make was done before and solved as well, one way or another. I'm looking forward to see your Mig-25, which too me has a similar badass attitude shown, than my two seater. Cheers Rob
-
Muchas gracias Phil, just baaad Russian concrete on the airfield . Cheers Rob
-
Ha-1112 K1L Tripala ‘Der Stern von Afrika’
DocRob replied to JeroenPeters's topic in LSM 1/35 and Larger Work In Progress
Looking good, I like the pre shading making the paintjob appear very interesting and the smooth finish is enhancing the effect. Cheers Rob -
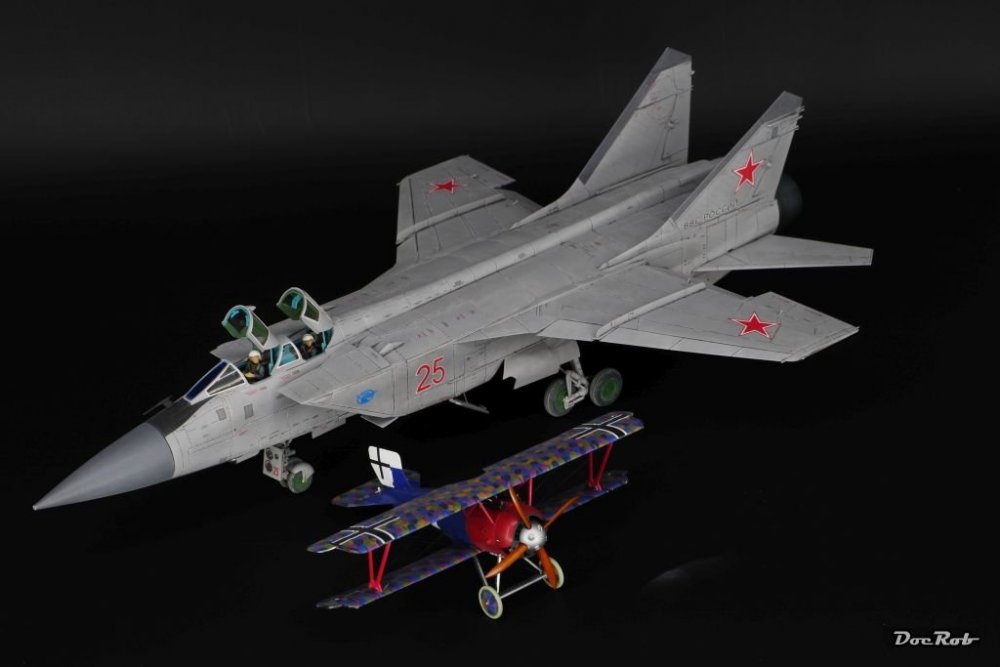
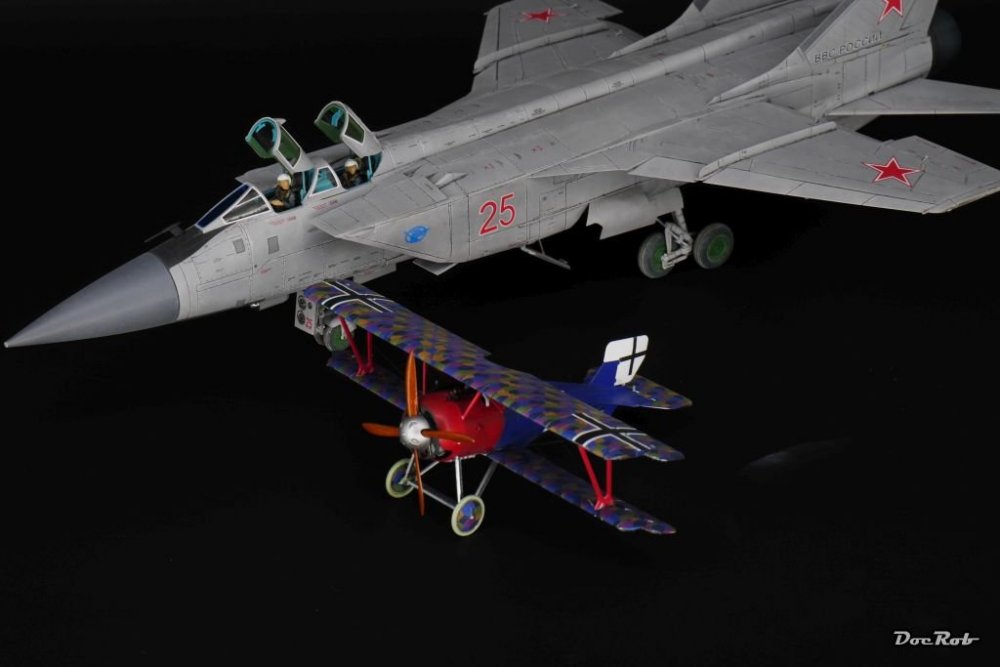
Hehe, you found one, I missed out... I was planning to make that comparison pic since restarting the Mig after finishing the SSW's, but had the same sensation like you. The colour richness of the SSW seems to make her appear bigger. 60years of permanent development separate these two. Thanks a lot Gaz, the Mig-31 is even bigger than your Mig-25, by no means a small plane. Cheers Rob
-
My last builds represented the ultimate interceptors of their time. Find the few differences between the birds Cheers Rob
-
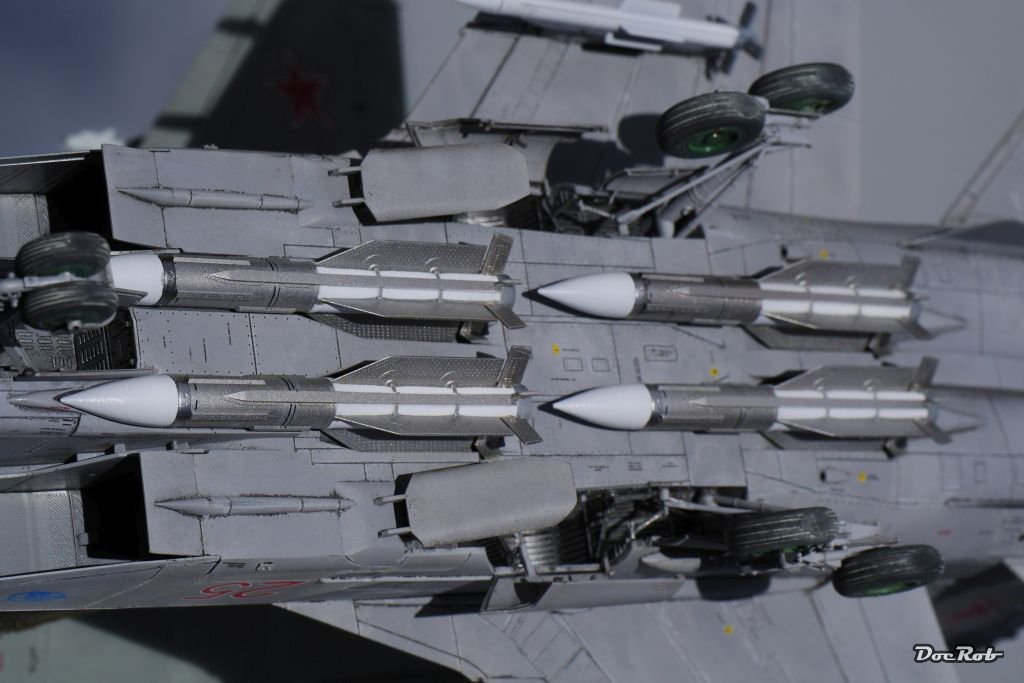
Almost done with the beast. I have to add the missiles, but first, I have to decide, if I stencil them and the pylons completely. There are some antennas to be mounted, but that's it. I wait for better light outside, to make some pics under blue sky. Cheers Rob


-
Thank you Phil, I hope your situation will change for the better soon. Some years ago, I had a very difficult time for different reasons and modelling helped me a lot, to get my calm back and solve my problems. It is hard to sit on your bench and try to focus on something so unimportant as modelling in times, were the world goes upside down, but I had the sensation, that focusing on modelling in hard times clears the head, because after a while of unconcentrated building I focus more and more and that clears the brain for other important things. To me, surfing is helping even more, because of the focus you have to maintain, it's like ctrl-alt-del for the brain. Cheers Rob
-
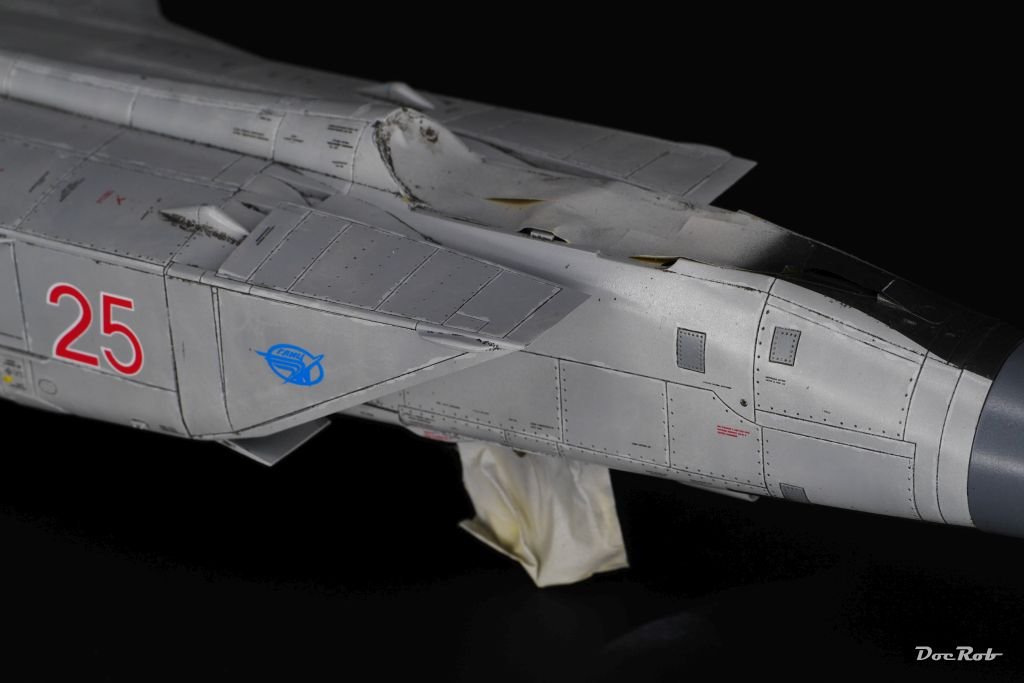
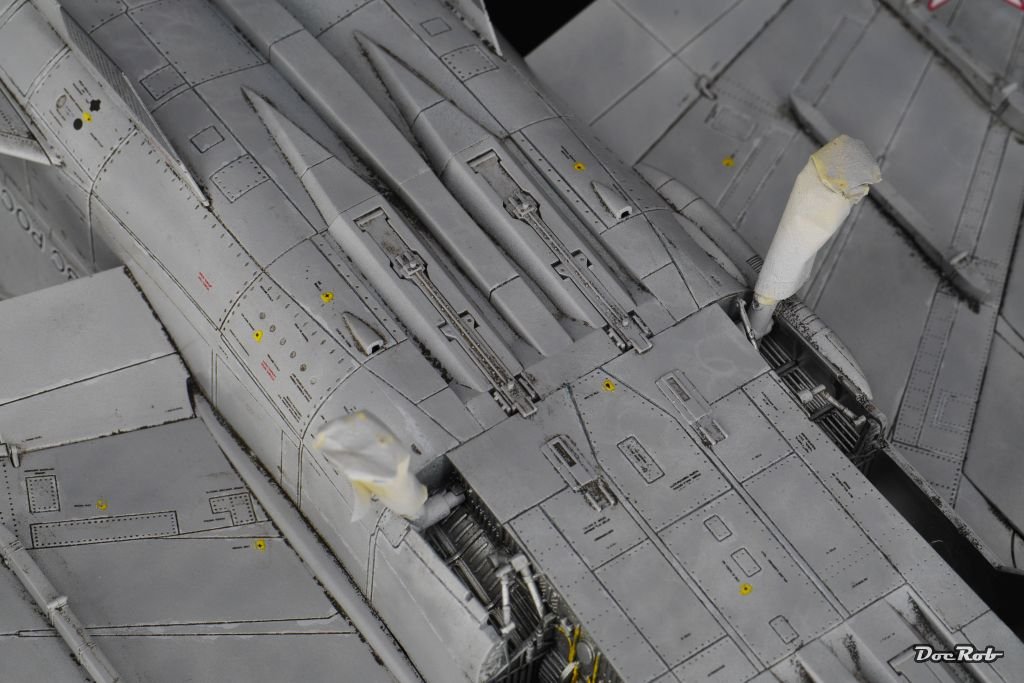
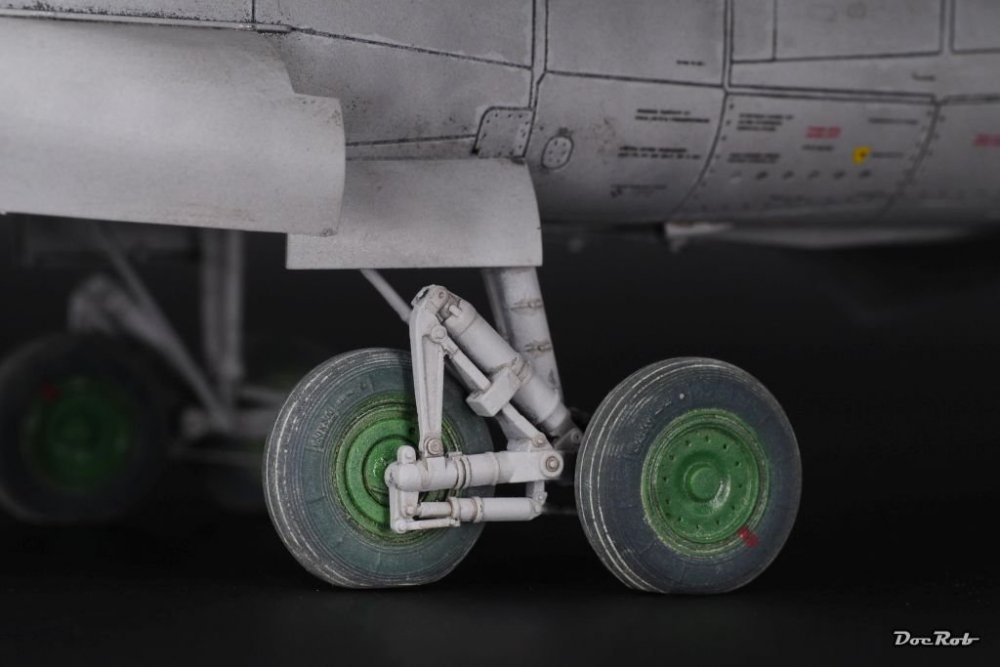
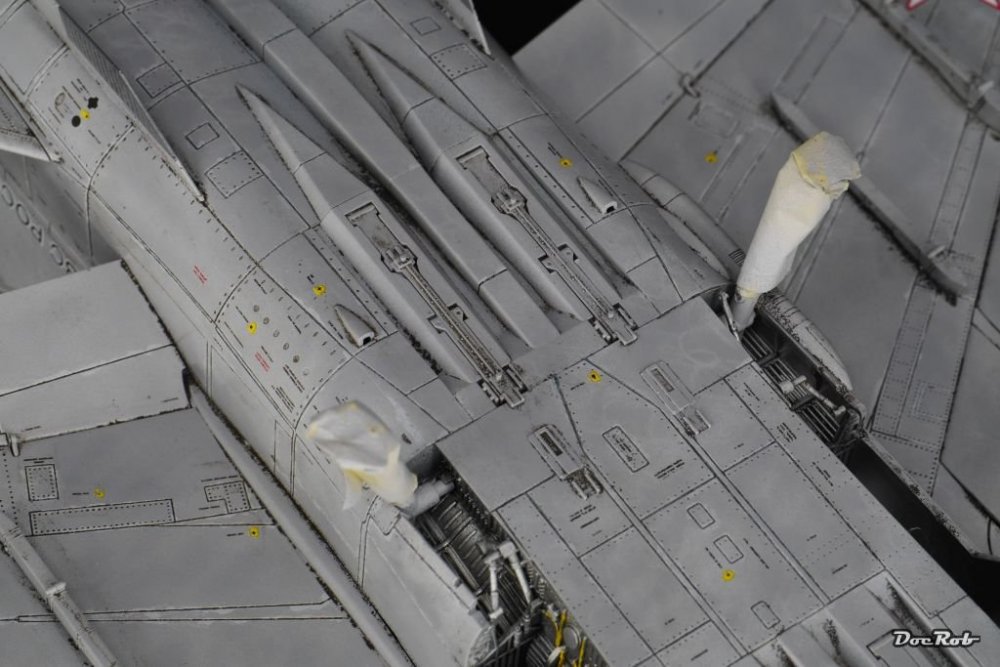
Today I removed the clay wash from the Mig. My first idea was to use a very fine sanding sponge on the panels to remove the access, but found that this method works not so good on a shiny surface. A matte coat as preparation would have been necessary, where the wash could bite better. Anyway, it would have been to much, at least it's a Russian plane and not a Greek one . Removing the access wash was done with water dampened paper towels and cotton swabs, cleaning in the direction of the airflow and light rubbing. I have to say, that I really liked the way, these Flory washes behaved. They are not aggressive, and you are able to remove them completely on a shiny surface if you have unwanted side effects. Tomorrow, the Mig will receive a second inspection and fine tuning of the wash and than there will be flat coating. With the easiness of use, I even dared to work the painted parts of the canopies with the clay wash, a task I didn't dare to do with another panel liner. The kit is a little bit heavy with the panel lines, perfect for me, depicting a worn plane, but too much for a new Mig, when you use a wash. Cheers Rob


-
Seems I've been carried away, by all these Kangaroos running around on the Australian race track. You are absolutely right, I meant the Kangoo thingy . Cheers Rob
- 2,035 replies
-
- 2
-
-

-
- car related stuff
- anything about cars
- (and 6 more)