DocRob
-
Posts
7,048 -
Joined
-
Last visited
Content Type
Profiles
Forums
Events
Gallery
Everything posted by DocRob
-
Indeed, an interesting kit, of an even more appealing plane. With the elegant lines and some internal additions, it will look great. Cheers Rob
- 4 replies
-
- 1
-

-
- polikarpov
- otivna
- (and 2 more)
-

Scammell tractor/trailer with M3 Grant
DocRob replied to BlrwestSiR's topic in LSM 1/35 and Larger Work In Progress
Wich hole , all the detail is looking great, and I hope, lots of it will show in the end. BTW, there is a hexagonal cap near the rope which cries for a little scrape with a blade, victim of the macro . It happens to me all the time. Cheers Rob -
Das Kamel - Hansa Brandenburg W.12
DocRob replied to DocRob's topic in LSM 1/35 and Larger Work In Progress
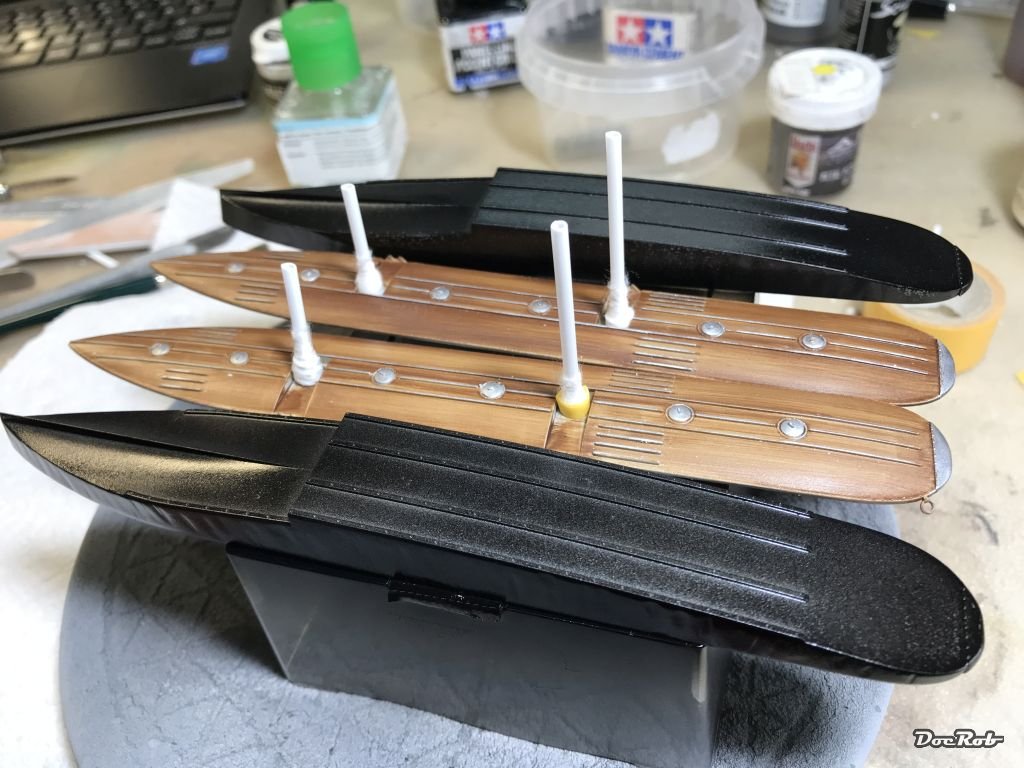
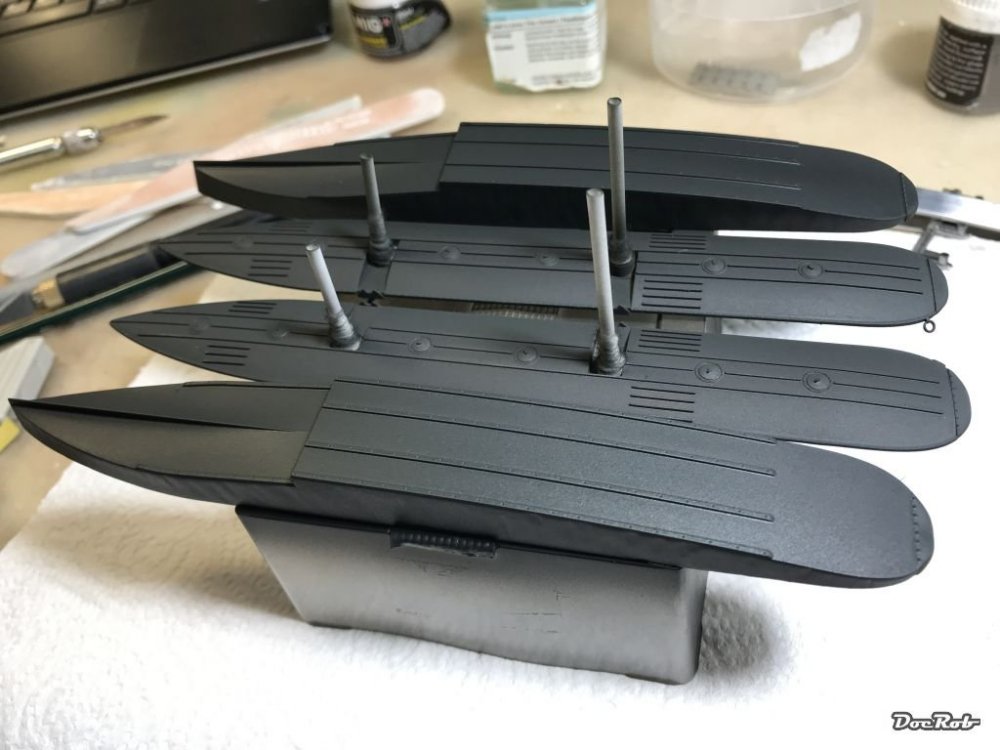
Carls tip was gold, the dampened sanding sponge did a lot of damage, purposeful luckily . Among other tools like toothpick with or without some hardened CA on the tip, an old stiff brush and most important a rubber eraser, I finished the first step of chipping with the multi layer hairspray method. The eraser was used as the last step and made the difference, let the different black tones noticeable. Next will be some touch ups with different near black tones and on the metal parts and then salt and algae. Cheers Rob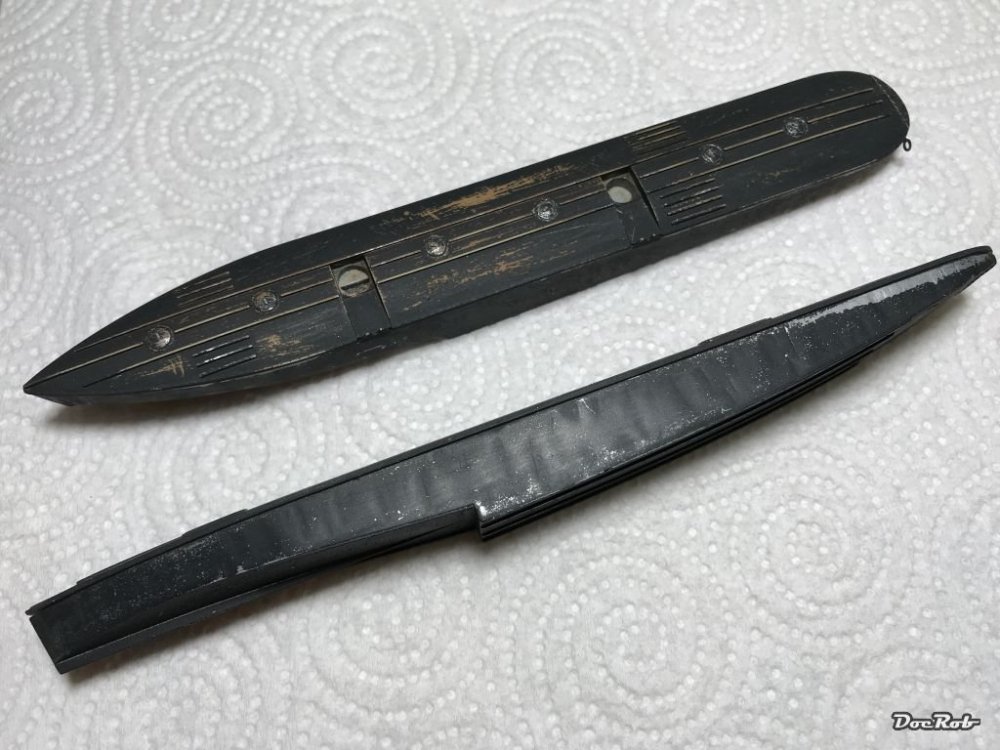
-
Das Kamel - Hansa Brandenburg W.12
DocRob replied to DocRob's topic in LSM 1/35 and Larger Work In Progress
Thanks Carl, I will try your sanding method. It might do the job as proposed, leaving the Nato black in the dents and having the semi gloss black showing, besides some metal spots. My first test with with a toothpick on the dampened surface looked ok, but didn't show the different black tones good enough, but maybe they are just not contrasting enough. If I can't achieve the desired effect, I will later paint on different black spots with a brush using my Lifecolor black rubber and shades set. After that there will be the fun part of salt residues and algae on the floats, poor old Kamel . Cheers Rob -
Das Kamel - Hansa Brandenburg W.12
DocRob replied to DocRob's topic in LSM 1/35 and Larger Work In Progress
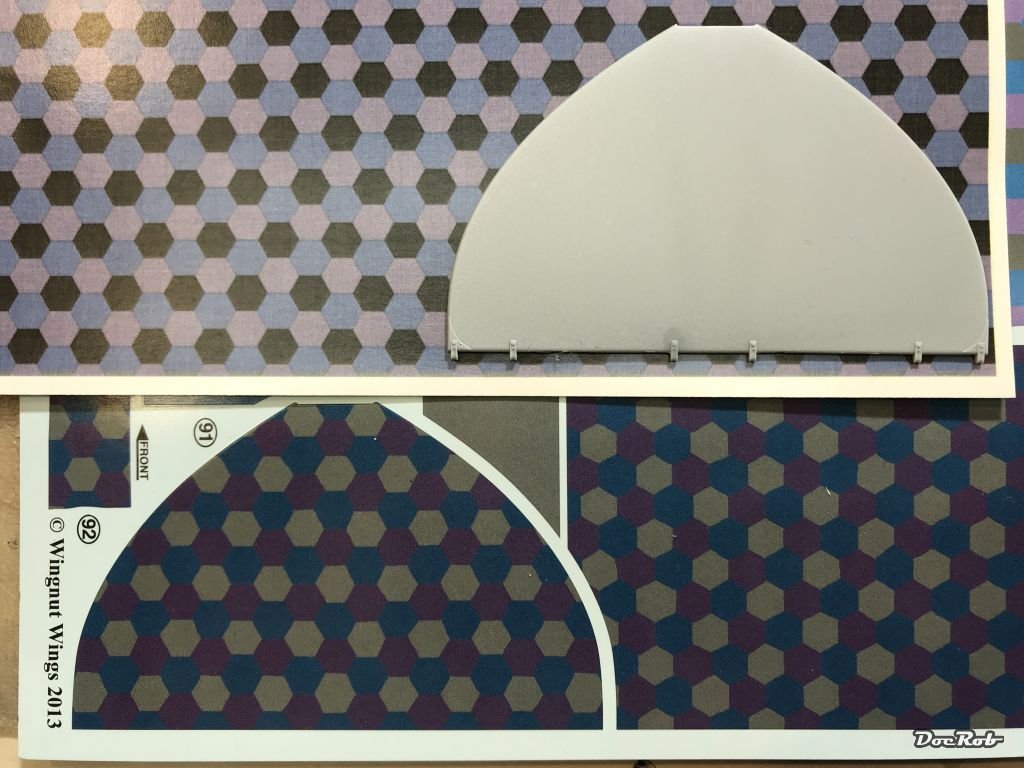
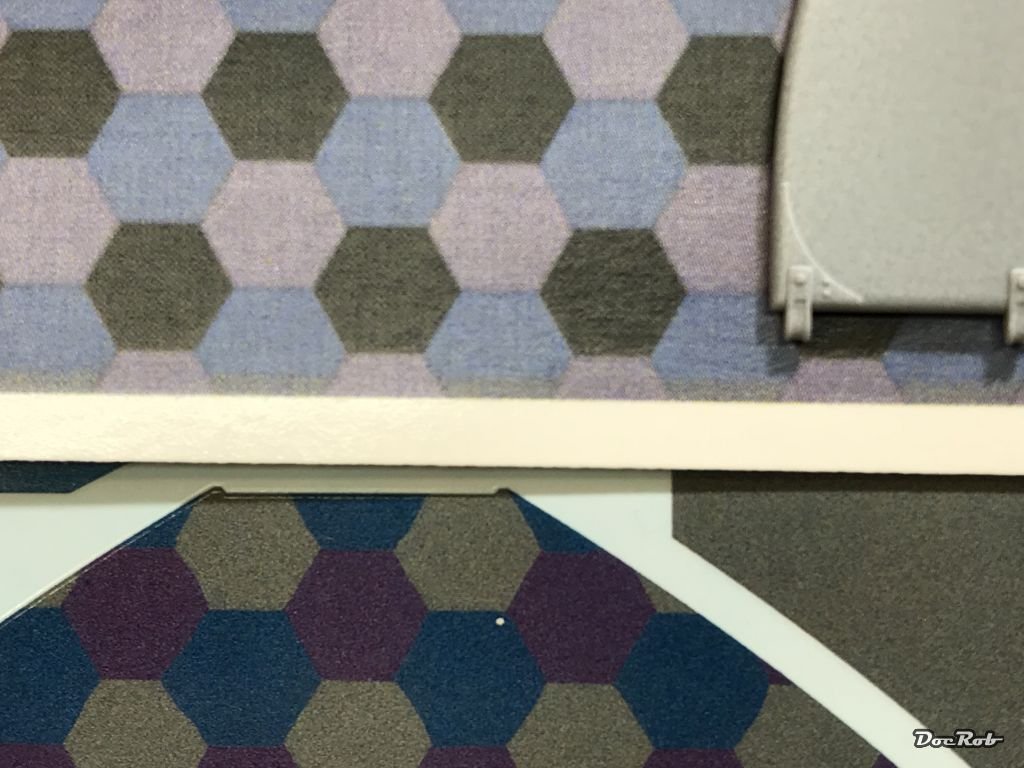
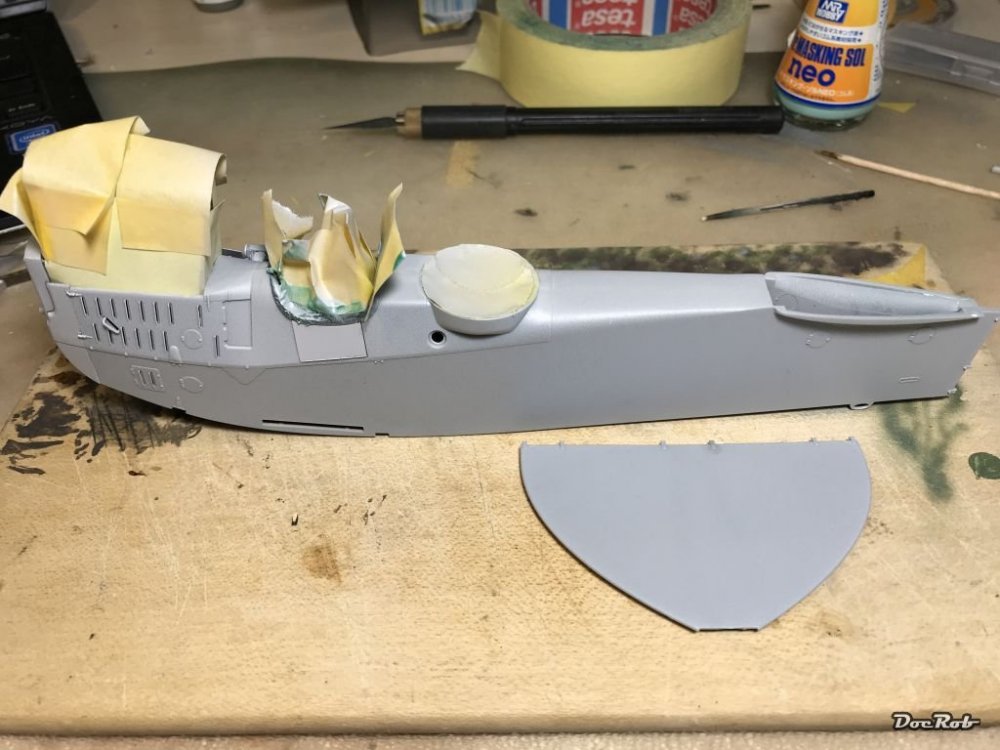
Closing in on the painting and decaling - sigh- stage. I primed the fuselage, after extensive masking, but forgot to cower the holes for the float struts. And now it's waiting, because I shattered my jar of fuselage grey and wait for a substitute, as well as Aviattic linen decals for the lower wing sections., was the the postman honking,.... As the Horizontal tailplane and back of the fuselage appear to be made of wood planking, I think about, giving them a different look than the wing Lozenge. For the wings I will use Aviattics Naval Lozenge, but am thinking of using the kit decals for the mentioned parts, as there is no linen structure noticeable on the kit decals, they will look different and hopefully more painted. WNW supplied different shades for these parts too, as the wings are lighter coloured. What do you think? Detail view for the pattern and texture Cheers Rob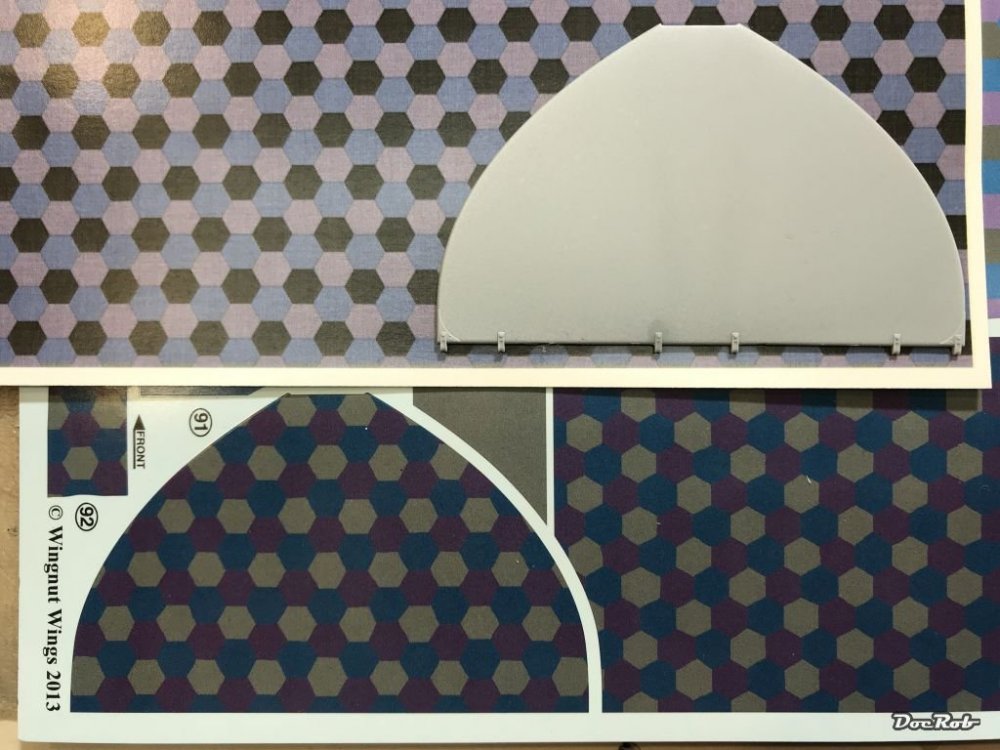

-
Good to see you back on this one. Mine got - err - finished this winter. Lets say 95% finished, as there is no weathering, which will be applied, when I can bring myself to do the snow sodden mud dio, I have planned for the fierce looking beast. Cheers Rob
-
Definitely not, it adds the trouble to cast crystal clear resin water to show the engine with a slight blue greenish tint in the freezing water with some of the cowlings bent or gone, which reminds me, that I want to make a broken ice dio since a long time. Cheers Rob
-
Das Kamel - Hansa Brandenburg W.12
DocRob replied to DocRob's topic in LSM 1/35 and Larger Work In Progress
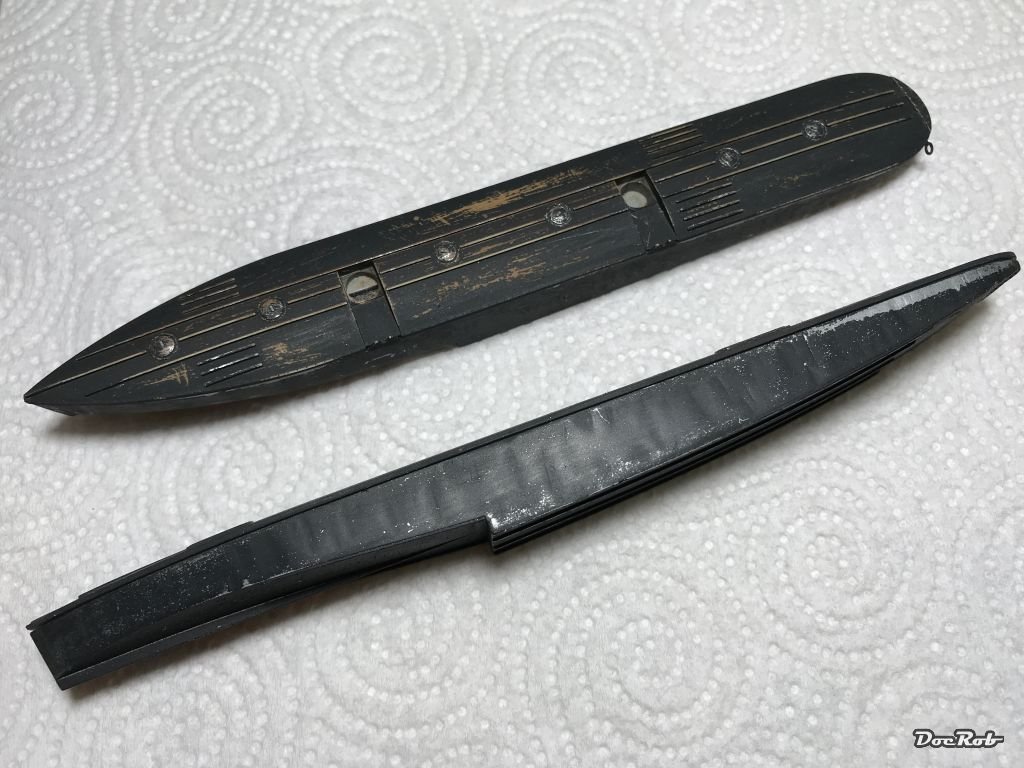
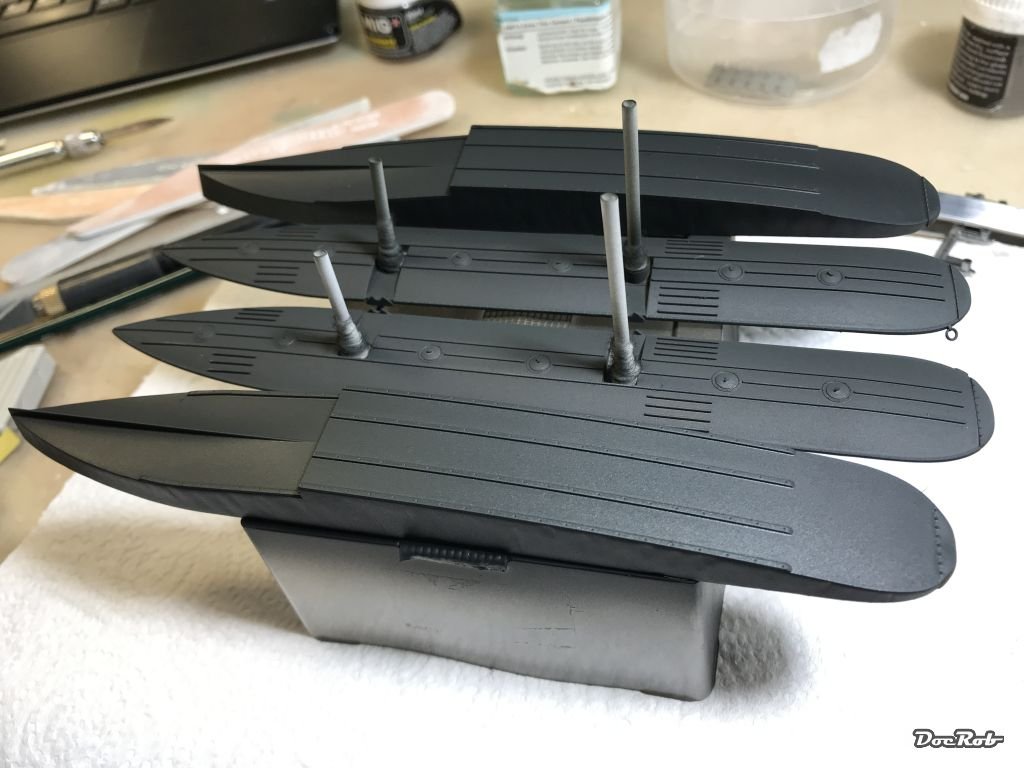
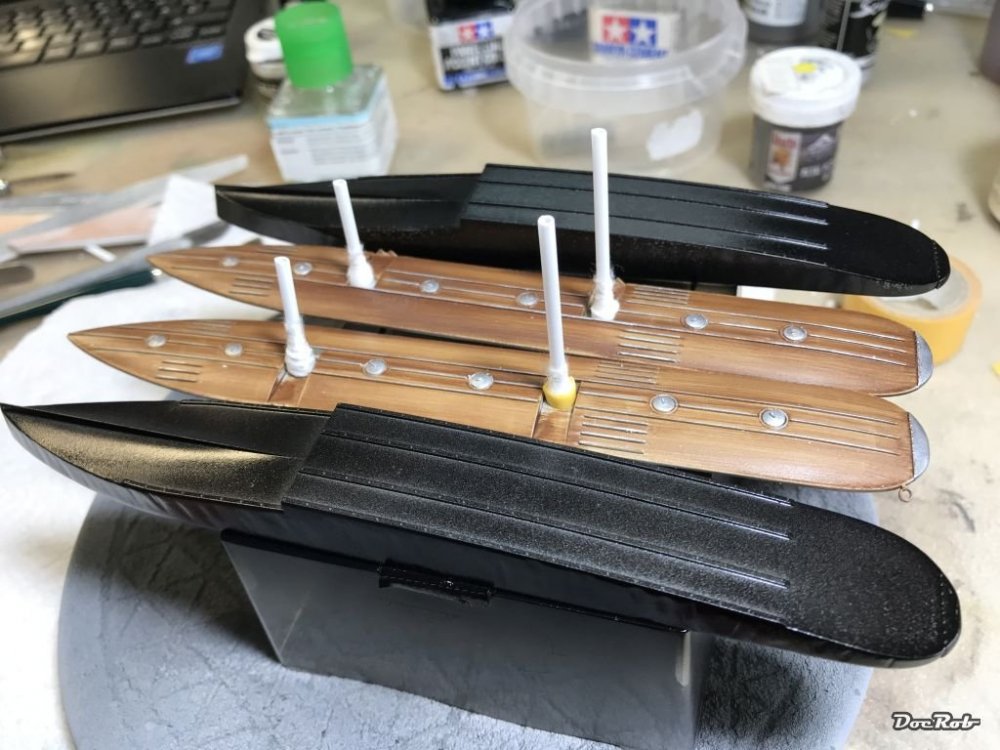
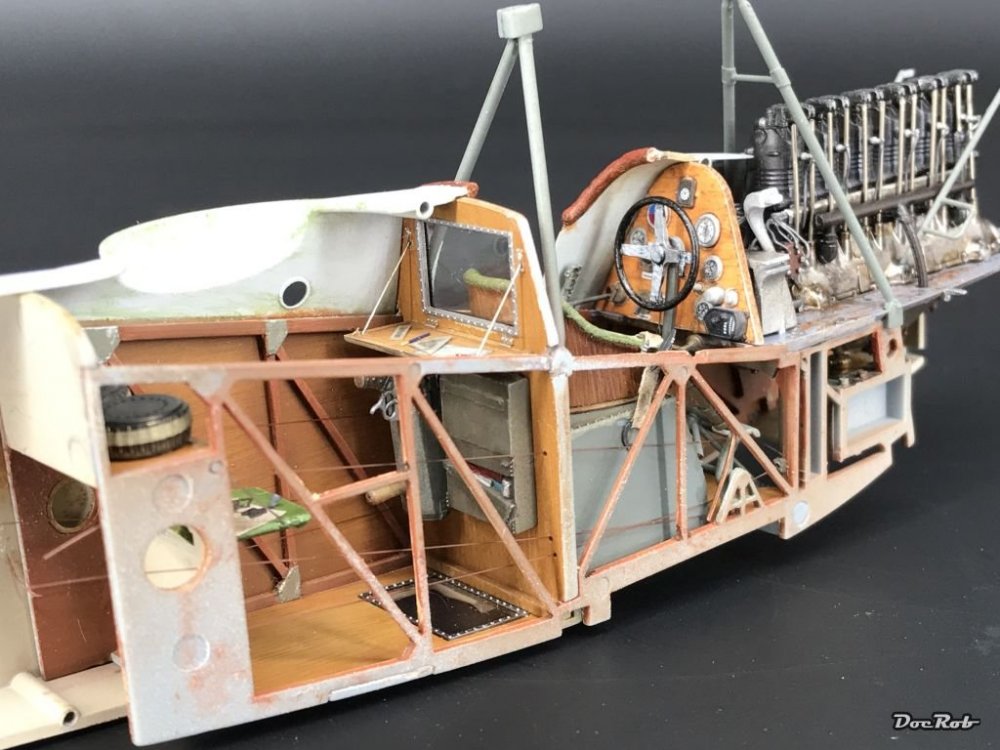
After closing the fuselage, I had to do a lot of filling and sanding, to get rid of the minor gaps of the halves. Actually there were no real gaps, but minor, but seeable steps, I filled with superglue and grinded clean. As I noticed that while test fitting before inserting the interior, it seems, that WNW was not completely up to their usual standard, but hey, we are modelers. All the struts were sprayed Nato Black and the floats were prepared for ageing weathering in a way, I never tried before. The idea was born, when I was building my Doobie tractor, where with IDF colour on top, there should be Caterpillar yellow under it and in parts with even heavier wear, base metal. I didn't come so far with the Doobie, so this s my test for multi layer chipping As always with WNW kits, I protected all the struts attachment points with tape, as fit is always very tight, and mostly impossible with a coat of colour. First the decks were painted with wood effect and the aluminum parts were coarsely painted with AK' Aluminum wax. The hulls got a coat of dark Aluminum and after drying the parts got two thin coats of hairspray. Second the hull parts got a cover of semi gloss black and another coat of hairspray. After the second coat of hairspray has dried, the hulls and decks of the floats received a generous coat of Nato Black for the tar like appearance. I hope, I will be able to activate the hairspray with water to different depths, with some aluminum showing through in some areas and the more glossy base coat in others, like where a wooden jetty scratched along, leaving some bare metal and some more shiny scraped tar colored parts. Cheers Rob
-
Das Kamel - Hansa Brandenburg W.12
DocRob replied to DocRob's topic in LSM 1/35 and Larger Work In Progress
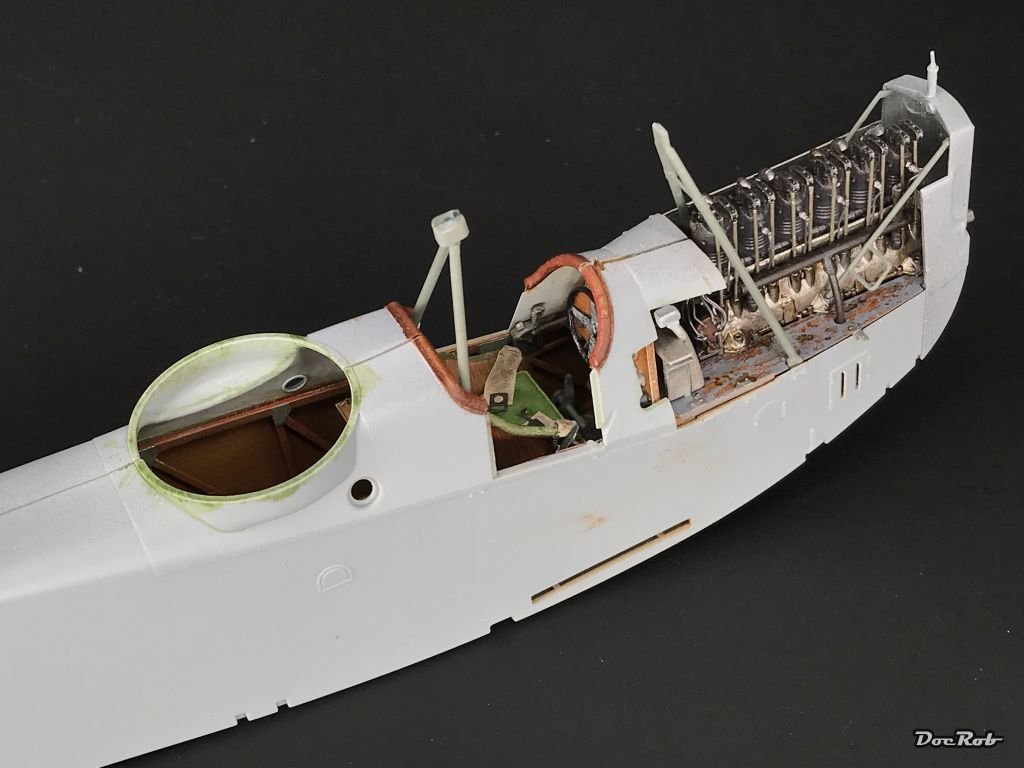
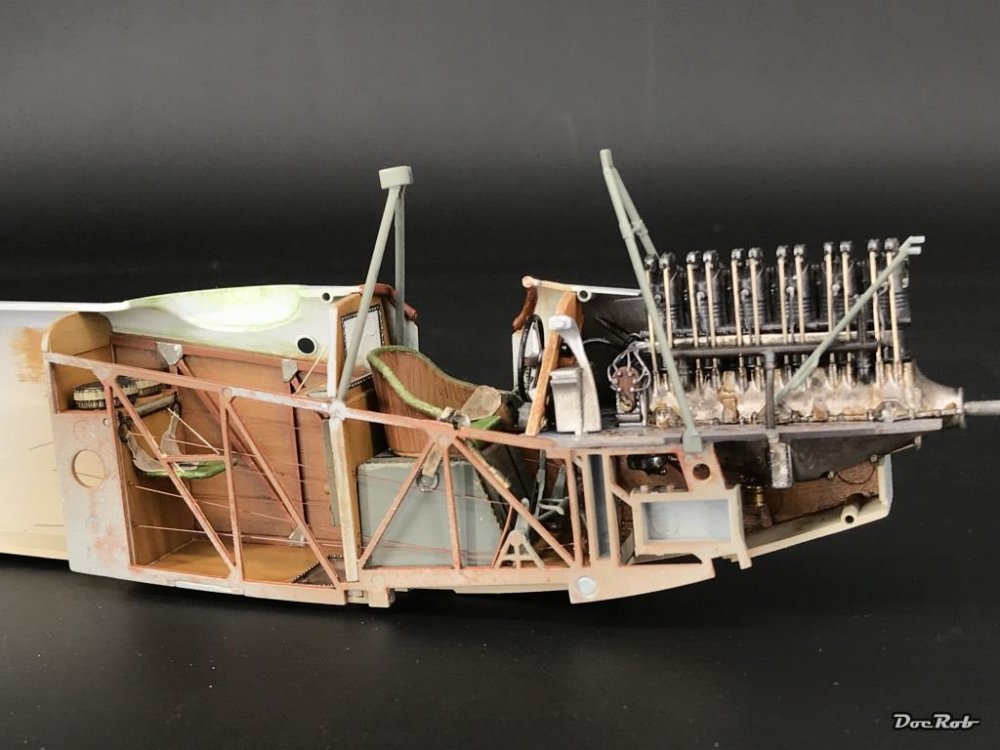
I achieved a big step today and closed the fuselage of the Kamel. The fit of the kit is great and there is only a slight gap between the pilots and observer place, but for now it's drying time with rubber bands and clamps. Cheers Rob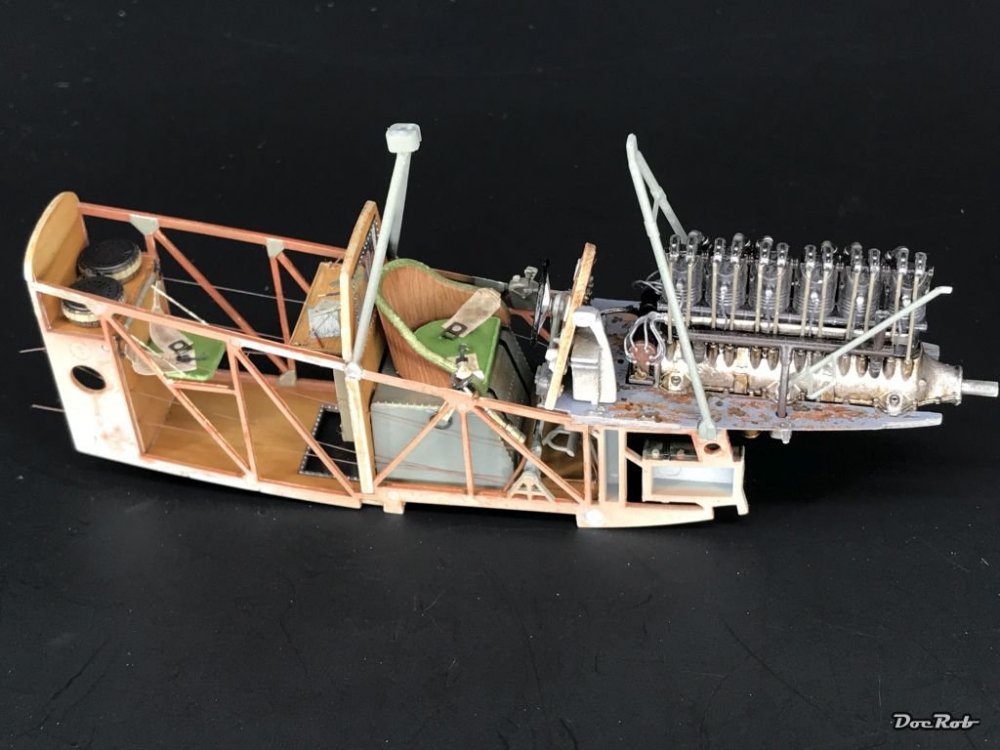


-
Das Kamel - Hansa Brandenburg W.12
DocRob replied to DocRob's topic in LSM 1/35 and Larger Work In Progress
Thanks Phil, but as my next step will show, pretty much will be covered, but I have the pics . Cheers Rob -
Nice work on the new bench, but can you really sit in front of it, without hitting your knees? Cheers Rob
-
Das Kamel - Hansa Brandenburg W.12
DocRob replied to DocRob's topic in LSM 1/35 and Larger Work In Progress
Thanks Gaz, not sure, what will be seen after closing the fuselage, but maybe I let the cowling off on one side. Cheers Rob -
Das Kamel - Hansa Brandenburg W.12
DocRob replied to DocRob's topic in LSM 1/35 and Larger Work In Progress
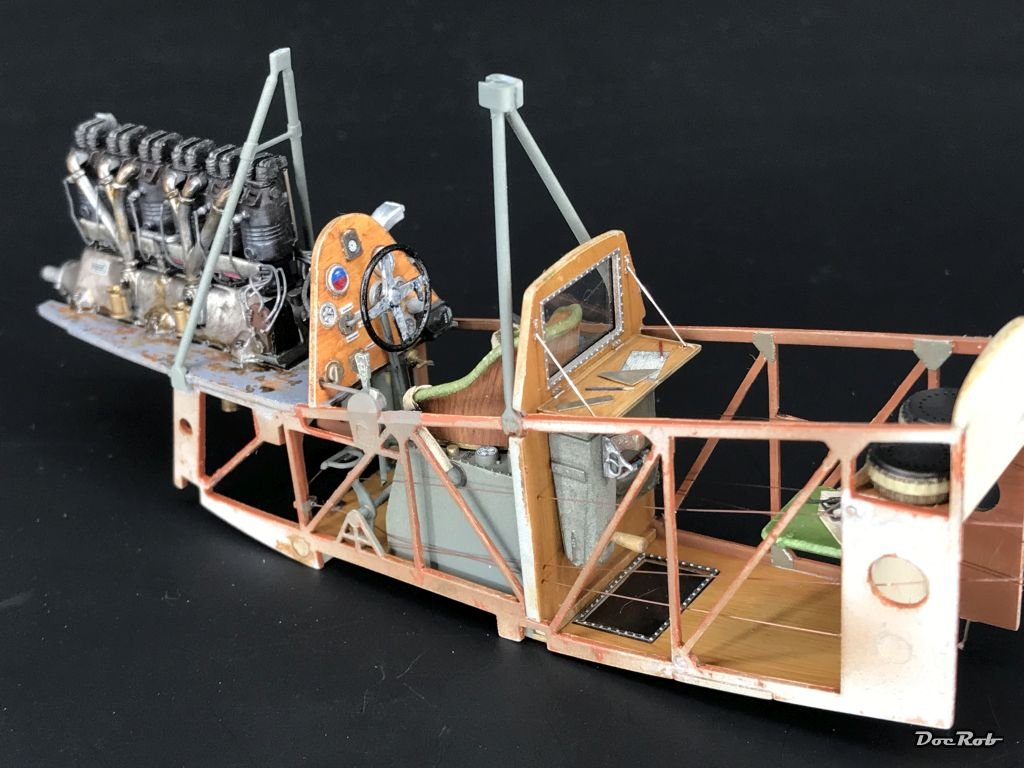
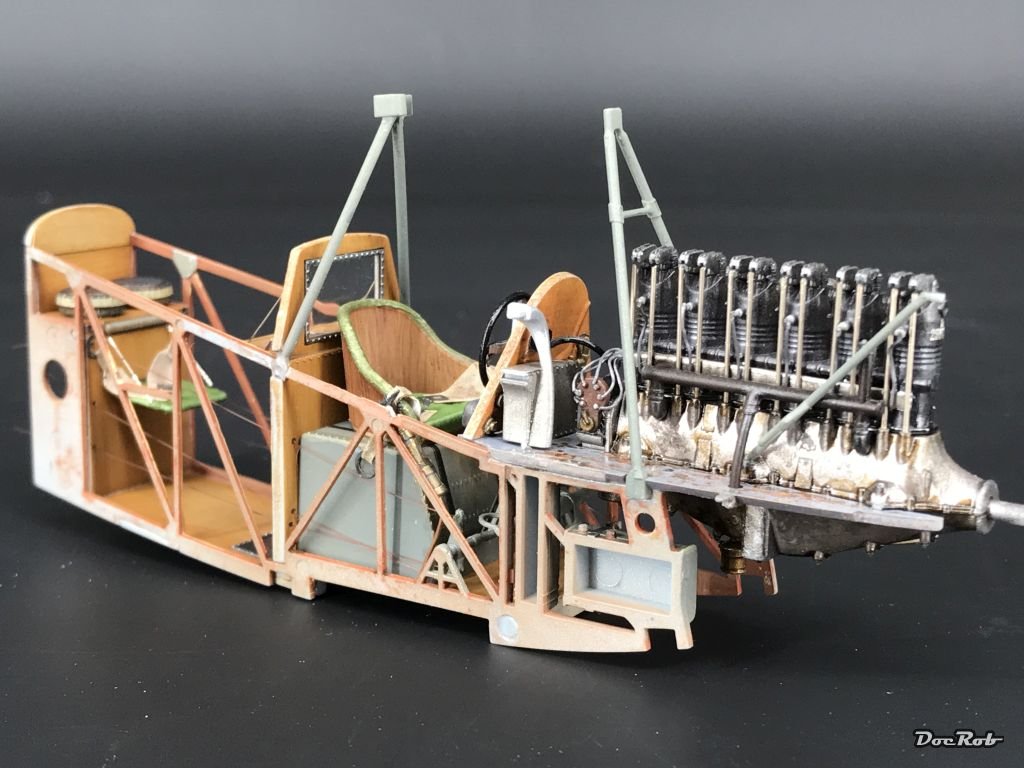
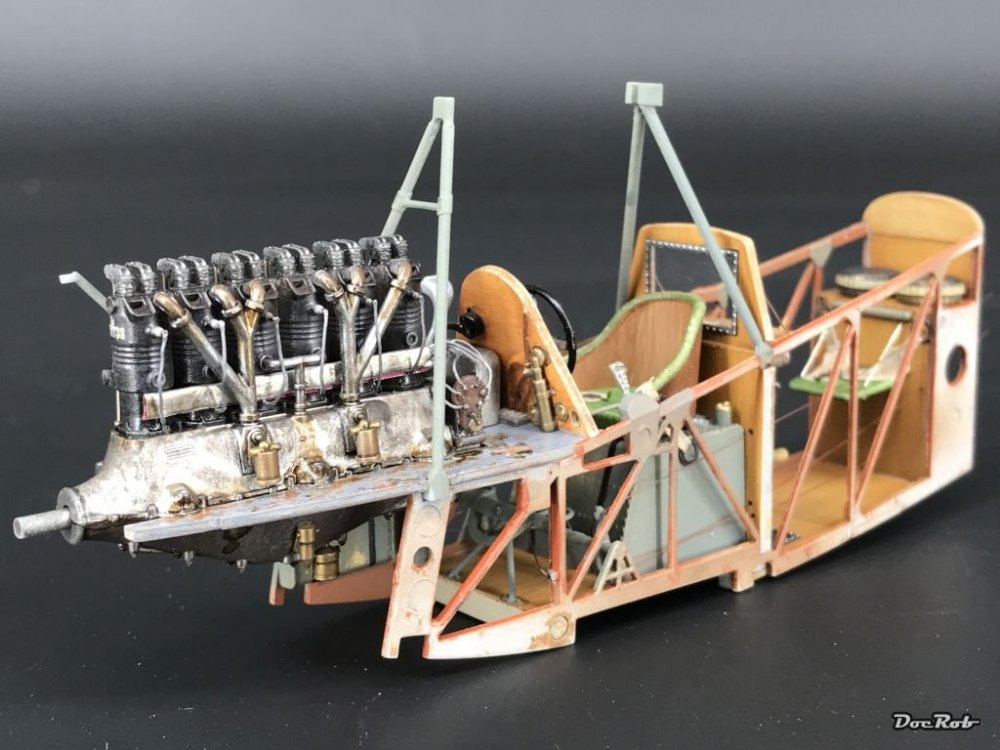
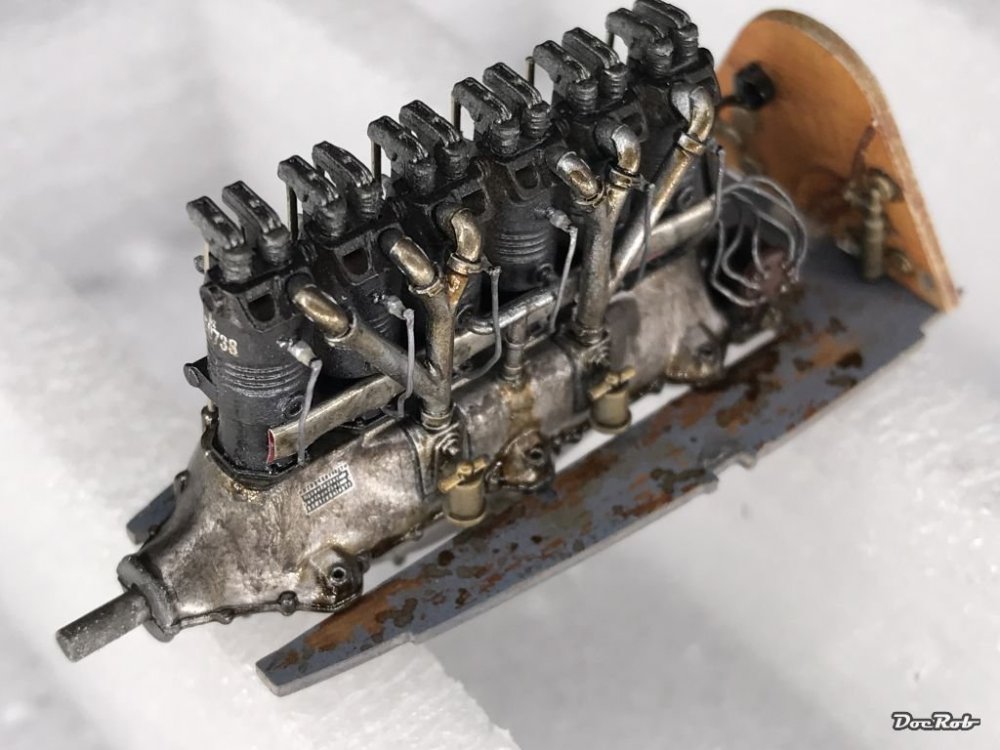
The engine received some love today, with washes first and after drying a mix of engine grime, oil and fuel stains worked in wet in wet to get layer results. The engine mount got the same treatment. I call the engine more or less ready, I decide tomorrow when everything has dried, if I rub on some more pigments. Cheers Rob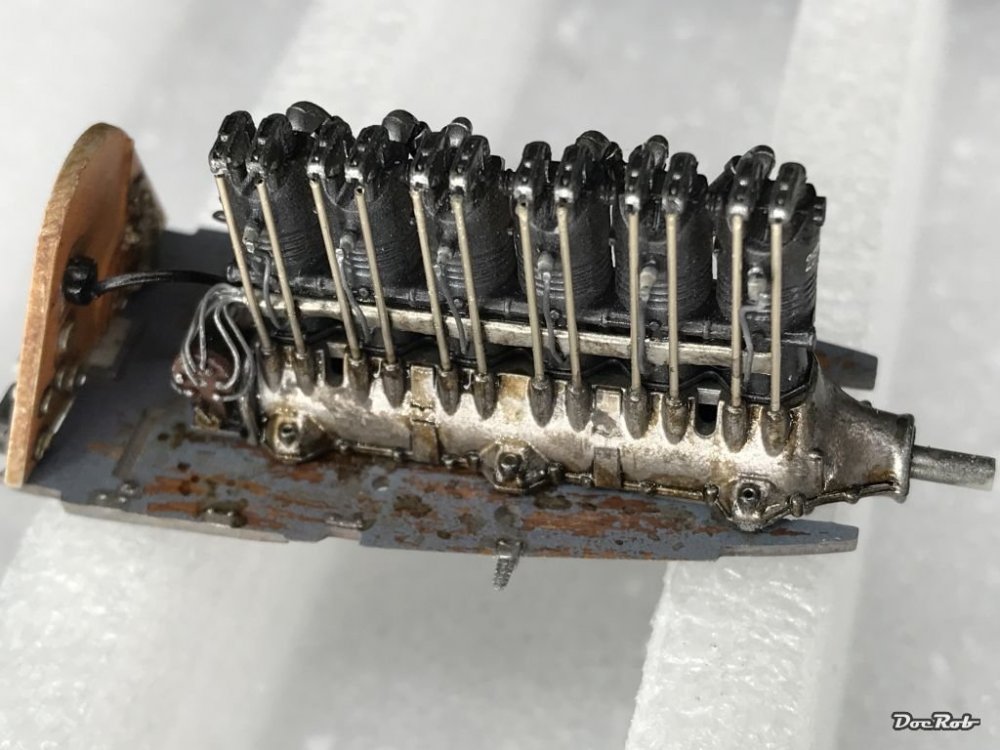
-
Das Kamel - Hansa Brandenburg W.12
DocRob replied to DocRob's topic in LSM 1/35 and Larger Work In Progress
Thanks for your kind words Jeff, it's a two seater, be my guest . Cheers Rob -
Scammell tractor/trailer with M3 Grant
DocRob replied to BlrwestSiR's topic in LSM 1/35 and Larger Work In Progress
Nice detail work, you could have spared a track though, as a reason of the towing , but now it's to late. Cheers Rob -
Das Kamel - Hansa Brandenburg W.12
DocRob replied to DocRob's topic in LSM 1/35 and Larger Work In Progress
Thanks Gentlemen, the good thing when you have no experience is, that you are open minded and not preoccupied. I give me a little time to evaluate the new challenges and try to think of solutions. A vague idea forms slowly to a clearer path with the help of you, other sources and last but not least my imagination. I really like that process, in the beginning, I'm itchy, thousands of questions in my head and slowly things fall together and there are only one or two options left and I get calmer and focused. Cheers Rob -
Das Kamel - Hansa Brandenburg W.12
DocRob replied to DocRob's topic in LSM 1/35 and Larger Work In Progress
Thanks Harv, I'm actually enjoying the detail work. Well thought through in advance, it's easier done than expected. Cheers Rob -
Das Kamel - Hansa Brandenburg W.12
DocRob replied to DocRob's topic in LSM 1/35 and Larger Work In Progress
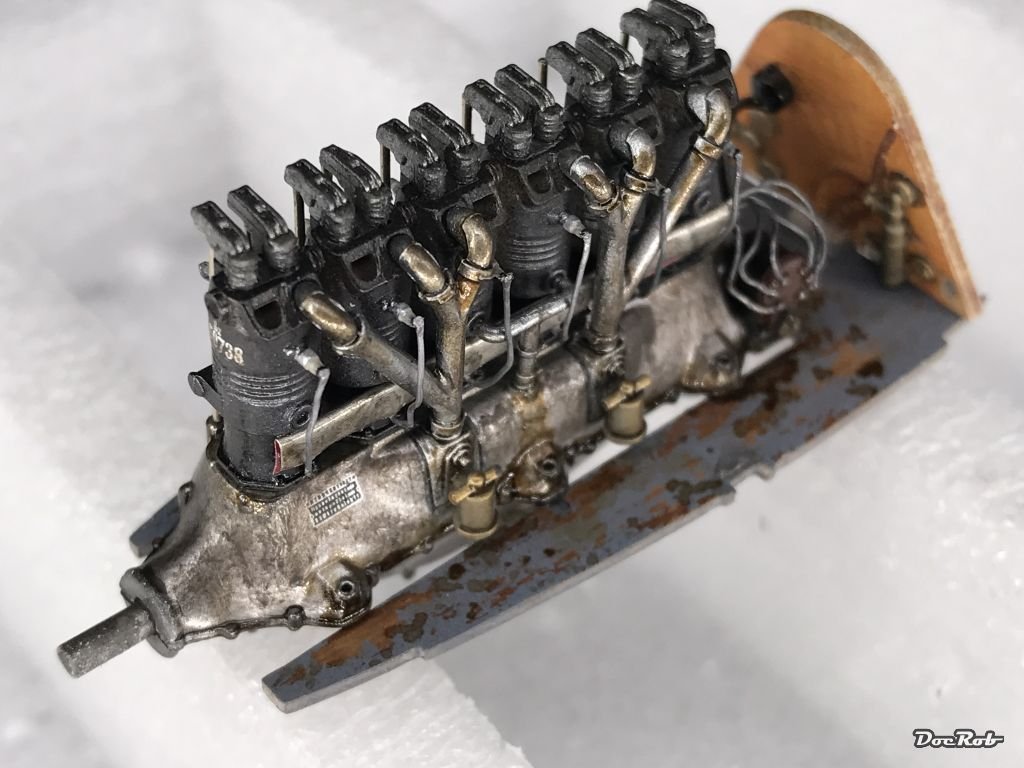
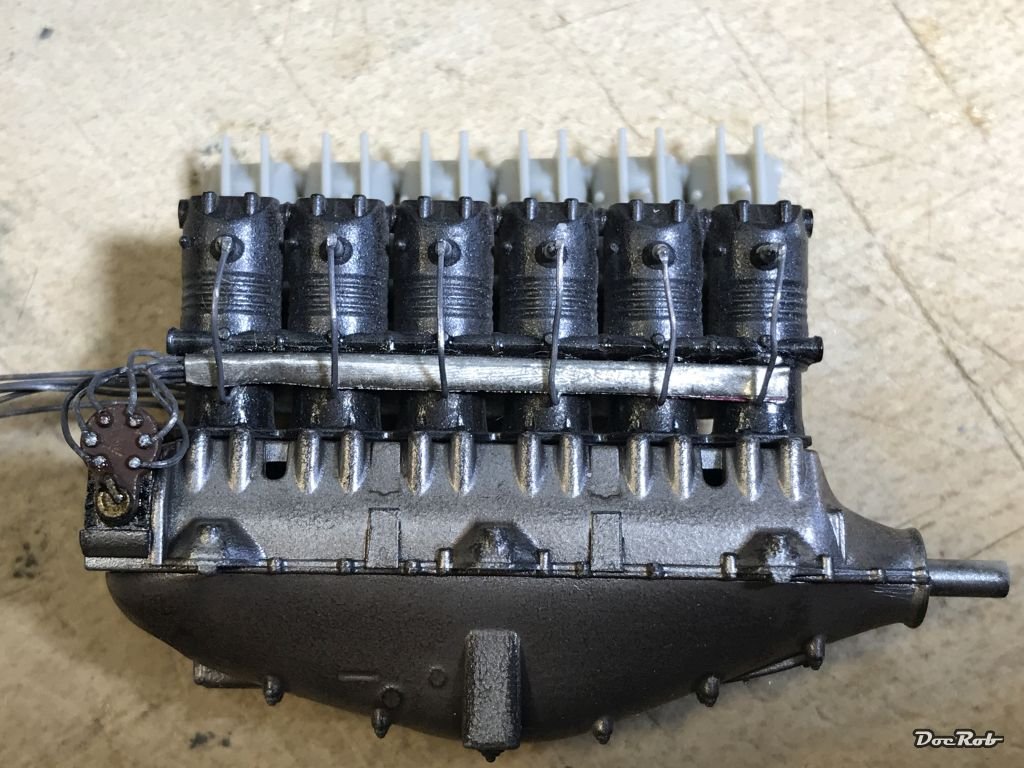
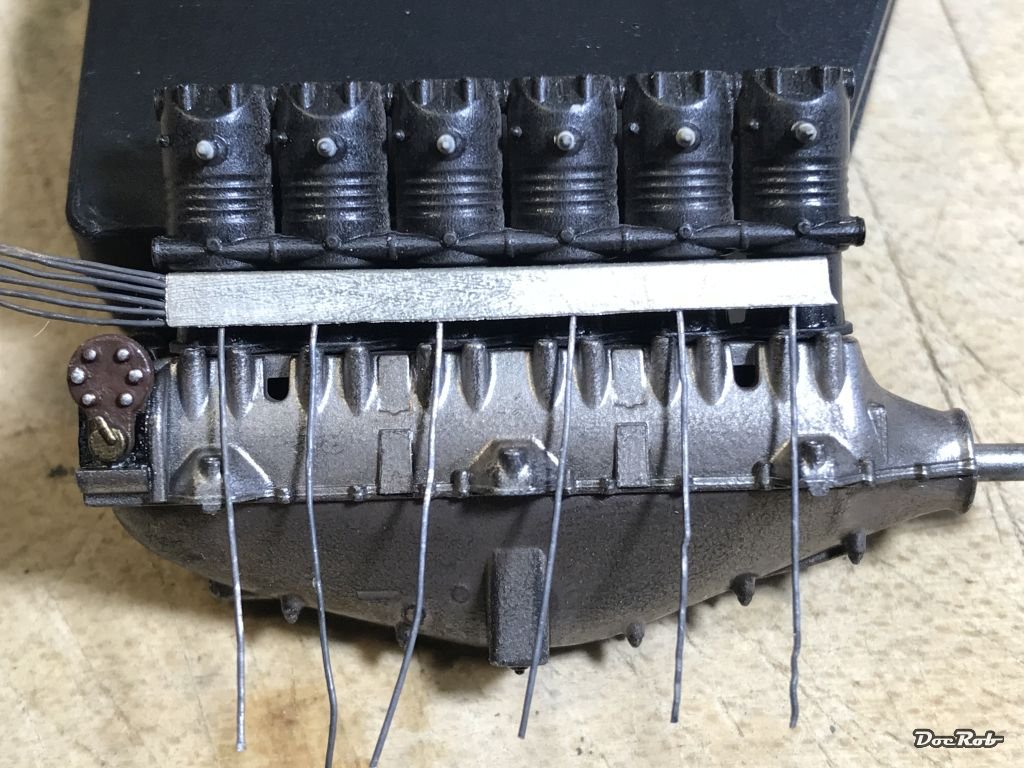
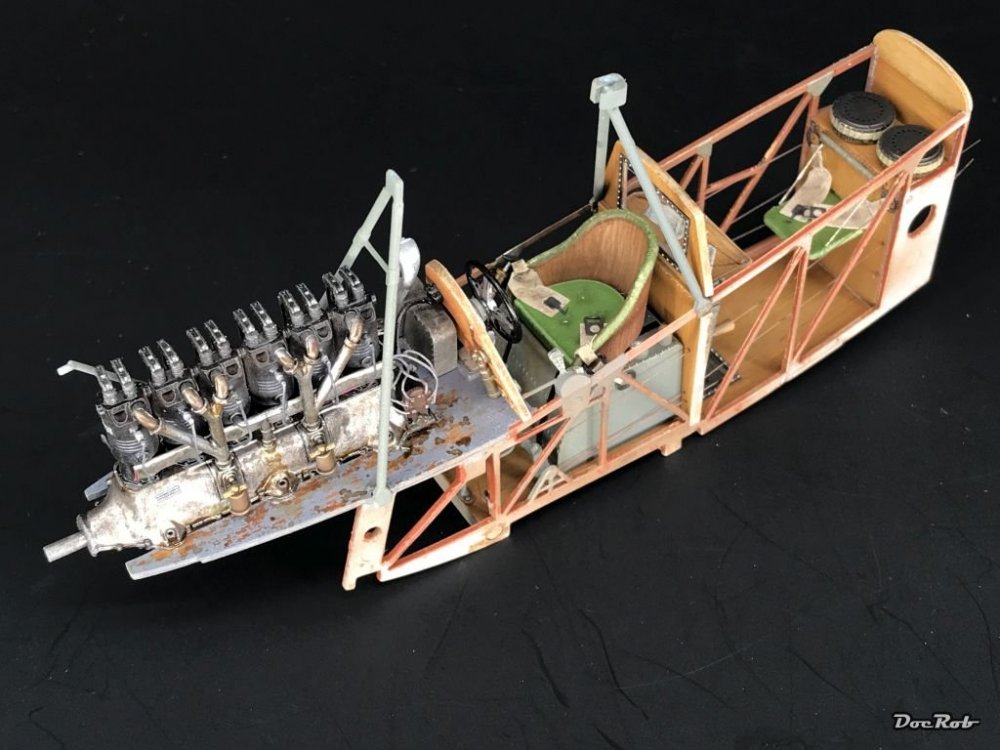
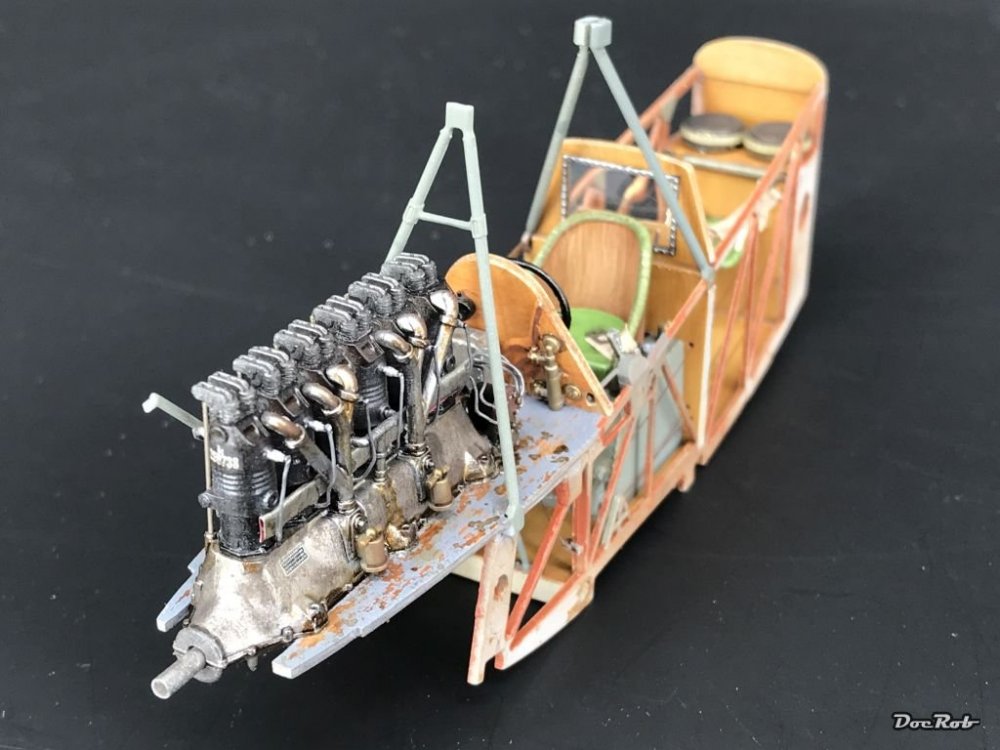
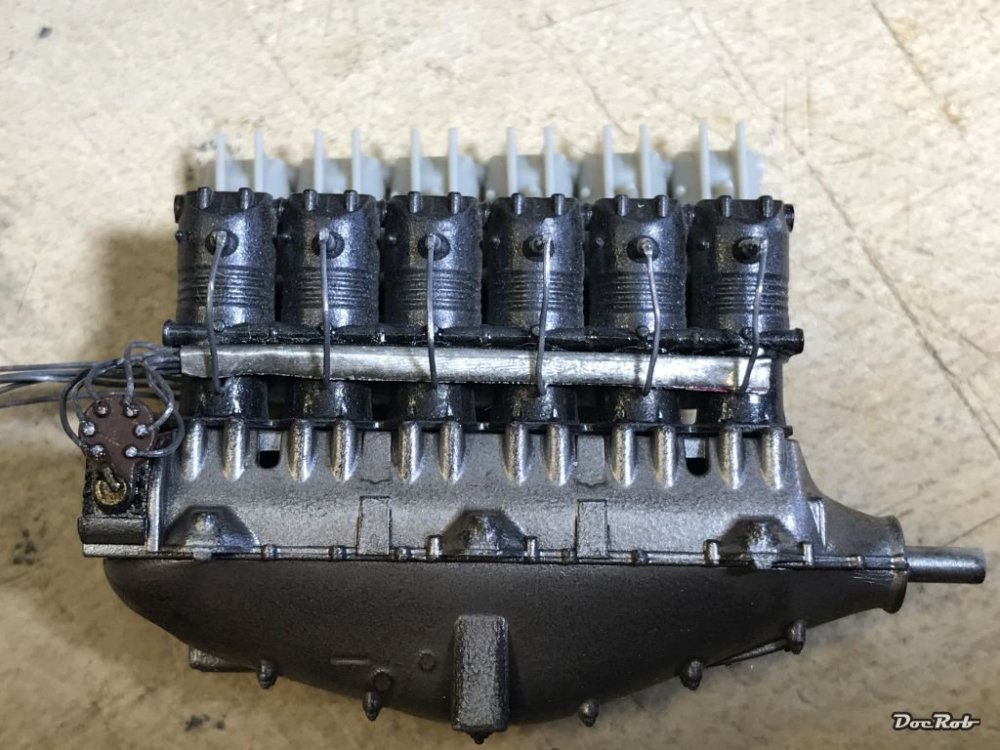
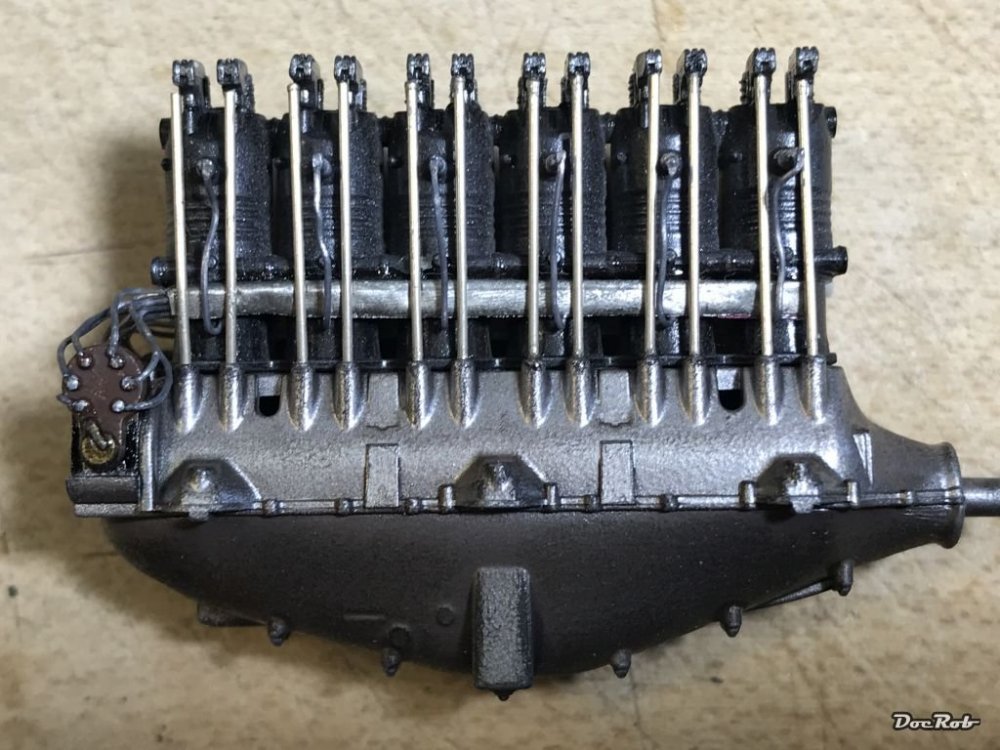
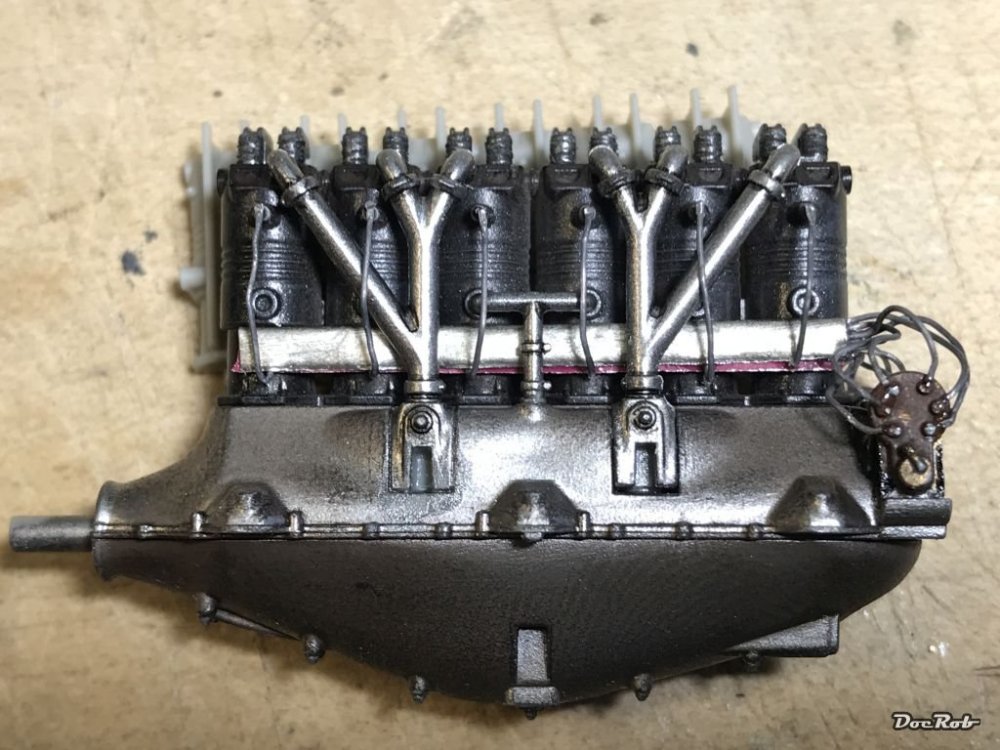
Today I finished the wiring for the engine, which was easier than thought with the lead wiring. The wires are so easy to bend, that I could put them in the final position, without them springing back a little, but first I attached the foil wiring housings to the block as flat as possible, to get the pushrods over correctly. Then I bent the wires to the spark plugs, cut them to length and flattened the end with a tweezer and glued them in place. Same was done with the wires to the Magneto Then it was time to set in the push rods and glue the rocker arms in place. Some has to be adjusted a little better, not so easy, because of the thickness of the wiring harness. The other side got wired the same way, but after adding the intake manifold, because pictures (and logic) show, that the wiring is on top of the tubes. Some more parts has to be added after drying and there are some touch ups to make here and there, but then the engine is done. Cheers Rob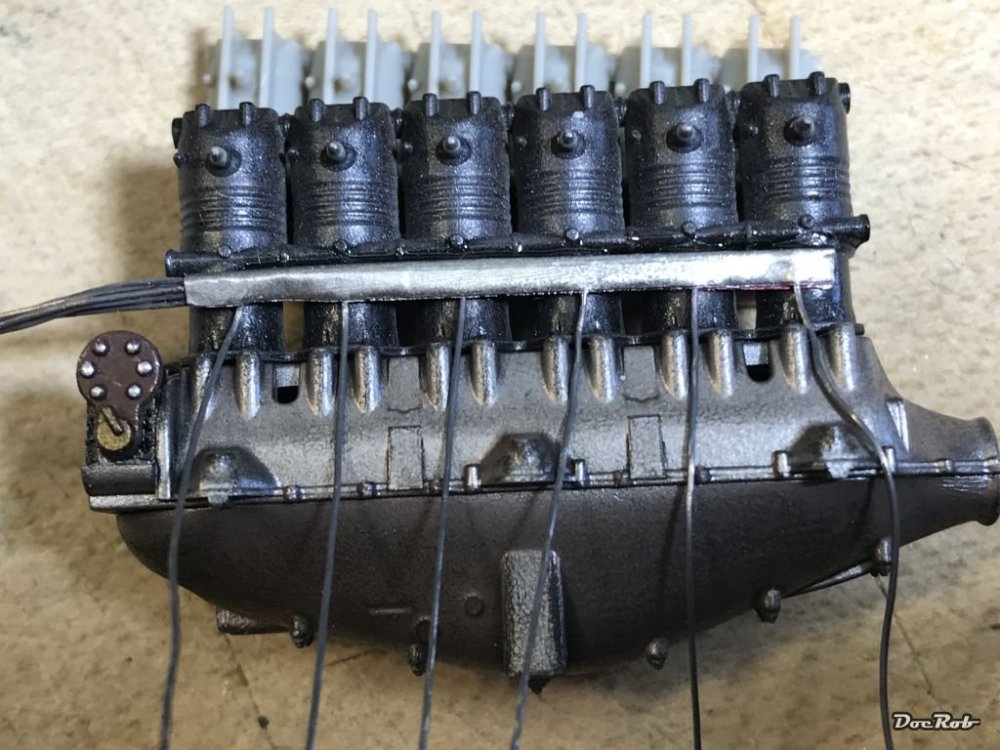
-
Das Kamel - Hansa Brandenburg W.12
DocRob replied to DocRob's topic in LSM 1/35 and Larger Work In Progress
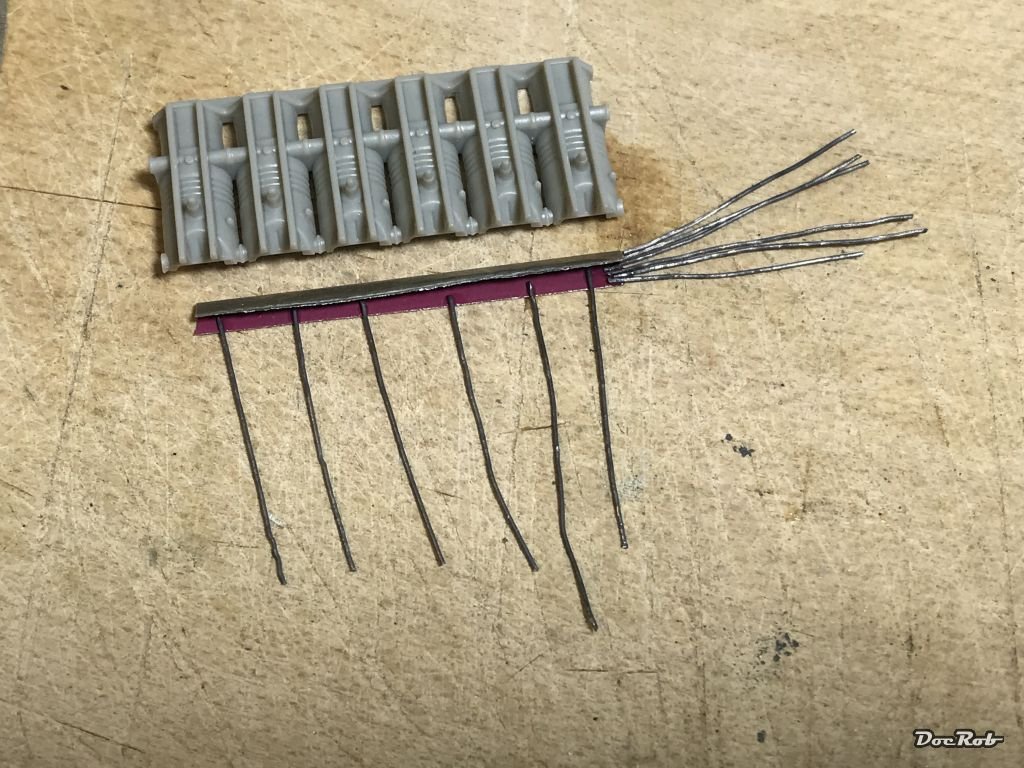
Today, I started to address the wiring for the engine. I tried to drill 0,3mm holes in the sides of my 0,5mm styrene strips and failed, because the holes made a tiny blister on each side of the strip. Then I cut a strip of metal foil from a wine bottle and folded it in the middle at 90 degrees. I added all the wires with CA glue and finally bend it flat with some more CA. I used the unloved kit part as a template for the ignition wires. This way, I didn't have to paint the foil, because with some weathering it will look good.

-
Just found this new bust of the Law Enforcement Steel Murphy. https://www.dersockelshop.de/maim---modern-armies-in-miniaturesmaim10016dead-or-alive,-you-come-with-me-bust--110 Cheers Rob
-
1:32 scale Ansaldo 'Baby'
DocRob replied to sandbagger's topic in LSM 1/35 and Larger Work In Progress
Very nice, I like the contrast between shining material and dull surfaces, as it makes figures look so much more realistic. I have the German Naval Crew from Copper State Models and will add these to my actual Hansa Brandenburg built. As there are no paint suggestions, I will store your depiction in mind. Cheers Rob -
Nice save, do you Future the canopy parts before? I do it almost always and had no probs with fogging, no matter what glue I used. Cheers Rob
-
Das Kamel - Hansa Brandenburg W.12
DocRob replied to DocRob's topic in LSM 1/35 and Larger Work In Progress
Thanks Gaz, as mentioned above, it was the 'I chickened out solution' , but definitely looks more realistic. Cheers Rob -
Das Kamel - Hansa Brandenburg W.12
DocRob replied to DocRob's topic in LSM 1/35 and Larger Work In Progress
The engraved result, gives a way better look of a spring, but with a real spring you can improve it even more. The diameter of the spring would have to be 1,4 mm then. First I was thinking about producing my own springs from soft, thin wire, but decided against. As you can hopefully see on the pic, these valve cylinders have the attachment nob casted on the underside. If you use a spring, you will need to use an axle for the spring, which is drilled into the cylinder block, which you have to fill in advance. Otherwise the tiny rocker arms, which are exposed to damage after mounting the engine, have no real hold. Too me that seemed too much work, with a too fragile result. Cheers Rob
-
Das Kamel - Hansa Brandenburg W.12
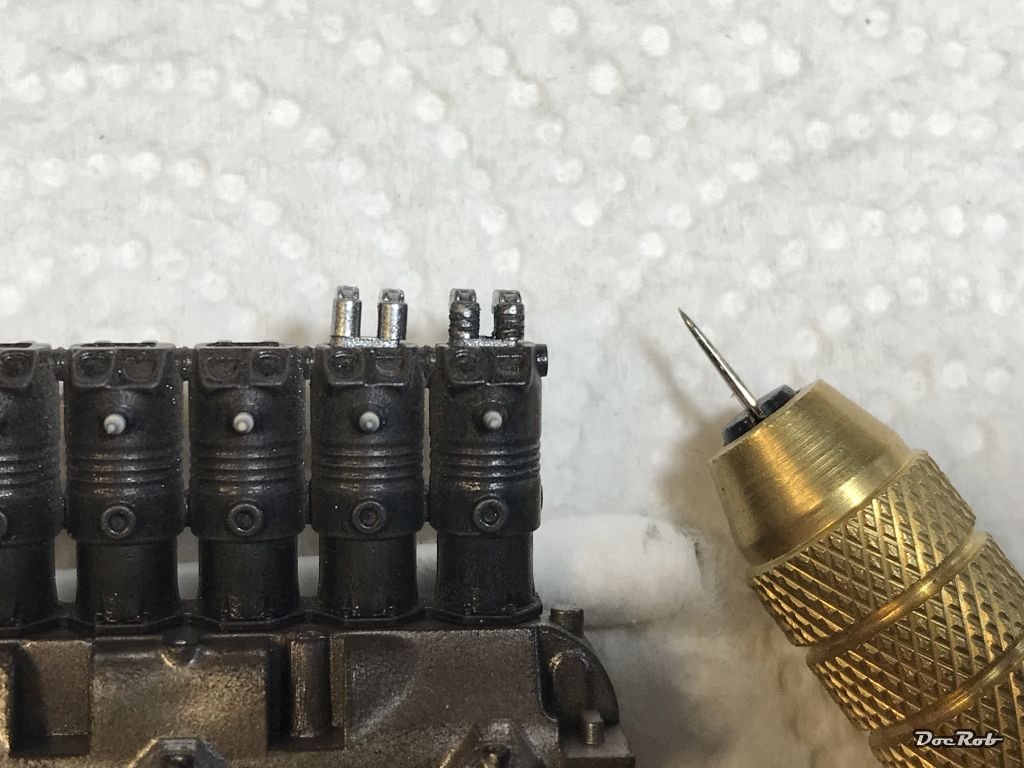
DocRob replied to DocRob's topic in LSM 1/35 and Larger Work In Progress
Today there is only a little update due to heavy swimming and watering the garden in the heat, but to me it's an important one, as I didn't like the WNW solution for the valve springs not at all, and these are on top of the engine in undisturbed eyesight on the finished kit. I took my engraving needle and scratched fine lines into the plastic cylinders and rubbed some steel pigments on and then a black panel liner. To my eye this looks more than a spring, than the WNW attempt and I hope the next ones will be a little finer engraved. Five minutes of work per one valve set, voila. Left WNW kit supplied, right as mentioned above. Cheers Rob