DocRob
-
Posts
7,127 -
Joined
-
Last visited
Content Type
Profiles
Forums
Events
Gallery
Everything posted by DocRob
-

GWH Hawk 81C AVG decals. 02/18/23
DocRob replied to Clunkmeister's topic in LSM 1/35 and Larger Work In Progress
Great start Ernie and the first motel build, I follow. You should look outside if one of the vending machines has some un-chilled Tamiya Extra Thin to sell. Cheers Rob -
Great progress Kevin, the base looks super cool with the rich varnish color. Would have been great, if the base color had matched the deck color, but anyhow the S-100 on its base has noble looks. Cheers Rob
-
ProModeler 1/48 PBY-5A Catalina + Goodies, RFI
DocRob replied to CANicoll's topic in Let’s Get Wet Group Build.
The only 'reference' I have is the Revell 1/72 boxing of a PBY-5A, a kit designed by Academy. It looks like this, hmmh. Cheers Rob
-
ProModeler 1/48 PBY-5A Catalina + Goodies, RFI
DocRob replied to CANicoll's topic in Let’s Get Wet Group Build.
Sometimes I have to smile, when you all comment about delivery times. I know, having to sign can be a pita, but delays of one day or so, that's so first world . That is no critique of you Chris, it's more being desperate about my situation, where the last delivery from England took about a month to get here. This is no exception, it can take up to three weeks to get a packet from the Spanish mainland and sometimes, if the sending company chose the wrong transportation company the stuff goes to Madrid and will be returned to sender. Once in a while, little miracles happen, like a parce from Japan, which got here in six days. There are goods though, which are not possible to deliver to my island, which means, they will be sent to our sons in Germany and picked up on one of the rare occasions, one of us is visiting Berlin. That's why we normally travel first class, with 40-60kg of luggage, at least the way back. Island life, I'm not complaining and of course, I see myself some years ago living in Berlin and waiting eagerly for a package overdue one day . I have nothing to share about filling panel lines due to the lack of experience, but what about the layout of the given ones. I'm no PBY expert, but to me they look totally off. I see no sense for applying panel on the real thing, looking like that and they match in no way what is fabricated onto the rest of the fuselage. Cheers Rob -
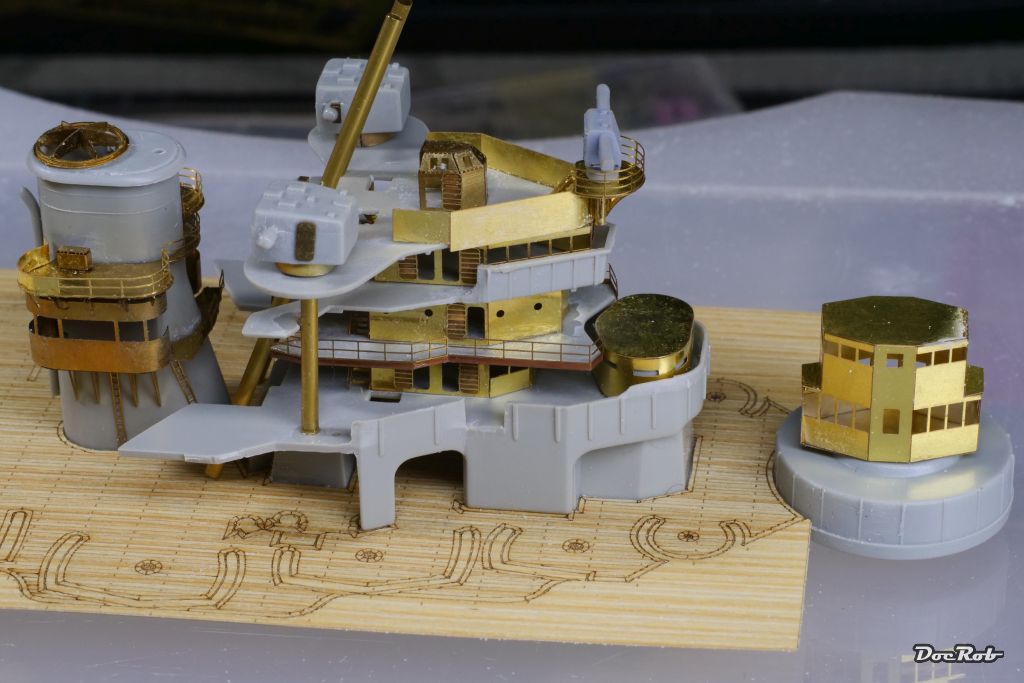
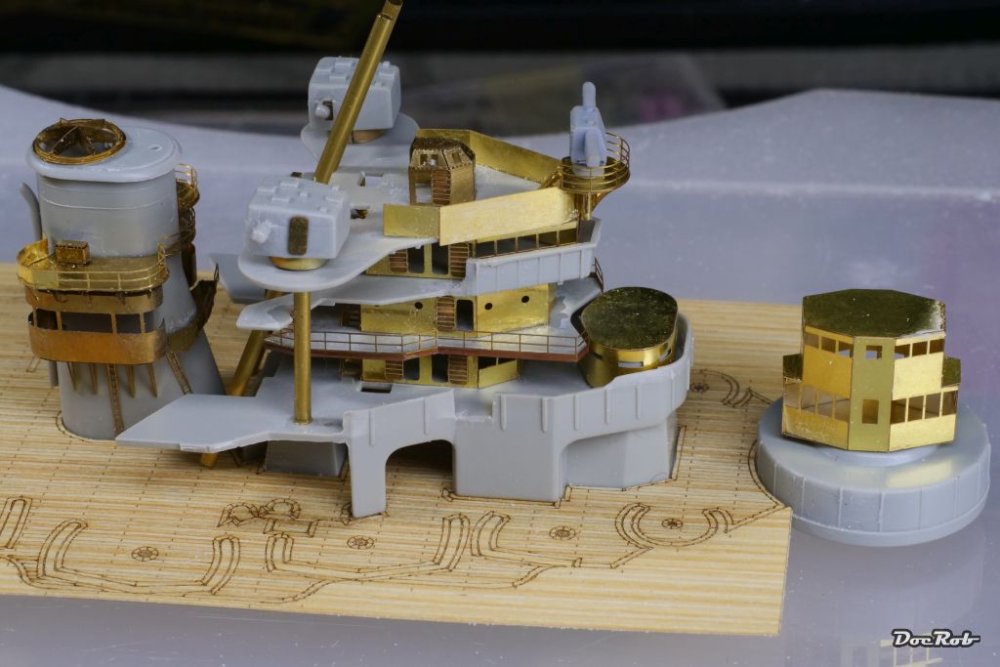
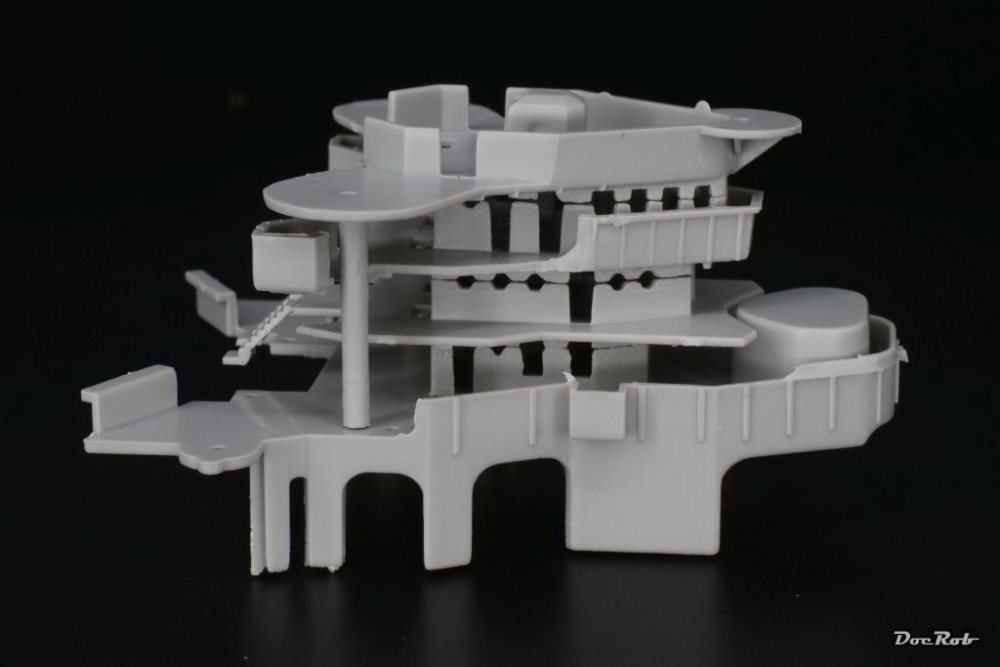
Doesn't look like much, but I worked a lot on these subassemblies, put in the brass columns for the rangefinders, rectified the angle of the top deck (sweat) and am about to determine the location points of the brass columns for the flying bridge, which I pre-assembled and left it on the turret base. There are no location marks on the plastic deck, nor the wooden deck, but some measurements in the manual. I re-cut the places of the wooden deck, where the superstructure and the funnel will be placed, because I will not remove the un cut carrier film before the final assembly stage. The upper and the underside of this deck and the deck below, where cleaned of all casted structures, to accept their PE substitutes later. I used every tool able to cut plastic to do this, Dremel tool with different saws and grinders, cutter, chisel, scalpels, micro saws, you name it. My bench is powdered now with plastic scrap and needs to be cleaned before I continue. Cheers Rob
- 329 replies
-
- 13
-

-

-
- uss arizona
- eduard
- (and 1 more)
-
Thank you Chris and Mike, the PE-work is tedious, but mostly has been satisfactory. It's the little and unexpected things, which make me cursing. There are peaceful hours of building and then there is a tiny part to add, nothing complicated, but it jumps off the tweezers, after finding it, glues everywhere, except where it should, you know the game. The other issue is rigidness, with all these tiny parts, it's difficult to touch the sub assemblies without damaging them. Cheers Rob
- 329 replies
-
- 5
-
-
- uss arizona
- eduard
- (and 1 more)
-
I have to admit, I don't like the pipe cleaner spray results too much. The effect doesn't look right to my eye. That along with the difficulties, spraying around curved or hard angled contours, makes it a no use technique for me. With my last Corsair build, I was at the same point thinking about how to tackle this kind of camo, which in my case was tri tone. After some consideration, I tried to freehand the borders and this worked astonishingly well. Of course, I needed some correction spray passes, but was satisfied with the relatively sharp corner achievable with heavily thinned AK lacquers and a spraying angle, slightly away from the color border. It needs a bit of concentration to get it right and it's very easy to ruin the paintjob with one pull on the trigger. Thank you for documenting this technique Bill and showing us the bare results to judge. BTW.: Nice fix with the cowling, seemingly a neuralgic point with radial driven planes. It looks good now and I guess, the brass pins make it very durable. Cheers Rob
-
LSM Modelling News 2023 merged Fran and Artful69’s threads
DocRob replied to Fran's topic in Modelling Discussion
AK is announcing three different new Landrover 88 kits in 35 scale. Cheers Rob -
Exactly Peter, you put my workflow in one sentence . Sometimes I think, fuzzy logic was developed with my brain as a template . Poco a poco is the motto here. Cheers Rob
- 329 replies
-
- 3
-
-
-
- uss arizona
- eduard
- (and 1 more)
-
LSM Modelling News 2023 merged Fran and Artful69’s threads
DocRob replied to Fran's topic in Modelling Discussion
Well nice, but... ...Italeri Cheers Rob -
I used to be an engineer with a solid education and practical skills in metallurgy in a former life. No margin for poof though . Cheers Rob
- 329 replies
-
- 2
-
-
- uss arizona
- eduard
- (and 1 more)
-
Thank you Phil, I used Pledge sometimes with PE, when I had flat surfaces to attach. Here the mating surfaces are mostly very tiny and I trust CA a bit more. I use two types, a thin fast curing and a gel like slower bonding one. Cheers Rob
- 329 replies
-
- 2
-
-
- uss arizona
- eduard
- (and 1 more)
-
They might have taken it from the Javas, those scrap collectors might have visited the earth sometime. Decaling looks great. It seems even more tedious, than stenciling a Mig-31. I never thought that possible. Cheers Rob
-
Thank you Maru, I do love these thingies too. It's the second I built and that says it all, as I'm not a friend of redundance. And there is more. Tamiya gave us one of the best plastic kits ever made with the gullwing series. They are a pleasure to build and a perfect and sturdy canvas for advanced painting and weathering techniques. Cheers Rob
-
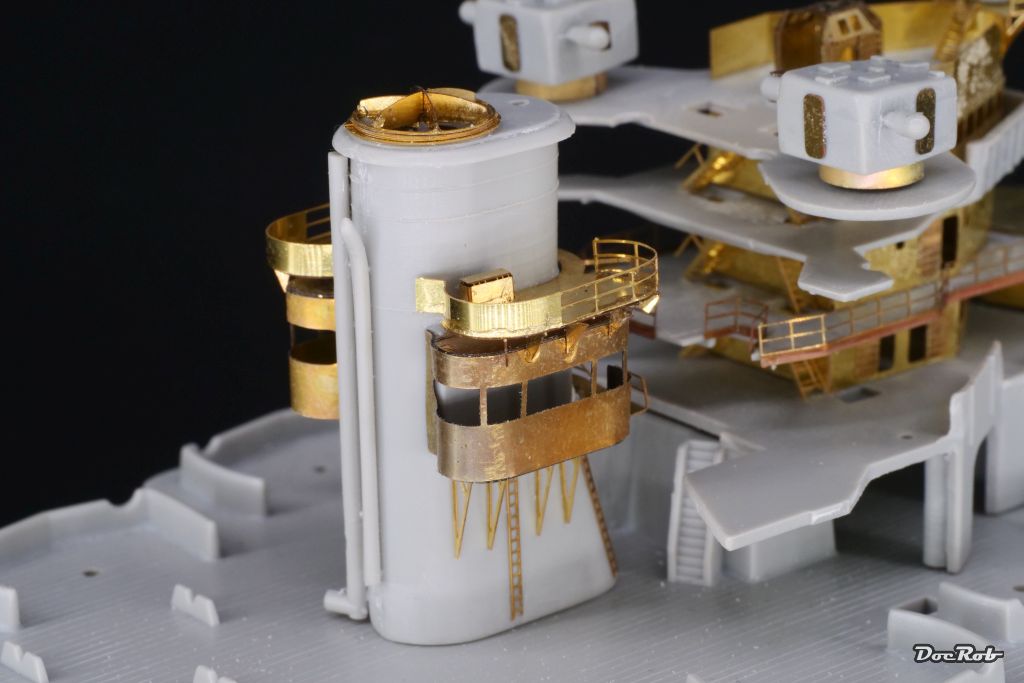
I continued with the funnel, another delicate construction. The casemate housings on the side where annealed for easier bending the radii. Luckily the PE parts are very well designed and the general fit is great. The Eduard manual lacks a bit especially with continuation. The exhaust hole on top was drilled out, using my relatively new Tamiya conical file for the first time. A great tool, which will also help a lot for my wooden ship builds. Cheers Rob

- 329 replies
-
- 15
-
-
-
- uss arizona
- eduard
- (and 1 more)
-
Thank you mis amigos, had the same thoughts, but wanted to advance the build a bit further, before bothering with the decks. I considered cutting the decks into smaller pieces, as well as cutting through the carrier film for dry fitting. This will be neccessary to determine, which components can be installed prior to the decks. Peter, I think I will hide the underwater section exactly where it belongs, under - acrylic - water. Since a long time, I wanted to try a water dio and it is more fitting, as I have figures for the Arizona. Cheers Rob
- 329 replies
-
- 4
-
-
- uss arizona
- eduard
- (and 1 more)
-
Thank you Peter, with a little bit more of progress, I will prime this section and put some color on. Let's see, how it shows afterwards. I started with the superstructure, because I was not sure how to tackle the decks building and painting sequence. The problem here, the wooden deck is adhesive and there is no way to test fit it. Some of the on deck components need to be glued into place and painted before applying the deck, others need to be added later. Before installing the deck, I have to decide, how I want to display the model and depending on that decision, I have to paint the hull first. I'm leaning towards an acrylic water base, only to hide the abysmal propellers, shafts and rudders. Decisions, decisions,... Cheers Rob
- 329 replies
-
- 4
-
-
- uss arizona
- eduard
- (and 1 more)
-
Thanks for the cheers, Carl, I will need them. From the start this project feels uncomfortable and I'm working on getting into some kind of groove with the build, as is usual with more demanding projects, where I focus after a while of irritation. I guess there are differences with the PE on our projects. With the Vosper, the added PE is more in the detail work, where it is more structural with the USS Arizona. In the end it doesn't matter, both are demanding projects, which keep you on the heels. Cheers Rob
- 329 replies
-
- 4
-
-
- uss arizona
- eduard
- (and 1 more)
-
Looking at your pics, there is no trace of the difficulties you had, except the culprit's shot Peter. The airframe under primer shows all the distinctive lines of a Kingfisher and you could only guess, it's an ancient kit. Good to hear, you found a second kit soon, but I'm a bit jealous about that too. When I make a mistake or forgot to buy something for a project, it's minimum two weeks of waiting until the goods arrive. Cheers Rob
-
ProModeler 1/48 PBY-5A Catalina + Goodies, RFI
DocRob replied to CANicoll's topic in Let’s Get Wet Group Build.
I'm with Hubert, these panel lines are really ugly and don't fit the look of the rest, but worse, they look totally sci fi to me. There is no sense in the layout, technically. Pics may prove me wrong and I'm not an expert, but they cry for filling and rescribing / riveting. Cheers Rob -
What is on your bench right now ? Share a picture :)
DocRob replied to Martinnfb's topic in Modelling Discussion
Your foiling job turns the plane into something magic, Gary. One day, I have to try it. Cheers Rob -
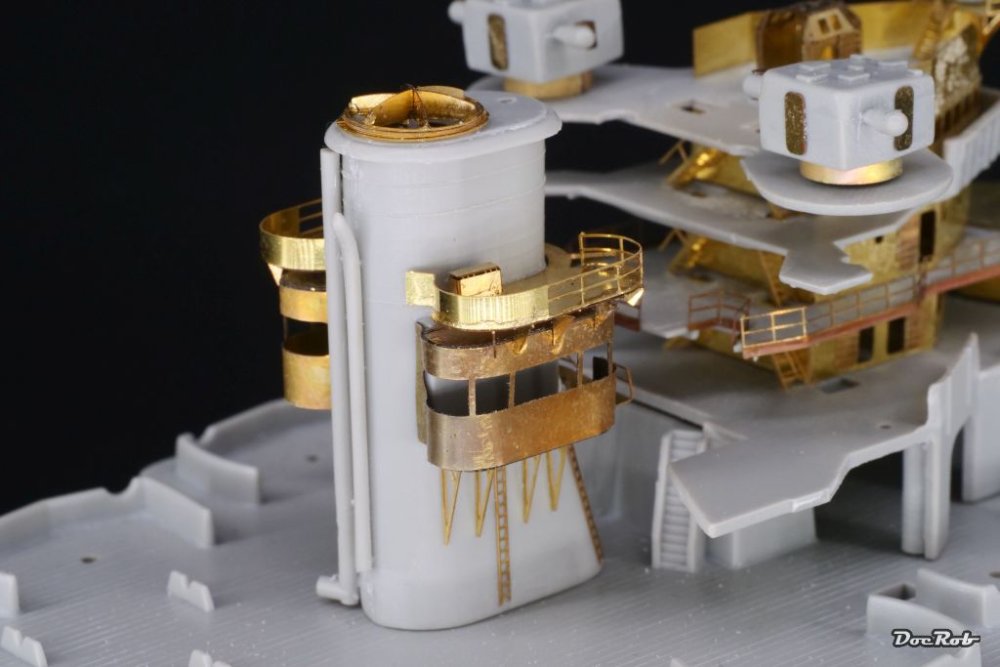
Thanks Hubert, you picked out the meanest angle, which luckily doesn't show that dramatic with the real eye. I add two brass columns later under the rangefinders and hope, I can correct this, as you said. Cheers Rob
- 329 replies
-
- 2
-
-
- uss arizona
- eduard
- (and 1 more)
-
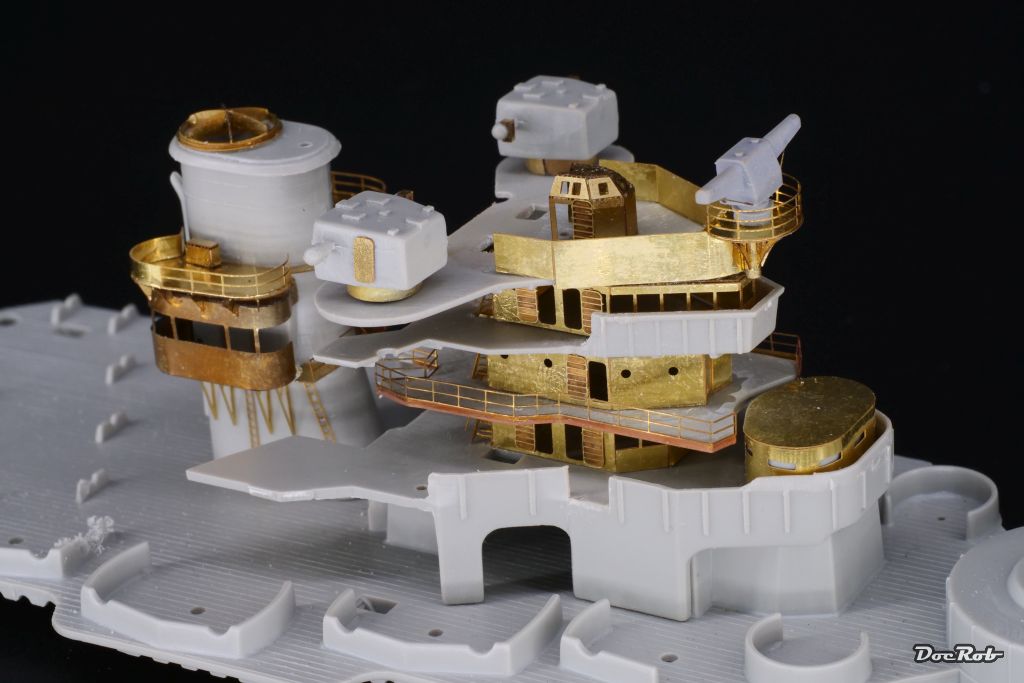
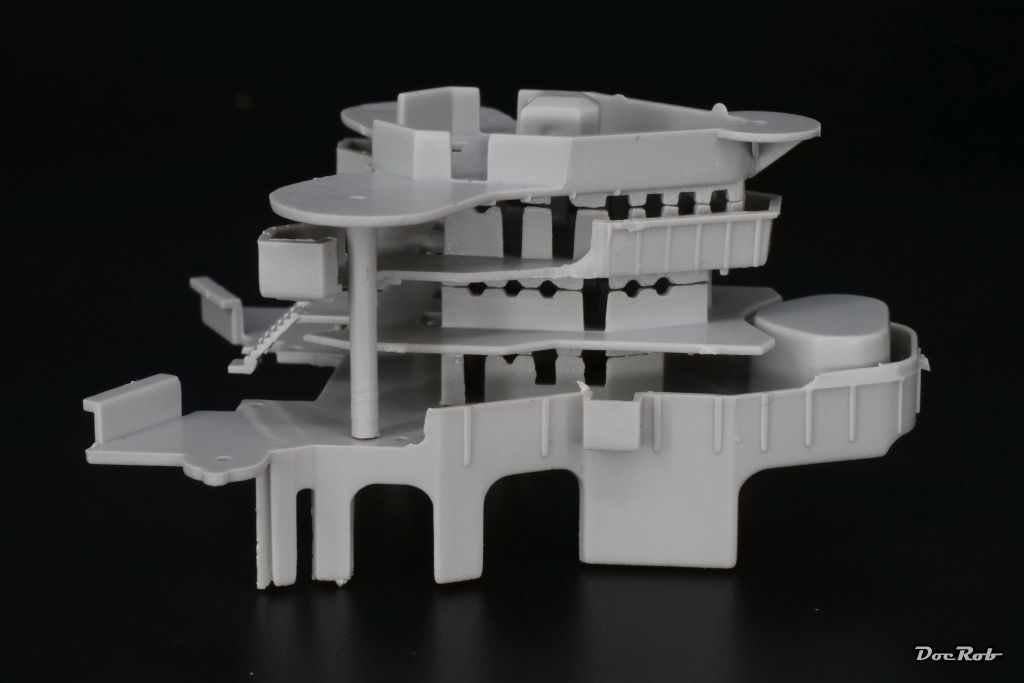
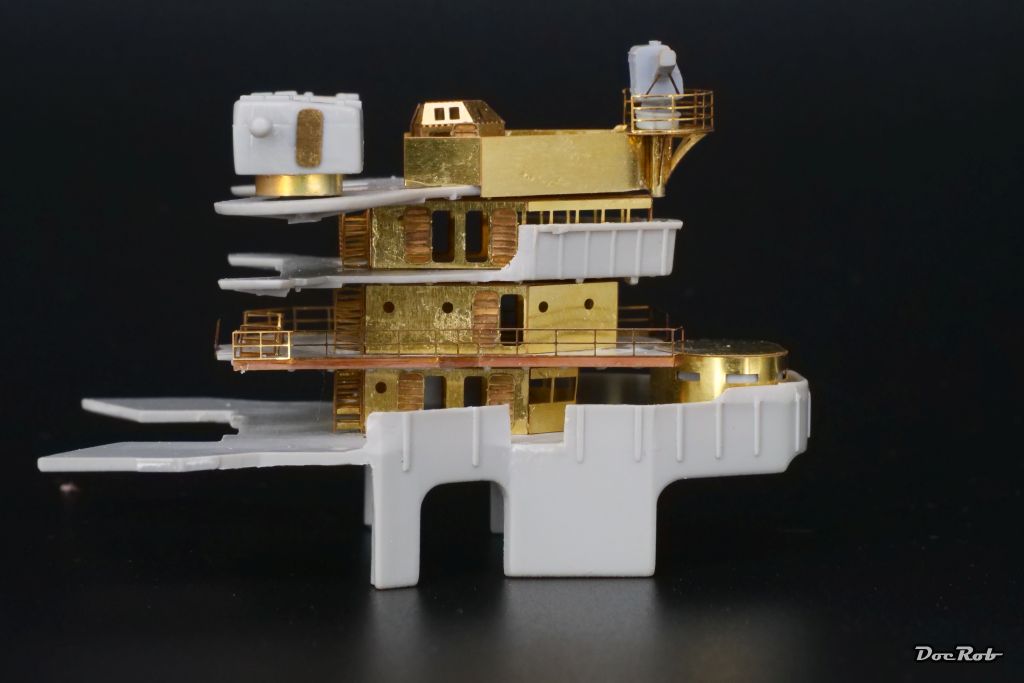
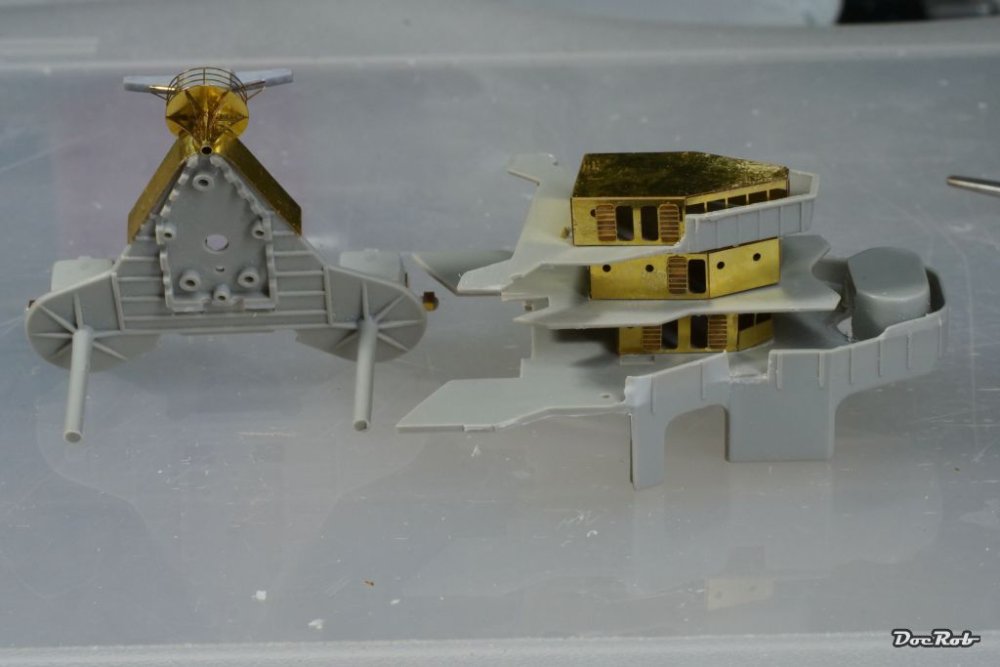
I ran in some trouble again with the build up of the superstructure, as I realized, al compartments folded from PE have a 'roof'. I hadn't checked it and left a bit of the structure on the underside of the platforms as a guide line for the compartments. This was easy fixed for platforms one to three, but the top one was already finished with fragile PE and printed parts. On the pic you can see the underside before surgery. Somehow I managed to get rid of the plastic without destroying the assembled parts, using a bench full of tools. Dabbing the sweat from my forehead, I continued with building up the superstructure, which is only stacked on the above pic. Platform by platform, I continued, until this was done according to the manual. I hope all 'connections' to other component fit, which is very difficult to check beforehand. Now this is what I achieved, I'm not entirely satisfied, but I'm still completely out of my comfort zone with this build. Slightly strange angles only depict the state of the art of American engineering scale wise . After: Before: (Find the 1247 differences ) Cheers Rob

- 329 replies
-
- 8
-
-
- uss arizona
- eduard
- (and 1 more)
-
Wow, Carl, what a beauty - err - -ful build and paint/decaling job. The Falcon looks hyperspace ready. Cheers Rob
-
Modeling and photographing are both passions of me, so feel free to write your thoughts about both, Peter. I have to admit, that I became sloppy when it came to digital photography and my old exploring spirit of analogue times never recovered full. I still experiment a lot with photography, but documenting my modeling steps, with the camera, I'm often a bit lazy, when it comes to perfect lighting, the best aperture or even the best setting and I never post process my pics, except for size reduction. The X's and O's of photography are still etched into my DNA, but I would need more time to regain the experimenting spirit, I had earlier. Quality photography is important, documenting work in modelling, I think, because it's the only way to explain or judge, except using words. Cheers Rob
- 329 replies
-
- 2
-
-
- uss arizona
- eduard
- (and 1 more)