DocRob
-
Posts
7,127 -
Joined
-
Last visited
Content Type
Profiles
Forums
Events
Gallery
Everything posted by DocRob
-
There is no verdict on this build until now. Your choice isn't too abstract at all, Hubert . Cheers Rob
- 329 replies
-
- 2
-

-
- uss arizona
- eduard
- (and 1 more)
-
Great pit Gus, the detail painting is amazing. The rave about these Tamiya kits is only part of the thing. There is no margin for fail with these kits, as they are so beautifully engineered and nope, I don't want to put any pressure on you Gus . Cheers Rob
-
 The dust off really payed, Ernie. Congratulations to your epic Helldiver. Love the result and there is a lot of detail to catch the eye. That's what I like about these huge two / three seaters in navy livery. It's made for a purpose and you can't oversee it, as your model shows exactly these qualities. Cheers Rob
 -
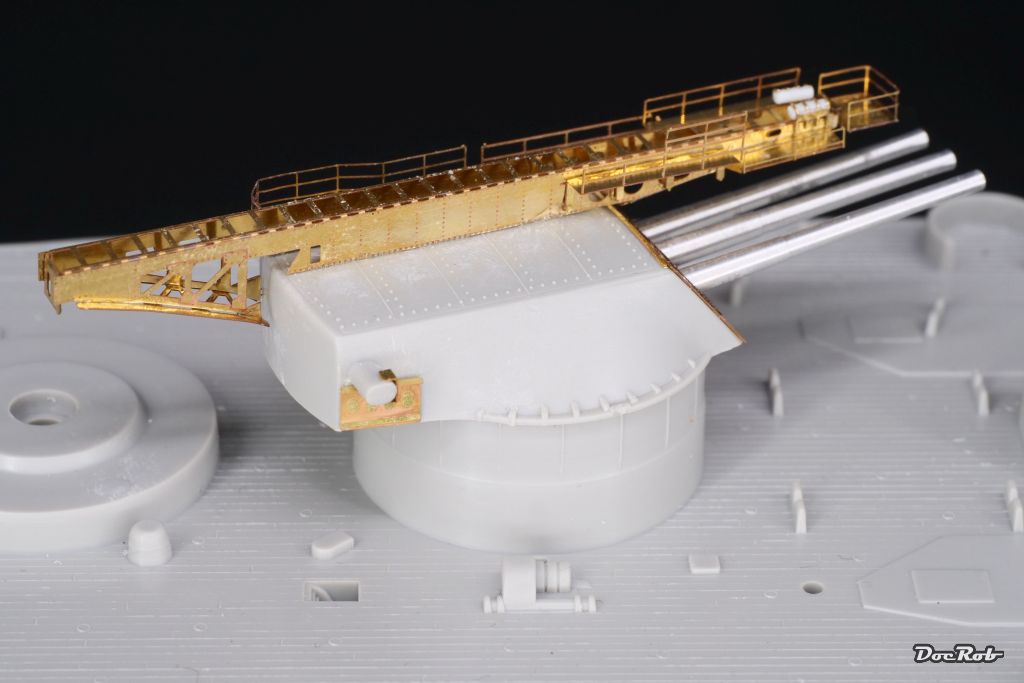
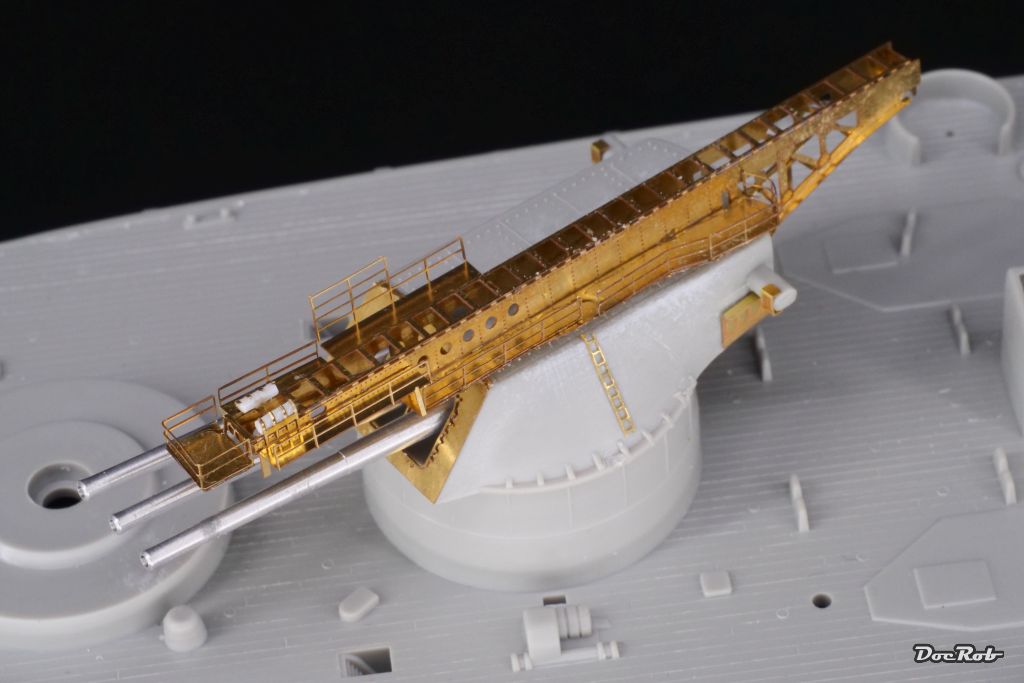
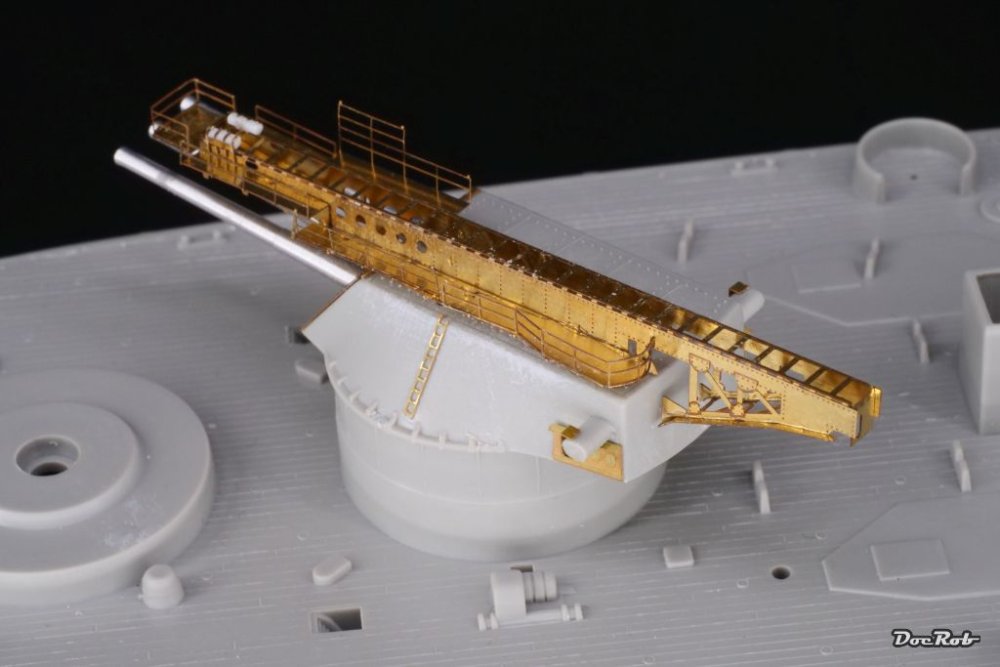
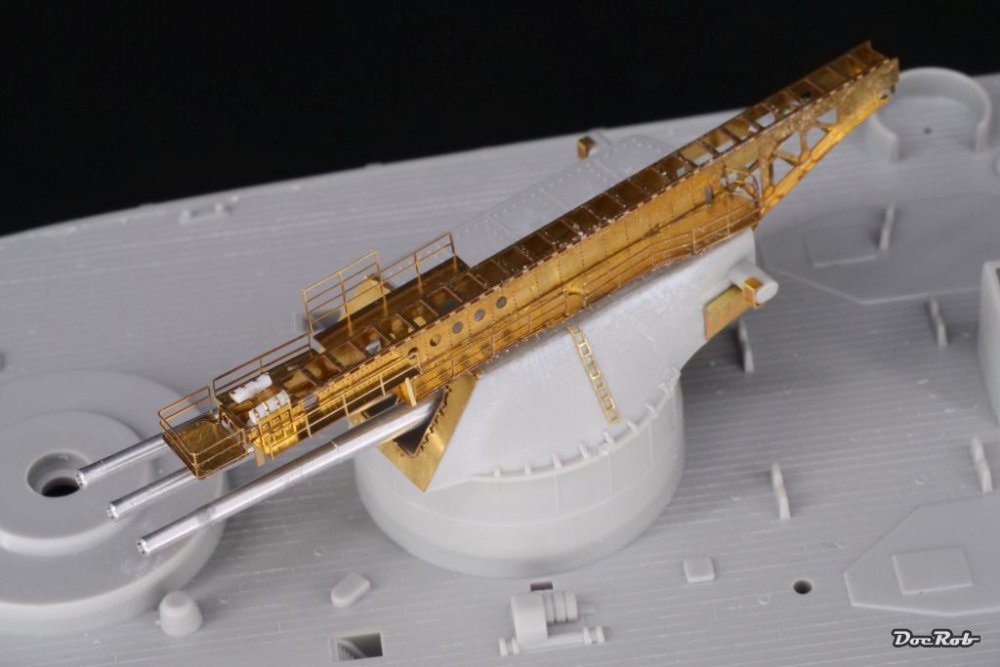
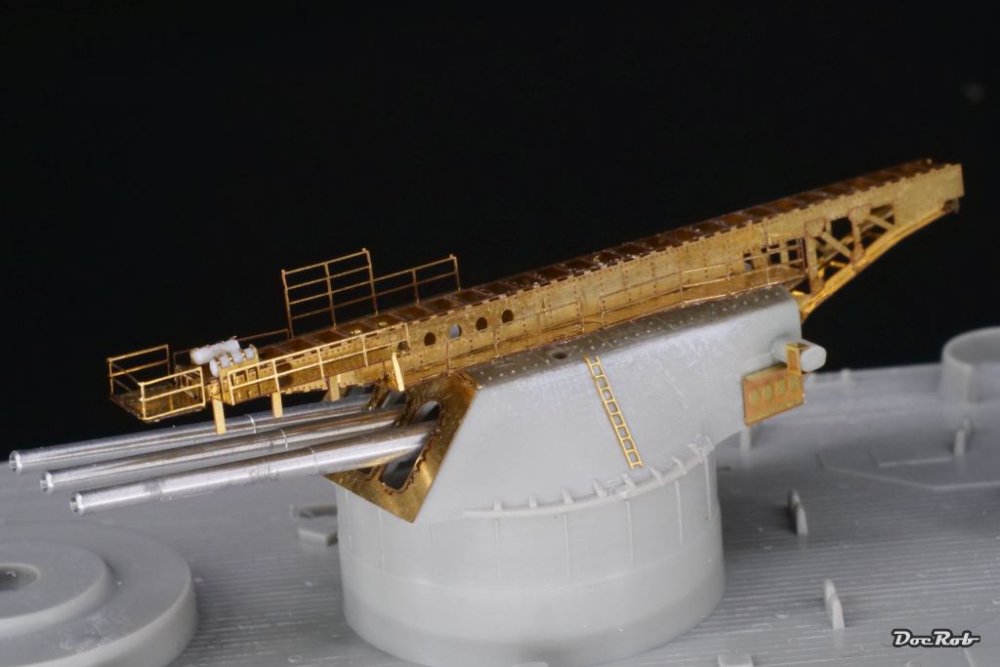
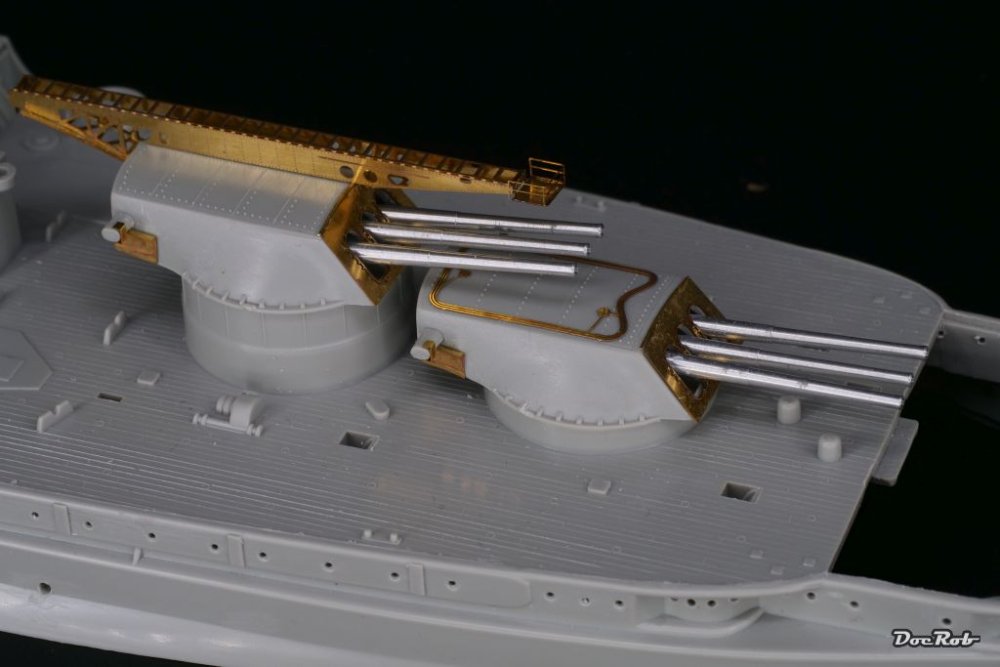
Thank you Phil, I continued with the PE and as far as it works, it has a relaxing component, but I fear, there will be issues later. I hope, I do not blow away half of the detail with the airbrush later. I finalized the first catapult today, where a ton of parts went in. This is mounted on turret #three and is luckily the more complicated of the two catapults, which sent the Kingfishers skywards. Cheers Rob

- 329 replies
-
- 11
-
-

-
- uss arizona
- eduard
- (and 1 more)
-
Your pile of hyperspace junk, called Falcon looks absolutely stunning, Carl. I love how you apply the fading and weathering effects, errr, wait, is there weather out there ? They could take your model and finally make a decent movie with it. Cheers Rob
-
Do your magic on the Friedrichshafen Ernie, what a great plane with the wood and cloth finish to replicate. I'm waiting my last wanted kit from WNW to materialize, the Albatros B.II, with a vague similar appearance sans floats. Cheers Rob
-
What is on your bench right now ? Share a picture :)
DocRob replied to Martinnfb's topic in Modelling Discussion
Not necessarily Gary. I used monofilament line threaded through brass tube, then looped through the eyelet and back through the tube. It's a close fit and holds alone through friction, when pulled taught. A final drop of CA and everything is fixed and is a strengthening part of the assembly. Cheers Rob -
F-82 G Twin Mustang 1:48 "MODELSVIT"
DocRob replied to Sasha As's topic in LSM 1/48 Work in Progress
Great work Sasha, the twins look good, I really like the way you built and painted the wheel wells. Cheers Rob -
And others: | Hannants Cheers Rob
-
I don't know, which ones you are looking for. Hannants (reliable), has three sets in stock in 48 scale. Hannants - Plastic model kits and accessories Cheers Rob
-
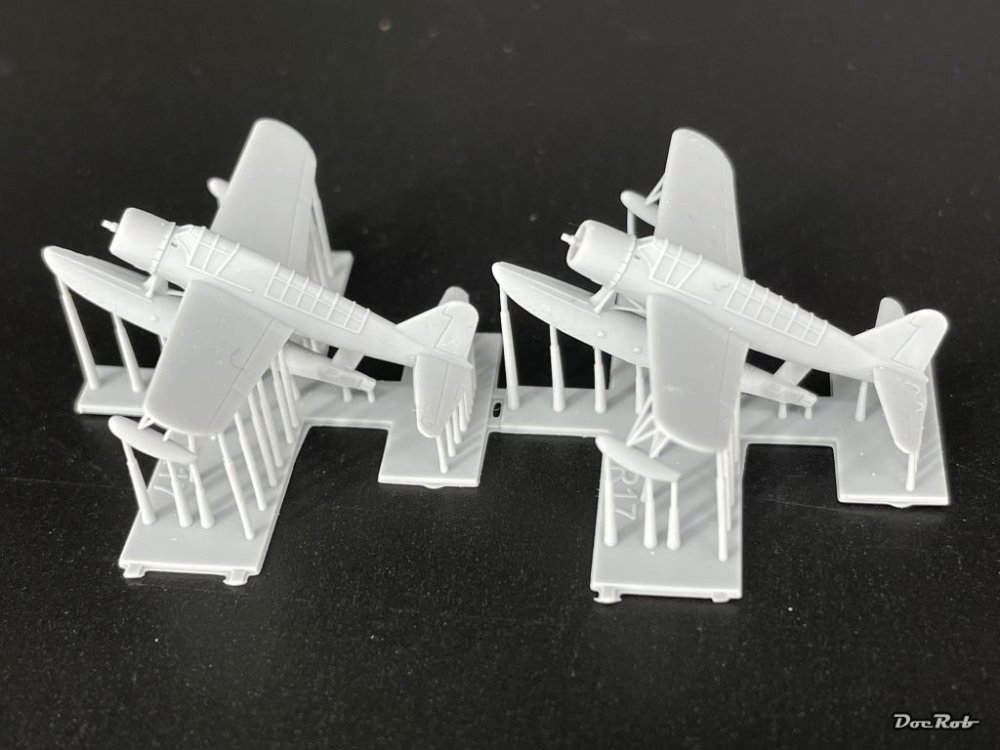
Nope, I thought about sculpting some, but found many pics without. I will spray the inside of the turrets black and that's it. Cheers Rob
- 329 replies
-
- 6
-
-
- uss arizona
- eduard
- (and 1 more)
-
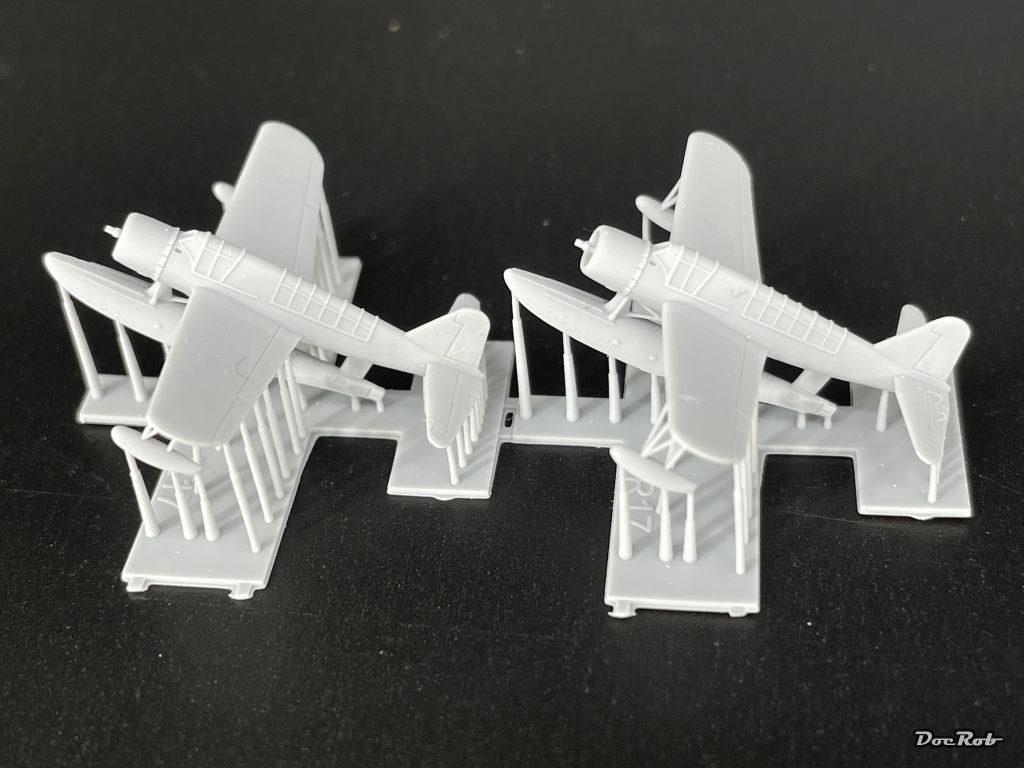
She's starting to look seriously like a Kingfisher, Peter. There is so much nice work made by you, beginning with the detailed interior. For a kit this old, you let the aged plastic shine through your build. Cutting masks for all these panes is a pain, but using the template is a good idea, as the panes are rectangular and you don't risk to scratch the clear part with a blade going the wrong way. I like your decision, to go with a yellow wing scheme. Cheers Rob
-
Thank you Gary, there is some more work needed on them, but what an improvement over the original plastic. Cheers Rob
- 329 replies
-
- 3
-
-
- uss arizona
- eduard
- (and 1 more)
-
Thank you CANicoll and Kevin, I will try the tips from both of you, as I have some PE scissors and sharp bladed cutters. I don't think, the cardboard /glass combo will work with the ultra fine railings and I doubt my hand is stable enough to cut them loose with a scissor or cutter either, but for other parts this might work perfectly. I have a Japanese grindstone with two different grains, to re-sharpen my blades. Cheers Rob
- 329 replies
-
- 5
-
-
- uss arizona
- eduard
- (and 1 more)
-
Thank you Hubert, I think, cutting and sanding will come first and rebuilding and putty only second, thanks to many PE parts substituting the plastic. I wish, could be so confident like you. Until now, it's an experiment for me. Cheers Rob
- 329 replies
-
- 5
-
-
- uss arizona
- eduard
- (and 1 more)
-
Thanks Peter, but it might be the other way around . Cheers Rob
- 329 replies
-
- 2
-
-
- uss arizona
- eduard
- (and 1 more)
-
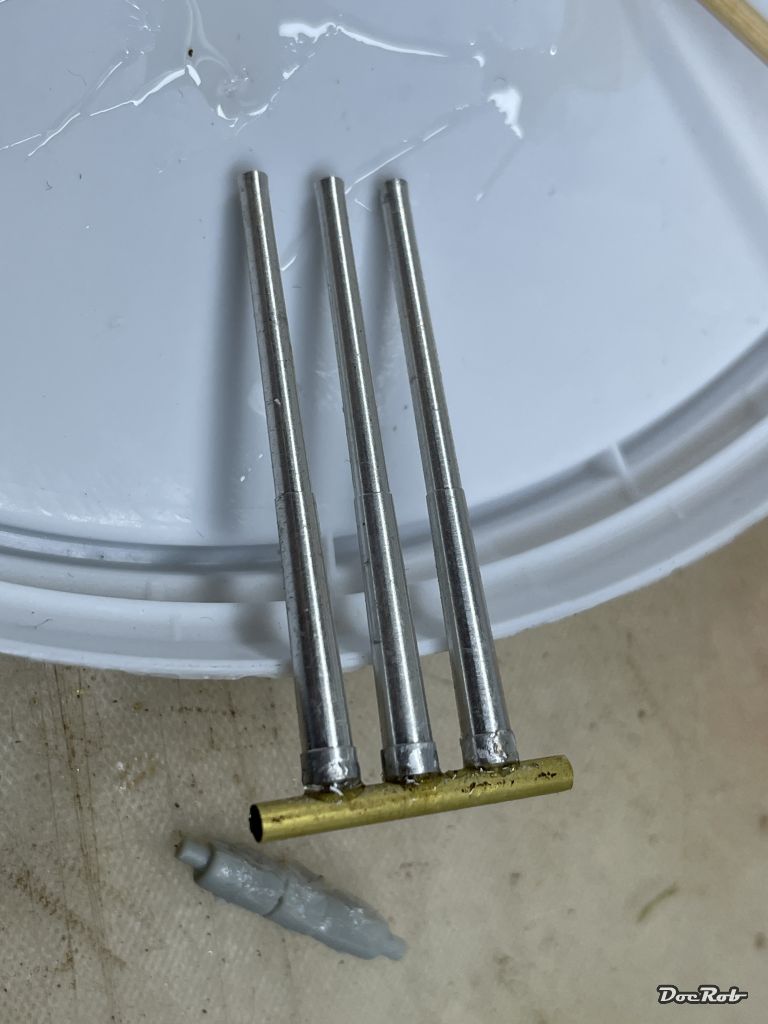
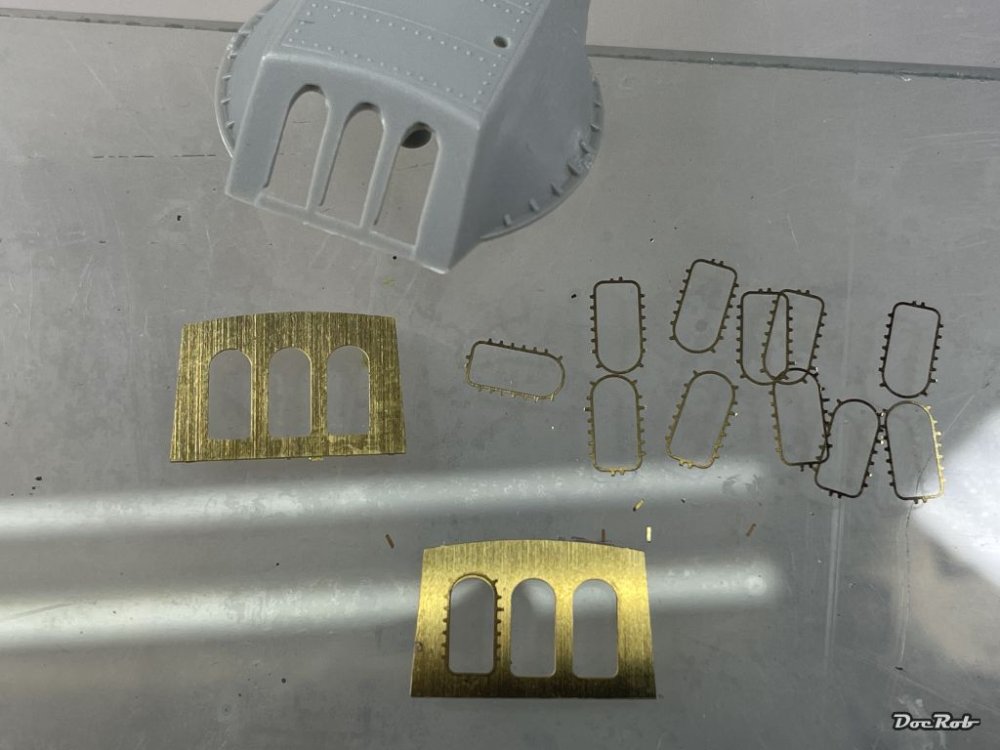
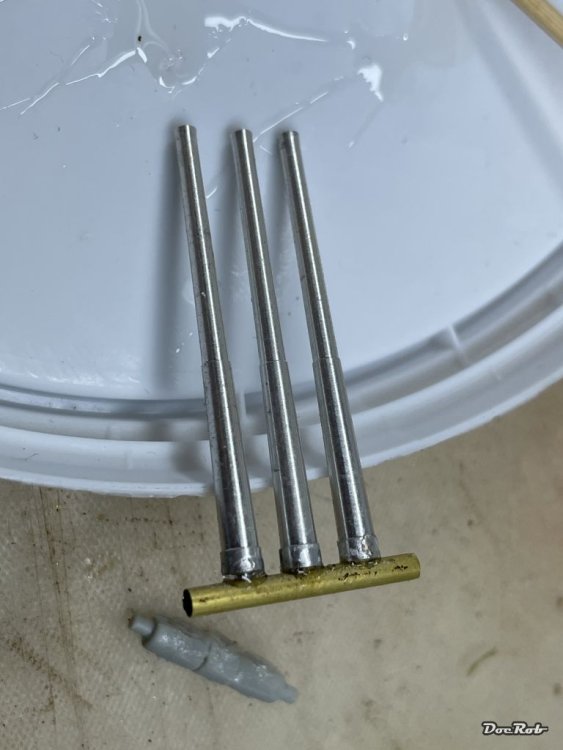
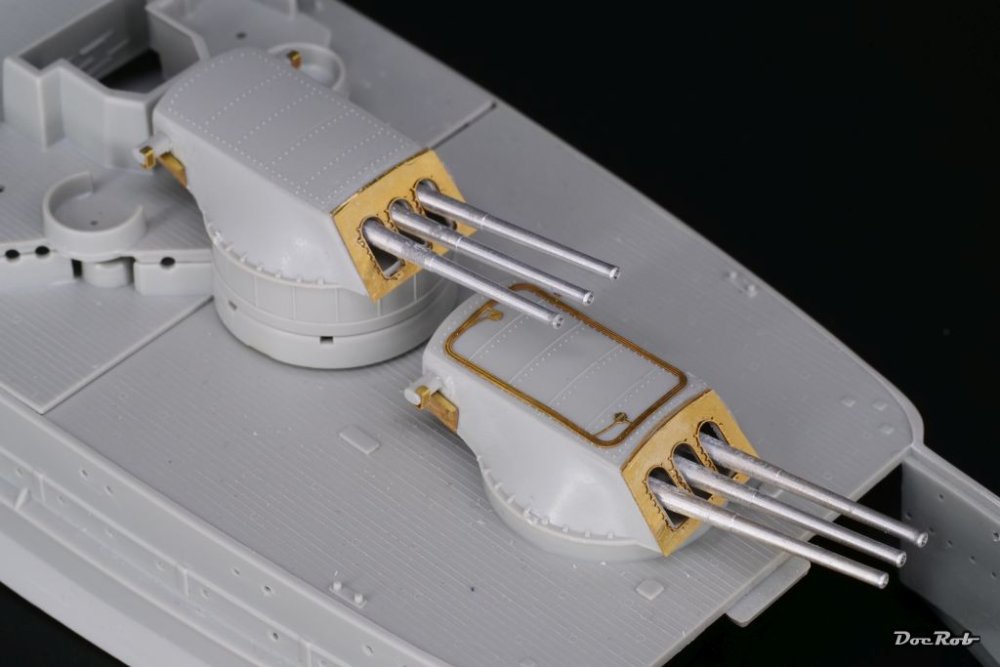
Progress is slow, even slower due to different issues. First, I discovered, there are only nine bollards included instead of sixteen. I mailed to the Eduard helpdesk and they reacted promptly and said they sent the rest, so i hope they will show up soon. I started with the turrets, where the manual is a it irritating, because there are three different types of turret assemblies out of four. There is some very delicate PE to add. For cutting PE, I use a sharp blade normally on a hard plastic tile, but with the superfine borders of the gun openings, I cut on a glass pane, because there is less deformation, but obviously it's not good for the service life of the blades. The second issue I ran in, where the plastic parts, which hold the barrels in the turret. They didn't fit well with the openings in the front shields and in one case adjustment wasn't enough and I had to make a new bed from drilled brass tube The basic equipment on the turrets is finished, except some very delicate railings, which I will add later, along with PE ladders. I started to build up the catapult for turret #3, but it is only fitted loosely for the picture. The front turrets: Cheers Rob
- 329 replies
-
- 15
-
-
- uss arizona
- eduard
- (and 1 more)
-
Thank you PW, I'm not sure about the future of this one either. I do like to challenge myself, but why tormenting . Earnestly, I had the plan to build a 1/350 ship for a long time with PE and extras, so I will try to stay in it. Cheers Rob
- 329 replies
-
- 3
-
-
- uss arizona
- eduard
- (and 1 more)
-
Never would have imagined the difference, Carl. I have to order some of these bolts. Cheers Rob
-
1:32 Tamiya Mossie FB Mk.VI with the whole enchilada
DocRob replied to JayDee's topic in LSM 1/35 and Larger Work In Progress
There is no Quinta set for the Mossie to my knowledge. Yahu panels look great, but not overly correct . With my recently finished Corsair build, I used a pimped version of the kit plastic and not the Yahu one I bought. The layout was mainly ok, but they use yellow color for the dials often and it doesn't look real. The other issue with Yahu is, it's only the IP and you have to match all the consoles to the Yahu's look, too limiting for me. Cheers Rob -
Let's hope so Carl, like you, I haven't built any ships except wooden ones, where I feel more homely now than with this one. Maybe we should leave it to the next generation . All the extra goodies look good in this box. Yesterday, I checked a lot of historical pics, which luckily showed no blast bags, no untalented sculpting needed . I still have to see about the instructions Phil. Typical Eduard style, but they proved a bit vague in some aspects. ...and that's only the beginning Scott. elbow grease will be needed for the next steps. Yesterday, I checked the underwater accessories, like shafts, props and rudders and started thinking about a dio in the water . Luckily in this case the PE and printed parts are no AM Mike, as they were included in the kit. Without the stuff, I wouldn't have attempted the build. I read about the base kits shortcomings before, but was negatively surprised on inspection of the real thing. Cheers Rob
- 329 replies
-
- 4
-
-
- uss arizona
- eduard
- (and 1 more)
-
Somehow your heli skipped my attention Mark. Your cockpit looks absolutely great and I think it will be very visible and an eyecatcher in the end. Cheers Rob
-
Nice work on that dinosaur Gary. We had rubber bands, when I was a kid and I knew how to use them and not only to snap someone in the head in school . Cheers Rob
-
Nice Carl, good idea with the bolt heads, noted . Cheers Rob
-
I'll ha I'll have a peek at your color scheme, to get mine right for my USS Arizona build, albeit about a 100th smaller . Cheers Rob