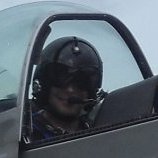
joeg Posted December 27, 2021 Posted December 27, 2021 Here are some pics of my Special Hobby Westland Whirlwind Mk. I that I finished yesterday as P6985 HEoJ of 263 Squadron as it flew from Exeter in March of 1941. The Model was built mainly oob except some improvements in the cockpit area where I added stringers and longerons as these are really obvious on the real thing and not represented in the kit. Furthermore I didn´t like the shape of the propeller blades as I think they were too pointed. I corrected thes by bending stretched sprue around the oute lines and sanded the blades to my liking. The kit goes together quite well although the wingtip navigation lights were nerve wrecking to fix as the flipped off the model several times and the carpet monster eagerly grabbed for them. I opted for the colour option as offered in the kits decal options but refused the kit instructions three times: 1. In my opinion the right elevator undersides were not black as per instructions. Obviously Special Hobby refers to a picture of HEoJ banking to the right and revealing its undersides that are painted as per Nov 1940-Apr1941 directive with the port wing black. Though the starboard elevator seem to be black this is probably the shadow of thelarge fin and rudder covering this area. Second I liked the idea of the bright undersides not to be painted Sky Type S but instead BS381 (1930) No 1 Sky Blue as proposed by Paul Lucas and JOn Freeman in their On Targed Special No 2 "Britain Alone". Also as a third point I referred to the same source be painting the spinners and fuselage band RAE Sky Blue a very light, nearly white hue. As for paints I used enamels from WEM, Xtracolor and Humbrol. The panel lines and scruffy appearance were obtained using school water colours after which a coat of semi gloss varnish was applied. The codes and roundels were painted on with home made masks. After the varnish oil and exhaust stains were applied. I am not too happy with the port spinner staining that -though simulating an leaking propellor governor- is slightly exaggerated. You might notice the oil dripping onto the port wheel. No aftermarket parts were used. I hopeyou like it, enjoy. Cheers Joachim 12 2
Bomber_County Posted December 27, 2021 Posted December 27, 2021 Stunning Joachim, this is the first SH I have seen completed. Did you have any WIP on this ?………love the weathering, depicts perfectly a plane in front line service. Congrats….. 2 2
joeg Posted December 27, 2021 Author Posted December 27, 2021 Thanks....well there are but these were made from my cellphone ..so not the best quality. 10 1
Bomber_County Posted December 27, 2021 Posted December 27, 2021 Thanks, some very nice detail. How did you find the kit as a whole…….? 2 1
joeg Posted December 27, 2021 Author Posted December 27, 2021 It was a nice and straightforward built. I encountered no problems. 5
DRUMS01 Posted December 27, 2021 Posted December 27, 2021 Wonderful build and presentation. Thanks for sharing it with us. Ben 5 1
HubertB Posted January 1, 2022 Posted January 1, 2022 Excellent work and result Joeg ! Love it ! Hubert 3 1
Peterpools Posted January 2, 2022 Posted January 2, 2022 Joachim Terrific build - your Whirlwind looks fantastic. I do have the kit and have yet to open the box but down the road, will be building it for sure. I am surprised that SH did not include stringers and longhorns in the cockpit area as they seem so pronounced. Nice to know you didn’t encounter any building issues and only a few incorrect details. Thank you for the build photos as they are an excellent source details for others who will be building their Whirlwinds. Keep ‘em comin Peter 2 1
joeg Posted January 2, 2022 Author Posted January 2, 2022 Hi Peter, thanks for the kind and encouraging comment. I hope you found some inspiration from my build. As you can see, SH have done some longerons and cross sections and at first I thought these would do it for me. But after checking my referrences I realized that these were much more prominent on the real thing and so I decided to add these from scratch. The rest of the build was pretty straightforward although the undercarriage is a bit fiddly. Cheers Joachim 2 1
Peterpools Posted January 2, 2022 Posted January 2, 2022 Thanks Joachim Much appreciated Keep 'em comin Peter 2

Recommended Posts
Create an account or sign in to comment
You need to be a member in order to leave a comment
Create an account
Sign up for a new account in our community. It's easy!
Register a new accountSign in
Already have an account? Sign in here.
Sign In Now