DocRob
-
Posts
7,041 -
Joined
-
Last visited
Content Type
Profiles
Forums
Events
Gallery
Everything posted by DocRob
-
The normally well informed and reliable MBK (modellbau-koenig.de) of Germany has informed it's customers in their blog on 02.02.22, that Bronco has paused their production. MBK is not expecting deliveries from Bronco and don't know, if this will be temporarily or permanent. Clearance Sale – Bronco Models (modellbau-koenig.de) I think it's time to secure me a Seehund Cheers Rob
-
Thanks for the encouragement Kent. I riveted sometimes on parts of builds, but never a full plane. Maybe the Henschel is a good starting point. Cheers Rob
-

Done - F-4EJ Kai Phantom - The Last of it's Kind ZM 1/48
DocRob replied to DocRob's topic in LSM 1/48 Work in Progress
Thanks Gaz, but there can be only one 'last' Kai Phantom . Earnestly, I've seen some pictures of finished builds. It seems that these Japanese Phantoms are quite popular among modelers, given the short timeframe since their release. Cheers Rob -
Done - F-4EJ Kai Phantom - The Last of it's Kind ZM 1/48
DocRob replied to DocRob's topic in LSM 1/48 Work in Progress
Thank you Kent, with the Kai Phantom it was somewhat different to other builds, the construction to painting/masking/decaling ratio was well out of bounds, with pure building time taking between 10-20%. Thank you Kai, I agree about the Japanese liveries, which are vivid and tasteful to my eye. The Kai Phantom will be a rare detour in your main field of action, jets. My next jet might be a ME-262 or maybe a bottle rocket like the Fly Natter. With these, I can read the stencils at least . Cheers Rob -
Thank you Kent, the riveting is visible on your pic of the underside. I will consider going this route, having not a lot of experience with riveting. Cheers Rob
-
Love your build, keeps me in the loop with mine . Fantastic building, painting and weathering. Do you think the riveting payed off after painting? I really would like to know, if I have to go this route too. Cheers Rob
-
Done - F-4EJ Kai Phantom - The Last of it's Kind ZM 1/48
DocRob replied to DocRob's topic in LSM 1/48 Work in Progress
Muchas gracias amigos, when I saw the yellow version announced, I thought, it would be even more eye catching. In the end, I really like the glitter blue metallic, which alters the appearance in different light conditions, very appealing. @Peterpools, I have no idea, what caused the fogging, clearly it is no masking glue residue, as it is from the inside. Next time, I will dip m canopy in Future, to see if it helps. This time, it was not possible, because of the way, I painted masked and polished the canopy. I believe the fogging is caused by hotter colors / thinner. This is my first plane build, where I used Tamiya lacquer paints with levelling thinner and Tamiya LP and Mr. Hobby GX100 clear coat. @Bomber_County, what's next? Good question Phil, I'm not decided yet, maybe the F1 McLaren, but that's a lot of decaling with all the carbon and ads. At leas in F1, there are not many stencils, as the pit crews seem to know their manuals . But first, I have to do some long overdue wood conservation on the ceiling of my cave, which means, I have to clean the bench first . Cheers Rob -
Bring 'em on Peter, definitely lovely kits. I will not spent the dough for a Hiro kit and will preferable build one or two Tamiya 1/12 F1 kits. Like you, I have the Brabham and I may add the Renault RE-20, which will be re-released by Tamiya this year. Cheers Rob
-
Done - F-4EJ Kai Phantom - The Last of it's Kind ZM 1/48
DocRob replied to DocRob's topic in LSM 1/48 Work in Progress
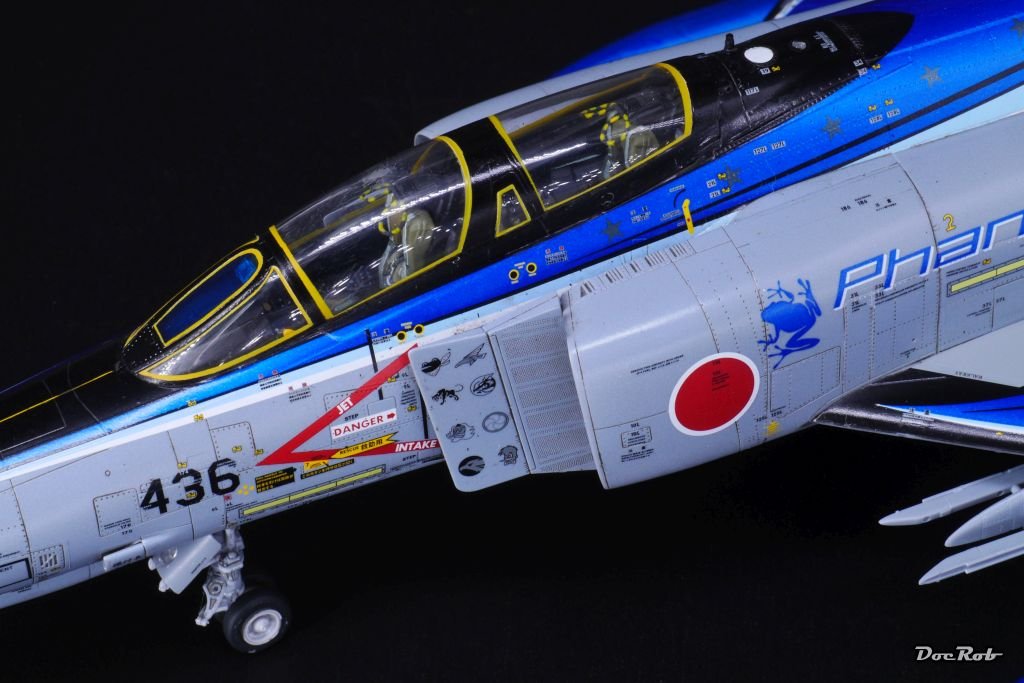
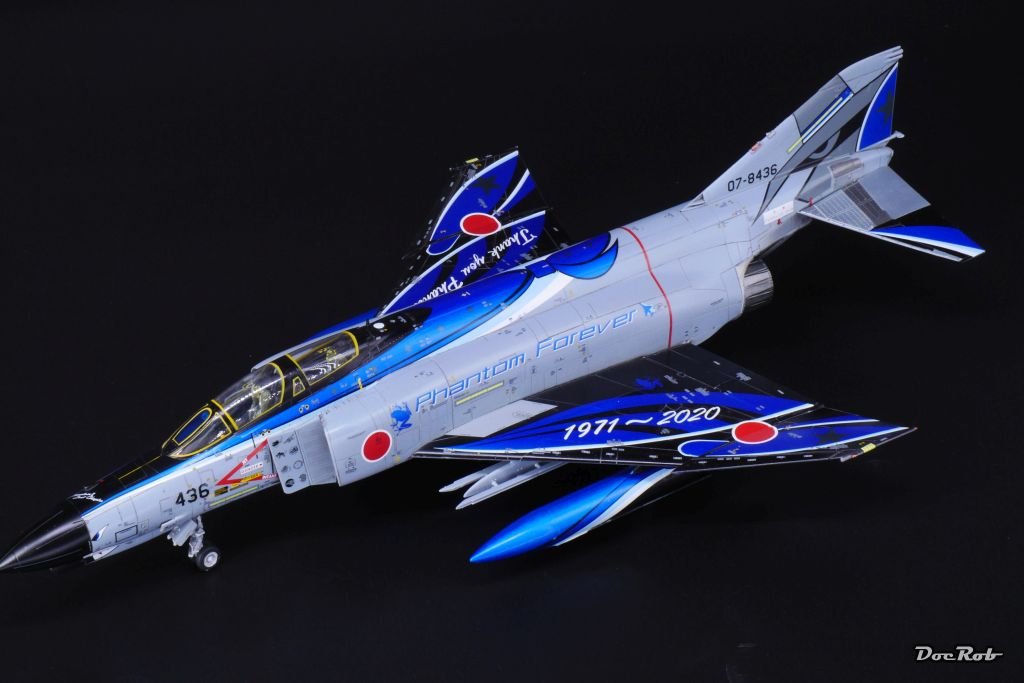
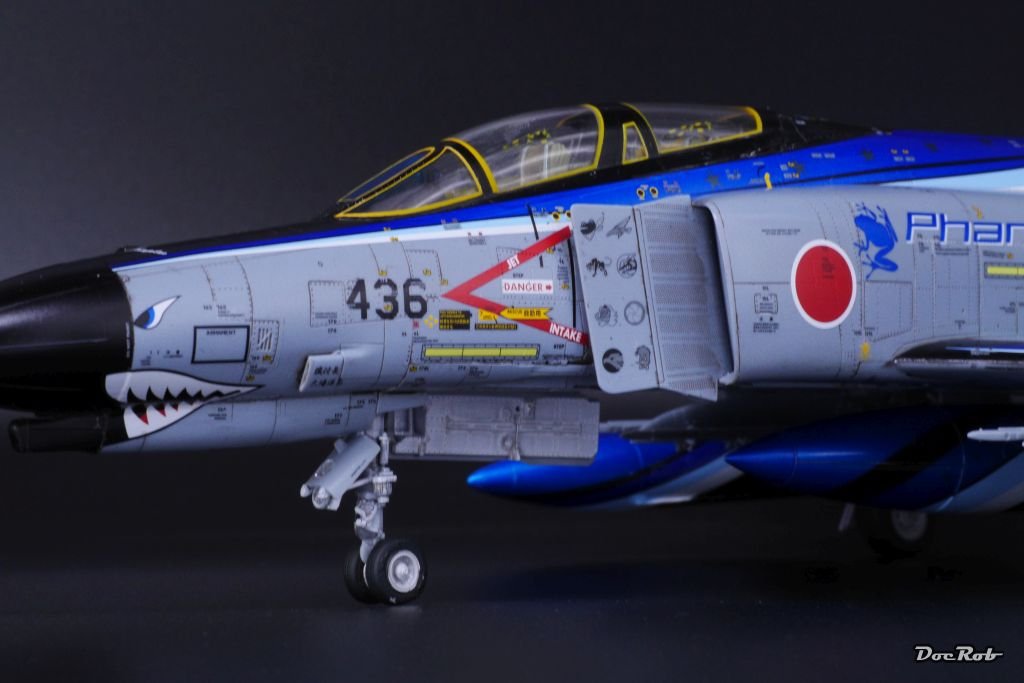
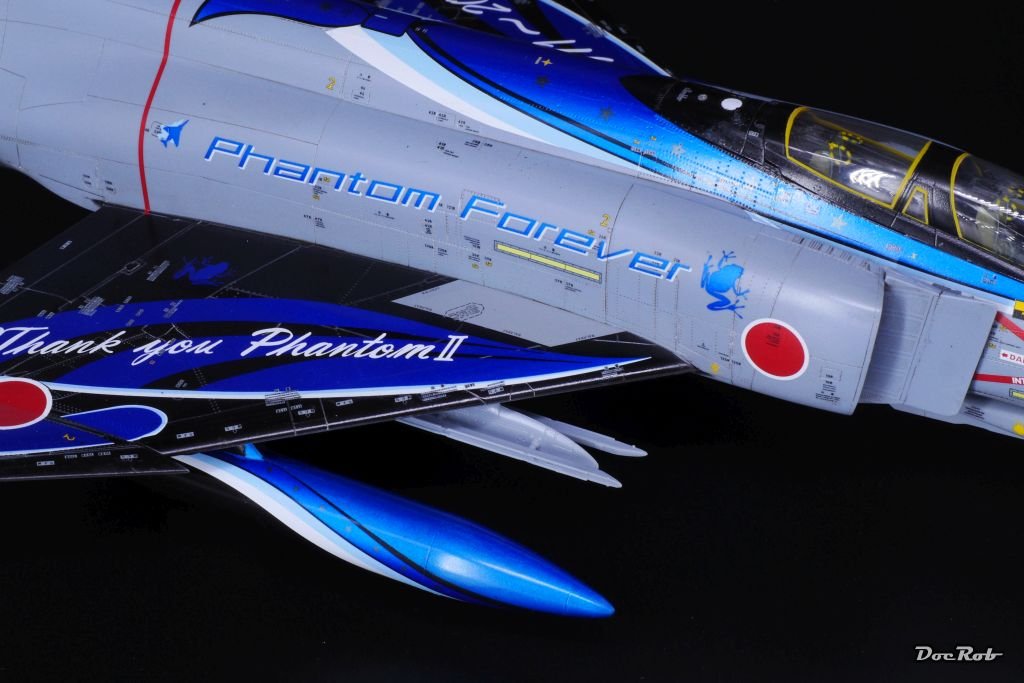
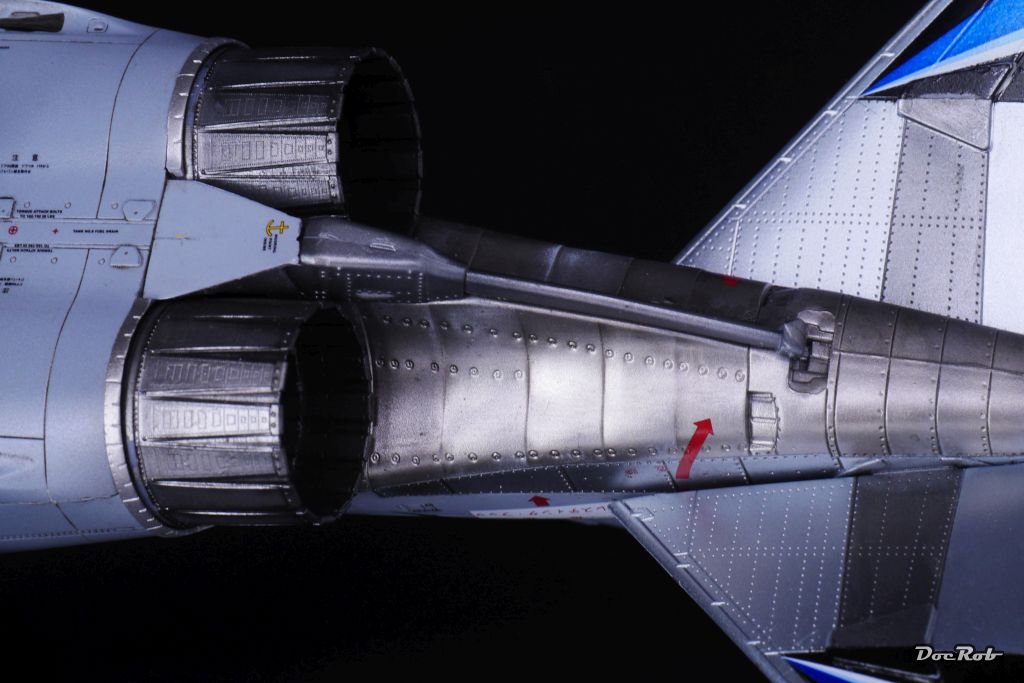
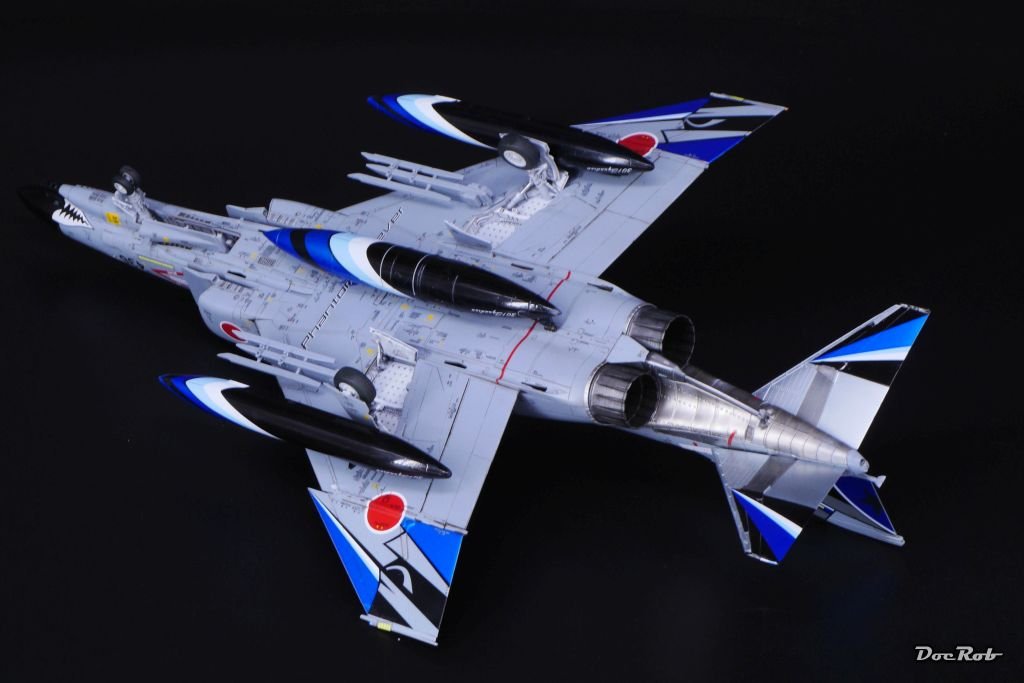
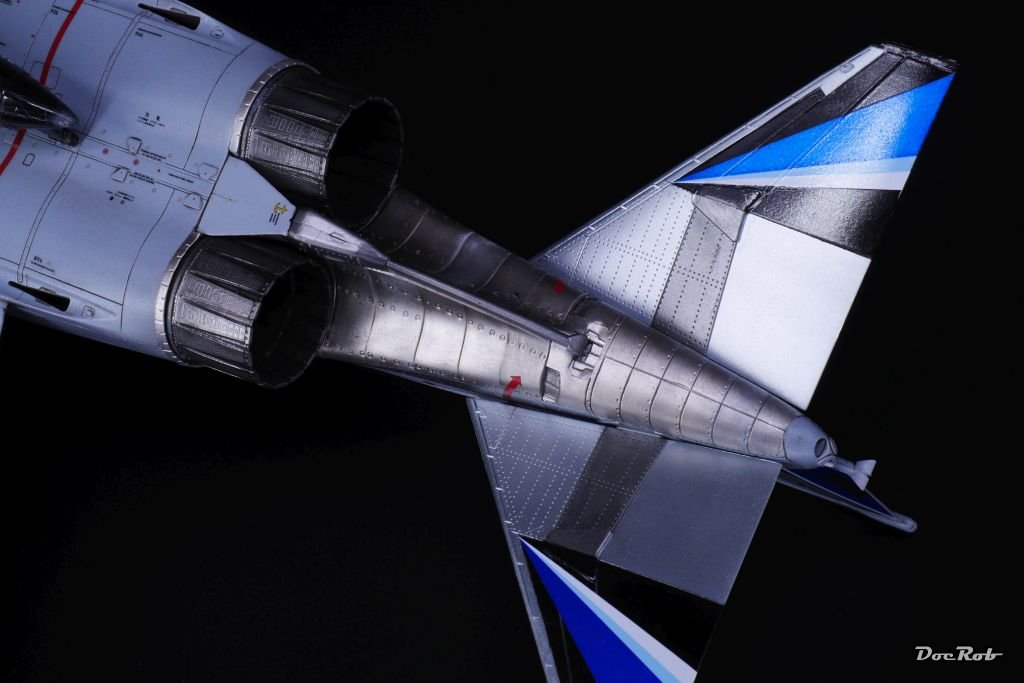
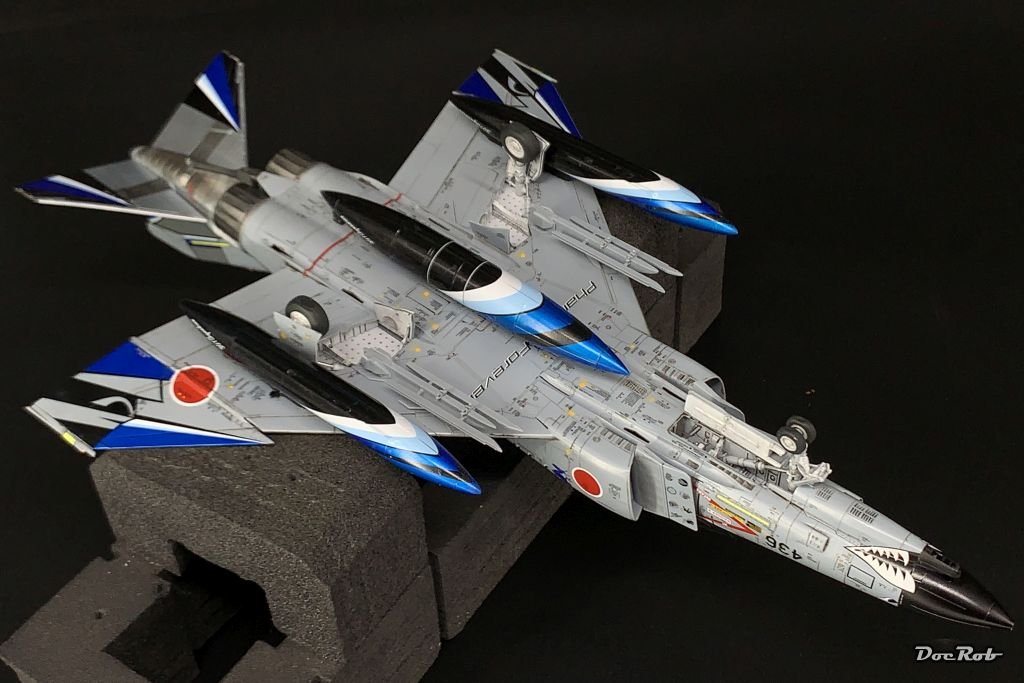
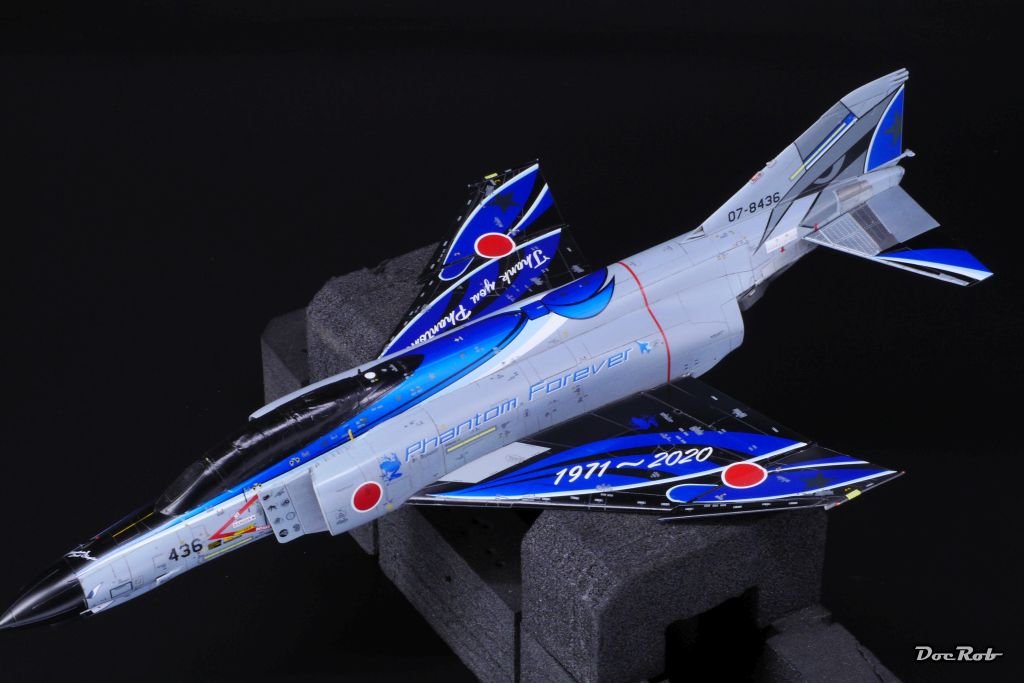
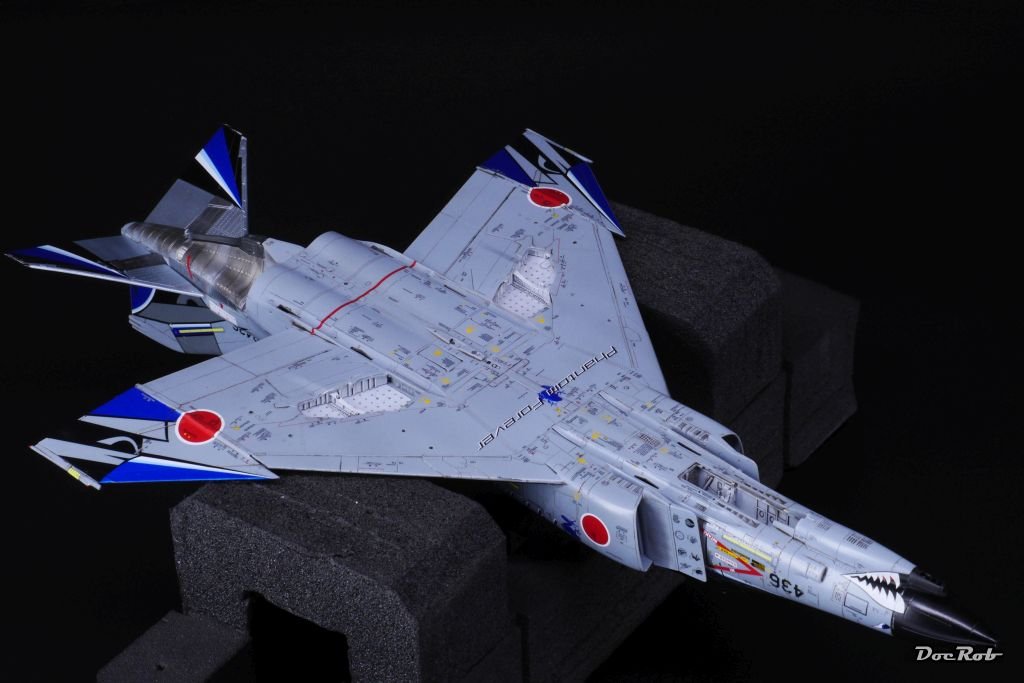
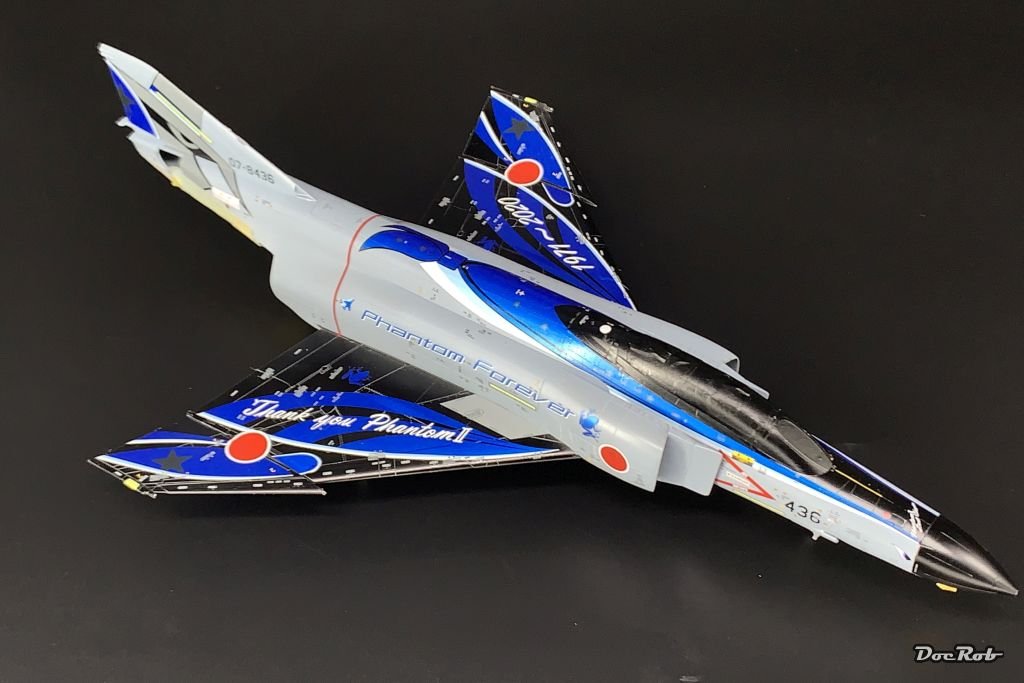
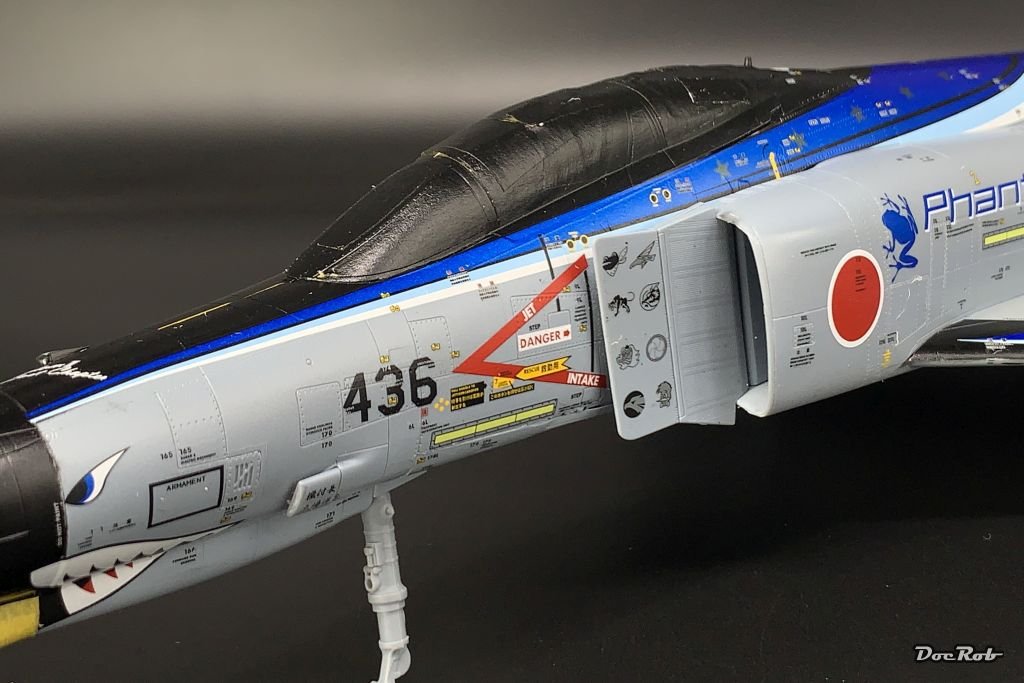
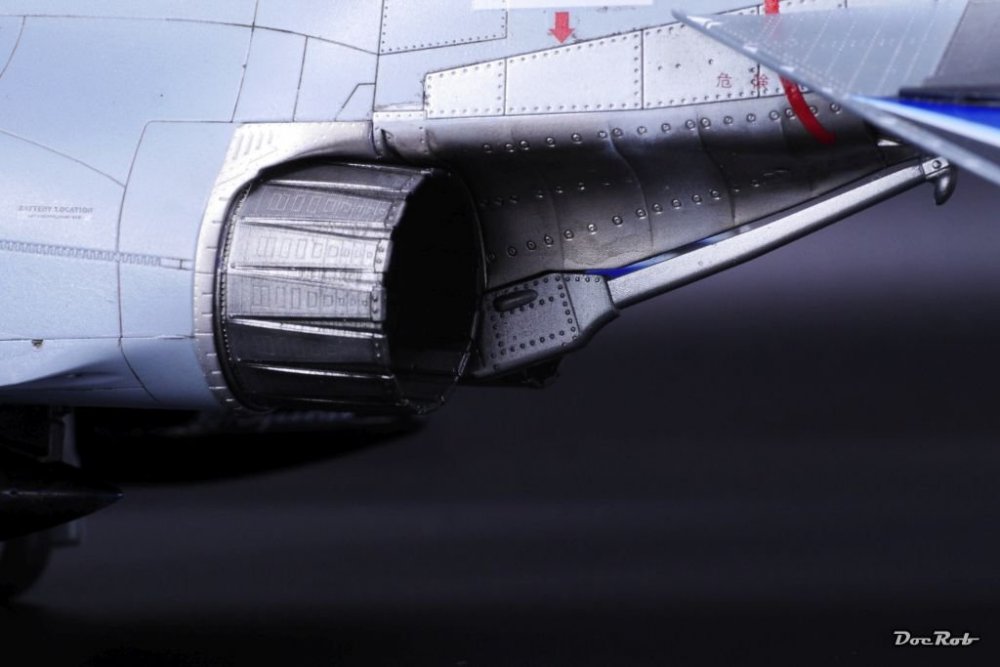
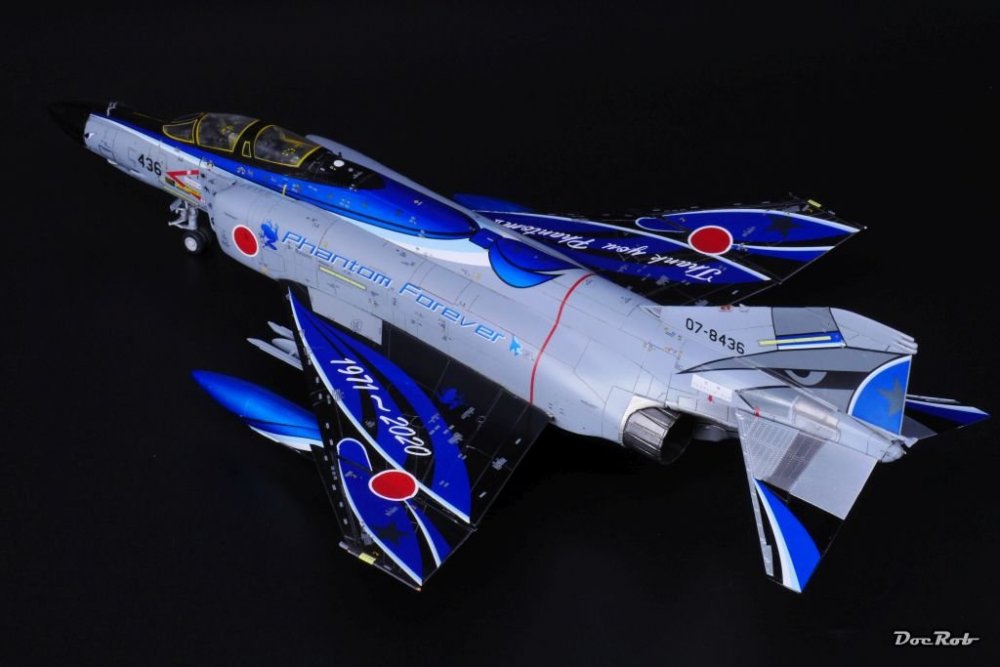
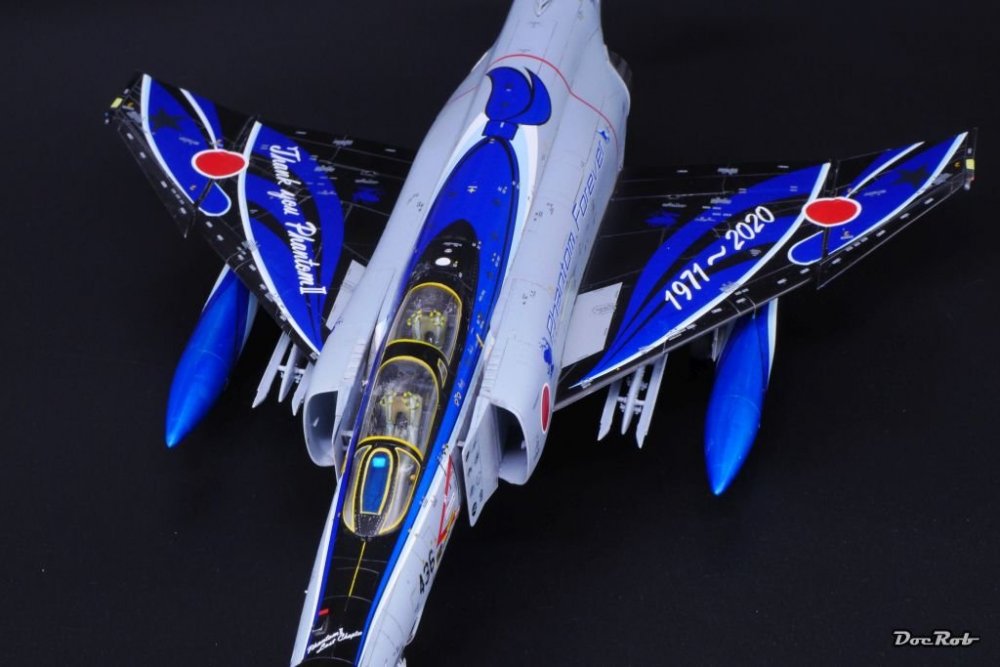
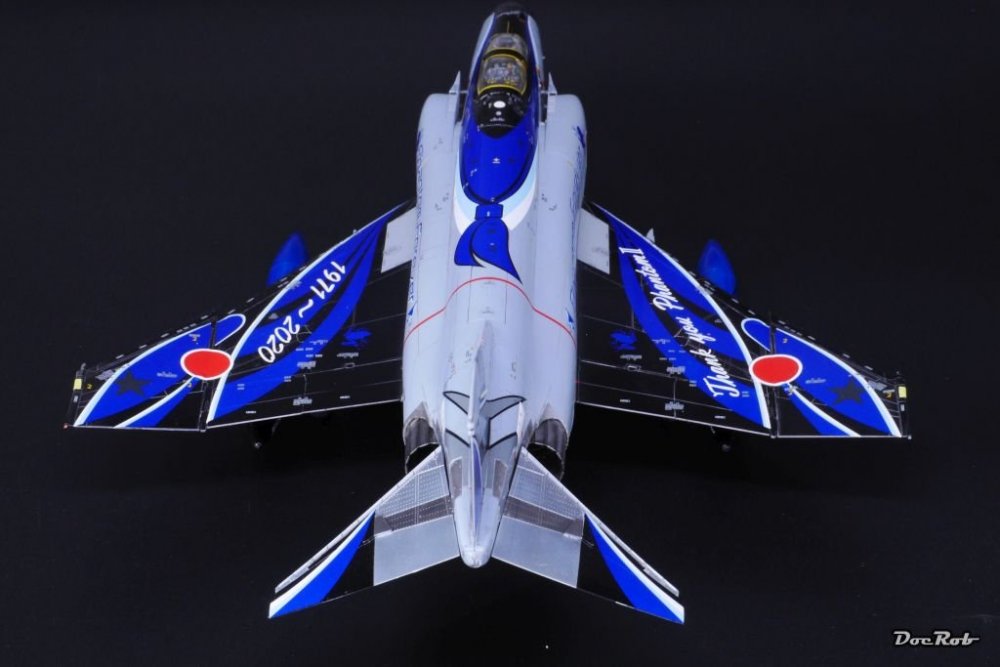
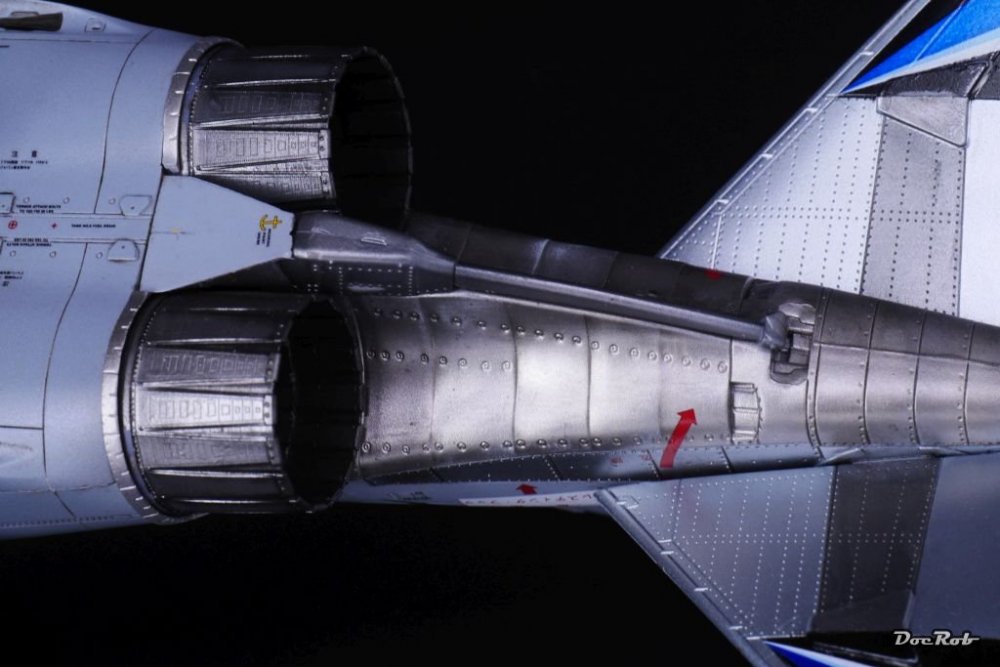
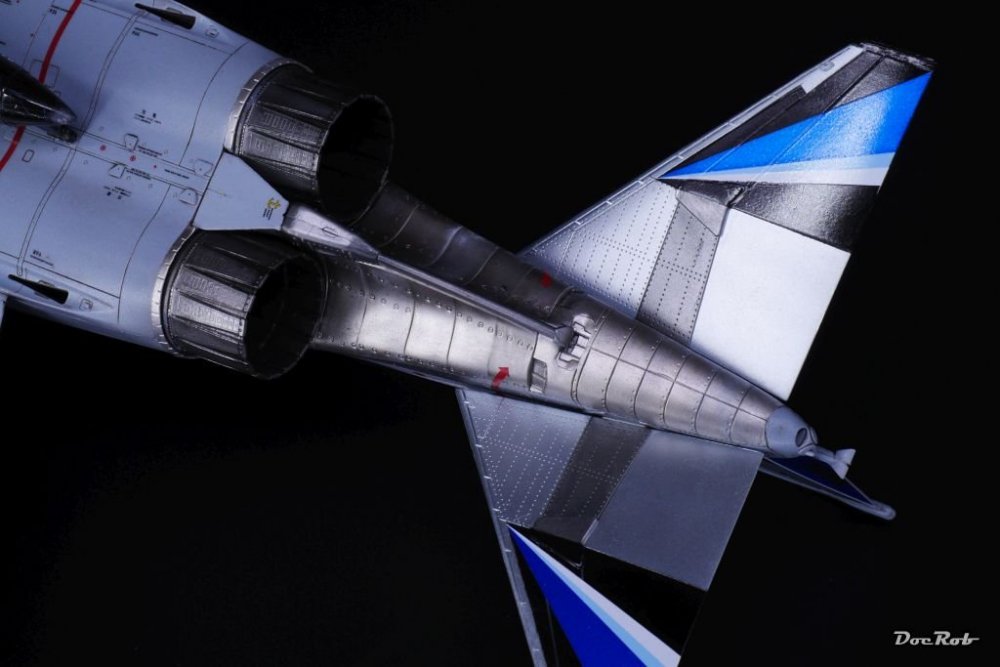
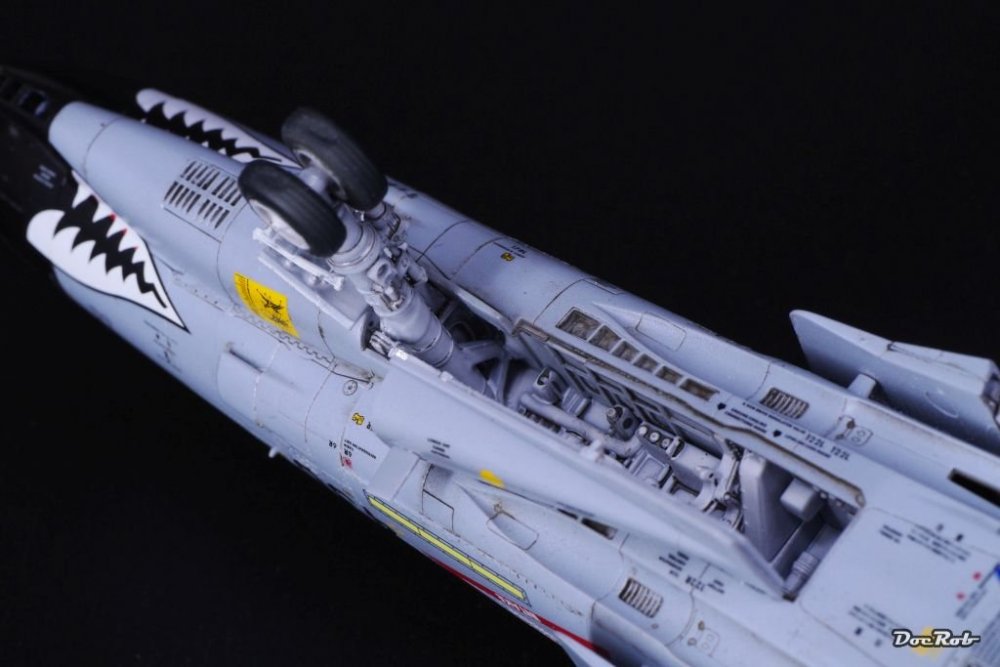
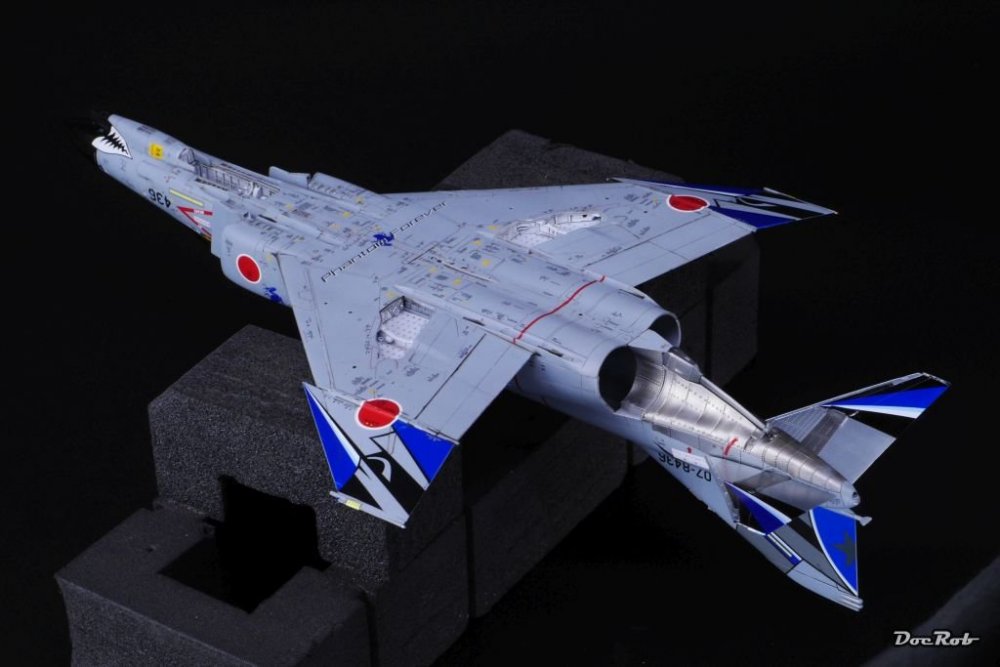
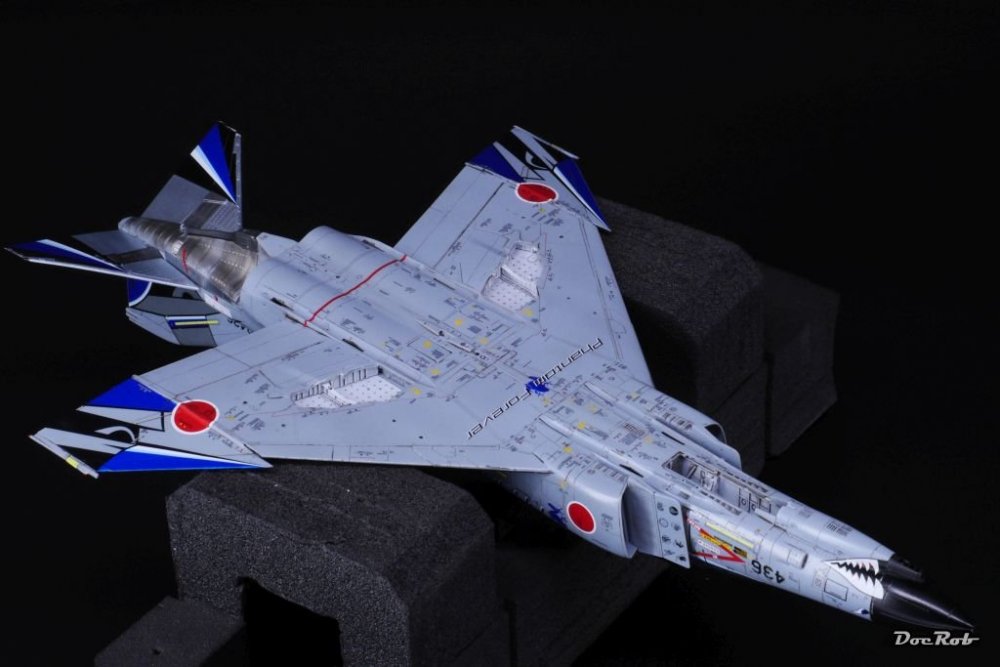
Today I finished this great model of the last of the Kai Phantoms. Zoukei Moura has produced a gem with only very few shortcomings. The fit and engineering was very good and the detail of the plastic is exceptional. The numerous decals are printed by Cartograph and this has been a live saver with so many decals from huge graphics to tiny stencils. The kit is definitely recommended and there will be a yellow livery available in shot time. The minor drawbacks were: no seatbelts were supplied, the molding of the clear canopy parts and the wheel struts were slightly less impressive than the rest of the kit. The manual tends to be a bit overdone. To much information, like you should rest the freshly glued undercarriage to rest and cure overnight. While recommendations are always welcome, finding a tiny detail in the manual fast, was tedious at times. All in all, I enjoyed the build a lot and added only some AM. The wheels are from Brassin, the seat belts from Kits World, which I can't recommend for the lack of a manual and delicate handling of parts like the bang seat cover pulling rings. The masks from New Ware were perfect measured and a great help to paint the canopy with the seals included. The exhaust nozzles are from Res Kit and they are beautifully detailed and a joy to paint and weather. I'm especially happy, that I was able to mix the right glitter blue color for the external tanks, not only concerning the hue, but also the refraction, which was an iterative process. One final downturn was, like I feared, that there was a slight fogging on the center part of the canopy. I tried to polish it away from the outside to no avail. It must have been caused by paint, thinner or decal solution. I decided not to pry open the canopy, as decals run over the sills. Cheers Rob Let the pics speak:


- 177 replies
-
- 10
-

-

-
Done - F-4EJ Kai Phantom - The Last of it's Kind ZM 1/48
DocRob replied to DocRob's topic in LSM 1/48 Work in Progress
Thank you Martin, I'm blushing. This very good kit had other challenges than most kits, I built. My shortly acquired car/bike painting skills came in handy. Thanks Gaz, it's as vivid as it gets for an old war plane. Cheers Rob -
Might be my first venture into F1 since my twens, let's see... I would have liked a Senna driven car, maybe a MP4/4, but couldn't score kit, details and decals as I liked. It's weird with these markings Carl, in some of the extra detail sets from Beemax/Aoshima you get the tobacco sponsors logo as single letters. I bet there are millions of youth smokers, being drawn in to the smoke via 1/20 kit decals . Next thing will be banning logos of frauding banks or unreliable telecommunication companies. Cheers Rob
-
Done - F-4EJ Kai Phantom - The Last of it's Kind ZM 1/48
DocRob replied to DocRob's topic in LSM 1/48 Work in Progress
Thanks Harv, the external tanks annoyed me a bit, other ways everything went fine. Cheers Rob -
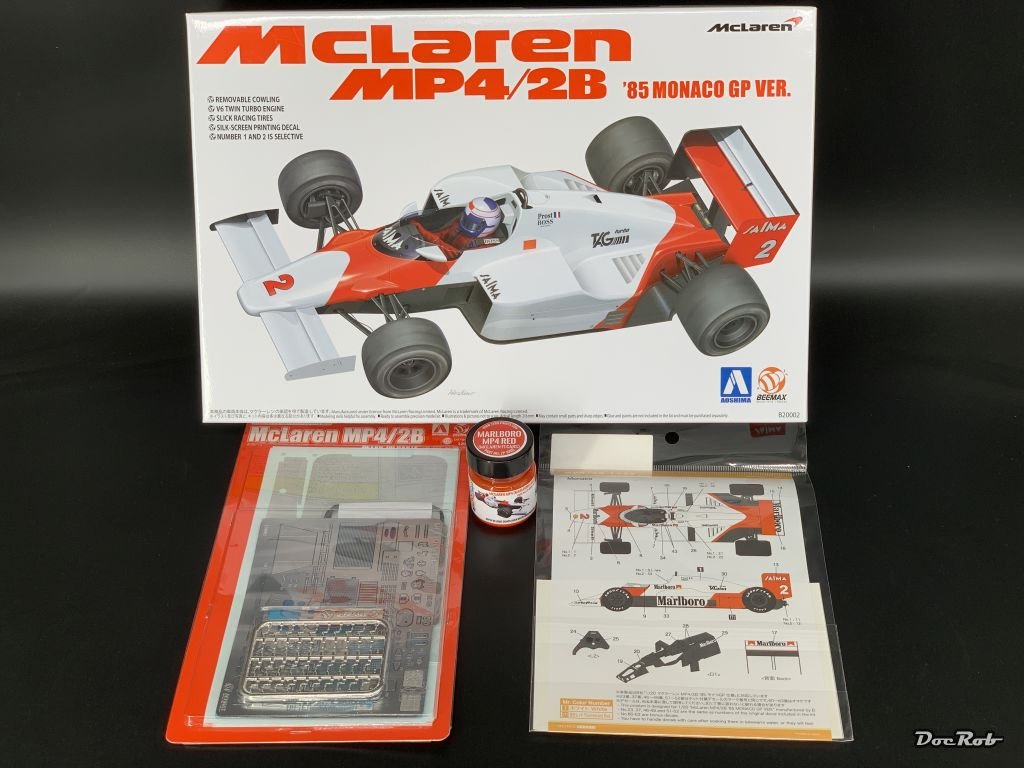
After the vivid Kai Phantom, I seemed to have found my love for brightly colored subjects. This kit along the detail set arrived today from Japan, the decals and color were bought in Spain. Cheers Rob

-
Done - F-4EJ Kai Phantom - The Last of it's Kind ZM 1/48
DocRob replied to DocRob's topic in LSM 1/48 Work in Progress
The Kai Phantom is almost done. I added the undercarriage, the missile racks, the nozzles and the external tanks. After I left the tanks for some days, there where somehow scratches and some drops on the surface. I have no idea how that happened. The parts most affected were sprayed with Tamiya LP gloss black, which seems to be less chemical and mechanical resistent than other LP colors. There is no reasonable way to correct this given the different (self mixed) colors and decals, so be it. After the UC is cured, another scary moment will occur, the removal of the canopy masks, which my luck, amigos. Cheers Rob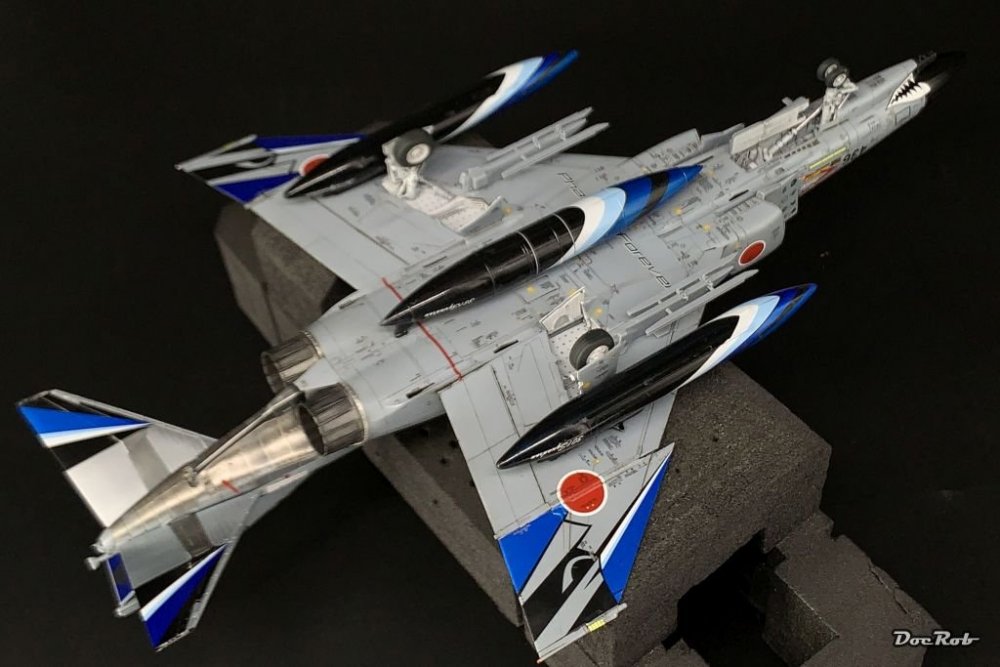

-
Done - F-4EJ Kai Phantom - The Last of it's Kind ZM 1/48
DocRob replied to DocRob's topic in LSM 1/48 Work in Progress
I guess you are right Peter, at least to me it's a new record with stencil density, followed by my Mig-31 build. With the Kai, you have to be especially careful, as most stencils are obviously written in Japanese and it's easy to add them wrong orientated. Indeed Gaz, when looking closer, there are even more. Sometimes thought, if I would leave out the base paint, nobody will notice . Cheers Rob -
That's a very nice looking interior, Phil. Detailing of the IP with the cables on looks especially good. Cheers Rob
-
Very nice, all over. The light weathering suits the plane. My only small critique would be the bomb alignment, which seems a bit off. Cheers Rob
-
Very nice, I like the look of the NMF with the panel accentuation. Cheers Rob
-
Done - F-4EJ Kai Phantom - The Last of it's Kind ZM 1/48
DocRob replied to DocRob's topic in LSM 1/48 Work in Progress
Nearing the finish line with the Phantom. I tried different washes and panel liners on the plane and decided to use Flory's dark grime clay wash. I liked the sharp contrast of the black Tamiya panel liner better, but have always issues with removing the residues, without cleaning out the panel lines. I added the tail wings and landing hook and painted the navigation lights with a Molotow marker and clear blue / red. Now I have to build and paint the undercarriage and hope for an unfogged canopy with evenly masked seal lines to finish the build. Cheers Rob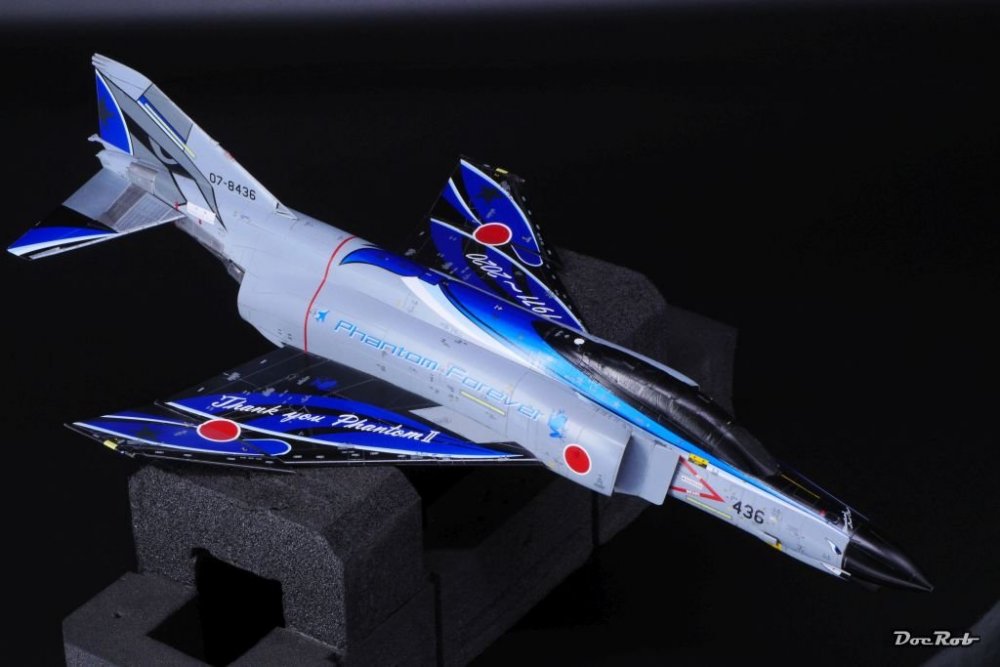

- 177 replies
-
- 10
-
-
Dragon Panther A with Zimmerit
DocRob replied to GazzaS's topic in LSM 1/35 and Larger Work In Progress
Very nice, I like the slightly irregular look of the Zimmerit. It looks handmade, which it actually was, if I remember it right. Cheers Du alter Klebstoffschnüffler Rob -
Welcome to the forum Daboss, some difficult to answer questions you have here. I really like the Katana and have often thought about building one from the Tamiya kit. I never primed on chrome, so I have no answer for that, but I have a recommendation for a perfect satin black, if airbrushed. Tamiya lacquer paint LP-5 has a perfect finish, I used on some car and bike kits. What I would try to do about the wheels would be, stripping them off the chrome, airbrushing Tamiyas LP gun metal or metallic grey and paint the the chromed rim parts with a marker. For glossy chrome, there are the fabulous Molotow markers, but you need dull chrome or even bette aluminum, where I don't know about a good marker. Cheers Rob
-
No Scots around here, actually no direct neighbors at all. The closest person is a very pleasant old widow100m down the road, who is hard of hearing. I can hear music as loud as I like without disturbing anybody . Cheers Rob
-
Done - F-4EJ Kai Phantom - The Last of it's Kind ZM 1/48
DocRob replied to DocRob's topic in LSM 1/48 Work in Progress
It seems like, Phil, always liked a manual better, but here it's is printed seemingly complete ponto the plane. Meanwhile, I gloss coated the Kai, to seal the decals and prepare for panel liner. Again had lots of trouble with GX100 from Mr. Hobby. I have no idea why the probs (fogging and cotton candy) occur, maybe because of the humidity (80%). I used GX100 before and had good results, but similar problems on other occasions. I finished the work with Tamiya lacquer clear which worked very well. Cheers Rob

- 177 replies
-
- 10
-
-
-
Done - F-4EJ Kai Phantom - The Last of it's Kind ZM 1/48
DocRob replied to DocRob's topic in LSM 1/48 Work in Progress
Thanks Peter, I despise stenciling and thought about leaving some out at times, but I want a newish high contrast paint- and decal job and therefore decided to go full in. The other question is, which stencils to leave out, specially with the Kai's decals, where some markings have multiple stencils included, which would lead to a spotty appearance. In fact, I haven't been to healthy the last weeks, with a thumping heart and don't know the reason. The stenciling Zen-ned my restless soul a bit and helped to calm down. You have to look for the benefits in every trade . Cheers Rob Thank you Gaz, coming together, with decaling nearly done now. Cheers Rob -
Short Sunderland MkII
DocRob replied to ThomasProbert's topic in LSM 1/35 and Larger Work In Progress
Absolutely awesome, paintjob looks great and the whole build is unprecedented. Cheers Rob